

SPRAYER CALIBRATOR
PRODUCT MANUAL MANUEL DU PRODUIT
Made In The USA
Fabriqué aux États-Unis
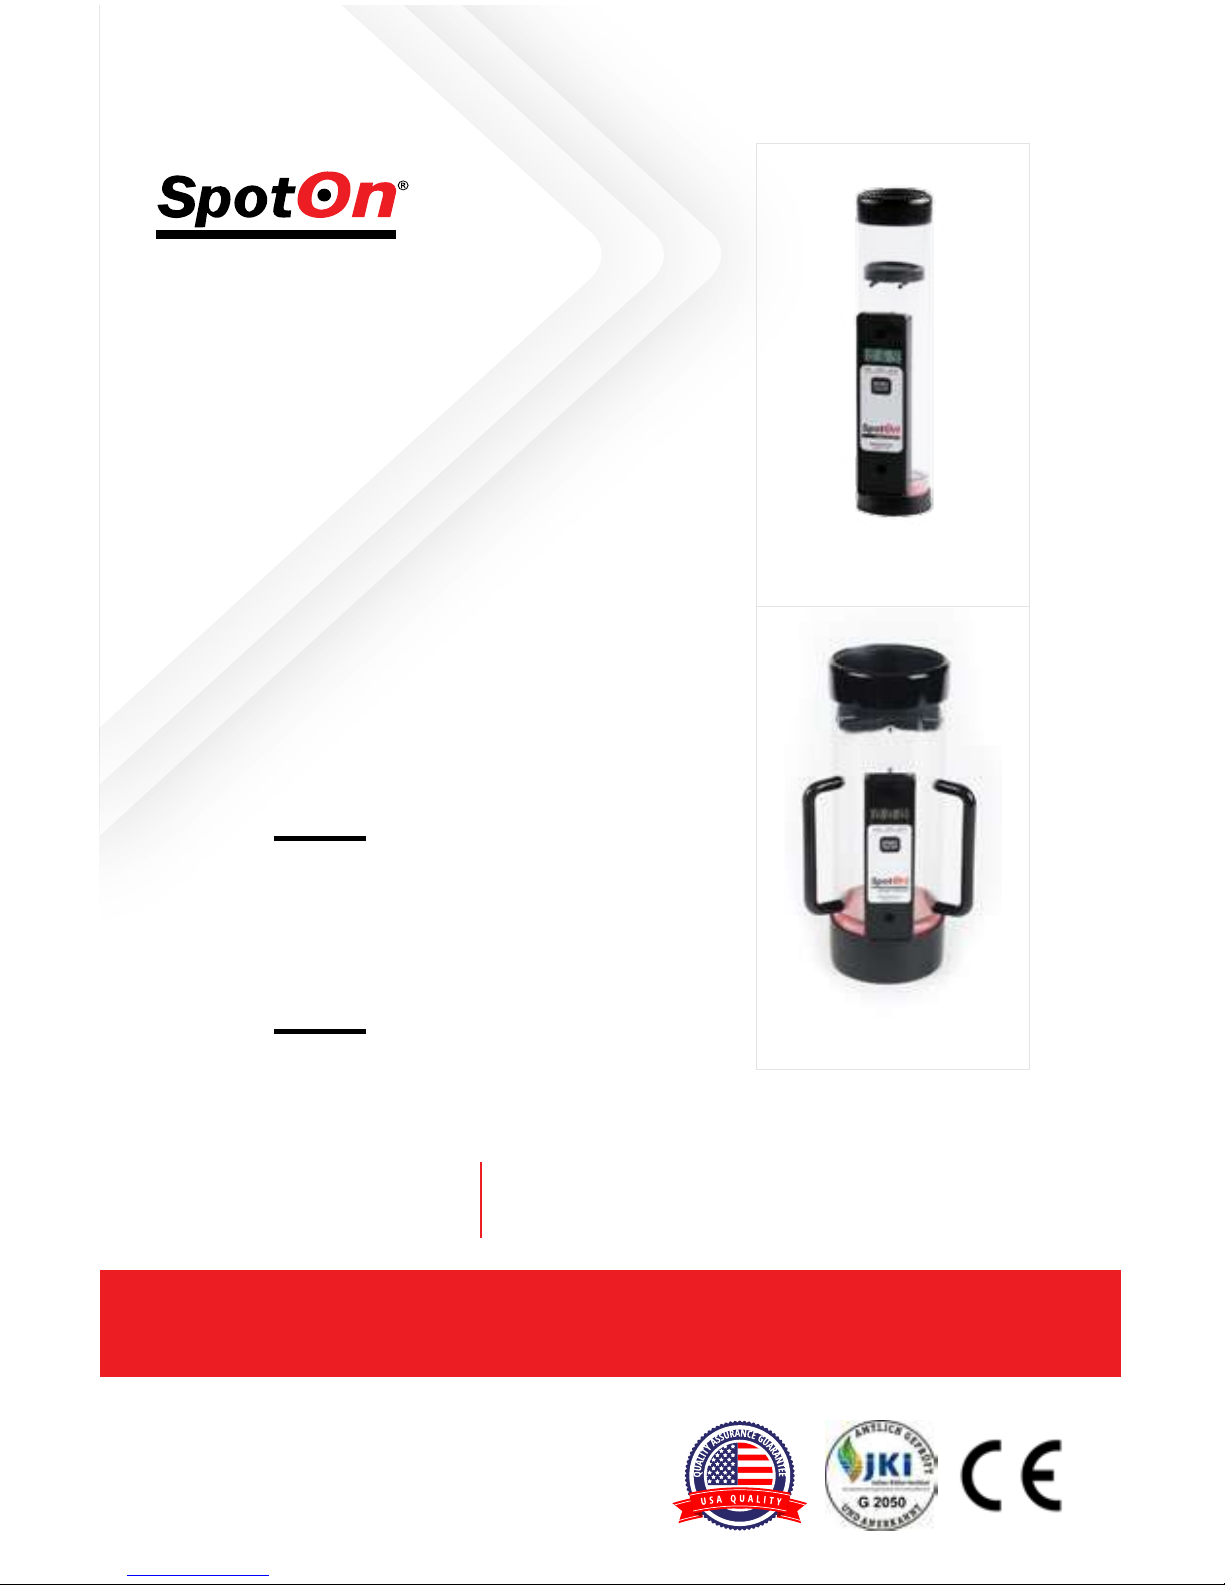
SPRAYER CALIBRATOR
Models SC-1 & SC-4
CALIBREUR POUR BUSES DE PULVÉRISATEUR
Modèles SC-1 & SC-4
SC-1 #23890
SC-4 #24200
ACCURATE FLOW RATE MEASUREMENT IN
SECONDS
MESURE PRÉCISE DU DÉBIT EN QUELQUES
SECONDES
US Patent # 8297131

За да видите ръководството за продукти на български език, посетете уеб страницата, посочена по-горе.
Da biste pogledali priručnik za proizvod na hrvatskom, posjetite gore navedenu web stranicu.
Chcete-li zobrazit příručku k produktu v češtině, navštivte webové stránky uvedené výše.
For at se produktmanualen på dansk, besøg hjemmesiden ovenfor.
Om de producthandleiding in het Nederlands te bekijken, bezoek de bovenstaande pagina.
Eesti tootejuhendi vaatamiseks külastage ülalolevat veebilehte.
Jos haluat tarkastella tuotekäsikirjaa suomeksi, vieraile edellä mainituilla verkkosivuilla.
A termék kézikönyv magyar nyelven történő megtekintéséhez látogassa meg a fenti weboldalt.
Per visualizzare il manuale del prodotto in italiano, visitare la pagina web di cui sopra.
Lai apskatītu produkta rokasgrāmatu latviešu valodā, apmeklējiet iepriekš minēto tīmekļa vietni.
Norėdami peržiūrėti gaminio vadovą lietuvių kalba, apsilankykite aukščiau esančiame tinklalapyje.
For å se produkthåndboken på norsk, besøk nettsiden ovenfor.
Aby wyświetlić instrukcję obsługi w języku polskim, odwiedź stronę internetową wymienioną powyżej.
Pentru a vedea manualul de produs în limba română, vizitați pagina web de mai sus.
Чтобы просмотреть руководство по продукту на русском языке, перейдите на веб-страницу выше.
Да бисте погледали упутства за производ на српском, посетите горе наведену веб страницу.
Ak chcete zobraziť návod na používanie v slovenčine, navštívte webovú stránku uvedenú vyššie.
Če si želite ogledati priročnik za izdelek v slovenščini, obiščite spletno stran zgoraj.
För att se produkthandboken på svenska, besök webbsidan ovan.
WWW.INNOQUESTINC.COM/PRODUCT-MANUALS
ENGLISH
FRANÇAIS
ESPAÑOL
PORTUGUÊS
DEUTSCHE
01
05
08
11
14
INSTRUCTIONS IN ENGLISH | SPRAYER CALIBRATOR
FEATURES:
• Quickly nd worn spray nozzles tips
Industry guidelines recommend tip replacement once flow rate exceeds that of a new tip by 10%
• Accurately measure true tip ow rate
Today’s high tech sprayers can only be properly calibrated and confirmed with this knowledge
• Fast and simple operation
Readings in 10 seconds or less per tip
• Displays in GPM, Liters/min or oz/min
• JKI - Julius Kuhn-Institut Certied G 2050
• Not recommended for use while chemicals are in sprayer
1 YEAR WARRANTY: This product is warranted to be free from defects in materials or
workmanship for one (1) year from the date of purchase.
MODEL SC-4
Best for higher ow rates between 1-4 GPM
typical of liquid fertilizer application
• Range & Units: 0.07-4.00 GPM, 9-512 oz/
min, 0.27-15.0 L/min (GPM in US Gallons)
• Resolution: 0.01 GPM, 1 oz/min, 0.01 L/
min to 9.99 or 0.1 L/min 10.0 & up
• Accuracy: +/- 4%
• Size: 4”(10.2cm) Dia x 10”(25.4cm) Tall
• Weight: 1.2 lbs(544g)
MODEL SC-1
Best for ow rates below 1 GPM typical of
herbicide and insecticide application.
• Range & Units: 0.02-1.00 GPM, 3-128 oz/
min, 0.08-3.80 L/min (GPM in US Gallons)
• Resolution: 0.01 GPM, 1 oz/min, 0.01 L/min
• Accuracy: +/- 2.5%
• Size: 2.25”(5.7cm) Dia x 9.25”(23.5 cm) Tall
• Weight: 0.52 lbs(236g)
SPECIFICATIONS:
1
Model SC-1 Item #23890 | Model SC-4 Item
#24200
STANDARD USA: METRIC:
GPM = LPM =
GPA = L/ha =
W = Tip Spacing (Inches) W = Tip Spacing (Meters)
GPA X MPH X W L/ha X kmph X W
5,940 X GPM 600 X LPM
5,940 600
MPH X W kmph X W
CALIBRATION EQUATIONS:
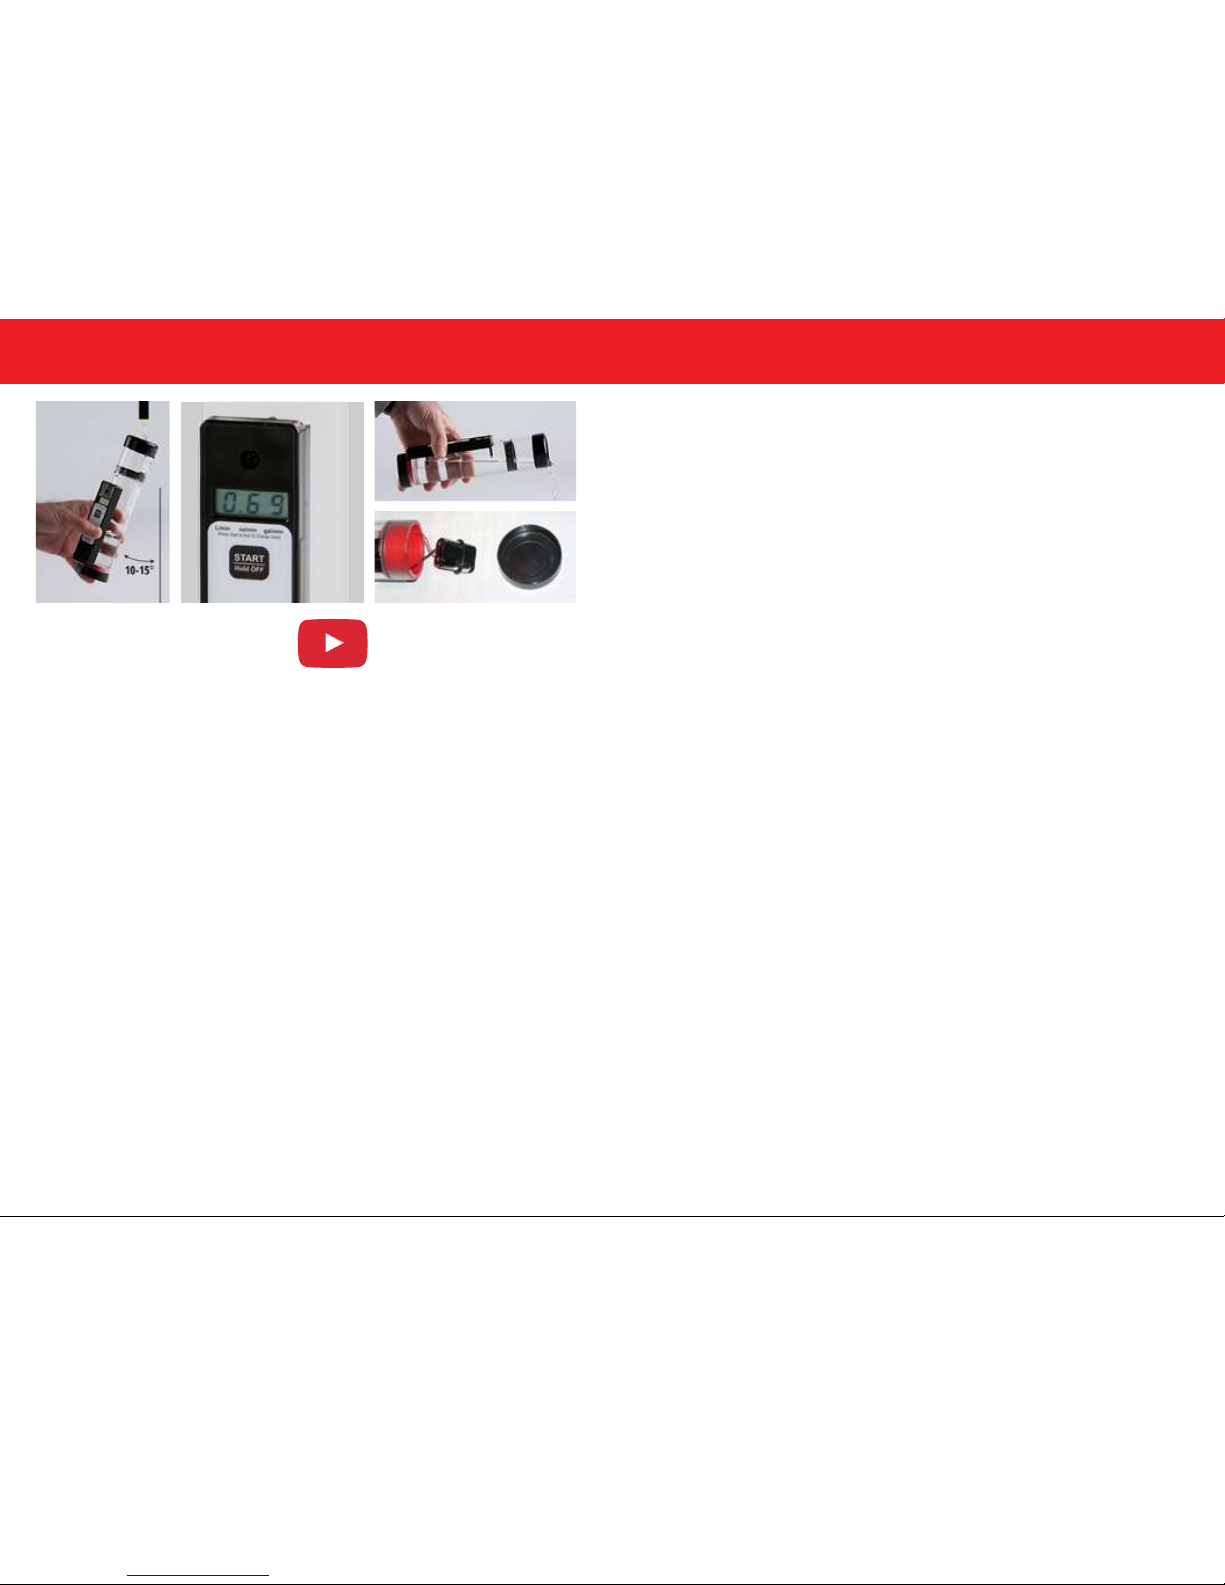
TAKING A MEASUREMENT:
Press the START button to turn the meter on. The LCD will flash “000” momentarily indicating it
is working properly. The LCD will then show a “_” marker to indicate the type of measurement
units the meter will use when displaying readings. The meter will then show “- - -“ on the LCD
indicating the meter is ready to take a new measurement. Once the meter shows “- - -“, it can be
placed under the spray nozzle to be tested (you have 60 seconds to place the meter under the
nozzle). Placement of the meter under the nozzle should be brisk and certain so that all the flow
from nozzle is transferred quickly to the meter (See Fig 1). As the meter fills with water, the display
will start flashing “- - -“; this indicates that the reading is in progress. As soon as water reaches the
meter’s upper sensor, the flashing stops and the flow rate is displayed on the LCD (See Fig 2). This
flow rate will continue to be displayed on the meter for 90 seconds or until the START button is
pressed to start a new reading. Once the reading has been displayed, the water can be poured out
of the open top of the meter (See Fig 3). Pouring out the contents of the meter will not aect the
reading being displayed on the LCD. If a reading must be restarted for some reason, simply empty
the meter and re-press the START button to ready it for a new measurement. PLEASE NOTE: The
most accurate measurements are made with the meter held at a slight angle to vertical as seen
in Fig. 1. This keeps the water flowing down into the meter along the back side of the meter and
keeps it from accidentally falling on and triggering the meter’s sensors.
TURNING THE METER OFF:
The meter will turn on any time the START button is pressed. The meter can be turned o in two
ways:
1. The meter can be shut o by pressing and holding the START button for several
seconds (about 3 seconds). As soon as the LCD goes blank, release the START button.
2. The meter will automatically shut itself o aer 90 seconds of inactivity. This means
that the user does not have to shut o the meter aer use since it will eventually shut itself o.
INSTRUCTIONS IN ENGLISH | SPRAYER CALIBRATOR
Fig. 1 Fig. 2
Fig. 3
Fig. 4
Model SC-1 Item #23890 | Model SC-4 Item #24200
2
YOUTUBE.COM
SEE THE DEMO VIDEO. SEARCH:
SpotOn Sprayer Calibrator
CHANGING MEASUREMENT UNITS:
The meter can be configured to display readings in either gallons per minute (gpm), ounces
per minute (oz/min), or liters per minute (L/min). To change the display units, the user must
first turn the meter o. Then press and hold the START button. Keep holding the START button
until the display shows “_ _ _” (about 3 seconds). When the display shows “_ _ _” release the
START button and the display will start flashing “_” above the unit type that is currently selected.
Press the START button to change this selection. Once the correct unit type is selected, wait
without pressing the START button for 5 seconds. The meter will then enter the new setting
and shut o. From that point forward, the meter will always display readings in the new units.
INSTALLING THE BATTERIES:
The batteries are housed inside the base of the meter (See Fig. 4). The black cap on the
bottom of the meter can be removed by pulling it straight o the end of the meter. The cap is
just a press fit onto the meter. Please use care to pull the cap o the meter so that the bottom
of the meter is pointing upward. This will keep the batteries from falling out of the meter
once the cap comes free which could put extra stress on the battery holder wires. The meter
requires two (2) N size alkaline batteries which are available at any drug store. Place both
new batteries in the battery holder following the polarity indication marked on the holder
(negative end towards the spring). Place the rubber retaining ring around the batteries once
they are in the holder as shown in Fig. 4. Then place the battery holder back into the end of
the meter and replace the black cap and press it firmly back onto the meter. When the meter’s
batteries need replacing, the meter will show “Lo b” on the LCD display aer the meter is
turned on. If this message is displayed, the batteries should be replaced as described above.
TROUBLESHOOTING:
The Spray Calibrator measures the flow rate by measuring the time it takes to fill the meter’s tube.
The rising water level is sensed by 3 electrodes in the meter. The meter will only function with fluids
that conduct electricity, such as water. In the case of distilled water, the conductivity may be too
low for proper meter operation. All tap water will work very well with the meter. Any substance that
coats or covers the exposed metal on the electrodes will hinder their ability to sense the water level.
Care should be taken to rinse the meter inside and out with clean tap water when measurements
are complete. This will keep any foreign material from building up on the electrodes. Complete
rinsing will also keep the diuser pad from becoming clogged and therefore hindering the flow of
water into or out of the meter during operation. If foaming or bubbles are a significant problem
inside the meter, a small drop of de-foaming agent may be added to the diuser pad prior to use.
WARRANTY, SERVICE, AND RETURNS:
One-Year Warranty
Innoquest, Inc. (“Innoquest”) warrants this product to be free from defects in materials
and workmanship under normal use for a period of one (1) year from date of purchase. This
warranty extends only to the original purchaser and shall not apply to any product which,
INSTRUCTIONS IN ENGLISH | SPRAYER CALIBRATOR
3
Model SC-1 Item #23890 | Model SC-4 Item
#24200

in Innoquest’s sole opinion, has been subject to misuse, alteration, abuse, or abnormal
conditions of operation or handling. Innoquest’s obligation under this warranty is limited to
repair or replacement of the product which is returned to Innoquest. Innoquest accepts no
liability for whatever damages may be caused by a malfunctioning product.
Repair & Service Policy
Products returned to Innoquest for repair or service must follow these guidelines: Return of the
product for warranty repair or service is the responsibility of the purchaser. Return of the product
for non-warranty repair or service, also the purchaser’s responsibility, will carry a charge of $35 for
assessing the product’s repair needs. Further work will not be completed without the purchaser’s
approval.
Return Procedure
All returns, regardless of reason, must have a Return Merchandise Authorization (“RMA”) number.
The purchaser must call Innoquest at (815) 337-8555 to obtain the RMA number prior to sending
any merchandise back. The RMA number must be displayed on the outside of the shipping
carton. All shipping charges will be paid by the purchaser. Innoquest is not responsible for
any package that is returned without a valid RMA number or for the loss of the package by any
shipping company.
Return for Refund Policy
We only accept returns of products purchased directly from Innoquest. Please return all other
products to the original place of purchase. A restocking fee (the greater of 15% of the purchase
price or $35) will apply to any returns sent back to Innoquest for a refund. For a refund, the
product must be in the original sealed packaging provided by Innoquest. If the unit was opened
but is completely functional and returned in good condition as determined by Innoquest, a
repackaging fee not to exceed $25 will be added to the restocking fee. No refund will be given for
damaged products.
INSTRUCTIONS IN ENGLISH | SPRAYER CALIBRATOR
Model SC-1 Item #23890 | Model SC-4 Item #24200
4
CARACTÉRISTIQUES:
• Trouvez rapidement des pointes de buses usées
Les lignes directrices de l’industrie recommandent le remplacement de la pointe une fois que le
débit dépasse celui d’une nouvelle pointe de 10%
• Mesurer avec précision le débit réel
Les pulvérisateurs de haute technologie d’aujourd’hui ne peuvent être correctement calibrés et
confirmés avec cette connaissance
• Fonctionnement rapide et simple
Lectures en 10 secondes ou moins par pointe
• Aché en GPM, Litres / min ou oz / min
• Non recommandé pour l’utilisation alors que les produits chimiques sont en pulvérisateur
CARACTÉRISTIQUES:
STANDARD USA: MÉTRIQUE:
GPM = LPM =
GPA = L/ha =
W = Pointe espacement (pouces) W = Pointe espacemen (Mètres)
GPA X MPH X W L/ha X kmph X W
5,940 X GPM 600 X LPM
5,940 600
MPH X W kmph X W
EQUATIONS DE CALIBRAGE:
INSTRUCTIONS EN FRANÇAIS | CALIBREUR POUR BUSES DE PULVÉRISATEUR
5
Modèle SC-1 Numéro d’article 23890 | Modèle SC-4 Numéro d’article
24200
GARANTIE DE 1 AN: Ce produit est garanti pour être exempt de défauts de matériaux ou
de fabrication pendant un (1) an à compter de la date d’achat.
MODÈLE SC-4
Meilleur pour des débits plus élevés entre
1-4 GPM typique de l’application d’engrais
liquide
• Gamme et unités: 0.07-4.00 GPM, 9-512
oz/min, 0.27-15.0 L/min (GPM dans des
gallons américains)
• Résolution: 0.01 GPM, 1 oz/min, 0.01 L/
min à 9.99 ou 0.1 L/min 10.0 et plus
• Précision: +/- 4%
• Taille: 4”(10.2cm) Dia x 10”(25.4cm) Tall
• Poids: 1.2 lbs(544g)
MODÈLE SC-1
Meilleur pour les débits inférieurs à 1 GPM
typique de l’application d’herbicides et
d’insecticides
• Gamme et unités: 0.02-1.00 GPM, 3-128
oz/min, 0.08-3.80 L/min (GPM dans des
gallons américains)
• Résolution: 0.01 GPM, 1 oz/min, 0.01 L/
min
• Précision: +/- 2,5%
• Taille:2,25 “(5,7 cm) Dia x 9,25” (23,5 cm)
grand
• Poids: 0.52 lbs(236g)

MESURER UN DÉBIT:
Appuyez sur le bouton <démarrer> pour activer le compteur. L’écran LCD clignote <000>
momentanément, ceci indique que I’appareil fonctionne correctement. L’écran LCD aichera alors
le signe <_> pour indiquer le type d’unités de mesure que le compteur utilisera lors de I’aichage
des mesures. Le compteur aiche alors <- - -> sur I’écran LCD indiquant que le compteur est prêt
à prendre une nouvelle mesure. Une fois que I’écran aiche <- - ->, il peut être placé sous la buse
à tester (vous avez 60 secondes pour placer le calibreur sous la Buse). Le positionnement sous
la buse doit être net et sans hésitations afin que le flux de la buse soit correctement capté par
I’appareil. (Voir fig. 1). Quand le calibreur se remplit avec de I’eau, I’aichage clignote <- - ->; ceci
indique que la lecture est en cours. Dès que I’eau atteint le capteur supérieur du calibreur, le
clignotement cesse et le débit s’aiché sur I’écran LCD (voir fig. 2). Ce débit mesuré continuera
d’être aiché sur l’écran pendant 90 sec- ondes ou jusqu’à une nouvelle pression sur le bouton
démarrer est pressé de commencer une nouvelle lecture. Une fois la mesure aichée, I’eau peut
être vidée par retournement de l’appareil (voir fig. 3). Verser le contenu du calibreur n’aectera
pas la lecture aichée sur I’écran LCD. Si une nouvelle mesure doit être eectuée pour une
raison quelconque, il suit tout simplement de vider le calibreur et de presser une fois sur
le bouton démarrer. VEUILLER NOTER: les mesures les plus précises sont réalisées avec le
calibreur maintenu avec un léger angle de la verticale, comme sur la Fig. 1. Ceci permet au flux
de s’écouler plus lentement dans I’appareil et empêche tout déclenchement intempestif des
capteurs du calibreur.
ARRÊTER LE CALIBREUR:
L’appareil sera mis en route chaque fois que l’on presse sur la touche “Start”. Le calibreur peut
être arrêté de deux façons.
1. En appuyant et en maintenant le bouton <Start> pendant plusieurs secondes (3
secondes environ), dès que I’écran LCD est n’ai plus rien, relâchez le bouton de démarrage.
INSTRUCTIONS EN FRANÇAIS | CALIBREUR POUR BUSES DE PULVÉRISATEUR
Fig. 1 Fig. 2
Fig. 3
Fig. 4
Modèle SC-1 Numéro d’article 23890 | Modèle SC-4 Numéro d’article 24200
6
YOUTUBE.COM
VOIR LA VIDÉO DEMO. CHERCHER:
SpotOn Sprayer Calibrator
2. Automatiquement et apres 90 secondes d’inactivité. Ceci signifie que l’utilisateur n’a pas besoin
d’arrêter le calibreur apres utilisation, car il s’éteindra seul.
CHANGER L’UNITÉ DE MESURE:
Le compteur peut être confi pour ai les mesures soit gallons par minute (GPM), soit en onces
par minute (oz/min) ou en litres par minute (L/min). Pour modifi les unités d’ai l’utilisateur
doit tout d’abord arrêter le calibreur. Puis enfoncez et maintenez le bouton de démarrage,
gardez la pression sur le bouton de démarrage jusqu’à I’ai montre <_ _ _> (environ 3 secondes).
Lorsque l’ai montre <_ _ _> relâchez le bouton de démarrage et I’ai indiquera <_> clignotant
au-dessus du type d’unité actuellement sélectionné. Appuyez sur le bouton <START> pour
modifi cette sé- lection. Une fois que l’unité correcte est sélectionnée, attendre sans appuyer sur
le bouton <START> pendant 5 secondes. Le calibreur acceptera la nouvelle unité et s’arrêtera,
à partir de cet instant le calibreur démarrera avec la nouvelle unité de mesure sélectionnée.
INSTALLATION DES PILES:
Les batteries sont logées à l’intérieur de la base du calibreur (voir Fig. 4). Le bouchon noir à la
base du calibreur peut être retire en tirant vers suivant l’axe du tube. Le bouchon est juste fi
sur le calibreur. Veuillez user de précautions en retirant ce bouchon. Ceci empêchera la chute
violent des piles ce qui pourrait occasionner une tension forte sur les fi électriques du système
de logement des piles. Nous vous préconisons l’usage de 2 piles alcalines type LR1. Placer les
deux nouvelles batteries dans le logement des piles en respectant l’indication de polarité
marquée (partie négative vers le ressort). Placez le bracelet caoutchouc autour du loge- ment
des piles comme montré sur la Fig. 4. Ensuite placez le magasin à piles dans la base du calibreur
et refermer I’appareil en poussant fermement le bouchon. Lorsque les piles du calibreur doivent
être remplacées, celui-ci ai <Lo b> sur I’écran LCD après démarrage de I’appareil. Si ce message
s’ai les piles doivent être remplacées comme.
PROBLÈMES DE FONCTIONNEMENT:
Le calibreur mesure le débit en comptant le temps nécessaire au remplissage du tube. II y a 3
électrodes dans le tube qui décèlent l’élévation du niveau de I’eau. Le calibreur ne fonctionne
qu’avec des fluides qui conduisent le courant comme par exemple I’eau. Dans le cas d’utilisation
d’eau distillée, celle-ci présente une trop faible conductivité pour mener à bien la mesure.
L’eau du robinet permet un trés bon fonctionnement du calibreur. Toute substance qui couvre
ou recouvre le métal exposé des électrodes entravera leur capacité à percevoir le niveau d’eau.
II faut rincer le calibreur à I’intérieur et l’extérieur avec I’eau du robinet lorsque les mesures sont
terminées. Cet entretien permettra aux électrodes de rester propres. Ce rinçage complet permet
aussi de garder proper l’aicheur. Si la formation de mousse ou de bulles sont un problème
important à l’intérieur du calibreur, une goutte de produit antimousse peut-être être ajoutée.
POLITIQUE DE RÉPARATION ET DE SERVICE:
Contactez votre revendeur local pour obtenir des retours ou des réparations.
INSTRUCTIONS EN FRANÇAIS | CALIBREUR POUR BUSES DE PULVÉRISATEUR
7
Modèle SC-1 Numéro d’article 23890 | Modèle SC-4 Numéro d’article
24200

CARACTERISTICAS:
• Encontrar rápidamente las puntas de los inyectores desgastados
Las directrices de la industria recomiendan el reemplazo de la punta una vez que el caudal excede
el de una punta nueva en un 10%
• Medir con precisión el caudal de la punta verdadera
Los pulverizadores de alta tecnología de hoy solo pueden ser calibrados y confirmados con este
conocimiento
• Operación rápida y sencilla
Lecturas en 10 segundos o menos por punta
• Muestra en GPM, Litros / min o oz / min
• No se recomienda su uso mientras los productos químicos se encuentren en el pulverizador
ESTÁNDAR USA: MÉTRICO:
GPM = LPM =
GPA = L/ha =
W = Espacio de punta a punta (pulgadas) W = Espacio de punta a punta (metros)
GPA X MPH X W L/ha X kmph X W
5,940 X GPM 600 X LPM
5,940 600
MPH X W kmph X W
EQUACIONES DE CALIBRACION:
INSTRUCCIONES EN ESPAÑOL | CALIBRADORA DE BOQUILLAS
Modelo SC-1 Número de artículo 23890 | Modelo SC-4 Número de artículo 24200
8
GARANTÍA DE 1 AÑO: Este producto está garantizado para estar libre de defectos en
materiales o mano de obra por un (1) año a partir de la fecha de compra.
MODELO SC-4
Mejor para tasas de ujo más altas entre 1-4
GPM típicas de la aplicación de fertilizante
líquido
• Rango y unidades: 0.07-4.00 GPM, 9-512
oz/min, 0.27-15.0 L/min (GPM en US galones)
• Resolución: 0.01 GPM, 1 oz/min, 0.01 L/min
a 9.99 o 0.1 L/min 10.0 & arriba
• Precisión: +/- 4%
• Tamaño: 4 “(10.2cm) Dia x 10” (25.4cm) Alto
• Peso: 1.2 libras (544g)
MODELO SC-1
Mejor para caudales inferiores a 1 GPM típicos
de la aplicación de herbicidas y insecticidas
• Rango y unidades: 0.02-1.00 GPM, 3-128
oz/min, 0.08-3.80 L/min (GPM en US galones)
• Resolución: 0.01 GPM, 1 oz/min, 0.01 L/min
• Precisión: +/- 2.5%
• Tamaño: 5,7 cm (5,7 cm) de diámetro x 9,25
“(23,5 cm) de altura
• Peso: 0.52 libras (236g)
DETALLES ESPECÍFICOS:
TOMA DE MEDICIONES:
Presione el botón START para encender el medidor. La pantalla mostrará “000”demanera
intermitente indicando que está funcionando bien. La pantalla mostrará un “_” para indicar
las unidades que el medidor utilizará para la medición. Luego mostrará “- - -“ indicando que el
medidor está listo para tomar una nueva medición. Una vez que se muestra “- - -“, el medidor
puede colocarse bajo la boquilla a medir (tendrá 60 segundos para colocarla bajo la boquilla).
La colocación del medidor bajo la boquilla debe ser rápida asegurando que todo el flujo de la
boquilla entre al medidor (Fig 1). Al tiempo que el medidor se llena, la pantalla con líquido, la
pantalla comenzará a parpadear “- - -“; esto indica que la medición está en progreso. Tan pronto
que el líquido llega al sensor superior, el parpadeo terminará y la tasa de flujo se mostrará en la
pantalla LCD (Fig 2). La tasa de flujo permanecerá en la pantalla por 90 segundos o hasta que
presione el botón START para iniciar una nueva lectura. Una vez que aparece la lectura, puede
tirar el líquido (Fig. 3). V a c i a r el líquido no afectará la lectura en pantalla. Si necesita tomar una
nueva lectura, simplemente vacíe el medidor y presione el botón START para iniciar la medición.
NOTA IMPORTANTE: Las mediciones más exactas se realizan con el medidor ligeramente inclinado
cerca de la vertical (Fig. 1). Esto evita que el líquido que entra al medidor por la pared de atrás
active accidentalmente los sensores.
APAGADO DEL MEDIDOR:
El medidor enciende cuando presiona el botón START. El medidor puede apagarse de dos
maneras:
1. Presione y sostenga el botón START por varios segundos (unos 3). Cuando se apague
la pantalla suelte el botón.
2. El medidor en automático se apaga en 90 segundos de inactividad. Esto significa que
el usuario no necesita apagarlo después de usarlo ya que se apagará por sí solo.
INSTRUCCIONES EN ESPAÑOL | CALIBRADORA DE BOQUILLAS
Fig. 1 Fig. 2
Fig. 3
Fig. 4
9
Modelo SC-1 Número de artículo 23890 | Modelo SC-4 Número de artículo
24200
YOUTUBE.COM
VER EL VIDEO DEMO. BUSCA:
SpotOn Sprayer Calibrator

CAMBIO DE UNIDADES DE MEDICIÓN:
El medidor puede configurarse para mostrar lecturas en galones/min (gpm), onzas/min (oz/min),
o litros/min (L/min). Para cambiar las unidades, el Usuario primero debe apagar el medidor.
Entonces presione y mantenga presionado el botón START. Mantenga presionado el botón
START hasta que la pantalla muestre “_ _ _” (unos 3 segundos). Cuando se muestre “_ _ _” suelte
el botón START y la pantalla parpadea con “_” por arriba de la unidad que está seleccionada.
Presione el botón START para cambiar esta selección. Una vez que la unidad deseada haya
sido seleccionada, espere sin presionar el botón START por 5 segundos. El medidor entonces
grabará la nueva unidad y se apagará. De ahí en adelante, el medidor mostrará esa última unidad
seleccionada.
INSTALACIÓN DE LAS BATERÍAS:
Las baterías están dentro de la base del medidor (Fig. 4). La tapa negra en la base del medidor
puede quitarse jalándola hacia afuera del medidor. La tapa se coloca por presión en el medidor.
Tenga cuidado al jalar la tapa de tal suerte que la base del medidor apunte hacia arriba. Esto
evitará que las baterías se caigan al quitar la tapa lo que podría poner presión en los cables del
porta-baterías. El medidor utiliza dos (2) baterías especiales tamaño “N” alcalinas. Coloque las
baterías en el porta-baterías cuidando la polaridad (el negativo hacia el resorte). Coloque el aillo
de retención alrededor de las baterías una vez que las haya colocado (Fig. 4). Entonces coloque
el porta-baterías en el medidor y ponga la tapa presionándola contra el medidor. Cuando el
necesite cambiar las baterías, el medidor indicará mostrando “Lo b” en la pantalla LCD después
de encender el medidor. Si ve este mensaje, debe cambiar las baterías como se menciona arriba.
SOLUCIÓN DE PROBLEMAS:
El Calibrador de Boquillas mide la tasa de flujo midiendo el tiempo que toma llenar el tubo del
medidor. El ascenso del líquido es medido por 3 electrodos en el medidor. El medidor funcionará
solamente con fluidos que conducen electricidad, como el agua. En el caso de que sea agua
destilada, la conductividad podría ser muy baja para que funcione correctamente el medidor. El
agua de la lave funcionará muy bien con el medidor. Cualquier substancia que cubra o recubra
el metal de los electrodos reducirá la capacidad de medir del equipo. Debe tener cuidado de
enjuagar siempre el medidor por dentro y por fuera cuando termine de utilizarlo – hágalo con
agua limpia de la llave. Esto evitará que materiales extraños se acumulen en los electrodos.
Enjuague muy bien el difusor para evitar que se tape y evite el flujo de los líquidos durante las
mediciones. Si ve que se forme espuma o burbujas en el difusor, coloque una gota de agente
eliminador de espuma en el difusor dentro del medidor antes de utilizarlo.
POLÍTICA DE SERVICIO Y REPARACIÓN:
Póngase en contacto con su distribuidor local para obtener detalles sobre devoluciones o
reparaciones.
INSTRUCCIONES EN ESPAÑOL | CALIBRADORA DE BOQUILLAS
Modelo SC-1 Número de artículo 23890 | Modelo SC-4 Número de artículo 24200
10
CARACTERÍSTICAS:
• Encontre rapidamente pontas de rodovias usadas
As diretrizes da indústria recomendam a substituição da ponta uma vez que a taxa de fluxo
excede a de uma nova dica em 10%
• Mede com precisão a taxa de uxo da propina verdadeira
Os pulverizadores de alta tecnologia de hoje só podem ser devidamente calibrados e confirmados
com este conhecimento
• Operação rápida e simples
Leituras em 10 segundos ou menos por dica
• Exibe em GPM, Litros / min ou oz / min
• Não recomendado para uso enquanto produtos químicos estão no pulverizador
ESTÁNDAR USA: MÉTRICO:
GPM = LPM =
GPA = L/ha =
W = Espaçamento entre dentes (polegadas) W = Espaçamento entre dentes (metros)
GPA X MPH X W L/ha X kmph X W
5,940 X GPM 600 X LPM
5,940 600
MPH X W kmph X W
EQUAÇÕES DE CALIBRAÇÃO:
INSTRUÇÕES EM PORTUGUÊS | CALIBRADOR DIGITAL PARA PULVERIZADORES
11
Modelo SC-1 Número de item 23890 | Modelo SC-4 Número de item
24200
GARANTIA DE 1 ANO: Este produto é garantido para ser livre de defeitos de material ou de
fabricação por 1 (um) ano a partir da data da compra.
MODELO SC-4
Melhor para maiores taxas de uxo entre 1-4
GPM típico da aplicação de fertilizantes líquidos
• Gama e unidades: 0.07-4.00 GPM, 9-512 oz/
min, 0.27-15.0 L/min (GPM em US Gallons)
• Resolução: 0.01 GPM, 1 oz/min, 0.01 L/min a
9.99 ou 0.1 L/min 10.0 & acima
• Precisão: +/- 4%
• Tamanho: 4 “(10.2cm) Dia x 10” (25.4cm)
Alto
• Peso: 1.2 lbs (544g)
MODELO SC-1
Melhor para taxas de uxo abaixo de 1 GPM
típico da aplicação de herbicida e inseticida
• Gama e unidades: 0.02-1.00 GPM, 3-128 oz/
min, 0.08-3.80 L/min (GPM em US Gallons)
• Resolução: 0.01 GPM, 1 oz/min, 0.01 L/min
• Precisão: +/- 2,5%
• Tamanho: 2,25 “(5,7 cm) Dia x 9,25” (23,5
cm) Alto
• Peso: 0.52 lbs (236g)
ESPECIFICAÇÕES:

INICIANDO A MEDIÇÃO:
Pressione o botão START para ligar o medidor. A tela de LCD piscará “000” momentaneamente,
indicando seu funcionamento correto. Em seguida, a tela de LCD mostrará um marcador “_” para
indicar a unidade de medida que será utilizada na medição, e depois parecerá o símbolo “- - -”.
Quando a tela de LCD apresentar o símbolo “- - -”, o medidor está pronto e deve ser colocado
debaixo do bico a ser testado (você terá 60 segundos para posicionar o medidor debaixo do
bico). O posicionamento do medidor deve ser feito de maneira que todo líquido pulverizado pelo
bico seja coletado pelo medidor, de forma rápida e direta (veja Fig. 1). Conforme o medidor enche
com água, o visor começará a piscar “- - -”, indicando que a leitura está em processo. Assim que a
água alcance o sensor superior, o display irá parar de piscar, e a vazão medida aparecerá indicada
na tela (veja Fig. 2). A vazão do bico continuará na tela por 90 segundos ou se pressionado o
botão START para uma nova medição. Uma vez mostrado a vazão na tela, pode-se esvaziar o
medidor pela abertura superior (veja Fig. 3) sem que a medição seja afetada. Caso uma medição
precise ser reiniciada, simplesmente esvazie o medidor e aperte o botão START novamente.
Note: Para realizar medições de maneira mais precisa, incline o medidor com um pequeno ângulo
na vertical, conforme mostrado na Fig. 1. Isto faz com que a água escorra para dentro do medidor
apenas pela parte de trás, evitando assim, o acionamento do sensor inferior de maneira indevida.
DESLIGANDO O MEDIDOR:
O medidor liga a qualquer momento quando pressionado o botão START, e pode ser desligado
de duas maneiras:
1. Pressionando o botão START por cerca de 03 segundos. Assim que a tela de LCD ficar
em branco, solte o botão START.
2. O medidor se desliga automaticamente após 90 segundos de inatividade. Isto
significa que o usuario não precisa desligá-lo após o uso, já que o medidor se desliga
automaticamente.
INSTRUÇÕES EM PORTUGUÊS | CALIBRADOR DIGITAL PARA PULVERIZADORES
Fig. 1 Fig. 2
Fig. 3
Fig. 4
Modelo SC-1 Número de item 23890 | Modelo SC-4 Número de item 24200
12
YOUTUBE.COM
VEJA O VÍDEO DEMO. PESQUISA:
SpotOn Sprayer Calibrator
ALTERANDO A UNIDADE DE MEDIDA:
O medidor pode ser configurado para apresentar as medidas em litros por minuto (L/min),
onças por minuto (oz/min) ou galões por minuto (gal/min). Para alterar a unidade de medida,
o usuário deve ligar o medidor no botão START e em seguida apertar e segurar o mesmo bota o
START (por aproximadamente 3 segundos) até pressionar o botão START. O medidor entrará na
nova configuração e desligará. A partir desse ponto, o medidor sempre exibirá leituras nas novas
unidades.
INSTALANDO AS BATERIAS:
As baterias estão alocadas dentro da base do medidor (ver Fig. 4). Para retirar a tampa preta da
base do medidor, segure-o de ponta cabeça e retire a tampa puxando-a cuidadosamente de forma
direta. Desta forma, as baterias não correrão risco de se desprender ou de romper os fios que a
ligam. O medidor necessita de duas (2) baterías alcalinas tipo N, que pode ser encontrada
em diversas lojas de conveniência ou de eletrônicos. Coloque as baterias no porta-baterias,
observando a polaridade da mesma (negativo em contato com a mola). Após a inserção das
baterias, coloque o anel de borracha conforme mostra a Fig. 4. Coloque o porta-baterias dentro
do medidor e recoloque a tampa preta encaixando-a na base e pressionado firmemente.
Quando o medidor precisar de novas baterias, o símbolo “Lob” aparecerá na tela de LCD quando
o medidor for ligado. Assim que a mensagem aparecer, deve-se substituir as baterias, conforme
mencionado acima.
SOLUÇÃO DE PROBLEMAS:
O Calibrador Digital mede a vazão de um líquido através da medição do tempo que demora
para encher o tubo do medidor. O aumento do nível do líquido é percebido por 3 eletrodos do
medidor. Dessa forma, o medidor só funcionará com fluidos condutores de eletricidade, como
água por exemplo. No caso de água destilada, a condutividade elétrica pode ser muito baixa para
uma medição precisa. Água de torneira, potável e mineral permitem o funcionamento correto
do medidor. Qualquer substância que cubra ou envolva os metais dos eletrodos expostos pode
prejudicar a sua sensibilidade para medir o nível de líquidos. Deve-se tomar cuidado com seu
manuseio e manter o medidor sempre limpo com água após as medições, evitando o acumulo
de resíduos e incrustações, tanto por dentro como por fora do equipamento.
REPARO E SERVIÇOS:
Entre em contato com o revendedor local para obter devoluções ou reparos.
INSTRUÇÕES EM PORTUGUÊS | CALIBRADOR DIGITAL PARA PULVERIZADORES
13
Modelo SC-1 Número de item 23890 | Modelo SC-4 Número de item
24200

EIGENSCHAFTEN:
• Schnelle Spritzdüsenspitzen schnell nden
Branchenrichtlinien empfehlen Tip Ersatz, sobald die Durchflussmenge die eines neuen Tresters
um 10% übersteigt
• Die tatsächliche Durchussmenge genau messen
Die heutigen High-Tech-Sprüher können nur mit diesem Wissen korrekt kalibriert und bestätigt
werden
• Schnelle und einfache Bedienung
Lesungen in 10 Sekunden oder weniger pro Tipp
• Anzeigen in GPM, Liter / min oder oz / min
• Nicht für den Gebrauch empfohlen, während Chemikalien in Sprüher sind
STANDARD USA: METRISCH:
GPM = LPM =
GPA = L/ha =
W = Spitzenabstand (zoll) W = Spitzenabstand (meters)
GPA X MPH X W L/ha X kmph X W
5,940 X GPM 600 X LPM
5,940 600
MPH X W kmph X W
KALIBRIERUNGSGLEICHUNGEN:
Modell SC-1 Artikelnummer 23890 | Modell SC-4 Artikelnummer 24200
14
ANLEITUNG AUF DEUTSCH | SPRITZGERÄT KALIBRATOR
1 Jahr Garantie: Dieses produto é garantiert sein livre de defeitos ou fabricação Material
für 1 (um) Jahr ab Kauf da da Daten.
MODELL SC-4
Beste für höhere Durchussmengen zwischen
1-4 GPM typisch für Flüssigdüngeranwendung
• Reichweite & Einheiten: 0.07-4.00 GPM,
9-512 oz/min, 0.27-15.0 L/min (GPM in US
Gallonen)
• Lösung: 0.01 GPM, 1 oz/min, 0.01 L/min
nach 9.99 oder 0.1 L/min 10.0 & oben
• Genauigkeit: +/- 4%
• Größe: 4 “(10.2cm) Dia x 10” (25.4cm) groß
• Gewicht: 1,2 lbs (544g)
MODELL SC-1
Am besten für Durchussraten unter 1 GPM
typisch für Herbizid und Insektizid Anwendung
• Reichweite & Einheiten: 0.02-1.00 GPM,
3-128 oz/min, 0.08-3.80 L/min (GPM in US
Gallonen)
• Lösung: 0.01 GPM, 1 oz/min, 0.01 L/min
• Genauigkeit: +/- 2,5%
• Größe: 5,7cm (5,7cm) Dia x 9,25 “(23,5 cm)
groß
• Gewicht: 0,52 lbs (236g)
TECHNISCHE DATEN:
MESSUNG DURCHFÜHREN:
Drücken Sie die START-Taste, um das Messgerät einzuschalten. Das LCD blinkt kurz “000” und
zeigt an, dass es ordnungsgemäß funktioniert. Das LCD zeigt dann eine “_” Markierung an, um die
Art der Messeinheiten anzuzeigen, die das Messgerät beim Anzeigen von Messwerten
verwendet. Der Zähler zeigt dann “- - -” auf dem LCD an, dass das Messgerät bereit ist, eine n
eue Messung durchzuführen. Sobald das Messgerät “- - -” zeigt, kann es unter die zu
prüfende Sprühdüse gestellt werden (Sie haben 60 Sekunden, um das Messgerät unter die
Düse zu legen). Die Platzierung des Messgerätes unter der Düse sollte reibungslos und sicher
sein, damit der gesamte Strom aus der Düse schnell auf das Messgerät übertragen wird (siehe
Abb. 1). Wenn das Messgerät mit Wasser füllt, beginnt das Display zu blinken “- - -”; Dies zeigt
an, dass das Lesen im Gange ist. Sobald das Wasser den oberen Sensor des Messgerätes
erreicht, hört das Blinken auf und die Durchflussrate wird auf dem LCD angezeigt (siehe Abb.
2). Diese Durchflussrate wird weiterhin auf dem Messgerät für 90 Sekunden angezeigt oder
bis die START-Taste gedrückt wird, um einen neuen Messwert zu starten. Sobald der Messwert
angezeigt wurde, kann das Wasser aus der oenen Oberseite des Messgerätes gegossen
werden (siehe Abb. 3). Das Ausgießen des Inhaltes des Messgeräts hat keinen Einfluss auf den
auf dem LCD angezeigten Messwert. Wenn ein Messwert aus irgendeinem Grund neu gestartet
werden muss, leeren Sie einfach den Zähler und drücken Sie erneut die START-Taste, um ihn für
eine neue Messung bereitzustellen. BITTE BEACHTEN SIE: Die genauesten Messungen werden
mit dem Zähler durchgeführt, der in einem leichten Winkel zur Vertikalen gehalten wird, wie
in Abb. 1 zu sehen. Dies hält das Wasser in den Meter entlang der Rückseite des Messgerätes
hinunter und hält es von versehentlich fallen auf und Auslösung der Sensoren des Messgerätes.
AUSSCHALTEN DES MESSGERÄTS:
Der Zähler schaltet sich jederzeit ein, wenn die START-Taste gedrückt wird. Der Zähler kann auf
zwei Arten ausgeschaltet werden:
1. Das Messgerät kann durch Drücken und Halten der START-Taste für einige Sekunden
(ca. 3 Sekunden) abgeschaltet werden. Sobald das LCD leer ist, lassen Sie die START-Taste los.
2. Das Messgerät schaltet sich nach 90 Sekunden Inaktivität automatisch ab. Dies
bedeutet, dass der Benutzer das Messgerät nach dem Gebrauch nicht abschalten muss, da es
ANLEITUNG AUF DEUTSCH | SPRITZGERÄT KALIBRATOR
Fig. 1 Fig. 2
Fig. 3
Fig. 4
15
Modell SC-1 Artikelnummer 23890 | Modell SC-4 Artikelnummer
24200
YOUTUBE.COM
SEHEN SIE DAS DEMO VIDEO. SUCHE:
SpotOn Sprayer Calibrator

sich schließlich ausschaltet.
MESSEINHEITEN ÄNDERN:
Das Messgerät kann so konfiguriert werden, dass es Messwerte in Gallonen pro Minute (gpm),
Unzen pro Minute (oz / min) oder Liter pro Minute (L / min) anzeigt. Um die Anzeigeeinheiten
zu wechseln, muss der Benutzer zuerst das Messgerät ausschalten. Drücken Sie dann die STARTTaste und halten Sie sie gedrückt. Halten Sie die START-Taste gedrückt, bis im Display “_ _ _”
(ca. 3 Sekunden) erscheint. Wenn das Display “_ _ _” anzeigt, lassen Sie die START-Taste los und
die Anzeige beginnt zu blinken “_” über dem aktuell ausgewählten Gerätetyp. Drücken Sie die
START-Taste, um diese Auswahl zu ändern. Sobald der richtige Gerätetyp ausgewählt ist, warten
Sie, ohne die START-Taste für 5 Sekunden zu drücken. Der Zähler wird dann die neue Einstellung
eingeben und abschalten. Von diesem Zeitpunkt an wird das Messgerät immer Messwerte in den
neuen Einheiten anzeigen.
INSTALLIEREN DER BATTERIEN:
Die Batterien befinden sich im Inneren des Messgerätes (siehe Abb. 4). Die schwarze Kappe
auf der Unterseite des Zählers kann entfernt werden, indem man sie gerade vom Ende des
Messinstruments zieht. Die Kappe ist nur eine Presspassung auf den Meter. Bitte achten Sie
darauf, die Kappe aus dem Messgerät zu ziehen, damit der Boden des Messgerätes nach oben
zeigt. Dadurch werden die Batterien aus dem Messgerät herausfallen, sobald die Kappe frei
kommt, was die Batteriehalter drähte besonders belasten könnte. Das Messgerät benötigt
zwei (2) N-Alkalibatterien, die in jedem Apotheken erhältlich sind. Legen Sie die beiden neuen
Batterien in die Batteriehalterung, nachdem die Polaritätsanzeige auf dem Halter markiert ist
(negatives Ende zur Feder). Legen Sie den Gummi-Haltering um die Batterien, sobald sie sich
in der Halterung befinden, wie in Abb. 4 gezeigt. Legen Sie den Batteriehalter wieder in das
Ende des Messgerätes und tauschen Sie die schwarze Kappe aus und drücken Sie sie auf das
Messgerät zurück. Wenn die Batterien des Messgerätes ausgetauscht werden müssen, zeigt
das Messgerät nach dem Einschalten des Messgerätes “Lo b” auf dem LCD-Display an. Wenn
diese Meldung angezeigt wird, sollten die Batterien wie oben beschrieben ersetzt werden.
FEHLERBEHEBUNG:
Der Spritzkalibrator misst den Durchfluss, indem er die Zeit misst, die benötigt wird, um das
Röhrenrohr zu füllen. Der ansteigende Wasserstand wird durch 3 Elektroden im Messgerät
erfasst. Der Zähler arbeitet nur mit Flüssigkeiten, die Strom erzeugen, wie Wasser. Im Falle von
destilliertem Wasser kann die Leitfähigkeit für einen ordnungsgemäßen Zählerbetrieb zu niedrig
sein. Alle Leitungswasser funktionieren sehr gut mit dem Messgerät. Jede Substanz, die das
freiliegende Metall auf den Elektroden beschichtet oder bedeckt, beeinträchtigt ihre Fähigkeit,
den Wasserstand zu erfassen. Es ist darauf zu achten, dass das Messgerät nach und nach mit
sauberem Leitungswasser abgespült wird. Dadurch wird kein Fremdmaterial vom Aufbau auf
den Elektroden gehalten. Die komplette Spülung wird auch verhindern, dass das Diusor-Pad
verstop wird und somit den Wasserfluss während des Betriebs in den oder aus dem Messgerät
hindert. Wenn Schaumbildung oder Blasen ein erhebliches Problem innerhalb des Messgerätes
sind, kann ein kleiner Tropfen des Entschäumungsmittels vor der Verwendung dem Diusorkissen
hinzugefügt werden.
REPARATUR- UND SERVICE-RICHTLINIEN:
Fragen Sie Ihren Händler für Retouren oder Reparaturen.
ANLEITUNG AUF DEUTSCH | SPRITZGERÄT KALIBRATOR
Modell SC-1 Artikelnummer 23890 | Modell SC-4 Artikelnummer 24200
16
EU DECLARATION OF CONFORMITY
Innoquest, Inc.
910 Hobe Road
Woodstock, IL 60098
USA
Eective Date: 10 October 2016
Model Number: 23890, 24200, 26060
Description: SpotOn Sprayer Calibrator
Type: Electrical Equipment for Measurement, Control, and Laboratory Use
Directive: 2014/30/EU
RoHS Directive 2011/65/EU
Standards: EN 61326-1:2013*
EN 50581:2012
Innoquest, Inc. declares under its sole responsibility that the SpotOn Sprayer Calibrators, model 23890,24200, and 26060 are in conformity with
the Electromagnetic Compatibility Directive 2014/30/EU and the RoHS Directive 2011/65/EU.
William C. Hughes
President
Innoquest, Inc.
*Note: This product may turn o when exposed to high levels of static electricity. This product is intended for use in wet environments where
high levels of static electricity do not exist and therefore inadvertent power o will not occur during normal use. A static electricity induced
power o does not cause damage to this product.
EU-KONFORMITÄTSERKLÄRUNG
Innoquest, Inc.
910 Hobe Road
Woodstock, IL 60098
USA
Gültig ab: 10. Oktober 2016
Modellnummer: 23890, 24200, 26060
Beschreibung: SpotOn Kalibriergerät für Sprühdüsen
Typ: Elektrogerät für Messungen, Kontrolle und den Einsatz im Labor
Richtlinie: 2014/30/EU
RoHS Richtlinie 2011/65/EU
Normen: EN 61326-1:2013*
EN 50581:2012
Innoquest, Inc. erklärt unter seiner alleinigen Haung, dass die SpotOn Kalibriergeräte für Sprühdüsen, Modell 23890,24200, und 26060 der
Richtlinie über die elektromagnetische Verträglichkeit 2014/30/EU und der RoHS-Richtlinie 2011/65/EU entsprechen.
William C. Hughes
President
Innoquest, Inc.
*Hinweis: Dieses Produkt kann sich ausschalten, wenn es dem Einfluss starker statischer Elektrizität ausgesetzt ist. Dieses Produkt ist für den
Einsatz in feuchten Umgebungen ausgelegt, wo normalerweise keine hohe statische Elektrizität auritt, sodass ein unabsichtliches Ausschalten
während des normalen Einsatzes nicht erfolgt. Ein durch statische Elektrizität bedingtes Ausschalten führt nicht zu einer Beschädigung dieses
Produkts.
17

910 Hobe Road
Woodstock, IL 60098
US 800-637-1623 | International+1-815-337-8555
sales@innoquestinc.com
www.innoquestinc.com
P/N 34490 Rev.1
© 2017 Innoquest, Inc
 Loading...