

Spotlight PCLED C100 DMX, FN LED C100 NW DMX, PC LED C100 CW DMX, PC LED C100 WW DMX, PC LED C100 NW DMX User Manual
...
Manuale utente - User manual
FresneLED C100 DMX
PCLED C100 DMX
cod. FN LED C100 CW DMX • FN LED C100 WW DMX • FN LED C100 NW DMX
PC LED C100 CW DMX • PC LED C100 WW DMX • PC LED C100 NW DMX
FN LED C100 DMX - PC LED C100 DMX
PREV/-
NEXT/+
BACK
ENTER
Manual
001
ATTENZIONE: Prima di usare questi apparecchi,
leggere attentamente le istruzioni che seguono.
Spotlight srl non potrà essere ritenuta responsabile di
danni derivanti dalla non osservanza di dette istruzioni.
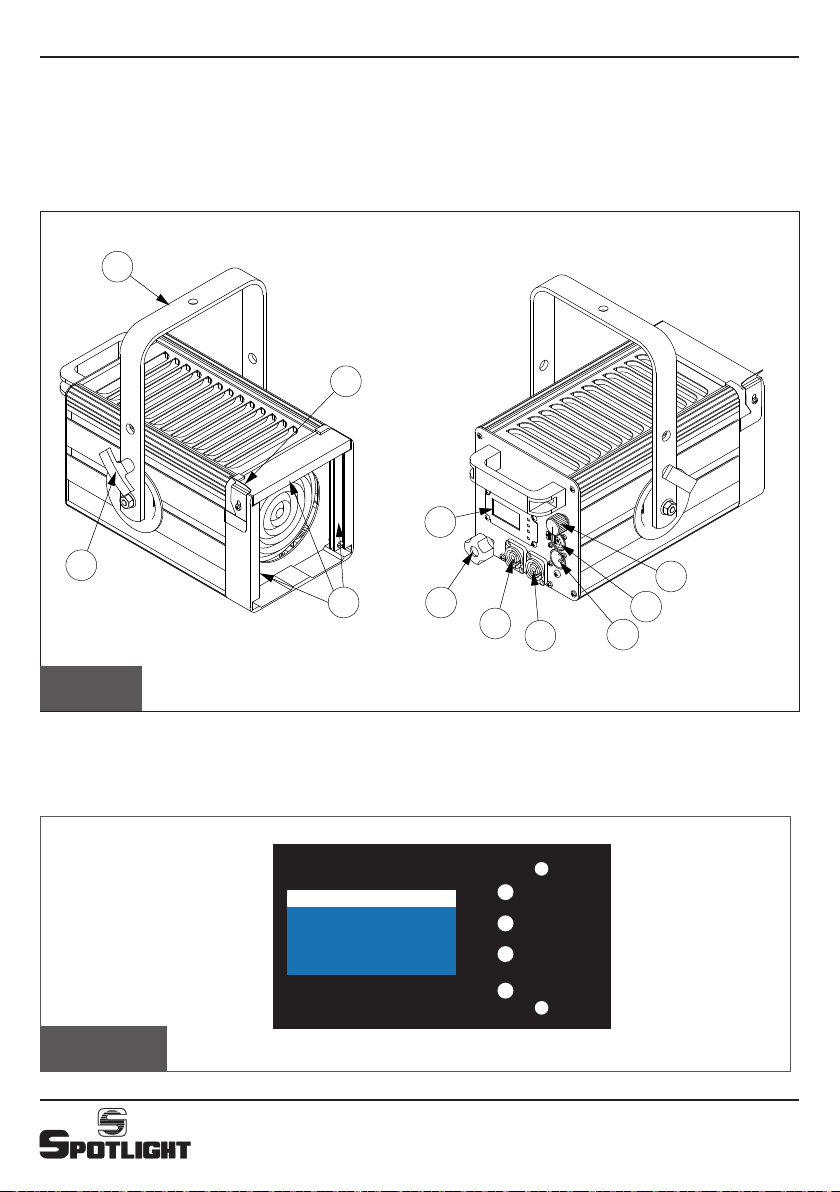
1
4
3
2
Fig. 1
SAFETY WARNING: Before using this product,
read the present instructions carefully.
Spotlight srl will not be responsible for damage
resulting from instructions not being followed.
8
9
5
10
11
7
6
Display con pulsanti Menu - Display with Menu buttons
Manual
001
PREV/- NEXT/+ BACKENTER
Fig. 2
2

FN LED C100 DMX - PC LED C100 DMX
Connessioni elettriche e DMX - Electrical and DMX connections
DMX IN
CONSOLE
100-240V
DMX IN
DMX OUT
IN
OUT
IN
DMX OUT
OUT
DMX IN
IN
Fig. 3
DMX OUT
OUT
Dimensioni (mm) e pesi - Dimensions (mm) and weights
215
305
290
Fig. 4
3
Kg. 3,5

FN LED C100 DMX - PC LED C100 DMX
DESCRIZIONE DEL PROIETTORE
Riferendosi ai disegni di pag. 2:
① Staffa di sospensione
② Maniglia per regolazione inclinazione del faro
③ Guide porta accessori con tettuccio di ritenzione
④ Molla per bloccaggio tettuccio accessori
⑤ Pomolo per regolazione dello zoom
⑥ Connettore DMX IN
⑦ Connettore DMX THRU
⑧ Display e pulsanti menu
⑨ Manopola di regolazione intensità luminosa
(in modalità Manual)
⑩ Alimentazione IN (connettore Powercon)
⑪ Alimentazione OUT (connettore Powercon
INDICAZIONI GENERALI
Il proiettore in Vs possesso risponde alle Direttive
Europee 2006/95/CE, 2004/108/CE e 2011/65/UE.
La targhetta che è sistemata sul fianco del proiettore,
contiene le seguenti informazioni:
• Modello
• Tensione di alimentazione in V
• Potenza in W
• Indice di protezione IP
• Massima temperatura ambiente ammissibile in °C
• Distanza minima da ogni superficie infiammabile
CONNESSIONI ELETTRICHE
Il vostro faro è stato progettato per una tensione di
alimentazione da 100 a 240V, 50/60 Hz.
Prima e durante l’installazione osservare le seguenti
norme:
• Verificare sempre l’efficienza del collegamento a terra
della linea in uso.
• Verificare che la tensione di alimentazione corrisponda a
quella dell’apparecchio
• L’apparecchio è previsto per uso all’interno: pertanto
deve essere protetto dall’umidità e dalla pioggia se
usato in condizioni diverse (IP 20).
• L’apparecchio NON può essere collegato a un dimmer.
PUNTAMENTO
Il proiettore deve essere collocato rispettando la
distanza minima dall’oggetto che si deve illuminare,
indicata sull’etichetta del faro.
Tramite la maniglia laterale ② si può allentare il
bloccaggio del faro in una certa posizione e modificare
la sua inclinazione. Lo stesso si può fare riguardo alla
rotazione sull’asse verticale, facendolo ruotare sul perno
di aggancio.
Per la regolazione dello zoom ruotare in senso orario o
antiorario il pomello ⑤, rispettivamente per stringere o
allargare il fascio luminoso.
INSTALLAZIONE
• Il proiettore è progettato esclusivamente per impiego
professionale.
• Non puntare il faro direttamente negli occhi
• Si prega di prestare la dovuta attenzione alle note
riportate sull’etichetta dell’apparecchio.
• Ricordarsi di collegare la fune di sicurezza se previsto
dalle norme di sicurezza locali.
• ll proiettore può essere usato sia sospeso sia montato
su cavalletto.
MANUTENZIONE
Non aprire l’apparecchio. La manutenzione deve essere
eseguita esclusivamente dal costruttore o dal suo
servizio di assistenza.
Sottoporre il faro a revisione almeno una volta all’anno
per controllare l’integrità delle parti elettriche e
meccaniche e l’aggiornamento del software.
RICICLAGGIO
Il prodotto deve essere riciclato o smaltito
secondo la direttiva 2002/96/CE
4

FN LED C100 DMX - PC LED C100 DMX
PREV/-
NEXT/+
BACK
ENTER
Manual
001
MODALITA' DI FUNZIONAMENTO
Il faro è predisposto per poter essere utilizzato in
diverse modalità di funzionamento:
• POTENZIOMETRO LOCALE
• DMX
• RDM
INTERFACCIA DISPLAY
Manual
001
PREV/- NEXT/+ BACKENTER
MENU
All’accensione viene visualizzata la versione
software installata, a cui fa seguito la
visualizzazione delle impostazioni di default,
ovvero la Modalità di Funzionamento attualmente
impostata:
- Manual, per utilizzo tramite potenziometro
- 1-3-channel mode, per modalità DMX/RDM
seguita dall'Indirizzo DMX assegnato all'unità.
Premendo il tasto ENTER si accede alle impostazioni
e si naviga attraverso i sottomenu agendo sui
pulsanti NEXT e PREV che in presenza di voci di tipo
valore avranno la funzione di modifica in aumento
o diminuzione dei valori stessi; le modifiche
potranno essere confermate con il pulsante ENTER
o annullate con il pulsante BACK.
Struttura del menu - MENU GENERALE
Voce Valori Def Descrizione
Dmx Settings Sottomenu impostazioni dmx
Options
Info Sottomenu informazioni
Sottomenu configurazioni
opzionali
MENU DMX SETTING
Voce Valori Def Descrizione
Dmx
Address
Dmx
Personality
1..xxx 1 Indirizzo dmx
3 channels mode
2 channels mode
1 channels mode
1 channels mode Modo dmx
MENU OPTIONS
Voce Valori Def Descrizione
LED Delay OFF / 30, 60 ... 600 ms 120 ms
Dimming
Curve
Out
Frequency
Led Boost
(*)
Fan Mode
(
)
**
Display
Rotat.
Display
Standby
Default
Set
Factory
Setting
LINEAR
QUADRATIC
500, 800,1000,1500...
10000,11000, 12000...
20000 Hz
OFF
ON
AUTO
STANDARD
SILENT
STANDARD
ROTATED
OFF
ON
Riservato al Costruttore Impostazioni di fabbrica
Quadratic Gamma Correction
Tempo di buffer sulle
uscite LED
1000 Hz Frequenza PWM LED
Imposta il valore
ON
massimo di corrente
(ON) o nominale (OFF).
Seleziona la modalità
AUTO
di funzionamento delle
ventole.
Rotazione di 180° del
display. Standard = tasti
Standard
a destra del
display.
Selezionando ON
il display si spegne
OFF
automaticamente dopo
60 secondi di inutilizzo
Imposta il default per
tutti i parametri utente
5

FN LED C100 DMX - PC LED C100 DMX
MENU INFO
Voce Valori Descrizione
LED Temperat. XX°C Temperatura sul LED
Board
Temperat.
Led Time 00 Hr – 00 min Tempo funzionamento uscite
Unit Time 00 Hr – 00 min Tempo funzionamento unità
Software
Version
XX°C Temperatura a bordo scheda
V. ....
Data di rilascio
Visualizza versione software
Controllo della luminosità in funzione della
temperatura
L'apparecchio è dotato di un controllo della temperatura
del LED e della scheda driver, che per evitare un
deterioramento anticipato in caso di sovratemperatura
regola l'intensità luminosa.
(*)
LED Boost
La funzione Boost permette di avere circa un 20% in più
di flusso luminoso, ma è compatibile esclusivamente con
un'impostazione della funzione FAN MODE in modalità
AUTO.
(
)
Controllo ventole
**
Vi sono tre modalità di controllo ventole. L'utente può
scegliere la modalità tramite il MENU OPTIONS.
1) modalità AUTO: le ventole sono regolate
automaticamente in base alla temperatura del led.
2) modalità STANDARD: le ventole sono mantenute
sempre al valore predefinito.
3) modalità SILENT: le ventole sono mantenute sempre al
valore minimo.
Mappa DMX
Modo Numero Canali
3 CH 3
2 CH 2
1 CH 1
DMX Personality 3: 3 channels mode
#
Nome Descrizione
1 DIMMER 0..255
DIMMER
2
FINE
3 STROBO
0..255
1..255
Dimmer
da spento (livello 0)
a acceso (livello 255)
Dimmer fine
da spento (livello 0)
a acceso (livello 255)
0 STROBO NON ATTIVO
Strobo
da lento (3,86 s)
a veloce (30 ms)
DMX Personality 2: 2 channels mode
#
Nome Descrizione
1 DIMMER 0..255
2 STROBO
Dimmer
da spento (livello 0)
a acceso (livello 255)
0 STROBO NON ATTIVO
Strobo
1..255
da lento (3,86 s)
a veloce (30 ms)
DMX Personality 1: 1 channels mode
#
Nome Descrizione
1 DIMMER 0..255
Dimmer
da spento (livello 0)
a acceso (livello 255)
6

PRIORITA' INGRESSI: LTP
L’ultimo ingresso (DMX o Potenziometro) che viene
modificato ha la priorità sugli altri.
Sul display, nella schermata principale, se l’ultimo segnale
ricevuto proviene dal potenziometro viene indicato
MANUAL, mentre se l’ultimo segnale ricevuto è DMX
viene riportato la modalità DMX corrente.
Assenza di segnale DMX
In assenza di segnale DMX viene mantenuto l’ultimo
valore ricevuto, durante il funzionamento normale.
In assenza di segnale DMX allo startup, invece, ha la
priorità il valore impostato dal potenziometro.
RDM
Il presente dispositivo supporta il protocollo RDM, ultima
versione (ANSI E1.20 - 2010). Vengono supportati i
seguenti parametri:
Denominazione Plasa/ESTA Numero Canali
DEVICE_INFO Lettura dei seguenti parametri:
IDENTIFY_DEVICE Accensione dei LED per consentire di
DMX_START_ADDRESS Impostazione/lettura Indirizzo DMX
SOFTWARE_VERSION_LABEL Descrizione testuale versione sw
SUPPORTED_PARAMETERS Elenco dei parametri supportati
DMX_PERSONALITY Impostazione modalità DMX
DMX_PERSONALITY_
DESCRIPTION
DEVICE_MODEL_DESCRIPTION Descrizione testuale del device model
MANUFACTURER_LABEL Descrizione testuale manufacturer
SENSOR_DEFINITION,
SENSOR_VALUE
- Versione protocollo RDM
- Device Model ID
- Categoria prodotto
- ID versione sw
- Numero di canali DMX
- Indice modalità DMX
- Indirizzo DMX
- Numero di sub-devices
- Numero di sensori
individuare visivamente il dispositivo
Ottenimento descrizione testuale
modalità DMX
Visualizzazione dei valori letti dal
sensore di temperatura, espresso in
decimi di grado Celsius
FN LED C100 DMX - PC LED C100 DMX
7

FN LED C100 DMX - PC LED C100 DMX
DESCRIPTION OF THE LUMINAIRE
Referring to pictures on pages 2:
① Suspension yoke
② Handle for tilt regulation
③ Accessory guides with retaining clip
④ Accessory locking spring
⑤ Zoom adjustment knob
⑥ DMX IN connector
⑦ DMX THRU connector
⑧ Display and menu buttons
⑨ Light intensity adjustment knob
(in Manual mode)
⑩ Power IN (Powercon connector)
⑪ Power OUT (Powercon connector)
INTRODUCTION
The luminaire you have bought complies to 2006/95/EC,
2004/108/EC and 2011/65/EU European Directives.
The label on the side of the luminaire lists the following
information:
• Model
• Mains supply voltage (V)
• Lamp wattage (W)
• Protection index (IP)
• maximum allowed ambient temperature in °C
• minimum flammable surface distance
INSTALLATION
• The luminaire has been designed for professional use
only
• Do not direct the light beam straight into somebody’s
eyes
• Read carefully the information label on the side of the
luminaire
• Remember to connect the safety cable, if required by
local health and safety regulations
• The luminaire can be either suspended or mounted on
a stand.
ELECTRICAL CONNECTIONS
The luminaire has been designed to operate with a
100V to 240V supply, 50-60Hz.
Before and during the installation, make sure you
follow the guidelines below:
• Always check the earth continuity connection for the
line being used.
• Ensure the required voltage of the unit is the same as
the supplied one.
• The unit is designed for indoor use: if it is to be used
outdoor, ensure it is protected from dampness and
rain. (IP 20)
• This unit cannot be connected to a dimmer.
FOCUSING
The luminaire should be at the minimum distance from
the object it is illuminating, as indicated on the label.
Using the side handle ② allows to loosen the luminaire
when it is locked in a certain position and thus change
its inclination. You can rotate the luminaire on the
vertical axis by rotating it on its hook clamp.
For the zoom adjustment rotate knob ⑤ clockwise or
counterclockwise to respectively narrow or widen the
light beam.
MAINTENANCE
Do not open the fixture. Maintenance should be
performed only by the manufacturer or by its service
agent.
The luminaire must be serviced at least once a year, to
check the integrity of its electrical and mechanical parts
and to keep software updated.
RECYCLING
The product must be recycled or disposed of,
according to Directive 2002/96/CE.
8

FN LED C100 DMX - PC LED C100 DMX
PREV/-
NEXT/+
BACK
ENTER
Manual
001
OPERATING MODE
The luminaire is designed to be used in different
operating modes:
• LOCAL POTENTIOMETER
• DMX
• RDM
DISPLAY INTERFACE
Manual
001
PREV/- NEXT/+ BACKENTER
MENU
When switched on, the installed software version
is displayed, followed by the display of the default
settings, ie the currently set operating mode:
- Manual, for use with a potentiometer
- 1-3-channel mode, for DMX/RDM mode
followed by the DMX address assigned to the unit.
Pressing the ENTER key you access the settings and
browse through the submenus by pressing the NEXT
and PREV buttons, which in case of value type
entries will have the function of increasing
or decreasing the values; the changes can be
confirmed with the ENTER button or canceled with
the BACK button.
Struttura del menu - MENU GENERALE
Item Value Def Description
Dmx Settings Dmx settings submenu
Options Optional settings submenu
Info Information submenu
MENU DMX SETTING
Item Value Def Description
Dmx
Address
Dmx
Personality
1..xxx 1 Dmx Address
3 channels mode
2 channels mode
1 channels mode
1 channels mode Dmx Mode
MENU OPTIONS
Item Value Def Description
LED Delay OFF / 30, 60 ... 600 ms 120 ms
Dimming
Curve
Out
Frequency
Led Boost
(*)
Fan Mode
(
)
**
Display
Rotat.
Display
Standby
Default
Set
Factory
Setting
LINEAR
QUADRATIC
500, 800,1000,1500...
10000,11000, 12000...
20000 Hz
OFF
ON
AUTO
STANDARD
SILENT
STANDARD
ROTATED
OFF
ON
For the Manufacturer only Factory default setting
Quadratic Gamma Correction
Buffer time on LED
outputs
1000 Hz PWM LED Frequency
Sets the maximum (ON)
ON
or nominal (OFF) current
value.
Selects the fans
AUTO
operation mode
180 ° rotation of the
display. Standard =
Standard
keys to the right of the
display
By selecting ON the
display turns off
OFF
automatically after 60
seconds of inactivity
It sets the default for all
the user parameters
9

FN LED C100 DMX - PC LED C100 DMX
MENU INFO
Item Value Description
LED Temperat. XX°C LED temperature
Board
Temperat.
Led Time 00 Hr – 00 min Output operation time
Unit Time 00 Hr – 00 min Unit operation time
Software
Version
XX°C
V. ....
Release date
Motherboard edges
temperature
It displays the software
version
Light output control depending on the
temperature
The fixture is equipped with a temperature control of the
LED and of the driver motherboard, which, to avoid an
early deterioration in case of overtemperature, regulates
the light intensity.
(*)
LED Boost
The Boost function allows about a 20% increase in light
output, but it is exclusively compatible with the FAN
MODE function setting in AUTO mode.
(
)
Fan control
**
There are three fan control modes. The user can choose
the mode via the OPTIONS MENU.
1) AUTO mode: the fans are automatically adjusted based
on the LED temperature.
2) STANDARD mode: the fans are always kept at the
default value.
3) SILENT mode: the fans are always kept at the
minimum value.
Mappa DMX
Mode Number of Channels
3 CH 3
2 CH 2
1 CH 1
DMX Personality 3: 3 channels mode
#
Nome Descrizione
1 DIMMER 0..255
DIMMER
2
FINE
3 STROBO
0..255
1..255
Dimmer
from OFF (level 0)
to ON (level 255)
Dimmer fine
from OFF (level 0)
to ON (level 255)
0 INACTIVE STROBO
Strobo
from slow (3,86 s)
to fast (30 ms)
DMX Personality 2: 2 channels mode
#
Nome Descrizione
1 DIMMER 0..255
2 STROBO
Dimmer
from OFF (level 0)
to ON (level 255)
0 INACTIVE STROBO
Strobo
1..255
from slow (3,86 s)
to fast (30 ms)
DMX Personality 1: 1 channels mode
#
Nome Descrizione
1 DIMMER 0..255
Dimmer
from OFF (level 0)
to ON (level 255)
10

INPUTS PRIORITIES: LTP
The last input (DMX or Potentiometer) that is modified
has priority over the others.
On the display, in the main screen, if the last received
signal comes from the potentiometer, MANUAL is
indicated, while if the last received signal is DMX
the current DMX mode is indicated.
Absence of DMX signal
In the absence of a DMX signal, the last value received is
retained during normal operation.
In the absence of DMX signal at startup, instead, the
value set by the potentiometer has priority.
RDM
This fixture supports the RDM protocol, latest version
(ANSI E1.20 - 2010). The following parameters are
supported:
Plasa/ESTA Denomination Number of Channels
DEVICE_INFO Reading of the following parameters:
IDENTIFY_DEVICE LEDs power on to allow to visually
DMX_START_ADDRESS DMX address setting/reading
SOFTWARE_VERSION_LABEL Text description version sw
SUPPORTED_PARAMETERS List of supported parameters
DMX_PERSONALITY DMX mode setting
DMX_PERSONALITY_
DESCRIPTION
DEVICE_MODEL_DESCRIPTION Text description of the device model
MANUFACTURER_LABEL Text description manufacturer
SENSOR_DEFINITION,
SENSOR_VALUE
- RDM protocol version
- Device Model ID
- Product category
- ID version sw
- Number of DMX channels
- DMX mode index
- DMX address
- Number of sub-devices
- Number of sensors
identify the fixture
Obtaining textual description of
DMX mode
Display of the values read by the
temperature sensor, expressed in
tenths of Celsius degree
FN LED C100 DMX - PC LED C100 DMX
11

FN LED C100 DMX - PC LED C100 DMX
Spotlight s.r.l.
Via Sardegna 3
20098 S. Giuliano Milanese
E-mail: info@spotlight.it
Milano - Italy
Tel. +39.02.98830.1
Fax +39.02.98830.22
www.spotlight.it
 Loading...