

Sporty's Stratus II Pilot's Manual

2nd Generation
PILOT’S GUIDE

COPYRIGHT INFORMATION
Stratus Second Generation Pilot’s Guide, © 2012 - 2014 Appareo
Systems, LLC. All Rights Reserved. All content within is copyrighted by
Appareo Systems, LLC and may not be reprinted without permission.
The content of this guide is furnished for information use only, is subject
to change without notice, and should not be construed as a commitment
by the manufacturer. Appareo Systems, LLC assumes no responsibility or
liability for any errors or inaccuracies that may appear in the information
content contained in this guide.
The Appareo, Sporty’s, and ForeFlight logos are all trademarks or
registered trademarks of their respective owners. MITRE is a registered
trademark of the MITRE Corporation. iPad, iPhone, and iPod touch are
registered trademarks of Apple Inc. App Store is a service mark of Apple
Inc.
To view the current Pilot’s Guide, go to www.appareo.com/stratus

1
QUICK START INSTRUCTIONS
1. Charge Stratus’s battery to 100% using the Stratus wall charger.
2. Place snap-in mount on glare shield or install suction cup mount.
3. Place Stratus in mount.
4. Power on Stratus by pressing the power button.
5. Connect your iPhone®, iPad®, or iPod touch® to the Stratus WiFi
network from the
device’s
Settings menu.
6. Open ForeFlight Mobile and conrm connection to Stratus.
NOTE: As ADS-B signals are broadcast by ground towers, Stratus will
not receive weather and trafc information while it is on the ground
.
PACKAGE CONTENTS
• Stratus module
• Snap-in mount with gel base
• Wall charger and charging cable
• Stratus Pilot’s Guide
• Carrying bag
2nd Generation
2
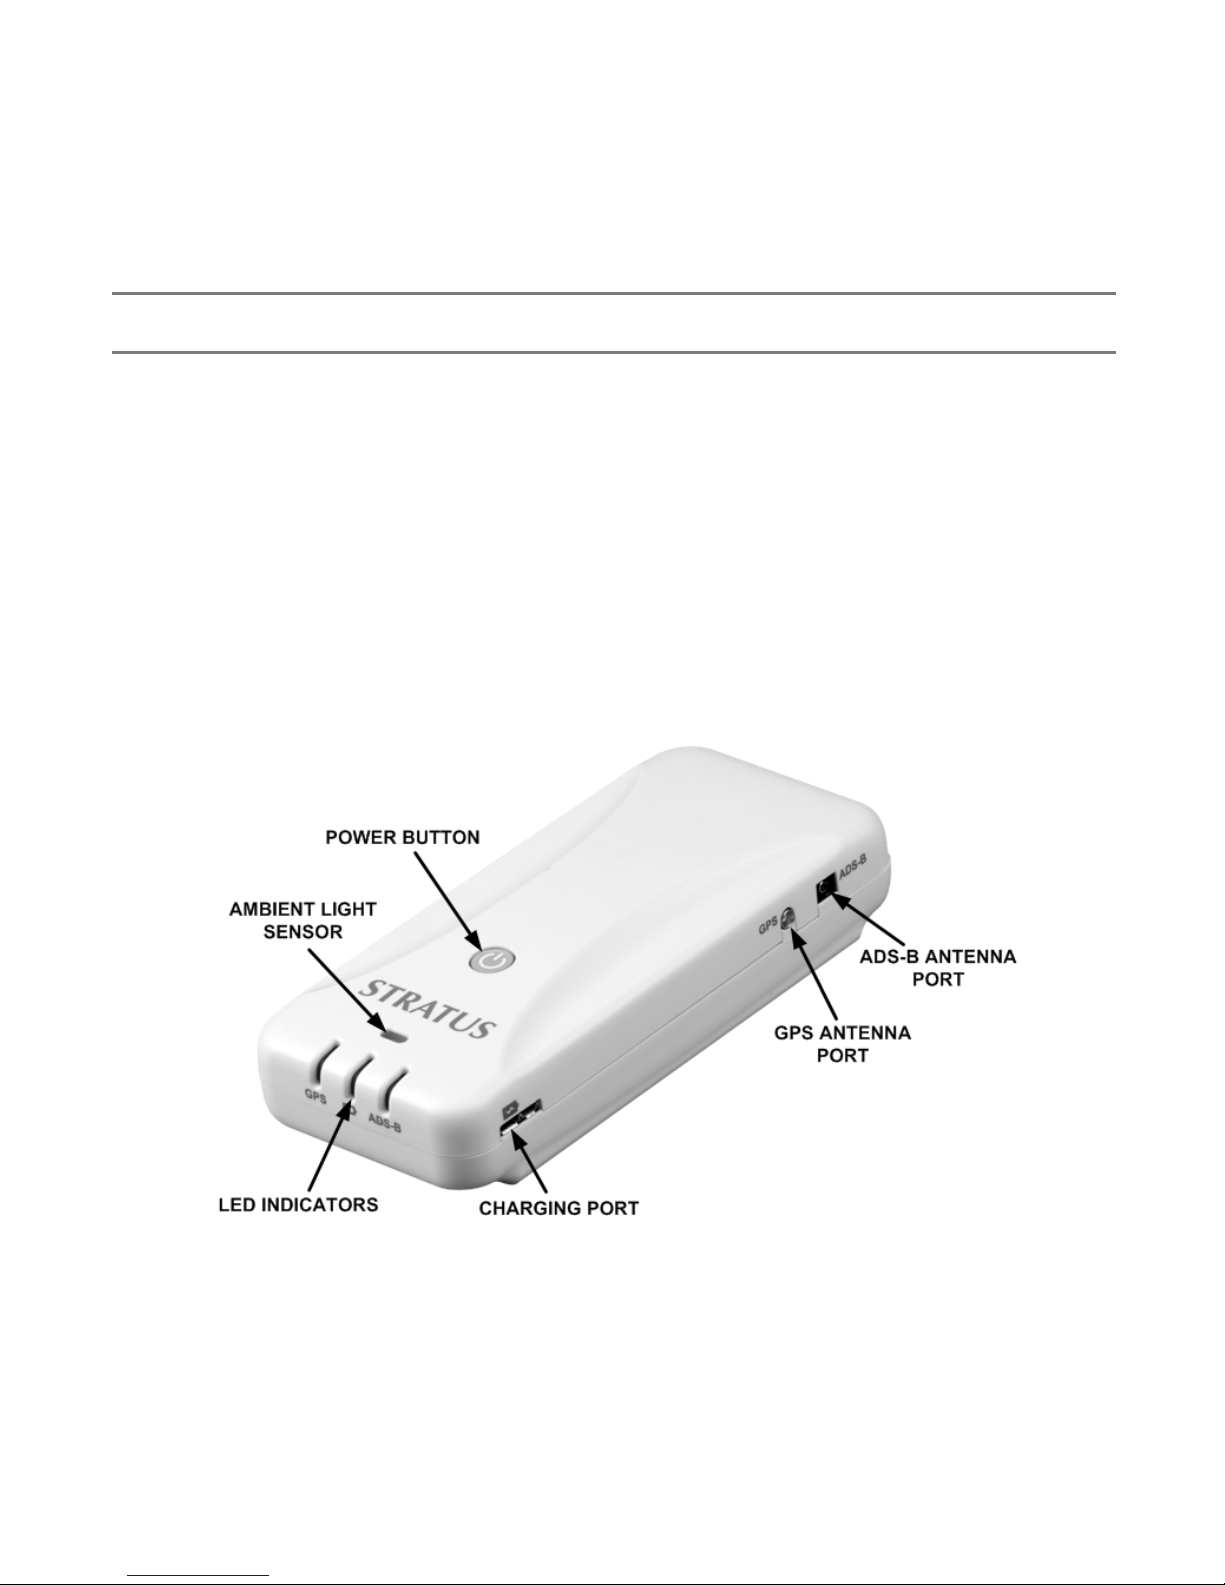
ABOUT STRATUS
Stratus is a portable, battery-operated receiver that works in conjunction
with the ForeFlight Mobile app. It provides pilots with free in-ight weather
and trafc and is a source of accurate GPS WAAS position. Stratus
receives Automatic Dependent Surveillance - Broadcast (ADS-B) weather
information (FIS-B), trafc information (TIS-B), and other related data and
broadcasts it to ForeFlight Mobile via a WiFi network.
Stratus is also an attitude heading reference system (AHRS) and ight
data recorder. See page 13 for more information about these features.

3
PRODUCT REGISTRATION
Your Stratus will automatically be registered with the retailer at the time
of purchase – you do not need to perform additional steps to activate
the warranty. The Stratus Limited Warranty is valid one year after your
device is shipped from the retailer and is non-transferable.
OPTIONAL ACCESSORIES
Visit www.sportys.com/stratus or www.appareo.com/stratus for a list of
compatible Stratus accessories, including mounts, external antennas, and
chargers.
TURNING STRATUS ON OR OFF
Press the power button for a few seconds to turn on Stratus. All LED
indicators will briey illuminate red and then green as Stratus powers on.

4
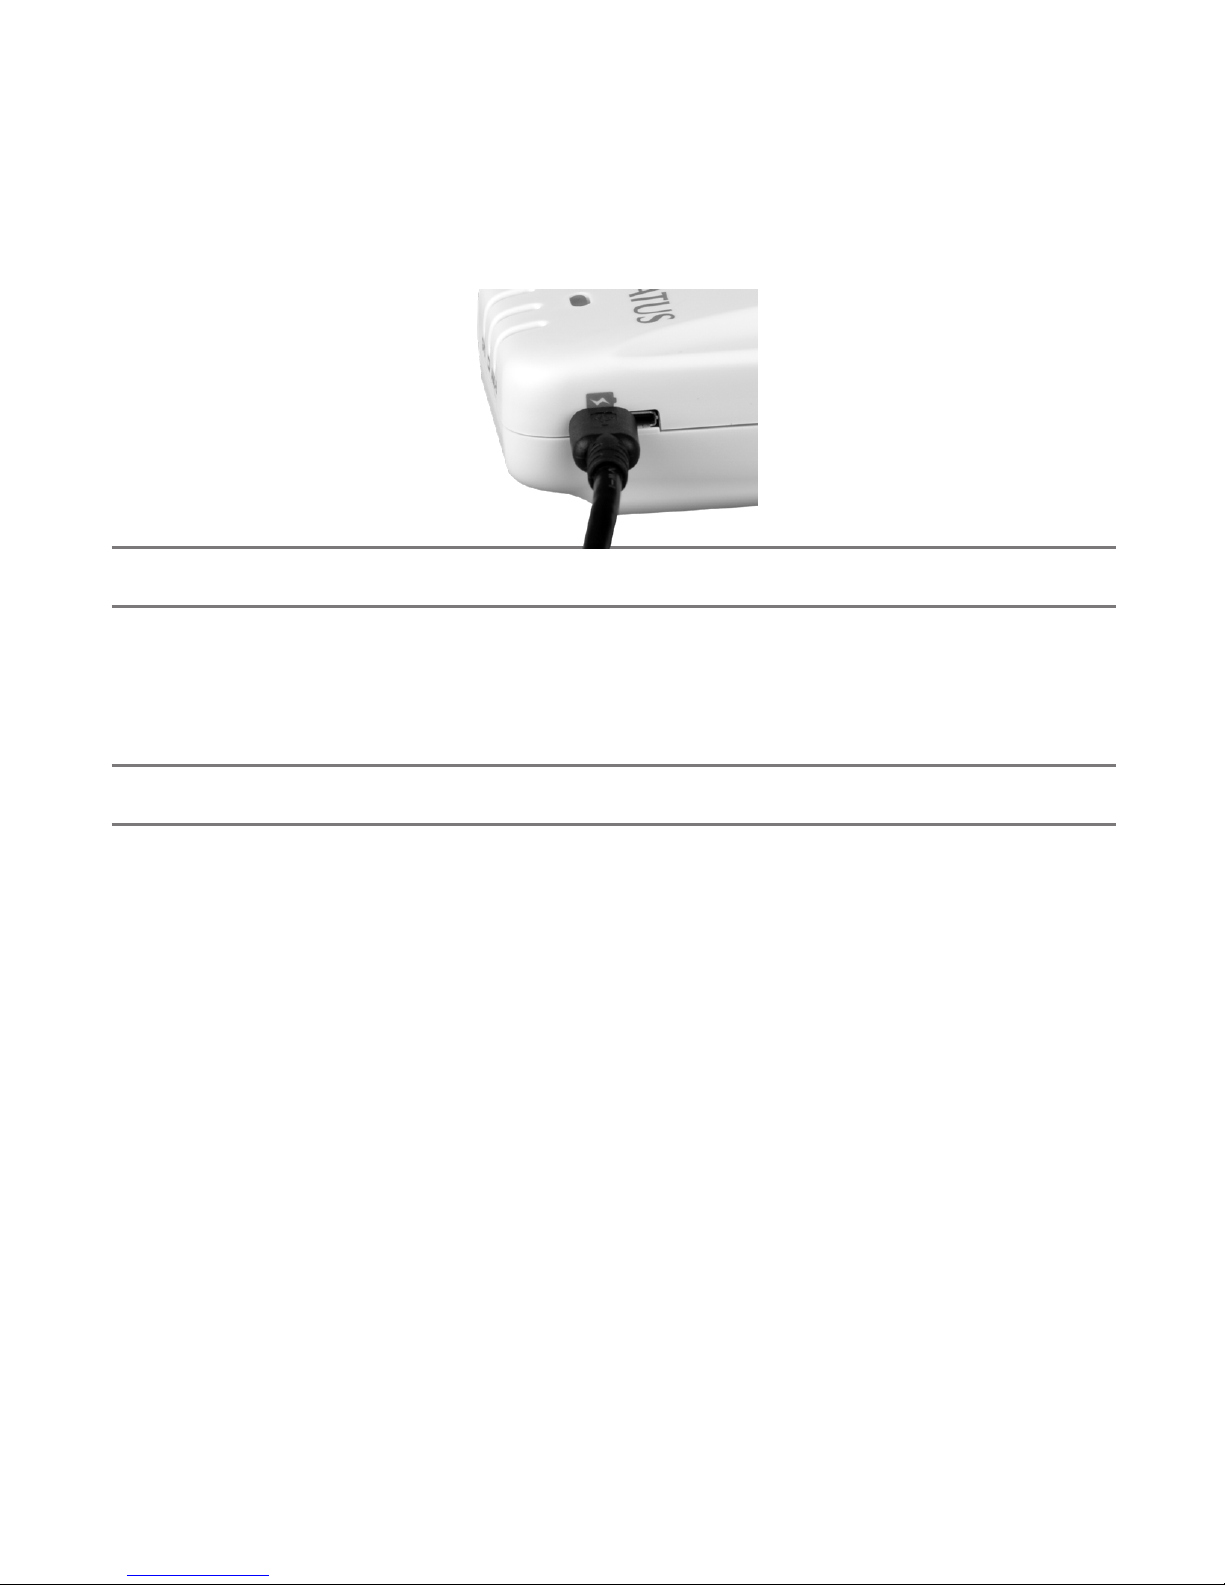
CHARGING THE BATTERY
Fully charge Stratus’s battery prior to rst use. To charge the battery:
1. Insert the USB plug of the charging cord into the wall charger’s port.
2. Plug the micro USB plug into Stratus’s charging port, as shown in the
graphic on page 5.
NOTE: The Stratus USB port contains two parts. Insert the charging
cable into the larger, left part of the port, which is marked with the
battery symbol.
3. Plug the wall charger into an electric wall outlet. When connected to
an external power source, the Stratus Power LED will ash on and off
once. Refer to the LED Indicator table on page 10 to determine when
the battery is fully charged.
NOTE: You may check the battery’s current charge level from the Stratus
Status page. See page 14 for more information.
WARNING: Use of non-approved battery chargers may result in
decreased battery performance, permanent damage to the USB port, and/
or inoperability of Stratus, and voids the warranty. Stratus requires a 2.0
amp charger.
5
USING BATTERY POWER
If Stratus is not connected to an external power adapter, such as a wall
charger or vehicle power adapter, it will automatically draw power from its
internal battery.
POWER OPTION SETTINGS
You may select how Stratus is powered on: automatically whenever the
device receives power, or only when the power button is pushed. This
setting may be changed by dragging the “Turn on When Powered” switch
in the ForeFlight Mobile Stratus Status to ON. For more information about
the Stratus Status Page, see page 14.
NOTE: If Stratus is set to automatically power on and external power
is removed, it will power off within two minutes if the aircraft is traveling
under 5 knots. If the aircraft is traveling faster than 5 knots, Stratus will
not power down and will draw from the battery power. To override the
automatic power-off, press the power button after removing power.

6
PLACING STRATUS IN AIRCRAFT
The snap-in mount secures Stratus to its mounting location during ight.
To place the mount in the aircraft:
1. Remove the protector sheet from the gel base of the snap-in mount.
2. Place the gel base of the snap-in mount onto the aircraft’s glare shield.
Stratus should be mounted perpendicular to the back of the aircraft
to ensure accurate AHRS data. It should also be placed as close as
practical to the pilot and copilot seats to help prevent overheating.
3. Lay Stratus in the snap-in mount so that it is leaning against the longer
arm of the mount’s cradle. The LEDs and Stratus logo should face the
back of the aircraft. If Stratus is facing the wrong direction, AHRS data
will be incorrect and the chance of overheating will be signicantly
increased.
NOTE: Refer to the graphic on the bottom of Stratus for the correct
mounting alignment with the aircraft.
4. Press on the top of the Stratus until the device snaps into place in the
cradle, as shown in the gure on the following page.
NOTE: An optional suction cup mount is available from your Stratus
retailer. This mount may improve the internal antenna’s ADS-B reception
and provides an option for mounting Stratus off the glare shield.
 Loading...