

Sportsstuff 54-1558, 54-1552, 54-1553 Owner's Manual

HOME SPA
OWNER'S MANUAL
Important information is enclosed in this manual. Please read these materials
prior to assembling and using this product. Keep for future reference.
For questions on assembly, parts or warranty, contact the experts at
Sportsstuff. DO NOT RETURN this product to the store!
Contact us TOLL FREE: 888-814-8833 (USA) (8am-5pm, CST Monday-Friday)
Congratulations on your new purchase! Sportsstuff prides itself in making the most
innovative inflatable products on the planet. Your high performance inflatable is
designed to provide a refreshing and relaxing experience for the whole family.
(Product model shown may differ slightly from actual unit)
WARNING
To lessen your risk of serious injury or death, follow these rules:
IMPORTANT SAFETY INSTRUCTIONS
READ AND FOLLOW ALL
INSTRUCTIONS
• WARNING - Always use a locked protective cover when the spa is not in use and
keep young children away from spas or hot tubs unless there is constant adult
supervision.
WARNING - Make sure the spa has the drain covers required by current safety
•
standards.
WARNING - Regularly have a professional check your spa or hot tub and make sure it
•
is in good, safe working condition, and that drain covers are in place and not cracked
or missing. Check the drain covers yourself throughout the year.
WARNING - Do not use spas or hot tubs unless all water suction valve caps are
•
closed to prevent body and hair entrapment.
WARNING - Know where the cut-off switch for your pump is so you can turn it off in
•
an emergency.
WARNING - People with infectious diseases should not use a spa or hot tub.
•
•
WARNING - Do not use a spa or hot tub immediately following strenuous exercise.
WARNING - To avoid injury, exercise care when entering or exiting the spa or hot tub.
•
WARNING - Do not consume alcohol or other drugs while using this product.
•
WARNING - Limit use to 15 minutes at a time.
•
WARNING - Do not use the spa alone.
•
WARNING - During pregnancy, soaking in hot water may cause damage to the fetus.
•
Limit use to 10 minutes at a time. Consult your physician before using.
•
WARNING - Prevent drowning.
WARNING - To reduce the risk of injury:
•
A) The water in a spa should never exceed 40°C (104°F). Water temperatures
between 38°C (100°F) and 40°C are considered safe for a healthy adult. Lower
water temperatures are recommended for young children and when spa use
exceeds 10 minutes.
B) Since excessive water temperatures have a high potential for causing fetal
damage during the early months of pregnancy, pregnant or possibly pregnant
women should limit spa water temperatures to 38°C (100°F).
C) Before entering a spa, the user should measure the water temperature with
an accurate thermometer since the tolerance of water temperature-regulating
devices varies.
D) The use of alcohol, drugs, or medication before or during spa use may lead
to unconsciousness with the possibility of drowning.
E) Obese persons and persons with a history of heart disease, low or high
blood pressure, circulatory system problems, or diabetes should consult a
physician before using a spa.
F) Persons using medication should consult a physician before using a spa
since some medication may induce drowsiness while other medication may
affect heart rate, blood pressure, and circulation.
2
WARNING
To lessen your risk of serious injury or death, follow these rules:
• WARNING - Spa heat speeds up the effects of alcohol, drugs or medicine and can
cause unconsciousness. Immediately leave spa if uncomfortable or sleepy.
DANGER - Risk of Accidental Drowning. Extreme caution must be exercised to
•
prevent unauthorized access by children. To avoid accidents, ensure that children
cannot use this spa unless they are supervised at all times.
WARNING - Prevent child drowning.
•
WARNING - Water attracts children.
•
WARNING - Always attach a spa cover after each use.
•
WARNING - Never use an extension cord to plug the pump/filter system in to a power
•
source. Doing so could cause damage to the pump/filter system.
WARNING - Always operate spa at a sufficient water level. Water level must be above
•
intake hose inlet. Insufficient water level will cause failure of filter/pump system and
void warranty.
DANGER - Risk of Electric Shock. Do not permit electric appliances (such as light,
•
telephone, radio, television, hair dryer, etc.) within 5 feet (1.52 meters) of this spa.
DANGER - Risk of Electric Shock. Never operate any electrical appliance when in
•
your spa or hot tub or when your body is wet.
DANGER - Risk of Electric Shock. Insert the plug only into a properly grounded
•
socket.
WARNING - It is necessary to have the plug accessible after installation of the spa or
•
hot tub.
DANGER - Risk of Electric Shock. To avoid electric shock, do not use the spa when it
•
is raining.
DANGER - Risk of Injury. Do not bury cord. Locate cord to minimize abuse from
•
lawn mowers, hedge trimmers, and other equipment.
DANGER - Risk of Injury. Replace damaged cord immediately by the manufacturer, its
•
service agent, or similarly qualified persons.
DANGER - Risk of Electric Shock. Always use the cord mounted GFCI connected to
•
the pump/filter system. Do not use if GFCI is not functioning. Failure to do so may
result in a shock hazard.
WARNING - Maintain a proper water pH of 7.4-7.6. Failure to do so could cause
•
damage to the spa and pump/filter system and its components and will void warranty.
DANGER - Risk of Injury. Never pour water which is higher than 104°F (40°C) into the
•
spa directly.
WARNING - Please examine equipment before use. Notify customer service address
•
listed on this manual for any damaged or missing parts at the time of purchase. Do not
assemble or operate if there are damages or missing parts.
WARNING - Keep pets away from spa, sharp teeth or claws may damage spa.
•
WARNING - Install and use the spa only on surfaces that can withstand repeated
•
exposure to water. If located in a multi-level building, care must be taken to protect the
objects on the levels below.
WARNING - Consult an architect or engineer to determine if the floor you wish to
•
install the spa on can withstand the floor loading required of the spa if you have any
doubt.
WARNING - Do not open the pump/filter system or the cord mounted GFCI; doing so
•
will void the warranty.
WARNING - Always drain all water from spa, hoses and pump/filter unit before
•
storing. Damage caused by freezing is not covered under the product warranty.
WARNING - Always maintain proper water sanitation with routine cleaning and
•
chemical usage as outlined in the included owner’s manual. Refer to sections on water
chemistry and filter maintenance.
3
WARNING
To lessen your risk of serious injury or death, follow these rules:
• WARNING - Always add chemicals to water, never add water to chemicals. Adding
water to chemicals may cause strong fumes or violent reactions and hazardous
chemical spray.
WARNING - This product is NOT for use by children under 6 years of age.
•
WARNING - Never leave children unattended. Use only under competent supervision.
•
WARNING - Sportsstuff products are NOT to be used for rental use.
•
DANGER - Risk of Injury. Connect to a grounded, grounding type receptacle only.
•
WARNING - To reduce the risk of injury, do not permit children to use this product
•
unless they are closely supervised at all times.
DANGER - Risk of Injury. The suction fittings in this spa are sized to match the
•
specific water flow created by the pump. Should the need arise to replace the suction
fittings or the pump, be sure that the flow rates are compatible. Never operate spa if
the suction fittings are broken or missing. Never replace a suction fitting with one rated
less than the flow rate marked on the original suction fitting.
DANGER - Risk of Electric Shock. Install at least 5 feet (1.5 m) from all metal
•
surfaces.
WARNING - Hyperthermia occurs when the internal temperature of the body reaches
•
a level several degrees above the normal body temperature of 98.6°F. The symptoms
of hyperthermia include an increase in the internal temperature of the body, dizziness,
lethargy, drowsiness, and fainting. The effects of hyperthermia include failure to
perceive heat; failure to recognize the need to exit the spa; and unconsciousness
resulting in the danger of drowning. WARNING - The use of alcohol, drugs, or
medication can greatly increase the the risk of fatal hyperthermia.
SAVE THESE INSTRUCTIONS
RELEASE OF LIABILITY:
By assembling and inflating this product, you agree that you have read and understand
the entire Sportsstuff’s product manual, including all instructions and warnings
contained in that material prior to using this product. You additionally agree that you
will ensure any additional or subsequent users of this product will read and understand
the entire owner’s manual. Misuse or improper use of this product could result in risks,
dangers and hazards which may result in serious injury or death. The risks and dangers
that may be encountered through the improper
reading and following the warning
proper use of this product. Your assembly and use of this product shall be evidence of
your agreement, to the fullest extent permitted by law, to properly follow the
instructions and abide by the warnings set forth within the product manual.
assembly and use of this product shall also constitute a release, to the extent permitted
by law, by you and by any third party permitted by you to use, in any manner, this
product, to Sportsstuff from any and all liability for any loss, damage, injury and/or
expense that you or any user of this product may suffer as a result of the use of this
product. This release shall extend to any loss, damage, injury or expense due to any
cause whatsoever, including negligence or breach of contract on the part
and/or any party participating in the design and/or manufacture
of this release shall be effective and binding upon you, your heirs, next of kin,
executors, administrators, assigns and representatives. Your assembly and use of this
product shall constitute your agreement to assume and accept any or all known or
unknown risks of injury to you and/or to third parties through the use of this product.
Sportsstuff and related parties have not made and hereby expressly deny any oral or
written representation and/or warranty, including warranty for a particular purpose,
other than what is set forth herein and in the Sportsstuff's owners manual.
guidelines listed within the owner's manual and by
4
use of this product can be avoided by
Your
of Sportsstuff
of this product. The terms

Product Name Model # Inflated Dimensions
Sportsstuff Home Spa Duo 54-1558 84 x 27.5in (210x65+cm)
Sportsstuff Home Spa 54-1552 84 x 27.5in (210x65+cm)
BioTech Home Spa 54-1553 84 x 27.5in (210x65+cm)
Qty Description of Part
1 Protective cover (zippered) (Fig 1)
1 Protective cover support (Fig 1)
1 Spa Body (Fig 1)
1 Protective Cover Lock (In bag attached to cover zipper) (Fig 1a)
1 Pump/Filter/Heater Unit (Fig 1b)
1 Inflation Hose (with nozzle at one end) (Fig 1c)
1 Hose Fitting Wrench (Fig 1d)
1 Drain Plug Cap (Fig 1e)
1 Pump Filter Cover (Fig 1f)
1 Filter Cartridge (Fig 1g)
1 GFCI Plug (Fig 1h)
Speed Safety Valve - A hybrid valve utilizing the best of both the
Oversized Safety Valve and the Speed Valve. Pulls out for fast
inflation/deflation, then can be pushed in flush with the tube.
Secure the valve by firmly fastening the bottom portion of the
valve into the base. To inflate, open cap or top portion of the
valve. Using the hose from your inflator, inflate through the top
Fig 1i
Protective Cover
Support
opening of the valve.
Fig 1a
Fig 1b
Protective Cover
Cover Lock
Pump/Filter/Heater
Fig 1
Fig 1e
Drain Plug
Pump/Filter Cover
Fig 1f
Filter Cartridge
Fig 1g
Spa Body
Inflation Hose
Fig 1c
Hose Fitting Wrench
Fig 1d
GFCI Plug
Fig 1h
5
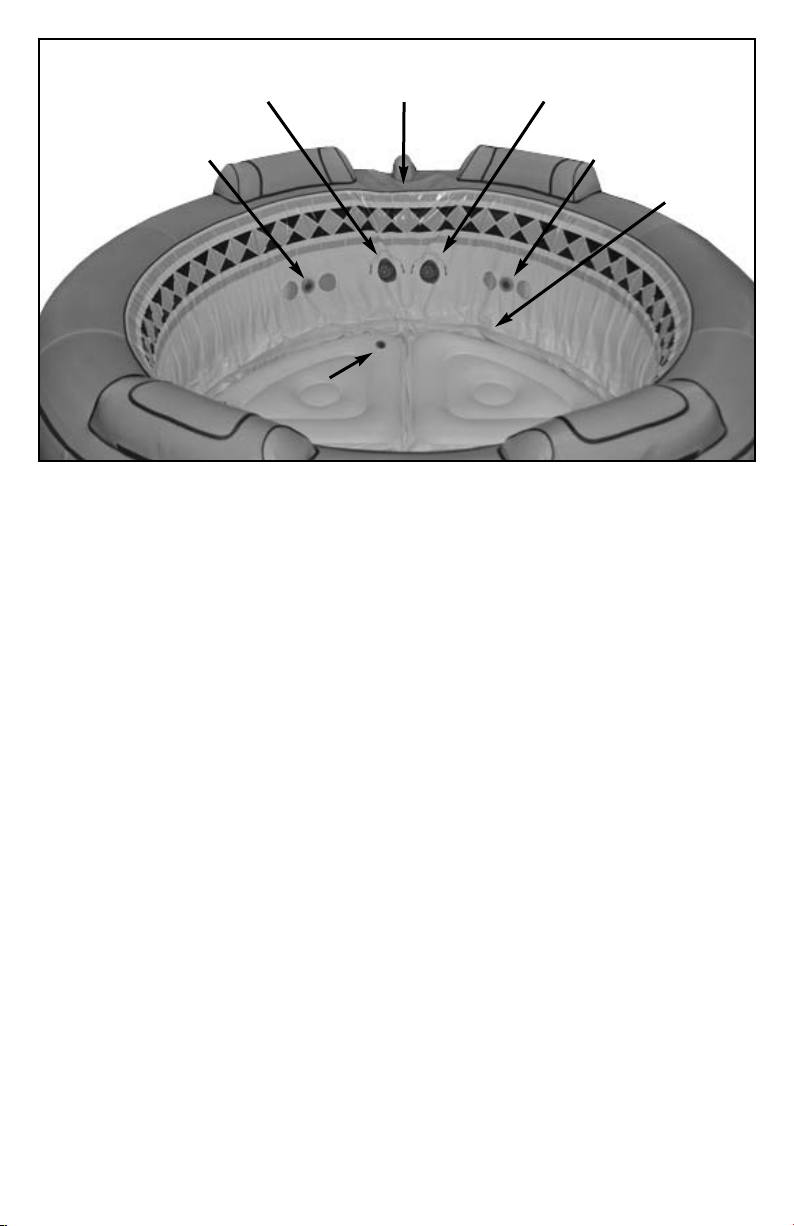
Pump/Filter Inlet
Bubbler Hose
Pump/Filter Outlet
Massage Jet Outlet
Floor Valve
Bubbler Floor
Fig 2
Massage Jet Outlet
Drain Valve
ASSEMBLY AND INSTALLATION:
SITE PREPARATION
1. Your spa should always be installed on a structurally sound, relatively smooth and
level surface.
2. Your spa should be connected to a grounded out
let within eight feet of the spa.
3. Make sure that there are no sharp objects under the spa.
INDOOR INSTALLATION:
Take special consideration to the following issues when installing your spa indoors.
1. Make sure the floor can support the total spa filled weight of 1500lbs.
2. Install your spa on a water resistant, non-slip floor. The floor should have a drain to
remove water splashed from the spa. Do not install the spa on carpet or other material
that will be damaged by moisture.
3. Allow enough clearance around the spa for full access to the spa equipment for
service.
4. Avoid installing the spa indoors on a second story above finished living space due to
the possibility of water and humidity damage.
5. Take into consideration the room humidity which will exist due to high temperatures.
Providing ventilation in the room will help maintain comfort and minimize moisture
damage to the surrounding environment.
OUTDOOR INSTALLATION:
You may install your spa on any smooth, level surface that is strong enough to support
the filled unit. The following considerations must be taken when installing your spa
outdoors.
1. Check local code requirements for restrictions such as fencing, enclosures,
childproof gates, etc.
2. Verify that there is adequate room to place the spa and permit safe access.
3. Do not install the spa on grass or dirt, as this will greatly increase the amount of
debris entering the spa. An 8’x8’ stone or solid wood surface, 5 to 9 inches in height is
recommended.
4. Take into consideration the positioning of the Spa for draining purposes.
6
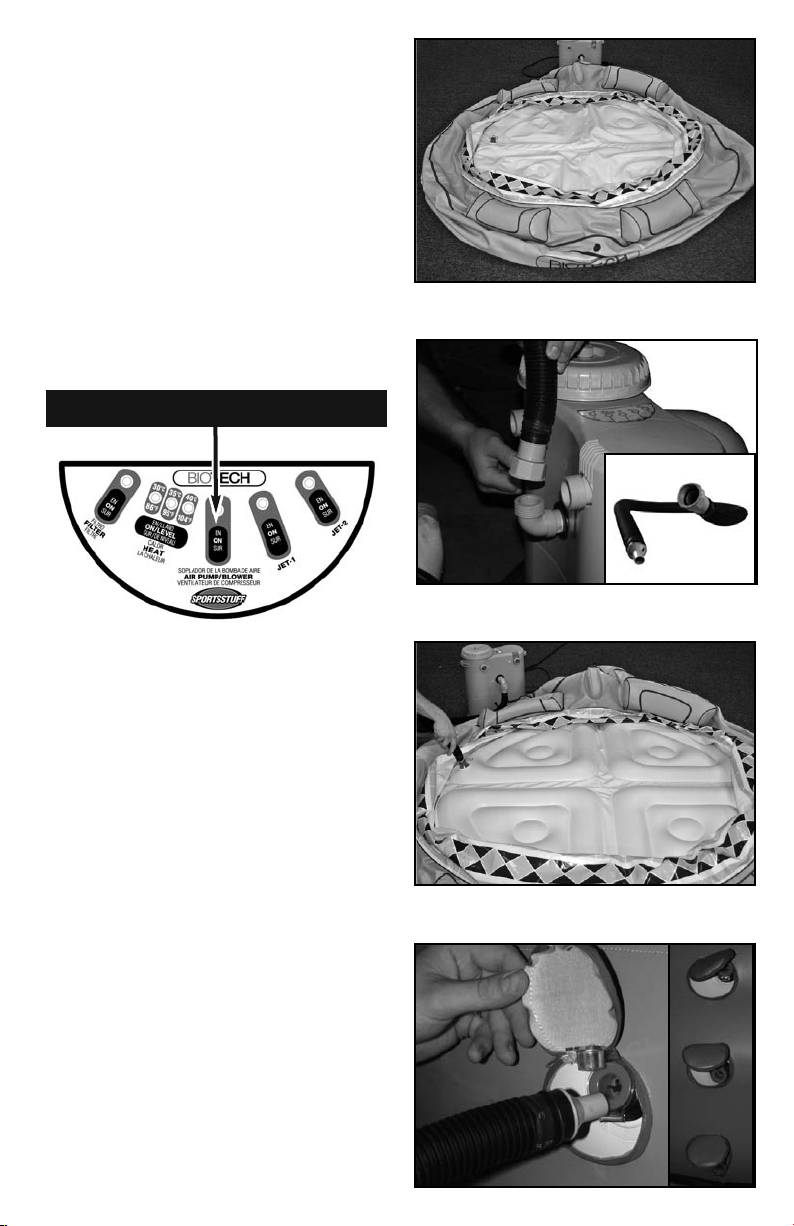
SPA ASSEMBLY:
1. Unfold the spa to lay flat. (Fig 3)
2. Plug in the filter pump to a grounded
outlet.
3. Connect the inflation hose to the center
hose connection on the Pump/Filter (Fig 4),
and press the air pump/blower button to
begin inflation (Fig 5).
Turn on air by pressing the center button on the
Pump/Filter control panel
Fig 5
NOTE: THE PUMP/FILTER UNIT WILL
MAKE A RATTLING NOISE WHILE THE
PUMP IS RUNNING WITH NO WATER.
THIS IS NOT A DEFECT. DO NOT RUN
THE UNIT WITHOUT WATER FOR MORE
THAN 15 MINUTES.
NOTE: INFLATION VALVES ARE
NUMBERED ON ITEM IN ORDER OF
INFLATION.
Fig 3
Inflation Hose
Fig 4
4. Locate floor valve. Using the air hose,
inflate until firm. Close valve completely
(Fig 6).
5. Inflate the three outer chambers in
numerical order, until they are firm and the
cover is wrinkle free and taut, starting with
the lowest valve, and working up (Fig 7).
Fig 6
Fig 7
4
3
2
7
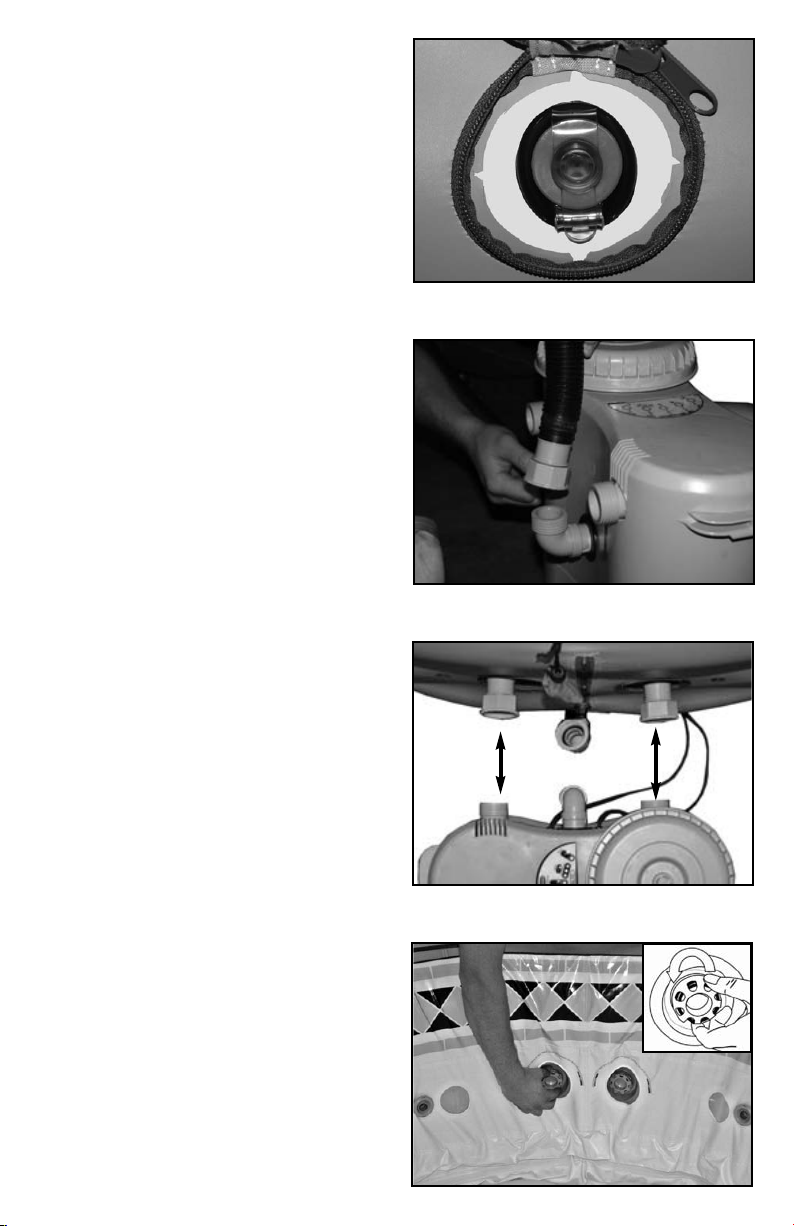
6. Check the fit of the outer cover on the
spa as you inflate the bladders, the
openings in the side of the cover should be
centered on all valves, and filter pump
connections (Fig 8). If not, let some air out
of the side tubes and adjust the cover to
center the inflation valves in the openings.
7. Close valves completely. Close zippers
on valve covers.
8. Inflate headrests and close zippers.
9. Detach inflation hose from pump unit
and replace with the bubbler hose located
on the back of the spa, being careful not to
cross-thread the fitting. Hand tighten the
nut. Use the Hose Fitting Wrench (Fig 1d)
if needed.
Fig 8
Fig 9
10. Line up the hose connections on the
back of the pump with the fittings on the
side of the spa (Fig 10).
11. Attach the hoses from the large fittings
on the back of the pump to the
corresponding fittings on the spa, being
careful not to cross-thread them. Hand
tighten the nut. Use the Hose Fitting
Wrench (Fig 1d) if needed.
12. Make sure that the filter pump inlet and
outlet are opened by turning the nozzles
counter clockwise (Fig 11).
NOTE: AFTER INFLATING THE SPA,
UNPLUG THE FILTER PUMP FROM THE
ELECTRICAL OUTLET BEFORE FILLING
WITH WATER.
8
Fig 10
Fig 11
C
A
B
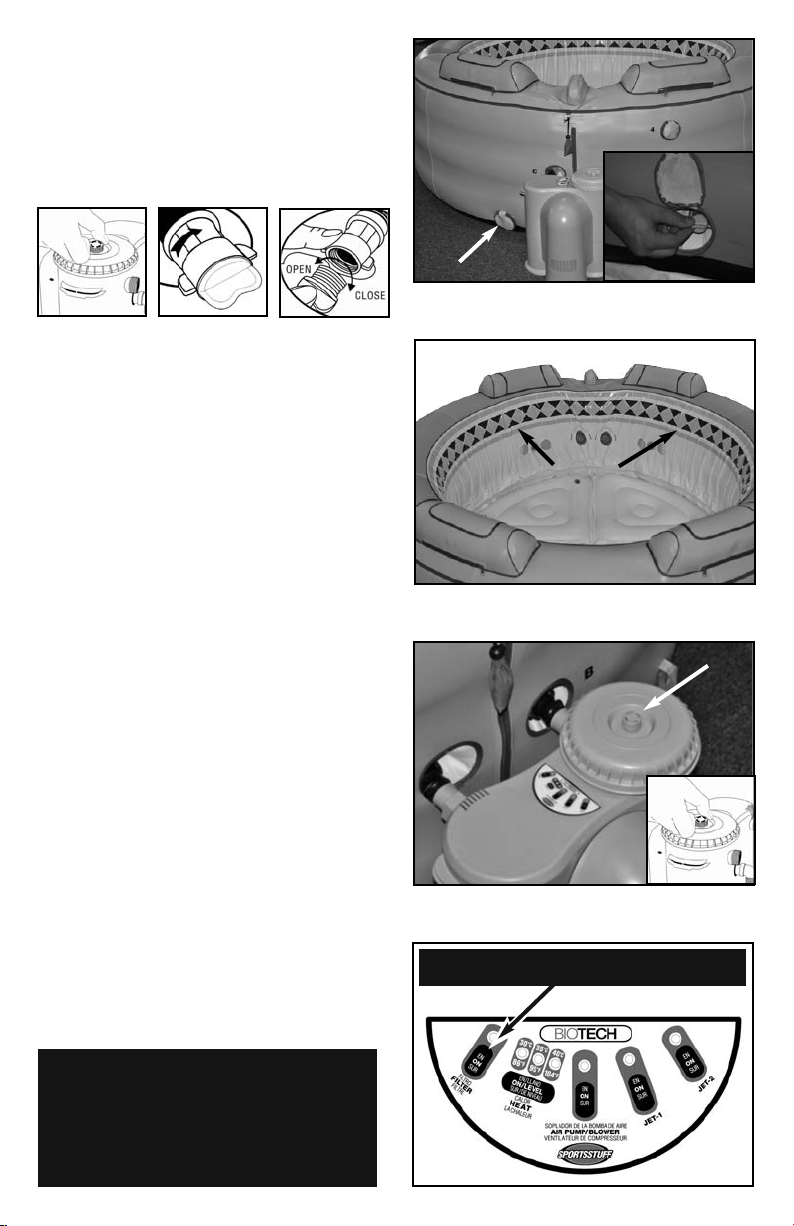
FILLING THE SPA:
1. Make sure that Pump/Filter covers are
closed (Fig 12a). Locate the drain (Fig 12)
and make sure that both the inner valve
(Fig 12b), and drain plug (Fig 12c) are
closed.
Fig 12a Fig 12b Fig 12c
2. Using a garden hose, fill the spa to the
bottom of the tile design (Fig 13). Be
careful not to over fill the spa, or it may
overflow during use. Each average adult
will raise the water level in the spa
approximately two inches, and the blower
action will raise the water level an
additional three to four inches.
3. Bleed the air from the pump/filter by
turning the air bleed valve on the top of the
pump/filter cover (Fig 14) counterclockwise. Allow the filter tank to bleed for
approximately one minute, or until water
drips from the fitting. Turn the fitting
clockwise to close the bleed valve.
Drain
Fig 12
Fill Line
Fig 13
Air Bleed Valve
4. Plug the filter pump into the electrical
outlet. Press the “Filter On” button located
on the Pump/Filter control panel (Fig 15)
The pump will turn on and begin pumping
water. Water should flow from the small
pump/filter outlet on the middle inside wall
to the right of the bubbler hose (Fig 2). If
water is not flowing from the pump/filter
outlet, repeat the air bleeding instructions
provided in step 3, and make sure the inlet
and outlet nozzles are open (Fig 11).
NOTE: UNPLUG THE PUMP/FILTER
WHILE BLEEDING AIR.
NOTE: If the air is not properly bled from the
pump/filter, the water pump will be air bound
and no water will flow. This will prevent the spa
from heating, and the water will not be filtered.
Make sure that water is flowing from the
pump/filter outlet before continuing.
Fig 14
Turn on filter by pressing the “Filter ON” button
on the Pump/Filter control panel
Fig 15
9
5. Select the desired heat level and place the
cover support and the protective cover over
the spa and seal until the water reaches the
desired temperature.
Select heat level by pressing the “HEAT ON/LEVEL”
button on the Pump/Filter control panel
Fig 17
NOTE: WHEN USING IN TEMPERATURES
UNDER 32°F HEATER MUST BE
RUNNING AT ALL TIMES.
Fig 16
WARNING: ALWAYS SUPERVISE CHILDREN AROUND BODIES OF WATER.
THE SPA COVER IS NOT A SUBSTITUTE FOR ADULT SUPERVISION.
11
44
33
HEAT ON / LEVEL
LOW - 86°F / 30°C
MED - 95°F / 35°C
HIGH - 104°F / 40°C
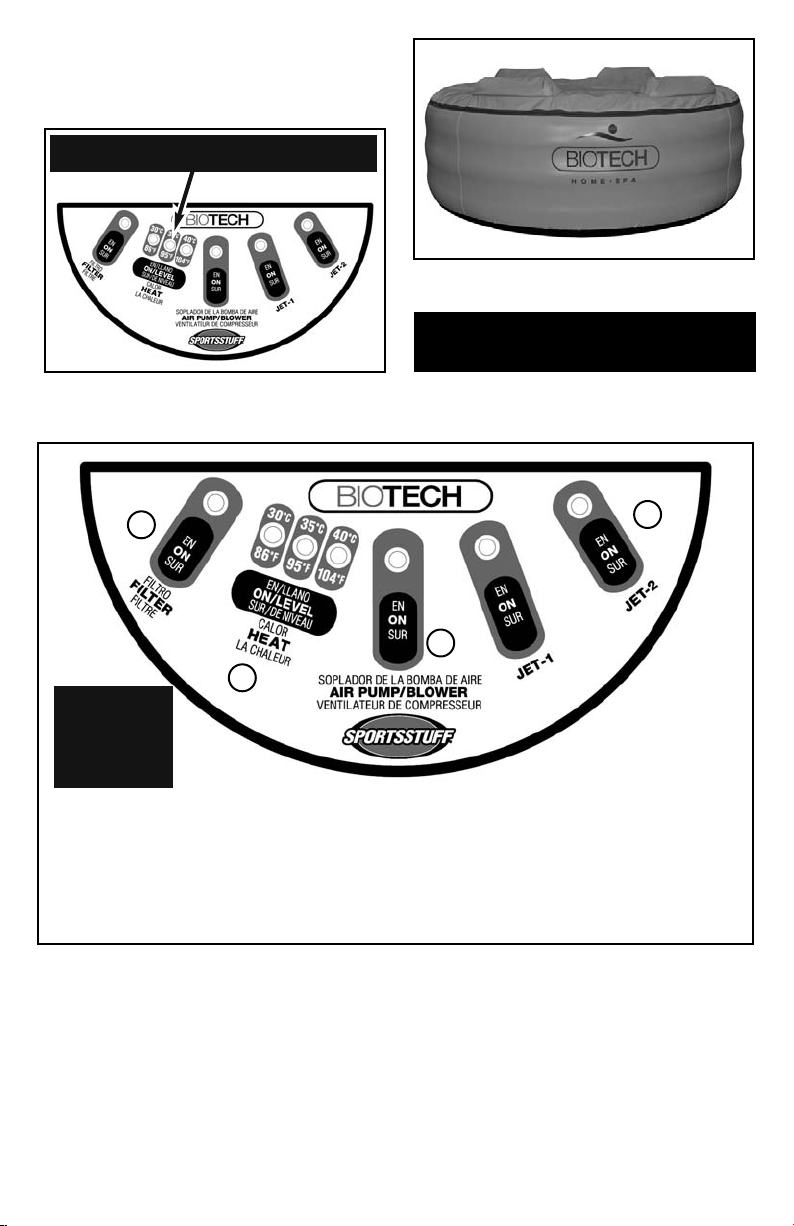
CONTROL PANEL OPERATION
1. FILTER ON/OFF - Turns filter unit on/off. Circulates and filters water.
2. HEAT ON/LEVEL - Turns heat on/off, as well as regulates heat level
(Low, Medium, High).
3. AIR PUMP/BLOWER - Turns on bubbler floor. Note: Filter feature must be
turned off before bubbler floor will function.
4. JETS - Turns massaging jets on/off.
MAINTENANCE
Very little care is required for the bladder or cover.
• You may clean your spa using soap and water or mild detergent.
• Never use strong cleaning agents.
• The Spa, when clean and dry, can be deflated and stored in a cool, dry area out of
direct sunlight.
• To deflate, simply open all inflation valves after draining water.
• Avoid storing this product in areas of extreme temperatures and please take
precautions against animals and rodents.
• Remove and clean the filter twice a month, or more often if necessary. Replace as
needed.
22
(Product model shown may differ from actual unit)
Note: Filter must be turned on for heat to function.
Fig 18
10
DRAINING THE SPA:
NOTE: SURFACE MUST HAVE A FLOOR
DRAIN OR SUITABLE OUTLET FOR
DRAINED WATER BEFORE DRAINING.
1. Turn off the Filter/Pump, and unplug the
GFCI plug from the outlet.
2. Close the water inlet/outlet valve located
on the inside wall of spa by turning both
valves clockwise (Fig A)
Fig A
3. Detach hoses from the fittings on the
back of the Filter/Pump from the
corresponding fitting on the spa.
4. Locate the drain and make sure that the
inner valve is closed by turning it clockwise
until finger tight. (Fig 20a)
5. Slowly open and remove the drain plug
by turning it in a counter-clockwise
direction. (Fig 20b)
Drain
Fig 19
Fig 20a
NOTE: IF WATER STARTS TO LEAK, THE
INNER VALVE IS OPEN AND NEEDS TO
BE SHUT BEFORE CONTINUING.
6. Attach a standard garden hose in place
of the drain plug. Make sure that the hose
is long enough to reach a suitable outlet
before draining (Fig 20c).
7. Open the inner valve by turning it
counter-clockwise (Fig 20d). This will start
the flow of water.
8.Allow spa to drain. Once all water has
been removed, tip spa onto the side of the
drain to empty out all remaining water.
9. Once drained, lay spa out to dry. Store
in a cool, dry location.
Fig 20b
Fig 20c
Fig 20d
11

MAIN POWER UNIT OPERATION
TESTING THE GFCI PLUG:
WARNING – RISK OF ELECTRIC SHOCK. The GFCI plug must be tested before
each use.
WARNING – If the GFCI plug does not function properly, do not use your spa.
Call the dealer or factory immediately for instructions. Do not bypass the GFCI
plug.
WARNING – Before inserting the power cord into a power outlet, make sure the
current rate of the power is suitable for the Main Power Unit.
WARNING – Do not use extension cords.
1. Insert the plug of the power cord into the power outlet.
2. Press the RESET button on the GFCI.
3. Turn on the massage air blower.
4. Push the TEST button on the GFCI located at the end of the power cord. The GFCI
light should go out and the massage air blower should shut off. If the GFCI light does
not go out, and the massage air blower does not shut off, the GFCI is faulty. Do not
use the spa. Contact your dealer or the factory immediately for instructions.
5. Press the RESET button on the GFCI. The light on the GFCI should turn on. If the
GFCI light does not turn on, the GFCI is faulty. Do not use the spa. Contact your
dealer or the factory immediately for instructions.
12
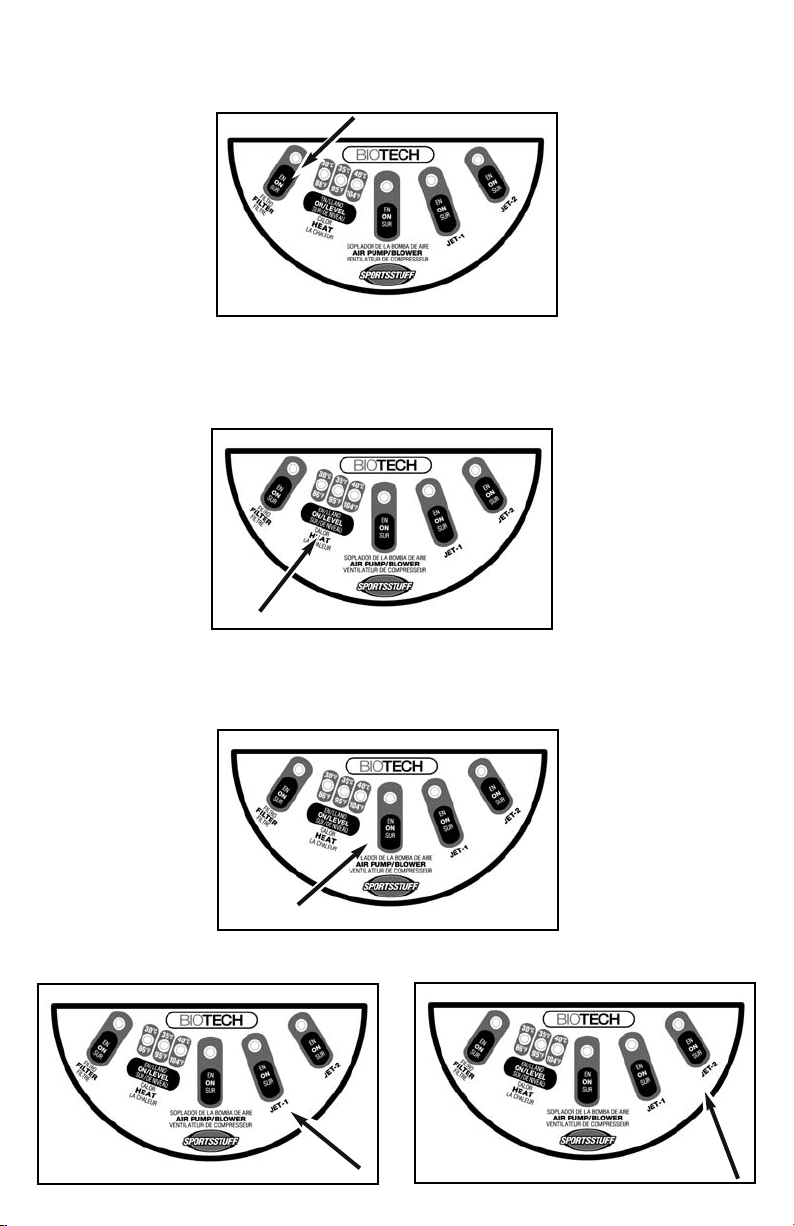
CONTROL PANEL OPERATION:
1. FILTER ON / OFF – Turns unit on / off. Circulates and filters water.
2. HEAT ON / LEVEL – Turns heat on, as well as regulates heat level. (Low = 86°F /
30°C, Medium = 95°F / 35°C, High = 104°F / 40°C)
on for heat to function. NOTE: WHEN USING IN TEMPERATURES UNDER
32°F HEATER MUST BE RUNNING AT ALL TIMES.
Note: Filter must be turned
3. AIR PUMP / BLOWER – Turns on the massage air blower. The massage air
blower will automatically shut off after 30 minutes of operation. Turn on again as
needed. Note: Filter feature must be turned off before massage air blower
will function.
4. JETS – Turns massaging jets on / off.
13

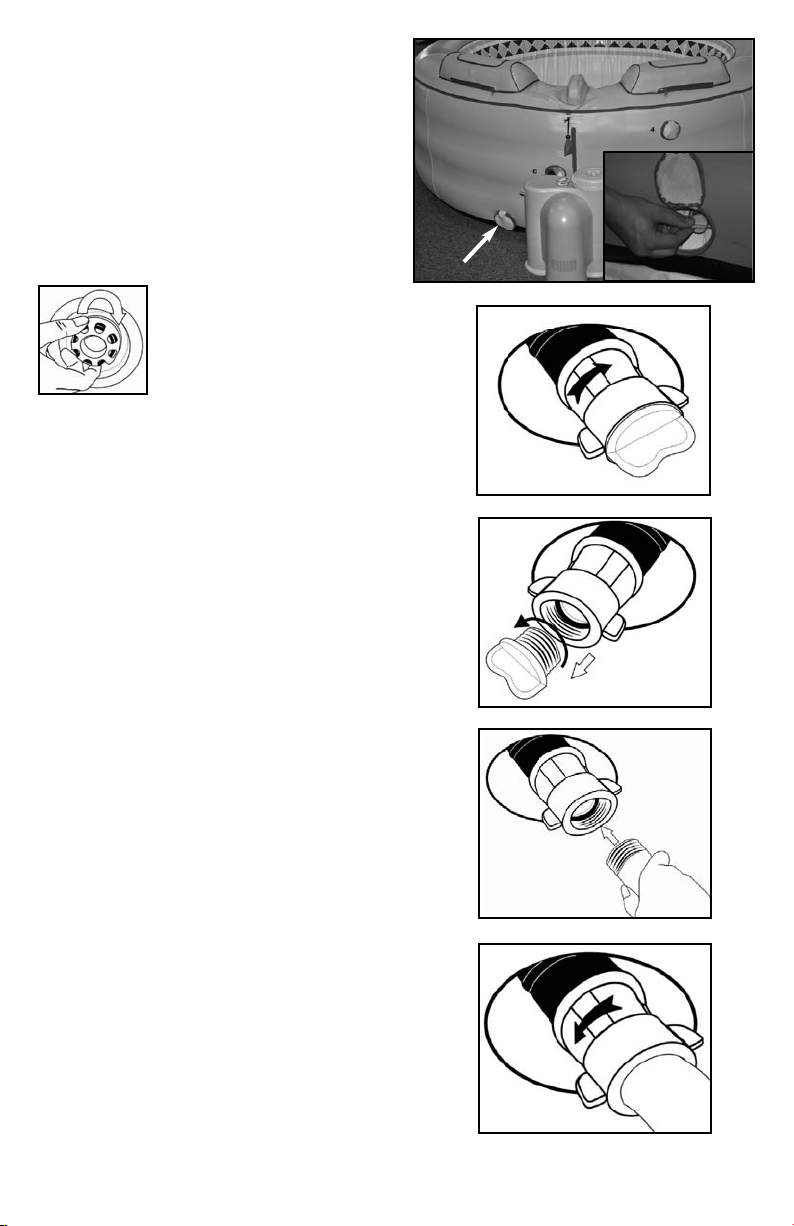
CLEANING THE FILTER:
1. Unplug the Main Power Unit from the electrical outlet.
2. Close the water inlet and outlet valve located on the inside wall of the spa by
turning both valves clockwise.
3. Open the Air Purge Valve on the top of the Main Power Unit.
4. Unscrew the Pump / Filter Cover.
5. Lift the Filter Cartridge out of the filter housing. Clean the filter with high
pressure water source.
6. Place the Filter Cartridge back into the filter housing. Make sure the Filter
Cartridge is properly seated in the housing and that the Pump / Filter Cover Seal is
properly seated in the groove.
7. Install the Pump / Filter Cover back on the Main Power Unit.
8. Open the water inlet and outlet valve located on the inside wall of the spa by
turning both valves counter-clockwise.
9. Open the Air Purge Valve on the top of the Main Power Unit.
10. Allow the filter tank to bleed air for approximately one minute, or until water
drips from the fitting. Turn the fitting clockwise to close the bleed valve.
11. Plug the Main Power Unit into the electrical outlet.
12. Turn on filter and heater.
CLEANING THE SPA INTERIOR AND EXTERIOR:
1. You may clean your spa using soap and water or mild detergent.
2. Never use strong cleaning agents.
3. The spa, when clean and dry, can be deflated and stored in a cool, dry area out
of direct sunlight.
4. To deflate, simply open all inflation valves, after draining water.
5. Avoid storing the spa in areas of extreme temperatures and please take
precautions against animals and rodents.
6. Remove and clean the filter twice a month, or more often if necessary. Replace
as needed.
14

NO HEAT
1. Dirty filter: Clean the filter per the instructions provided in the Maintenance
section of this manual. The filter should be replaced every two months. If the filter
is more than two months old, replace it. After cleaning or replacing the filter, cover
the spa, turn the temperature set point to ‘High’, and leave the spa for 24 hours. If
the spa still will not heat, contact the manufacturer for instructions.
2. No circulation, water pump is air bound: Unplug the Main Power Unit from the
electrical outlet. Bleed air from the filter tank by turning the bleed fitting on the top
of the filter tank counter-clockwise. After one minute, or when water drips from the
fitting, close the bleed fitting and plug in. Make sure that the filter pump inlet and
outlet, located on the inner side wall of the spa, are opened by turning the nozzles
counter-clockwise and on some models, remove the outlet valve cover as well.
And if the water pump becomes air bound again, check the Pump / Filter Cover
Seal on the top of the filter tank. Refer to the filter changing instructions in the
Maintenance section of this manual. Replace the Pump / Filter Cover Seal if
necessary. If the water pump still does not pump water, contact the manufacturer
for instructions.
3. Faulty Main Power Unit: Ensure power is available to the spa. Check the circuit
breaker at the main electrical panel. Connect another electrical appliance to the
plug used for the spa. If power is available to the spa, test the GFCI using the
instructions supplied in the Maintenance section. If the GFCI is working properly
and the Main Power Unit does not function, the Main Power Unit is defective. If the
GFCI is not working properly, do not use the spa. Contact the manufacturer
immediately for instructions.
4. Thermostat Malfunction: A thermostat malfunction will cause the heating coil in
the filter/pump unit to overheat, at which time it will automatically shut down until it
cools off. If the internal thermostat malfunctions, the three heat level lights on the
pump/filter control panel will start to flash simultaneously. The lights will continue
to flash until the heating coil has cooled down enough to be turned back on. Once
the lights stop flashing, press the manual reset button on the side of the pump/filter
unit. Next, press the FILTER ON button, followed by the HEAT ON/LEVEL button on
the pump/filter control panel. This will manually reset the thermostat and allow you
to continue normal use.
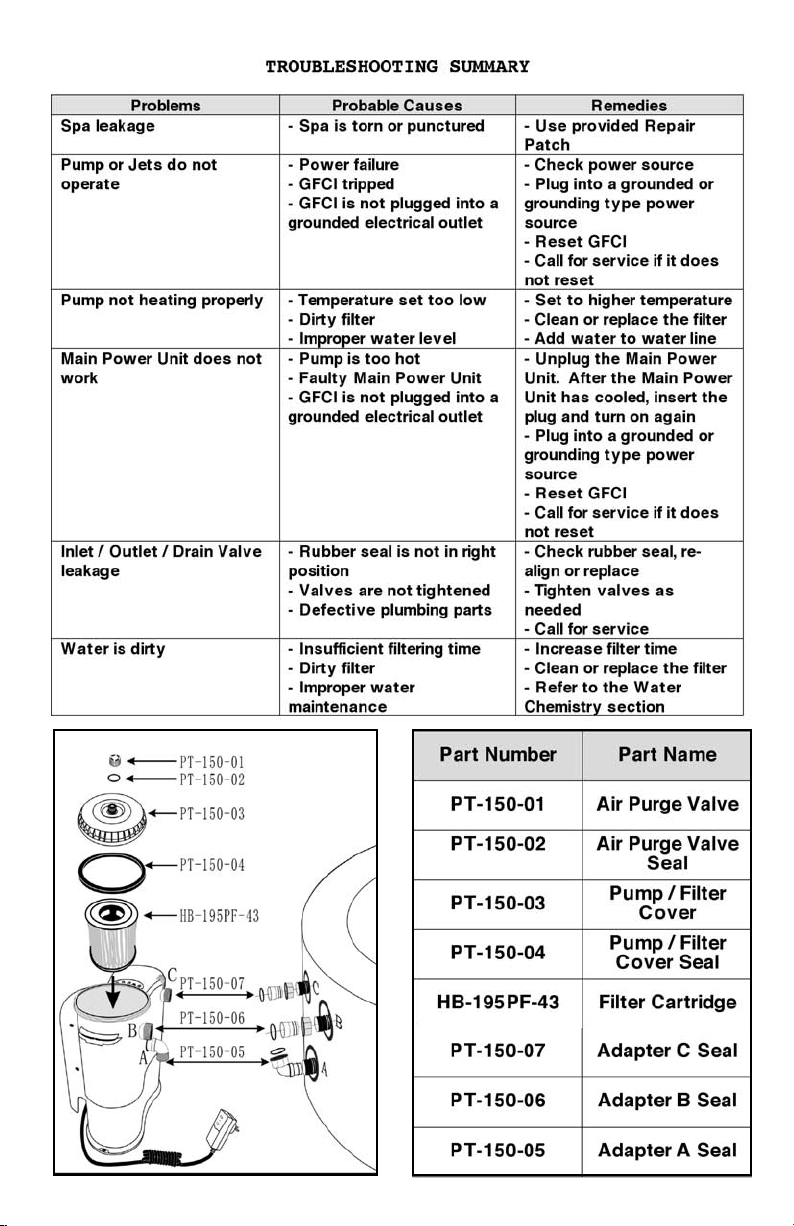
LEAKS:
1. Blower connection is leaking: If the blower connection between the spa and the
Main Power Unit is leaking, ensure the Adapter A Seal inside the fitting is in place
and undamaged.
2. The water inlet / outlet connections between the Main Power Unit and the spa
are leaking: Ensure the Adapter B and C Seal inside each of these fittings is still in
place and undamaged.
3. Water drain valve is leaking: Make sure valve is turned off, by turning clockwise
and ensure the o-ring inside the fitting is in place and undamaged.
15
16

RECOMMENDED WATER CHEMISTRY
Purchase a water test kit from your dealer, and follow the directions pertaining to the
kit. Test the water chemistry after each use of the spa, or no less than once a week.
AVOID A LOW pH. Low pH will cause wrinkles to form in the vinyl, may damage the
heater, AND WILL VOID YOUR WARRANTY. The following are the recommended water
CHEMISTRY ranges for your spa.
Ph........................................................7.4 - 7.6
Total alkalinity.............................80 - 120 ppm
Calcium hardness.....................150 - 250 ppm
Bromine residual...............................2 - 3 ppm
Total dissolved solids............below 1500 ppm
REPLACING PRODUCT PARTS:
If a leak or problem is suspected with your tube, locate the valves, deflate the item and
remove the inflatable PVC bladder to inspect possible problem areas. Contact
Sportsstuff warranty department for prompt parts replacement if a problem is located.
For non-warranty parts replacement, follow the same procedure. When a replacement is
received, follow the steps below:
1. Unfold the cover and lay the bladder out.
2. Locate the bladder and the inflation valve. Carefully place the PVC bladder inside the
cover of the product in the appropriate location.
3. Line up the valve with the valve opening in the cover.
4. Follow ASSEMBLY AND INSTALLATION steps.
WARRANTY POLICY:
Sportsstuff warrants, to the original purchaser only, that their high performance
products, when used for normal recreational purposes, are free from defects in material
and workmanship for a period of ninety (90) days from the date of purchase. This
warranty does NOT cover: products for rental, for hire and other uses not considered
for normal recreational purposes; nor punctures, cuts, abrasions in normal use. For
prompt parts replacement or warranty issues, contact Sportsstuff directly at 888-814-
8833. Replacement parts are shipped within 48 hours of notification Monday through
Friday. Do not return to your dealer (USA ONLY). This warranty is only valid in the USA.
If you have any questions about any Sportsstuff, Inc. product, replacement parts or
locating a dealer in your area, contact us at:
Sportsstuff Inc.
11213 E Circle Suite A
Omaha, NE 68137
Toll Free: 888-814-8833
Tel: 402-592-9085
Fax: 402-592-1354
E-mail: customercare@sportsstuff.com
Warranty registration is available on-line at:
Prior authorization is required for returned merchandise. No credit will be given for a
product that is sent back without prior authorization from Sportsstuff, Inc. After
receiving an authorization number, please ship returned products to the following
address:
Sportsstuff, Inc. Return Center
11213 E Circle, Suite A
Omaha, NE 68137
(Please label package with RA #)
http://www.sportsstuff.com
17
 Loading...