

Page 1

MY 1ST PLAYHOUSE
ASSEMBLY, INSTALLATION, CARE, MAINTENANCE AND USE
INSTRUCTONS
Assembly Size: 136 x 97 x 152cm
!
WARNING
Carefully read and understand the entire manual before assembling and using this
product.
This product is intended for use by children ages 3yrs+.
Do not allow more than 4 children to use the Wooden Playhouse at the same time.
Maximum user weight is 45kg, with combined weight not to exceed 180kg.
Assembly requires at least TWO adults.
Always inspect product thoroughly before each use.
PLEASE RETAIN THESE INSTRUCTIONS FOR FUTURE REFERENCE.
DO NOT RETURN PRODUCT TO THE STORE. FOR CUSTOMER SERVICE OR REPLACEMENT
PARTS, PLEASE CALL (+44) 0330 0904 420, or Email [email protected] or visit
www.sportspowerspares.com
Sportspower Ltd.
20/F, Parkview Centre, 7 Lau Li Street, Causeway Bay, Hong Kong
www.sportspowerltd.net.
WP-612R
Page 2

INTRODUCTION
Thank you for purchasing a Sportspower product! Please read and understand the contents of this
instruction manual. This manual contains specific safety instructions that must be followed to prevent
injuries and ensure proper maintenance.
This equipment is for residential use only. This product is NOT intended for public or commercial
use.The warranty will be voided if the product is used in a commercial application.
This product is intended for use by children ages 3yrs+. Children must NOT play on this set
until it is properly assembled and inspected by two adults. Adult supervision is required at all times
while children are playing on the equipment. Do not allow children under four (4) years old to be near
during the assembly of this product due to choking hazards of small parts.
The equipment must be installed on level ground.
Installation on sloping or uneven ground will put stress on the joints, causing the unit to become loose
and unstable which
(e.g. electrical wires, branches, house, fence, garage, etc) within two (2) meters from the equipment.
Please thoroughly read and follow the instructions in this manual to ensure proper and enjoyable play
for your children. The product must be checked before each use and maintained regularly. This includes,
but is not limited to inspecting the play set for cracks, excess wear, missing parts, loose connections and
for overall integrity. When the set shows any signs of weakness or damage you must stop using the
produ
ct immediately and properly store the set or restrict access by users until the condition is resolved.
may result in serious injuries.You must ensure there are no obstructions or structures
Uneven ground must be leveled prior to installation.
2
Page 3

IMPORTANT WARNINGS AND INSTRUCTIONS
IMPORTANTWARNINGS AND INSTRUCTIONS
Important–Please read these instructions thoroughlybefore assembly or use.
BEFORE YOU BEGIN:Carefully read all instructions in this manual before assembling and using
thisproduct.The unit must be assembled by adults. Heavy duty working gloves must be worn to avoid
injuries during assembly.
READ ALL INSTRUCTIONS BEFORE ASSEMBLING OR USING THIS EQUIPMENT
AGE LIMIT
This product is intended for use by children ages 3yrs+.
Maximum user weight is
Use by smaller children can result in entrapment and serious injury.
On-site adult supervision is required at all times for children of all ages.
Do not allow use by children with any physical condition that may affect his/her ability to use this
equipment safely.
IMPORTANT:
Children must NOT play on this set until it is properly assembled and inspected by an adult.
The product must be properly installed BEFORE by children use.
You MUST
product.
read and follow all instructions in this manual before installing or attempting to use this
45kg each with a combined maximum weight of 180kg.
Failure to follow these important requirements may result in the warranty being voided and/or serious
injury. Please supervise your children carefully during the installation and assembly of the product.
Please also pay close attention to the periodic maintenance that is required to keep your set in a safe
condition for maximum enjoyment of backyard fun!
3
Page 4

IMPORTANT WARNINGS AND INSTRUCTIONS
IMPORTANTWARNINGS AND INSTRUCTIONS
Important–Please read these instructions thoroughlybefore assembly or use.
BEFORE YOU BEGIN ASSEMBLY:
Take a complete inventory of components using the parts list.
Sort and lay out the wood pieces. Label each piece of wood for easy reference. For easy
identification during the assembly process, write the board’s letter on masking tape and adhere to
each piece of the wood. Some wooden components may twist or warp in the carton after packaging.
Usually, these parts straighten out when assembled. You may also see some cracking of the grain.
This is normal.
Sort all hardware according to size. Do not worry if extra hardware is included.
FIND A SAFE PLAY LOCATION.
You MUST install the product on level ground. Uneven ground must be leveled prior to installation.
The manufacturer cannot a
Installing on sloping ground will put stress on all the joints, which will cause the set to become loose
and unstable.
Find a location where the equipment can be placed more than 2meters from any structure or
obstruction (ex: electrical wires, branches, house, fence, garage). The safe play area refers to a zone
extending 2meters beyond the gym set on all sides, including the space above the play set.
The safe play area must be free of all structures, landscaping, tress and branches, rocks, wires and
other obstacles to safe play. Children can be seriously injured running or swinging into these
obstacles.
Remove any rocks or any jagged or sharp object that could endanger your children’s’ safety.
Remove all tripping hazards from the safe play area. Tripping hazards include but are not limited to:
roots, stumps, rocks, landscaping, sprinkler heads, railroad ties, plumbing, and electrical
connections.
Do NOT install
following is a list of recommended ground covers from the Consumer Product Safety Commission.
your play set over gravel, asphalt, packed earth or any other hard surface. The
ssume responsibility for any failure from incorrect installation.
SUGGESTED MATERIAL UNCOMPRESSED DEPTH
mc32 hcluM kraB dedderhS elbuoD
mc5.03 spihC dooW mrofinU
mc5.03 levarG eniF
mc5.03 dnaS eniF
4
Page 5

IMPORTANT WARNINGS AND INSTRUCTIONS
IMPORTANTWARNINGS AND INSTRUCTIONS
Important–Please read these instructions thoroughlybefore assembly or use.
BEFORE YOU BEGIN: Carefully read all instructions in this manual before assembling and using
thisproduct. The unit must be assembled by adults. Heavy duty working gloves must be worn to avoid
injuries during assembly.
READ ALL INSTRUCTIONS BEFORE ASSEMBLING OR USING THIS EQUIPMENTAGE LIMIT
PLAY SUPERVISION
DO NOT allow children to walk too close to moving parts. ALWAYS keep a safe distance to avoid
being struck by other children while playing.
Owners shall be responsible for maintaining the legibility of the warning labels.
Observing the following statements and warnings reduces the likelihood of serious or fatalinjury.
It is the owner’s responsibility to instruct children
intended.
DO NOT allow children to climb or jump off the equipmen
ALWAYS dress children appropriately for safe play, e.g. wear well-fitted rubber sole shoes, and
remove loose or sharp items such as jewelry, hair accessories, scarf, ponchos, which may become
entangled in the equipment or cause injuries.
ALWAYS check parts exposed to the body for extreme heat from the sun before allowing children to
use the equipment.
ALWAYS prevent access and secure from any unauthorized use when there is no adult supervision.
DO NOT allow pets or other animals near the equipment to prevent damage or injuries.
not to use the equipment in a manner other than
t. Serious injury or death can occur.
5
Page 6

IMPORTANT WARNINGS AND INSTRUCTIONS
IMPORTANTWARNINGS AND INSTRUCTIONS
Important–Please read these instructions thoroughlybefore assembly or use.
INSPECTION PRIOR TO EACH USE OR DAILY INSPECTION
DO NOT use the equipment if any bolts or nuts are missing or loose. ALWAYS check to ensure the
equipment and all parts are well secured and stable before each use.
ALWAYS clear the play area of any rocks, sharp objects, or any materials that could be potentially
hazardous to users.
DO NOT attach items to the equipment that are not specifically designed for use with the equipment,
including, but not limited to, jump ropes, clothesline, pet leashes, cables and chains as they may
cause choke hazards.
The wood and steel parts used in your product are subject to normal wear.Gradual deterioration of
the material will occur, the speed
pollution, outdoor weather conditions such as rain and wind and the amount of use. You must inspect
the equipment prior to every use.This includes, but is not limited to inspecting the set for
excess wear, missing parts, loose connections, and for overall integrity. When the set shows any
signs of weakness, you must stop using the play set immediately, properly store the set or restrict
access by users until the condition is resolved.
of which will depend on the level of exposure to UV rays, airborne
cracks,
AT THE BEGINNING OF EACH PLAY SEASON:
Tighten all hardware.
Lubricate all metallic moving parts per manufacturer’s instructions.
Check all protective coverings on bolts, pipes, edges, and corners. Replace if they are
or missing.
Check all wood members for deterioration and splinters. Sand down splinters and replace
deteriorating wood members.
Rake and check depth of loose fill protective surfacing materials to prevent compaction and to
maintain appropriate depth. Replace as necessary.
TWICE A MONTH DURING PLAY SEASON:
Tighten all hardware.
Check all protective coverings on bolts, pipes, edges, and corners. Replace if they are loose, cracked,
or missing.
Rake and
to maintain appropriate depth. Replace as necessary.
ONCE A MONTH DURING PLAY SEASON:
Lubricate all metallic moving parts
check depth of loose fill protective surfacing materials to prevent compaction and
per manufacturer’s instructions.
loose, cracked,
6
Page 7

IMPORTANT WARNINGS AND INSTRUCTIONS
IMPORTANTWARNINGS AND INSTRUCTIONS
Important–Please read these instructions thoroughlybefore assembly or use.
At the end of each play season or when the temperature drops below 32°F (temperature to
be selected b y the manufacturer).
Rake and check depth of loose fill protective surfacing materials to prevent compaction and
to maintain appropriate depth. Replace as necessary.
Owners shall be responsible for maintaining the legibility of the warning labels.
WEATHER CONDITIONS
Please be aware of weather conditions when using the equipment. If it is too windy, users could lose
control and suffer injuries. The playground equipment must be properly anchored, stored away or
restricted from use during inclement wea
should consult a local contractor about ways to anchor the product in your location.
Take indoors
DISPOSAL INSTRUCTIONS
Please use care when disassembling the equipment. Wear heavy duty working gloves to avoid
injuries.
Do not leave partially disassembled equipment parts in areas accessible by children.
All steel parts could be recycled.Take it to your local recycling center. Do not let children play with
any disassembled parts destined for disposal, such as chains, slide, tubing, bolts, nuts, screws, etc.
or do NOT use when the temperature drops below 32 degrees F.
ther such as heavy winds or severe weather storms. You
7
Page 8

IMPORTANT WARNINGS AND INSTRUCTIONS
IMPORTANTWARNINGS AND INSTRUCTIONS
Important–Please read these instructions thoroughlybefore assembly or use.
The following guidelines are extracts from the Consumer Product Safety Commission Outdoor
Home Playground Safety Handbook. It is recommended that you read the entire handbook and
take necessary precautions to prevent serious injuries to your children, including:
CHOOSING A SITE
When you choose a home playground, a location away from roads and driveways and readily visible
from inside the home and patios or porches, is important.
Create a site free of obstacles that could cause injuries-such as low overhanging tree branches,
overhead wires, tree stumps and/or roots, large rocks, bricks and concrete.
Choose a level location for the equipment. This can reduce the likelihood of the play set tipping over
and loose-fill surfacing materials washing away during heavy
to improve drainage or to reduce the slope.
Locate play set at least 2 meters from any structure or obstacles, such as a house, fence, sheds,
trees or poles. Swings should be further away from structures to the front and rear of the swings-a
distance equal to twice the height of the top bar from which the swing is suspended.
Locate bare metal platforms and slides out of direct sunlight to reduce the likelihood of serious burns.
A slide that faces north will receive the least direct sunlight.
rains. Some sites may need regarding
Do not install home playground equipment over
fall onto a hard surface can result in serious injury to the equipment user. Grass and dirt are not
considered protective surfacing because wear and environmental factors can reduce their shock
absorbing effectiveness. Carpeti
Loose-Fill Materials
Maintain a minimum depth of 23cm of loose-fill materials such as wood mulch/chips, engineered
wood fiber(EWF), or shredded/recycled rubber mulch for equipment up to 244cm high; and 23cm of
sand or pea gravel for equipment up to 152cm high. NOTE: An initial fill level of 31cm will compress
to about a 9-inch depth of surfacing over time. The surfacing will also compact, displace, and settle,
and should be periodically refilled to maintain at least a 23cm depth.
Use containment, such as digging out around the perimeter and/or lining the perimeter with
landscape edging. Don’t forget to account for water drainage.
Check and maintain the depth of the loose-fill surfacing material. To maintain the right am
loose-fill materials, mark the correct level on play equipment support posts.That way you can easily
see when to replenish and/or redistribute the surfacing.
Do not
install loose fill surfacing over hard surfaces such as concrete or asphalt.
ng and thin mats are generally not adequate protective surfacing.
concrete, asphalt, or any other hard surface. A
ount of
8
Page 9

IMPORTANT WARNINGS AND INSTRUCTIONS
IMPORTANTWARNINGS AND INSTRUCTIONS
Important–Please read these instructions thoroughlybefore assembly or use.
Poured-In-Place Surfaces or Pre-Manufactured Rubber Tiles
You may be interested in using surfacing other than loose-fill materials-like rubber tiles orpoured-in-place
surfaces.
Installations of these surfaces generally require a professional and are not “do-it-yourself” projects
Check the protective surfacing frequently for wear.
PLACEMENT
Proper placement and maintenance of protective surfacing is essential. Be sure to:
Extend surfacing at least 2 meter from the equipment in all directions.
9
Page 10
IMPORTANT WARNINGS AND INSTRUCTIONS
IMPORTANTWARNINGS AND INSTRUCTIONS
Important–Please read these instructions thoroughlybefore assembly or use.
Outdoor Home Playground Safety Checklist
Use this to help make your home playground a safe place to play!
Supervision
Surfacing
Types of
Surfacing
Be sure to always supervise children on play equipment.
Install a protective surface under and around play equipment to reduce the
likelihood of serious head injuries.
For most play equipment, install protective surfacing 2 meters in all
directions beyond the equipment.
For swings, extend protective surfacing in front and back of the swing to a
distance that is twice the height of the bar from which the swing is suspended.
For tire swings, install protective surfacing outward from the swing equal tothe
suspension chain plus 2 meter.
Use wood mulch/chips, shredded rubber mulch, or engineered wood fiber for
equipment up to 2 meters high.
Use sand, pea gravel, or mulch products listed above for play equipment up to 2
meters high; or use surface mats tested to provide impact protection equal to or
greater than the height of the play equipment.
Equipment
Maintenance
Opening
Guardrails
or Barriers
Repair
Upkeep of
Hardware
Periodically check nuts, bolts, caps, swing seats, suspension ropes, chains and
cables and replace as necessary. Maintain loose-fill surfacing and surface mats.
Eliminate openings that can trap a child's head or neck,such as openings in
guardrails or ladders. Openings should be smaller than 9cm to prevent entry of a
small child's body, or larger than 23cm to allow a child's head and body to slide
completely through.
Make sure that platforms and ramps over 76cm high have guardrails or barriers
to prevent falls.
Repair sharp points or doges on equipment that can cause injuries.
Replace missing hardware, eliminate protruding bolts and close "S" hooks that
can cause injuries.
10
Page 11

IMPORTANT WARNINGS AND INSTRUCTIONS
IMPORTANTWARNINGS AND INSTRUCTIONS
Important–Please read these instructions thoroughlybefore assembly or use.
What to Inspect:
Hardware:
Inspect all nuts and bolts and tighten if required. Hardware should be firmly against, but not crushing the
wood. Over-tightening hardware crushes wood fibers and can split wooden components resulting in the
bolt thread extending beyond the wood. This poses a severe safety hazard. If bolt threads protrude
beyond the wood surface, replace the bolt with a shorter one that will not protrude. If splintering has
occurred from over-tightening, larger washers can be purchased at your local hardware store and
installed under the bolt head. Be sure to reuse or replace your lock washers.
Major Wooden Parts:
Inspect for structural defects and splintering. If
repellent stain. Seasonal cracking of the grain on wooden parts is quite natural. Water and heat are the
most frequent causes of expansion and contraction of wood fibers. Our wood set has been treated with
stain to resist weathering, but it needs to be maintained periodically by applying new stain or paint.
Dowels (Rungs)
Inspect for structural defects and splintering. If necessary, lightly sand and refinish with a clear water
repellent, exterior sealant or boiled linseed oil. Do NOT paint, varnish or finish rungs with any substance
that may reduce your child’s ability to firmly grasp or step on the rungs.
necessary, lightly sand and refinish with an exterior water
Play Area
Inspect to assure that the swing set
has settled properly and the location of the set is still level.
11
Page 12
GROUND COVER INFORMATION
Important–Please read these instructions thoroughlybefore assembly or use.
SELECTING THE CORRECT LOCATION FOR YOUR PLAY PRODUCT IS IMPORTANT
FOR YOUR CHILDREN’S SAFETY AND THE PRODUCT’S LONGEVITY
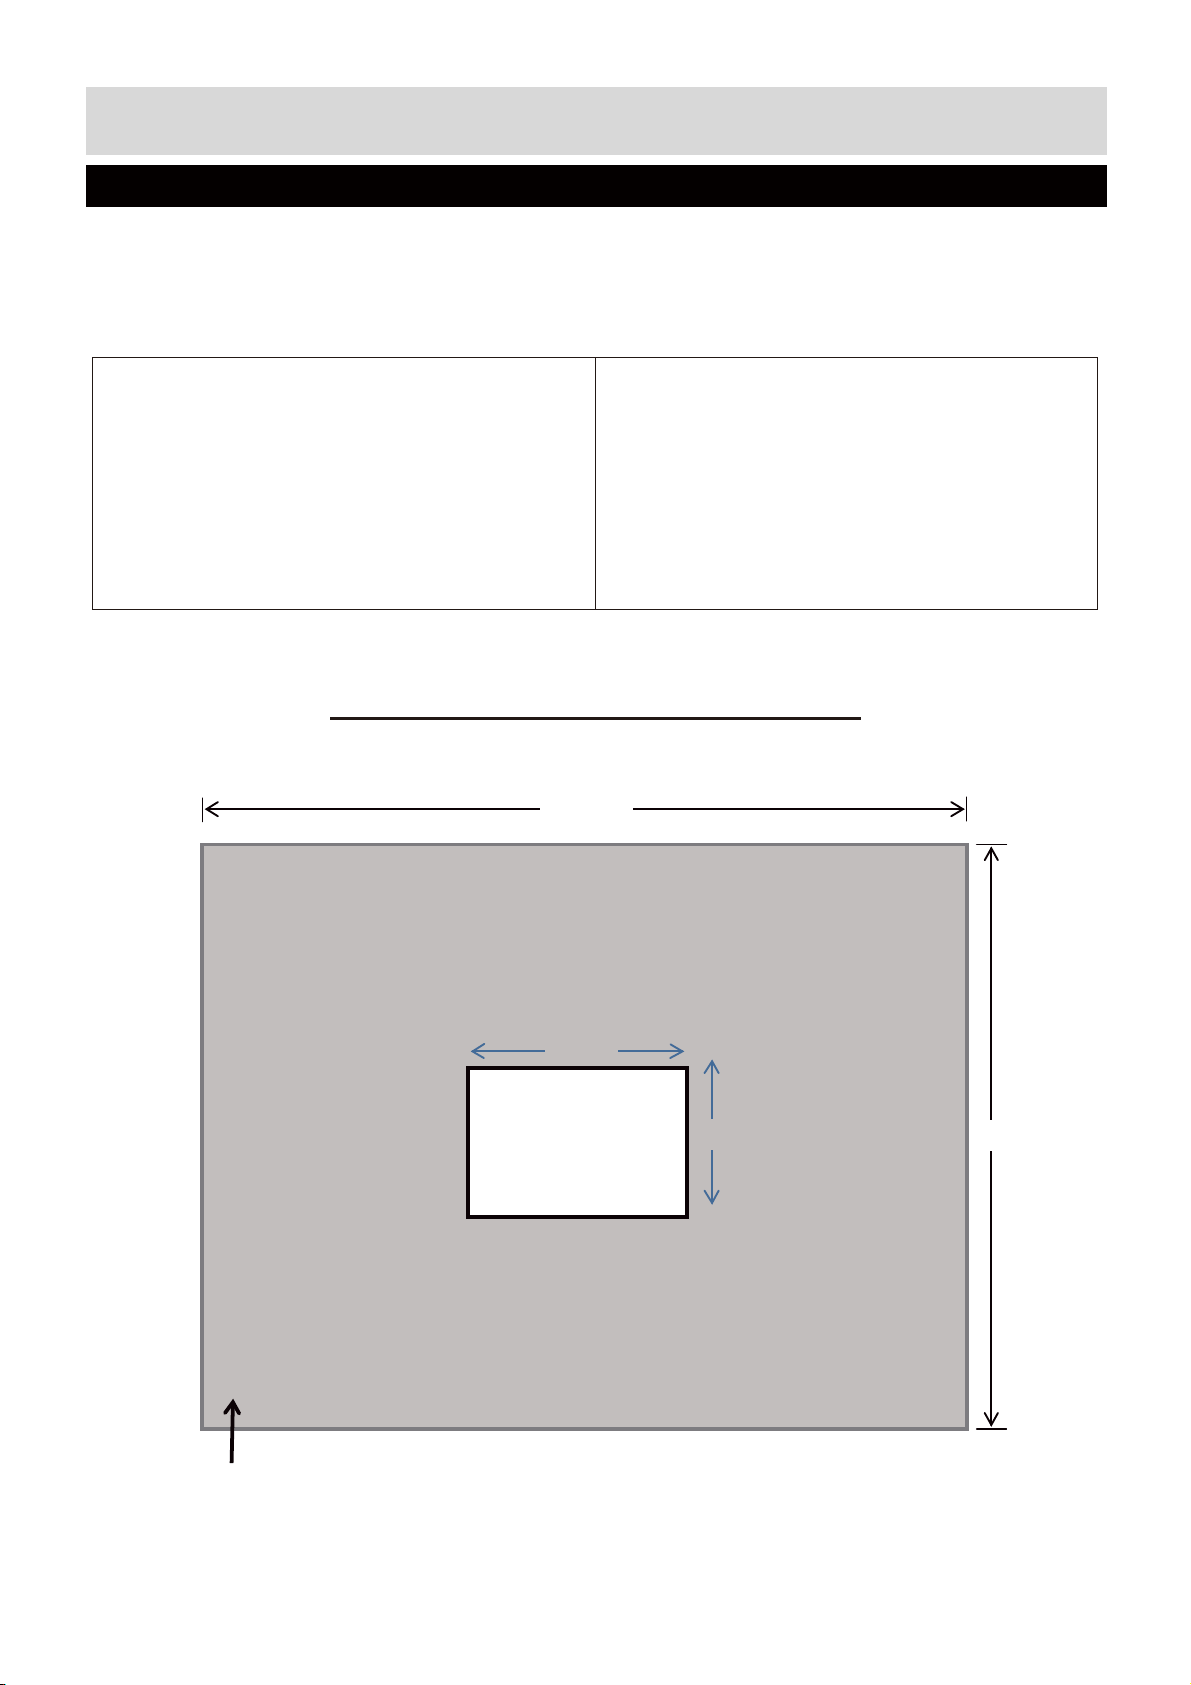
Dimensions:
Product Dimension:136 x 97 x 152cm
Recommended Play Area Ground Cover:
450 x 450 x 450cm
RECOMMENDED PLAY AREA DIAGRAM
General Information:
The play set has been designed and engineered
for up to 4 children.
Maximum of 45kg per child, with combined
weight is not to exceed 180kg
450cm
180cm
HO US E
180cm
450cm
Rec ommended dim ension of play area using appropriate ground c ove
12
Page 13
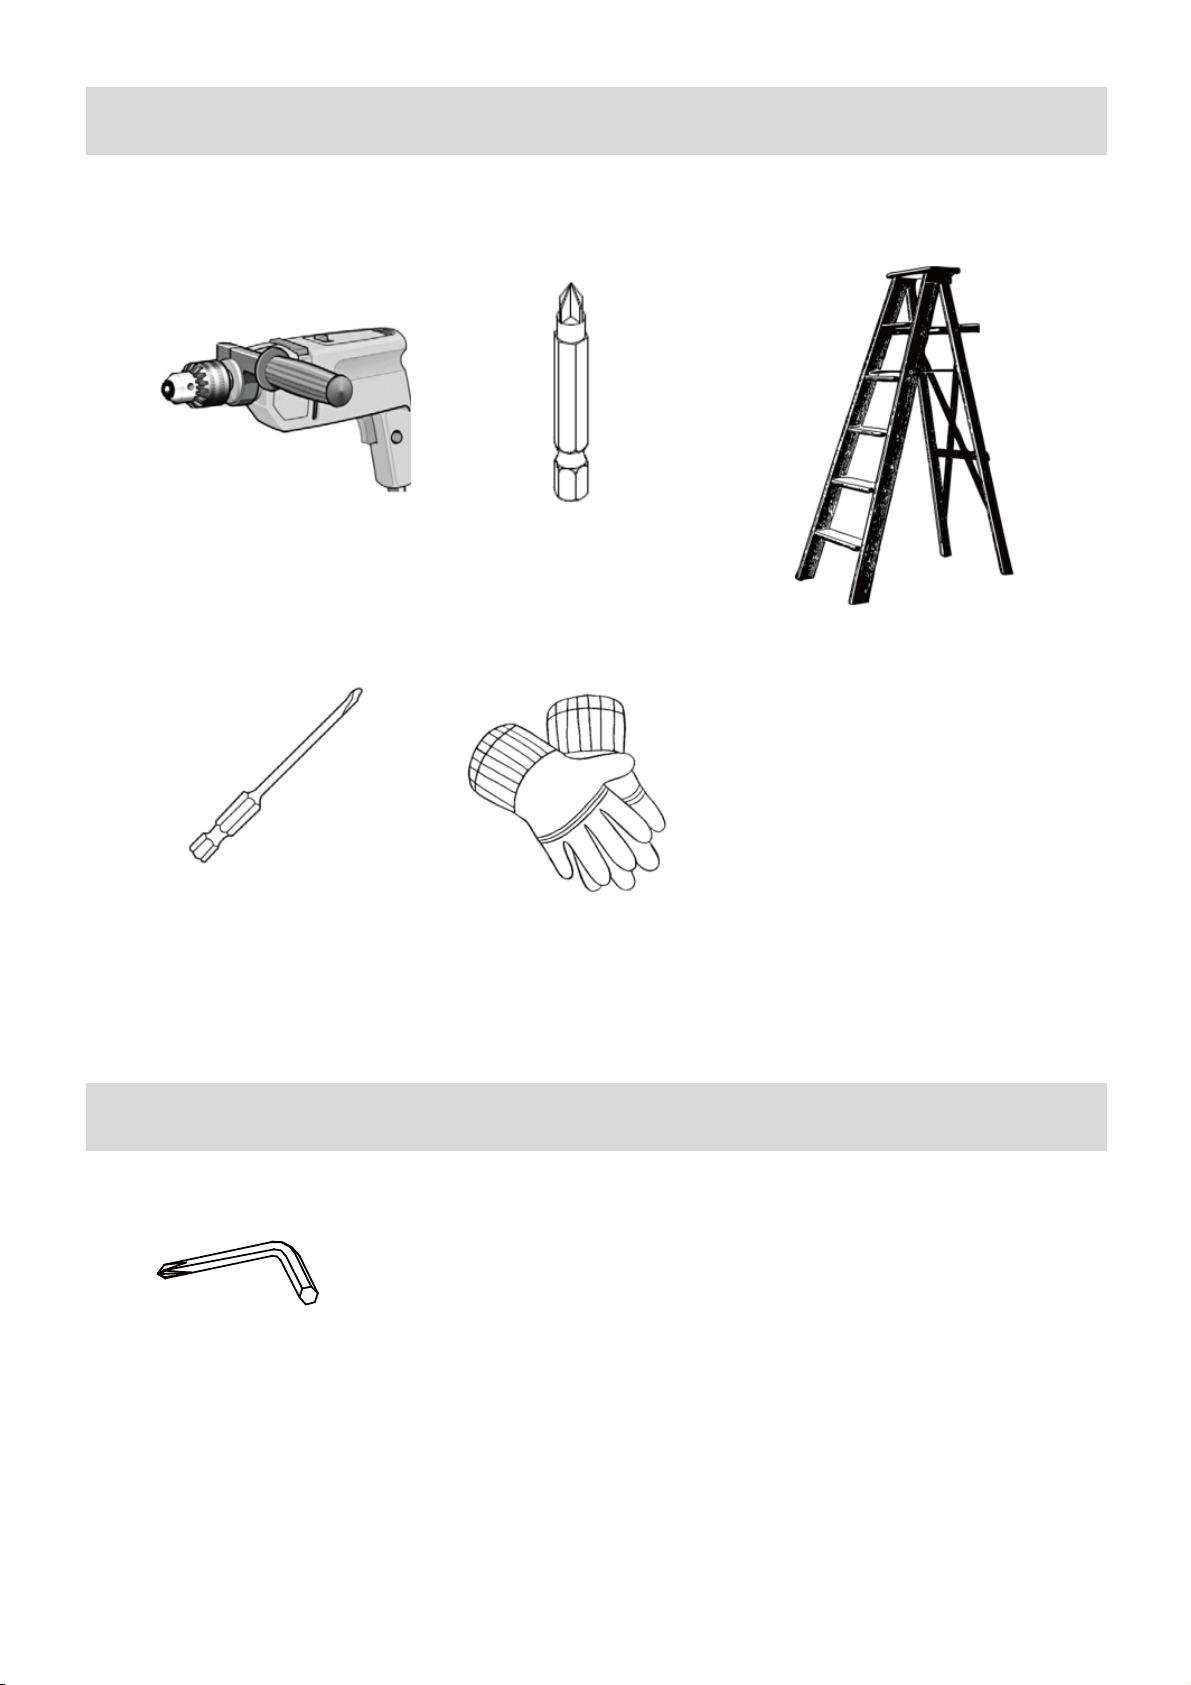
Tools Required for Assembly (Not Included)
Electric Drill
Phillips Head Screwdriver
Phillips Head Screwdriver
Ladder or Step Tool
Working Gloves
Tools Required for Assembly (Included)
Wrench
(M5)
13
Page 14
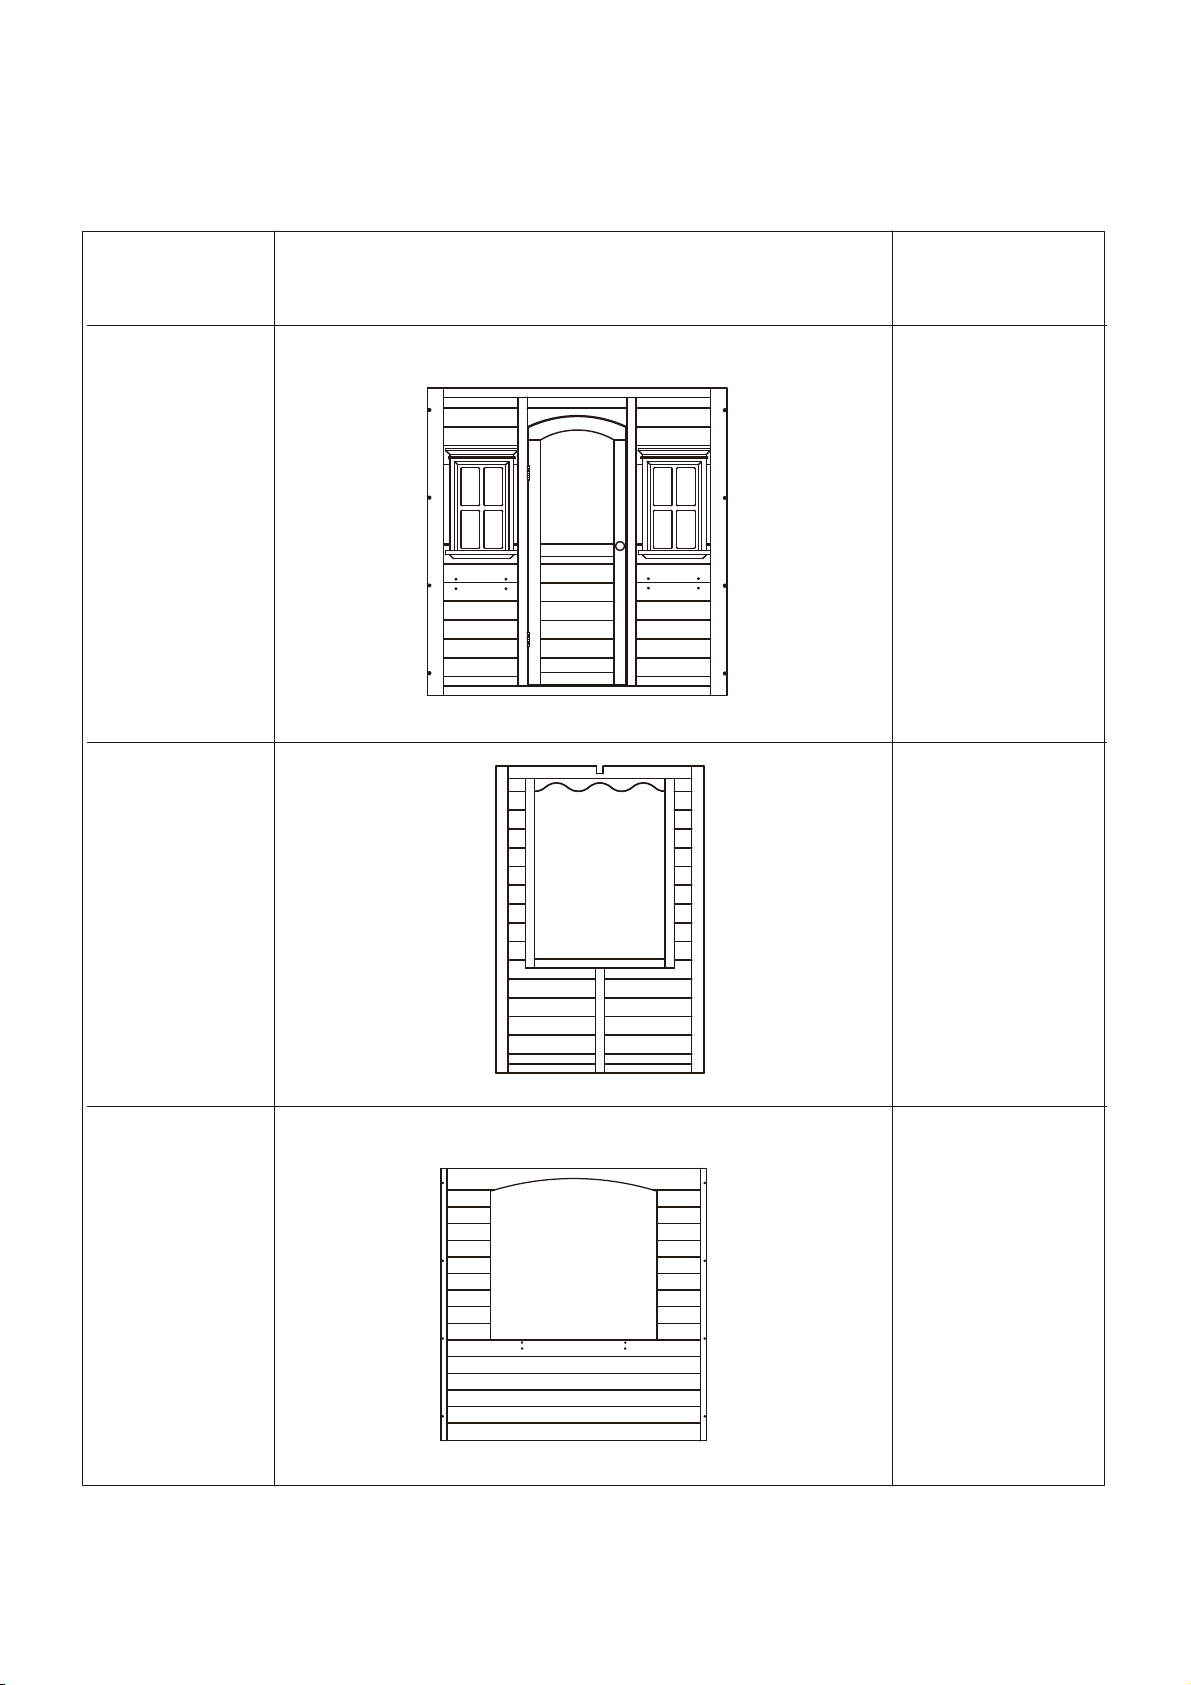
Wood parts list
Part Number
1W
Part Picture
Qty
1
2W
3W
2
1
14
Page 15
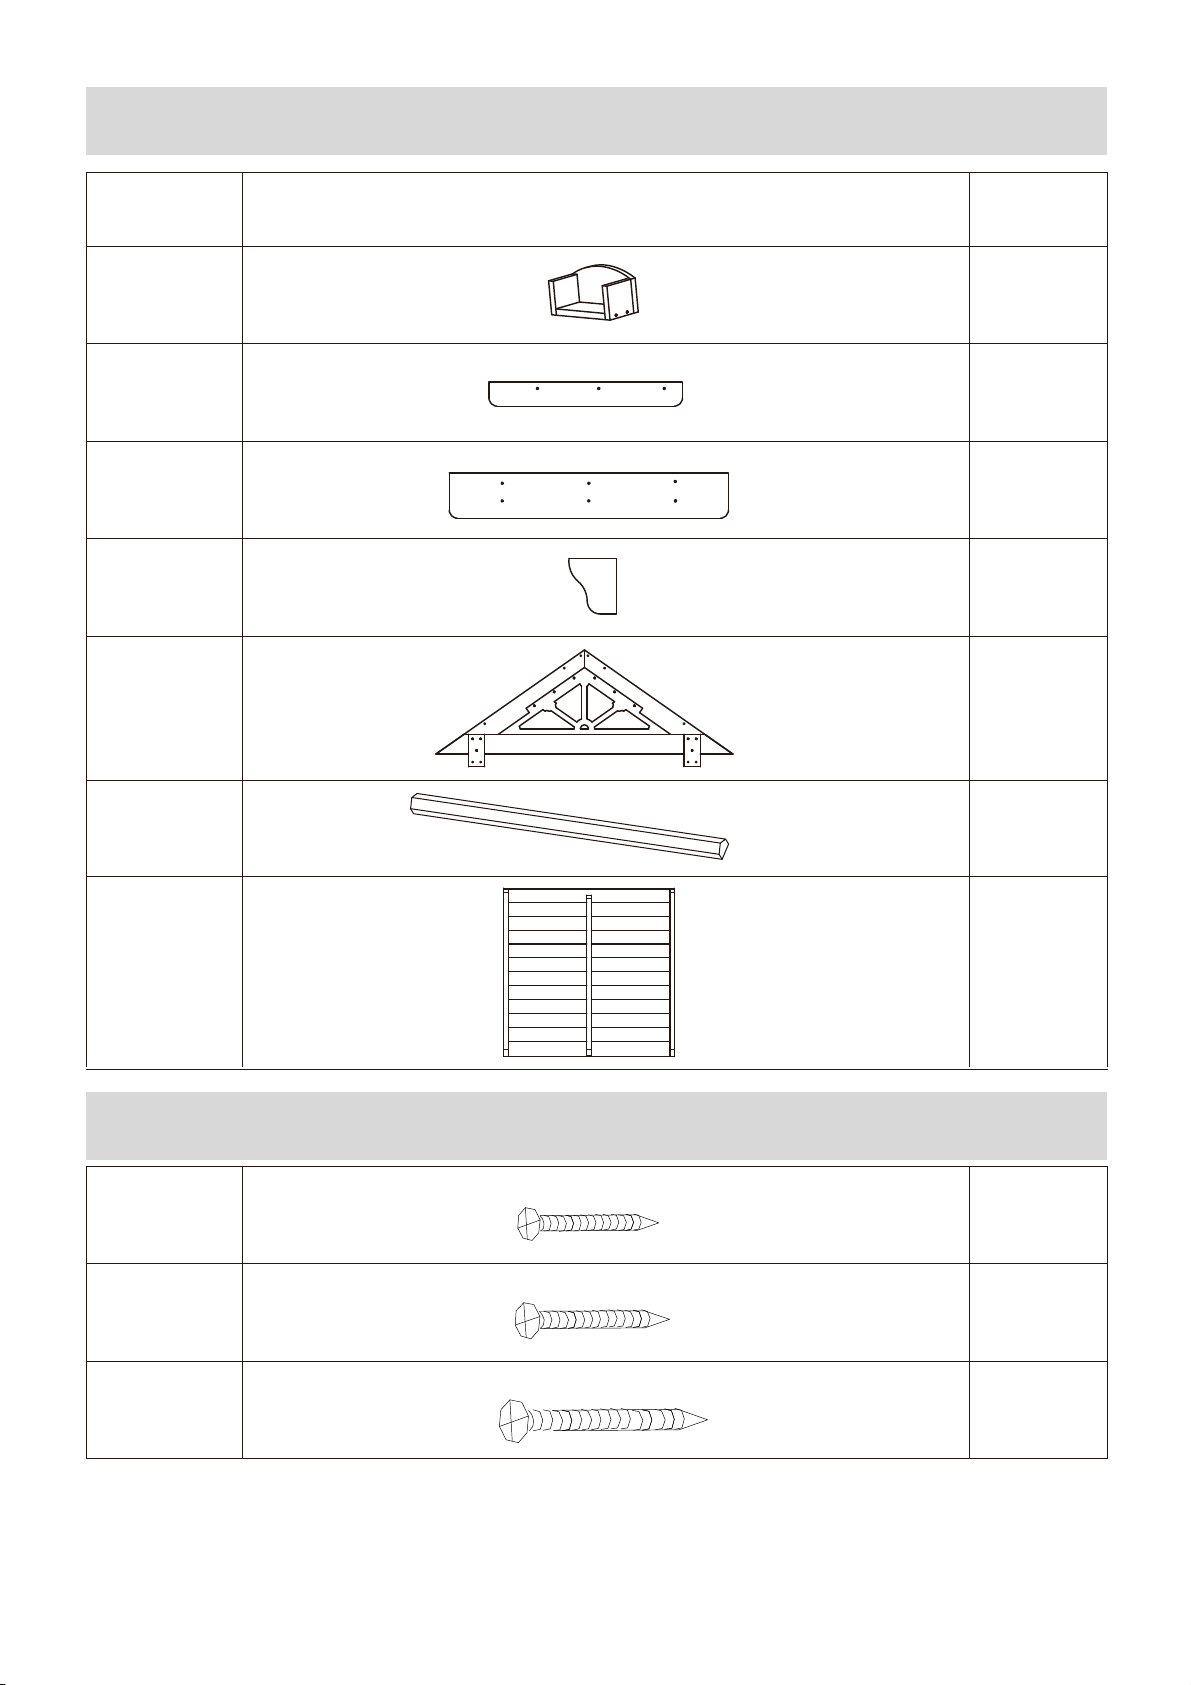
Woodparts list
Part Number Part Picture Qty
W4
W5
W6
W7
W8
W9
2
2
1
3
2
1
W10
Hardwareparts list
S5
M4X30
S6
M4X35
S7
M4X45
2
28
12
22
15
Page 16

IMPORTANT!!!
Please do not fully tighten screws until
set is completely assembled.
Screws should be tightened just enough to hold the parts
together initially. Once the whole unit is assembled, you
must go back and tighten all screws and inspect for
stability before allowing children to use the play set.
All wood parts are labeled with the part number and holes
are pre-drilled for easier installation.
16
Page 17
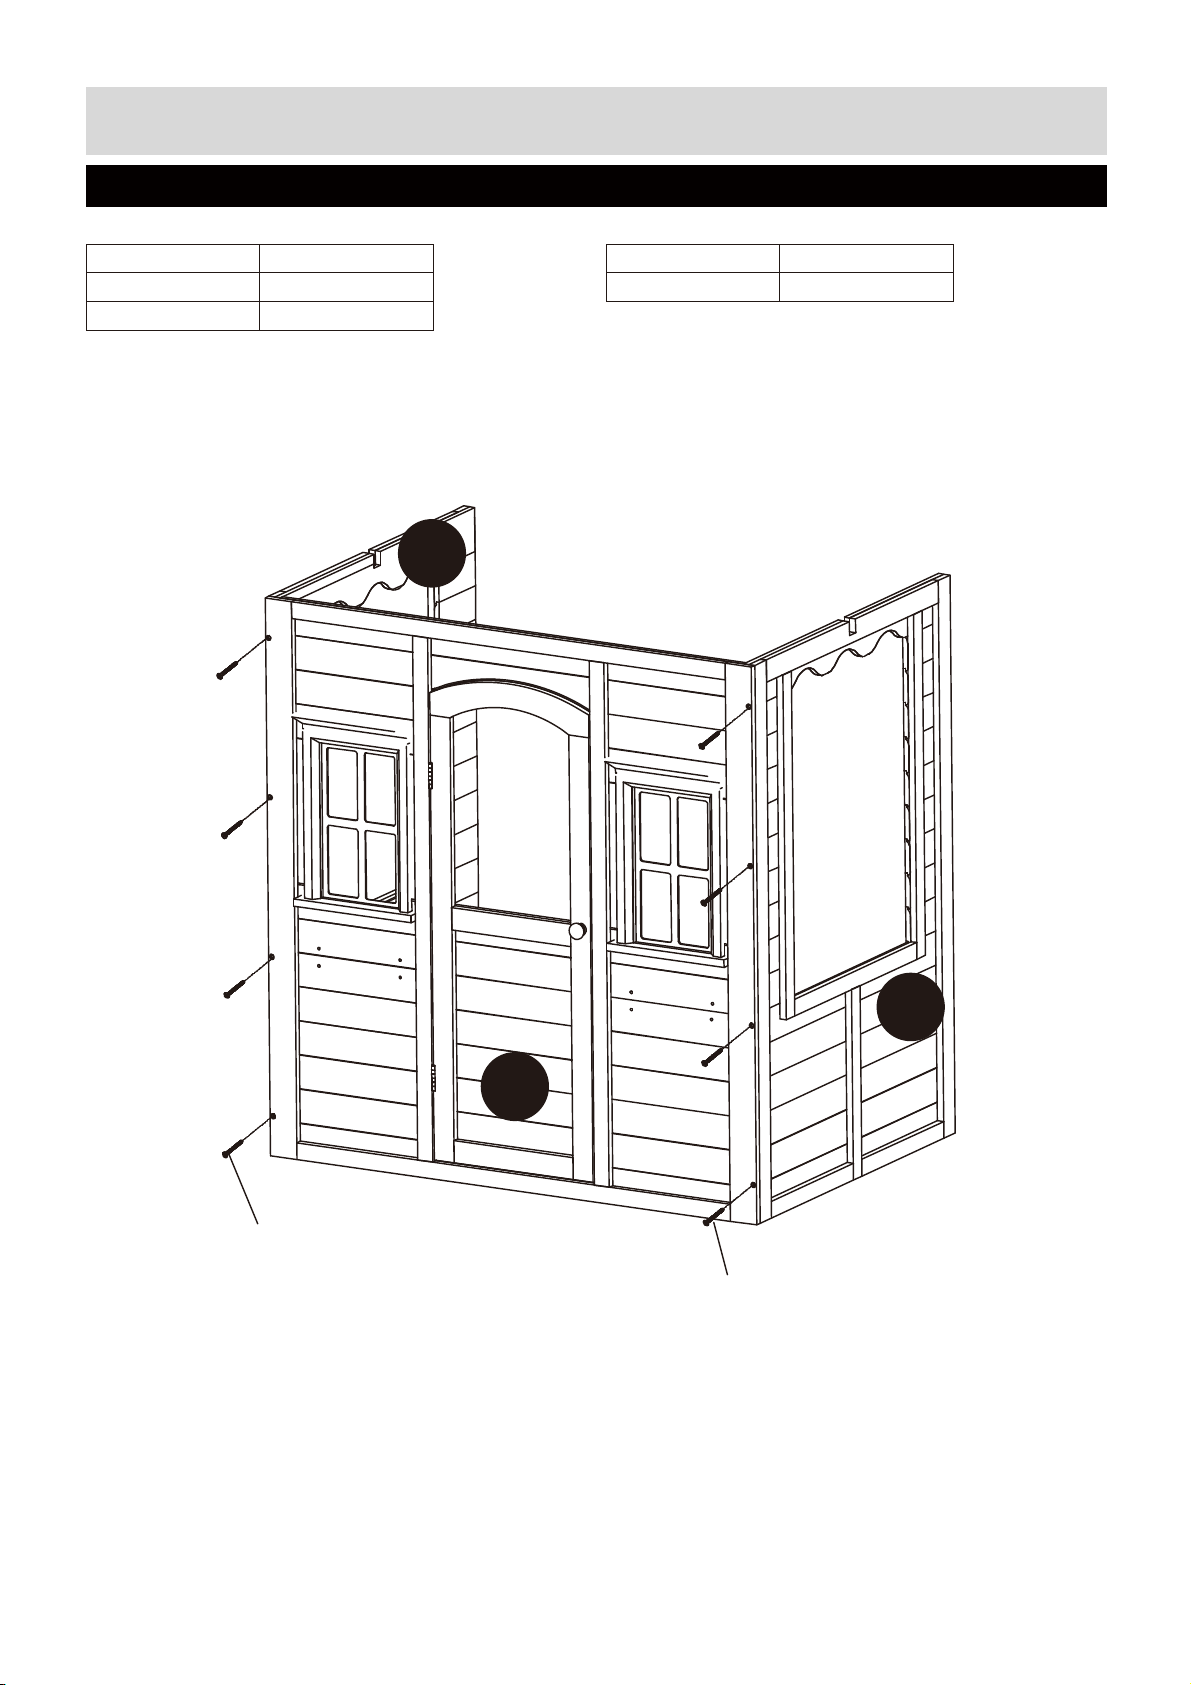
Assembly Instructions
Step 1
Wood Boards Needed: Hardware Needed:
Part No. Quantity Part No. Quantity
W1 1 pieces S7 8 pieces
W2 2 pieces
INSTALL WALL PANELS OF PLAYHOUSE
Connect part #W1 to part #W2 using S7 (8 pieces) as shown.
W2
S7X4
W2
W1
S7X4
17
Page 18
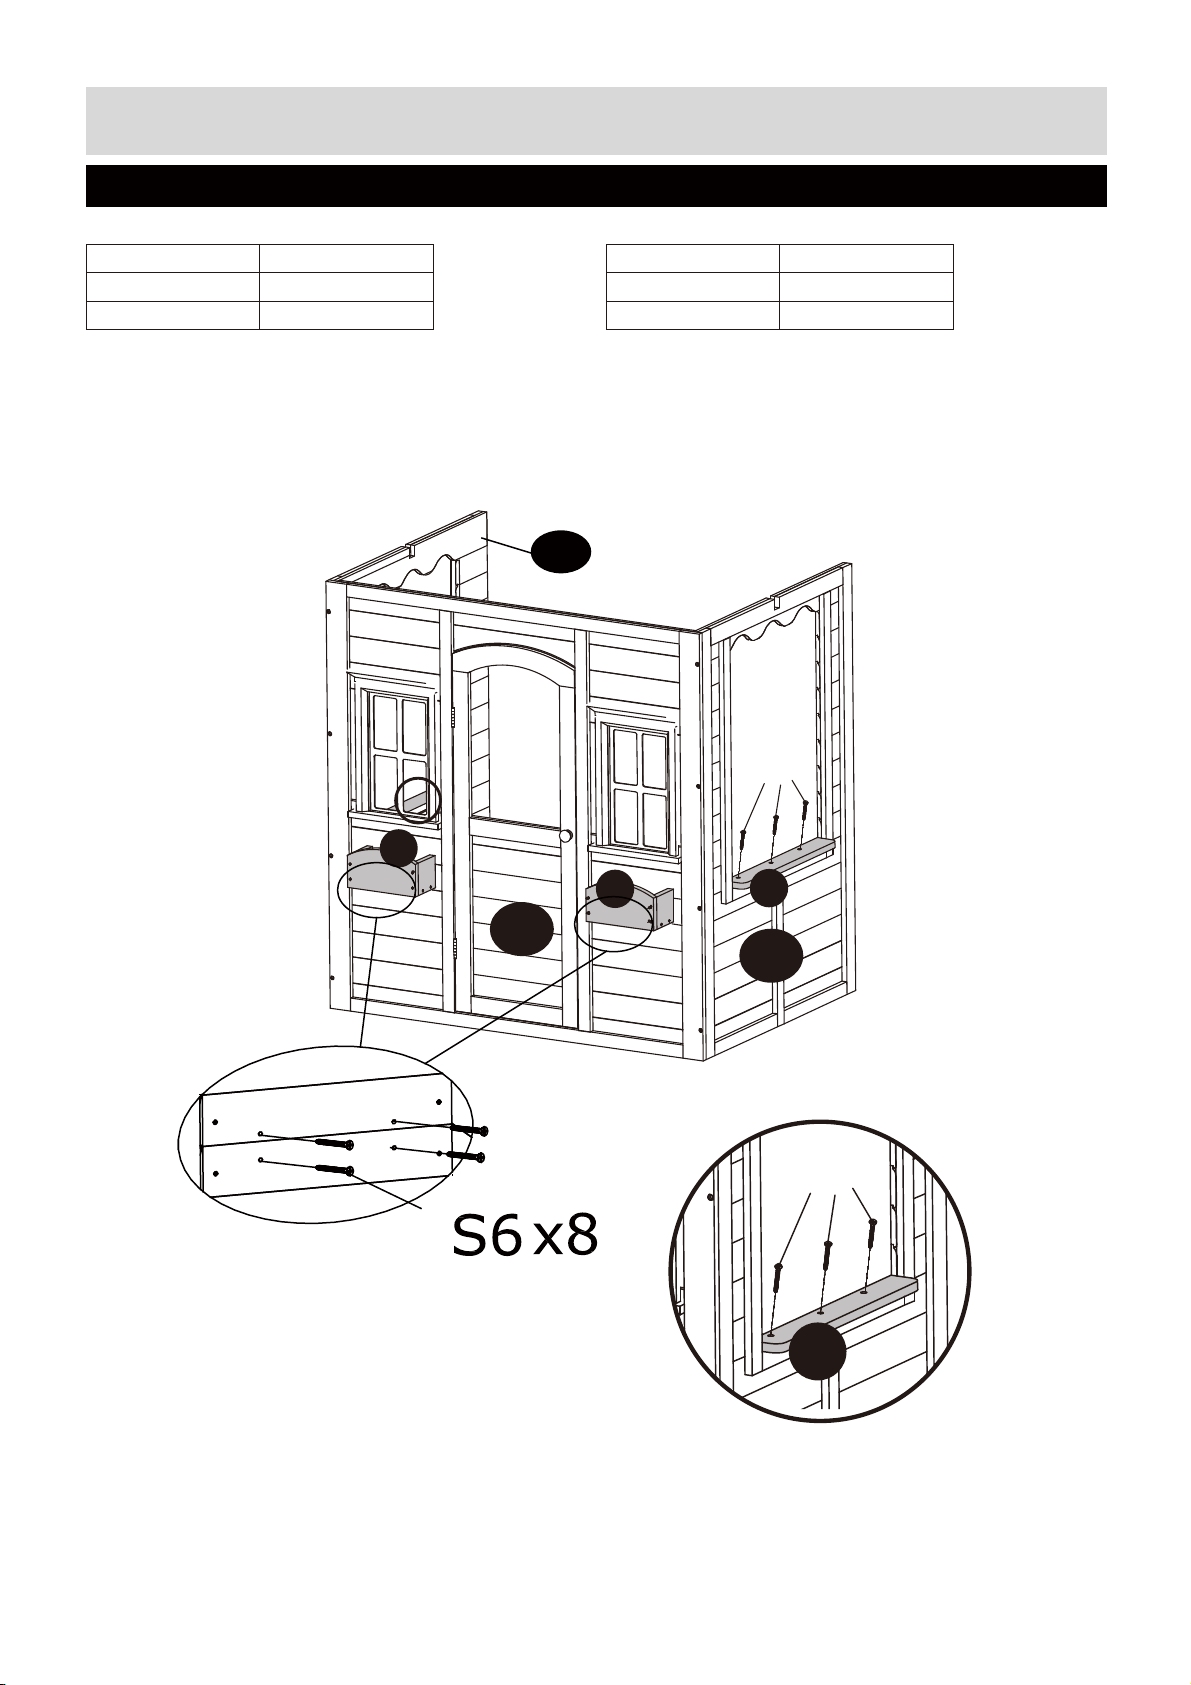
Assembly Instructions
S5X3
W5
Step 2
Wood Boards Needed: Hardware Needed:
Part No. Quantity Part No. Quantity
W4 2 pieces
W5 2 pieces
Connect part #W4 to part #W1 using S6 (8 pieces) from inside as shown.
Connect part #W5 to part #W2 using S5 (6 pieces) on both sides as shown.
S5 6 pieces
S6 8 pieces
W2
W4
W1
W4
S5X3
W5
W2
18
Page 19
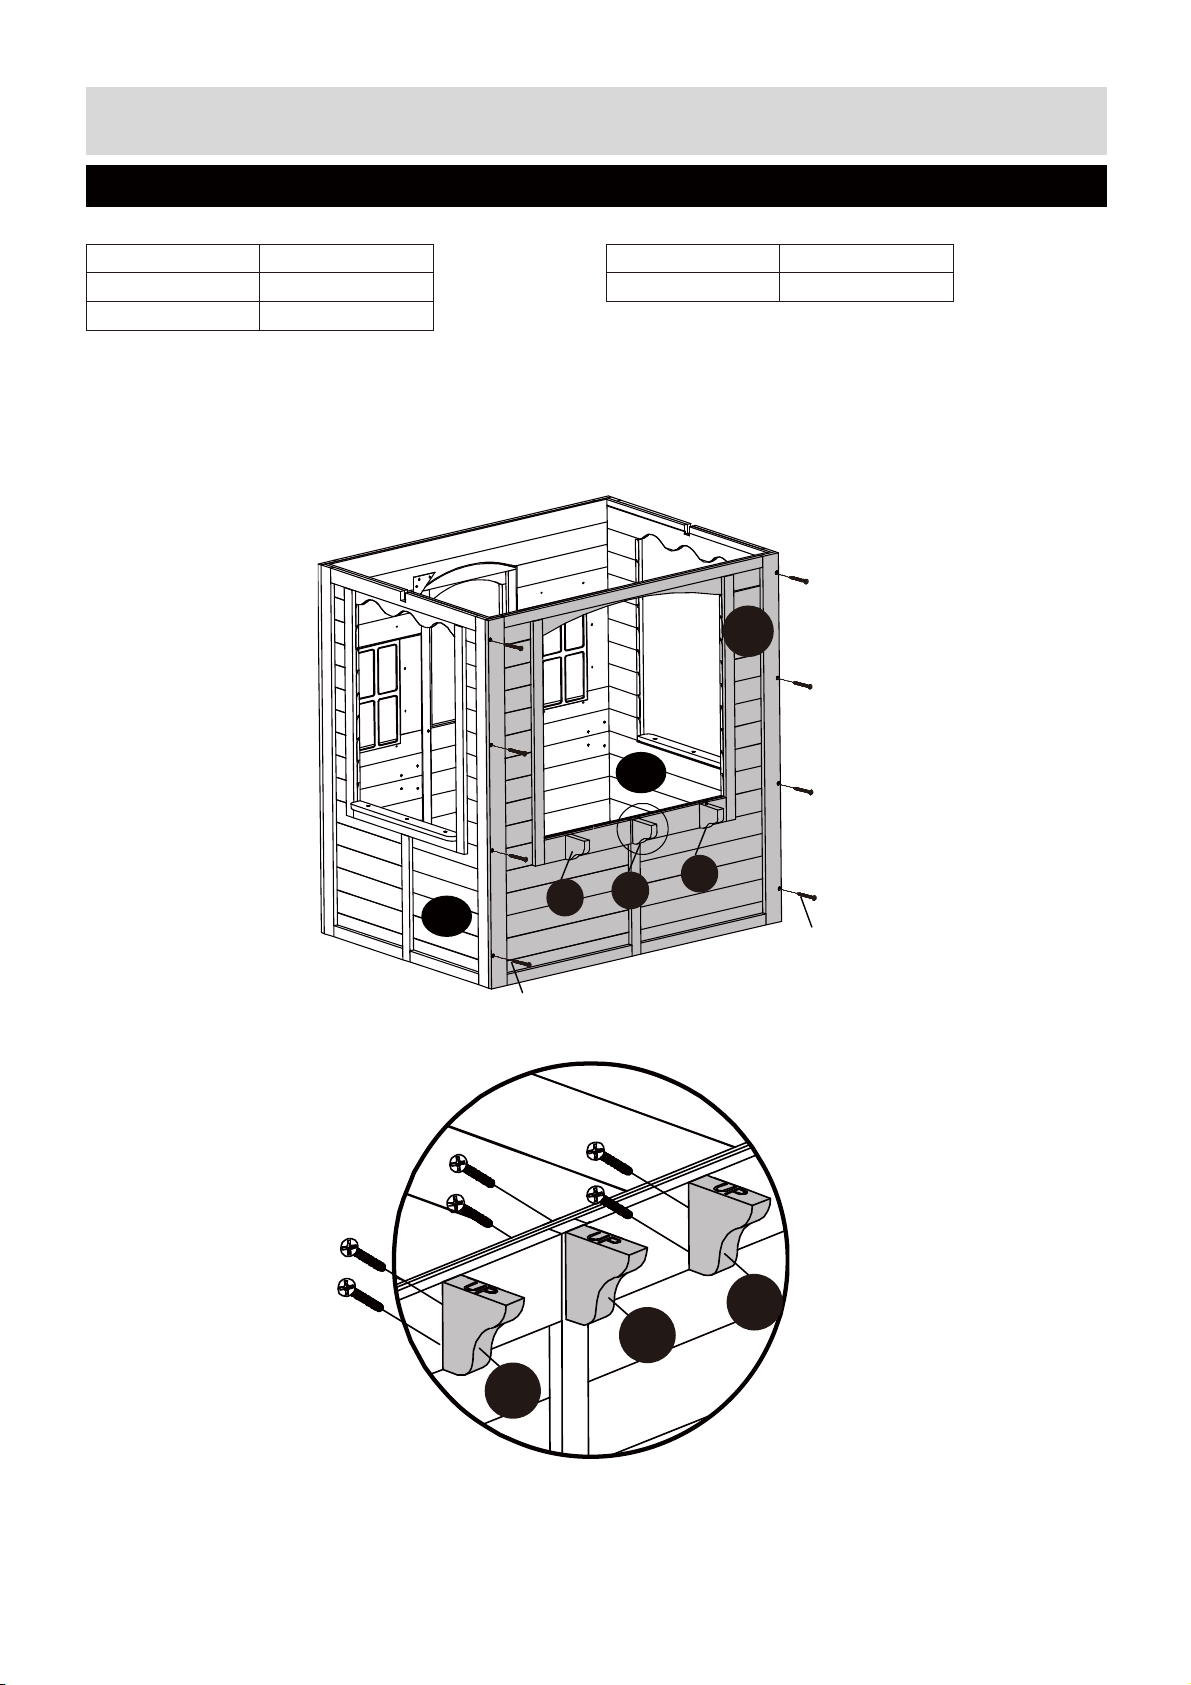
Assembly Instructions
Step 3
Wood Boards Needed: Hardware Needed:
Part No. Quantity Part No. Quantity
W3 1 pieces
W7
Connect part #W3 to part #W2 using S7 (8 pieces) as shown.
Connect part #W7 to part #W3 using S7 (6 pieces) as shown.
Hint: make sure the UP marking on W7 is facing up when assembling.
3 pieces
S7 14 pieces
W3
W2
W7
S7X4
S7X6
W2
W7
W7
S7X4
W7
W7
W7
19
Page 20
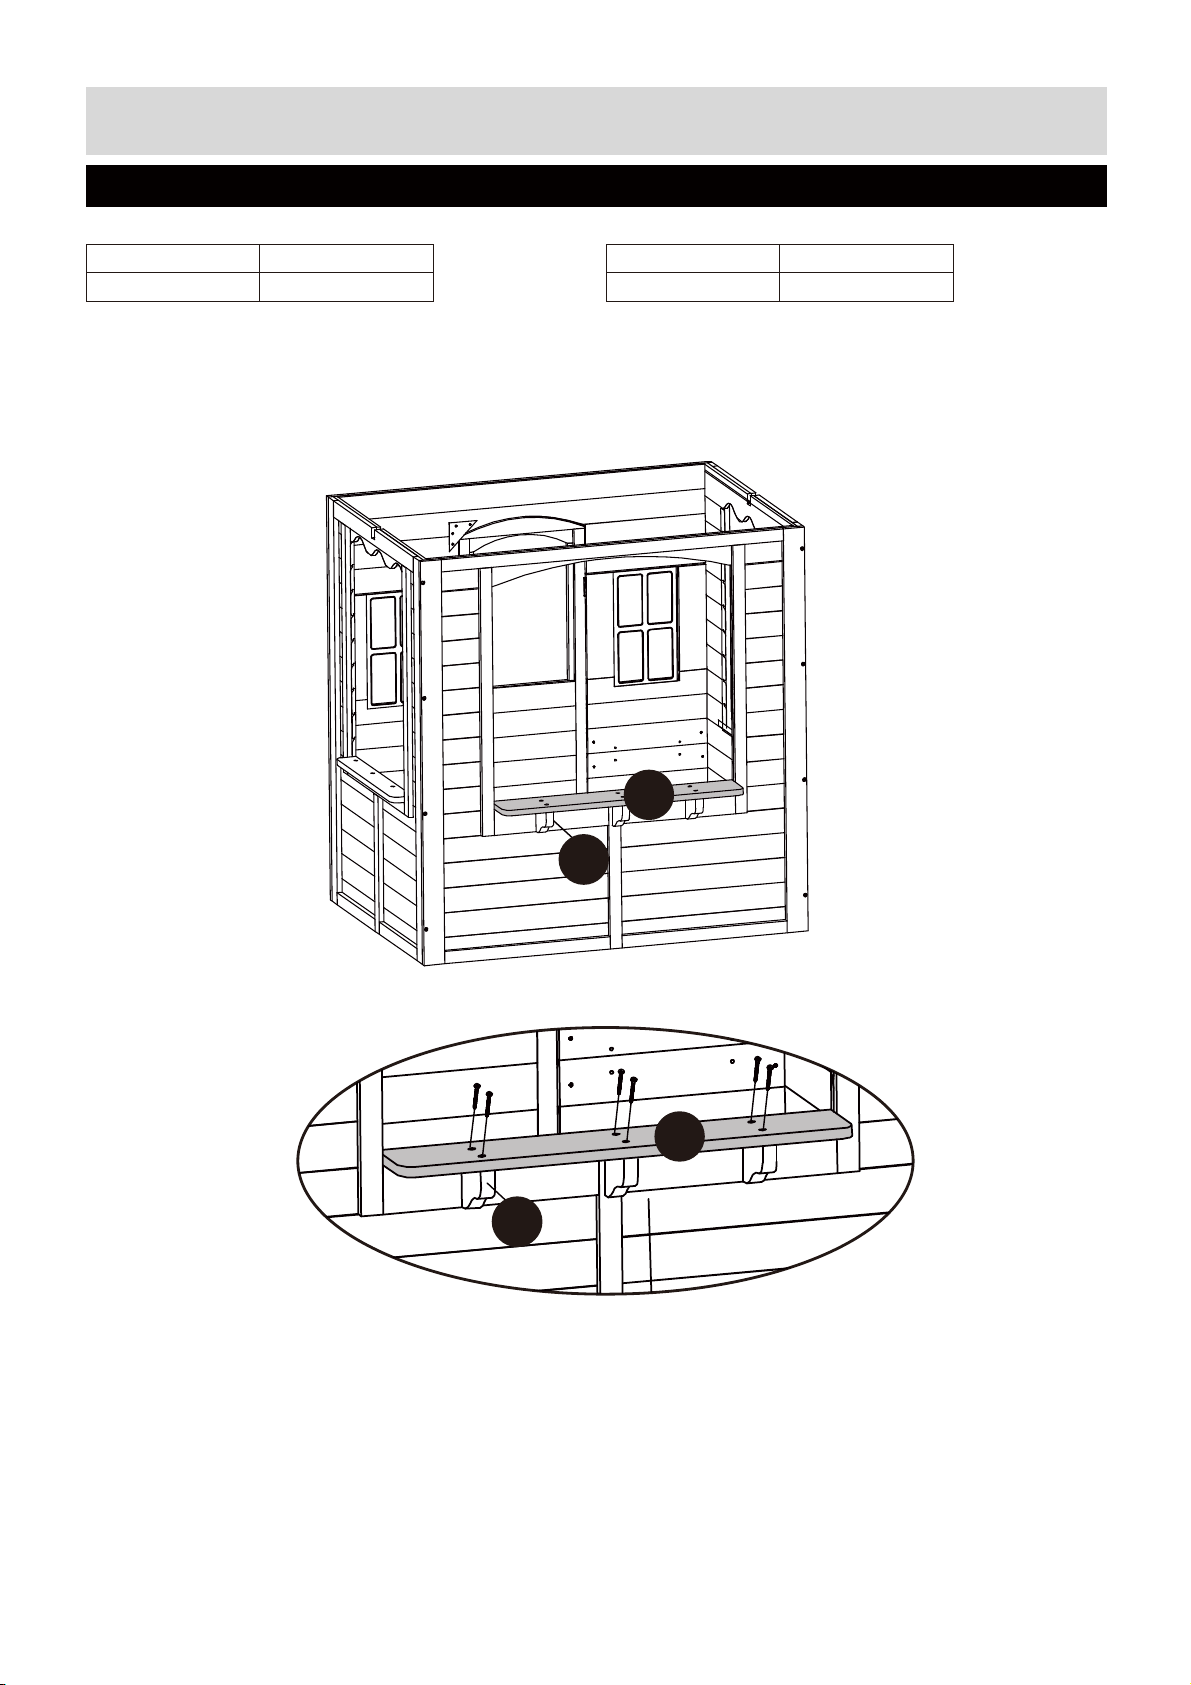
Assembly Instructions
S5X6
Step 4
Wood Boards Needed: Hardware Needed:
Part No. Quantity Part No. Quantity
W6 1 pieces S5 6 pieces
Connect part W6 to part #W7 using S5 (6 pieces) as shown.
W7
W6
W7
W6
20
Page 21
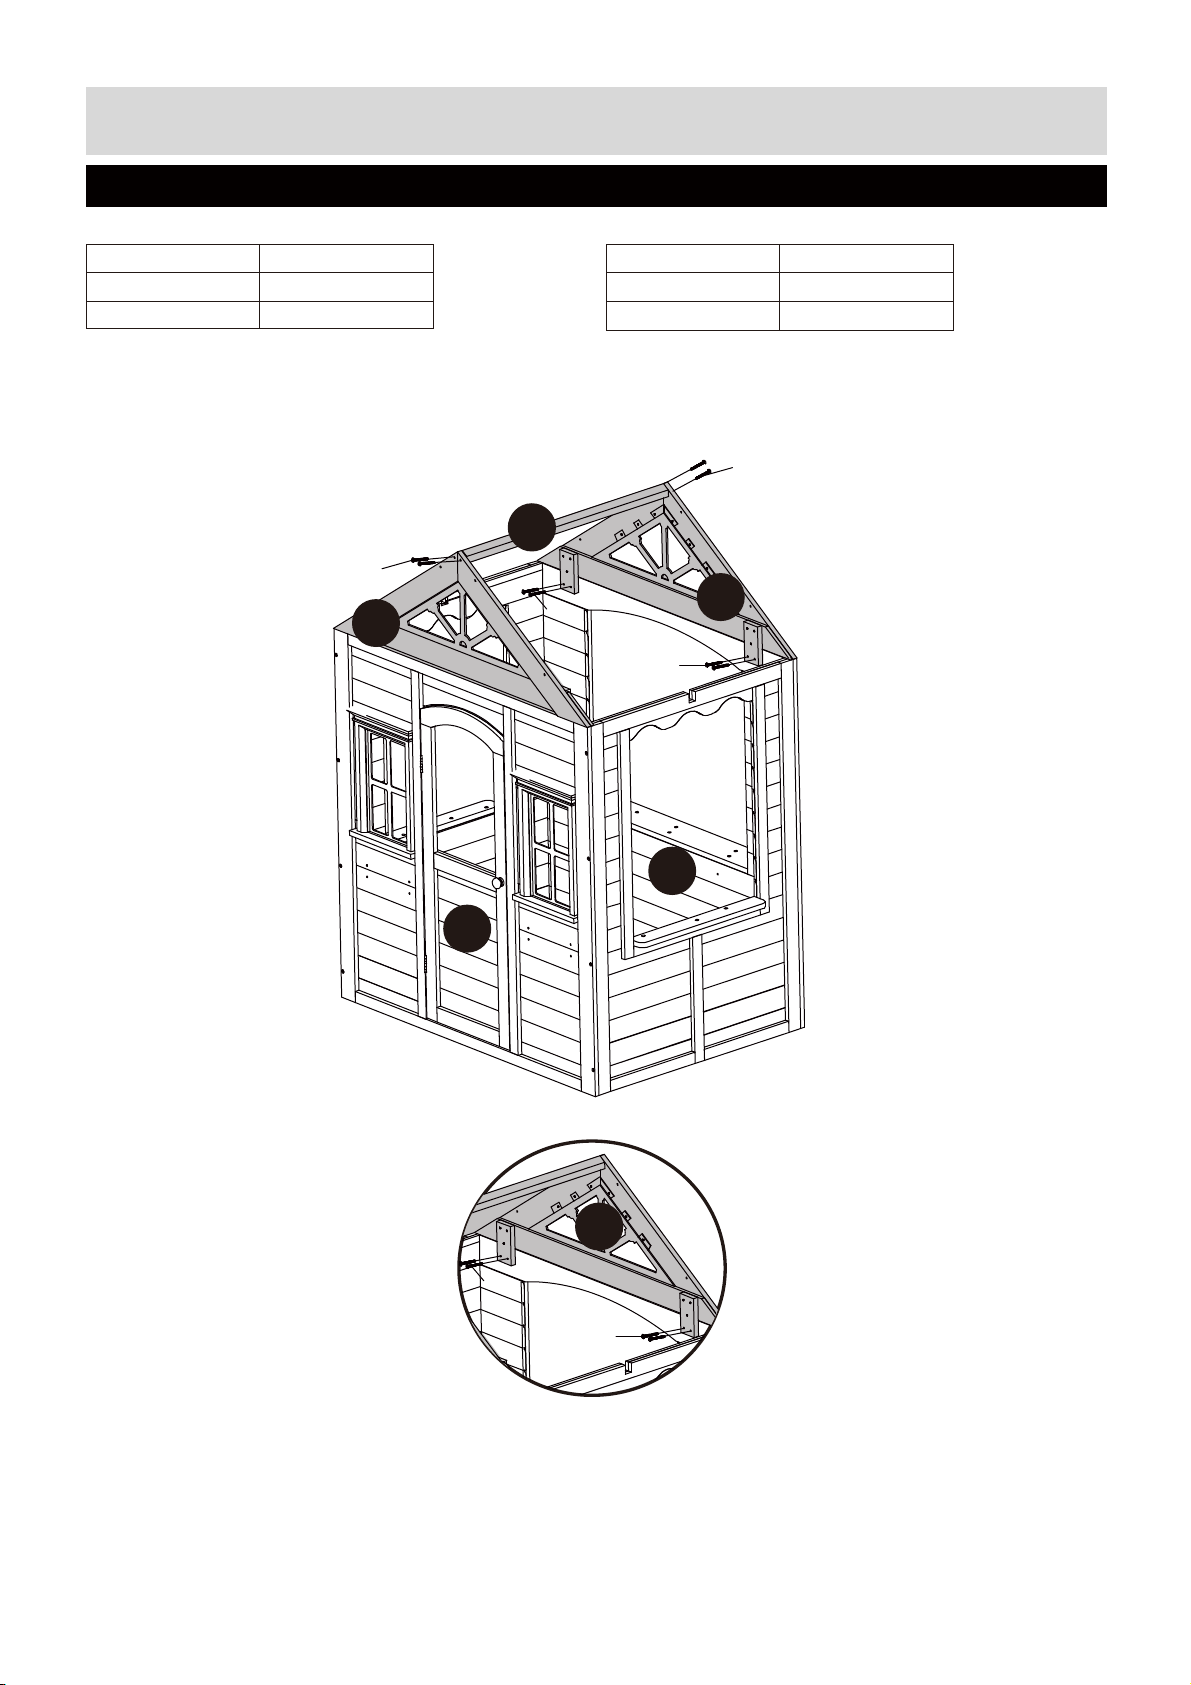
Assembly Instructions
S5
S5
Step 5
Wood Boards Needed: Hardware Needed:
Part No. Quantity Part No. Quantity
W8 2 pieces S5 8 pieces
W9 1 pieces
S6 4 pieces
Connect part #W8 to part #W1 and W3, using S5 (8 pieces).
Connect part #W9 to part #W8, using S6 (4 pieces) as shown.
S6
W9
S6
W8
S5
W8
S5
W1
W3
W8
21
Page 22
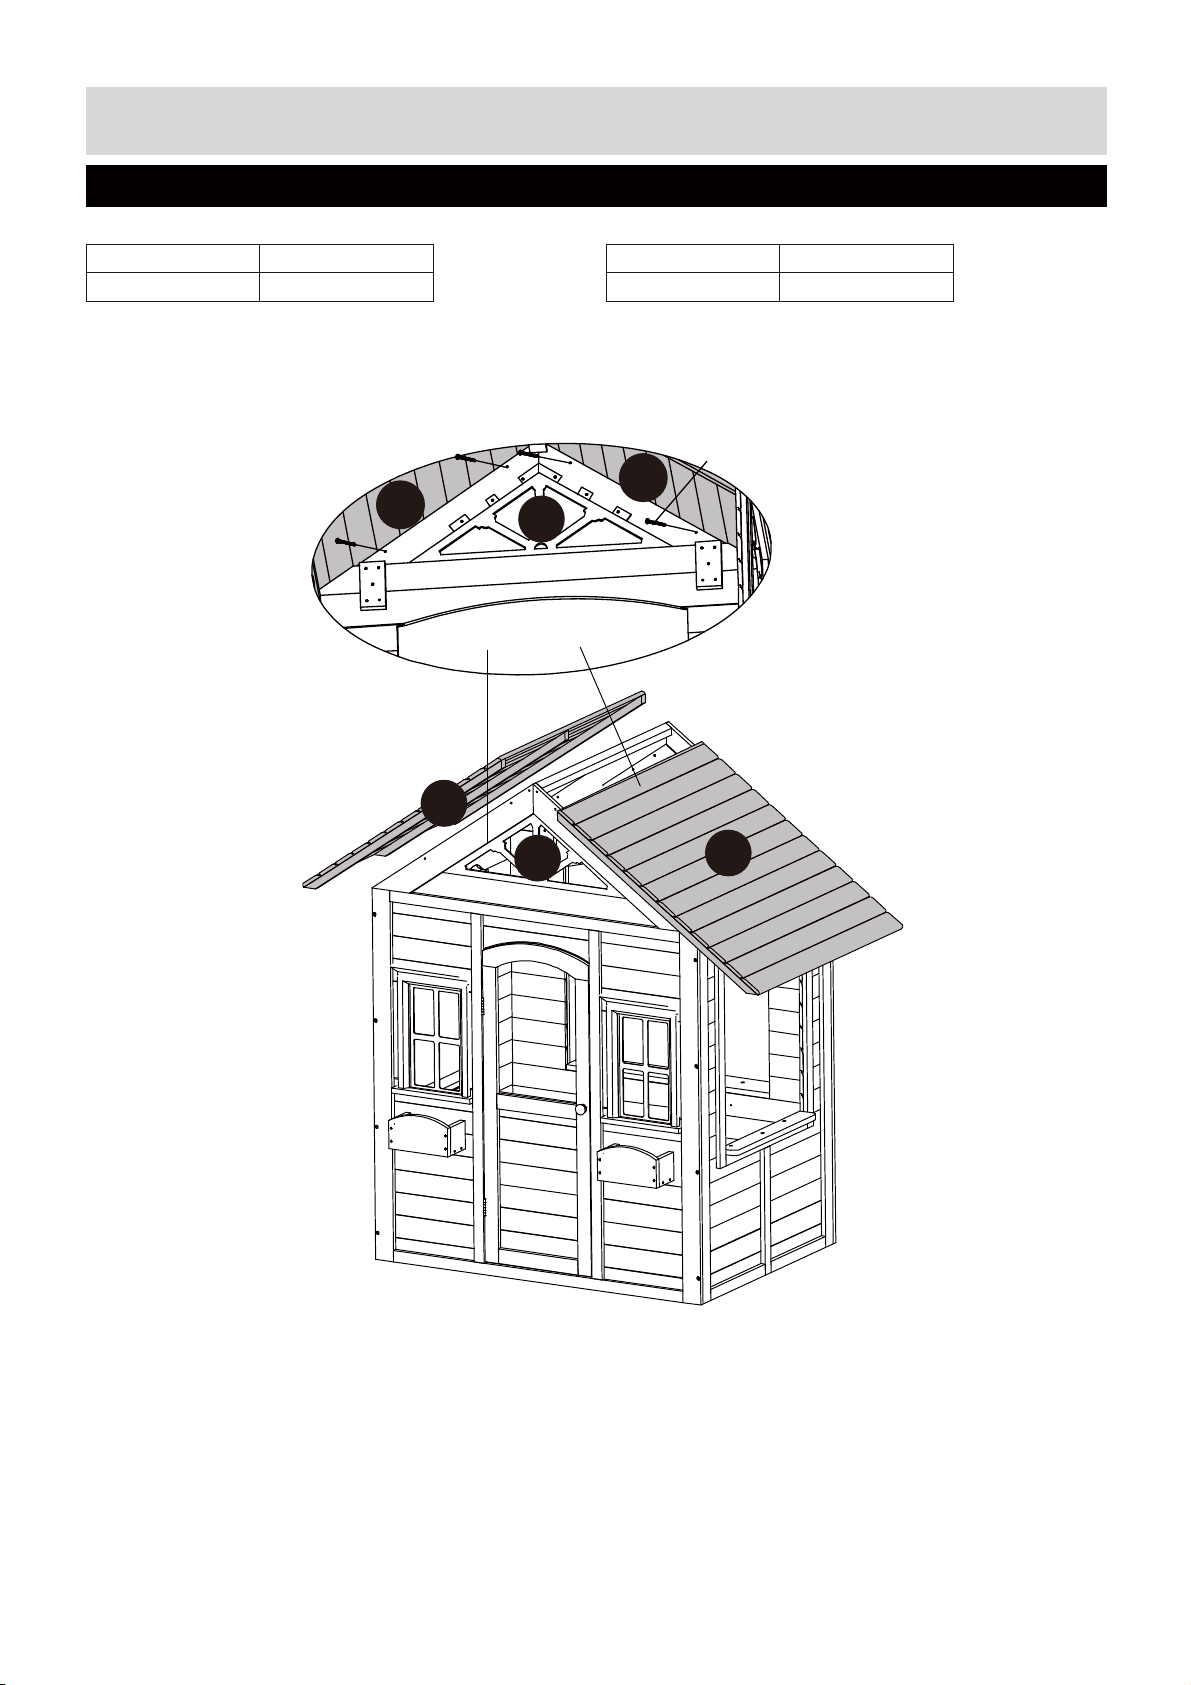
Assembly Instructions
Step 6
Wood Boards Needed: Hardware Needed:
Part No. Quantity Part No. Quantity
W10 2 pieces S5 8 pieces
Connect part #W10 to part #W8, using S5 (8 pieces) from inside as shown.
S5
W10
W10
W8
W10
W8
W10
Congratulations! You have completed installing the playhouse. Please go over the
entire unit to tighten all the screws. Make sure all parts are properly assembled
before allowing children to use.
Page 23

Product Warranty
Sportspower Ltd warrants its products to be free from defects in material and workmanship under normal
use and service
All warranty coverage extends only to the original purchaser of the product and is not assignable or
transferable. The original store or online purchase receipt must be kept as proof of purchase in order for the
warranty to be valid. These documents must be presented in the event of making a claim under warranty.
During the warranty period, Sportspower will provide repair or replacement of defe
thereof covered by the warranty. Any handling, transp
the servicing of the equipment shall be borne by the Purchaser. If the product includes a number of accessories,
only the
The warranty will become void if any defects or damages are associated with the use of unauthorized
replacement parts. All replacement parts must be obtained from Sportspower authorized agents.
All decisions made by Sportspower in respect of the servicing of the equipment (including repairs,
replacements or issues rela
agrees to be bound by such decisions. Any defe
property of Sportspower.
In the event of a product or accessory being replaced during the guarantee, the guarantee on
replacement will expire at the original date, i.e. 180 days from the original purchase date.
This warranty excludes defects caused by the product not being used in accordance with instru
accidental damage, misuse or being tampered with by unauthorized persons.
The Sportspower Limited Warranty does not cover:
(a) Products used for commercial or rental purposes.
(b) Loss or damage to product due to: (i) abuse, repairs and/or tampering by any person other than the
authorized personnel of Sportspower; (ii) negligence and/or misuse (including foreign object, accident,
improper storage, exposure to sun/moisture, excessive temperature, sand, dust, dirt, other pollu
environmental condi
User’s Manual such as improper
(vi) freight or improper transport damages, and (v) improper usage (including use by under-age, over-weight
or excessive number of users permi
(c) Defects, damages or accidents due to the malfunc
unauthorized parts. In such event, Sportspower reserves the right to cancel the Limited Warranty coverage
immediately.
To the extent allowed by the applicable local law, the remedies i
and exclusive remedies.
defe
part or accessory will be replaced.
for 180 days the date of purchase.
equipment or parts
delivery and other incidental charges in respect of
to defects of workmanship or materials) shall be conclusive and the Purchaser
equipment or part thereof replaced shall become the
the
or othe
and failure to follow precau or proper opera stated in the
(iii) fire, flood, lightning strike, wind storm or other acts of God;
ed as stated in the User’s Manual).
on, connec on to or use of non-Sportspower or
n the Limited Warranty are the Purchaser’s sole
r
27
Page 24

Product Warranty
SPORTSPOWER IS NOT RESPONSIBLE OR LIABLE FOR INDIRECT, SPECIAL OR
CONSEQUENTIAL DAMAGES ARISING OUT OF OR IN CONNECTION WITH THE USE OR
PERFORMANCE OF THE PRODUCT OR OTHER DAMAGES WITH RESPECT TO ANY
ECONOMIC LOSS, LOSS OF PROPERTY, LOSS OF REVENUE OR PROFITS, LOSS OF
ENJOYMENT OR USE, COST OF REMOVAL, INSTALLATION OR OTHER CONSEQUENTIAL
DAMAGES.
PLEASE NOTE: ANY REPAIRS OR REPLACEMENTS MUST BE MADE USING AUTHORIZED
SPORTSPOWER PARTS IN ORDER FOR THIS WARRANTY TO BE VALID.
DO NOT RETURN PRODUCT TO THE STORE. PLEASE CONTACT OUR CUSTOMER SERVICE
FOR PARTS OR ASSEMBLY INSTRUCTIONS. STORES ARE NOT EQUIPPED TO PROVIDE
CUSTOMER SERVICE FOR THIS PRODUCT.
DO NOT RETURN PRODUCT TO THE STORE. FOR CUSTOMER SERVICE OR REPLACEMENT
PARTS, PLEASE CALL (+44) 0330 0904 420, or Email [email protected] or visit
www.sportspowerspares.com
Sportspower Ltd.
20/F, PARKVIEW CENTRE, 7 LAU LI STREET, CAUSEWAY BAY, HONG KONG
www.sportspowerltd.net
28
SP-26-WP612R-SMYTH-19001
 Loading...