

Sports Play 901-801 EXPLORER Installation Instruction
3/1/15
1
901-801 EXPLORER
INSTALLATION INSTRUCTION INSTALLATION INSTRUCTION
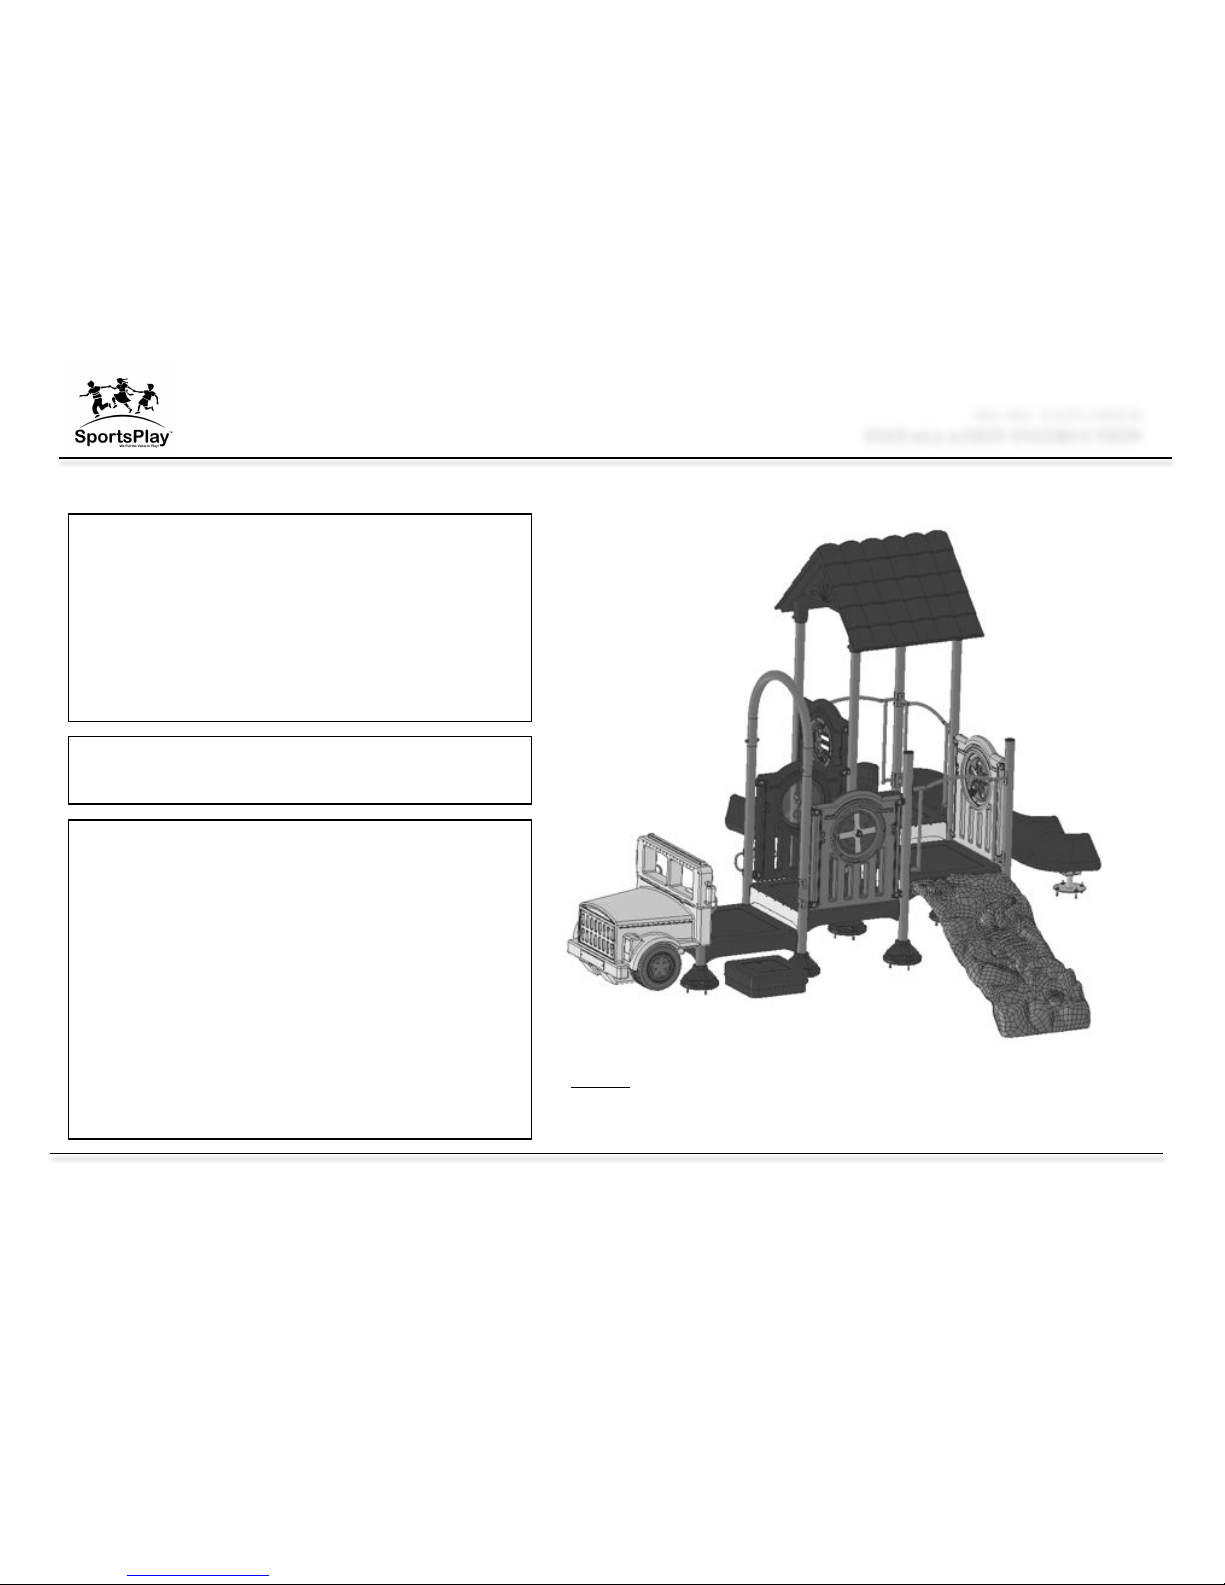
INSTALLATION DETAILS
! Recommended crew (Adult): 2
! Installation time: 5 hours + concrete and ground
prep
! User age: 2-5
! Use zone: 32 X 31
! Weight: 1,455 lbs
SURFACING: Use of safety surfacing in compliance
with ASTM specification F1292 is required.
MAINTENANCE:
! As the owner of the playground you are
responsible for maintenance of the equipment and
play area. A maintenance schedule must be
developed and the equipment inspected frequently.
! Be sure to inspect surfacing for foreign objects that
could cause injury and that sufficient surfacing is
in place in accordance with ASTM and CPSC
standards.
NOTE: Keep a copy of these instructions on file to
assist you with maintenance and replacement parts.
3/1/15
2
901-801 EXPLORER
INSTALLATION INSTRUCTION INSTALLATION INSTRUCTION
3/1/15
3
901-801 EXPLORER
INSTALLATION INSTRUCTION INSTALLATION INSTRUCTION
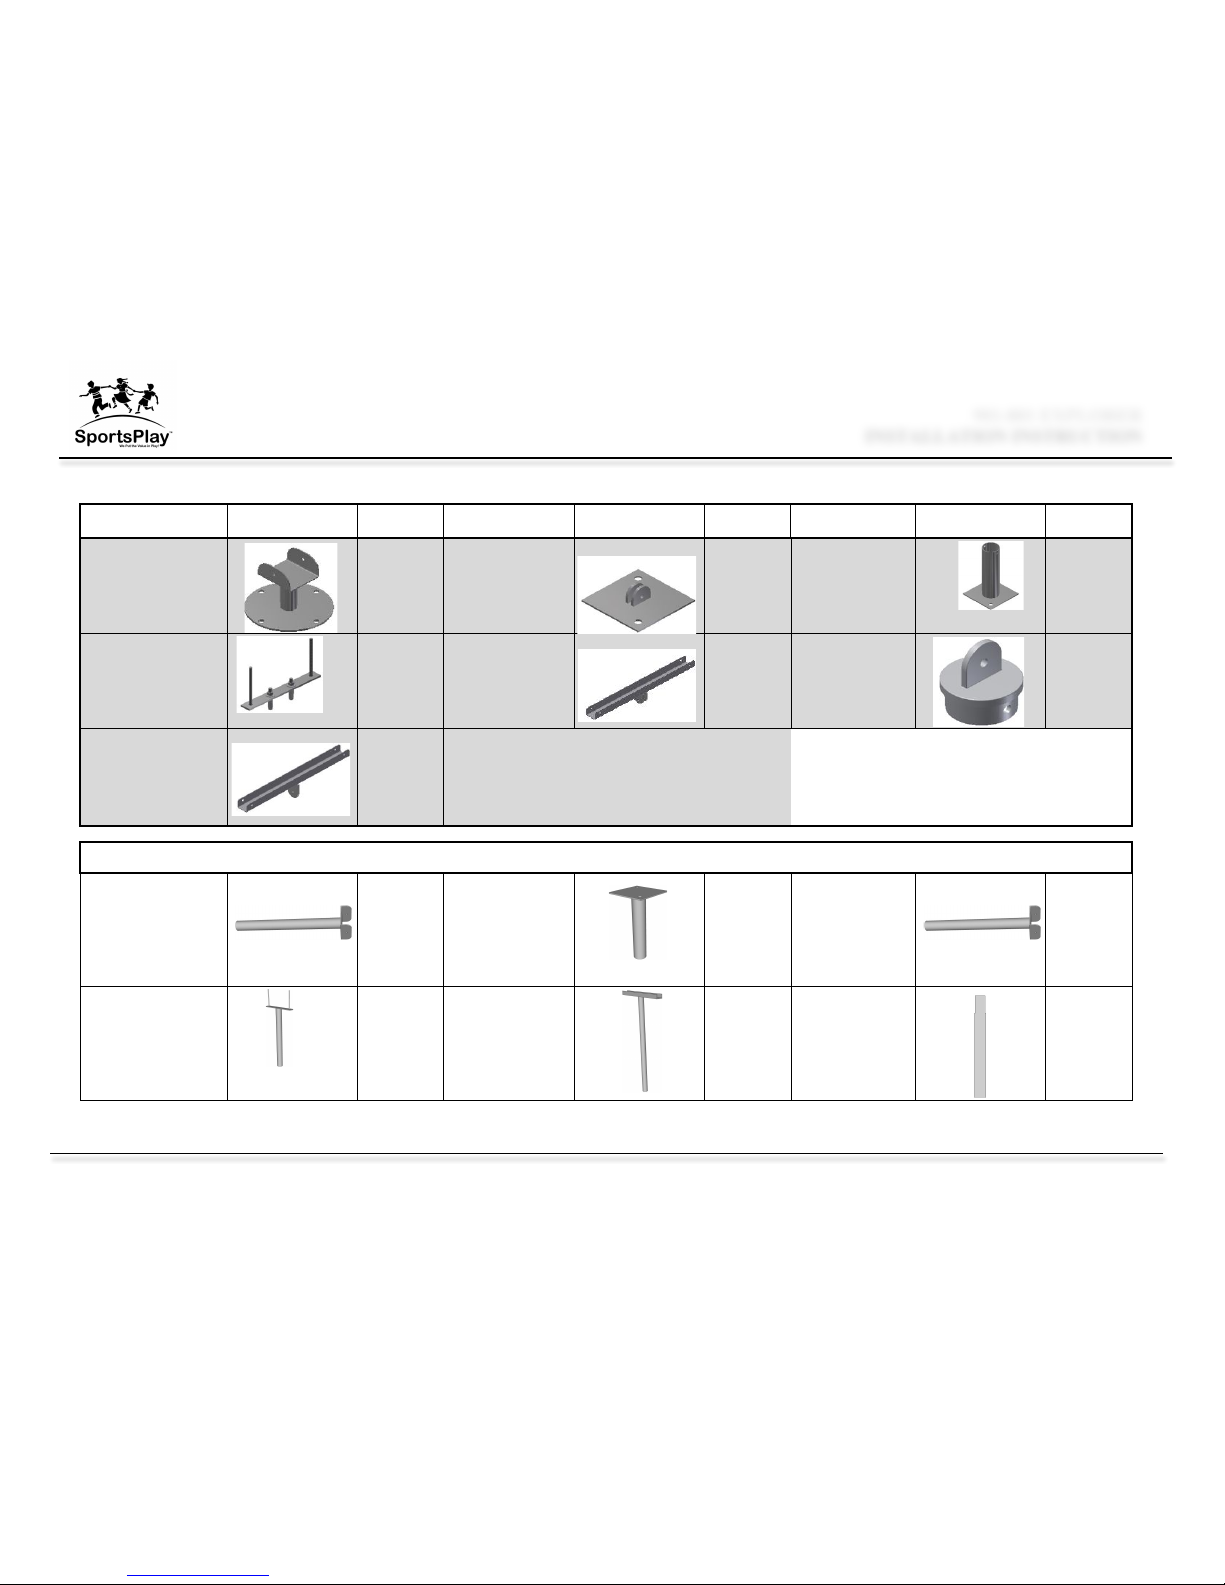
PART%NUMBER/DESCRIPTION
IMAGE
QTY
PART%NUMBER/DESCRIPTION
IMAGE
QTY
PART%NUMBER/DESCRIPTION
IMAGE
QTY
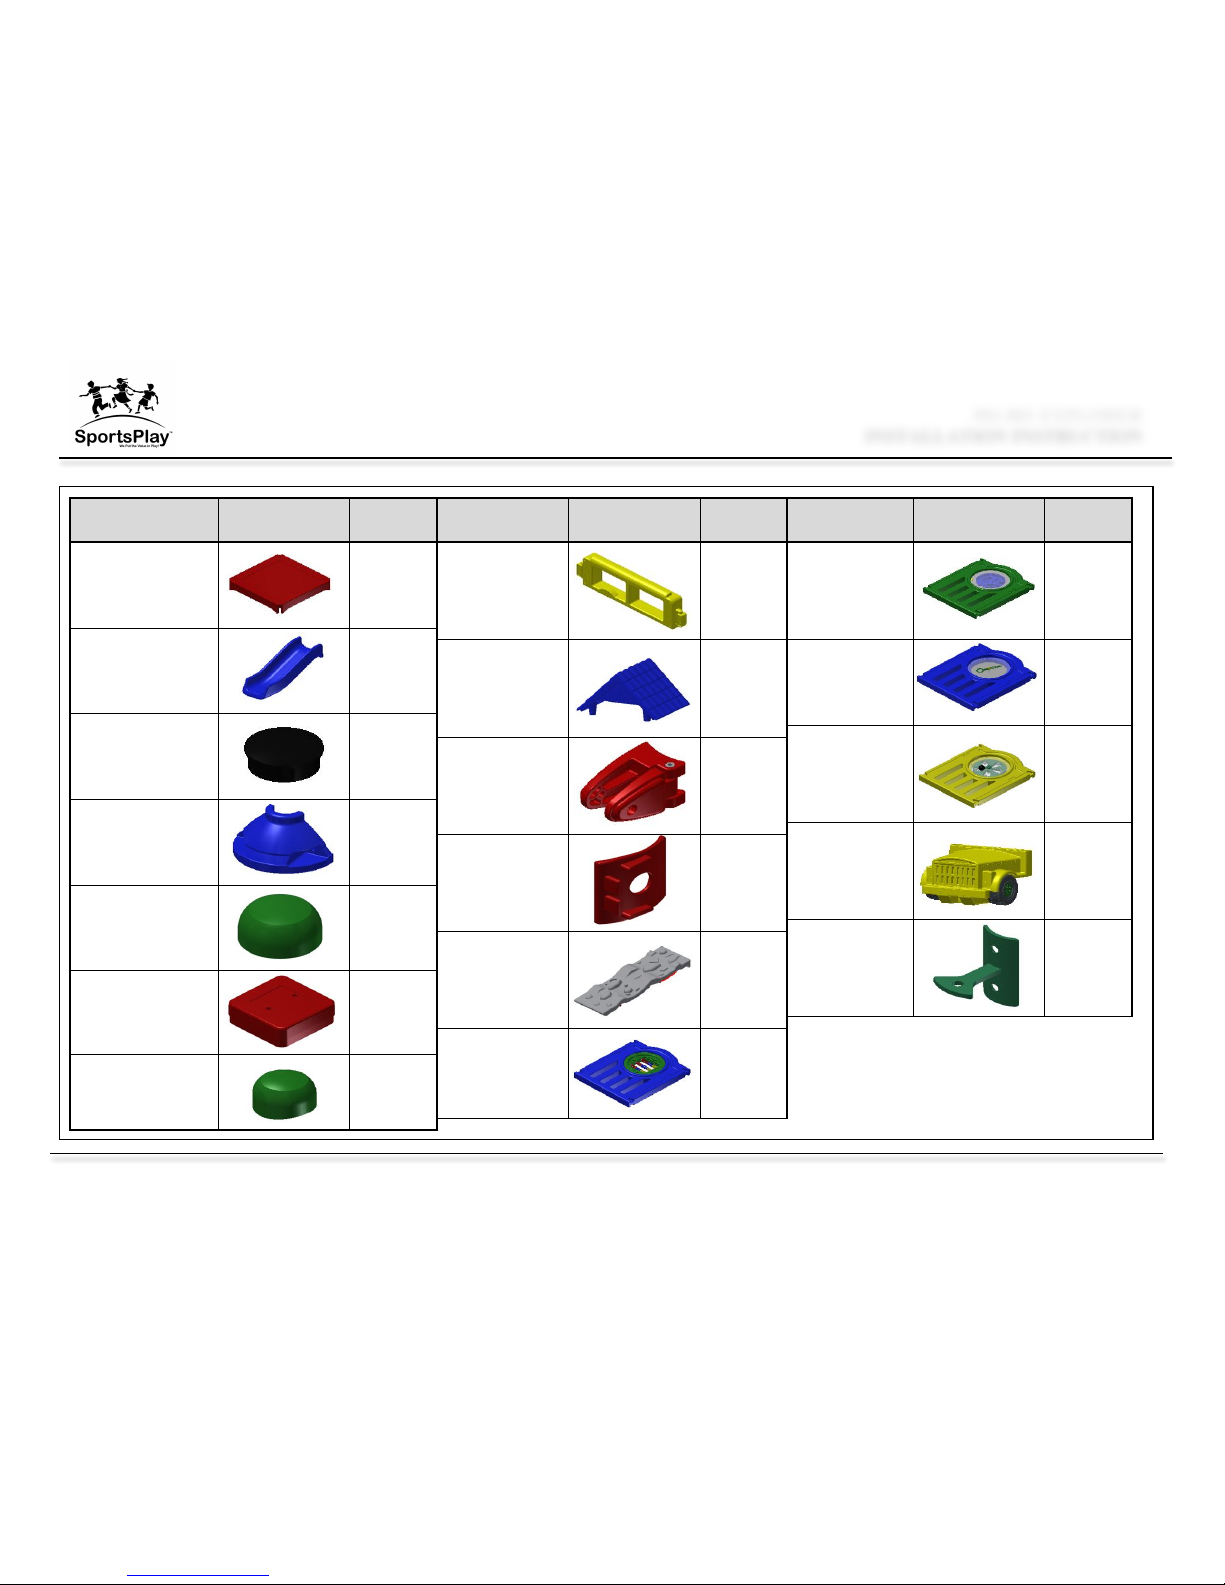
YP.EX.99.01.01
PLATFORM
4
H.02.03.037
BLACK%COVER
2
YP.EX.99.06.01
SLIDE
2
YP.EX.99.04.01
POST%COVER
20
H.02.04.009
BOLT%COVER
90
H.02.04.010
BOLT%COVER%RADIUS
10
YP.EX.99.12.01
STEP
1
YP.EX.99.07.01
ROOF
1
YP.EX.99.09.01%
JEEP%WINDOW
1
16
YL.EX.99.11.01
DINO%CLIMB
1
YY.EX.01.01.01
EXPLORER%ABACUS%WALL
1
YY.EX.01.02.01
EXPLORER%LABYRINTH%
WALL
1
H.02.04.047
CLAMP
YL.EX.99.07.01
PLATFORM%CONNETION%
PART
16
16
H.02.04.083
FLANGE
YY.EX.01.04.01
EXPLORER%JUMPING%
BALLS%WALL
1
YY.EX.01.01.01
EXPLORER%JEEP%BODY
1
3/1/15
4
901-801 EXPLORER
INSTALLATION INSTRUCTION INSTALLATION INSTRUCTION
3
YL.EX.99.11.01,,,,,,,,,,,,,,,,,,,,,,,,,
SLIDE,GUARD,
YL.EX.99.04.01,,,,,,,,,,,,,,,U,
SHAPED,PIPE
1
YL.EX.99.17.01,,,,,,,,,
HANDHOLD,WITH,
ROUNDED,MOUNTING,
PLATE,
2
YL.EX.99.016.01,,,,,,,,,
HANDHOLD
2
YL.EX.99.03.01.002,,POST,
100,CM
1
YL.EX.99.03.01.001,,POST,
100,CM
1
YL.EX.99.01.01.004,,POST,280,
CM
1
YL.EX.99.01.01.002,,POST,280,
CM
1
YL.EX.99.15.01.001,,POST,
200,CM
1
YL.EX.99.15.01.002,,POST,
200,CM
1
YL.EX.99.01.01.003,,POST,280,
CM
YL.EX.99.01.01.001,POST,280,
CM,
1
PART%NUMBER/DESCRIPTION
IMAGE
QTY
PART%NUMBER/DESCRIPTION
IMAGE
QTY
PART%NUMBER/DESCRIPTION
IMAGE
QTY
YL.EX.99.02.01.002,,POST,200,
CM
1
YL.EX.99.02.01.001,,POST,200,
CM
1
1

3/1/15
5
901-801 EXPLORER
INSTALLATION INSTRUCTION INSTALLATION INSTRUCTION
!"#$"#%"#&#''''''''''''''''''''''''''''
()*+'%#,-#'.)/01'!231'
!2,'425'63*7308921
$
!"#$"#%"#:;'''''''''''''''''''''''''''''
()*+'<%#,=#'!2,'!231
>
!"#$"#%"#%&'''''''''''''''''''''''''''''
()*+'%#,%=#'!2,'!231'
$
%&
!"#$"#-"#%;'''''''''''''''''''''''''''''''''''
0/+'<%#'?8+!'@8(2.
&:
!"#$"#%"%#>'''''''''''''''''''''''''
.)/01'!23121'80),'()*+'
<%#,:#'
&#
!"#$"#&"##;'''''''''''''''''''''''''''
?3A!2.'<%#'
;#
!"#$"#%"#>$'''''''''''''''''''''
()*+'!2,'!231'%#B%%#'
:
!"#$"#:"##='''''''''''30C!).
=>
QTY
!"#$"#D"#$%'''''''''''''
E!8**8EA'!231'AC.2?'
$F;,>=''63*7308921
$>
''!"#$"#-"#%&'''''''''''''''
05*)0'80A2.+'*)C4'0/+'
<;'63*7308921
!"#$"#%"#%D''''''''''''''''''''
()*+'%#B%&#'!2,'!231
%>
!"#$"#%"%:#'''''''''''''''''''''
()*+';,=='.)/01'!231'
!2,'425'63*7308921
%&
!"#$"#%"%%;'''''''''''''''''''''''
()*+'%#,$#'.)/01'!2,'
425'!231
!"#$"#%"#=='''''''''''''''''''
()*+'%#,D#'!2,'!231
%&
!"#$"#%"%>$'''''''''''''''''''
()*+'%#,=#'.)/01'
!231'!2,'425'
63*7308921
$
PART%NUMBER/DESCRIPTION
IMAGE
QTY
!"#$"#%"#D>'''''''''''''''''''
()*+'%#B%>#'.)/01'
!231'!2,'425
%#
!"#$"#%"#$='''''''''''''''''''
()*+'%#,&#'!2,'!231'
>#
PART%NUMBER/DESCRIPTION
IMAGE
%&
!"#$"#="##:''''''''''''''''''''
.872+'$B%=
$
PART%NUMBER/DESCRIPTION
IMAGE
QTY
3/1/15
6
901-801 EXPLORER
INSTALLATION INSTRUCTION INSTALLATION INSTRUCTION
1
YL.EX.99.06.01,,,,,,,,,,,,,,,
DINO,CLIMBING,SHORT,
GROUND,CONNECTION,
METAL
1
POST,EXTENSION
10
ITEMS%BELOW%ONLY%INCLUDED%FOR%IN7GROUND%MOUNT
1
1
ITEMS%SHADED%THIS%COLOR%ARE%ONLY%
INCLUDED%FOR%SURFACE%MOUNT
YL.EX.99.05.01.IG,,,,,,,,,,,,,,,,,INJ
GROUND,SLIDE,GROUND,
MOUNTING,METAL
2
YL.EX.99.14.01.IG,,,,,,,,,,,,,,,,,INJ
GROUND,,STEP,GROUND,
MOUNTING,METAL
1
YL.EX.99.06.01.IG,,,,,,,,,,,
DINO,CLIMBING,SHORT,
GROUND,CONNECTION,
METAL,
1
YL.EX.99.11.01.001,,,,,,,,,POST,
TO,DINO,CONNECTION,PART,
1
YL.EX.99.11.01.002,,,,,,,
POST,TO,DINO,
CONNECTION,PART,
1
H.04.02.037,,,,,,,
ALUMINUM,,COVER
1
YL.EX.99.13.01,,,,,,,,,DINO,
CLIMBING,DOWN,TALL,
CONNECTION,POST
YL.EX.99.05.01,,,,,,,,SLIDE,
GROUND,MOUNTING,METAL
2
YL.EX.99.06.01,,,,,,,,,,,,,,,,,
DINO,CLIMBING,SHORT,
GROUND,CONNECTION,
METAL,
YL.EX.99.14.01,,,,,,,,,STEP,
GROUND,MOUNTING,METAL
1
YL.EX.99.13.01.IG,,,,,,,,,,,,
DINO,CLIMBING,DOWN,
TALL,CONNECTION,POST
PART%NUMBER/DESCRIPTION
IMAGE
QTY
PART%NUMBER/DESCRIPTION
IMAGE
QTY
PART%NUMBER/DESCRIPTION
IMAGE
QTY
3/1/15
7
901-801 EXPLORER
INSTALLATION INSTRUCTION INSTALLATION INSTRUCTION
3/1/15
8
901-801 EXPLORER
INSTALLATION INSTRUCTION INSTALLATION INSTRUCTION
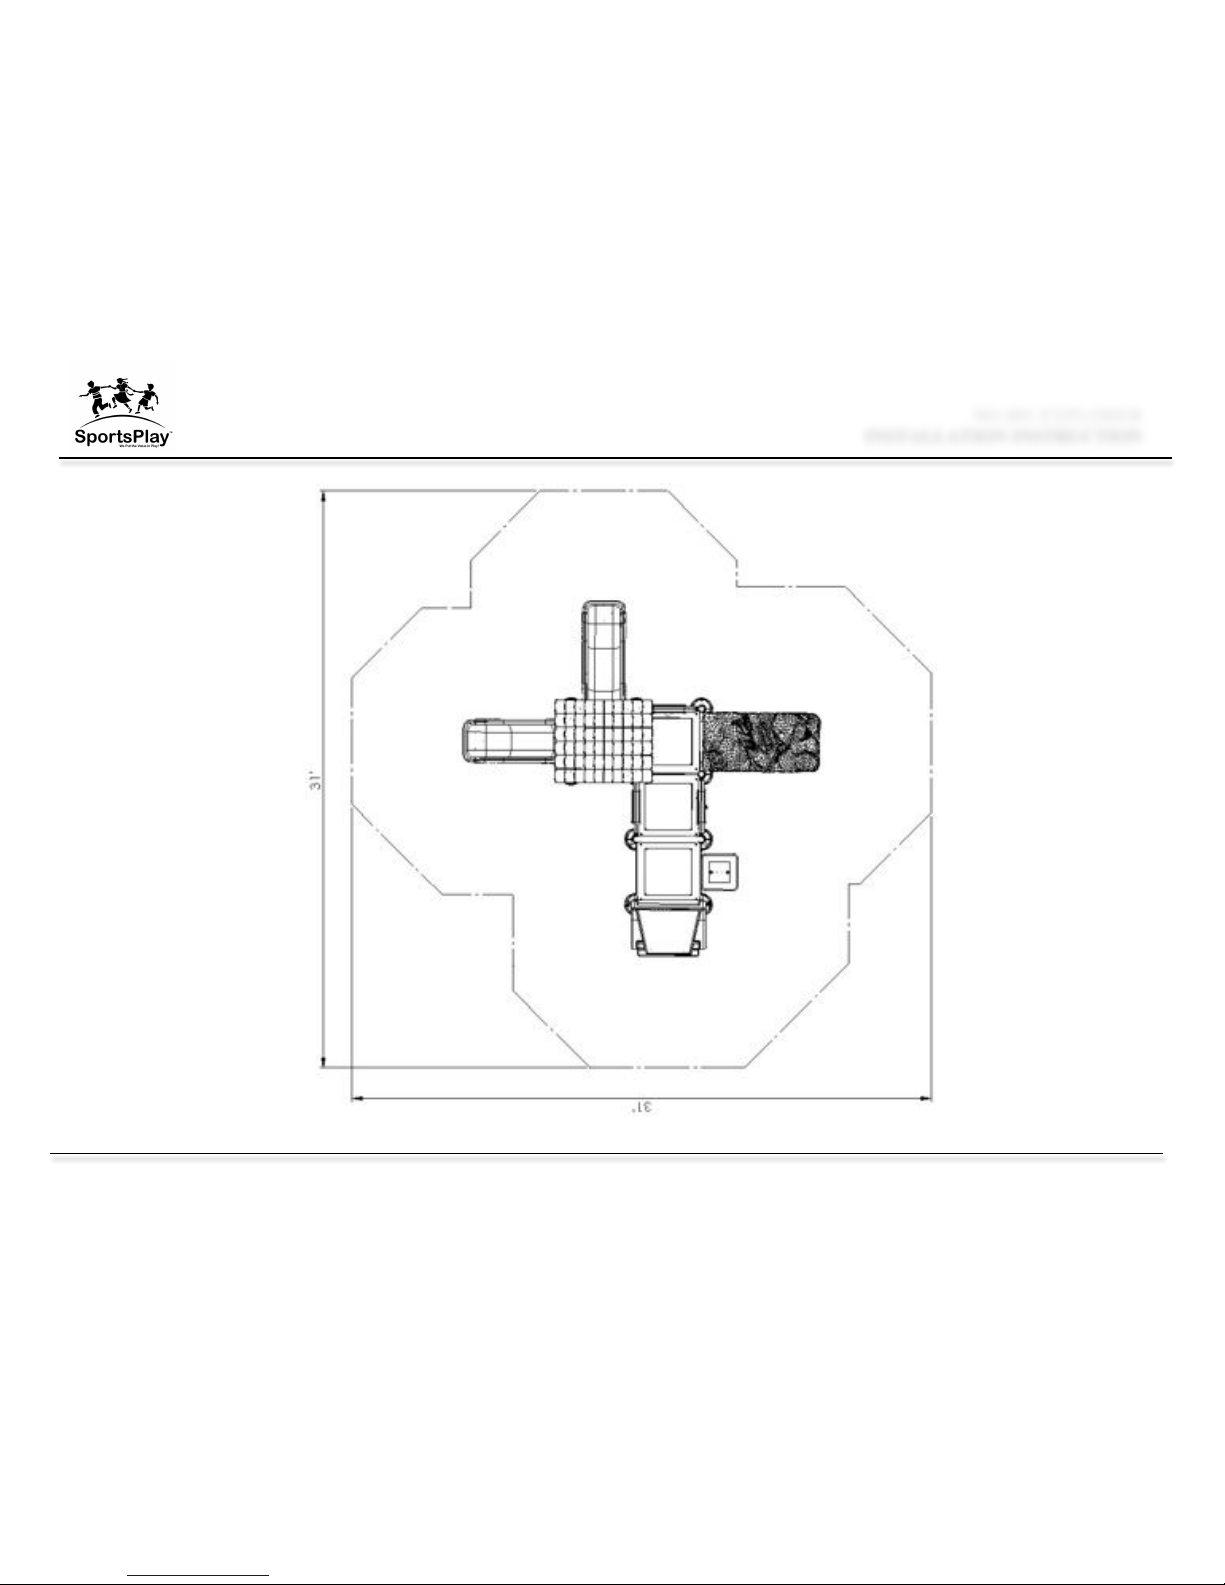
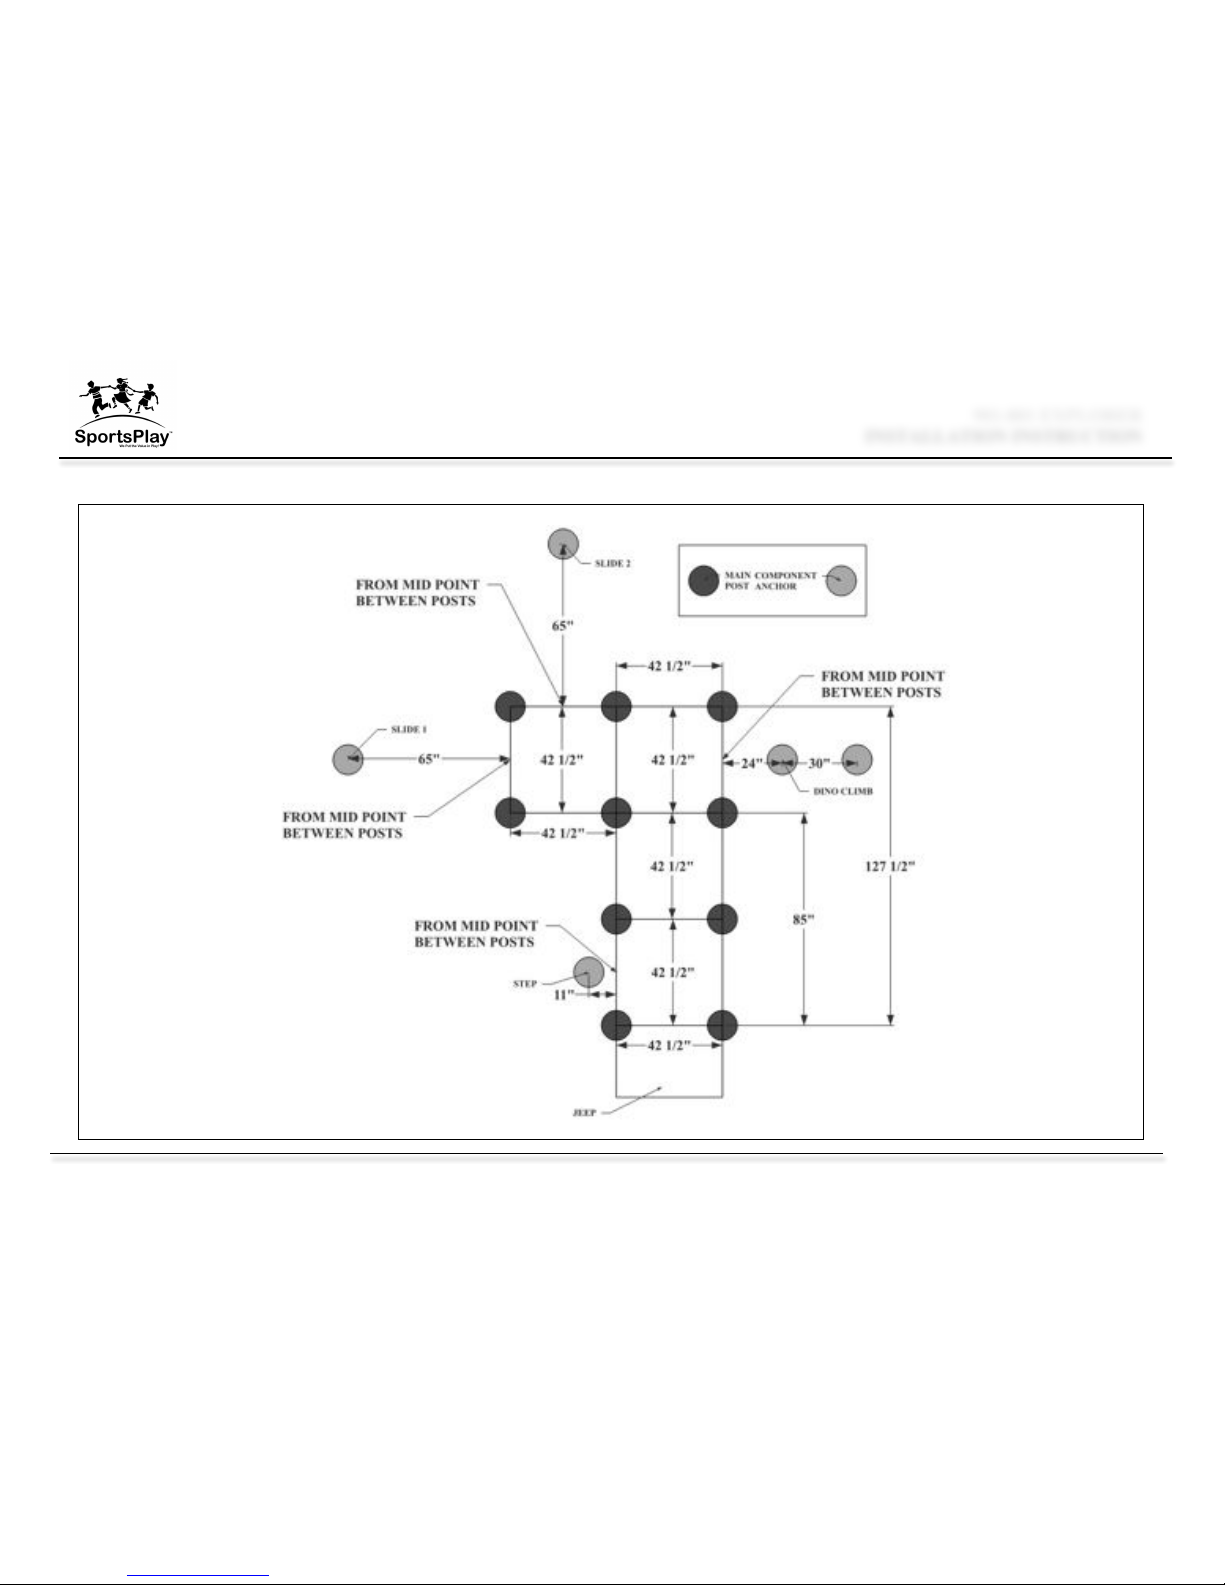
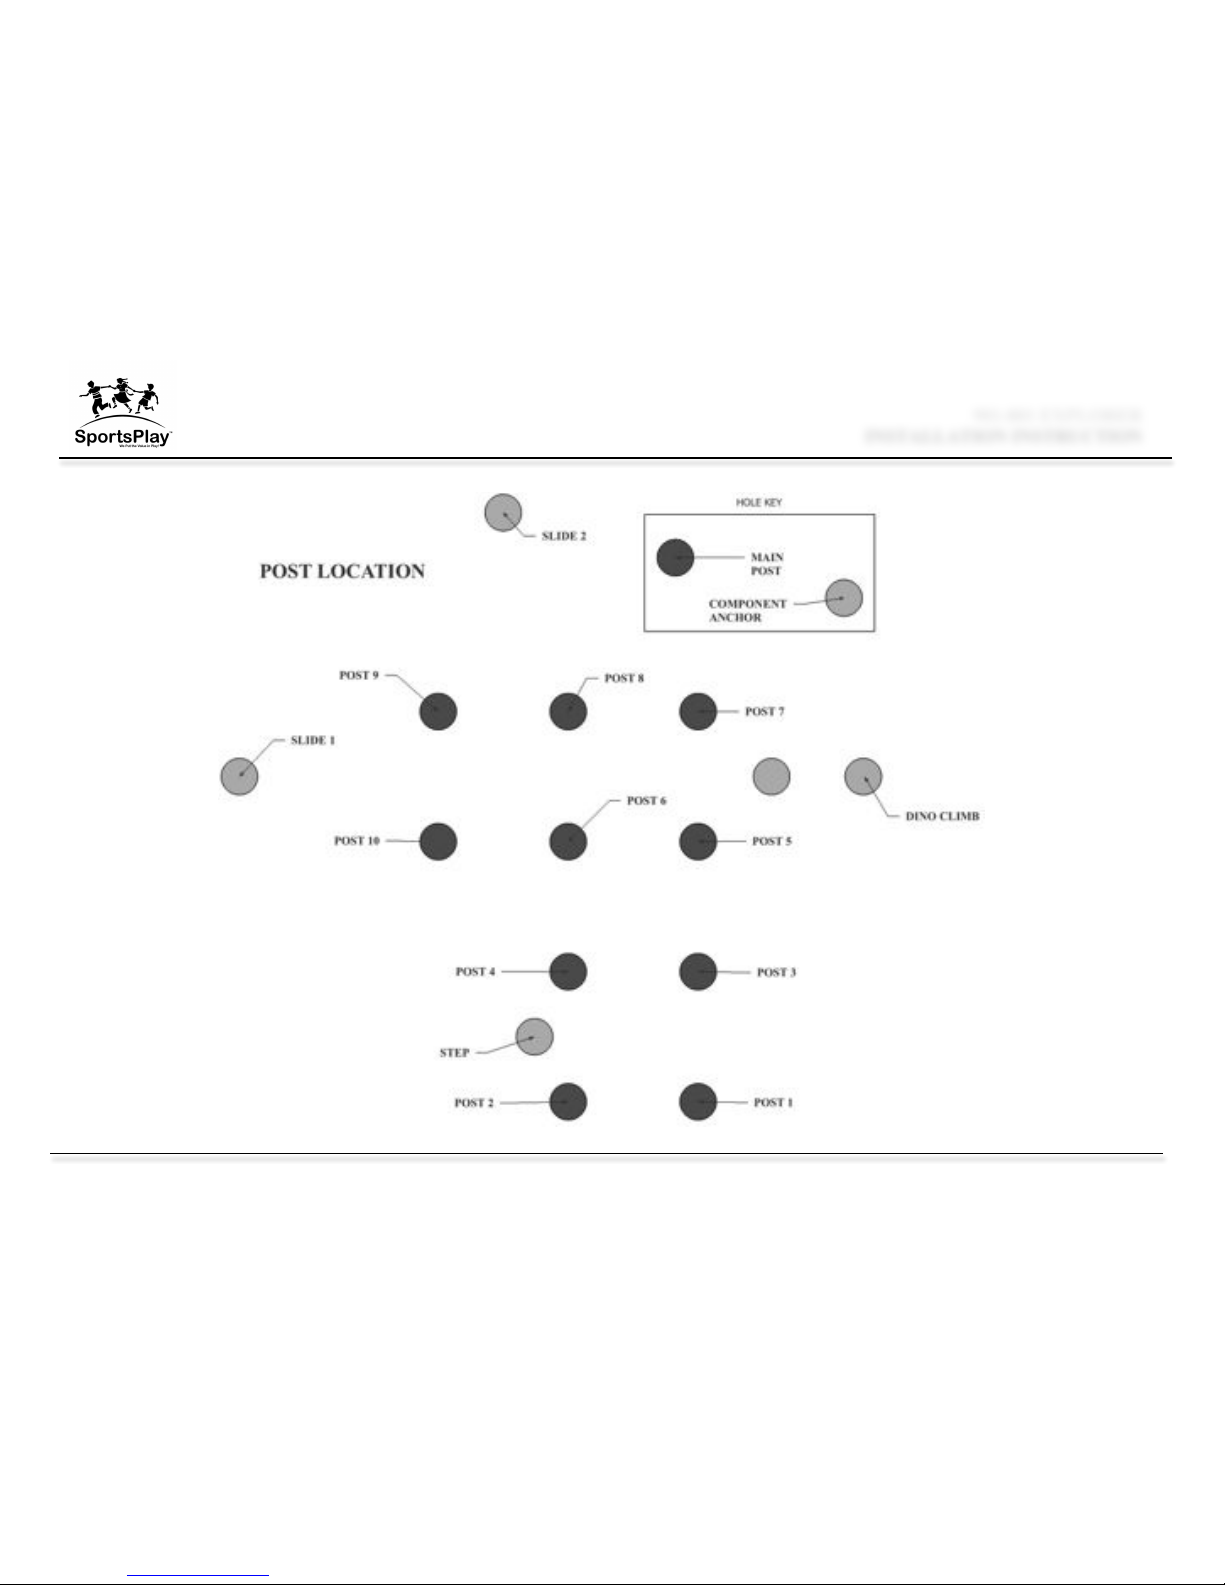
FOOTING DIAGRAM
3/1/15
9
901-801 EXPLORER
INSTALLATION INSTRUCTION INSTALLATION INSTRUCTION
3/1/15
10
901-801 EXPLORER
INSTALLATION INSTRUCTION INSTALLATION INSTRUCTION
Important
Please read completely before beginning installation.
This equipment has been designed for safety as well as fun. This equipment has
been designed to reduce injuries and therefore must be installed “Step by Step”
per our Instructions.
The U.S. Consumer Product Safety Commission (CPSC) published a report
stating 79% of all playground injuries treated in U.S. Emergency Rooms was the
result of a fall. It is critical that you refer to the Protective Surfacing section of
these instructions, located on the next page prior to installing your playground.
As the owner you are responsible for the safe installation of not only the play
equipment, but also the safety of the site.
When your receive your playground
• Identify all parts by comparing them to the part list.
• Always compare the number of pallets, cartons or other items the BOL
has listed with the number actually received. Note any discrepancies on
the BOL.
• Also note any obvious damage to the packing materials, pallets or
components on the BOL.
Equipment should be inventoried and installed within a few days of receipt. The
packing materials are meant to protect the equipment during shipping and not for
storage. Heat, weather and sunlight can damage the packing materials, which
can impact the components. If storage is required you must store the equipment
in a controlled environment away from heat, moisture and sunlight. SportsPlay
recommends carefully unpacking the unit and taking an inventory before storing
the equipment. Care should be taken with all powder coated
• parts to prevent damage to the coating. Additionally all plastic panels
need to be stored flat to prevent warping.
• You have 30 days from receipt of your equipment to file a claim for
missing or damaged parts.
Before you begin
Review your playground footing and top view drawings to ensure your site
is large enough. The use zone for playground structures extends 6’ (72”)
from its perimeter. Remember that you may not overlap the use zone of any
slide with another playground. These guidelines are available from the
CPSC (contact information for the CPSC is located on the next page).
• Read through the entire instruction booklet before beginning the actual
installation.
• Before you begin preparing the site or digging any holes you must first
contact you local utility companies so they can visit the site and mark all
of the buried utilities. In the U.S. you may call 811 and your call will be
routed to your local utility center.
• This equipment was designed to install on a clear and level site. There
should be no more than 3” of grade variations in a 10’ span.
• Footing layout is the first critical step once the installation begins. Mark
all holes using the footing diagram. Prior to digging holes compare the
measurements from the footing diagram to the actual site markings to
ensure accuracy. Then check it again!
• Our in-ground posts are manufactured to accommodate 12” of
protective surfacing. (12” loose and 9” compacted)

3/1/15
11
901-801 EXPLORER
INSTALLATION INSTRUCTION INSTALLATION INSTRUCTION
• Our surface mount posts are manufactured for surfacing levels of 3” –
12”. At 12” the surfacing will be as high as the slide bed but when
compacted there will be space. At this deck height it is ok to have the
slide bed end at the top of the surfacing.
• Do not leave the jobsite un-attended during installation unless all access
points to the play area are secure, all bolts and fasteners are tight and all
ground holes are covered.
• SportsPlay Equipment inc. has provided two warning labels that state:
“WARNING – Installation over a hard surface such as concrete, asphalt
or packed earth may result in serious injury or death from falls.” These
labels must be installed on vertical posts as per ASTM F1487.
Instructions for the placement of these labels are included in this
booklet.
• SportsPlay will provide manufacturer identification labels that must be
installed on the structure during installation per ASTM F1487.
Installation instructions for these labels are included in this instruction
manual.
• Labels must be replaced when they are no longer legible. Contact your
distributor for replacement labels.
• Evaluate the site for drainage. To ensure good drainage around the
equipment consult a local professional.

3/1/15 12
901-801 EXPLORER
INSTALLATION INSTRUCTION INSTALLATION INSTRUCTION
Safety Surfacing
WARNING! – INSTALLATION OVER A HARD SURFACE SUCH AS
CONCRETE, ASPHALT OR PACKED EARTH MAY RESULT IN
SERIOUS INJURY OR DEATH FROM A FALL
Because accidental falls are likely to occur around play equipment, SportsPlay
Equipment Inc. recommends that a resilient safety surfacing that will meet
standard ASTM F1292 be placed under and around the structure and extend
throughout the entire use zone.
SportsPlay Equipment Inc. does not manufacture safety surfacing. All
manufacturers of safety surfacing require different depths of surfacing for fall
heights. Consult your surfacing supplier about the required safety surfacing
depth for your play equipment.
This equipment was designed for multiple mounting options, all of which
require safety surfacing. This unit is designed for 12” of safety surfacing
that compacts to 9”. If using the in ground post extensions you will have to
adjust the depth of the post depending on the amount of surfacing the
surfacing supplier recommends. The surface mount (concrete or spike
method) can still accommodate this amount of surfacing but the surfacing
will actually sit on top of the post feet and step.
Refer to the CPSC Handbook for Public Playground Safety for the recommended
type and depth of the protective surfacing as well as all other playground safety
concerns.
For a copy of the most current issue of the CPSC Handbook for Public
Playground Safety, write to:
For a copy of either the standard for surfacing (ASTM F1292) or for play
equipment (ASTM 1487) write to:
You must consider the type of safety surfacing you will use before beginning
the installation process. There are two general types, organic/loose fill or
synthetic unitary (pour in place). You must know which type of surfacing
you are going to use prior to installing the playground.
If loose fill surface material is to be used (example: wood mulch) you will
need to consider containment borders. There are many products to choose
from including hard plastic and natural products such as wood (Creosoted
railroad ties are NOT recommended for use as borders in a play area). Loose
fill materials are easily displaced so use of some type of containment border
is necessary to keep the surfacing material inside the intended area. Some
customers also prefer to have a weed mat installed to prevent weed growth.
Choose a mat that will prevent growth but will also allow for drainage.
 Loading...