

Page 1
BASEBALL PITCHING MACHINES
BASEBALLBASEBALL
Includes: OPERATION · SETUP · USE & CARE · SERVICE
REV 083115
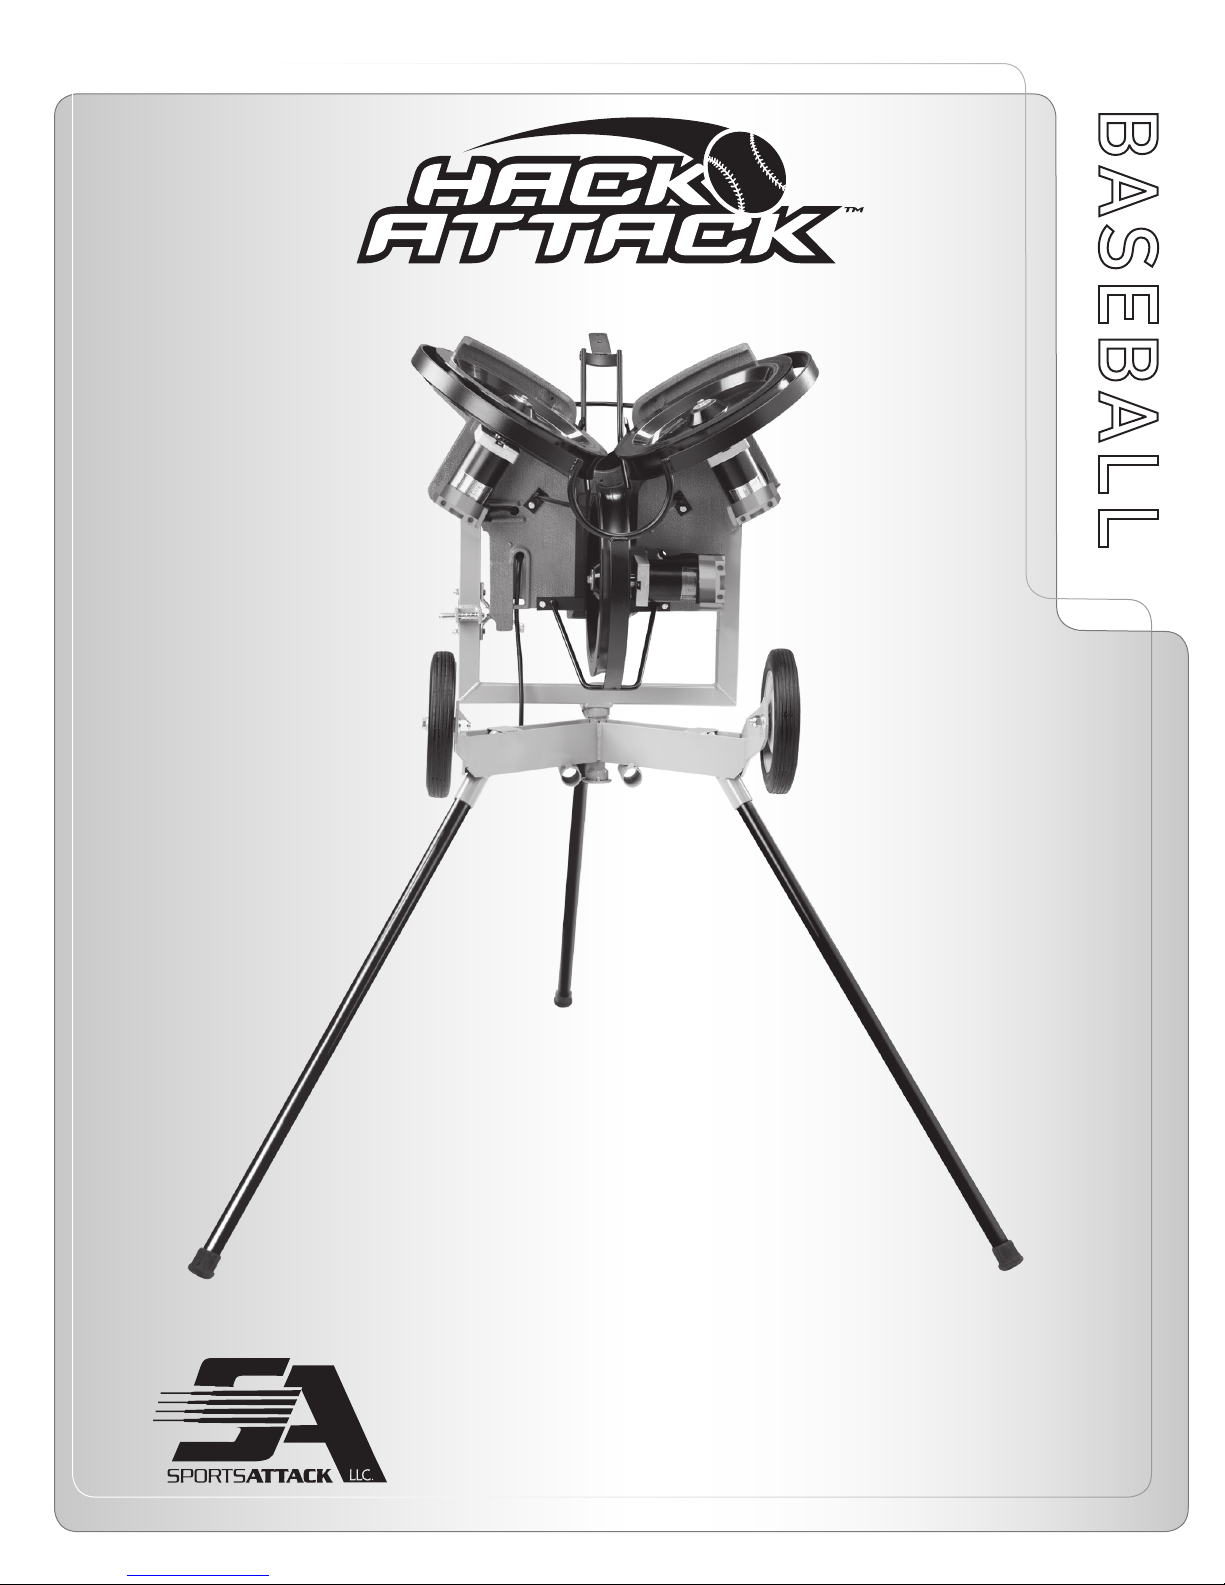
HACK ATTACK™ PITCHING MACHINE
PATENTS APPLIED FOR
INSTRUCTION MANUAL
SPORTS ATTACK, LLC. • 800-717-4251 • sportsattack.com
Page 2

WARRANTY STATEMENT
What is most important to Sports Attack is that your machine meets your expectations of
quality and performance. We stand behind the material and workmanship of our machines
for five (5) years from the date or original purchase for institutional and residential use and
one (1) year for commercial environments, with the following exceptions:
-Throwing Wheels are warranted for two (2) years;
-Electronic Controller is warranted for two (2) years; and,
-Throwing Wheel Motors are warranted for two (2) years.
This warranty excludes any cosmetic issues or normal wear and tear of the unit, and is not in
effect if the machine has been misused, misapplied, improperly assembled, or modified without the express written permission of Sports Attack. In addition, this warranty does not apply
to damage in transit, in any accident unrelated to the direct operation of the equipment, or
by fire, flood or act of God.
If you encounter any issues during the warranty period, Sports Attack will quickly get your
machine back in working order. If the warranty repair involves a replacement part, we will
make sure you get both the part and easy instructions for replacement at no cost to you. If a
service person is needed, Sports Attack will pay the pre-approved labor charge to get your
machine back in working order.
Please know that any problem can quickly be resolved with a phone call to our experienced,
responsive customer service department at 800.717.4251. We are here to answer your questions and to make sure your machine provides you years of service.
RETURNS
Sports Attack manufactures the highest quality sports training equipment in the world. If for
any reason you are not satisfied, a machine can be returned within 30 days of receipt for any
reason for a full refund less a 10% restocking fee. Cost of shipping the unit back to Sports Attack will also be the responsibility of the purchaser. Please note that the refund amount may
be reduced by any non-cosmetic damage to the machine.
If you have any questions or concerns, please give our experienced, responsive customer service
department a call at 800.717.4251.
To register the Warranty,
please go to our website:
www.sportsattack.com/warranty
For repairs and service after the
Warranty period, please call:
Sports Attack
Customer Service Dept.
Ph 800-717-4251
Fx 775-345-2883
RETURNS
To return an item, please
contact our Customer Service
Department at 800-717-4251.
A 15% restocking fee will be
charged for any items accepted
for return. It is the customer’s
responsibility to handle the
repacking and shipment (as well
as all associated fees) back to
Sports Attack.
No returns will be accepted after
30 days of receiving product.
Warranty/Shipping
SHIPPING DAMAGE CLAIMS PROCEDURE
NOTE: For your protection, please note that equipment in this shipment was carefully
inspected and packaged by skilled personnel before leaving the factory.
Upon acceptance of this shipment, the transportation company assumes full responsibility
for its safe delivery.
IF SHIPMENT ARRIVES DAMAGED:
1. VISIBLE LOSS OR DAMAGE: Be certain that any visible loss or damage is noted on
the freight bill or express receipt, and that the note of loss or damage is signed by the
delivery person.
2. FILE CLAIM FOR DAMAGE IMMEDIATELY: Regardless of the extent of the damage.
3. CONCEALED LOSS OR DAMAGE: If damage is unnoticed until the merchandise is
unpacked, notify the transportation company or carrier immediately, and file
“CONCEALED DAMAGE” claim with them. This must be done within fifteen (15) days
from the date the delivery was made to you. Be sure to retain the container for inspection.
Sports Attack, LLC. cannot assume liability for damage or loss incurred in transit. We will,
however, at your request, supply you with the necessary documents to support your claim.
HACK ATTACK™ BASEBALL PITCHING MACHINE
SPORTS ATTACK, LLC. • 800-717-4251 • sportsattack.com
xi
Page 3

TABLE OF CONTENTS
Warranty Statement ...................................................................xi
Safety Instructions .................................................................... 2
HACK ATTACK BASEBALL MACHINE OPERATION
Features & Operating Controls ...................................................... 4
Set-up & Preparation ............................................................... 5
Batting Practice .................................................................... 6
Fungo (Fielding Practice) ........................................................... 8
Shutting Down..................................................................... 9
MAINTENANCE & SERVICE
Care, Cleaning & Maintenance......................................................10
Component Replacement.......................................................... 11
Exploded View .................................................................... 13
Parts List.......................................................................... 14
Conversion, Baseball to Softball . . . . . . . . . . . . . . . . . . . . . . . . . . . . . . . . . . . . . . . . . . . . . . . . . . . . 15
SPORTS ATTACK
Product Line ......................................................................16
Table of Contents/Introduction
INTRODUCTION
Thank you for purchasing this Sports Attack, LLC. equipment.
Proper assembly, careful operation and consistent maintenance of this equipment will
ensure that it gives you the very best performance and a long, economical service life.
This manual contains the information needed to properly set up the Hack Attack Baseball
Pitching Machine, and to use, care for and maintain the Hack Attack in a manner which
will ensure its optimum performance.
HACK ATTACK™ BASEBALL PITCHING MACHINE
SPORTS ATTACK, LLC. • 800-717-4251 • sportsattack.com
1
Page 4

SAFETY INSTRUCTIONS
ELECTRICAL SAFETY
Use a 115 volt single phase 3-wire (2 wire with ground) grounded power source.
Up to 200 ft. from power source, use a minimum #14/3 grounded 3-wire 15 amp minimum
rating extension cord.
Over 200 ft. from power source, consult a licensed electrician for required power cord size.
OPERATING SAFETY
CAUTION: Never reach down near moving throwing wheels for any reason! If it is necessary
to reach into the throwing wheels, ALWAYS:
1. Turn all three speed dials to “0”.
2. Turn on/off switch “OFF”.
3. Unplug Hack Attack from power source
4. Wait until the throwing wheels have come to a complete stop before reaching hands or
fingers anywhere near the throwing wheels.
CAUTION: Carefully check Hack Attack for completeness and condition before connecting to
electrical power:
1. Throwing wheels must be tight on the motor shafts
2. Wheel guard and ball chute must be tightly fastened to the throwing head.
Carefully check the throwing wheels frequently for cleanliness, chips and cracks. Do not use
the machine if the throwing wheels are damaged, or if chips or cracks appear in the wheels.
(For damage within Warranty period, see Warranty Statement, page i.)
ALWAYS set the speed controls to “0” before connecting the machine to power. Check that
the speed controls are at “0” before turning the on/off switch “ON.”
WARNING
PERSONAL INJURY HAZARD
Carefully read all instructions in
this manual, and all labels and
warnings on Hack Attack before
using this machine.
Use machine only under adult
supervision. Failure to operate
Hack Attack as described in this
manual can result in severe
personal injury or death.
•
Never loosen the horizontal
swivel lock while pitching to a
batter. If the lock is not secure,
the throwing head could pivot.
A loose swivel lock can allow a
pitch to be inside which could hit
the batter.
ELECTRICAL SHOCK HAZARD
Hack Attack must be connected
to a properly grounded electrical
receptacle.
•
Do not operate on wet ground.
Hack Attack Safety Instructions
Do not allow anyone to walk in front of the machine if it is connected to electrical power.
CAUTION
PERSONAL INJURY HAZARD
Keep hands away from throwing
wheels anytime the machine is
connected to a power source.
•
Carefully check Hack Attack for
completeness and condition
before connecting to electrical
power.
EQUIPMENT ELECTRICAL
DAMAGE
Keep hands away from throwing
wheels anytime the machine is
connected to a power source.
•
Carefully check Hack Attack for
completeness and condition
before connecting to electrical
power.
HACK ATTACK™ BASEBALL PITCHING MACHINE
SPORTS ATTACK, LLC. • 800-717-4251 • sportsattack.com
2
Page 5
SAFETY INSTRUCTIONS (cont’d)
BALL SELECTION
Never mix leather balls with synthetic pitching machine balls.
Be careful not to mix new with old balls or balls from different manufacturers.
Balls must be consistent in type and amount of wear to produce repeatability.
Never use wet balls!
BATTING PRACTICE
The horizontal swivel lock must be securely tightened before the batter approaches the plate.
ALWAYS test and adjust the Hack Attack before a batter steps up to the plate:
1. Adjust so that Hack Attack throws a ball across the plate.
2. Throw test pitches until required velocity and break are reached.
3. Throw several pitches to verify pitch location repeatability.
DO NOT make any speed or pitch location changes while the batter is at the plate.
Batter and pitching machine operator must wear batting helmets.
Only one person at a time should operate the machine.
Always present the ball to the batter before feeding the ball into the machine.
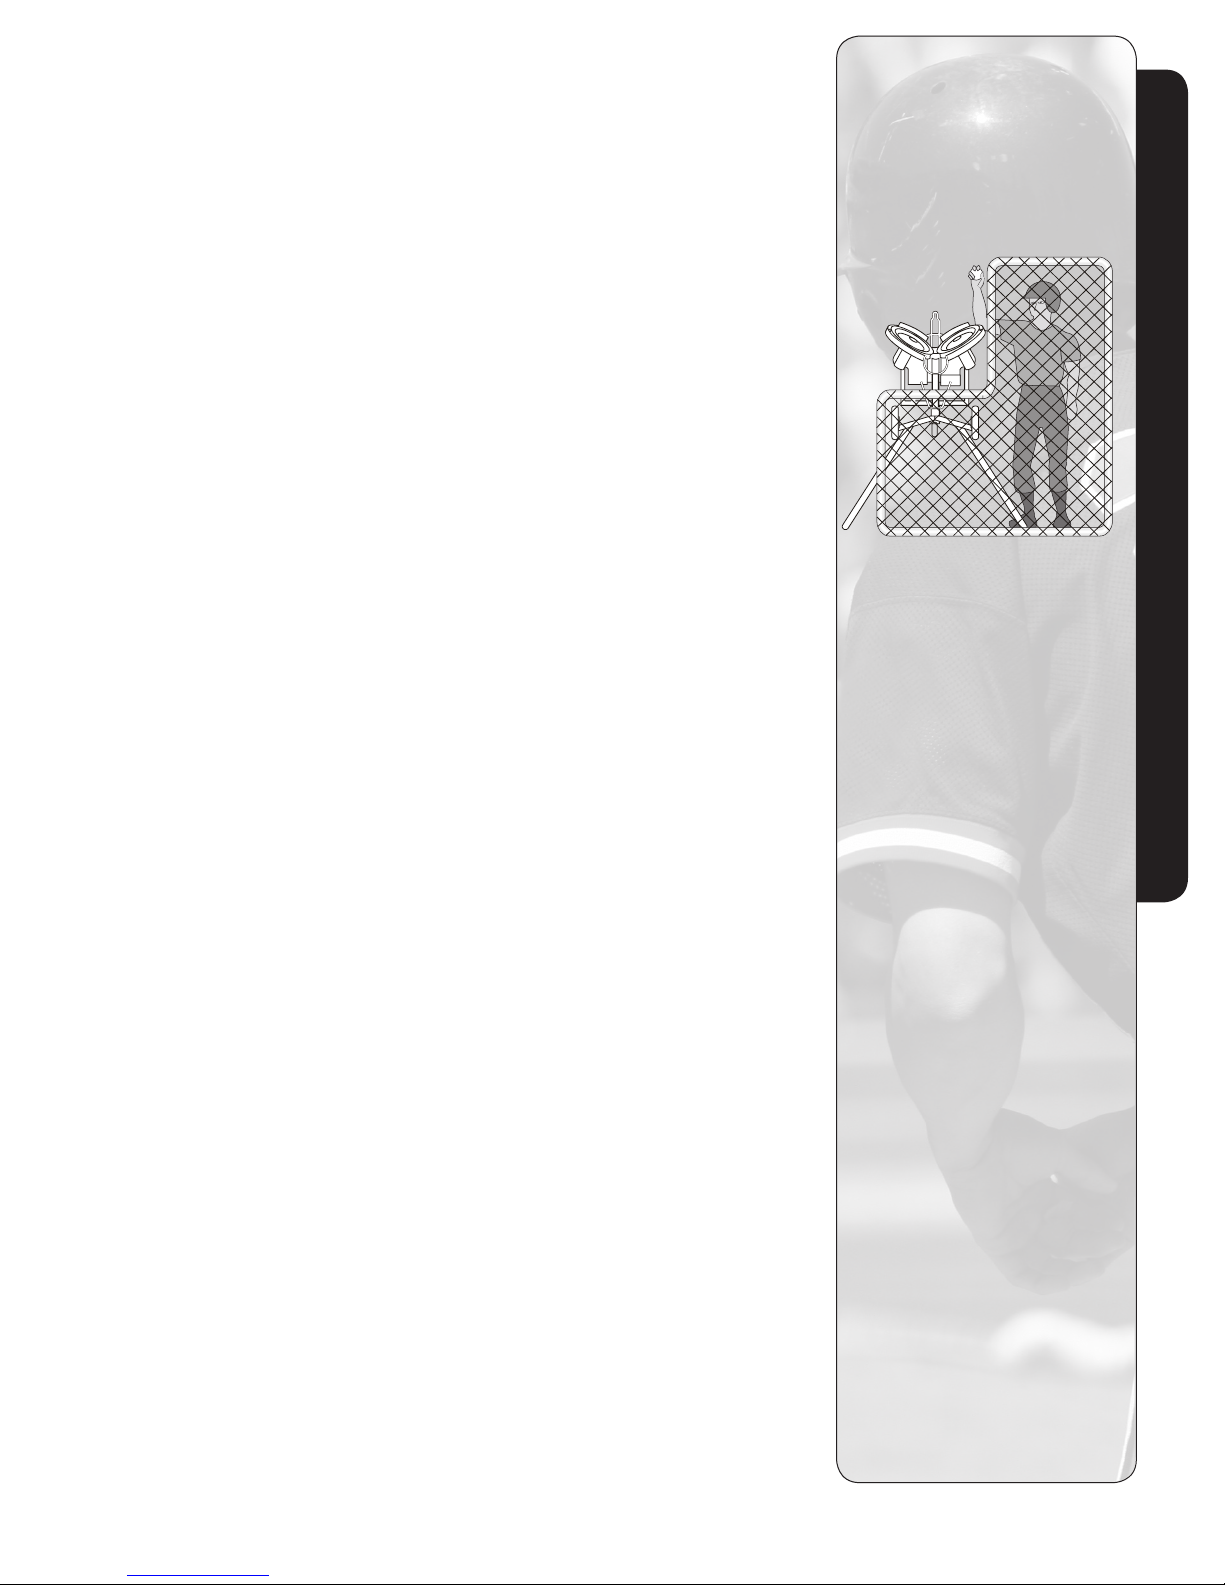
Operator must stand behind a protective screen to prevent injury from balls off the bat.
Screen is not included with Hack Attack.
FIELDING PRACTICE
Both the elevation control and swivel lock must be released so that the throwing head
moves freely through the intended range of motion.
Never reach up chute to push ball into the throwing wheels.
Keep hands and fingers well away from the throwing wheels.
Be careful to keep all persons away from in front of Hack Attack.
For best accuracy, use dimpled pitching machine balls.
CAUTION
PERSONAL INJURY HAZARD
ALWAYS use a protective screen
to protect the operator from
the ball off the bat. (Screen not
included with Hack Attack.)
ALWAYS wait for all three
throwing wheels to come to
a complete stop before
transporting Hack Attack, lifting
the throwing head or performing
any repairs.
ADDITIONAL INFORMATION
If you have any questions
regarding the safe operation of
this equipment, please call:
Sports Attack Customer
Service Department
Ph 800-717-4251
Fx 775-345-2883
Hack Attack Safety Instructions
NOTE: Vertical (elevation control) must be adjusted whenever you change pitches (spins).
Knuckle Balls thrown too fast are dangerous and unrealistic!
HACK ATTACK™ BASEBALL PITCHING MACHINE
SPORTS ATTACK, LLC. • 800-717-4251 • sportsattack.com
3
Page 6
FEATURES & OPERATING CONTROLS
HACK ATTACK BASEBALL PITCHING MACHINE PATENTS APPLIED FOR
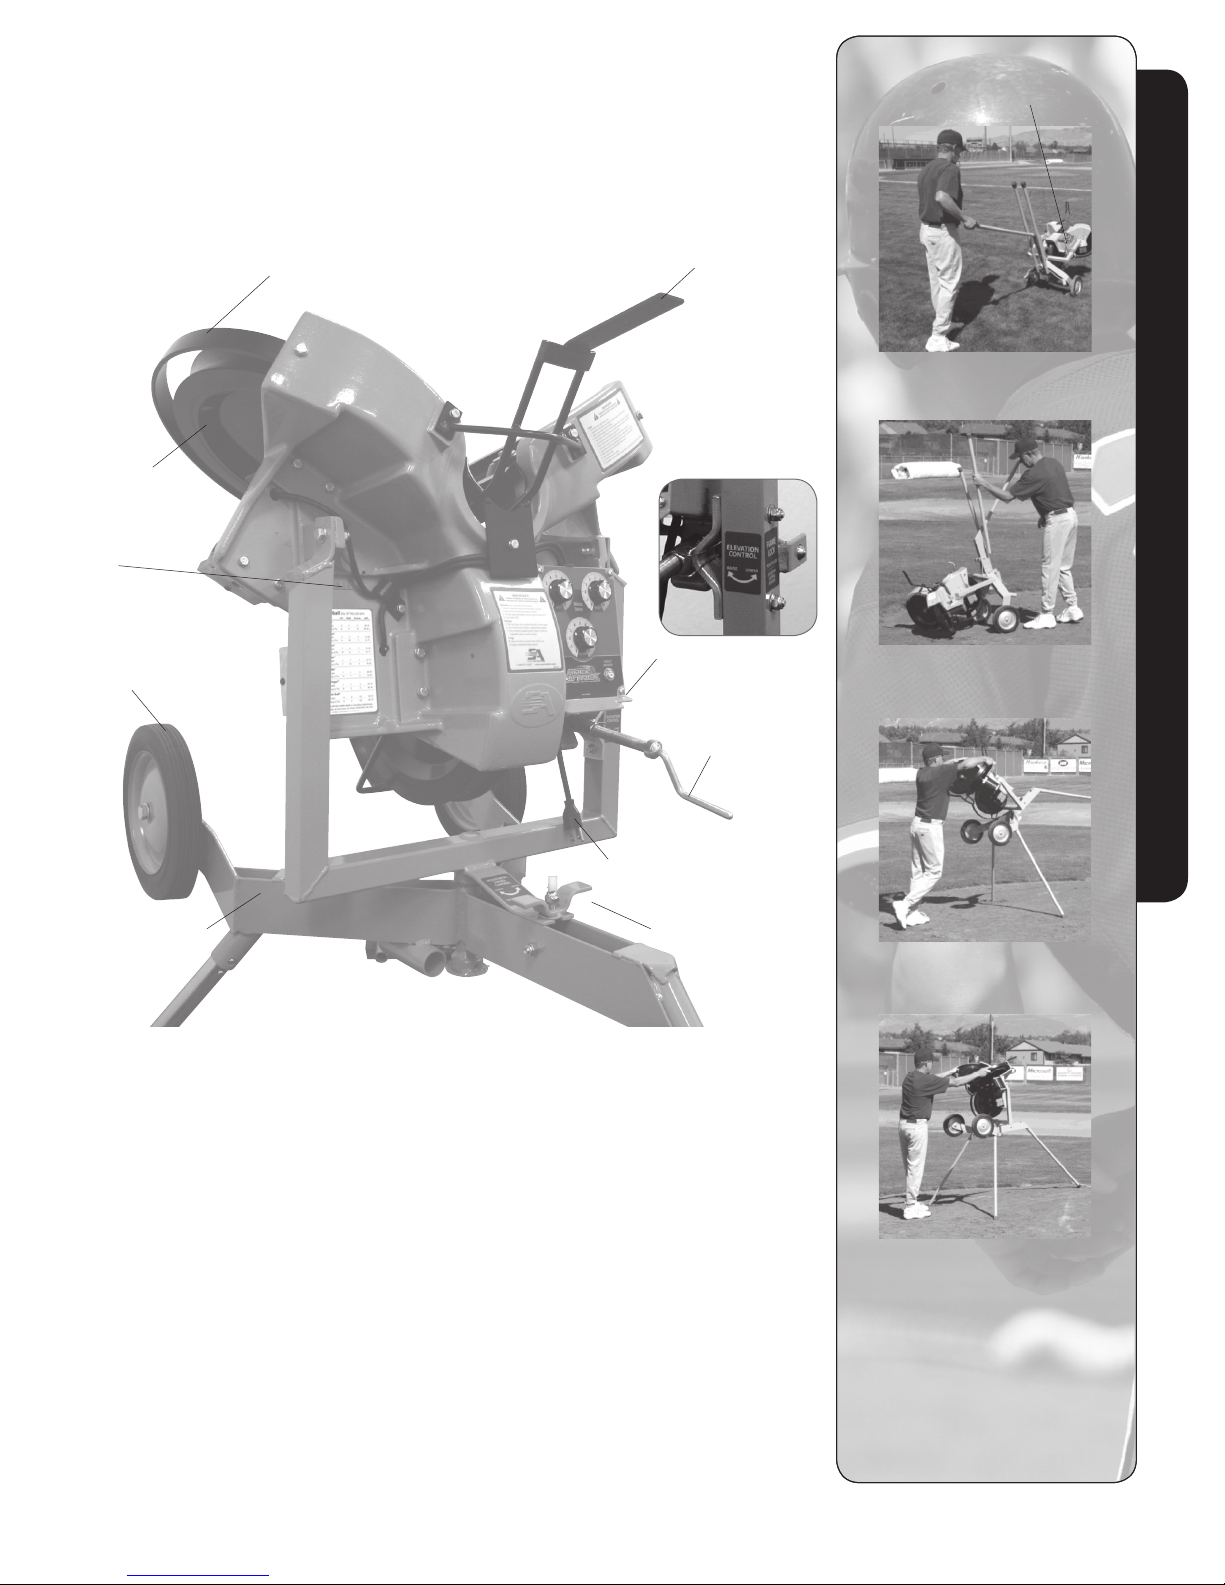
Travel lock must be secure prior
to movement.
Throwing
Wheel
Serial
Number
Transport
Wheel
Wheel Guard
Ball Chute
Travel Lock
(opposite side)
Elevation
Control
Figure 1 Position Hack Attack
Figure 2 Tip up onto wheel guard; Insert
two front legs
Features & Operating Controls
Under Carriage
ADDITIONAL PARTS & CONVERSION KITS
Exploded Views and Parts List ......13
Baseball/Softball Conversion ......15
Power Cord
Horizontal
Swivel Lock
Figure 3 Set Hack Attack upright
Figure 4 Carefully tilt Hack Attack up onto
its legs
SAFETY HINT
Keep your back straight and lift
with your legs. Be ready to grab
the wheel guard and guide Hack
Attack into the upright position.
HACK ATTACK™ BASEBALL PITCHING MACHINE
SPORTS ATTACK, LLC. • 800-717-4251 • sportsattack.com
4
Page 7

SET-UP & PREPARATION
1. Install the rear leg (NOTE: the leg has a push button, which locks the leg into the
socket). Roll Hack Attack onto the mound approximately four feet in front of the rubber.
2. Be sure the horizontal swivel lock is tightened securely.
3. Tilt Hack Attack forward until it rests on the throwing wheel guard.
4. Insert the two front legs into the front sockets in the undercarriage (NOTE: the front
legs also have locking push buttons).
5. See Figure 2 on page 4.
Walk around to the front of Hack Attack, and, with your back to home plate, reach
down and grasp the wheel guards. Then, lift Hack Attack up and over the front legs
and set it gently onto the rear leg.
6. Position Hack Attack:
a. To approximate the release point of a live pitcher, position Hack Attack so that the
rear leg is just in front of the rubber.
b. Then, sight down ball chute. Move the rear leg right or left to adjust machine so
that it is pointing directly at home plate.
c. Check the horizontal swivel lock to make sure it remains tight.
7. Unlock the travel lock. Turn the handle of the elevation control counter-clockwise
until the bar of the travel lock snaps back out of the way.
8. Adjust the throwing head:
a. Turn the handle of the elevation control clockwise. Raise the throwing head until
it will throw somewhere near the required height.
b. This initial adjustment will come through experience. To start, turn the elevation
adjustment 10 turns clockwise.
9. Examine Hack Attack for condition and completeness:
a. Be sure the horizontal swivel lock is secured.
b. Throwing wheels must be tight on the motor shafts. Check that the keyway retaining
bolts are tight.
c. Wheel guard and ball chute must be securely fastened to the throwing head.
10. Be certain on/off switch is turned “OFF”, then plug Hack Attack into an extension
cord or other power source. (See generator information at right if applicable.)
WARNING
HAZARD FROM
HIGH-SPEED PROJECTILES
Being struck by a pitched ball
can cause serious injury or death.
Make sure that no one steps in
front of Hack Attack while it is
connected to electric power.
Clear all hitters away from home
plate, the batter’s box and the
backstop area before connecting
Hack Attack to electric power.
GENERATOR INFORMATION
1. Hack Attack requires a
generator capable of providing
clean electricity 2000 watts at
120 volts 60hz.
2. Be sure the on/off switch is
“OFF” before plugging Hack
Attack into the generator.
3. Start the generator and allow
it to reach full speed before
turning the on/off switch “ON”.
IMPORTANT: Generator speed
fluctuations can damage the
electronic speed control. Maintain
adequate fuel in the generator at
all times.
4. Turn the on/off switch “OFF”
before shutting off the
generator and before
unplugging Hack Attack.
Set-up & Preparation
HACK ATTACK™ BASEBALL PITCHING MACHINE
SPORTS ATTACK, LLC. • 800-717-4251 • sportsattack.com
5
Page 8
BATTING PRACTICE
THE WIND-UP (getting ready to pitch)
1. Turn the on/off switch “ON”.
2. Set the speed control dials*:
Top Left to “4”
Top Right to “4”
Bottom to “7”
* This is the average setting for a high school fastball.
WARNING
HAZARD FROM
HIGH-SPEED PROJECTILES
Being struck by a pitched ball
can cause serious injury or death.
Make sure that no one steps in
front of Hack Attack while it is
connected to electric power.
3. Check again to make sure no one is in front of Hack Attack or anywhere near the
batter’s box. Then, feed a ball down the ball chute to pitch the first ball.
4. Note where the pitch goes in relation to home plate. Adjust the pitch to the left or right
by shifting the rear leg:
a. To move the pitch left, move the rear leg to the right.
b. To move the pitch right, move the rear leg to the left.
5. Adjust the elevation:
a. Turn the elevation control clockwise to raise the pitch.
b. Turn the elevation control counter-clockwise to lower the pitch.
6. Adjust the speed control dials to produce the required speed. Larger numbers equal
higher speed.
7. Pitch a second ball.
8. Repeat steps 4, 5 and 6 until the proper path, elevation and speed are achieved.
9. Refer to “Selecting the Pitch”, page 7, for different pitches.
10. Pitch several more test balls to ensure the selected pitch repeats.
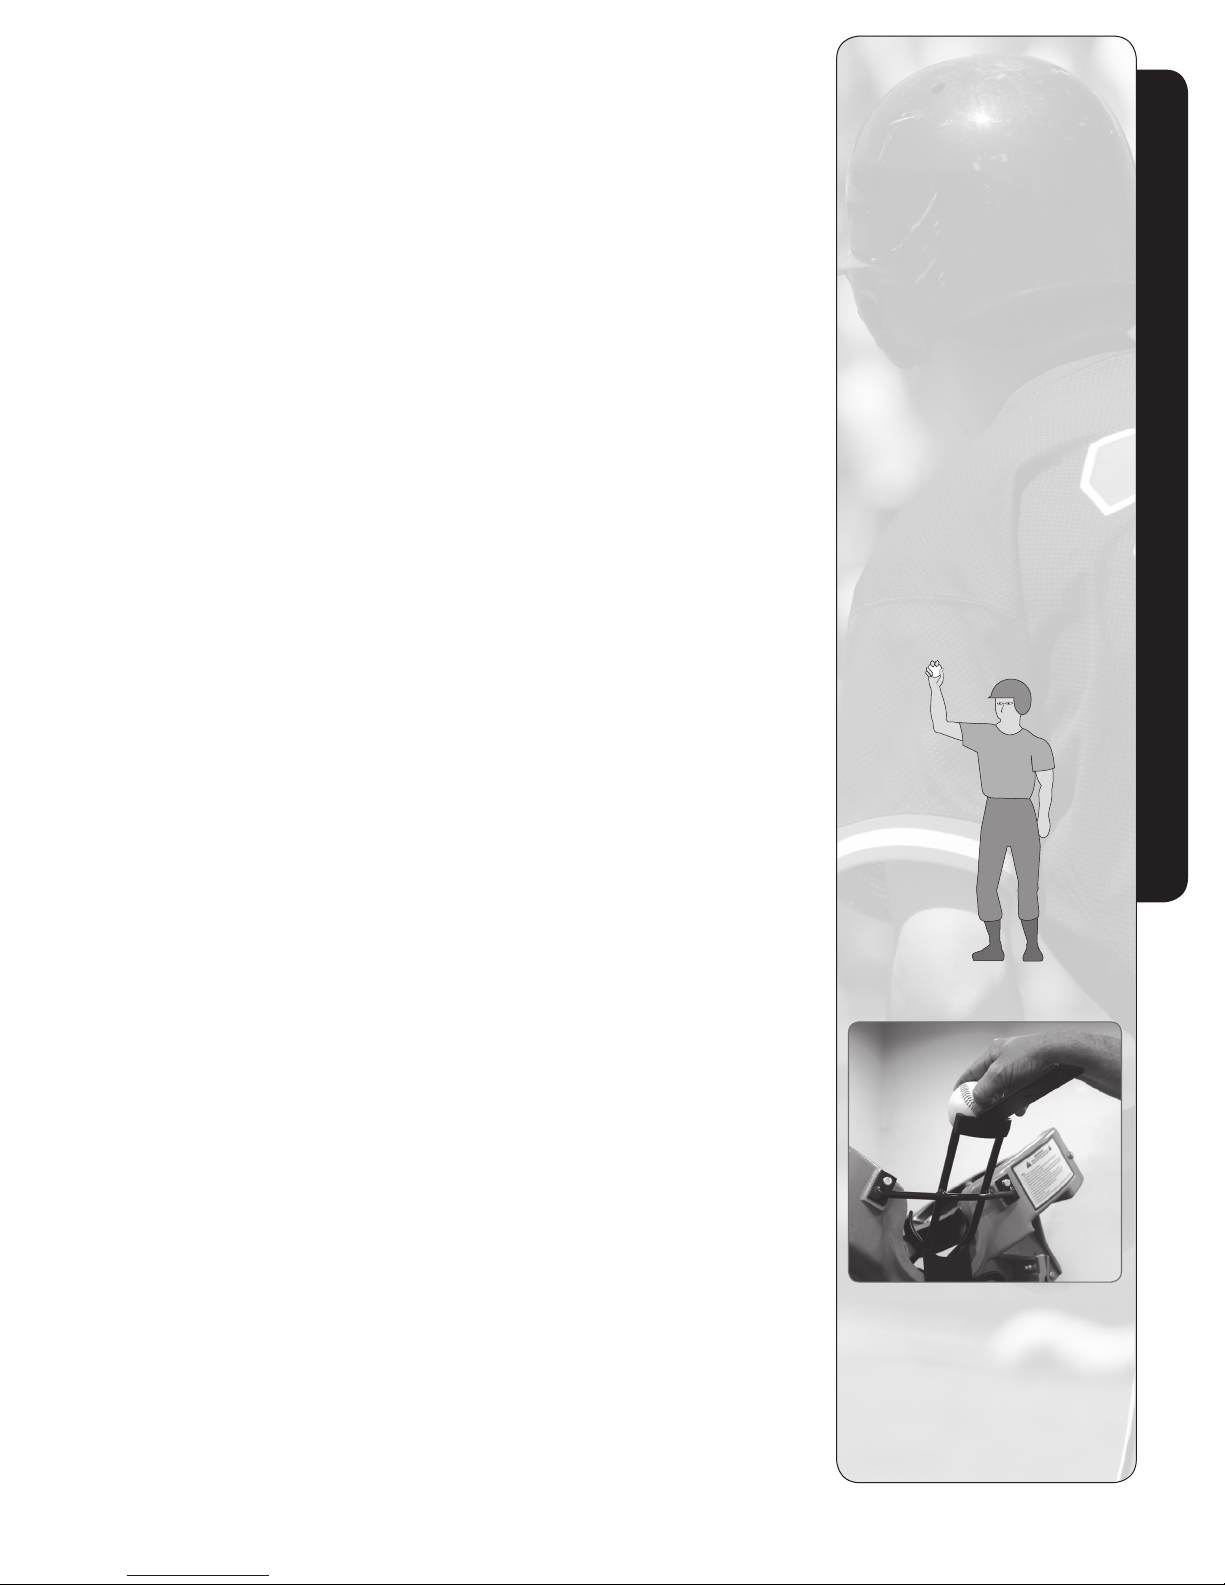
11. After you are sure desired pitch is repeating, allow the hitter to step into the batter’s box.
12. See Figures 3 and 4 at left.
a. Before each pitch present the ball to the hitter.
b. Drop the ball into the ball chute.
Clear all hitters away from home
plate, the batter’s box and the
backstop area before connecting
Hack Attack to electric power.
NOTE: As wheel speeds are
changed for different velocities
and spins, the ball will be pitched
to differing locations. Compensate
for these changes by turning the
elevation control, and by moving
the rear leg.
Figure 3 Present the ball to the hitter
Batting Practice
AND… THE PITCH
Proper feeding technique is important to take advantage of Hack Attack’s life-like vision
and timing.
When feeding:
1. Be sure hitter is ready.
2. Present the ball to hitter by raising it approximately to eye level, then place ball at the
top of the ball chute, seating it firmly against the ball chute. The ball should be held
back against the chute to ensure a smooth consistent feed.
3. Release the ball to roll down the ball chute and into the throwing wheels.
HACK ATTACK™ BASEBALL PITCHING MACHINE
SPORTS ATTACK, LLC. • 800-717-4251 • sportsattack.com
Feeding the ball
IMPORTANT: Hitter should stride
the instant he sees the ball release
from the feeder’s hand at the upper end of the ball chute.
6
Page 9
BATTING PRACTICE (cont’d)
SELECTING THE PITCH
NOTE: Vertical (elevation) and horizontal (swivel) must both be adjusted whenever you
change speed or spin.
Always have the batter step away from the batter box before adjusting speed or spin.
BALL SELECTION
1. Never mix leather balls with synthetic pitching machine balls.
2. Be careful not to mix new with old balls, or balls from different manufacturers.
3. Balls must be consistent in type and amount of wear to produce repeatability.
4. NEVER USE WET BALLS!
Leather balls work well but will wear faster than synthetic pitching machine balls.
Watch to see that leather balls do not begin to soften from the great amount of hitting
they will receive.
Discard old or soft leather balls from your Hack Attack batting sessions. Similarly, discard
older worn synthetic pitching balls.
WARNING
PERSONAL INJURY HAZARD
Never reach down near throwing
wheels for any reason! Always turn
all three speed control dials “OFF”,
turn the on/off switch “OFF”, unplug
Hack Attack from the power source
and wait until the throwing wheels
have come to a complete stop
before reaching hands or fingers
anywhere near throwing wheels.
•
Never loosen the horizontal swivel
lock while pitching to a batter.
If the lock is not secure, the
throwing head is free to pivot.
A loose swivel lock can allow a
pitch to be inside which could hit
the batter.
Batting Practice
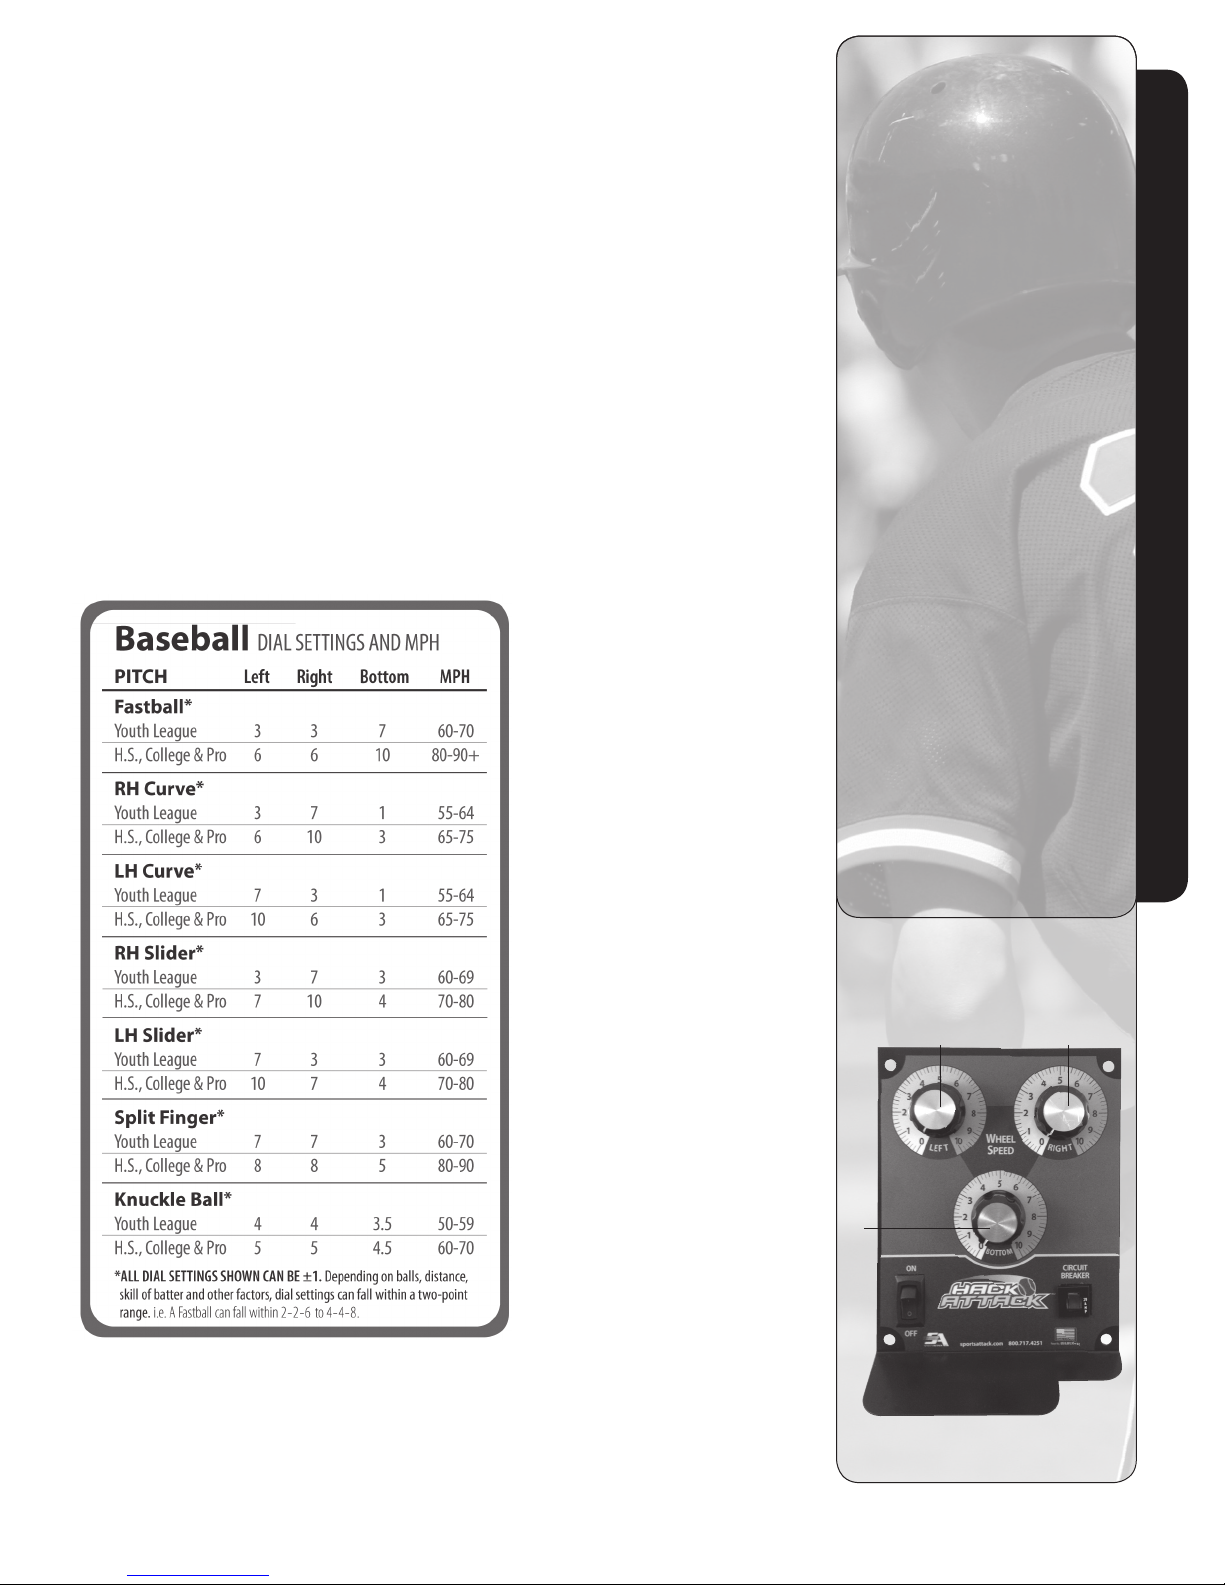
Figure 5 Pitch Selection Chart - These settings are a general guideline for professional pitches
for major league hitters only. Adjustments for players of lesser skill can be made from these settings.
HACK ATTACK™ BASEBALL PITCHING MACHINE
SPORTS ATTACK, LLC. • 800-717-4251 • sportsattack.com
Bottom wheel
speed control
Left wheel
speed control
Right wheel
speed control
7
Page 10
BASEBALL FUNGO (FIELDING PRACTICE)
1. Roll Hack Attack to home plate and face toward center field. Install legs, tilt it into
position and connect to electric power.
2. Turn the elevation control counter-clockwise to release the travel lock.
3. Loosen the horizontal swivel lock until the throwing head pivots freely.
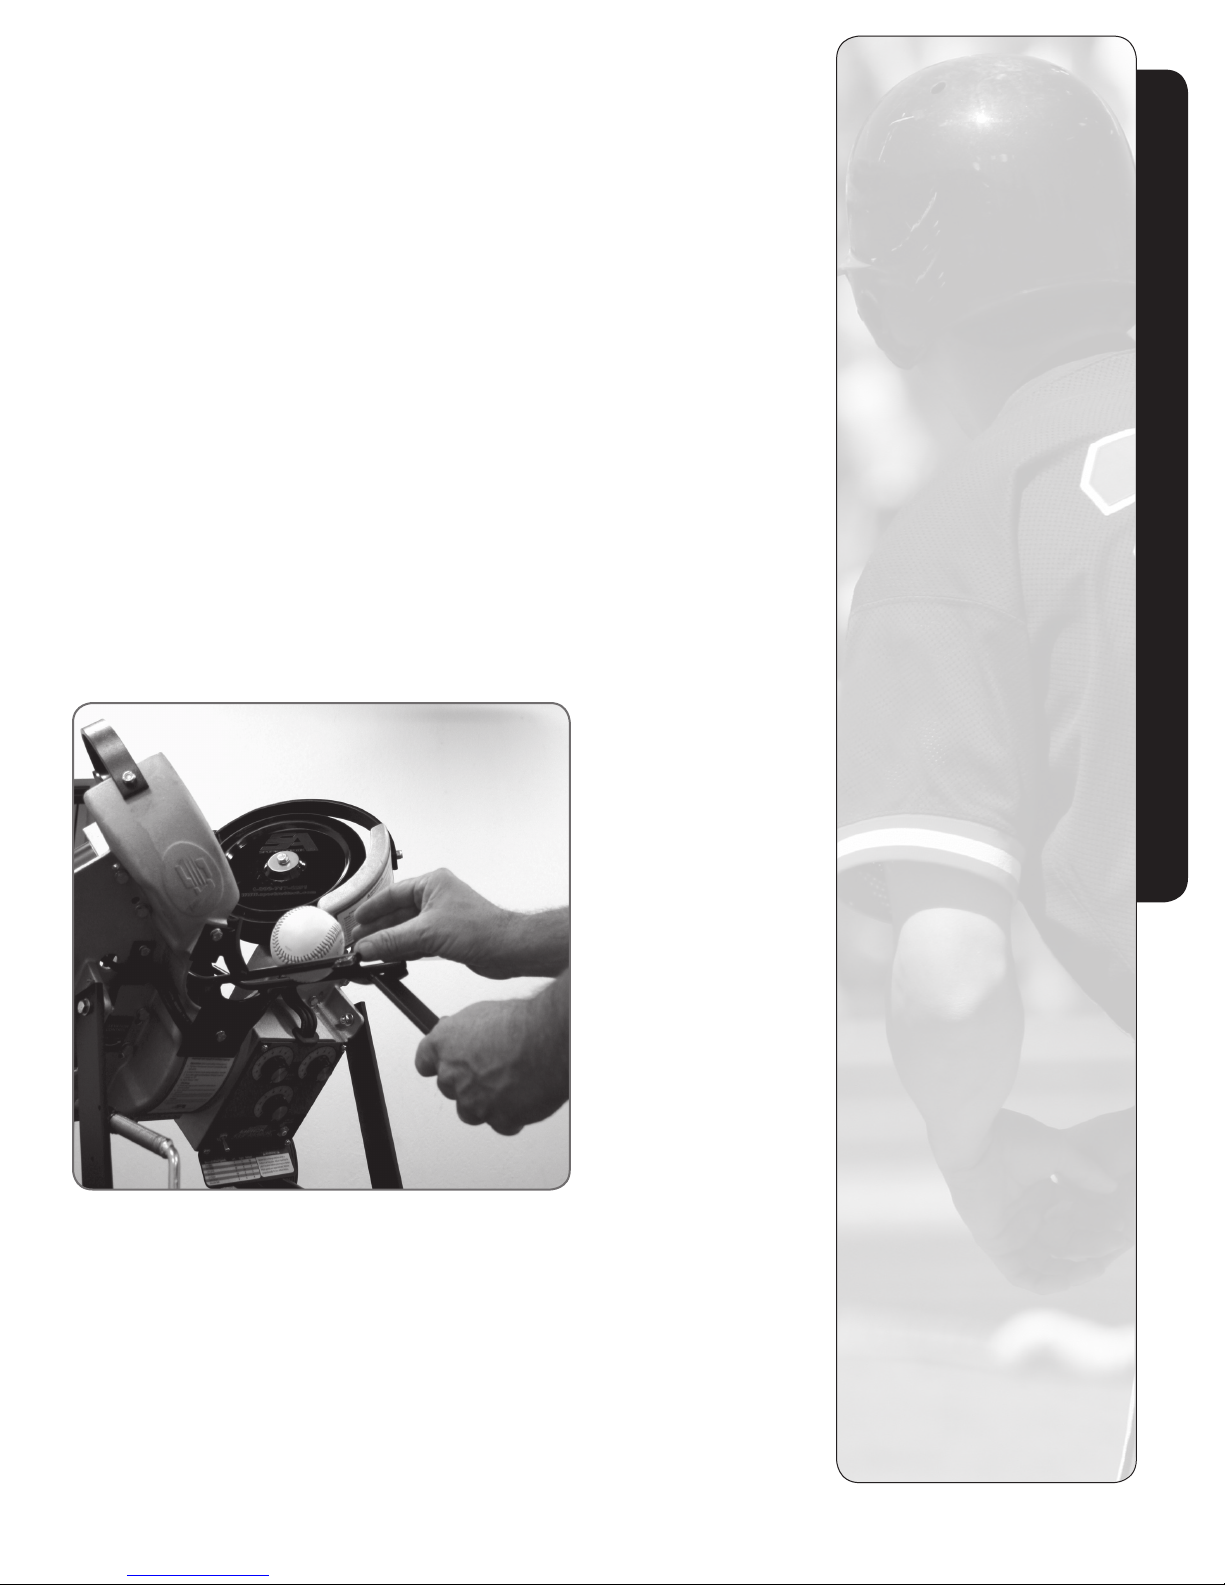
By using the handle on the end of the ball chute, you can easily pivot Hack Attack
to aim at any point on the field.
You can simulate various line drives (slicing, fading, sinking, rising, etc.) by adjusting the
spin. Refer to Figure 5 on page 7.
See Figure 6 below:
For pop-ups, push the handle down. Using the opposite hand, situate ball on ball
chute and give the ball a shove hard enough that ball rolls up the chute and into the
throwing wheels.
4. When defensive work is completed, center the throwing head on the undercarriage and
securely tighten the horizontal swivel lock.
5. Secure the throwing head with the travel lock. Allow all three throwing wheels to come
to a complete stop before transporting Hack Attack.
WARNING
HAZARD FROM
HIGH-SPEED PROJECTILES
Being struck by a pitched ball can
cause serious injury or death. Make
sure that no one steps in front of
Hack Attack while it is connected to
electric power.
Clear all hitters away from home
plate, the batter’s box and the
backstop area before connecting
Hack Attack to electric power.
CAUTION
PERSONAL INJURY HAZARD
Never reach up chute to push ball
into the throwing wheels. Be sure
to keep hands and fingers well
away from the throwing wheels.
•
Be careful to keep all persons away
from front of Hack Attack any time
it is connected to electrical power.
Baseball Fungo (Fielding Practice)
Figure 6 Feeding the ball for pop-ups
HACK ATTACK™ BASEBALL PITCHING MACHINE
SPORTS ATTACK, LLC. • 800-717-4251 • sportsattack.com
8
Page 11
SHUTTING DOWN
HEAD
TURNING HACK ATTACK “OFF”
1. Set each speed control dial to “0”.
2. Turn the on/off switch “OFF”.
3. Unplug Hack Attack from the power source.
PUTTING HACK ATTACK AWAY
1. Be absolutely sure that the throwing wheels have completely stopped turning.
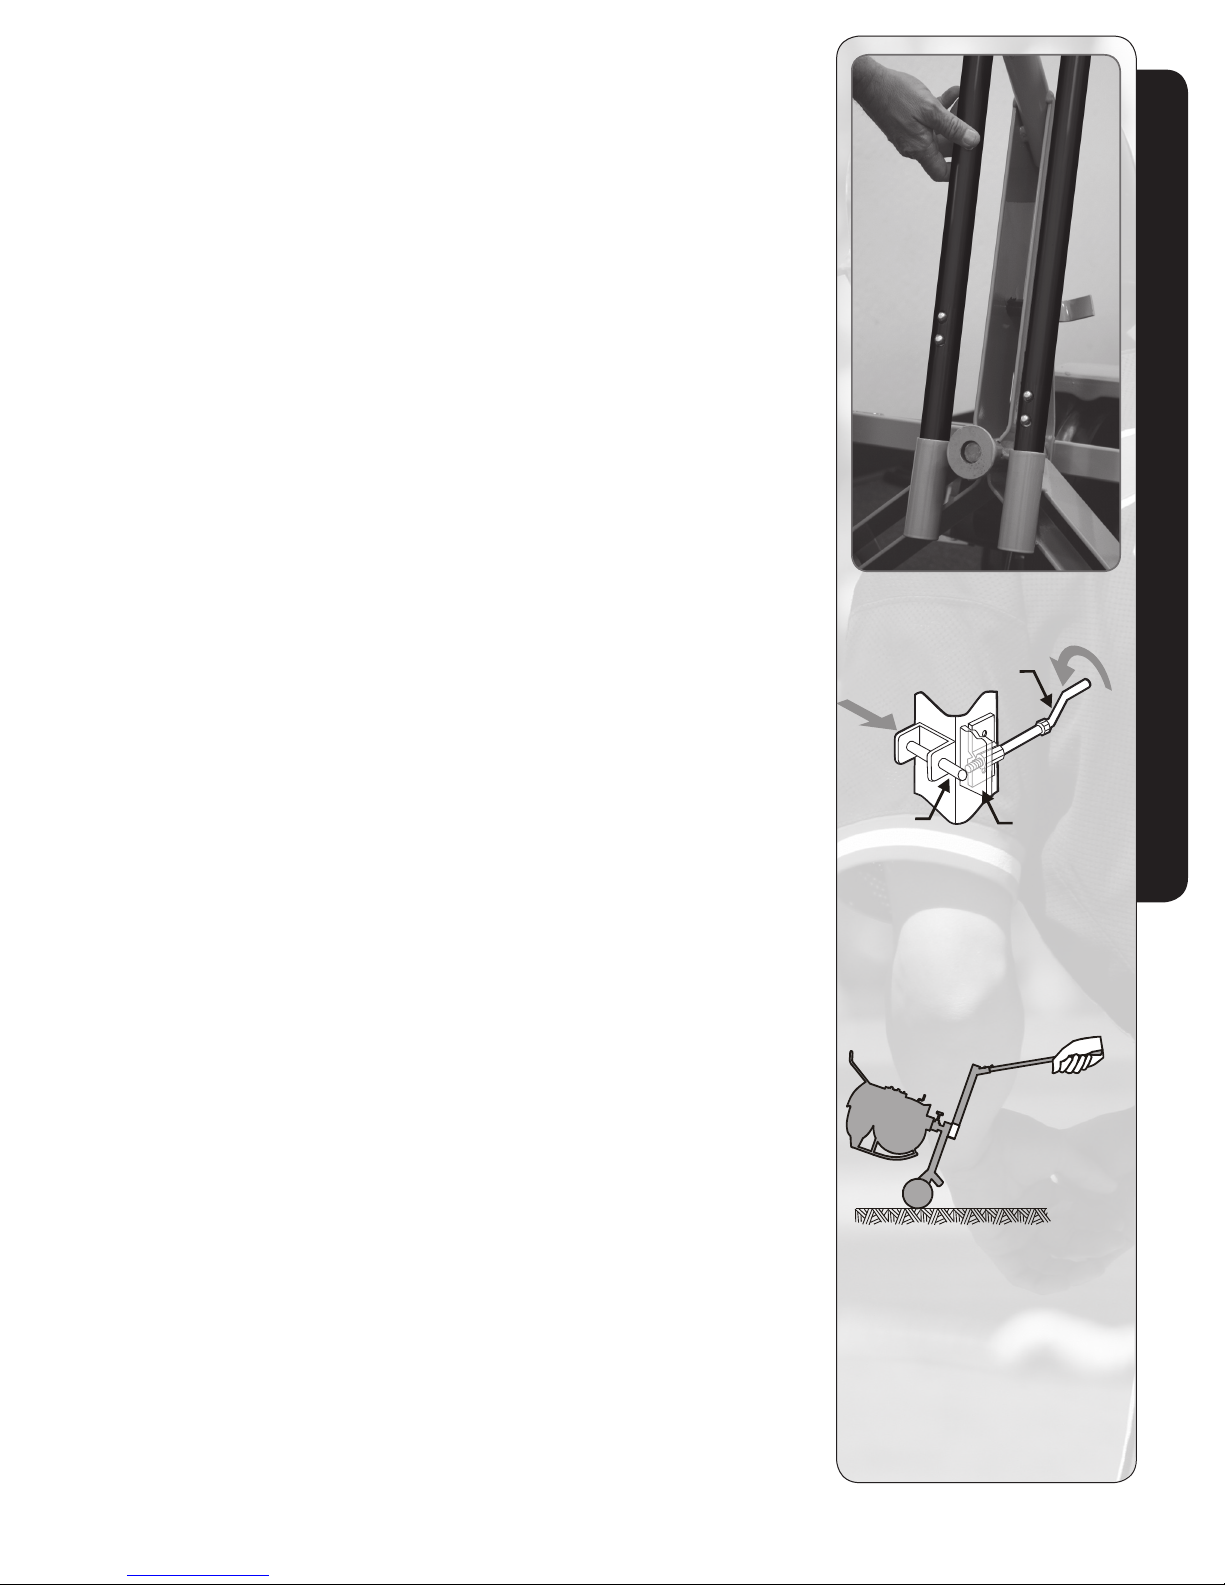
2. See Figure 7 at right:
a. Turn the elevation adjustment counter-clockwise until the throwing head is all the
way down against the elevation control nut.
b. Push and hold the travel lock all the way in.
c. Turn the elevation adjustment clockwise until the throwing head is held tightly
against the travel lock. Tighten just enough to secure the throwing head. It is not
necessary to over tighten.
3. Using the rear leg as a handle, tip Hack Attack up and over onto the wheel guard.
4. Remove (unsocket) both front legs and store by inserting in the travel storage sockets.
5. See Figure 8 at right:
Again, using the rear leg as a handle, tip Hack Attack back until machine can be
comfortably rolled on the travel wheels. Hack Attack can now be rolled and
maneuvered off of the field.
6. To transport Hack Attack in a car, remove the throwing head:
a. Be sure the travel lock is engaged and the throwing head is tightly secured to
the yoke.
b. Loosen the horizontal swivel control. Turn it counter-clockwise until the throwing
head is free to lift out of the swivel.
c. Lift the throwing head straight up and clear of the undercarriage.
SUGGESTION: The throwing head, while awkward, can be carried for short distances
by gripping the top section of the wheel guard and balancing the piece against your
thighs as you walk.
d. To prevent damage in transport, rest the throwing head on the wheel guard and yoke;
motors should be down, and the control panel pointing up.
Storing Legs in Travel Socket
ELEVATION
CONTROL
TRAVEL
LOCK
Figure 7 Secure the Travel Lock
Shutting Down
LOCKING
TAB ON
THROWING
HACK ATTACK™ BASEBALL PITCHING MACHINE
SPORTS ATTACK, LLC. • 800-717-4251 • sportsattack.com
USE TRANSPORT
LEG AS A HANDLE
TO MANEUVER
Figure 8 Maneuvering
9
Page 12

CARE, CLEANING & MAINTENANCE
LUBRICATION (once per season, or as required):
1. Elevation Control
a. Apply fresh grease.
b. Reinstall, making sure that the tension spring is around the threads. (See item 30, 30B
and 31 on page 13).
2. Travel Lock
Apply a small amount of grease where the pin passes through the fitting. Make sure the
travel lock operates freely.
3. Horizontal Swivel Lock
a. Completely remove the horizontal swivel lock nut. Clean all old grease, dirt, etc. from
the threads.
b. Wipe the threads with a very small amount of fresh grease.
c. Reinstall.
THROWING WHEEL MOTORS
Motors are sealed and require no lubrication.
Check bolts for tightness once a season. Tighten bolts securely, but do not over-tighten.
See Figures 7 and 8 on page 11.
CLEANING THE THROWING WHEELS
The throwing wheels must be kept clean to maintain accuracy. Clean the wheels periodically
to control the build-up of grass and dirt.
1. Turn the on/off switch “OFF” and allow the wheels to come to a complete stop. Unplug
Hack Attack from electric power.
CAUTION
PERSONAL INJURY HAZARD
Never attempt to clean the
throwing wheels while they are
turning. Rags or implements
caught in spinning wheels can
cause serious injury.
Unplug the machine before
cleaning the wheels or
performing any service.
Care & Cleaning
CHEMICAL HAZARD
Methyl Ethyl Ketone (M.E.K)
Read and follow the directions
and safety instructions on the
M.E.K container.
FIRE HAZARD
Methyl Ethyl Ketone (M.E.K)
M.E.K. is flammable. Do not
use M.E.K. around a fire or
flame. Do not use M.E.K. near
a running generator or other
source of ignition.
Dampen a rag with soap and water. Turn the throwing wheel by hand and scrub the wheel
until the build-up is removed. For very heavy build-up, a synthetic scouring pad, such as a
Scotch-Brite
Ketone (M.E.K.) may be required to help loosen the build-up of dirt or ball residue.
®
scouring pad, or medium sandpaper may be used sparingly. Methyl Ethyl
EXAMINE THE MACHINE
Examine Hack Attack for condition and completeness before every use:
1. For batting practice, be sure the horizontal swivel lock is secured.
2. Throwing wheels must be tight on the motor shafts. Check that the keyway retaining
bolts are tight.
3. Wheel guard and ball chute must be securely fastened to the throwing head.
HACK ATTACK™ BASEBALL PITCHING MACHINE
SPORTS ATTACK, LLC. • 800-717-4251 • sportsattack.com
10
Page 13
COMPONENT REPLACEMENT
THROWING WHEEL REPLACEMENT
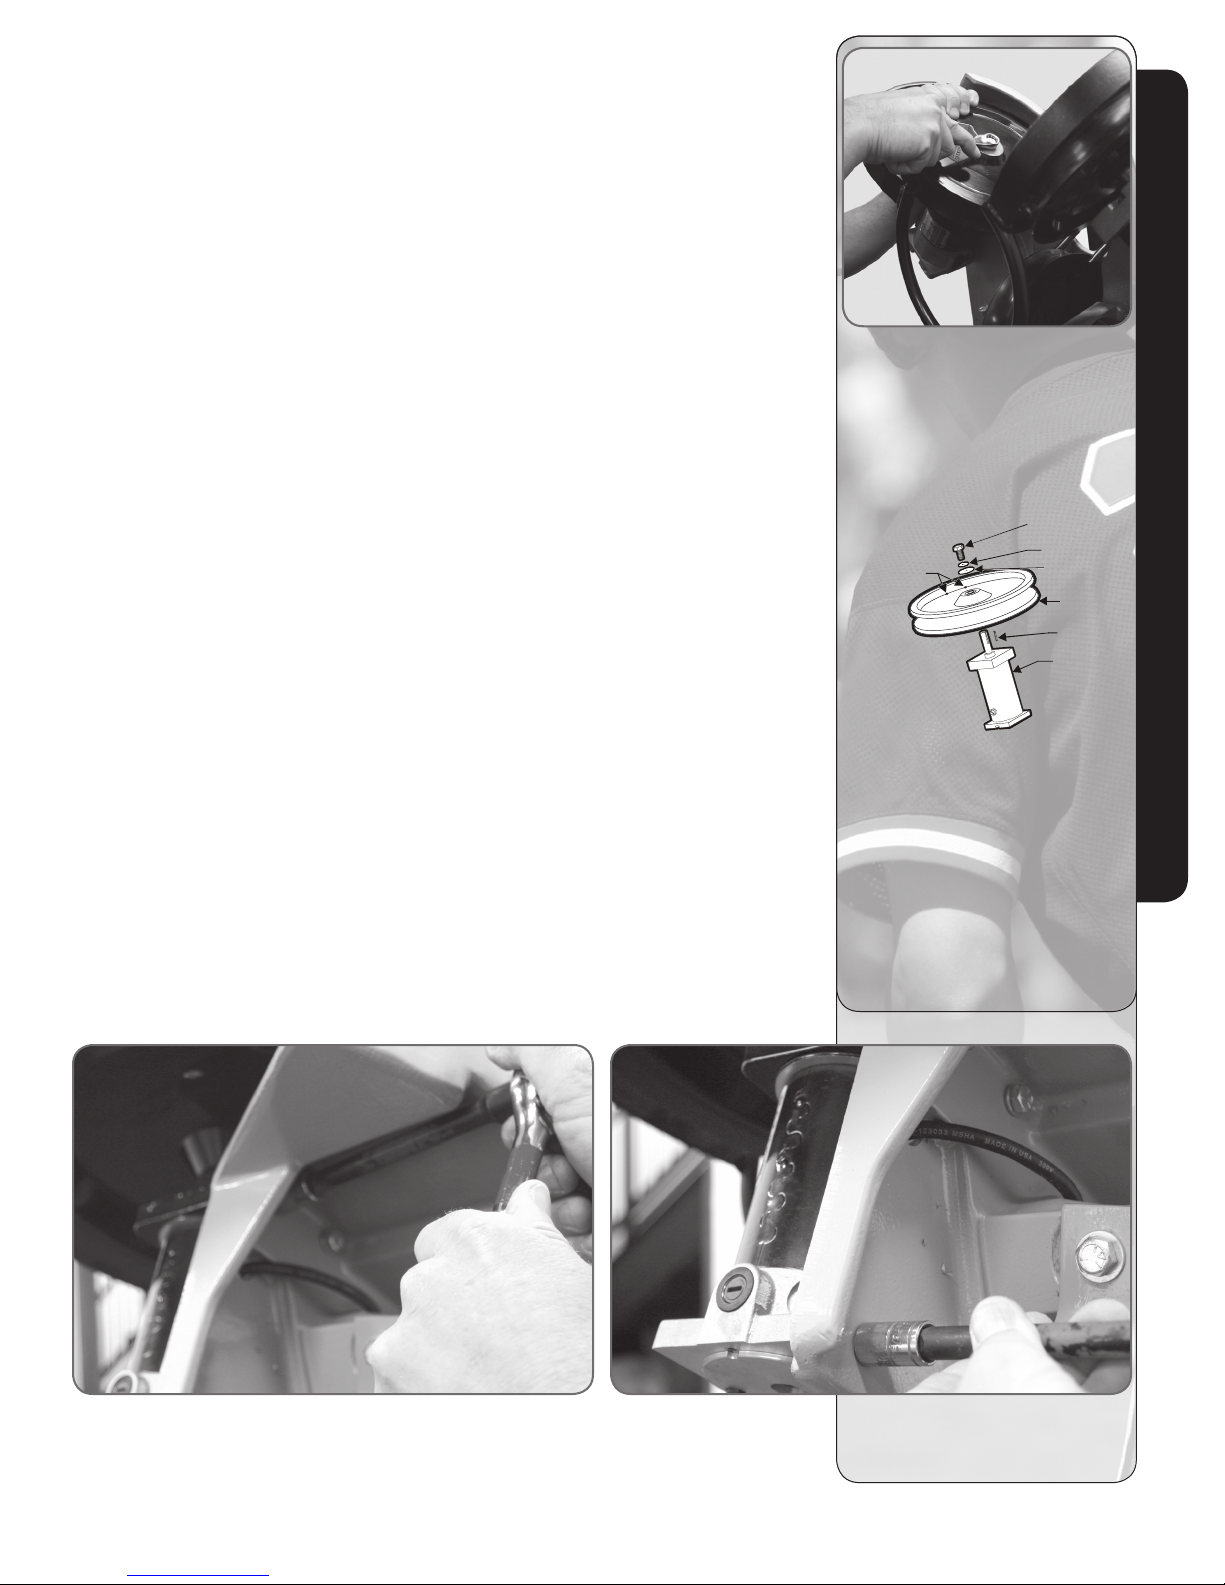
1. Turn the on/off switch “OFF” and unplug the power cord. For the bottom throwing
wheel, remove 6 bolts holding the wheel guard to the main casting.
2. Hold the wheel so that it cannot move. Turn the keyway retaining bolt counter-clockwise
using a box end wrench.
3. Remove the bolt and washers.
4. Work the wheel off of the motor shaft. Be sure to catch the key as it is freed from
the keyway.
5. Ball throwing wheels are machine balanced. Small holes in the side of the wheel are
applied at the factory and are normal. A slight wobble is normal.
Reassemble in reverse order.
a. Install wheel to motor shaft with key slots aligned.
b. Be sure the key is in place, and inserted so that it is flush with the boss at the
wheel center.
c. Be sure the washer and lock washer are installed in the right order, and that the
keyway retaining bolt is tightened.
d. Test the wheel by spinning it by hand and making sure that it spins freely without
wobble before turning the unit “ON”.
e. Be sure the wheel guard is properly and securely reinstalled.
MOTOR REPLACEMENT
1. Turn the on/off switch “OFF” and unplug the power cord.
2. Remove the throwing wheel (see above).
3. Remove four screws holding controller into main casting. Note the position of the motor
wires on the controller, then disconnect the wires. See Figure 10 on page 12.
4. Note the routing of the motor wires. Loosen any wire clamps.
5. Remove four bolts holding the motor to the main casting. See Figures 7 and 8 below.
Reassemble in reverse order.
Hold wheel while loosening bolts.
NOTE: On the bottom wheel, the
Front wheel guard (part 43 on
page 13) must be removed prior
to the removal of the motor or
ball-throwing wheel
1/2” KEYWAY
RETAINING BOLT
HOLES DRILLED
FOR BALANCE
LOCK WASHER
FL AT WASHER
THROWING
WHEEL
KEY
MOTOR
When replacing the motor, you will
see two sets of bolts:
1
/4” x 1 1/4” coarse thread bolts
2 -
5
/16” x 1 1/2” coarse thread bolts
2 -
The wrench or socket size needed
1
for the
/4” bolt is a 7/16”.
The wrench or socket size needed
5
for the
/16” bolt is a 1/2”.
Component Replacement
Figure 7 Shown using a 6” extension with 1/2” socket. Figure 8 Shown using a 6” extension with 7/16” socket.
NOTE: Check bolts for tightness once a season. Tighten bolts securely, but do not over-tighten.
HACK ATTACK™ BASEBALL PITCHING MACHINE
SPORTS ATTACK, LLC. • 800-717-4251 • sportsattack.com
11
Page 14
COMPONENT REPLACEMENT (cont’d)
CONTROLLER REPLACEMENT
1. Turn the on/off switch “OFF” and unplug the power cord.
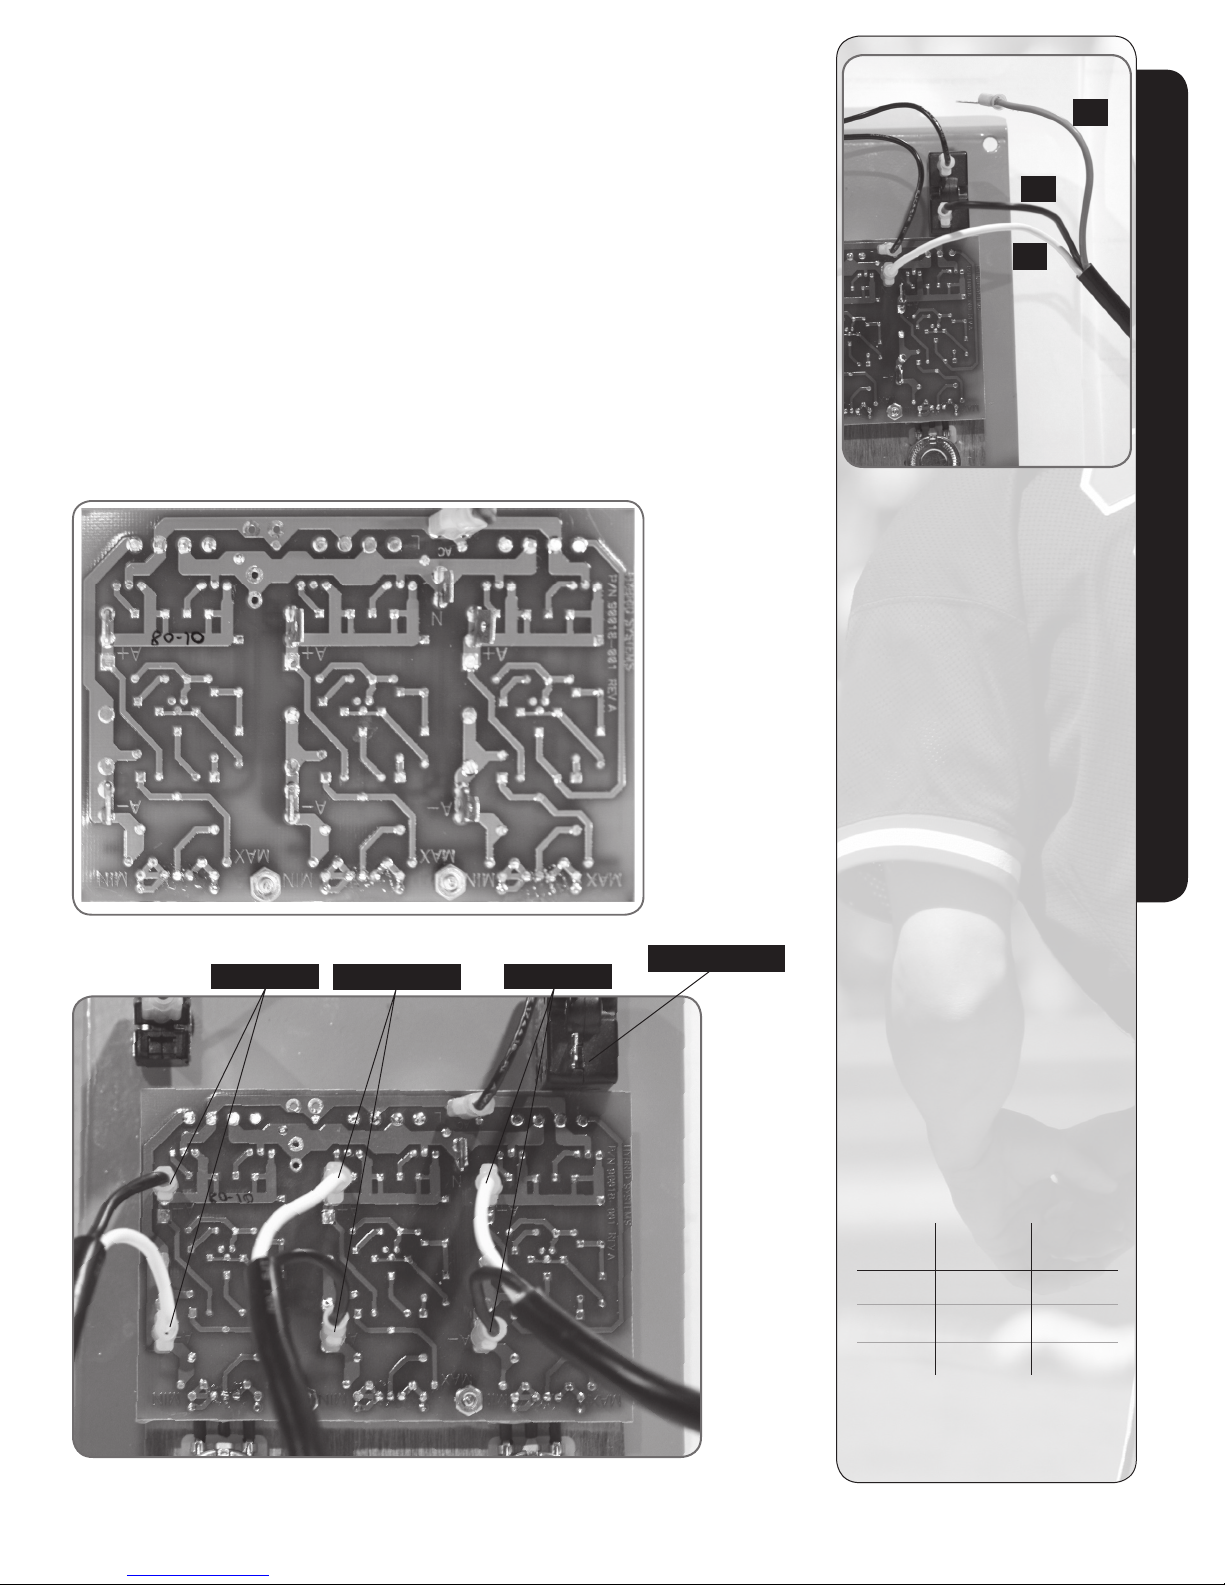
2. Remove four screws holding controller faceplate into main casting. Note the position of
the main power and motor wires on the controller, then disconnect the wires. See Figure
10 on page 12 for the three motor wires. See Figure 11 on page 12 for the main power
cord wires.
3. Loosen the nuts holding the three speed control shafts to the faceplate, then remove
the controller.
Reassemble in reverse order.
Be sure wires are correctly reinstalled. Motor wire connectors are different sizes. Be
sure they are installed on the correct size terminal. See Figure 10 for the motor wires
and Figure 11 for the power cord wire.
#3
#1
#2
Component Replacement
Figure 11
WIRING
POWER CORD
White or Blue Wire (1)
To middle male terminal marked “N.”
Black or Brown Wire (2)
To circuit breaker.
Green Wire (3)
Grounds to machine/motor.
Figure 9 Wiring diagram from the control board side.
Left Motor
Bottom Motor
MOTOR WIRE LEADS
Black 3/16” wide connectors.
White 1/4” wide connectors.
Black Wire (2) connects t o A-
on circuit board.
White Wire (2) connects to A+
on circuit board.
Circuit Breaker
Right Motor
CONTROLLER
Black Wire (2) 2 PR jumper wire:
- 1 from on/off switch to
circuit breaker
- 1 from on/off switch to
circuit board terminal “L”.
CONNECTING WIRES
Motor Black White
Wire Wire
Right A- A+
Left A+ A-
Bottom A- A+
Figure 10 Wiring diagram for all three motors.
HACK ATTACK™ BASEBALL PITCHING MACHINE
SPORTS ATTACK, LLC. • 800-717-4251 • sportsattack.com
Black motor wires are 3/16” female
disconnect and white wires are
1
/4” female disconnect.
12
Page 15
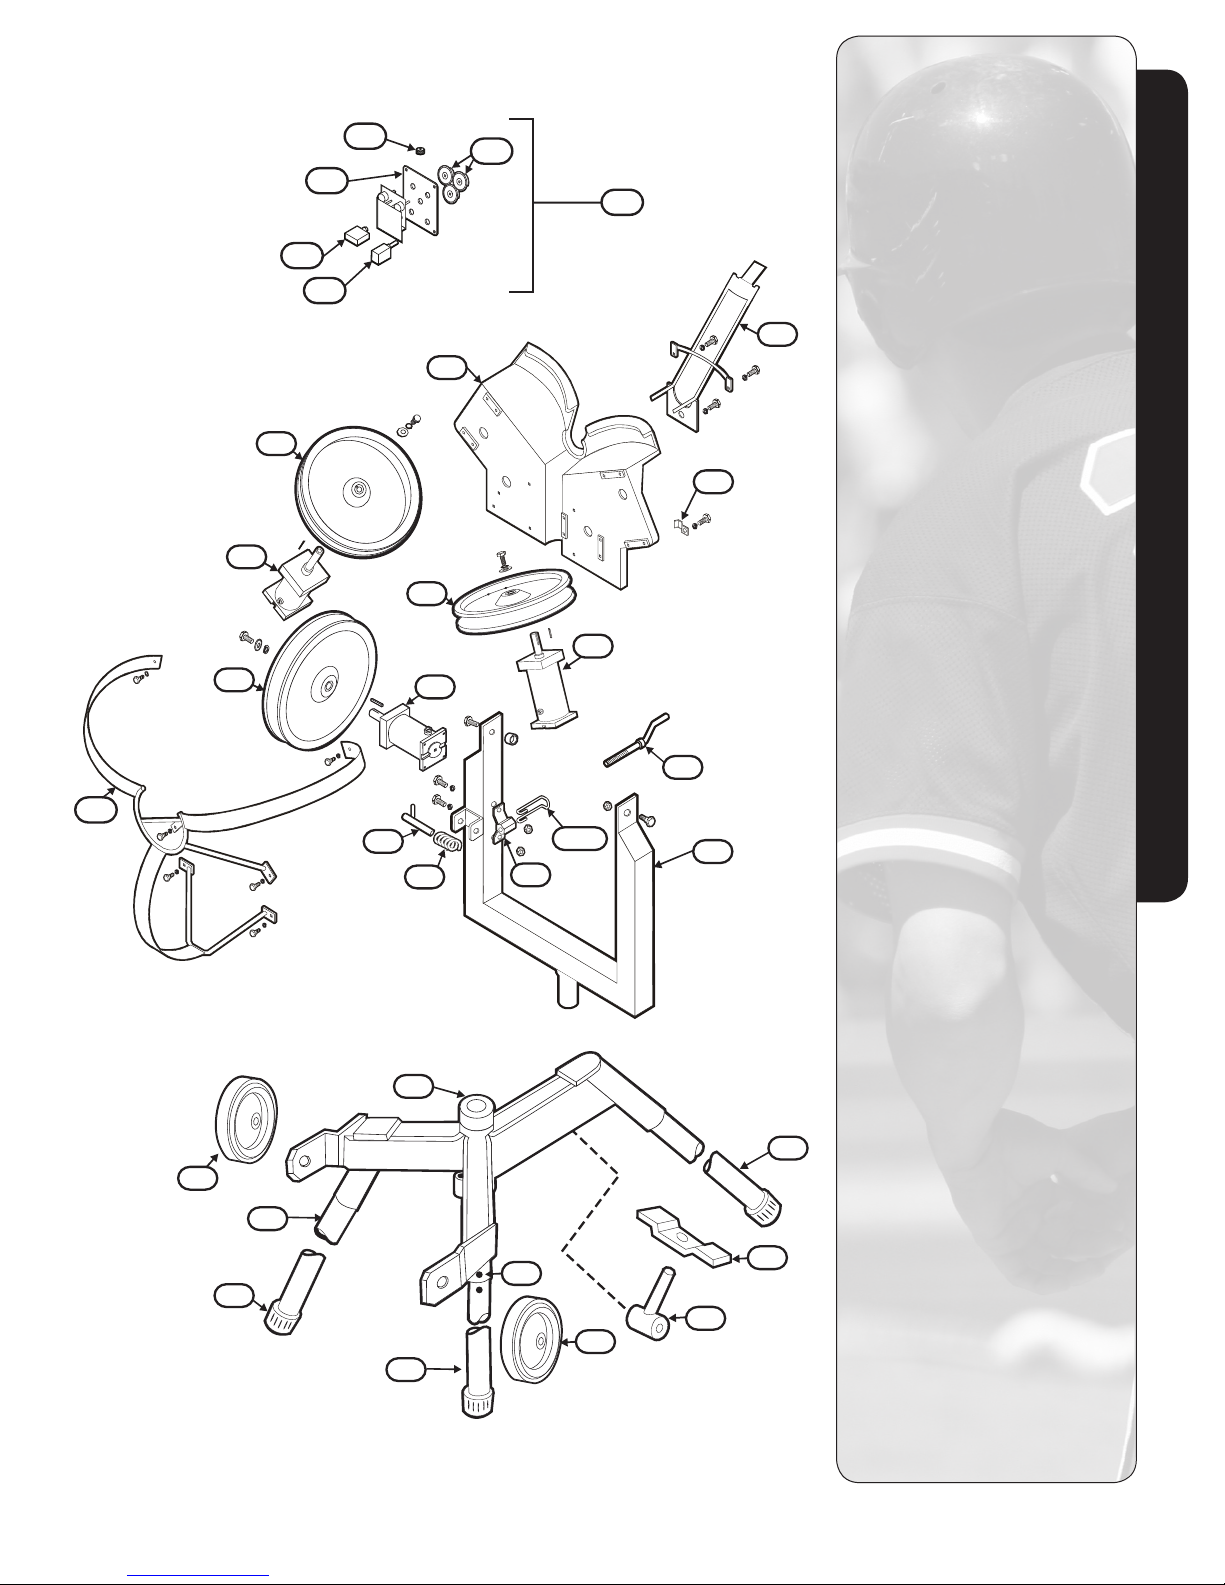
EXPLODED VIEW
1 Cane Tip
38
37
38
64
60
65
49
38
37
34
61
37
63
35
39
2 Leg - Standard Size (ea.)
5 Undercarriage
13 Horizontal Swivel
Lock Handle
14 Swivel Lock Pivot
17 Snap-Button
19 Travel Wheel (with axle, bolt,
nut, washers)
21 Yo ke
26 Pin, Travel Lock
27 Spring, Travel Lock
30 Fitting, Elevation Control
30B Tension Spring,
Elevation Control
31 Handle, Elevation Control
Exploded View
43
19
34 Main Casting,
Throwing Head
26
27
30
30B
31
21
35 Clamp, Cable
36 Hinge Assembly,
Throwing Head
37 Motor, Variable
Speed 90V
38 Throwing Wheel
39 Ball Chute
43 Wheel Guard (ea.)
5
2
49 Grommet, Wiring
50 Plate, Travel Lock, and
Elevation Control
60 Plate, Control, Panel Cover
2
17
1
14
19
2
13
61 Knob, Speed Control
63 Controller Assembly
64 Safety Reset
65 On/Off Switch
HACK ATTACK™ BASEBALL PITCHING MACHINE
SPORTS ATTACK, LLC. • 800-717-4251 • sportsattack.com
Power Cord (not shown)
13
Page 16
PARTS LIST
REF#s
39 533-1307
1 280-1003
HA BASEBALL
PART#s
Ball Chute
Cane Tip ea.
DESCRIPTION
To order additional parts,
please call:
Sports Attack Customer
Service Department
Ph 800-717-4251
Fx 775-345-2883
35 533-0002
63 530-0006
30 531-1505
49 280-3007
31 531-1504
13 533-0500
61 280-2003
2 532-0001
37 530-1012
65 223-0004
old 223-0002
232-0000
64 232-0002
old 232-0007
14 533-0501
30B 310-0021
Clamp, Cable
Controller Assembly
Fitting, Elevation Control
Grommet, Wiring
Handle, Elevation Control
Horizontal Swivel Lock Handle
Knob, Speed Control
Leg, Standard Size ea.
Motor, Variable Speed 90V
On/Off Switch (Rocker)
On/Off Switch (Old Style - Toggle)
Power Cord (US)
Safety Reset
Safety Reset (Old Style Breaker)
Swivel Lock Pivot
Tension Spring, Elevation Control
Parts List
Parts List
38 531-0001
19 281-0002
281-0001
5 533-1301
43 533-1306
21 533-1302
Throwing Wheel
Travel Wheel ea.
Travel Wheel, Extra-Heavy Duty
Undercarriage
Wheel Guard ea.
Yoke
HACK ATTACK™ BASEBALL PITCHING MACHINE
SPORTS ATTACK, LLC. • 800-717-4251 • sportsattack.com
14
Page 17
CONVERSION
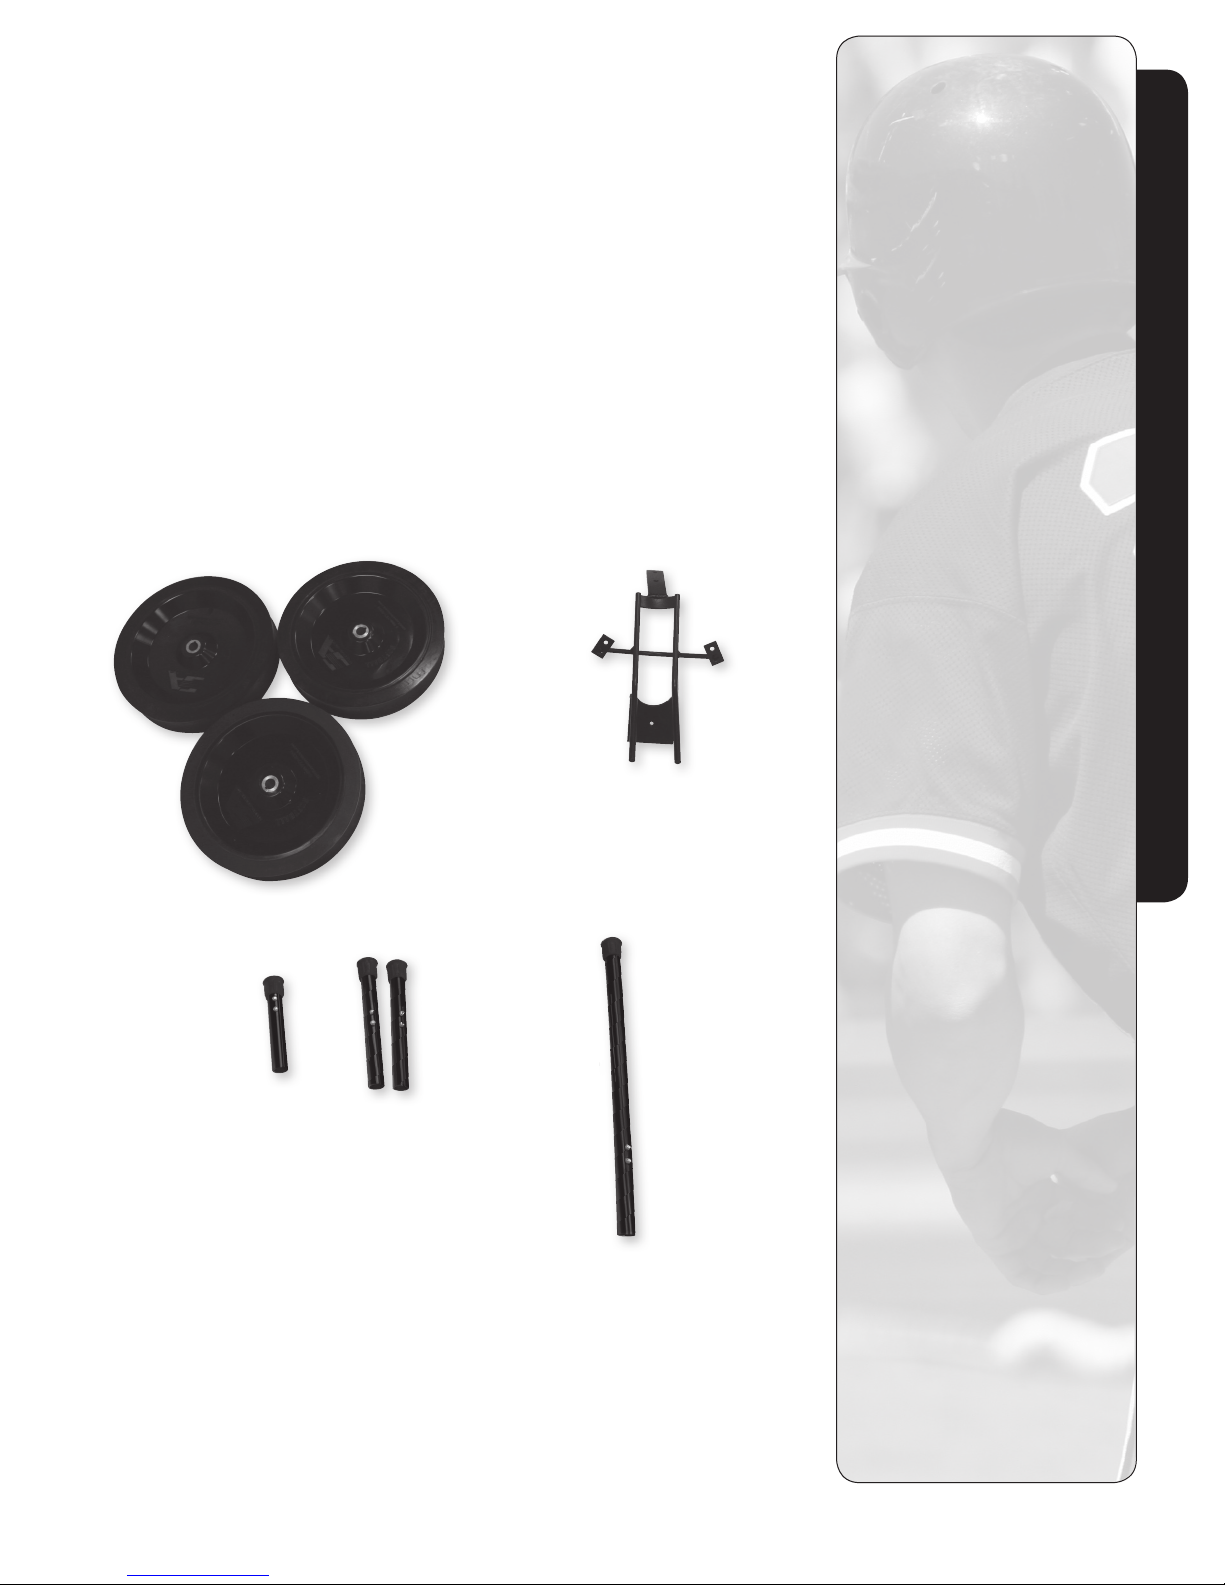
BASEBALL TO SOFTBALL KIT NO. 110-3001
SUGGESTION:
1. Turn the on/off switch “OFF” and unplug the power cord.
2. Remove all three baseball throwing wheels (see page 1 1 ).
3. Remove the ball feed chute.
4. Install part no. 520-0023 softball feed chute.
5. Install one part no. 531-0002 softball throwing wheel on each motor.
6. Install one part no. 532-0002 front leg in each front leg socket.
Install one part no. 532-0003 rear leg in rear leg socket.
Insert one part no. 532-0009 carry handle in the rear leg socket for transport.
7. Reinstall wheel guard. Test Hack Attack for proper operation.
SUGGESTION: Carefully mark and store all removed parts for later conversion back to
baseball operation.
531-0002 Softball Throwing Wheels
Conversion
532-0003
Rear Leg
532-0002
Front Legs
520-0023 Softball
Ball Chute
532-0009
Transport Handle
HACK ATTACK™ BASEBALL PITCHING MACHINE
SPORTS ATTACK, LLC. • 800-717-4251 • sportsattack.com
15
Page 18
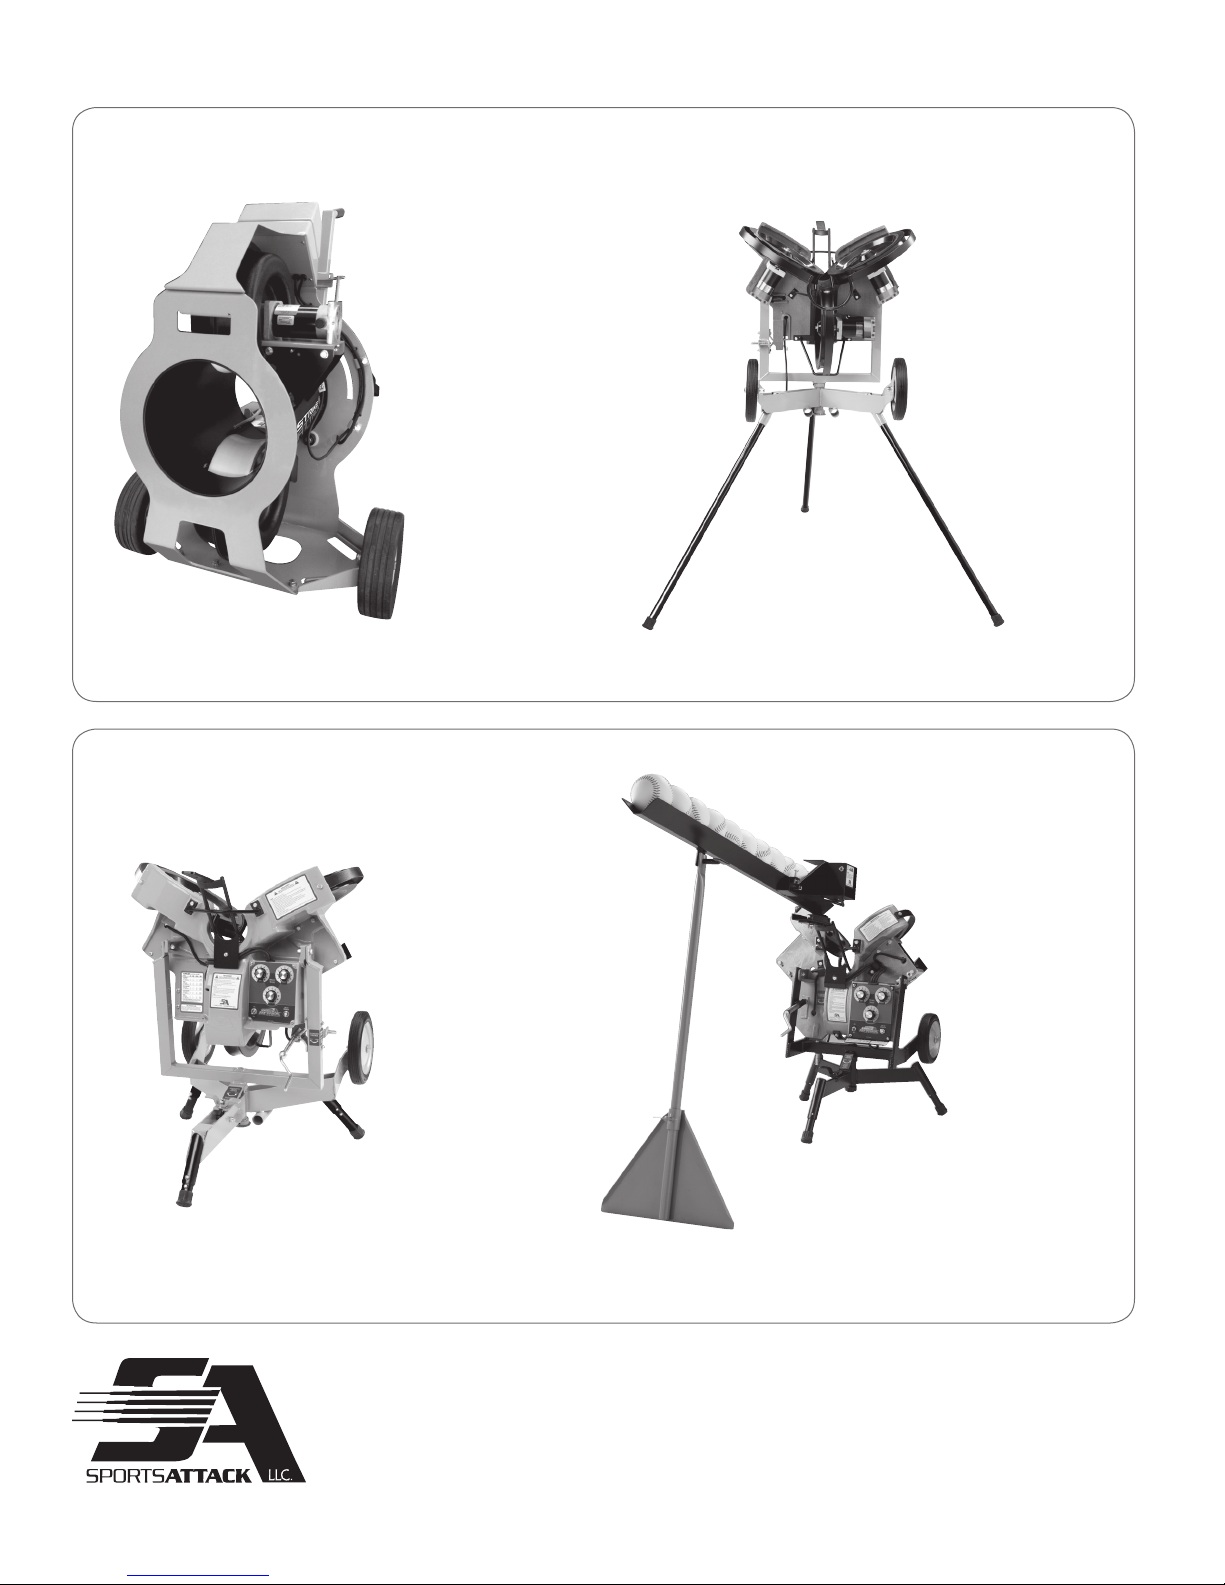
SPORTS ATTACK PRODUCTS
SOCCER CRICKET
STRIKE ATTACK
SOFTBALL
CRICK ATTACK
HACK ATTACK SOFTBALL
Please visit our web site sportsattack.com for information about Sports Attack sports
training products, or call 800-717-4251 for complete information and specifications.
HACK ATTACK™ BASEBALL PITCHING MACHINE
SPORTS ATTACK, LLC. • 800-717-4251 • sportsattack.com
JUNIOR HACK ATTACK SOFTBALL (shown with optional feeder)
16
Page 19
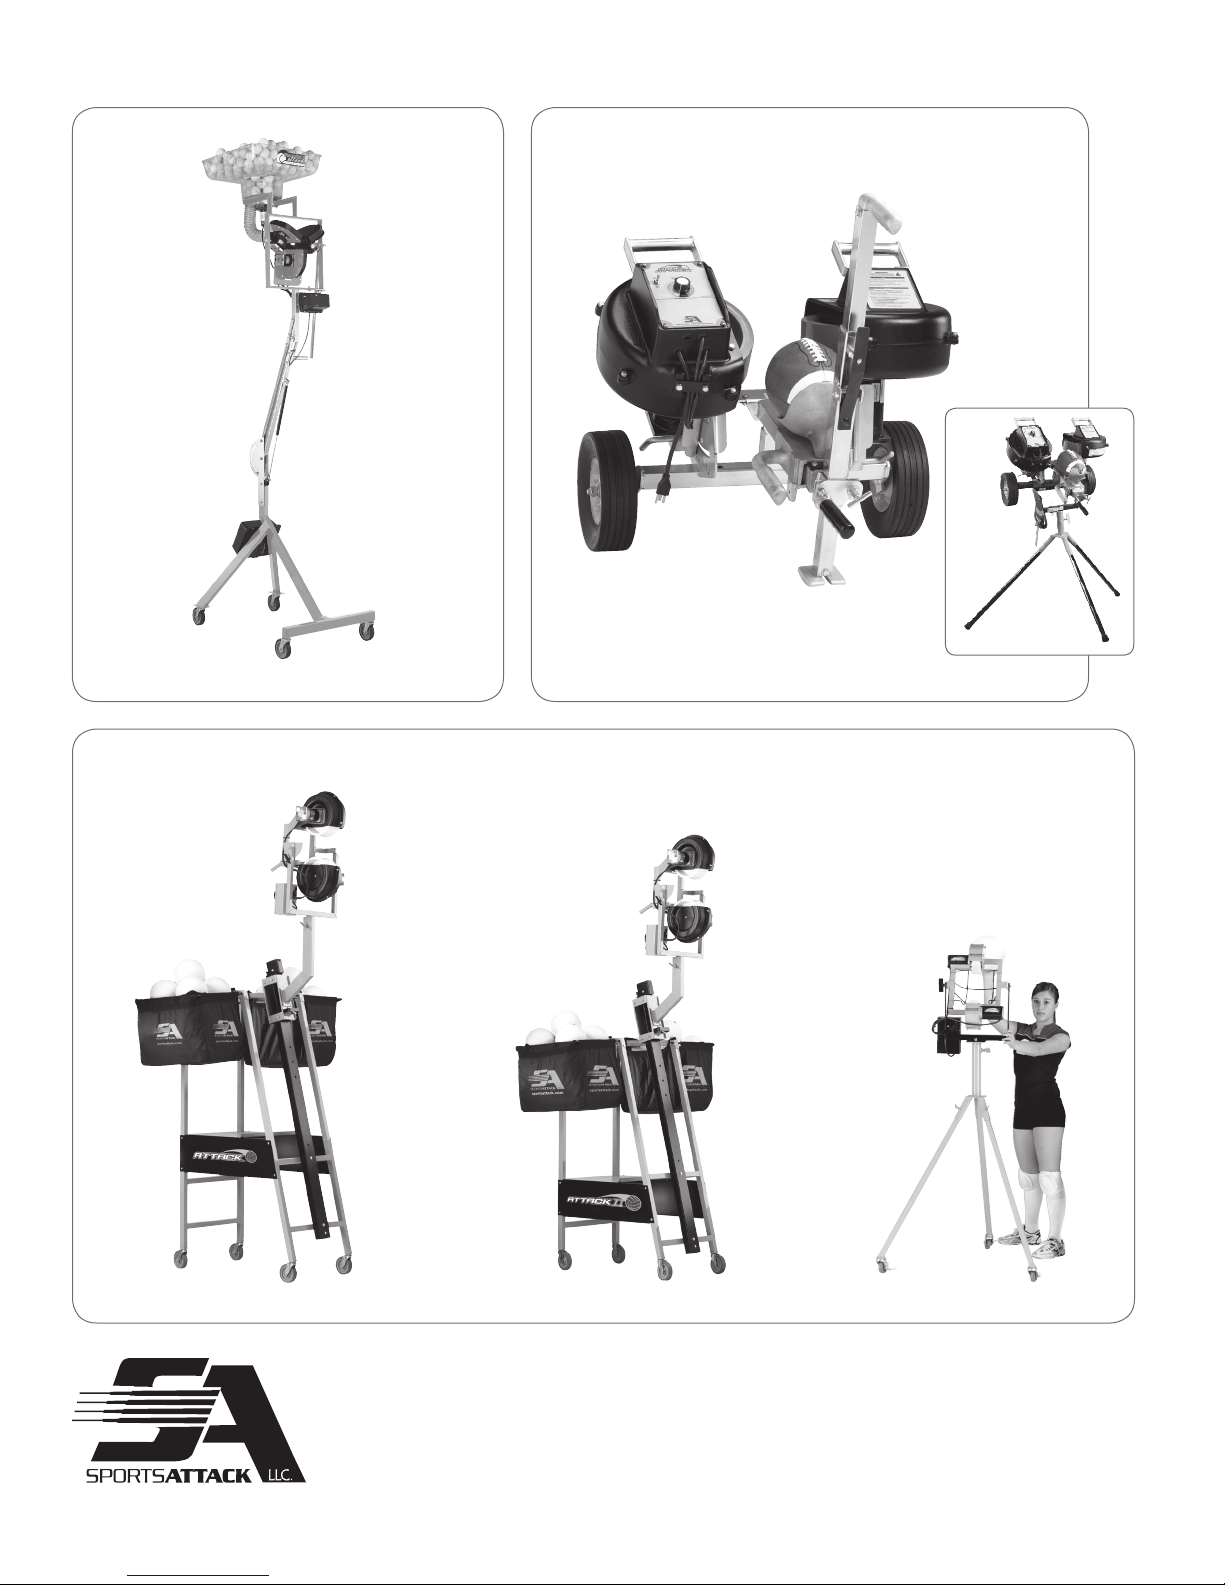
SPORTS ATTACK PRODUCTS
TENNIS FOOTBALL
ACE ATTACK SNAP ATTACK
VOLLEYBALL
ATTACK (shown with optional ball bags) SKILL ATTACK
Please visit our web site sportsattack.com for information about Sports Attack sports
training products, or call 800-717-4251 for complete information and specifications.
HACK ATTACK™ BASEBALL PITCHING MACHINE
SPORTS ATTACK, LLC. • 800-717-4251 • sportsattack.com
ATTACK II (shown with optional ball bags)
17
 Loading...