

SportsArt Fitness Upright Bike C520U, SC520U Owner's Manual

1
2
4
6
12
13
14
17
20
22
23
24
24
24
25
26
SPORTSARTC520UUPRIGHTBIKE
TABLEOFCONTENTS
1.INTRODUCTION....................................................................................................
2.IMPORTANTSAFETYPRECAUTIONS...............................................................
3.ASSEMBLINGYOURBIKE
ListofParts............................................................................................................
UnitAssemblyProcedure......................................................................................
SeatAdjustmentProcedure....................................................................................
SeatForward/BackwardAdjustment......................................................................
4.UNDERSTANDINGTHEC520UDISPLAYCONSOLE
DisplayWindows...................................................................................................
OperatingtheC520Bike........................................................................................
ProgramFunctions.................................................................................................
InternalSettings.....................................................................................................
5.USERPARAMETERSETTING............................................................................
6.MAINTAININGTHEBIKE.......................................................................................
7.GUIDELINESFOREXERCISE
HowlongshouldIexercise.................................................................................
HowoftenshouldIexercise.................................................................................
8.TROUBLESHOOTING
ProceduretoReplaceaFuse...............................................................................
9.WIRINGSCHEMATIC...........................................................................................

SPORTSARTC520UUPRIGHTBIKE
INTRODUCTION
Congratulationsonpurchasingoneofthefinestpiecesofexerciseequipmentonthe
markettoday,theSportsArtC520UUprightBike.Constructedofhighquality
materialsanddesignedforyearsoftrouble-freeusage,theC520Uwillbeanintegral
partofyourfitnessregimen.
BeforeusingyourC520Ubike,werecommendthatyoufamiliarizeyourselfwiththis
Owner'sManual.Whetheryouareafirsttimeuserofanuprightbikeoraseasoned
"pro,"understandingthecorrectuseoftheequipmentwillenhanceyourabilityto
achieveyourexercisegoalssafelyandsuccessfully.
1
Display
Cupholder
Handlebar
Pedestal
Uppercover
Pedestalcover
Sidecover
Pedal
Frontfootcover
Crank
Lowerframe
Handlebarmountcover
Seatbottom
Seatpostcover
Seatforward
adjustlever
Rearsupport
cover
Leveler

YourSportsArtbikewasdesignedandbuiltforoptimumsafety.However,certain
precautionsapplywheneveryouuseyourbike.Pleasereadtheentiremanualbefore
assemblyandoperation.Also,pleasenotethefollowingsafetyprecautions:
Pleasereadandobservethefollowingsafetyguidelines:
Keepthisowner'smanualforfutureuseandreference.
Readthisowner'smanualandfollowtheinstructions.
Assembleandoperatethebikeonasolid,levelsurface.
Neverallowchildrenonornearthebike.
Checkthemachinebeforeeveryuse.Makesureallpartsareassembled,andall
nutsandboltsaretightened.Donotusethemachineiftheunitisdisassembledin
anyway.
Keepyourhandsawayfrommovingparts.
Wearproperworkoutclothing.DoNOTwearoverlylooseclothing.Donotwear
shoeswithleathersolesorhighheels.Tiealllonghairback.
Donotrocktheunitfromsidetosideandtakecarewhenmountingand
dismountingtheunit.
Donotstandontheunit.
Donotuseaccessoriesthatarenotspecificallyrecommendedbythe
manufacturerasthesemightcauseinjuriesorcausetheunittofail.
Allowsufficientspaceonbothsidesofthebikeforuserstomountandtodismount
theunit.
Ifanypartsfailoraredefective,pleasestopyourworkoutimmediatelyandcontact
yourauthorizeddealerforrepairs.
Workwithinyourrecommendedexerciselevel;doNOTworktoexhaustion.
Ifyoufeelanypainorabnormalsensations,STOPYOURWORKOUT.Consult
yourphysicianimmediately.
IMPORTANTSAFETYPRECAUTIONS
‧
‧
‧
‧
‧
‧
‧
‧
‧
‧
‧
‧
‧
‧
Warning
2

‧Theweightlimitforthisbikeis150kgs(330lbs).
Beforebeginninganyexerciseprogram,youshouldconsultwithyourdoctor.Itis
recommendedthatyouundergoacompletephysicalexamination.
Caution
3

ASSEMBLINGYOURBIKE
Thankyouforpurchasingourproduct.Eventhoughwegotogreateffortstoensure
thequalityofeachproduct,occasionalerrorsand/oromissionsdooccur.Please
contactyourdealerifyoufindthisproducttobedefectiveormissingapart.Please
readthisowner'smanualandfollowtheinstructions.
IMPORTANT:Thepackingforthisbikewasdesignedtoprotectitduringshipment.
Pleasestoretheoriginalpackinginasafeplaceincaseyouneedto
shiptheunitinthefuture.
Beforeassemblingyourbike,makesurethatyouhaveallofthefollowingitems.
1.Pedestal
2.Pedestalcover
3.Rightpedal
4.Mainframe
5.Rearsupport
6.Rearsupportcover
7.Leftpedal
8.Seatbottom
9.Handlebarmountlowercover
10.Handlebars
11.Handlebarmountuppercover
12.Hardwarekit
LISTOFPARTS
4
1-Opendoubleendwrench,1pc
2-T-shapedAllenwrench(M5),1pc
3-T-shapedAllenwrench(M6),1pc
4-Screwdriverhandle(green),1pc
5-Double-endedscrewdriver,1pc
6-RoundheadPhillipsscrews,5pc
7-Screwinserts,6pc

5
1.Pedestal
2.Pedestalcover
3.Rightpedal
4.Mainframe
5.Rearsupport
6.Rearsupportcover
7.Leftpedal
8.Seatbottom
9.Handlebarmountlowercover
10.Handlebars
11.Handlebarmountuppercover
12.Hardwarekit
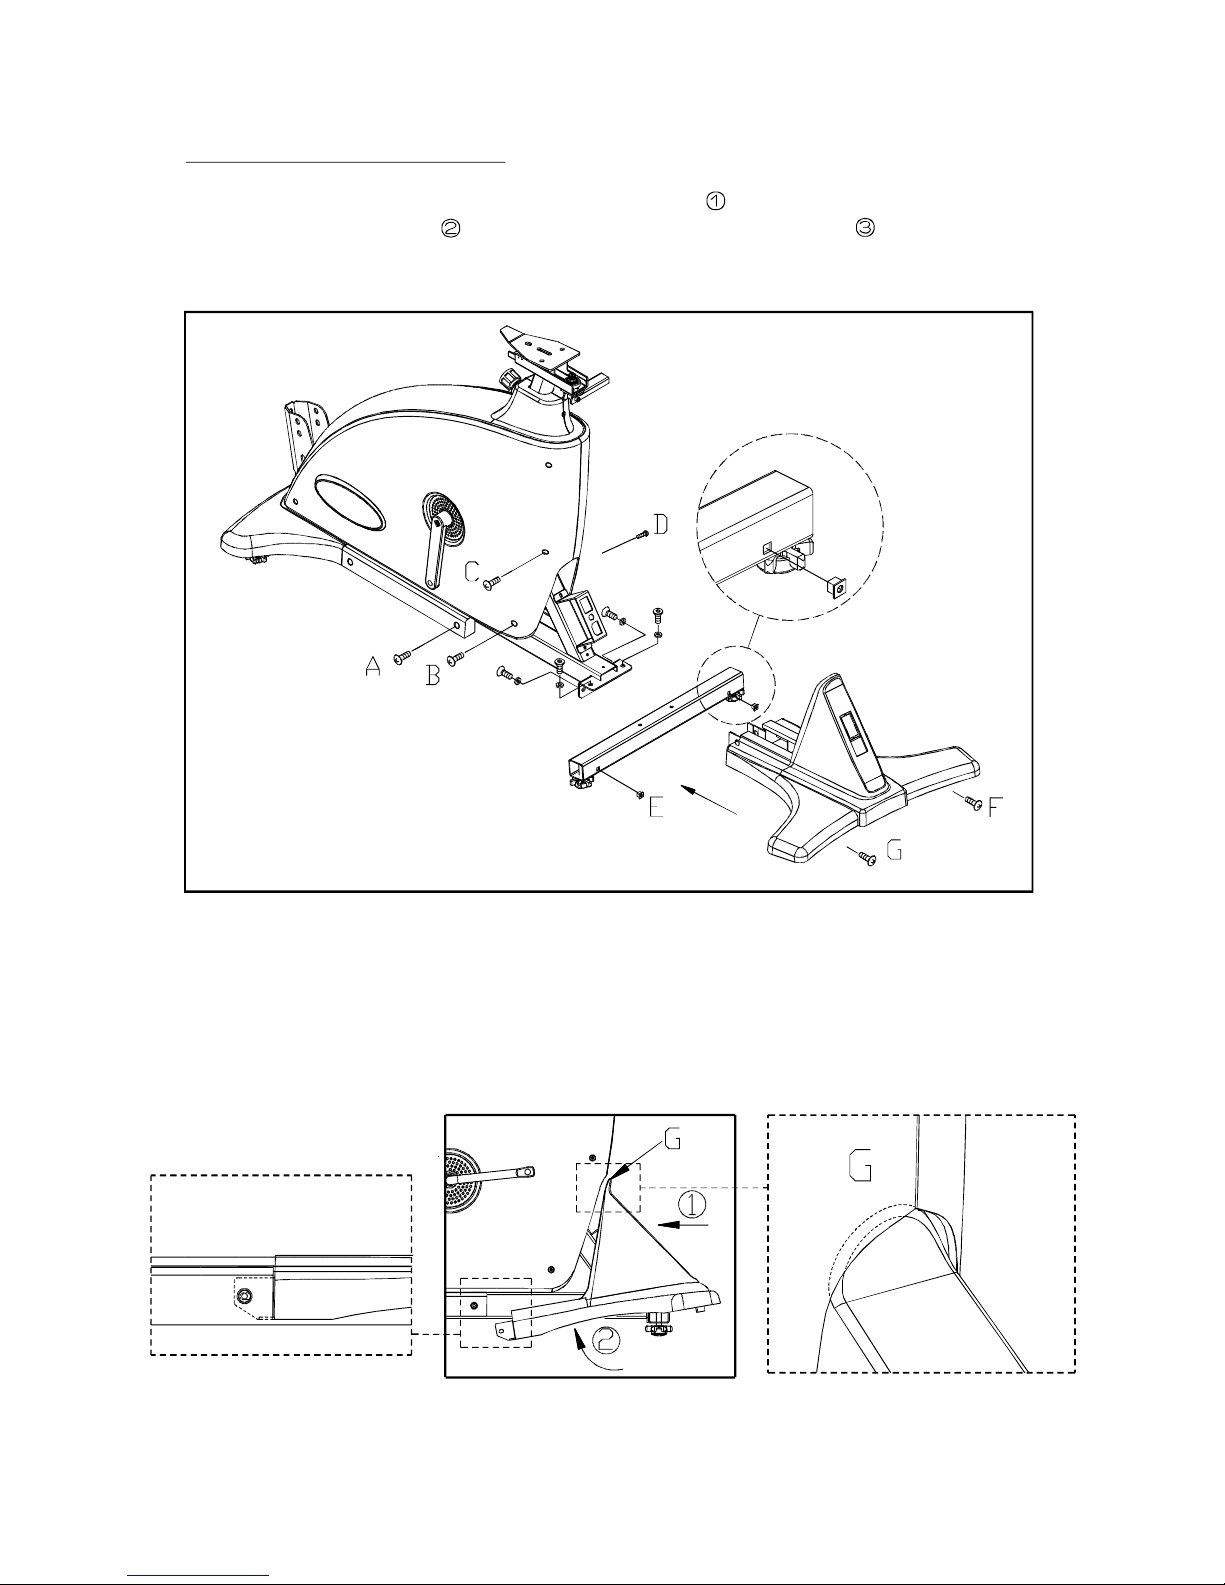
UnitAssemblyProcedure
STEP1.Forthefollowing,pleaserefertoFigure1.Securetherearsupportbarto
theunitframe.InsertscrewsocketsEintotheholes.Loosenscrews
A,B,C,Dtomakeroomfortherearsupportcover.Slidetherearsupport
coverintoplace.Thensecurethosescrews.
Note:Holdtherearsupportcoverata5-degreeanglewhileinsertingitintotheframe.
PresslightlyatGtoinsertthetopintobothsidesofthecover.Whenthetop
hasenteredthesidecovers,thenslidethecoverstraightontothesupportbar
asshowninFigure2.
6
Fig.1
Fig.2
7
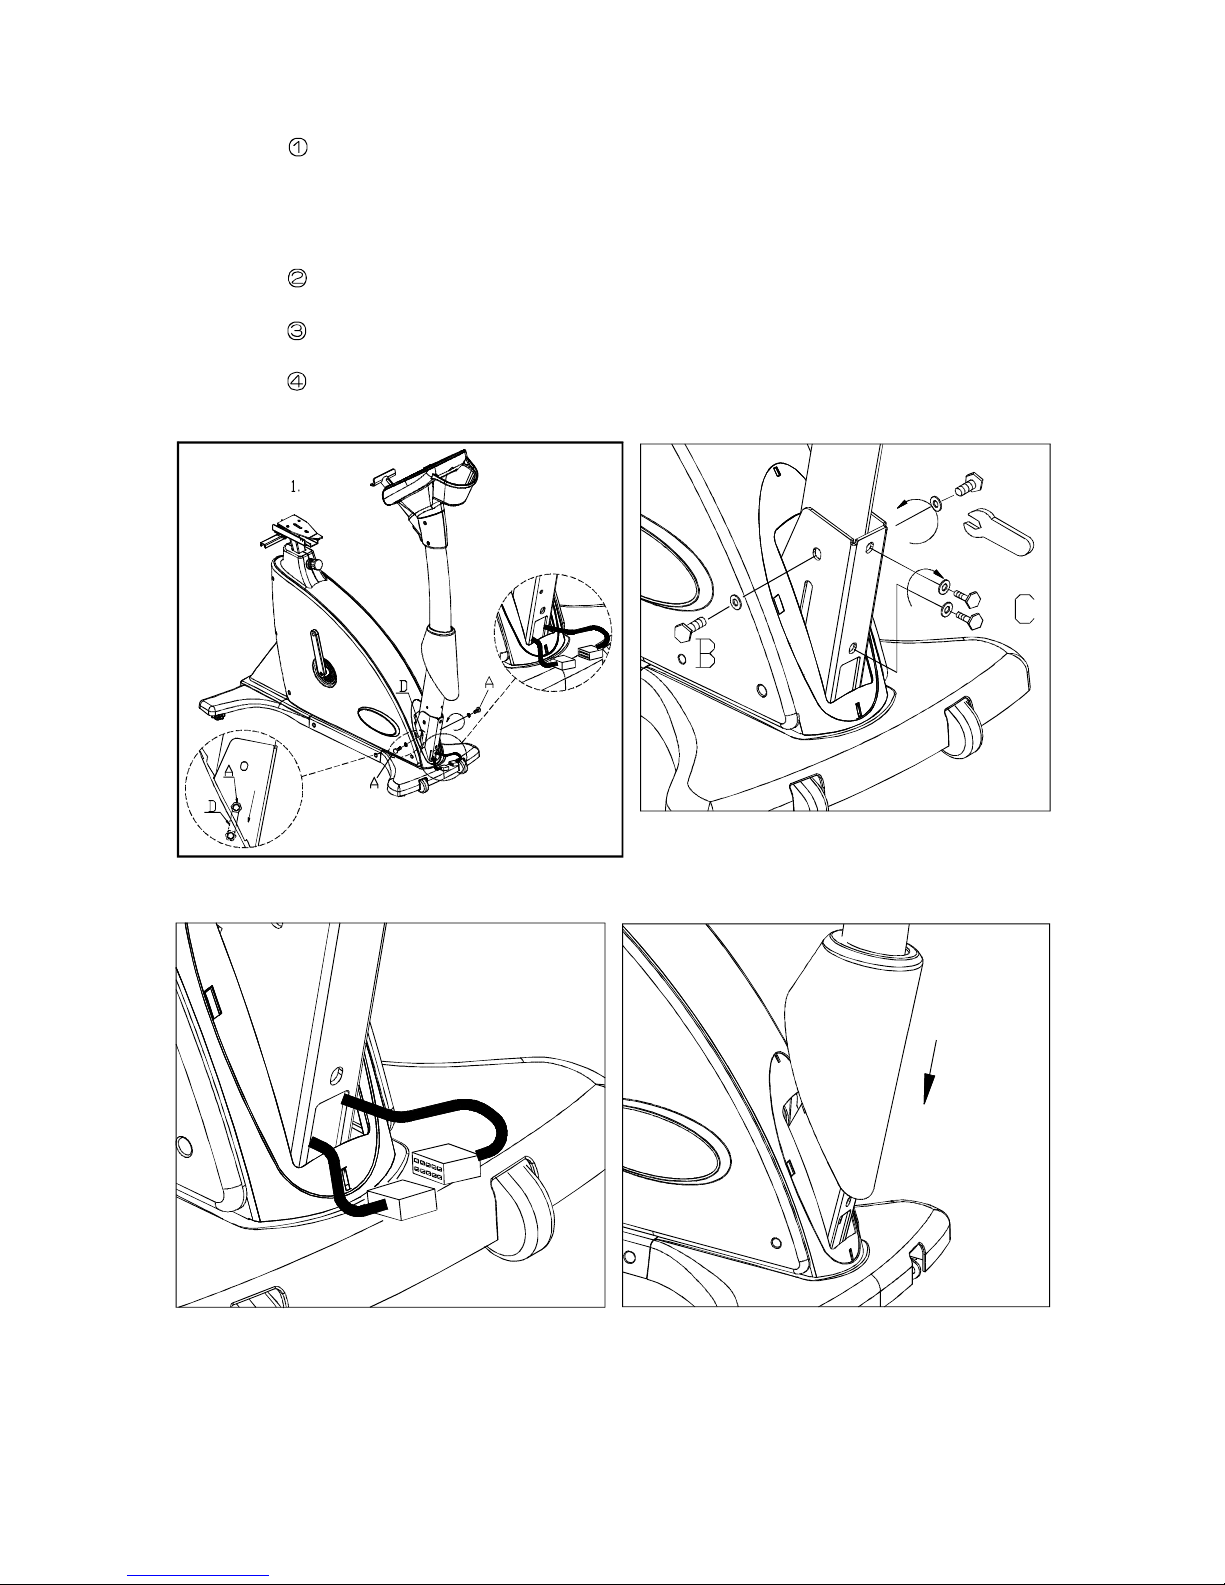
STEP2.Firstslipthepedestalcoverontothepedestal.Positionthedatacablefor
safety.Theninsertthepedestalontoitsmount.LightlytightenboltsA
intothelowerholes(atpositionD)tosecurethepedestal.Donotfully
tightenthesebolts.Pullthepedestaldownwarduntiltheotherholes
comeintoplaceandboltscanbesecured.SeeFigure3.
TightenboltsinpositionCasshowninFigure4.Thensecureboltsin
positionsAandB,asshowninFigure4.
Connectdatacableconnectors,theninsertthecableintothepedestal,
asshowninFigure5.
Placethepedestalcoverinplacetomeetthetopcoverasshownin
Figure6.
Fig.3
Fig.4
Fig.5
Fig.6
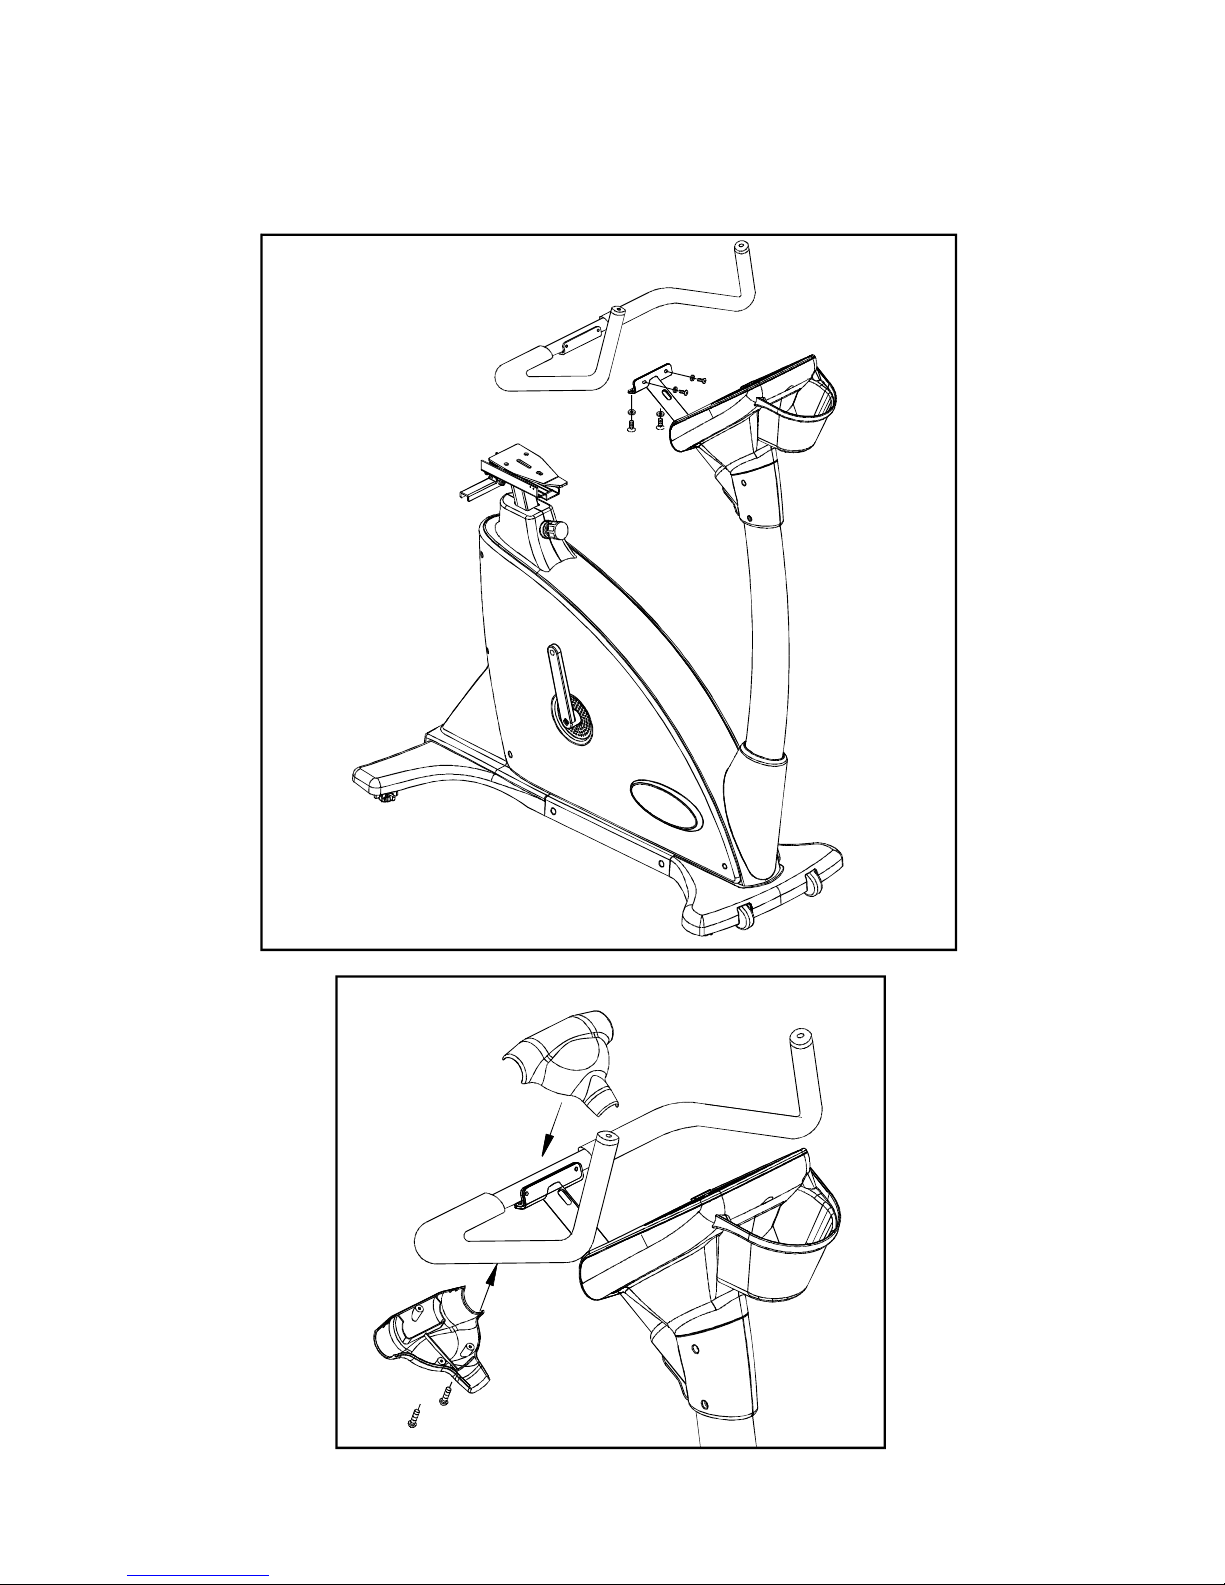
STEP3.Holdthehandlebarsinplaceontheframewhilesecuringthehandlebar
bolts.Thensecuretheupperandlowerhandlebarmountcovers.See
Figures7and8.
Fig.7
Fig.8
8
 Loading...