

SportsArt Fitness T610 User Manual

1
4
4
4
6
6
8
9
9
10
11
13
14
14
14
15
16
18
19
20
21
23
24
24
24
25
26
TABLEOFCONTENTS
Introduction
1.ImportantSafetyInstructions................................................................................
2.AssemblingYourTreadmill....................................................................................
InstallationRequirements.....................................................................................
ListofParts...........................................................................................................
3.TreadmillAssembly...............................................................................................
StepbyStepInstructions......................................................................................
4.ConnectToPower.................................................................................................
5.T610ElectronicDisplay........................................................................................
ElectronicsDisplayLayout...................................................................................
DisplayFeatures..................................................................................................
DisplayControls...................................................................................................
SafetyKey............................................................................................................
6.HowToUseYourT610Treadmill.........................................................................
QuickStartandTouch-N-GoQuickStartPrograms..............................................
UserSelection......................................................................................................
WorkoutSetup......................................................................................................
Programs..............................................................................................................
UserParametersettings......................................................................................
7.GuidelineForExercise.........................................................................................
8.AdjustTheRunningBelt.......................................................................................
9.BeltAdjustmentProcedure...................................................................................
10.FloorLevelAdjustment.......................................................................................
11.TroubleShooting................................................................................................
ErrorMessages..................................................................................................
InclineFuseFailure............................................................................................
12.MainFuseFailure...............................................................................................
13.WiringSchematic...............................................................................................

1
YourSportsArttreadmillwasdesignedandbuiltforoptimumsafety.However,certain
precautionsapplywheneveryouuseyourtreadmill.
Pleasereadtheentiremanualbeforeassemblyandoperation.Also,pleasenoteand
savethefollowingsafetyinstructions:
-Toreducetheriskofelectricshock:
Improperconnectionoftheequipment-groundingconnectorcanresultinariskof
electricshock.Checkwithaqualifiedelectricalorservicepersonifyouareindoubt
astowhetherthetreadmillisproperlygrounded.Donotmodifytheplugprovided
withtreadmill,ifitdoesn'tfittheoutlet,gettheproperoutletinstalledbyaqualified
technician.
Alwaysunplugthistreadmillfromtheelectricaloutletimmediatelyafterusingand
beforecleaning.
-Toreducetheriskofburns,fire,electricshock,orinjurytopersons:
1)Thetreadmillshouldneverbeleftunattendedwhenpluggedin.Unplugfromoutlet
whennotinuse,andbeforeputtingonortakingoffparts.
2)Donotoperateunderblanketorpillow.Excessiveheatingcanoccurandcause
fire,electricshock,orinjurytopersons.
3)Closesupervisionisnecessarywhenthistreadmillisusednearchildren,invalids,
ordisabledpersons.
4)Usethistreadmillonlyforitsintendeduseasdescribedinthismanual.Donotuse
attachmentsnotrecommendedbythemanufacturer.
5)Neveroperatethistreadmillifithasadamagedcordorplug,ifitisnotworking
properly,ifithasbeendroppedordamaged,ordroppedintowater.Returnthe
treadmilltoaservicecenterforexaminationandrepair.
6)Donotcarrythistreadmillbysupplycordorusecordasahandle.
7)Keepthecordawayfromheatedsurfaces.
8)Neveroperatethetreadmillwiththeairopeningsblocked.Keeptheairopenings
freeoflint,hair,andthelike.
9)Neverdroporinsertanyobjectintoanyopening.
10)Donotuseoutdoors.
IMPORTANTSAFETYINSTRUCTIONS
DANGER
WARNING

2
11)Theweightlimitforthistreadmillis275Ibs(125kg).
12)Donotoperatewhereaerosol(spray)productsarebeingusedorwhereoxygen
isbeingadministered.
13)Todisconnect,turnallcontrolstotheoffposition,thenremoveplugfromoutlet.
14)Assembleandoperatethetreadmillonasolid,levelsurface.Keepthearea
behindthetreadmillclear.
15)Neverallowchildrenonornearthetreadmill.Therunningbeltwillnotstop
immediatelyifanyobjectbecomescaughtinthebeltorrollers.
16)Keephandsawayfrommovingparts.
17)Wearproperworkoutclothing:Donotwearlooseclothing.Donotwearshoes
withleathersolesorhighheels.Tiebackalllonghair.
18)Straddlethemachinewithyourfeetontherightandleftstagingplatformbefore
startingtherunningbelt.
19)Workwithinyourrecommendedexerciselevel,doNOTworktoexhaustion.
20)Ifyoufeelanypainorabnormal,STOPYOURWORKOUTandconsultyour
physicianimmediately.
21)Connectthistreadmilltoaproperlygroundedoutletonly.
22)Alwaysusethesafetycordwhenoperatingthetreadmill.
TheTreadmillisdesignedforyouruseandenjoyment.Pleasefollowtheabove
safetyinstructionsandusinggoodjudgmentandcommonsense.
3
SPORTSARTT610TREADMILL
INTRODUCTION
Congratulationsonpurchasingoneofthefinestpieceofexerciseequipmentonthe
markettoday,theSportsArtT610treadmill.TheT610isdesignedwiththeenduser
inmindandconstructedofhighqualitymaterialsanddesignedforyearsoftroublefreeuse.
BeforeusingyourSportsArtT610treadmill,werecommendthatyoufamiliarize
yourselfwiththisOwner'sManual.Whetheryouareafirsttimeuserofatreadmillor
aseasoned"PRO",understandingthecorrectuseoftheequipmentwillenhance
yourabilitytoachieveyourexercisegoalssafelyandsuccessfully.
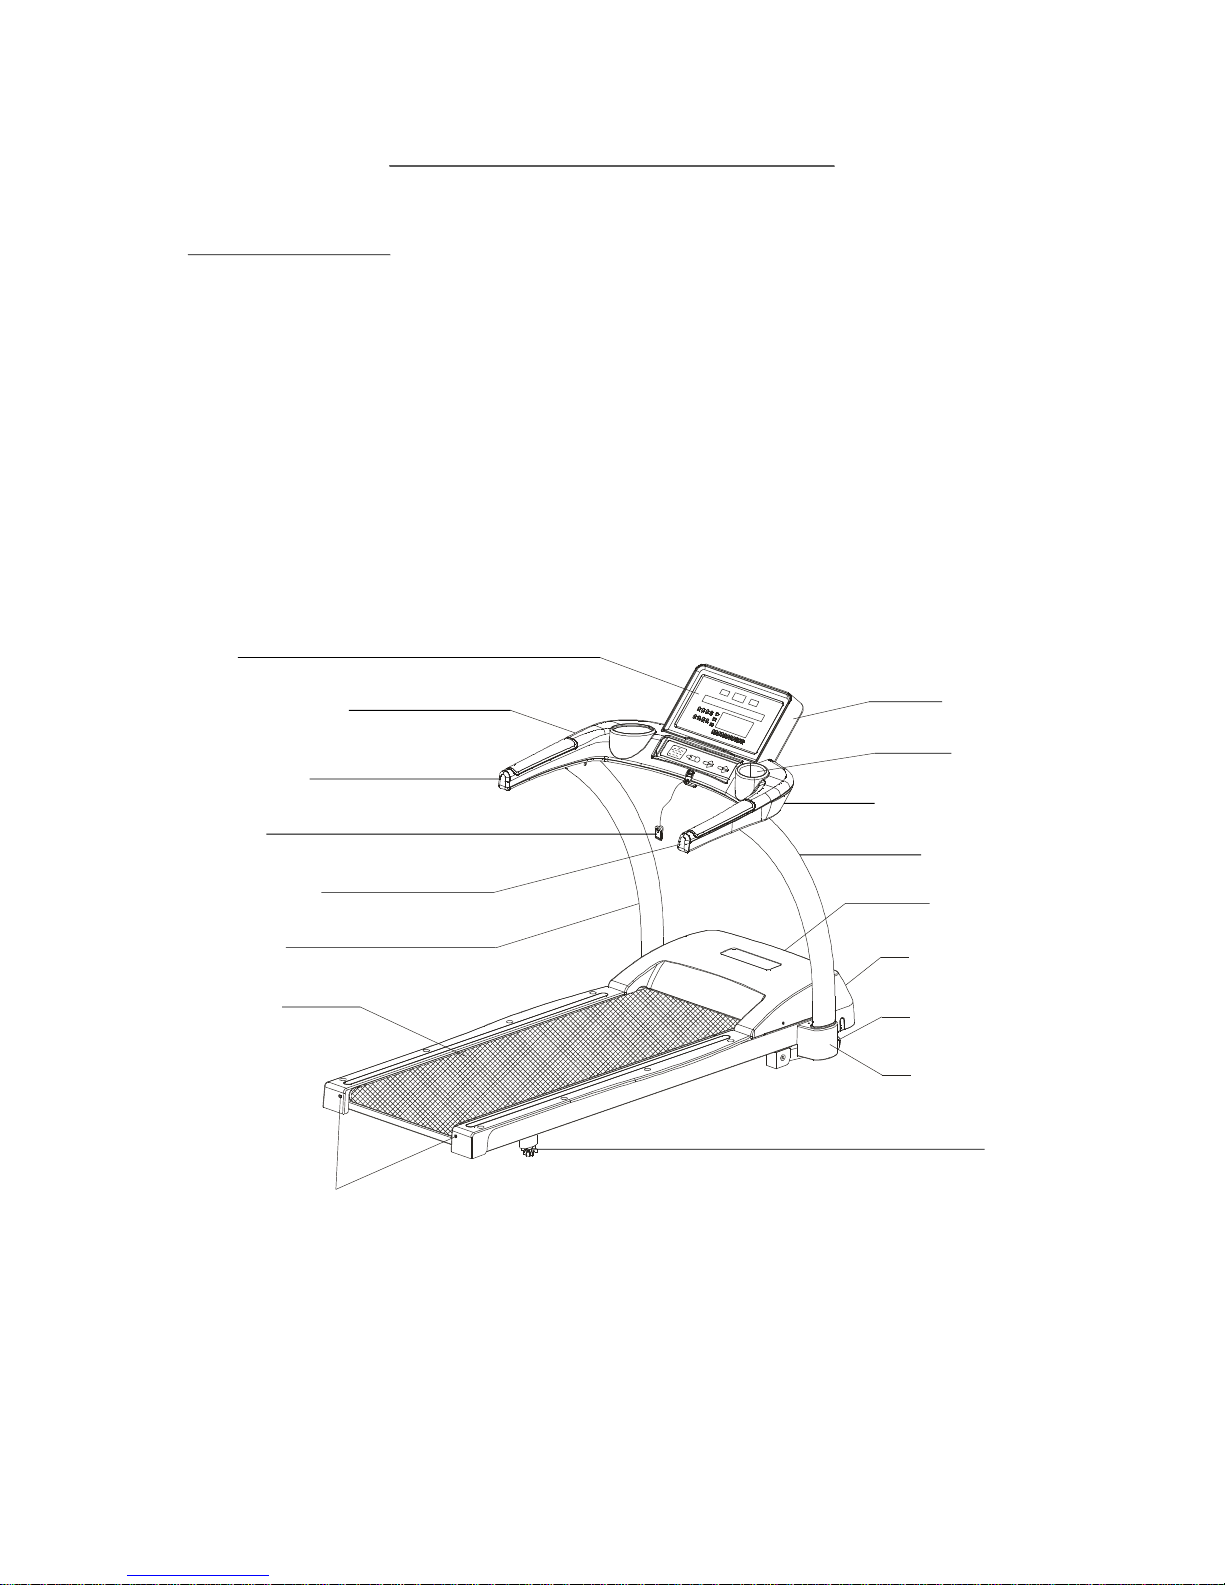
Treadmillprofile:
Display
UpperHandlePlastic
LeftHandleCap
SafetyKey
RightHandleCap
LeftPedestal
RunningBelt
BeltAdjustmentBolt
LowerHandlePlastic
DisplayBack
CupHolder
RightPedestal
PowerSwitch
MotorEnclosure
TransportWheel
SupportBracket
Leveler

4
ASSEMBLINGYOURTREADMILL
InstallationRequirements
ListofParts
ThankyouforpurchasingaSportsArtFitnessproduct.Forproperinstallationplease
readandfollowtheinstructions.Ifthetreadmillisnotassembledproperly,youcould
voidtheSportsArtFitnessLimitedWarranty.
Ifthereareanypartsortoolsthataremissingpleasecontactyourdealer
immediately.
Toensuresafetytoyourselfandthetreadmill,werecommendyoudropthe
sidesoftheboxandslidethetreadmillfromtheboxratherthanlifting.
Beforeassemblingyourtreadmill,makesurethatyouhaveallfollowingitems:
1.Onesafetykey
2.Onefuse15A(110v)/10A(220v)
3.Onescrewdriverforpowerconnectionanduprightpedestalcover
4.Onehexallenwrench(M6)foruprightpedestalassembly
5.Onehexallenwrench(M4)withThandlefordisplayassembly
6.Twoflatcapsforuprightpedestalassembly
7.Twocurvedcapsforuprightpedestalassembly
Caution:
5
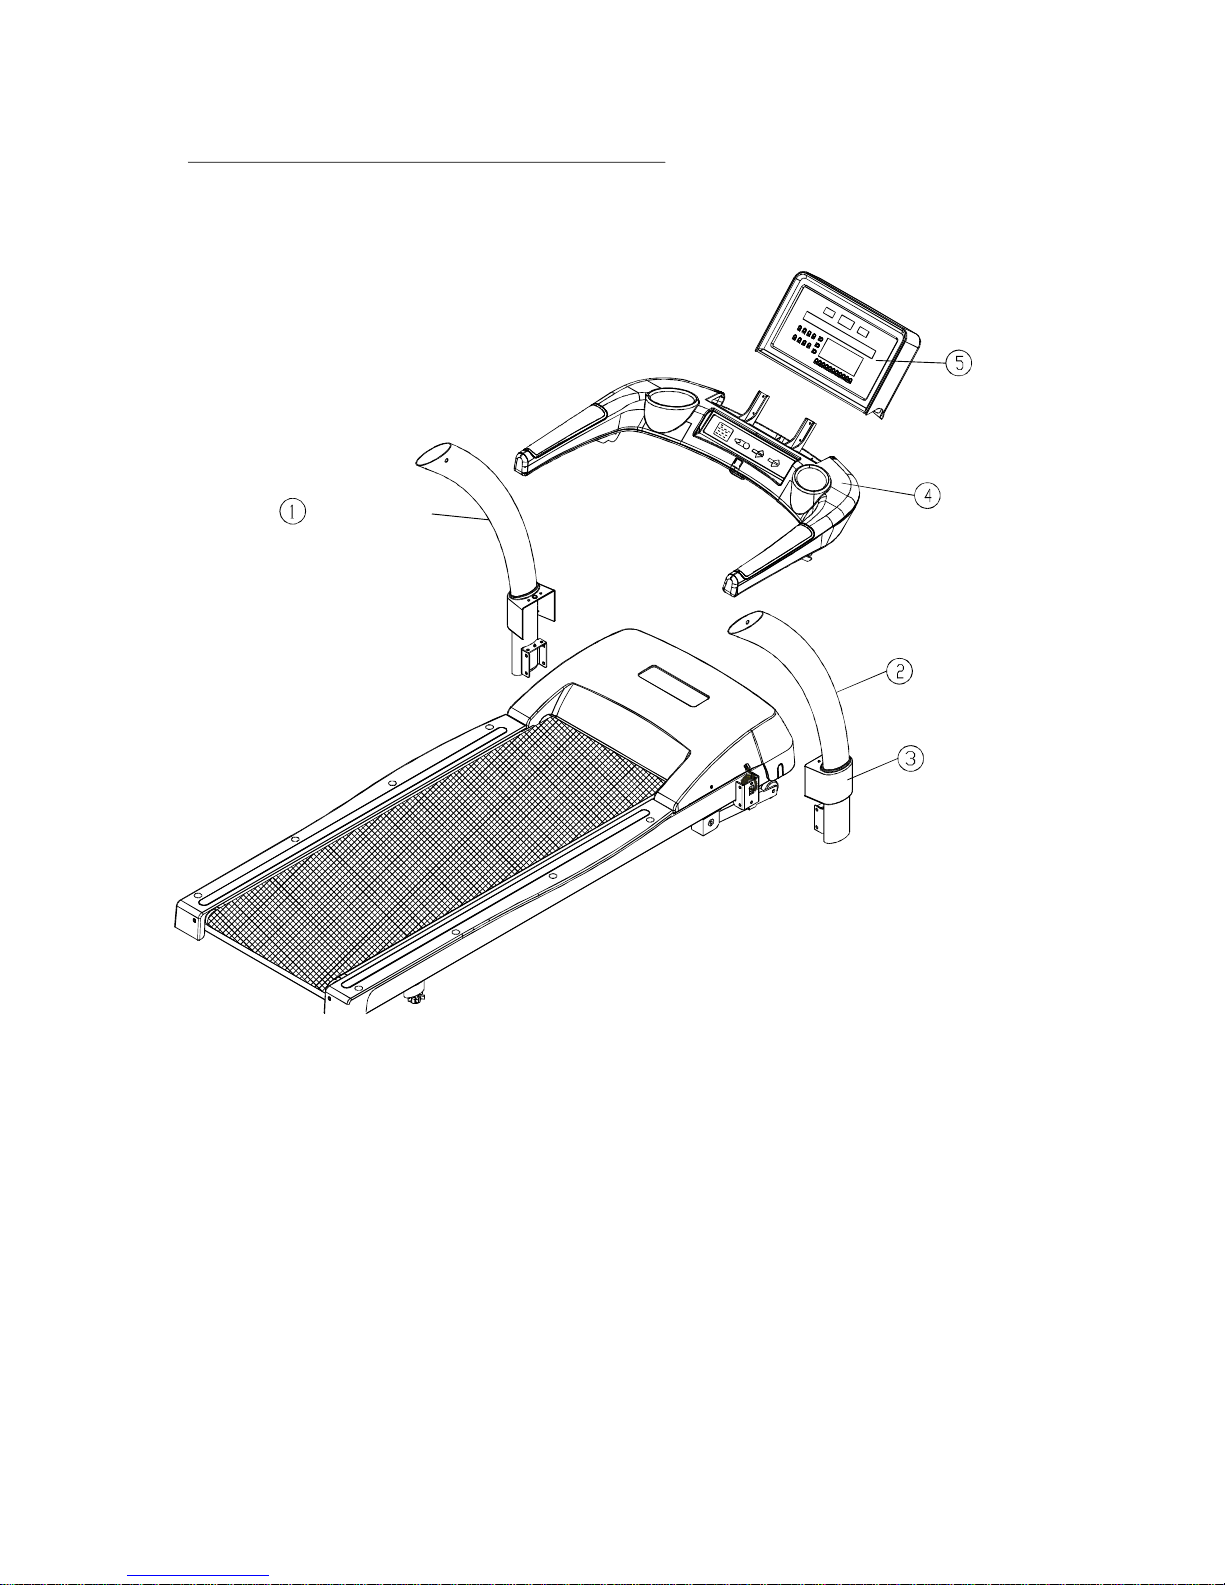
Pleaseseethepartillustrationsbelow
LeftPedestal
PedestalCover
RightPedestal
Handle
Display
6
TREADMILLASSEMBLY
StepbyStepInstructions
Theimportantsparepartsareplacedintothegridofstyrofoam.Whenyouremove
thetreadmillfromitsbox,firstchecktomakesureallofpartsarepresentbeforeyou
discardthestyrofoam.Thoroughlyreadtheassemblyinstructionsbeforeyoubegin.
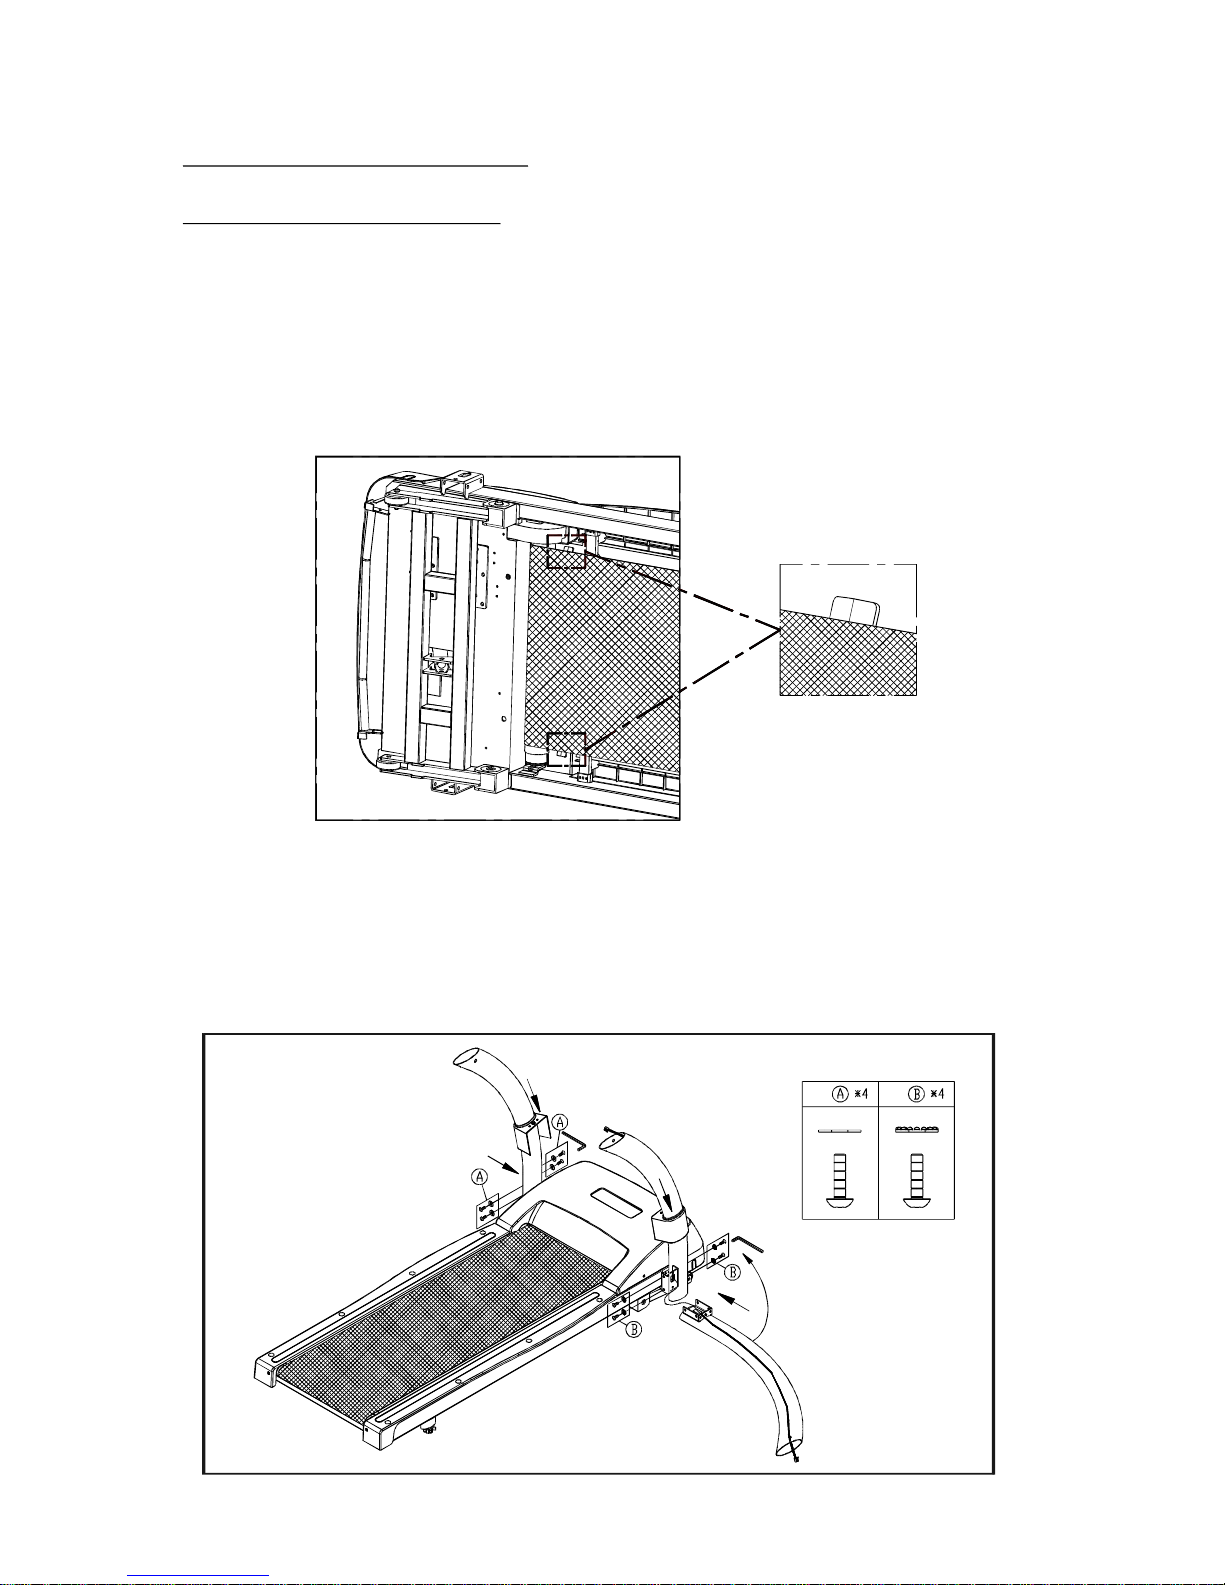
1.Tipthetreadmillonitsside.Inspecttheundersideofthebeltandconfirmthatthe
beltiscenteredbetweenthebeltalignmentguides(seeFig.1).Pleaseplacethe
treadmillontosolidflatgroundforassembly.
2.Releasethedatacable.ScrewsareattachedtotheL/Rsupportbrackets.Please
removethesescrewsbeforeyouassemblethepedestals.Feedthedatacable
throughtherightpedestal,theninserttherightpedestalintotherightsupport
bracket.Alsoinserttheleftpedestalintotheleftsupportbracketontheleftsideof
thetreadmill.UseanAllenwrench(M6)tolooselysecurethetwopedestals,do
NOTtightenthescrewsfirmlyatthispoint.Slidedowntheeachpedestalcoverto
bothpedestals.
Fig.2
Fig.1
plasticwasher
flatwasher
3.Connecttheupperdatacable(seeFig.3-1).Screwsareattachedontothehandle.
Pleaseremovethesescrewsbeforeyouassemblethehandle.Theninsertthe
handleontoboththeleftandrightpedestals.Pleasebecarefullythedatacable
shouldbefullyintothetubing,can'tbepressedbypedestals.
UseanAllenwrench(M6)tolooselysecuretheupperfastenersonthepedestals
(seeFig.3-2).DoNOTtightenfirmlyatthispoint.
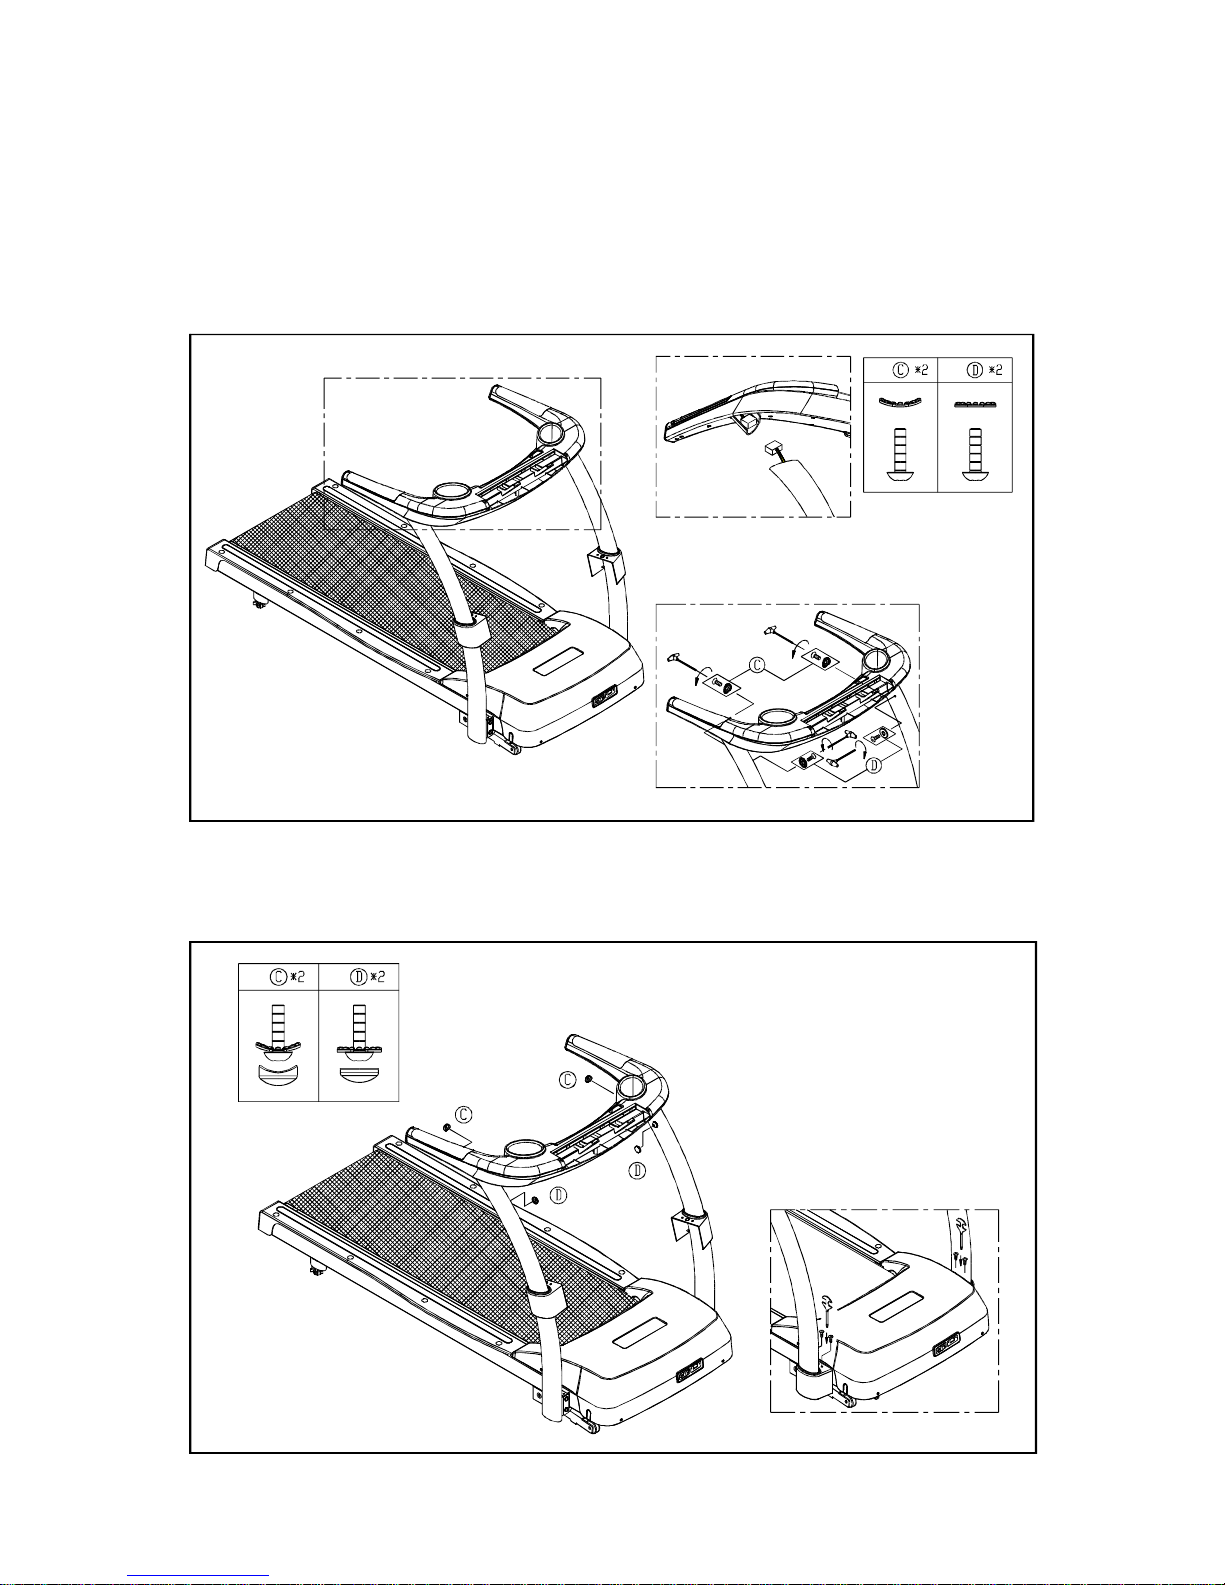
4.Tightenthelowerfastenersfirst,thentheupperfasteners.Presscurvedandflat
capsontoscrewheads.Pusheachuprightpedestalcoverdowntothebottomand
tightenfirmly.
Fig.3
(3-1)
(3-2)
Fig.4
7
curvedwasher
curvedcap
flatwasher
flatcap
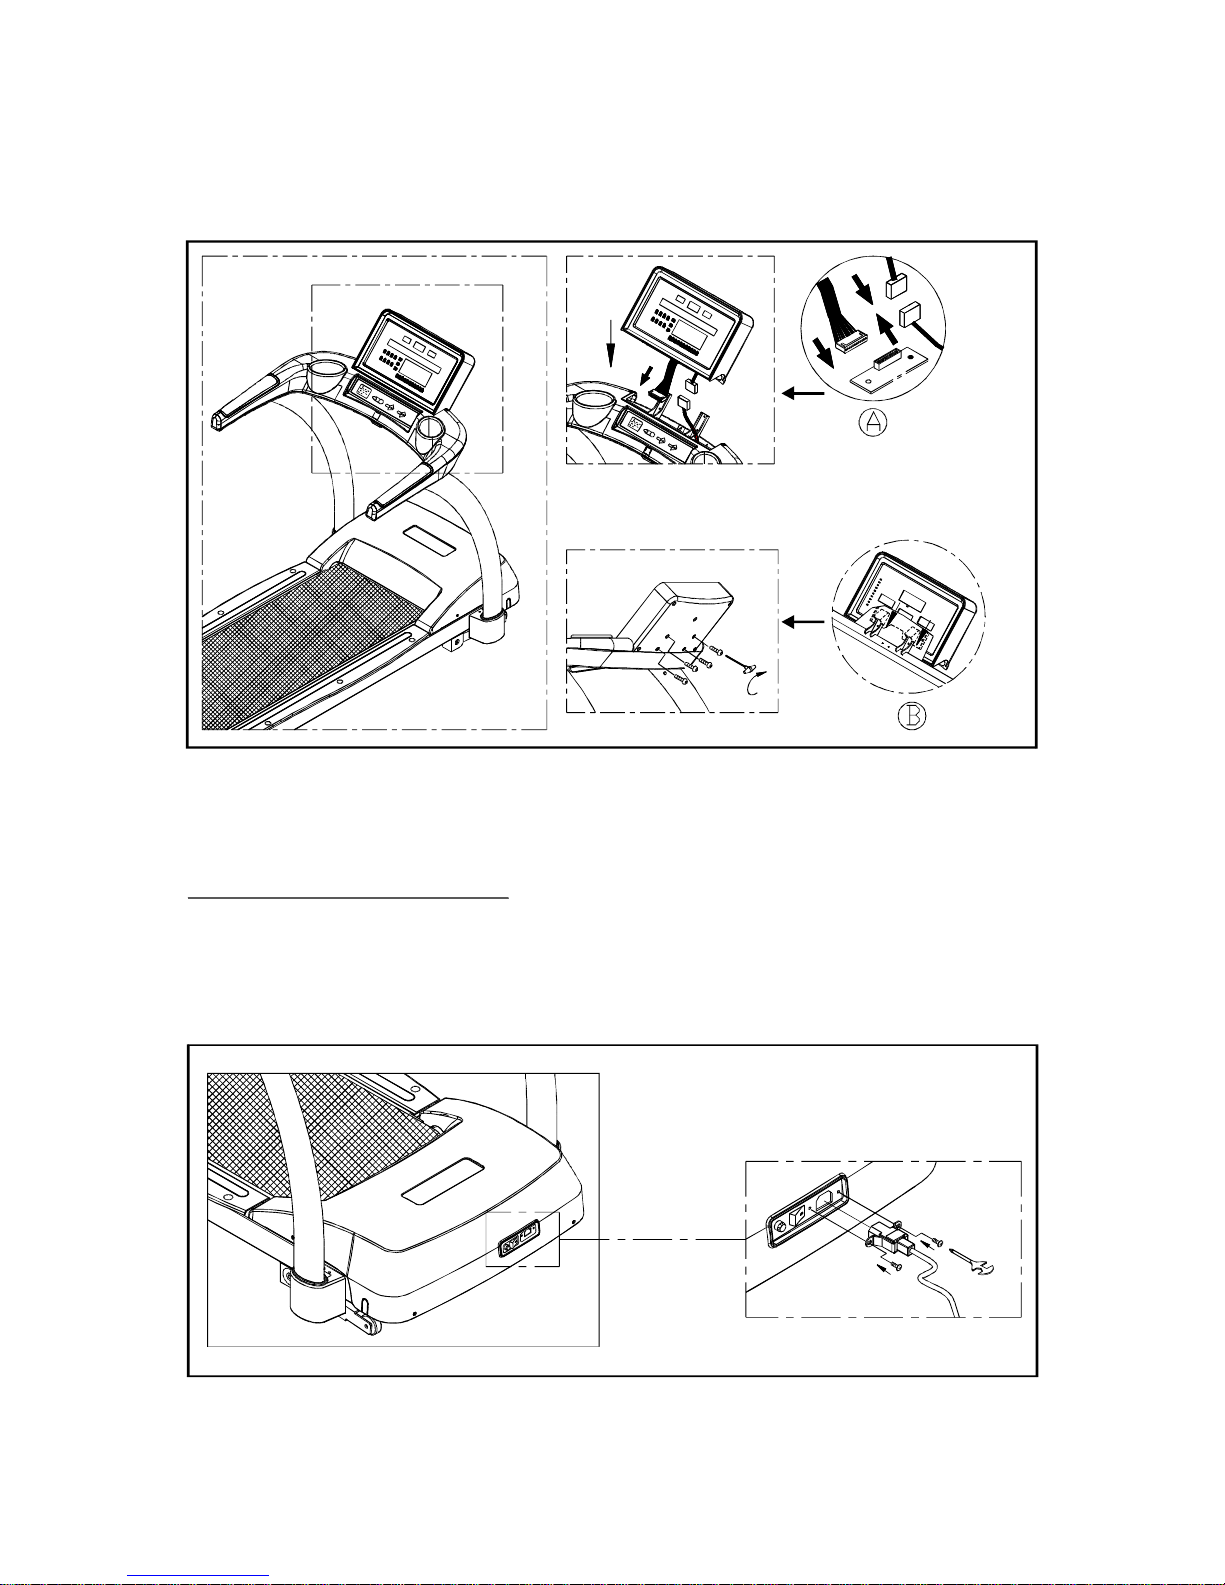
5.ConnecttwodatacablesasshowninfigureAbeforeyouassemblethedisplay.
ThencarefullyplacethedisplayontothehandleasshowninfigureBbyhexallen
wrench(M4).Tightenfourscrewstosecurethedisplay.
Fig.5
Fig.6
8
CONNECTTOPOWER
Connectthepowercableasthefigureshows,andsecureitinplacebytighteningthe
screws.
 Loading...