

SportsArt Fitness E822 User Manual

SPORTSARTE822ELLIPTICALTRAINER
TABLEOFCONTENTS
1.INTRODUCTION...................................................................................................
3.ASSEMBLINGYOURELLIPTICALTRAINER
Listofparts............................................................................................................
StepbyStepInstructions...................................................................................
4.UNDERSTANDINGTHEE822DISPLAY
DisplayWindow.....................................................................................................
DisplayFunctionOverview....................................................................................
DisplaySettingRanges.........................................................................................
OperatingtheE822Bike.......................................................................................
5.PROGRAMFunctions...........................................................................................
6.InternalSettings....................................................................................................
9.WIRINGSCHEMATIC...........................................................................................
2.SAFETYGUIDELINES.........................................................................................
7.MAINTENANCE:LUBRICATING..........................................................................
ShoulderJoint.......................................................................................................
1
2
3
5
15
16
17
18
21
23
25
25
26
1
INTRODUCTION:
Congratulationsonpurchasingoneofthefinestpiecesofexerciseequipmentonthe
markettoday,theSportsArtE822.Constructedofhighqualitymaterialsand
designedforyearsoftrouble-freeuse,theSportsArtE822willbeanintegralpartof
yourfitnessregimen.
Thisoutstandingpieceofequipmentprovidesvariedchoicesandfunctionstomeet
yourexerciseneeds.ButbeforeusingyourSportsArtE822,werecommendthat
youfamiliarizeyourselfwiththisOwnersManual.Whetheryouareafirsttimeuser
ofanellipticaltraineroraseasonedprofessional,understandingthecorrectuseof
theequipmentwillenhanceyourabilitytoachieveyourexercisegoalssafelyand
successfully.
'
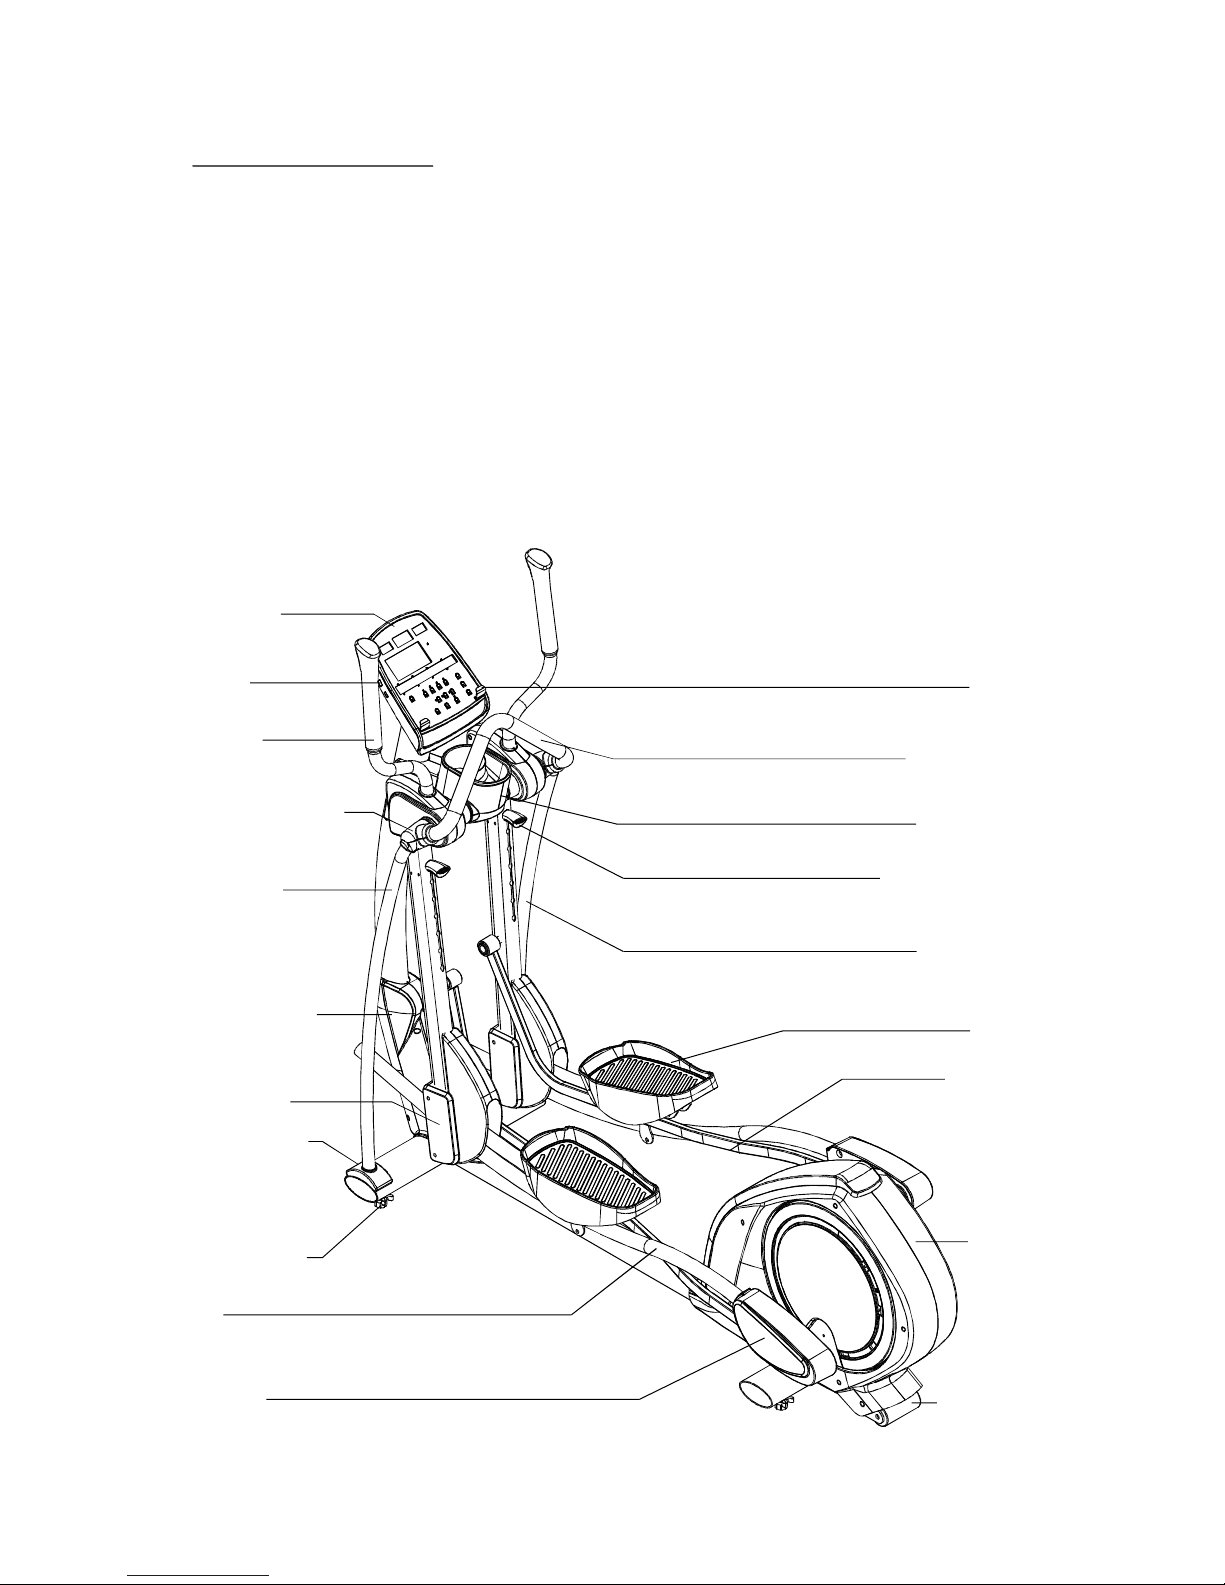
ElectronicDisplay
LeftHandleBar
Cardiotheater
StationaryHandleBarcover
LeftSupportTube
UprightFrontEnclosure
RockingBarCover
SupportTubeEndCap
FloorLevelAdjustment
GlideRail
GlideRailCover
Bookshelf
StationaryHandleBar
WaterBottleHolder
RightSupportTube
StrideLengthAdjustment
FootPedal
StrideLinkage
RearCover
TransportWheel

2
SAFETYGUIDELINES:
Pleasereadandfollowthesafetyguidelines:
Keepthisownersmanualforfutureuseandreference.
Readthisownersmanualandfollowtheinstructions.
AssembleandoperatetheSportsArtE822EllipticalTraineronasolid,level
surface.
Neverallowchildrenonornearthemachine.
Inspectthemachinebeforeeachuse.Makesureallpartsareassembled,andall
nutsandboltsaretightened.Donotusethemachineiftheunitisdisassembledin
anyway.
Donotplacethemachineoritspartsnearwateroranyliquid.
Wearproperworkoutclothing:DoNOTwearlooseclothing.Donotwearshoes
withleathersolesorhighheels.Tiealllonghairback.
Dontrocktheunitfromsidetoside,andusecarewhenmountingand
dismountingtheunit.
Donotuseanyaccessoriesthatarentspecificallyrecommendedbythe
manufacturer.Thesemightcauseinjuriesorcausetheunittofail.
Workwithinyourrecommendedexerciselevel.DoNOTworktoexhaustion.
Ifyoufeelanypainorabnormalsensations,STOPYOURWORKOUT.And
consultyourphysicianimmediately.
Theweightlimitforthisellipticaltraineris286LBS(130KGS)
Allowsufficientspaceonbothsidesoftheellipticalforuserstomountand
dismountthemachine.
Ifanythingaboutthemachineseemsamiss,pleasestopyourworkout
immediatelyandcontactyourauthorizeddealerforrepairs.
‧
‧
‧
‧
‧
‧
‧
‧
‧
‧
‧
‧
‧
‧
'
'
'
'
‧Beforebeginninganyexerciseprogram,consultwithyourdoctor.Itis
recommendedthatyouundergoacompletephysicalexamination.
Keepyourhandsandfeetawayfrommovingparts.CAUTION:

3
ASSEMBLINGYOURELLIPTICALTRAINER
Thankyouforpurchasingthisproduct.Wegothroughgreateffortstoensurethe
qualityofeachproduct.Ifyoufindthisproducttobedefectiveinanyway,please
contactSportsArtoryourdealer.
Notethatsomepartsmaygetmixedamongstpackagingmaterialduringshipping.
Pleaselocateallthepartsfirstbeforeyoudiscardthepackagingmaterial.
Thepackingforthisellipticalwasdesignedtoprotectitduringshipment.Please
storetheoriginalpackingmaterialinasafeplaceincaseyouneedtotransportthe
unitinthefuture.
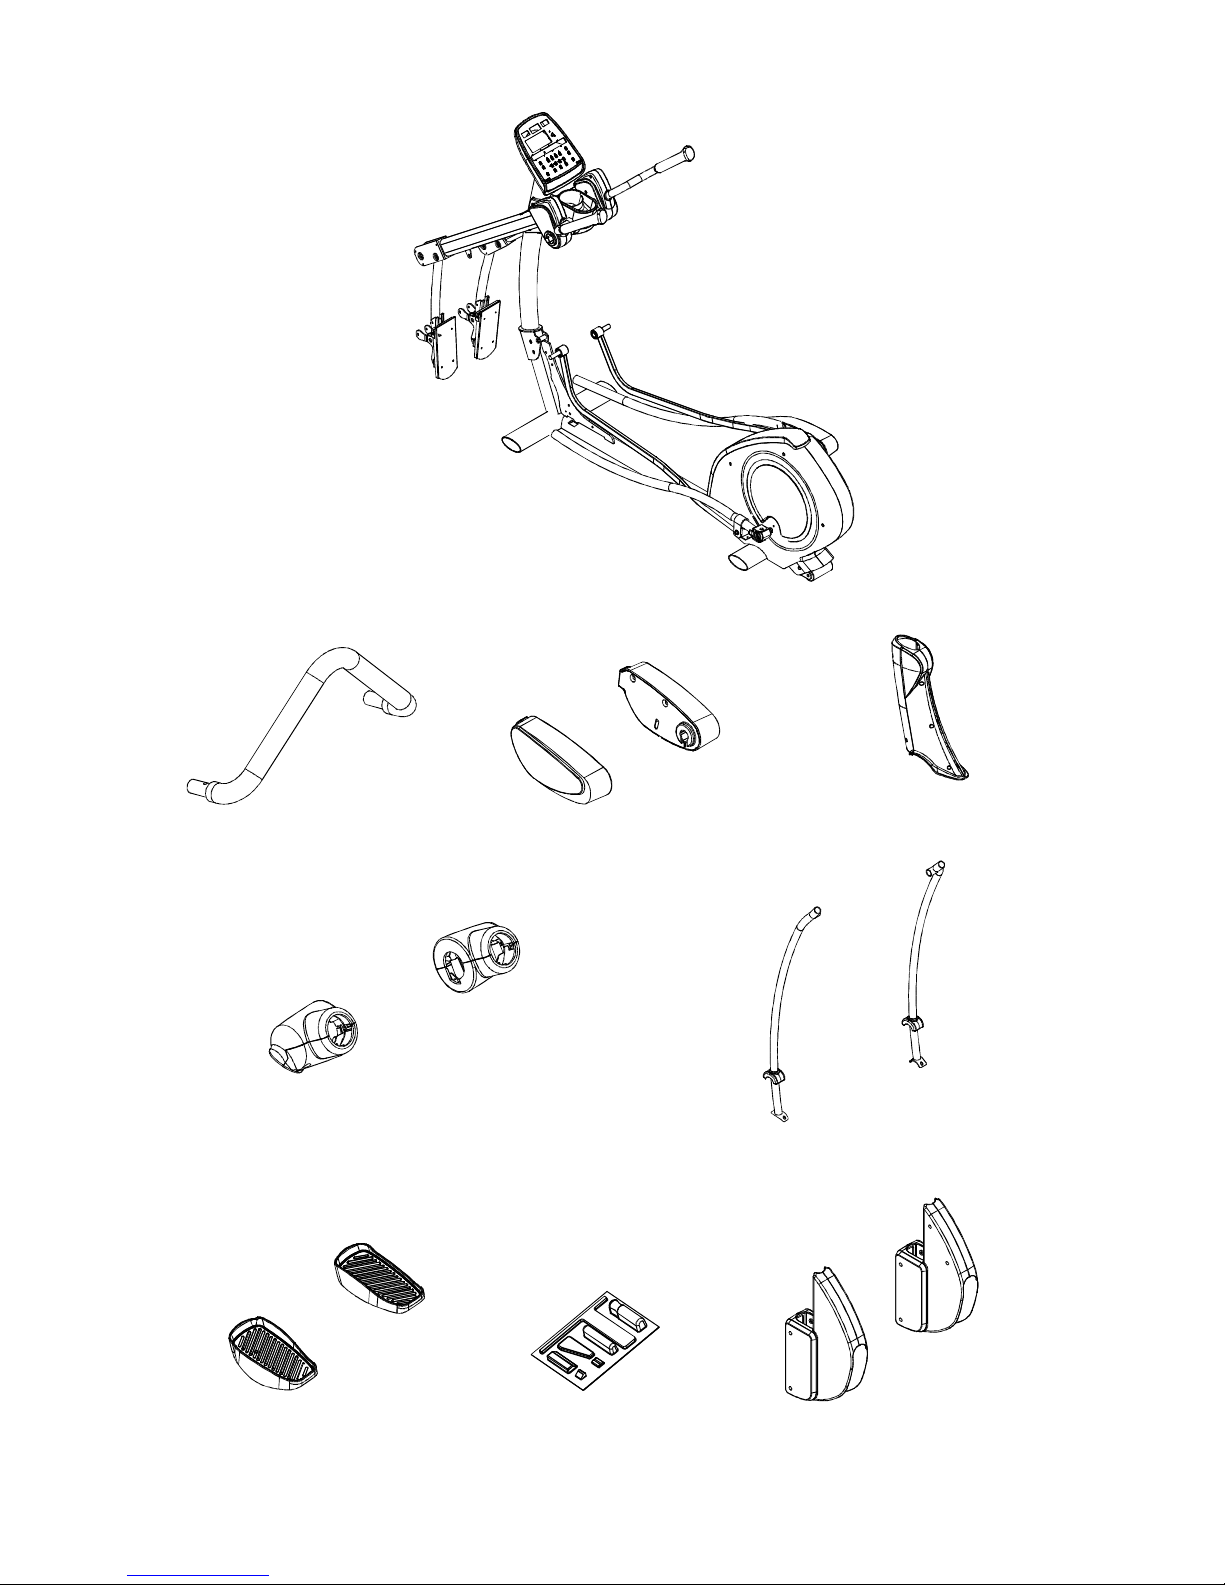
Beforeassemblingyourellipticaltrainer,pleaselocatethefollowingitems.
1.Onemainframe
2.OnestationaryHandleBar
3.TwoGlideRailcovers(right+left)
4.OneUprightFrontEnclosure
5.TwoStationaryHandleBarcovers(right+left)
6.TwoSupportTubes(right+left)
7.TwoPedals(right+left)
8.Toolkit
(right+left)
Pleaseseethepartillustrationsbelow:
LISTOFPARTS:
9.RockingBarCovers
4
1.Onemainframe
2.OnestationaryHandleBar
4.OneUprightFront
Enclosure3.TwoGlideRailcovers
5.TwoStationaryHandleBarcovers
7.TwoPedals 8.Toolkit
9.RockingBarCovers
(right+left)
6.TwoSupportTubes
5
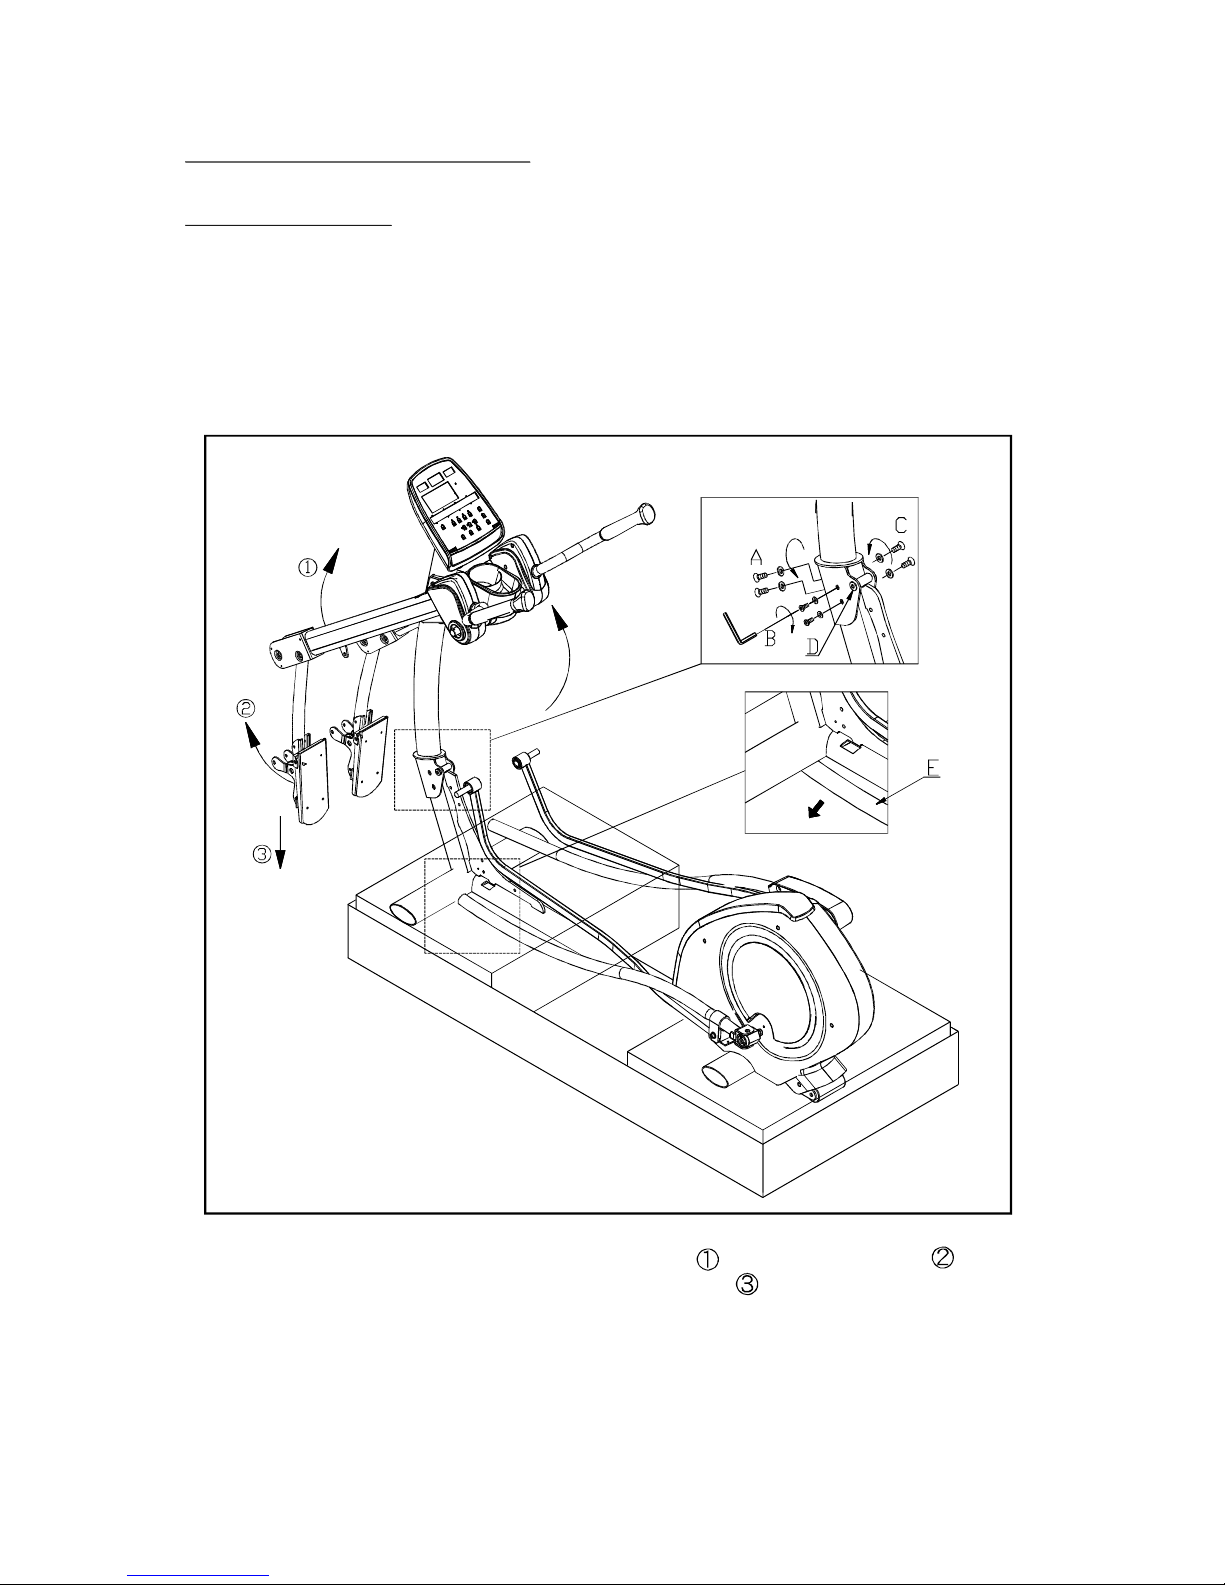
ELLIPTICALASSEMBLY
Frameassembly
STEP1. Removetheupperboxandallpackingmaterialbutleavetheunitinthe
lowerboxforsupport.
STEP2.
STEP3.
STEP4.
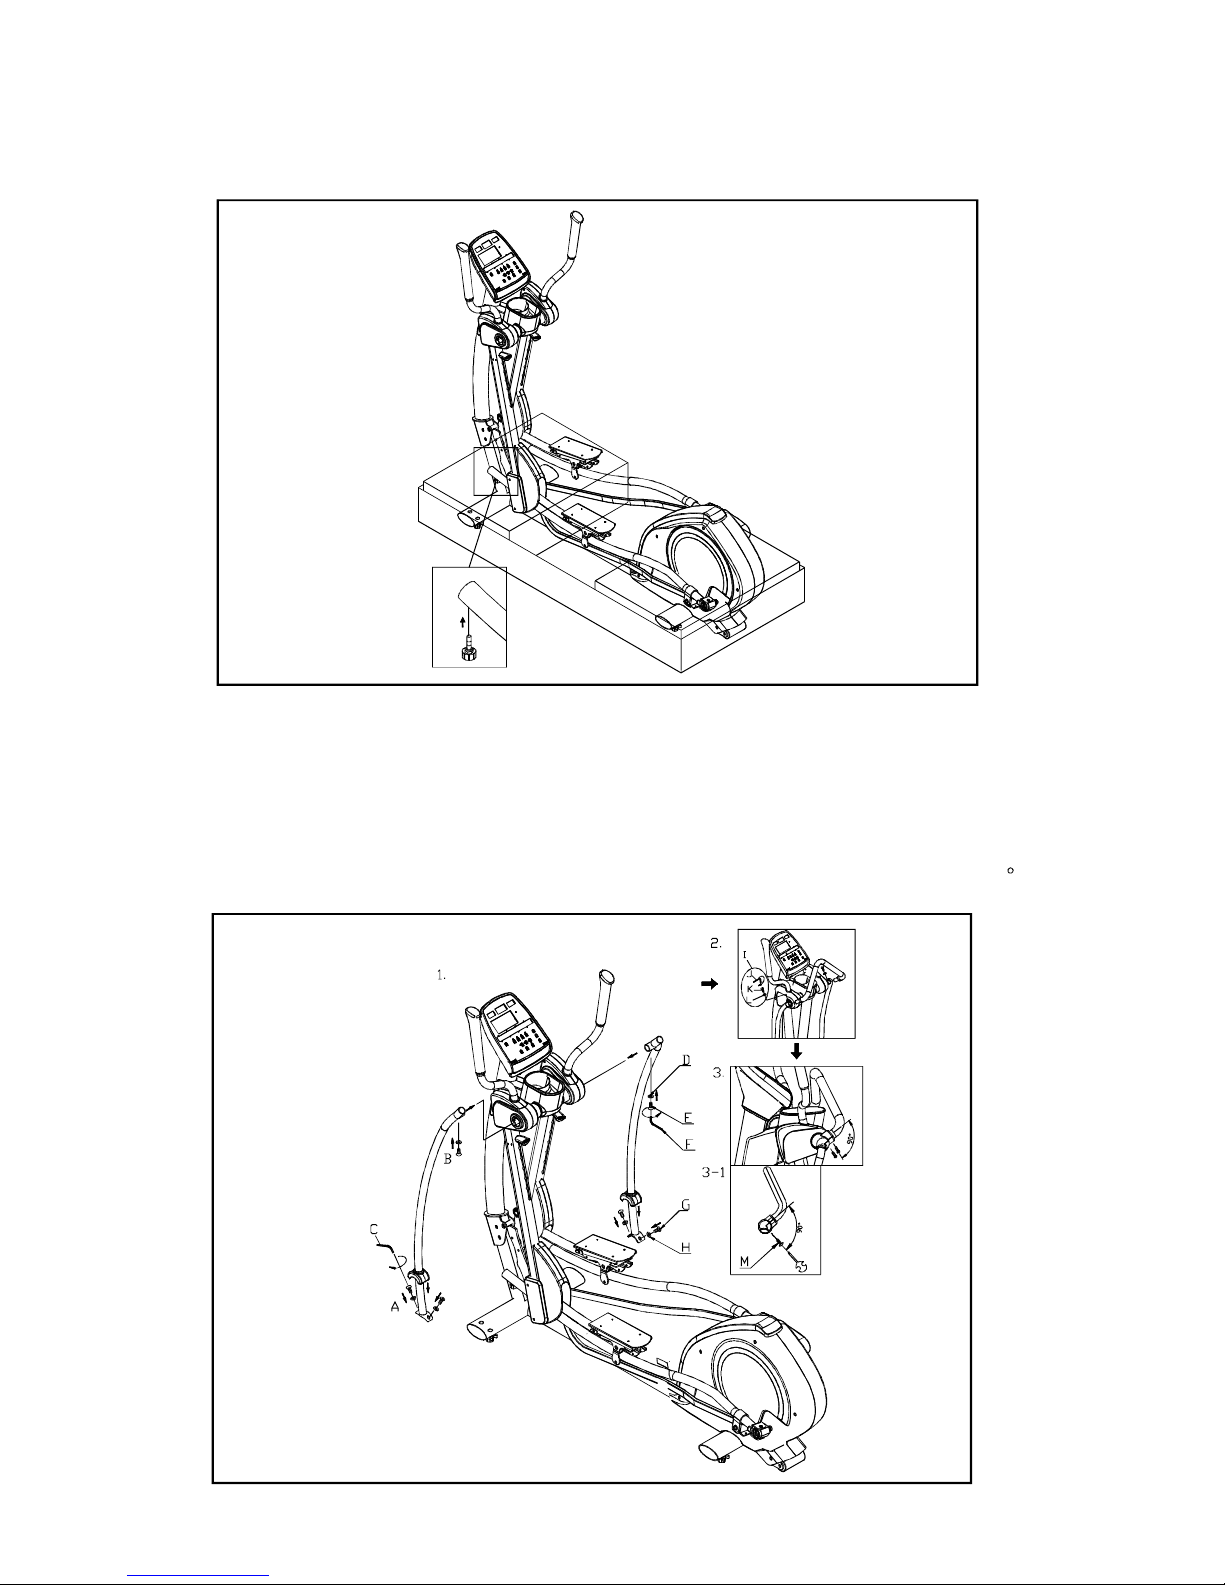
ThescrewAislooselyattachedbeforeassembly.Raisethemainpostor
pedestalintoposition.Securethepedestalhardwareinsequence,firstD,
thenA,BandC.(PleaseSeeFig.1)
Then,raisetheStrideSupportAssemblyandpedalcarriage.Place
thetipofthefoodpadsurfaceontheground.Dothisstepontheother
sideoftheunitaswell.
TiptheframeslightlytoaccessGlideRailE.
Fig.1
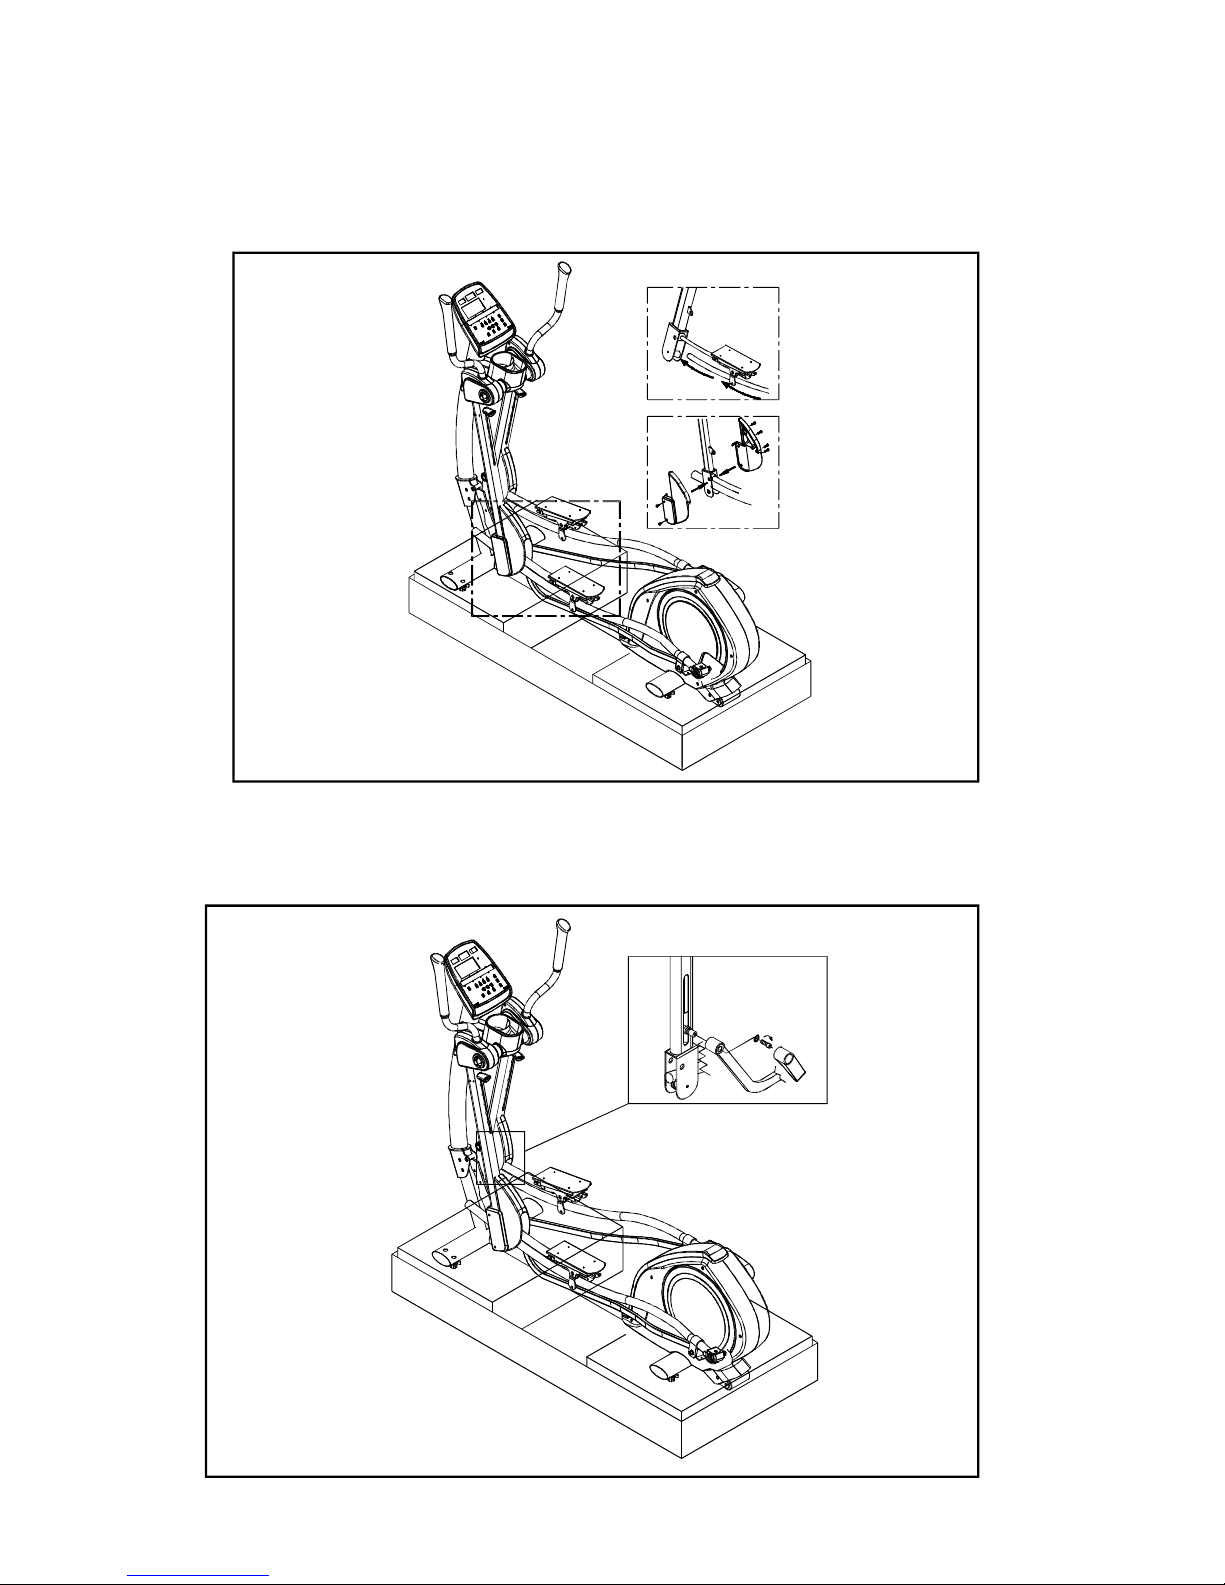
STEP5.
STEP6. PuttheStrideLinkageinplaceandusetheboltandwashertosecureit
ontotheStrideSupportAssembly.Thenpressthestridelinkagecoverinto
place.SeeFig.3forreference.Completesteps4,5,and6ontheother
sideoftheunittoo.(SeeFig3)
SliptheGlideRailintoplaceunderthePedalCarriageandalsoonthe
rolleronthestridesupportAssembly.UnsecuretheboltsfromtheRocking
BarsandthenputtheRockingBarCoversplaceandsecurethemasFig.2
shownbelow.
Fig.2
Fig.3
6
STEP7. Securestopperboltsonthefront,bottomofbothgliderails.Thenremove
theunitfromthelowerbox.(SeeFig.4)
STEP8. (1)LooselysecureboltsAandBonbothSideSupports.Atthispoint,do
nottightenthesebolts.
(2)WithhardwareshowninillustrationI,securetheStationaryHandlebar
atbothsides.ThenTightenboltsAandB.
(3)SecuretheStationaryHandlebarcoverswithMscrews.
Note:TheangleofMscrewsandtheStationaryHandlebarshouldbe90.
Fig.4
Fig.5
7

GlideRailAssembly
STEP1.
STEP2.
STEP3.
MovetheGlideRail(AinthetoprightdiagramofFigure6)totheupperleft
partoftheflywheelwithinthe90-degreeindication.HooktheParkBonto
theGlideRail.
TurnpartBclockwiseasshowntoanearlyhorizontalposition,whereit
coverstheGlideRail.
InstallPartContoPartB.UseScrewsD&Etofastenthesepartstogether.
PARTA:GlideRail
PARTB&C:RearCovers
PARTD:Self-tappingScrews(m4)
PARTE:Round-headScrews(m5)
8
Fig.6
 Loading...