

SportsArt Fitness C580R User Manual

SPORTSARTC580RCOMMERCIALBIKE
TABLEOFCONTENTS
1.INTRODUCTION....................................................................................................
2.IMPORTANTSAFETYPRECAUTIONS...............................................................
3.ASSEMBLINGYOURBIKE
ListofParts............................................................................................................
Step-by-stepInstructions.......................................................................................
4.UNDERSTANDINGTHEDISPLAYCONSOLE
DisplayFeatures.....................................................................................................
DisplayFunctions...................................................................................................
ButtonFunctions.....................................................................................................
5.HOWTOOPERATEYOURBIKE
QuickStart.............................................................................................................
WorkoutSetup.......................................................................................................
CoolDown.............................................................................................................
6.PROGRAMS
Manual..................................................................................................................
Random.................................................................................................................
Interval(1:1,1:2,2:2)............................................................................................
FatBurn................................................................................................................
Plateau..................................................................................................................
WtLoss/Cardio/CustomHR..................................................................................
FitTest..................................................................................................................
1
2
4
6
23
23
25
27
27
28
29
29
29
29
29
30
30
7.USERPARAMETERSETTING............................................................................
8.AUTOMATICCHANNELSCAN............................................................................
9.MAINTAININGTHEBIKE.......................................................................................
10.GUIDELINESFOREXERCISE
HowlongshouldIexercise.................................................................................
HowoftenshouldIexercise.................................................................................
11.TROUBLESHOOTING.........................................................................................
12.WiringSchematic..................................................................................................
31
31
32
32
32
33
34
SPORTSARTC580RCOMMERCIALBIKE
INTRODUCTION
Congratulationsonpurchasingoneofthefinestpiecesofcommercialgradeexercise
equipmentonthemarkettoday,theSportsArtC580RRecumbentBike.Constructed
ofhighqualitymaterialsanddesignedforyearsoftrouble-freeusage,theC580Rwill
beanintegralpartofyourfitnessregimen.
BeforeusingyourC580Rbike,werecommendthatyoufamiliarizeyourselfwiththis
Owner'sManual.Whetheryouareafirsttimeuserofarecumbentbikeora
seasoned"pro,"understandingthecorrectuseoftheequipmentwillenhanceyour
abilitytoachieveyourexercisegoalssafelyandsuccessfully.
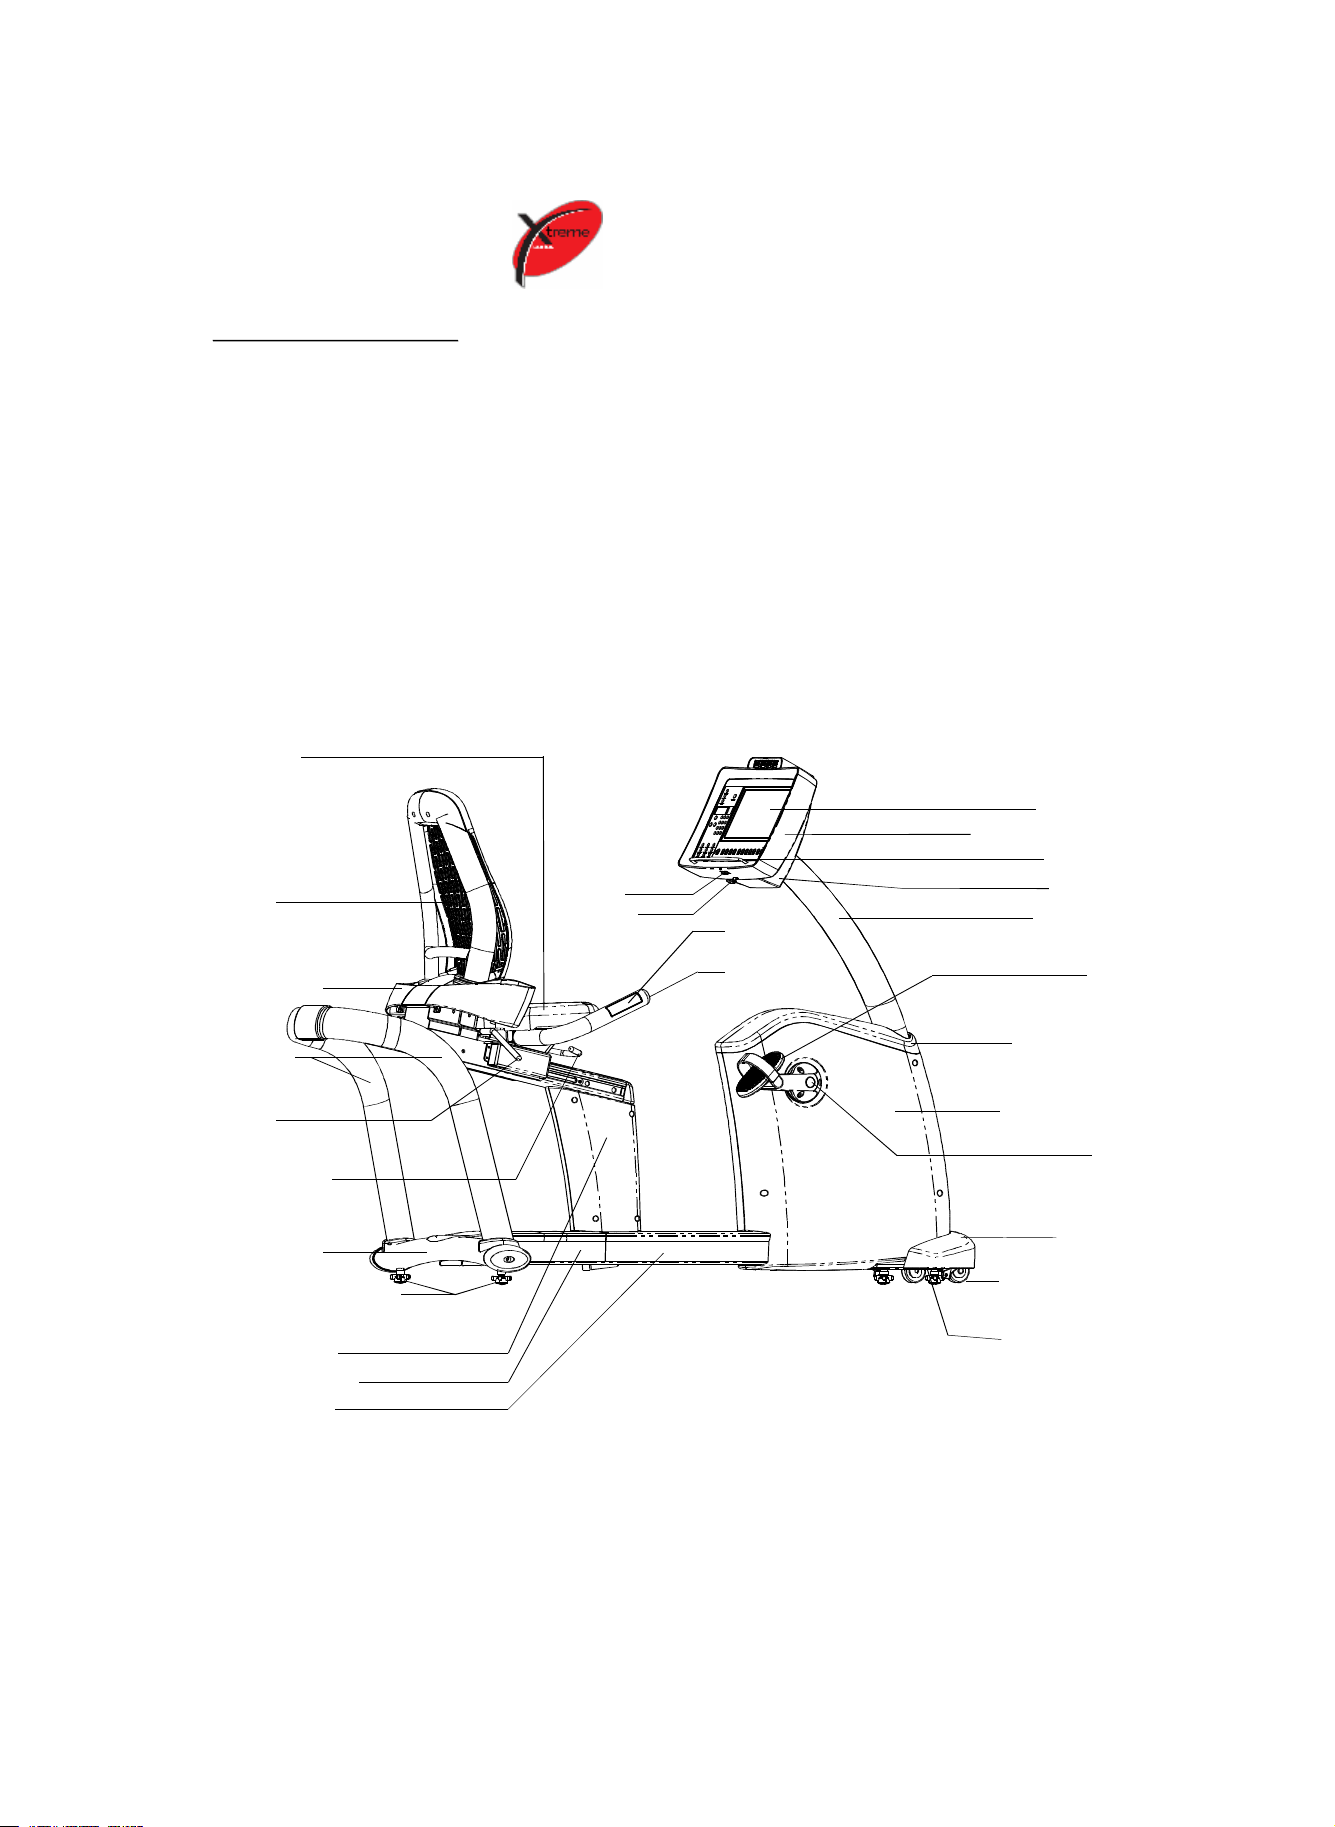
SeatBottom
DisplayBackCover
Headset
SeatBack
Socket
Headset
Hook
HTR
LCDScreen
BookRack
FanCover
DisplayPost
AccessoryTray
RearFrame
SeatBack
AdjustmentLever
SeatAdjustment
Lever
RearCrossBar
FloorLevelAdjustment
SeatPostCover
RearFrameCover
FootAreaCover
Handlebar
Pedal
TopEnclosure
MainEnclosure
Crank
FootPod
TransportWheel
FrontCrossBar
1

YourSportsArtbikewasdesignedandbuiltforoptimumsafety.However,certain
precautionsapplywheneveryouuseyourbike.Pleasereadtheentiremanualbefore
assemblyandoperation.Also,pleasenotethefollowingsafetyprecautions:
IMPORTANTSAFETYPRECAUTIONS
Pleasereadandobservethefollowingsafetyguidelines:
Keepthisowner'smanualforfutureuseandreference.
•
Readthisowner'smanualandfollowtheinstructions.
•
Assembleandoperatethebikeonasolid,levelsurface.
•
Neverallowchildrenonornearthebike.
•
Checkthemachinebeforeeveryuse.Makesureallpartsareassembled,andall
•
nutsandboltsaretightened.Donotusethemachineiftheunitisdisassembledin
anyway.
WARNING
Keepyourhandsawayfrommovingparts.
•
Wearproperworkoutclothing.DoNOTwearoverlylooseclothing.Donotwear
•
shoeswithleathersolesorhighheels.Tiealllonghairback.
Donotrocktheunitfromsidetosideandtakecarewhenmountingand
•
dismountingtheunit.
Donotstandontheunit.
•
Donotuseaccessoriesthatarenotspecificallyrecommendedbythe
•
manufacturerasthesemightcauseinjuriesorcausetheunittofail.
Allowsufficientspaceonbothsidesofthebikeforuserstomountandtodismount
•
theunit.
Ifanypartsfailoraredefective,pleasestopyourworkoutimmediatelyandcontact
•
yourauthorizeddealerforrepairs.
Workwithinyourrecommendedexerciselevel;doNOTworktoexhaustion.
•
Ifyoufeelanypainorabnormalsensations,STOPYOURWORKOUT.Consult
•
yourphysicianimmediately.
2

•Theweightlimitforthisbikeis150kgs(330lbs).
CAUTION
Beforebeginninganyexerciseprogram,youshouldconsultwithyourdoctor.Itis
recommendedthatyouundergoacompletephysicalexamination.
3

ASSEMBLINGYOURBIKE
INSTALLATIONREQUIREMENTS:
Thankyouforpurchasingourproduct.Eventhoughwegotogreateffortstoensure
thequalityofeachproduct,occasionalerrorsand/oromissionsdooccur.Please
contactyourdealerifyoufindthisproducttobedefectiveormissingapart.
Pleasereadthisowner'smanualandfollowtheinstructions.
IMPORTANT:Thepackingforthisbikewasdesignedtoprotectitduringshipment.
Pleasestoretheoriginalpackinginasafeplaceincaseyouneedto
shiptheunitinthefuture.
LISTOFPARTS:
Beforeassemblingyourbike,makesurethatyouhaveallofthefollowingitems.
1.Onemainframe
2.Onerearframe
3.Oneseattube
4.Onehandlebar
5.Oneseat
6.Oneseatback
7.Oneelectronicdisplayandpedestal(referredtoasa"post")
8.Pedals(right+left)
9.Onerearframecover
10.Oneseatpostcover(right)
11.Oneseatpostcover(left)
12.Onetoolkit
4
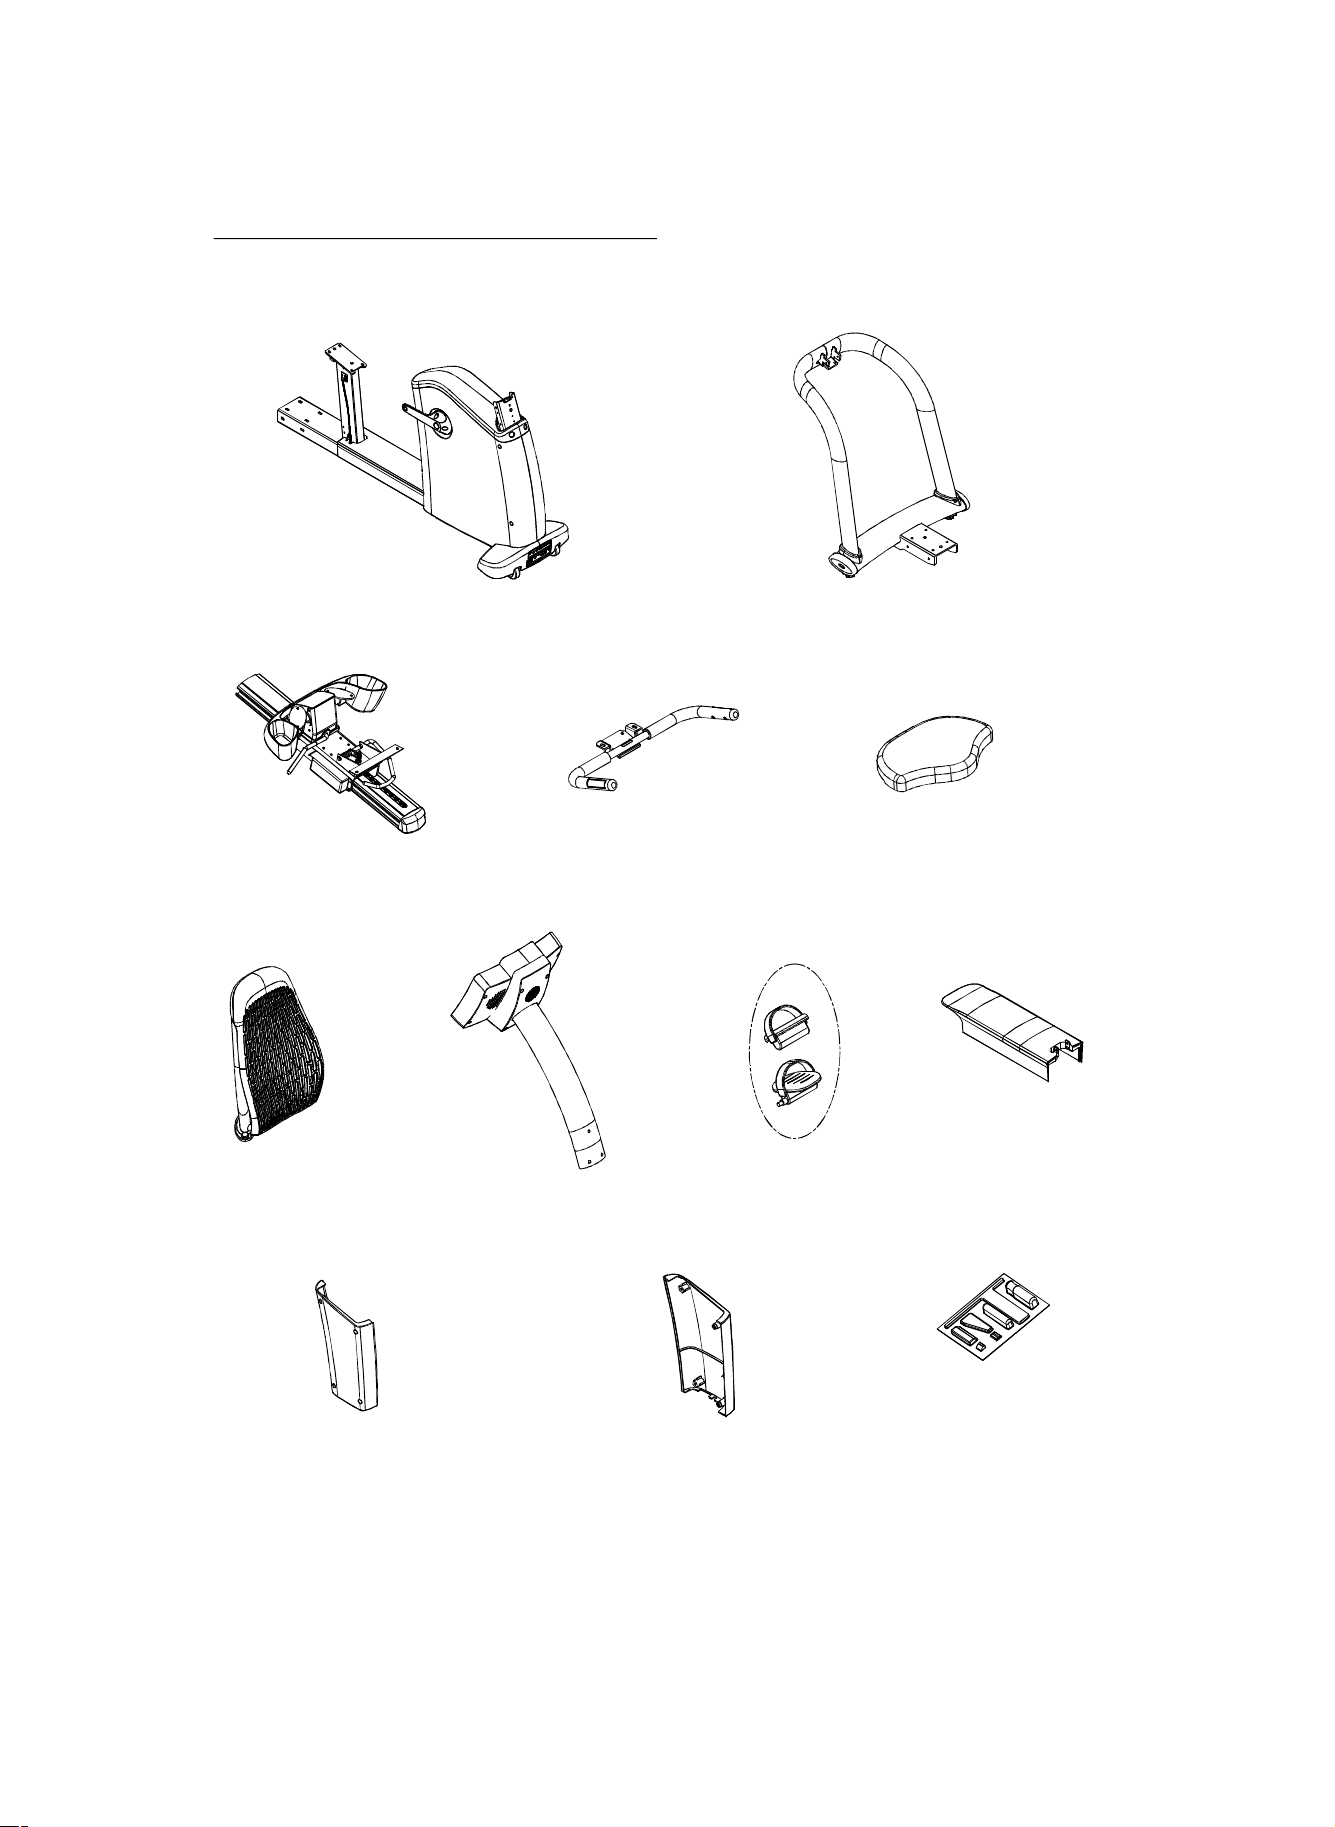
Pleaseseethepartillustrationsbelow:
1.MainFrame2.RearFrame
3.SeatTube4.Handlebar5.Seat
6.SeatBack7.ElectronicDisplay&Post8.Pedals9.RearFrameCover
10.SeatPostCover(Right)11.SeatPostCover(Left)12.ToolKit
Somepartsmaygetmixedamongstpackagingmaterialduringshipping.Please
locateallthepartsbeforeyoudiscardthepackagingmaterial.Thoroughlyreadthe
assemblyinstructionsbeforeyoubegin.
5
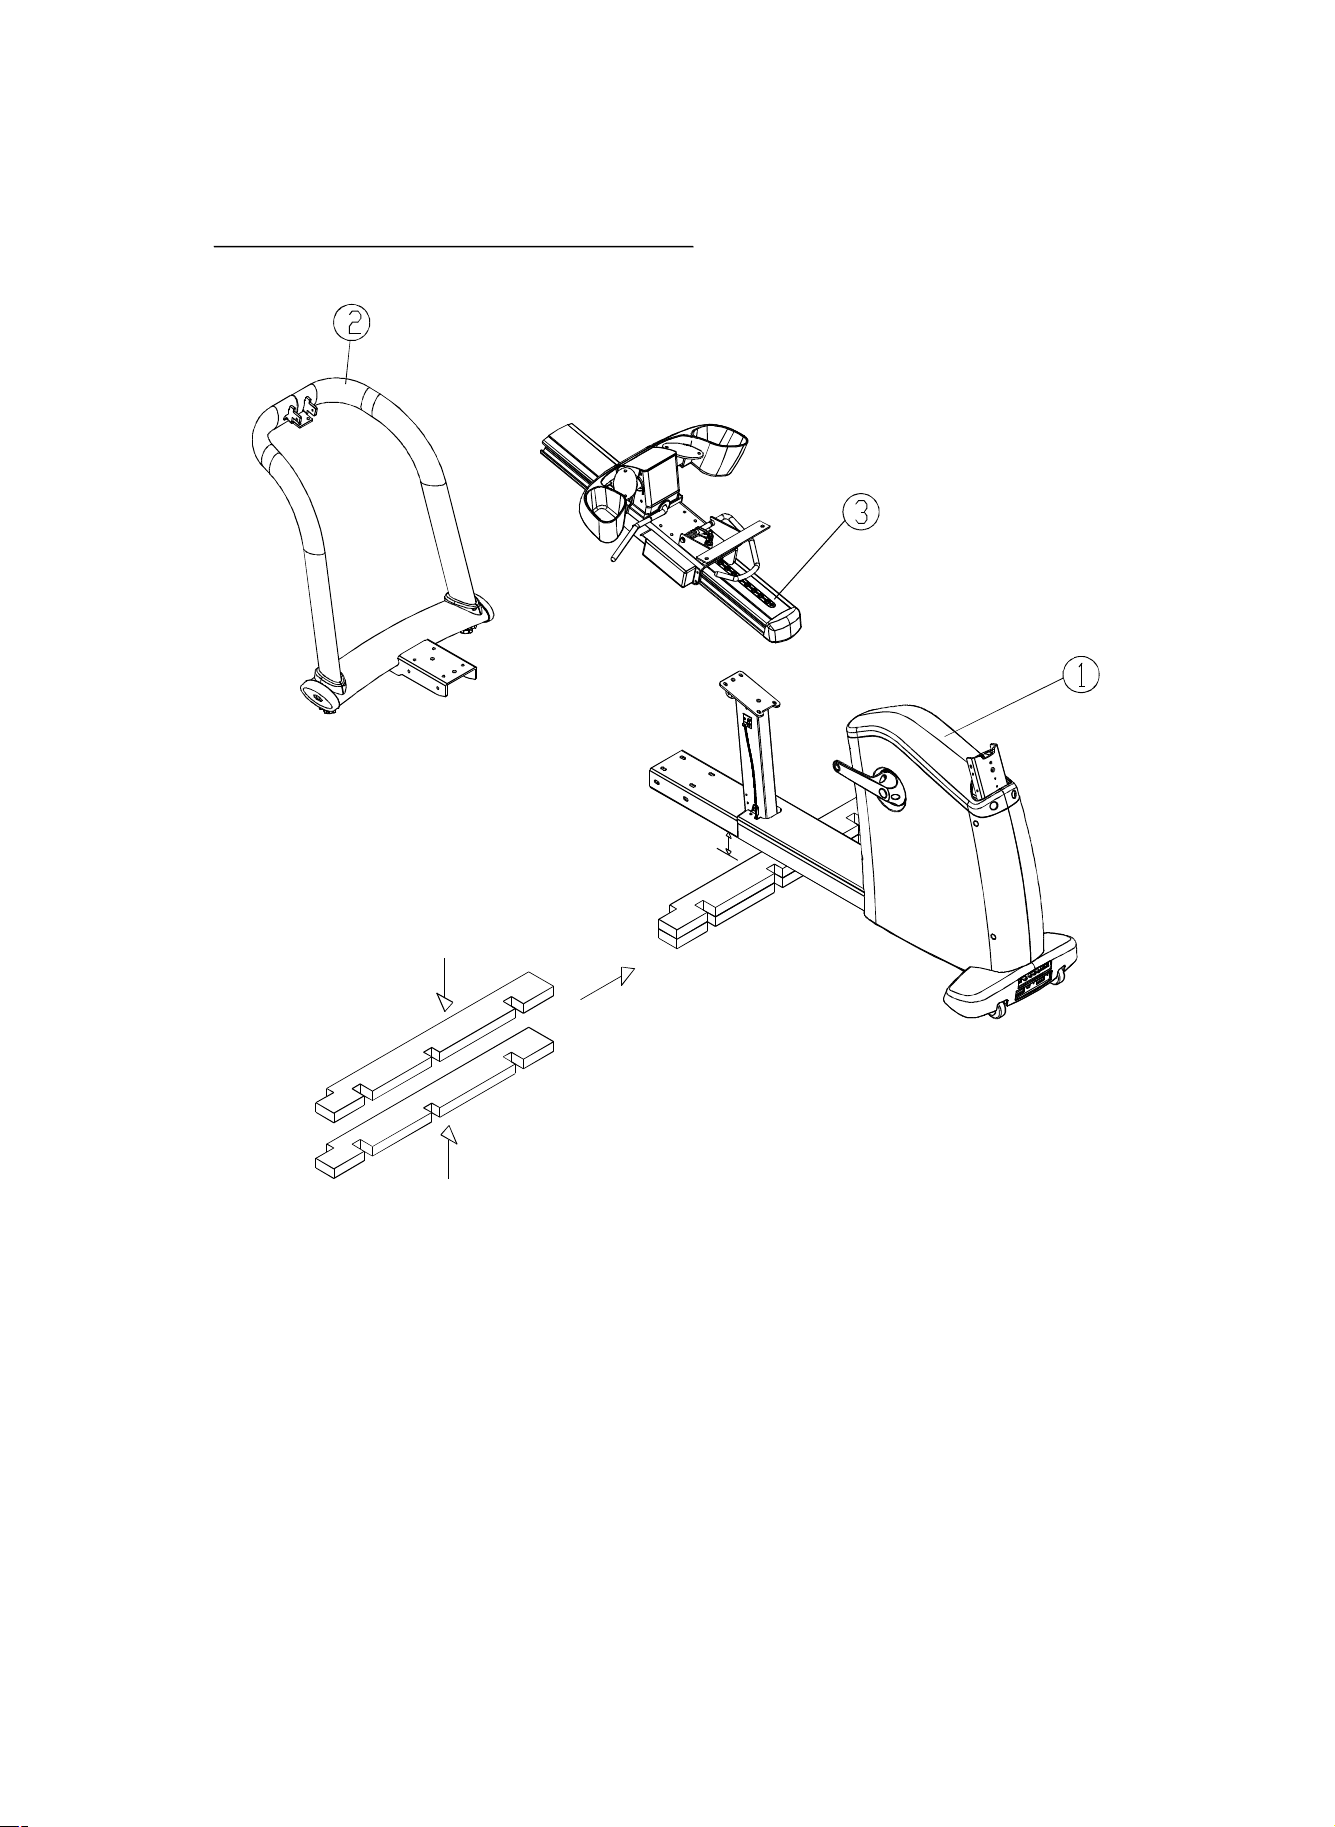
STEP-BY-STEPINSTRUCTIONS
RearFrame
SeatTube
MainFrame
60mm
CardBoard
BeforeassemblingtheRearFrameandtheSeatTube,findtwopiecesofcard
boardsfromthepackagingmaterialandstackthemtogether.Placethecardboards
underneaththeMainFramesothatitleavesa60mmspacetotheground.
6

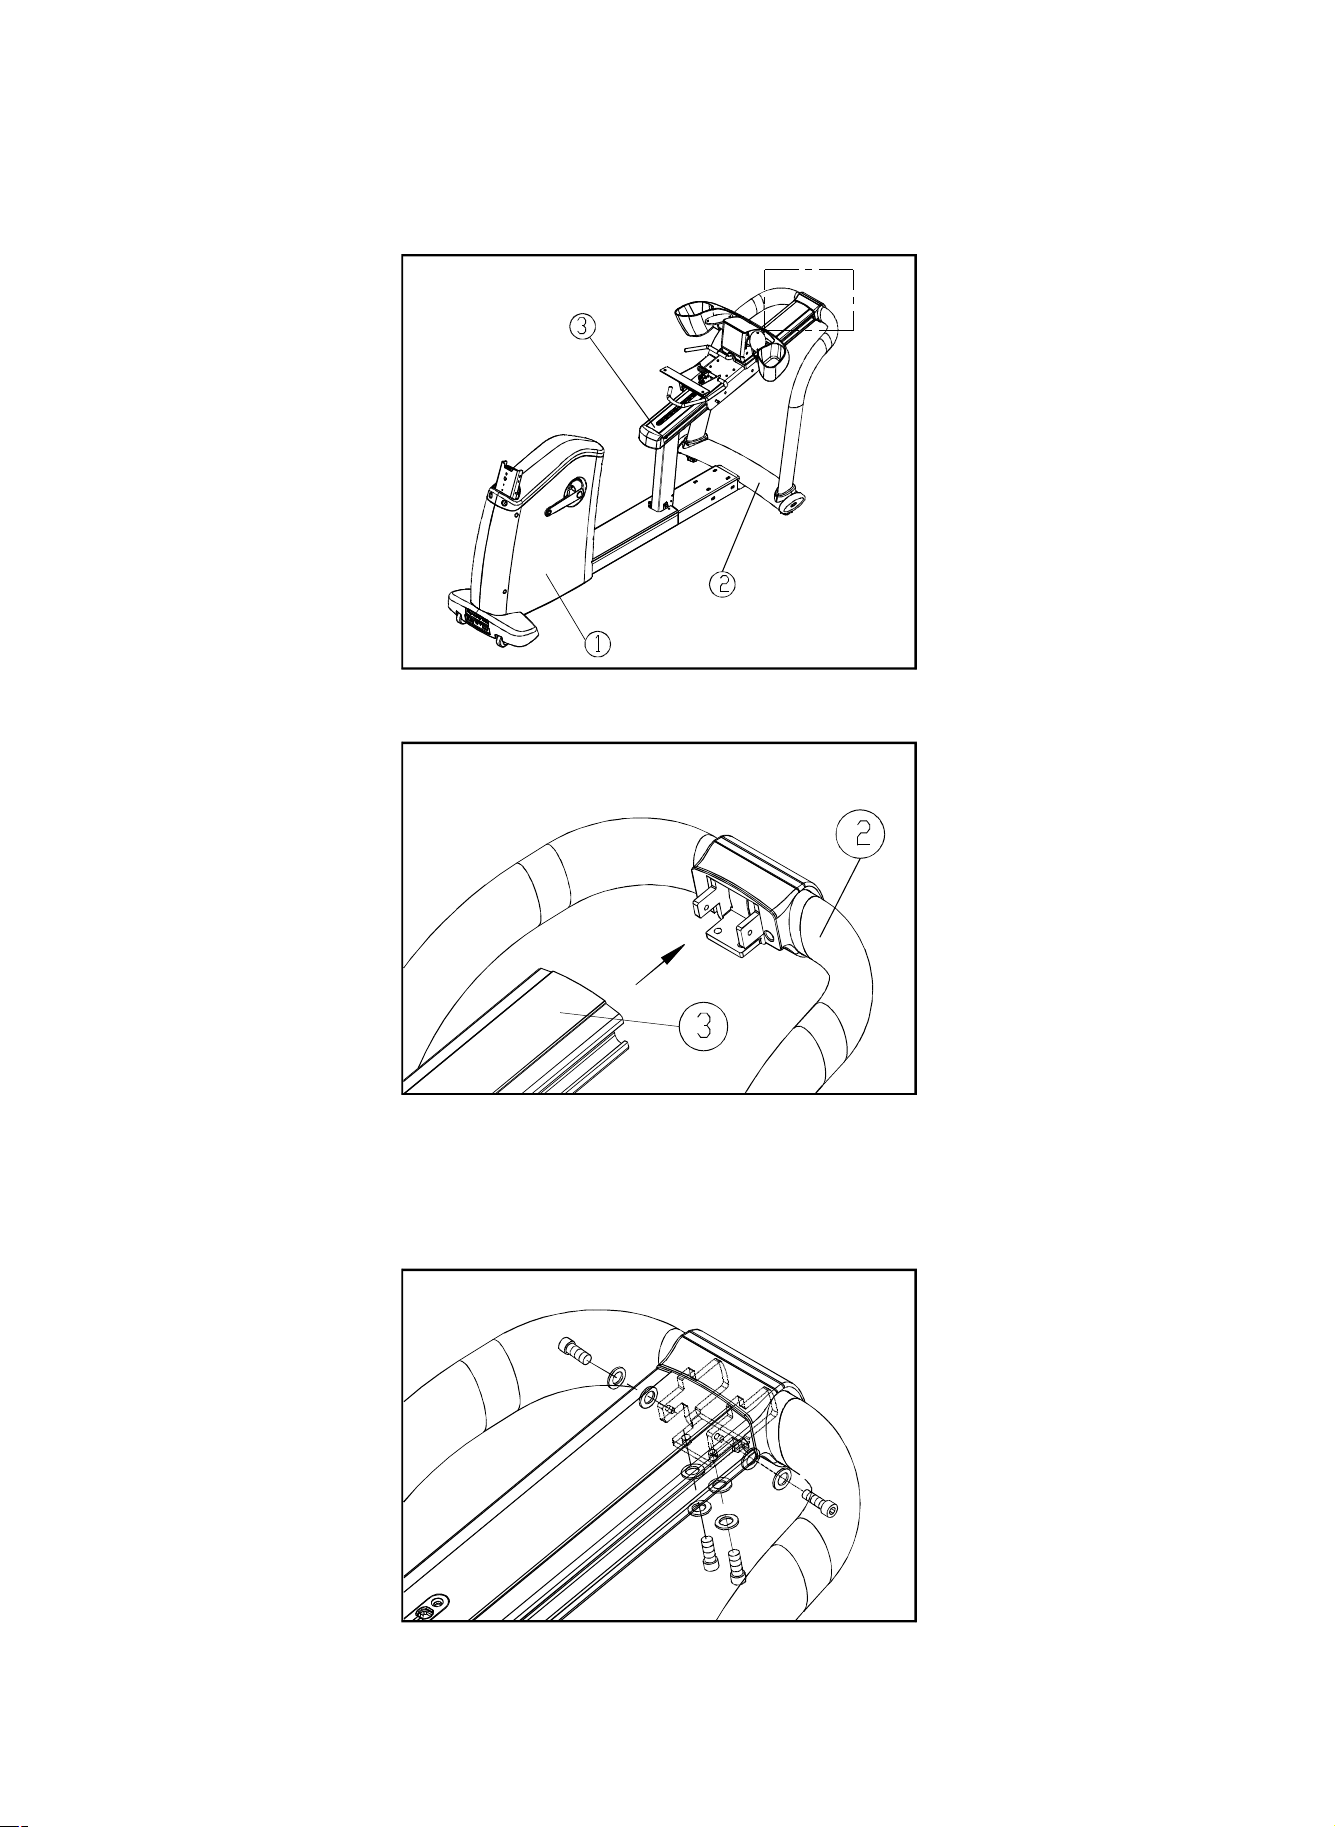
FRAMEASSEMBLY
RearFrame
MainPrame
STEP1.
STEP2.
Removescrewsandwashersfromthemainframe.Assembletherear
frame(part#2)ontothemainframe(part#1).SeeFig.1.
Fig.1
LooselysecurethescrewsandwashersasshowninFig.2.Atthismoment,
doNOTtightenthishardwarefully.Leaveitsomewhatloose.
Fig.2
7
SEATTUBEASSEMBLY
SeatTube
RearFrame
MainFrame
STEP1.
STEP2.
AssembletheSeatTube(part#3)ontotheRearFrame(part#2).SeeFig.
Fig.3
Foursetsofscrewsandwashersareprovidedtosecuretheseattubeto
therearframe.Pleasesecuretwosetsofhardwarefrombelow,then
secureonesetintoeachside(oneontheleft,andoneontheright).Atthis
moment,doNOTfullytightenthishardware.Keepthehardwaresomewhat
loose.SeeFig.4.
3.
Fig.4
8
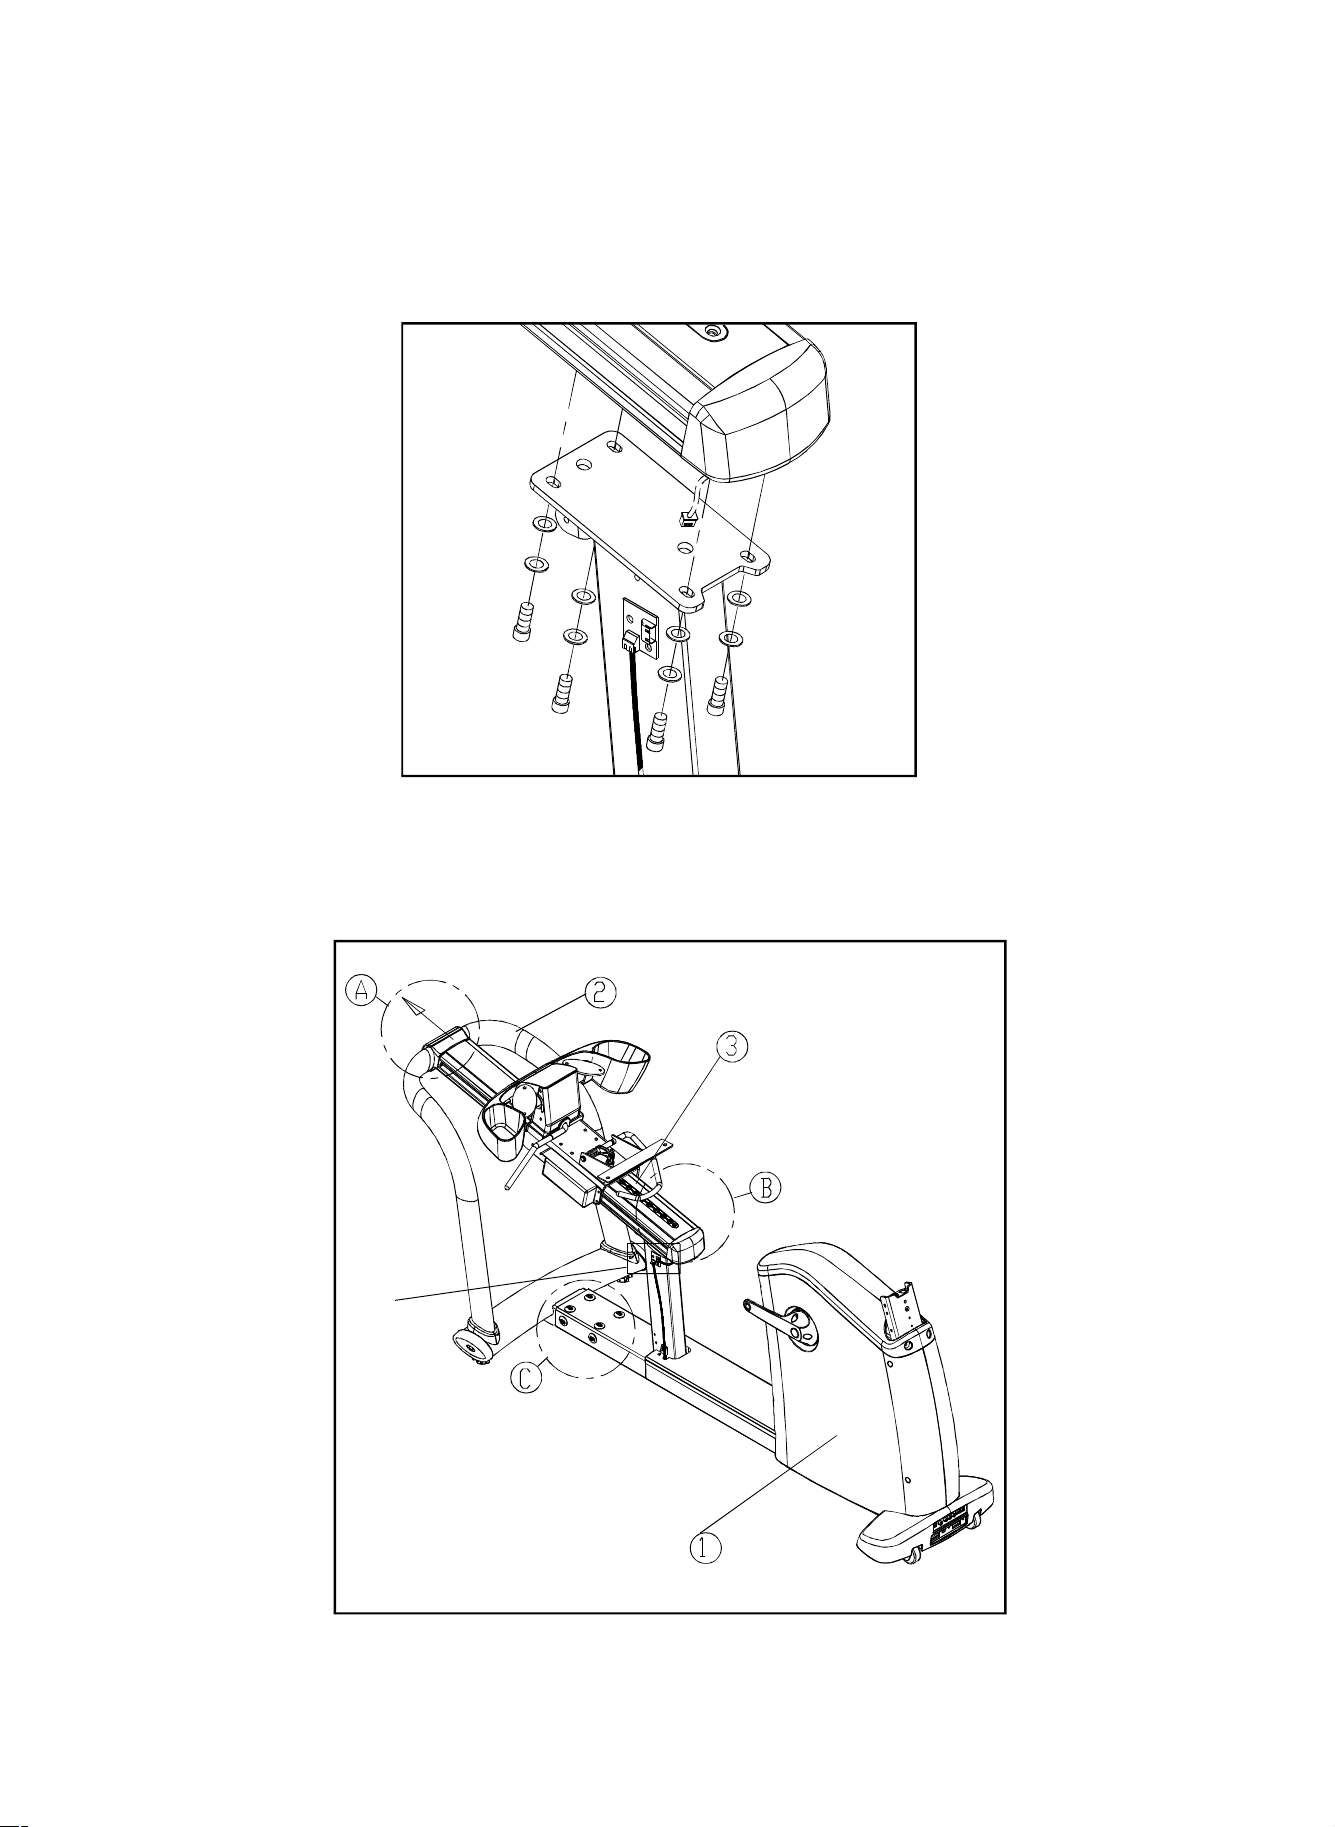
STEP3.
PlacetheSeatTubeontheSeatPost.Lightlysecurescrewsandwashers
asillustratedbelow.DoNOTfullytightenthehardware.Leaveitsomewhat
loose.SeeFig.5.
Fig.5
STEP4.
WhenscrewsatA,B,andClocationsareinplaceloosely,pulltherear
frame(part#2)backwardawayfromthefrontofthebike.Usethetool
providedtotightenthesescrewsinthefollowingorder:A,B,andC.See
Fig.6.
RearFrame
SeatTube
D
MainFrame
9
Fig.6
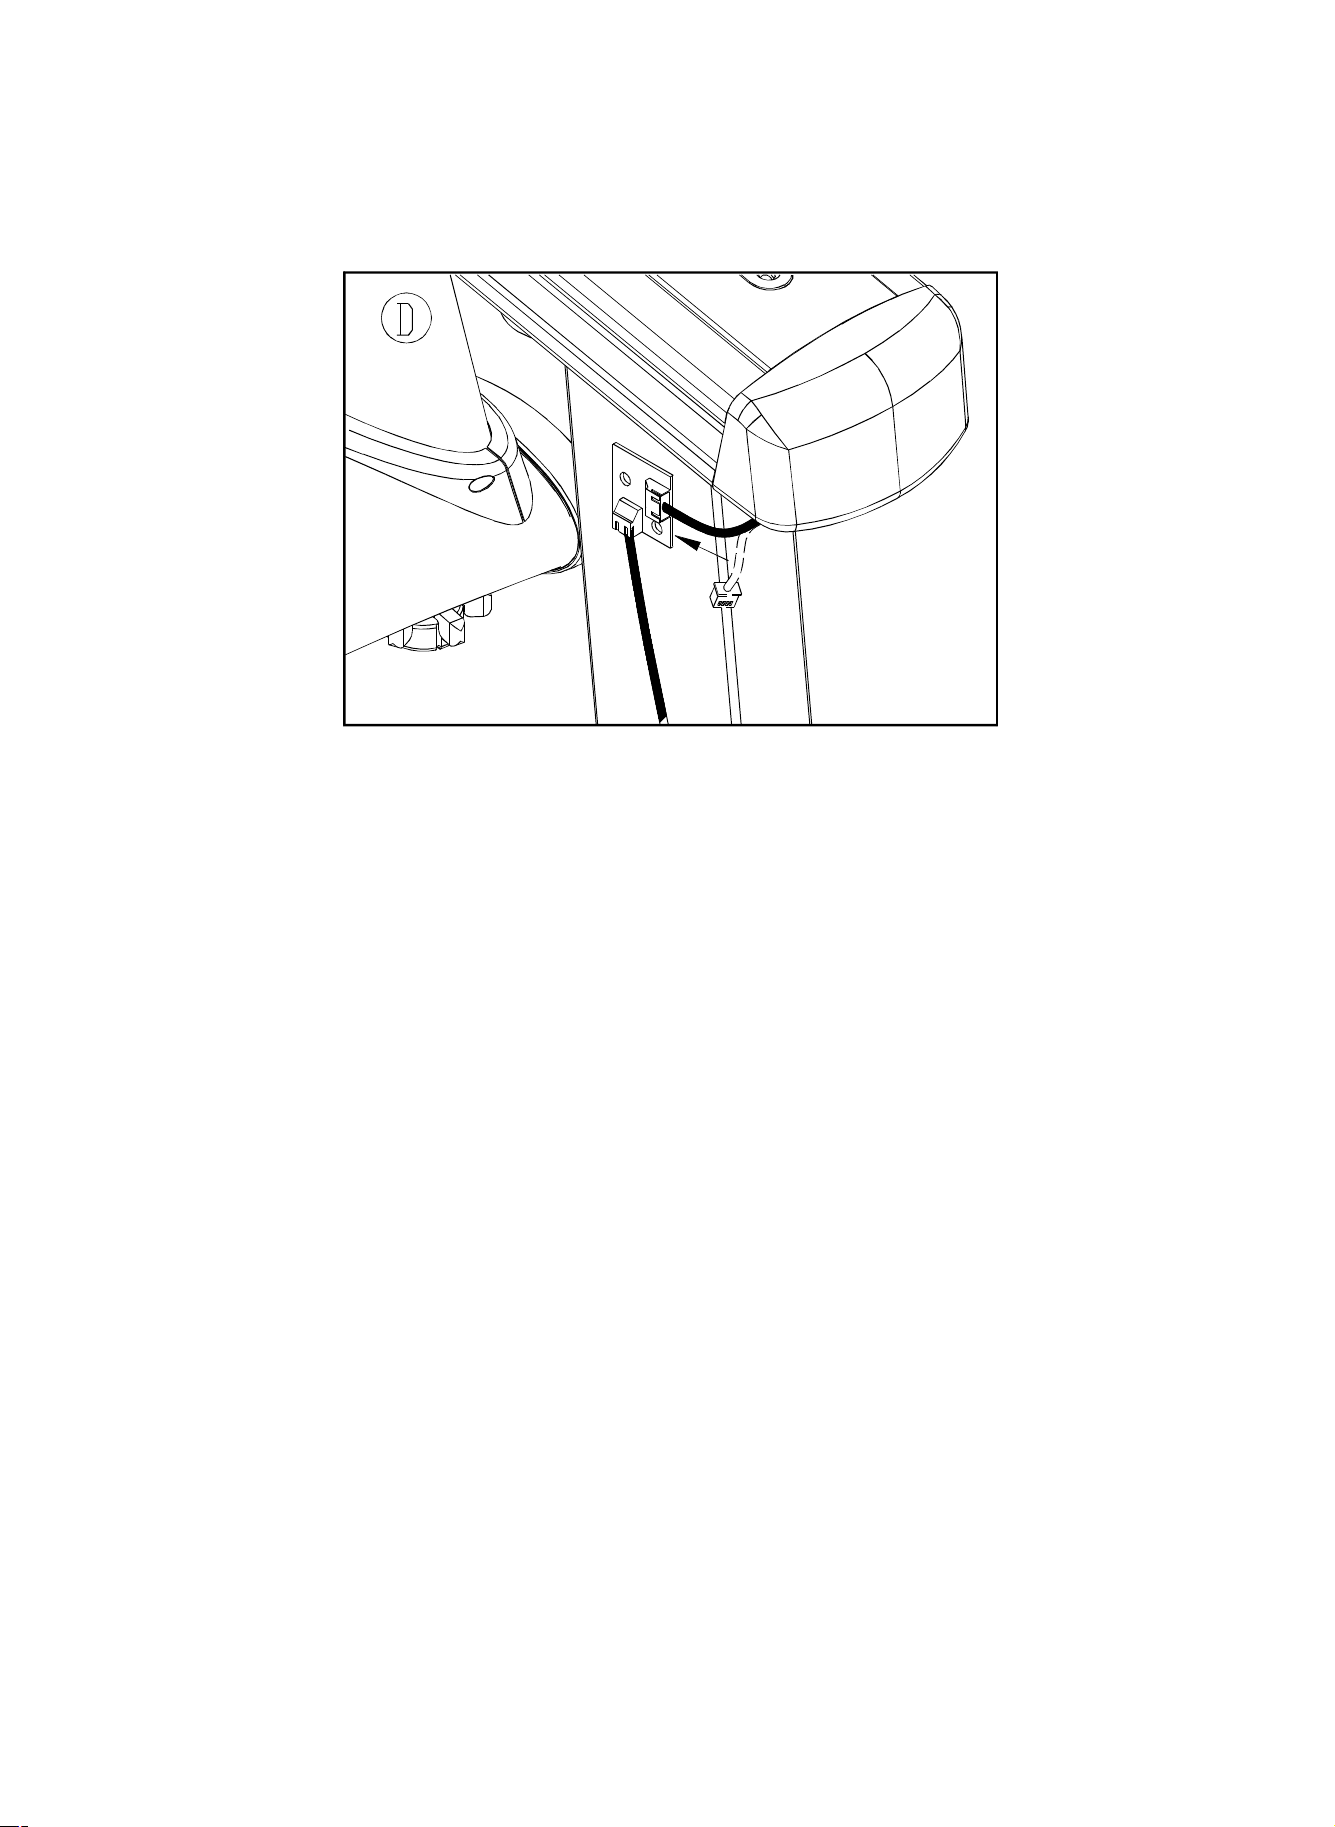
STEP5. PlugthepowercordconnectorintothesocketasshowninFig.7.
Fig.7
10
 Loading...