

SportsArt Fitness 1260 Owner's Manual

SAFETYGUIDELINES:
Pleasereadandfollowthefollowingsafetyguidelines:
Beforebeginninganyexerciseprogram,youshouldconsultwithyourdoctor.Itis
recommendedthatyouundergoacompletephysicalexamination.
.Readthisowner'smanualandfollowtheinstructions.
.Assembleandoperatethetreadmillonasolid,levelsurface.Keeptheareabehind
thetreadmillclear.
.Neverallowchildrenonornearthetreadmill.Thetreadmillrunningbeltwillnot
stopimmediatelyifanyobjectbecomescaughtinthebeltorrollers.
.Checkthetreadmillbeforeeveryuse.Makesureallpartsareassembled,andall
nutsandboltsaretightened.Donotusethetreadmilliftheunitisdisassembledin
anyway.
.Keephandsawayfrommovingparts.
.Theweightlimitforthistreadmillis275LBS.(125KGS).
.Wearproperworkoutclothing:Donotwearlooseclothing.Donotwearshoeswith
leathersolesorhighheels.Tiebackalllonghair.
.Don'trocktheunitfromsidetoside.Careshouldbetakenwhenmountingand
dismountingtheunit.
.Straddlethemachinewithyourfeetontherightandleftstagingplatformsbefore
startingtherunningbelt.
.Donotplaceanyliquidsonanypartofthetreadmill.
.Topreventshock,keepallelectricscomponents,suchasthemotor,cord,and
switchawayfromwater.
.Donotuseanyaccessoriesthataren'tspecificallyrecommendedbythe
manufacturer,thesemightcauseinjuriesorcausetheunittofail.
.Workwithinyourrecommendedexerciselevel,doNOTworktoexhaustion.
.Ifyoufeelanypainorabnormalsensation,STOPYOURWORKOUTandconsult
yourphysicianimmediately.
.Turnoffthetreadmillwhileadjustingorworkingneartherearroller.

Warning―Toreducetheriskofburns,fire,electricshock,orinjurytopersons:
.Atreadmillshouldneverbeleftunattendedwhenpluggedin.Unplugfromoutlet
whennotinuse,andbeforeputtingonortakingoffparts.
.Closesupervisionisnecessarywhenthistreadmillisusedby,on,ornearchildren,
invalids,ordisabledpersons.
.Usethistreadmillonlyforitsintendeduseasdescribedinthismanual.
.Neveroperatethistreadmillifithasadamagedcordorplug,ifitisnotworking
properly,ifithasbeendroppedordamaged,ordroppedintowater.Returnthe
treadmilltoaservicecenterforexaminationandrepair.
.Donotcarrythistreadmillbysupplycordorusecordasahandle.
.Keepthecordawayfromheatedsurfaces.
.Neveroperatethetreadmillwiththeairopeningsblocked.Keeptheairopenings
freeoflint,hair,andthelike.
.Neverdroporinsertanyobjectintoanyopening.
.Donotuseoutdoors.
.Donotoperatewhereaerosol(spray)productsarebeingusedorwhereoxygenis
beingadministered.
.Todisconnect,turnallcontrolstotheoffposition,thanremoveplugfromoutlet.
.Connectthistreadmilltoaproperlygroundedoutletonly.
Thetreadmillisdesignedfortheuseandenjoyment.Byfollowingtheabove
precautionsandusinggoodjudgmentandcommonsense,youwillenjoysafeand
pleasurableexercisewiththistreadmill.

TABLEOFCONTENTS
1.SAFETYGUIDELINES.........................................................................................
2.INTRODUCTION...................................................................................................
3.ASSEMBLINGYOURTREADMILL
InstallationRequirements......................................................................................
Listofparts............................................................................................................
Stepbystepinstructions.......................................................................................
Floorleveladjustment...........................................................................................
4.OPERATINGINSTRUCTIONS
Safetykey.............................................................................................................
5.UNDERSTANDINGTHEELECTRONICSPACKAGE
Keyfunctions........................................................................................................
Whateachofthecategoriesmeans.....................................................................
6.RUNNINGONTHETREADMILL.........................................................................
7.GUIDELINESFOREXERCISE
HowlongshouldIexercise?................................................................................
HowoftenshouldIexercise?...............................................................................
1
3
5
5
6
10
11
11
13
14
14
14
8.MAINTAININGYOURTREADMILL
Cleaningthetreadmill..........................................................................................
Adjustingtherunningbelt....................................................................................
9.TROUBLESHOOTING
ERRmessages....................................................................................................
Blankdisplay........................................................................................................
Electronicspackageandmotorfusefailure.........................................................
FuseFailureForInclineSystem..........................................................................
FuseFailureFordriveboard...............................................................................
15
15
18
19
20
21
21
INTRODUCITON:
Congratulationsonpurchasingoneofthefinestpiecesofexerciseequipmentonthe
markettoday.Constructedofhighqualitymaterialsanddesignedforyearsoftrouble
freeusage.Wehopethistreadmillwillbeanintegralpartofyourfitnessregimen.
BeforeusingyourTreadmill,werecommendthatyoufamiliarizeyourselfwiththis
Owner'sManual.Whetheryouareafirsttimeuserofexerciseequipmentora
seasoned"pro",understandingthecorrectuseoftheequipmentwillenhanceyour
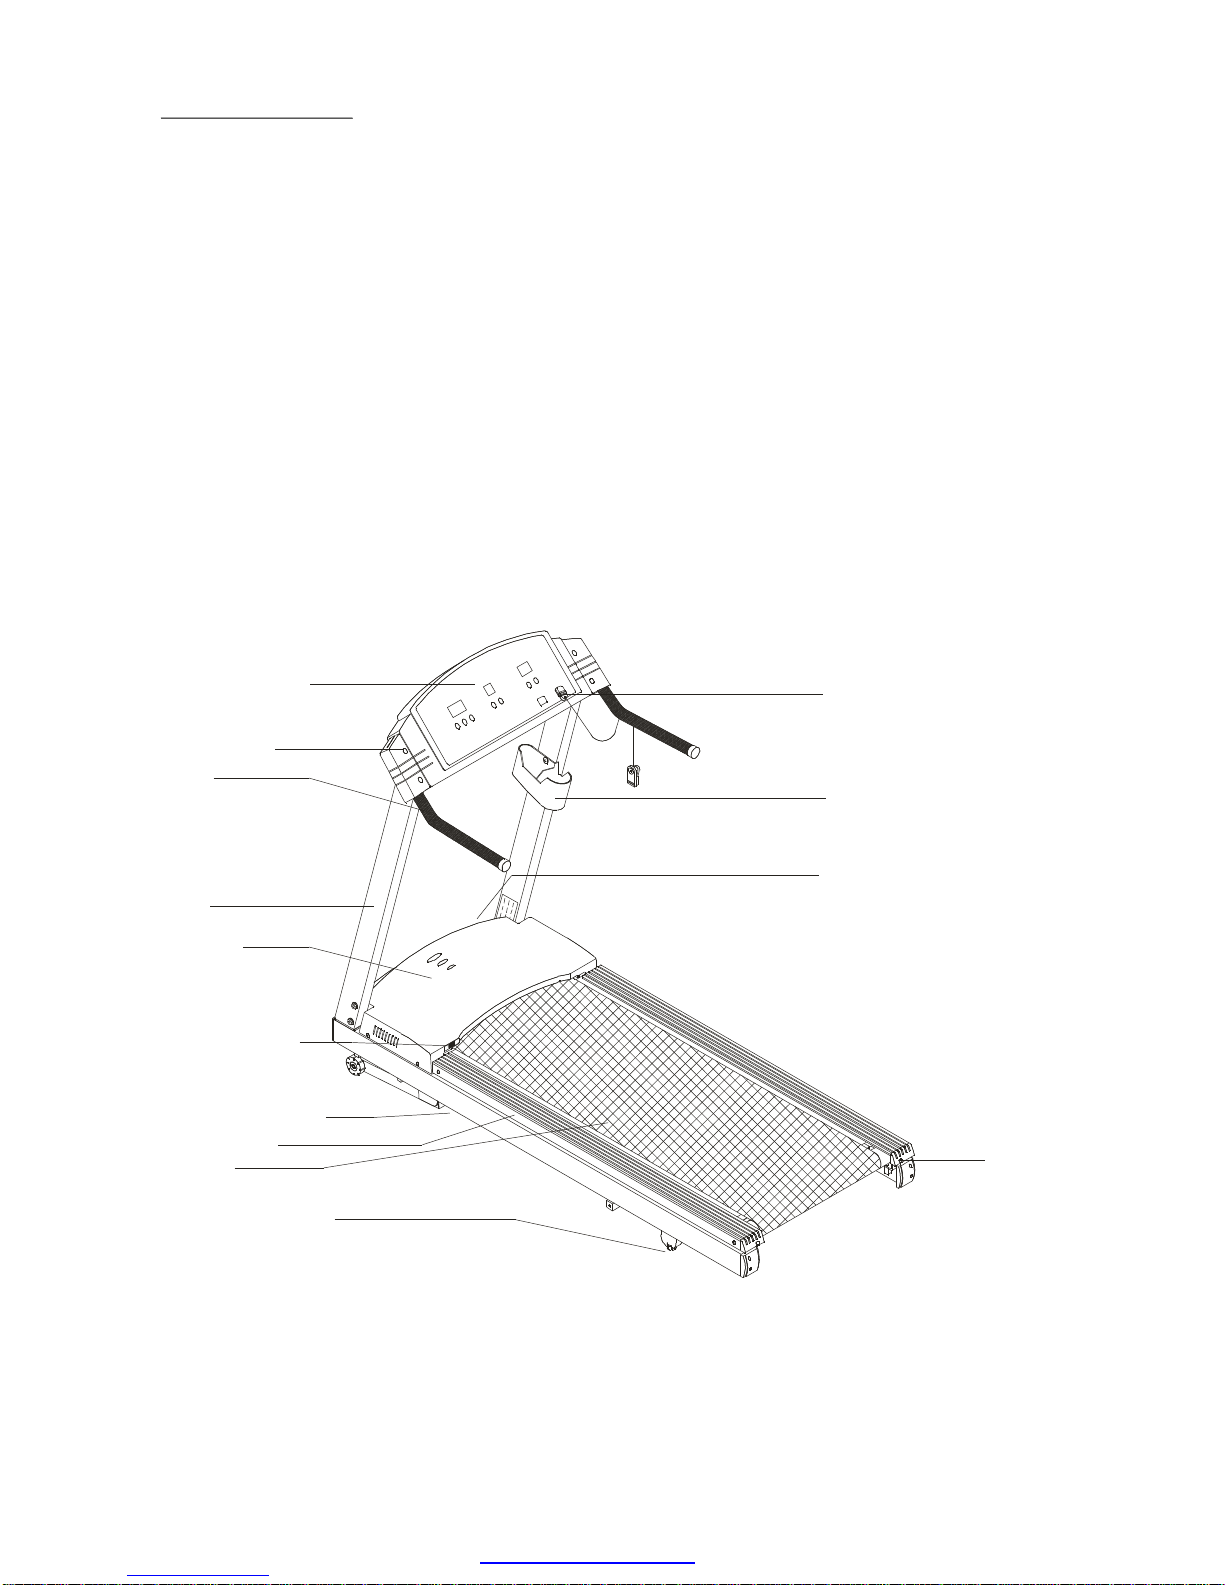
abilitytoachieveyourexercisegoalssafelyandsuccessfully.Belowisthedrawing
ofthistreadmill.
TREADMILLWITHSTANDARDHANDLEBARS:
ELECTRONICSPACKAGE
HANDLEBARHOLDER
HANDLEBAR
LIFTPOST
MOTORSHROUD
BELTALIGNMENTGAUGE
BELTALIGNMENTROLLER
STAGINGPLATFORM
RUNNINGBELT
FLOORLEVELADJUSTMENT
SAFETYKEY
WATERBOTTLEHOLDER
POWERSWITCH
ADJUSTINGBOLT

TREADMILLWITHLONGHANDLERAILS:
ELECTRONICSPACKAGE
HANDRAILHOLDER
HANDRAIL
LIFTPOST
MOTORSHROUD
BELTALIGNMENTGAUGE
BELTALIGNMENTROLLER
STAGINGPLATFORM
RUNNINGBELT
HANDRAILCLAMP
FLOORLEVELADJUSTMENT
SAFETYKEY
WATERBOTTLEHOLDER
POWERSWITCH
ADJUSTINGBOLT

ASSEMBLINGYOURTREADMILL:
InstallationRequirements
Readthisowner'smanualandfollowtheinstructionscontainedherein.
CAUTION:
Toavoidbackstrain,andtoinsuresafetytotheunitandyourself,we
suggestyoumayneedahelpertoremovetherunningdeckassembly
frombox.
Listofparts
Beforeassemblingyourtreadmill,makesurethatyouhaveallthefollowingitems:
1.Eight5/16"x3/4"bolts-liftpost
2.Eight5/16"nylonwashers-liftpost
3.Eight5/16"washers-liftpost
4.Four1/4"x11/4"bolts-handrail/handlebarholder
4A.Two5/16"bolts-handrailclamp(for1200Lonly)
5.Two1/4"x1/2"screws-waterbottleholder
6.Onewaterbottleholder
7.Onesafetykey
8.OnehexAllenwrench
9.TwohexAllenwrenchwithhandle
10.Onecombinationwrench
11.Threefuses
a.12A(100V/120Vuse)or7A(200V/240Vuse)-ElectronicsandMotor
b.1A(100V/120Vuse)or2A(200V/240Vuse)-Inclinesystem
c.0.5A-Driveboard
Ifanyitemsaremissing,contactyourauthorizedservicedealer.
IMPORTANT:
Thepackingforthistreadmillwasdesignedtoprotectitduring
shipment.Pleasestoretheoriginalpackaginginasafeplaceincase
youneedtoshipthetreadmillinthefuture.
Stepbystepinstructions
Thefollowingstepsexplainhowtoassembleyourtreadmill.Pleasereadeverystep
thoroughly,andfollowthedirectionscompletelytoensurecorrectassembly.
1.ThereareimportantpartsenclosedinsideoftheStyrofoam,pleasecheck
Styrofoamcompartmentsbeforediscarding.Makesureallpackingmaterialsare
removedfromthetreadmilldeck.
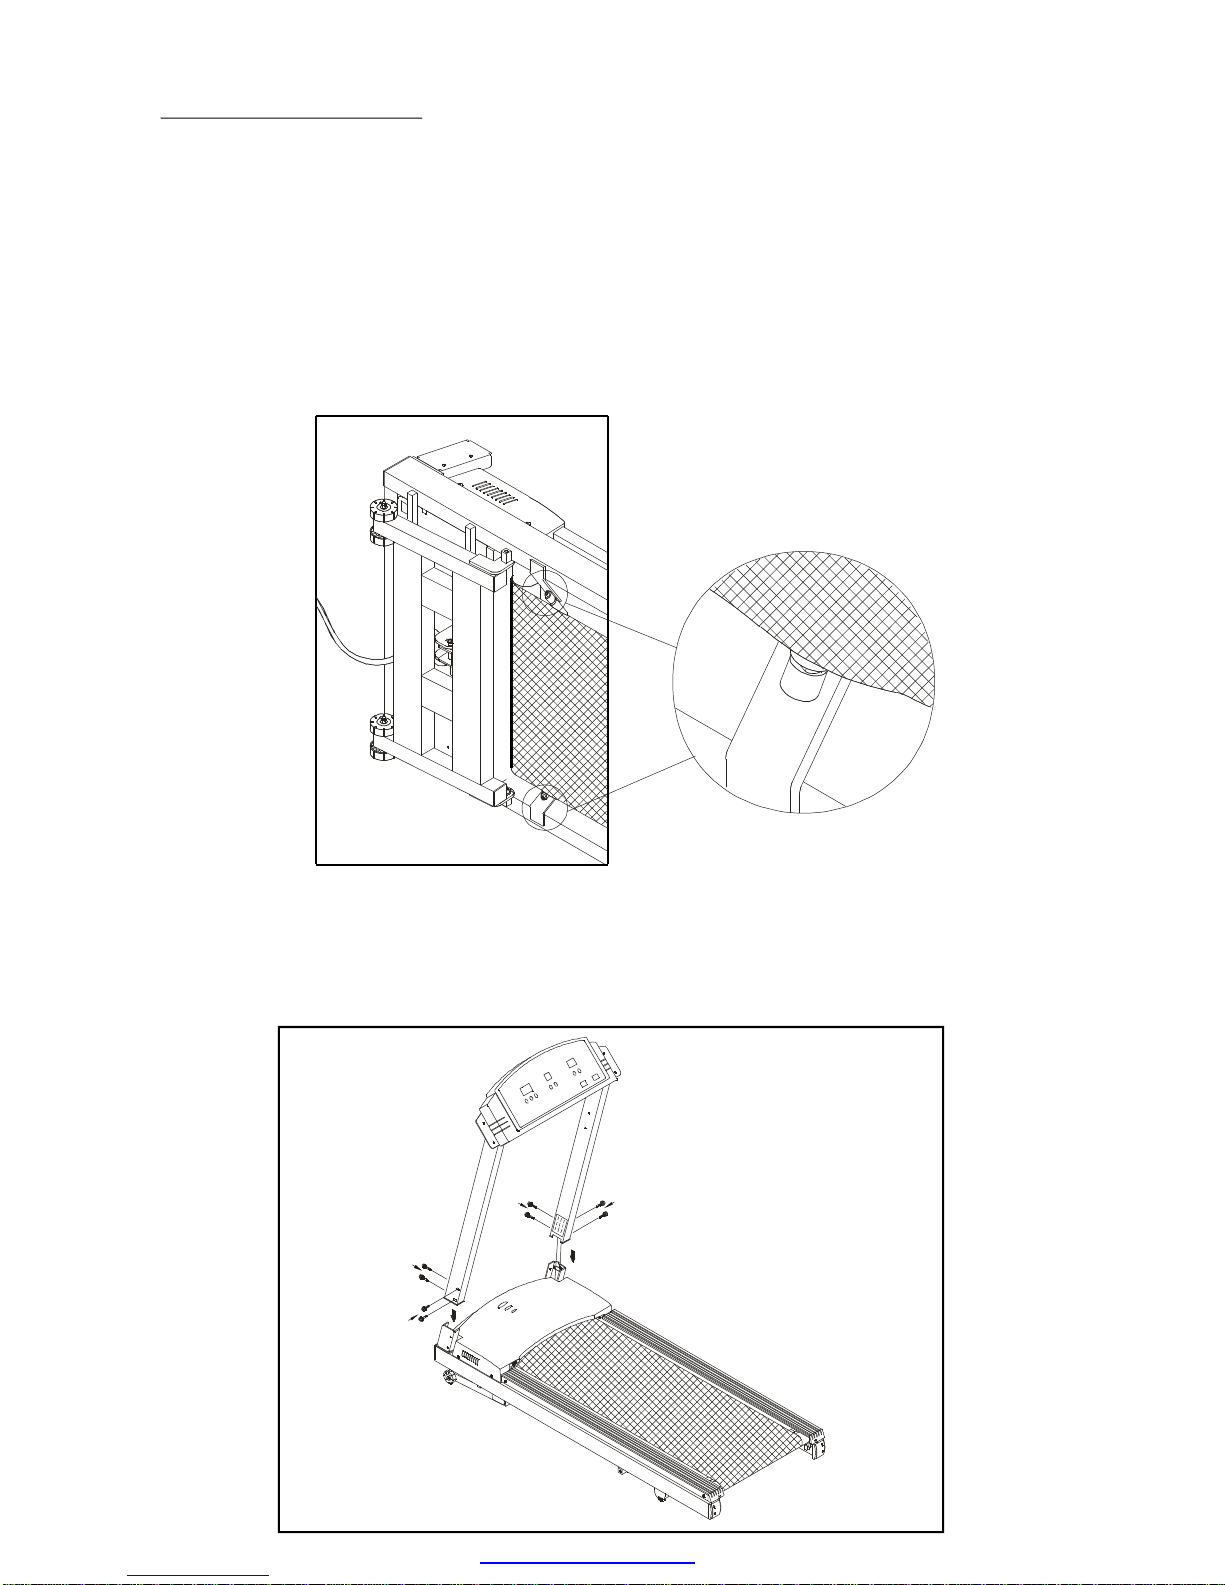
2.Laythetreadmillonitsside.Makesuretherunningbeltispositioninthetracksof
thetwoBELTALIGNMENTROLLERundersideofthemachine(seeFig.1).
Fig.1
3.Then,placethetreadmillonalevel,flatsurface.
4.Insertthetwofrontpostsintotheirrespectivesocketsandsecurewithfourbolts
andwashersprovidedoneachside(seeFig.2).
Fig.2
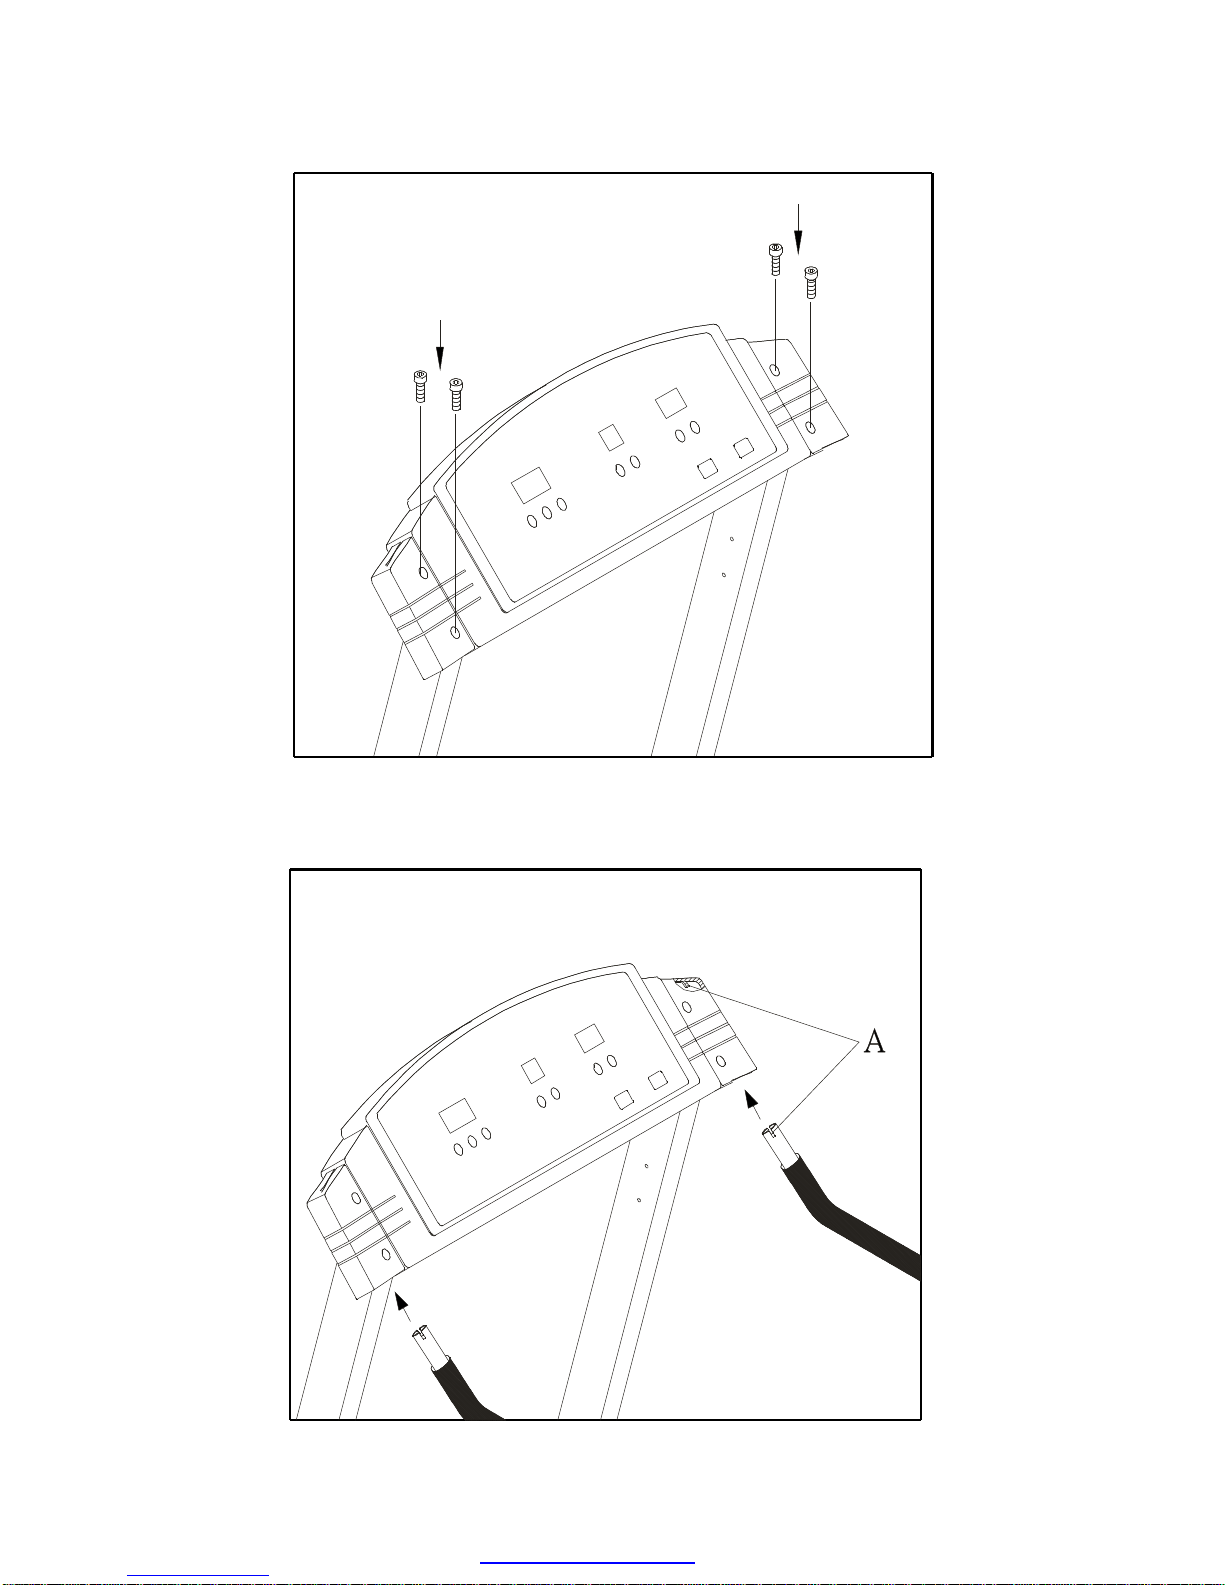
5.Attachthehandlebarortheendofthehandrailtoitsholder,donottightenthe
boltsyet(seeFig.3).
Fig.3
6.Makingsurethatthenotchinthehandlebarorhandrailsfitsintotheholder
channel(seeFig.4).
Fig.4
 Loading...