

Page 1
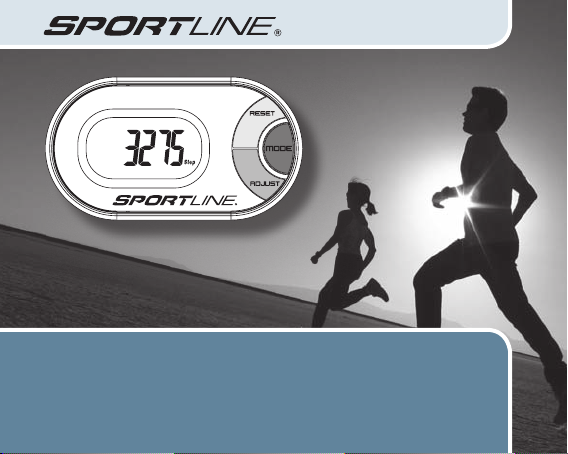
Qlip
PEDOMETER
model 310
Page 2
TABLE OF CONTENTS
INTRODUCTION 1
HOW TO USE THIS MANUAL 2
REMOVING THE BATTERY INSULATOR TAB 3
WARNINGS & CAUTIONS 4
PEDOMETER FUNCTIONS 5
HOW TO WEAR YOUR PEDOMETER 6
KEYS AND THEIR FUNCTIONS 7
MAIN OPERATING MODES 8
SETTING THE PEDOMETER FUNCTIONS
SETTING TIME 9
SETTING USER DATA 10
OPERATING THE PEDOMETER
VIEWING PEDOMETER DATA 11
RESETTING PEDOMETER DATA 12
TIPS FOR INCREASING YOUR DAILY STEPS 13
REPLACING THE BATTERY 14
CARE & MAINTENANCE 15
RANGES & SPECIFICATIONS 16
WARRANTY 17
Page 3

INTRODUCTION
Congratulations on your purchase of a Sportline Qlip Pedometer. The Qlip Pedometer
features the Infinity Motion Sensor, a highly advanced pedometer technology that accurately
measures your body movements from multiple locations on the body and in multiple
orientations.
Please keep in mind your pedometer is a sensitive technical instrument. With proper care
and maintenance, it will last for many years. However, improper care and handling can cause
the various sensors to be damaged and to stop functioning.
Qlip
1
Page 4
HOW TO USE THIS MANUAL
Sportline Qlip Pedometers have many unique features and functions. Please read all sections
of this manual carefully and become familiar with the operation of the pedometer before
using it in the field.
Proper setup and operation will greatly enhance the pedometer’s usefulness and your
enjoyment of the product.
The manual is divided into sections outlining each of the major functions of the pedometer.
A drawing of the screen that represents a starting point or other important point for each
operational process is shown adjacent to the instructions; important keys are shown
PRESS & HOLD and PRESS.
indicating
The steps for the programming or operation are adjacent to the screen illustration. Key points
and important information are shown in highlighted blocks.
2
Page 5
REMOVING THE BATTERY INSULATOR TAB
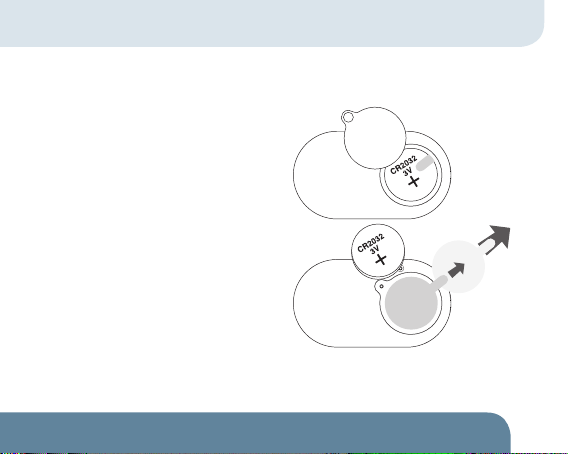
NOTE: In order to activate your pedometer after purchase, you must remove the battery
insulator tab inside the battery compartment.
1. Unscrew the battery compartment door with a
small Phillips screwdriver.
2. Remove the tab (be sure that the battery is in
the correct polarity position – positive (+) side
of the battery is visible).
3. Replace the battery compartment door and
tighten the fastening screw with a Phillips
screwdriver.
4. Remove the label that appears on the
pedometer display.
Qlip
3
Page 6
WARNINGS & CAUTIONS
WARNING: Before starting any exercise program or performing any vigorous physical activity,
we strongly suggest you visit your doctor for a complete physical and to discuss your plans.
CAUTION Qlip Pedometers are not water resistant.
AVOID exposing the Pedometer to extreme conditions.
AVOID rough uses or severe impacts to the Pedometer.
CLEAN the Pedometer occasionally with a soft, dry cloth.
STORE the Pedometer in a dry place when it is not in use for a long time.
4
Page 7

PEDOMETER FUNCTIONS
TIME
• Time displayed in 1-second resolution
• 12 or 24 hour formats
PEDOMETER
• Measures Walking Steps
• Distance
• Average Speed
• Exercise Time
• Calories Burned
TIMER
• 1-Second Resolution
• 10 Hour
OTHER
• Removable Clip Holster
Qlip
5
Page 8
HOW TO WEAR YOUR PEDOMETER
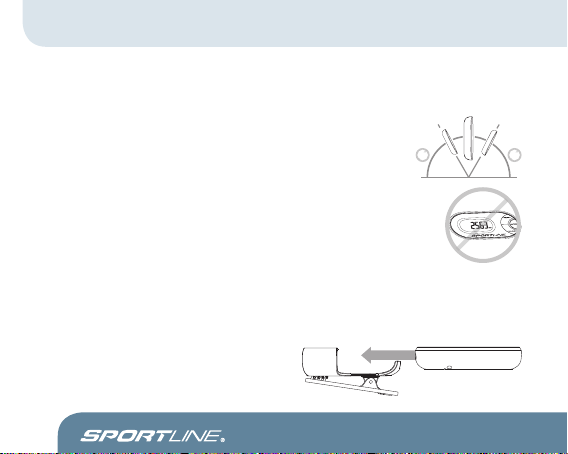
For most accurate measurements, Sportline recommends inserting the unit into a tight,
secure pocket or clipping the unit (with the holster included) to the beltline.
FOR MOST ACCURATE PEDOMETER READINGS:
1. Position the unit in a vertical orientation (angle of 30° or less – see
illustration A. IMPORTANT: positioning the unit horizontally (display
flat to the ground) will compromise accuracy – see illustration B.
2. Secure the unit as close to the body as possible (DO NOT attach to
loose clothing).
NOTE: This Pedometer will be most accurate when worn close to the body. If
the Pedometer is clipped to loose clothing or loosely contained in a pocket, the
unit’s accuracy may be compromised.
To clip the pedometer to your clothing, simply
insert the pedometer unit into the clip holster
as shown.
6
A
30°
30°
60°
60°
B
Page 9
KEYS AND THEIR FUNCTIONS
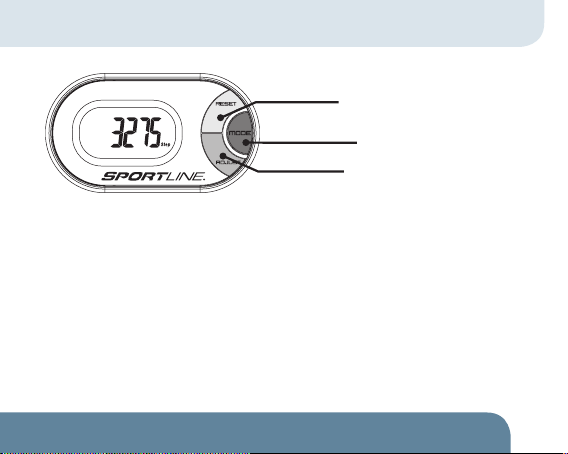
RESET KEY
MODE KEY
ADJUST KEY
MODE KEY
• Scroll through operating modes
• Advance to next setting in Programming
Sequence
RESET KEY
•
PRESS & HOLD: Clears data in Pedometer
modes (Step, Distance, Calories, Speed
and Timer)
• Increase values being set during a
Programming Sequence
ADJUST KEY
PRESS & HOLD: Accesses Programming
•
Sequence in Time of Day and Step
modes
• Toggle between Metric and Imperial
measurement in Distance and Speed
modes
Qlip
Qlip
7
Page 10
MAIN OPERATING MODES
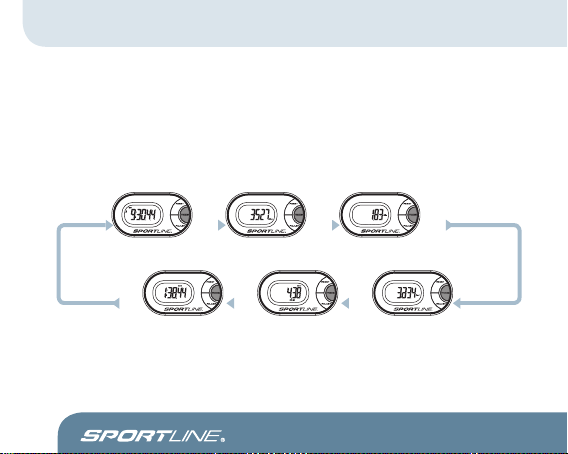
The Sportline Qlip has 6 main operating modes: Time, Step, Distance, Calories, Speed, and
Exercise Timer.
• Scroll through main operating modes by
• Toggle between Metric and Imperial measurements (in Distance and Speed modes) by
PRESSING the ADJUST key.
PRESSING the MODE key.
TIME OF DAY
PRESS
MODE
EXERCISE TIMER
PRESS
MODE
PRESS
MODE
STEP
SPEED
PRESS
MODE
PRESS
MODE
DISTANCE
CALORIES
PRESS
MODE
8
Page 11
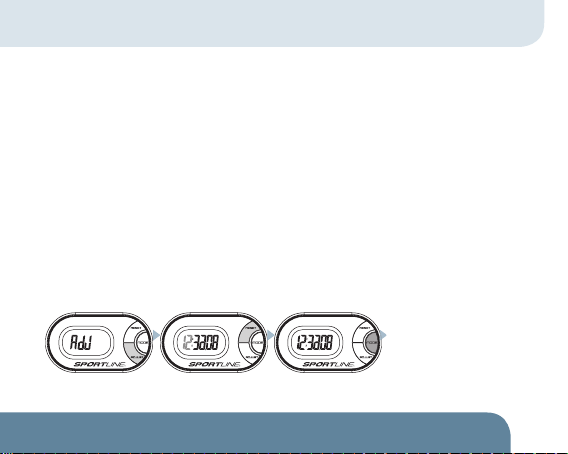
SETTING THE PEDOMETER FUNCTIONS
SETTING TIME
1. PRESS & HOLD the ADJUST key in Time Mode to access the programming sequence.
2. Adjust Hour by PRESSING the RESET key.
3. Set Hour and advance to Set Minutes by PRESSING the MODE key.
4. Adjust Minutes by PRESSING the RESET key.
5. Set Minutes and advance to Set Seconds by PRESSING the MODE key.
6. To adjust Seconds, PRESS the RESET key to reset Seconds to 00. Advance to select 12- or
24-hour format by PRESSING the MODE key.
7. Toggle between 12- or 24-hour format by PRESSING the RESET key.
8. When all settings are programmed, PRESS the MODE key to return to Time mode.
TIP: Pressing & Holding the RESET key in any Setting Sequence will fast advance the variable being set.
CONTINUE THROUGH
ALL FIELDS. PRESS THE
MODE KEY TO RETURN TO
OPERATING MODE
PRESS & HOLD ADJUST ADJUST: PRESS RESET SET: PRESS MODE
Qlip
9
Page 12
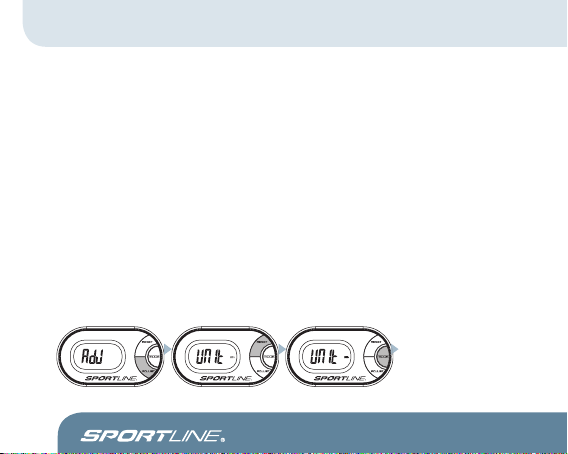
SETTING THE PEDOMETER FUNCTIONS
SETTING USER DATA
The Sportline Qlip is equipped with an advanced Pedometer that measures Steps, Speed,
Distance, Calorie Expenditure and Exercise Time. In order to ensure exercise data is as
accurate as possible, you must enter your personal profile.
1. Scroll to Step mode by PRESSING the MODE key.
2. PRESS & HOLD the ADJUST key to enter the programming sequence.
3. Select Distance Units (Mile or KM) by PRESSING the RESET key. PRESS the MODE key to
Advance to Set Weight.
NOTE: If Miles are selected, weight will be measured in pounds and stride length will be measured in inches. If Kilometers
are selected, weight will be measured in kilograms and stride length will be measured in centimeters.
4. Adjust Weight by PRESSING the RESET key. PRESS the MODE key to Advance to Set Stride
Length.
5. Adjust Stride Length by PRESSING the RESET key. PRESS the MODE key to Advance to Set
Stride Length. PRESS the MODE key to return to Step mode.
TIP: To more accurately set Stride: run/walk a defined distance (i.e. 100 yards/meters). Count the number of steps/strides.
Divide number of steps/strides by the distance (in inches or centimeters) to get your average stride length.
CONTINUE THROUGH
ALL FIELDS. PRESS THE
MODE KEY TO RETURN TO
PRESS & HOLD ADJUST ADJUST: PRESS RESET SET: PRESS MODE
10
OPERATING MODE
Page 13
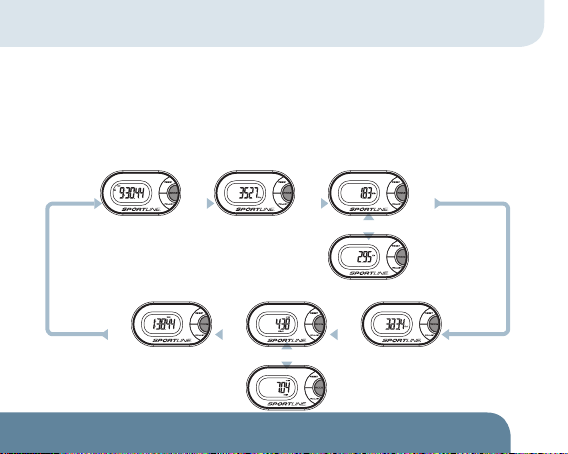
OPERATING THE PEDOMETER
VIEWING PEDOMETER DATA
The Sportline Qlip automatically tracks Pedometer data when you start walking. To view
real-time pedometer data, scroll through display modes by
toggle between Metric and Imperial measurement by
or Speed modes.
TIME OF DAY
STEP
PRESSING the MODE key. You may
PRESSING the ADJUST key in Distance
DISTANCE
PRESS
MODE
EXERCISE TIMER
PRESS
MODE
PRESS
MODE
SPEED
PRESS ADJUST
PRESS
MODE
PRESS ADJUST
PRESS
MODE
CALORIES
PRESS
MODE
Qlip
11
Page 14
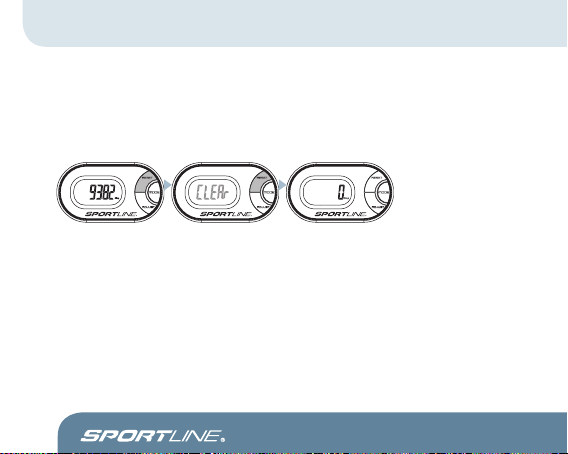
OPERATING THE PEDOMETER
RESETTING PEDOMETER DATA
1. Reset Pedometer data by PRESSING & HOLDING the RESET key in Step, Distance (Mile or
Km), Calorie (Kcal), Speed or Timer modes.
PRESS & HOLD RESET
12
Page 15

OPERATING THE PEDOMETER
TIPS FOR INCREASING YOUR DAILY STEPS
Studies have shown that walking may contribute to your health. Some tips to help you
increase your daily step total:
• Walk to your office by getting off the bus earlier or park your car farther away from your
office.
• Establish a walking habit every day.
• Set a goal: e.g. specific distance or time per day.
HOW THIS PEDOMETER HELPS YOU ACHIEVE YOUR GOAL
This unit includes advanced pedometer functions that not only count your walking steps, but
can also calculate the distance, speed, exercise time and calorie expenditure for your walking
or running. These unique pedometer features will guide you for achieving your goal.
EXAMPLE 1: Set a specific distance goal for every day: the daily record will display the
distance you have achieved towards your goal.
EXAMPLE 2: Set a daily time goal: the daily record will tell you the exercise time you have
achieved towards your goal.
Qlip
13
Page 16
REPLACING THE BATTERY
The Sportline Qlip Pedometer uses one CR2032 3V lithium battery.
Battery replacement will be required from time to time, and should occur when:
1. The display fades in part or completely
2. The pedometer function will not activate
Replacing the battery:
1. Unscrew the battery compartment cover on the backside of the unit using a small Phillips
screwdriver and remove the cover.
2. Remove the exhausted battery from the unit, and insert a new battery (be sure to place
the positive (+) side of the battery is visible, facing toward the battery compartment
cover).
3. Replace the battery compartment cover on the battery compartment and fasten the screw
(CAUTION: do not over tighten).
CAUTION – BATTERY SAFETY INFORMATION
• Non-rechargeable batteries are not to be recharged
• Rechargeable batteries must be removed before recharging
• Rechargeable batteries only to be recharged under adult
supervision
• Do not mix alkaline, standard (carbon-zinc), or rechargeable
(nickel-cadmium) batteries
14
• Do not mix old and new batteries
• Exhausted batteries to be removed
• Do not dispose of battery in fire; battery may explode or
leak
• Do not dispose of product in fire; battery may explode or
leak
Page 17

CARE & MAINTENANCE
• NEVER get the pedometer wet. This unit is not water resistant.
DO NOT expose the unit to extreme heat, shocks, magnetic fields, electrical noise, strong
•
vibration or long-term exposure to direct sunlight.
DO NOT drop or step on the pedometer.
•
TO CLEAN THE UNIT: wipe with a lightly moistened cloth. Apply mild soap to the area if
•
there are stubborn stains or marks. Do not expose the unit to strong chemicals such as
gasoline, cleaning solvents, acetone, alcohol, insect repellents, as they may damage the
unit’s seal, case and/or finish.
• STORE the unit in a dry place when you are not using it.
CUSTOMER SUPPORT
If you have questions, comments or need assistance with your Sportline Qlip, you may
contact Customer Support by calling
1-800-338-6337.
Qlip
15
Page 18
RANGES & SPECIFICATIONS
PEDOMETER
• Steps Display Range: 0-999999
• Exercise Timer: Maximum 24 hours
• Calorie Range: 0-99999
TIME
• AM, PM, hour, minute, second
• 12/24 hour format
TIMER
• Resolution: 1-second
• Measuring range: 9 hours, 59 minutes,
59.99 seconds
16
Page 19

WARRANTY
GUARANTEE CERTIFICATE – FOR PURCHASES MADE IN THE U.S.
EB SPORT GROUP, 585 Oak Ridge Road, Hazleton, PA 18202NAME TEL STORE
PURCHASED FROM
ADDRESS DATE OF PURCHASE
CITY PURCHASE PRICE
STATE ZIP
PROBLEM WITH PRODUCT
REPLACEMENT
©2008 Distributed by Sportline®, Hazleton, PA 18202
FOR PURCHASES MADE IN THE UK:
Should you experience problems with this item, please return it to the point of purchase. This will not affect your statutory rights.
Alternatively return it to the address shown below for a repair/replacement.
StarCase (UK) Ltd, Berkeley Business Park, Wainwright Road, Worcester WR4 9FA
www.sportline.com
Distributed in the UK by StarCase (UK) Ltd., Worcester WR4 9FA
Qlip
17
Page 20

www.sportline.com
©2008 Distributed by Sportline®, Hazleton, PA 18202
Distributed in the UK by StarCase (UK) Ltd., Worcester WR4 9FA
Qlip
PEDOMETER
WV4405IS01SPT
 Loading...