

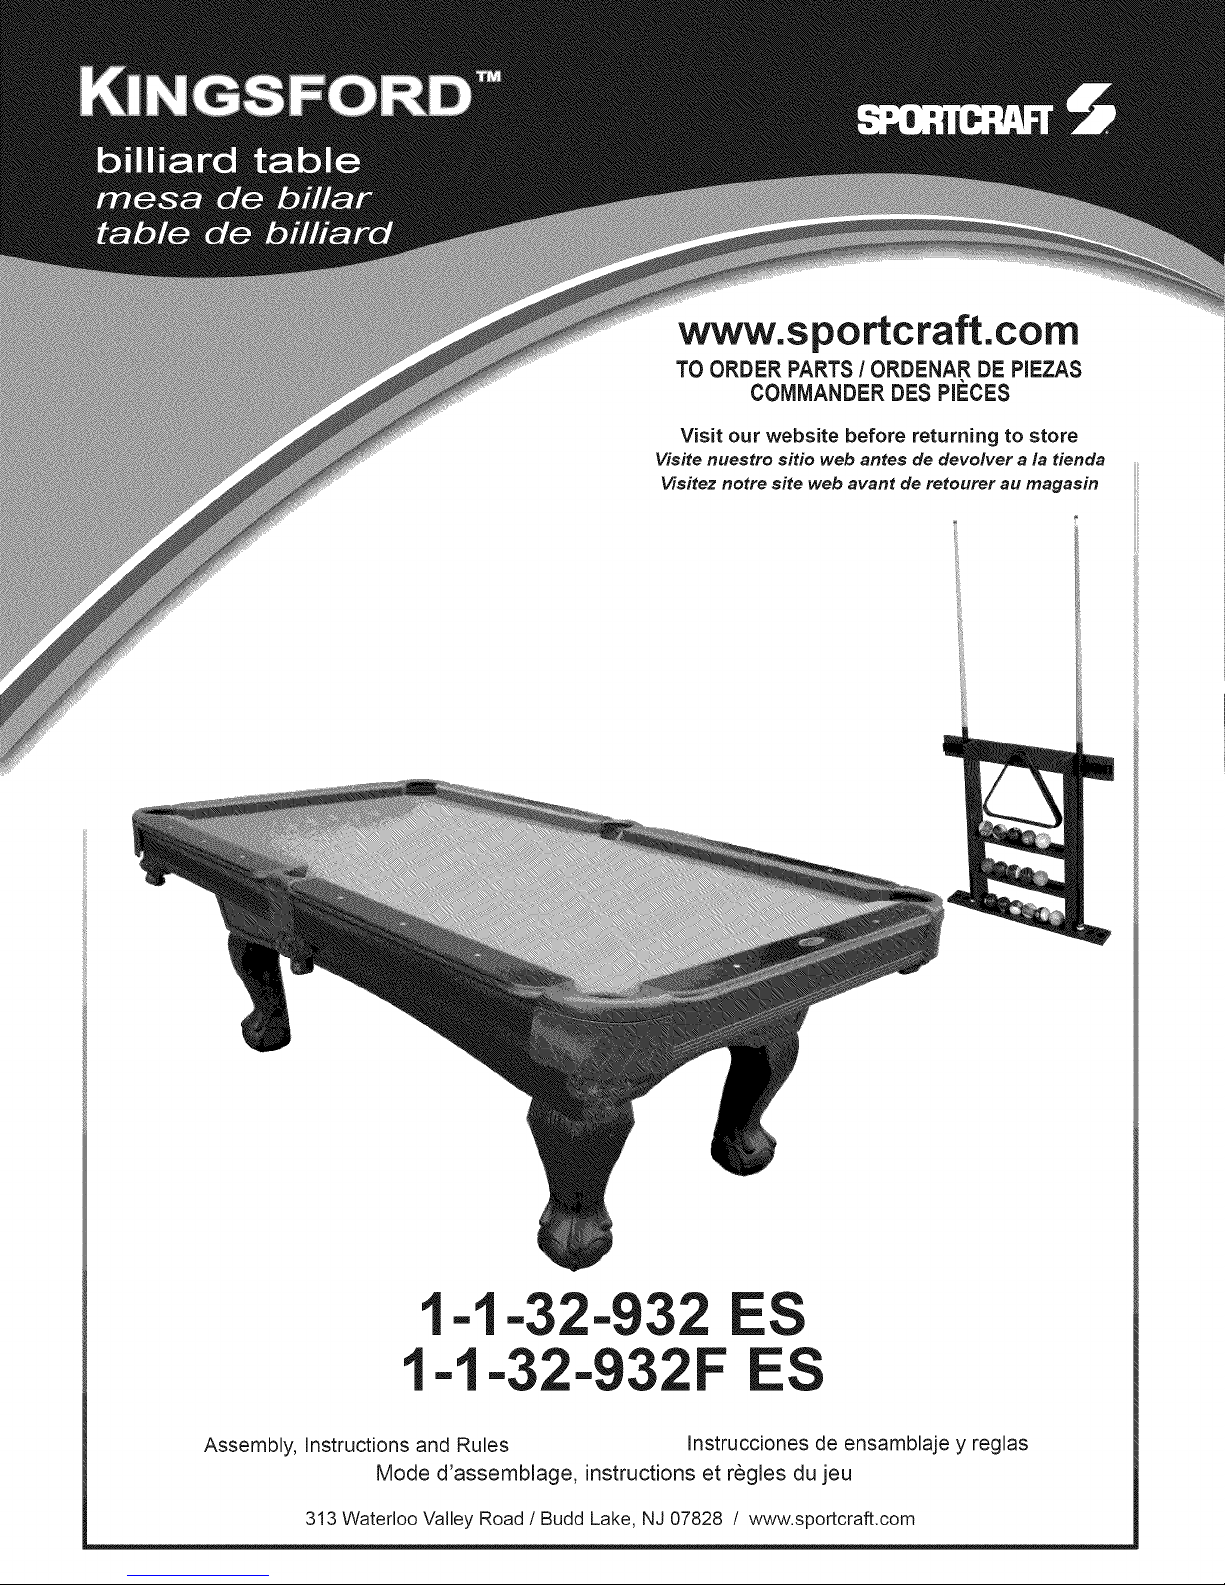
Sportcraft Kingsford 1-1-32-932 ES, Kingsford 1-1-32-932F ES User Manual
www.sportcraft.com
TO ORDER PARTS / ORDENAR DE PIEZAS
COMMANDER DES PIECES
Visit our website before returning to store
Visite nuestro sitio web antes de devolver a la tienda
Visitez notre site web avant de retourer au magasin
Assembly, Instructions and Rules Instrucciones de ensamblaje y reglas
Mode d'assemblage, instructions et regles du jeu
313 Waterloo Valley Road /Budd Lake, NJ 07828 / www.sportcraft,com
1-1-32-932
-1-32-93
I English I I Espan°l I I Frangais ]
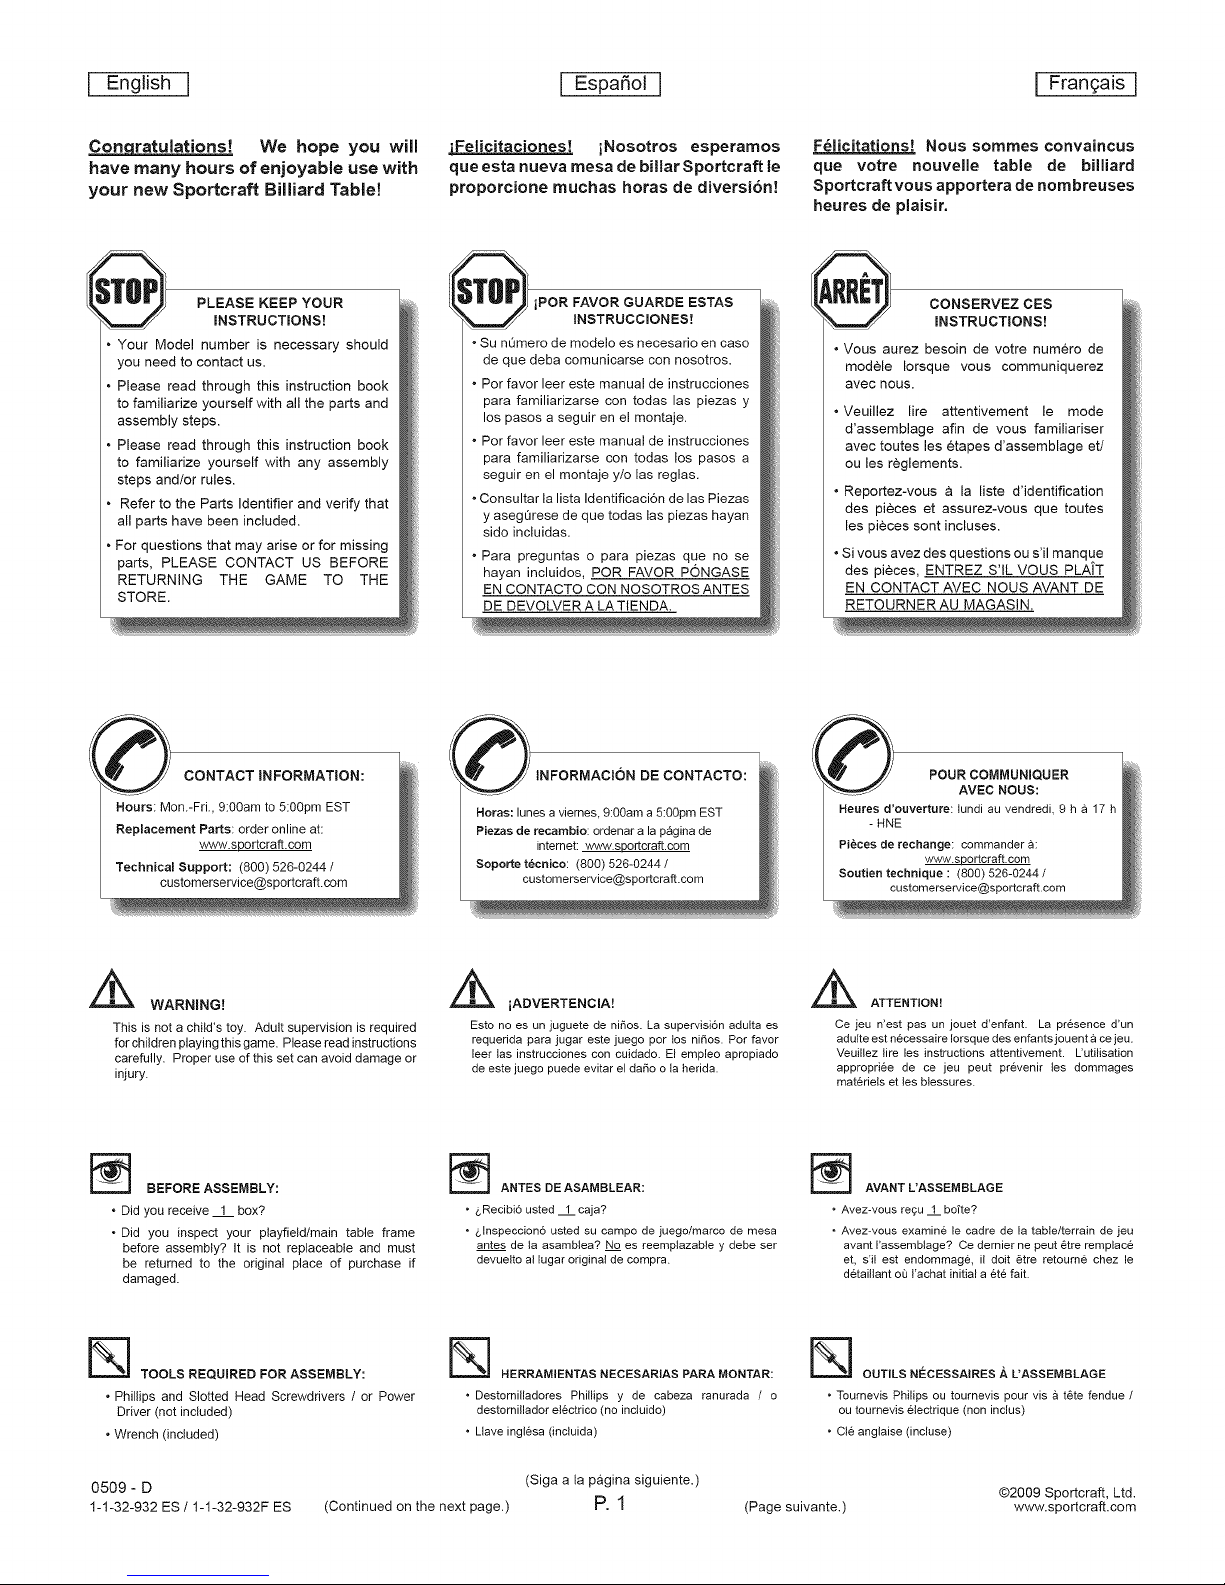
Congratulations! We hope you will
have many hours of enjoyable use with
your new Sportcraft Billiard Table!
PLEASE KEEP YOUR
INSTRUCTIONS!
Your Model number is necessary should
you need to contact us.
Please read through this instruction book
to familiarize yourself with all the parts and
assembly steps.
Please read through this instruction book
to familiarize yourself with any assembly
steps and/or rules.
Refer to the Parts Identifier and verify that
all parts have been included.
For questions that may arise or for missing
parts, PLEASE CONTACT US BEFORE
RETURNING THE GAME TO THE
STORE.
jFelicitaciones! iNosotros esperamos
que esta nueva mesa de billar Sportcraff le
proporcione muchas horas de diversi6n!
jPOR FAVOR GUARDE ESTAS
INSTRUCCIONES!
• Su nQmero de modelo es necesario en caso
de que deba comunicarse con nosotros.
• Por favor leer este manual de instrucciones
para familiarizarse con todas las piezas y
Ice pasos a seguir en el montaje.
• Pot favor leer este manual de instrucciones
para familiarizarse con todas los pasos a
seguir en el montaje y/o las reglas.
• Consultar la lista Identificaci6n de las Piezas
y asegQrese de que todas las piezas hayan
sido incluidas.
• Para preguntas o para piezas que no se
hayan incluidos, POR FAVOR PONGASE
EN CONTACTO CON NOSOTROS ANTES
DE DEVOLVER A LATIENDA.
F61icitations! Nous sommes convaincus
que votre nouvelle table de billiard
Sportcraft vous apportera de nombreuses
heures de plaisir.
CONSERVEZ CES
INSTRUCTIONS!
• Vous aurez besoin de votre numero de
modele Iorsque vous communiquerez
avec nous.
• Veuillez life attentivement le mode
d'assemblage afin de vous familiariser
avec toutes les etapes d'assemblage et/
ou les reglements.
• Reportez-vous a la liste d'identification
des pieces et assurez-vous que toutes
les pieces sont incluses.
• Si vous avez des questions ou s'il manque
des pieces, ENTREZ S'IL VOUS PLAIT
EN CONTACT AVEC NOUS AVANT DE
RETOURNER AU MAGASIN.
__ CONTACT INFORMATION:
Hours: Mon.-Fri, 9:00am to 5:00pro EST
Replacement Parts: order online at:
www.sportcraft.com
Technical Support: (800) 526-0244 /
customerservice@sportcraft.com
WARNING!
This is not a child's toy. Adult supervision isrequired
forchildren playing this game. Please readinstructions
carefully. Proper use of this set can avoid damage or
injury.
_] BEFORE ASSEMBLY:
• Did you receive 1 box?
• Did you inspect your playfield/main table frame
before assembly? It is not replaceable and must
be returned to the original place of purchase if
damaged.
_ INFORMACI6N DE CONTACTO:
Horas: lunes a viernes, 9:00am a 5:00pro EST
PJezas de recambio: ordenar a la p&gina de
Soporte t6cnico: (800) 526-0244 /
,_ iADVERTENCIA!
Esto no es un juguete de nifios. La supervisi6n adulta es
requerida para jugar este juego por los nifios. Por favor
leer tas instrucciones con cuidado. El empleo apropiado
de este juego puede evitar el dafio o la herida.
_] ANTES DEASAMBLEAR:
• &Recibi6 usted "i caja?
• &Inspeccion6 usted su campo de juego/marco de mesa
internet: www.sportcraft.com
customerservice@sportcraft.com
antes de ta asambtea? No es reemptazable y debe ser
devuelto al lugar original de compra.
POUR COMMUNIQUER
AVEC NOUS:
Heures d'ouverture: tundi au vendredi, 9 h a 17 h
- HNE
Pi_ees de rechange: commander a:
Soutien technique : (800) 526-0244 /
,_ ATTENTION!
Ce jeu n'est pas un jouet d'enfant. La presence d'un
adulte est necessaire Iorsque des enfants jouent a ce jeu.
Veuillez fire les instructions attentivement. L'utilisation
appropri6e de ce jeu peut prevenir les dommages
mat6riets et les blessures.
_] AVANT L'ASSEMBLAGE
• Avez-vous regu 1 boke?
• Avez-vous examine le cadre de la table/terrain de jeu
avant I'assembtage? Ce dernier ne peut 6tre remplac6
et, s'il est endommag6, il dolt 6tre retourne chez le
d6tailtant ou l'achat initial a 6t6 fait.
vwwq.sportcraft.com
customerservice@sportcraft.com
[_==] TOOLS REQUIRED FORASSEMBLY:
. Phillips and Slotted Head Screwdrivers / or Power
Driver (not included)
. Wrench (included)
0509 - D
1-1-32-932 ES/ 1-1-32-932F ES
(Continued on the next page.) P. 1
_--_ HERRAMIENTAS NECESARIAS PARA MONTAR:
• Destornilladores Phillips y de cabeza ranurada / o
destornillador el6ctrico (no inctuido)
• Liave ingl6sa (inctuida)
(Siga a la pagina siguiente.)
(Page suivante.)
OUTILS NECESSAIRES A L'ASSEMBLAGE
• Tournevis Philips ou tournevis pour vis & t6te fendue /
ou tournevis etectrique (non inclus)
• CI6 anglaise (incluse)
@2009 Sportcraft, Ltd.
www.sportcraft.com
I English I I Espa_°l I I Frangais ]
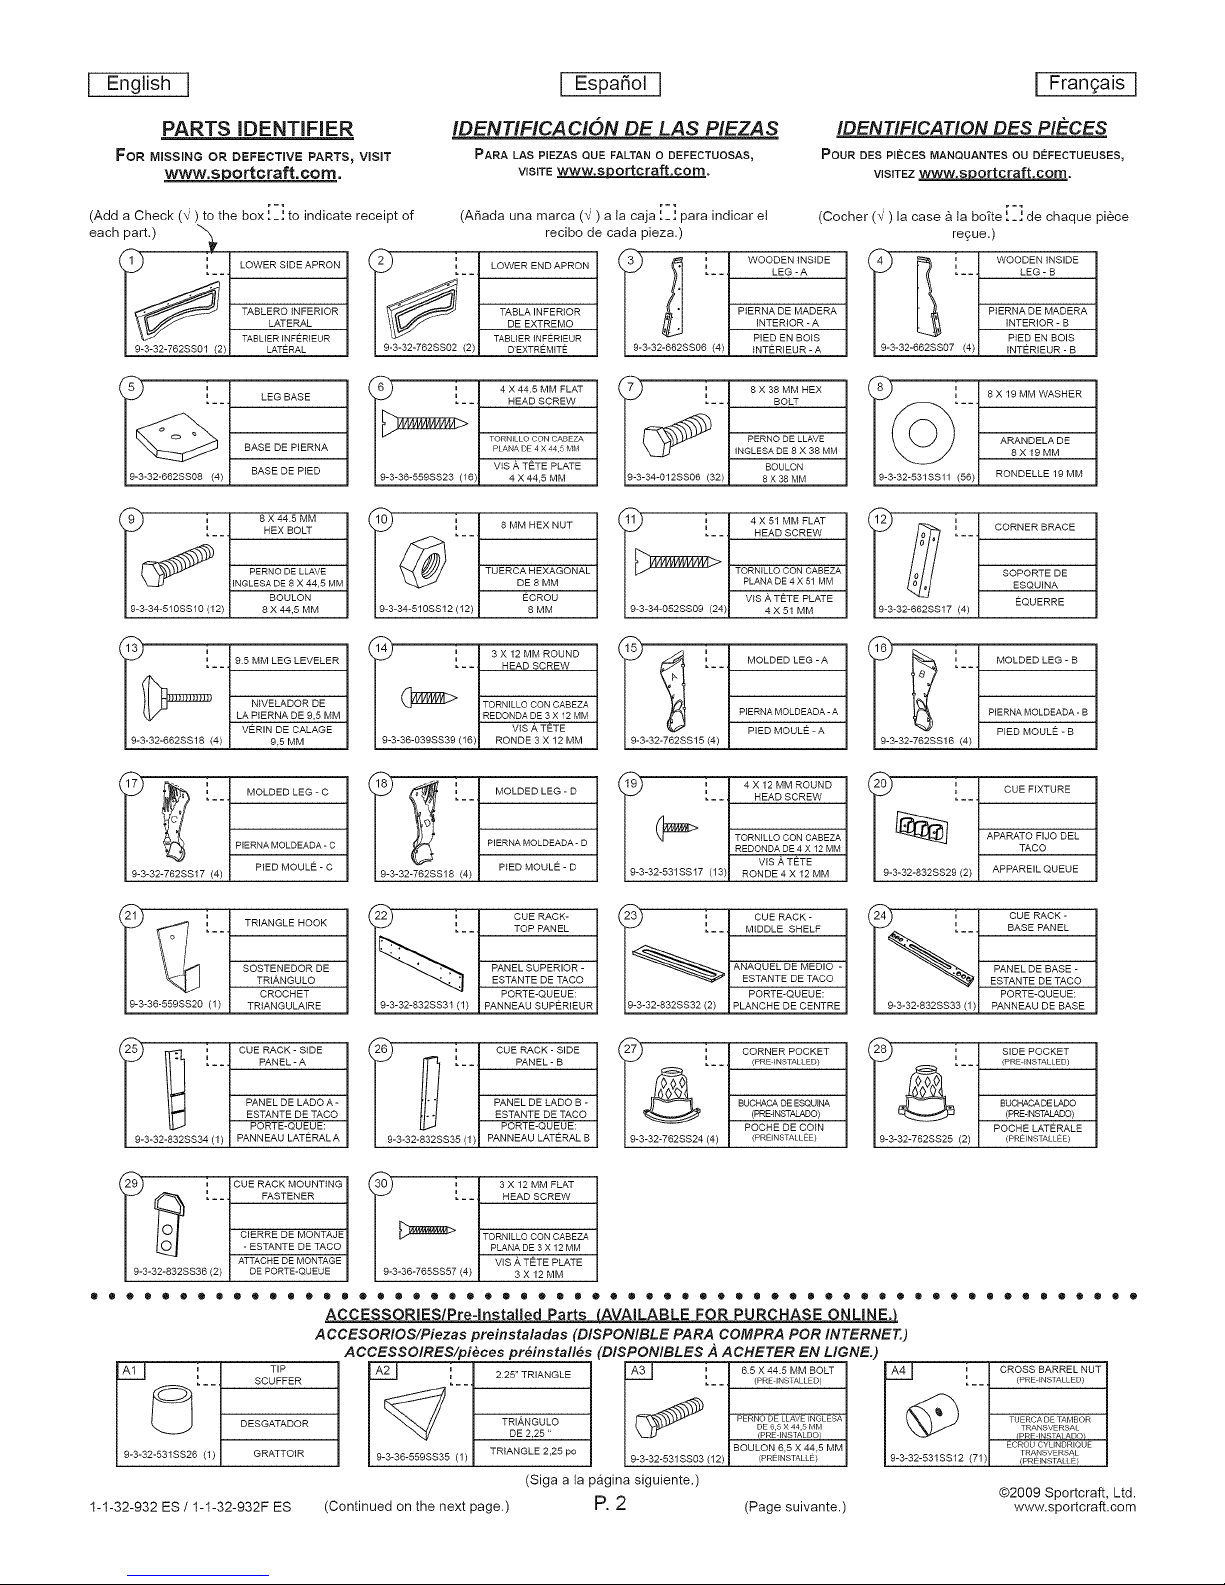
PARTS IDENTIFIER
FOR MISSING OR DEFECTIVE PARTS_ VISIT
www.sportcraft.com.
(Add a Check (_") to the box : _Jto indicate receipt of
each part.) "_
TASLBRO INFERIOR
LATERAL
9-3-32-762SS01 2 LATERAL
7 1
-32-662SS08 (4) BASE DE PIED
('_') ' I sx445MM I
I 9-3-34-510SS10 (12) J 8X44,5 MM I
TABLIER INFERIEUR
[ - - LEG BASE
BASE DE PIERNA
PEEVE
INGLESA DE 8 X 44,5 MM
BOULON
NWELADOR DE
LA PIERNA DE 9,5 MM
VERIN DE CALAGE
9.5 MM
9-3-32-762SS02 2 D'EXTREMtTE -32-662SS0 INTERIEUR - A
i_ i 4 X 445 MM FLAT
-36-559SS23 (16) 4 X 44,5 MM
1l1
-34-510SS12 (12) 8 MM
IDENTIFICACION DE LAS P#EZAS
PARA LAS PIEZAS QUE FALTAN O DEFECTUOSAS_
VlSITE www.sPortcraft.com.
(ASada una marca (_,")a la caja ',_,' para indicar
- HEAD SCREW
[ 8 MM HEX NUT
-36-039SS39 (16) RONDE 3 X 12 MM
recibo de cada pieza.)
LOWER END APRON LEG -A
TASLA INFERIOR PIERNA DE MADERA
DE EXTREMe INTERIOR - A
TABLIER INFERIEUR PIED BN BOIS
TORNILLO CON CABEZA
PLANA DE4 X44.5 MM
TUERCA HEXAGONAL
DE8MM
ECROU
_1 HEAD SCREW
[ 9-3-34-052SS09 (24)J 4 X 51 MM
-32-762SS15 (4)
IDENTIFICATION DES PIE'CES
POUR DES PI_:CES MANQUANTES OU DEFECTUEUSES_
VISITEZ www.sportcraft.com.
et (Cocher (_,") la case _ la boTte :_] de chaque piece
i BOLT
_N_
INGLESA DE 8 X 38 MM
BOULON
8X38MM
_ 4 X 51 MM FLAT
i
TORNILLO CON CABEZA
PLANA DE 4 X 51 MM
VIS ,_ TETE PLATE
PIERNA MOLDEADA - A
PIED MOULE - A
12 , I CORNER BRACE
recue.)
PIBRNA DE MADERA
INTERIOR - B
I 8X19MM WASHER
ARANDELADB
RONDELLE19MM
PIERNA MOLDEADA - B
:41
PIED MOULE - B
PIED EN BOIS
INTERIEUR - B
8X19MM
- - HEAD SCREW
PIERNA MOLDEADA - C
PIED MOULE - C
[ -- TRIANGLE HOOK
SOSTENEDOR DE
2l1
-36-559SS20 (1) TRIANGULAIRB
3-32-832SS3 PANN EAU LATERAL A
TRI#,NGULO
CROCHET
PANEL DE LADO A -
ESTANTE DE TACO
PORTE-QUEUE:
TORNILLO CON CABEZA
i3 _ = I MOLDED LEG- D i i I 4X12MMROUND
[ 9-3-32-531SS17 (13) RONDE4 X 12 MM
TOP PANEL
PANEL SUPERIOR -
ESTANTE DE TACO
i-)- 1 CUE RACK-
9-3-32-832SS3t PANNEAU SUPERIEUR
26 _ . I CUE RACK - SIDE
-3-32-832SS3 PANNEAU LATERAL B
PORTE-QUEUE:
PANEL DE LADO B -
ESTANTE DE TACO
9-3- PORTE-QUEUE:3_-632ss32/_/IPL2022g_ggbRB
9-3-32-762SS24 4 (PREINSTALLEE)
REDONDA DE 4 X 12 MM
VtS A TETE
= CUE RACK -
[-- MIDDLE SHELF
AN_IO -
(PRE INSTALLED)
BUCHACA DEESQUINA
(PRE-INSTALADO)
POCHE DE COIN
i il CUEF,XTURB
i 9_3_32_832SS29 (2) j APPAREIL QUEUE
i i CUE RACK -
! 9-3-32-832SS33 (1) PANNEAU DE BASE
19-3-32-762SS25 (2) J (PREINSTALLEE)
APARATO FIJO DEL
TACO
, BASE PANEL
PANEL DE BASE -
ESTANTE DE TACO
PORTE-QUEUE:
_- (PRE INSTALLED)
BUCHACA DELADO
lS'DEPOOKET
(PREqNSTALADO)
POCHE LATERALE
) , IOUBRAOKMOUNT,NGi_') , I 3X12MMFLAT
"CT'E_ _ TORNILLO CON CABEZA
- ESTANTE DE TACO PLANADE 3 X 12 MM
19-3-32-832SS36 (2) J -36-765SS57 (4) 3 X 12 MM
ACCESSORIES/Pre-lnstalled Parts AVAILABLE FOR PURCHASE ONLINE,}_
ACCESORIOS/Piezas preinstaladas (D/SPONIBLE PARA COMPRA POR INTERNET.)
All i
9-3-32-531SS26 (1)
1-1-32-932 ES / 1-1-32-932F ES (Continued on the next page.) www.sportcraft.com
TIP
SCUFFER
DESGATADOR
GRATTOIR
ACCESSOIRES/pi@ces preinsta//es 'DISPONIBLES A ACHETER EN L/GNE.)
2.25" TRIANGLE
TRIANGULO _ PERNO DE LLAVEINGLESA
DE 2,25 " (PRE INSTALDO/
9-3-36-559SS35 (1)
TRIANGLE 2,25 pc BOULON 6,5 X 44.5 MM
(Siga a la pagina siguiente.)
A31 i 6.5 X 44.5 MM BOLT
LZ_
9-3-32-531 SS03 (12) (PREINSTALLE)
I
=- - (PRE INSTALLED)
DE6,5 X 44,5 MM
P.2 (Pagesuivante.)
A4_ i CROSS BARREL NUT
9-3-32-631SS12 (71) TRANSVERSAL
[ - -, (PRE INSTALLED)
(_ TU ERCA DE TAMBOR
TRANSVERSAL
(PRE INSTALADO)
ECROU CYLINDRIQUE
(PRE[NSTALLE)
@2009 Sportcraft, Ltd.
I English I I Espan°l I [Frangais]
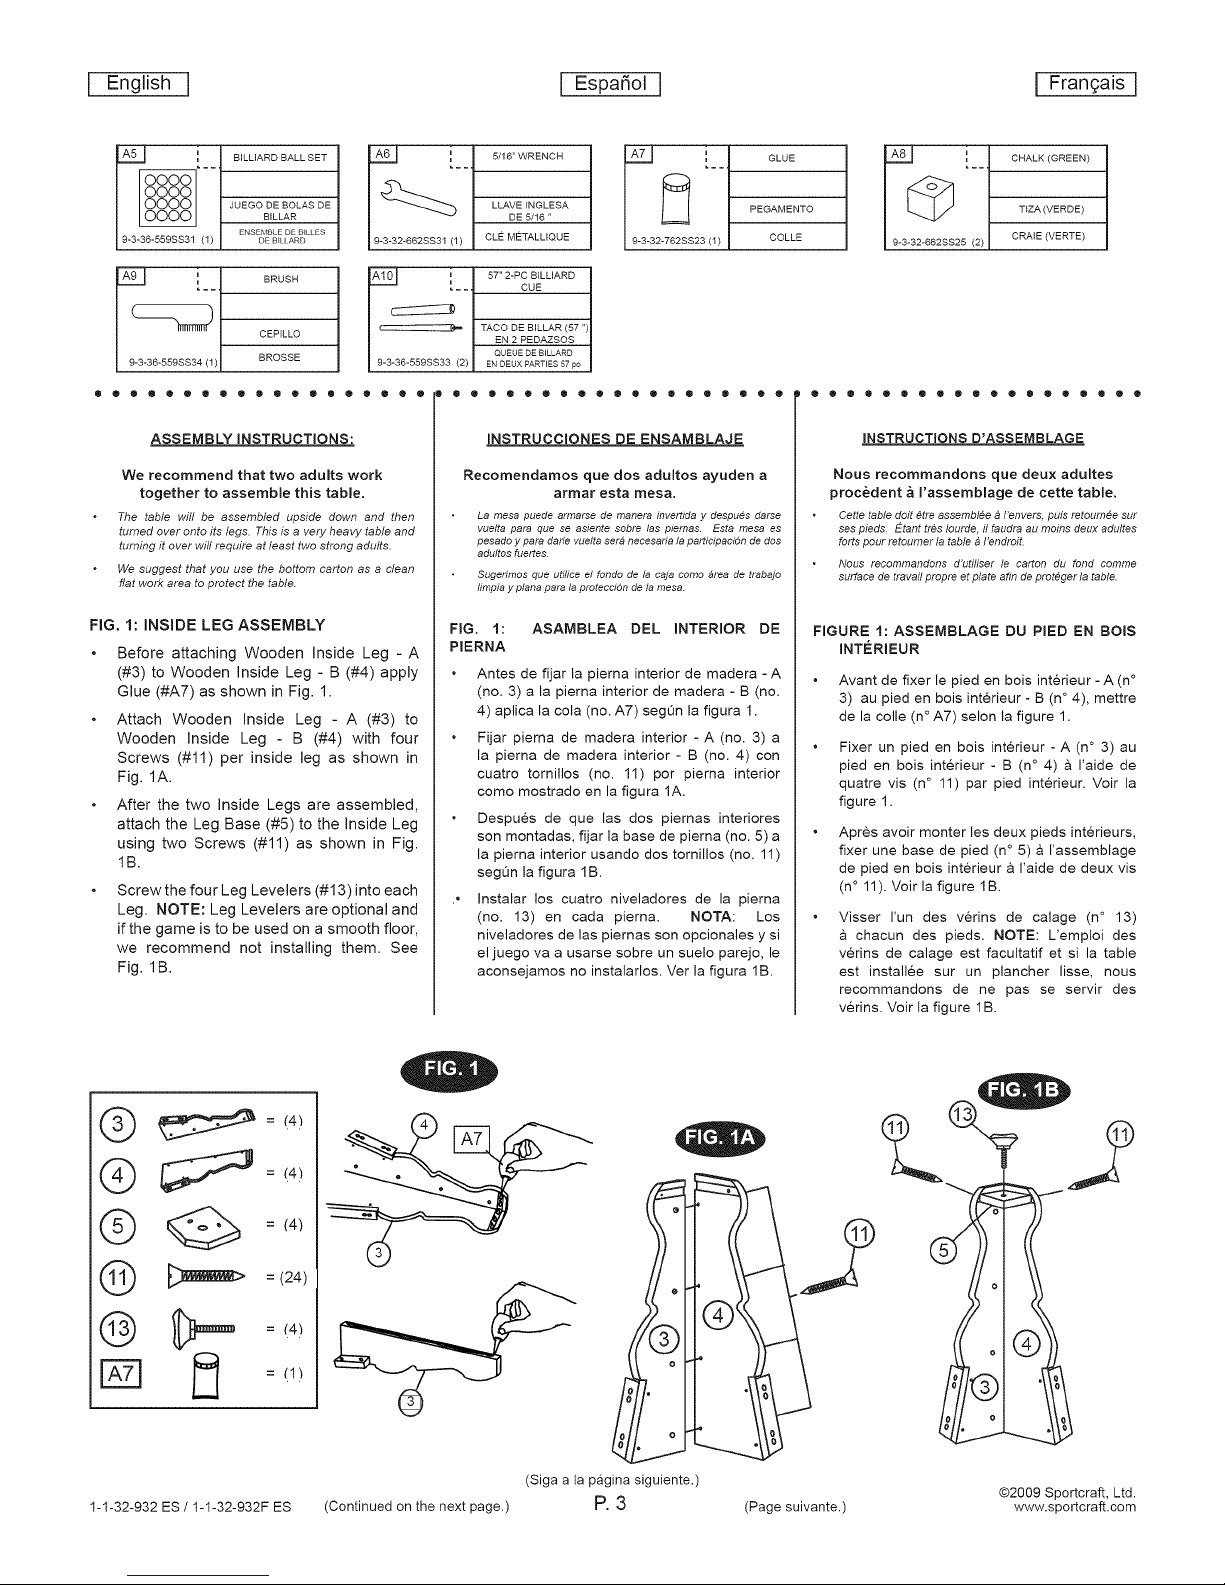
A51 BILLIARD BALL SET
8%8
OOOO JUEGO DE BOLAS DE
OOOO BILLAR
9-3-36-559SS31 (1) DE BILLARD
ASSEMBLY INSTRUCTIONS:
We recommend that two adults work
together to assemble this table,
The tame will be assembled upside down and then
turned over onto its legs. This is a very heavy tame and
turning it over will require at least two strong adults.
We suggest that you use the bottom carton as a dean
flat work area to protect the table.
FIG. 1: INSIDE LEG ASSEMBLY
Before attaching Wooden Inside Leg - A
(#3) to Wooden Inside Leg - B (#4) apply
Glue (#A7) as shown in Fig. 1.
Attach Wooden Inside Leg - A (#3) to
Wooden Inside Leg - B (#4) with four
Screws (#11) per inside leg as shown in
Fig. 1A.
After the two Inside Legs are assembled,
attach the Leg Base (#5) to the Inside Leg
using two Screws (#11) as shown in Fig.
lB.
Screw the four Leg Levelers (#13) into each
Leg. NOTE: Leg Levelers are optional and
if the game is to be used on a smooth floor,
we recommend not installing them. See
Fig. 1B.
ENSEMBLE DE BILLES
A£J
9-3-32-662SS31 (1)
9-3-36-559SS33 (2)
5/16"WRENCH
LLAVE INGLESA
DE 5/16 "
CLE METALLIQUE
[ 57" 2-PC BILLIARD
: - - CUE
TACO DE BILLAR (57 ")
EN 2 PEDAZSOS
QUEUE DE BILLARD
ENDEUX PARTIES57po
ALl
PEGAMENTO
9-3-32-762SS23 (1)
INSTRUCCIONES DE ENSAMBLAJE
Recomendamos que dos adultos ayuden a
armar esta mesa.
La mesa puede arrnarse de manera invertida y despues darse
vuelta pare qua se asiente sobre las piernas. Esta mesa es
pesado y pare darle vuelta sere necesaria la participaci6n de dos
adultos fuertes
Sugerimos qua utilice el fondo de la caja como area de trabajo
limpia y plane pare la proteccidn de la mesa.
FIG. 1: ASAMBLEA DEL INTERIOR DE
PIERNA
Antes de fijar la pierna interior de madera - A
(no. 3) ala pierna interior de madera - B (no.
4) aplica la cola (no. A7) segOn la figura 1.
Fijar pierna de madera interior - A (no. 3) a
la pierna de madera interior - B (no. 4) con
cuatro tornillos (no. 11) pot pierna interior
como mostrado en la figura 1A.
Despues de que las dos piernas interiores
son montadas, fijar la base de pierna (no. 5) a
la pierna interior usando dos tornillos (no. 11)
segQn la figura lB.
Instalar los cuatro niveladores de la pierna
(no. 13) en cada pierna. NOTA: Los
niveladores de las piernas son opcionales y si
el juego va a usarse sobre un suelo parejo, le
aconsejamos no instalarlos. Ver la figura lB.
GLUE
COLLE
A_2J
9-3-32-662SS25 (2)
CHALK(GREEN)
CRAIE (VERTE)
INSTRUCTIONS D'ASSEMBLAGE
Nous recommandons que deux adultes
proc&dent _ I'assemblage de cette table.
Cette table dolt etre assembl_e _ I'envers puis retoum_e sur
ses pieds E:tanttres Iourde, fl faudra au mains deux adultes
forts pour retoumer la table b I'endroiL
Nous recommandons d'utiliser le carton du fond comme
surface de travail propre at plate afin de prot_ger la table.
FIGURE 1: ASSEMBLAGE DU PIED EN BOB
INT_:RIEUR
Avant de fixer le pied en bois interieur - A (n°
3) au pied en bois interieur - B (n° 4), mettre
de la colle (n ° A7) selon la figure 1.
Fixer un pied en bois interieur - A (n ° 3) au
pied en bois interieur - B (n° 4) a I'aide de
quatre vis (n° 11) par pied interieur. Voir la
figure 1.
Apres avoir monter les deux pieds interieurs,
fixer une base de pied (n° 5) a I'assemblage
de pied en bois interieur a I'aide de deux vis
(n ° 11). Voir la figure lB.
Visser Fun des verins de calage (n ° 13)
chacun des pieds. NOTE: L'emploi des
verins de calage est facultatif et si la table
est installee sur un plancher lisse, nous
recommandons de nepas se servir des
verins. Voir la figure 1B.
TIZA (VERDE)
Q _ = (4)
:!1!
1-1-32-932 ES / 1-1-32-932F ES
(Continued on the next page.) P.3
(Siga a la p_gina siguiente.)
(Page suivante.)
@2009 Sportcraft, Ltd.
www.sportcraft.com
I English I
I Espafi°l I
I Frangais ]
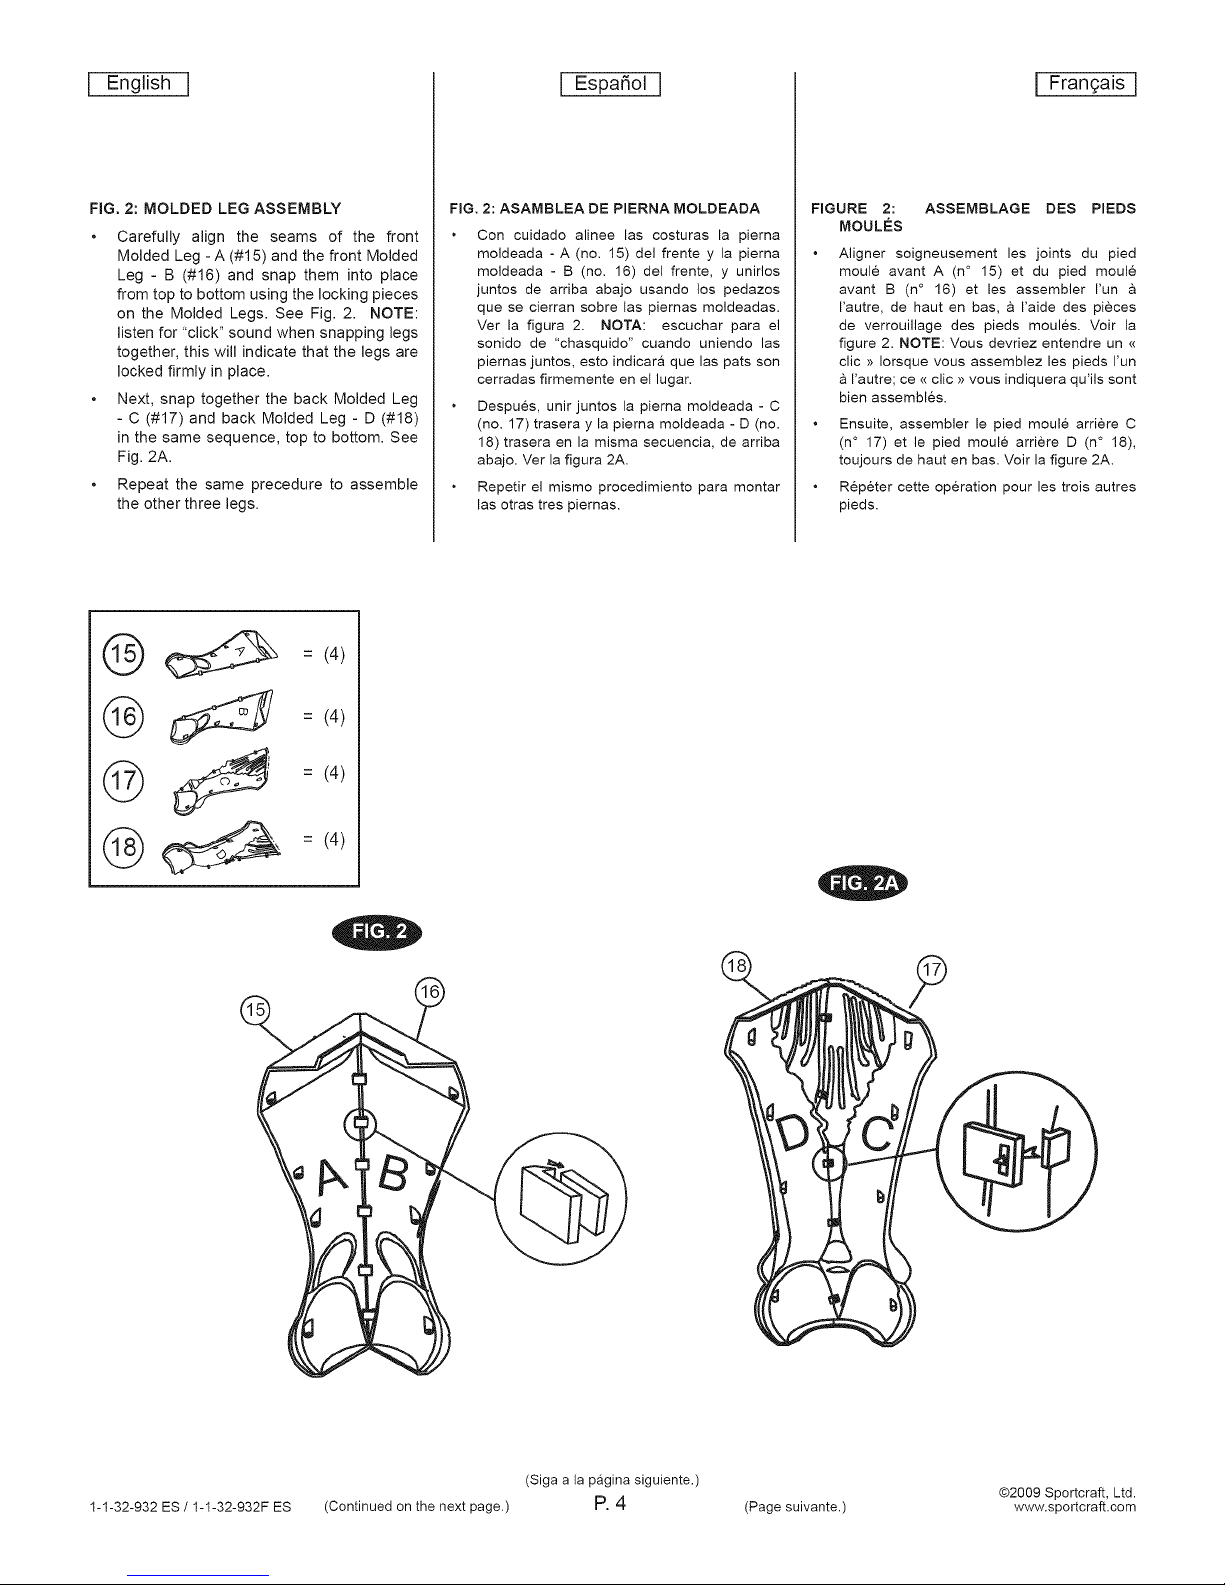
FIG. 2: MOLDED LEG ASSEMBLY
Carefully align the seams of the front
Molded Leg - A (#15) and the front Molded
Leg - B (#16) and snap them into place
from top to bottom using the locking pieces
on the Molded Legs. See Fig. 2. NOTE:
listen for "click" sound when snapping legs
together, this will indicate that the legs are
locked firmly in place.
Next, snap together the back Molded Leg
- C (#17) and back Molded Leg - D (#18)
in the same sequence, top to bottom. See
Fig. 2A.
Repeat the same precedure to assemble
the other three legs.
_ =(4)
FIG. 2: ASAMBLEA DE PIERNA MOLDEADA
Con cuidado alinee las costuras la pierna
moldeada - A (no. 15) del frente y la pierna
moldeada - B (no. 16) del frente, y unirlos
juntos de arriba abajo usando los pedazos
que se cierran sobre las piernas moldeadas.
Ver la figura 2. NOTA: escuchar para el
sonido de "chasquido" cuando uniendo las
piemas juntos, esto indicara que las pats son
cerradas firmemente en el lugar.
Despues, unit juntos la pierna moldeada - C
(no. 17) trasera y la piema moldeada - D (no.
18) trasera en la misma secuencia, de arriba
abajo. Vet la figura 2A.
Repetir el mismo procedimiento para montar
las otras tres piernas.
FIGURE 2: ASSEMBLAGE DES PIEDS
MOULES
Aligner soigneusement les joints du pied
moule avant A (n ° 15) et du pied moule
avant B (n° 16) et les assembler Fun
I'autre, de haut en bas, a raide des pieces
de verrouillage des pieds moules. Voir la
figure 2. NOTE: Vous devriez entendre un <<
clic >>Iorsque vous assemblez les pieds run
rautre; ce <<clic >>vous indiquera qu'ils sont
bien assembles.
Ensuite, assembler le pied moule arriere C
(n ° 17) et le pied moule arriere D (n ° 18),
toujours de haut en bas. Voir la figure 2A.
Rep6ter cette operation pour les trois autres
pieds.
1-1-32-932 ES / 1-1-32-932F ES
(Continued on the next page.) P.4
(Siga a la p_gina siguiente.)
(Page suivante.)
P
@2009 Sportcraft, Ltd.
www.sportcraft.com
 Loading...