

Sportcraft 1-1-36-933FES, 1-1-36-933ES Installation Guide
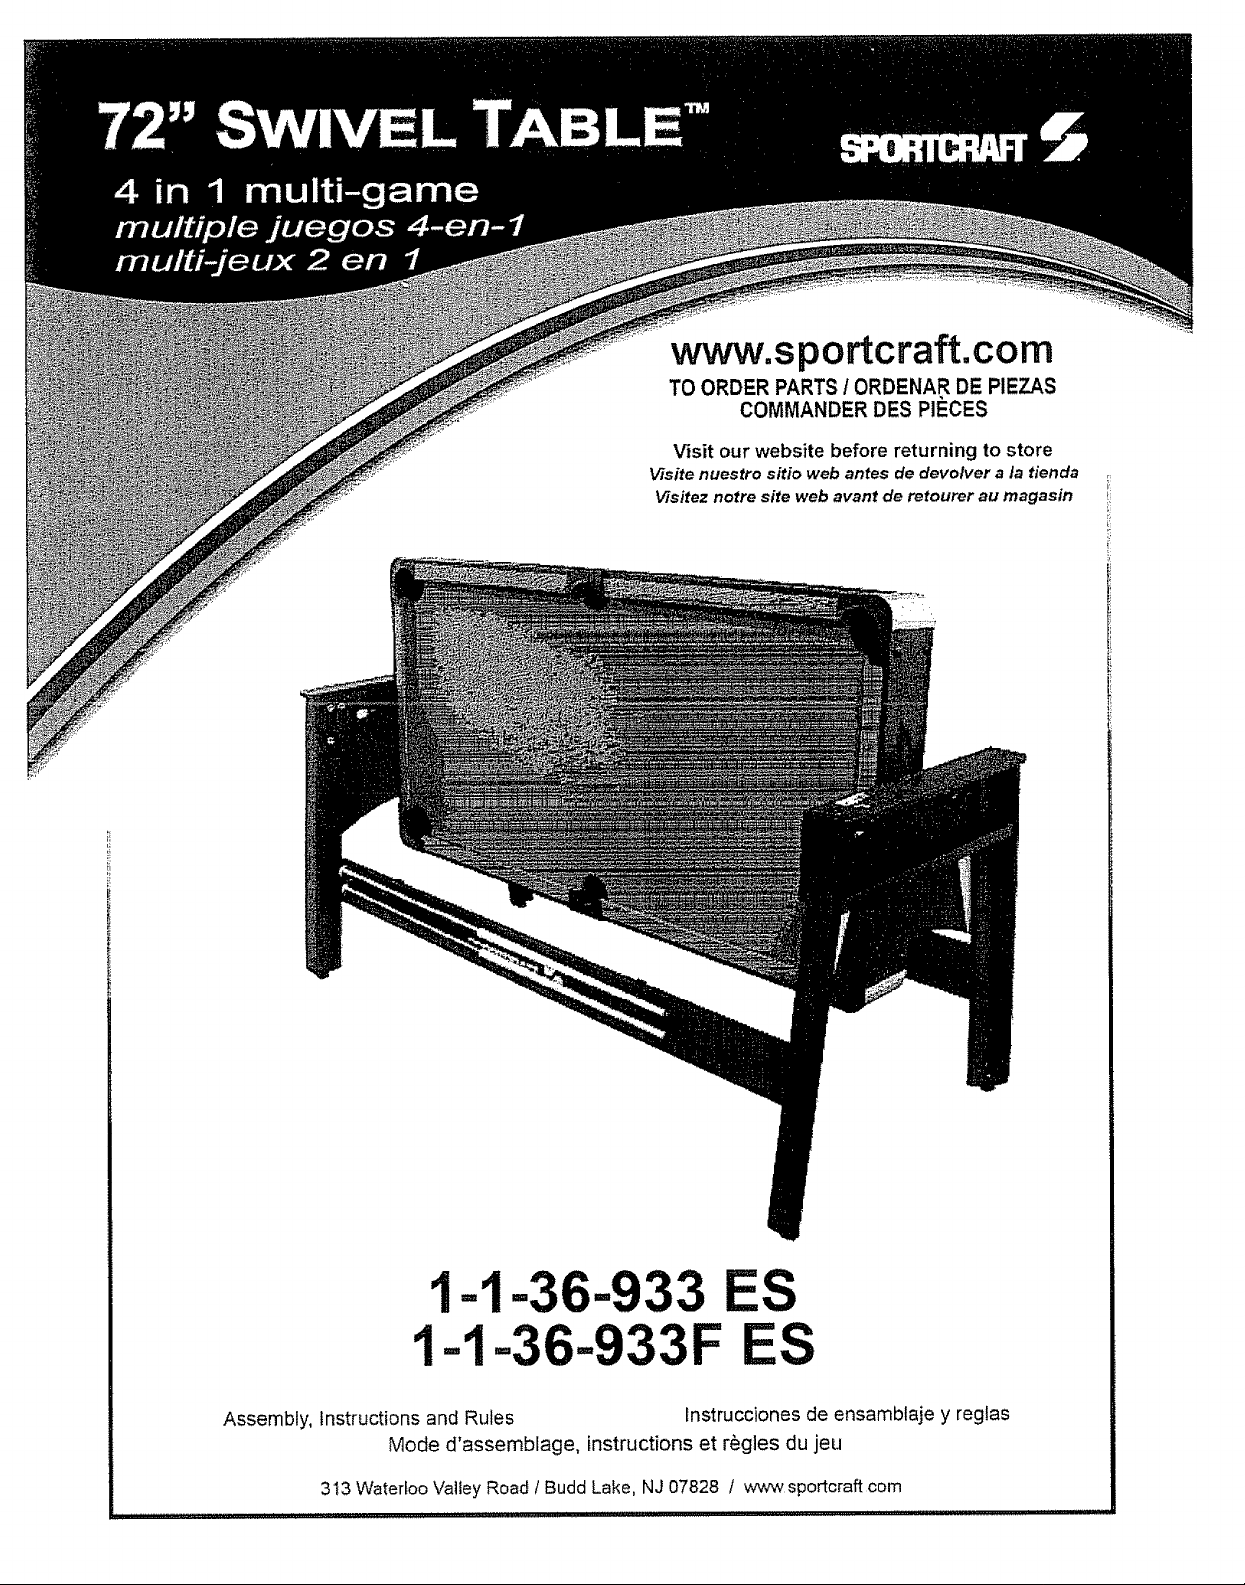
www.sportcraft.com
TO ORDER PARTS / ORDENAR DE PIEZAS
COMMANDER DES PIECES
Visit our website before returning to store
Visffe nuestro sitio web antes de devolver a la tienda
Visitez notre site web avant de retourer au magasin
1=1-36-933 ES
1-1=36-933F
Assembly, Instructions and Rules Instrucciones de ensambtaje y reglas
Mode d'assemblage, instructions et r&gles du jeu
313 Waterloo Valley Road / Budd Lake, NJ 07828 / wwwsportcraff corn
.............................................. I .qlllll '1'
ES
I English I L Espafiol J I Frangais]
IMPORTANTSAFETY
INSTRUCTIONS
1. Read all instructions - All the safety and operating
instructions should be read carefully before this
turbo hockey game is played.
2. Caution - This is not a toy and is intended for use by or
under the supervision of adults. Adults should review
safety guidelines with children to avoid possible risk of
electric shock or other injuries.
3. Power sources - This hockey game should be
operated only from 100-125V A.C., 50/60 cycle current
as indicated on the identification label. If you are not
sure of the type of power supply to your home, consult
your appliance dealer or local power company.
4. Power cord protection - Power cord should be routed
so that it is not likely to be walked on or pinched by
items placed upon or against it. Pay particular attention
to cords at plugs, convenience receptacles, and the
point of exit from the game.
5. Overloading - Do not overload wall outlets and
extension cords as this can result in a risk of fire or
electric shock.
6. Object and liquid entry - Never push objects of any
kind into this game through openings as they may
touch dangerous voltage points or short-out parts
which could result in a fire or electric shock. Never spill
liquid of any kind on the game.
7. Ventilation - Openings inthe game are provided for the
exhaust air to create a cushion effect. The openings
on the air blower are for the intake air. Keep clear of
the air blower when it is on. Do not put hand or other
objects near the intake openings. To ensure reliable
operation of the game and protect it from overheating
these openings must not be blocked or covered.
8. Damage requiring service - Unplug the game from
the wall outlet. Do not attempt to service the blower
yourself as opening or removing covers may expose
you to dangerous voltage or other hazards. Refer
servicing to qualified service personnel under the
following conditions.
A. When the power supply cord or plug is
damaged.
B. If liquid has spilled, or objects have fallen into
the blower.
C. When the air blower exhibits a distinct change in
performance e.g. abnormal noise, this indicates
a need for service.
9. Grounding or Polarization - This game is equipped
with a polarized alternating current line plug (a plug
having one blade wider than the other). This plug will
fit into the power outlet only one way. This is a safety
feature. If you are unable to insert the plug fully into
the outlet, try reversing the plug. If the plug should
still fail to fit, contact your electrician to replace your
obsolete outlet. Do not defeat the safety purpose of
the polarized plug.
10. CAUTION - ELECTRICALLY OPERATED PRODUCT
- Not recommended for children under 6 years of age.
As with all electrical products, precautions should be
observed during handling and use to reduce the risk of
electric shock.
11. We recommend that the game be periodically
examined for conditions that may result in the risk of
fire, electrical shock, or injury to persons. In the event
such conditions exist, the game should not be used
until properly repaired.
SAVE THESE iNSTRUCTiONS
WARNING: To Reduce The Risk Of Fire Or Electric
Shock, Do Not Use This Fan With Any Solid-State
1-1-36-933 ES / 1-1-36-933F ES (Continued on the next page.)
Speed Control Device
IMPORTANTESDESEGURIDAD
I. Lea todas lae instrucciones - todas lae instruceiones de
seguridad y operaci6n se deben leer con euidado antes
de utilizar este juego de hockey.
2. Advertencia - Eeto no ee un juguete y es para el use de
adultos o menoree con la supervisi6n de adultee. Lae
personas adultas deben revisar las pautas de seguridad en
cuanto a los nifios para evitar cualquier posible riesgo de
electrocuci6n u otras lesionee.
3. Fuentee de peder - Este juege de hockey e61o se debe
operar con corriente alterna de 100-125V C.A., y 50/60
ciclos seg_n se indica en la etiqueta de identificaci6n. Si
usted no sabe con seguridad que tipo de energia tiene en
sa hogar, consalte con un vendedor de electrodomesticos o
con la compafiia local de electricidad.
4. Protecci6n det cord6n - Se debe colocar el cord6n de
manera que no se pueda pisar, ni aplastar con objetos que
se le coloquen encima o al lado. Preste mucha atenci6n a
los cordones en la parte del enchufe, los receptaculos y los
puntos de salida del juego.
5. Sobrecarga - No sobrecargue los tomacorrientes ni las
extensiones ya que esto puede ocasionar riesgo de incendio
o electrocuci6n.
6. Entrada de objetos y liquidos- Nunca inserte ninguna clase
de objeto en las aberturas de este juego ya que pueden
entrar en contacto con puntos de voltaje peligrosos o partes
que causan cortocircuito Io cual puede causar un incendio
o electrocuci6n. Nunca se debe derramar ningun tipo de
liquido sobre este juego.
7. VentiIaci6n - Las aberturas del juego estan disefiadas
para que el aire de salida cree un efecto de "colch6n". Las
aberturas en el soplador de aire son para la entrada de aire.
Mantengase alejado del soplador cuando esta encendido. No
coloque las manos ni otros objetos cerca de las aberturas de
entrada de aire. Para asegurar el funcionamiento confiable
det juego y evitar que se sobrecaliente, estas aberturas no
se deben bloquear ni cubrir.
8. Dafios que requieran servicios de reparaci6n - Desenchufe
el juego. No trate de reparar el soplador usted mismo ya que
el abrir o quitar las cubiertas Io expone a voltajes peligrosos
u otros peligros. Los servicios de reparaci6n los deben
proporcionar una persona calificada bajo las siguientes
condiciones:
A. Cuando el cord6n o el enchufe estan daSados.
B. Si se ha derramado un liquido o se han dejado caer
C. Cuando el soplador de aire muestra un cambio
9. Polarizaci6n o conexi6n a tierra - Este juego viene con un
enchufe de linea de corriente alterna polarizada (un enchufe
que tiene un diente mas ancho que el otro). Este enchufe
s61o entra en et tomacorriente de una manera. Esta es una
medida de seguridad. Si no puede insertar el enchufe por
completo en el tomacorriente, trate de invertido. Si, aun asi,
no entra, contacte a un electricista para que reemplace el
tomacorriente obsoleto. No intente violar esta medida de
seguridad.
10. PRECAUCION PRODUCTO ELECTRICAMENTE
MANEJADO - No recomendado para niSos bajo 6 afios.
Como con todos los productos electricos, las precauciones
deberian set observadas durante el manejo y el empleo
para reducir el riesgo de choque electrico.
11. Recomendamos que el juego sea examinado de vez en
cuando de las condiciones que pueden causar el riesgo de
fuego, la descarga electrica, o la herida a personas. Si estes
condiciones existen, el juego no deberia ser usado hasta
que esta reparado.
ADVERTENClA: Para dieminuir el riesgo de ineendio o
electroeuei6n, no use este ventilador con un dispoeitivo de
INSTRUCCIONES
objetos dentro del soplador.
marcado en su
desempefio
GUARDE ESTAS INSTRUCCIONES
control de velocidad de estado s61ido.
(Siga a la p_gina siguiente.)
P.2
(Page suivante.)
CONSIGNES
IMPORTANTES
1. Lisez toutes les instructions. Toutes les consignes
de s_curit_ et de fonctionnement doivent _tre lues
attentivement avant d'utiliser ce jeu.
2. Avertiseement - Cette tame n'est pae un jouet et erie doit
6tre utiiisee par des aduites ou sous {a supervision d'un
adulte. Les adultes doivent prendre connaissance des
consignes de securit6 et en informer les enfants afin
d'eviter tout risque potentiel de choc electrique ou de
blessure corporelte.
3. Sources d'alimentation - Ce jeu de hockey doit 6tre
branche uniquement darts une prise de 100-125 V C.A.,
50/60 HZ comme indiqu¢ sur {a fiche signaletique. Si
vous avez un doute sur le type d'alimentation electrique
de votre residence, consulter votre detaillant ou votre
distributeur d'61ectricite local.
4. Protection du cordon d'alimentation - Le cordon
d'alimentation doit courir au sol de telle sorte qu'on ne
marche pas dessus ou qu'it ne soit pas coince par des
objets depos6s dessus ou tout contre. II faut porter une
attention particuti@e aux fiches, aux prises et a I'endroit
d'oQ sort le cordon de la table de jeu.
5. Surcharge - Ne pas surcharger les prises murales et les
cordons de raltonge car cela peut entrafner un risque
d'incendie ou de choc etectrique.
6. Objets et liquides - Ne jamais enfoncer d'objets de
quelque nature que ce soit dans les orifices de ce jeu
puisqu'ils pourraient entrer en contact avec des points de
tension electrique dangereux ou court-circuiter des pieces
pouvant entrafner un incendie ou un choc eIectrique. Ne
jamais repandre quelque liquide que ce soit sur la table
de jeu.
7. Ventilation - Les orifices de ce jeu sont fournis pour que
Fair ¢vacu¢ cree un effet d'amortissement. Les orifices
du ventilateur servent a I'admission d'air. Se tenir loin
du ventilateur {orsqu'il est en fonction. Ne pas mettre les
mains ou des objets pres des admissions d'air. Pour
assurer un fonctionnement fiable du jeu et le proteger de
toute surchauffe, ces orifices ne doivent pas 6tre obstrues
ou fermes,
8. Dommage exigeant un appel de service - Debrancher
le jeu de la prise de courant murale. Ne pas tenter de
reparer le ventilateur par vous-m6me puisque le fait
d'ouvrir ou de retirer les couvercles peut vous exposer
une tension eleetrique dangereuse ou a d'autres
risques. Confier la reparation a un technicien quatifie si
les conditions suivantes se presentent:
A. Lorsque le cordon d'alimentation ou la fiche est
endommage(e).
B. Si un liquide a et6 repandu ou si des objets sont
tombes dans le ventilateur.
C. Lorsque le ventilateur demontre un changement
notable dans son rendement comme par un bruit
anormal. Ceci indique qu'un appei de service est
requis.
9. Mise a la terre ou prise polarisee - Ce jeu est muni d'une
fiche de courant alternatif polarisee (une fiche ayant une
broche plus large que Fautre). Cette fiche se branche
dans la prise d'une seule fagon. C'est un dispositif de
securite. Si vous n'_tes pas capable d'inserer la fiche
enti@ement darts la prise, essayer d'inverser la fiche. Si
la fiche ne reussit toujours pas a entrer dans la prise,
communiquer avec votre electricien pour remplacer votre
prise de courant desuete. Ne pas toucher a la broche de
mise a la terre.
10. AVERTISSEMENT - PRODUIT FONCTIONNANT _,
L'ELECTRtCITE - Non recommand¢ pour des enfants
de moins de 8 ans. Comme pour tousles appareils
electriques, des precautions doivent _tre prises durant la
manipulation et I'utflisation afin de reduire les risques de
choc etectrique.
11. Nous recommandons que le jeu soit inspect¢
pcriodiquement pour detecter toute condition pouvant
entrafner un risque d'incendie, de choc electrique ou
de blessure corporelle. Dans I'¢ventualit¢ de telles
conditions, le jeu ne dolt pas servir jusqu'a temps qu'il
soit repare adequatement.
CONSERVER CES CONSIGNES!
AVERTISSEMENT: afin de r_duire les risques d'incendie
ou de choc _lectrique, ne pas utiliser ce ventilateur
avec tout dispositif de commande de vitesse _ semi-
conducteurs.
@2009 Sportcraft, Ltd.
www.sportcraft.com
I English I I Espan°l I I Frangais ]
Congratulations! We hope you will
have many hours of enjoyable use with
your new Sportcraft Swivel Table!
PLEASE KEEP YOUR
INSTRUCTIONS!
Your Model number is necessary should
you need to contact us.
Please read through this instruction book
to familiarize yourself with all the parts and
assembly steps.
Please read through this instruction book
to familiarize yourself with any assembly
steps and/or rules.
Refer to the Parts identifier and verify that
all parts have been included.
For questions that may arise or for missing
parts, PLEASE CONTACT US BEFORE
RETURNING THE GAME TO THE
STORE.
CONTACTINFORMATION:
Hours: Mon.-Fri., 9:00am to 5:00pro EST
Replacement Parts: order online at:
Technical Support: (800) 526-0244 /
www.sportcraft.com
customerservice@sportcraft.com
jFelicitaciones! iNosottos esperamos
que esta nueva mesa giranda Sportcraft le
proporcione muchas horas de diversi6n!
jPOR AVOR GUARDE ESTAS
INSTRUCCIONES!
• Su nQmero de modelo es necesario en caso
de que deba comunicarse con nosotros.
• Por favor leer este manual de instrucciones
para familiarizarse con todas las piezas y
los pasos a seguir en el montaje.
• Pot favor leer este manual de instrucciones
para familiarizarse con todas los pasos a
seguir en el montaje y/o las reglas.
• Consultar la lista Jdentificaci6nde las Piezas
y asegQrese de que todas las piezas hayan
sido incluidas.
• Para preguntas o para piezas que no se
hayan incluidos, POR FAVOR PONGASE
EN CONTACTO CON NOSOTROS ANTES
DE DEVOLVER A LATIENDA.
_ INFORMACI6N DE CONTACTO:
Horas: lunes a viernes, 9:00am a 5:00pm EST
PJezas de recambio: ordenar a la p&gina de
intemet: www.sportcraft.com
Soporte t6cnico: (800) 526-0244 /
customerservice@sportcraft.com
F61icitations! Nous sommes convaincus
que votre nouvelle table r6versible
Sportcraft vous apportera de nombreuses
heures de plaisir.
_--_ CONSERVEZ CES
iNSTRUCTiONS!
• Vous aurez besoin de votre numero de
modele Iorsque vous communiquerez
avec nous.
• Veuillez lire attentivement le mode
d'assemblage afin de vous familiariser
avec toutes les etapes d'assemblage et/
ou les reglements.
• Reportez-vous a la liste d'identification
des pieces et assurez-vous que toutes
les pieces sont incluses.
• Si vous avez des questions ou s'il manque
des pieces, ENTREZ S'IL VOUS PLAIT
EN CONTACT AVEC NOUS AVANT DE
RETOURNER AU MAGASIN.
POUR COMMUNIQUER
AVEC NOUS:
Heures d'ouverture: tundi au vendredi, 9 h a 17 h
- HNE
Pieces de rechange: commander a:
SoutJen technique : (800) 526-0244 /
vwwv.soortcraft.com
customerservice@sportcraft.com
WARNING!
This is not a child's toy. Adult supervision is required
forchildren playing this game. Please read instructions
carefully. Proper use of this set can avoid damage or
injury.
This product contains (a) small magnet(s). Swallowed
magnets can stick together across intestines causing
serious infections and death. Seek immediate medical
attention if magnet(s) are swallowed or inhaled.
Toys contains small balls and/or parts.
_] BEFORE ASSEMBLY:
• Did you receive 1 box?
• Did you inspect your playfield/main table frame
before assembly? It is not replaceable and must
be returned to the original place of purchase if
damaged.
[_=7 TOOLS REQUIRED FORASSEMBLY:
. Phillips and Slotted Head Screwdrivers / or Power
Driver (not included)
. Allen Key and Wrench (included)
0609 -N
1-1-36-933 ES/ 1-1-36-933FES
(Continued on the next page.) P. 1
iADVERTENCIA !
Esto no es un juguete de niSos= La supervisi6n adulta es
requerida para jugar este juego por los niSos. Pot favor
leer tas instrucciones con cuidado. El empleo apropiado
de este juego puede evitar el daSo o la herida.
Este producto contiene un(Ios) iman(anes) pequeSo(s).
Los imanes tragados pueden mantenerse juntos a
traves de intestines y causar infecciones serias y la
muerte. Busque la asistencia m6dica inmediata si el(los)
iman(anes) es tragado o inhalado.
Los juguetes contener pequeSas pelotas y/o piezas.
_] ANTES DEASAMBLEAR:
• &Recibi6 usted "i caja?
• &Inspeccion6 usted su campo de juego/marco de mesa
antes de ta asambtea? No es reemptazable y debe ser
devuelto al lugar originat de compra.
I'_ HERRAMIENTAS NECESARIAS PARA MONTAR:
• Destornilladores Phillips y de cabeza ranurada / o
destornillador el6ctrico (no inctuido)
• Liave hexagonal e ingtesa (incluidas)
(Siga a la pagina siguiente.)
(Page suivante.)
,i_ ATTENTION!
Ce jeu n'est pas un jouet d'enfant. La presence d'un
adulte est n6cessaire Iorsque des enfants jouent a ce jeu.
Veuillez lire les instructions attentivement. L'utilisation
appropri6e de ce jeu peut prevenir les dommages
mat6riets et tes blessures.
Ce produit contient un(des) petit(s) aimant(s). Des
aimants avat6s peuvent coller & travers des intestins
causant des infections serieuses et la mort. Cherchez
i'assistance medicale immediate si Faimant est avai6 ou
inhai&
Les jouets contiennent de petites baltes et-ou des
pieces.
AVANT L'ASSEMBLAGE
• Avez-vous re_u 1 bofte?
• Avez-vous examine le cadre de la table/terrain de jeu
avant Fassembtage? Ce dernier ne peut 6tre remplac6
et, s'il est endommag6, il doit 6tre retourn6 chez le
d6tailtant or] i'achat initial a 6t6 fait.
I'_ OUTILS NECESSAIRES A L'ASSEMBLAGE
• Tournevis Philips ou tournevis pour vis & t6te fendue /
ou tournevis etectrique (non inclus)
• CI6 anglaise et cle hexagonale [Atlen)] (incluses)
@2009 Sportcraft, Ltd.
www.sportcraft.com
I English I
I Espan°l I
I Fran(_ais ]
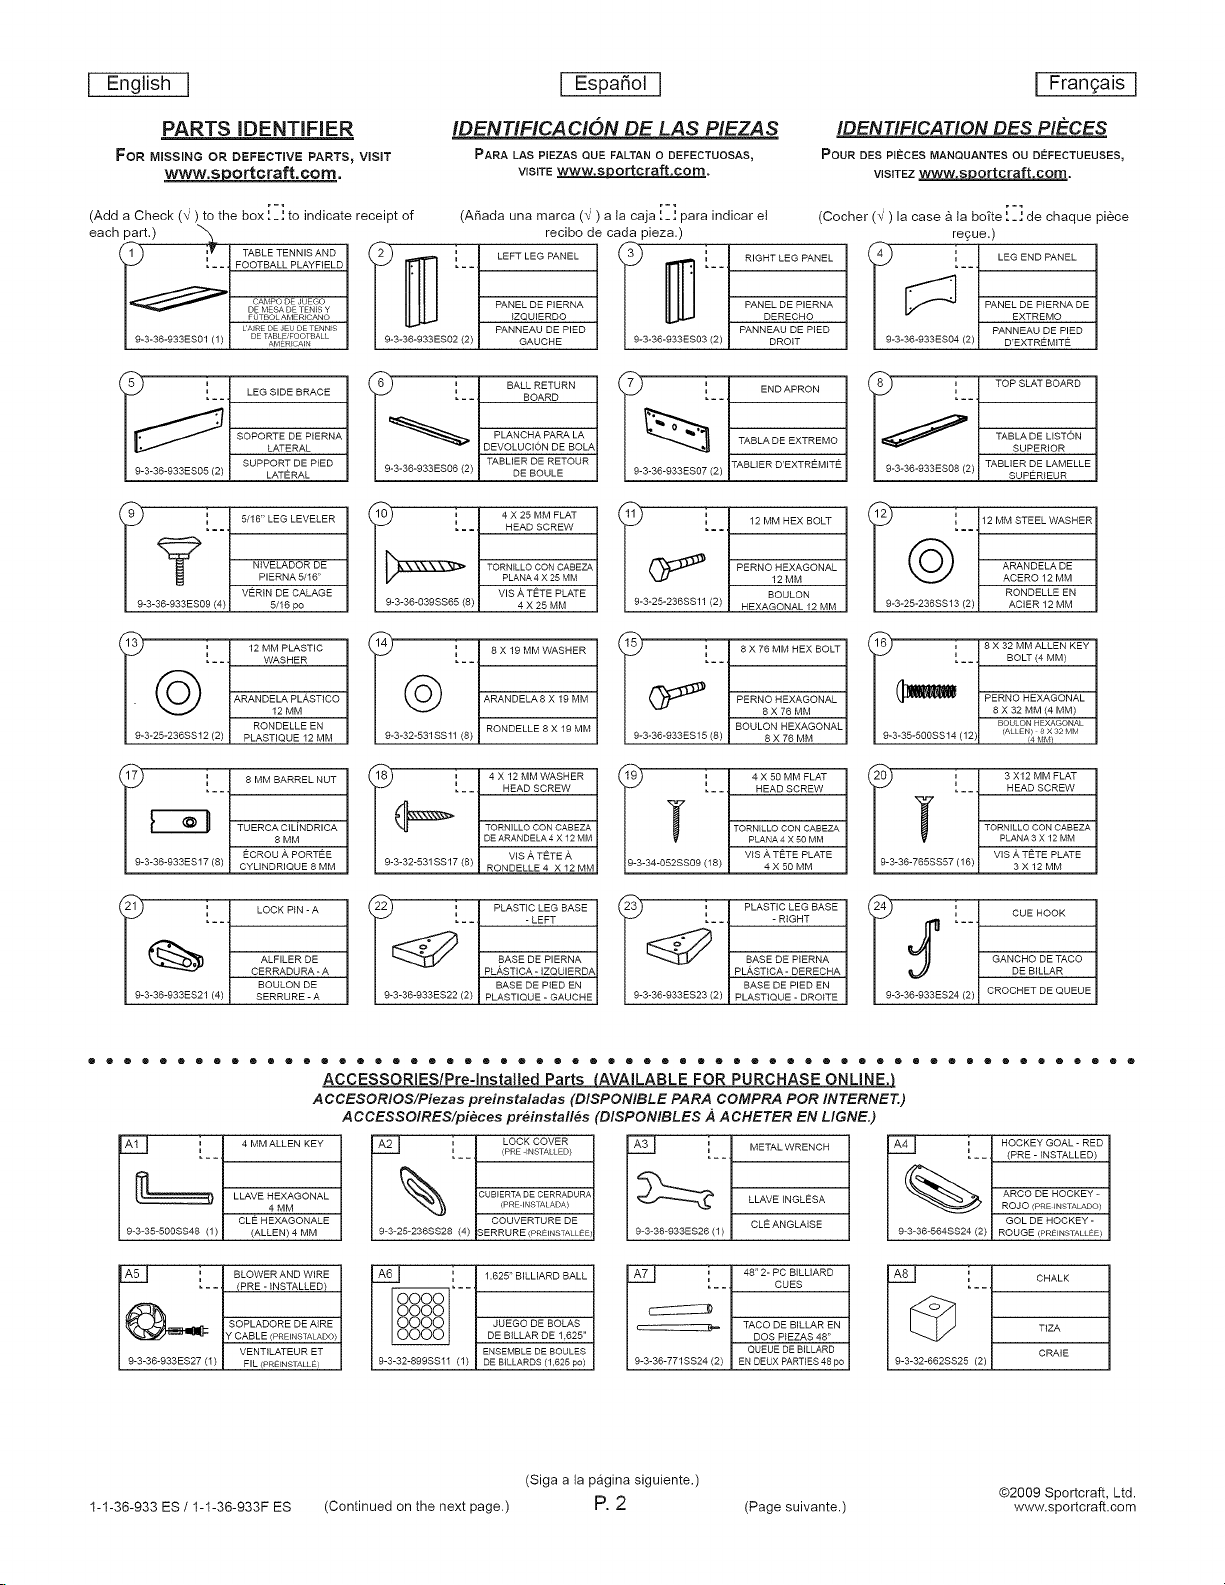
PARTS IDENTIFIER
FOR MISSING OR DEFECTIVE PARTS_ VISIT
www.sportcraft.com.
(Add a Check (N") to the box : _ Jto indicate receipt of
each part.) "_
__ TABLE TENNIS AND
_ FOOTBALL PLAYFIELDDEMESA DETENFSY
9-3-36-933ES01 (1) J DETABLE_FOOTBALLAIvlERICAIN
9-3-36-933ES05 (2)
3- 5/16 po
o lw
19-3-25-236ss12/2//
FOTBOLAMERiCANO
LEG SIDE BRACE
SOPORTE DE PIERNA
LATERAL
SUPPORT DE PIED
LATERAL
NWELADOR DE
PIERNA 5/16"
VERtN DE CALAGE
= ] 12 MM PLASTIC
AR_ICO
12 MM
3-36-933ES0 GAUCHE
3-36-933ES06 (2) DE BOULE
[ 9-3-36-039SS65 (8) J
[ 9-3-62-631SSll_6)JRONDELLE6X1__M
IDENTIFICACION DE LAS PIEZAS
PARA LAS PIEZAS QUE FALTAN O DEFECTUOSAS_
VlSITE www.sPortcraft.com.
(ASada una marca (N) a la caja ',_,' para indicar et
recibo de cada pieza )
PANEL DE PIERNA
IZQUIERDO
PANNEAU DE PIED
3-36-933ES0 DROIT
PANEL DE PIERNA
PANNEAU DE PIED
I 1
[.. HEADSCRW
TO_EZA
PLANA4 X 25 MM
A_
[ 9-3-25-236SSll (2) J BOULON
3 8X76MM
PERNO HEXAGONAL
HEXAGONAL 12 MM
PERNO HEXAGONAL
BOULON HEXAGONAL
IDENTIFICATION DES PIECES
POUR DES PtI_CES MANQUANTES OU DEFECTUEUSES_
VISITEZ www.sportcraft.com.
(Cocher (x') la case _ la boTte :_I de chaque piece
DERECHO
9-3-36-933ES04 2 D'EXTREMITE
_9_ji) I TOP SLAT BOARD
12 MM
8X76MM
I ©
9-3-25-236SS13 (2)J ACIER 12 MU
re cue.)
PANEL DE PIERNA DE
PANNEAU DE PIED
TABLA DE LISTON
TA_E
- - BOLT (4 MM)
PERNO HEXAGONAL
8 X 32 MM (4 MM)
3-35-500SS14 (12 (ALLEN) 8X32MM
EXTREMO
SUPERIOR
SUPER_EUR
ARANDELA DE
ACERO 12 MM
RONDELLE EN
BOULON HEXAGONAL
(4 MM)
HEAD SCREW
1 _'_--1 8 MM BARREL NUT
! 9-3-36-933ES17 (8) _ CYLINDRIQUE 8 MM
i i LOOKPIN-A
_ 9-3-36-933ES21 (4) J SERRURE- A
® O Q ® @ ® ® ® ® Q ® Q • ® • Q ® ® ® • ® ® Q ® O Q • • ® ® ® ® ® ® Q Q ® O Q ® ® ® ® ® ® • ® O Q ® O ® • ® ® Q ® Q Q
TUERCA CILiNDRICA
8 MM
ECROU A PORTEE
ALFILER DE
CERRADU RA - A
DE ARANDELA4 X 12 MM
! 9-3-32-531SS17 (8) !
?_- - 1 PLASTIC LEG BASE
[ 9-3-36-933ES22 (2) J PLASTIQUE- GAUCHE
T__HEAD SCREW
- LEFT
BASE DE PIERNA
PL,_,STICA- IZQUIERDA
_) = | 4 X 50 MM FLAT
[9-3-34-052SS09 (18) J 4 X 50 MM
[ 9-3-36-933ES23 (2) J PLASTtQUE- DROITE
TOR_ZA
,.__lHEAOSCREW'
PLANA 4 X 50 MM
WS A TETE PLATEI
BASE DE PIERNA
PLA,STICA - DERECHA
TORNILLO CON CABEZA
PLANA 3 X 12 MM
XL
36- S57 3X12MM
3-36-933ES2 CROCHET DE QUEUE
VIS/k TETE PLATE
GANCHO DE TACO
DE BILLAR
ACCESSORIES/Pre-lnstalled Parts _AVAILABLE FOR PURCHASE ONUNEJ
ACCESORIOS/Piezas preinstaladas (DISPONIBLE PARA COMPRA POR INTERNET.)
ACCESSOIRES/pi_ces preinstall_s (DISPONIBLES ,4 ACHETER EN LIGNE.)
Al_ uu 4 MM ALLEN KEY
LLAVE HEXAGONAL
4 MM
9-3-35-500SS48 (1) (ALLEN)4 MM
A5_ i BLOWER AND WIRE
9-3-36-933ES27 (1) FIL (PRE_NSTALLE)
CLE HEXAGONALE
- - (PRE - INSTALLED)
SOPLADORE DE A_RE
Y CABLE (PREINSTALADO)
VENTILATEUR ET
A2_ ; LOCK COVER
9-3-25-236SS28 (4) SERRURE(PREINSTALLEE)
A61 i 1.625 '_BILLIARD BALL
9-3-32-899SSll (1) DE BiLLARDS (1,625 po)
[- - (PRE _NSTALLED)
CUBIERTADE CERRADURA
{PREINSTALADA)
COUVERTURE DE
JUEGO DE BOLAS
DE BILLAR DE 1.625"
ENSEMBLE DE BOULES
A3_
9-3-36-933ES26 (1)
AT_ i 48" 2- PC BILLIARD
{--[€. TACO DE BILLAR EN
9-3-36-771SS24 (2) EN DEUX PARTIES 48 po
METAL WRENCH
=__,
LLAVE INGLESA
CLE ANGLAISE
.... CUES
DOS PiEZAS 48"
QUEUE DE BILLARD
A4_ =- - (PRE - iNSTALLED)
(_ RCO DE HOCKEY -
9-3-36-564SS24 (2) ROUGE (PREINSTALLEE)
A81 i CHALK
9-3-32-662SS25 (2)
= HOCKEY GOAL - RED
ROJO (PRE ]NSTALADO)
GOL DE HOCKEY -
TIZA
CRAIE
1-1-36-933 ES / 1-1-36-933F ES
(Siga a la pagina siguiente.)
(Continued on the next page.) P.2
(Page suivante.)
@2009 Sportcraft, Ltd.
www.sportcraft.com
I English I I Espan°l I I Fran9ais]
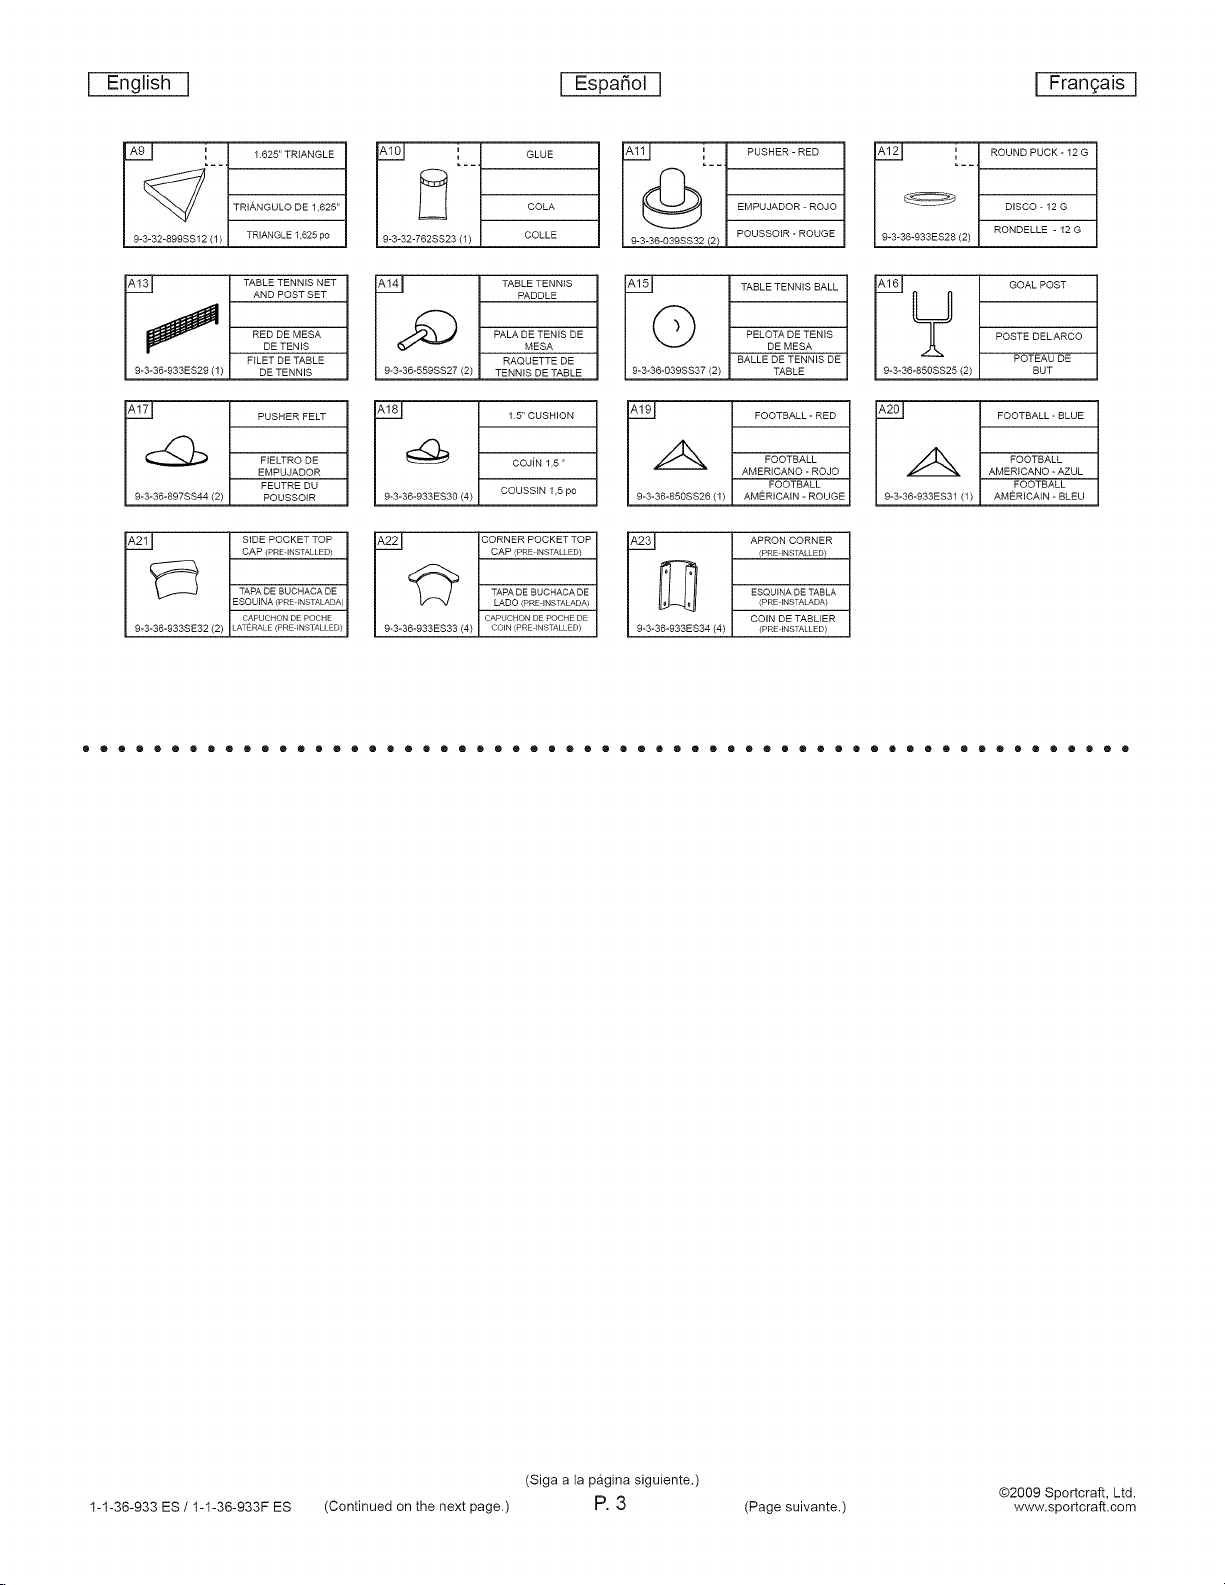
A_pJ
9-3-32-899SS 12 (1)
9-3-36-933SE32 (2)
1625" TRIANGLE
TRI,_,NGULO DE 1,625"
TRIANGLE 1.625 po
TABLE TENNIS NET
AND POST SET
RED DE MESA
DE TENIS
FILET DE TABLE
DE TENNIS
PUSHER FELT
FIE_RO DE
EMPUJADOR
FEUTRE DU
POUSSOIR
SIDE POCKET TOP
CAP (PRE INSTALLED)
TAPA DE BUCHACA DE
ESOUINA (PRE JNSTALADA)
C,_PUCHON DE POCHE
LATERALE (PRE INSTALLED)
i GLUE
9-3-32-762SS23 (1) COLLE
TABLE TENNIS
PADDLE
__(2)
9-3-36-933ES30 (4)
9-3-36-933ES33 (4)
PALA DE TENIS DE
RAQUETTE DE
TENNIS DE TABLE
1.5 _CUSHION
COJJN 1,5 "
CQUSSIN 1,5 po
CORNER POCKET TOP
CAP (PREINSTALLED)
TAPA DE BUCHACA DE
LADO (PRE INSTALADA)
CAPUCHON DE POCHE DE
COIN (PRE _NSTALLED)
COLA
MESA
IAtll
9-3-36-039SS32 (2)
AI_2J
@
9-3-36-039SS37 (2)
9-3-36-850SS26 (1)
9-3-36-933ES34 (4)
PUSHER-RED
EMPUJADOR-ROJO
PQUSSOIR-ROUGE
TABLE TENNIS BALL
PELOTA DE TENIS
DE MESA
BALLE DE TENNIS DE
TABLE
FOOTBALL-RED
FOOTBALL
AMERICANO- ROJO
FOOTBALL
AMERICAtN- ROUGE
APRON CORNER
(PRE INSTALLED)
ESQUiNA DE TABLA
(PRE INSTALADA)
COIN DE TABUER
(PRE INSTALLED)
9-3-36-933ES28 (2)
_9_-36-36-850SS2Y (2)
9-3-36-933ES31 (1)
ROUND PUCK-12 G
DISCO-12 G
RONDELLE -12 G
GOALPOST
POSTE DELARCO
POTEAU DE
BUT
FOOTBALL - BLUE
FOOTBALL
AMERICANO - AZUL
FOOTBALL
AMERICAtN - BLEU
1-1-36-933 ES / 1-1-36-933F ES
(Siga a la p_gina siguiente.)
(Continued on the next page.) P.3
(Page suivante.)
@2009 Sportcraft, Ltd.
www.sportcraft.com

I English j I Espa_ol J I Frangais]
ASSEMBLY INSTRUCTIONS:
We recommend that two adults work
together to assemble this table,
The tame will be assembled upside down and then
turned over onto its legs. This is a very heavy table and
turning it over will require at least two strong adults.
We suggest that you use the bottom carton as a dean
flat work area to protect the table.
FIG. 1:
Apply Glue (#A10) to the edge of each
Right Leg Panel (#3).
Attach Leg Base - Right (#23) to the
Bottom of each Right Leg Panel (#3) using
two Screws (#10).
Next, screw one Leg Leveler (#9) into the
top of the Leg Base - Right (#23).
Repeat the above steps for the other Leg
Bases and Panels, only use the Leg Base
- Left (#22) with the Left Leg Panels (#2).
INSTRUCCIONES DE ENSAMBLAJE
Recomendamos que dos adultos ayuden a
armar esta mesa.
La mesa puede annarse de manera Jnvertida y despues darse
vue/ta para que se asiente sobre /as p/emas. Esta mesa es
pesado y para darle vuelta sera necesaria la part/cJpacJ6n de dos
adultos fuertes.
Sugerimos que utilice el rondo de la caja como area de trabajo
limpia y plana para la proteccidn de la mesa
FIG. 1:
Applicar la cola (no. A10) al borde de cada
panel de pierna derecho (no. 3).
Fijar una base de pierna - derecha (no. 23) al
rondo de cada panel de pierna derecho (no.
3) usando dos tornillos (no. 10).
Despues, atornillar un nivelador de pierna
(no. 23) en cada base de pierna.
Repetir los susdichos pasos para las otras
bases y los otros paneles de pierna, s61o
usando la base de pierna - izquierdo (no. 22)
con los paneles de pierna izquierdos (no. 2).
INSTRUCTIONS D'ASSEMBLAGE
Nous recommandons que deux adultes
proc&dent & I'assemblage de cette table.
Cette table dolt _tre assernbl_e a I'envers, puis retoum&e sur
ses pieds Etant tr_s Iourde, il faudra au moins deux adultes
forts pour retoumer la table a I'endroit.
Nous recommandons d'utitiser /e carton du fond comme
surface de travail propre et plate afin de prot&ger la table.
FIGURE 1:
Appliquer la colle (n°A10) au bord de chaque
panneau de pied droit (n°3).
Fixer une base de pied -droite (n°23) au fond
de chaque panneau de pied droit (n°3) &
I'aide de deux vis (n°10).
Ensuite, visser un verin de calage (n°9) au
sommet de chaque base de pied.
Rep6ter les susdits etapes pour les autres
bases de pied et les panneaux de pied,
seulement utilisant les bases de pied -
gauches (n°22) avec les panneaux de pied
gauches (n°2).
_ : (2)
(_) _ = (2)
(4)
@ =/2/
1-1-36-933 ES / 1-1-36-933F ES
(Siga a la p_gina siguiente.)
(Continued on the next page.) P.4
(Page suivante.)
@2009 Sportcraft, Ltd.
www.sportcraft.com
I English j J Espa_ol J I Frangais]
_ = (2)
©
@ :/4/
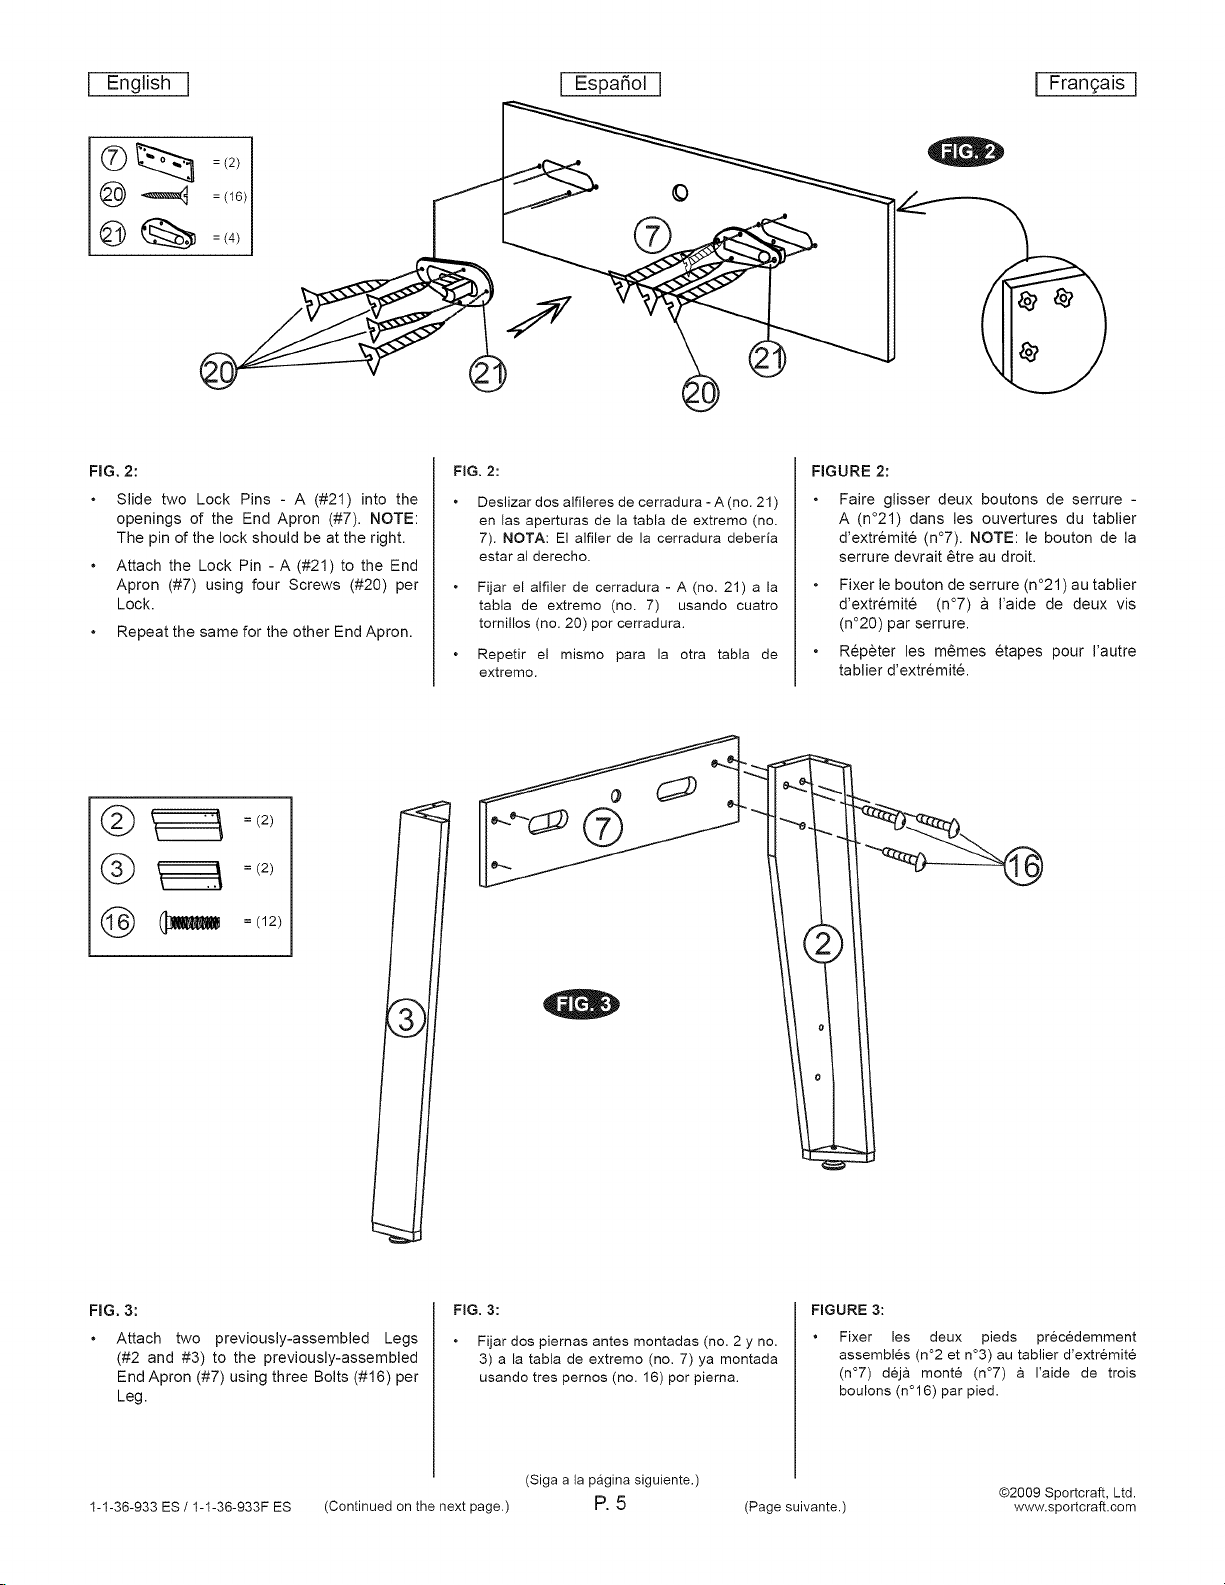
FIG. 2:
Slide two Lock Pins - A (#21) into the
openings of the End Apron (#7). NOTE:
The pin of the lock should be at the right.
Attach the Lock Pin - A (#21) to the End
Apron (#7) using four Screws (#20) per
Lock.
Repeat the same for the other End Apron.
= (2)
= (2)
FIG. 2:
Deslizar dos alfileres de cerradura - A (no. 21 )
en las aperturas de la tabla de extremo (no.
7). NOTA: El alfiler de la cerradura deberia
estar al derecho.
Fijar el alfiler de cerradura - A (no. 21) a la
tabla de extremo (no. 7) usando cuatro
tornillos (no. 20) por cerradura.
Repetir el mismo para la otra tabla de
extremo.
FIGURE 2:
Faire glisser deux boutons de serrure -
A (n°21) dans les ouvertures du tablier
d'extrGmite (n°7). NOTE: le bouton de la
serrure devrait 6tre au droit.
Fixer le bouton de serrure (n°21) au tablier
d'extremit6 (n°7) a I'aide de deux vis
(n°20) par serrure.
RepGter les m@mes etapes pour I'autre
tablier d'extremit&
FIG. 3:
Attach two previously-assembled Legs
(#2 and #3) to the previously-assembled
End Apron (#7) using three Bolts (#16) per
Leg.
1-1-36-933 ES / 1-1-36-933F ES
(Continued on the next page.) P.5
FIG. 3:
Fijar dos piernas antes montadas (no. 2 y no.
3) a la tabla de extremo (no. 7) ya montada
usando tres pernos (no. 16) pot pierna.
(Siga a la p_gina siguiente.)
FIGURE 3:
(Page suivante.)
Fixer les deux pieds precGdemment
assembles (n°2 et n°3) au tablier d'extrGmite
(n°7) deja monte (n°7) & I'aide de trois
boulons (n°16) par pied.
@2009 Sportcraft, Ltd.
www.sportcraft.com
J English j J Espa_ol J I Frangais]
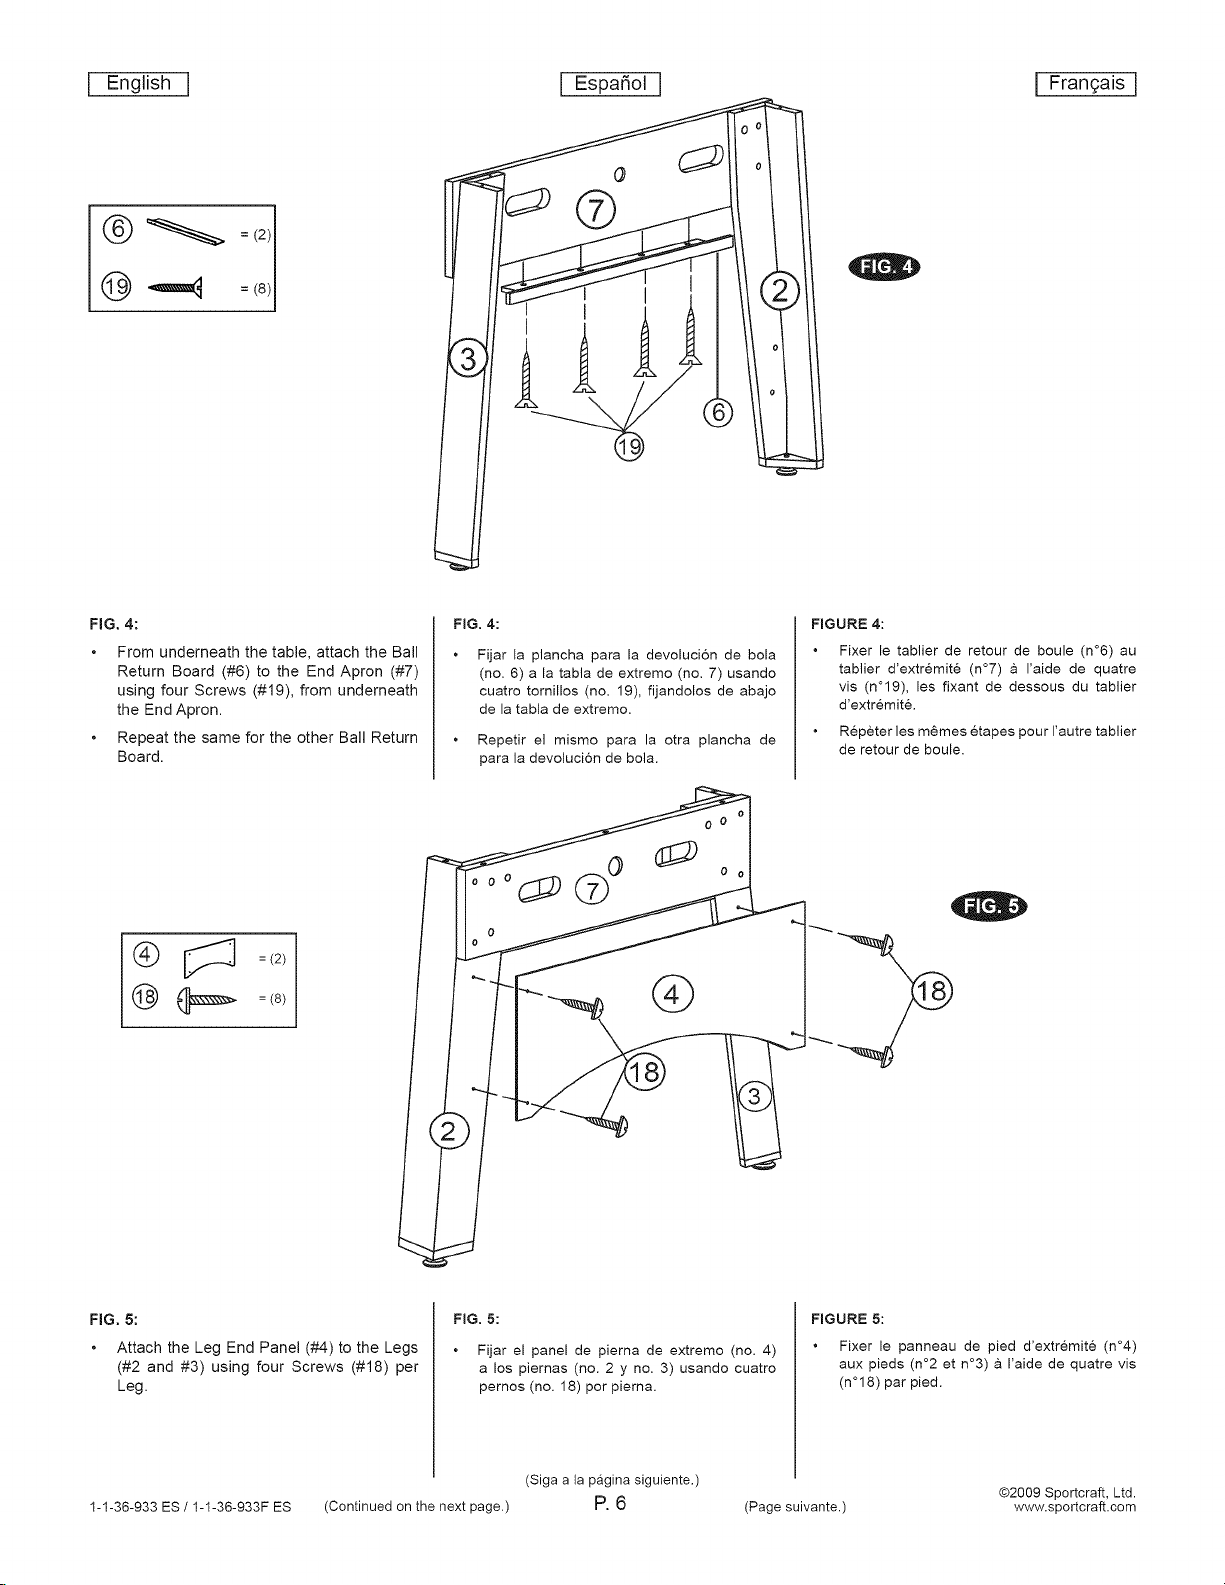
FIG. 4:
From underneath the table, attach the Ball
Return Board (#6) to the End Apron (#7)
using four Screws (#19), from underneath
the End Apron.
Repeat the same for the other Ball Return
Board.
FIG. 4:
Fijar la plancha para la devolucion de bola
(no. 6) a la tabla de extreme (no. 7) usando
cuatro tornillos (no. 19), fijandolos de abajo
de la tabla de extremo.
Repetir el mismo para la otra plancha de
para la devolucion de bola.
FIGURE 4:
Fixer le tablier de retour de boule (n°6) au
tablier d'extremit6 (n°7) & I'aide de quatre
vis (n°19), les fixant de dessous du tablier
d'extremitG.
Repeter les mGmes etapes pour I'autre tablier
de retour de boule.
FIG. 5:
Attach the Leg End Panel (#4) to the Legs
(#2 and #3) using four Screws (#18) per
Leg.
1-1-36-933 ES / 1-1-36-933F ES
(Continued on the next page.) P.6
FIG. 5:
Fijar el panel de pierna de extreme (no. 4)
a los piernas (no. 2 y no. 3) usando cuatro
pernos (no. 18) pot pierna.
(Siga a la p_gina siguiente.)
FIGURE 5:
(Page suivante.)
Fixer le panneau de pied d'extrGmite (n°4)
aux pieds (n°2 et n°3) a I'aide de quatre vis
(n°18) par pied.
@2009 Sportcraft, Ltd.
www.sportcraft.com
 Loading...