

Sportcraft 1-1-24-943HD Installation Guide

www.sportcraft.com
TO ORDER PARTS / ORDENAR DE PIEZAS
Visit our website before returning to store
Visite nuestro sitio web antes de devolver a la tienda
WARNING! ADULT ASSEMBLY REQUIRED.
ADVERTENCIA! ASAMBLEA ADULTA REQUERIDA.
1-1-24-943
Assembly, Instructions and Rules Instrucciones de ensamblaje y reglas
313 Waterloo Valley Road / Budd Lake, NJ 07828 / www.sportcraft,com
English I
[ EspaSol ]
Conqratulations! We hope you will have many
hours of enjoyable use with your new Sportcraft
Table Tennis Table!
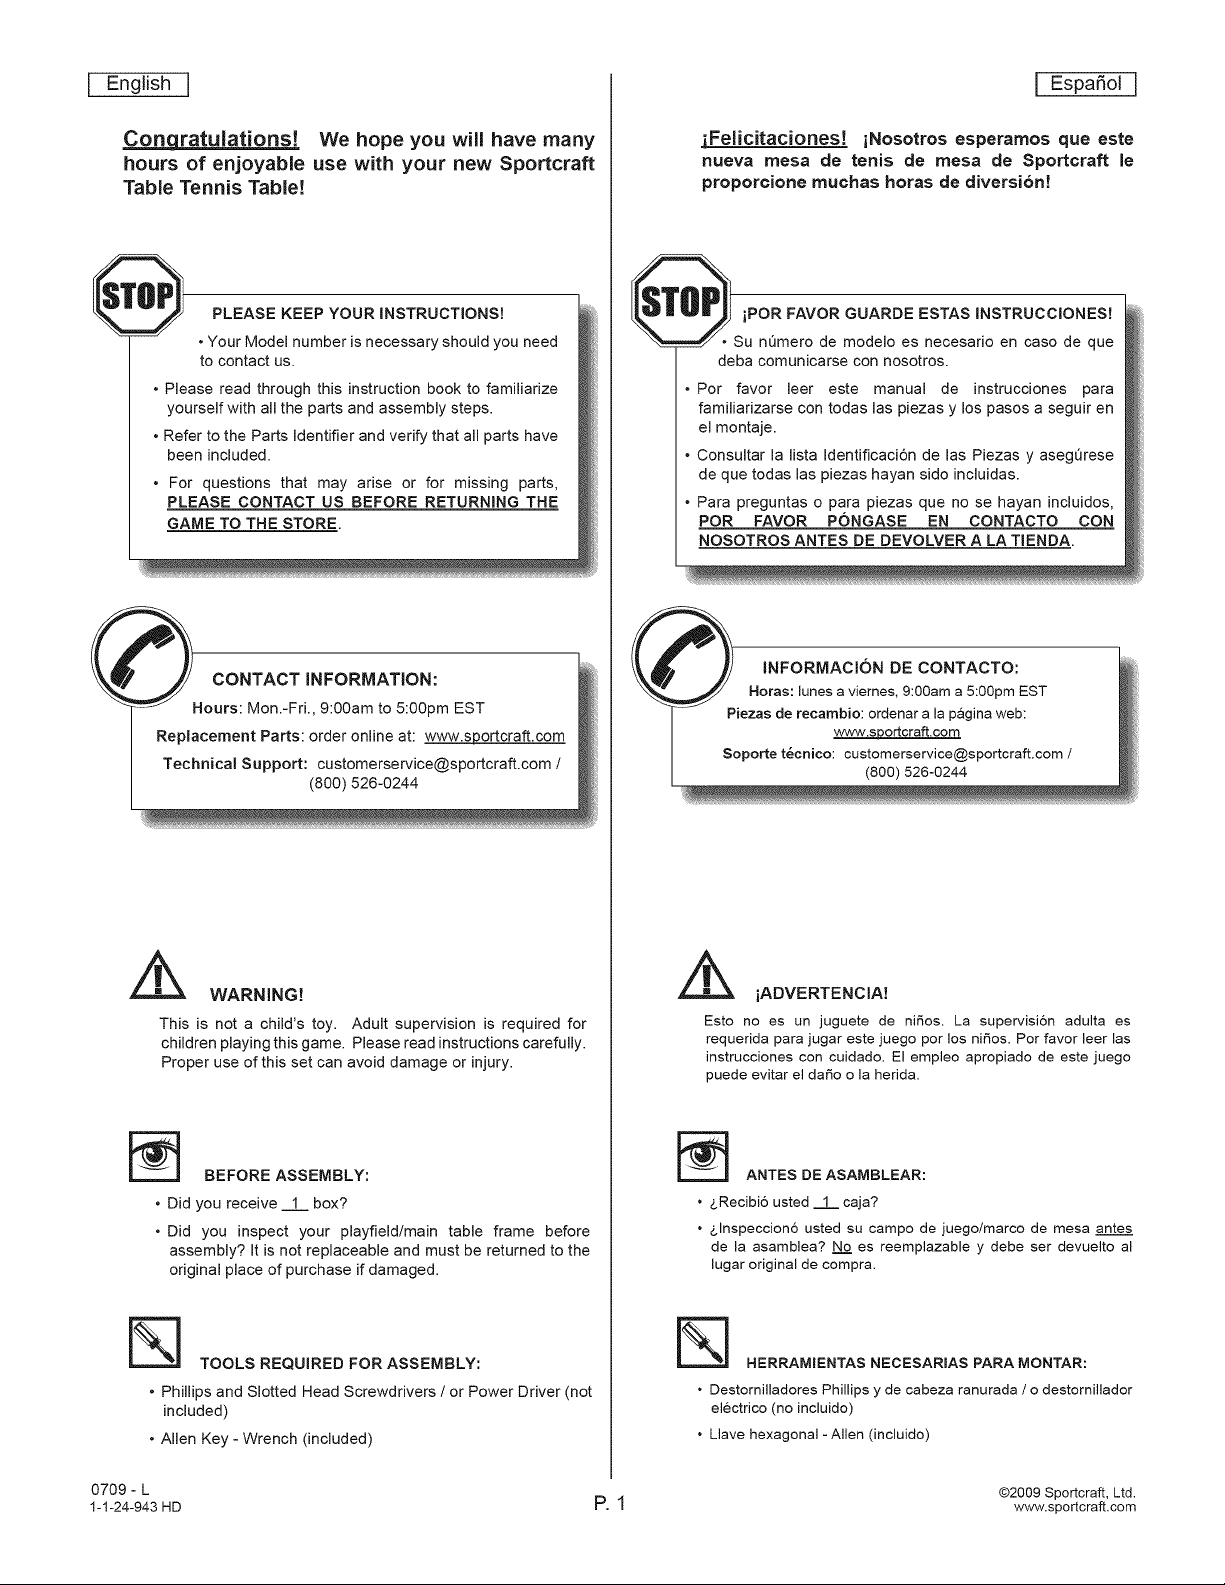
PLEASE KEEP YOUR INSTRUCTIONS!
• Your Model number is necessary should you need
to contact us.
• Please read through this instruction book to familiarize
yourself with all the parts and assembly steps.
• Refer to the Parts Identifier and verify that all parts have
been included.
For questions that may arise or for missing parts,
PLEASE CONTACT US BEFORE RETURNING THE
GAME TO THE STORE.
CONTACT INFORMATION:
Hours: Mon.-Fri., 9:00am to 5:00pm EST
Replacement Parts: order online at: www.sportcraft.com
Technical Support: customerservice@sportcraft.com /
(800) 526-0244
jFelicitaciones! iNosotros esperamos que este
nueva mesa de tenis de mesa de Sportcraft le
proporcione muchas horas de diversibn!
S' %VOe":o"d e?o"e?Cto'?te?Tc'oe":::
deba comunicarse con nosotros.
• Por favor leer este manual de instrucciones para
familiarizarse con todas las piezas y los pasos a seguir en
el montaje.
• Consultar la Iista Identificaci6n de las Piezas y asegQrese
de que todas las piezas hayan sido incluidas.
• Para preguntas o para piezas que no se hayan incluidos,
POR FAVOR PONGASE EN CONTACTO CON
NOSOTROS ANTES DE DEVOLVER A LA TIENDA.
tNFORMACI6N DE CONTACTO:
Horas: lunes a viernes, 9:00am a 5:00pm EST
Piezas de recambio: ordenar a la pagina web:
Soporte t_cnico: customerservice@sportcraft.com /
www.s[_ortcraft.com
(800) 526-0244
WARNING!
This is not a child's toy. Adult supervision is required for
children playing this game. Please read instructions carefully.
Proper use of this set can avoid damage or injury.
BEFORE ASSEMBLY:
• Did you receive 1 box?
• Did you inspect your playfield/main table frame before
assembly? It is not replaceable and must be returned to the
original place of purchase if damaged.
TOOLS REQUIRED FOR ASSEMBLY:
• PNlips and Slotted Head Screwdrivers / or Power Driver (not
included)
• Allen Key- Wrench (included)
0709 - L @2009Sportcraft, Ltd.
1-1-24-943 HD P. 1 www.sportcraft.com
[_ HERRAM_ENTAS NECESAR_AS PARA MONTAR:
iADVERTENCIA!
Esto no es un juguete de nir_os. La supervisi6n adulta es
requerida para jugar este juego por los nitros. Pot favor leer las
instrucciones con cuidado. El empleo apropiado de este juego
puede evitar el dafio o la herida.
ANTES DE ASAMBLEAR:
• &Recibi6 usted 1==!.=caja?
• &lnspeccion6 usted su campo de juego/marco de mesa antes
de la asamblea? N_._oes reemplazable y debe ser devuelto al
lugar original de compra.
• Destornilladores Phillips y de cabeza ranurada / o destornillador
electrico (no incluido)
• Llave hexagonal - Allen (incluido)
English I
FoRMISSING OR DEFECTIVE PARTS_ ViSiT
PARTS IDENTIFIER I EspaSol ]
IDENTIFICAClON DE LAS PIEZAS PARA LAS PtEZAS QUE FALTAN O DEFECTUOSAS,
www.sportcraft.com.
(Ad_ to the box [:] to indicate receipt of each part.)
( 1 _ = " I T='_L_F_IT'_ ('_ i I TABLE SURFACE-
W
su_ SUPERFICIE DE MESA
VISITE www.sportcraft.com.
(ASada una marca (x_) a la caja [-] para indicar el recibo de cada pieza.)
[ - - CASTER FNSERTS - - WITH CAPS
t:,
i PIERNACURVA INTERIOR PIERNA CURVAEXTERIOR
CON ENCARTESDERUEDA U CONTAPONES
6-_-_43N00_1_/ -ii-_4_NO2(2)
" - - STOP BRACKET - A
TUBO DE UNION CON
3 u I LINKAGE TUBE WITH
-24-943HD6 '3 (2)
l 9437HD :[[)1 6 x 18 MM HEXBOLTPERNo(4MM)DE
-24- t (
-24-943HD12 (8)
PESTILLO DE PARADA A
HEXAGONAL (4 MM) DE
6X 20 MM
_ _ HEAD BOLT
PERNOCON CABEZA
REDONDA DE8 X 53 MM
I 8 X 53 MM ROUND
[ - - STOP BRACKET- B
TUBO DE UNION CON
I3 u I LINKAGE TUBE WITH
-24-943HD04 (2)
9-3-24-943HD08 2
-2 1
PESTILLO DEPARADA B
CUBIERTA DE PIERNA
PL,_,STICA
TUERCA DE 8 MM
I i__1 0MMNUT
-24-943HD05 (10)
_1 i 1 AND FRAME
[ (PRE-ASSEMBLED) J
_ ' t 3.5 X12 MM ROUND
IV r° 4
| | (+8pre-instalados) |
[ 9-3-36-886HD33 (8) I |
TUERCA DE 6MM
_ PLASTIC LEG PANEL
PANEL DE PIERNA
PL#,STICO Y APOYO
(PRE - ENSAMBLADO)
[ _ _ HEAD SCREW
(+6 pre-insta#ed)
RED©NDADE 65 X12 M
[ 9-3-32-503HD13 (52)1
[ 9-6-24-943HD09 (2) |
I I 6 X 50 MM ALLEN KEY
-24-943HDll (8)
A_B_M
i__1 6MMWASHER
CERRADURA DE
1__
GRAVEDAD
__ BOLT (4 MM)
PERNODE LLAVE
HEXAGONAL (4 MMM)
DE6X50MM
t
• @ @ • @ @ • @ @ ® @ @ @ @ @ @ @ @ @ ® @ @ ® @ @ @ @ @ @ @ @ @ ® @ @ @ @ @ @ @ @ @ @ @ @ @ @ @ @ @ @ @ @ @ @ ® @ @ @
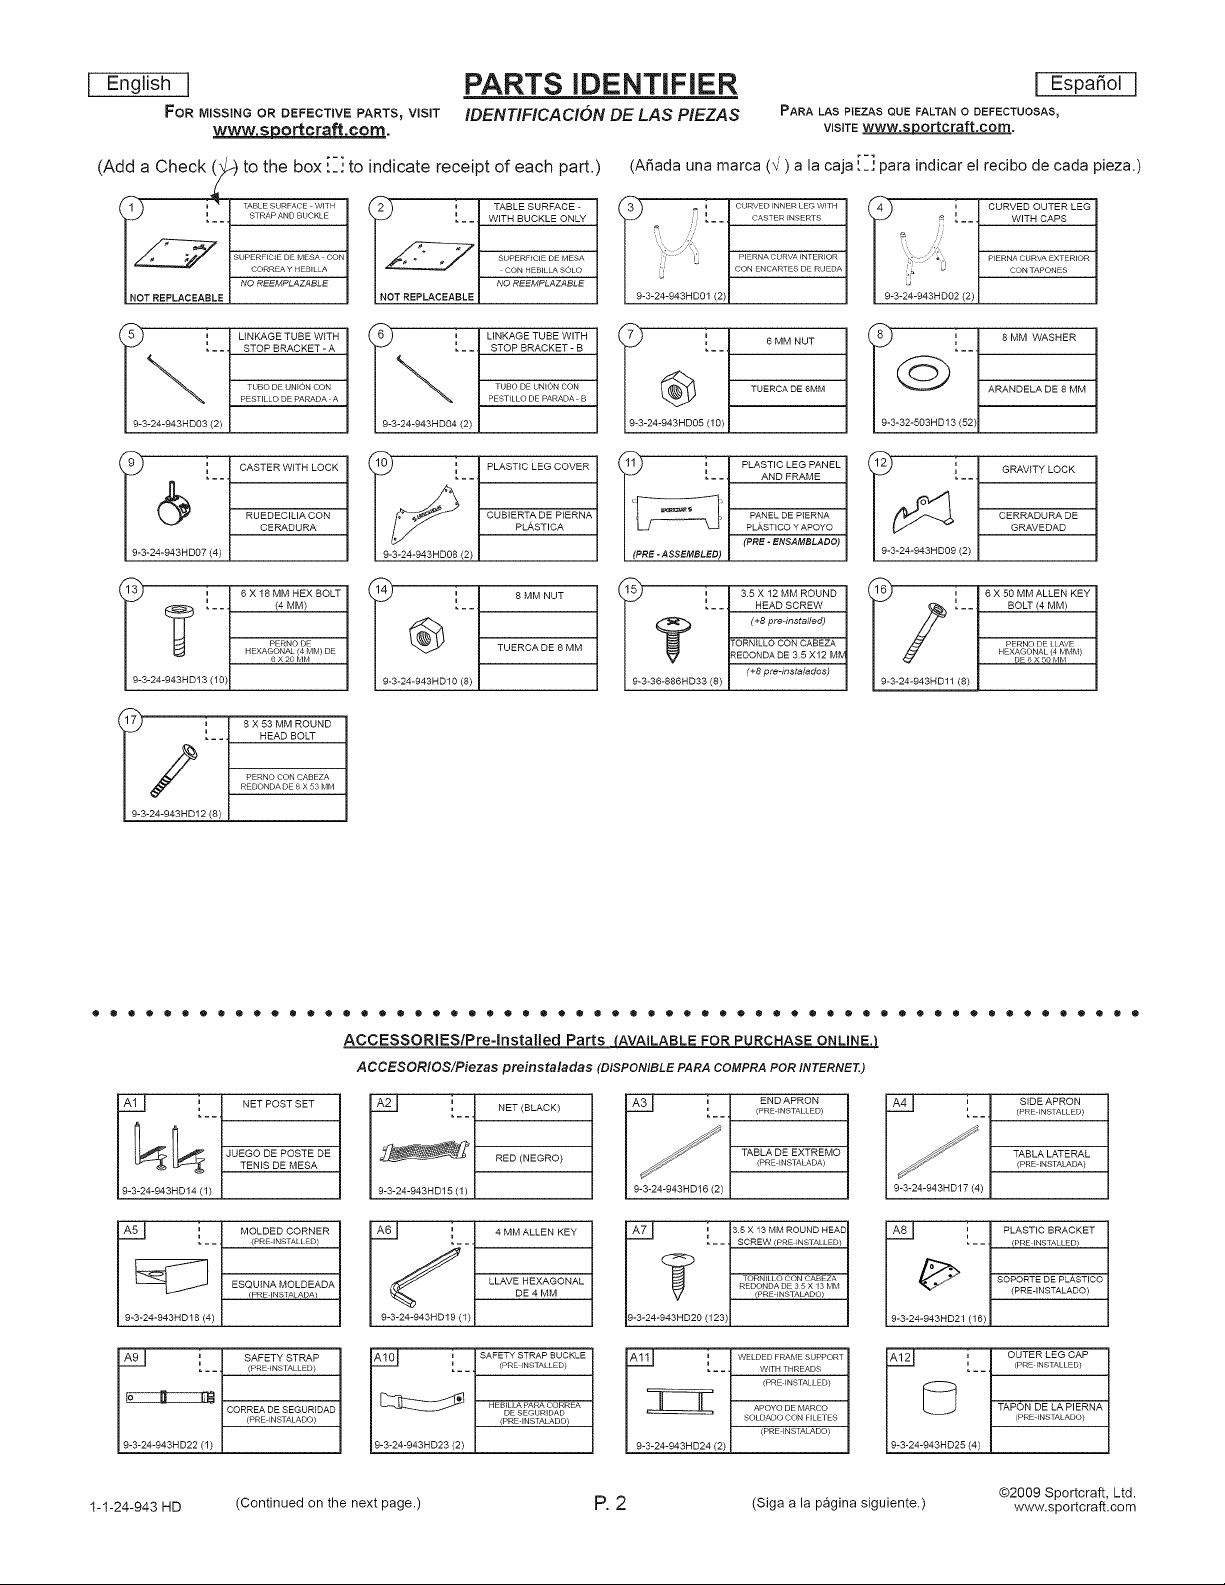
ACCESSORIES/Pre-lnstalied Parts _AVAILABLE FOR PURCHASE ONLINE3
ACCESORIOS/Piezas preinstaladas (D/SPONIBLE PARA COMPRA POR /NTERNE7_)
At_ ; NETPOSTSET
[_ JUEGO DE POSTE DE
9-3-24-943HD14 (1)
A5 I MOLDED CORNER
9-3-24-943HD18 (4)
F[__ 1 SAFETY STRAP
I 9-3-24-943HD22 (I) J
TENIS DE MESA
__ (PRE INSTALLED)
ESQUINA MOLDEADA
/PRE INSTALADA)
_ _ (PRE INSTALLED)
CORREA DE SEGURIDAD
(PRE _NSTALADO)
1-1-24-943 HD (Continued on the next page.) P.2 (Siga a la pagina siguiente.) www.sportcraft.com
#,21
9-3-24-943HD 15 (1)
A6_ 4 MM ALLEN KEY
9-3-24-943HD19 (1)
9-3-24-943HD23 (2)
NET (BLACK)
RED (NEGRO)
LLAVE HEXAGONAL
DE4MM
i SAFETYSTRAPBUCKLE
u (PREINSTALLED)
HEBtLLA PARA CORREA
DE SEGURIDAD
(PRE tNSTALADO)
A3 I ; ENDAPRON
9-6-24-946HDt6 (2)
AT_ _ 135 x 13 MM ROUND HEAD
y TORNtLLO CON CABEZA
)-3-24-943HD20 (123:
9-3-24-943HD24 (2)
(PRE tNSTALLED)
TABLA DE EXTREMO(PRE tNSTALADA)
- - SCREW (PRE INSTALLED)
REDONDA DE 3 5 X _3 MM
(PRE INSTALADO)
i WELDED FRAME SUPPORT
- - WITH THREADS
(PRE INSTALLED)
APOYO DEMARCO
SOLDADO CON FILETES
(PRE INSTALADO)
A4 I ; SIDE APRON
9-3-24-943HD17 (4)
A8_ ; PLASTIC BRACKET
9-3-24-943HD21 (16)
9-3-24-943HD25 (4)
L - - (PRE iNSTALLED)
TABLA LATERAL(PRE _NSTALADA)
___ /PREtNSTALLED)
SOPORTE DE PLASTICO
(PRE-INSTALADO)
i OUTER LEG CAP
u (PRE INSTALLED)
TAP©N DE LA PIERNA
(PRE tNSTALADO)
@2009 Sportcraft, Ltd.
English I
[--.
NET POST CAP
u__
WRENCH
_ WRENCH- DOUBLE
u- - END
I Espa_ol ]
i PLASTIC LEG PANEL
.... {PRE INSTALLED)
9-3-24-943HD26/2)
9-3-24-943HD30 (8)
TAPADEPOSTE
i LEG TOP CAP
.... (PRE tNSTALLED)
TAPA DE P[ERNA SUPERIOR
(PRE tNSTALADA)
i 9-3-24-943HD27 (1)
LLAVEINGLESA
ASSEMBLY INSTRUCTIONS:
We recommend that two adults work together to assemble this table.
The table will be assembled upside down and then turned over onto its legs. This is a very
heavy table and turning it over will require at least two strong adults.
We suggest that you use the bottom carton as a clean flat work area to protect the table.
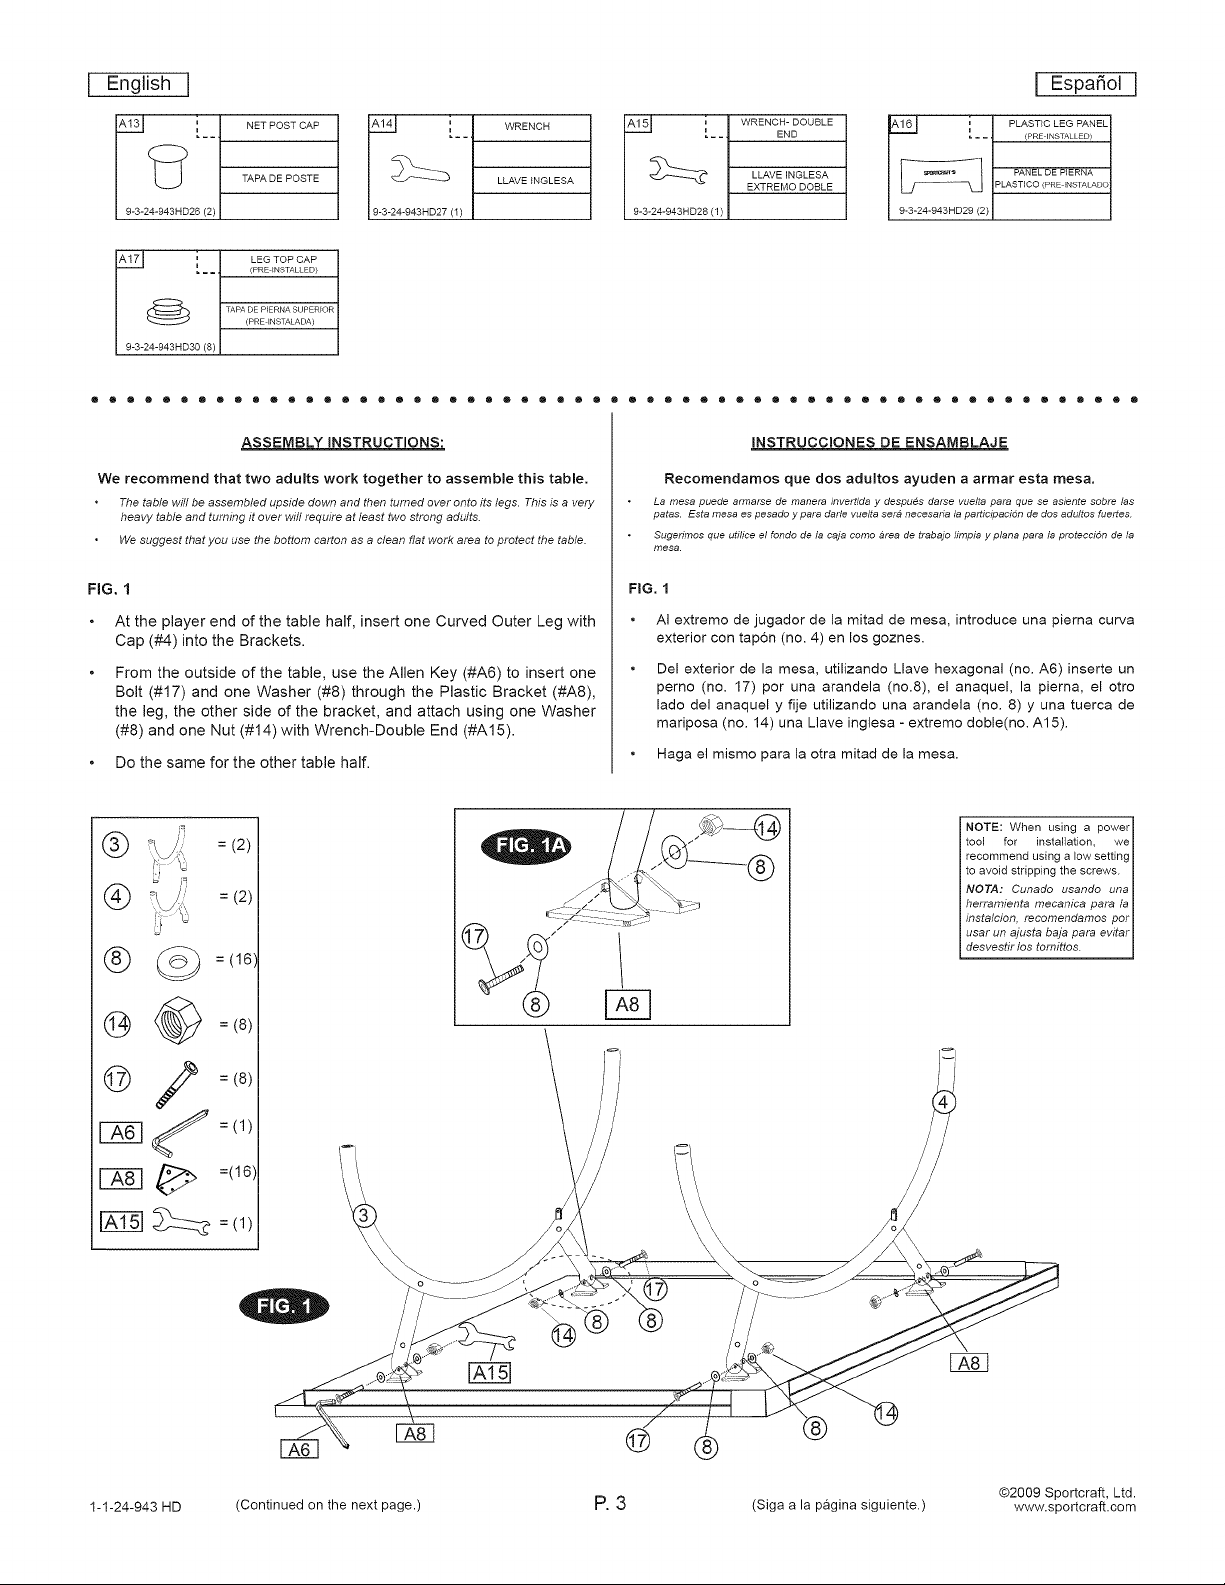
FIG. 1
At the player end of the table half, insert one Curved Outer Leg with
Cap (#4) into the Brackets.
From the outside of the table, use the Allen Key (#A6) to insert one
Bolt (#17) and one Washer (#8) through the Plastic Bracket (#A8),
the leg, the other side of the bracket, and attach using one Washer
(#8) and one Nut (#14) with Wrench-Double End (#A15).
Do the same for the other table half.
9-3-24-943HD28 (1)
LLAVEINGLESA
EXTREMO DOBLE
[_ PANEL DE PIERNA
9-3-24-943HD29 (2)
PLASTICO (PRE FNSTALADC
INSTRUCCIONES DE ENSAMBLAJE
Recomendamos que dos adultos ayuden a armar esta mesa.
La mesa puede armarse de manera invertida y despues darse vuelta para que se asiente sobre las
patas. Esta mesa es pesado y para darle vuelta sera necesaria la participacion de dos adultos fuertes.
Sugerimos que utilice el fondo de la caja como area de trabajo limpia y plana para la protecci6n de la
mesa.
FIG, I
AI extremo de jugador de la mitad de mesa, introduce una pierna curva
exterior con tapon (no. 4) en los goznes.
Del exterior de la mesa, utilizando Llave hexagonal (no. A6) inserte un
perno (no. 17) por una arandela (no.8), el anaquel, la pierna, el otro
lado del anaquel y fije utilizando una arandela (no. 8) y una tuerca de
mariposa (no. 14) una Llave inglesa - extremo doble(no. A15).
Haga el mismo para la otra mitad de la mesa.
(_ _ = (2)
(_ = (2)
@ _ =(16)
@ @ =/8)
@ =(8)
_;_ =(16)
_--_ = (1)
®
NOTE: When using a power I
tool for installation, we I
recommend using a low setting
to avoid stripping the screws. I
NOTA: Cunado usando una I
herramienta mecanica para la
instalcion, recomendamos perl
usar un ajusta baja para evitar
desvest r los tornittos. J
FA-eq
1-1-24-943 HD (Continued on the next page.) P.3 (Siga a la pagina siguiente.) www.sportcraft.com
@2009 Sportcraft, Ltd.
I English I I Espa_°l ]
=(1)
® @ =(8)@ =(8)
®
|
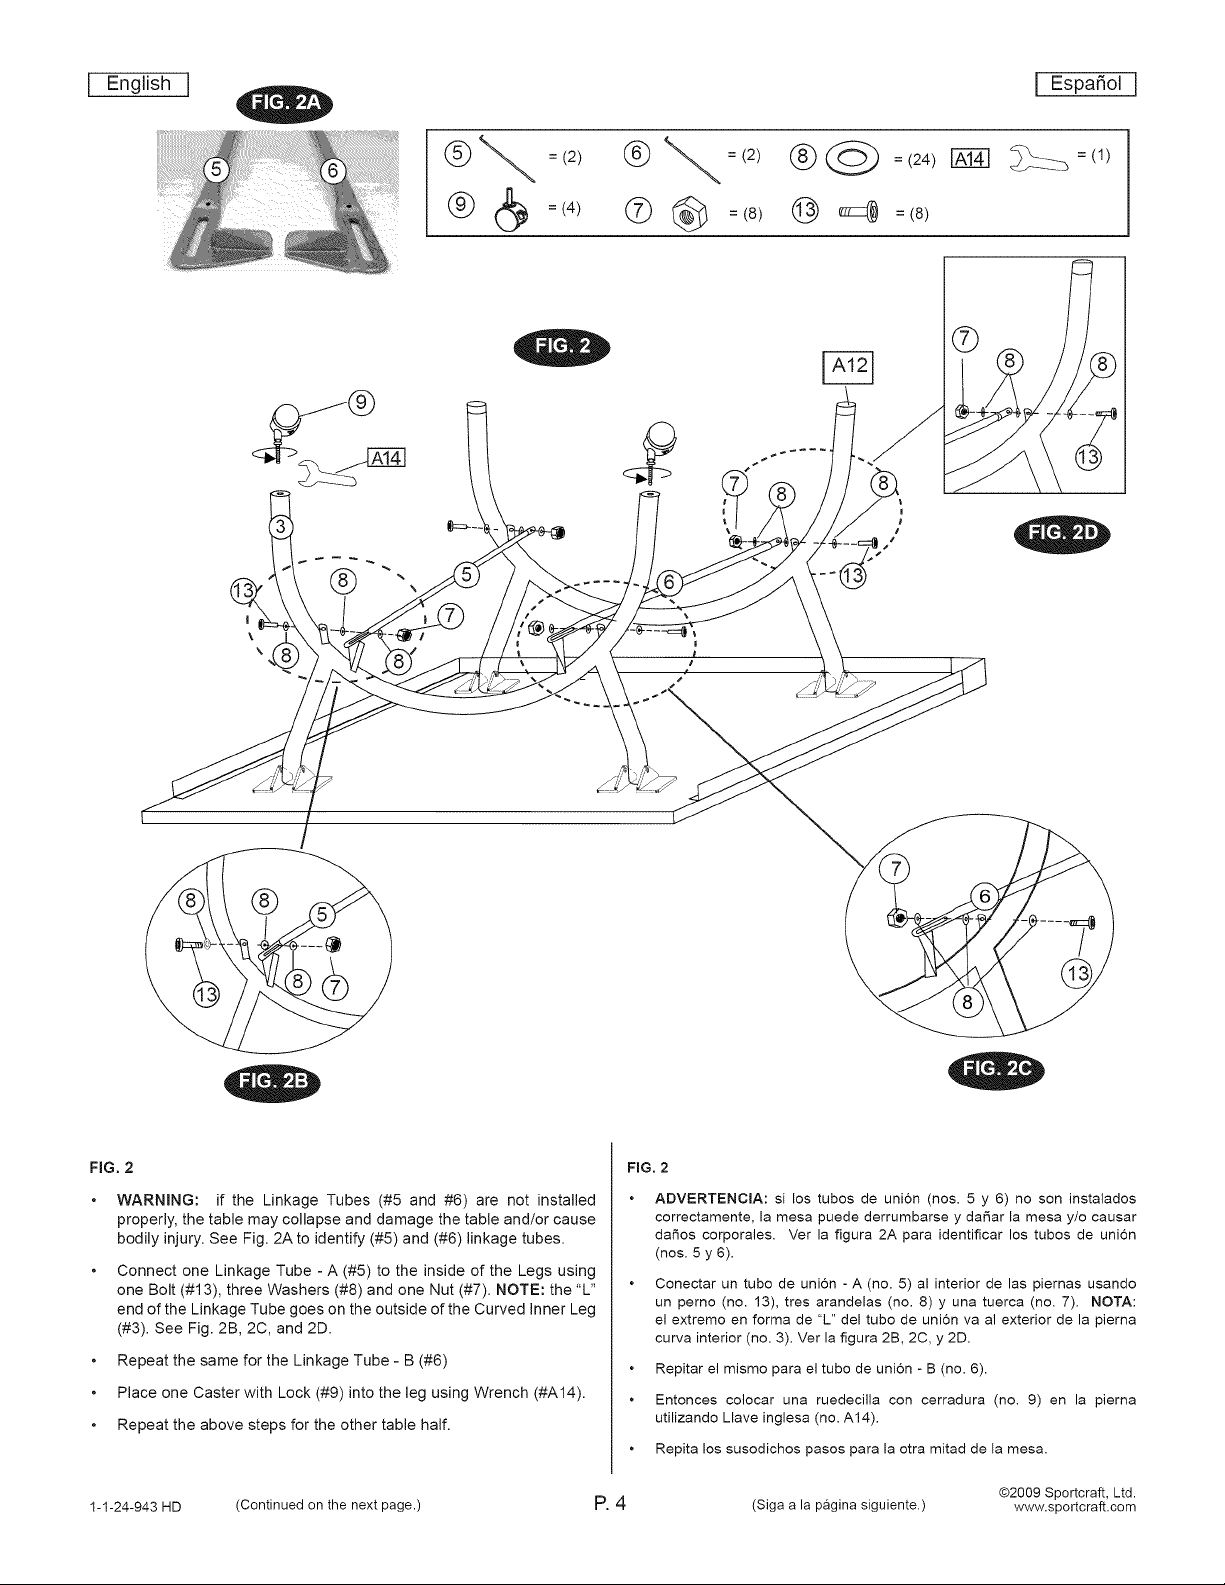
FiG. 2
WARNING: if the Linkage Tubes (#5 and #6) are not installed
properly, the table may collapse and damage the table and/or cause
bodily injury.See Fig. 2A to identify (#5) and (#6) linkage tubes.
Connect one Linkage Tube - A (#5) to the inside of the Legs using
one Bolt (#13), three Washers (#8) and one Nut (#7). NOTE: the "L"
end of the Linkage Tube goes on the outside of the Curved inner Leg
(#3). See Fig. 2B, 2C, and 2D.
Repeat the same for the Linkage Tube - B (#6)
Place one Caster with Lock (#9) into the leg using Wrench (#A14).
Repeat the above steps for the other table half.
1-1-24-943 HD (Continued on the next page.) P. 4 (Siga a la pagina siguiente.) www.sportcraft.com
FIG. 2
ADVERTENCIA: si los tubos de uni6n (nos. 5 y 6) no son instalados
correctamente, la mesa puede derrumbarse y daSar la mesa y/o causar
daSos corporales. Ver la figura 2A para identificar los tubos de union
(nos. 5 y 6).
Conectar un tube de union - A (no. 5) al interior de las piemas usando
un pemo (no. 13), tres arandelas (no. 8) y una tuerca (no. 7). NOTA:
el extremo en forma de "L" del tubo de union va al exterior de la pierna
curva interior (no. 3). Ver la figura 2B, 2C, y 2D.
Repitar el mismo para el tube de union - B (no. 6).
Entonces colocar una ruedeciila con cerradura (no. 9) en la pierna
utilizando Llave inglesa (no. A14).
Repita los susodichos pasos para la otra mitad de la mesa.
@2009 Sportcraft, Ltd.
 Loading...