

Sportcraft 1-1-24-942GD Installation Guide
www.sportcraft.com
TO ORDER PARTS / ORDENAR DE PIEZAS
Visit our website before returning to store
Visitenuestrositioweb antesdedevolvera/a tienda
WARNING! ADULT ASSEMBLY REQUIRED.
ADVERTENCIA! ASAMBLEA ADULTA REQUERIDA.
1-1-24-942 GD
Assembly, Instructionsand Rules lnstrucciones de ensamblaje y reglas
313 Waterloo Valley Road ! Budd Lake, NJ 07828 1 wwwsportcraft.com
' I I I, I II ii iiiiiiiui ]1]1]1]1 II_I]II_L,]

English I
I EspaSol ]
Conqratulations! We hope you will have many
hours of enjoyable use with your new Sportcraft
Table Tennis Table!
PLEASE KEEP YOUR INSTRUCTIONS!
* Your Model number is necessary should you
need to contact us.
* Please read through this instruction book to
familiarize yourself with all the parts and assembly
steps.
* Refer to the Parts Identifier and verify that all parts
have been included.
* For questions that may arise or for missing parts,
PLEASE CONTACT US BEFORE RETURNING
THE GAME TO THE STORE.
]Felicitaciones! iNosotros esperamos que este
nueva mesa de tenis de mesa de Sportcraft le
proporcione muchas horas de diversibn!
iPOR FAVOR GUARDE ESTAS INSTRUCCIONES!
• Su nQmero de modelo es necesario en caso de que
deba comunicarse con nosotros.
• Por favor leer este manual de instrucciones para
familiarizarse con todas las piezas y los pasos a seguir en
el montaje.
• Consultar la lista Identificaci6n de las Piezas y asegQrese
de que todas las piezas hayan sido incluidas.
• Para preguntas o para piezas que no se hayan incluidos,
POR FAVOR PONGASE EN CONTACTO CON
NOSOTROS ANTES DE DEVOLVER A LA TIENDA.
CONTACT INFORMATION:
Hours: Mon.-Fri., 9:00am to 5:00pm EST
Replacement Parts: order online at: www.sportcraft.com
Technical Support: customerservice@sportcraft.com /
(800) 526-0244
WARNING!
This is not a child's toy. Adult supervision is required for
children playing this game. Please read instructions carefully.
Proper use of this set can avoid damage or injury.
BEFORE ASSEMBLY:
• Did you receive 1 box?
• Did you inspect your playfield/main table frame before
assembly? it is not replaceable and must be returned to the
original place of purchase if damaged.
INFORMACION DE CONTACTO:
Horas: lunes a viernes, 9:00am a 5:00pro EST
Piezas de recambio: ordenar a la pagina web:
www.sportcraft.com
Soporte t_cnico: customerservice@spertcraft.com /
(800) 526-0244
iADVERTENCIA!
Esto no es un juguete de nir_os. La supervisi6n adulta es
requerida para jugar este juego por los nitros. Pot favor leer las
instrucciones con cuidado. El empleo apropiado de este juego
puede evitar el daSo o la herida.
ANTES DE ASAMBLEAR:
• &Recibi6 usted 1=.!=caja?
• &lnspeccion6 usted su campo de juego/marco de mesa antes
de la asamblea? N..._oes reemplazable y debe ser devuelto al
lugar original de compra.
TOOLS REQUIRED FOR ASSEMBLY:
• Phillips and Slotted Head Screwdrivers / or Power Driver
(included)
• Wrench (included)
0709 - H @2009Sportcraft, Ltd.
1-1-24-942GD P. 1 www.sportcraft.com
[_ HERRAM_ENTAS NECESAR_AS PARA MONTAR:
• Destornilladores Phillips y de cabeza ranurada / o destornillador
electrico (incluido)
• Llave (incluida)
English I
FoRMISSING OR DEFECTIVE PARTS_ VISIT
www.sportcraft.com.
PARTS iDENTiFiER
IDENTIFICAClON DE LAS PIEZAS
I Espa_ol ]
PARA LAS PIEZAS QUE FALTAN O DEFECTUOSAS_
VlStTE www.s.#ortcraft.com.
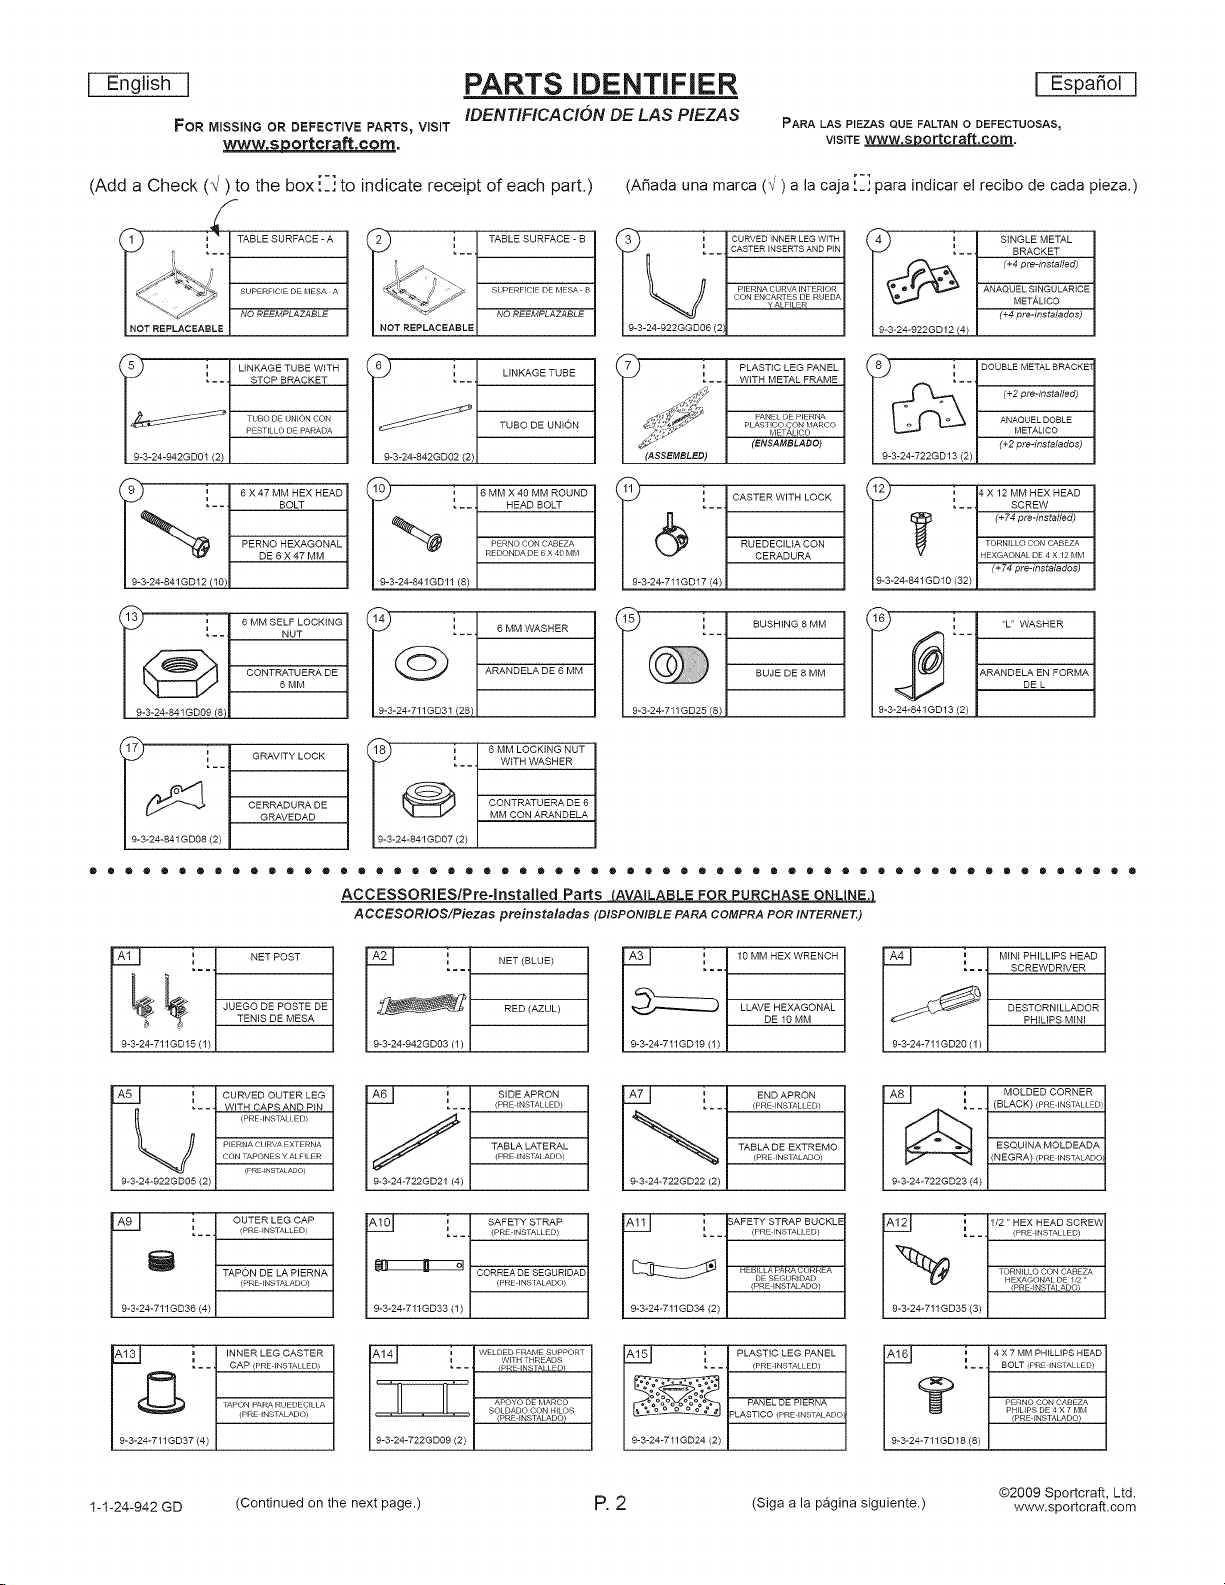
(Add a Check (_/) to the box [-] to indicate receipt of each part.)
STOP BRACKET
TUBO DE UNION CON
PESTILLO DE PARADA
[--1 LINKAGE TUBE WiTH
-24-942GD01 (2)
PERNO HEXAGONAL
DE6X47MM
OLT
9-3-24-841GD12 10
NUT
l_ I 6 MM SELF LOCKING
6 MM
)
_.<o [--1 TABLESURFAOE-B
A
T REPLACEABLE
I_/1 LINKAGE TUBE
% , |6 MM X 40 MM ROUND
I 9-3-24-711GD3t (28)|
NO REEMPLAZABLE
TUBO DE UNION
[ - - ! HEAD BOLT
ARANDELA DE 6 MM
WITH WASHER
(ASada una marca (%/)a la caja [-1 para indicar el recibo de cada pieza.)
_) = I CURVED INNER LEG WITH
PIERNA CURVA INTERIOR
DON ENCARTES DE RUEDA
YALFILER
I 9-3-24-922GGD06 (2)_
i WITH METAL FRAME
PANEL DEPIERNA
PLASTICOCON MARCO
METAUCO
(ASSEMBLED) |
! 9-3-24-711GD17 (4) m
I 9-3-24-711GD25 (8)|
(ENSAMBLADO)
RUEDECILIA CON
CERADURA
BUJE DE 8 MM
_) = _ SINGLE METAL
| | (+4 pre-instalados)
I 9-3-24-922GD12 (4) |
|L:J [
| | (+2 pre-instalados)
! 9-3-24-722GD13 (2) |
, 4X 12 MM HEX HEAD
p-3-24-841GD10 (32) |
ARAND% NPORMA
I 9-3-24-841GD13 (2) I I
CERRADURA DE
GRAVEDAD
(
® ® @ ® ® @ @ ® @ ® ® ® @ ® ® @ ® @ ® ® ® ® ® ® ® @ ® ® @ @ ® @ ® ® ® ® ® @ @ ® @ ® ® ® @ ® ® ® @ ® ® @ @ ® @ ® ® ® @
I 9-3-24-841GD07 (2) |
CONTRATUERA DE 6
MM CON ARANDELA
ACCESSORIES/Pre-lnstalled Parts {AVAILABLE FOR PURCHASE ONLINE J_
ACCESORIOS/Piezas preinstaladas (DISPONIBLE PARA COMPRA POR INTERNE'l:)
Atl i NET POST
9-3-24-711GD15 (1) 9-3-24-942GD03 (1)
A51 i CURVED OUTER LEG
9-3-24-922GD05 (2)
A9 I ; OUTER LEG CAP
9-3-24-711GD36 (4)
9-3-24-711GD37 (4)
===
_ JUEGO DE POSTE DE
TENIS DE MESA
(PRE INSTALLED)
PIERNA CURVA EXTERNA
- - WITH CAPS AND PiN
CON TAPON ES Y ALF]LER
(PRE _NSTALADO}
[ - - (PRE _NSTALLED)
TAPON DE LA PIERNA
(PRE _NSTALADO)
; INNER LEG CASTER
i
.... CAP (PRE INSTALLED)
TAPON PARA RUEDEDILLA
(PRE INSTALADO)
A61 i SIDE APRON
j TABLALATERAL
9-3-24-722GD21 (4)
_lJ _ ol
9-3-24-711GD33 (1)
9-3-24-722GD09 (2)
NET(BLUE)
RED (AZUL)
.... (PRE_NSTALLED)
(PREINSTALADO)
; SAFETY STRAP
[__. (PREINSTALLED)
CORREA DE SEGURIDAE
(PREINSTALADO)
_ WELDED FRAME SUPPORT
= WITH THREADS
.... {PREINSTALLED_
APOYO DE MARCO
SOLDADO DON HILOS
(PREFNSTALADO /
A3_ i 10 MM HEX WRENCH
9-3-24-711GD19 (1)
A71 i END APRON
9-3-24-722GD22 (2)
Atl I ; ;AFETY STRAP BUCKLE
9-3-24-711 GD34 (2)
A151 i PLASTIC LEG PANEL
9-3-24-711 GD24 (2)
===
LLAVE HEXAGONAL
DE 10 MM
___ (PREINSTALLED)
TABLA DE EXTREMO
(PREINSTALADO)
[__ (PREINSTALLED)
HEB]LLA PARA CORREA
DE SEGURIDAD
(PRE FNSTALADO)
.... (PRE INSTALLED)
PANEL DE PIERNA
3LASTICO (PRE INSTALADO
_ MINt PHILLIPS HEAD
= = SCREWDRIVER
DESTORNiLLADOR
PHiLIPS MINI
9-3-24-711GD20 (1)
i MOLDED CORNER
i (BLACK) (PRE INSTALLED)
-- ESQUINA MOLDEADA
I(NEGRA) (PRE INSTALADO
9-3-24-722GD23 (4)
- - -- (PRE INSTALLED)
TORNILLO CON CABEZA
HEXAGONAL DE//2 '
rlq: i[ '2"NExNEADsOREw
I 9-3-24-711GD35 (3)
9-3-24-711GD18 (8)
(PRE [NSTALADO)
! 4 X 7 MM PHILLIPS HEAD
I
.... BOLT (PRE INSTALLED)
PERNOCON CABEZA
PH_LIPSDE 4 X 7 MM
(PRE INSTALADO)
1-1-24-942 GD (Continued on the next page.) P.2 (Siga a la pagina siguiente.) www.sportcraft.com
@2009 Sportcraft, Ltd.
English I
I EspaSol ]
ASSEMBLY iNSTRUCTIONS:
We recommend that two adults work together to assemble this table.
The table will be assembled upside down and then turned over onto its legs. This is a very
heavy table and turning it over will require at least two strong adults.
We suggest that you use the bottom carton as a clean flat work area to protect the table•
N
(_ =(1)
G L./
@ 4_ =(32)
| _ =(;)
INSTRUCCIONES DE ENSAMBLAJE
Recomendamos que dos adultos ayuden a armar esta mesa.
La mesa puede armarse de manera invertida y despues darse vuelta para qua se asiente sobre las
paras Esta mesa es pesado y para darle vuelta sera necesaria la participaci#n de dos adultos fuertes.
Sugerimos que utilice el rondo de ta caja como area de trabajo limpia y plana para la protecciSn de la
mesa
//1
i
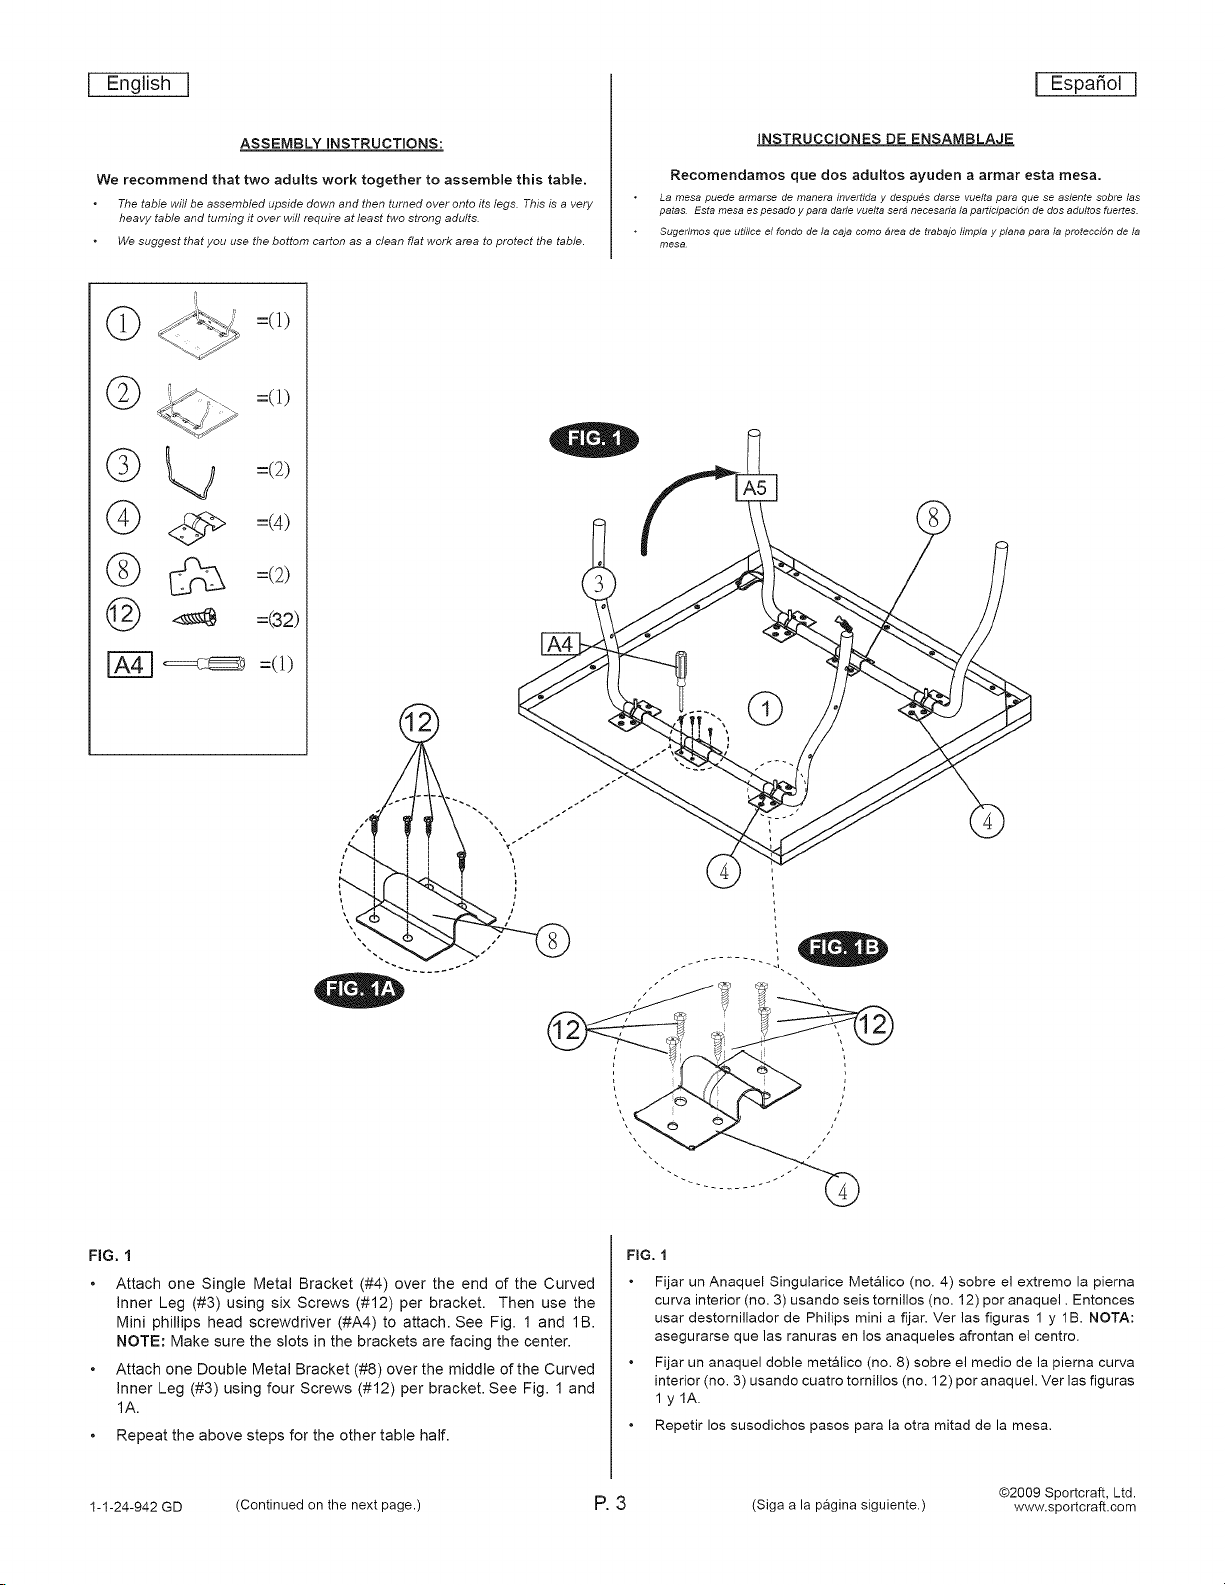
FIG. 1
Attach one Single Metal Bracket (#4) over the end of the Curved
inner Leg (#3) using six Screws (#12) per bracket. Then use the
Mini phillips head screwdriver (#A4) to attach. See Fig. 1 and lB.
NOTE: Make sure the slots in the brackets are facing the center.
Attach one Double Metal Bracket (#8) over the middle of the Curved
inner Leg (#3) using four Screws (#12) per bracket. See Fig. 1 and
1A.
Repeat the above steps for the other table half.
FIG, I
Fijar un Anaquel Singularice Metalico (no. 4) sobre el extremo la pierna
curva interior (no. 3) usando seis tornillos (no. 12) por anaquel. Entonces
usar destomillador de Philips mini a fijar. Ver las figuras 1 y 1B. NOTA:
asegurarse que las ranuras en los anaqueles afrontan el centro.
Fijar un anaquel doble met&lico (no. 8) sobre el medio de la pierna curva
interior (no. 3) usando cuatro tornillos (no. 12) por anaquel. Ver las figuras
lylA.
Repetir los susodichos pasos para la otra mitad de la mesa.
1-1-24-942 GD (Continued on the next page.) P.3 (Siga a la pagina siguiente.) www.sportcraft.com
@2009 Sportcraft, Ltd.
J J Espa_ol IEnglish I
=(2)
=(16)
@ =(8)
=(2)
@
PLAYER / JUGADOR
CENTER / CENTRO
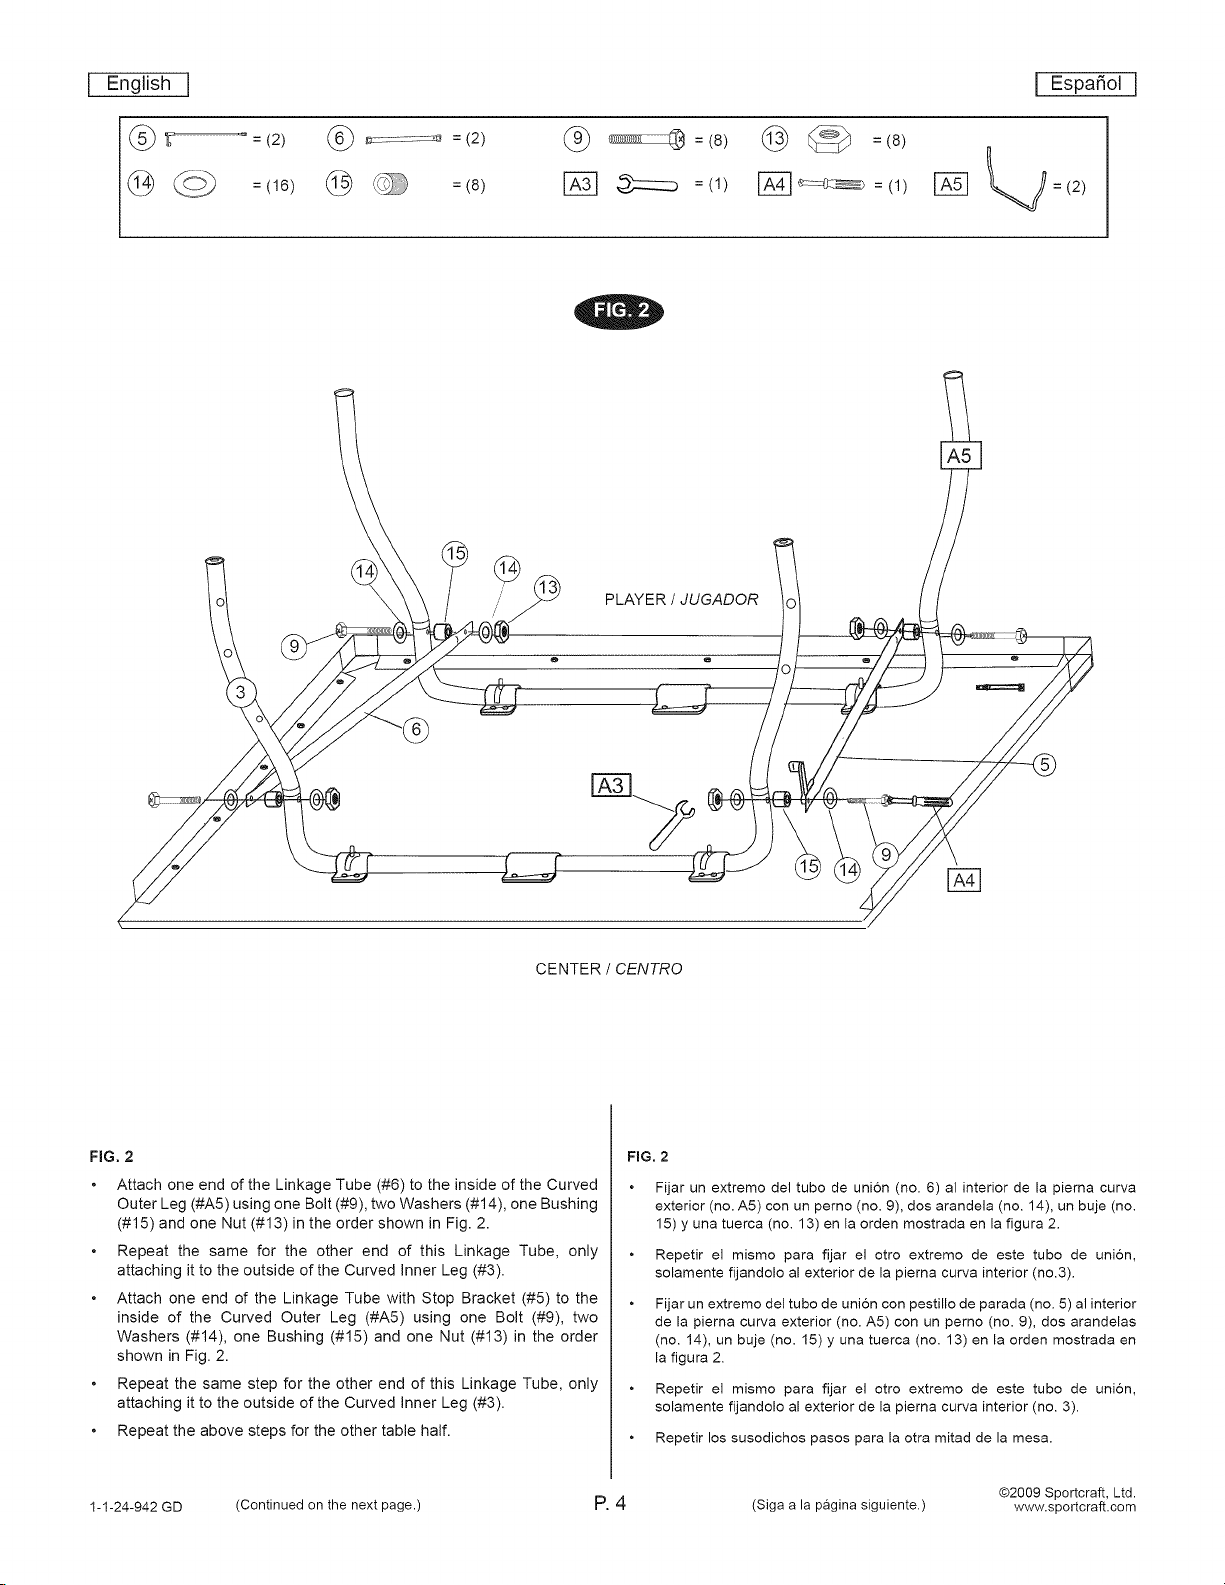
FIG. 2
Attach one end of the Linkage Tube (#6) to the inside of the Curved
Outer Leg (#AS) using one Bolt (#9), two Washers (#14), one Bushing
(#15) and one Nut (#13) in the order shown in Fig. 2.
Repeat the same for the other end of this Linkage Tube, only
attaching it to the outside of the Curved Inner Leg (#3).
Attach one end of the Linkage Tube with Stop Bracket (#5) to the
inside of the Curved Outer Leg (#AS) using one Bolt (#9), two
Washers (#14), one Bushing (#15) and one Nut (#13) in the order
shown in Fig. 2.
Repeat the same step for the other end of this Linkage Tube, only
attaching it to the outside of the Curved Inner Leg (#3).
Repeat the above steps for the other table half.
1-1-24-942 GD (Continued on the next page.) P. 4 (Siga a la pagina siguiente.) www.sportcraft.com
FIG. 2
Fijar un extremo del tubo de union (no. 6) al interior de la pierna curva
exterior (no. A5) con un pemo (no. 9), dos arandela (no. 14), un buje (no.
15) y una tuerca (no. 13) en la orden mostrada en la figura 2.
Repetir el mismo para fijar el otro extremo de este tubo de uni6n,
solamente fijandolo al exterior de la pierna curva interior (no.3).
Fijar un extremo del tube de union con pestillo de parada (no. 5) al interior
de la pierna curva exterior (no. A5) con un pemo (no. 9), dos arandelas
(no. 14), un buje (no. 15) y una tuerca (no. 13) en la orden mostrada en
la figura 2.
Repetir el mismo para fijar el otto extremo de este tubo de union,
solamente fijandolo al exterior de la pierna curva interior (no. 3).
Repetir los susodichos pasos para la otra mitad de la mesa.
@2009 Sportcraft, Ltd.
 Loading...