

Codice n° /
Code N
°
/ Code n° /
Codenummer
/ N° de código : SC220110/5060 ALL
Edizione /
Edition
/ Edition /
Ausgabe
/ Edición : 07/2002
SUPERCOLD 12 LT
SUPERCOLD 20 LT
SUPERCOLD 12+12 LT
MANUALE DI ISTRUZIONI
INSTRUCTION MANUAL
MANUEL D'INSTRUCTIONS
BEDIENUNGSANLEITUNG
MANUAL DE INSTRUCCIONES
DRINK SYSTEMS s.r.l.
ATTREZZATURE BAR
DISTRIBUTORE PRE-MIX DI BEVANDE FREDDE
PRE-MIX COLD DRINK DISPENSER
DISTRIBUTEUR PRE-MIX DE BOISSONS FROIDES
PRE MIX-AUSGABEGERÄT FÜR KALTE GETRÄNKE
DISTRIBUIDOR PRE-MIX DE BEBIDAS FRIAS

1
ITALIANO pag. 3
ENGLISH page 13
FRANÇAIS page 23
DEUTSCH Seite 33
ESPAÑOL pág. 43

2

3
Gentile Cliente,
ci congratuliamo con Lei per aver scelto un prodotto di qua-
lità che sicuramente risponderà alle Sue aspettative.
RingraziandoLa per la preferenza accordataci, la invitiamo
cortesemente a prendere attenta visione del presente manuale istruzioni prima di utilizzare la Sua macchina
Supercold 12 lt / Supercold 20 lt.

4
INDICE
1AVVERTENZE E CONSIGLI
IMPORTANTI pag. 5
2 INDICAZIONI UTILI PER IL
TRASPORTO pag. 5
3INSTALLAZIONE pag. 5
4 COLLEGAMENTO ALLA RETE
ELETTRICA pag. 6
5 FUNZIONAMENTO pag. 7
6 OPERAZIONI DI PULIZIA pag. 8
7 MANUTENZIONE STRAORDINARIA pag. 10
8 SCHEMA ELETTRICO pag. 11

5
1 - AVVERTENZE E CONSIGLI IMPORTANTI
Il presente manuale istruzioni è parte integrante di
Supercold e dovrà esserlo per qualsiasi consultazione.
Leggere attentamente le avvertenze contenute nel presente manuale di istruzioni prima di installare ed utilizzare Supercold.
Questo manuale, oltre ad informare sulla manutenzione
ordinaria di Supercold ed a supportare i tecnici nella
ricerca e nella riparazione degli eventuali guasti, si pone
come obiettivo il massimo sfruttamento della potenzialità della macchina, al fine di poterla adattare alle esigenze dei vari paesi dove si andrà ad utilizzare.
Modificare o tentare di modificare questo apparecchio,
oltre a fare decadere qualsiasi forma di garanzia, è
estremamente pericoloso.
E' necessario che le operazioni di manutenzione vengano effettuate da personale professionalmente qualificato; non tentare mai di ripararlo da soli poiché l'intervento di persone non competenti, oltre ad essere pericoloso, può causare dei gravi danni.
2 - INDICAZIONI UTILI PER IL TRASPORTO
Al fine di evitare che l’olio contenuto nel compressore
defluisca nel circuito refrigerante, è necessario trasportare,
immagazzinare e movimentare in posizione verticale
rispettando le indicazioni poste sull’imballo.
3 - INSTALLAZIONE
a) Liberare l'apparecchio dall'imballo, quindi sfilarlo dall'al-
to.
b) Posizionamento
- fare in modo che la carrozzeria della macchina sia
ben aerata ed evitare di installarla vicino a punti di calore; si consiglia temperature ambiente tra i 15 ed i 25
°C.

6
Prima di inserire la spina nella presa di alimentazione
è necessario che, per la Vs. sicurezza, prendiate attenta visione delle seguenti precauzioni.
- La sicurezza elettrica di questo apparecchio è raggiunta
soltanto quando lo stesso è correttamente collegato ad
un efficace impianto di messa a terra, eseguito come previsto dalle vigenti normative nazionali di sicurezza. Il
costruttore non può essere quindi considerato responsabile per eventuali danni causati dalla mancanza di messa
a terra dell'impianto.
- E' indispensabile predisporre, per una corretta e sicura
installazione una apposita presa comandata da un interruttore unipolare con distanza di apertura dei contatti uguale o superiore a 3 mm, conforme alle vigenti normative
nazionali di sicurezza.
- Accertarsi che il cavo di alimentazione, per tutta la sua
lunghezza, non venga in nessun modo schiacciato. Non
usare prolunghe e, per staccare la spina, afferrare la stessa effettuando trazione dolce, dopo azionato (staccato)
l'interruttore.
- Non ostruire le griglie di ventilazione e di dissipazione del
calore in quanto una cattiva aerazione, oltre a determinare la diminuizione di rendimento ed un cattivo funzionamento, può provocare seri danni all'apparecchio.
4 - COLLEGAMENTO ALLA RETE ELETTRICA
7
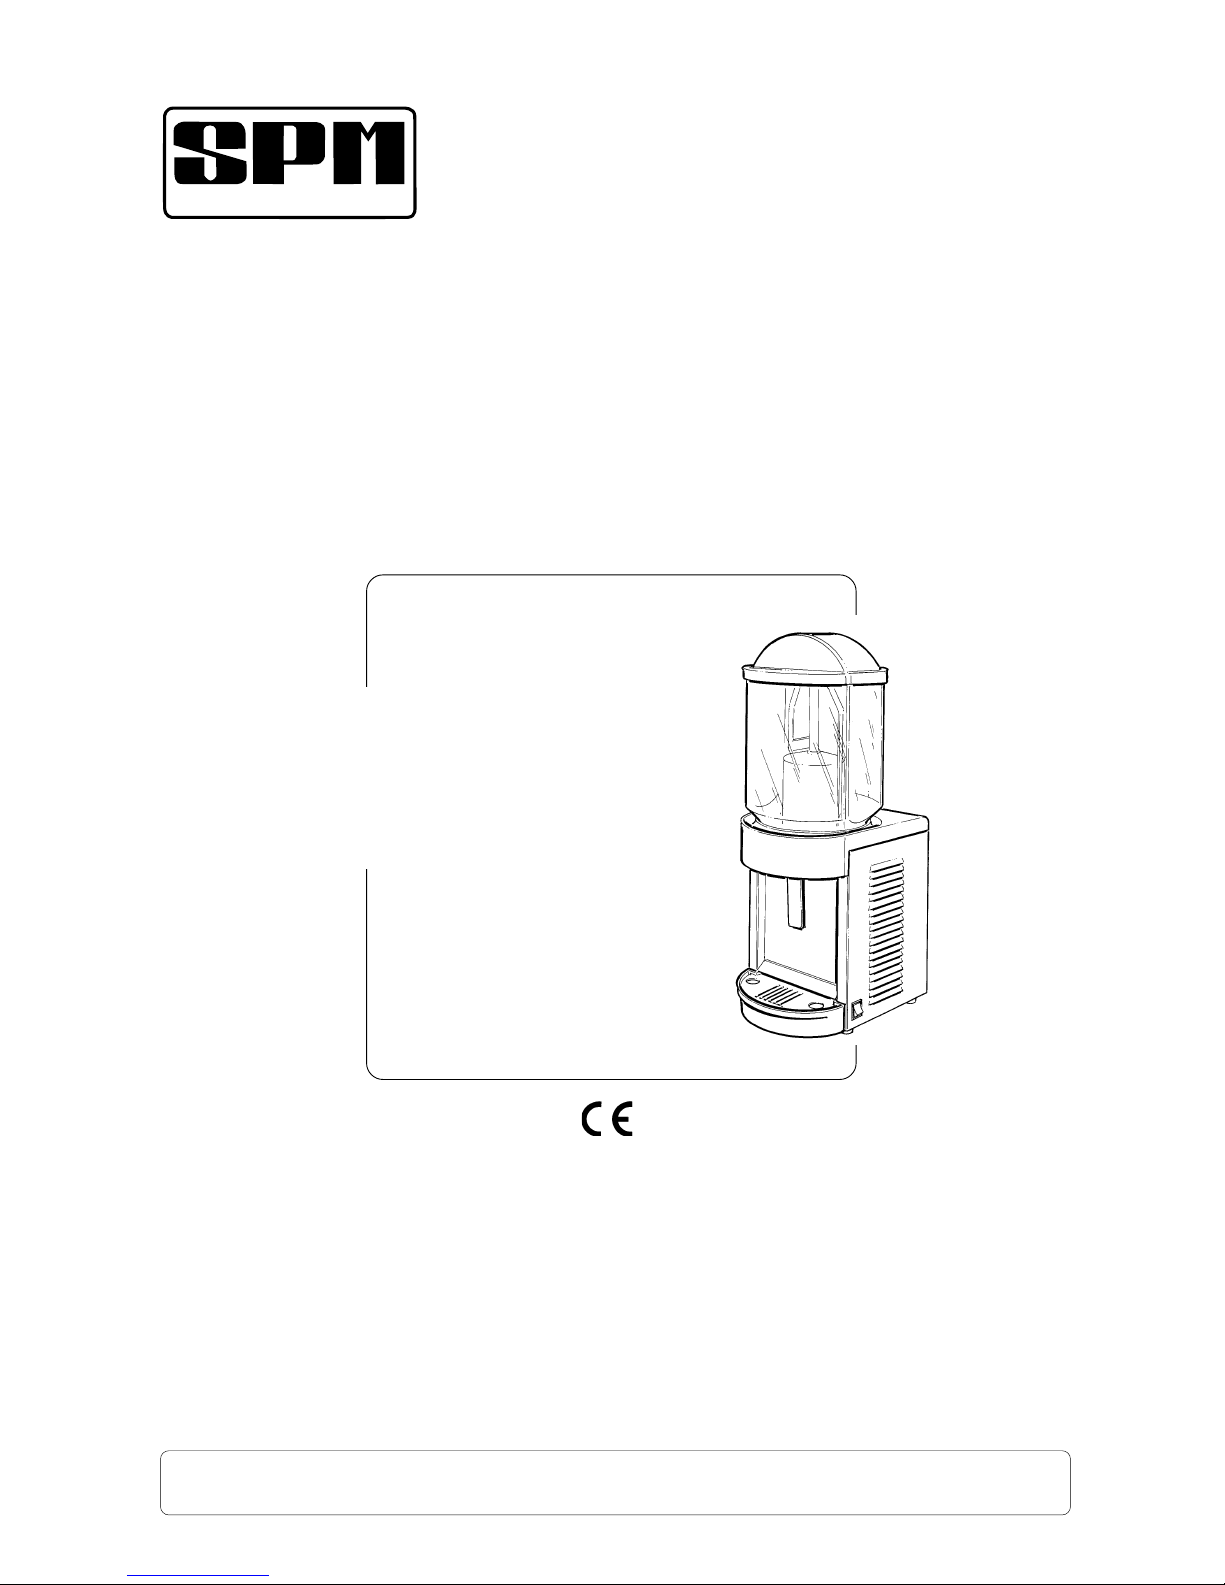
5 - FUNZIONAMENTO
- Introdurre il prodotto nella vasca (A) ed accendere la
macchina tramite l'interruttore (B) - fig. 1.
- Per erogare il prodotto, collocare un bicchiere sotto il
rubinetto e spingere la relativa leva verso l'interno (fig. 2).
Fig. 2
Fig. 1
8
Fig. 5
Fig. 3
Fig. 4
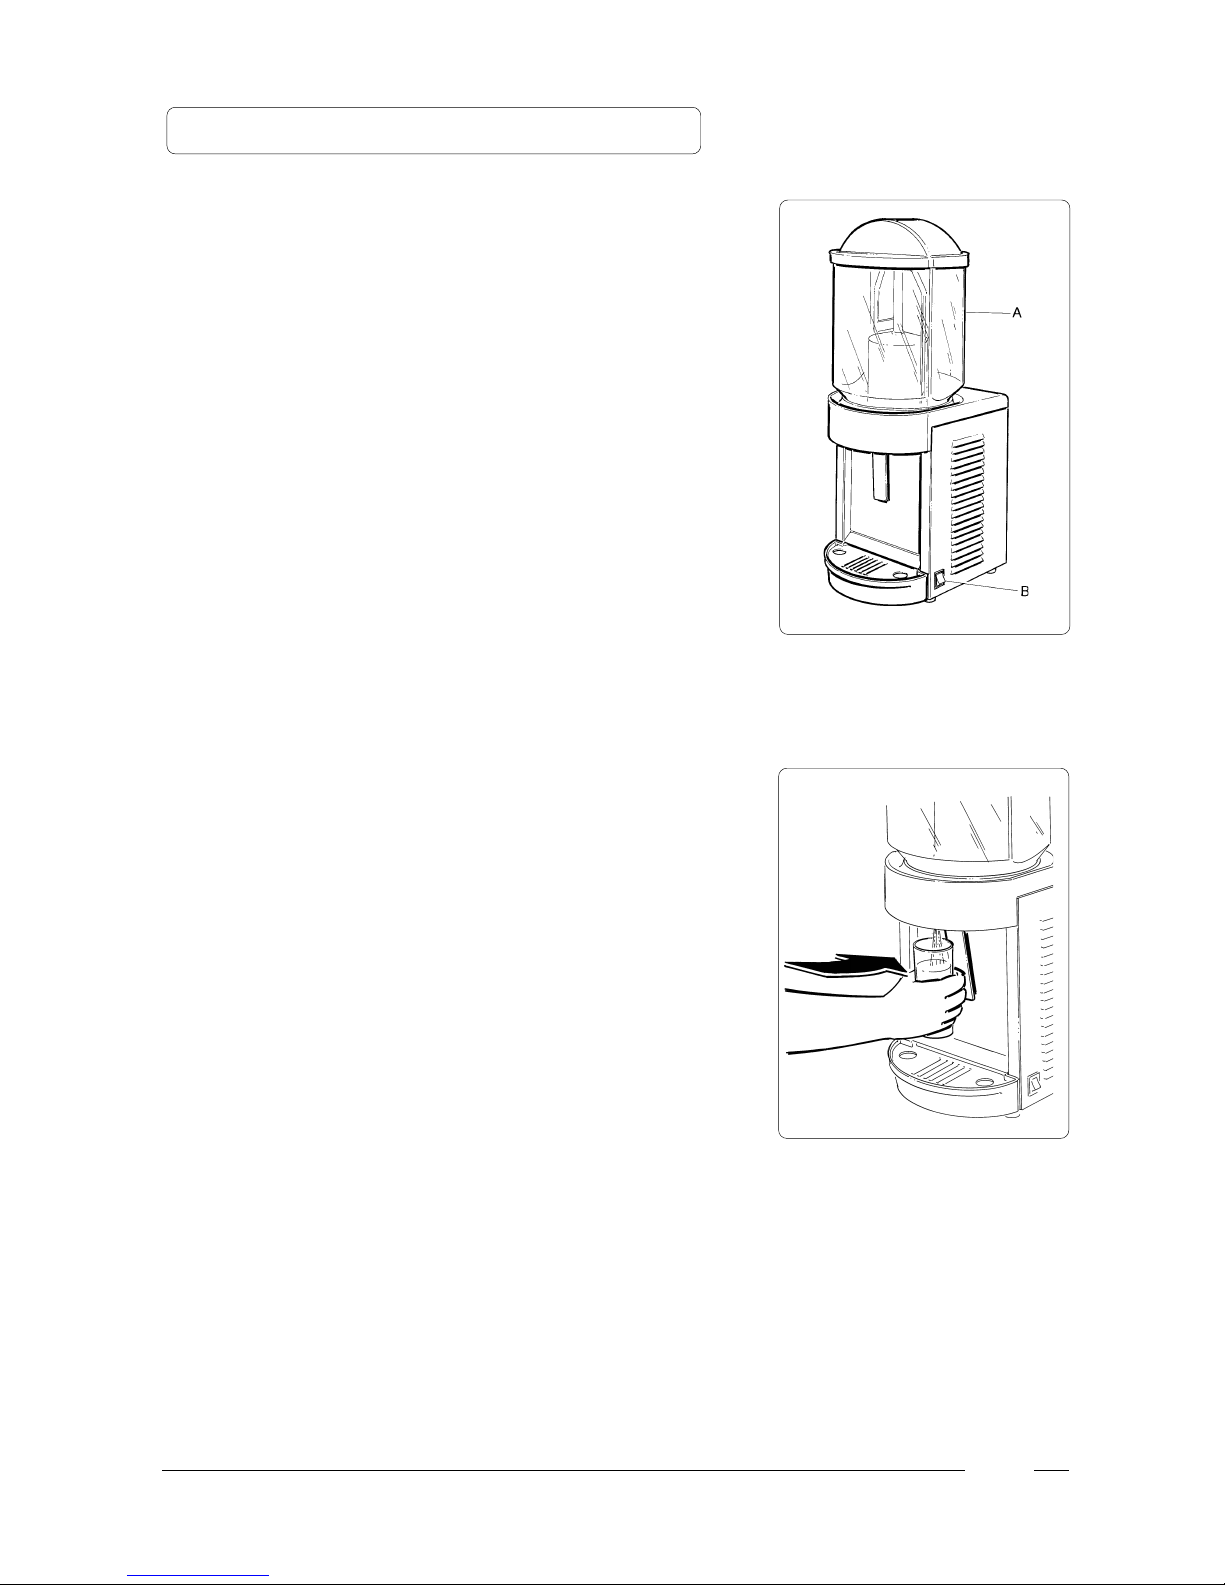
6- OPERAZIONI DI PULIZIA
- Smontare la vasca (A) dalla propria sede spingendola verso l'alto come raffigurato in fig. 3.
- Estrarre la pala mescolatrice (C) tirandola verso l'alto (fig.
4).
- Smontare il rubinetto in sequenza (fig. 5): svitare il pomello (D), estrarre la leva (E), svitare la rondella dentata (F) e
la molla (G) dopodichè estrarre dalla parte superiore la
boccola (H).
- Pulire dettagliatamente la vasca (A), la pala mescolatrice
(C) e tutti i componenti che formano il rubinetto, con acqua calda e detersivo per le stoviglie.
➤
H
G

9
Fig. 6
Fig. 8
- Per il rimontaggio del rubinetto procedere come segue (fig.
6,7 e 8):
- collocare la boccola (H) dalla parte superiore;
- dalla parte inferiore collocare la molla (G) e la rondella
dentata (F) spingendola verso l'alto e nel medesimo tempo avvitandola in senso orario.
- Per il rimontaggio della pala mescolatrice (C) appoggiarla
sopra al proprio albero di rotazione senza esercitare forza
eccessiva.
- Per il rimontaggio della vasca (A) inumidire con acqua la
guarnizione della vasca e spingerla con due mani dalla
parte superiore verso il basso in modo che si allinei completamente con la sua sede.
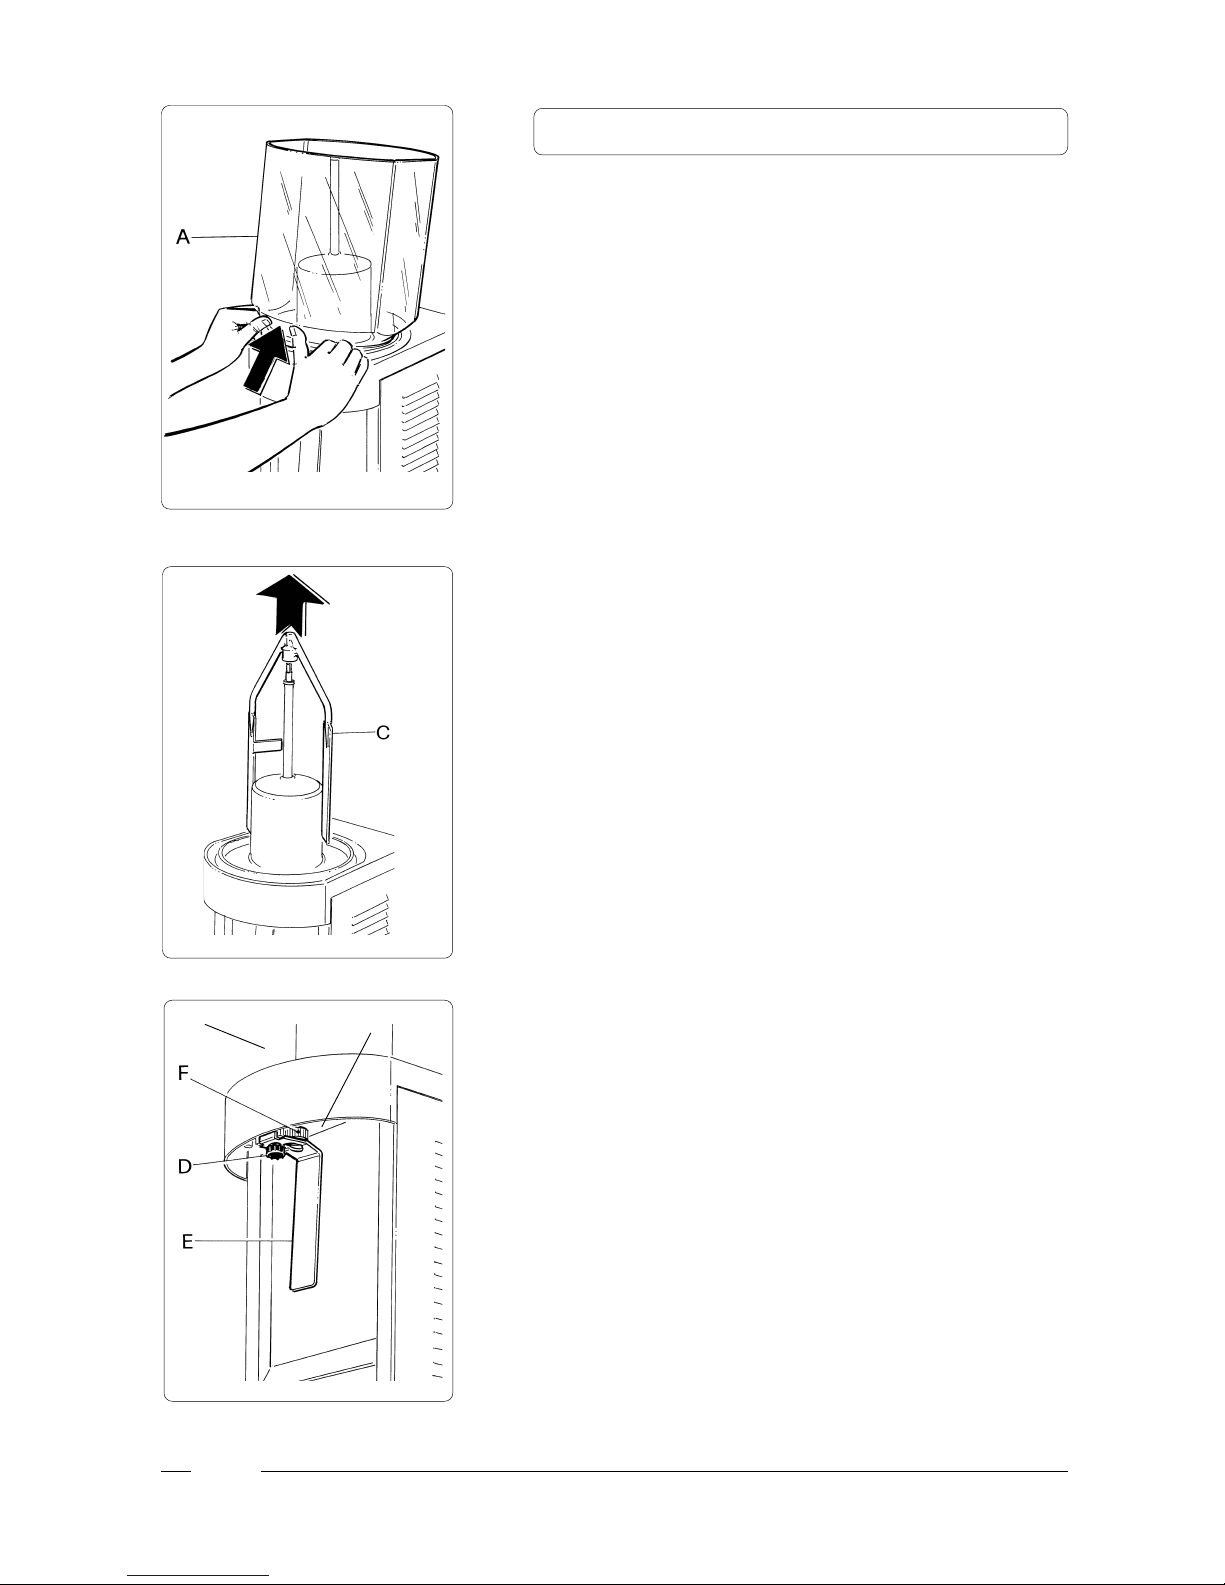
-Per estrarre la vaschetta raccogligocce alzare leggermente la parte frontale e sfilarla verso l'esterno (fig. 9).
Fig. 7
Fig. 9
10
Fig. 10
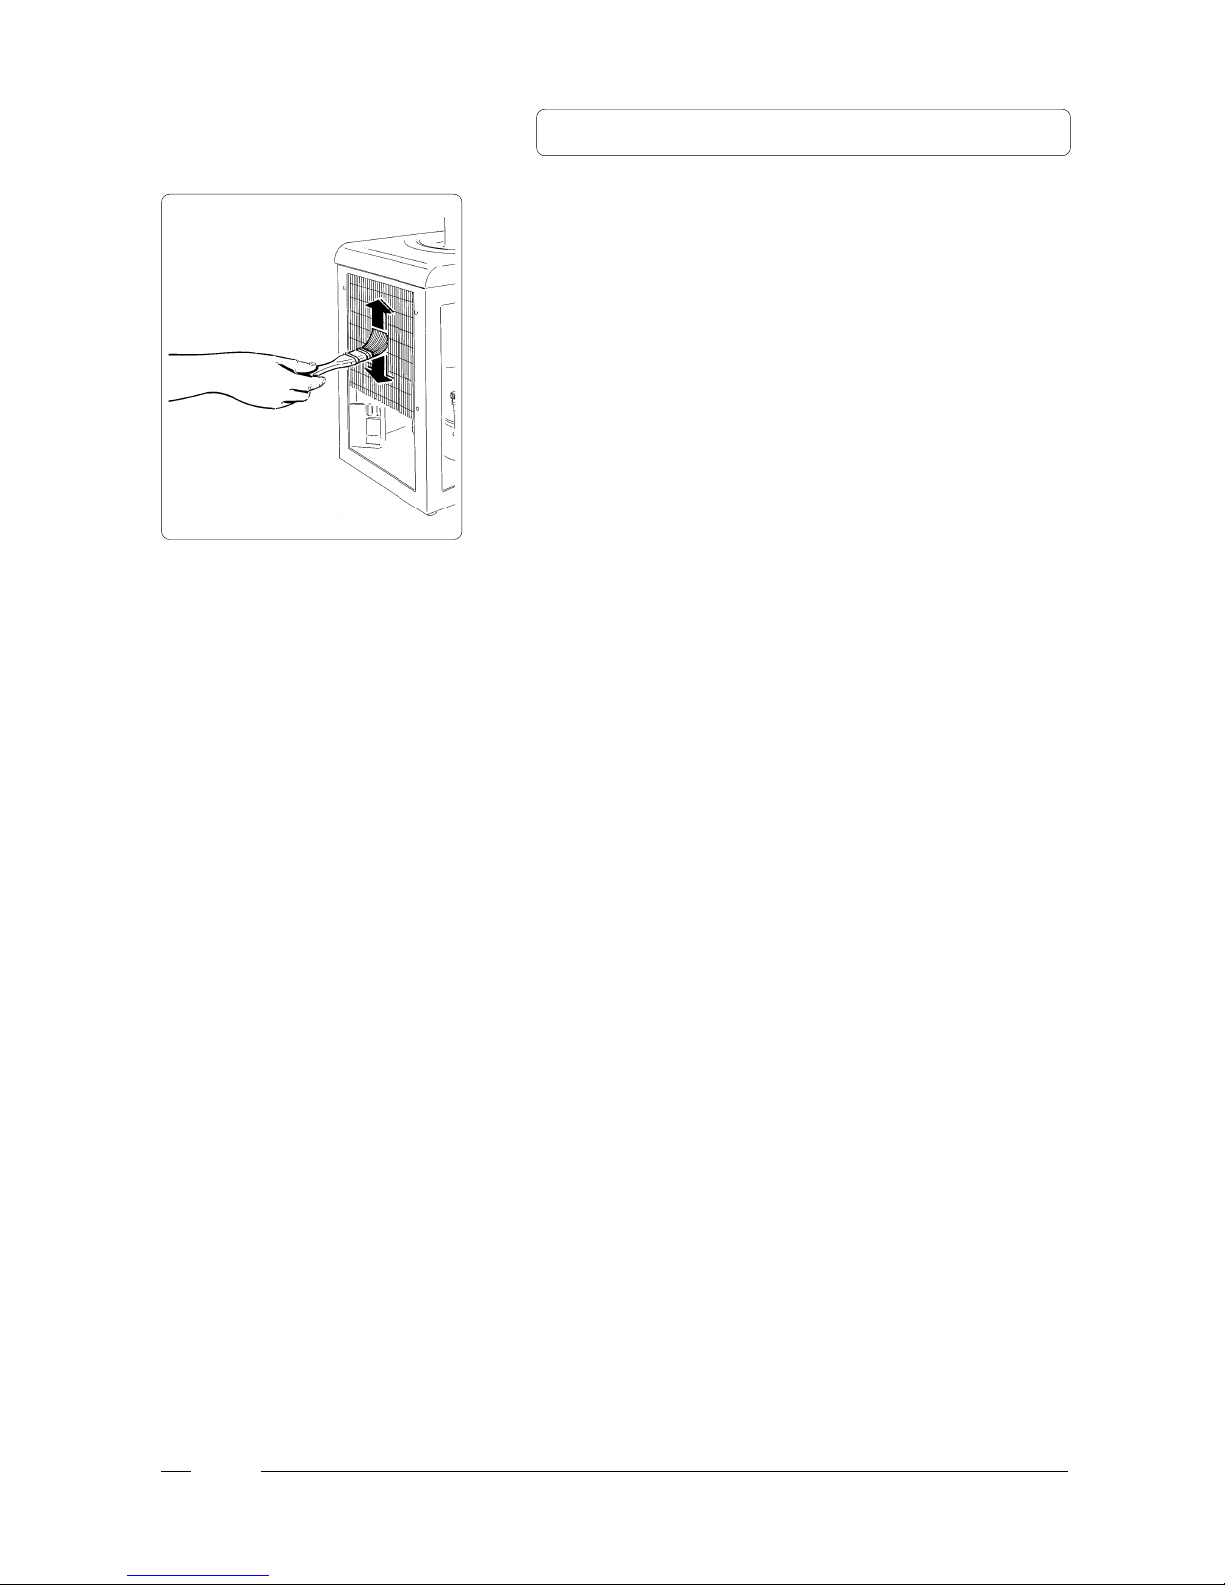
7 - MANUTENZIONE STRAORDINARIA
Al fine di ottenere un buon rendimento del gruppo frigorifero,
si raccomanda una volta al mese di pulire il condensatore
della macchina (fig. 10).

11
Fig. 11
8 - SCHEMA ELETTRICO
- Legenda schema elettrico
INT) Interruttore generale
V) Ventilatore
MR1) Motoriduttore 1
MR2) Motoriduttore 2
T1) Termostato 1
T2) Termostato 2
C) Compressore
R) Relé compressore
CS) Condensatore di spunto completo
PT) Protettore termico compressore
INT
N
L
MR1
MR2
T1
T2
PT
C
R
CS
V
Ø
2
1

12

13
Dear Client,
we would like to congratulate you for having chosen a high
quality product which will surely meet all your expectations.
While thanking you for the preference you have given us,
we invite you to carefully read the following instruction
manual before operating your Supercold 12 lt / Supercold
20 lt.

14
INDEX
1 IMPORTANT WARNINGS AND
SUGGESTIONS page 15
2 USEFUL INSTRUCTIONS FOR
TRANSPORT page 15
3 INSTALLATION page 15
4 CONNECTION TO POWER SUPPLY
MAINS page 16
5 OPERATING PROCEDURE page 17
6 CLEANING PROCEDURE page 18
7 SELECT MAINTENANCE page 20
8 WIRING DIAGRAM page 21

15
3 - INSTALLATION
a) Remove the packing material from the machine, then slide
it off from the top.
b) Positioning the machine
- the main body of the machine must be well ventilated.
Installation of the machine near a heat source should
be avoided. A room temperature between 15 °C and
25 °C is suggested.
1 - IMPORTANT WARNINGS AND SUGGESTIONS
The present instruction manual is an important part of
the Supercold and must be kept for any future
consultation.
Carefully read the warnings contained in this instruction manual before installing and operating the
Supercold.
Besides providing information on routine maintenance
of the Supercold and aiding the technical assistants in
the detection and repair of possible malfunctions, the
objective of this manual is to take advantage of the
maximum potentials of the Supercold in order to adapt
the machine to the specific needs of the various countries where it will be used.
Modification of, or any attempt to modify this machine,
is extremely dangerous and will cancel any form of
warranty.
All maintenance procedures must be performed by
expertly qualified personnel.
The attempt to repair the machine by unqualified persons is dangerous and may cause serious damage to
the machine.
2 - USEFUL INSTRUCTIONS FOR TRANSPORT
In order to prevent the oil contained in the compressor from
flowing into the cooling circuit, it is necessary to always carry,
store and handle the Supercold in a vertical position,
following the instructions found on the packaging.

16
For your personal safety, before inserting the plug into
the electrical outlet carefully read the following precautions.
- The electrical safety of Supercold can only be achieved if
the machine is properly connected to an efficient grounding system, in compliance with current national safety
standards. Therefore, the manufacturer cannot be held
responsible for damage and/or injury caused by failure to
properly ground the machine.
- For a safe and correct installation, it is necessary to provide for a special outlet, with contacts having an open distance equal to or greater than 3 mm, controlled by an unipolar circuit breaker, conforming to current national security standards.
- The power supply cable must not, in any way, for its entire
length, be compressed, extension cords may not be used,
and finally, the plug must be removed from the outlet with
a slight pulling movement, after having first cut-off the
power supply.
- Do not obstruct the ventilating grill and heat dispersion
grill, since an insufficient ventilation may not only reduce
the efficiency of the machine, causing it to function inadequately, but may also cause serious damage to the machine.
4 - CONNECTION TO POWER SUPPLY MAINS

17
5 - OPERATING PROCEDURE
- Pour the product into the bowl (A) and turn on the machine,
using the switch (B) - fig. 1.
- To dispense the product place a cup under the tap and
press the relevant lever inward (fig. 2).
Fig. 2
Fig. 1

18
Fig. 5
Fig. 3
Fig. 4
6- CLEANING PROCEDURE
- Remove the bowl (A) from its place by pushing it upward,
as shown (fig. 3).
- Remove the mixing blade (C) by pulling it upward (fig. 4).
- Disassembling the tap (fig. 5): unscrew the knob (D), remove the lever (E), unscrew the toothed washer (F) and
the spring (G) then remove the ferrule (H) from the upper
part.
- Carefully clean the bowl (A), the mixing blade (C) and all
part of the tap using hot water and dishwashing detergent.
➤
H
G

19
Fig. 6
Fig. 8
-To reassemble the tap, proceed as follows (fig. 6,7 and 8):
- place the ferrule (H) in the upper part;
- in the lower part place the spring (G) and the toothed
washer (F) pushing the washer upward while screwing it
clockwise.
-To reassemble he mixing blade (C) place it on its rotating
shaft, without exerting too much pressure.
-To reassemble the bowl (A), moisten the bowl gasket with
water, then press it down on the upper part, using both
hands, so that it is completely aligned in place.
-To remove the liquid drip tray, slightly lift the front part,
then pull it outward (fig. 9).
Fig. 7
Fig. 9

20
Fig. 10
7 - SELECT MAINTENANCE
To make sure that the refrigerating unit operates efficiently,
the condenser should be cleaned once a month (fig. 10).

21
Fig. 11
8 - WIRING DIAGRAM
- Wiring diagram key
INT) Power switch
V) Ventilator
MR1) Gear box 1
MR2) Gear box 2
T1) Thermostat 1
T2) Thermostat 2
C) Compressor
R) Compressor relay
CS) Starting condenser
PT) Overload protector
INT
N
L
MR1
MR2
T1
T2
PT
C
R
CS
V
Ø
2
1

22

23
Cher Client,
nous sommes heureux que vous ayez choisi un produit de
qualité qui saura sûrement répondre à vos attentes.
Nous vous remercions de la confiance que vous avez bien
voulu nous accorder et nous vous invitons à consulter attentivement ce manuel d'instructions avant d'utiliser votre
Supercold 12 lt / Supercold 20 lt.

24
SOMMAIRE
1 RECOMMANDATIONS ET
CONSEILS IMPORTANTS page 25
2 INDICATIONS UTILES POUR LE
TRANSPORT page 25
3 INSTALLATION page 25
4 CONNEXION AU RESEAU
ELECTRIQUE page 26
5 FONCTIONNEMENT page 27
6 NETTOYAGE page 28
7 TRAVAUX D'ENTRETIEN
EXTRAORDINAIRE page 30
8 SCHEMA ELECTRIQUE page 31

25
2 - INDICATIONS UTILES POUR LE TRANSPORT
Pour éviter que l’huile qui se trouve dans le compresseur
ne s’écoule dans le circuit de réfrigération, il faut transporter,
emmagasiner et déplacer la machine en position verticale
en respectant les indications qui se trouvent sur l’emballage.
3 - INSTALLATION
a) Libérez l'appareil de son emballage et ensuite retirez-le
par le haut.
b) Mise en place
-faites en sorte que le revêtement métallique de la machine soit bien aéré et ne l'installez pas, si possible, à
proximité de sources de chaleur; nous conseillons une
température ambiante allant de 15 à 25 degrés C.
1 - RECOMMANDATIONS ET CONSEILS IMPORTANTS
La présente notice fait partie intégrante du Supercold
et vous devez la garder soigneusement pour pouvoir la
consulter quand vous le désirez.
Lisez attentivement les recommandations qui s’y trouvent avant d’installer et d’utiliser votre Supercold.
Ce manuel donne des informations sur l'entretien ordinaire de Supercold et il aide les techniciens à rechercher les pannes éventuelles et à les réparer. En outre, il
se propose de stimuler au maximum l'exploitation des
capacités de la machine afin de pourvoir l'adapter aux
exigences propres aux différents pays dans lesquels
elle sera utilisée.
Modifier ou essayer de modifier cet appareil est extrêmement dangereux et, en plus, cela comporte la déchéance de toute sorte de garantie.
Il est nécessaire que les travaux d'entretien soient
effectués par un personnel qualifié professionnellement; n'essayez jamais de le réparer vous-même car
l'intervention de personnes non compétentes est non
seulement dangereuse mais en plus elle peut provoquer de graves dommages.

26
4 - CONNEXION AU RESEAU ELECTRIQUE
Avant d’introduire la fiche dans la prise d'alimentation,
il faut, pour votre propre sécurité, que vous preniez attentivement connaissance des précautions suivantes.
- La sécurité électrique de cet appareil n'est assurée que
s'il est correctement connecté à une installation de mise à
terre efficace et exécutée comme il est prévu par les réglementations nationales sur la sécurité en vigueur. Le
constructeur ne peut par conséquent être tenu pour responsable des dommages éventuels qui seraient causés
par l'absence de mise à terre de l'installation.
- Il faut absolument prévoir, pour avoir une installation correcte et sure, une prise spéciale commandée par une interrupteur unipolaire dont la distance d'ouverture des contacts soit de 3 mm ou plus, conformément aux réglementations nationales sur la sécurité en vigueur.
- Vérifiez que le câble d'alimentation ne soit écrasé en
aucune façon partie, n'employez pas de rallonges et, pour
détacher la fiche, prenez celle-ci en tirant doucement après
avoir actionné (détaché) l'interrupteur.
- N'obstruez pas les grilles de ventilation de dispersion de
la chaleur car une mauvaise aération, non seulement entraîne une diminution du rendement et un mauvais fonctionnement, mais en plus, peut provoquer de graves dommages à l'appareil.

27
5 - FONCTIONNEMENT
- Introduire le produit dans le réservoir (A) et mettre la
machine en marche en actionnant l'interrupteur (B) - fig. 1.
- Pour la distribution du produit, placer un verre sous le
robinet et pousser le levier correspondant vers l'intérieur
(fig. 2).
Fig. 2
Fig. 1

28
Fig. 5
Fig. 3
Fig. 4
6- NETTOYAGE
- Démonter le réservoir (A) hors de son logement en exerçant une poussée vers le haut d'après la figure 3.
- Extraire la palette mélangeuse (C) en la tirant vers le haut
(fig. 4).
- Démonter le robinet dans l'ordre (fig. 5): dévisser le bouton (D), extraire le levier (E), dévisser la rondelle dentée
(F) e le ressort (G) puis extraire la douille (H) par le haut.
- Nettoyer soigneusement le réservoir (A), la palette mélangeuse (C) et tous les composants du robinet à l'eau chaude
et avec un produit vaisselle.
➤
H
G

29
Fig. 6
Fig. 8
-Pour le remontage du robinet, procéder comme suit (fig.
6,7 et 8):
- remettre la douille (H) en place par le haut;
- remettre le ressort (G) ainsi que la rondelle dentée (F)
en place par le base en la poussant vers le haut, et en la
vissant simultanément dans le sens des aiguilles d'une
montre.
-Pour le remontage de la palette mélangeuse (C), la poser
au-dessus de son arbre de rotation sans le forcer.
-Pour le remontage du réservoir (A), humidifier avec de l'eau
la garniture du réservoir et la pousser des deux mains vers
le bas pour l'aligner complètement sur son logement.
-Pour extraire la gouttière, soulever légèrement la partie frontale et la faire glisser vers l'extérieur (fig. 9).
Fig. 7
Fig. 9

30
Fig. 10
7 - TRAVAUX D’ENTRETIEN EXTRAORDINAIRES
Pour obtenir un bon rendement du groupe frigorifique, on
recommande de procéder une fois par mois au nettoyage
du condensateur de la machine (fig. 10).

31
Fig. 11
8 - SCHEMA ELECTRIQUE
- Légende schéma des connexions
INT) Interrupteur général
V) Ventilateur
MR1) Motoréducteur 1
MR2) Motoréducteur 2
T1) Thermostat 1
T2) Thermostat 2
C) Compresseur
R) Relais compresseur
CS) Condensateur de chute complet
PT) Dispositif de protection thermique compresseur
INT
N
L
MR1
MR2
T1
T2
PT
C
R
CS
V
Ø
2
1

32

33
Sehr geehrter Kunde,
Sie haben sich für ein Qualitätsprodukt entschieden, das
mit Sicherheit Ihre Erwartungen erfüllen wird.
Wir danken Ihnen für diese Wahl und möchten Sie bitten,
diese Bedienungsanleitung sorgfältig zu lesen, bevor Sie
Ihre Supercold 12 lt / Supercold 20 lt in Betrieb nehmen.

34
INHALT
1 WICHTIGE HINWEISE UND
EMPFEHLUNGEN Seite 35
2 NÜTZLICHE HINWEISE FÜR
DEN TRANSPORT Seite 35
3 INSTALLATION Seite 35
4 ANSCHLUSS AN DAS STROMNETZ Seite 36
5 ANWEISUNGEN Seite 37
6 REINIGUNG Seite 38
7AUSSERORDENTLICHE
WARTUNG Seite 40
8 SCHALTPLÄNE Seite 41

35
2 - NÜTZLICHE HINWEISE FÜR DEN TRANSPORT
3 - INSTALLATION
a) Entfernen sie die Verpackung, indem sie den Karton nach
oben abziehen.
b) Ausstellung
- Stellen Sie die Supercold so auf dass das Gehäuse
gut gelüftet wird und vermeiden Sie Installationen in der
Nahe von Warmequellen; es wird eine Umgebungstemperatur von 15 °C - 25 °C empfohlen.
1 - WICHTIGE HINWEISE UND EMPFEHLUNGEN
Das vorliegende Anleitung stellt einen integralen Bestandteil von Supercold dar und muß zur Konsultation
aufbewahrt werden.
Lesen Sie die in diesem Handbuch enthaltenen Hinweise aufmerksam durch, bevor Sie Supercold installieren
und benutzen.
Dieses Handbuch informiert über die Ordnungsgemäße
Wartung der Supercold, dient den Technikern bei der
Suche und der Reparatur eventueller Störungen und
setzt sich das Ziel, eine optimale Nutzung der Maschine
zu ermöglichen, um sie an die spezifischen Anforderungen der verschiedenen Länder anzupassen, in denen
sie eingesetzt wird.
Abänderungen und versuchte Abänderungen des Gerätes fuhren zum sofortigen Verfall jeder Art von Garantie und sind ausgesprochen gefährlich.
Die erforderlichen Wartungsarbeiten mussen von qualifiziertem Fachpersonal aufgeführt werden; versuchen
Sie nie, selbst Eingriffe durchzufuhren, denn dies ist
gefährlich und kann schwere Beschädigungen hervorrufen.
Der Getränkeautomat muß unter Beachtung der Angaben
auf der Verpackung aufrecht transportiert, gelagert und
bewegt werden, um zu verhindern, dass das im Kompressor
enthaltene Öl auslauft.

36
4 - ANSCHLUSS AN DAS STROMNETZ
Vor dem Einstecken des Netzsteckers mussen di folgenden Sicherheitsmaßnahmen beachtet werden.
- Die elektrische Sicherheit diese Geräts wird nur erreicht,
wenn es wie von den geltenden nationalen Sicherheitsbestimmungen vorgeschrieben ausreichend geerdet wird.
Der Hersteller kann daher nicht haftbar gemacht werden
für Schaden, die auf einer unzureichenden Erdung der
Anlage zurückzuführen sind.
- Für eine sichere und korrekte Installation muß dem elektrischen Anschluss ein den geltenden nationalen Sicherheitsbestimmungen entsprechender Trennschalter mit einer Kontaktoffnungsweite von zumindest 3 mm vorgeschaltet werden.
- Stellen Sie sicher, das Netzkabel auf seiner gesamten
Lange nicht gequetscht wird, verwenden sie keine Verlängerung und ziehen Sie nie am Netzkabel, sondern immer am Netzstecker selbst, nachdem Sie den Trennschalter geöffnet haben.
- Achten Sie darauf, dass die Luftungsschlitze stets frei sind,
da eine schlechte Lüftung die Leistung des Geräts verringert, zu einem schlechten Funktionieren führt und außerdem schwere Beschädigungen des Geräts verursachen
kann.

37
5 - ANWEISUNGEN
- Das Produkt die Schale (A) einführen und die Maschine mit
dem Schalter (B) einschalten - Abb. 1.
- Für die Ausgabe des Produkts einen Becher unter den
Hahn stellen und den entsprechenden Hebel nach innen
drucken (Abb. 2).
Abb. 2
Abb. 1

38
Abb. 5
Abb. 3
Abb. 4
6- REINIGUNG
- Die Schale (A) aus ihrem Sitz ausbauen, indem sie wie
abgebildet nach oben geschoben wird (Abb. 3).
- Den Mischflugel (C) nach oben herausziehen (Abb. 4).
- Den Hahn wie folgt ausbauen (Abb. 5): den Knauf (D) abschrauben, den Hebel (E) herausziehen, die Zahnscheine
(F) und die Feder (G) abschrauben; anschließend die Buchse (H) am oberen Teil herausnehmen.
- Die Schale (A), den Mischflugel (C) und alle Bauteile, die
den Hahn bilden, sorgfaltig mit warmem Wasser und Spulmittel reinigen.
➤
H
G

39
Abb. 6
Abb. 8
- Beim Wiedereinbau des Hahns wie folgt vorgehen (Abb.
6,7 und 8):
- die Buchse (H) von oben einsetzen;
- von unten die Feder (G) und die Zahnscheibe (F) einsetzen, nach oben drucken und gleichzeitig in Gegenuhrzeigerrichtung drehen.
- Beim Wiedereinbau den Mischflugel (C) auf seine
Rotationswelle aufsetzen, ohne dabei einen zu grossen
Druck auszuüben.
- Beim Wiedereinbau der Schale (A) die Dichtung der Schale mit Wasser anfeuchten und mit beiden Händen von oben
nach unten drucken, so dass sie perfekt in ihren Sitz eintritt.
- Beim Herhausnehmen der Tropfenfangschale dieselbe vorne leicht anheben und dann herausziehen (Abb. 9).
Abb. 7
Abb. 9

40
Abb. 10
Zur Erzielung einer guten Leistung des Kuhlaggregats wird
empfohlen, den Kondensator der Maschine monatlich zu
reinigen (Abb. 10).
7 - AUSSERORDENTLICHE WARTUNG

41
Abb. 11
8 - SCHALTPLÄNE
- Zeichenerläuterung Schaltpläne
INT) Hauptschalter
V) Lüfter
MR1) Getriebemotor 1
MR2) Getriebemotor 2
T1) Thermostat 1
T2) Thermostat 2
C) Kompressor
R) Relais Kompressor
CS) Anlaufkondensator
PT) Thermoschalter Kompressor
INT
N
L
MR1
MR2
T1
T2
PT
C
R
CS
V
Ø
2
1

42

43
Estimado Cliente,
Nos alegramos por Usted que ha elegido un producto de
calidad que seguramente responderá a sus expectativas.
Agradeciendo su preferencia, le invitamos amablemente a
leer atentamente este manual de instrucciones, antes de
utilizar su Supercold 12 lt / Supercold 20 lt.

44
INDICE
1ADVERTENCIAS Y CONSEJOS
IMPORTANTES pág. 45
2 INDICACIONES UTILES PARA
EL TRANSPORTE pág. 45
3 INSTALACION pág. 45
4 CONEXION A LA RED
ELECTRICA pág. 46
5 FUNCIONAMIENTO pág. 47
6 OPERACIONES DE LIMPIEZA pág. 48
7 MANTENIMIENTO
EXTRAORDINARIO pág. 50
8 ESQUEMA ELECTRICO pág. 51

45
1 - ADVERTENCIAS Y CONSEJOS IMPORTANTES
El presente manual de instrucciones forma parte integrante de su Supercold y, por lo tanto, deberá conservarse para efectuar cualquier tipo de consulta.
Lean atentamente las advertencias que contiene el
presente manual de instrucciones antes de instalar y
utilizar Supercold.
Este manual, además de informar sobre el mantenimiento diario del expendedor y de servir de ayuda a los
técnicos que deban encontrar o reparar posibles averías, tiene como finalidad que uds. aprovechen al máximo las capacidades productivas de la máquina, para
que puedan adaptarla a las exigencias especificas de
los paises donde sera utilizada.
Modificar o intentar modificar este aparto no solo acarrea la perdida de cualquier forma de garantía, sino que
puede resultar peligroso.
Es necesario que las operaciones de mantenimiento
sean realizadas por personal especializado; les aconsejamos vivamente que se abstengan de intentar reparar la máquina por si mismos, ya que además de ser
peligroso puede causar danos graves al sistema.
2 - INDICACIONES UTILES PARA EL TRANSPORTE
Con el fin de evitar que el aceite contenido en el compresor
pase al circuito refrigerante, es necesario transportar, almacenar y desplazar en posición vertical el aparato, respetando las indicaciones situadas en el embalaje.
3 - INSTALACION
a) Liberen el aparato de su embalaje, extrayéndolo cuida-
dosamente por la parte superior.
b) Colocación
- asegúrense de que la carrocería de la máquina esté
bien aireada y procuren no instalarla cerca de fuentes
de calor, se aconseja una temperatura ambiente entre
los 15 °C y 25 °C.

46
Antes de introducir el enchufe en la toma de corriente,
es necesario uds. adopten las siguientes precauciones.
- La seguridad eléctrica de este aparato depende de que
esté correctamente conectado a una eficaz instalación de
puesta a tierra realizada tal y como está previsto por las
normas nacionales vigentes de seguridad. Por lo tanto, el
constructor no puede ser considerado responsable por
los posibles danos causados por la falta de puesta a tierra de la instalación.
- Es indispensable colocar, para una correcta y segura instalación, una toma gobernada por un interruptor unipolar
que tenga una distancia de abertura de los contactos igual
o superior a 3 mm, conforme a lo establecido por las normas vigentes de seguridad de la nación.
- Asegúrense de que el cable de alimentación no sufra
aplastamientos en ninguna de sus partes; eviten el uso
de alargadores y, para sacar el enchufe, tiren suavemente de la cabeza, después de haber desactivado (apagado) el interruptor.
- No obstruyan las rejillas de ventilación y de disipación del
calor ya que una mala ventilación, no solo provoca la disminución del rendimiento y el mal funcionamiento del aparato, sino que puede acarrear serios danos a todo el sistema.
4 - CONEXION A LA RED ELECTRICA

47
5 - FUNCIONAMIENTO
- Introducir el producto en el recipiente (A) y encender la
máquina con el interruptor (B) - fig. 1.
- Para suministrar el producto, colocar un vasito debajo del
grifo y empujar la relativa palanca hacia el interior (fig. 2).
Fig. 2
Fig. 1

48
Fig. 5
Fig. 3
Fig. 4
6- OPERACIONES DE LIMPIEZA
- Desmontar el recipiente (A) de la propia sede empujandolo
hacia arriba como muestra el dibujo (fig. 3).
- Extraer la paleta mezcladora (C) tirándola hacia arriba (fig.
4).
- Destornillar el pomo (D), extraer la palanca (E), destornillar la arandela dentada (F) y el muelle (G) a continuación
extraer el anillo (H) desde la parte superior (fig. 5).
- Limpiar detenidamente el recipiente (A), la paleta mezcladora (C) y todos los componentes que forman el grifo, con
agua caliente y detergente para lavavajillas.
➤
H
G

49
Fig. 6
Fig. 8
-Para volver a montar el grifo proceder como sigue (fig. 6,7
y 8):
- colocar el anillo (H) desde la parte superior;
- desde la parte inferior colocar el muelle (G) y la arandela dentada (F) empuyandola hacia arriba y al mismo tiempo atornillándola en el sentido horario.
-Para volver a montar la paleta mezcladora (C) apoyarla
sobre el propio árbol de rotación sin ejercitar una fuerza
excesiva.
-Para volver a montar el recipiente (A) humedecer con agua
su guarnición y empujarlo con dos manos desde la parte
superior hacia abajo, de manera que se alinee completamente con su sede.
-Para extraer el recipiente recoge-gotas levantar ligeramente la parte frontal y extraerla (fig. 9).
Fig. 7
Fig. 9

50
Fig. 10
7 - MANTENIMIENTO EXTRAORDINARIO
Con el objetivo de obtener un buen rendimiento del grupo
frigorífico, se recomienda limpiar una vez al mes el
condensador de la máquina (fig. 10).

51
Fig. 11
8 - ESQUEMA ELECTRICO
- Leyenda esquema alámbrico
INT) Interruptor general
V) Ventilador
MR1) Motorreductor 1
MR2) Motorreductor 2
T1) Termostato 1
T2) Termostato 2
C) Compresor
R) Relé compresor
CS) Condensador del punto de arranque completo
PT) Dispositivo de protección térmica compresore
INT
N
L
MR1
MR2
T1
T2
PT
C
R
CS
V
Ø
2
1

52

MOD. SUPERCOLD
12 LT / 20 LT / 12+12 LT
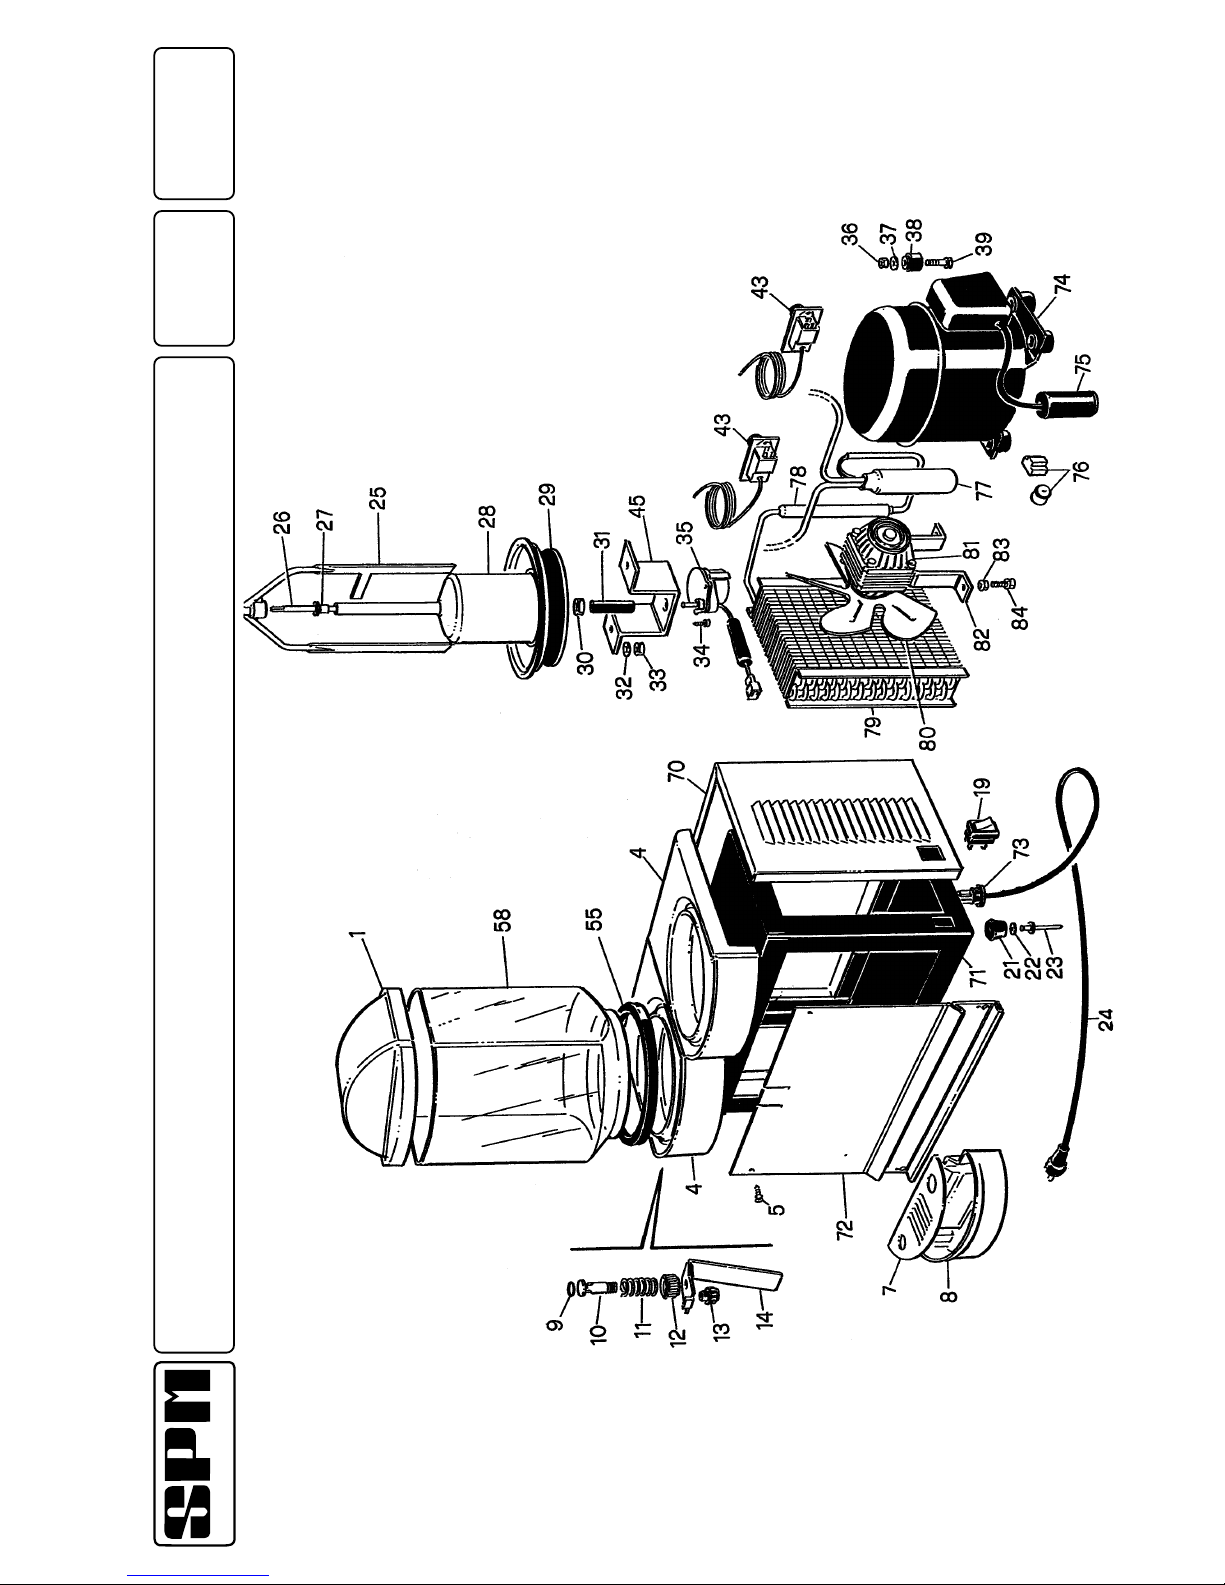
ORDINAZIONE PARTI DI RICAMBIO
SPARE PARTS ORDERING
COMMANDE PIECES DE RECHANGE
ERSATZTEILEBESTELLUNG
PEDIDO PIEZAS DE RECAMBIO
PARTI DI RICAMBIO /
SPARE PARTS
PIECES DE RECHANGE /
ERSATZTEILE
PIEZAS DE RECAMBIO
Per l'ordinazione dei ricambi indicare:
A) tipo della macchina
B) numero di matricola
C) numero di tavola
D) numero di posizione
Request the spare parts by indicating:
A) type of the machine
B) serial number
C) table number
D) position number
Pour commander le pièces de rechange donner les
indications suivantes:
A) type de la machine
B) numéro de série
C) numéro de table
D) numéro de position
Geben bei der Bestellung des Ersatzteils an:
A) Machinentyp
B) Seriennummer
C) Tafelnummer
D) Positionnummer
Para efectuar el pedido de piezas de recambio
indicar:
A) tipo de la máquina
B) numero de matrícula
C) numero de tabla
D) numero de posición
DRINK SYSTEMS s.r.l.


DRINK SYSTEMS s.r.l.
SUPERCOLD
TAV.
1
SUPERCOLD
12 LT - 110/60

DRINK SYSTEMS s.r.l.
SUPERCOLD
TAV.
2
SUPERCOLD
12 LT - 220/60

DRINK SYSTEMS s.r.l.
SUPERCOLD
TAV.
3
SUPERCOLD
12 LT - 230/50

DRINK SYSTEMS s.r.l.
SUPERCOLD
TAV.
4
SUPERCOLD
20 LT - 110/60

DRINK SYSTEMS s.r.l.
SUPERCOLD
TAV.
5
SUPERCOLD
20 LT - 220/60

DRINK SYSTEMS s.r.l.
SUPERCOLD
TAV.
6
SUPERCOLD
20 LT - 230/50
DRINK SYSTEMS s.r.l.
SUPERCOLD
TAV.
7
SUPERCOLD
12+12 LT
230/50

 Loading...