

Page 1
Data di emissione: Maggio, 2016 Revisione: 6 Pag. : 1/64
SP
MANUALE D’USO E MANUTENZIONE
GEBRAUCHS UND WARTUNGSANLEITUNG
OPERATOR’S MANUAL
ITALIANO PAG.2
DEUTSCH SEITE 20
ENGLISH PAGE 40
Page 2
Data di emissione: Maggio, 2016 Revisione: 6 Pag. : 2/64
Pubblicazione emessa da:
SPM DRINK SYSTEMS S.p.a.
Via Panaro n° 2
41057 Spilamberto (MO)
Edizione: 05/2016
Revisione: 06
© 2016 – SPM Drink Systems
Tutti i diritti di riproduzione del presente manuale sono riservati alla SPM DRINK SYSTEMS, la riproduzione anche
parziale è vietata.
Le descrizioni e le illustrazioni sono riferite alla specifica macchina/impianto in oggetto. SPM DRINK SYSTEMS si
riserva il diritto di apportare in qualsiasi momento tutte le modifiche che riterrà opportune alla produzione di serie.
Il presente manuale:
è parte integrante della fornitura e deve essere letto attentamente al fine di un utilizzo corretto, in
conformità ai requisiti essenziali di sicurezza;
è elaborato secondo le disposizioni della Direttiva Macchine 2006/42/CE e riporta le informazioni
tecniche necessarie per svolgere correttamente tutte le procedure in condizioni di sicurezza;
deve essere conservato con cura (protetto in un involucro trasparente e stagno per evitarne il
deterioramento) e deve accompagnare la macchina durante tutta la sua vita, compresi eventuali passaggi di
proprietà. In caso di smarrimento o deterioramento è possibile riceverne una copia facendo richiesta alla
SPM DRINK SYSTEMS segnalando i dati riportati sulla targhetta d’identificazione
SPM DRINK SYSTEMS declina ogni responsabilità per uso improprio della macchina/impianto e/o per danni causati
in seguito ad operazioni non contemplate in questo manuale.
Gentile Cliente,
ci congratuliamo con Lei per aver scelto un
prodotto di qualità che sicuramente
risponderà alle Sue aspettative.
RingraziandoLa per la preferenza accordataci,
la invitiamo cortesemente a prendere attenta
visione del presente manuale d’uso e
manutenzione.
Page 3

Data di emissione: Maggio, 2016 Revisione: 6 Pag. : 3/64
INDICE
1. AVVERTENZE E CONSIGLI IMPORTANTI
......................................................................4
2. CORREDO DELL’APPARECCHIO ............4
3. INDICAZIONI UTILI PER IL TRASPORTO4
4. INDICAZIONI UTILI PER IL
SOLLEVAMENTO .....................................4
5. SPECIFICHE TECNICHE ............................5
6. POSIZIONAMENTO ....................................6
7. COLLEGAMENTO ALLA RETE
ELETTRICA ................................................7
8. OPERAZIONI DI AVVIAMENTO E
MODALITA’ D’USO ..................................8
Impostazione della temperatura di defrost (solo
per SP2 ed SP3 elettroniche)........................... 10
9. OPERAZIONI DI PULIZIA E
SANITIZZAZIONE QUOTIDIANA ........11
10. MANUTENZIONE STRAORDINARIA ....18
Pulizia del condensatore ................................. 18
Controllo e sostituzione delle guarnizioni ...... 19
Stoccaggio invernale ....................................... 19
11. ESCLUSIONE DI RESPONSABILITA’ ....19
12. GUIDA ALLA RISOLUZIONE DEI
PROBLEMI ...............................................20
Page 4

Data di emissione: Maggio, 2016 Revisione: 6 Pag. : 4/64
1. AVVERTENZE E CONSIGLI
IMPORTANTI
Il presente manuale d’uso ed installazione
è parte integrante dell’apparecchio e dovrà
essere conservato per qualsiasi
consultazione. Salvo diversa indicazione, il
presente manuale è rivolto all’operatore
(personale che usa quotidianamente
l’apparecchio) e al manutentore (personale
qualificato per installazione e/o
manutenzione). Le parti del manuale
rivolte solo al manutentore verranno
opportunamente evidenziate. Leggere
attentamente le avvertenze contenute nel
presente manuale prima di installare ed
utilizzare l’apparecchio.
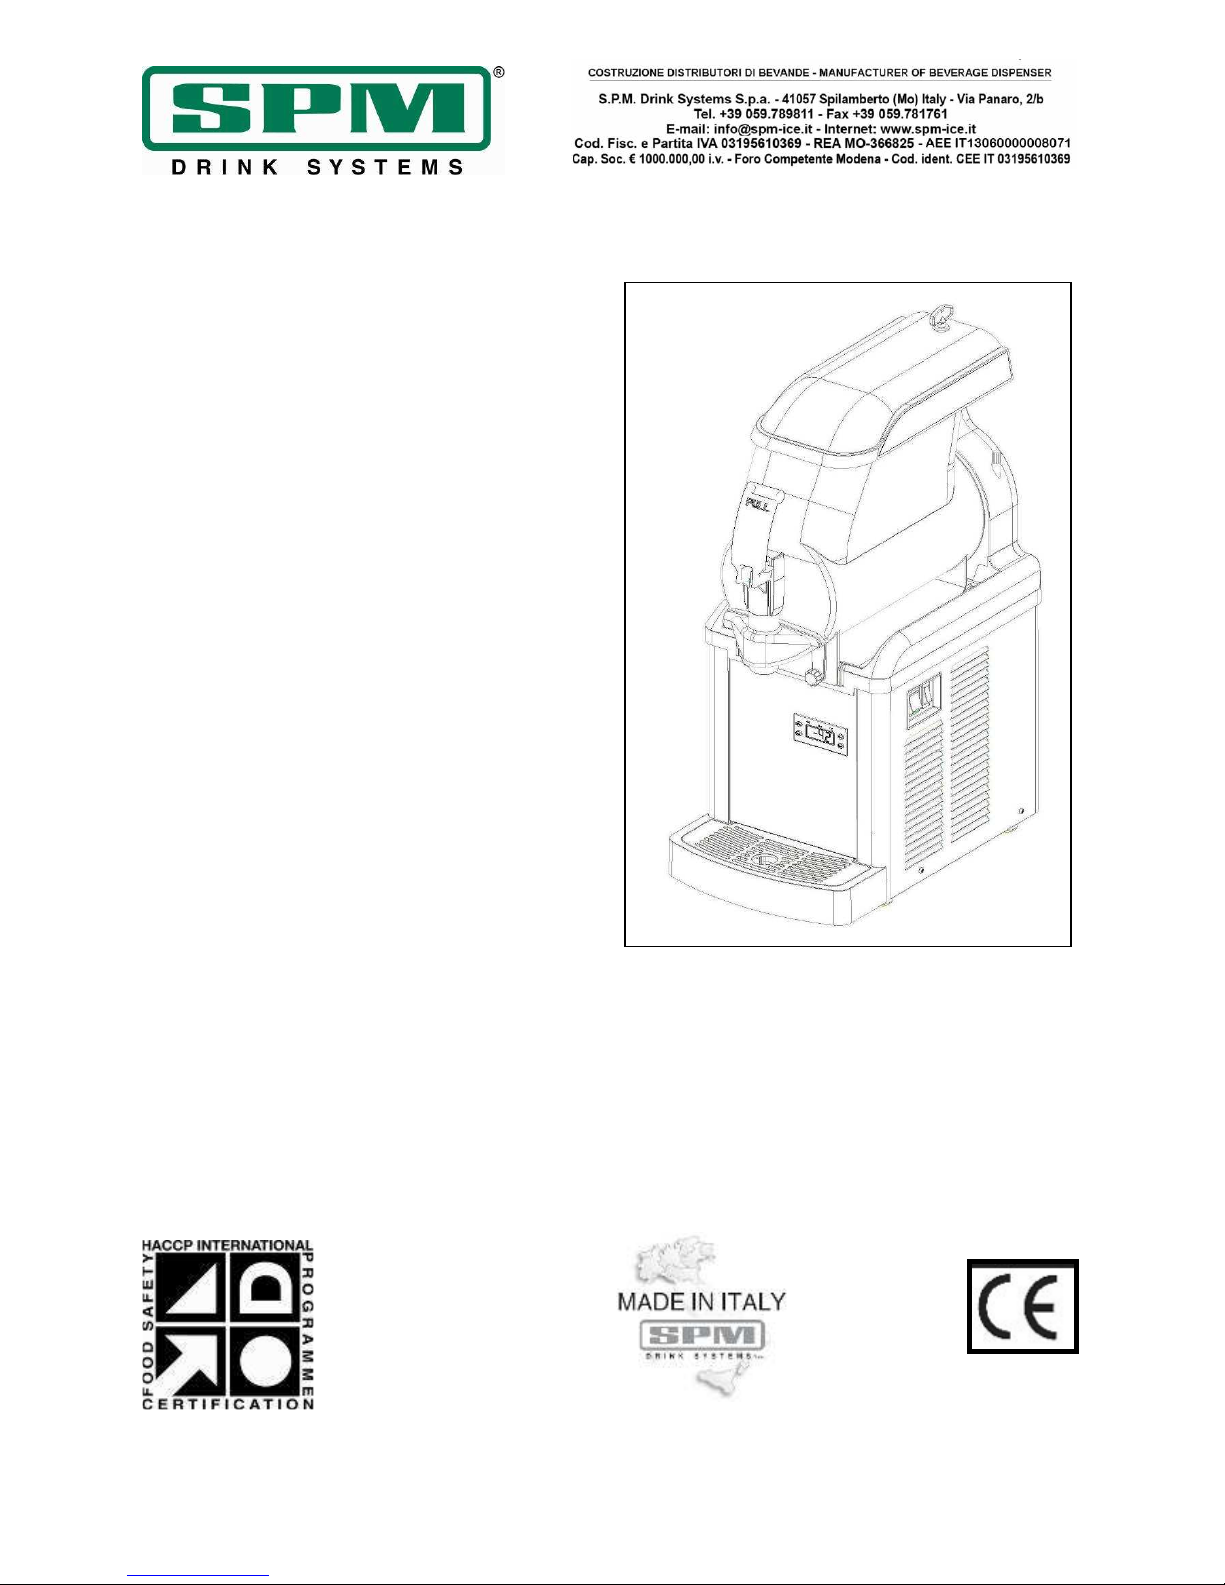
Il presente apparecchio è stato progettato
per la produzione di creme al caffè, ice
cappuccino, sorbetti, granite e prodotti
similari preparati miscelando acqua o latte
con prodotti in polvere.
Al momento del ricevimento di questo
apparecchio assicurarsi che il codice di
identificazione dello stesso corrisponda
a quello da Voi ordinato e riportato sempre
sui documenti di trasporto e cioè:
- “nome apparecchio” seguito dal numero
di matricola progressivo.
Questo apparecchio è destinato solo ed
esclusivamente all’uso per il quale è stato
concepito ed il costruttore non può essere
ritenuto responsabile per eventuali danni
dovuti ad un uso improprio.
Il presente apparecchio non è da intendersi
adatto all’uso da parte di persone (incluso
bambini) con ridotte capacità fisiche,
sensoriali o mentali, o prive di esperienza e
conoscenza, a meno che siano state
supervisionate o istruite riguardo all’uso
dell’apparecchio da una persona
responsabile della loro sicurezza. I bambini
dovrebbero essere supervisionati per
assicurarsi che non giochino con
l’apparecchio.
Il presente apparecchio non è adatto
all’uso esterno. Il presente apparecchio
non è adatto all’installazione in luoghi in
cui può essere utilizzato un getto d’acqua.
Il presente apparecchio deve essere
installato in luoghi dove possa essere
controllato da personale qualificato.
2. CORREDO DELL’APPARECCHIO
Al momento dell’apertura all’interno dell’imballo
si troveranno i seguenti elementi:
- il presente manuale di uso e manutenzione,
- la dichiarazione di conformità CE;
- 1 tubetto di lubrificante (vaselina);
- 1 vaschetta raccogli gocce.
3. INDICAZIONI UTILI PER IL
TRASPORTO
Al fine di evitare che l’olio contenuto nel
compressore ermetico defluisca nel circuito
refrigerante, è necessario trasportare,
immagazzinare e movimentare l’apparecchio in
posizione verticale rispettando le indicazioni
poste sull’imballo. Nel caso in cui l’apparecchio
sia stato accidentalmente o volutamente per
ragioni di trasporto, tenuto in posizione non
verticale è necessario, prima del suo
avviamento, tenerlo per circa 3-4 ore in
posizione eretta in modo che l’olio ritorni nel
compressore.
4. INDICAZIONI UTILI PER IL
SOLLEVAMENTO
Ogni apparecchio è munito di un apposito
bancale in legno che ne permette lo
spostamento utilizzando gli usuali mezzi di
movimentazione e di sollevamento.
Attenzione
Non sollevare mai l’apparecchio
singolarmente, ma con l’aiuto di un altro
operatore.
Per non provocare danni all'apparecchio, le
manovre di carico e scarico sono da effettuarsi
con particolare cura. E' possibile sollevare
l'apparecchio, con carrello elevatore, a motore o
manuale, posizionando le pale nella parte
sottostante dello stesso.
Page 5
Data di emissione: Maggio, 2016 Revisione: 6 Pag. : 5/64
Va, invece, evitato di:
- rovesciare il distributore;
- trascinare il distributore con funi od altro;
- sollevare il distributore con imbracature o funi
- scuotere o dare scossoni al distributore ed al
suo imballo.
Per lo stoccaggio è necessario che l'ambiente sia
asciutto e con temperature comprese tra 0°C e
40 °C. Con l'imballo originale è possibile
sovrapporre non più di 2 apparecchi avendo
cura di mantenere la posizione verticale indicata
dalle frecce sull'imballo.
5. SPECIFICHE TECNICHE
Caratteristiche tecniche ed elettriche
dell’apparecchio
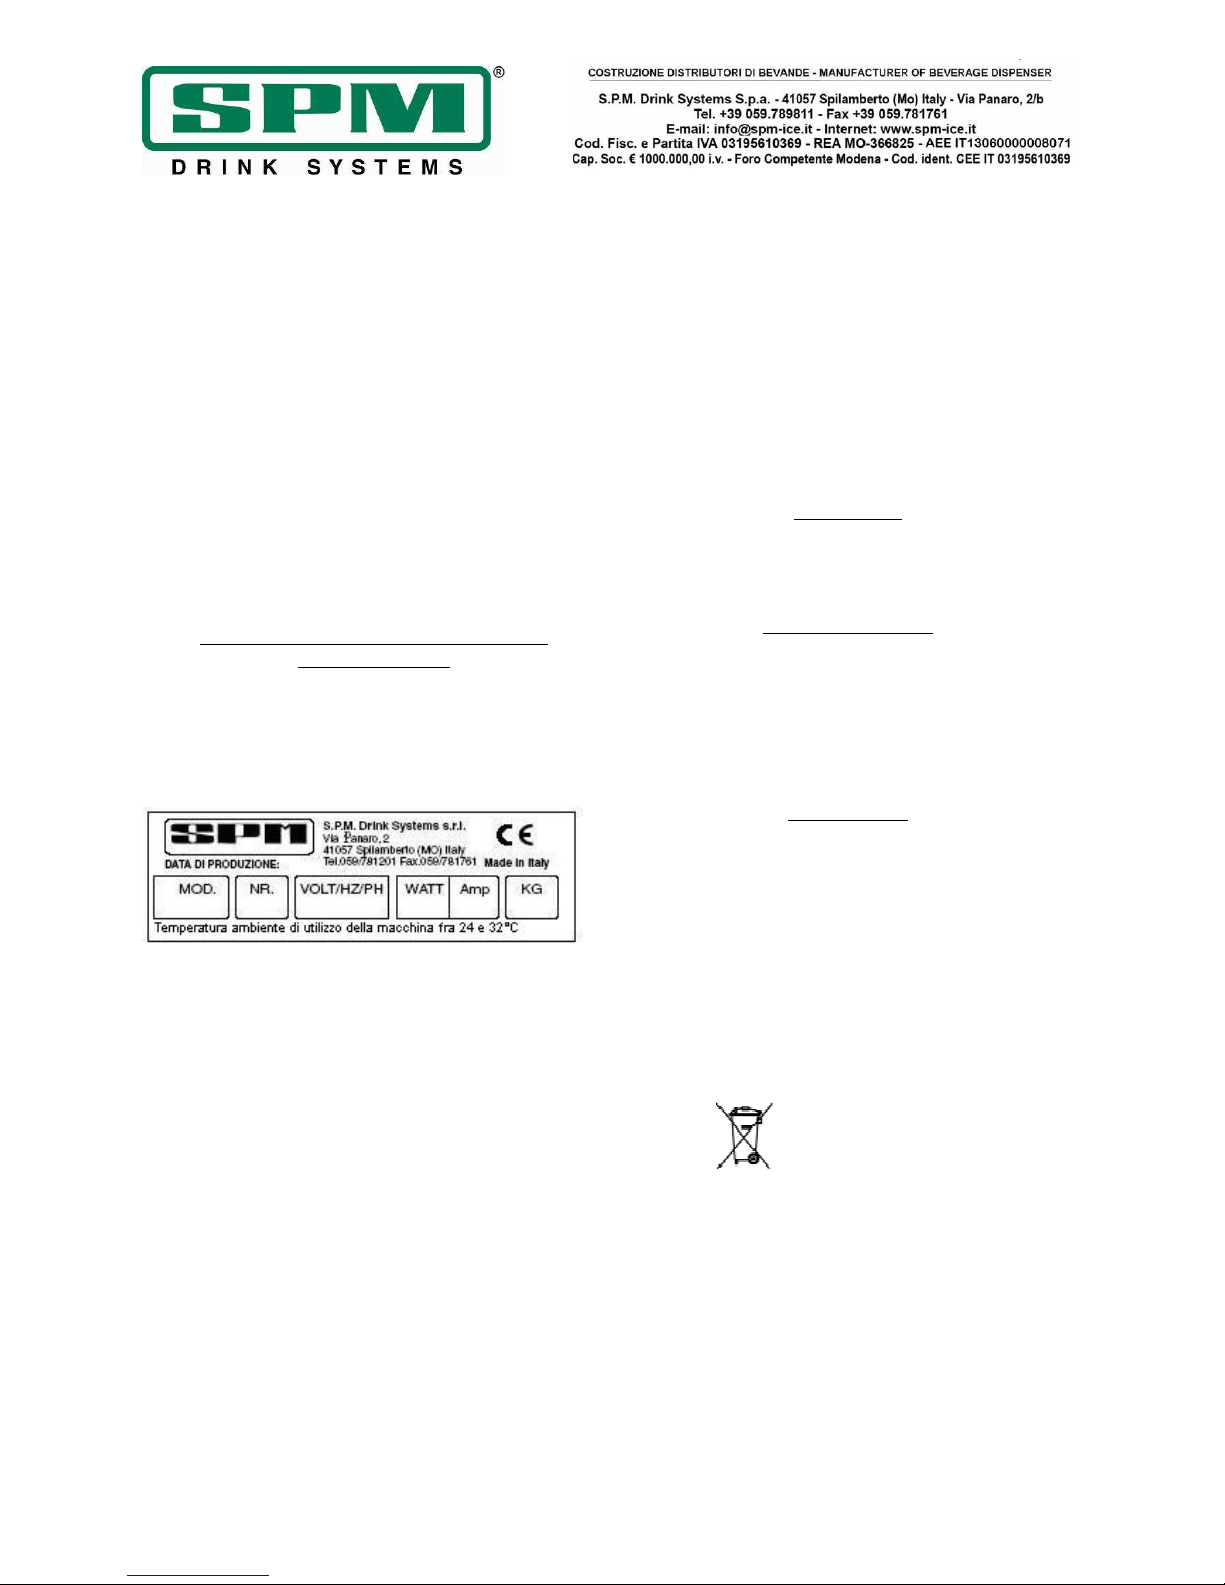
Tutte le caratteristiche tecniche ed elettriche
dell’apparecchio sono riportate sulla targhetta
matricola applicata all’interno dell’apparecchio e
qui sotto riprodotta.
Sulla targhetta vengono riportati:
• Modello;
• Numero di matricola;
• Caratteristiche elettriche in Volt/ Hz;
• Assorbimento max in Watt;
• Corrente max in Amp;
• Peso in kg;
• Temperatura ambiente di utilizzo della
macchina compresa fra i 24 ed i 32°C.
Le dimensioni di ingombro dell’ apparecchio
sono:
SP1
• Altezza 61,2 cm.
• Larghezza 26,2 cm.
• Profondità 42,7 cm.
• Peso 28 kg.
SP2
• Altezza 61,2 cm.
• Larghezza 44,7 cm.
• Profondità 43,8 cm.
• Peso 48 kg.
SP3
• Altezza 61,2 cm.
• Larghezza 62,8 cm.
• Profondità 44,3 cm.
• Peso 65 kg.
Rumorosità
Il livello di pressione acustica continuo,
equivalente, ponderato è inferiore a 70 dB.
In caso di guasto:
Nella maggior parte dei casi, gli eventuali
inconvenienti tecnici sono risolvibili con piccoli
interventi; suggeriamo perciò di leggere
attentamente il presente manuale, prima di
contattare il costruttore o il centro di assistenza.
Smaltimento
Importante
Tutti gli elementi dell’imballaggio non devono
essere lasciati alla portata dei bambini in quanto
potenziali fonti di pericolo.
Importante
Nel rispetto dell’ambiente, non disperdere gli
elementi dell’imballaggio ma conservarli in
modo da poterli riutilizzare qualora necessario
(i.e. stoccaggio invernale).
Il simbolo indica che l'apparecchio non
può essere smaltito come rifiuto comune, ma
deve essere smaltito secondo quanto stabilito
dalla direttiva europea 2003/108/CE (Waste
Electrical and Electronics Equipments - WEEE) e
dalle legislazioni nazionali derivanti, per
prevenire possibili conseguenze negative per
l'ambiente e per la salute umana.
Per il corretto smaltimento dell’apparecchio,
contattate il punto vendita presso cui avete
acquistato l’apparecchio oppure il nostro servizio
post vendita.
Page 6
Data di emissione: Maggio, 2016 Revisione: 6 Pag. : 6/64
Fig. 1
Fig. 2
6. POSIZIONAMENTO
SOLO PER MANUTENTORE
L'installazione e le successive operazioni di
manutenzione, devono essere effettuate da
personale specializzato ed addestrato
all'uso dell'apparecchio, secondo le norme
in vigore.
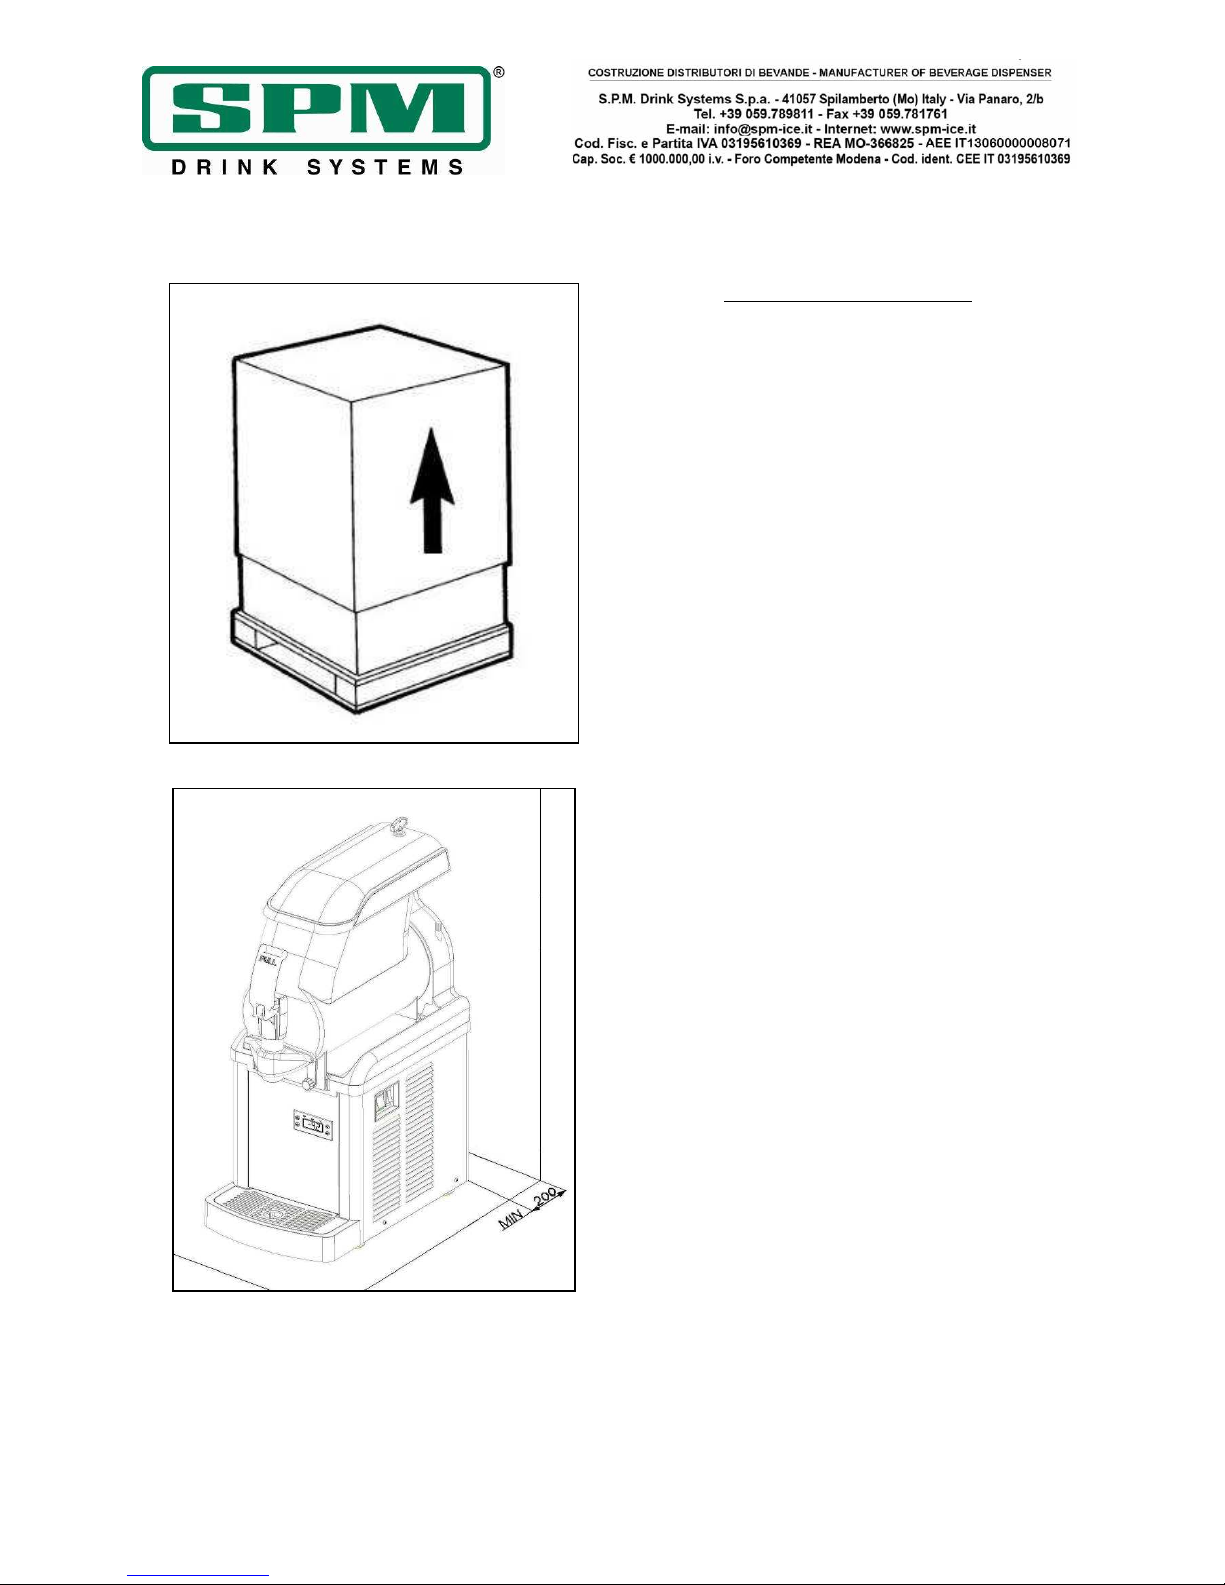
a) Dopo aver tolto l’imballo conservarne tutti
gli elementi per lo stoccaggio invernale ed
assicurarsi dell’integrità dell’apparecchio (fig.1).
!IMPORTANTE!
Tutti gli elementi dell’imballaggio non
devono essere lasciati alla portata dei
bambini in quanto potenziali fonti di
pericolo.
b) Appoggiare l’apparecchio su una superficie
orizzontale e solida facendo in modo che la
carrozzeria dell’apparecchio sia ben areata
(almeno 20 cm di spazio libero, fig.2), installare
l’apparecchio in un ambiente asciutto ed evitare
di installarlo vicino a fonti di calore. La
temperatura ambiente di utilizzo macchina
deve essere compresa tra i 24°C e i 32°C.
c) Controllare che la tensione di rete
corrisponda a quella indicata sulla targhetta
matricola e che la potenza disponibile sia
adeguata a quella richiesta dall’apparecchio.
Inserire la spina in una presa di corrente munita
del polo di terra, eliminando prese multiple.
PER ULTERIORI PRECAUZIONI, LEGGERE
ATTENTAMENTE IL PARAGRAFO
“COLLEGAMENTO ALLA RETE ELETTRICA”.
d) L’installazione deve essere effettuata secondo
le istruzioni del produttore. Un mancato rispetto
di tali indicazioni può compromettere la
funzionalità dell’apparecchio.
Importante
La messa a terra è necessaria e obbligatoria a
termine di legge. Prima di effettuare qualsiasi
operazione di pulizia o manutenzione
straordinaria assicurarsi di aver scollegato
l’apparecchio dalla rete togliendo la spina di
alimentazione.
In caso di guasto o mal funzionamento spegnere
l’apparecchio e staccare la spina.
Page 7
Data di emissione: Maggio, 2016 Revisione: 6 Pag. : 7/64
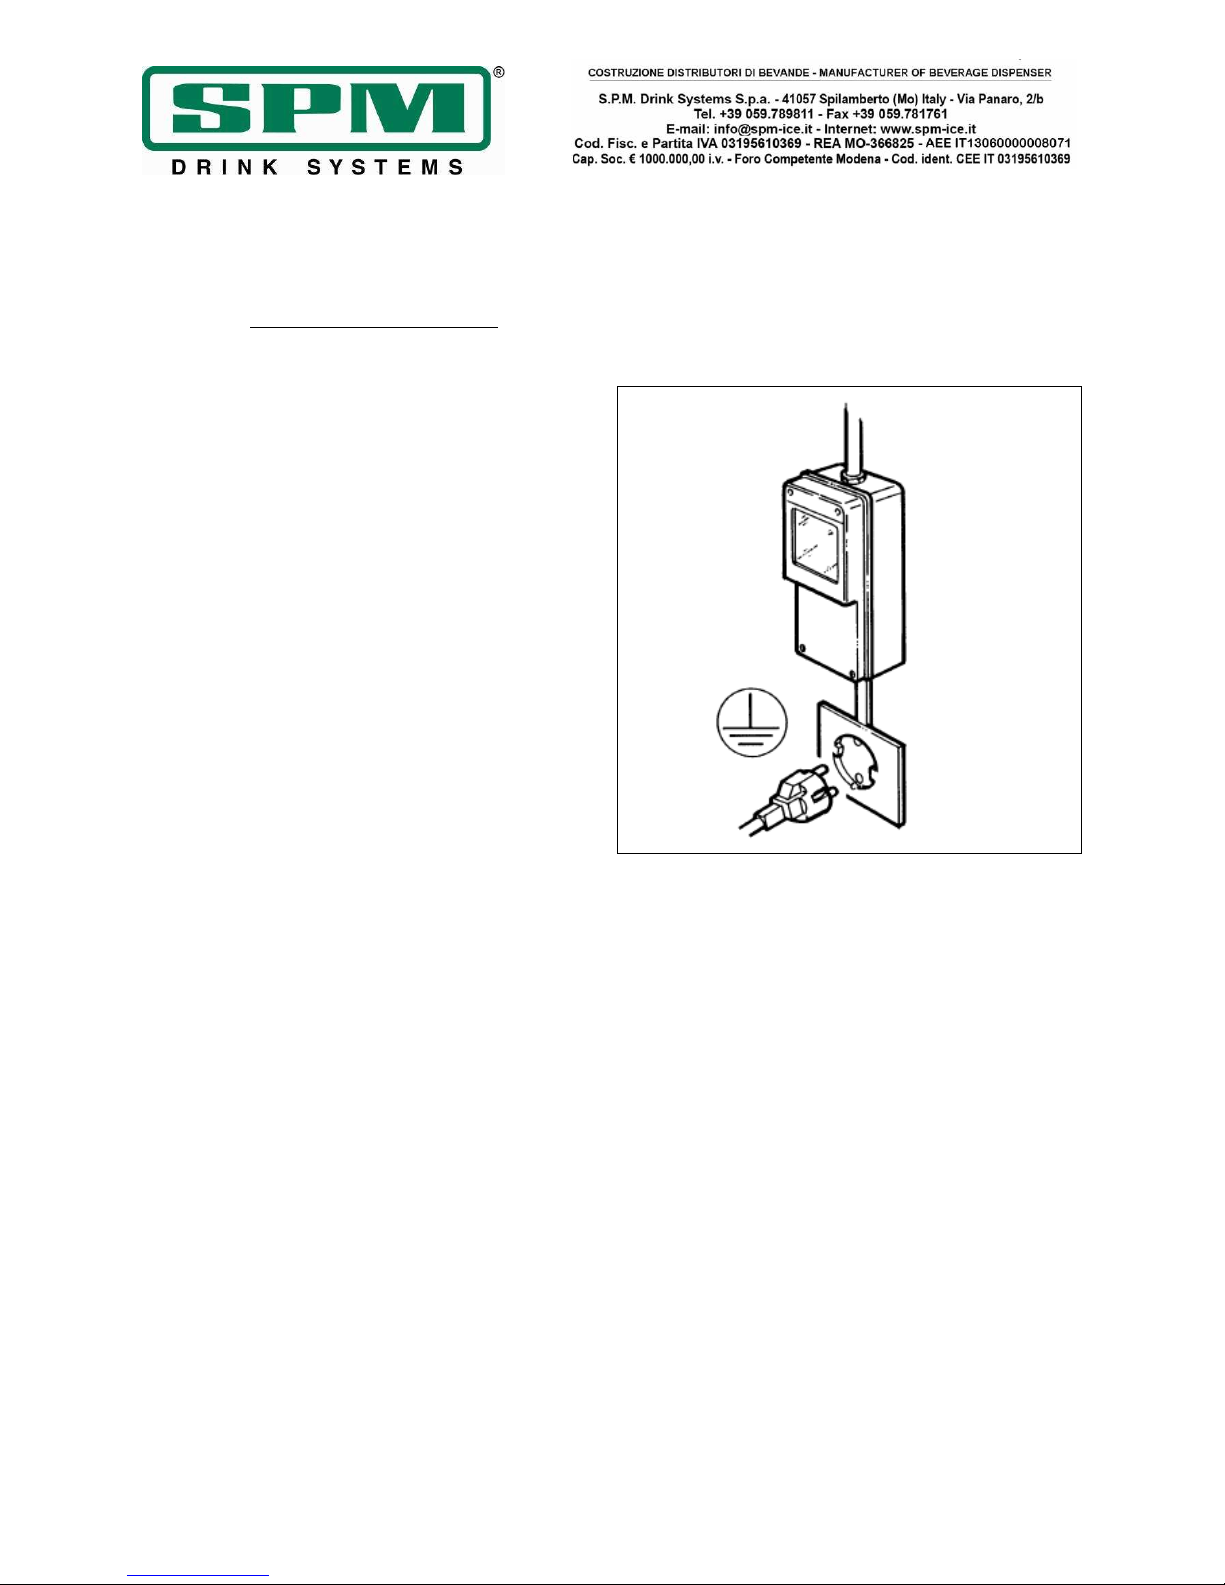
7. COLLEGAMENTO ALLA RETE
ELETTRICA
SOLO PER MANUTENTORE
Prima di inserire la spina nella presa di
alimentazione, come già spiegato nel
paragrafo precedente, è necessario che per
la Vostra sicurezza prendiate attenta
visione delle seguenti precauzioni:
- Accertarsi che il collegamento sia
effettuato ad un impianto dotato di un
efficace messa a terra come previsto dalle
vigenti normative di sicurezza (fig.3).
Il costruttore non può essere quindi
considerato responsabile per eventuali
danni causati dalla mancata messa a terra
dell’ impianto.
- Verificare sempre le specifiche elettriche
sulla targhetta di ogni singolo apparecchio,
i dati di targa rimpiazzano sempre quelli
riportati sul presente manuale.
- E’ indispensabile, per una corretta e
sicura installazione, predisporre
un’apposita presa comandata da un
interruttore magnetotermico con distanza
d’apertura dei contatti uguale o superiore a
3mm, conforme alle vigenti normative
nazionali di sicurezza (fig.3).
- Non usare mai prese multiple o
prolunghe.
- Accertarsi che il cavo di alimentazione per
tutta la sua lunghezza non venga in nessun
modo schiacciato.
- Per staccare la spina, dopo aver sempre
staccato l’interruttore generale, afferrare
la stessa effettuando trazione dolce.
Importante
SE IL CAVO DI ALIMENTAZIONE E’
DANNEGGIATO, ESSO DEVE ESSERE
SOSTITUITO DAL COSTRUTTORE O DAL SUO
SERVIZIO DI ASSISTENZA O COMUNQUE DA
UNA PERSONA CON QUALIFICA SIMILARE , IN
MODO DA PREVENIRE OGNI RISCHIO.
Fig. 3
Page 8
Data di emissione: Maggio, 2016 Revisione: 6 Pag. : 8/64
8. OPERAZIONI DI AVVIAMENTO E
MODALITA’ D’USO
!ATTENZIONE!
PRIMA DI EFFETTUARE IL PRIMO AVVIAMENTO
DELLA MACCHINA, PROCEDERE ALLE
OPERAZIONI DI PULIZIA E SANITIZZAZIONE
DESCRITTE NEL CAPITOLO 9
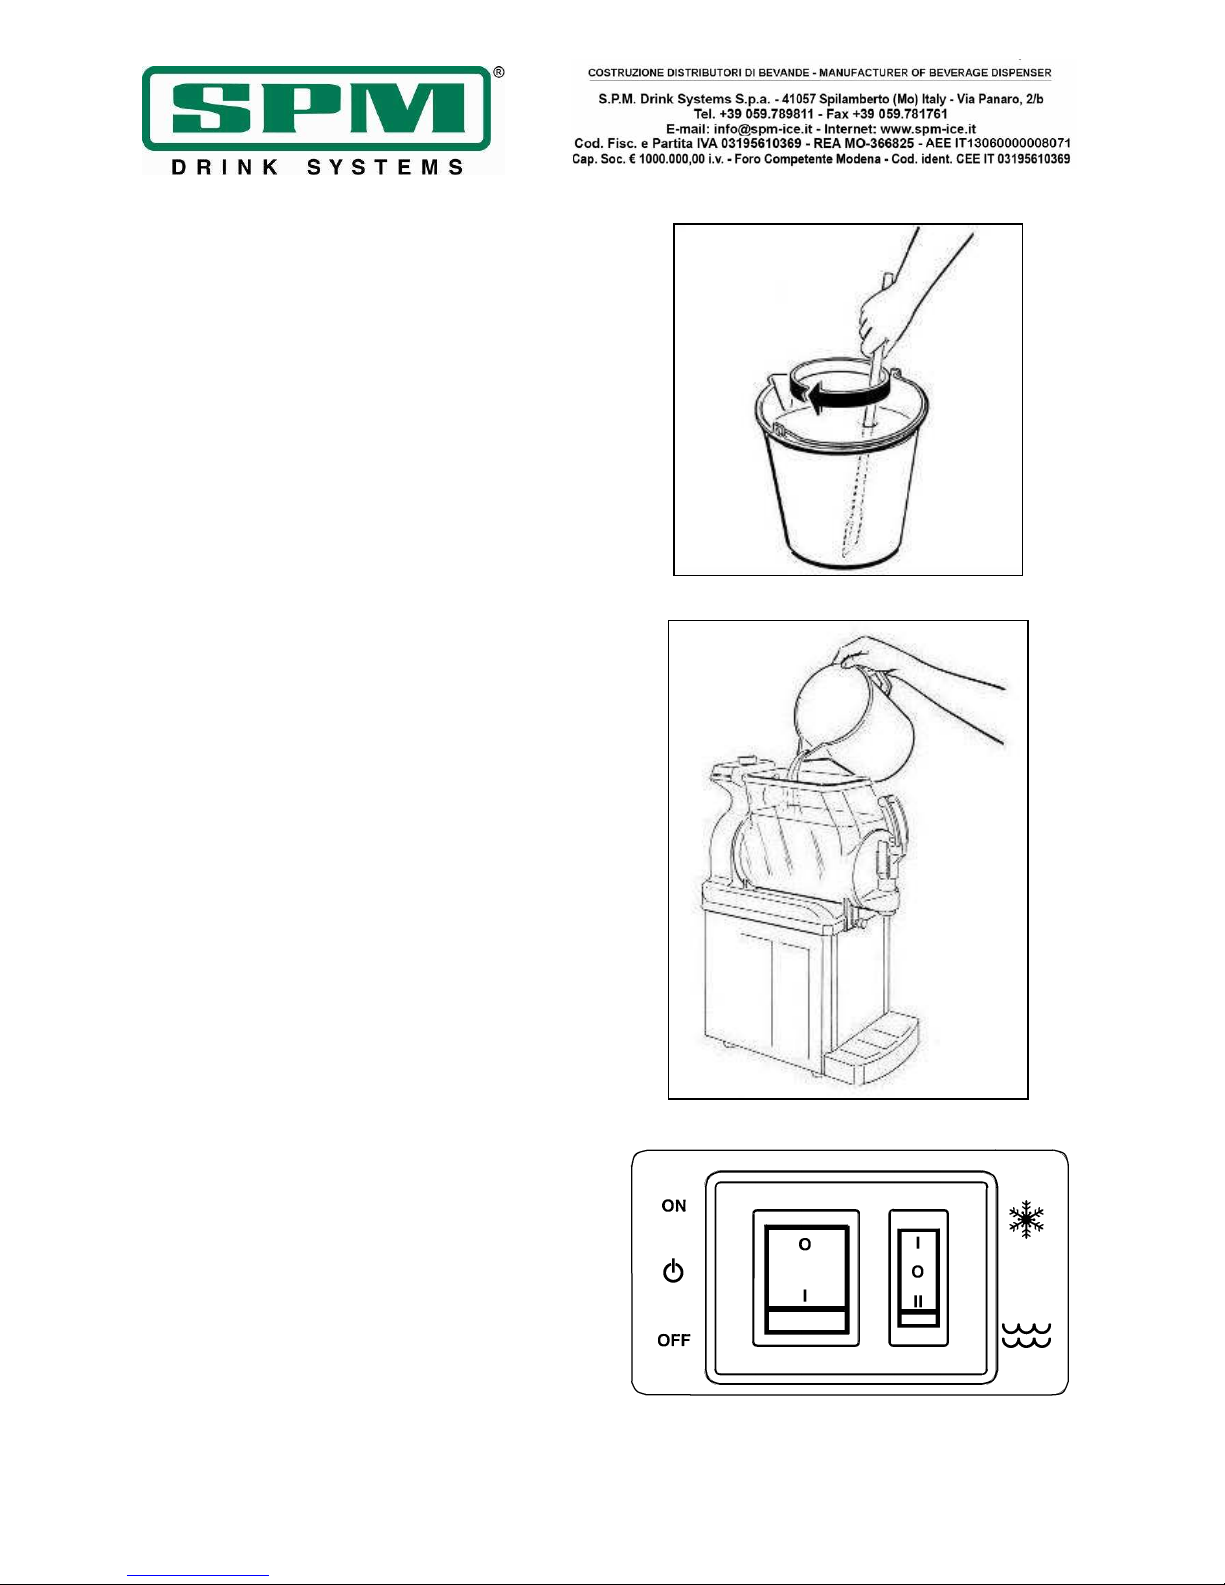
- Diluire e miscelare, in un recipiente a parte, il
prodotto con acqua o latte secondo le indicazioni
del produttore (vedi figura 4).
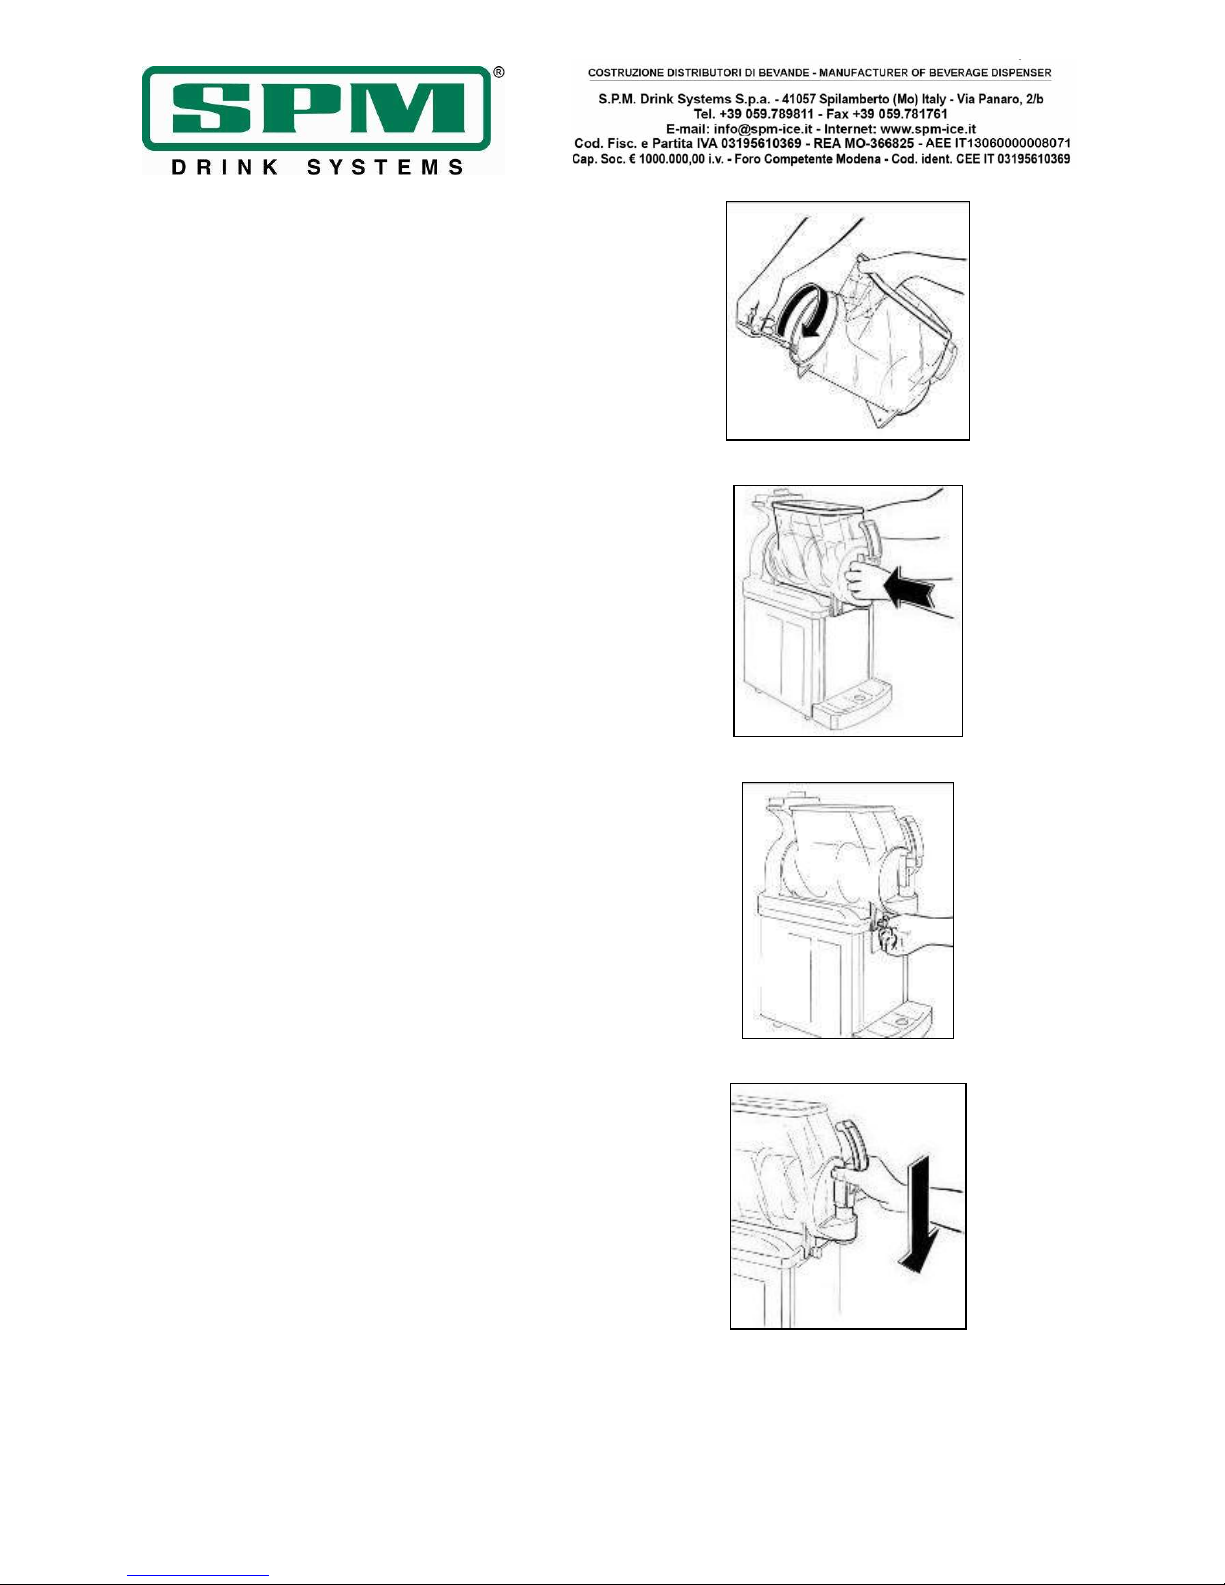
- Versare il prodotto ottenuto nella vasca (vedi
fig.5).
- Riposizionare prima il sottocoperchio e quindi il
coperchio principale.
Nota -----------------------------------------------
Le macchine della linea SP sono dotate di un
efficace dispositivo di sicurezza a tutela
dell’operatore, che entra in funzione con il
sollevamento del coperchio e determina
l’automatico ed immediato arresto di tutti gli
organi in movimento.
Nel caso in cui il coperchio non sia
correttamente posizionato, il mescolatore
corrispondente non entrerà quindi in
funzione.
------------------------------------------------------
- Inserire la spina nella presa di alimentazione
elettrica.
-Attivare l’interruttore generale, il mescolatore
entrerà automaticamente in funzione.
-Attivare il tasto per il congelamento recante il
simbolo del fiocco di neve (posizione I
dell’interruttore piccolo in fig. 6).
Fig. 4
Fig. 5
Fig. 6
Page 9
Data di emissione: Maggio, 2016 Revisione: 6 Pag. : 9/64
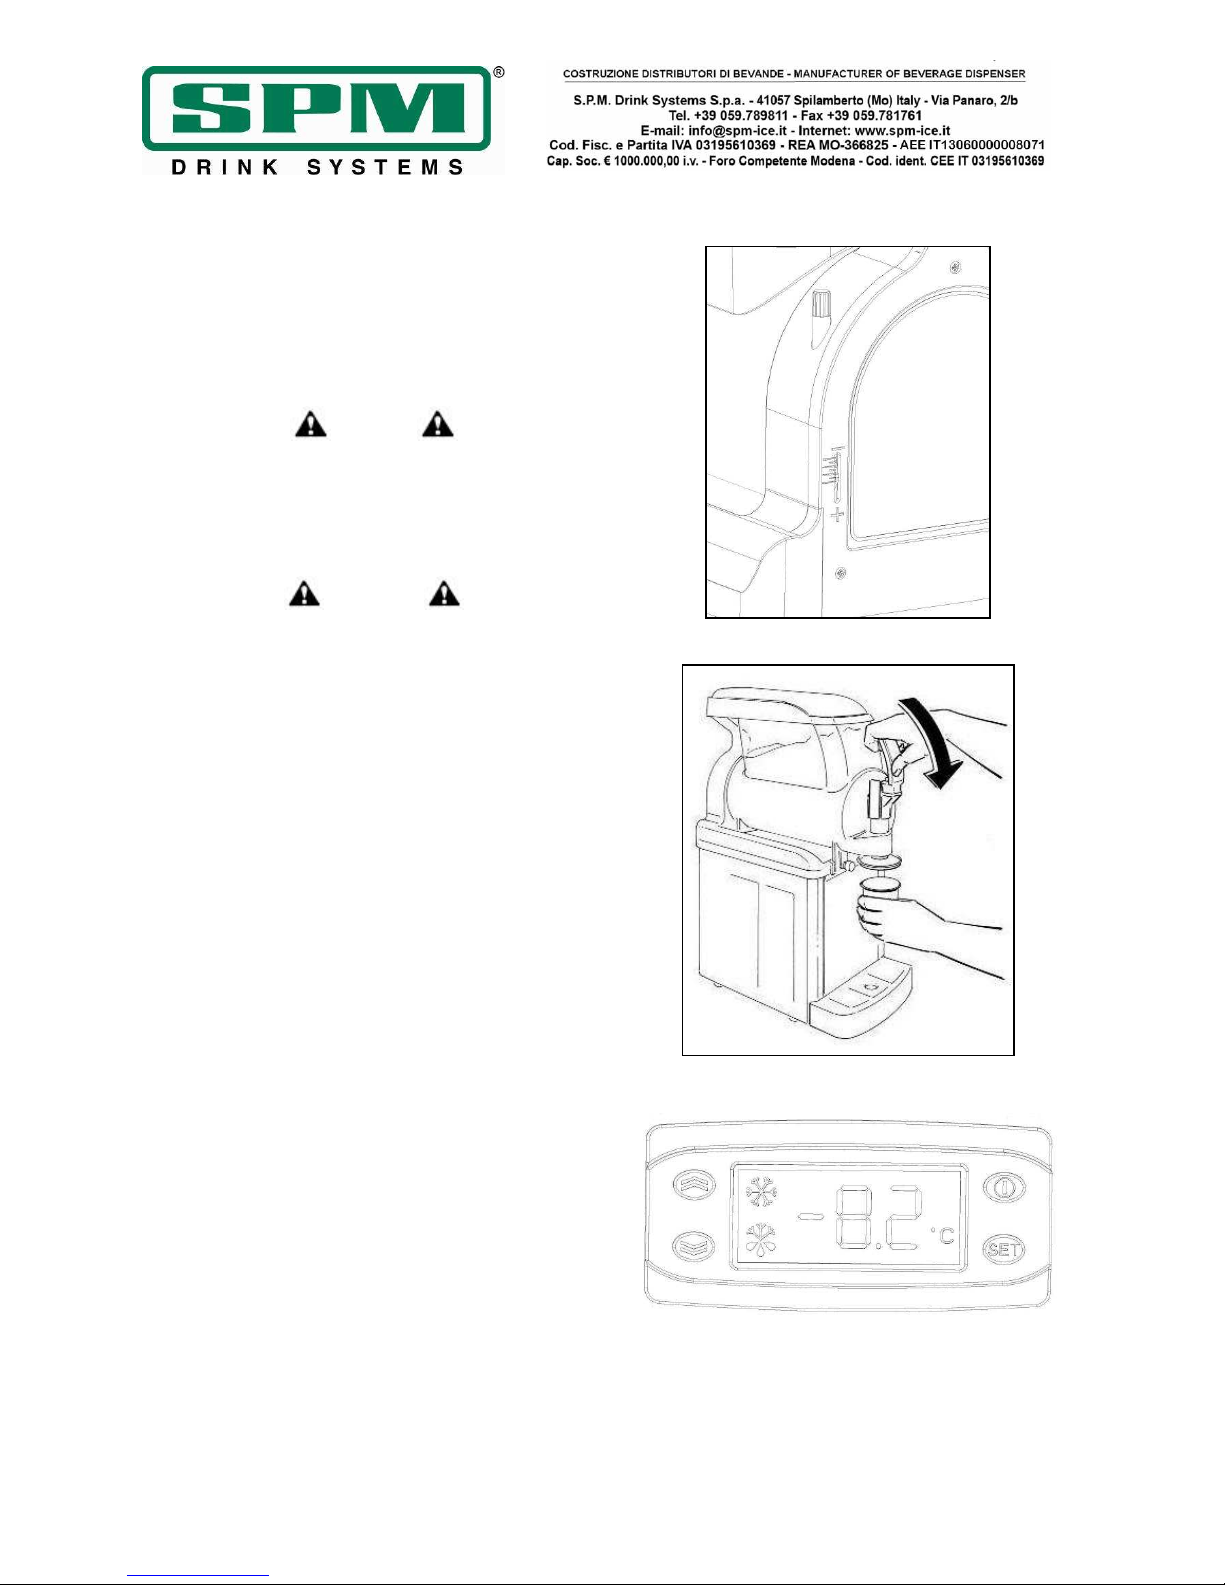
Regolazione della consistenza: per variare la
consistenza del prodotto, agire sulla vite
collocata nel retro della macchina (fig. 7);
girando in senso orario, il prodotto diventerà
meno denso, girando in senso antiorario, il
prodotto diventerà più denso.
Attenzione
Questo dispositivo agisce solo sulla consistenza
del prodotto da erogare (più o meno denso) e
non agisce assolutamente sulla temperatura di
raffreddamento dello stesso.
Attenzione
Quando il livello della granita all’interno della
vasca è sotto alla coclea miscelatrice, onde
evitare che il prodotto diventi troppo denso, è
necessario provvedere al rabbocco della vasca.
NOTA: qualora si desiderasse passare dalla
modalità CONGELAMENTO a quella DEFROST, è
sufficiente impostare la posizione II del tasto
piccolo (Fig.6)
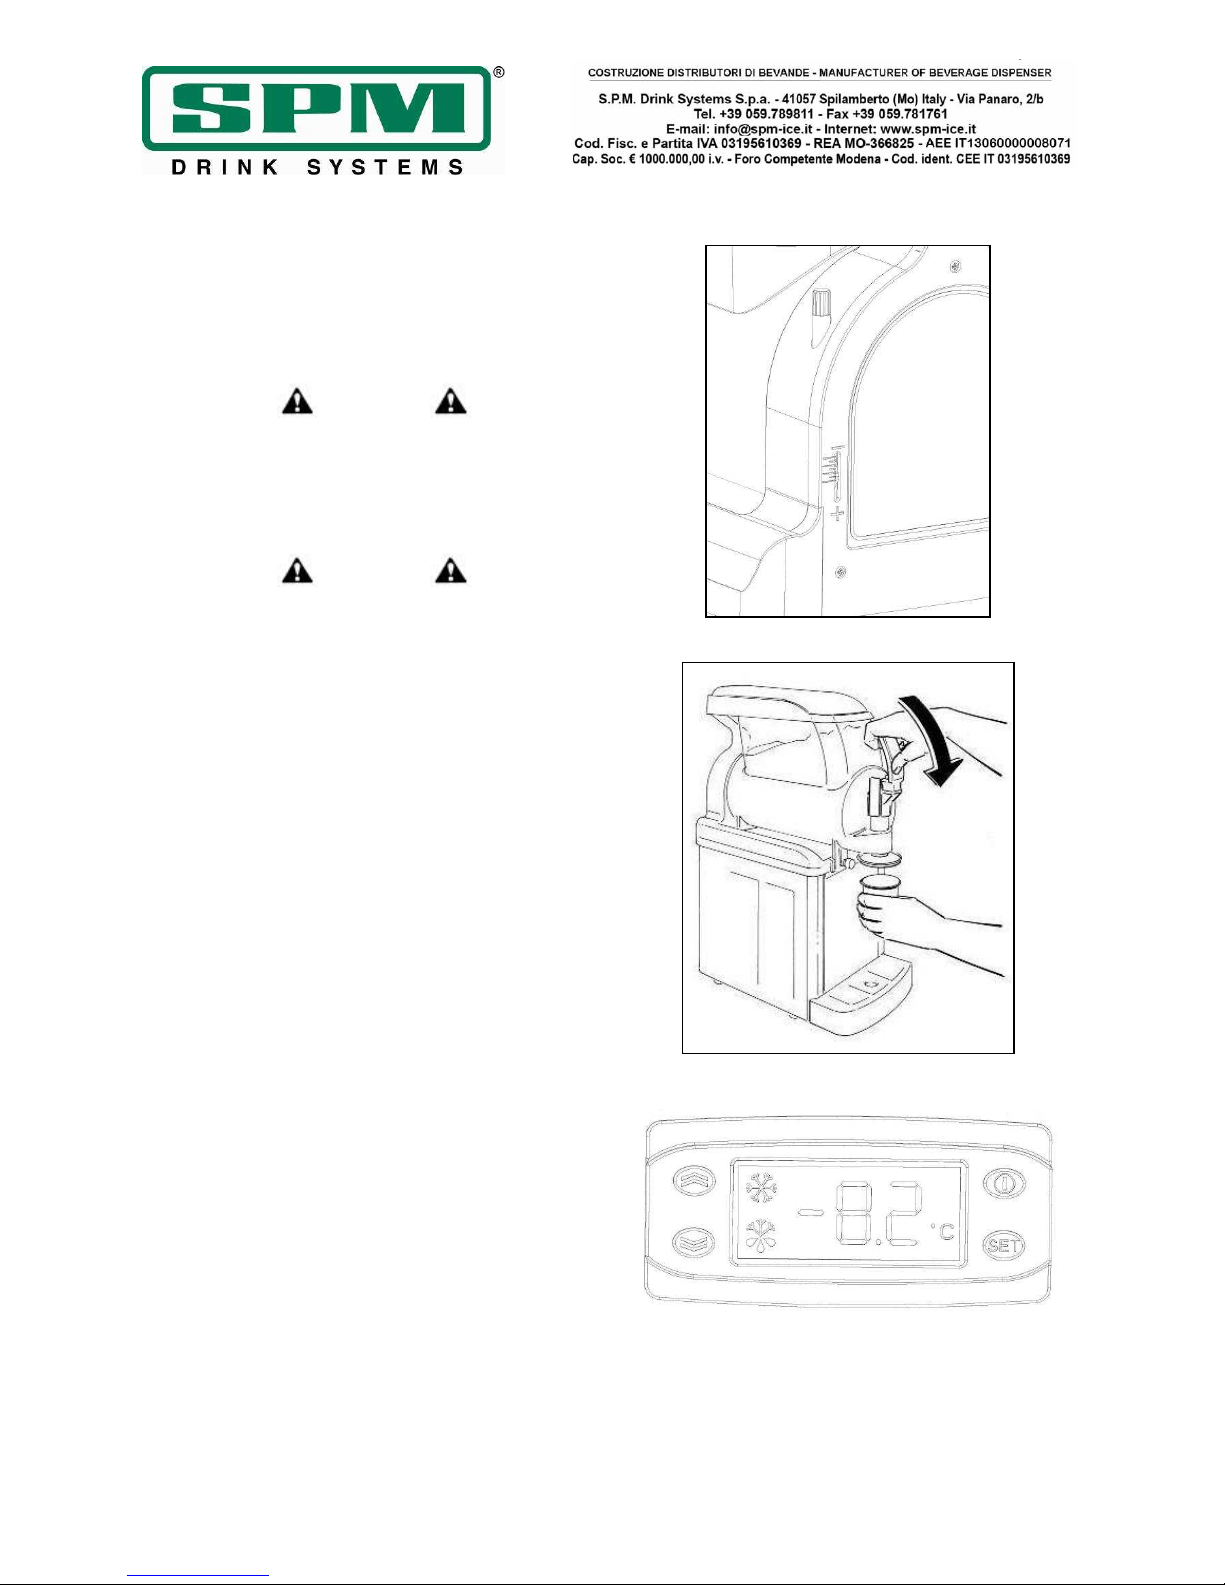
- Una volta che il prodotto avrà raggiunto la
consistenza desiderata, per erogare, posizionare
il bicchiere sotto al rubinetto e tirare la leva
come mostrato in figura 8.
La linea di macchine SP è munita di un display
digitale (fig.9 e fig.9bis) che consente di
visualizzare la temperatura in ciascuna vasca.
Nella SP2 e nella SP3, premendo le frecce
(fig.9bis) è possibile passare dalla lettura di una
vasca all’altra.
Fig. 7
Fig. 8
Fig. 9
Page 10
Data di emissione: Maggio, 2016 Revisione: 6 Pag. : 10/64
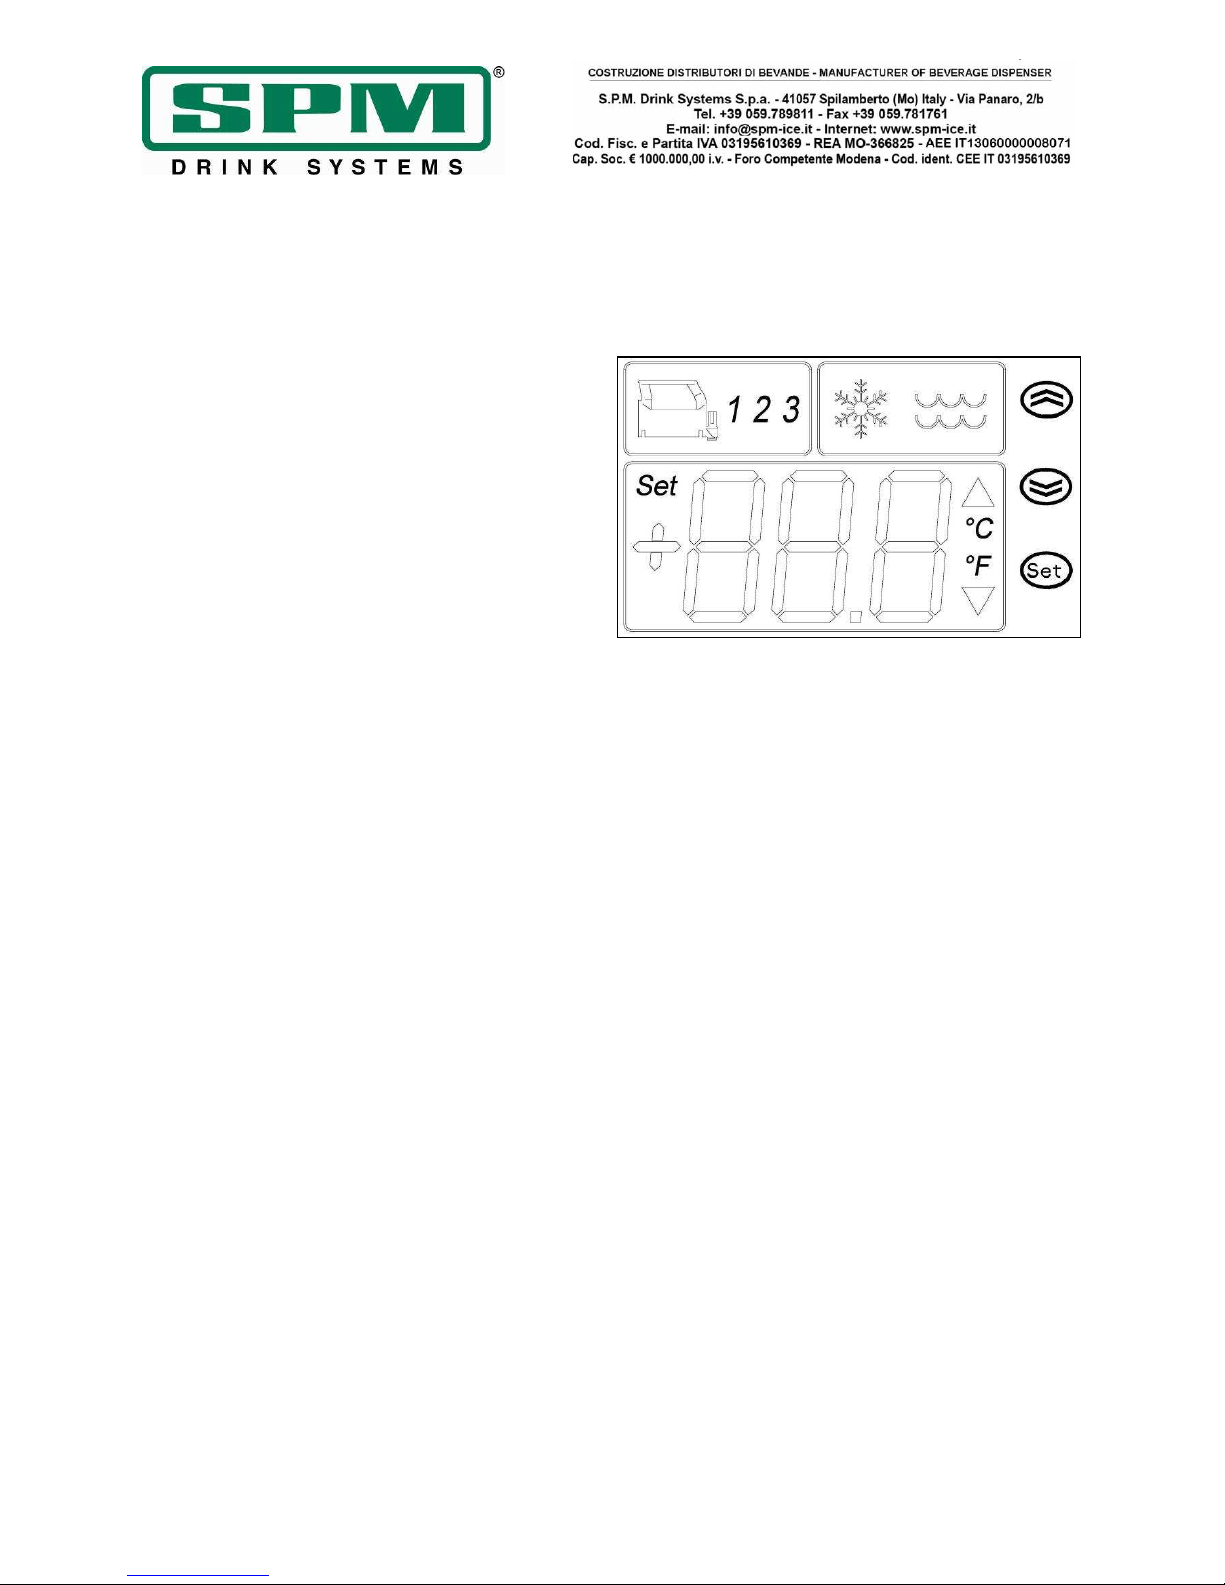
Impostazione della temperatura di defrost
(solo per SP2 ed SP3 elettroniche)
Nelle versioni SP2 ed SP3 elettroniche è
possibile impostare le temperature di attacco e
stacco impianto frigorifero durante la fase di
defrost.
In fase di defrost si definisce temperatura di
attacco la temperatura massima al di sopra
della quale l’impianto frigorifero viene riattivato.
Sempre in fase di defrost si definisce
temperatura di stacco la temperatura minima al
di sotto della quale l’impianto frigorifero viene
disattivato.
In questo modo avrò sempre una temperatura
di mantenimento che oscillerà fra i due valori
impostati.
!ATTENZIONE!
Visto il significato di queste due temperature il
software impedisce che la temperatura di
attacco possa venir impostata con un valore più
basso di quella di stacco e viceversa.
Per impostare le due temperature agire come
segue:
- Premere il tasto SET.
- La freccia verso l’alto sul lato destro del
valore della temperatura sta ad indicare
che si è entrati nel menu di impostazione
della temperatura di attacco; con le
frecce è possibile passare a quello della
temperatura di stacco evidenziato dalla
freccia verso il basso.
- Una volta visionata la temperatura che si
desidera modificare premendo di nuovo il
tasto SET si vedrà che il valore della
temperatura inizierà a lampeggiare il che
significa che è possibile modificarlo
utilizzando le frecce.
- Premendo ancora il tasto SET inizierà a
lampeggiare l’unità di misura con cui si
vuole visualizzare tale temperatura,
anche in questo caso con le frecce sarà
possibile scegliere fra i °C e i °F.
- Premendo per l’ultima volta il tasto SET i
parametri impostati verranno
memorizzati ed il display mostrerà la
temperatura corrente di una delle
vasche.
Fig. 9bis
Page 11
Data di emissione: Maggio, 2016 Revisione: 6 Pag. : 11/64
9. OPERAZIONI DI PULIZIA E
SANITIZZAZIONE QUOTIDIANA
Al fine di avere sempre un buon funzionamento
dell’apparecchio e di rispettare le vigenti
normative sanitarie, è indispensabile effettuare
frequentemente e dettagliatamente le
operazioni di pulizia e sanitizzazione descritte in
seguito, assicurandosi sempre che la persona
adibita a tali operazioni, si sia in precedenza
lavata e sanitizzata le mani e gli avambracci.
Nel caso di prolungato inutilizzo dell’apparecchio
(stagionalità) eseguire sempre tali operazioni
prima di rimettere in funzione la macchina.
Attenzione
Onde evitare rischi di shock elettrico,
durante le operazioni di pulizia, non
spruzzare acqua sugli interruttori ed
evitare che i componenti elettrici interni
vengano a contatto con l’acqua ed i
prodotti utilizzati.
Attenzione
Per prevenire la formazione di batteri
usare solo prodotti approvati per la
disinfezione di oggetti in plastica e gomma,
il mancato rispetto di queste procedure
può provocare rischi alla salute.
NOTA BENE: è responsabilità dell’utilizzatore
essere consapevole delle normative vigenti in
modo da rispettare le leggi federali, statali o
locali, in termini di frequenza di pulizia e
conservazione dei prodotti utilizzati.
Le procedure descritte in seguito sono essenziali
per impedire la formazione di batteri e
mantenere così la macchina in ottime condizioni
igieniche.
Si consiglia di eseguire tali procedure
quotidianamente e comunque rispettando
sempre le normative in vigore.
Né la casa costruttrice della macchina, né il
quella produttrice del preparato alimentare
introdotto nella stessa, possono essere ritenute
responsabili per eventuali danni che possono
direttamente o indirettamente derivare a
persone in conseguenza della mancata
osservanza di tutte le prescrizioni indicate nel
presente manuale e concernenti specialmente le
avvertenze in tema di pulizia e sanitizzazione
dell’apparecchio.
Page 12

Data di emissione: Maggio, 2016 Revisione: 6 Pag. : 12/64
- Disattivare l’impianto frigorifero e far
funzionare la macchina con il solo mescolatore
in movimento per una decina di minuti
(posizione 0 dell’interruttore piccolo
mantenendo in posizione I quello grande).
- Munirsi di un comune prodotto adatto alla
disinfezione di oggetti in plastica e gomma
(AMUCHINA®).
IMPORTANTE
Attenersi in maniera scrupolosa alle
prescrizioni del prodotto utilizzato per
quanto riguarda i tempi e le modalità di
conservazione dello stesso.
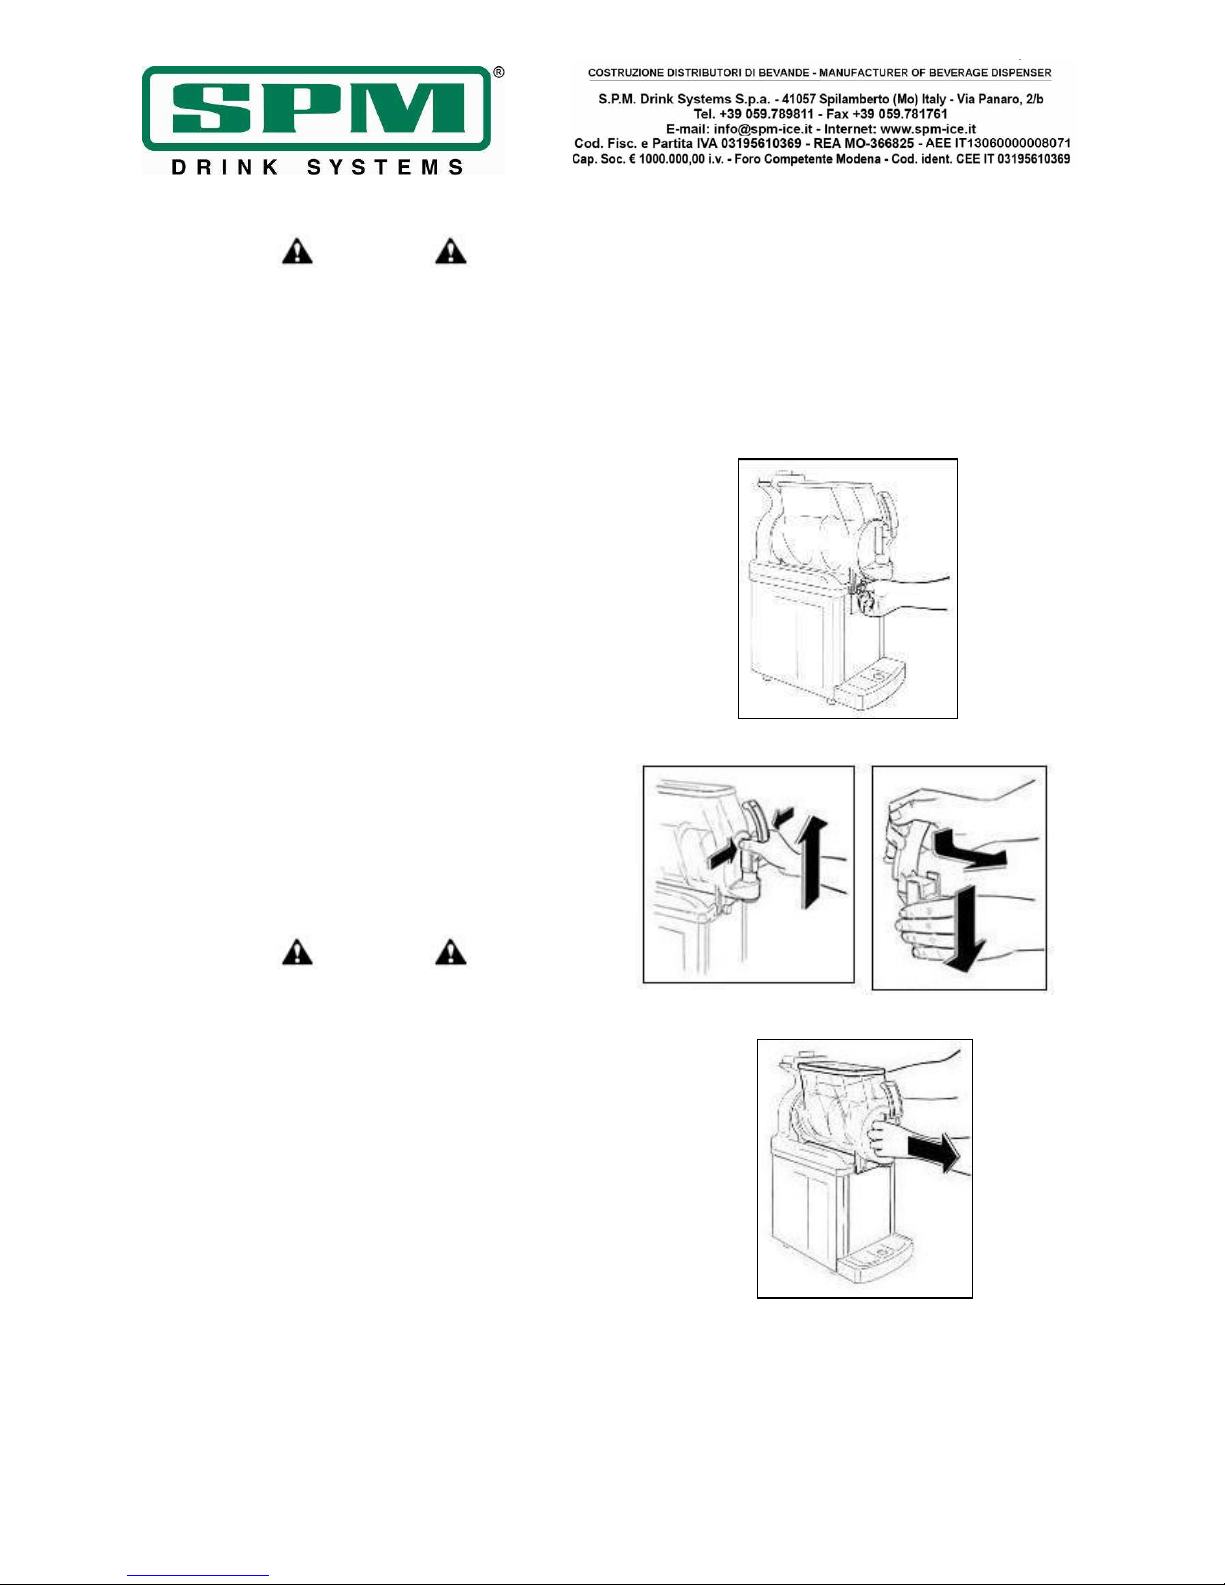
- Dopo aver rimosso il fermo attraverso
l’apposita chiave (fig.10), rimuovere prima il
coperchio di sicurezza, poi il sottocoperchio
come mostrato in figura 11.
- Riempire la vasca con acqua tiepida (fig.12) e
dopo aver riposizionato il coperchio far
funzionare il mescolatore per alcuni minuti.
!ATTENZIONE!
SP è dotata di un dispositivo di sicurezza
che ne impedisce il funzionamento qualora
il coperchio non sia correttamente
posizionato nella sua sede.
- Svuotare la vasca e ripetere le stesse
operazioni finché dalla stessa non esce acqua
limpida (fig.13).
Fig. 10
Fig. 11
Fig. 12
Fig. 13
Page 13
Data di emissione: Maggio, 2016 Revisione: 6 Pag. : 13/64
Attenzione
Onde evitare rischi di shock elettrico o di
contatto con parti mobili, durante le
operazioni di smontaggio e rimontaggio,
assicurarsi che tutti gli interruttori siano
nella posizione off e che il cavo di
alimentazione sia scollegato dalla rete.
- Disattivare l’interruttore generale A posto sul
fianco destro della macchina (fig.6) e
disconnettere il cavo di alimentazione dalla rete.
- Rimuovere il coperchio.
- Lavarsi e disinfettarsi accuratamente le mani
prima di procedere alle operazioni di pulizia.
- Svitare e sfilare i pomelli (fig.14).
- Smontare il rubinetto dalla vasca premendo
contemporaneamente sulle due alette di blocco
e sollevarlo in modo da estrarlo dalla propria
sede (fig.15).
- Scomporre il rubinetto in tutti i suoi
componenti tenendo premuto verso il basso il
corpo e sfilando la leva dalla propria sede
(fig.15).
Attenzione
Per prevenire la formazione di batteri
rimuovere e pulire sempre anche gli o-ring;
il non rispetto di questa prescrizione può
comportare rischi alla salute delle persone.
- Tirare la vasca verso l’esterno e liberarla dalla
propria sede (fig.16).
Fig. 14
Fig. 15
Fig. 16
Page 14
Data di emissione: Maggio, 2016 Revisione: 6 Pag. : 14/64
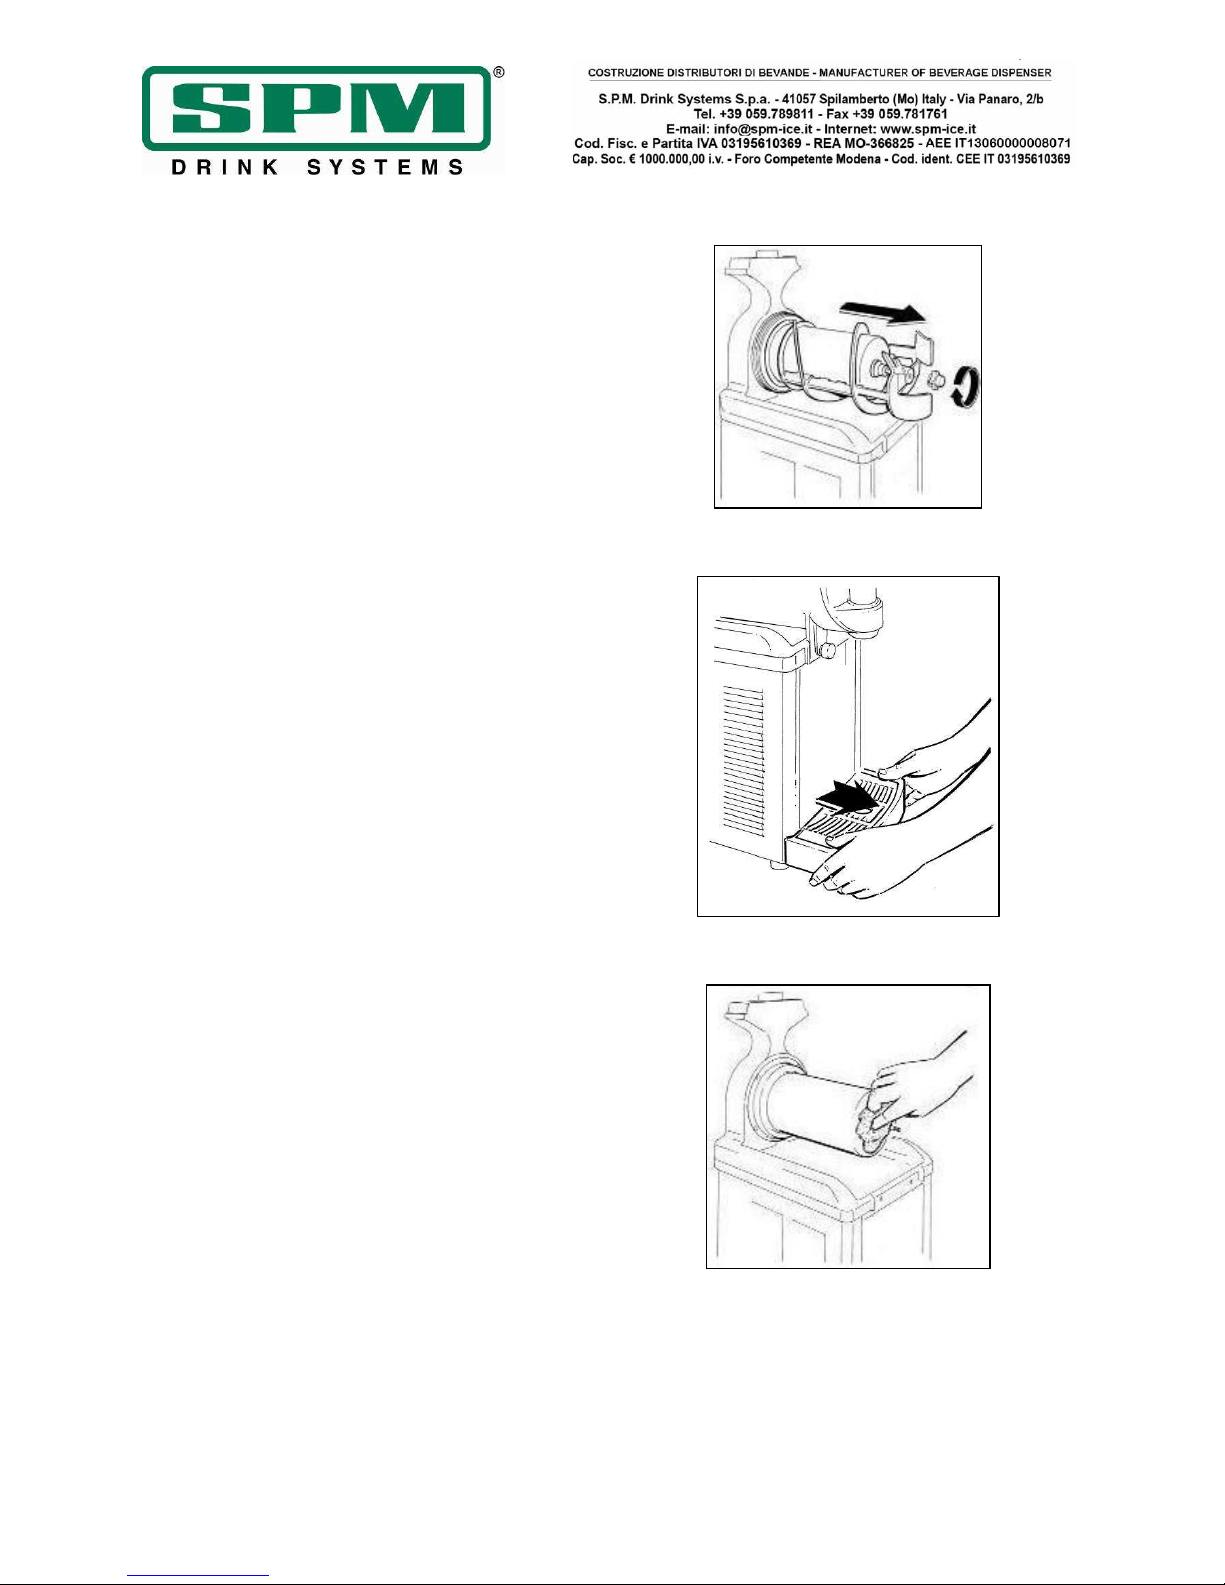
- Svitare il pomello di fissaggio nel senso della
freccia (filettatura sinistra) e procedere
all’estrazione del gruppo di miscelazione e delle
guarnizioni di tenuta (fig.17).
- Smontare la vaschetta raccogli gocce tirandola
verso l’esterno (fig.18).
- Lavare accuratamente ognuno di questi
componenti con acqua calda e detersivo per
stoviglie.
IMPORTANTE
Non utilizzare detersivi o polveri abrasive,
questi prodotti potrebbero danneggiare la
vasca e gli altri componenti con cui
vengono a contatto.
ATTENZIONE
Per effettuare queste operazioni di
lavaggio non utilizzare mai una
lavastoviglie in quanto questi componenti
potrebbero risultarne gravemente
danneggiati
- Risciacquare bene ed immergere ogni parte
nel prodotto sanitizzante seguendo le dosi ed i
tempi di immersione suggeriti dal produttore
dello stesso.
- Una volta rispettati i corretti tempi di
disinfezione, sciacquare attentamente ogni
componente con acqua pulita ed asciugare con
un panno pulito.
- Lavare accuratamente l’evaporatore ed il piano
raccogli condensa, rimuovendo ogni residuo di
prodotto con una spugna pulita imbevuta di
sanitizzante (vedi fig.19).
- Ripetere le stesse operazioni con una spugna
imbevuta di acqua pulita ed asciugare
accuratamente tutte le superfici con un panno
pulito.
Fig. 17
Fig. 18
Fig. 19
Page 15
Data di emissione: Maggio, 2016 Revisione: 6 Pag. : 15/64
Una volta eseguite accuratamente tutte queste
operazioni di pulizia e sanificazione, si può
procedere al rimontaggio dei componenti.
Il corretto assemblaggio della macchina è molto
importante per prevenire perdite di prodotto ed
il danneggiamento della stessa.
Per assemblare la macchina è necessario
disporre di un lubrificante approvato (Vaselina).
Assicurarsi sempre che ogni parte sia stata
correttamente lavata e sanitizzata e che la
persona adibita al rimontaggio si sia
accuratamente lavato e sanitizzato le mani e gli
avambracci.
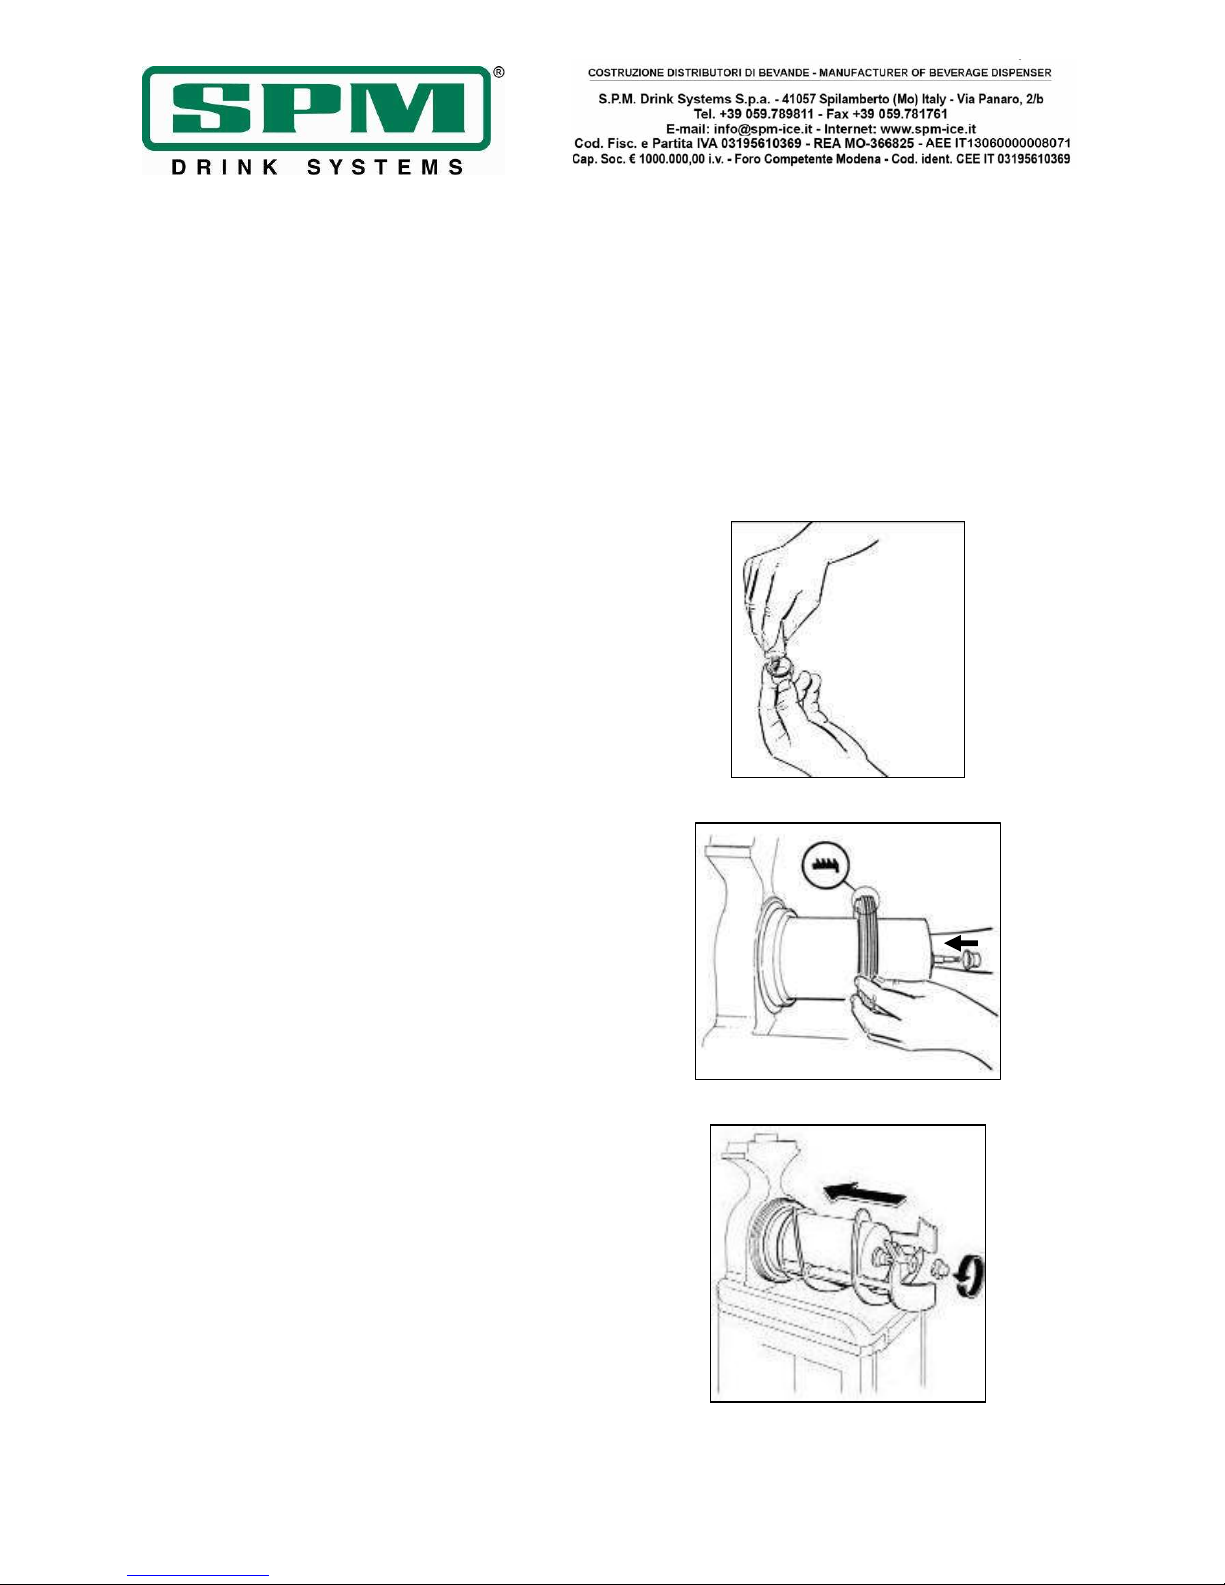
- Lubrificare con cura la parte interna della
guarnizione a ventosa con il grasso di vaselina
(fig.20).
- Rimontare la guarnizione posteriore della
vasca e quella frontale a ventosa, prestando
attenzione al verso della prima come mostrato
in figura 21.
- Rimontare il mescolatore avendo cura che il
codolo frontale si incastri perfettamente con
l’albero di rotazione.
- Fissare tutti i componenti avvitando il pomello
in senso antiorario (fig.22).
Fig. 20
Fig. 21
Fig. 22
Page 16
Data di emissione: Maggio, 2016 Revisione: 6 Pag. : 16/64
- Per agevolarne il montaggio consigliamo
inoltre di inumidire con acqua pulita la parte
posteriore della vasca nel punto in cui la stessa
combacia con la sua guarnizione di tenuta (vedi
figura 23);
- Rimontare la vasca collocandola nella propria
sede accertandosi che faccia esattamente tenuta
con la propria guarnizione (vedi figura 24).
- Fissare la vasca avvitando entrambi i pomelli
fino al fondo della loro corsa (fig.25).
IMPORTANTE
Non serrare eccessivamente i pomelli di
fissaggio vasca, una forza eccessiva
potrebbe danneggiare la filettatura e/o la
vasca stessa.
- Rimontare il rubinetto (fig.26) avendo cura di
cospargere con grasso di vaselina le guarnizioni
per agevolare lo scorrimento dello stesso nella
propria sede fino al completo inserimento.
!ATTENZIONE!
Il non perfetto scorrimento del rubinetto ne
compromette la tenuta.
- Rimontare la vaschetta raccogli gocce.
Fig. 23
Fig. 24
Fig. 25
Fig. 26
Page 17

Data di emissione: Maggio, 2016 Revisione: 6 Pag. : 17/64
SANITIZZAZIONE
Qualora la macchina rimanga ferma per alcuni
giorni dopo essere stata pulita e disinfettata
accuratamente come descritto nel capitolo 9, al
momento del riavvio è necessario effettuare le
operazioni di sanitizzazione descritte in seguito.
- Sollevare prima il coperchio di sicurezza, poi il
sottocoperchio.
- Riempire la vasca di acqua ed aggiungere il
prodotto per la disinfezione di oggetti ad uso
alimentare (AMUCHINA®) seguendo
attentamente le dosi prescritte dalla ditta
produttrice dello stesso.
- Dopo aver riposizionato il coperchio far
funzionare il mescolatore e lasciare agire per il
tempo necessario, anch’esso specificato dal
produttore.
IMPORTANTE
Non lasciare il sanitizzante nella vasca per
periodi di tempo superiori a quelli prescritti
dal produttore
- Svuotare la vasca aprendo e chiudendo
almeno 10 volte il rubinetto in modo da
sanitizzare anche la zona di passaggio prodotto.
- Risciacquare accuratamente ripetendo le
stesse operazioni utilizzando però solo acqua
pulita al posto del sanitizzante.
- Dopo aver accuratamente eseguito queste
operazione la macchina è pronta per essere
utilizzata.
Page 18
Data di emissione: Maggio, 2016 Revisione: 6 Pag. : 18/64
10. MANUTENZIONE STRAORDINARIA
Attenzione
Prima di procedere a qualsiasi operazione
di manutenzione, è obbligatorio spegnere
l’apparecchio e staccare il cavo di
alimentazione dalla presa di corrente.
Pulizia del condensatore
Al fine di garantire un buon rendimento
dell’impianto frigorifero, è indispensabile
effettuare una buona pulizia del
condensatore una volta al mese.
Per potervi accedere:
- Togliere la tensione all’apparecchio
disattivando l’interruttore generale e
scollegando il cavo di alimentazione.
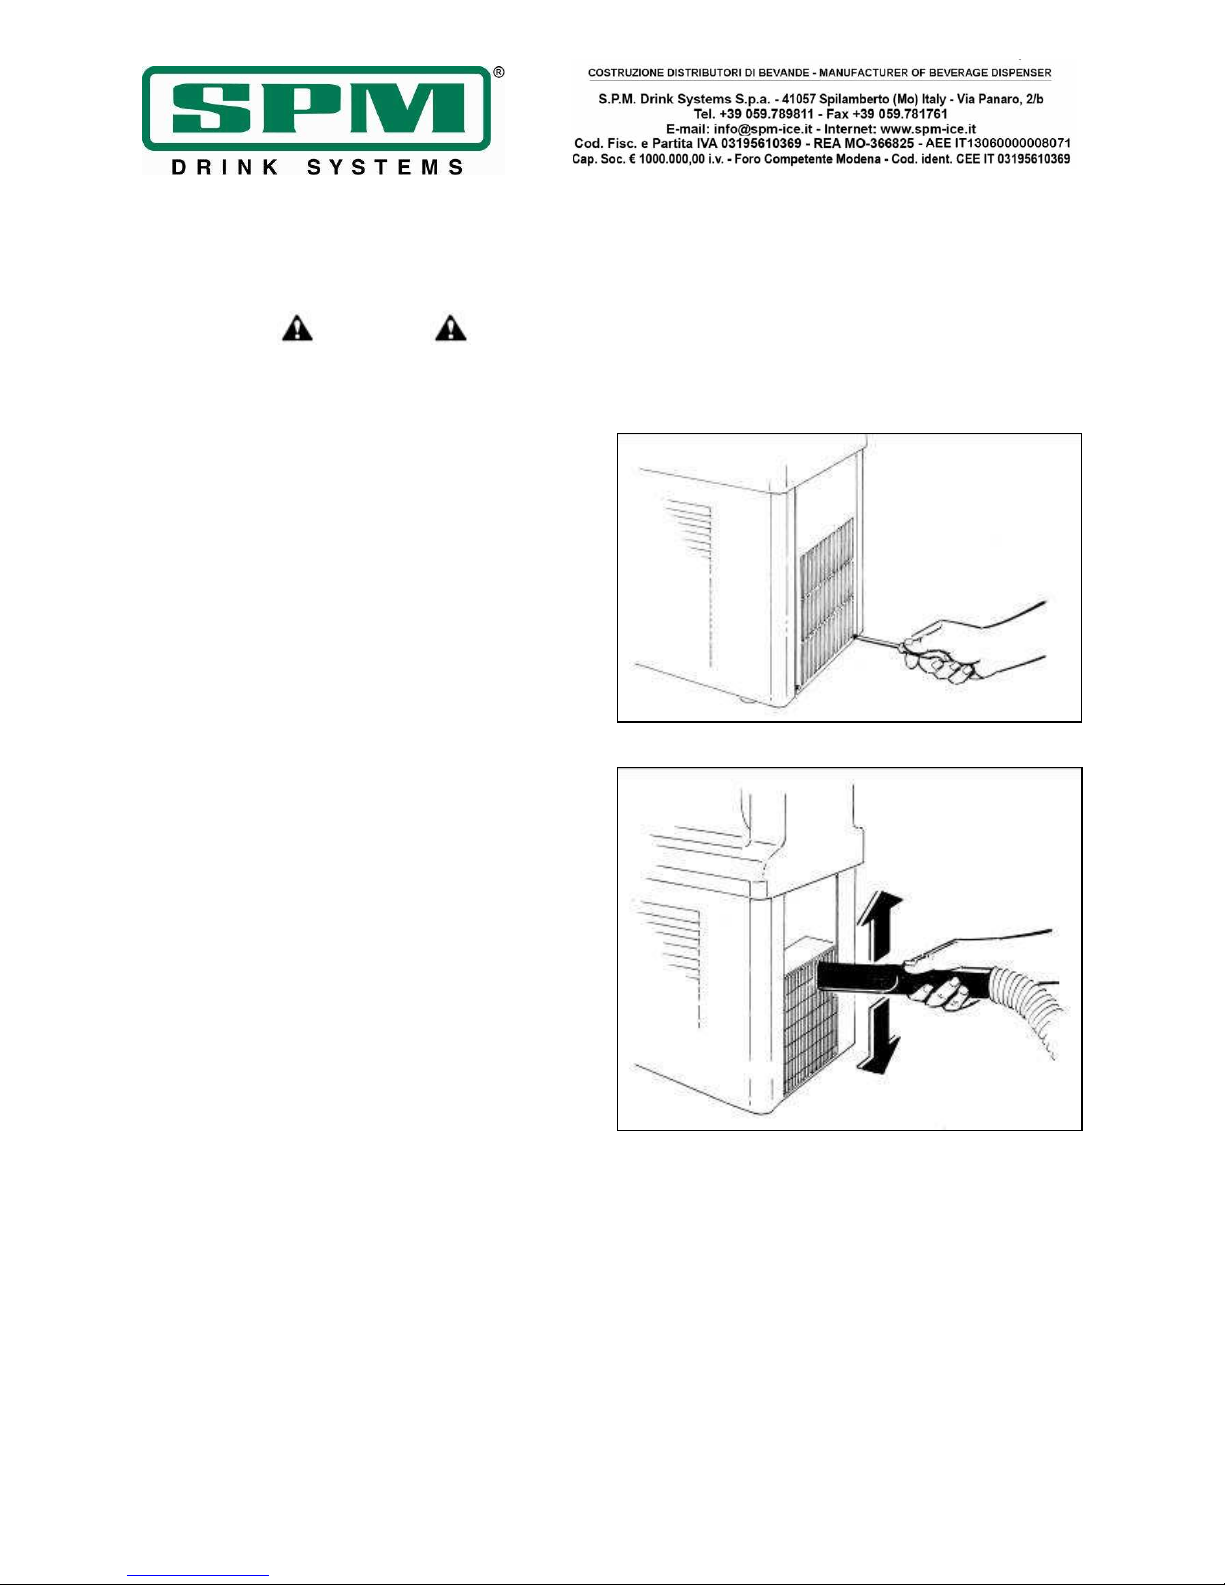
- Rimuovere il pannello posteriore svitando le
due viti che lo trattengono nella sua parte
inferiore (fig.27).
- Con un aspiratore rimuovere la polvere
infiltratasi tra le lamelle del condensatore
(fig.28).
IMPORTANTE
Non usare mai il cacciavite o qualsiasi altro
oggetto appuntito per rimuovere lo sporco
accumulatosi fra le lamelle del
condensatore.
Fig. 27
Fig. 28
Page 19

Data di emissione: Maggio, 2016 Revisione: 6 Pag. : 19/64
Controllo e sostituzione delle guarnizioni
GUARNIZIONE VASCA
La guarnizione posta sul retro della vasca va
sostituita ogni 12 mesi a seconda dello stato di
usura e del livello di manutenzione e
lubrificazione.
GUARNIZIONI (O-RING) RUBINETTO
Gli o-ring di tenuta del rubinetto di erogazione
prodotto vanno sostituiti ogni volta che
appaiono usurati. Queste guarnizioni vanno
lubrificate ogni volta che la macchina viene
rimontata dopo la pulizia e controllata
attentamente onde evitare perdite indesiderate.
GUARNIZIONE A VENTOSA
La guarnizione a ventosa posta sulla parte
frontale dell’evaporatore va sostituita ogni 3
mesi e comunque ogni volta che appare
usurata. Questa guarnizione va lubrificata ogni
volta che viene rimontata dopo la pulizia con il
grasso di vaselina in dotazione.
Stoccaggio invernale
Per proteggere la macchina durante i periodi di
inattività come l’inverno, è importante
immagazzinarla correttamente come descritto in
seguito:
- Disconnettere la macchina da qualsiasi fonte di
energia.
- Smontare, lavare e sanificare tutte le parti a
contatto con il prodotto come descritto nel
capitolo 9.
- Pulire anche i pannelli esterni.
- Rimontare accuratamente tutti i componenti.
- Coprire la macchina completamente montata
con l’imballo originale in modo che venga
protetta dalla polvere e da altri agenti
contaminanti.
- Posizionare la macchina in un luogo asciutto.
11. ESCLUSIONE DI RESPONSABILITA’
La casa costruttrice declina ogni forma di
responsabilità per eventuali danni che possono
direttamente o indirettamente derivare a
persone, cose, animali in conseguenza della
mancata osservanza di tutte le prescrizioni
indicate nel presente manuale e concernenti
specialmente le avvertenze in tema di
istallazione, uso e manutenzione
dell’apparecchio.
Il produttore non risponde delle eventuali
inesattezze imputabili ad errori di stampa, di
trascrizione o di traduzione contenute nel
presente manuale; si riserva di apportare quelle
modifiche che ritenesse necessarie o utili, anche
nell’interesse dell’utilizzatore, senza
pregiudicare le caratteristiche essenziali di
funzionalità e sicurezza.
Page 20

Data di emissione: Maggio, 2016 Revisione: 6 Pag. : 20/64
12. GUIDA ALLA RISOLUZIONE DEI
PROBLEMI
Problema Possibile causa Soluzione
La macchina non
raffredda o raffredda
solo parzialmente ed il
compressore funziona
• Lo spazio di ventilazione attorno
alla macchina è inadeguato
• La macchina sta funzionando in
modalità DEFROST
• Le lamelle del condensatore sono
sporche e piene di polvere
• La ventola non sta funzionando
• C’è una perdita di refrigerante
• L’elettrovalvola è difettosa
• Il timer elettrovalvola è
danneggiato
• Lasciare almeno 20cm di spazio libero
attorno alla macchina e non posizionarla
vicino ad altre fonti di calore
• Ripristinare la modalità CONGELAMENTO
• Pulire il condensatore
• Controllare i collegamenti elettrici, se
disconnessi riconnettere e se ancora non
funziona, sostituire la ventola
• Individuare la perdita, eliminarla e
ricaricare l’impianto
• Sostituire l’elettrovalvola
•
Sostituire la scheda timer
La macchina non
raffredda o raffredda
solo parzialmente ed il
compressore non
funziona
• Le parti elettriche del compressore
non funzionano
• Alcuni collegamenti elettrici sono
incompleti
•
Il compressore è difettoso
• Sostituire i componenti che non
funzionano
• Verificare le connessioni e sistemare
quelle incomplete
•
Sostituire il compressore
La macchina è rumorosa • Le pale della ventola urtano alcuni
dei componenti interni
• Verificare e sistemare
L’interruttore principale
è in posizione ON ma la
macchina non funziona
• Il coperchio principale non è stato
riposizionato correttamente
• Alcune connessioni elettriche sono
incomplete
• L’interruttore principale è rotto
• La scheda termostato elettronico è
difettosa
•
Il motoriduttore è difettoso
• Posizionare correttamente il coperchio
principale
• Verificare le connessioni e sistemare
quelle incomplete
• Sostituire l’interruttore
• Sostituire la scheda
• Sostituire il motoriduttore
La vasca perde • Una delle guarnizioni non è
posizionata correttamente
• Rimontare correttamente la guarnizione
o, se è il caso, sostituirla
Il rubinetto perde • Il rubinetto non è stato rimontato
correttamente
• Il movimento del rubinetto è
impedito
• Gli o-ring di tenuta sono
danneggiati o usurati
• Smontare e rimontare correttamente il
rubinetto
• Pulire il rubinetto e la sua sede e
lubrificare con il grasso di vaselina in
dotazione
•
Sostituire gli o-ring
Il prodotto finisce nella
vaschetta raccogli gocce
attraverso il tubo di
drenaggio
• La guarnizione a ventosa, il mozzo
del mescolatore ed il pomello di
fissaggio non sono stati rimontati
correttamente
• La guarnizione a ventosa o la
boccola di tenuta dell’albero sono
danneggiati o usurati
• Smontare e rimontare correttamente il
sistema di mescolamento
• Smontare e sostituire le guarnizioni
Il mescolatore non gira • Il coperchio principale non è stato
riposizionato correttamente
• Alcune connessioni elettriche sono
incomplete
•
Il motoriduttore è difettoso
• Posizionare correttamente il coperchio
principale
• Verificare le connessioni e sistemare
quelle incomplete
•
Sostituire il motoriduttore
Il mescolatore risulta
rumoroso durante la
rotazione
• La guarnizione a ventosa è stata
sostituita senza essere lubrificata
correttamente
• La spirale di mescolamento non è
stata rimontata correttamente
• Smontare, pulire, sanitizzare e lubrificare
correttamente la guarnizione
• Smontare e rimontare correttamente la
spirale e tutto il sistema di mescolamento
Sul display appare il
messaggio di errore “E1”
• Una della sonde di temperatura è in
corto circuito
• Sostituire la sonda
NOTA BENE: le seguenti procedure
devono essere eseguite da un tecnico
qualificato
Page 21

Data di emissione: Maggio, 2016 Revisione: 6 Pag. : 21/64
Herausgeber der Veröffentlichung:
SPM DRINK SYSTEMS S.p.a.
Via Panaro n° 2
41057 Spilamberto (MO)
Ausgabe: 06/2016
Stand: 06
© 2016 – SPM Drink Systems
Alle Vervielfältigungsrechte des vorliegenden Handbuches liegen bei Firma SPM DRINK SYSTEMS; die Reproduktion
– auch auszugsweise – ist untersagt.
Die Beschreibungen und Abbildungen beziehen sich auf die spezifische, in diesem Handbuch behandelte
Maschine/Anlage. SPM DRINK SYSTEMS behält sich das Recht vor, jederzeit alle als notwendig erachteten
Änderungen an der Serienproduktion vorzunehmen.
Die vorliegende Anleitung ist integrierender Bestandteil der Lieferung und muss aufmerksam durchgelesen werden,
um einen korrekten Gebrauch im Sinne der grundlegenden Sicherheitsvorschriften zu ermöglichen; wurde im Sinne
der Anordnungen der Maschinenrichtlinie 2006/42/EG ausgearbeitet und enthält die erforderlichen technischen
Informationen für die korrekte Ausführung aller Verfahren unter Sicherheitsbedingungen; muss sorgfältig in einem
wasser- und staubdichten transparenten Umschlag verwahrt werden und die Maschine während ihrer gesamten
Nutzzeit, auch im Fall eines Besitzerwechsels, immer begleiten. Bei Verlust oder Beschädigung des Handbuches bitte
unter Angabe der Daten auf dem Typenschild eine Kopie bei SPM DRINK SYSTEMS anfordern.
SPM DRINK SYSTEMS übernimmt keinerlei Verantwortung für einen unsachgemäßen Gebrauch der
Maschine/Anlage und/oder für Schäden, die durch eine nicht in dieser Anleitung vorgesehene Nutzung entstehen.
Sehr geehrte Kundin, sehr geehrter Kunde,
wir beglückwünschen Sie zur Wahl eines
Qualitätserzeugnisses und sind sicher, dass
es Ihre Erwartungen erfüllen wird.
Wir möchten Sie auch im eigenen Interesse
bitten, die vorliegende Gebrauchs- und
Wartungsanleitung aufmerksam
durchzulesen.
Page 22

Data di emissione: Maggio, 2016 Revisione: 6 Pag. : 22/64
INHALT
1. WICHTIGE HINWEISE UND TIPPS ..23
4. NÜTZLICHE INFORMATIONEN ZUR
HANDHABUNG ......................................23
5. TECHNISCHE SPEZIFIKATIONEN ....24
6. AUFSTELLUNG ........................................25
7. ANSCHLUSS AN DAS STROMNETZ .26
8. INBETRIEBNAHME .................................27
Einstellung der Defrost-Temperatur (nur für
elektronische SP2 und SP3) ............................ 29
9. TÄGLICHE REINIGUNG UND
DESINFEKTION .....................................30
10. AUSSERPLANMÄSSIGE WARTUNG37
Reinigung des Kondensators ............... 37
Überprüfung und Ersatz der
Dichtungen .................................................. 38
Winterlagerung .......................................... 38
11. HAFTUNGSAUSSCHLUSS ..................38
12. LEITFADEN ZUR PROBLEMLÖSUNG
....................................................................39
Page 23

Data di emissione: Maggio, 2016 Revisione: 6 Pag. : 23/64
1. WICHTIGE HINWEISE UND
TIPPS
Die vorliegende Gebrauchs- und Wartungsanleitung ist integrierender Teil des
Produktes: Bitte für späteres Nachschlagen
aufbewahren. Soweit nichts Gegenteiliges
angegeben ist, richtet sich das vorliegende
Handbuch an den Anwender (Personal,
welches das Gerät täglich benutzt) und das
Wartungspersonal (qualifizierte Installateure und/oder Wartungstechniker). Die
nur für den Wartungstechniker bestimmten
Abschnitte sind entsprechend gekennzeichnet. Lesen Sie die Anweisungen des
vorliegenden Handbuches aufmerksam
durch, bevor das Gerät installiert und in
Betrieb genommen wird.
Das vorliegende Gerät wurde für die
Herstellung von Softeis, Eiscremes,
Sorbets, kalten Cremes, Frozen Yoghurts,
Smoothies und ähnlichen halbgefrorenen
Produkten entwickelt, die aus einem mit
Wasser oder Milch vermischten Pulverkonzentrat zubereitet werden. Prüfen Sie
beim Empfang dieses Gerätes immer, ob
die auf den Transportunterlagen angegebene Seriennummer und der Name des
Gerätes mit dem von Ihnen bestellten
Gerät übereinstimmen:
Dieses Gerät ist ausschließlich für den
Zweck bestimmt, für den es konzipiert
wurde. Der Hersteller kann nicht für
eventuelle Schäden durch unsachgemäßen
Gebrauch zur Verantwortung gezogen
werden. Das vorliegende Gerät ist nicht für
die Benutzung durch Kinder oder Personen
vorgesehen, die in ihrer psychischen oder
motorischen Leistungsfähigkeit beeinträchtigt sind oder denen es an Erfahrung oder
Kenntnissen mangelt, es sei denn, sie
werden von einer für ihre Sicherheit verantwortlichen Person beaufsichtigt oder in
der Benutzung des Gerätes unterrichtet.
Kinder sollten beaufsichtigt werden, um
sicherzustellen, dass sie nicht an dem
Gerät herumspielen. Das vorliegende Gerät
ist nicht für den Einsatz im Freien geeignet.
Das vorliegende Gerät darf nicht an Orten
installiert werden, an denen die Verwendung von Wasserstrahlen möglich ist. Das
vorliegende Gerät muss an Orten installiert
werden, an denen es durch qualifiziertes
Personal überwacht werden kann.
2. AUSSTATTUNG DES GERÄTES
In der Ihnen ausgelieferten Verpackung finden
Sie:
- die vorliegende Gebrauchs- und
Wartungsanleitung
- die EG-Konformitätserklärung
- 1 Tube Schmierfett (Vaseline)
- 1 Tropfschale und 3 Saugdichtungen.
3. NÜTZLICHE INFORMATIONEN
ZUM TRANSPORT
Um zu verhindern, dass das Öl aus dem
hermetisch geschlossenen Kompressor in den
Kühlkreis fließt, muss das Gerät vertikal (vgl.
Verpackungsangaben) transportiert, gelagert
und gehandhabt werden. Falls das Gerät
versehentlich oder aus Transport-gründen nicht
vertikal gehalten wurde, muss es vor der
Inbetriebnahme etwa 3-4 Stunden aufrecht
stehen gelassen werden, damit das Öl in den
Kompressor zurück-fließen kann.
4. NÜTZLICHE INFORMATIONEN
ZUR HANDHABUNG
Jedes Gerät wird auf einer Holzpalette
geliefert, auf der es unter Verwendung
gewöhnlicher Hubmittel angehoben und
transportiert werden kann.
Achtung
Versuchen Sie nicht, das Gerät
eigenständig anzuheben, sondern bitten
Sie einen Mitarbeiter um Hilfe.
Beim Ver- und Entladen immer vorsichtig
vorgehen, um Schäden am Gerät zu
vermeiden. Es ist möglich, das Gerät mit
einem motorisierten oder Handgabelstapler anzuheben. Hierfür die Gabeln
unter dem Gerät ansetzen.
Page 24

Data di emissione: Maggio, 2016 Revisione: 6 Pag. : 24/64
Vermeiden Sie es, das Gerät
- auf den Kopf zu stellen
- mit Seilen o. Ä. zu ziehen
- mit Hubgurten oder -seilen anzuheben
- und seine Verpackung Vibrationen oder Stößen
auszusetzen.
Das Gerät in einem trockenen Raum bei
Temperaturen zwischen 0 °C und 40 °C lagern.
Es dürfen höchstens zwei Geräte in ihrer
Originalverpackung vertikal übereinander
gestapelt werden (siehe Pfeile auf der
Verpackung).
5. TECHNISCHE
SPEZIFIKATIONEN
Technische und elektrische Eigenschaften
des Gerätes
Alle technischen und elektrischen Eigenschaften
des Gerätes sind auf dem nachfolgend
abgebildeten Typenschild im Inneren
des Geräts wiedergegeben.
Auf dem Typenschild ist zudem die
Seriennummer des Modells angegeben.
Das Typenschild enthält folgende Angaben:
• Modell
• Seriennummer
• Elektrische Eigenschaften in Volt/Hz
• Max. Stromaufnahme in Watt
• Max. Strom in Amp
• Gewicht in kg
• Die Klimaklasse „N” (Einsatztemperatur
zwischen 16 und 32 °C) gemäß IECNorm 60335-2-24.
Die Außenmaße des Gerätes sind:
SP1
• Höhe 61,2 mm
• Breite 26,2 mm
• Tiefe 42,7 mm
• Gewicht 28 kg
SP2
• Höhe 61,2 mm
• Breite 44,7 mm
• Tiefe 43,8 mm
• Gewicht 48 kg
SP3
• Höhe 61,2 mm
• Breite 62,8 mm
• Tiefe 44,3 mm
• Gewicht 65 kg
Geräuschpegel
Der gewichtete äquivalente Dauerschallpegel
liegt unter 70 dB.
Störungen:
Eventuelle Störungen lassen sich in den meisten
Fällen durch kleine Eingriffe beheben. Bitte
lesen Sie die vorliegende Anleitung aufmerksam
durch, bevor Sie den Hersteller oder
Kundendienst verständigen.
Entsorgung
Wichtig
Alle Verpackungsteile können gefährlich sein
und müssen für Kinder unzugänglich aufbewahrt
werden.
Wichtig
Die Verpackungsmaterialien gehören nicht in die
Landschaft. Bewahren Sie sie für späteren
Gebrauch, wie beispielsweise für die Lagerung
in der Winterpause, auf.
Das Symbol weist darauf hin, dass das
Gerät nicht als Siedlungsmüll entsorgt werden
darf, sondern nach den Bestimmungen der
europäischen Richtlinie 2003/108/EC (Waste
Electrical and Electronics Equipments - WEEE)
und den hiervon abgeleiteten nationalen
Gesetzen zu entsorgen ist, um möglichen
Umwelt- und Gesundheitsschäden vorzubeugen.
Für die korrekte Entsorgung des Gerätes
kontaktieren Sie bitte die Verkaufsstelle,
bei der Sie das Gerät erworben haben,
oder unseren After-Sales-
Page 25

Data di emissione: Maggio, 2016 Revisione: 6 Pag. : 25/64
Abb. 1
Abb. 2
6.
AUFSTELLUNG
NUR FÜR WARTUNGSPERSONAL
Die Installation und die späteren
Wartungsarbeiten dürfen ausschließlich
von einer im Gebrauch des Gerätes
geschulten Fachkraft unter Beachtung der
einschlägigen Vorschriften ausgeführt
werden.
a) Das Gerät auspacken und auf eventuelle
Transportschäden untersuchen (Abb. 1). Die
Originalverpackung für die Winterlagerung
aufbewahren.
!WICHTIG!
Alle Verpackungsteile können gefährlich
sein und müssen für Kinder unzugänglich
aufbewahrt werden.
b) Das Gerät in einem trockenen Raum und fern
von Wärmequellen auf einer waagrechten und
soliden Unterlage aufstellen. Um eine
ausreichende Belüftung des Unterbaus zu
gewährleisten, muss um das Gerät ein Freiraum
von mindestens 20 cm belassen werden
(Abb. 2). Die Raumtemperatur muss zwischen
15 °C und 32 °C liegen (Klimaklasse N).
c) Prüfen Sie, ob die Netzspannung mit den
Angaben auf dem Typenschild übereinstimmt
und die verfügbare Leistung für die Aufnahme
des Gerätes geeignet ist. Schließen Sie den
Netzstecker an eine Steckdose mit Erdung an,
keine Mehrfachsteckdosen verwenden.
FÜR WEITERE VORSICHTSMASSNAHMEN
BITTE DEN ABSCHNITT „ANSCHLUSS AN
DAS STROMNETZ" DURCHLESEN.
d) Die Installation hat gemäß den Herstelleranleitungen zu erfolgen. Eine Missachtung dieser
Vorgaben kann den einwandfreien Betrieb des
Gerätes beeinträchtigen.
Wichtig
Die Erdung ist gesetzlich vorgeschrieben. Ziehen
Sie vor jeder Reinigung oder außerplanmäßigen
Wartung den Netzstecker, um das Gerät vom
Stromnetz zu trennen.
Das Gerät im Fall von Defekten oder
Betriebsstörungen ausschalten und den
Netzstecker ziehen.
Page 26

Data di emissione: Maggio, 2016 Revisione: 6 Pag. : 26/64
7. ANSCHLUSS AN DAS
STROMNETZ
NUR FÜR WARTUNGSPERSONAL
Bevor Sie den Stecker an das Stromnetz
anschließen (vgl. Beschreibung im
vorausgehenden Abschnitt), beachten Sie zu
Ihrer Sicherheit folgende Vorsichtsmaßnahmen:
- Vergewissern Sie sich, dass das bauseitige
Stromnetz, an welches das Gerät angeschlossen
werden soll, den Anforderungen der
einschlägigen Sicherheitsvorschriften entspricht
und zuverlässig geerdet ist (Abb. 3).
Der Hersteller kann nicht für eventuelle Schäden
durch ein Fehlen der Erdung der Anlage haftbar
gemacht werden.
- Überprüfen Sie immer die elektrischen
Spezifikationen auf dem Typenschild jedes
einzelnen Gerätes. Die Daten auf dem
Typenschild ersetzen auf jeden Fall die Angaben
des vorliegenden Handbuches.
- Für eine korrekte und sichere Installation ist
es unerlässlich, dass der Steckdose ein
Fehlerstromschutzschalter mit mindestens 3
mm Kontaktöffnung vorgeschaltet wird, in
Konformität mit den gesetzlichen
Sicherheitsvorschriften (Abb. 3).
- Keine Mehrfachsteckdosen oder
Verlängerungskabel verwenden.
- Das Netzkabel darf an keiner Stelle gequetscht
oder eingeklemmt werden.
- Schalten Sie immer den Hauptschalter aus,
bevor Sie den Netzstecker vorsichtig aus der
Steckdose ziehen.
Wichtig
IN BESCHÄDIGTES NETZKABEL MUSS DURCH
DEN HEERSTELLER ODER SEINEN
KUNDENDIENST ODER AUF JEDEN FALL DURCH
EINEN TECHNIKER MIT GLEICHWERTIGER
QUALIFIKATION ERSETZT WERDEN, UM JEDES
RISIKO AUSZUSCHLIESSEN
Abb. 3
Page 27

Data di emissione: Maggio, 2016 Revisione: 6 Pag. : 27/64
8. INBETRIEBNAHME
!ACHTUNG!
VOR DER INBETRIEBNAHME DER
MASCHINE IST DIE IN KAPITEL 10
BESCHRIEBENE REINIGUNG UND
DESINFEKTION AUSZUFÜHREN.
- Verdünnen und mischen Sie das Konzentrat
oder Pulver nach den Herstellerangaben in
einem getrennten Behälter mit Wasser oder
Milch (siehe Abb. 4).
- Das angerührte Produkt in den Behälter geben
(siehe Abb. 5).
- Zuerst den Behälterdeckel und anschließend
den Hauptdeckel schließen und mit dem
zugehörigen Schlüssel sichern.
Hinweis
------------------------------------------SP1,SP2 und SP3 sind mit einer
Sicherheitsvorrichtung für den Anwender
ausgestattet, die beim Anheben des
Hauptdeckels automatisch anspricht und
augenblicklich alle Bewegungsteile stoppt.
Falls der Deckel nicht vorschriftsmäßig
geschlossen wird, können SP1,SP2 und SP3
nicht in Betrieb genommen werden.
---------------------------------------------------
- Den Stecker in die Steckdose stecken.
- Den Hauptschalter einschalten. Im Fall von
Mehrkammergeräten auch den kleinen
Rührwerkschalter aktivieren.
- Die Gefriertaste mit dem Schneeflockensymbol
betätigen und die ideale Dichte für das
eingefüllte Produkt einstellen.
Abb. 4
Abb. 5
Abb. 6
Page 28
Data di emissione: Maggio, 2016 Revisione: 6 Pag. : 28/64
Regelung der Konsistenz: Zur Veränderung
der Produktkonsistenz muss die Schraube an
der Rückseite der Maschine (Abb. 7) verstellt
werden. Durch Drehen im Uhrzeigersinn wird
das Produkt weniger fest, durch Drehen gegen
den Uhrzeigersinn wird das Produkt dagegen
fester.
Achtung
Diese Einrichtung wirkt nur auf die Konsistenz
des auszugebenden Produkts (mehr oder
weniger fest) und hat keinerlei Einfluss auf die
Kühltemperatur.
Achtung
Wenn der Füllstand der Granita im Inneren des
Behälters unterhalb der Mischerschnecke liegt,
muss Produkt nachgefüllt werden, um zu
vermeiden, dass es zu fest wird.
HINWEIS: Wenn von der Betriebsart GEFRIEREN
auf DEFROST umgeschaltet werden soll, muss
die kleine Taste (Abb. 6) in Stellung II gebracht
werden.
- Wenn das Produkt die gewünschte Konsistenz
erreicht hat, ist zur Ausgabe ein Becher unter
den Hahn zu stellen. Dann den Hebel ziehen,
wie in Abbildung 8 dargestellt.
Die Maschinenlinie SP ist mit einem DigitalDisplay (Abb. 9 und Abb. 9bis) ausgestattet, das
das Einblenden der Temperatur in jedem Becken
gestattet.
In der SP2 und der SP3 kann durch Einsatz der
Pfeile (Abb. 9bis) von der Ablesung eines der
Becken zur anderen gewechselt werden.
Abb. 7
Abb. 8
Abb. 9
Page 29

Data di emissione: Maggio, 2016 Revisione: 6 Pag. : 29/64
Einstellung der Defrost-Temperatur (nur
für elektronische SP2 und SP3)
Bei den elektronischen Versionen der SP2 und
SP3 kann die Defrost-Temperatur des Ein- und
Abschaltens des Kompressors während der
Defrost-Phasen eingestellt werden.
In der Defrost-Phase wird die
Einschalttemperatur des Kompressors
festgelegt, die Höchsttemperatur, über der die
Kühlanlage wieder aktiviert wird.
Ebenfalls in der Defrost-Phase wird die
Ausschalttemperatur des Kompressors
festgelegt, die Mindesttemperatur, unter der die
Kühlanlage wieder deaktiviert wird.
Auf diese Weise liegt stets eine
Erhaltungstemperatur vor, die zwischen den
beiden eingegebenen Werten variiert.
!ACHTUNG!
Angesichts der Bedeutung dieser beiden
Temperaturen verhindert die Software, dass die
Einschalttemperatur auf einen Wert unter der
Ausschalttemperatur eingegeben werden kann
und umgekehrt.
Um die beiden Temperaturen einzugeben, wie
folgt vorgehen:
- Die Taste SET betätigen.
- Der Pfeil nach oben auf der rechten Seite
des Temperaturwerts dient der Anzeige,
dass man sich in das Menü der Eingabe der
Einschalttemperatur begibt. Mit den Pfeilen
kann zu dem der Ausschalttemperatur
gewechselt werden, das durch den Pfeil nach
unten angegeben wird.
- Sobald die Temperatur ausgewählt wurde,
die geändert werden soll, sieht man, wenn
erneut die Taste SET gedrückt wird, dass der
Temperaturwert zu blinken beginnt, was
bedeutet, dass dieser unter Verwendung der
Pfeile geändert werden kann.
- Durch erneutes Betätigen der Taste SET
beginnt die Maßeinheit zu blinken, mit der
die Temperatur angezeigt werden soll und
auch hier kann mit den Pfeilen zwischen °C
und °F gewählt werden.
- Durch ein letztes Betätigen der Taste SET
werden die eingegebenen Parameter
gespeichert und das Display zeigt die
momentane Temperatur eines der Becken
an.
Abb. 9bis
Page 30

Data di emissione: Maggio, 2016 Revisione: 6 Pag. : 30/64
9. TÄGLICHE REINIGUNG UND
DESINFEKTION
Um einen stets einwandfreien Betrieb in
Erfüllung der einschlägigen Gesundheits- und
Hygienevorschriften zu gewährleisten, ist eine
regelmäßige und sorgfältige Ausführung der
nachfolgend beschriebenen Reinigung und
Desinfektion erforderlich, wobei zu beachten
ist, dass sich das hiermit beauftragte Personal
zuvor die Hände und Unterarme waschen und
desinfizieren muss.
Nach einer längeren saisonbedingten
Nichtbenutzung muss das Gerät immer gereinigt
und desinfiziert werden.
Achtung
Spritzen Sie bei der Reinigung kein Wasser
auf die Schalter und vermeiden Sie, dass
interne elektrische Komponenten mit
Wasser und Reinigungsprodukten in
Berührung kommen. Es besteht
Stromschlaggefahr!
Achtung
Um die Bildung von Bakterien zu
verhindern, verwenden Sie ausschließlich
für die Desinfektion von Kunststoff und
Gummi zugelassene Produkte. Bei
Missachtung dieser Vorschrift besteht ein
Gesundheitsrisiko.
HINWEIS: Es obliegt der Verantwortung des
Anwenders, sich über die einschlägigen
Vorschriften zu informieren und die Bundes-,
Landes- und örtlichen Gesetze im Hinblick auf
die Häufigkeit der Reinigung und die Lagerung
der verwendeten Produkte einzuhalten.
Die nachfolgend beschriebenen Arbeiten sind
unerlässlich, um die Bildung von Bakterien in
der Maschine zu verhindern und beste
hygienische Bedingungen zu gewährleisten.
Es wird empfohlen, die Reinigung/Desinfektion
täglich und auf jeden Fall in Konformität mit
den einschlägigen Vorschriften auszuführen.
Weder der Maschinenhersteller noch der
Hersteller des verwendeten Softeis-Konzentrats
können für eventuelle direkte oder indirekte
Personenschäden haftbar gemacht werden, die
auf eine – auch teilweise – Nichteinhaltung aller
Vorgaben des vorliegenden Handbuchs und
insbesondere der Reinigungs- und
Desinfektionsvorschriften zurückzuführen sind.
Page 31

Data di emissione: Maggio, 2016 Revisione: 6 Pag. : 31/64
- Den Behälter so weit wie möglich von
Produktresten befreien.
Die Maschine mithilfe des Hauptschalters
abschalten.
- Nachdem der Anschlag mithilfe des
zugehörigen Schlüssels (Abb. 10) entfernt
wurde, zunächst den Sicherheitsdeckel und
dann den darunter liegenden Deckel abnehmen,
wie in Abb. 11 dargestellt.
Den Behälter mit lauwarmem Wasser füllen
(Abb. 12) und beide Deckel wieder anbringen.
Dabei muss überprüft werden, dass der
Sicherheits- Mikroschalter aktiviert wurde.
!ACHTUNG!
SP ist mit einer Sicherheitseinrichtung
ausgestattet, die den Betrieb der Maschine
verhindert, wenn der Deckel nicht richtig in
seine Aufnahme eingesetzt wurde.
- Starten Sie die Spirale im Kühlmodus (Stufe
II)
- Lassen Sie die Spirale einige Minuten laufen
und entleeren Sie dann den Behälter.
- Wiederholen Sie diesen Vorgang so lange bis
das Wasser klar bleibt (Abb. 13).
- Die Maschine abschalten und das
Versorgungskabel lösen.
- Ein handelsübliches Desinfektionsmittel für
Kunststoff und Gummi bereitstellen (z.B.
AMUCHINA®).
WICHTIG
Die Anweisungen auf der Packung des
verwendeten Produkts im Hinblick auf die
Dauer und die Modalitäten zu dessen
Aufbewahrung müssen strikt eingehalten
werden.
Abb. 10
Abb. 11
Abb. 12
Abb. 13
Page 32

Data di emissione: Maggio, 2016 Revisione: 6 Pag. : 32/64
Achtung
Um Stromschlaggefahr und einen
versehentlichen Kontakt mit
Bewegungsteilen während der Zerlegung
und des Zusammenbaus zu vermeiden,
prüfen Sie, ob alle Schalter auf OFF stehen
und der Netzstecker gezogen ist.
- Deaktivieren Sie den Hauptschalter A an der
rechten Maschinenseite und trennen Sie das
Versorgungskabel vom Netz.
- Nehmen Sie die Deckel ab.
- Waschen und desinfizieren Sie sich sorgfältig
die Hände, bevor Sie mit der Reinigung
beginnen.
- Schrauben Sie die Griffe ab (Abb. 14).
- Nehmen Sie die sternförmige Garniertülle ab
(Abb. 15).
- Drücken Sie gleichzeitig auf die zwei
Verschlussklemmen am Ausgabehahn
und ziehen Sie ihn nach oben aus seiner
Aufnahme heraus (Abb. 15).
- Zerlegen Sie den Hahn in seine Bauteile.
Drücken Sie hierzu den Körper nach unten und
ziehen Sie den Hebel heraus (Abb. 15).
Achtung
Um einer Bakterienbildung vorzubeugen,
sind immer auch die O-Ring-Dichtungen
auszubauen und zu reinigen. Bei
Missachtung dieser Vorschrift besteht ein
Gesundheitsrisiko.
- Ziehen Sie den Behälter nach vorne aus
seinem Sitz heraus (Abb.16 ).
Abb. 14
Abb. 15
Abb. 16
Page 33

Data di emissione: Maggio, 2016 Revisione: 6 Pag. : 33/64
- Schrauben Sie den Befestigungsmutter in
Pfeilrichtung ab (Linksgewinde) und entnehmen
Sie das Rührwerk und die Dichtungen (Abb. 17).
Ziehen sie die Tropfschale gegen Außen zu um
sie zu abmontieren (Abb. 18).
- Waschen Sie alle Bauteile sorgfältig mit
heißem Wasser und Geschirrspülmittel.
WICHTIG
Verwenden Sie keine Scheuermittel, die
den Behälter und andere Komponenten,
mit denen sie in Kontakt kommen,
beschädigen könnten.
Achtung!
Nicht in der Geschirrspülmaschine waschen
weil die verschiedene Teile können
beschädigt werden.
- Spülen Sie alle gewaschenen Komponenten
gründlich nach und tauchen Sie sie anschließend
in die Desinfektionsflüssigkeit, wobei die vom
Hersteller empfohlene Dosierung und
Einwirkzeiten zu beachten sind.
- Nach der vorgegebenen Desinfektionszeit alle
Bauteile mit sauberem Wasser nachspülen und
mit einem sauberen Tuch abtrocknen.
- Reinigen Sie den Verdampfer und den
Kondensatsammelbereich gründlich und
entfernen Sie anschließend jeden
Produktrückstand mit einem in
Desinfektionsmittel getränkten Schwamm (siehe
Abb. 20).
- Waschen Sie die Teile mit einem in sauberem
Wasser getränkten Schwamm nach und
trocknen Sie anschließend alle Oberflächen mit
einem sauberen Tuch ab.
Abb. 17
Abb. 18
Abb. 19
Page 34

Data di emissione: Maggio, 2016 Revisione: 6 Pag. : 34/64
Nach der gründlichen Reinigung und
Desinfektion können die Komponenten wieder
zusammen- und eingebaut werden.
Die korrekte Montage des Gerätes ist sehr
wichtig, um seine Dichtheit zu gewährleisten
und mögliche Schäden durch austretendes
Produkt zu verhindern.
Für den Zusammenbau des Gerätes ist ein
zugelassenes Schmiermittel erforderlich
(Vaseline).
Vergewissern Sie sich immer, dass alle Teile
korrekt gewaschen und desinfiziert wurden und
dass der mit der Montage beauftragte
Mitarbeiter zuvor seine Hände und Unterarme
gründlich gewaschen und desinfiziert hat.
- Schmieren Sie die Innenseite der
Saugdichtung sorgfältig mit Vaseline (Abb. 20).
- Schieben Sie die hintere Behälterdichtung wie
in Abb. 21 dargestellt und die vordere
Saugdichtung auf.
- Achten Sie bei der Montage des Rührwerks
darauf, dass sich das frontseitige Endstück
einwandfrei in die Drehwelle einfügt.
- Schrauben Sie die Befestigungsmutter
entgegen des Uhrzeigersinns ein, um die
Komponenten in Position zu sichern (Abb. 22)
Abb. 20
Abb. 21
Abb. 22
Page 35

Data di emissione: Maggio, 2016 Revisione: 6 Pag. : 35/64
- Um die Montage zu erleichtern, empfehlen wir,
die Stelle der Behälterrückseite, die an der
Dichtung anliegt, mit sauberem Wasser oder
Lebensmittelfett (Vaseline) zu befeuchten
(siehe Abb. 23).
- Setzen Sie den Behälter in seine Aufnahme
ein und prüfen Sie, ob er passgenau an seiner
Dichtung anliegt (siehe Abb. 24)
- Schrauben Sie die zwei Behälterschrauben bis
zum Anschlag ein, um den Behälter zu
befestigen (Abb. 25).
WICHTIG
Ziehen Sie die Schrauben nicht zu stark an,
um Schäden am Gewinde bzw. am Behälter
zu vermeiden.
- Bestreichen Sie den Ausgabehahn dünn mit
Vaseline, um den Einbau zu erleichtern, und
schieben Sie ihn bis zum Anschlag ein (Abb.
26).
!ACHTUNG!
Die Dichtheit des Hahnes ist nur dann
gewährleistet, wenn er sich leichtgängig und
reibungslos in seine Aufnahme einfügen lässt.
- Montieren Sie die Garniertülle unter die
Ausgabe.
- Setzen Sie die Tropfschale ein
Abb. 23
Abb. 24
Abb. 25
Abb. 26
Page 36

Data di emissione: Maggio, 2016 Revisione: 6 Pag. : 36/64
STERILISATION
Falls die Maschine nach einer gründlichen
Reinigung und Desinfektion (vgl. Kap. 10) für
einige Tage nicht benutzt wurde, muss sie wie
nachstehend beschrieben sterilisiert werden.
- Nehmen Sie zuerst den Hauptdeckel und dann
den Behälterdeckel ab.
- Füllen Sie den Behälter mit Wasser und einem
für Lebensmittel zugelassenen Desinfektionsmittel, dessen genaue Dosierung den
Herstellerangaben zu entnehmen ist.
- Schließen Sie die Deckel und schalten Sie das
Rührwerk ein (alle LEDs aus). Lassen Sie die
Desinfektionsflüssigkeit laut Herstellerangaben
für die erforderliche Zeit einwirken.
WICHTIG
Lassen Sie das Desinfektionsmittel nicht
länger als vom Hersteller vorgeschrieben
im Behälter.
- Schließen und öffnen Sie beim Entleeren des
Behälters den Hahn mindestens zehn Mal, um
auch den Ausgabebereich zu desinfizieren.
- Den Behälter gründlich ausspülen. Hierzu wie
oben beschrieben vorgehen, jedoch nur
sauberes Wasser verwenden.
- Nach Abschluss dieser Sterilisation ist die
Maschine einsatzbereit..
Page 37

Data di emissione: Maggio, 2016 Revisione: 6 Pag. : 37/64
10. AUSSERPLANMÄSSIGE
WARTUNG
Achtung
Es ist Vorschrift, das Gerät vor jeder
Wartung auszuschalten und den
Netzstecker zu ziehen.
Reinigung des Kondensators
Um einen hohen Wirkungsgrad der Kühlanlage
zu gewährleisten, muss der Kondensator
einmal monatlich gereinigt werden.
Für den Zugriff auf den Kondensator:
- Schalten Sie das Gerät am Hauptschalter A an
der rechten Maschinenseite aus und trennen Sie
das Versorgungskabel vom Netz.
- SP: Lösen Sie die zwei Befestigungsschrauben
unten an der Geräterückseite und nehmen Sie
die Verkleidung ab (Abb. 27).
- Entfernen Sie den Staub zwischen den
Kondensatorrippen mit einem Staubsauger
(Abb. 28).
WICHTIG
Verwenden Sie keine Schraubendreher
oder sonstigen spitzen Gegenstände, um
Schmutz zwischen den Kondensatorrippen
zu entfernen.
Abb. 27
Fig. 28
Page 38

Data di emissione: Maggio, 2016 Revisione: 6 Pag. : 38/64
Überprüfung und Ersatz der
Dichtungen
BEHÄLTERDICHTUNG
Die Dichtung an der Behälterrückseite muss je
nach Verschleiß und Wartungs-/Schmierniveau
alle zwölf Monate ausgewechselt werden.
HAHNDICHTUNGEN (O-RINGE)
Die O-Ring-Dichtungen der Ausgabe sind bei
Anzeichen von Verschleiß auszuwechseln. Diese
Dichtungen müssen bei jedem Zusammenbau
nach der Maschinenreinigung geschmiert und
sorgfältig auf Verschleiß geprüft werden, um
unerwünschte Produktverluste zu vermeiden.
SAUGDICHTUNG
Die frontseitige Saugdichtung am Verdampfer
ist alle drei Monate auszuwechseln und auf
jeden Fall, wenn Verschleiß festgestellt wird.
Diese Dichtung muss bei jedem Zusammenbau
nach der Maschinenreinigung mit dem
migelieferten Vaselinefett geschmiert werden.
Winterlagerung
Um die Maschine während der saisonbedingten
Nichtbenutzung wie im Winter angemessen zu
schützen, sind folgende Vorbereitungen zu
treffen:
- Trennen Sie die Maschine von jeder
Energiequelle.
- Zerlegen Sie die Maschine, reinigen und
desinfizieren Sie alle Komponenten mit
Produktkontakt. Siehe hierzu Kap. 10.
- Reinigen Sie auch die Außenverkleidungen.
- Bauen Sie die Maschine sorgfältig zusammen.
- Verwahren Sie die vollständig montierte
Maschine in ihrer Originalverpackung, um sie
vor Staub und anderen schädlichen
Einwirkungen zu schützen.
- Lagern Sie die Maschine an einem trockenen
Ort
11. HAFTUNGSAUSSCHLUSS
Der Hersteller übernimmt keinerlei Haftung für
eventuelle direkte oder indirekte Personen/Sach- oder Tierschäden, die auf eine – auch
teilweise – Nichteinhaltung aller Vorgaben des
vorliegenden Handbuchs und insbesondere der
Installations-, Gebrauchs- und
Wartungsvorschriften für das Gerät
zurückzuführen sind.
Der Hersteller haftet nicht für eventuelle
Ungenauigkeiten dieser Bedienungsanleitung
aufgrund von Druck- oder Übertragungs- bzw.
Übersetzungsfehlern. Er behält sich das Recht
vor, die als notwendig oder nützlich erachteten
Änderungen an seinen Produkten vorzunehmen,
ohne ihre wesentlichen Merkmale zu verändern
Page 39

Data di emissione: Maggio, 2016 Revisione: 6 Pag. : 39/64
12. LEITFADEN ZUR
PROBLEMLÖSUNG
HINWEIS: Die nachstehenden Eingriffe müssen von
einem qualifizierten Techniker ausgeführt werden.
Störung Mögliche Ursache Abhilfe
Die Maschine kühlt nicht oder nur
teilweise, der Kompressor
funktioniert
• Mangelnde Luftzirkulation um die
Maschine
• Die Maschine ist auf DEFROST
geschaltet
• Kondensatorrippen mit Schmutz
und Staub zugesetzt
• Der Lüfter funktioniert nicht
• Kältemittelleckage
• Die Maschine nicht in der Nähe von
Wärmequellen installieren und
mindestens 20 cm Freiraum um sie
herum belassen
• Auf GEFRIEREN umschalten
• Den Kondensator reinigen
• Die elektrischen Anschlüsse kon-
trollieren und ggf. wiederherstellen.
Falls das Gerät weiterhin nicht
funktioniert, den Lüfter ersetzen
• Leckstelle suchen und beheben; die
Anlage neu befüllen
Die Maschine kühlt nicht oder nur
teilweise; der Kompressor
funktioniert nicht
• Elektrik des Kompressors außer
Betrieb
• Elektrische Anschlüsse nicht
vorschriftsgemäß ausgeführt
oder defekt
•
Der Kompressor ist defekt
• Defekte Komponenten auswechseln
• Anschlüsse überprüfen und im
Bedarfsfall neu anschließen bzw.
auswechseln
• Den Kompressor auswechseln
Lautes Betriebsgeräusch der
Maschine
• Die Lüfterschaufeln stoßen
gegen interne Komponenten
• Überprüfen und beheben
Der Hauptschalter steht auf ON, die
Maschine funktioniert jedoch nicht
• Der Hauptdeckel wurde nicht
richtig geschlossen
• Elektrische Anschlüsse nicht
vorschriftsgemäß ausgeführt
oder defekt
• Hauptschalter defekt
• Elektronische Steuerkarte defekt
• Motorsteuerkarte defekt
•
Getriebemotor defekt
• Den Hauptdeckel korrekt schließen
• Anschlüsse überprüfen und im
Bedarfsfall neu anschließen bzw.
auswechseln
• Den Schalter auswechseln
• Die Steuerkarte auswechseln
• Die Motorkarte auswechseln
• Den Getriebemotor auswechseln
Der Behälter ist undicht • Eine Dichtung ist falsch montiert • Die Dichtung korrekt montieren
oder ggf. auswechseln
Der Ausgabehahn tropft • Der Hahn wurde nicht richtig
eingebaut
• Der Hahn lässt sich nicht bewe-
gen
• O-Ringdichtungen schadhaft
oder abgenutzt
• Die Ausgabe ausbauen und vor-
schriftsmäßig einbauen
• Den Hahn und seine Aufnahme
reinigen und mit dem mitge-
lieferten Vaselinefett schmieren
•
Die O-Ringdichtungen auswechseln
Das Produkt gelangt durch den
Ablassschlauch in die Tropfschale
• Saugdichtung, Rührwerknabe
und Befestigungsgriff wurden
nicht korrekt montiert
• Saugdichtung oder
Dichtungsbuchse schadhaft oder
abgenutzt
• Das Rührwerk ausbauen und
korrekt montieren
• Die Dichtungen ausbauen und
auswechseln
Das Rührwerk dreht nicht • Der Hauptdeckel wurde nicht
richtig geschlossen
• Bei Zweikammermaschinen
wurde der Behälterschalter nicht
aktiviert
• Elektrische Anschlüsse nicht
vorschriftsgemäß ausgeführt
oder defekt
• Motorsteuerkarte defekt
•
Getriebemotor defekt
• Den Hauptdeckel korrekt schließen
• Den Rüchrwerkschalter aktivieren
• Anschlüsse überprüfen und im
Bedarfsfall neu anschließen bzw.
auswechseln
• Die Motorkarte auswechseln
• Den Getriebemotor auswechseln
Lautes Betriebsgeräusch während der
Rührwerkdrehung
• Die neue Saugdichtung wurde
vor der Montage nicht korrekt
geschmiert
• Die Rührspirale wurde nicht
korrekt montiert
• Die Dichtung ausbauen, reinigen,
desinfizieren und vorschriftsmäßig
schmieren
• Die Spirale und das gesamte
Rührsystem ausbauen und neu
montieren
Am Display erscheint die
Fehlermeldung “E1”
• Eine der Temperatursonden ist
kurzgeschlossen
• Sonde austauschen
Page 40

Data di emissione: Maggio, 2016 Revisione: 6 Pag. : 40/64
Page 41

Data di emissione: Maggio, 2016 Revisione: 6 Pag. : 41/64
Published by:
SPM DRINK SYSTEMS S.p.a.
Via Panaro n° 2
41057 Spilamberto (MO)
Edition: 02/2014
Revision: 05
© 2014 – SPM Drink Systems
All copying rights are reserved to SPM DRINK SYSTEMS; copying, even partial, is illegal.
The descriptions and illustrations refer to the specific machine at issue. SPM Drink Systems reserves the right to
modify at any time the equipment for mass production.
This manual:
- is integral part of the supply and must be carefully read, in order to be properly used, in compliance with
the essential safety requirements;
- has been drafted by following the dispositions 2006/42/CE and reports the technical information that are
necessary to correctly run all the procedures, under safety conditions;
- must be carefully kept (protected by a transparent, watertight wrapping, in order to avoid any damage)
and must go with the machine during its life, including potential changes of ownership. In case of loss or
damage, it’s possible to ask for a copy to SPM DRINK SYSTEMS, pointing out the information stated on
the identification label;
SPM DRINK SYSTEMS declines all responsibility for a wrong usage of the machine and/or damages caused by
operations not provided for in this manual..
Dear Customer,
We would like to congratulate you for
choosing this high-quality product, that will
certainly meet all your expectations.
We thank you for the preference reserved to
our company and we invite you to carefully
read the following instruction manual before
machine’s start up.
Page 42

Data di emissione: Maggio, 2016 Revisione: 6 Pag. : 42/64
INDEX
1. IMPORTANT WARNINGS AND ADVICES
....................................................................43
2. EQUIPMENT KIT .......................................43
3. TRANPORT TIPS .......................................43
4. LIFTING TIPS .............................................43
5. TECHNICAL SPECIFICATIONS ..............44
6. POSITIONING ............................................45
7. CONNECTION TO THE POWER SUPPLY
MAINS .......................................................46
8. OPERATING INSTRUCTIONS AND
START-UP PROCEDURES .....................47
Defrost temperature setting (only for SP2 and
SP3 electronic version) ................................... 49
9. CLEANING AND DAILY SANITIZING
PROCEDURES..........................................50
10. SPECIAL MAINTENTANCE.....................57
Condenser cleaning ......................................... 57
Control and replacement of seals .................... 58
Winter storage ................................................. 58
11. DISCLAIMER .............................................58
12. TROUBLESHOOTING GUIDE .................59
Page 43

Data di emissione: Maggio, 2016 Revisione: 6 Pag. : 43/64
1. IMPORTANT WARNINGS AND
ADVICES
This installation and operation manual is
an integral part of the equipment and must
be kept for future consultation.
Unless otherwise stated, this manual is
addressed to operators (staff members
who uses the equipment on a daily basis)
and to servicemen (staff members qualified
to carry out the installation and/or
maintenance). The parts of the manual
addressed only to servicemen are pointed
out accordingly. Please read carefully the
warnings listed here below before
installation and start-up of the equipment.
This equipment has been designed to
produce coffee cream, ice cappuccino,
sorbets, slushes and similar frozen dairy
products.
Upon receipt of the equipment, make sure
that its part number matches the one
specified in the order, which can be found
on all the delivery documents.
This equipment is exclusively destined to
the purpose for which it was designed. The
manufacturer cannot be held responsible
for any damage due to improper use.
This equipment is not intended for use by
persons (including children) with reduced
physical, sensory or mental capabilities, or
lack of experience and knowledge, without
supervision or instruction concerning its
use by a person responsible for their
safety. Children should be supervised to
ensure that they do not play with the
machine.
This equipment is not suitable for outdoor
use. This machine is not suitable for
installation in locations where water jets
are used. This equipment must be installed
in places where it can be controlled by
qualified staff.
2. EQUIPMENT KIT
In the packaging of this equipment you will find
also:
- operator’s manual,
- 1 tube of Vaseline grease lubricant to be used
for machine maintenance;
- EC declaration of conformity;
- 1 drip tray.
3. TRANPORT TIPS
To prevent the oil held in the hermetic
compressor running into the cooling circuit, the
device must be carried, stored and handled in
the upright position, following the direction
instructions on the packing. If the device is
accidentally or intentionally (for transportation
reasons) kept in any other position, it must be
set again in the correct position at least twenty
minutes before start-up procedures, in order to
let the oil flow back into the compressor.
4. LIFTING TIPS
Each machine is equipped with a special wooden
pallet that allows the handling with standard
forklift trucks.
Caution
Never lift the machine alone, but always seek
the assistance of another operator.
To prevent and avoid any damage to the
machine, all loading and unloading operations
should be carried out with special care. The
equipment can be lifted, with either a manual or
engine-powered lifting truck, by positioning the
forks in the base section of the unit.
The following operations should always be
avoided:
- to turn upside down the machine;
- to drag the machine with ropes or others;
- to lift the machine with slings or ropes
- to shake or rattle the machine and its
packaging.
Page 44

Data di emissione: Maggio, 2016 Revisione: 6 Pag. : 44/64
The machine must be stored in a dry place with
temperatures from 0°C to 40 °C. No more than
2 machines should be stacked on top of each
other, taking care to maintain the vertical
position, as shown by the arrows on the carton.
5. TECHNICAL SPECIFICATIONS
Technical and electrical specifications
All the machine’s technical and electrical
specifications are stated on the identification
plate, positioned in the internal part of the
equipment; a sample is shown here below.
The plate specifies:
• Model: XX
• n°: XX
• Electrical specifications: Volt/ Hz
• Max. absorption (Watt)
• Max. current (Amp)
• Machine ambient working temperatures
between 24°C and 32°C.
Dimensions and weight:
SP1
• Height: 61,2 cm.
• Width: 26,2 cm.
• Depth: 42,7 cm.
• Weight: 28 kg.
SP2
• Height: 61,2 cm.
• Width: 44,7 cm.
• Depth: 43,8 cm.
• Weight: 48 kg.
SP3
• Height: 61,2 cm.
• Width: 62,8 cm.
• Depth: 44,3 cm.
• Weight: 65 kg.
Noise emissions
The continuous, equivalent, weighted level of
acoustic pressure is below 70 dB.
In the event of breakdown:
In most cases, any technical problem can be
settled with slight interventions (please see the
troubleshooting guide at the end of this
manual); we therefore recommend you to
carefully read this handbook before contacting
the manufacturer or service centre.
Disposal
Caution
All the parts of the packaging must be kept
beyond the range of children, as they might
represent a potential safety/health risk.
Important
In respect of the environment, please dispose
the packaging as illustrated.
This symbol: means that the machine
cannot be disposed as common waste. It must
be handled in compliance with the provisions of
European directive 2003/108/CE (Waste
Electrical and Electronic Devices - WEEE) and
the resulting national legislation, in order to
prevent any potential damage to the
environment and to create health risks.
In order to correctly dispose of the device,
please contact the distributor from which you
purchased it or our after-sales service.
Page 45

Data di emissione: Maggio, 2016 Revisione: 6 Pag. : 45/64
Fig. 1
Fig. 2
6. POSITIONING
FOR MAINTENANCE WORKER ONLY
The installation and subsequent servicing
operations must be carried out by skilled
members who have been trained to use the
device and in compliance with the
regulations in force.
a) Remove the packing (fig.1) and preserve it
in order to reuse for winter storage.
Caution
All the parts of the packaging must be kept
beyond the range of children, as they might
represent a potential safety/health risk.
b) Make sure the machine is in perfect
condition.
c) Rest the machine on a sturdy, flat surface
making sure it is well ventilated by leaving a
gap of 20 cm around it and do not install it near
heat sources (fig.2); we recommend you to
maintain a room temperature between 24
and 32°C.
d) Check that the power mains voltage meets
the specifications on the equipment
identification plate and that the output available
meets the device’s power requirements.
Fit the plug into an earthed socket, removing all
multiple adaptors.
FOR FURTHER PRECAUTIONS, READ THE
SECTION “CONNECTION TO THE ELECTRICITY
MAINS” CAREFULLY.
e) The installation must be carried out in
accordance with the manufacturer’s instructions.
Failure to comply with the positioning and
installation instructions may impair the
machine’s operation.
Important
You are legally required to provide a suitable
grounding system for the equipment.
Before carrying out any cleaning and/or special
maintenance on the device, make sure it is
disconnected from the mains by unplugging it.
In the event of a breakdown or malfunctioning,
switch off the device and remove the plug.
Page 46
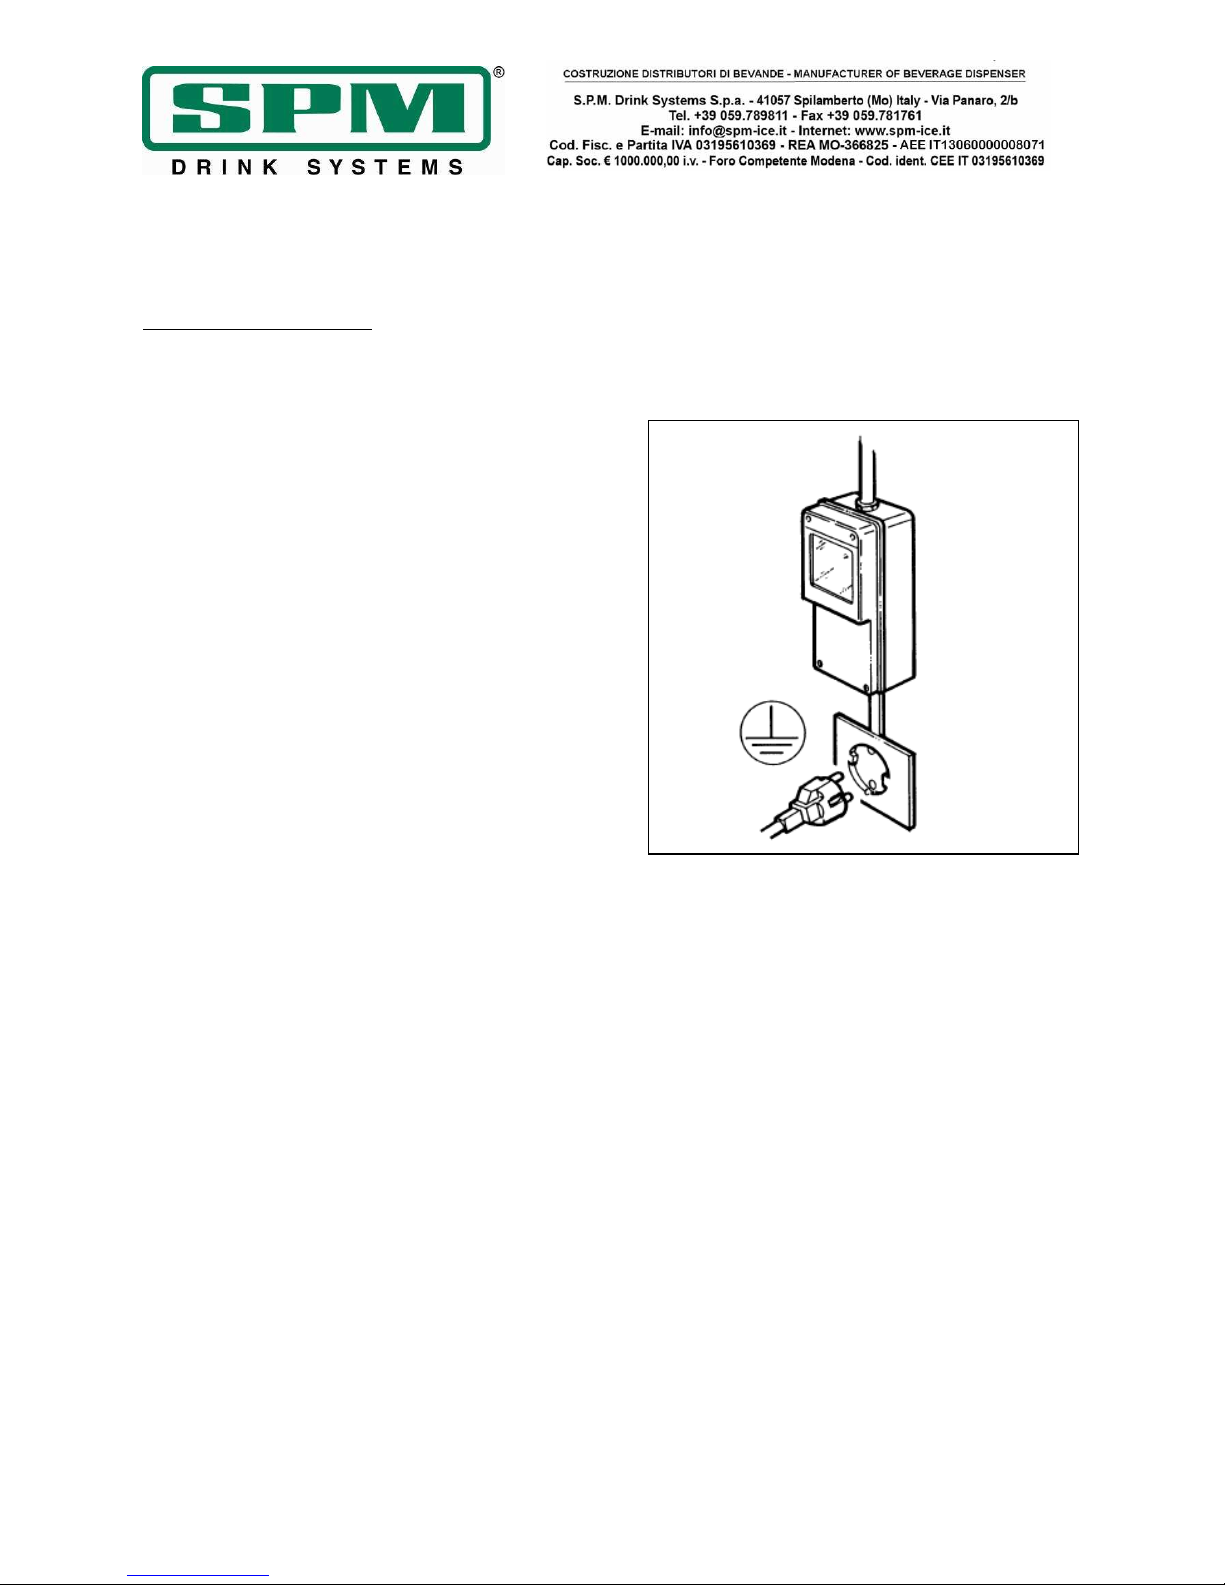
Data di emissione: Maggio, 2016 Revisione: 6 Pag. : 46/64
7. CONNECTION TO THE POWER
SUPPLY MAINS
FOR SERVICEMAN ONLY
Before fitting the plug in the power supply
socket, for your own safety, as already
mentioned in the previous paragraph, please
read the following precautions.
- The machine’s electrical safety is only
guaranteed when it is connected to a suitable
earth system, structured as provided by the
national safety current regulations (fig.3).
Therefore, the manufacturer cannot be held
responsible for any damage due to failure of the
grounding system of the machine.
- Always verify electrical specifications on the
data plate of each machine. Data plate
specifications always replace the information of
this manual.
- For a safe and correct installation, it is
essential to provide a suitable socket controlled
by a thermal cut-out switch whose contacts are
at least 3 mm apart, in accordance with the
current national safety regulations (see fig.3).
- Never use extensions or multiple adaptors.
- Check the power lead along its entire length to
make sure it is not crushed in any way.
- To unplug the device, first disconnect the
power supply with the switch, then grip the plug
and gently pull it out.
Important
IF THE POWER CABLE IS DAMAGED, IT MUST
BE REPLACED BY THE MANUFACTURER, ITS
AFTER SALE SERVICE OR BY QUALIFIED
PERSONNEL, TO PREVENT ANY POSSIBLE RISK.
Fig. 3
Page 47

Data di emissione: Maggio, 2016 Revisione: 6 Pag. : 47/64
8. OPERATING INSTRUCTIONS AND
START-UP PROCEDURES
!IMPORTANT!
BEFORE STARTING THE MACHINE, CARRY OUT
THE CLEANING AND SANITISING PROCEDURES
DESCRIBED IN CHAPTER 9.
- Dilute and mix the product in a separate
container according to the manufacturer’s
instructions (see fig.4).
- Pour the mix obtained into the bowl (see
fig.5).
- Restore the secondary cover and then the
main one.
Note -----------------------------------------------
SP units are equipped with a very efficient
safety mechanism designed to protect the
operator; it is activated when cover is lifted.
This device automatically and immediately stops
all moving parts.
If the main cover is not correctly
positioned, the correspondent mixing
system will not work.
------------------------------------------------------
- Insert the plug into the electrical power outlet.
- Activate the main switch on the right side of
the machine, the scraper auger will
automatically start rotating.
- Activate the FROZEN mode by switching on
the snowflake button (right side, small button,
position I, see fig.6).
Fig. 4
Fig. 5
Fig. 6
Page 48

Data di emissione: Maggio, 2016 Revisione: 6 Pag. : 48/64
Adjusting the consistency: to adjust the
consistency of the product, turn the red screws
located on the back of the machine in the
following way: clockwise to make the product
less dense, anticlockwise to make the product
denser (see figure 7).
Caution
This device only changes the consistency of the
product to be dispensed. It does not affect the
cooling temperature of the product.
Caution
When the level of the slush inside the bowl is
below the mixing spiral, to prevent the product
from becoming too thick, it is necessary to refill
the bowl.
NOTE: if you need to switch from FREEZING
mode to DEFROST one, it's necessary to switch
the small button on the waves position (position
II in the figure 6).
- Once the desired product consistency is
reached, to dispense product it is necessary to
position a cup under the tap and lower the lever
as shown in figure 8.
SP units are fitted with a digital display to show
the bowls temperature (fig.9 and fig.9bis).
In the SP2 and SP3 it is possible, by using the
arrows (fig.9bis), to switch from one bowl
temperature to the others.
Fig. 7
Fig. 8
Fig. 9
Page 49

Data di emissione: Maggio, 2016 Revisione: 6 Pag. : 49/64
Defrost temperature setting (only for SP2
and SP3 electronic version)
In the SP2 and SP3 electronic version it is
possible to set the refrigerating system cut in
and cut out temperatures during the defrost
mode.
During this defrost phase, the cut in
temperature is the maximum temperature over
which the refrigerating system is switched on
while the cut out temperature is the minimum
temperature under which the refrigerating
system is switched off.
In this way the defrost temperature will be
maintained between these two values.
!ATTENTION!
The software will automatically prevent to set
the cut in temperature lower than the cut out
one and vice versa.
In order to set these two temperature is
necessary to operate as described below:
- Press the SET button.
- The up arrow on the temperature value
right side indicates that we entered
inside the cut in temperature setting
menu; with the two arrows it is possible
to switch on the cut off temperature
menu as indicated by the down arrow on
the temperature value right side.
- Once selected the temperature that is
necessary to modify, after pressing the
SET button the value will start blinking to
indicate that is now possible to modify it
by using the arrows.
- Pushing again the SET button the °C or
the °F will start blinking to indicate that
is possible to switch from one to the
other.
- Pushing for the last time the SET button
the set parameters will be memorized
and the temperature on the display will
stop blinking.
Fig. 9bis
Page 50

Data di emissione: Maggio, 2016 Revisione: 6 Pag. : 50/64
9. CLEANING AND DAILY SANITIZING
PROCEDURES
In order to maintain your SP units in like-new
operating condition and to respect current
regulations, it’s absolutely necessary to
frequently and carefully perform the cleaning
and sanitizing operations as described below.
In case of prolonged shutdown (winter storage),
the machine must be disassembled, washed and
sanitized according to the instructions in this
manual before start-up to ensure the best
possible cleanliness.
Caution
Electric shock hazard. Do not splash water
on switches or allow water to flow onto
electrical components inside the machine.
Caution
To prevent bacteria growth, use only
sanitizers approved for plastic and rubber
objects, failure to do so could create a
health hazard.
NOTE: it is responsibility of the operator to be
aware of and conform to the requirements of
current local, state and federal laws concerning
the frequency of cleaning and conservation of
products used.
The cleaning instructions explained in this
section are essential procedures to remove
bacteria and maintain a sanitarily clean
machine.
We recommend to perform the cleaning
and sanitizing procedures every day and
anyway according to the local laws.
The machine and the mix manufacturers decline
all responsibility to damage that directly or
indirectly derives from people, animals, as
consequence of failure to comply with all
cleaning and sanitation instructions indicated in
this manual.
Page 51

Data di emissione: Maggio, 2016 Revisione: 6 Pag. : 51/64
- Stop the freezing system and let the machine
run with the only auger activated (position O for
the small button, position I for the main one) for
ten minutes.
- Provide yourself with a sanitizer suitable for
plastic, rubber and stainless steel objects
(AMUCHINA®).
IMPORTANT
Carefully follow the mix producer
prescriptions in terms of time and modes
of conservation.
- After unlocking the main cover with its key
(fig.10), remove the main cover and the
secondary one under it (fig.11).
- Pour lukewarm water into the bowl (fig.12)
and, after re-positioning the main cover, make
the scraper auger rotating for some minutes.
NOTE
SP is equipped with a very efficient safety
mechanism, activated when the cover is lifted,
designed to protect the operator. If the cover
is not correctly positioned SP will not work.
- Empty the bowl and repeat the same
operations until the coming out water is clear
(fig.13).
Fig. 10
Fig. 11
Fig. 12
Fig. 13
Page 52

Data di emissione: Maggio, 2016 Revisione: 6 Pag. : 52/64
Caution
To avoid electrical shock or contact with
moving parts, before proceeding with the
disassembling operations, make sure all
switches are in “OFF” position and that the
main power supply is disconnected.
- Switch off the machine and disconnect the
power cable.
- Remove the main cover.
- Wash and sanitize your hands and forearms.
- Unscrew the bowl knobs (fig.14).
- Simultaneously press the two securing tabs
and lift the tap to extract it from its seat (see
fig.15).
- Disassemble the tap by keeping the body
pressed down and slipping the lever from its
seat (fig.15).
Caution
To prevent bacteria growth, remove all
o-rings when cleaning.
Failure to do so could create a health
hazard.
- Pull the bowl outward, as shown, to
completely remove it from its seat (fig.16).
Fig. 14
Fig. 15
Fig. 16
Page 53

Data di emissione: Maggio, 2016 Revisione: 6 Pag. : 53/64
- Unscrew the security knob in the direction of
the arrow (threading on left), then pull out the
mixing unit, the bell shaped seal and the bowl
gasket on the back (fig.17).
- Remove the drip tray pulling it outward
(fig.18).
- Thoroughly wash all the removed components
with hot water and dish washing, but do not use
abrasive detergents or powders that can
damage the bowl.
IMPORTANT
Do not use too aggressive sanitizers or
detergents, these kind of products could
damage the bowl and the other
components.
CAUTION
Never perform these washing operation
with a dish washing machine; failure to do
so could seriously damage the unit’s parts.
- Rinse well and then place all the components
in the sanitizer solution; for proper sanitizing
the parts must remain fully plunged for 15
minutes or as recommended by the sanitizer
manufacturer.
- After respecting the correct sanitizing period,
rinse well all the components with clean water
and dry them up with a clean cloth.
- Thoroughly wash the evaporator and the drip
tray surfaces with a sponge soaked with the
sanitizer (see fig.19).
- Repeat all these operations with a clean
sponge soaked with water and carefully dry up
all the surfaces with a clean cloth.
Fig. 17
Fig. 18
Fig. 19
Page 54

Data di emissione: Maggio, 2016 Revisione: 6 Pag. : 54/64
Once performed all these cleaning and sanitizing
procedures, it’s possible to reassemble all the
components.
The correct assembly of the device is essential
to prevent leakage of product and damage of
the machine. To assemble the machine you will
need an approved lubricant (such as Vaseline).
Make sure all parts have been washed and
sanitized before assembling. Persons assembling
the machine must first wash and sanitize their
hands and forearms with an approved sanitizer.
- Spread Vaseline on the bell shaped seal
internal surface before reassembling it (fig.20).
- Reassemble the rear gasket and the bell
shaped one, respecting the correct direction as
indicated in figure 21.
- Reassemble the mixing unit making sure that
the frontal cylinder perfectly fit inside its
rotating shaft seat.
- Block all these components into place by
turning the knob in counter clockwise direction
(fig.22).
Fig. 20
Fig. 21
Fig. 22
Page 55

Data di emissione: Maggio, 2016 Revisione: 6 Pag. : 55/64
- Moisten with water the rear of the tank where
it meets with the seal to facilitate the
reassembling procedures (see fig.23);
- Reassemble the bowl by positioning it back
into its seat, verifying that it faces in the correct
direction and it is held in place by its seal (see
fig.24).
- Fix the bowl by reinsert the knobs (fig.25).
IMPORTANT
Do not over tighten the bowl knobs.
Excessive force could damage the thread
and/or the bowl itself.
- Re-insert the tap (fig.26) spreading Vaseline
on the o-rings to facilitate sliding the tap in its
seat until completely inserted.
!Warning!
If the tap does not perfectly slide into position,
the sealing hold will be endangered.
- Reassemble the drip tray.
Fig. 23
Fig. 24
Fig. 25
Fig. 26
Page 56

Data di emissione: Maggio, 2016 Revisione: 6 Pag. : 56/64
SANITIZING
Whenever the machine has remained unused for
some days after been cleaned and sanitized as
described in the chapter 9, the sanitizing
procedures described below must be performed
just prior to start-up the machine.
- Remove the main cover and the secondary
one.
- Pour sanitizing solution (AMUCHINA®) into the
bowl carefully following the manufacturer
prescriptions.
- After restoring the main cover, switch on the
machine and let the auger rotating (all control
board LED switched off) leaving the sanitizing
solution for the time specified by its producer.
IMPORTANT
Never let the sanitizer inside the bowl for
more than 15 minutes.
- Drain the solution by opening the plunger to
allow the bowl to empty. Open and close the
plunger at least 10 times during draining to
sanitize the product way out area also.
- Thoroughly rinse repeating these operations
with clean water instead of sanitizer solution.
- Now the machine is ready to be used.
Page 57

Data di emissione: Maggio, 2016 Revisione: 6 Pag. : 57/64
10. SPECIAL MAINTENTANCE
Caution
Before proceeding with any maintenance
operation, it is compulsory to switch off the
machine and unplug it from the mains.
Condenser cleaning
In order to guarantee good cooling system
performance, the condenser must be well
cleaned every month.
How to reach it:
- Switch off the power supply and disconnect
the power cable;
- Remove the rear panel by unscrewing the two
bolts fastening it (fig.27);
- Using a dust exhauster, remove the dust that
has collected between the condenser fins
(fig.28).
IMPORTANT
Never use a screwdriver or sharp object to
clean between fins
Fig. 27
Fig. 28
Page 58

Data di emissione: Maggio, 2016 Revisione: 6 Pag. : 58/64
Control and replacement of seals
BOWL GASKET (LOCATED AT THE REAR OF
BOWL)
Replace it every 12 months according to the
conditions of use and level of maintenance.
DISPENSE VALVE O-RING
The dispense valve o-rings should be replaced
as necessary when wear is evident. Lubricate
them each time they are replaced or the
dispense valve is removed for cleaning.
SUCTION GASKET
Replace every 3 months according to the
conditions of use and level of maintenance. This
part should be lubricated during the reassembly after every cleaning with Vaseline.
Winter storage
To protect the unit during seasonal shutdown,
it’s important to properly store the machine
using the following procedures:
- Disconnect all power to the freezer.
- Disassemble, wash and sanitize all parts that
come into contact with the mix as described in
chapter 9.
- Clean also all the exterior panels.
- Reassemble all these parts.
- Cover the machine with the original package
to protect it from dust or other contaminating
elements.
- Place the machine in dry location.
11. DISCLAIMER
The manufacturer declines all responsibility for
any damage that directly or indirectly might be
brought on to people, things, animals, as a
consequence of failure to comply with all
instructions given in this manual with the
warnings concerning installation procedures, use
and maintenance of the machine.
The manufacturer cannot be held responsible for
possible mistakes due to printing, copying or
translating errors contained in this manual.
In addition, the manufacturer reserves the right
to modify what deemed necessary or useful for
the machine, as well as for the benefit of the
user, yet at the same time maintaining the
essential operative and safety characteristics of
said machine.
Page 59

Data di emissione: Maggio, 2016 Revisione: 6 Pag. : 59/64
12. TROUBLESHOOTING GUIDE
NOTE: the following procedures must be performed by a qualified service technician.
Problem Possible cause Solution
The machine does not cool,
or cools only partially and
the compressor is running
• The space around the machine is
inadequate for ventilation
• The refrigeration system is working in
DEFROST mode
• The condenser fins are clogged with
airborne particles
• Fan motor is not running
• Refrigerant is leaking
• The solenoid valve is faulty
• The thermostat is faulty
• Allow at least 20cm between the
machine and anything next to it;
keep it away from heat sources
• Return to FREEZE mode
• Clean the condenser fins
• Check the fan motor’s electrical
connections and, if disconnected,
reconnect. If still not operating,
replace the motor
• Locate the leak, eliminate it and
recharge the system
• Replace the solenoid valve
•
Replace the thermostat
The machine does not cool,
or cools only partially and
the compressor is not
running
• Electrical components of the compressor
are not functioning
• Some electrical connections are not
complete
•
The compressor is malfunctioning
• Replace the malfunctioning
components
• Check the contacts and correct
those incomplete
•
Replace the compressor
The machine is noisy • The fan motor blades are hitting internal
components
• Check and correct
The main power switch is
“ON” but the unit s not
running
• The main cover is not correctly
assembled
• Some electrical connections are not
complete
• The main power switch is broken
• The thermostat is faulty
•
The gear motor is malfunctioning
• Assemble the main cover
correctly
• Check the contacts and correct
those incomplete
• Replace the switch
• Replace the thermostat
•
Replace the gear motor
The bowl is leaking
•
One of the bowl seal is not in place
•
Replace or reposition the seal
The dispensing valve is
leaking
• The dispensing valve has been
incompletely or incorrectly replaced in its
position
• The free movement of the valve is
impeded
•
Dispensing valve o-rings are damaged
• Reassemble and replace
• Clean and lubricate the valve
and the valve cylinder with the
lubricant provided with the
machine
•
Replace the o-rings
Product is flowing into drain
tray through drainage pipe
• The bell shaped seal between the front of
the cylinder and the auger hub has not
been reinstalled properly
• The bell shaped shaft seal or the spindle
bushing seal is damaged or worn
• Find the seal and put it back in
place
• Replace the damaged/worn seal
and check the condition of the
drive shaft
The auger is not turning • The main cover is not correctly
assembled
• Some electrical connections are not
complete
•
The gear motor is malfunctioning
• Assemble the main cover
correctly
• Check the contacts and correct
those incomplete
•
Replace the gear motor
The auger is creating noise
as it rotates
• The bell shaped shaft seal has been
replaced without lubrication or is
damaged
• The auger has been incompletely or
incorrectly reassembled
• Replace or clean and lubricate
with the lubricant provided with
the machine
• Check and correct
The display is showing the
message “E1”
• The temperature probe is in short circuit • Replace the probe
Page 60

Data di emissione: Maggio, 2016 Revisione: 6 Pag. : 60/64
Page 61

Data di emissione: Maggio, 2016 Revisione: 6 Pag. : 61/64
Page 62

Data di emissione: Maggio, 2016 Revisione: 6 Pag. : 62/64
Page 63

Data di emissione: Maggio, 2016 Revisione: 6 Pag. : 63/64
ASSISTENZA TECNICA ITALIA
Mail: info@service-k.it
Tel. 059782884
Conforme alla normativa RoHS
Questo apparecchio è conforme alla direttiva europea 2002/95/CE e successive modifiche per quanto riguarda la restrizione all’uso di
sostanze pericolose nella produzione di apparecchiature elettriche ed elettroniche.
Smaltimento
Ai sensi della direttiva RAEE 2002/96/CE e successiva modifica 2003/108/CE questa apparecchiatura viene contrassegnata con il
seguente simbolo del contenitore di spazzatura con ruote barrato. “ INFORMAZIONE AGLI UTENTI: Ai sensi dell’art. 13 del Decreto
Legislativo 25 Luglio 2005 n. 151 - Attuazione delle Direttive 2002/95/CE e 2002/96/CE, relative alla riduzione dell’uso di sostanze
pericolose nelle apparecchiature elettriche ed elettroniche, nonché allo smaltimento dei rifiuti. Il simbolo del cassonetto barrato indica
che il prodotto, alla fine della sua vita utile, deve essere raccolto separatamente dagli altri rifiuti. L’utente deve conferire
l’apparecchiatura giunta a fine vita ad idonei centri di raccolta differenziata dei rifiuti elettrici ed elettronici, oppure consegnarla al
rivenditore al momento dell’acquisto di nuova apparecchiatura di tipo equivalente, in ragione di uno ad uno. L’adeguata raccolta
differenziata per l’avvio successivo al trattamento e allo smaltimento ambientalmente compatibile contribuisce ad evitare possibili effetti
negativi sull’ambiente e sulla salute e favorisce il reimpiego e il riciclo dei materiali di cui è composta l’apparecchiatura. Lo smaltimento
abusivo del prodotto da parte dell’utente comporta l’applicazione delle sanzioni amministrative di cui al D.Lgs. n.22/1997 registro AEE
IT13060000008071.”
Page 64

Data di emissione: Maggio, 2016 Revisione: 6 Pag. : 64/64
INTERNATIONAL CUSTOMER CARE
intcustcare@spm-ice.it
+39 059781761
Company
with certified quality
management system
UN EN ISO 9001
 Loading...