


Data di emissione: February, 2016 Revisione: 1 Pag. : 1/48
NINA HOT &
COLD
Operator’s manual Page 2
Betriebs- und Wartungsanleitung Seite 23
Data di emissione: February, 2016 Revisione: 1 Pag. : 2/48
Published by:
SPM DRINK SYSTEMS S.p.a.
Via Panaro n° 2
41057 Spilamberto (MO)
Edition: 02/2016
Revision: 01
© 2016 – SPM Drink Systems
All copying rights are reserved to SPM DRINK SYSTEMS; copying, even partial, is illegal.
The descriptions and illustrations refer to the specific machine at issue. SPM Drink Systems reserves the right to
modify at any time the equipment for mass production.
This manual:
- is integral part of the supply and must be carefully read, in order to be properly used, in compliance with
the essential safety requirements;
- has been drafted by following the dispositions 2006/42/CE and reports the technical information that
are necessary to correctly run all the procedures, under safety conditions;
- must be carefully kept (protected by a transparent, watertight wrapping, in order to avoid any damage)
and must go with the machine during its life, including potential changes of ownership. In case of loss or
damage, it’s possible to ask for a copy to SPM DRINK SYSTEMS, pointing out the information stated on
the identification label;
SPM DRINK SYSTEMS declines all responsibility for a wrong usage of the machine and/or damages caused by
operations not provided for in this manual..

Data di emissione: February, 2016 Revisione: 1 Pag. : 3/48
INDEX
1. IMPORTANT WARNINGS AND ADVICES4
2. EQUIPMENT KIT .........................................4
3. TRANPORT TIPS .........................................4
4. LIFTING TIPS ...............................................4
5. TECHNICAL SPECIFICATIONS ................5
6. POSITIONING ..............................................6
7. CONNECTION TO THE POWER SUPPLY
MAINS .........................................................7
8. START-UP PROCEDURES AND
OPERATING INSTRUCTIONS .................8
9. CLEANING AND DAILY SANITIZING
PROCEDURES..........................................11
10. SPECIAL MAINTENTANCE.....................18
Condenser cleaning ......................................... 18
Control and replacement of seals .................... 19
Winter storage ................................................. 19
Product storage................................................ 19
11. SOFT SERVE ICE CREAM INFORMATION
....................................................................20
12. DISCLAIMER .............................................20
13. TROUBLESHOOTING GUIDE .................21
14. WIRING DIAGRAM...................................23

Data di emissione: February, 2016 Revisione: 1 Pag. : 4/48
1. IMPORTANT WARNINGS AND
ADVICES
This installation and operation manual is an
integral part of the equipment and must be
kept for future consultation.
Unless otherwise stated, this manual is
addressed to operators (staff members who
uses the equipment on a daily basis) and to
servicemen (staff members qualified to
carry out the installation and/or
maintenance). The parts of the manual
addressed only to servicemen are pointed
out accordingly. Please read carefully the
warnings listed here below before
installation and start-up of the equipment.
This equipment has been designed to
produce both frozen and hot products such
soft serve creamy product, sorbets, hot
chocolate custards and similar products.
Upon receipt of the equipment, make sure
that its part number matches the one
specified in the order, which can be found
on all the delivery documents.
This equipment is exclusively destined to
the purpose for which it was designed. The
manufacturer cannot be held responsible
for any damage due to improper use.
This appliance can be used by children
aged from 8 years and above and persons
with reduced physical, sensory or mental
capabilities or lack of experience and
knowledge if they have been given
supervision or instruction concerning use
of the appliance in a safe way and
understand the hazards involved. Children
shall not play with the appliance. Cleaning
and user maintenance shall not be made
by children without supervision.
This equipment is not suitable for outdoor
use. This machine is not suitable for
installation in locations where water jets
are used.
The appliance is only to be installed in
locations where its use and maintenance is
restricted to trained personnel.
Do not store explosive substances such as
aerosol cans with a flammable propellant
in this
appliance.
This appliance is intended to be used in
household and similar applications such as
– staff kitchen areas in shops, offices and
other working environments;
– farm houses and by clients in hotels,
motels and other residential type
environments;
– bed and breakfast type environments;
– catering and similar non-retail
applications.
2. EQUIPMENT KIT
In the packaging of this equipment you will find
also:
- operator’s manual,
- 1 tube of Vaseline grease lubricant to be used
for machine maintenance;
- EC declaration of conformity;
- drip trays.
3. TRANPORT TIPS
To prevent the oil held in the hermetic
compressor running into the cooling circuit, the
device must be carried, stored and handled in the
upright position, following the direction
instructions on the packing. If the device is
accidentally or intentionally (for transportation
reasons) kept in any other position, it must be
set again in the correct position at least twenty
minutes before start-up procedures, in order to
let the oil flow back into the compressor.
4. LIFTING TIPS
Each machine is equipped with a special wooden
pallet that allows the handling with standard
forklift trucks.
Caution
Never lift the machine alone, but always seek
the assistance of another operator.
To prevent and avoid any damage to the
machine, all loading and unloading operations
should be carried out with special care. The
equipment can be lifted, with either a manual or
engine-powered lifting truck, by positioning the
forks in the base section of the unit.

Data di emissione: February, 2016 Revisione: 1 Pag. : 5/48
The following operations should always be
avoided:
- to turn upside down the machine;
- to drag the machine with ropes or others;
- to lift the machine with slings or ropes
- to shake or rattle the machine and its
packaging.
The machine must be stored in a dry place with
temperatures from 0°C to 40 °C. No more than 2
machines should be stacked on top of each other,
taking care to maintain the vertical position, as
shown by the arrows on the carton.
5. TECHNICAL SPECIFICATIONS
Technical and electrical specifications
All the machine’s technical and electrical
specifications are stated on the identification
plate, positioned in the internal part of the
equipment; a sample is shown here below.
The plate specifies:
Model: XX
n°: XX
Electrical specifications: Volt/ Hz
Max. absorption (Watt)
Max. current (Amp)
Machine ambient working temperatures
between 24°C and 30°C.
Dimensions and weight:
NINA2 HOT&COLD
Height: 487.5 mm.
Width: 280 mm.
Depth: 387.5 mm.
NINA3 HOT&COLD
Height: 520 mm.
Width: 420 mm.
Depth: 390 mm.
Noise emissions
The continuous, equivalent, weighted level of
acoustic pressure is below 70 dB.
In the event of breakdown:
In most cases, any technical problem can be
settled with slight interventions (please see the
troubleshooting guide at the end of this manual);
we therefore recommend you to carefully read
this handbook before contacting the
manufacturer or service centre.
Disposal
Caution
All the parts of the packaging must be kept
beyond the range of children, as they might
represent a potential safety/health risk.
Important
In respect of the environment, please dispose the
packaging as illustrated.
This symbol: means that the machine
cannot be disposed as common waste. It must be
handled in compliance with the provisions of
European directive 2003/108/EC (Waste
Electrical and Electronic Devices - WEEE) and the
resulting national legislation, in order to prevent
any potential damage to the environment and to
create health risks.
In order to correctly dispose of the device, please
contact the distributor from which you purchased
it or our after-sales service.
Data di emissione: February, 2016 Revisione: 1 Pag. : 6/48
6. POSITIONING
FOR MAINTENANCE WORKER ONLY
The installation and subsequent servicing
operations must be carried out by skilled
members who have been trained to use the
device and in compliance with the
regulations in force.
a) Remove the packing and preserve it in order
to reuse for winter storage.
Caution
All the parts of the packaging must be kept
beyond the range of children, as they might
represent a potential safety/health risk.
b) Make sure the machine is in perfect condition.
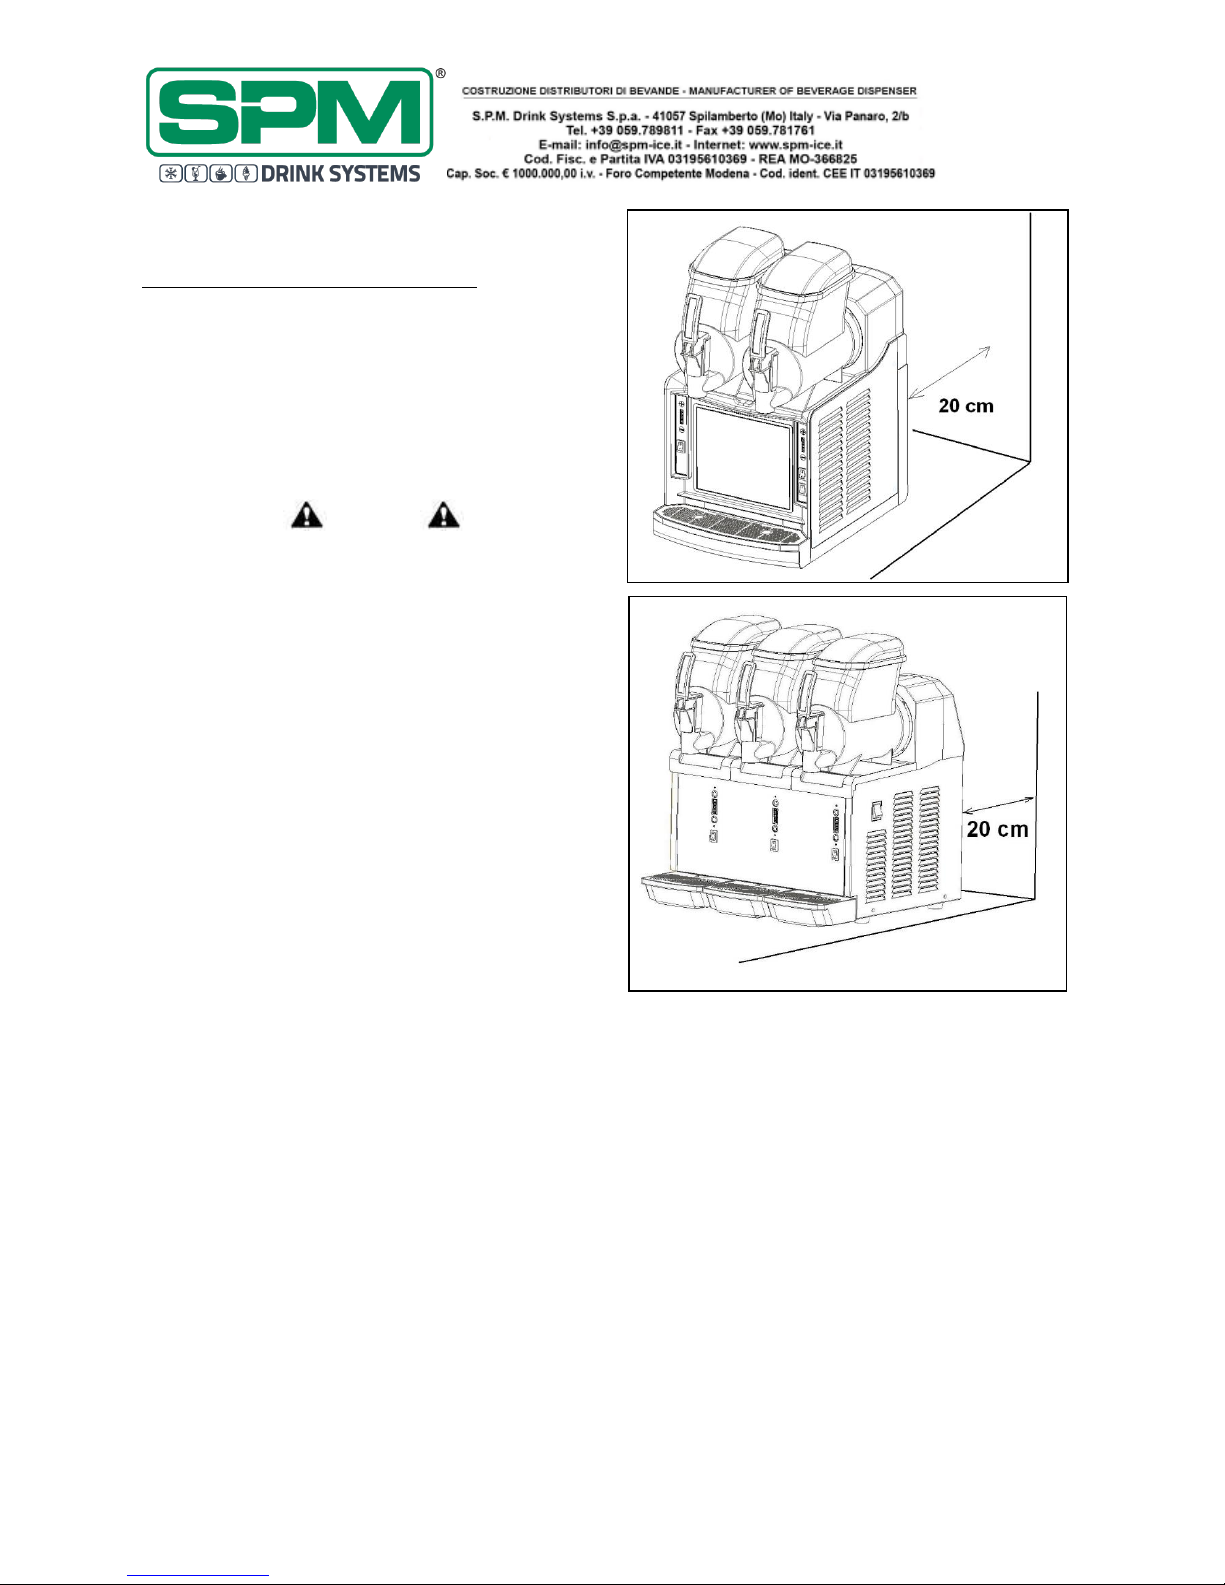
b) Rest the machine on a sturdy, horizontal
surface making sure it is well ventilated by
leaving a gap of 20 cm around it and do not install
it near heat sources (fig.1); we recommend
you to maintain a room temperature
between 24 and 30°C.
c) Check that the power mains voltage meets the
specifications on the equipment identification
plate and that the output available meets the
device’s power requirements.
Fit the plug into an earthed socket, removing all
multiple adaptors.
FOR FURTHER PRECAUTIONS, READ THE
SECTION “CONNECTION TO THE ELECTRICITY
MAINS” CAREFULLY.
d) The installation must be carried out in
accordance with the manufacturer’s instructions.
Failure to comply with the positioning and
installation instructions may impair the
machine’s operation.
Important
You are legally required to provide a suitable
grounding system for the equipment.
Before carrying out any cleaning and/or special
maintenance on the device, make sure it is
disconnected from the mains by unplugging it.
In the event of a breakdown or malfunctioning,
switch off the device and remove the plug.
Fig. 1

Data di emissione: February, 2016 Revisione: 1 Pag. : 7/48
7. CONNECTION TO THE POWER
SUPPLY MAINS
FOR SERVICEMAN ONLY
Before fitting the plug in the power supply socket,
for your own safety, as already mentioned in the
previous paragraph, please read the following
precautions.
- The machine’s electrical safety is only
guaranteed when it is connected to a suitable
earth system, structured as provided by the
national safety current regulations (fig.2).
Therefore, the manufacturer cannot be held
responsible for any damage due to failure of the
grounding system of the machine.
- Always verify electrical specifications on the
data plate of each machine. Data plate
specifications always replace the information of
this manual.
- For a safe and correct installation, it is essential
to provide a suitable socket controlled by a
thermal cut-out switch whose contacts are at
least 3 mm apart, in accordance with the current
national safety regulations (see fig.3).
- Never use extensions or multiple adaptors.
- Check the power lead along its entire length to
make sure it is not crushed in any way.
- To unplug the device, first disconnect the power
supply with the switch, then grip the plug and
gently pull it out.
Important
IF THE POWER CABLE IS DAMAGED, IT MUST
BE REPLACED BY THE MANUFACTURER, ITS
AFTER SALE SERVICE OR BY QUALIFIED
PERSONNEL, TO PREVENT ANY POSSIBLE RISK.
Fig. 2
Data di emissione: February, 2016 Revisione: 1 Pag. : 8/48
8. START-UP PROCEDURES AND
OPERATING INSTRUCTIONS
!IMPORTANT!
BEFORE STARTING THE MACHINE, CARRY OUT
THE CLEANING AND SANITISING PROCEDURES
DESCRIBED IN CHAPTER 9.
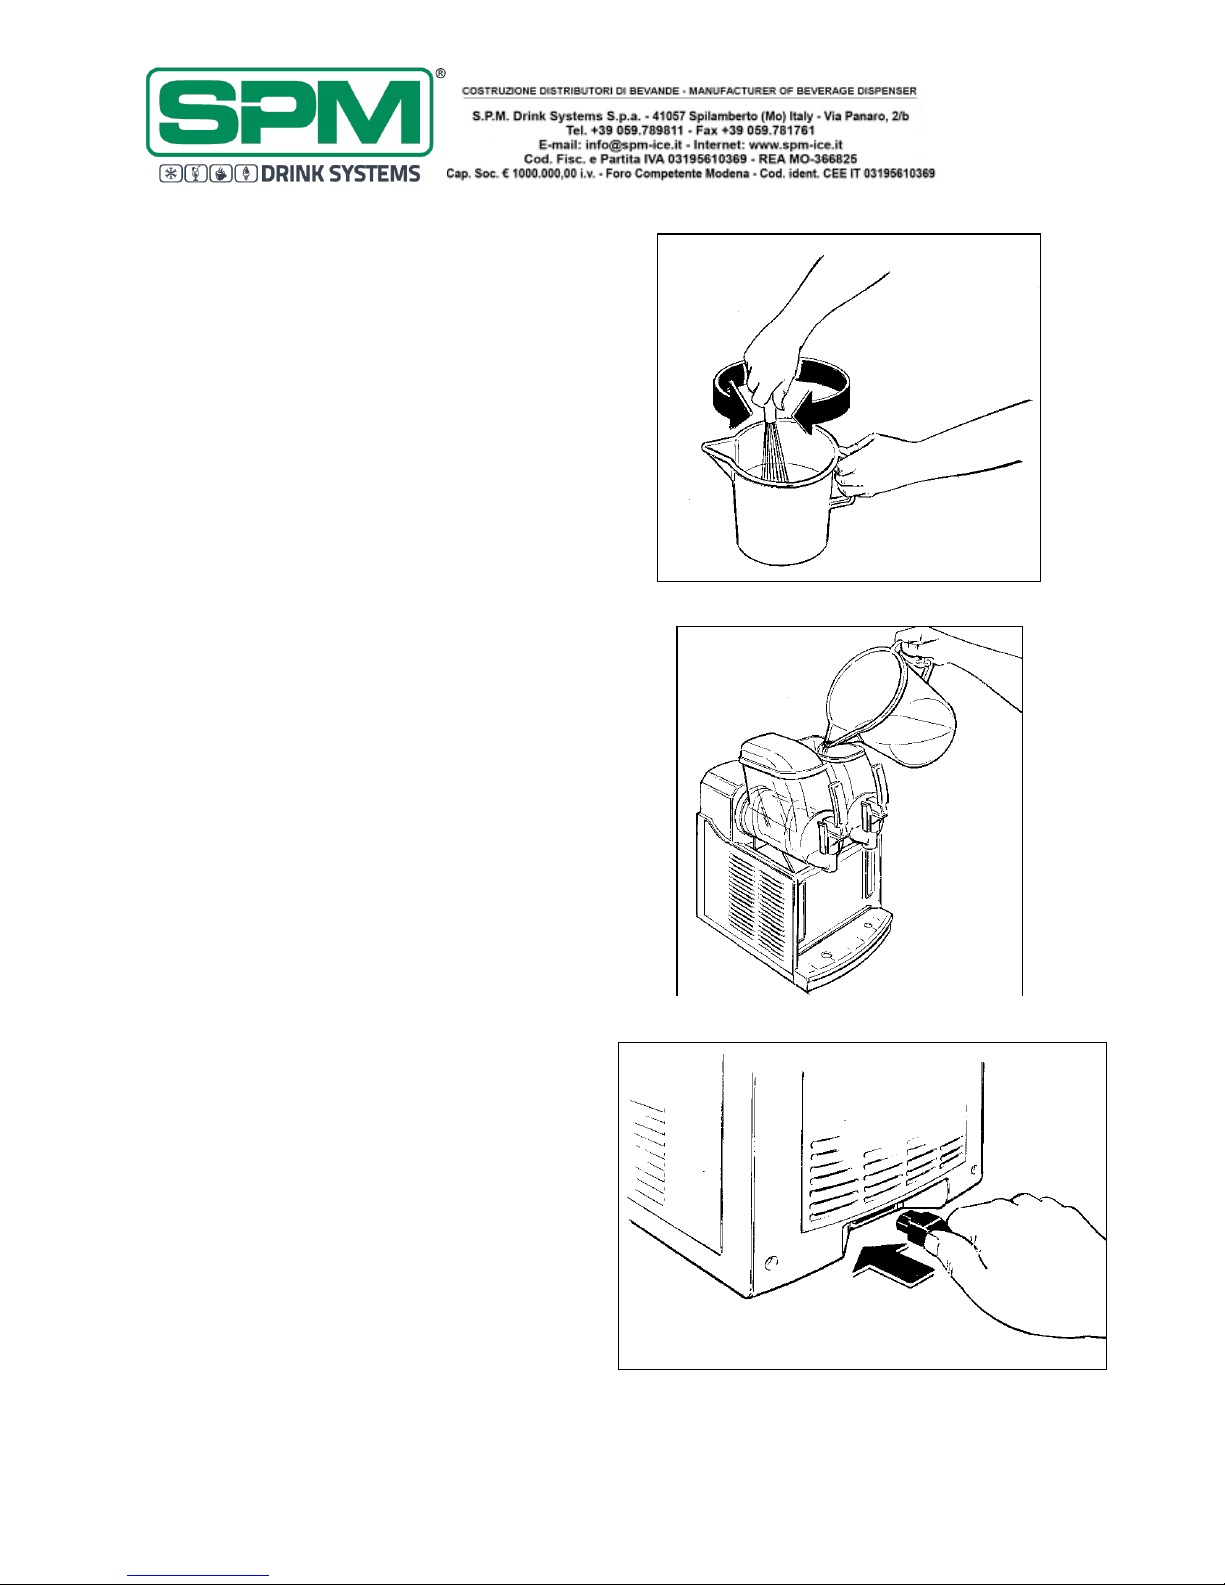
- Dilute and mix the product in a separate
container according to the manufacturer’s
instructions (see fig.3).
NOTE: “mix” is the result of the blending
between water or milk with the powder to
make soft serve creamy product, sorbets,
and similar products or hot creams or
chocolates.
While in the left hot barrel it is possible to
introduce maximum 2 litres of product, filling
the centre and right frozen ones it is better to
avoid introducing more than 1.5 litres of
mix inside the bowl. This kind of products
have a not negligible overrun during their
freezing process and for this reason it is
important to control it in order to avoid to go
over the bowl maximum level (please see the
chapter about the overrun calculation).
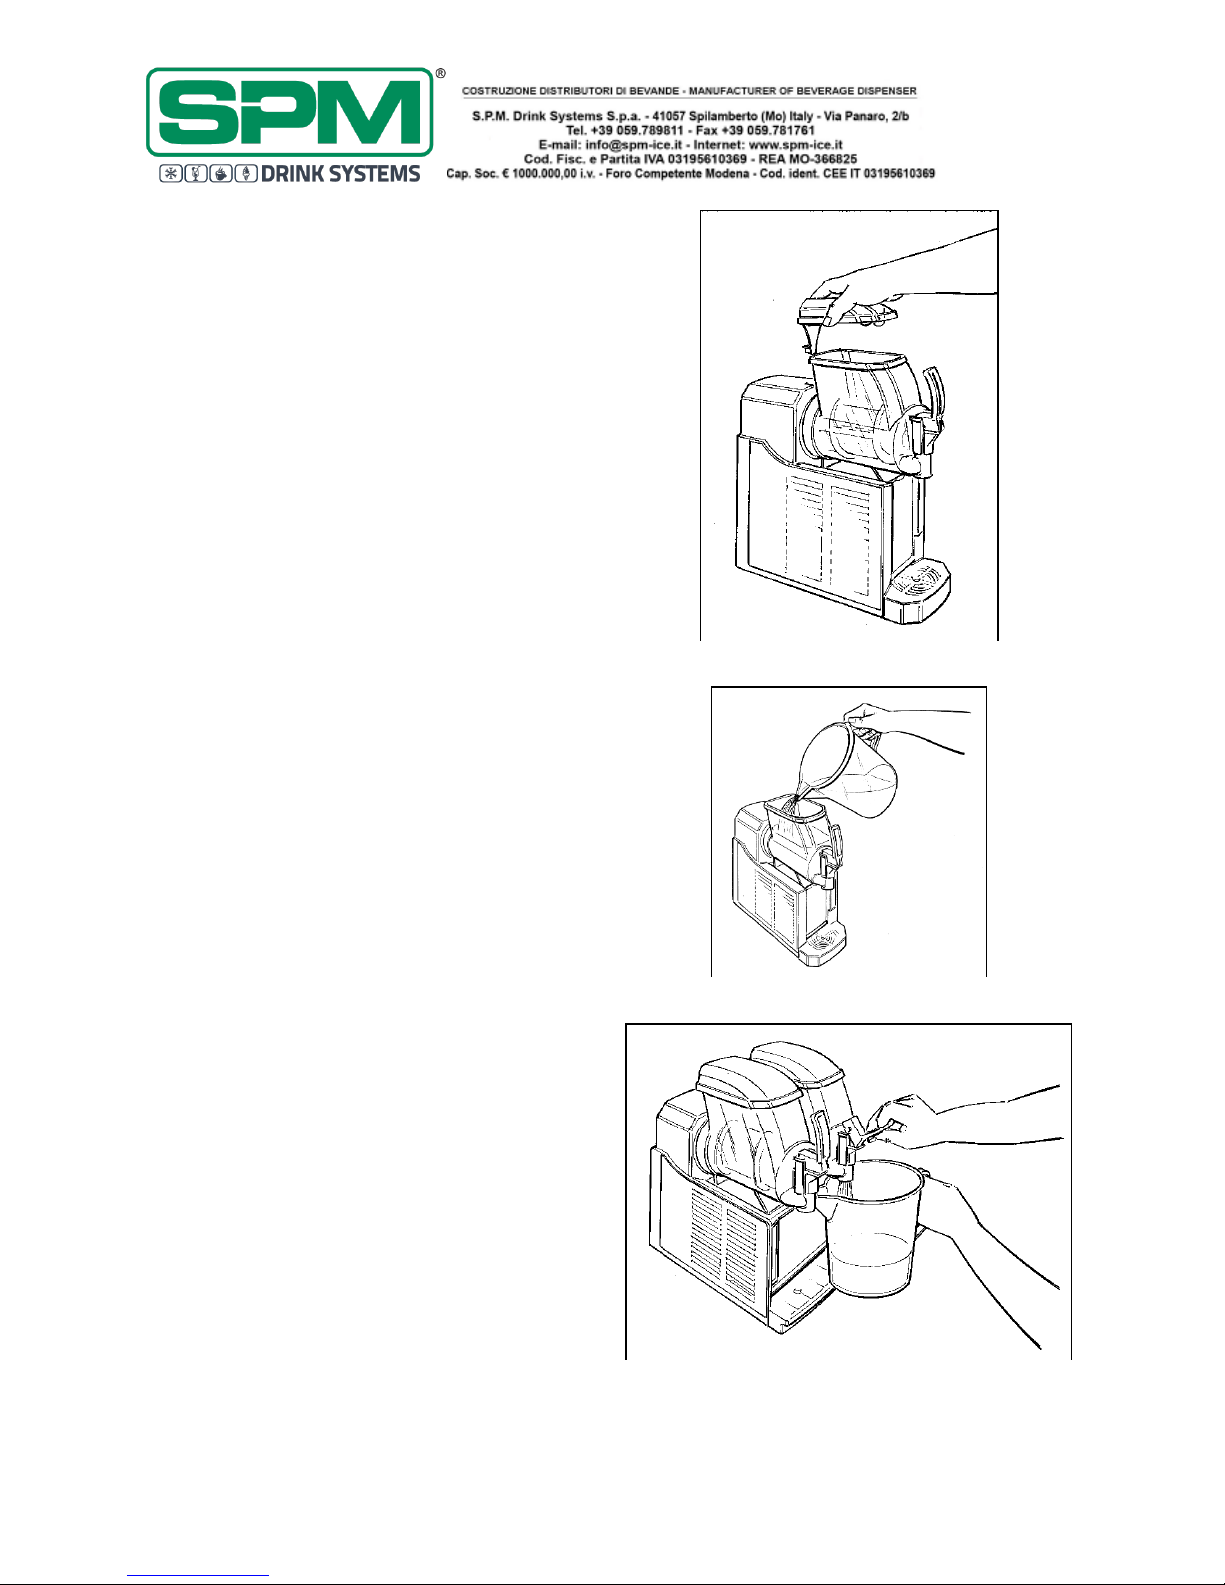
- Pour the mix obtained into the bowl (see
fig.4).
- Restore the transparent cover.
Note -----------------------------------------------
Each bowl is equipped with a very efficient
safety mechanism designed to protect the
operator; it is activated when cover is lifted.
This device automatically and immediately stops
all moving parts.
If the cover is not correctly positioned, the
correspondent mixing system will not
work.
------------------------------------------------------
- Insert, just in the NINA2 HOT&COLD case, the
female plug into the electrical power inlet (fig.5)
and then the male one into the power supply
socket.
Fig. 3
Fig. 4
Fig. 5

Data di emissione: February, 2016 Revisione: 1 Pag. : 9/48
- NINA2 HOT&COLD (fig.6):
C switch (fig.6) activates the right side
auger rotation designed to freeze the
product and enables its functioning.
D switch (fig.6) activates the left side
auger rotation designed to warm up the
product and enables its functioning.
- NINA3 HOT&COLD (fig.7):
Activate the main switch A on the right
side of the unit (fig.7) in order to enable
the heating of the product into the left
barrel.
Activate the main switch B on the right
side of the unit (fig.7) in order to enable
the freezing of the product into the
central and right barrel.
C switch activates the right side auger
rotation designed to freeze the product.
G switch activates the central side auger
rotation designed to freeze the product.
D switch activates the left side auger
rotation designed to warm up the
product.
!WARNING!
In case the corresponding auger will not start
rotating once one of the C, G or D switches are
activated, check for the corresponding lid
correct positioning, each bowl is equipped with a
very efficient safety mechanism, if the lid is not
correctly positioned, the machine will not work.
!WARNING!
Both the refrigerating and the heating system of
each bowl could be activated only if the
correspondent auger is rotating.
FREEZING SIDE FUNCTIONING
- In order to activate the refrigerating system
and to regulate the product consistency, it is
necessary to use the buttons + and - on the
control board (fig.9); operating on the + button,
the number of lighted LED will increase with the
product consistency; operating on the - button,
the number of lighted LED will decrease with the
product consistency (fig.9).
Fig. 6
Fig. 7
Fig. 8

Data di emissione: February, 2016 Revisione: 1 Pag. : 10/48
- In order to activate the refrigerating system in
defrost mode it is necessary to press the –
button an keep it pressed until the first and the
last LED of the scale will turn on.
In order to exit from the defrost mode it is
necessary to press the + button an keep it
pressed until the all the Led will be switched off.
NOTE: when all the LED are switched off the
refrigerating system is not working and the
product is not cooled.
NOTE: when the unit is switched off the
electronic board will keep in memory the last
setting, for this reason the unit will restart in
the same operating mode when switched on
again.
!WARNING!
The refrigerating system is activated when at
least one LED is switched on; in order to avoid
any damage, before activating it, is necessary
to fill up the bowl; failure to do so could damage
the unit.
Important
Do not use the unit with the refrigerating
system activated (this means in both freeze or
defrost mode) with water or sanitizer in the
bowl, the machine will be damaged.
HEATING SIDE FUNCTIONING
- In order to activate the heating system it is
necessary to activate the E switch (fig.10)
considering that if the correspondent auger is
not rotating the heating element will not work.
NOTE: when the heating element is working the
red light F is turned on (fig.10); the heating
system warms up the product until the desired
temperature and keep it at this value with
ON/OFF cycles; for this reason, during the
functioning the light will alternately turn on and
off.
NOTE: the machine is equipped with an internal
thermostat in order to regulate the product final
temperature, the maximum value that is
possible to be set is 80°C.
- Once the desired product consistency is
reached, to dispense product position a cup
under the tap and lower the lever as shown in
figure 11.
Fig. 9
Fig. 10
Fig. 11
Data di emissione: February, 2016 Revisione: 1 Pag. : 11/48
9. CLEANING AND DAILY SANITIZING
PROCEDURES
In order to maintain the unit in like-new
operating condition and to respect current
regulations, it’s absolutely necessary to
frequently and carefully perform the cleaning
and sanitizing operations as described below.
In case of prolonged shutdown (winter storage),
the machine must be disassembled, washed and
sanitized according to the instructions in this
manual before start-up to ensure the best
possible cleanliness.
Caution
Electric shock hazard. Do not splash water
on switches or allow water to flow onto
electrical components inside the machine.
Caution
To prevent bacteria growth, use only
sanitizers approved for plastic and rubber
objects, failure to do so could create a
health hazard.
NOTE: it is responsibility of the operator to be
aware of and conform to the requirements of
current local, state and federal laws concerning
the frequency of cleaning and conservation of
products used.
The cleaning instructions explained in this
section are essential procedures to remove
bacteria and maintain a sanitarily clean
machine.
We recommend to perform the cleaning
and sanitizing procedures every day and
anyway according to the local laws.
The machine and the mix manufacturers decline
all responsibility to damage that directly or
indirectly derives from people, animals, as
consequence of failure to comply with all
cleaning and sanitation instructions indicated in
this manual.
Data di emissione: February, 2016 Revisione: 1 Pag. : 12/48
- Stop the refrigerating (by switching off all the
LED acting on the – button or by pressing the
+button and keep it pressed to switch off the
defrost mode) and the heating system (E switch
in OFF position) and let the machine run with
the only auger activated for ten minutes.
- Remove all the residual product considering
that the hot product could still be at high
temperature.
- Provide yourself with a sanitizer suitable for
plastic, rubber and stainless steel objects
(AMUCHINA®).
IMPORTANT
Carefully follow the mix producer
prescriptions in terms of time and modes
of conservation.
- Remove the cover (fig.12).
- Pour lukewarm water into the bowl (fig.13)
and, after re-positioning the cover, make the
scraper auger rotating for some minutes (all
LED switched off).
NOTE
Each bowl is equipped with a very efficient
safety mechanism, activated when the cover is
lifted, designed to protect the operator. If the
cover is not correctly positioned, the
machine will not work.
- Empty the bowl and repeat the same
operations until the coming out water is clear
(fig.14).
Fig. 12
Fig. 13
Fig. 14
Data di emissione: February, 2016 Revisione: 1 Pag. : 13/48
Caution
To avoid electrical shock or contact with
moving parts, before proceeding with the
disassembling operations, make sure all
switches are in “OFF” position and that the
main power supply is disconnected.
- Switch off the machine and disconnect the
power cable.
- Remove the cover.
- Wash and sanitize your hands and forearms.
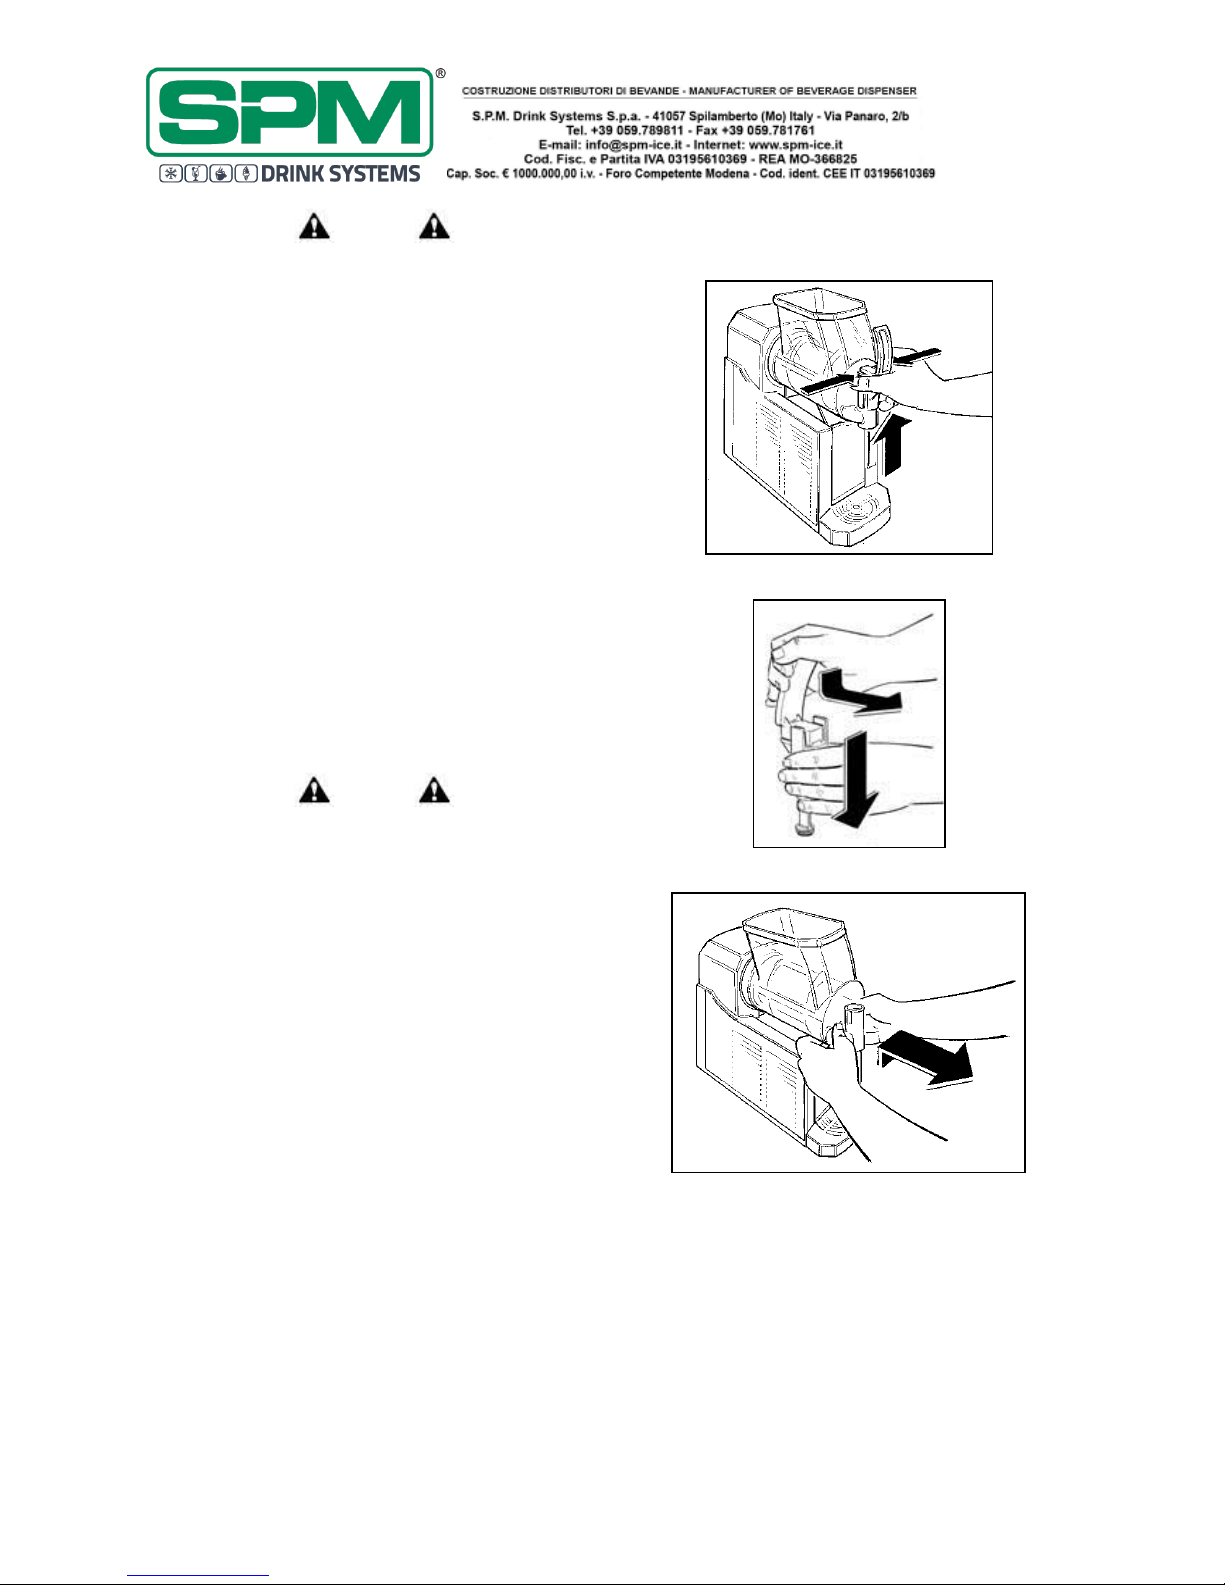
- Simultaneously press the two securing tabs
and lift the tap to extract it from its seat (see
fig.15).
- Disassemble the tap by keeping the body
pressed down and slipping the lever from its
seat (fig.16).
Caution
To prevent bacteria growth, remove all
O-rings when cleaning.
Failure to do so could create a health
hazard.
- Pull the tank upward and outward, as shown,
to completely remove it from its seat (fig.17).
Fig. 15
Fig. 16
Fig. 17
Data di emissione: February, 2016 Revisione: 1 Pag. : 14/48
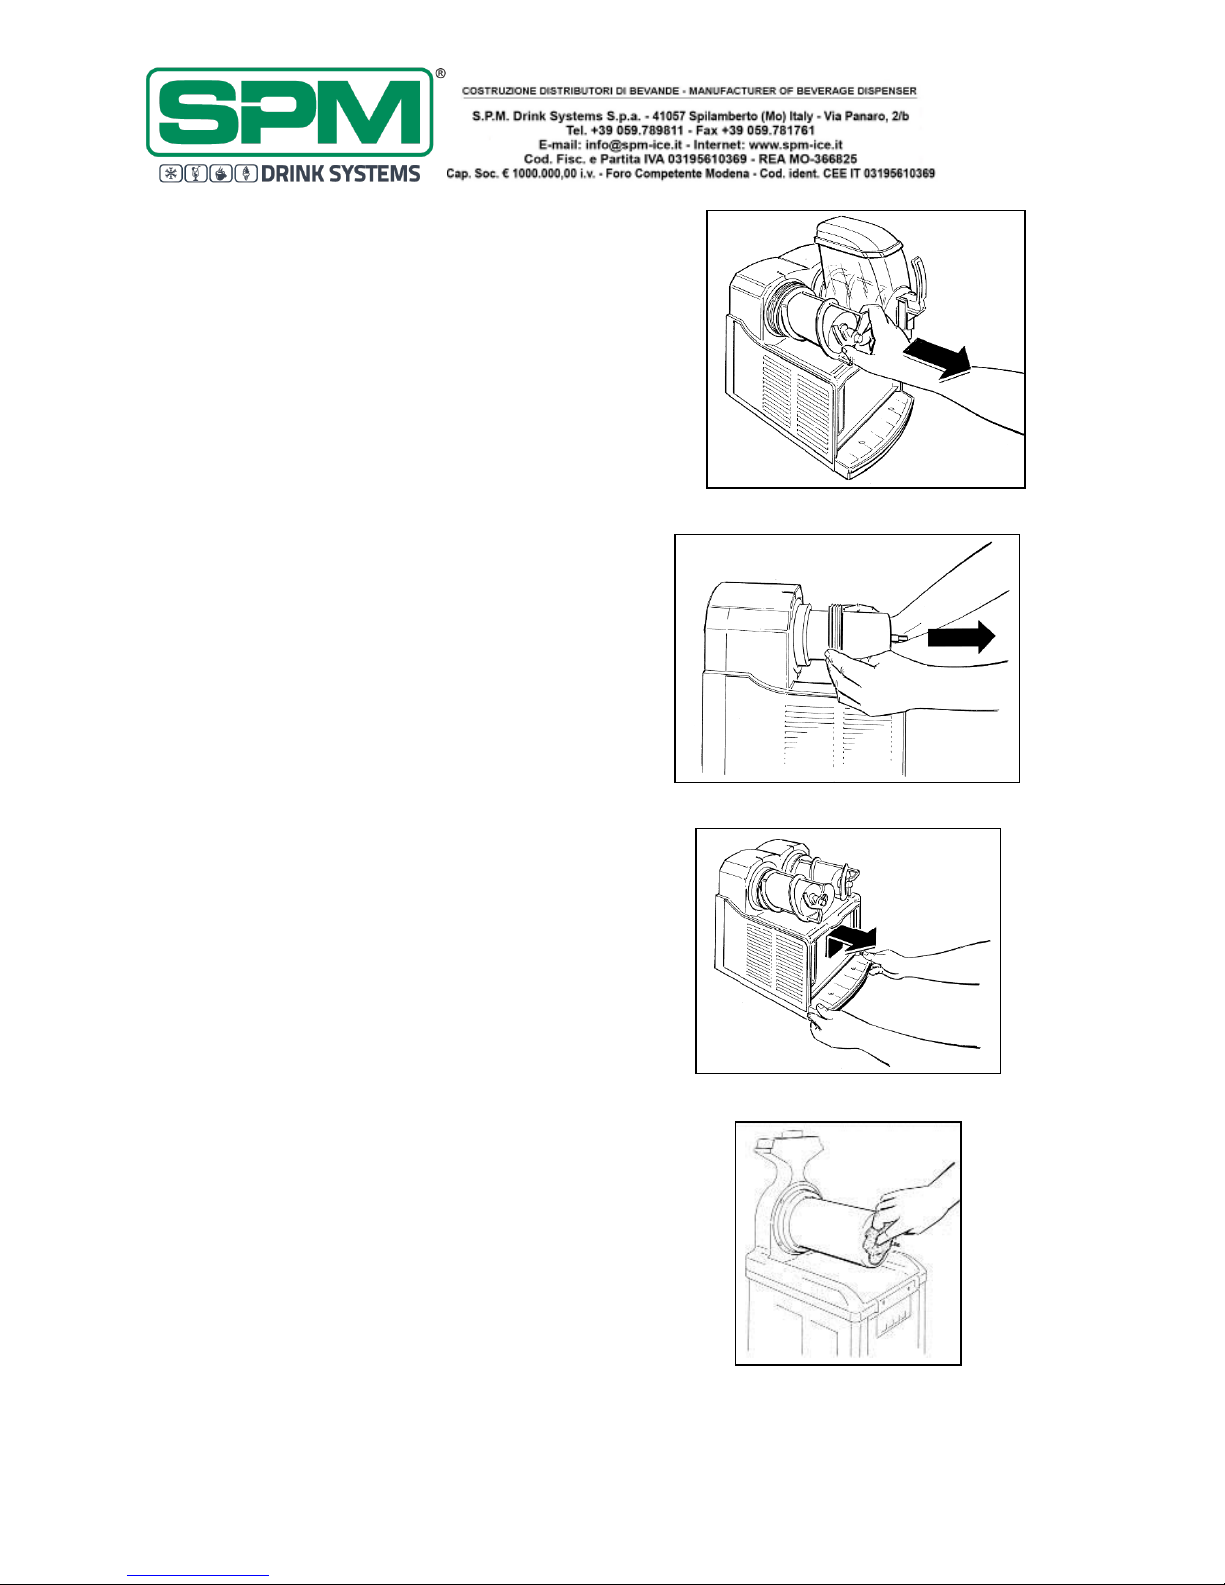
- Pull out the mixing unit, the bell shaped seal
and the bowl gasket on the back (fig.18 and
19).
- Remove the drip tray by moving it upward and
pulling it outward (fig.20).
- Thoroughly wash all the removed components
with hot water and dish washing, but do not use
abrasive detergents or powders that can
damage the bowl.
IMPORTANT
Do not use too aggressive sanitizers or
detergents, these kind of products could
damage the bowl and the other
components.
CAUTION
Never perform these washing operation
with a dish washing machine; failure to do
so could seriously damage the unit’s parts.
- Rinse well and then place all the components
in the sanitizer solution; for proper sanitizing
the parts must remain fully plunged for 15
minutes or as recommended by the sanitizer
manufacturer.
- After respecting the correct sanitizing period,
rinse well all the components with clean water
and dry them up with a clean cloth.
- Thoroughly wash the evaporator and the drip
tray surfaces with a sponge soaked with the
sanitizer (see fig.21).
- Repeat all these operations with a clean
sponge soaked with water and carefully dry up
all the surfaces with a clean cloth.
Fig. 18
Fig. 19
Fig. 20
Fig. 21

Data di emissione: February, 2016 Revisione: 1 Pag. : 15/48
Once performed all these cleaning and sanitizing
procedures, it’s possible to reassemble all the
components.
The correct assembly of the device is essential
to prevent leakage of product and damage of
the machine. To assemble the machine you will
need an approved lubricant (such as Vaseline).
Make sure all parts have been washed and
sanitized before assembling. Persons assembling
the machine must first wash and sanitize their
hands and forearms with an approved sanitizer.
- Reassemble the rear gasket respecting the
correct assembling direction as indicated in
figure 22.
- Spread Vaseline on the bell shaped seal
internal surface before reassembling it (fig.23).
- Insert the suction gasket into the auger by
carefully inserting it into its seat (fig. 24).
- Reassemble the mixing unit making sure that
the frontal cylinder perfectly fit inside its
rotating shaft seat (fig.25).
Fig. 22
Fig. 23
Fig. 24
Fig. 25

Data di emissione: February, 2016 Revisione: 1 Pag. : 16/48
- Moisten with water the rear of the tank where
it meets with the seal to facilitate the
reassembling procedures (see fig.26);
- Reassemble the bowl by positioning it back
into its seat until it gets blocked into it (see
fig.27).
- Re-insert the tap (fig.28) spreading Vaseline
on the O-rings to facilitate sliding the tap in its
seat until completely inserted.
!Warning!
If the tap does not perfectly slide into position,
the sealing hold will be endangered.
- Reassemble the drip tray.
Fig. 26
Fig. 27
Fig. 28

Data di emissione: February, 2016 Revisione: 1 Pag. : 17/48
SANITIZING
Whenever the machine has remained unused for
some days after been cleaned and sanitized as
described in the chapter 9, the sanitizing
procedures described below must be performed
just prior to start-up the machine.
- Remove the main cover and the secondary
one.
- Pour sanitizing solution (AMUCHINA®) into the
bowl carefully following the manufacturer
prescriptions.
- After restoring the main cover, switch on the
machine and let the auger rotating (all control
board LED switched off) leaving the sanitizing
solution for the time specified by its producer.
IMPORTANT
Never let the sanitizer inside the bowl for
more than 15 minutes.
- Drain the solution by opening the plunger to
allow the bowl to empty. Open and close the
plunger at least 10 times during draining to
sanitize the product way out area also.
- Thoroughly rinse repeating these operations
with clean water instead of sanitizer solution.
- Now the machine is ready to be used.

Data di emissione: February, 2016 Revisione: 1 Pag. : 18/48
10. SPECIAL MAINTENTANCE
Caution
Before proceeding with any maintenance
operation, it is compulsory to switch off the
machine and unplug it from the mains.
Condenser cleaning
In order to guarantee good cooling system
performance, the condenser must be well
cleaned every month or whenever
necessary.
How to reach it:
- Switch off the power supply and disconnect the
power cable;
- NINA2 HOT&COLD: remove the rear panel as
indicated in figure 29;
- NINA3 HOT&COLD: take away the left panel
(fig. 30) by removing the two fixing screws;
- Remove, if present, the condenser filter and
wash it carefully, otherwise clean carefully the
condenser fins with a vacuum cleaner;
- Place, if present, the filter back into its seat and
close the plastic panel before re-starting the unit.
IMPORTANT
Never use a screwdriver or sharp object to
clean between fins.
Fig. 29
Fig. 30

Data di emissione: February, 2016 Revisione: 1 Pag. : 19/48
Control and replacement of seals
BOWL GASKET (LOCATED AT THE REAR OF
BOWL)
Replace it every 12 months according to the
conditions of use and level of maintenance.
DISPENSE VALVE O-RING
The dispense valve O-rings should be replaced
as necessary when wear is evident. Lubricate
them each time they are replaced or the
dispense valve is removed for cleaning.
SUCTION GASKET
Replace every 3 months according to the
conditions of use and level of maintenance. This
part should be lubricated during the reassembly after every cleaning with Vaseline.
Winter storage
To protect the unit during seasonal shutdown,
it’s important to properly store the machine
using the following procedures:
- Disconnect all power to the freezer.
- Disassemble, wash and sanitize all parts that
come into contact with the mix as described in
chapter 9.
- Clean also all the exterior panels.
- Reassemble all these parts.
- Cover the machine with the original package
to protect it from dust or other contaminating
elements.
- Place the machine in dry location.
Product storage
Since the safety of the product used with this
unit depends upon the temperature and the
duration of storage, it is necessary to refer
directly to the food product producer instruction
and specifications in order to correctly manage
it and in order to avoid any possible safety
issue.

Data di emissione: February, 2016 Revisione: 1 Pag. : 20/48
11. SOFT SERVE ICE CREAM
INFORMATION
OVERRUN
While the product is frozen in the bowl, its
volume increase; to control overrun is important
as too much of it could go over the bowl
maximum level.
To correctly measure overrun carry out the
following steps:
- Place an empty container on the scale and
adjust your scale to zero;
- Remove the container from scale and fill it
with liquid product to the top. Weigh container
and record;
- Replace liquid product with frozen one, strike
off the excess of it so it is even with the top of
the container and measure the weight;
- Use the following formula to figure overrun
percentage:
“Weight of liquid mix minus weight of frozen
product divided by the frozen weight. Multiply
by 100””
Example:
Weight of half litre of mix: 530g;
Weight of half litre of frozen product: 380g;
Difference:150g;
150/380=0.4
0.4x100=40% overrun
12. DISCLAIMER
The manufacturer declines all responsibility for
any damage that directly or indirectly might be
brought on to people, things, animals, as a
consequence of failure to comply with all
instructions given in this manual with the
warnings concerning installation procedures, use
and maintenance of the machine.
The manufacturer cannot be held responsible for
possible mistakes due to printing, copying or
translating errors contained in this manual.
In addition, the manufacturer reserves the right
to modify what deemed necessary or useful for
the machine, as well as for the benefit of the
user, yet at the same time maintaining the
essential operative and safety characteristics of
said machine.

Data di emissione: February, 2016 Revisione: 1 Pag. : 21/48
13. TROUBLESHOOTING GUIDE
NOTE: the following procedures must be performed by a qualified service technician.
Problem
Possible cause
Solution
The machine does not cool,
or cools only partially and
the compressor is running
The space around the machine is
inadequate for ventilation
The refrigeration system is working in
DEFROST mode
The condenser filter is clogged with
airborne particles
Fan motor is not running
Refrigerant is leaking
Allow at least 20cm between the
machine and anything next to it;
keep it away from heat sources
Return to FREEZE mode
Clean the condenser filter
Check the fan motor’s electrical
connections and, if
disconnected, reconnect. If still
not operating, replace the motor
Locate the leak, eliminate it and
recharge the system
The machine does not cool,
or cools only partially and
the compressor is not
running
Electrical components of the compressor
are not functioning
Some electrical connections are not
complete
The compressor is malfunctioning
Replace the malfunctioning
components
Check the contacts and and
correct those incomplete
Replace the compressor
The machine is noisy
The fan motor blades are hitting internal
components
Check and correct
The main power switch is
“ON” but the unit is not
running
The main cover is not correctly
assembled
Some electrical connections are not
complete
The main power switch is broken
The control board is faulty
The gear motor is malfunctioning
Assemble the main cover
correctly
Check the contacts and and
correct those incomplete
Replace the switch
Replace the control board
Replace the gear motor
The bowl is leaking
One of the bowl seal is not in place
Replace or reposition the seal
The dispensing valve is
leaking
The dispensing valve has been
incompletely or incorrectly replaced in its
position
The free movement of the valve is
impeded
Dispensing valve O-rings are damaged
Reassemble and replace
Clean and lubricate the valve
and the valve cylinder with the
lubricant provided with the
machine
Replace the O-rings
Product is flowing into drain
tray through drainage plate
The bell shaped seal between the front of
the cylinder and the auger hub has not
been reinstalled properly
The bell shaped shaft seal or the spindle
bushing seal is damaged or worn
Find the seal and put it back in
place
Replace the damaged/worn seal
and check the condition of the
drive shaft
The auger is not turning
The main cover is not correctly
assembled
Some electrical connections are not
complete
The control board is faulty
The gear motor is malfunctioning
Assemble the main cover
correctly
Check the contacts and correct
those incomplete
Replace the control board
Replace the gear motor
The auger is creating noise
as it rotates
The bell shaped shaft seal has been
replaced without lubrication or is
damaged
The auger has been incompletely or
incorrectly reassembled
Replace or clean and lubricate
with the lubricant provided with
the machine
Check and correct
LED errors (from the lower):
- 1st LED blinking
- 2nd LED blinking
- 3rd LED blinking
- 4th LED blinking
- 5th LED blinking
Memory error
Temperature probe short circuit
Temperature probe disconnected
Motor overcurrent
Power overcurrent
Replace the board
Replace the probe
Re-connect the probe
Switch off. Solve the root cause
and switch on again
Switch off. Solve the root cause
and switch on again

Data di emissione: February, 2016 Revisione: 1 Pag. : 22/48
Problema
Possibile causa
Soluzione
The machine does not
heat
The correspondent auger is not
rotating, D switch in OFF position
The heating system is not
activated, E switch in OFF position
Only for NINA3 HOT&COLD, the
heating system is not enabled, A
switch on the right side in OFF
position
L’elemento riscaldante non
funziona
Activate the auger switch D
Activate the heating system by moving
the switch E from OFF to ON position
Enable the heating system with the A
switch
Check the heating element electrical
connections and, if disconnected,
reconnect. If still not operating, replace
the heating cylinder
The machine does not
heat and the red light on
the front side is always
ON
The manual regulation thermostat
is faulty
The safety thermostat is faulty
Replace the manual regulation
thermostat
Replace the safety thermostat

Ausgabedatum: Februar 2016 Revision: 1 Seite: 23/48
Veröffentlichung von:
SPM DRINK SYSTEMS S.p.a.
Via Panaro, 2
41057 Spilamberto (MO)
Ausgabe: 02/2016
Revision: 01
© 2016 – SPM Drink Systems
Alle Rechte auf Vervielfältigung des vorliegenden Handbuchs sind der Fa. SPM DRINK SYSTEMS vorbehalten. Die
auch nur teilweise Vervielfältigung ist untersagt.
Die Beschreibungen und Abbildungen beziehen sich auf die vorstehend genannte Maschine/Anlage. SPM DRINK
SYSTEMS behält sich das Recht vor, an der Serienproduktion jederzeit alle Änderungen vorzunehmen, die sie für
dienlich erachtet.
Die vorliegende Anleitung:
ist wesentlicher Bestandteil der Lieferung und muss zwecks korrektem Betrieb und Einhaltung der
wesentlichen Sicherheitsvorschriften aufmerksam gelesen werden;
wurde aufgrund der Vorschriften der Maschinenrichtlinie 2006/42/EG erstellt und enthält alle
technischen Informationen, die zur Ausführung aller Arbeitsgänge unter Sicherheitsbedingungen notwendig sind;
muss sorgfältig aufbewahrt werden (in einer durchsichtigen, wasserdichten Schutzhülle, um Schäden zu
vermeiden). Sie muss die Maschine während ihrer gesamten Standzeit begleiten, auch im Fall eines
Besitzwechsels. Bei Verlust oder Schädigung kann bei SPM DRINK SYSTEMS unter Angabe der auf dem
Typenschild angegebenen Daten eine Kopie angefordert werden
SPM DRINK SYSTEMS verweigert jegliche Haftung für unsachgemäßen Einsatz der Maschine/Anlage, sowie für
Schäden, die durch in diesem Handbuch nicht vorgesehene Abläufe zustande kommen.
Sehr geehrter Kunde,
wir gratulieren Ihnen zur Wahl eines
Qualitätsprodukts, das mit Sicherheit Ihre
Erwartungen erfüllt.
Wir danken dafür, dass Sie unserem Produkt den
Vorzug gegeben haben und bitten Sie
freundlichst, diese Betriebs- und
Wartungsanleitung aufmerksam zu lesen.

Ausgabedatum: Februar 2016 Revision: 1 Seite: 24/48
INHALT
1. WICHTIGE HINWEISE UND
EMPFEHLUNGEN ...................................25
2. AUSSTATTUNG DES GERÄTS ...............25
3. NÜTZLICHE HINWEISE FÜR DEN
TRANSPORT ............................................25
4. NÜTZLICHE HINWEISE FÜR DAS HEBEN
....................................................................25
5. TECHNISCHE DATEN ..............................26
6. AUFSTELLUNG .........................................27
7. ANSCHLUSS AN DAS STROMNETZ .....28
8. INBETRIEBNAHME UND
BETRIEBSMODALITÄTEN ....................29
9. TÄGLICHE REINIGUNG UND
DESINFIZIERUNG ...................................32
10. AUSSERORDENTLICHE WARTUNG .....39
Reinigung des Kondensators ........................... 39
Kontrolle und Austausch der Dichtungen ....... 40
Einlagerung über Winter ................................. 40
Aufbewahrung Produkt ................................... 40
11. NÜTZLICHE INFORMATIONEN ZUR
HERSTELLUNG VON SPEISEEIS .........41
12. HAFTUNGSAUSSCHLUSS .......................41
13. ANLEITUNG ZUR PROBLEM LÖSUNG 42
14. WIRING DIAGRAM...................................45

Ausgabedatum: Februar 2016 Revision: 1 Seite: 25/48
1. WICHTIGE HINWEISE UND
EMPFEHLUNGEN
Die vorliegende Betriebs- und
Wartungsanleitung ist wesentlicher
Bestandteil des Geräts und muss
aufbewahrt werden, um sie auch in Zukunft
jederzeit nachschlagen zu können. Sofern
nicht anderweitig angegeben, wendet sich
diese Anleitung an die Bediener (d.h. an
das Personal, das täglich mit dem Gerät
umgeht), und an die Wartungstechniker
(d.h. an Personal, das für die Installation
und/oder Wartung qualifiziert ist). Die
Teile dieser Anleitung, die sich an die
Wartungstechniker wenden, sind
entsprechend gekennzeichnet. Die in dieser
Anleitung enthaltenen Hinweise vor der
Installation und dem Betrieb des Geräts
aufmerksam lesen. Dieses Gerät ist für die
parallele Herstellung von warmen und
kalten Produkten wie Cremes, Sorbets und
dgl. ausgelegt. Bei Empfang dieses Geräts
muss sicher gestellt werden, dass die
Kennnummer des Geräts mit dem von
Ihnen bestellten und stets in den
Transportpapieren angegebenen
übereinstimmt, und zwar: - “Bezeichnung
Gerät”, gefolgt von der laufenden
Seriennummer. Dieses Gerät darf
ausschließlich zu dem Zweck verwendet
werden, für den es entwickelt wurde und
der Hersteller kann nicht für Schäden
haftbar gemacht werden, die durch
unsachgemäßen Einsatz zustande kommen.
Dieses Gerät ist nicht für den Gebrauch
durch Kinder im Alter unter 8 Jahren und
Personen mit eingeschränkten
körperlichen, sensorischen oder geistigen
Fähigkeiten, Personen mit mangelnder
Erfahrung oder Kenntnis geeignet, sofern
sie nicht überwacht oder in den Betrieb des
Geräts durch eine Person eingewiesen
werden, die für ihre Sicherheit
verantwortlich ist. Kinder müssen
überwacht werden, damit sie nicht mit dem
Gerät spielen. Reinigung und
Desinfizierung dürfen von Kindern nur
unter strenger Aufsicht vorgenommen
werden. Dieses Gerät ist nicht für den
Einsatz im Freien ausgelegt. Dieses Gerät
ist nicht für die Installation an Orten
geeigneten, in denen Wasserstrahlen zum
Einsatz kommen. Dieses Gerät muss so
installiert werden, dass es von
qualifiziertem Personal überwacht werden
kann. Keine Gasflaschen mit entzündlichen
Gasen in der Nähe des Geräts aufstellen.
Dieses Gerät ist ausgelegt für
Anwendungen wie:
- Teeküchen für die Belegschaft in
Geschäften, Büros und sonstigen
Arbeitsumgebungen;
- Gemeinschaftsräume in Hotels, Motels
oder Gastbetrieben allgemein;
- Bed and Breakfast, Catering und
ähnliche Anwendungsbereiche
2. AUSSTATTUNG DES GERÄTS
In der Verpackung müssen sich beim Öffnen die
folgenden Elemente befinden:
- die vorliegende Betriebs- und
Wartungsanleitung
- die CE- Konformitätserklärung
- 1 Tube Schmiermittel (Vaseline);
- Tropfschalen.
3. NÜTZLICHE HINWEISE FÜR DEN
TRANSPORT
Um zu verhindern, dass das im dichten
Kompressor enthaltene Öl in den Kältekreis
eindringt, muss das Gerät in vertikaler Stellung
transportiert, gelagert und gehandhabt werden,
wobei die Angaben auf der Verpackung zu
beachten sind. Sollte das Gerät versehentlich
oder absichtlich aus Platzgründen beim
Transport in nicht vertikale Stellung gebracht
worden sein, muss es vor der Inbetriebnahme
3-4 Stunden lang aufrecht stehen gelassen
werden, damit das Öl in den Kompressor
zurückfließen kann.
4. NÜTZLICHE HINWEISE FÜR DAS
HEBEN
Jedes Gerät wird auf einer eigenen Holzpalette
ausgeliefert, die das Heben und Befördern mit
normalen Hebe- und Beförderungsmitteln
gestattet.

Ausgabedatum: Februar 2016 Revision: 1 Seite: 26/48
Achtung
Das Gerät nicht alleine heben, sondern
stets mit Hilfe einer weiteren Person.
Um Schäden des Geräts zu vermeiden muss das
Auf- und Abladen mit besonderer Sorgfalt
vorgenommen werden. Das Gerät kann anhand
eines motor-oder handbetriebenen
Gabelstaplers gehoben werden. Dazu sind die
Gabeln unter dem Gerät einzuführen.
Dagegen muss folgendes vermieden
werden:
- Kippen der Maschine
- Schleppen der Maschine anhand von Seilen
oder Sonstigem
- Heben der Maschine mit Anschlaggurten oder
Seilen
- Rütteln oder Stoßen der verpackten oder
unverpackten Maschine.
Das Gerät muss an einem trockenen Ort mit
Umgebungstemperatur zwischen 0 und 40 °C
gelagert werden. In der Originalverpackung
können maximal 2 Geräte übereinander
gestapelt werden, wobei darauf geachtet
werden muss, dass die durch Pfeile auf der
Verpackung markierte, aufrechte Stellung
beibehalten wird.
5. TECHNISCHE DATEN
Technische und elektrische Merkmale des Geräts
Alle technischen und elektrischen Merkmale des
Geräts sind auf dem Typenschild angegeben,
das im Inneren der Maschine angebracht und
nachstehend abgebildet ist.
Auf dem Typenschild sind angegeben:
Modell
Seriennummer
Stromversorgung in Volt/ Hz
Max. Leistungsaufnahme in Watt
Max. Strom in Amp
Gewicht in kg
Umgebungstemperatur für den Betrieb
der Maschine zwischen 24 und 30°C.
Die Abmessungen des Geräts sind:
NINA2 HOT & COLD
Höhe 487.5 mm
Breite 280 mm
Tiefe 387.5 mm
NINA3 HOT & COLD
Höhe 520 mm
Breite 420 mm
Tiefe 390 mm
Geräuschpegel
Der dauernde äquivalente, gewichtete
Schalldruckpegel liegt unter 70 dB.
Im Störungsfall:
In den meisten Fällen lassen sich eventuelle
technische Störungen durch bescheidene
Maßnahmen beseitigen. Wir empfehlen deshalb,
aufmerksam die vorliegenden Anleitung zu
lesen, bevor Kontakt mit dem Hersteller oder
dessen Kundendienststellen aufgenommen wird.
Entsorgung
Wichtig
Die Bestandteile der Verpackung dürfen nicht in
Reichweite von Kindern liegen gelassen werden,
da sie eine potentielle Gefahrenquelle
darstellen.
Wichtig
Die Verpackungsteile dürfen nicht in der Umwelt
freigesetzt werden. Sie sollten aufbewahrt
werden, um sie bei Bedarf wieder verwenden zu
können (z.B. zur Einlagerung über Winter).
Das Symbol bedeutet, dass das Gerät
nicht als normaler Hausmüll entsorgt werden
darf, sondern aufgrund der Europäischen WEEERichtlinie 2003/108/EG (Waste Electrical and
Electronics Equipments) und den daraus
abgeleiteten nationalen Gesetzesvorschriften
entsorgt werden müssen, um schädliche
Auswirkungen auf die Umwelt und die
Gesundheit des Menschen zu vermeiden.

Ausgabedatum: Februar 2016 Revision: 1 Seite: 27/48
Zur korrekten Entsorgung des Geräts können
Sie Kontakt mit dem Händler aufnehmen, bei
dem Sie es erworben haben, oder mit unserem
After-Sales-Service.
Abb. 1
6. AUFSTELLUNG
NUR FÜR WARTUNGSTECHNIKER
Die Installation und spätere Wartung
müssen aufgrund der einschlägigen
Vorschriften von Fachpersonal
vorgenommen werden, das in den
Gebrauch dieses Geräts eingewiesen
wurde.
a) Alle Verpackungsteile für die WinterEinlagerung aufbewahren und sicherstellen,
dass das Gerät in einwandfreiem Zustand ist.
!WICHTIG!
Die Bestandteile der Verpackung dürfen
nicht in Reichweite von Kindern liegen
gelassen werden, da sie eine potentielle
Gefahrenquelle darstellen.
Das Gerät auf einer horizontalen, soliden und
ausreichend belüfteten Fläche (mindestens 20
cm Freiraum, siehe Abb.1) in einem trockenen
Raum aufstellen. Nicht in der Nähe von
Hitzequellen aufstellen. Die
Umgebungstemperatur für den Betrieb der
Maschine muss zwischen 24 und 30°C
liegen.
c) Kontrollieren, dass die Netzspannung mit den
Angaben auf dem Typenschild übereinstimmt
und dass die verfügbare Leistung für den Bedarf
des Geräts ausreichend ist.
Den Stecker in eine geerdete Steckdose
stecken. Auf Mehrfach-Steckdosen muss
verzichtet werden.
WEITERE VORKEHRUNGEN SIND
SORGFÄLTIG IM ABSCHNITT "ANSCHLUSS
AN DAS STROMNETZ" NACHZULESEN.
d) Die Installation muss aufgrund der
Anweisungen des Herstellers erfolgen. Die
Nichteinhaltung dieser Anweisungen kann die
Funktionstüchtigkeit des Geräts beeinträchtigen.
Wichtig
Die Erdung ist notwendig und gesetzlich
vorgeschrieben. Bevor Reinigungs- oder
Wartungsarbeiten jeglicher Art vorgenommen
werden, durch Abziehen des Steckers
sicherstellen, dass das Gerät von der
Stromversorgung getrennt ist.

Ausgabedatum: Februar 2016 Revision: 1 Seite: 28/48
Bei Defekten oder Funktionsstörungen, das
Gerät abschalten und den Stecker aus der
Steckdose ziehen.
7. ANSCHLUSS AN DAS STROMNETZ
NUR FÜR WARTUNGSTECHNIKER
Bevor der Stecker in die Steckdose
gesteckt wird, sind zu Ihrer eigenen
Sicherheit wie bereits vorstehend erwähnt,
sorgsam die folgenden Vorkehrungen zu
treffen:
- Sicherstellen, dass das Gerät an eine
entsprechend den einschlägigen
Sicherheitsvorschriften wirksam geerdete
Elektroanlage angeschlossen wird (Abb. 3).
Der Hersteller kann nicht für Schäden
haftbar gemacht werden, die durch
mangelnde Erdung der Anlage zustande
kommen.
- Stets die elektrischen Merkmale auf dem
Typenschild des jeweiligen Geräts
kontrollieren. Die Daten auf dem
Typenschild haben jederzeit Vorrang
gegenüber den Angaben dieses Handbuchs.
- Zur korrekten und sicheren Installation
ist es unerlässlich, dass eine
entsprechende Steckdose bereitgestellt
wird, die entsprechend den einschlägigen
nationalen Sicherheitsvorschriften über
einen magnetthermischen Schutzschalter
mit einer Kontaktöffnungsweite gleich oder
größer 3 mm gesteuert wird (Abb. 2).
- Keinesfalls Mehrfach-Steckdosen oder
Verlängerungskabel verwenden.
- Sicher stellen, dass das Versorgungskabel
auf seiner gesamten Länge an keiner Stelle
gequetscht wird.
- Zum Abziehen des Steckers nach
Abschalten des Hauptschalters, direkt den
Stecker greifen und sanft daran ziehen.
Wichtig
SOLLTE DAS VERSORGUNGSKABEL
BESCHÄDIGT SEIN, MUSS ES VOM
HERSTELLER ODER DESSEN KUNDENDIENST
BZW. VON EINER VERGLEICHBAR
QUALIFIZIERTEN PERSON AUSGETAUSCHT
WERDEN, UM JEDES RISIKO ZU VERMEIDEN.
Abb. 2

Ausgabedatum: Februar 2016 Revision: 1 Seite: 29/48
8. INBETRIEBNAHME UND
BETRIEBSMODALITÄTEN
!ACHTUNG!
VOR DER ERSTEN INBETRIEBNAHME DER
MASCHINE MÜSSEN ALLE IN KAPITEL 9
BESCHRIEBENEN REINIGUNGS- UND
DESINFIZIERUNGSMASSNAHMEN GETROFFEN
WERDEN
- In einem Gefäß das Produkt je nach Angaben
des Herstellers (siehe Abb. 3) mit Wasser oder
Milch auflösen und verrühren.
HINWEIS: unter dem Begriff "Produkt"
versteht sich das Ergebnis der
Vermischung von Wasser oder Milch mit
dem Präparat für die Herstellung von
kalten Cremes, Sorbet und dgl. bzw. bei
Verwendung warmer Milch, von warmen
Cremes oder heißer Schokolade.
Während in der warmen linken Wanne bis zu 2
Liter Produkt eingefüllt werden können, muss
bei der Wenn für kalte Produkte unbedingt
darauf geachtet werden, dass nicht mehr als
1.5 Liter Flüssigprodukt eingefüllt wird, da
sich das Volumen durch die Kühlung beachtlich
vergrößert und daher das maximale
Fassungsvermögen der Wanne überschreiten
könnte (siehe Kapitel zur Berechnung der
Volumensteigerung).
- Das Produkt in die Wanne geben (siehe
Abb.4).
- Den durchsichtigen Deckel wieder aufsetzen.
Hinweis -------------------------------------------
Jede Wanne ist mit einer effizienten
Sicherheitsvorrichtung zum Schutz des
Bedieners ausgestattet, die beim Abheben des
Deckels anspricht und automatisch den
sofortigen Stillstand aller bewegten
Maschinenteile bewirkt.
Sollte der Deckel nicht richtig angebracht
sein, kann das Rührwerk nicht in Betrieb
gesetzt werden.
------------------------------------------------------
- Nur bei NINA2 HOT&COLD die Steckbuchse in
die Maschine (Abb. 5) und den Stiftstecker in
die Versorgungssteckdose einstecken.
Abb. 3
Abb. 4
Abb. 5

Ausgabedatum: Februar 2016 Revision: 1 Seite: 30/48
- NINA2 HOT&COLD (Abb.6):
Der Schalter C (Abb.6) aktiviert die
Rotation der Spirale auf der rechten
Seite, die zur Kühlung des Produkts
dient, und gibt deren Betrieb frei.
Der Schalter D (Abb.6) aktiviert die
Rotation der Spirale auf der linken Seite,
die zur Erhitzung des Produkts dient, und
gibt deren Betrieb frei.
- NINA3 HOT&COLD (Abb.7):
Den Hauptschalter A auf der rechten
Seite der Maschine betätigen (Abb. 7),
um das Erhitzen des Produkts in der
linken Wanne freizugeben.
Den Hauptschalter B auf der rechten
Seite der Maschine betätigen (Abb. 7),
um das Kühlen des Produkts in der
mittleren und der rechten Wanne
freizugeben.
Der Schalter C aktiviert die Rotation der
Spirale der rechten Wanne, die zur
Kühlung des Produkts dient.
Der Schalter G aktiviert die Rotation der
Spirale der mittleren Wanne, die zur
Kühlung des Produkts dient.
Der Schalter D aktiviert die Rotation der
Spirale der linken Wanne, die zum
Erhitzen des Produkts dient.
!ACHTUNG!
Sollte sich bei Betätigung der Schalter C, G oder
D die entsprechende Spirale nicht in Bewegung
setzen, kontrollieren, ob der Deckel richtig
aufgesetzt wurde. Jede Wanne ist mit einer
Sicherheitsvorrichtung ausgestattet, die den
Betrieb verhindert, wenn der Deckel nicht
ordnungsgemäß in seine Aufnahme eingesetzt
wurde.
!ACHTUNG!
Sowohl die Kühlungs- als auch die
Erhitzungsanlage der einzelnen Wannen können
nur in Betrieb gesetzt werden, wenn die
zugehörige Spirale in Funktion ist.
FUNKTIONSWEISE DER KÜHLUNGS-SEITE
- Zur Aktivierung der Kälteanlage im Kühlbetrieb
und zur Veränderung der Konsistenz des
Produkts, die Tasten + oder - am Tastenfeld
betätigen (Abb.9). Bei Betätigung der Taste +
leuchten nach und nach mehr Leds auf und die
eingestellte Konsistenz wird erhöht. Bei
Betätigung der Taste - erlöschen nach und nach
die Leds und die Konsistenz wird verringert
(Abb.9).
Abb. 6
Abb. 7
Abb. 8

Ausgabedatum: Februar 2016 Revision: 1 Seite: 31/48
- Zur Aktivierung der Kälteanlage im DefrostBetrieb muss die Taste - einige Sekunden lang
gedrückt gehalten werden, bis der erste und die
letzte Led der Skala aufleuchten.
Zum Verlassen dieser Betriebsart muss die
Taste + gedrückt gehalten werden.
HINWEIS: wenn alle LEDs erloschen sind,
bedeutet dies, dass die Kälteanlage
abgeschaltet ist und somit das Produkt nicht
gekühlt wird.
HINWEIS: wenn die Maschine abgeschaltet wird,
speichert sie den letzten Betriebszustand, der
daher beim Einschalten mit den gleichen
Bedingungen wieder aufgenommen wird.
!ACHTUNG!
Die Kälteanlage ist in Betrieb, wenn mindestens
eine LED- der Konsistenz-Skala leuchtet. Um
Schäden des Geräts zu vermeiden muss vorher
immer sichergestellt werden, dass bereits
Produkt in die Wanne gefüllt wurde. Das Gerät
keinesfalls bei leerer Wanne betreiben.
Wichtig: die Maschine nicht mit Wasser oder
Desinfektionslösung betreiben, wenn die
Kälteanlage aktiviert wurde (also sowohl im
Kühl- als auch im Defrost-Betrieb). Andernfalls
könnte das Rührwerk schaden nehmen.
FUNKTIONSWEISE DER ERHITZUNGS-SEITE
- Zur Aktivierung der Anlage mit Heizbetrieb
muss der Schalter E betätigt werden (Abb.10),
wobei zu berücksichtigen ist, dass das
Heizelement nicht funktioniert, wenn der
zugehörige Mischer nicht in Betrieb ist.
HINWEIS: wenn das Heizelement in Betrieb ist,
leuchtet die rote Lampe F (Abb.10). Die
Maschine erhitzt das Produkt und hält es durch
laufendes Ein- und Ausschalten auf der
richtigen Temperatur. Aus diesem Grund ist es
normal, dass die rote Lampe während des
Betrieb immer wieder ein- und ausgeschaltet
wird.
HINWEIS: die Maschine ist mit einem internen
Thermostaten ausgestattet, um die Temperatur
des Produkts regeln zu können. Dieser
Thermostat kann maximal auf 80°C eingestellt
werden.
- Nachdem das Produkt die gewünschte
Temperatur/Konsistenz erreicht hat, ist zum
Zapfen von Produkt ein Glas unter den
Zapfhahn zu stellen und der Hebel zu ziehen,
wie in der Abb. 11 dargestellt.
Abb. 9
Abb. 10
Abb. 11

Ausgabedatum: Februar 2016 Revision: 1 Seite: 32/48
9. TÄGLICHE REINIGUNG UND
DESINFIZIERUNG
Um eine stets einwandfreie Funktion des Geräts
und die Einhaltung der einschlägigen
Gesundheitsvorschriften zu gewährleisten,
müssen die nachstehend beschriebenen
Reinigungs- und Desinfektionsmaßnahmen
häufig und sorgfältig vorgenommen werden.
Außerdem muss sicher gestellt werden, dass die
Person, die diese Arbeiten ausführt, vorher
Hände und Unterarme gewaschen und
desinfiziert hat.
Sollte das Gerät längere Zeit (saisonbedingt)
nicht benutzt werden, müssen die genannten
Vorgänge immer ausgeführt werden, bevor die
Maschine wieder in Betrieb genommen wird.
Achtung
Um Risiken wie beispielsweise Stromschlag
während der Reinigungsarbeiten zu
vermeiden, kein Wasser auf die Schalter
sprühen und verhindern, dass die
elektrischen Bauteile im Inneren des
Geräts mit Wasser oder den verwendeten
Produkten in Berührung kommen.
Achtung
Um der Entstehung von Bakterien
vorzubeugen, ausschließlich Produkte
verwenden, die für die Desinfizierung von
Kunststoff- und Gummiteilen zugelassen
sind. Die Nichteinhaltung dieser Vorschrift
kann zu Gesundheitsrisiken führen.
HINWEIS: es liegt in der Verantwortung des
Betreibers, sich mit den einschlägigen
Vorschriften vertraut zu machen, um alle
staatlichen, regionalen oder lokalen Gesetze im
Hinblick auf Reinigungshäufigkeit und
Aufbewahrung der verwendeten Produkte
einzuhalten.
Die nachstehend beschriebenen Abläufe sind
von ausschlaggebender Wichtigkeit, um die
Entstehung von Bakterien zu verhindern und die
optimalen Hygienebedingungen der Maschine zu
gewährleisten.
Es empfiehlt sich, die genannten Abläufe
täglich vorzunehmen und in jedem Fall die
einschlägigen Gesetzesvorschriften einzuhalten.
Weder der Hersteller der Maschine noch der
Hersteller des eingefüllten Pulverprodukts
können für Personenschäden verantwortlich
gemacht werden, die direkt oder indirekt durch
mangelnde Einhaltung der in diesem Handbuch
angegebenen Vorschriften, insbesondere im
Hinblick auf Reinigung und Desinfizierung des
Geräts zustande kommen.

Ausgabedatum: Februar 2016 Revision: 1 Seite: 33/48
- Sowohl die Kälteanlage (Taste – drücken, bis
alle LEDs erloschen sind) als auch die
Heizanlage (Taste E in Abschalt-Stellung)
abschalten und die Maschine etwa zehn Minuten
lang nur bei laufendem Mischer betreiben.
- Das gesamte restliche Produkt entfernen,
wobei bei warmen Produkten Vorsicht geboten
ist, das das Produkt noch heiß sein könnte.
- Ein handelsübliches Produkt für die
Desinfizierung von Kunststoff- und
Gummigegenständen bereitstellen (z.B.
AMUCHINA®).
WICHTIG
Die Anweisungen auf dem verwendeten
Produkt in Bezug auf Zeit und
Aufbewahrungsmodalitäten müssen strikt
eingehalten werden.
- Den Deckel entfernen, wie in Abb. 12
dargestellt.
- Die Wanne mit lauwarmem Wasser füllen
(Abb. 13) und das Rührwerk einige Minuten lang
laufen lassen (alle LEDs ausgeschaltet),
nachdem der Deckel wieder aufgesetzt wurde.
!ACHTUNG!
Jede Wanne ist mit einer
Sicherheitsvorrichtung ausgestattet, die
den Betrieb verhindert, wenn der Deckel
nicht ordnungsgemäß in seine Aufnahme
eingesetzt wurde.
- Die Wanne entleeren und den Vorgang
wiederholen, bis das verwendete Wasser klar
bleibt (Abb. 14).
Abb. 12
Abb. 13
Abb. 14

Ausgabedatum: Februar 2016 Revision: 1 Seite: 34/48
Achtung
Um die Gefahr von Stromschlägen oder
Kontakt mit den bewegten Maschinenteilen
zu vermeiden, muss sichergestellt werden,
dass während des Ein- und Ausbaus der
Bauteile alle Schalter auf Off stehen und
das Versorgungskabel aus der Steckdose
gezogen ist.
- Die Hauptschalter A und/oder B auf der
rechten Seite der Frontseite des Geräts
abschalten und den Stecker aus der Steckdose
ziehen.
- Den Deckel abheben
- Bevor die Reinigung vorgenommen wird, die
Hände sorgfältig waschen und desinfizieren.
- Den Hahn von der Wanne abmontieren, indem
gleichzeitig die beiden Verriegelungslaschen
gedrückt und der Hahn nach oben aus seiner
Aufnahme herausgezogen wird (Abb. 15).
- Den Hahn in seine Einzelteile zerlegen. Dazu
den Ventilkörper nach unten gedrückt halten
und den Hebel aus seiner Aufnahme ziehen
(Abb. 16).
Achtung
Um die Entstehung von Bakterien zu
verhindern, stets auch die O-Ringe
herausnehmen und reinigen. Die
mangelnde Einhaltung dieser Anweisung
kann zu Gesundheitsrisiken für die
Verbraucher führen.
- Die Wanne greifen, wie in Abb. 17 dargestellt,
leicht nach oben bewegen, um sie aus ihrer
Aufnahme zu lösen und dann nach außen
ziehen.
Abb. 15
Abb. 16
Abb. 17

Ausgabedatum: Februar 2016 Revision: 1 Seite: 35/48
- Den Spiralrührer und die Napfdichtung
herausnehmen (Abb.18).
- Die Dichtung der Wanne entfernen, wie in Abb.
19 dargestellt.
- Die Tropfschale leicht nach oben bewegen und
dann nach außen abziehen (Abb. 20).
- Alle Einzelteile sorgfältig mit heißem Wasser
und Geschirrspülmittel reinigen.
WICHTIG
Keine scheuernden Reinigungsmittel oder
Pulver verwenden, da diese die Wanne und
die sonstigen Bauteile schädigen können,
mit denen sie in Berührung kommen.
ACHTUNG
Die genannten Elemente keinesfalls in der
Spülmaschine waschen, da sie dort schwer
beschädigt werden können
- Alle Teile gründlich abspülen und in das
Desinfektionsmittel legen. Dabei die vom
Hersteller angegebene Dosierung und
Einwirkungszeit einhalten.
- Nach Ablauf der korrekten Desinfektionszeit,
alle Teile sorgfältig mit reinem Wasser spülen
und mit einem sauberen Tuch trocknen.
- Den Verdampfer und die Kondenswasserschale
sorgfältig reinigen. Alle Produktrückstände mit
einem sauberen, mit Desinfektionsmittel
getränkten Schwamm beseitigen (siehe Abb.
21).
- Den gleichen Vorgang mit einem in reinem
Trinkwasser getränkten Schwamm wiederholen
und dann alle Flächen mit einem sauberen Tuch
trocknen.
Abb. 18
Abb. 19
Abb. 20
Abb. 21

Ausgabedatum: Februar 2016 Revision: 1 Seite: 36/48
Nachdem die obigen Reinigungs- und
Desinfizierungsmaßnahmen sorgfältig
ausgeführt wurden, können die Bauteile wieder
eingebaut werden.
Das richtige Zusammensetzen der Maschine ist
sehr wichtig, da es andernfalls zum Auslaufen
von Produkt und zu Schäden der Maschine
selbst kommen kann.
Beim Zusammenbau ist ein zugelassenes
Schmiermittel erforderlich (Vaseline).
Stets sicherstellen, dass alle Teile
ordnungsgemäß gereinigt und desinfiziert
wurden, und dass alle mit dem Zusammenbau
befassten Personen sorgfältig ihre Hände und
Unterarme gewaschen und desinfiziert haben.
- Die hintere Wannendichtung wieder einbauen,
wobei auf die richtige Lage der Dichtung zu
achten ist. Siehe Abb.22.
- Die Innenseite der Napfdichtung sorgfältig mit
Vaseline-Fett schmieren (Abb.23).
- Die Napfdichtung in ihre Aufnahme am
Spiralrührer einsetzen, bevor die Baugruppe in
das Gerät eingebaut wird (Abb.24).
- Das Rührwerk und die Napfdichtung wieder
einbauen, wobei darauf zu achten ist, dass der
vordere Schaft perfekt in die Rotationswelle
eingreift (Abb.25).
Abb. 22
Abb. 23
Abb. 24
Abb. 25

Ausgabedatum: Februar 2016 Revision: 1 Seite: 37/48
- Um die Montage zu erleichtern, empfiehlt es
sich, den hinteren Teil der Wanne mit sauberem
Wasser an dem Punkt anzufeuchten, an dem sie
an ihrer Dichtung anliegt (siehe Abb. 26);
- Zum Wiedereinbau, die Wanne am Verdampfer
entlang bis zum Anschlag drücken und hinter
dem Sperrprofil in ihrer Aufnahme blockieren.
Sicherstellen, dass sie exakt an ihrer Dichtung
anliegt (siehe Abbildung 27).
- Den Hahn wieder einbauen (Abb.28) und die
Dichtungen mit Vaseline-Fett schmieren, um das
Eingleiten des Hahns in seine Aufnahme zu
erleichtern.
!ACHTUNG!
Ein nicht einwandfreies Gleiten des Hahns
beeinträchtigt dessen Dichtheit.
- Die Tropfschale wieder anbringen.
Abb. 26
Abb. 27
Abb. 28

Ausgabedatum: Februar 2016 Revision: 1 Seite: 38/48
DESINFIZIERUNG
Wenn die Maschine nach sorgfältiger Reinigung
und Desinfizierung gemäß Kapitel 9 mehrere
Tage nicht benutzt wird, muss sie wie
nachstehend beschrieben neu desinfiziert
werden.
- Den Sicherheitsdeckel abheben.
- Die Wanne mit Wasser und
nahrungsmittelechtem Desinfektionsmittel
(AMUCHINA®) füllen, wobei die
Dosierungsanweisungen des Herstellers
beachtet werden müssen.
- Nachdem der Deckel wieder angebracht
wurde, das Rührwerk in Betrieb setzen (alle
LEDs erloschen) und das Produkt nach Vorschrift
des Herstellers einwirken lassen.
WICHTIG
Das Desinfektionsmittel nicht länger als
vom Hersteller vorgeschrieben in der
Wanne belassen
- Die Wanne entleeren, indem das Ventil
mindestens 10 Mal geöffnet und geschlossen
wird. Auf diese Weise wird auch der gesamte
Durchlaufbereich des Produkts desinfiziert.
- Sorgfältig nachspülen, d.h. die obigen
Vorgänge mit reinem Wasser anstelle von
Desinfektionsmittel wiederholen.
- Nachdem die vorstehend beschriebene
Desinfektion sorgfältig vorgenommen wurde, ist
die Maschine gebrauchsbereit.

Ausgabedatum: Februar 2016 Revision: 1 Seite: 39/48
10. AUSSERORDENTLICHE WARTUNG
Achtung
Bevor Wartungsarbeiten jeglicher Art
ausgeführt werden, muss obligatorisch das
Gerät abgeschaltet und der Stecker aus der
Steckdose gezogen werden.
Reinigung des Kondensators
Um eine einwandfreie Leistung der Kälteanlage
zu gewährleisten, muss für sorgfältige Reinigung
des
Kondensators mindestens einmal monatlich
oder immer dann gesorgt werden, wenn
der Verstopfungsgrad dies notwendig
macht.
Für den Zugang zum Kondensator
- die Spannungsversorgung des Geräts durch
Abschalten des Hauptschalters und Abziehen
des Steckers aus der Steckdose unterbrechen;
- Bei NINA2 HOT&COLD die untere Verkleidung
an der Rückseite entfernen, indem die
Kunststoffklammern gelöst und die Verkleidung
leich nach außen gezogen wird, wie in Abb. 29
dargestellt;
- Bei NINA3 HOT&COLD das linke Seitenteil
entfernen, nachdem die beiden
Befestigungsschrauben abgeschraubt wurden
(Abb. 30);
- Sofern vorhanden, den Filter herausnehmen
und sorgfältig spülen. Andernfalls sorgfältig die
Flügel des Kondensators mit einem Staubsauger
reinigen;
- Den eventuellen Filter wieder einsetzen und
die Verkleidung wieder anbringen, bevor die
Maschine in Betrieb gesetzt wird.
WICHTIG
Zum Entfernen des Schmutzes zwischen
den Lamellen des Kondensators keinesfalls
Schraubenzieher oder sonstige
scharfkantige Gegenstände verwenden.
Abb. 29
Abb. 30

Ausgabedatum: Februar 2016 Revision: 1 Seite: 40/48
Kontrolle und Austausch der Dichtungen
WANNENDICHTUNG
Die Dichtung an der Rückseite der Wanne muss
alle 12 Monate ausgetauscht werden, je nach
Verschleiß und Wartungs- bzw.
Schmierungszustand.
DICHTUNGEN (O-RINGE) DES HAHNS
Die O-Ringdichtungen des Zapfhahns müssen
ersetzt werden, sobald sie verschlissen sind.
Diese Dichtungen müssen bei jedem
Zusammenbau der Maschine nach der Reinigung
geschmiert und sorgfältig kontrolliert werden,
um unerwünschte Leckagen zu vermeiden.
NAPFDICHTUNG
Die Napfdichtung an der Vorderseite des
Verdampfers muss alle 3 Monate ausgetauscht
werden, bzw. immer dann, wenn sie
verschlissen ist. Diese Dichtung muss bei jedem
Zusammenbau der Maschine nach der Reinigung
mit dem mitgelieferten Vaseline-Fett geschmiert
werden.
Einlagerung über Winter
Um die Maschine bei Stillstandszeiten wie
beispielsweise im Winter zu schützen, muss sie
ordnungsgemäß gelagert werden, wie
nachstehend beschrieben:
- Die Maschine von allen Energiequellen
trennen.
- Alle Teile, die mit dem Produkt in Berührung
kommen ausbauen, reinigen und desinfizieren,
wie in Kapitel 9 beschrieben.
- Auch die Außenplatten reinigen
- Alle Bauteile wieder ordnungsgemäß einbauen.
- Die Maschine vollständig montiert mit der
Originalverpackung bedecken, um sie vor Staub
und sonstigen Verschmutzungen zu schützen.
- Die Maschine an einem trockenen Ort
verwahren.
Aufbewahrung Produkt
Da die Haltbarkeit des Produkts von der
Temperatur und von der Dauer der
Aufbewahrung abhängig ist, müssen unbedingt
die Angaben des Herstellers eingehalten
werden, um Gesundheitsrisiken durch ein wegen
falscher Aufbewahrungsbedingungen schlecht
gewordenes Produkt zu vermeiden.

Ausgabedatum: Februar 2016 Revision: 1 Seite: 41/48
11. NÜTZLICHE INFORMATIONEN ZUR
HERSTELLUNG VON SPEISEEIS
VOLUMENSTEIGERUNG
Beim Übergang vom flüssigen Anfangszustand
in den verdickten, cremigen Endzustand nimmt
das Volumen des Produkt beachtlich zu. Die
Quantifizierung des Ausmaßes dieser
Volumensteigerung kann sehr hilfreich sein, um
das Überfüllen der Wanne mit zu viel Produkt zu
vermeiden.
Die folgende, einfache Berechnung gestattet die
Bestimmung des Prozentsatzes, um den sich
das Volumen vergrößern wird.
- Einen leeren Behälter auf eine Waage stellen
und diese somit auf Null Gewicht einstellen;
- Den Behälter abnehmen, vollständig mit
flüssigem Produkt füllen, wiegen und das
Gewicht notieren;
- Den gleichen Vorgang wiederholen, indem der
Behälter mit dem Produkt gefüllt wird, das die
gewünschte Dichte aufweist: wiegen und das
erzielte Gewicht notieren;
- Nun anhand der nachstehenden Formel die
prozentuale Volumensteigerung berechnen:
“Gewicht des flüssigen Produkts minus Gewicht
des cremigen Produkt, geteilt durch das Gewicht
des cremigen Produkts und dann multipliziert
mal 100”
Beispiel:
Gewicht eines halben Liters flüssigen Produkts:
530 g
Gewicht eines halben Liters cremigen Produkts:
380 g
Differenz:150 g
150/380=0.4
0.4x100=40% Volumensteigerung
12. HAFTUNGSAUSSCHLUSS
Der Hersteller verweigert jegliche Haftung für
eventuelle direkte oder indirekte Personen-,
Sach- und Tierschäden infolge der mangelnden
Einhaltung der Vorschriften dieses Handbuchs,
insbesondere der Hinweise in Bezug auf
Installation, Betrieb und Wartung des Geräts.
Der Hersteller haftet nicht für eventuell in
diesem Handbuch enthaltene Ungenauigkeiten
infolge von Druck-, Abschrift- oder
Übersetzungsfehlern und behält sich das Recht
vor, alle Änderungen vorzunehmen, die er für
notwendig oder dienlich erachtet, ohne die
wesentlichen Funktions- und
Sicherheitsmerkmale der Maschine zu
beeinträchtigen.

Ausgabedatum: Februar 2016 Revision: 1 Seite: 42/48
13. ANLEITUNG ZUR PROBLEM
LÖSUNG
Problem
Mögliche Ursache
Abhilfe
Die Maschine kühlt nicht
oder nur teilweise, und
der Kompressor
funktioniert
Der Belüftungs-Freiraum rings um
die Maschine ist nicht ausreichend
Die Maschine arbeitet nur im
Rührbetrieb
Der Kondensator ist verschmutzt
oder verstaubt
Der Lüfter funktioniert nicht
Es liegt eine Kältemittel-Leckage
vor
Mindestens 20 cm Freiraum rings um die
Maschine belassen und die Maschine fern
von Hitzequellen aufstellen
Die Kälteanlage durch Drücken der Taste
+ einschalten
Den Filter des Kondensators reinigen
Die elektrischen Anschlüsse kontrollieren
und eventuell wieder herstellen. Sollte
die Maschine trotzdem nicht
funktionieren, den Lüfter austauschen
Die Leckstelle feststellen, beseitigen und
die Anlage wieder füllen
Die Maschine kühlt nicht
oder nur teilweise, und
der Kompressor
funktioniert nicht
Die elektrischen Teile des
Kompressors funktionieren nicht
Einige Elektroanschlüsse sind
unvollständig
Der Kompressor ist defekt
Die Bauteile austauschen, die nicht
funktionieren
Die Anschlüsse kontrollieren und
unvollständige Anschlüsse in Ordnung
bringen
Den Kompressor austauschen
Die Maschine läuft laut
Die Flügel des Lüfters stoßen an
interne Bauteile
Überprüfen und in Ordnung bringen
Der Hauptschalter steht
auf ON, aber die
Maschine funktioniert
nicht
Der Hauptdeckel wurde nicht
ordnungsgemäß angebracht
Einige Elektroanschlüsse sind
unvollständig
Der Hauptschalter ist defekt
Die elektronische Steuerkarte ist
defekt
Der Getriebemotor ist defekt
Den Hauptdeckel ordnungsgemäß
anbringen
Die Anschlüsse kontrollieren und
unvollständige Anschlüsse in Ordnung
bringen
Den Schalter austauschen
Die Steuerkarte austauschen
Den Getriebemotor austauschen
Die Wanne hat
Leckstellen
Eine der Dichtungen ist nicht richtig
eingelegt
Die Dichtung entfernen und richtig
anbringen. Falls notwendig, die Dichtung
austauschen
Leck am Zapfhahn
Der Zapfhahn wurde nicht
ordnungsgemäß montiert
Die Bewegung des Hahns ist
behindert
Die O-Ringdichtungen sind
beschädigt oder verschlissen
Den Hahn aus- und korrekt wieder
einbauen
Den Hahn und seine Aufnahme reinigen
und mit dem zur Lieferung gehörenden
Vaseline-Fett schmieren
Die O-Ringe austauschen
Das Produkt läuft an der
Rückseite auf die
Tropfschale
Die Napfdichtung und die
Haltebuchse der Welle sind
beschädigt oder verschlissen
Die Dichtungen entfernen und ersetzen
Das Rührwerk dreht sich
nicht
Der Hauptdeckel wurde nicht
ordnungsgemäß angebracht
Einige Elektroanschlüsse sind
unvollständig
Die Steuerkarte des Motors ist
defekt
Der Getriebemotor ist defekt
Den Hauptdeckel ordnungsgemäß
anbringen
Die Anschlüsse kontrollieren und
unvollständige Anschlüsse in Ordnung
bringen
Die Steuerkarte des Motors austauschen
Den Getriebemotor austauschen
Das Rührwerk läuft laut
während der Rotation
Die Napfdichtung wurde
ausgetauscht, ohne sie
ordnungsgemäß zu schmieren
Die Mischerspirale wurde nicht
ordnungsgemäß montiert
Die Dichtung herausnehmen, reinigen,
desinfizieren und ordnungsgemäß
schmieren
Die Spirale und das gesamte Rührwerk
aus- und korrekt wieder einbauen
HINWEIS: die nachstehenden
Arbeitsgänge müssen von technischem
Fachpersonal ausgeführt werden

Ausgabedatum: Februar 2016 Revision: 1 Seite: 43/48
Problem
Mögliche Ursache
Abhilfe
Fehleranzeigen der
LEDs (von unten nach
oben):
- Blinken der 1. LED
- Blinken der 2. LED
- Blinken der 3. LED
- Blinken der 4. LED
- Blinken der 5. LED
Speicherfehler
Sonde der Wanne kurzgeschlossen
Sonde der Wanne nicht
angeschlossen
Überstrom des Motors
Netzspannungsfehler
Karte austauschen
Sonde austauschen
Sonde anschließen
Abschalten, Störung beseitigen und
wieder einschalten
Abschalten, Störung beseitigen und
wieder einschalten
Die Maschine heizt nicht
Der Mischer ist nicht eingeschaltet,
Taste D in Stellung OFF
Die Maschine arbeitet nur mit dem
Mischer, Taste E in Stellung OFF
Nur bei NINA3 HOT&COLD - der
Betrieb der Heizanlage ist nicht
freigegeben, Taste A auf der
rechten Seite in Stellung OFF
Das Heizelement funktioniert nicht
Den Mischer durch Betätigen des
Schalters D einschalten
Den Schalter E des Heizelements
betätigen
Das Heizsystem durch Betätigen des
Schalters A freigeben
Die elektrischen Anschlüsse
kontrollieren und eventuell wieder
herstellen. Sollte die Maschine trotzdem
nicht funktionieren, den Kundendienst
rufen
Die Maschine heizt nicht
und das rote Licht auf
der Frontseite bleibt
stets eingeschaltet
Der Regelthermostat ist defekt, so
dass der Sicherheitsthermostat
anspricht
Der Sicherheitsthermostat ist
defekt
Den Regelthermostaten austauschen
Den Sicherheitsthermostaten
austauschen

Ausgabedatum: Februar 2016 Revision: 1 Seite: 44/48

Ausgabedatum: Februar 2016 Revision: 1 Seite: 45/48
14. WIRING DIAGRAM

Ausgabedatum: Februar 2016 Revision: 1 Seite: 46/48

Ausgabedatum: Februar 2016 Revision: 1 Seite: 47/48
ASSISTENZA TECNICA ITALIA
Mail: info@service-k.it
Tel. 059782884
Conforme alla normativa RoHS
Questo apparecchio è conforme alla direttiva europea 2002/95/CE e successive modifiche per quanto riguarda la restrizione all’uso di
sostanze pericolose nella produzione di apparecchiature elettriche ed elettroniche.
Smaltimento
Ai sensi della direttiva RAEE 2002/96/CE e successiva modifica 2003/108/CE questa apparecchiatura viene contrassegnata con il
seguente simbolo del contenitore di spazzatura con ruote barrato. “ INFORMAZIONE AGLI UTENTI: Ai sensi dell’art. 13 del Decreto
Legislativo 25 Luglio 2005 n. 151 - Attuazione delle Direttive 2002/95/CE e 2002/96/CE, relative alla riduzione dell’uso di sostanze
pericolose nelle apparecchiature elettriche ed elettroniche, nonché allo smaltimento dei rifiuti. Il simbolo del cassonetto barrato indica che
il prodotto, alla fine della sua vita utile, deve essere raccolto separatamente dagli altri rifiuti. L’utente deve conferire l’apparecchiatura
giunta a fine vita ad idonei centri di raccolta differenziata dei rifiuti elettrici ed elettronici, oppure consegnarla al rivenditore al momento
dell’acquisto di nuova apparecchiatura di tipo equivalente, in ragione di uno ad uno. L’adeguata raccolta differenziata per l’avvio
successivo al trattamento e allo smaltimento ambientalmente compatibile contribuisce ad evitare possibili effetti negativi sull’ambiente e
sulla salute e favorisce il reimpiego e il riciclo dei materiali di cui è composta l’apparecchiatura. Lo smaltimento abusivo del prodotto da
parte dell’utente comporta l’applicazione delle sanzioni amministrative di cui al D.Lgs. n.22/1997 registro AEE IT13060000008071.”

Ausgabedatum: Februar 2016 Revision: 1 Seite: 48/48
INTERNATIONAL CUSTOMER CARE
intcustcare@spm-ice.it
+39 059781761
Company
with certified quality
management system
UN EN ISO 9001
 Loading...