

SPLENDID WDV2200XCD Use & Care

Instructions for use
WASHER-DRYER
EN
English, 1
Français, 17
WDV2200XCD
FR
Contents
Washer-dryer safety 2
Installation instructions 3-4-5
Unpacking and leveling
Removing the transit screws
Minimum installation spacing
Exhaust requirements
Connecting water inlet
Drainage
Connecting the drain hose
Under sink method
Electrical
Technical information
Operating instructions 6-7-8
Control panel
Wash cycle table
Product description
Detergent dispenser drawer
Bleach cycle
Wash cycles
Dry cycles
Wash + dry cycles
Display
First-time use
Daily use
Pausing a cycle
Opening the door, if necessary
Changing a running wash cycle
At the end of the wash cycle
Options
Tips and suggestions
Accessories
Opening the porthole door manually
Cleaning & maintenance 9-10
Checking the water supply hose
Cleaning the mesh lters in the water inlet valves
Cleaning the detergent dispenser
Cleaning the water lter / draining residual water
Transport and handling 11
Troubleshooting 12-13
After-sales service 14
RV/Marine winterization 15
Warranty 16
WASHERDRYER SAFETY
IMPORTANT SAFETY INSTRUCTIONS
WARNING: To reduce the risk of re, electric shock, or injur y to persons when using the dryer, follow basic precautions, including the following:
■ Read all instructions before using the washer.
■ Do not wash articles that have been previously cleaned in, washed in,
soaked in, or spotted with gasoline, dr y-cleaning solvents, other ammable,
or explosive substances as they give o vapors that could ignite or explode.
■ Do not add gasoline, dry-cleaning solvents, or other ammable, or explo-
sive substances to the wash water. These substances give o vapors that
could ignite or explode.
■ Under certain conditions, Hydrogen gas may be produced in a hot water
system that has not been used for 2 weeks or more. HYDROGEN GAS IS EXPLOSIVE. If the hot water system has not b een used for such a period, before
using the appliance, turn on all hot-water faucets and let the water ow for
several minutes. This will release any accumulated hydrogen gas. As the gas
is ammable, do not smoke or use an open ame during this time.
■ Turn o water faucets when appliance is not in use to relieve pressure on
hoses and valves and to minimize leakage if a break or rupture occurs.
■ Do not allow children to play on or in the washer. Close supervision of
children is necessary when the washer is used near children.
■ Before the washer is removed from service or discarded, remove the
door or lid.
■ Do not reach into the washer if the drum, tub or agitator is moving.
■ Do not install or store the washer where it will be exposed to the
weather.
■ Do not tamper with controls.
■ Do not repair or replace any part of the washer or attempt any servic-
ing unless specically recommended in this manual or in published
user-repair instructions that you understand and have the skills to
carry out.
■ See Installation Instructions for grounding instructions.
■ Do not use replacement parts that have not been recommended by
the manufacturer (e.g. parts made at home using a 3D printer).
SAVE THESE INSTRUCTIONS
IMPORTANT SAFETY INSTRUCTIONS
WARNING: To reduce the risk of re, electric shock, or injur y to persons when using the dryer, follow basic precautions, including the following:
■ Read all instructions before using the dryer.
■ Do not place items exposed to cooking oils in your dryer. Items contami-
nated with cooking oils may contribute to a chemical reaction that could
cause a load to catch re. To reduce the risk of re due to contaminated
loads, the nal part of a tumble dryer c ycle occurs without heat (cool down
period). Avoid stopping a tumble dr yer before the end of the drying cycle
unless all items are quickly removed and spread out so that the heat is
dissipated.
■ Do not dr y articles that have been previously cleaned in, washed in, soaked
in, or spotted with gasoline, dry-cleaning solvents, or other ammable or
explosive substances as they give o vapors that could ignite or explode.
■ Do not allow children to play on or in the dryer. Close supervision of
children is necessary when the dryer is used near children.
■ Before the dryer is removed from service or discarded, remove the
door to the drying compartment.
■ Do not reach into the dryer if the drum is moving.
■ Do not install or store the dryer where it will be exposed to the weather.
■ Do not tamper with controls.
■ Under certain conditions, Hydrogen gas may be produced in a hot water
system that has not been used for 2 weeks or more. HYDROGEN GAS IS
EXPLOSIVE. If the hot water system has not been used for such a period,
before using the appliance, turn on all hot-water faucets and let the water
ow for several minutes.This will release any accumulated hydrogen gas.
As the gas is ammable, do not smoke or use an open ame during this
time.
■ Do not repair or replace any part of the dryer or attempt any servic-
ing unless specically recommended in this Use and Care Guide or in
published user-repair instructions that you understand and have the
skills to carry out.
■ Do not use fabric softeners or product to eliminate static unless rec-
ommended by the manufacturer of the fabric softener or product.
■ Do not use clothes dryer fabric softener in combo units.
■ Do not use heat to dry articles containing foam rubber or similarly
textured rubber-like materials.
■ Keep area around the exhaust opening and adjacent surrounding
areas free from the accumulation of lint, dust, and dirt.
■ The interior of the dryer and exhaust vent should be cleaned peri-
odically by qualied service personnel.
■ See Installation Instructions for grounding instructions.
■ Do not use replacement parts that have not been recommended by
the manufacturer (e.g. parts made at home using a 3D printer).
■ Turn o water faucets to relieve pressure on hoses and valves and to
minimize leakage if a break or rupture occurs.
SAVE THESE INSTRUCTIONS
2
INSTALLATION INSTRUCTIONS
0
0
1
1
0
WARNING - “Risk of Fire”
- Clothes dryer installation must be performed by a qualied installer.
Install the clothes dryer according to the manufacturer’s instructions and local codes.
- Do not install a clothes dr yer with exible plastic venting materials. If exible metal duct is installed,
it must be of a specic type identied by the appliance manufacturer as suitable for use with clothes
dryers. Flexible venting materials are known to collapse, be easily crushed, and trap lint. These conditions will obstruct clothes dr yer airow and increase risk of re.
- To reduce the risk of severe injury or death, follow all installation instructions.
- Save these instructions.
Install the clothes washer-dryer according to the manufacturer’s instructions and local codes.
UNPACKING AND LEVELING
Unpacking
1. Remove the washer-dryer from its packaging.
2. Make sure that the washer-dryer has not been damaged during the
transportation process. If it has been damaged, contact the retailer and do
not proceed any further with the installation process.
Dispose of/recycle all packaging materials.
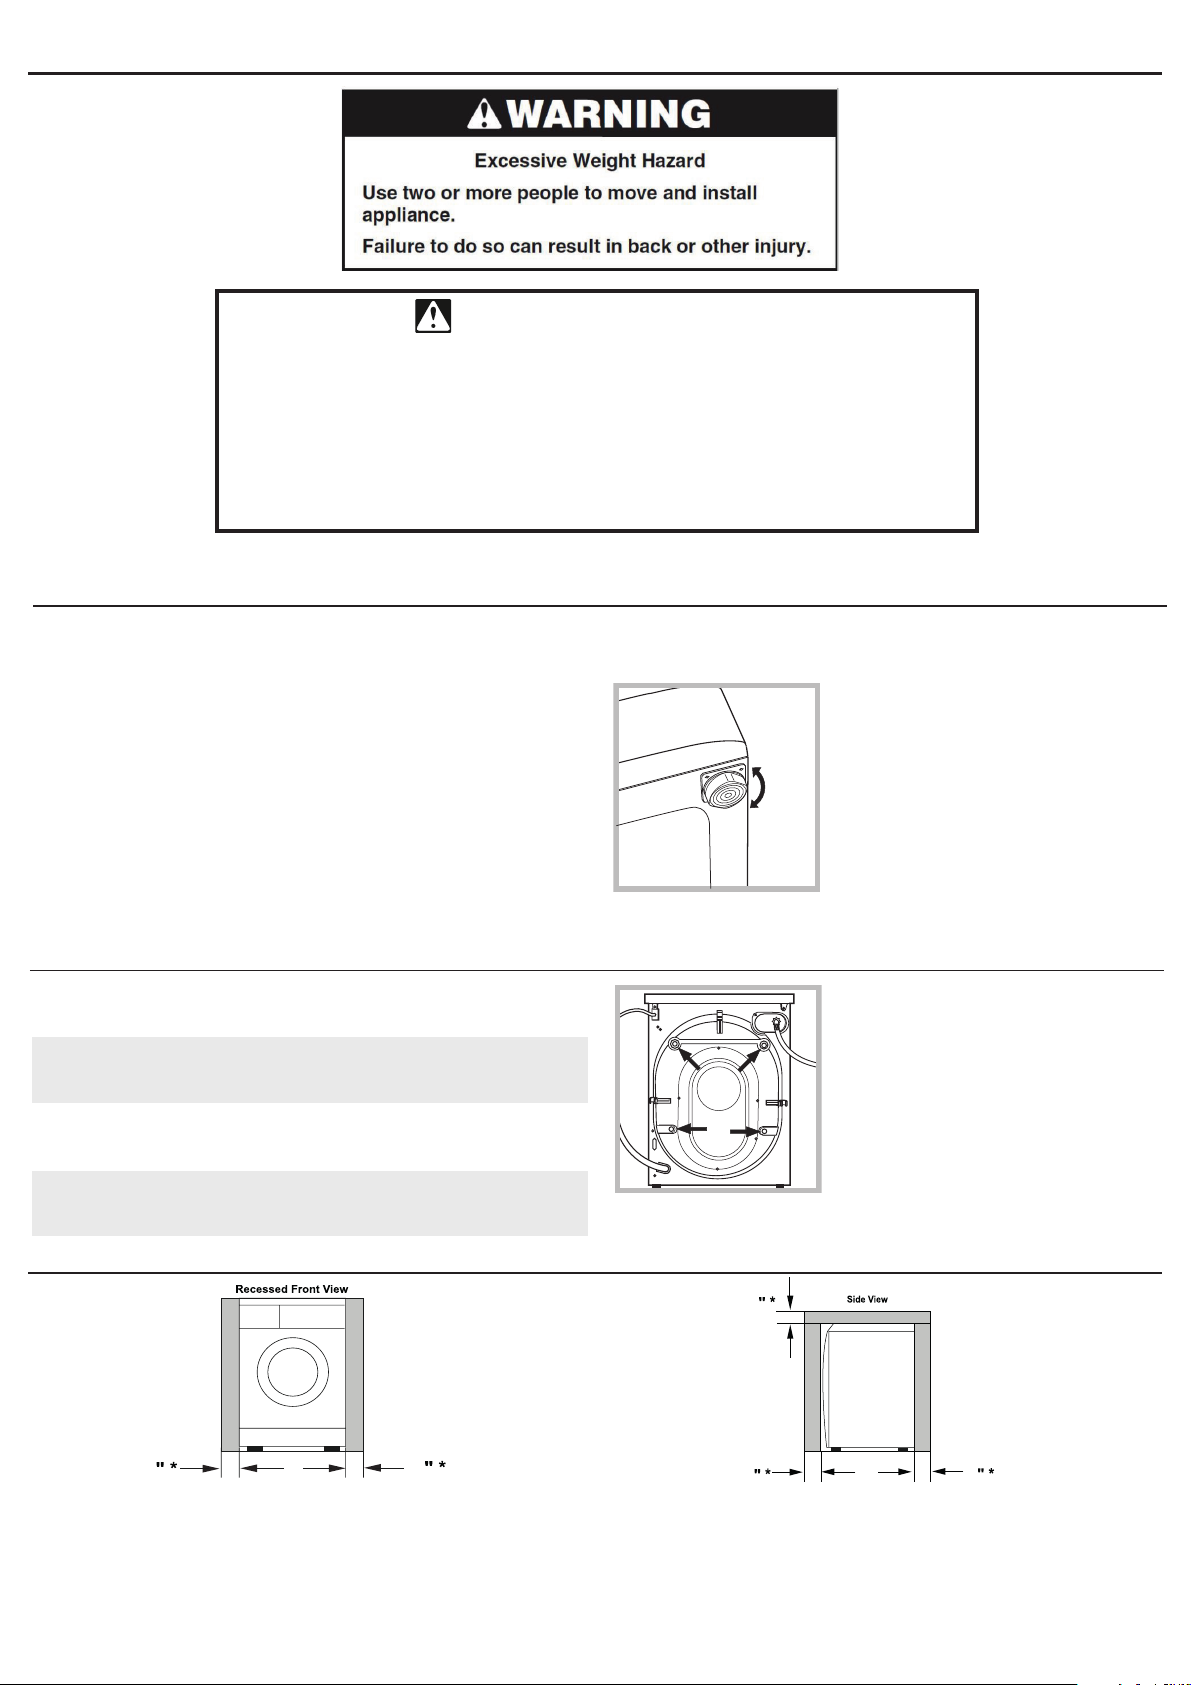
Leveling
1. Install the washer-dryer on a at sturdy oor, without resting it up
against walls, furniture cabinets or anything else.
2. If the oor is not perfectly level,
compensate for any unevenness by
tightening or loosening the adjustable front
feet (see gure); the angle of inclination,
measured in relation to the worktop, must
not exceed 2°.
REMOVING THE TRANSIT SCREWS
For transportation, the inside of the machine is supported by screws, rubber
grommets and spacers on the back panel. Before using the washer-dryer,
these items MUST be removed.
Important: Transit screws and spacers must be removed before operating
the machine to allow proper operation of the machine and to prevent
damage to the appliance.
After positioning the washer-dryer near the installation location, remove the
four screws (see gure), with the rubber grommets and plastic spacers that are
attached to them.
Important: Retain the transit screws, spacers and rubber tubes. These items
should be reinstalled to prevent damage if or when you transport the
machine in the future.
MINIMUM INSTALLATION SPACING
Leveling the machine correctly will provide it with stability, help to avoid
vibrations and excessive noise and prevent it from shifting while it is operating.
This machine may be installed free standing as well as in a recessed area, closet,
or alcove. The installation spacing is in inches and is the minimum acceptable.
*Additional spacing should be considered for easy installation, servicing
and compliance with local codes and ordinances. Installations must
conform with the minimum dimensions indicated.
If a cabinet door is installed, a min. opening of 8 sq. in. should be provided for make up air. Louvered doors with equivalent air opening are acceptable. Allow clearances
behind door(s) to avoid rubbing between back of cabinet door(s) and front control panel. Additional clearances for all, door and f loor molding may be required.
Floor must support 280 lbs. and be a solid level surface. To avoid damage
to the ooring, do not install on carpet.
RV/Marine lnstallations - When locating the appliance in a towable trailer
or watercraft, position the machine over the axles or mid-ship where
movement is at a minimum. For RV or marine applications, please visit the
Splendide website or call 1-800-356-0766 for the available installation kits.
3
2
H
C
EXHAUST REQUIREMENTS
WARNING: Risk of re. Do not install a booster fan in the exhaust duct.
Note: The booster fan warning does not apply to clothes dryers intended to be installed in a multiple clothes dryer system, with an engineered exhaust
duct system that is installed per the clothes dryer manufacturer’s guidelines.
Follow these requirements when installing the exhaust for this washer-dryer:
• The appliance shall not be exhausted into a chimney, a wall, a ceiling, an attic, a crawl space, or a concealed space of a building.
• Only rigid or exible metal duct shall be used for exhausting. Contact Westland Sales at 1-800-356-0766 for recommended metal venting kits.
• In Canada, only those foil-type exible ducts, if any, specically identied for use with the appliance by the manufacturer shall be used. In the United States, only
those foil-type exible ducts, if any, specically identied for use with the appliance by the manufacturer and that comply with the UL 2158A, shall be used.
• The exhaust duct shall be 4” (102 mm) in diameter.
• The maximum duct length shall be no greater than 7.9 ft (2.4 m), and the number of bends shall not exceed 2 elbows.
•The total length of exible metal duct shall not exceed 7.9 ft (2.4 m).
• The duct shall not be assembled with screws or other fastening means that extend into the duct and catch lint.
NOTE: Exhaust ducts should be as short and as straight as possible.
NOTE: Long exhaust ducting can extend drying time, collect lint and may aect drying performance.
For available venting kits, contact Westland Sales at 1-800-356-0766 or by email at service@westlandsales.com.
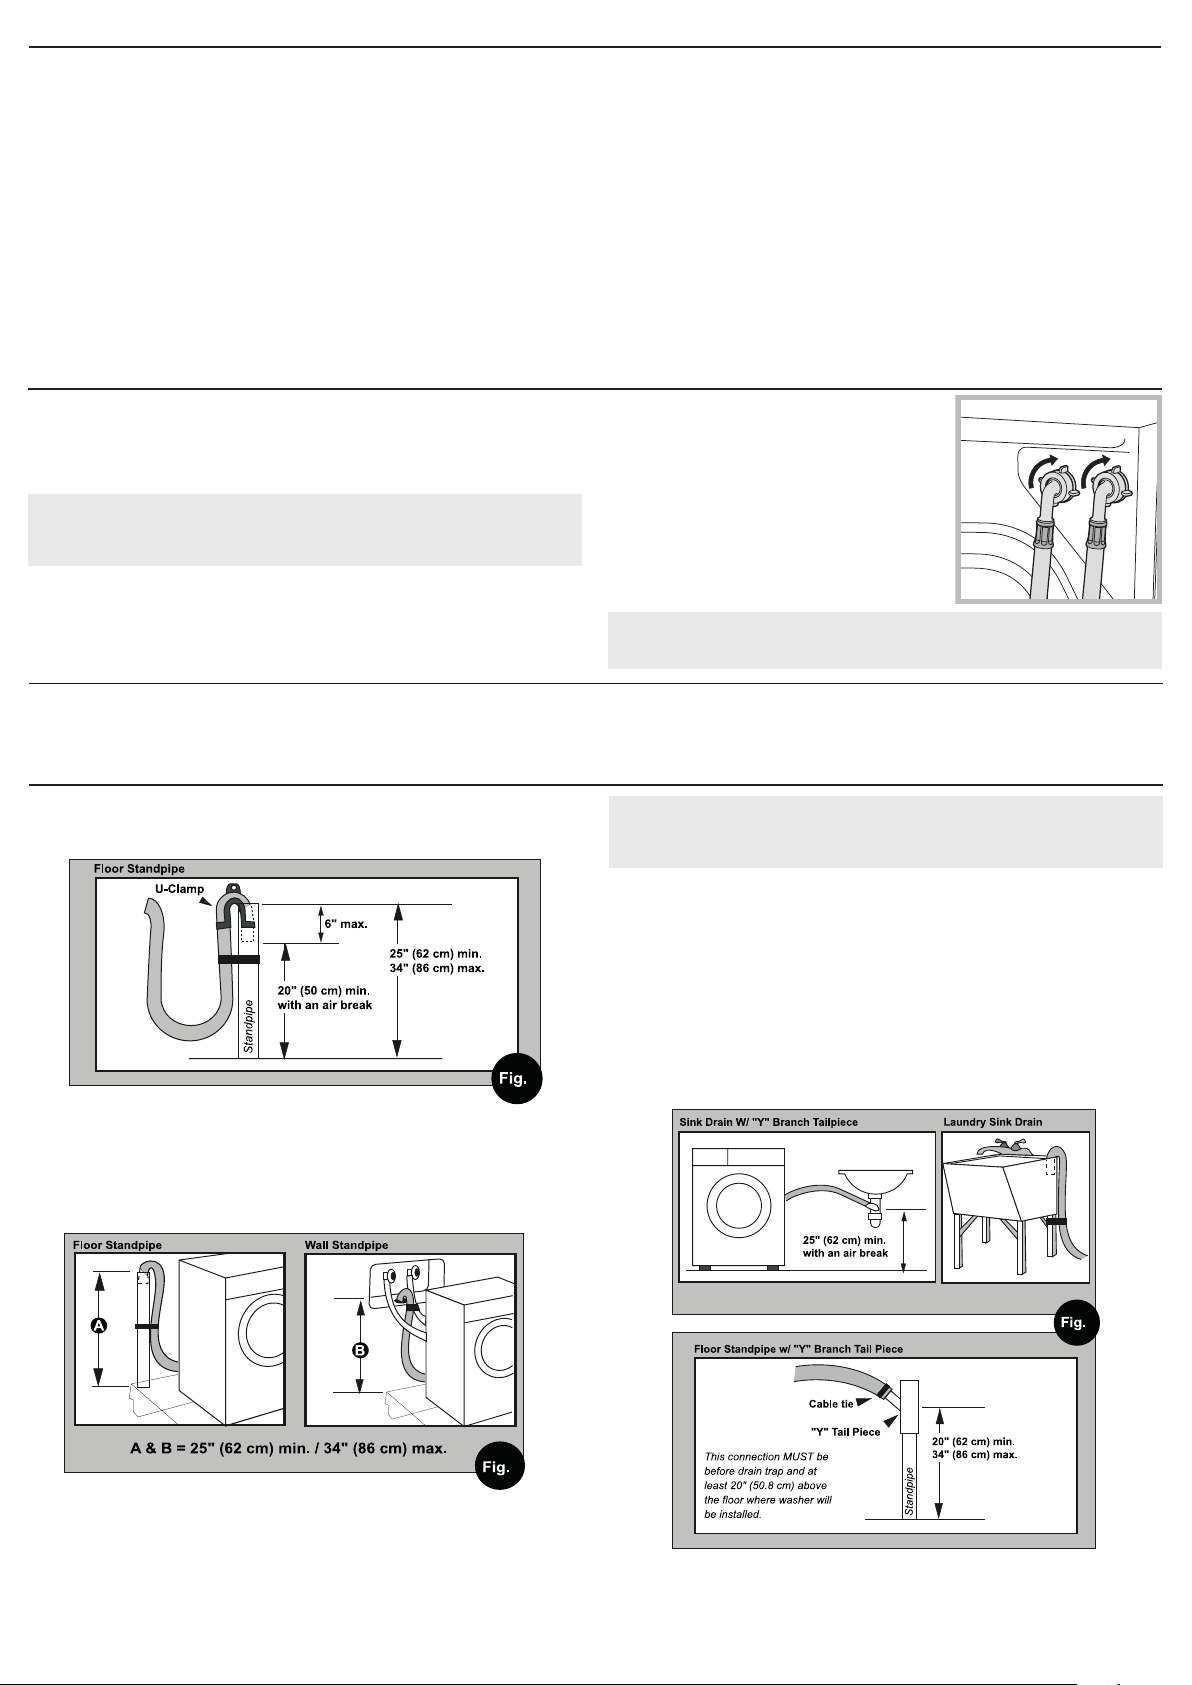
CONNECTING WATER INLET
If the water pipes you will be connecting to are new or unused, run the
water until clear to remove any debris that could clog the water valve
screens or valves before connecting the machine.
NOTE: Supply shut-o valves should be easily accessible.
Important: Water pressure MUST range within the values indica-
ted on the “Technical Data” chart.
1. Screw the cold water ll hose (C blue
connector) onto the cold water supply
until tight.
2. Turn on the cold water supply and check
for leaks, tighten if necessary.
3. Screw the hot water ll hose (H red
connector) onto the hot water supply until
tight.
4. Turn on the hot water supply and check
for leaks, tighten if necessary.
DRAINAGE
• Standpipe Diameter/Capacity - Needs a 1 ¼” minimum diameter
standpipe with a minimum carry-away capacity of 7 gallons per minute.
• Top of Standpipe - Must be b etween 25” - 34” high from the bottom of the machin e.
CONNECTING THE DRAIN HOSE
It is possible for the water to be discharged into a sink, standpipe or
drainpipe, but an air break must be available at a min. 20” height to
prevent the machine from siphoning (Fig. 1).
1
Standpipe Drain System - Installations require a minimum 1 ¼” (3.2 cm)
diameter standpipe with a minimum carry away capacity of 7 gallons (26
liters) per minute.
Wall or Floor Standpipe Drain System - The top of the standpipe must be
between 25” (62 cm) - 34” (86 cm) from the bottom of the washer-dryer (Fig. 2).
Important: Do not use excessive force. Damage to the couplings
can result. The couplings should be tightened by hand; a tool should
only be used if a leak occurs.
• Outlet End of Drain Hose (provided with the unit) - Must be at least
20” above the bottom of the washer-dryer. An air break must be
available at the standpipe to avoid siphoning. No more than 6” of the
drain hose should be inserted into the drain pipe to prevent siphoning.
Important: Make sure that the drain hose is not kinked and that
water ow is not restricted.
3) Through the oor to a separate trap. The trap must be vented to
prevent siphoning. To provide proper venting, install an Air Gap Kit
(available at most hardware stores).
4) To the faucet using a Faucet Adapter Kit (available separately).
• Use a U-Clamp (provided in your accessories packet) or suitable item to
secure the outlet end of the drain hose (included in the plastic bag
provided inside of your washer-dryer).
• Insert the outlet end of the drain hose into the standpipe, wall or oor
drain (Fig. 1).
NOTE: The outlet end of the drain hose MUST be at least 20” (50 cm)
above the base of the machine. No more than 6” of the drain hose should
be inserted into the drain pipe to prevent siphoning.
• Use a strap, cable tie, or similar item to hold the hose or the U-Clamp in place.
Sink Drainpipe System - Entry into the sink drain system must be above the trap
(Fig. 3). When routing the drain hose through cabinets or walls, use a protective
material such as electrical or duct tape to cover sharp edges that could damage the
drain hose. Use a suitable clamp to secure the drain hose to the “Y” branch or the
disposer. With a sink drainpipe system, you may connect directly:
1) to a disposer by following the manufacturers attachment method.
2) to a “Y” branch tail piece (available at most hardware stores).
4
3
C
U
L
US LISTED
®
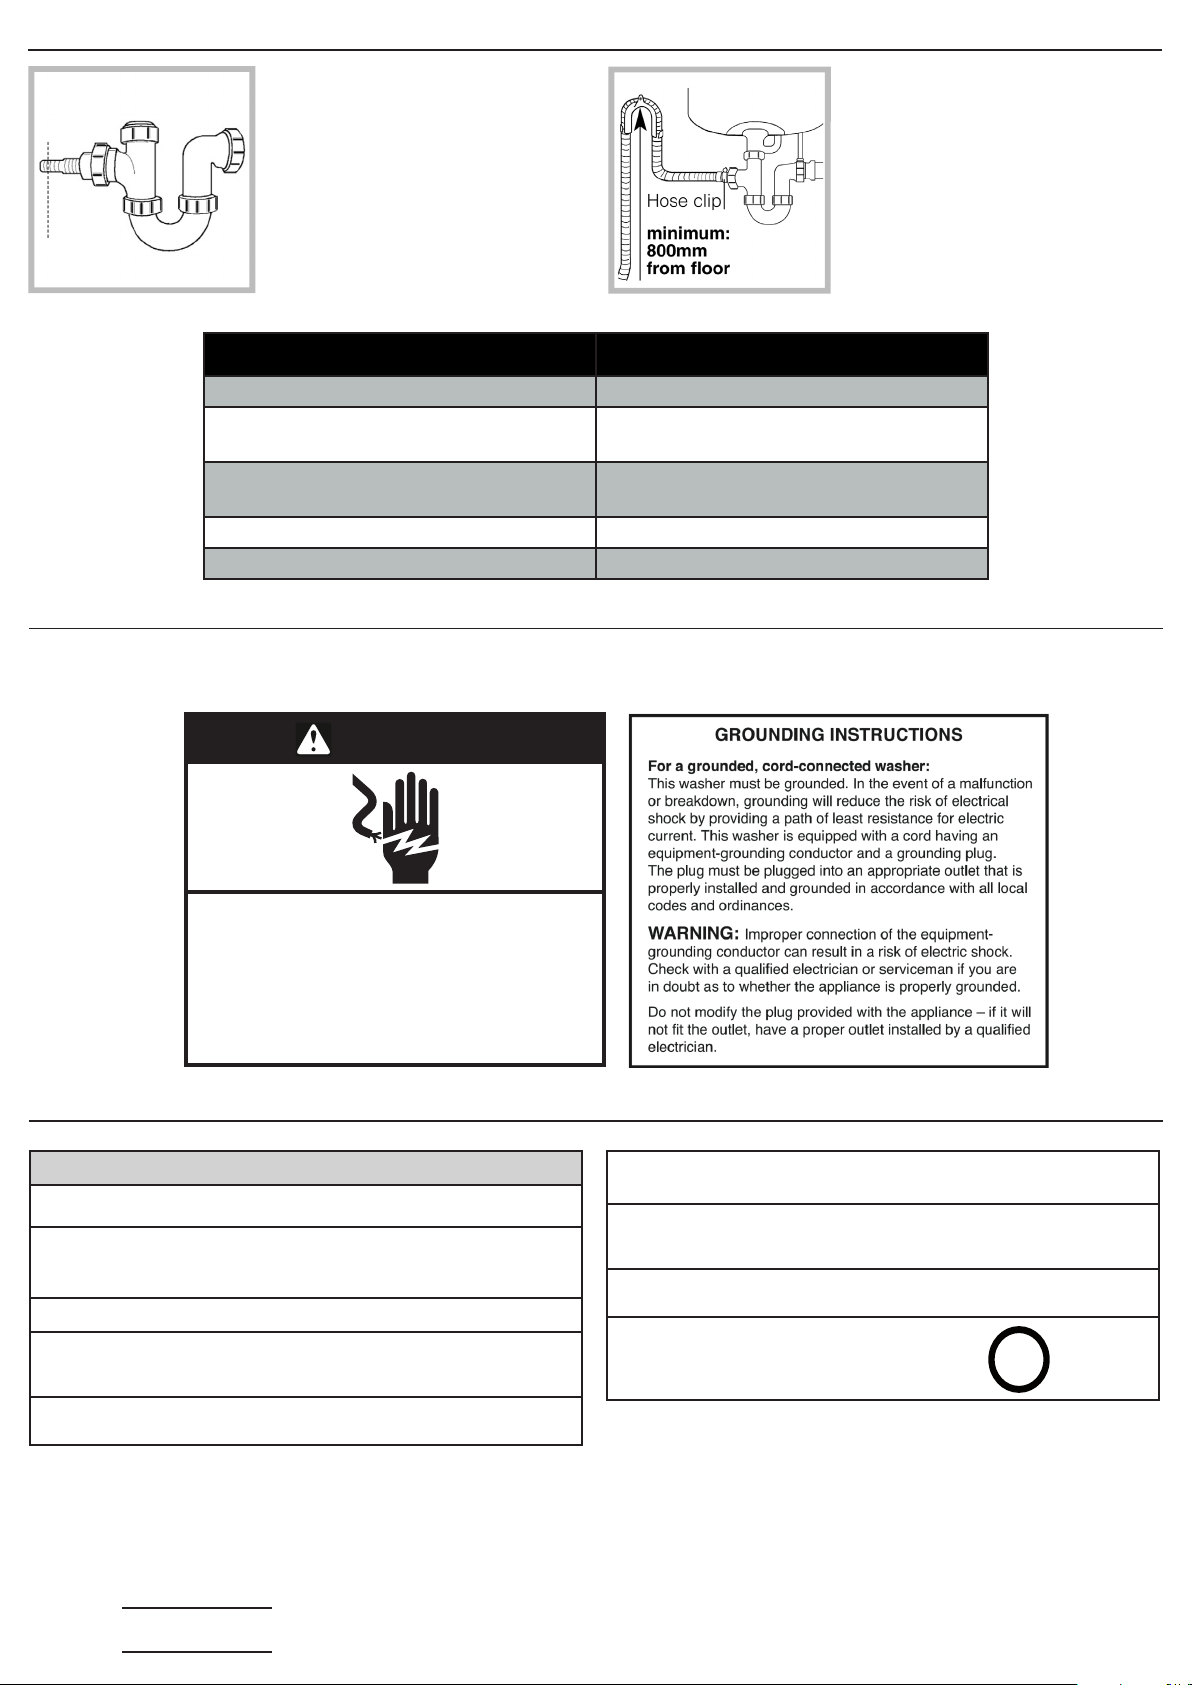
UNDER SINK METHOD
If you have... You’ll need...
no access to Hot/Cold water hookups Splendide Faucet Adapter Kit, or equivalent.
to install a dryer vent and ducting in your
RV or boat
concerns about the appliance shifting in
your RV or boat
water damage concerns Splendide Drain-A-Way Pan, or equivalent.
to make a 90° duct turn in less than 4.5” Splendide 90° oset elbow, or equivalent
ELECTRICAL
1. Cut the blocked end of the under sink
drainage unit.
2. Fix the hooked end support a minimum
of 24.4” (620 mm) from the oor.
3. Use a hose clip clamp to securely attach
the grey drainage hose end to the under
sink drainage unit using a hose clamp.
Splendide Vent Kit, or equivalent.
Splendide SecureFit braket kit,or equivalent.
• Machine Voltage/Amperage - 120V, 60 Hz, 12.5 Amp.
• Connection - 3-prong plug with 6’ cord is provided with the machine.
WARNING
Electrical Shock Hazard
Plug into a grounded 3 prong outlet.
Do not remove ground prong.
Do not use an adapter.
Do not use an extension cord.
Failure to follow these instructions can result in
death, re, or electrical shock.
TECHNICAL INFORMATION
Technical data
Model WDV2200XCD
Dimensions
Weight 148 lbs
Minimum Installation Clearances
Capacity
width: 23.4” (59.5 cm)
height: 33.24” - 33.75” (84.5 - 85.7 cm)
depth: 22” (55.9 cm)
Sides: 0”
Front / Back: 1”
Top: 0”
Washing: 2 to 15 lbs. (1 to 7 kg)
Drying: 2 to 11 lbs (1 to 5 kg)
• Circuit/Protector - 3-wire single phase, 120V, 60 Hz, AC, on a separate
15 Amp branch circuit.
Electrical connections
Water connections
Max. Spin speed up to 1200 RPM
This appliance was tested by UL and
conforms with both Canadian and U.S.
UL safety requirements and displays their Mark.
Voltage: 120Volts, 12.5 Amp, 60 Hz
Max. Pressure: 0.69 MPa (6.9 bar), 100 psi
Min. Pressure: 0.05 MPa (0.5 bar), 7.5 psi
The model number and serial number of this machine may be found on the label attached to the front panel behind the door, and also on the
label attached to the rear panel.
You should note the model and serial numbers of this unit in the space provided. Retain this booklet as a permanent record of your purchase to
aid in identication in the event of theft.
MODEL N.
SERIAL N.
5
 Loading...