

SPLENDID WDC 7100 XC (NA).1 User Manual

Automatic Clothes Washer
and Ventless Dryer
Instructions for use
Contents
General information, 1-2-3-4-5
Technical Information, 2-3
Important Safety Instructions, 4
Introduction, 5
Installation requirements, 6-7
Attention / Grounding instructions, 6
Electrical, location and draining, 7
Installing the washer-dryer, 8-9-10-11
Unpacking the washer-dryer, 8
Removing the transit screws, 8
Connecting the water inlets, 9
Connecting the drain hose, 9
Installing the exhaust ducting, 10
Leveling the washer-dryer, 10
Completing the installation, 11
About your appliance, 12-13-14-15
Washer-dryer special features, 12
Control panel, 13
Option buttons, 14
Program key, 14
Detergent and laundry aids, 15
Dispenser drawer, 15
Washing and drying, 16-17-18-19
Cycle Description Chart, 16
Before starting a cycle, 17
Determining load sizes, 17
Setting a wash, dry or wash-to-dry cycle, 17
Splendide laundry tips, 18
For best results, 18
Combo laundry FAQs / Sample loads, 19
Care and maintenance, 20-21
Turning off the water or electricity supply, 20
Cleaning the dispenser drawer, 20
Checking the water inlet hoses, 20
Cleaning the interior, 20
Cleaning the pump pre-chamber, 21
No lint filter to clean, 21
Read All Instructions Before Using
Troubleshooting, 22-23
Troubleshooting Chart, 22
If you need assistance, 23

General Information
This appliance was tested by UL and
conforms with both Canadian and
U.S. UL safety requirements and
displays their mark.
2 General Information
Technical information
Model WDC 7100 XC
Weight
Dimensions
Minimum Installation
Clearances
Capacity
Electrical Connection
Water Connection
Max. Spin Speed
Min. Installation Spacing
Splendide 7100 XC
148 lbs.
Width: 23.4” (59.5 cm)
Height: 33.25”-33.75” (84.5-85.7 cm)
Depth: 22” (55.9 cm)
Sides: 0”
Front / Back: 1”
Washing: 2 to 15 lbs. (1 to 7 kg)
Drying: 2 to 11 lbs. (1 to 5 kg)
Voltage: 120 Volts, 11 Amp, 60 Hz
Max. Absorbed Power: 1300 Watts
Max. Pressure: .69 MPa (6.9 bar), 100 PSI
Min. Pressure: 0.05 MPa (0.5 bar), 7.5 PSI
Up to 1200 RPM
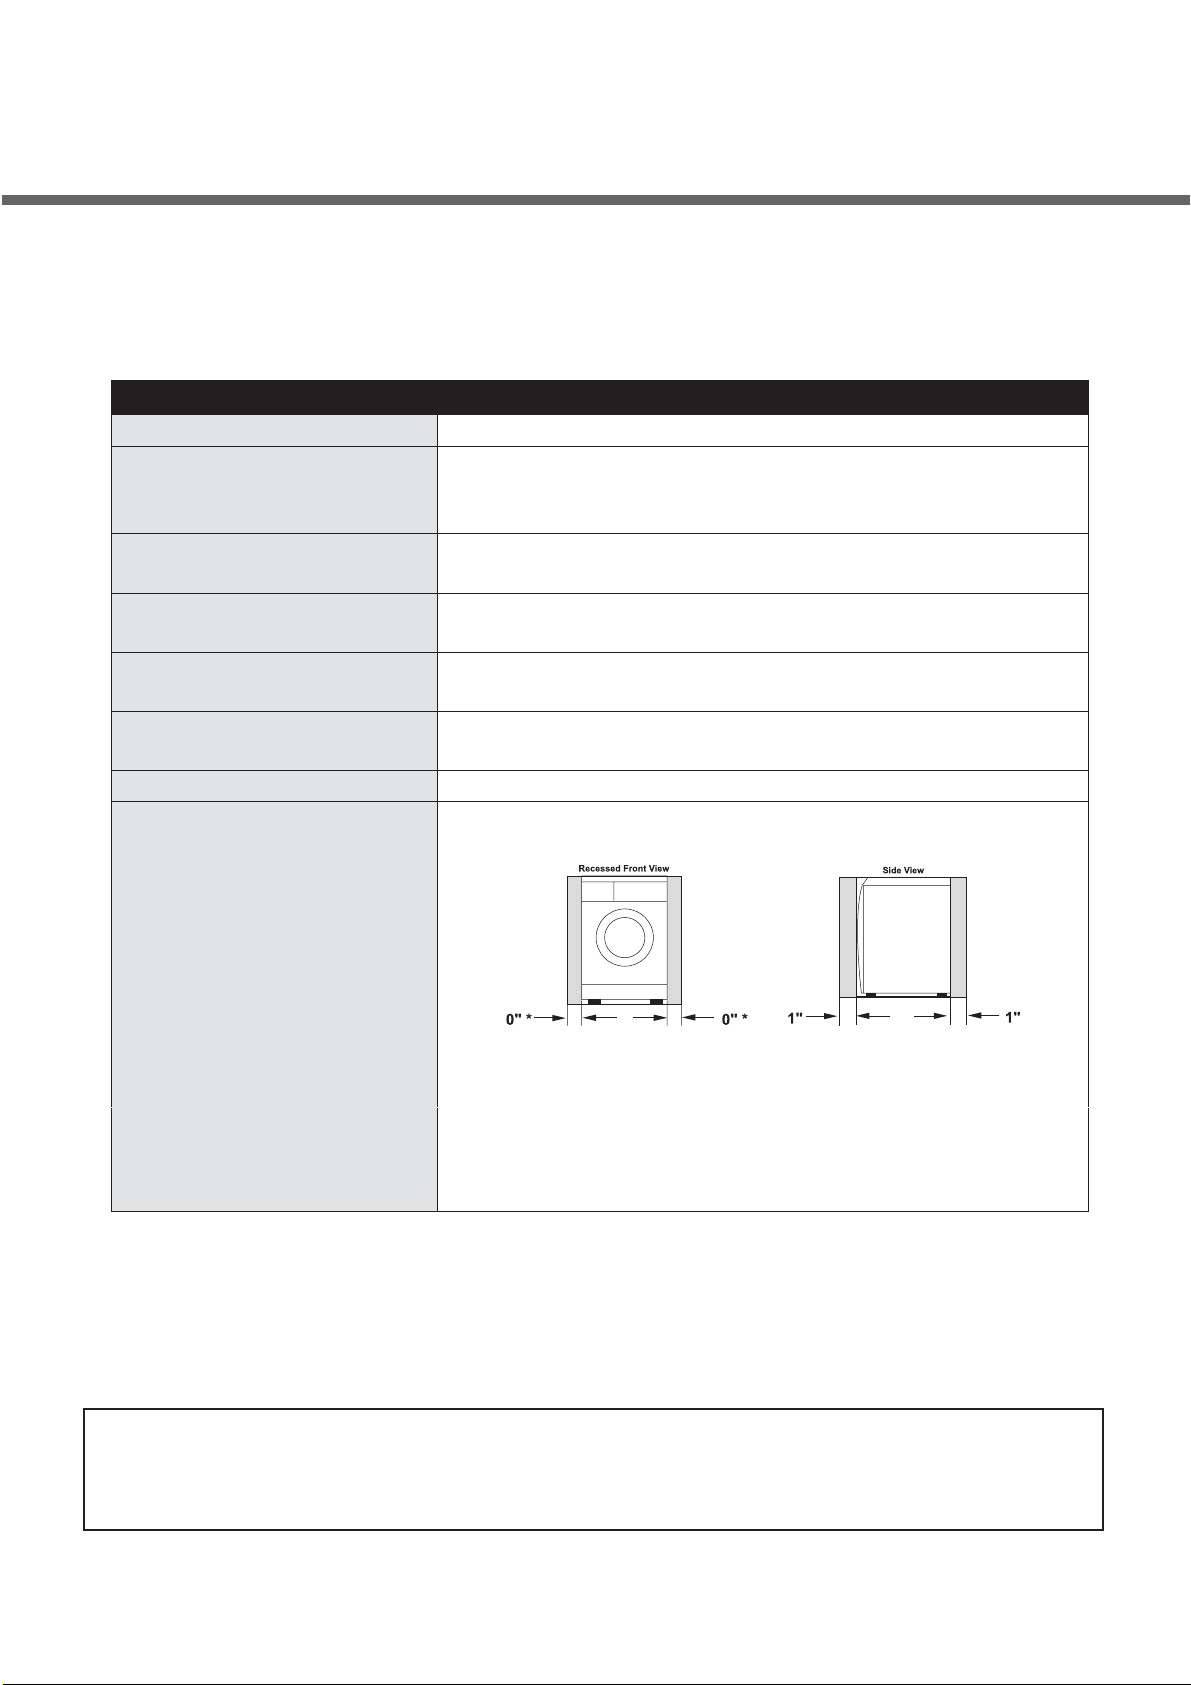
This appliance may be installed in a recessed area, closet or alcove. The installation
spacing is in inches and is the minimum acceptable. *Additional spacing should be
considered for easy installation, servicing and compliance with local codes and
ordinances. Installations must conform with the minimum dimensions indicated.
NOTE: The manufacturer reserves the right to make any improvements to its appliances without giving prior notice.
State of California Proposition 65 Warnings:
WARNING: This product contains one or more chemicals known to the State of California to cause cancer.
WARNING: This product contains one or more chemicals known to the State of California to cause birth defects or
other reproductive harm.
General Information 3

IMPORTANT SAFETY INSTRUCTIONS
WARNING - To reduce the risk of fire, electric shock, or
injury to persons when using your appliance, follow basic
precautions, including the following:
• Read all instructions before using any appliance.
• Do not wash or dry articles that have been previously
cleaned in, washed in, or spotted in gasoline, dry cleaning
solvents, or other flammable/explosive substances as they
give off vapors that could ignite or explode.
• Do not allow children to play on or in the appliance.
Close supervision of children is necessary when the
appliance is used near children.
• Before the appliance is removed from service or
discarded, remove the door to the washing/drying
compartment.
• Do not add gasoline, dry-cleaning solvents or other
flammable or explosive substances to the wash water.
These substances give off vapors that could ignite or
explode.
• Do not use fabric softeners or products to eliminate static
unless recommended by the manufacturer of the fabric
softener or product.
• Do not use heat to dry articles containing foam rubber or
similarly textured rubber-like materials.
• Good, safe practices and caution MUST be applied when
installing, operating, and maintaining any appliance. Follow
basic precaution.
• Disconnect power to the washer at the circuit breaker or
fuse box, or unplug the machine in an emergency or when
servicicng is required. Have the installer show you and label
the proper switch or fuse at the electrical disconnect box.
• The interior of the appliance should be
cleaned periodically by qualified service personnel.
• Do not place items exposed to cooking oils in your dryer.
Items contaminated with cooking oils may contribute to a
chemical reaction that could cause a load to catch fire.
• Before loading the washer, make sure the drum is empty.
• Do not install or store this appliance where it will be
exposed to the weather.
• Do not tamper with controls.
• Under certain conditions, Hydrogen gas may be
produced in a hot water system that has not been used
for 2 weeks or more. HYDROGEN GAS IS EXPLOSIVE.
If the hot water system has not been used for such a
period, before using the appliance, turn on all hot-water
faucets and let the water flow from each for several
minutes. This will release any accumulated hydrogen gas.
As the gas is flammable, do not smoke or use an open
flame during this time.
• Turn off water faucets to relieve pressure on hoses and
valves and to minimize leakage if a break or rupture
occurs.
• Do not reach into appliance if the drum is moving.
• Repair or replacement of a part should be made only by
a qualified service technician to prevent personal injury or
damage to the machine. Contact Splendide to locate an
authorized repair service company near you.
• Do not repair or replace any part of the appliance or
attempt any servicing unless specifically recommended in
the user-maintenance instructions or in published userrepair instructions that you understand and have the skills
to carry out.
SAVE THESE INSTRUCTIONS
GROUNDING INSTRUCTIONS
This appliance must be grounded. In the event of malfunction or
breakdown, grounding will reduce the risk of electric shock by
providing a path of least resistance for electric current.
This appliance is equipped with a cord having an equipmentgrounding conductor and a grounding plug.
The plug must be plugged into an appropriate outlet that is
properly installed and grounded in accordance with all local codes
and ordinances.
WARNING - Improper connection of the equipment-grounding
conductor can result in a risk of electric shock.
Check with a qualified electrician or service representative or
personnel if you are in doubt as to whether the appliance is
properly gounded.
Do not modify the plug provided with the appliance: if it will not
fit the outlet, have a proper outlet installed by a qualified
electrician.
4 General information

Congratulations
Introduction
Congratulations on your purchase of a
Splendide. Your Spendide washer-dryer takes
the drudgery out of doing laundry - simply toss
dirty laundry in and get clean, dry laundry out!
Whether it’s installed in a luxury RV, yacht, or
apartment closet, your new Splendide is
designed to fit where others won’t and deliver
outstanding washing and drying performance
(all while conserving more energy and water
than other brands). Enjoy your new Splendide!
Read this manual
Please read this manual carefully. If you need
further assistance, please contact Splendide
For your records
Write model and serial numbers here. You can find
them on the front of the machine and inside of the
door opening.
Model:
WDC7100XC
Serial No:
S/N
Laundry Centers (Mon-Fri 7am-5pm PST)
1-800-356-0766
General information 5

Installation Requirements
ATTENTION!
For your own protection and to prevent
accidents, injury, and fire, please read the
following carefully before installing the
washer-dryer.
• Installation and grounding must be done in
accordance with local codes and by a qualified
installer. Installation Instructions provided in
this booklet are for the installers’ reference.
• Washer-dryer MUST be installed on a strong,
level floor and in a protected dry and wellventilated area close to a power supply and
drain outlet of sufficient capacity. DO NOT
install on carpet.
IMPORTANT: Installation on
carpet floors will cause the
machine to vibrate and may
result in excessive machine
vibration during the spin cyc les
and loss of performance.
• The washer-dryer should be plugged into a
properly grounded (3) prong electrica
capable of 120 Volt, 60 Hz, 1300 W, and
10.5 Amp. It shouldn’t be controlled by a
wall switch or pull cord which could b
turned off accidentally. For your safety, the
third or round grounding prong must never
be removed. DO NOT USE AN EXTENSION
CORD.
• DO NOT install or store this appliance where
it will be exposed to weather or in an area
where gasoline or other flammables a
stored.
l outlet
e
re
GROUNDING INSTRUCTIONS
This appliance must be grounded. In the
event of malfunction, or breakdown,
grounding will reduce the risk of electric
shock by providing a path of least resistance
for electric current. This appliance is
equipped with a cord having an equipment
grounding conductor and grounding plug.
The plug must be plugged into an appropriate outlet that is properly installed and
grounded in accordance with all local codes
and ordinances. DO NOT modify the plug
provided with the appliance. If it will not fit
the outlet, have a proper outlet installed by a
qualified electrician.
WARNING! Improper
connection of the equipment
-grounding conductor can
result in a risk of electric
shock. Check with a qualified
electrician or serviceman if you
are in doubt as to whether the
appliance is properly
grounded.
!
WARNING
ELECTRICAL SHOCK HAZARD
Disconnect power before servicing.
Replace all panels before operating.
Failure to do so can result in death
or electrical shock.
6 Installation requirements

Electrical
• Machine Voltage/Amperage - 120V, 60 Hz,
1300 W, 11 Amp.
• Connection - 3-prong plug with 6’ cord is
provided with the machine.
• Circuit/Protector - 3-wire single phase, 120V,
60 Hz, AC, on a separate 15 Amp circuit.
If you have... You’ll need...
no access to Hot/Cold
water hookups
concerns about the
appliance shifting in
your RV or boat
water damage
concerns
Splendide Faucet Adapter
Kit, or equivalent.
Splendide SecureFit bracket
kit, or equivalent.
Splendide Drain-A-Way Pan,
or equivalent.
Location
• This machine may be installed free
standing as well as in a recessed area,
closet, or alcove
• Minimum Installation Spacing - 0” on
sides and 1” in front and back. NOTE:
Additional installation spacing needs to be
considered for easy installation, servicing,
and compliance with state and federal
codes.
• Floor - Must support at least 280 lbs. and
be a solid, level surface. DO NOT install on
carpet.
• RV/Marine Installations - When locating
the appliance in a towable trailer or
watercraft, position the machine over the
axles or mid-ship where movement is at a
minimum. Block the machine to prevent
extreme movement.
Drainage
Standpipe Diameter/Capacity - Needs a 1 ¼”
minimum diameter standpipe with a minimum
carry-away capacity of 7 gallons per minute.
Top of Standpipe - Must be between 25” and 34”
high from the bottom of the machine.
Outlet End of Drain Hose (provided with the unit)
- Must be at least 20” above the bottom of the
washer-dryer. An air break must be available at the
standpipe to avoid siphoning. No more than 6” of
the drain hose should be inserted into the drain
pipe to prevent siphoning.
• NO DRYER VENT - This appliance uses an
internal water condenser to dry laundry.
All humidity stays within the unit and is
drained as water. NO heated or
conditioned air is exhausted outside; NO
exhaust vent is needed.
Installation requirements 7
Installing the washer-dryer
Unpacking the washer-dryer
• Carefully remove the packing materials with care
not to damage the drain hose and power cord
that are shipped installed on the machine.
Check that the machine is intact. Report any
damage immediately.
• Position the washer-dryer near the desired
installation position.
WARNING! Plastic bags, styrofoam, nails
and other packaging parts are not
children’s toys and can be potentially
dangerous. Destroy the carton and plastic
bags after the washer-dryer has been
unpacked.
IMPORTANT: Retain the transit screws,
spacers and rubber tubes. These items
should be reinstalled to prevent damage if
or when you transport the machine in the
future.
Connecting the water inlets
If the water pipes you will be connecting to are new
or unused, run the water until clear to remove any
debris that could clog the water valve screens or
valves before connecting the machine. NOTE: Supply
shut-off valves should be easily accessible.
IMPORTANT: Water pressure MUST range
within the values indicated on the
“Technical Data” chart
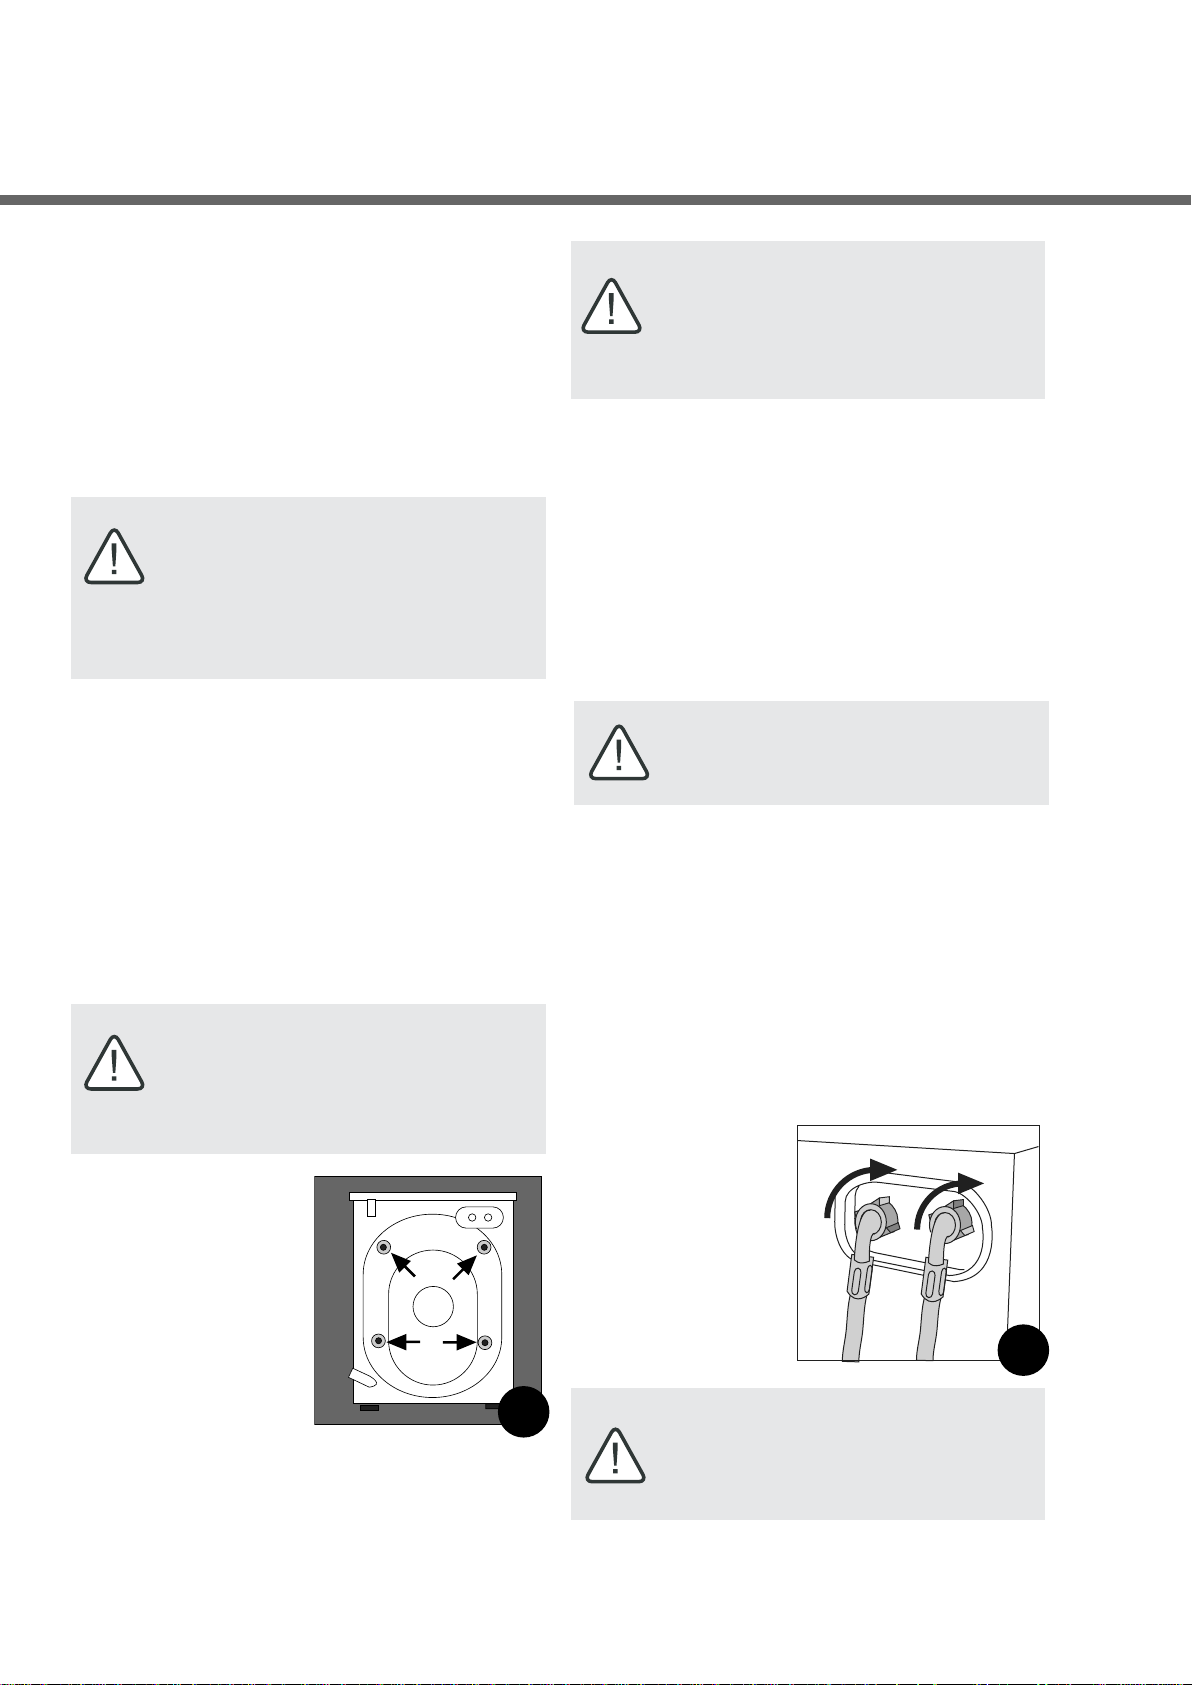
Removing the transit screws
For transportation, the inside of the machine is
supported by screws, rubber grommets and spacers
on the back panel. Before using the washer-dryer,
these items MUST be removed.
IMPORTANT: Transit screws and spacers
must be removed before operating the
machine to allow proper operation of the
machine and to prevent damage to the
appliance.
• After positioning
the washer-dryer
near the
installation
location, remove
the four screws
(Fig.1), with the
rubber grommets
and plastic spacers
that are attached
to them.
• Use the plastic plugs (provided in the accessories
bag) to fill in the holes.
Fig 1
• Included in the accessories supplied with your
machine are 2 inlet hoses with 4 rubber washers
pre installed. Check that the rubber washers are
installed in the ends of the inlet hoses to make a
water tight seal at each connection point.
• Connect the straight ends of the water inlet
hoses to the supply taps that have ¾” BSP
thread (standard hose bib).
• Connect the 90º angled ends (20 mm thread) of
these hoses to
the inlet valves
on the back of
the machine (Fig.
2). NOTE: Water
Inlet valves are
color coded:
Red (Hot) &
White (Cold).
IMPORTANT: Do not use excessive force.
Damage to the couplings can result. The
couplings should be tightened by hand; a
tool should only be used if a leak occurs.
H
C
Fig 2
8 Installing the washer-dryer
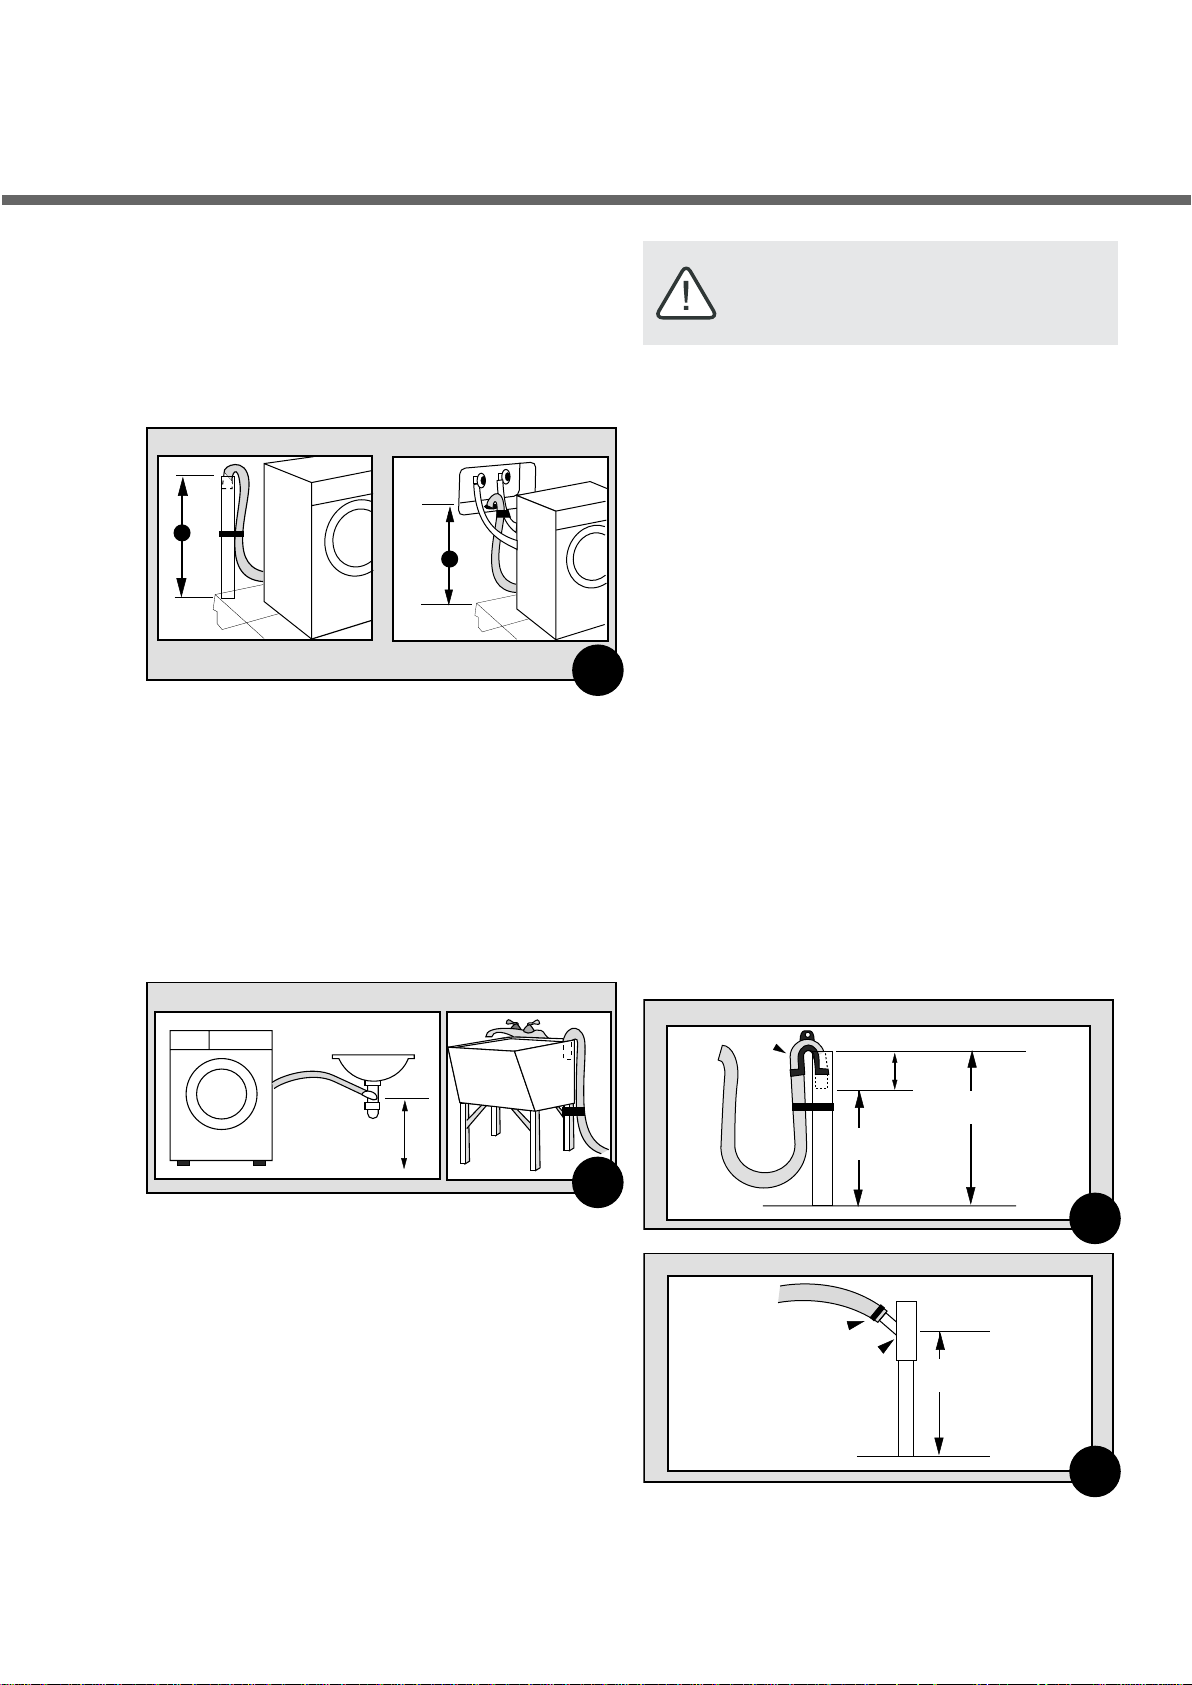
Connecting the drain hose
Floor Standpipe
20" (50 cm) min.
with an air break
25" (62 cm) min.
34" (86 cm) max.
6" max.
Standpipe
U-Clamp
Fig 6
20" (51.8 cm) min.
34" (86 cm) max.
Standpipe
"Y" Tail Piece
This connection MUST be
before drain trap and at
least 20" (50.8 cm) above
the floor where washer will
be installed.
Cable tie
Floor Standpipe w/ "Y" Branch Tail Piece
Fig 7
It is possible for the water to be discharged into a
sink, standpipe or drainpipe, but an air break must be
available at a minimum 20” height to prevent the
machine from siphoning (Fig. 6).
Floor Standpipe Wall Standpipe
A
B
A & B = 25" (62 cm) min. / 34" (86 cm) max.
Standpipe Drain System - Installations require a
minimum 1 ¼” (3.2 cm) diameter standpipe with a
minimum carry away capacity of 7 gallons (26 liters)
per minute.
Wall or Floor Standpipe Drain System - The top of the
standpipe must be between 25” (62 cm) - 34” (86
cm) from the bottom of the washer (Fig. 4).
Fig 4
IMPORTANT: Make sure that the drain
hose is not kinked and that water flow is
not restricted.
method. 2) directly to a “Y” branch tail piece
(available at most hardware stores). 3) Through the
floor to a separate trap. The trap must be vented to
prevent siphoning. To provide proper venting, install
an Air Gap Kit (available at most hardware stores). 4)
To the faucet using a Faucet Adapter Kit (available
separately).
• Use a U-Clamp (provided in your accessories
packet) or suitable item to secure the outlet end
of the drain hose (pre-installed on the back of
your machine).
• Insert the outlet end of the drain hose into the
standpipe, wall or floor drain (Fig. 6). NOTE:
The outlet end of the drain hose MUST be at
least 20” (50 cm) above the base of the
machine. No more than 6” of the drain hose
should be inserted into the drain pipe to prevent
siphoning.
• Use a strap, cable tie, or similar item to hold the
hose or the U-Clamp in place.
Sink Drain W/ "Y" Branch Tailpiece
Sink Drainpipe System - Entry into the sink drain
system must be above the trap (Fig. 5). When routing
the drain hose through cabinets or walls, use a
protective material such as electrical or duct tape to
cover sharp edges that could damage the drain hose.
Use a suitable clamp to secure the drain hose to the
“Y” branch or the disposer (Fig. 7). With a sink
drainpipe system, you may connect directly: 1) to a
disposer by following the manufacturers attachment
25" (62 cm) min.
with an air break
Laundry Sink Drain
Fig 5
Installing the washer-dryer 9
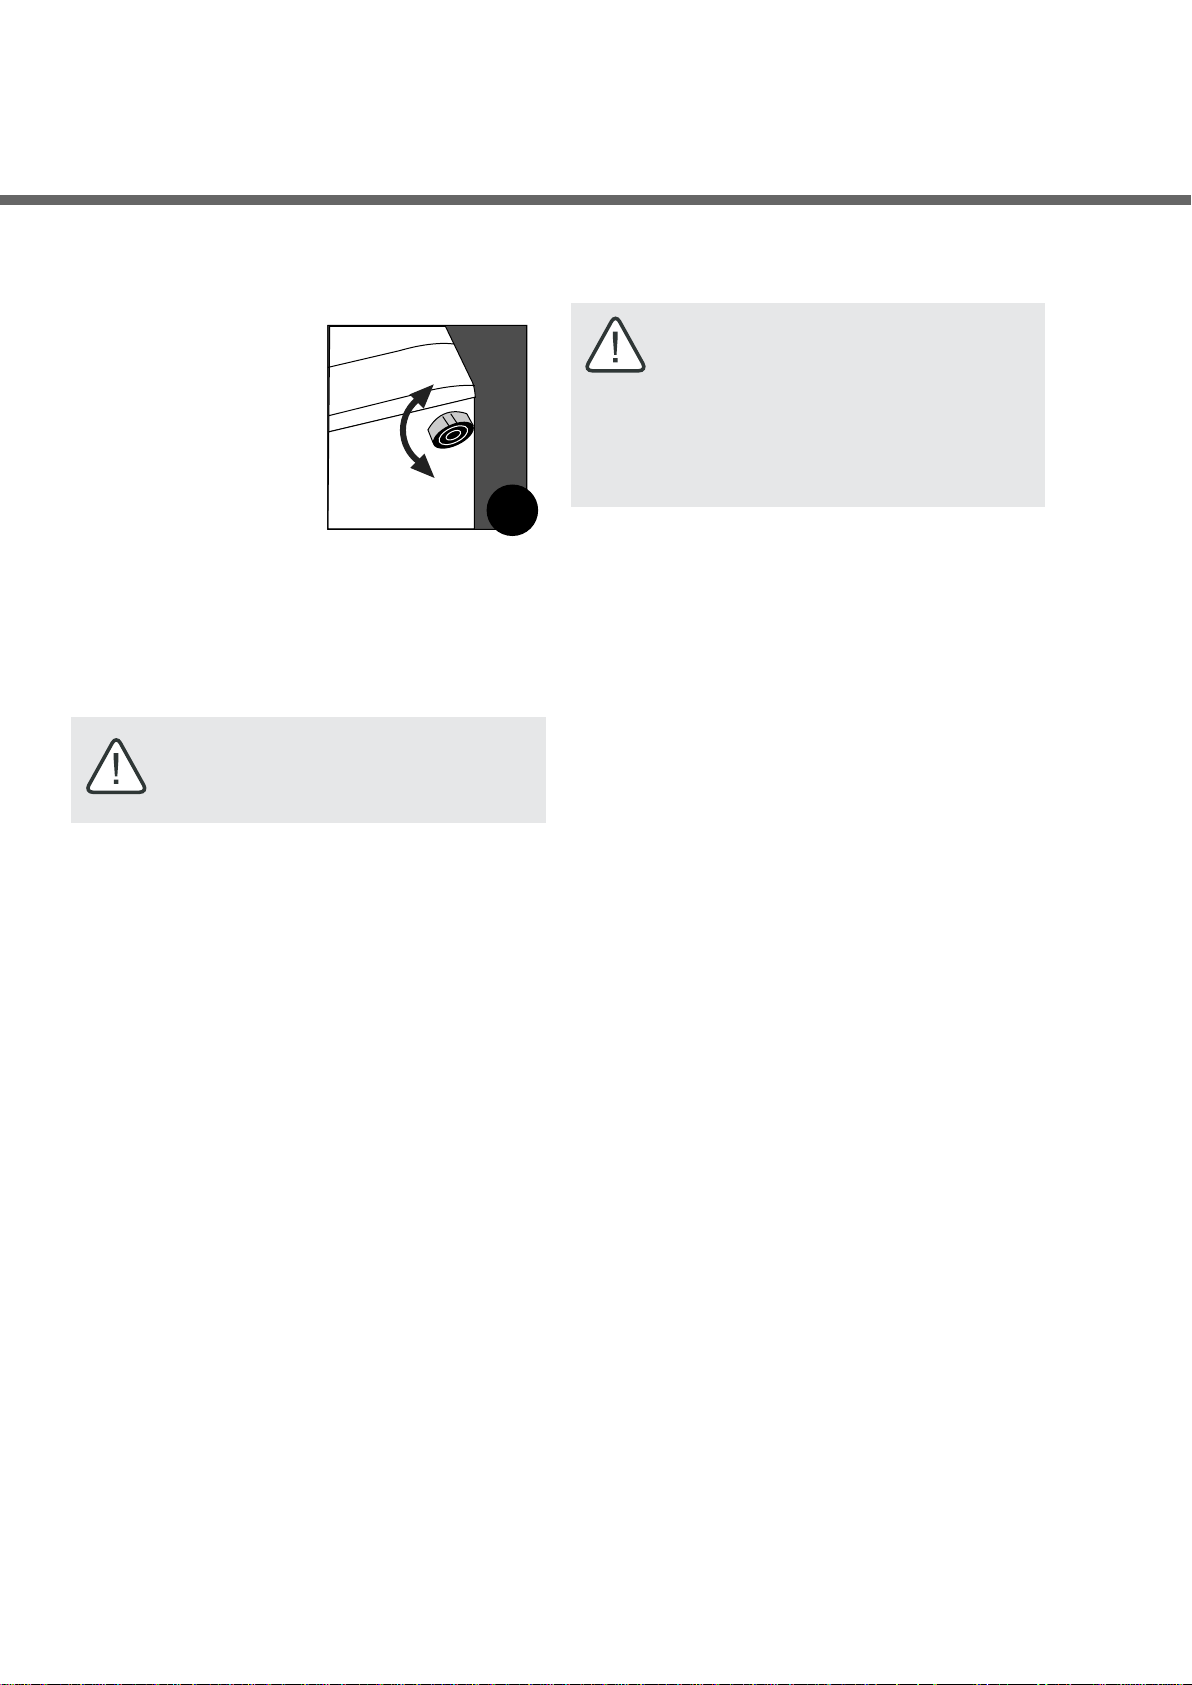
Leveling the washer-dryer
• To access the front
leveling legs, tilt the
machine backwards,
leaning it against a
wall or other stable
structure.
• Adjust the legs up
or down (Fig. 9) to
ensure the washer is
resting solid and
does not rock side-to-side or front-to-back
when the machine is upright.
• Check that the angle of inclination, measured
according to the work top, does not exceed 2°.
IMPORTANT: The machine must rest solid
on a sturdy floor for optimum performance
and minimum vibration.
If a cabinet door is installed, a min. opening
of 8 sq. in. should be provided for make up
air. Louvered doors with equivalent air
openings are acceptable. Allow clearances
behind door(s) to avoid rubbing between
back of cabinet door(s) and front control
panel. Additional clearances for all, door
and floor molding may be required.
Fig 9
10 Installing the washer-dryer

Completing the installation
• Check the electrical requirements. Be sure
that you have the correct electrical supply
and the recommended grounding method.
• Check that the shipping brackets have been
removed.
• Check that the water faucets are ON.
• Check for leaks around faucets and inlet
hoses.
• Plug washer into a grounded 3-prong outlet.
• Slide the washer-dryer to it’s final location
and confirm that it’s level.
• When installing this appliance in an RV or
marine vessel, you should block in the unit
to prevent it from shifting or tipping. A
SecureFit Bracket Kit is available from
Splendide to keep the unit from shifting
front-to-back or side-to-side.
• Test and clean the washer. Run a test load
with no laundry.
Testing and cleaning the washer,
• Press the ON-OFF button to turn the washer
ON
• Pour 1 to 2 TBSP of powder detergent into
the detergent dispenser compartment ‘2’
• Select wash program ‘2’.
• Make sure the DRY TIME knob is in the ‘OFF’
position.
• Then press START. Allow the washer to
complete the wash cycle.
Installing the washer-dryer 11

About your washer-dryer
WARNING - To reduce the risk of fire, electic shock, or injury to
persons, read the IMPORTANT SAFETY INSTRUCTIONS before
operating this appliance.
CAUTION RISK OF ELECTRIC SHOCK
DO NOT OPEN
CAUTION: To reduce the risk of electric shock, DO NOT
remove cover (or back). No user serviceable parts inside.
Refer servicing to qualied service personnel.
The lightning ash with arrowhead symbol,
with-in an equilateral triangle, is intended to
alert the user to the presence of uninsulated
“dangerous voltage” within the product’s
enclosure that may be of sucient magnitude
to constitute a risk of electric shock to persons.
The exclamation point within an equilateral
triangle is intended to alert the user to the
presence of important operating and maintenance (servicing) instructions in the literature
accompanying the appliance.
Your New Appliance
Your new appliance is an automatic washer and ventless
tumble dryer by Splendide. Front-loading with a stainless
steel drum and an extra large door opening for easy loading
and unloading. It features 10 wash programs, 7 water temp.
settings, 3 dry programs, and a 1200 RPM max. spin speed.
About Condenser Drying
This appliance dries laundry by heating the laundry inside
the drum to create steam and then cooling the outer drum.
As the steam hits the cooled surface, its condensed back
into water and is pumped out through the drain system.
This process repeats until the clothes are dry. NOTE: This
drying process does not require any outside venting,
however, it does require approx. 5 gallons of COLD water
per your of dry time. Splendides ventless models DO NOT
add moisture or humidity to the surrounding area. All
humidity stays within the unit and is drained as water.
Automatic Dispenser Drawer
Automatically dispenses laundry aids (detergent, bleach,
softener) during the cycle.
More Rinse Cycles
Most washers have only 1 rinse following each wash while
your Splendide washer-dryer has up to 4. It rinses 2-3
times after every wash (except Express Wash) and features
an Extra Rinse button that adds yet another rinse to
remove even more dirt/detergent from fabrics
(recommended for those with detergent contact
allergies).
Foam Removal System
Your machine automatically measures the amount of
foam in circulation and adds water to the drum to remove
excess foam for the highest rinsing performance.
Recirculating Wash Feature
With your Splendide washer-dryer, no detergent is
wasted. Water recirculates and redistributes detergent
throughout the drum in a way that assures all detergent
is dissolved for max. resource efficiency.
Automatic Balance System
Every Splendide washer-dryer incorporates the latest
motor technology. When it detects an out-of-balance
load the motor will adjust speed (or come to a complete
stop) and reposition the load automatically.
Impulse Spin Technology
Your machine features Splendides exclusive IST processor
that varies pulse in low spin for less wrinkling, less wear
on clothing, less noise, less vibration, and improved
energy efficiency.
Extra-Large Door Opening
For easier loading and unloading.
1200 RPM High Spin
For better drying performance.
Extra-Durable
Heavy duty springs, shock absorbers. Stainless steel drum.
Dryer Cool Down
The last few minutes of the dry cycle, your dryer will carry
out a cool down period. Clothing will tumble freely
without heat. This will cool fabric, buttons and snaps for
safe handling and to reduce wrinkling.
Auto Water/Energy Control
Automatically adjusts the amount of water and energy to
use for each load.
Safety Door Lock
Protects you from opening the door when it is unsafe.
Express Wash
Washes lightly soiled Cotton Heavy Duty and Permanent
Press fabrics in less time.
12 About your appliance
Low Maintenance
Lint passes safely through a self-cleaning pump and then
out the drain or dryer vent - so theres no messy wash or
dry filter for you to clean.

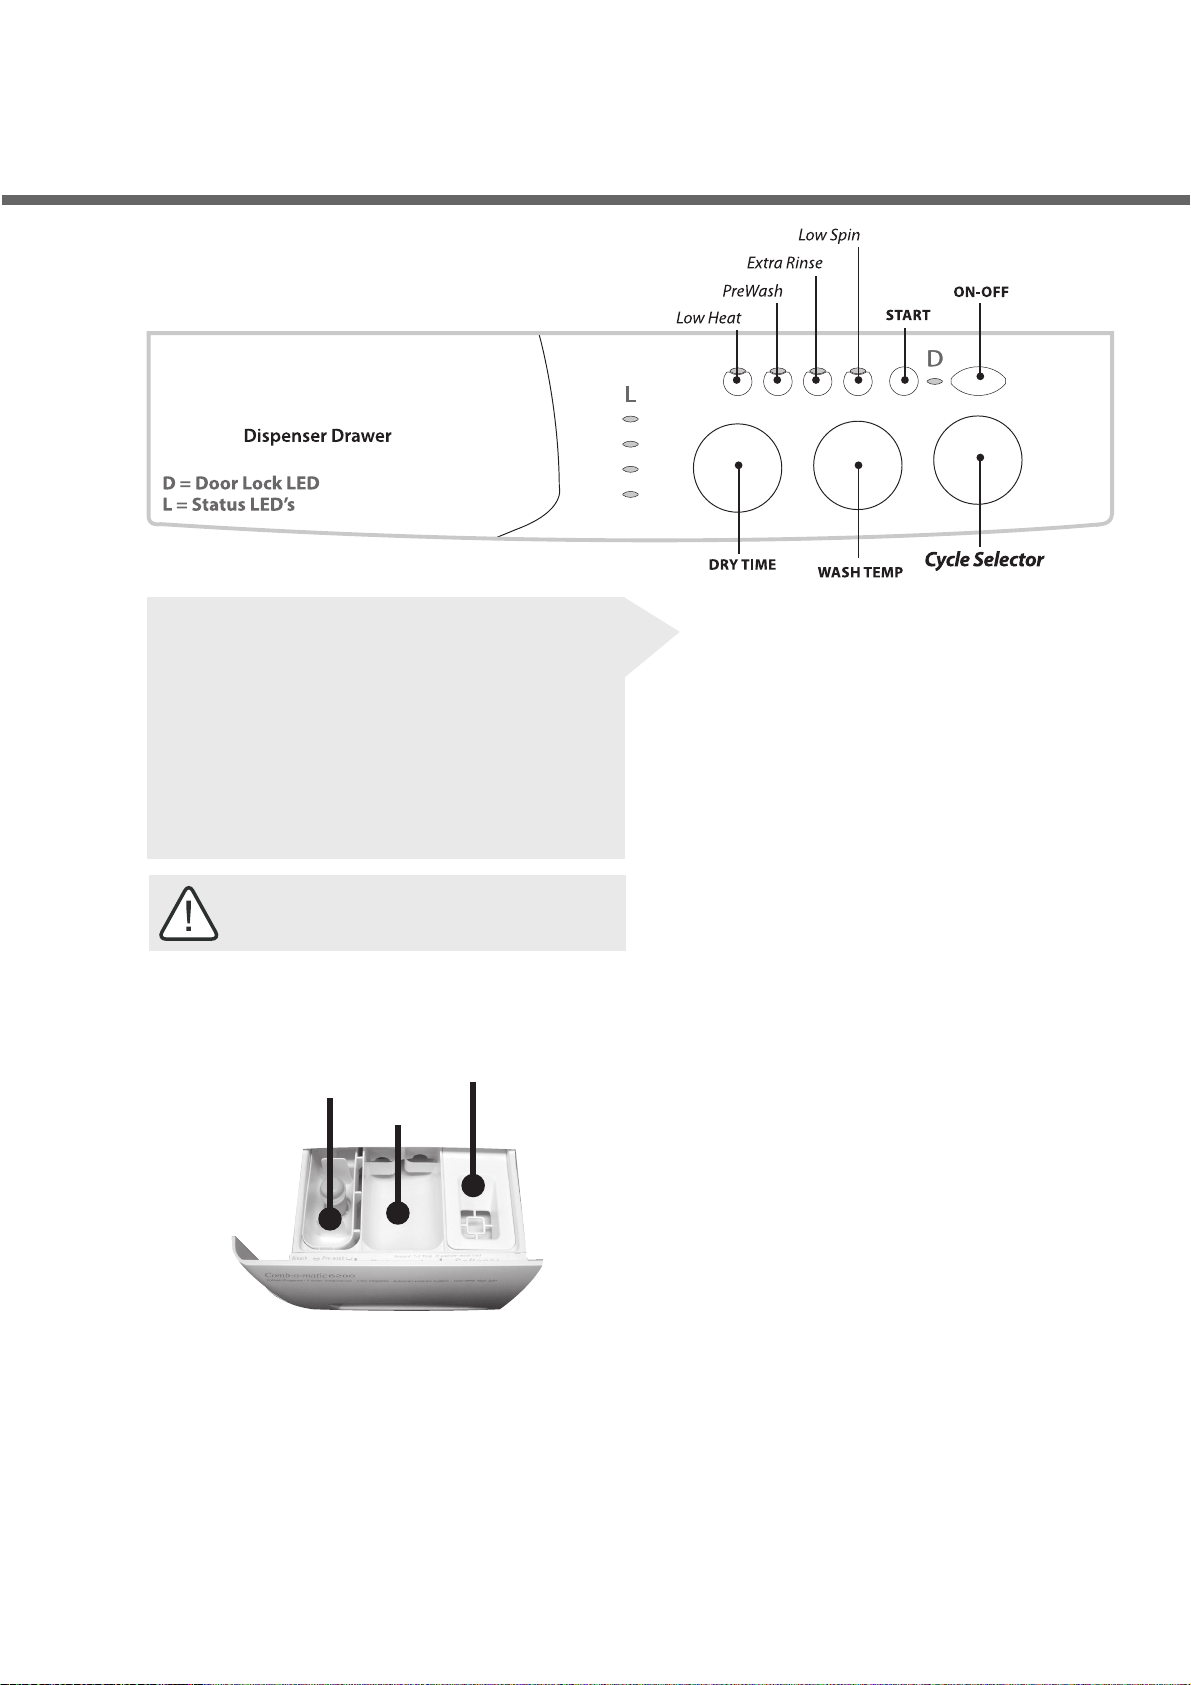
Description of the control panel
OPTION
Buttons
DOOR LOCK
LED
STATUS LED’s
ON/OFF (Door Open) Button
Turns power to the washer ON or OFF, unlocks the
door during the wash and dry cycles. Also restarts a
SILK or WOOL cycle that’s gone into Anticrease/
Soak.
DOOR LOCK LED
Indicates when the door is locked and when it can
be safely opened:
SOLID=Locked, FLASHING=Unlocked
Once locked, the door can be unlocked for up
to 5 MINUTES into any WASH cycle and at ANY
TIME during a DRY cycle.
To unlock the door: Press the ON/OFF button.
To resume the cycle: Close the door and press the
ON/OFF button again.
ON/OFF
CYCLE
Selector
DRY TIME
Selector
START
WASH TEMP
Selector
OPTION Buttons
Use these buttons to modify the wash cycle
(see “Description of Option Buttons, page 12”)
.
STATUS LED’S
Indicates the cycle phase that’s underway.
DRY TIME Selector
Use this knob to select:
A. the desired drying minutes (20 to 120) or;
B. one of the AUTO dry cycles
• Less Dry: Slightly damp clothes, easy to
iron
• Ver y Dry: Very dry clothes, ready to be
put away. Recommended for towels or
bathrobes. NOTE: The DRY TIME knob
does not move during the dry cycle
IMPORTANT: The rapid flashing of the
DOOR LOCK LED together with flashing of
atleast one other LED indicates an
abnormality (see Troubleshooting)
START (Cancel) Button
Press once to START the program, or press and hold
to CANCEL a program in progress.
WASH TEMP Selector
Use this knob to select the water tempurature
(when a WASH cycle is selected. NOTE: Rinse
water is always COLD.
CYCLE Selector
Use this knob to select a WASH or DRY cycle.
NOTE: This knob does not move during the
wash or dry cycle.
About your appliance 13
Description of the Option Buttons
You can customize the wash by adding an OPTION or combination of options
to your cycle selection. The button corresponding to the OPTION selected will
remain LIT. NOTE: If you push an OPTION button and it flashes, that means
the OPTION you selected is not available for that cycle.
Low
Heat
EXTRA RINSE - Adds an extra rinse
to the wash cycle (Not available in
Express cycle 9)
LOW SPIN - Reduces the high spin
speed to 600 rpm (Not available in
Delicates). NOTE: This option is not
available if a Dry cycle is set.
)
Pre
Wash
Extra
Rinse
LOW HEAT - Increases the duration
of the cooling period for the selected
dry cycle.
PRE-WASH - Adds an extra fill at the
beginning of the wash cycle
Low
Spin
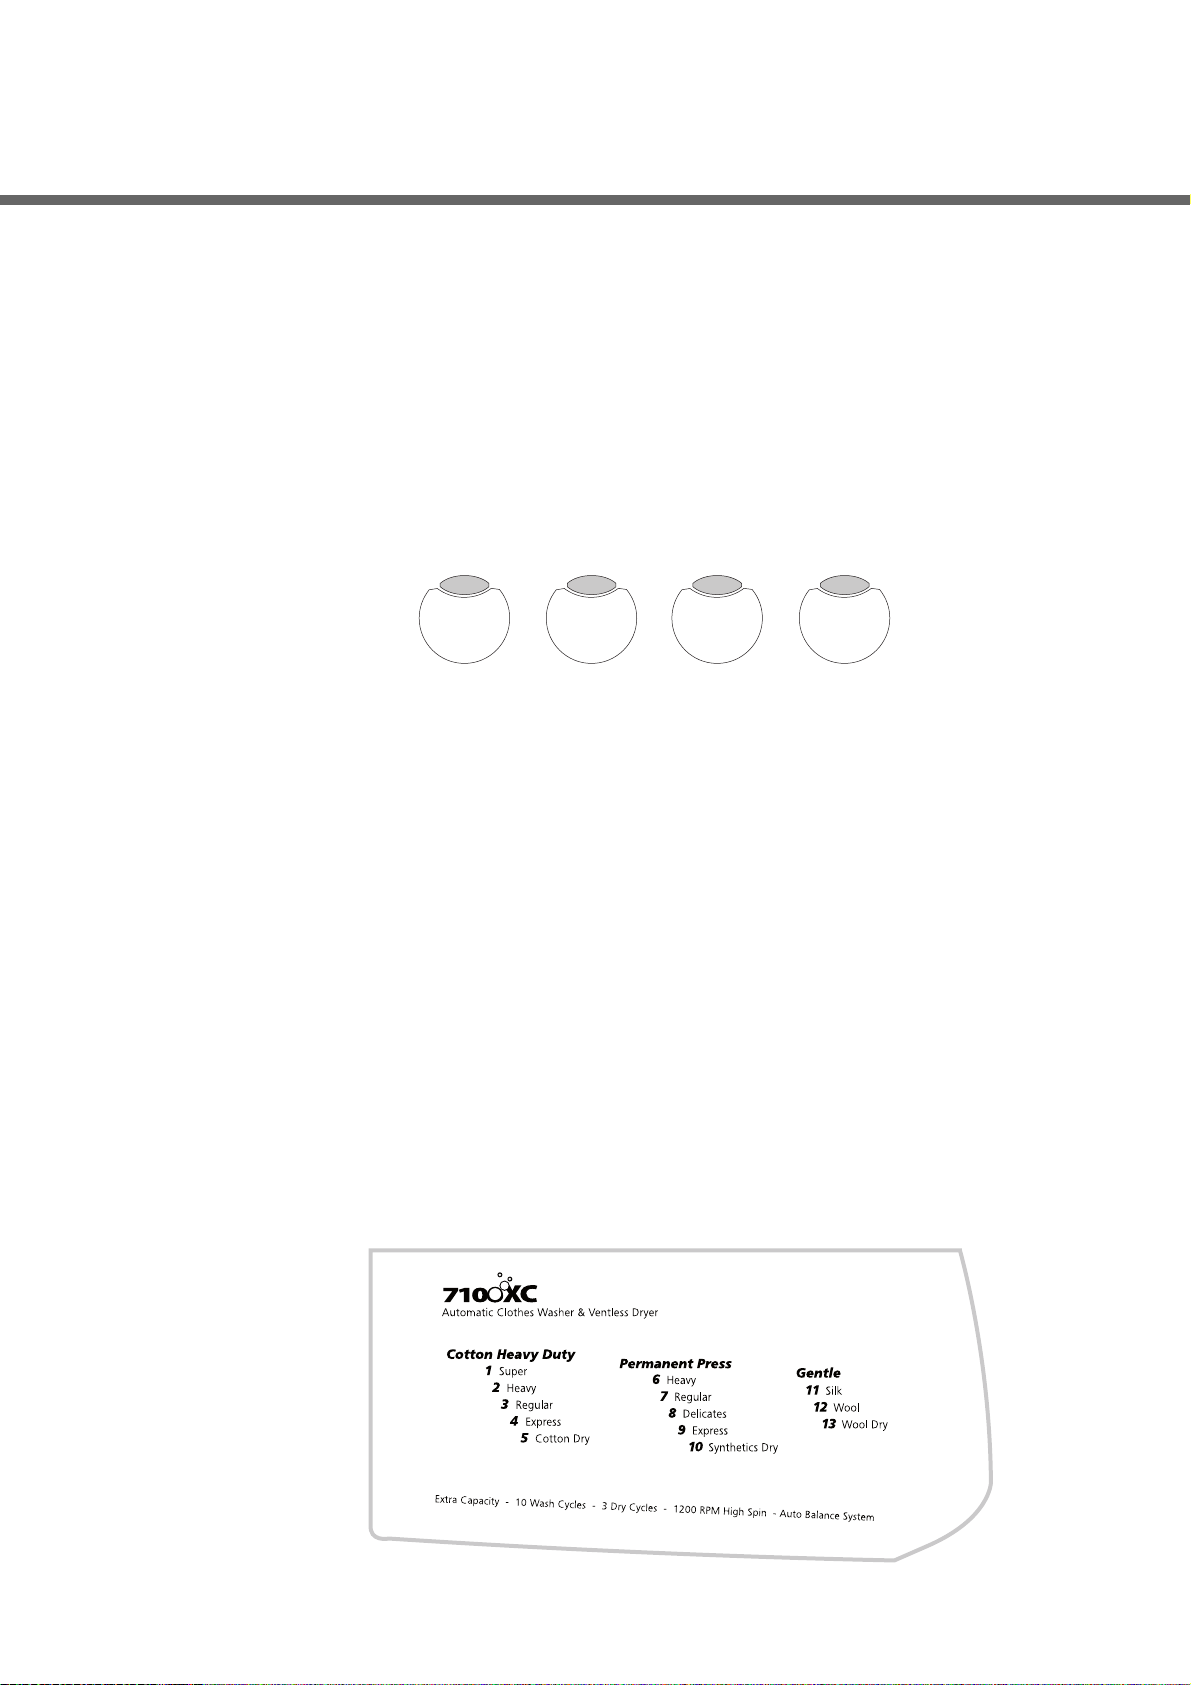
Description of the Program Key
The front of the dispenser drawer contains a Program Key to help you select a
Wash or Dry Cycle using the Cycle Selector Knob.
14 About your appliance
Optional
All-Natural, HE
•
detergent formulated
for your washer-dryer
Softens fabrics
•
naturally
While not required, Splen dide recommends the use
of a High Efciency (HE)
detergent. HE detergents
are quick dissolving and
low sudsing and will deliver
optimum results in your
front-loading machine.
Splendide Premium
Laundry Powder,
Part No. 1005
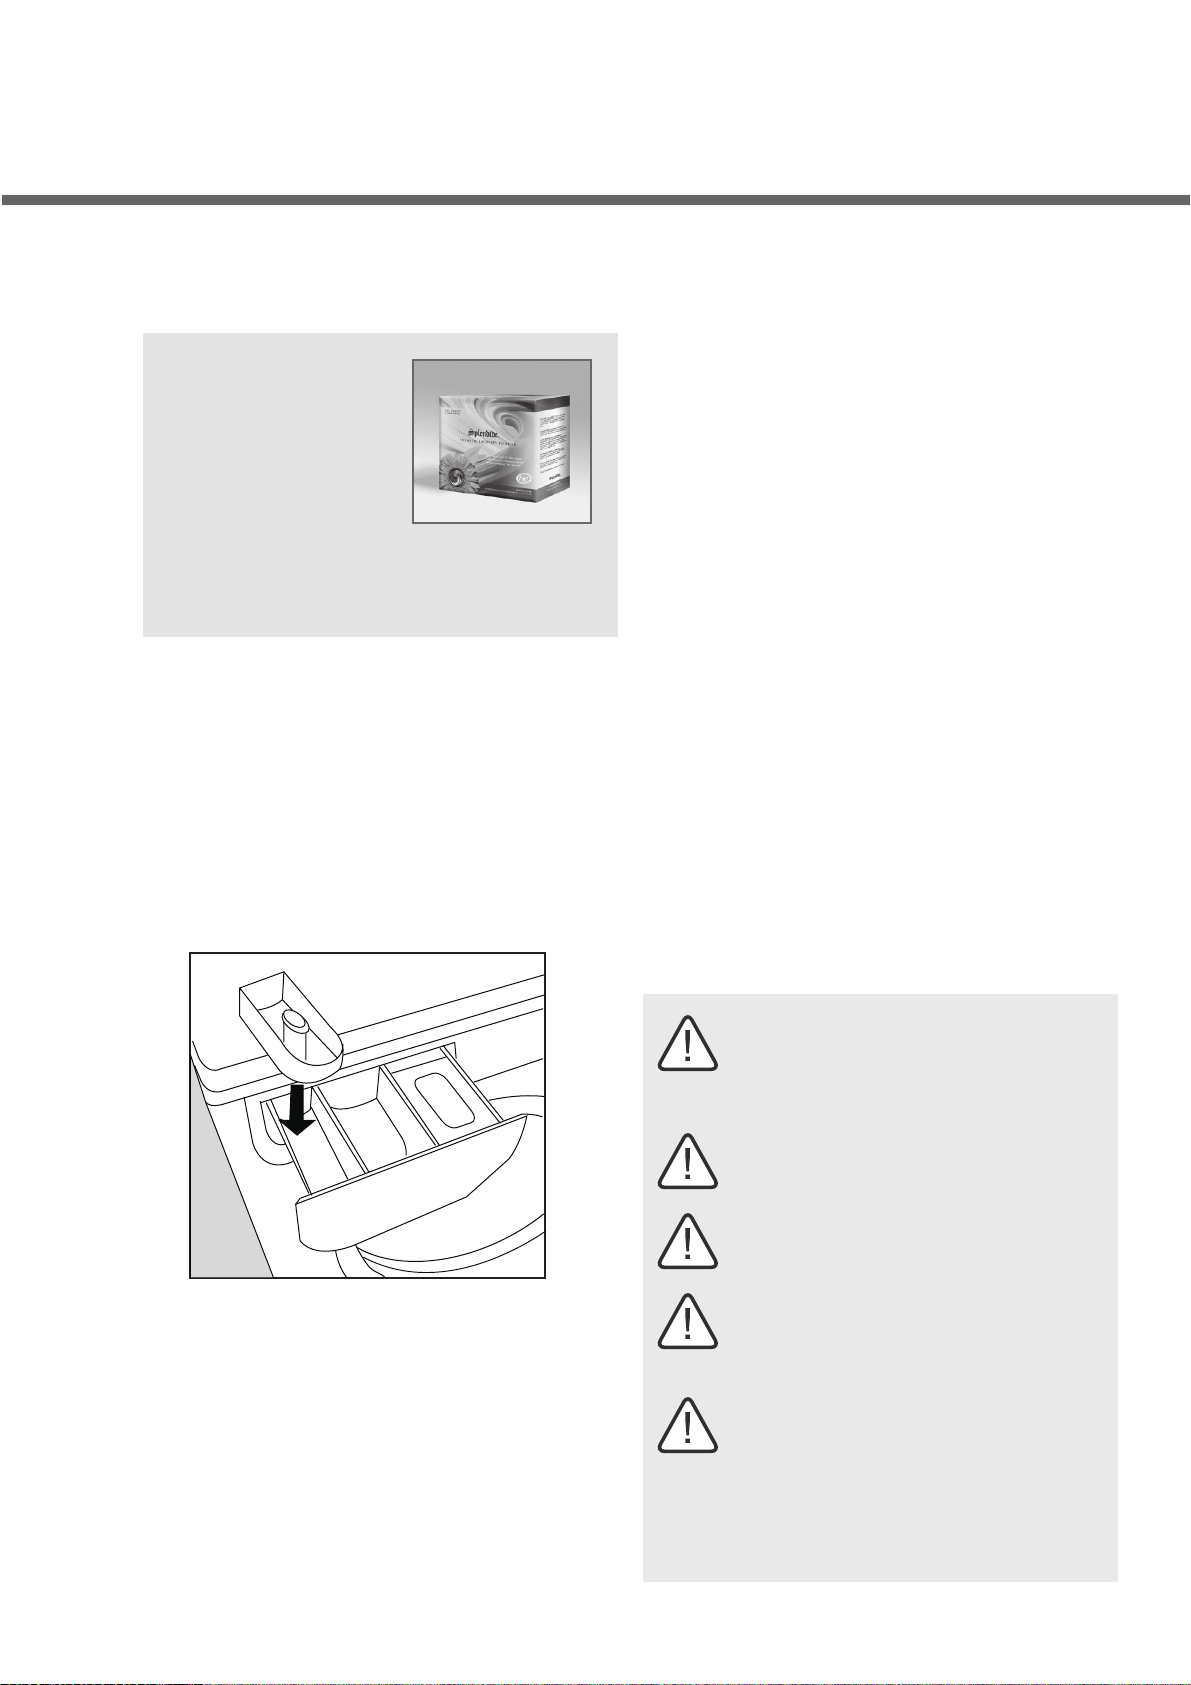
About the Dispenser Drawer
Laundry Aid Type / Amounts
Your Splendide requires smaller amounts of laundry
aids to get fabrics clean. Adding too much
detergent wont necessarily make for a more
efficient wash, and may in fact cause build up on
your clothes and inside your appliance and even
pollute the environment. Recommended laundry
aid amounts per wash load:
• Prewash detergent (Optional):
1 to 2 TBSP Powder
(or 1 TBSP Liquid)
Laundry products are diluted and dispensed
automatically at the proper time during the wash
cycle. The dispenser drawer has three
compartments (plus one removable bin) for adding
laundry products to the wash load. These
compartments are:
4
3
2
1
1 PreWash Detergent (With Bleach Bin
removed)
2 Detergent for the Wash Cycle
(Powder or Liquid)
3 Fabric Softener (Liquid)
4 Bleach (With Bleach Bin in place)
NOTE: Bleach option available in
cycle 1 (Super) wash ONLY
• Detergent:
1 to 2 TBSP Powder
(or 1 TBSP Liquid)
• Fabric softener:
1to 2 TBSP (Liquid ONLY)
• Bleach (Optional):
DO NOT exceed the MAX fill line
IMPORTANT: Adjust laundry aid amounts for
heavily/lightly soiled loads, or hard/soft water.
NEVER EXCEED the recommended amounts of
detergent or fabric softener. Doing so could
impair wash results and cause damage to the
internal parts of your machine!
IMPORTANT: NEVER USE FABRIC SOFTENER
SHEETS!
WARNING! Always dilute bleach before using.
Never overfill bleach dispenser. Excess bleach
could damage clothes.
IMPORTANT: The suds level should never rise
more than half way up to the porthole. Too much
foam will rise through the dispenser and make a
mess on your floor
IMPORTANT: Using fabric softener causes items
to release from the drum immediately after
high-speed spin, helping clothes to dry faster
while minimizing wrinkling and softening fabrics.
NOTE: Splendide recommends using 1 to 2 tbsp.
of a bio-friendly, or similar brand per wash load.
These softeners tend to appear light in color and
dissolve more quickly in less water, minimizing
build-up within your machine.
About your appliance 15
Washing and drying
pe
e
y
a
s
t
y
e
y
a
eli
t
s
y
thetics
y
l
s
pi
e
l
o.
r
t
e
eFabric
r
s
e
gth
e
n
ach
e
ash
ash
s
s
e
n
cs:
.
cs:
.
d
y
cat
cs
cs
n
d
y
d
y
d
d
y
d
y
d
y
d
d
d
d
at
ash
se
at
e
at
at
at
at
ash
se
se
at
at
se
00
.
.
.
.
.
.
.
0
.
.
0
.
.
.
.
.
spin cycles
n
OTE
y
y)
s
y)
g
.
Cycle lengths may vary
ype
p
y
e
p
n
,
0
D
y
y
y
at
eat
,
y
y
0
.
0
.
0
0
y
,
0
.
0
.
at
at
gg
d
)
)
pin
)
ual
ool
y
ool
3
3
at
at
30
50
g
y
,
y cy
ll
d
the
sh
.
y
ool
y
d
at
n
se
n
at
s
e
n
m
n
.
.
.
.
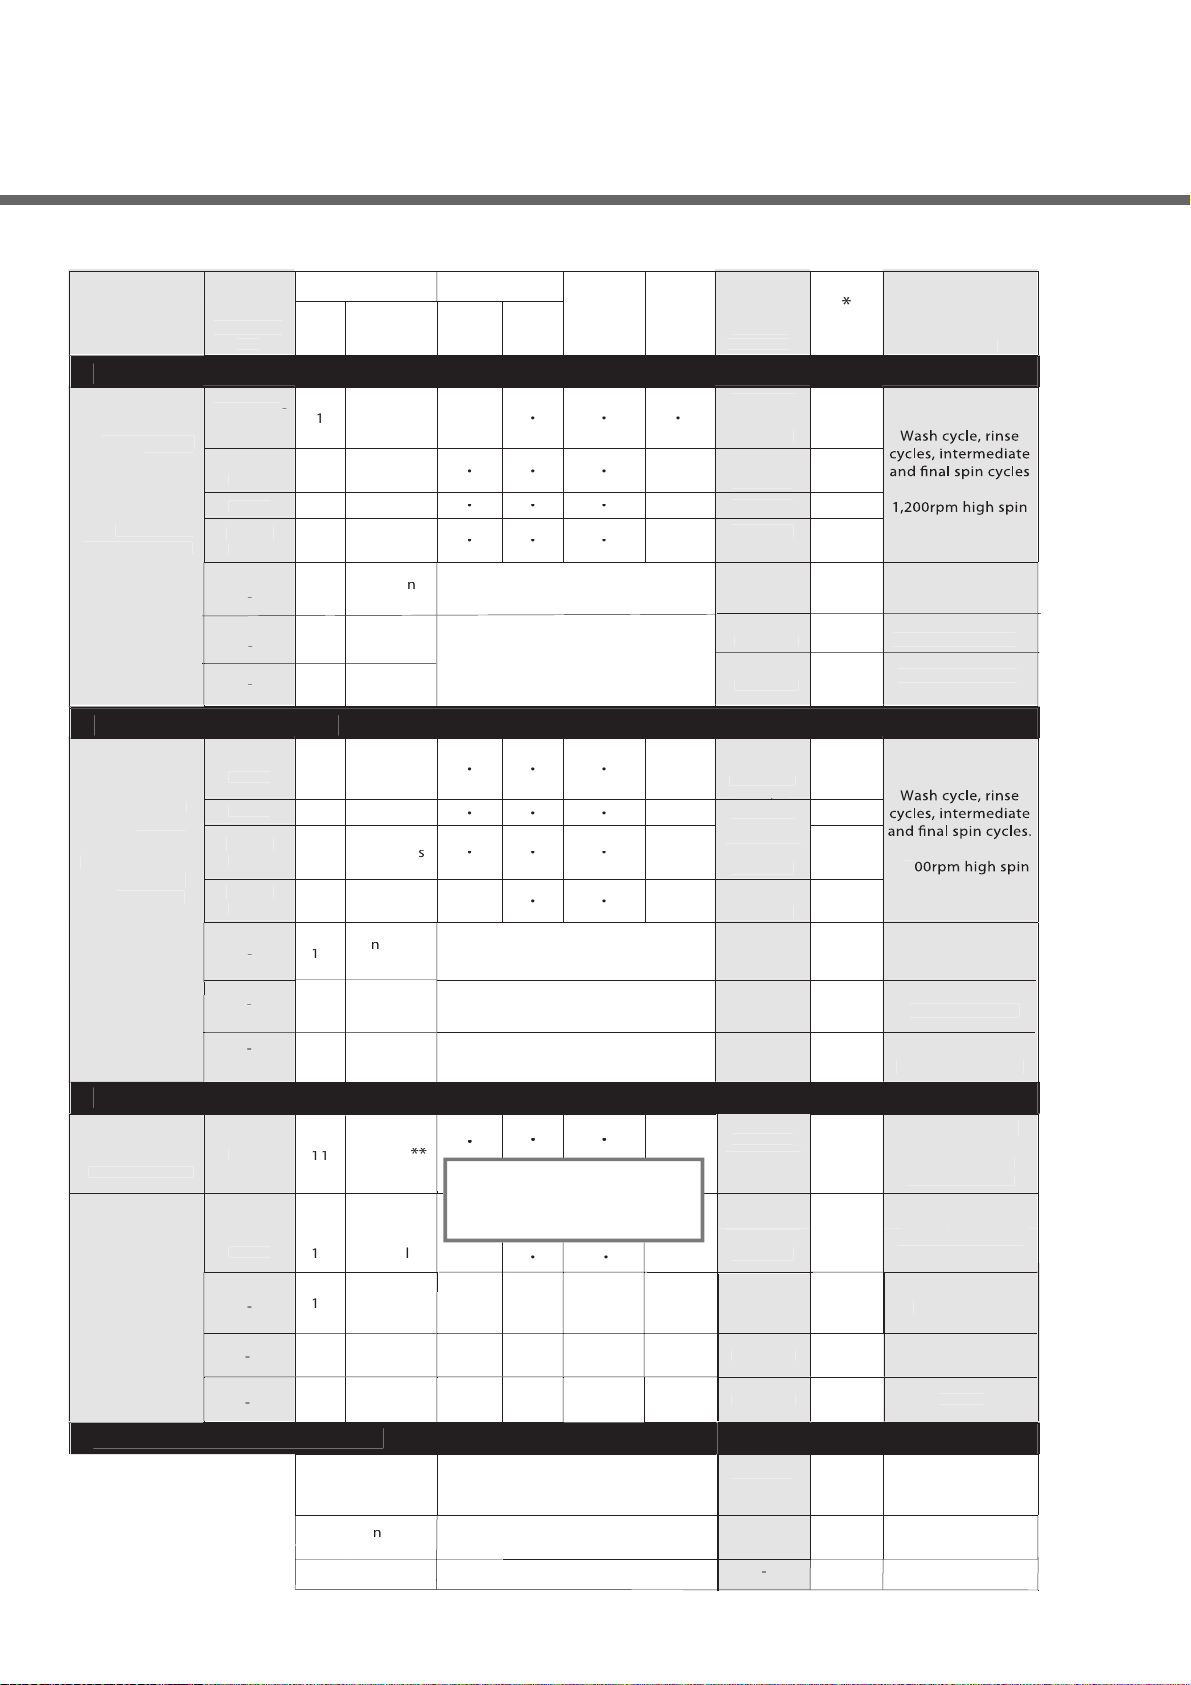
Cycle Description Chart
Fabric typ
Degree of
i
Cotton Heavy Duty Cycle
Exceptio
Heavy cotton
fabri
i.e. sheets, socks,
towels, jeans,
underwear,
sweatshirts, etc
ally Soile
Heavil
ile
ile
Lightl
ile
Permanent Press Cycle
Synthetic, light
n and
more delicate
fabri
i.e. button-ups,
khakis, rayon
shirts, etc
Heavil
ile
ile
Lightl
ile
Lightl
ile
Gentle Cycl
ilk an
particularl
eli
e fabri
Wool fabri
ile
ile
About Rinse, Spin and Drai
On silk cycle ( 11) the dryin
program is not available
according to water pressure,
load size and fabric t
16 Washing and drying
Cycle Selecto
N
1
1
NOTE: LOW SPIN option not available when a dr
Cycl
Nam
Su
H
Regul
Expe
Less
Extra Dr
H
Regul
D
Expe
Less Dr
1
Extra Dr
i
Dr
man
W
Less Dr
W
Extra Dr
1
W
in
S
Drai
Detergen
Pr
W
automaticall
Note: High spin speed varie
depending on the cycle you choos
Drain any water from the dru
W
N
: A high spin is carried out
during c
for automated drying setting
(hanger/iron and extra dr
To prevent wrinkles, cycle 11 wi
end with the laundry left soak an
'Rinse' LED flashing.To fini
the cycle, press the START button
NOTE: When using liquid fabric
softener, it is dis
ftene
(always
su
este
cle 5 (Cotton Dr
during the rinse cycl
ensed
Ble
cle is set.
Option
Availabl
Low He
Extra Rin
Low Spin
Low Heat,
Extra
Wash,
Low Spin
Low Heat,
Extra
Wash,
Low Heat,
Extra
Wash,
Low Spin
Low He
Low He
Low H
w He
Pre W
Extra Rin
Low Spi
Low He
Pre W
Extra Rin
Low Spin
Low He
Low Spin
Low He
Low He
Low He
Extra Rin
Low He
Extra Rins
Low Spin
Low He
Low He
Low He
Low He
Low Spi
Extra Rin
Low He
Low Spi
Pre Rinse
Pre -
Rinse
Pre Rinse
Cycle
Len
min
1
min
72 min.
min
Varies
40 to 12
min
to 14
min
0 to18
min
70 min
min
min
min
Varies
20 to 12
min
to 12
min
0 to 15
min
45 min
min
varies,
40 to 12
min
1
1
35 min
16 min
1 to 4 mi
Cycl
Descriptio
Timed drying
Iron/hanger dr
Extra dry clothes
ready to put awa
Timed dryin
Iron/hanger dr
Extra dry clothes
ready to put away,
Wash cycle, rinse
cycles, anticrease
nd Drain ONLY
NO SPIN CYCLE
Wash cycle, rinse
800 rpm high spi
Timed drying
Timed
Time
Cotton rinse cycle
and s
(1200 rpm high spin
Cotton spin
(1200 rpm high spin
Drain ONLY
NO SPIN CYCLE
Before starting a cycle
Setting a
wash-to-dry
cycle
Always make sure,
the drum is loaded correctly (see below)
•
the door is closed
•
the ON-OFF button has been pressed and machine
•
power is ON
laundry aids have been added to the Dispenser
•
Drawer (see below)
IMPORTANT: DO NOT attempt to open the door
when the ‘Door Lock’ LED (D) is LIT SOLID!
Bleach
(with bin)
Prewash
Detergent
(without
bin)
1 to 2 TBSP
Powder
Detergent
(or liquid
equiv.)
1 to 2 TBSP
Liquid
Fabric
Softener
1) Select the wash cycle
• select a washing cycle using the Cycle
Selector;
• select the wash water temperature using the
WASH TEMP knob;
• press available OPTION buttons (optional);
2) Select the dry time
• select the length of drying time with the DRY
TIME knob; (NOTE: Average loads will dry in 90
to 120 minutes)
3) Press the START button. When the wash
cycle ends, the appropriate dry cycle will start
automatically
Setting a
1) Select the wash cycle (See above);
2) Select the dry time
wash
cycle
• set the DRY TIME knob to OFF;
Determining load sizes
Maximum WASH CYCLE capacity - Cottons: 15
lbs, Synthetics: 7.5 lbs, Silk: 3.5 lbs, Wools: 3.5 lbs
Maximum DRY CYCLE capacity - Cottons: 11
lbs, Synthetics. 7.5 lbs, Wool: 3.5 lbs.
Always allow space for air to flow around the
clothes when drying. In general, if your drying,
dont fill the drum more than 1/2 to 3/4 full.
3) Press the START button. When the wash
cycle ends, the machine will stop.
Setting a
1) Select the dry cycle
dry
cycle
• set the Cycle Selector to position 5, 10, or 13;
2) Select the dry time
• select the length of drying time using the DRY
TIME knob (20 to 180 min.);
3) Press the START button. When the dry cycle
ends, the machine will stop.
Washing and drying 17

Combine large and small items in one full load.
When washing single items such as a sweater,
towel or jeans, add 1 or 2 similar items to help
balance the load. Single, heavy items such as a
bathrobe can be washed separately.
Do not wash rugs that could come apart and
clog your machine.
For more delicate garments protect underwear,
tights, stockings and other small or delicate
items by placing them in a mesh laundry pouch
while washing and drying.
When using the ‘Wool’ cycle, for best results,
use a detergent that is for wool garments,
taking care not to wash more than 2.2 lbs.
Splendide laundry tips
• Wash cycles are 30 to 96 minutes.
• Dry times for average sized loads are 70 to
120 minutes
• Wash cycles use 7 to 18 gal. of water. YOU
MAY NOT SEE WATER IN THE DRUM. This is
normal.
• Once set, the DRY TIME, WATER TEMP and
CYCLE SELECTOR knobs wont move.
• The door automatically locks during the wash
and dry cycles. To unlock the door, access the
drum, then RESUME the cycle, see DOOR
LOCK LED on page 13.
For best results,
• DONT OVERLOAD THE DRUM. Keep up with
laundry by doing smaller loads every day or
two.
• DONT EXCEED RECOMMENDED DETERGENT
OR FABRIC SOFTENER AMOUNTS.
• When going from was-to-dry automatically,
Always use a fabric softener (Or a Detergent
with built-in softeners) so clothes release from
the drum after the high speed spin.
• ONLY use Cotton Heavy Duty for heavy
cottons (towels, jeans, etc.)
• For items that may wrinkle, use Low Spin in
wash and Synthetics Dry
• To further prevent wrinkles, set a wash
ONLY cycle with LOW SPIN pressed. After the
wash cycle ends, remove large items (pants,
sheets, etc.) from the drum and shake them
out. Loosely fold them and place them back in
the drum. Then set a Synthetics Dry cycle with
LOW HEAT pressed.
• For mixed DRY CYCLE loads, remove items
that may wrinkle while still damp (dress shirts,
etc.) Hand press and hang them. Then,
continue drying the rest (underwear, towels,
etc.)
• NEVER OVER DRY LAUNDRY. Over drying is a
major cause of wrinkling. A certain amount of
humidity is what makes fabrics soft and fluffy.
WARNING!
During the drying phase, the door tends to get
quite hot.
Do not use the appliance to dry clothes that have
been washed with flammable or chemical
solvents (e.g. trichlorethylene).
18 Washing and drying
This appliance can only be used to dry clothes
that have been pre-washed in water.
Do not use the appliance to dry foam rubber or
similar materials

Combo laundry FAQ’s
Is using a combination washer-dryer much
dierent than what I’m use to?
Yes, in some ways. You are washing and drying
in the same drum and load sizes are smaller.
Wash cycles are similar, but because combination washer-dryers are compact and operate
using 115V (vs. 230V), dry times are longer.
Instead of washing several, bulky loads of
laundry in one day, you’ll learn to adjust your
laundry habits to launder smaller, more convenient loads every day or two.
Why do I need to load my drum less full for ‘dry’
and ‘wash-to-dry’ cycles?
Your machine can wash larger loads than it can
dry. Remember, separate washers and dryers
have drums of dierent sizes (the dryer drum is
usually 2 times bigger), and your machine
washes and dries in the same drum. When you
program your machine to ‘dry’ or ‘wash-to-dry’
you must load the drum no more than 1/2 to
3/4 full. (NOTE: Automatic wash-to-dry not
available when Silk is selected)
What factors aect drying times?
Drying times depend largely on the type of
material (some bers absorb more water than
others), and the dampness of the articles when
drying is started (1200 RPM spin vs. 800- 600
RPM spin), and on the amount of laundry that is
being dried. Jeans, towels and similar (rather
thick) articles will take longer to dry.
Sample wash-to-dry loads
To get you started, here are a few sample load sizes that
can go directly from wash through dry. NOTE: Data
purely indicative. Actual drying times will vary depending on type/weight of material.
Sample Load 1
Wash Cycle: Regular Cotton Heavy Duty/ Dry Time:
120 min.
2-3 Bath Towels (27 x 52 / all 100% cotton)
1 Hand Towel (16 x 28)
1-2 Wash Cloth(s) (13 x 13)
Sample Load 2
Wash Cycle: Regular Cotton Heavy Duty/ Dry Time:
70 to 120 min.
1 Flat Sheet (90 x 102 / all 230 thread count)
1 Fitted Sheet (60 x 80)
2 Standard Queen Pillowcases (21 x 32)
Sample Load 3
Wash Cycle: Regular Cotton Heavy Duty / Dry Time:
70 to 95 min.
1 Hand Towel (16 x 28)
1 Pair Jeans (35 waist/32 inseam)
1 Sweatshirt (Large, 50% cotton, 50% polyester)
Washing and drying 19
Care and maintenance
Turning off the water or
electricity supply
Turn off the water supply after every wash. This
will limit the wear of your appliances water
system and also prevent leaks. Unplug your
appliance when cleaning it, while on vacation
and during all maintenance operations.
Cleaning your appliance
The exterior and rubber parts of your appliance
can be cleaned with a soft cloth soaked in
lukewarm soapy water. Do not use solvents or
abrasives.
Cleaning the dispenser
Checking the water inlet
hoses
Check the water inlet hoses at least once a year.
Clean the filters and the water valves. If you see
any cracks, bulges or wear, replace hoses
immediately; During the wash cycles, water
pressure is very strong and a cracked hose could
easily split open.
WARNING! Never use inlet hoses that have
already been used.
IMPORTANT: Replace the inlet hoses at least
every ve years of use to reduce the risk of hose
failure. When replacing the inlet hoses, mark the
date of replacement on the label with a permanent marker.
drawer
Remove the dispenser by raising it and pulling it
out. Wash it under running water; repeat as
needed.
Caring for your appliance
door and drum
When not in use, leave the appliance door ajar
to prevent unpleasant odors from forming.
Cleaning the interior
The interior of the machine should be cleaned
periodically by a qualified service technician. Over
time, continual oversudsing can clog up the
condensing chamber and fan blower with lint and
reduce drying efficiency.
20 Care and maintenance
Cleaning the pump
No lint filter to clean
pre-chamber
The washer-dryer is fitted with a self-cleaning
pump that does not require regular maintenance.
However, if small items (such as coins or buttons)
fall into the pre-chamber that protects the pump,
you will need to retrieve them.
IMPORTANT: Before cleaning, make sure
the wash cycle has ended and unplug the
appliance.
Your Splendide removes the lint automatically with
the help of it’s self-cleaning pump, so there’s no lint
filter to clean.
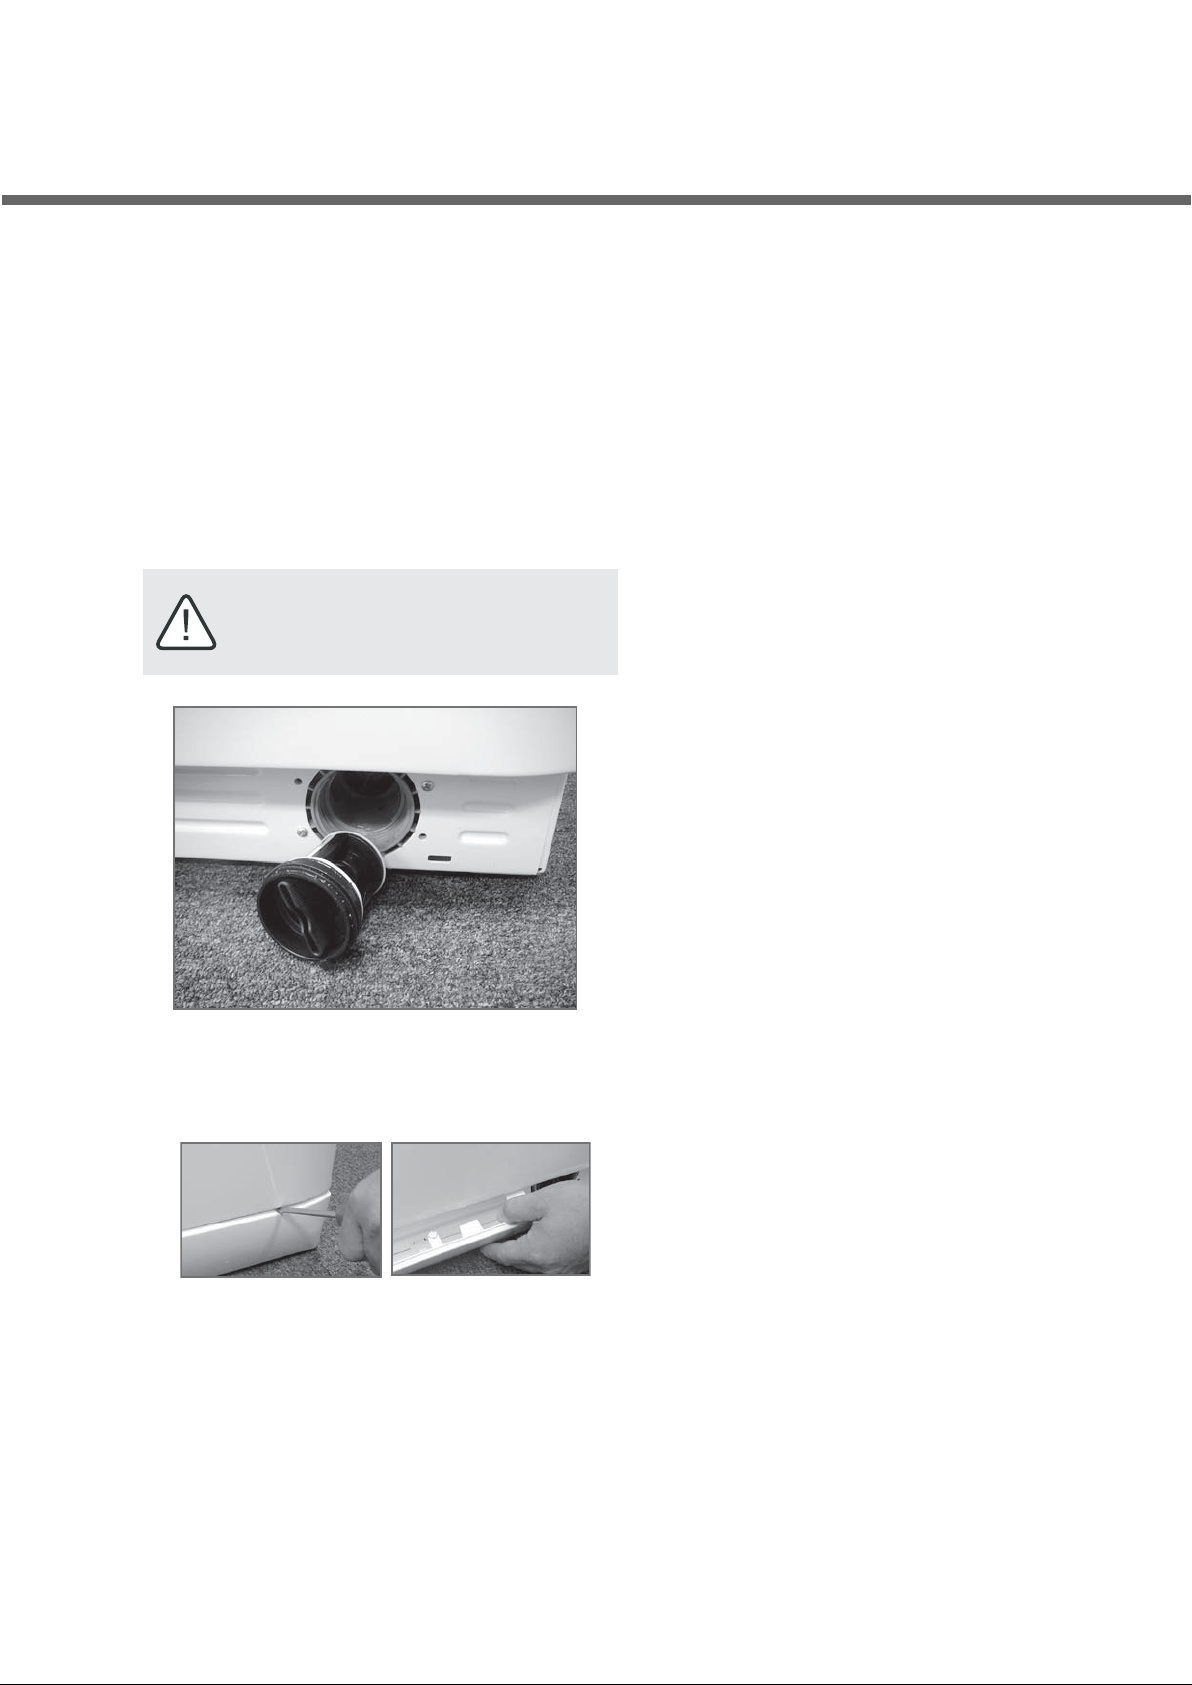
To access the pre-chamber:
1 Using a screwdriver, remove the cover panel on
the lower front of the washer-dryer.
2 Place a small dish or tray below the cover.
Unscrew the pre-chamber by rotating it counter
clockwise. A little water may trickle out. This is
perfectly normal.
3 Clean the interior thoroughly.
4 Screw the pre-chamber back on.
5 Reposition the panel, making sure the tabs are
positioned correctly before you push the panel
back onto the appliance.
Care and maintenance 21

Troubleshooting
Before calling for assistance, make sure the problem can’t easily be solved by consulting the following list
Problem Possible Causes / Solution
• There is no power.
appliance is not plugged into a socket, or not enough to make contact.
one second.)
ater tap is not turned ON.
The washer-dryer
won’t start.
The washer-dryer
does not fill with
water.
• The
• There has been a power failure.
• The appliance door is not shut properly.
• The START button has not been pressed. (Note: It should be held a minimum of
• The water tap is not turned on or supply hoses are kinked.
• The water inlet hose is not connected to the tap.
• The hose is kinked.
• The w
• The water pressure is insufficient.
• The START button has not been pressed.
The washer-dryer
continuously fills
and empties with
water.
The washer-dryer
does not drain or
spin.
The washer-dryer
vibrates too much
during the spin
cycle.
The washer-dryer
leaks.
• The drain hose is too low or too far into the standpipe.
• The wall drainage system doesn’t have an air break.
• Some programs have a slower final spin to take best care of the fabrics (See
‘Cycle Description Chart’, pg. 14).
• The drain hose is kinked.
• Check the pump pre-chamber (See ‘Cleaning the pump pre-chamber,’ pg. 18)
• Remove the drain hose from the standpipe or under-sink trap and check for
blockages, ensuring that the water can drain freely away from the machine.
• The Transit Screws are still in place. Remove the screws (See ‘
transit screws’, pg. 6).
• Verify the washer is resting on a solid, level surface.
• The drum is overloaded.
• The washer-dryer is not level (See ‘Levelling the washer-dryer’, pg. 8).
• The w
• The water inlet hose is not screwed on correctly (See ‘Connecting the water
• The washer is not level.
• The drain pump or drain hose is obstructed.
• The detergent dispenser is obstructed (See ‘Cleaning the dispenser drawer’, pg.
• The dr
asher-dryer is too close to cabinets or adjacent walls.
inlets’, pg. 6).
18).
ain hose is not secured properly. (See ‘Connecting the drain hose’, pg. 7).
Removing the
FAULT CODES:
The DOOR LOCK
LED flashes rapidly
at the same time as
at least one
other LED
22 Troubleshooting
The unit has entered diagnostic mode and there may be a problem.
1. Unplug the unit, or turn off the circuit breaker to the unit for a minimum of 40
seconds.
2. Plug the unit back in, and switch the machine back ON.
3. If the unit still enters the diagnostic mode, please record which lights are
flashing, as well as the model and serial number of your machine.
4. Call Splendide Technical Support.
Problem Possible Causes / Solution
There is too much
foam.
• The detergent is not suitable for washing machines (it should be labeled “For
washing mac
• Too much detergent or softener being used.
hines” or “hand and machine wash,” or the like).
•
The appliance is not plugged into the so
The dryer does
not start.
Poor drying
performance
Dryer performance
has decreased over
time.
Wrinkling
• There has been
• The appliance door is not shut properly.
•
The DRY TIME Knob is on the ‘OFF
• The drum is overloaded.
• Verify water supply conne
• Verify that water supply is turned on.
• Continual oversudsing from using too much/wrong kind of detergent or fabric
softener. (See ‘Detergent and laundry aids,’ pg. 15).
• The
•
•
• Incorrect w
• Clothes matted to the drum
• Refer to www.splendide.com for addition
condensing chamber or f
Incorrect sorting.
The drum is overloaded.
a power failure.
ash cycle
If you need assistance
Every Splendide washer-dryer comes with a Limited
Warranty. Please read the Limited Warranty
Statement that came with your machine for
complete details. You’ll find many answers to
common problems in the “Troubleshooting”
section of this manual. If you review this section
first, you may not need to call for service at all.
NOTE: You will be charged for a service call while
the appliance is under warranty if the problems are
not caused by defective workmanship or materials.
cket, or not enough to make contact.
’ setting.
ctions are connected properly to the hot and cold valves.
an blower is clogged (See ‘Cleaning the interior,’ pg. 20)
after spin.
al fabric care tips.
Splendide Technical Service
15650 SE 102nd Ave
Clackamas, Oregon 97015 - USA
1-800-356-0766
• If you do need service, you can relax knowing
that help is only a phone call away. Call our
Splendide Technical Service/Assistance
Department toll-free at 1-800-356-0766
Monday-Friday 7:00AM-4:30PM Pacific Time.
• Please have the model number and serial
number of your washer-dryer ready when you
call.
(Ext. 5)
Hours: Mon-Fri 7AM-4:30PM (PST)
Local Phone: 503-655-2563
Troubleshooting 23
 Loading...