

Splash-E-Tech Mini0805 Instruction Manual
SplashETech
Mini0805
Instruction
Manual
Please read this manual carefully before using this product.
Please get this manual well-kept for future reference.
Please use the product correctly based on a full understanding of the manual.

List of Parts
Precautions
Name of Items
SplashETech Mini0805
Car Charger
USB Cable
3M Plastic Sticker
Vehicle Mounting Bracket (GPS Tracker)
Instruction Manual
Quantity
1
1
1
1
1
1
1
• There may be a layer of plastic protective film on the LCD screen
and the lens, which is intended to prevent any scratch during
transportation. In that case, please remove the protective film before
putting the product into use.
• The product will generate heat after being used for a long time.
Please note that it is not a malfunction.
• Do not try to disassemble, refit or heat the product. Doing so may
result in electrical shock and will most likely resulting in damaging
the dash camera.
• Please keep the product from water or any other liquid.
• Do not clean the product using alcohol, gasoline, diluent or any
other organic solvent. Only a dry cloth should be used.
• Do not mistreat the dash camera. Do not crash, push or press the
lens hard – otherwise, an injury or a product damage may be caused.
• Please protect the product from dropping or being strongly
impacted. In case of dropping down or a product damage, do not
touch the inside part of the product so as to prevent any harm.
• Stop using it immediately if the product emits smoke or any
peculiar smell or there occurs any other abnormal situation.
Before using this product, please make sure that your dashboard camera
package consists of all the following items. Please contact the distributor
in case of any loss.

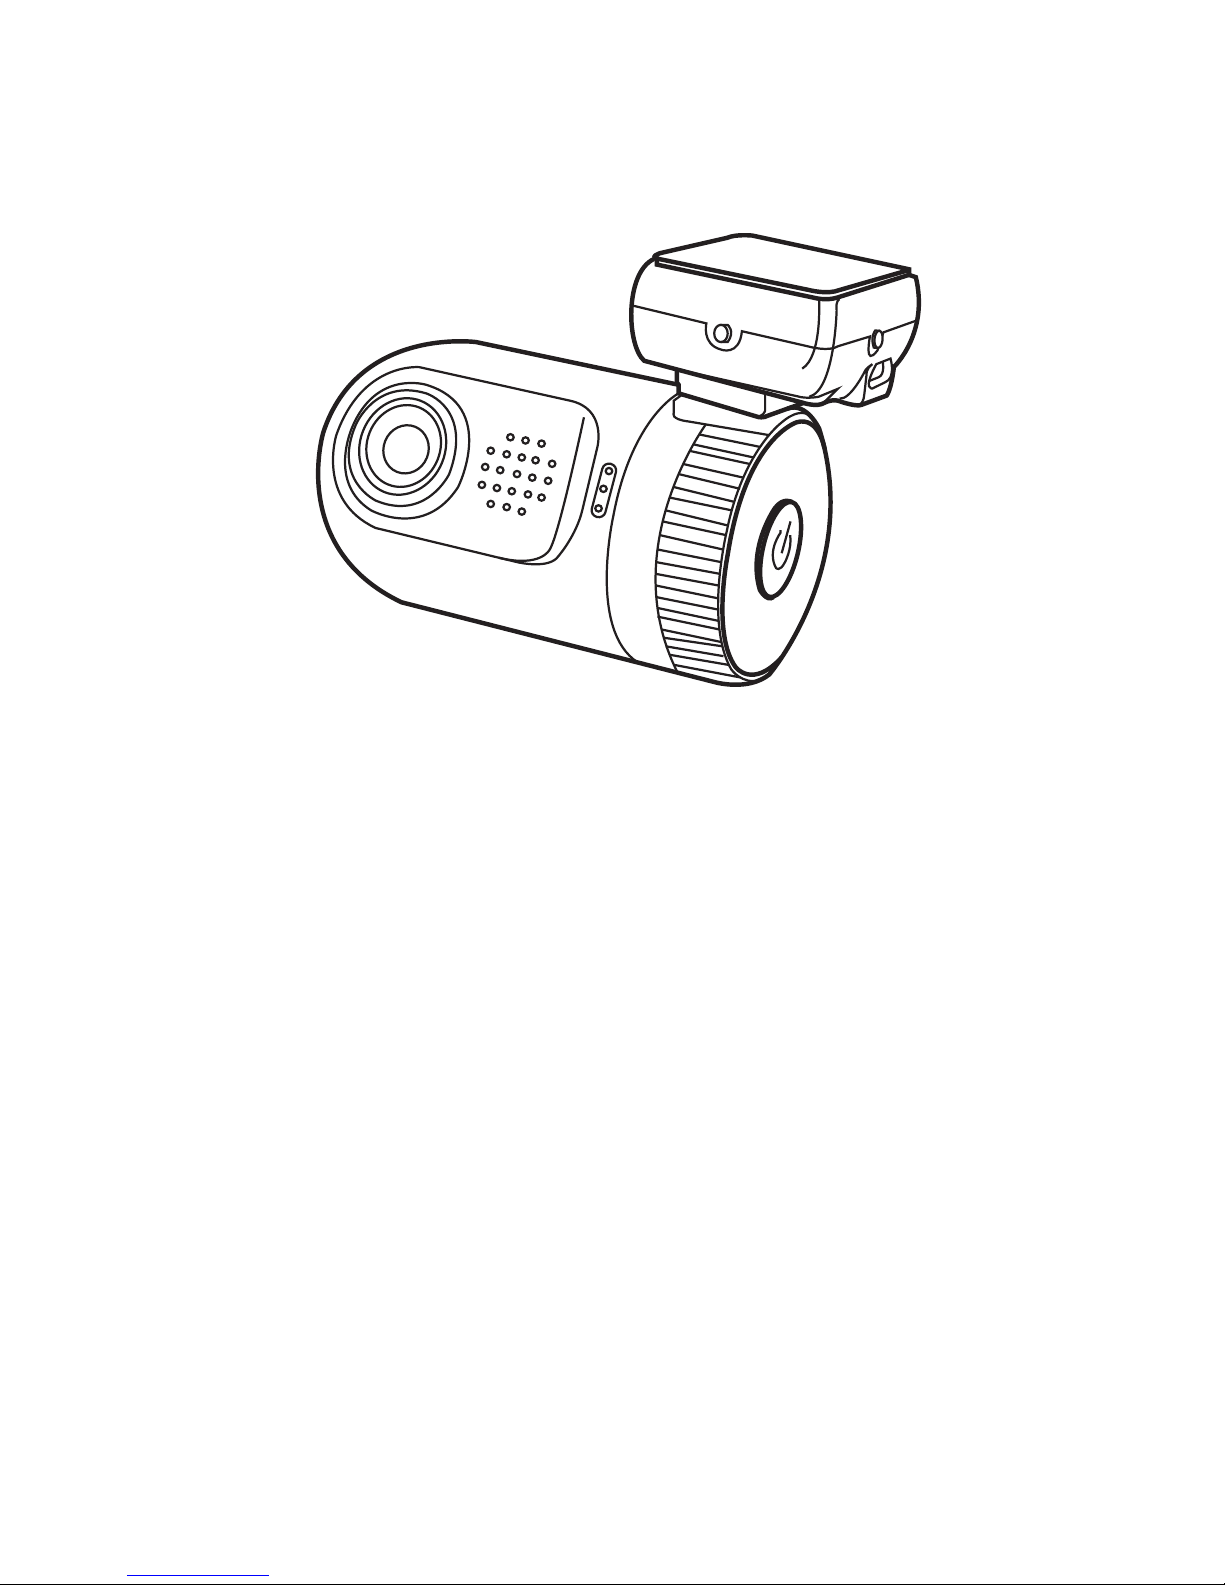
Product Structure
2
1. 3M Sticker
4. Up/Mute Button (a long press for the menu)
7. Indicator Light
10. HDMI Port
13. GPS Tracker/Mounting Bracket (Angle adjustable)
2. USB Port -1
5. OK Button
8. Lens
11. USB Port -2
3. AV Port
6.Down/Lock File Button
9. MicroSD Card Slot
12. Power Button
13
1
2
4
5
8
6
7
10
9
12
11
3
• Do not expose the dash camera to a temperature lower than -10℃
or higher than 65℃. Otherwise, a possible battery leakage,
overheating or an explosion may happen, resulting in a fire, an
electric shock, burns or other injuries.
-- High temperature can shorten the life span of the device, and extremely
high temperature will shorten the battery and/or degrade the plastic
components. Please note that extreme temperatures can be achieved in
parked cars in direct sunlight.
-- Expose the dash camera in sunlight with Motion Detection mode may
cause the dash camera crash or damaged as the temperature is too high
in your car in summer.
• Do not expose the dash camera to dusty, dirty, or wet areas, if this
gets into the camera or on the lens, damage to components can be
caused.

Initial Use and Installation
Insert the MicroSD Card:
Insert an appropriate microSD card into the dash cam to record to the
external microSD card. Only after a microSD card (with a memory of no
more than 128G) is correctly inserted into the camera will it work properly.
It is recommended to use microSD card which reads and writes faster than
Class 6.
Power On/Power Off:
Short press the "Power" button to boot the machine, meanwhile the blue
light will light up. And the short press the OK button to start recording
video. Extended press the "Power" button to shut it down and the blue light
will go out. The camera will shut down automatically when having given a
low power indication. After connecting with vehicle power, it is supported
to automatically start recording when the car is starting, and when the car
is off the video will be saved automatically then the recorder will be turned
off.
The dash camera is preconfigured for a simple plug and play experience
with the most popular options; if you want further customize the settings,
should you require a slight different experience, please refer to section
“SETTING”.
Installation Instructions:
Take the SplashETech Mini0805 out of the package, install the GPS
tracker correctly; then, tear off the 3M Sticker, and stick the camera into an
appropriate position on the front windshield. Switch the GPS tracker to get
a proper angle.
Operatio
Normal mode: After turning on the recorder, it will automatically enter a
video mode, please short press the OK button to stop recording and go to
normal mode for picture-taking and settings.
Video Mode: When having started up the camera, short press the OK
button to start or stop recording. In the upper right corner of the screen,
there will appear a flashing red dot and the recording time, which indicates
the start of recording.
3
 Loading...