

Page 1
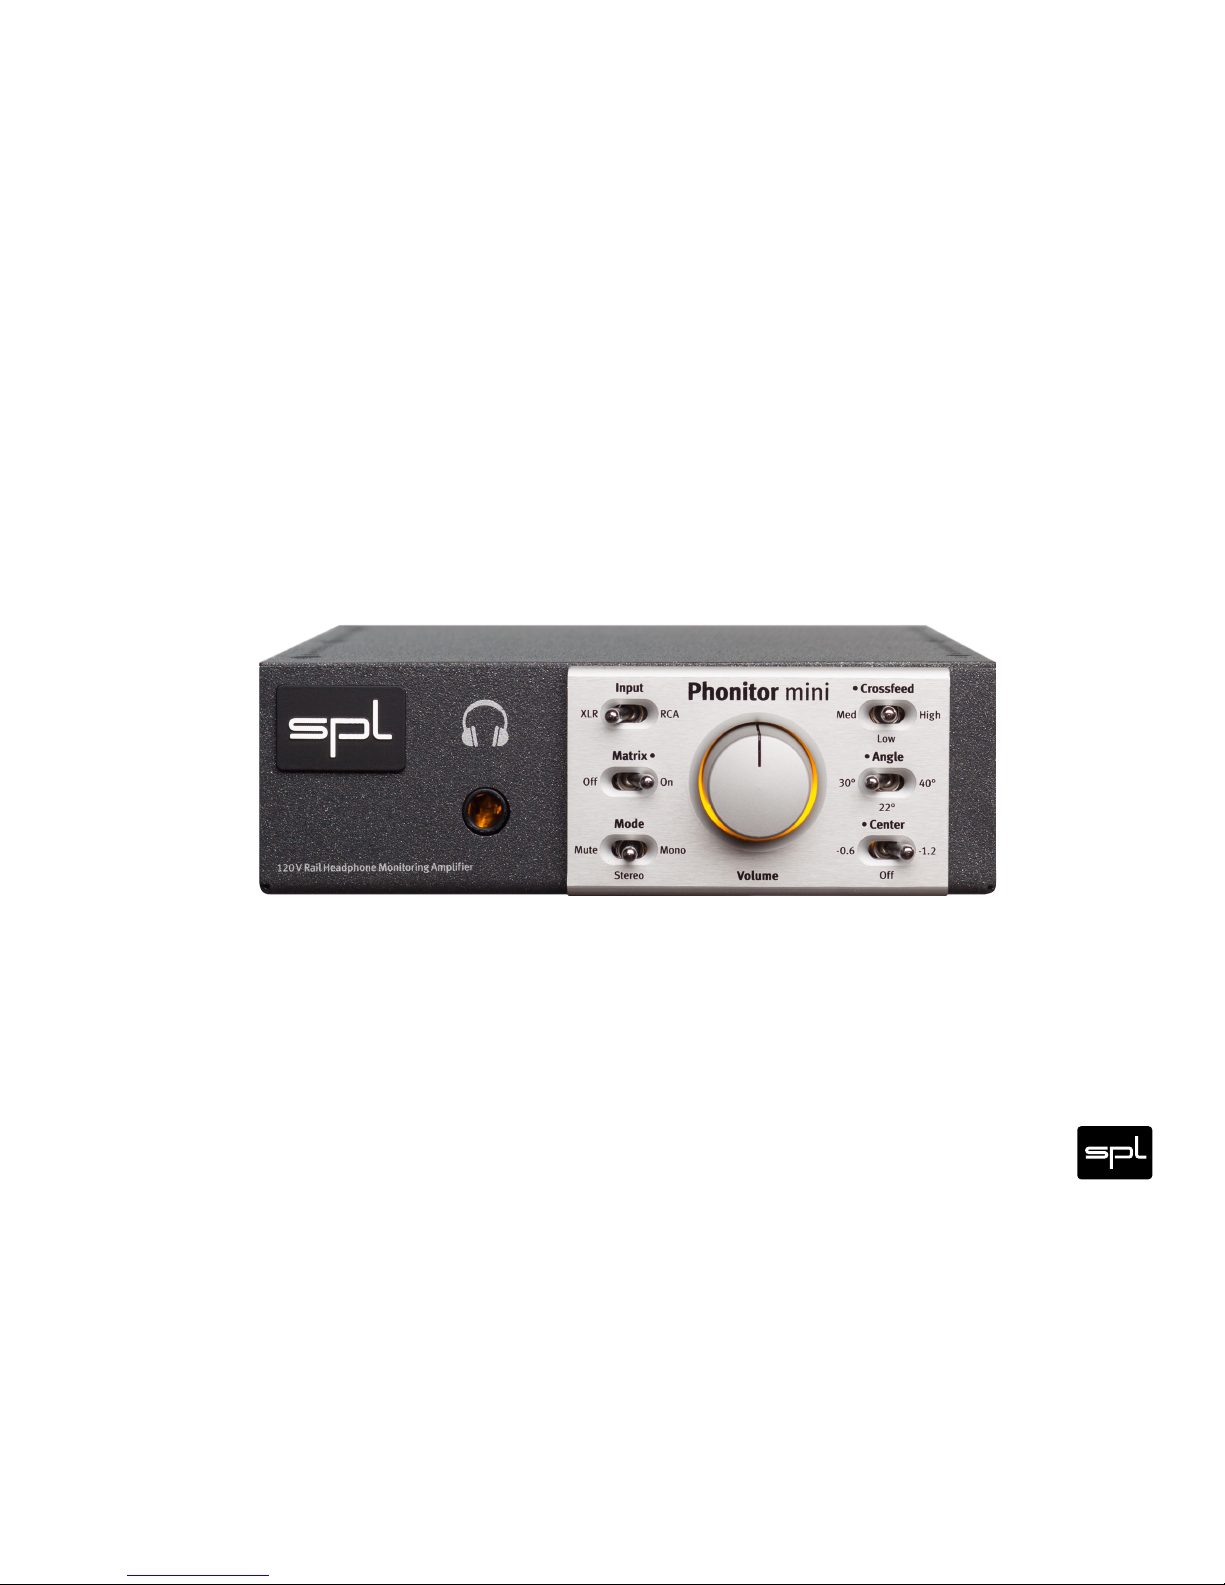
Phonitor mini
120 Volt Amplier for Headphones
Modell 1320
Manual
Page 2

2Phonitor mini
Content
Content 2
Scope of Delivery 5
Introduction 6
Phonitor 6
Phonitor 2 7
Phonitor mini 8
Home Listening 9
Sound Engineers 10
The end of ear fatigue 11
Applications 12
Special Features 13
Tech Talk 14
120 Volt Technology 14
The advantages of the 120-Volt operating voltage 15
Specifications 18
Inputs 18
Headphone Output 19
Power Supply 20
Measurement & Weight 20
Hook Up 21
Connecting to the mains 21
Placement 22
Before You Begin 23
Warning 24
Page 3

3Phonitor mini
Control Elements 25
Input: XLR or RCA 25
Matrix: On or Off 26
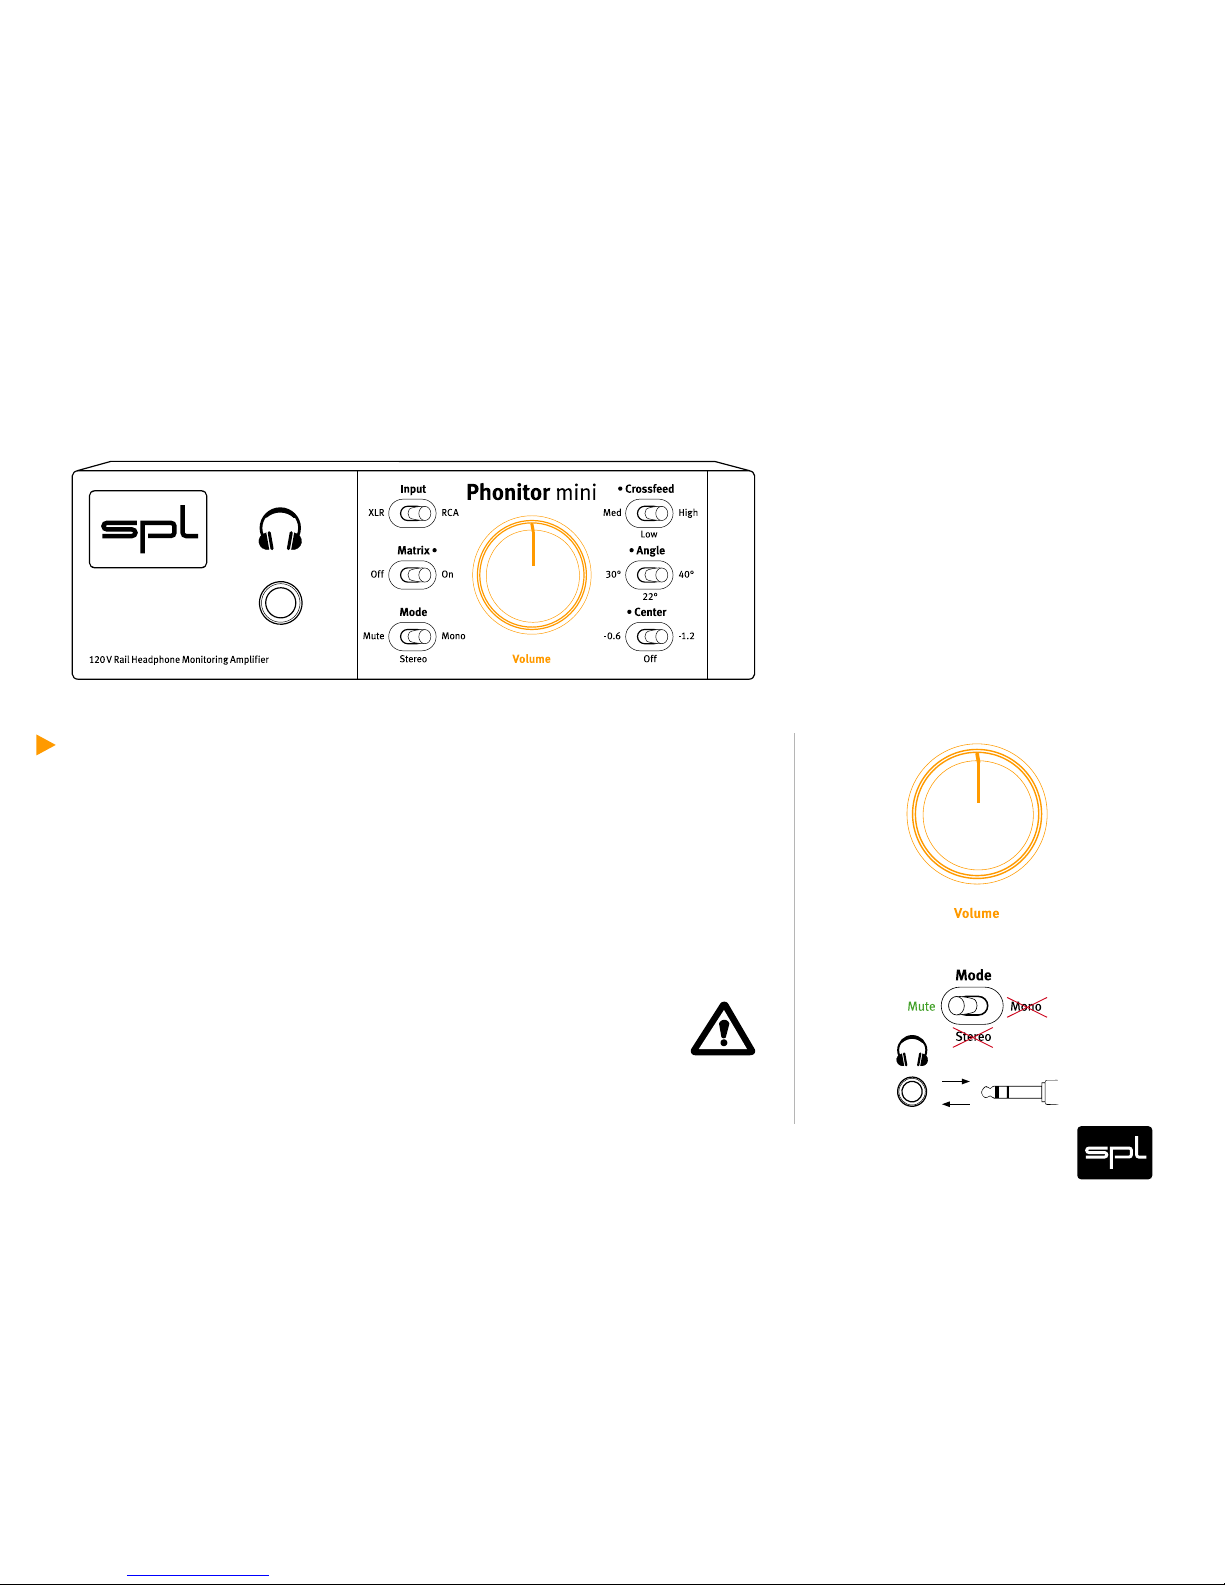
Mode: Stereo, Mono or Mute 27
Crossfeed: Low, Med or High 28
Angle: 30°, 22° or 40° 29
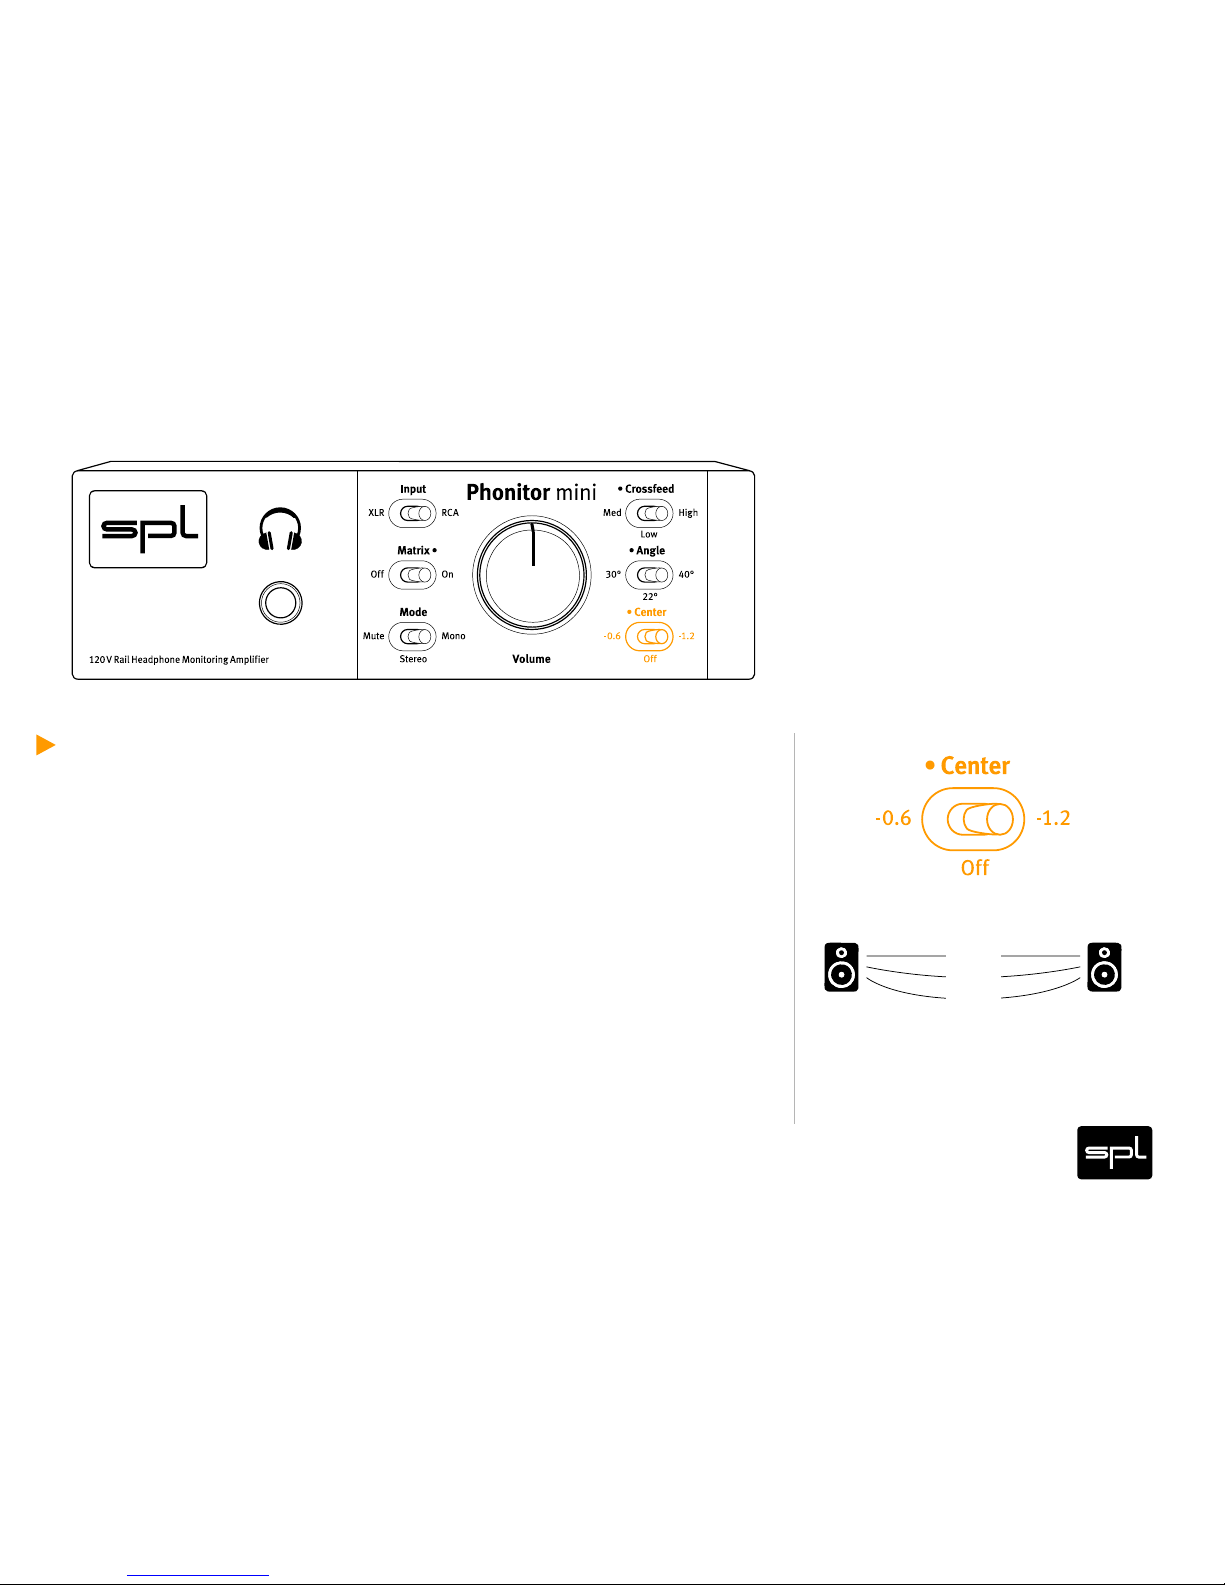
Center: -0,6 dB, -1,2 dB or Off 30
Volume 31
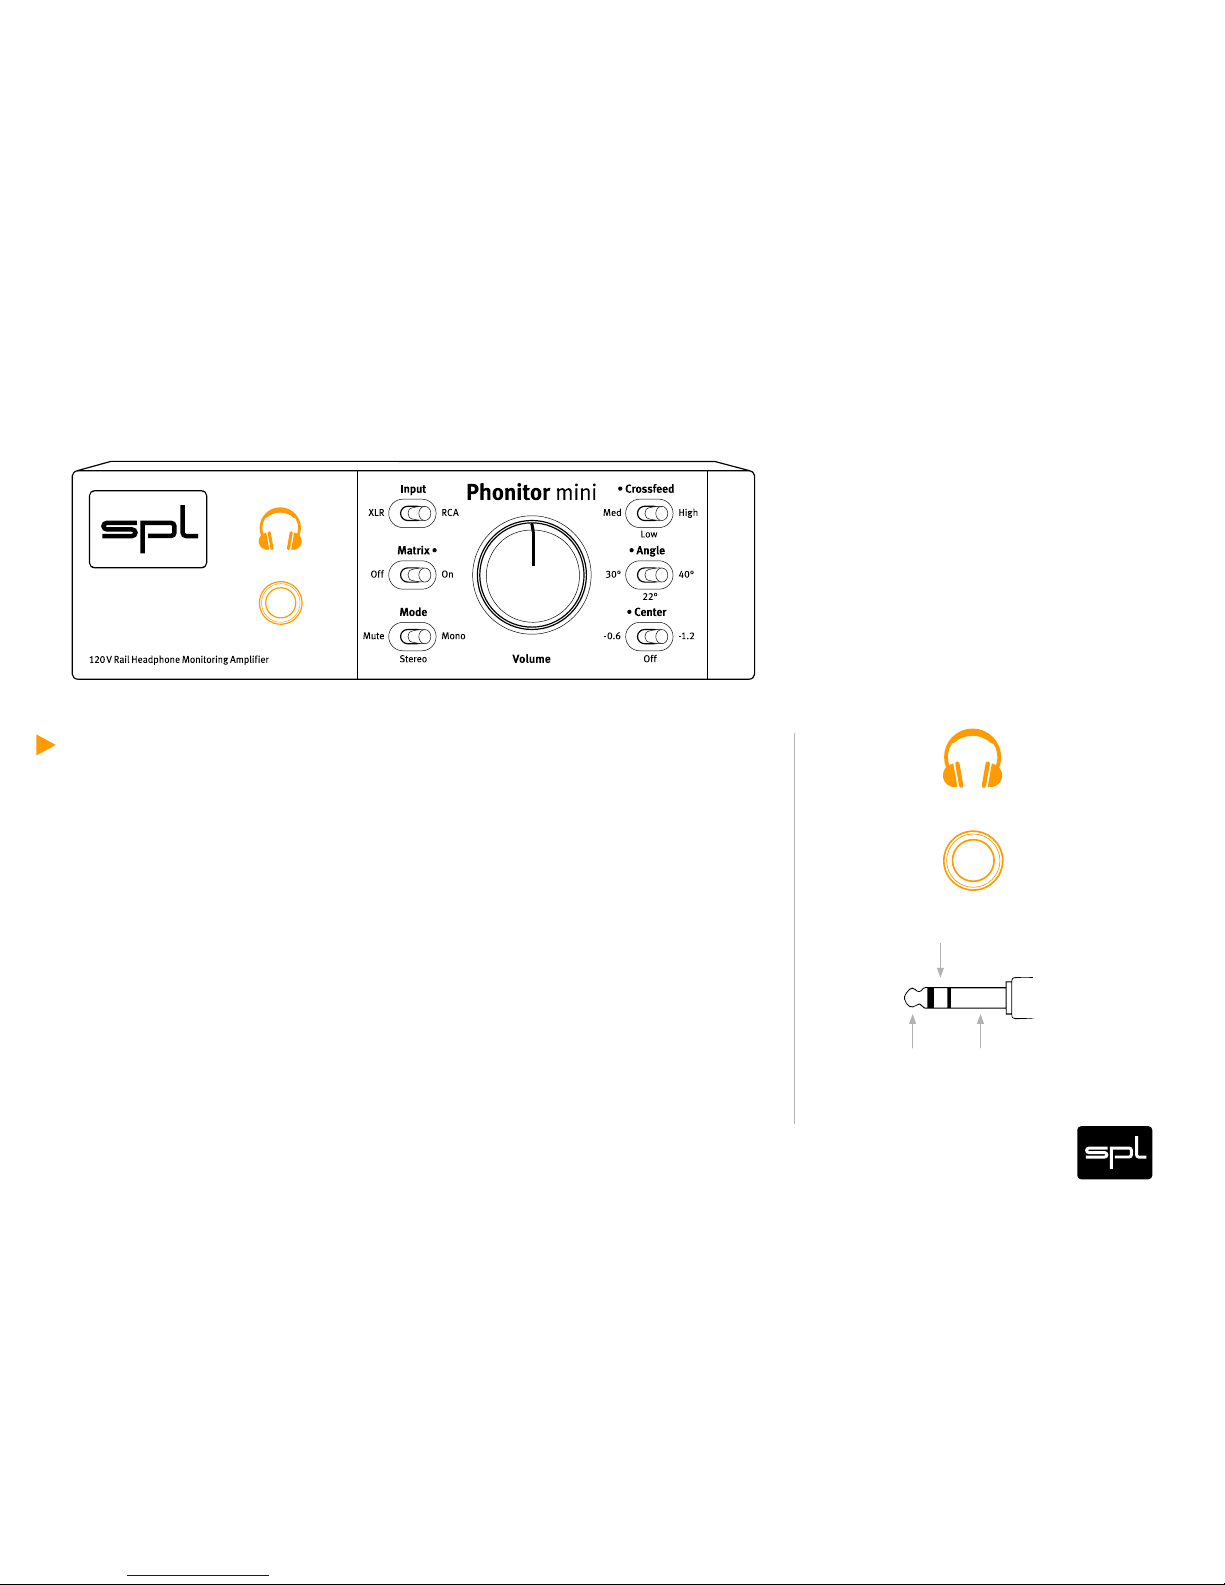
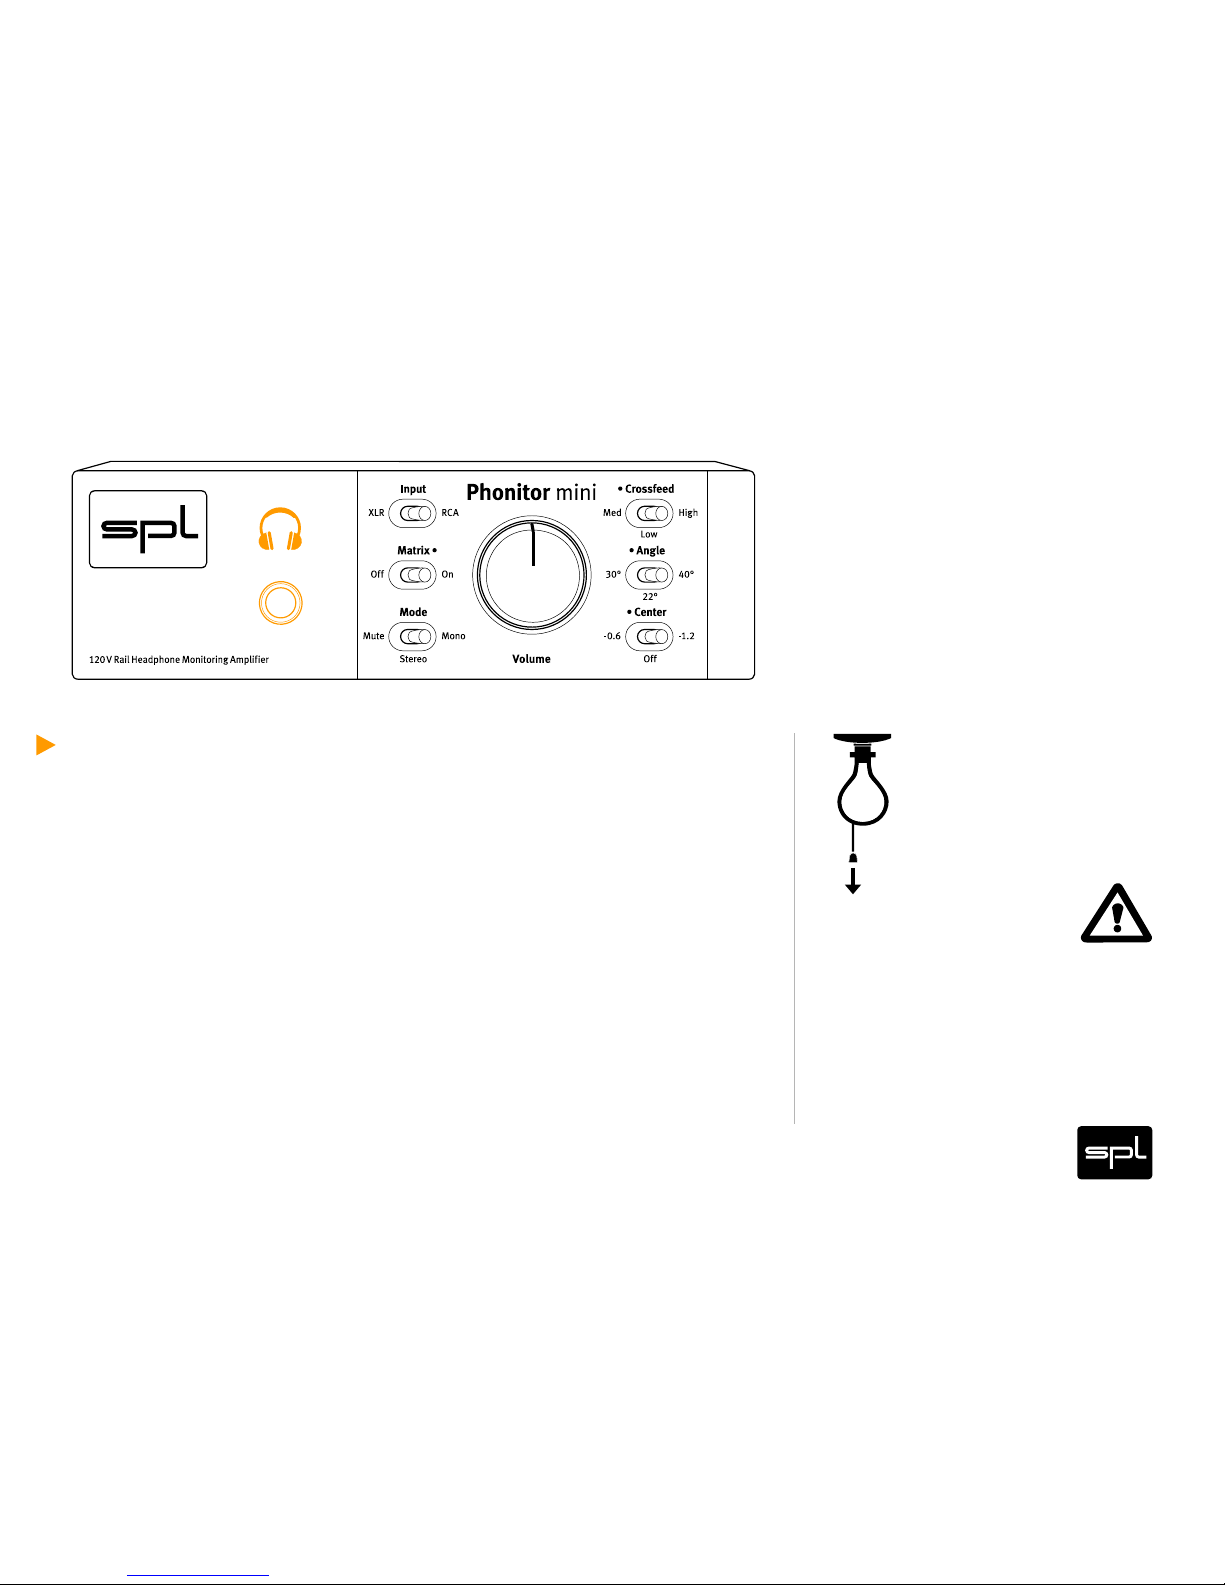
Headphone Connection 32
Rear Panel: Power 34
Voltage Select 34
Power Connection 36
On/Off Switch 37
Rear Panel: Signals 38
XLR Sockets 38
Operation 39
Setting up the Phonitor Matrix in three steps 39
Symbols 44
Security Advices 45
Declaration of CE Conformity 50
Notes on Environmental Protection 51
Contact 52
Content
Page 4

4Phonitor mini
Developer: Bastian Neu
This manual contains a description of the product SPL Phonitor mini,
Model 1320. In no way it represents a guarantee of particular cha-
racteristics or results of use. The information in this document has
been carefully compiled and verified and, unless otherwise stated
or agreed upon, correctly describes the product. Sound Performance
Lab (SPL) continuously strives to improve its products and reserves
the right to modify the product described in this manual at any time
without prior notice.
This document is the property of SPL and may not be copied or reproduced in any manner, in part or fully, without prior authorization by
SPL.
Phonitor mini
Version 1.0 – 6 /2014
Page 5

5Phonitor mini
Scope of Delivery
Phonitor mini, Model 1320
Power cord
Scope of Delivery
Page 6

6Phonitor mini
Introduction
Phonitor
When we brought out the first Phonitor — the first ever headphone
amp with 120 Volt technology — back in 2008, the professional
audio world seemed to have been eagerly awaiting it. The success
of this unique headphone preamp was overwhelming. In hindsight,
we also had to wonder how none of us had come to the idea of combining basic monitoring options, speaker simulation capabilities
and a headphone preamp. Ever since we call this new species a
„Headphone Monitoring Amp,“ which inspired the product name itself: Phonitor.
Interestingly enough, the Phonitor not only became best friends with
thousand of professional users, it also won a lot of fans in the Hi-Fi
market segment. But that was by no means a coincidence — ultimately, the Phonitor can be counted among the best headphone preamps in the world thanks to our unique 120-Volt technology.
Page 7

7Phonitor mini
Phonitor 2
Many Phonitor users told us they wished they could also use the
unmatched signal quality that the Phonitor provides to feed their
speakers.
And so began to take form the idea of making its successor a fullfledged stereo preamp that could become the heart of modern professional and home systems alike where headphones have a preeminent importance.
We have further achieved new progress regarding the 120-Volt circuit
technology, so the technical specifications of the Phonitor 2 have
been improved in almost all areas, setting new standards.
Other improvements concern, particularly, the use of virtually any
type of headphone with any impedance. The Phonitor 2 is completely indiscriminating with low-impedance headphones starting at 10
Ohm and balanced headphones with load impedances starting at 40
Ohms.
Introduction
Page 8

8Phonitor mini
Phonitor mini
The outstanding technical and sonic characteristics of the Phonitor
2 were translated into a more compact and less-expensive format to
create the Phonitor mini.
Its ease-of-use, small and sturdy housing and affordable price, make
the Phonitor mini the perfect headphone amp for home studios, hi-fi
enthusiasts and mobile recording and mixing.
The Phonitor mini is our high-end/low-size version of a premium
headphone amplifier. And it obviously features the Phonitor Matrix
too, to recreate speaker-like working conditions, plus the developments of the second generation of our 120-Volt amplifier technology.
Introduction
Page 9
9Phonitor mini
Home Listening
Home users can now get — for an unheard-of value for money — a
headphone amplifier to enjoy an authentic sound reproduction with
headphones.
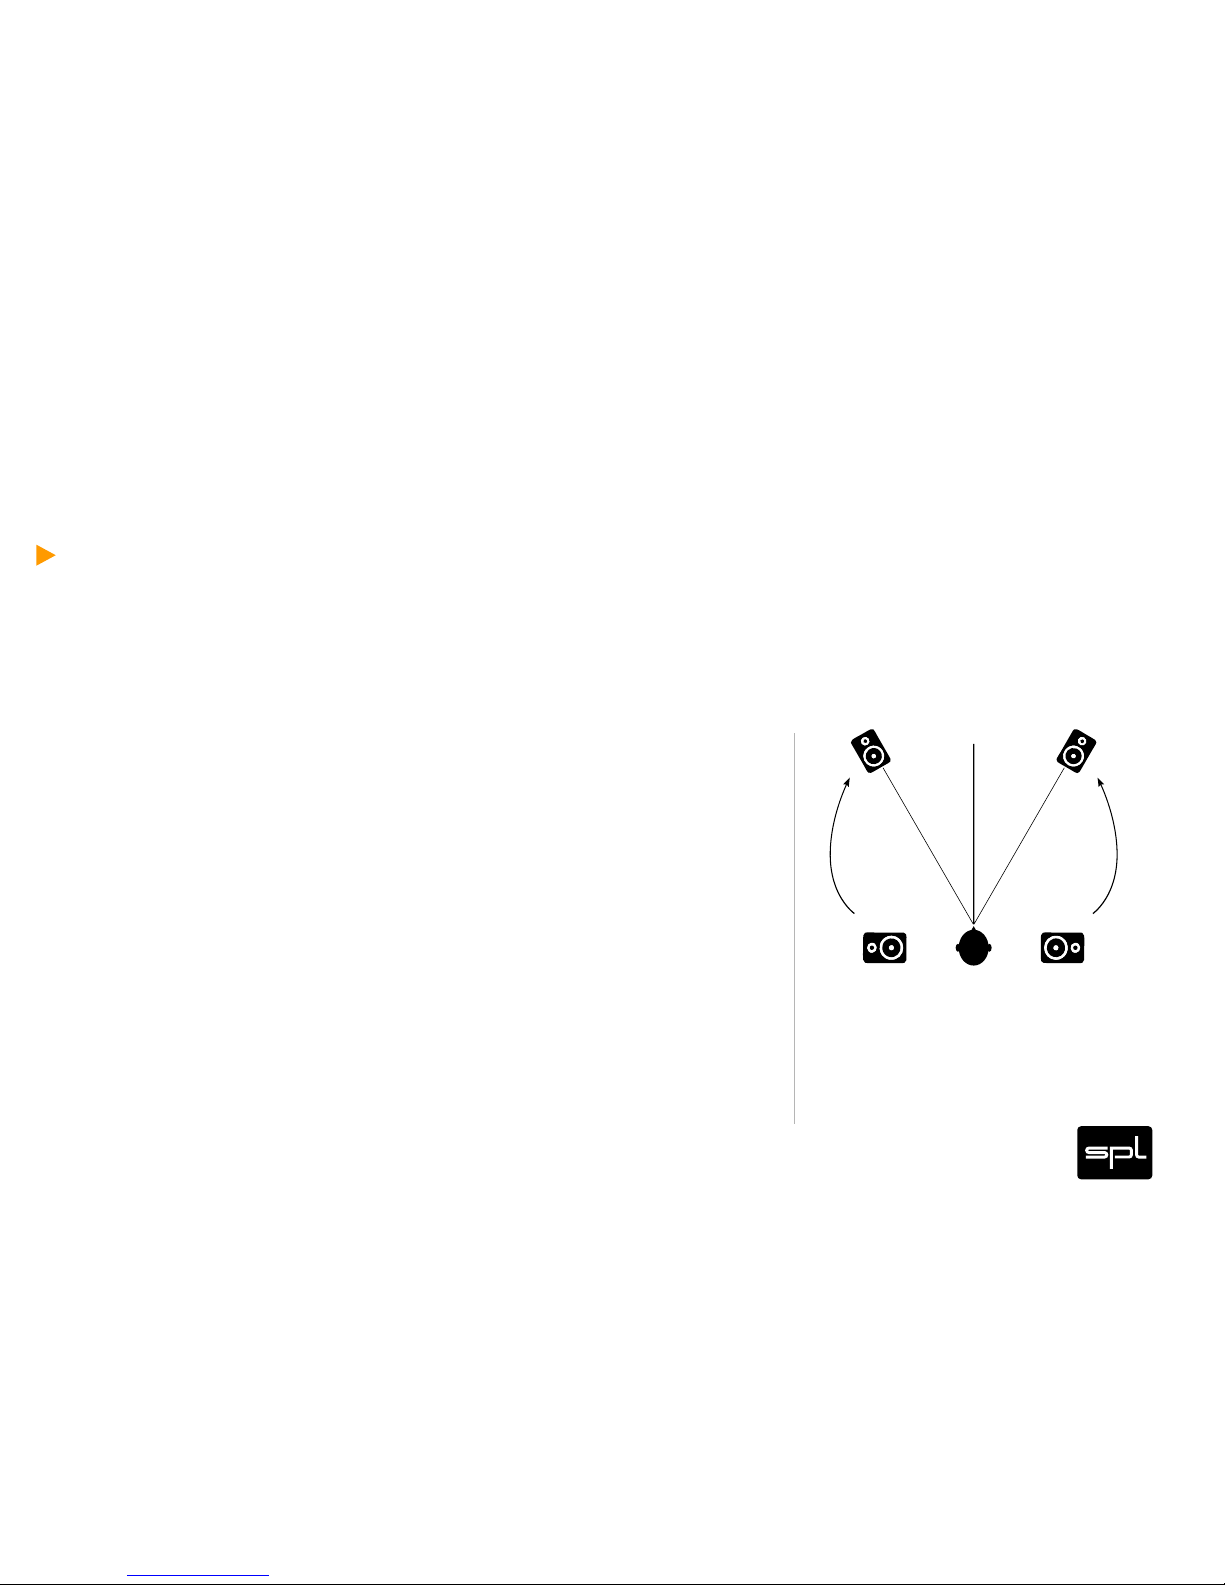
Headphones usually provide a 180-degree stereo image (the Super
Stereo effect), and that‘s exactly where the problem is rooted.
Generally speaking, music is mixed so that all instruments are reproduced correctly in their position when the loudspeakers form a stereo triangle.
Thus, headphone reproduction is not the same as it was intended
during recording. The side component becomes too important during
playback, and effects like delay and reverb are reproduced in an
exaggerated way. The position of instruments and vocals in the stereo image is pushed further apart. All in all, the sound is not authentic anymore. With our Phonitor Matrix, music playback with headphones becomes a real delight thanks to an authentic perception of the
stereo width, a more precise localization of the sound sources and a
correct balance between effects and other elements.
Introduction
0°
30°30°
Page 10
10Phonitor mini
Sound Engineers
Studio engineers will find in the Phonitor mini a high-quality headphones amplifier.
On the one side, there is the traditional, analytical work with headphones as with a magnifying glass, which can be done always bearing in mind the lack of room influence. Working with a magnifying
glass has its advantages when it comes to discovering noises, clicks
and crackles, assessing edits, or spotting problems of single tracks.
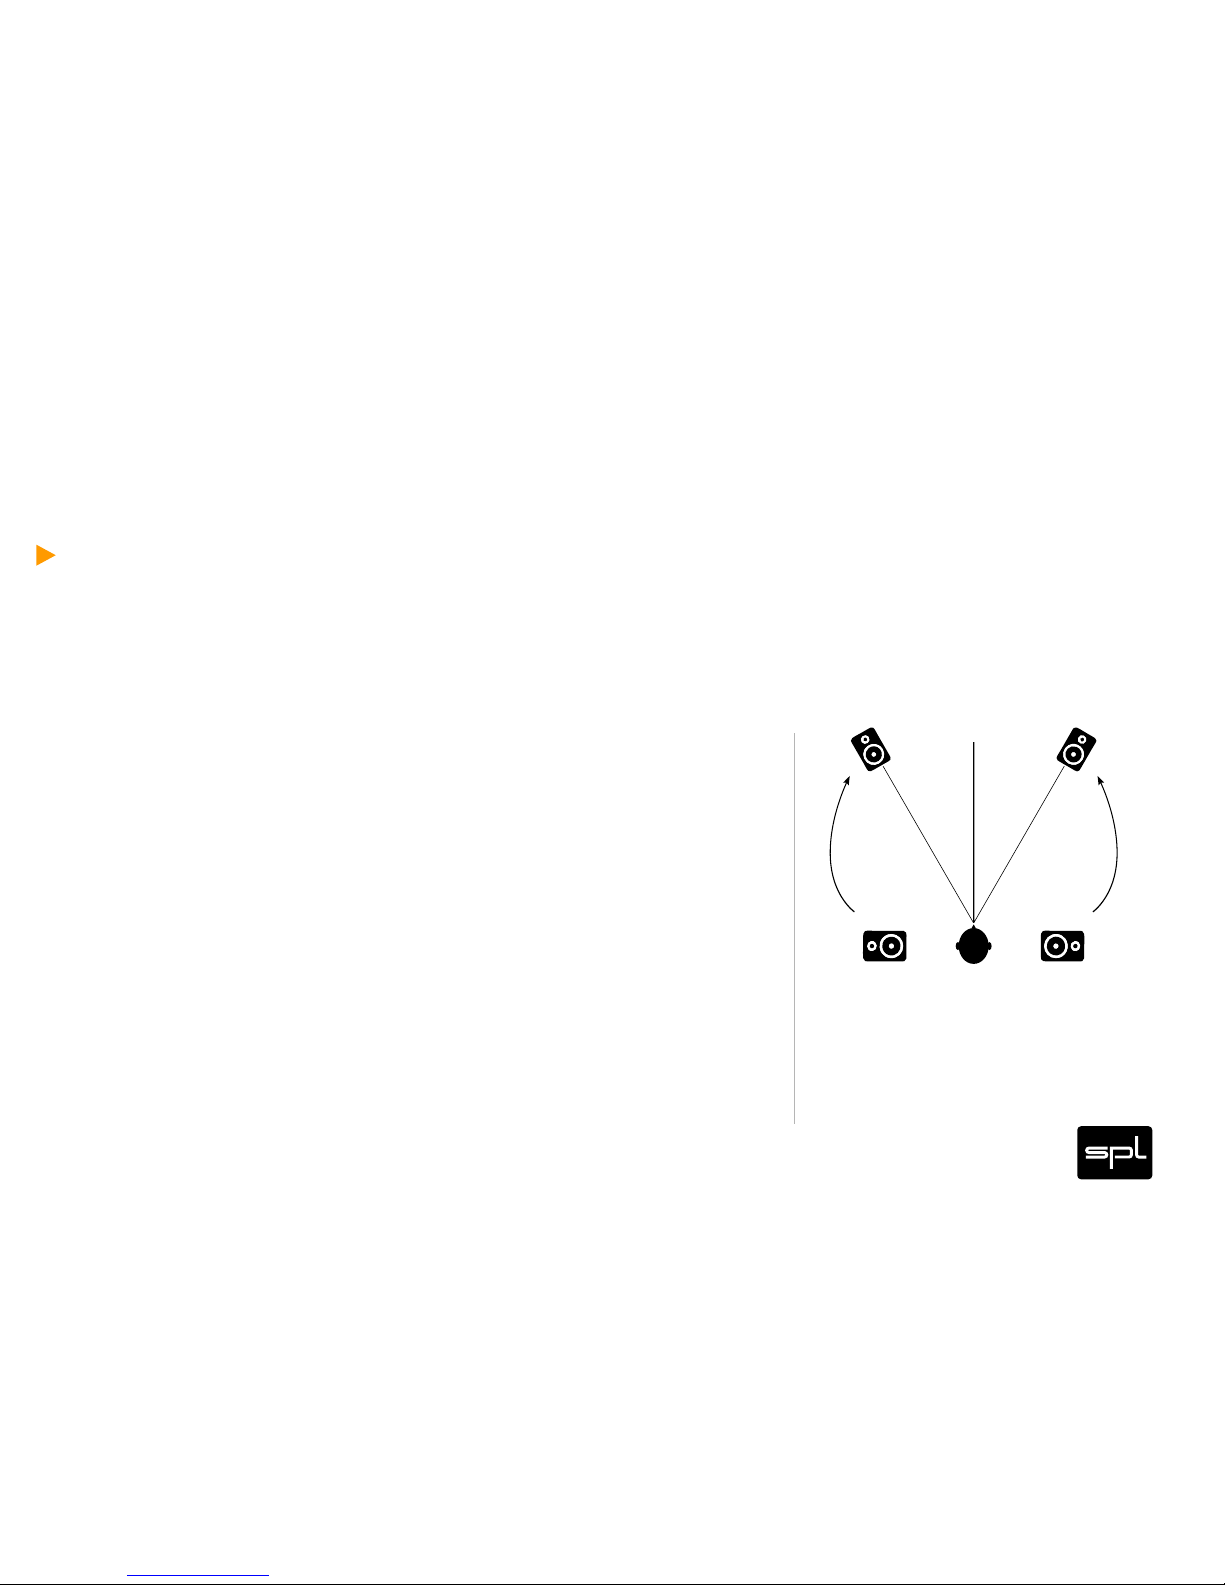
On the other side, the Phonitor Matrix makes it possible to correctly
determine the position of sound sources in the mix. Spatial information and effects are also more easily appraised, since the impression
of the stereo width created is not the 180-degree one usually heard
with headphones, but rather that of music being played back through
monitoring speakers in the control room.
Introduction
0°
30°30°
Page 11

11Phonitor mini
The end of ear fatigue
The initially impressive „Super Stereo effect” with headphones can
become tiring with time.
Besides the unnatural ambience impressions, other disadvantages also lead to an early ear fatigue when mixing or listening with
headphones.
A cheap headphone amplifier can also be a good reason for early
hearing fatigue.
Ordinary IC technology is used in almost all of today‘s headphone
amplifiers. In the best of cases, they work with a balanced voltage
supply of +/-15V and up to +/-18V, otherwise, they work with an unbalanced voltage of 9V or 12V from external wall warts.
Introduction
Page 12

12Phonitor mini
Applications
Headphone amplification for two sources
Headphone amplifier for all headphone systems and impedances
Loudspeaker-like reproduction with headphones
Monitoring alternative in studios and mobile units
Mobile reproduction of usual monitoring conditions
Headphone monitoring live or during recording
Introduction
•
•
•
•
•
•
Page 13

13Phonitor mini
Special Features
The Phonitor mini combines the new technical and sonic standards
of the Phonitor 2 with a compact, competitively priced design
Optimally suited for all dynamic headphones from 10 Ohm
Mount-stand compatible with VESA adapter
Ideal for mobile applications
•
•
•
•
Introduction
Page 14

14Phonitor mini
Tech Talk
120 Volt Technology
The foundations of this high-end-development is our 120 Volt reference technology: specially developed and manufactured op-amps
that run on an operating voltage of 120 volts, which corresponds to
approximately twice that of most modern analog audio semiconductor
technologies.
Thanks to our 120-volt circuitry and processing we reach outstanding
performance levels, especially in terms of dynamic range and headroom. As such, the technical specifications exceed all known analog
and digital standards.
Page 15
15Phonitor mini
Tech Talk
The advantages of the 120-Volt operating voltage
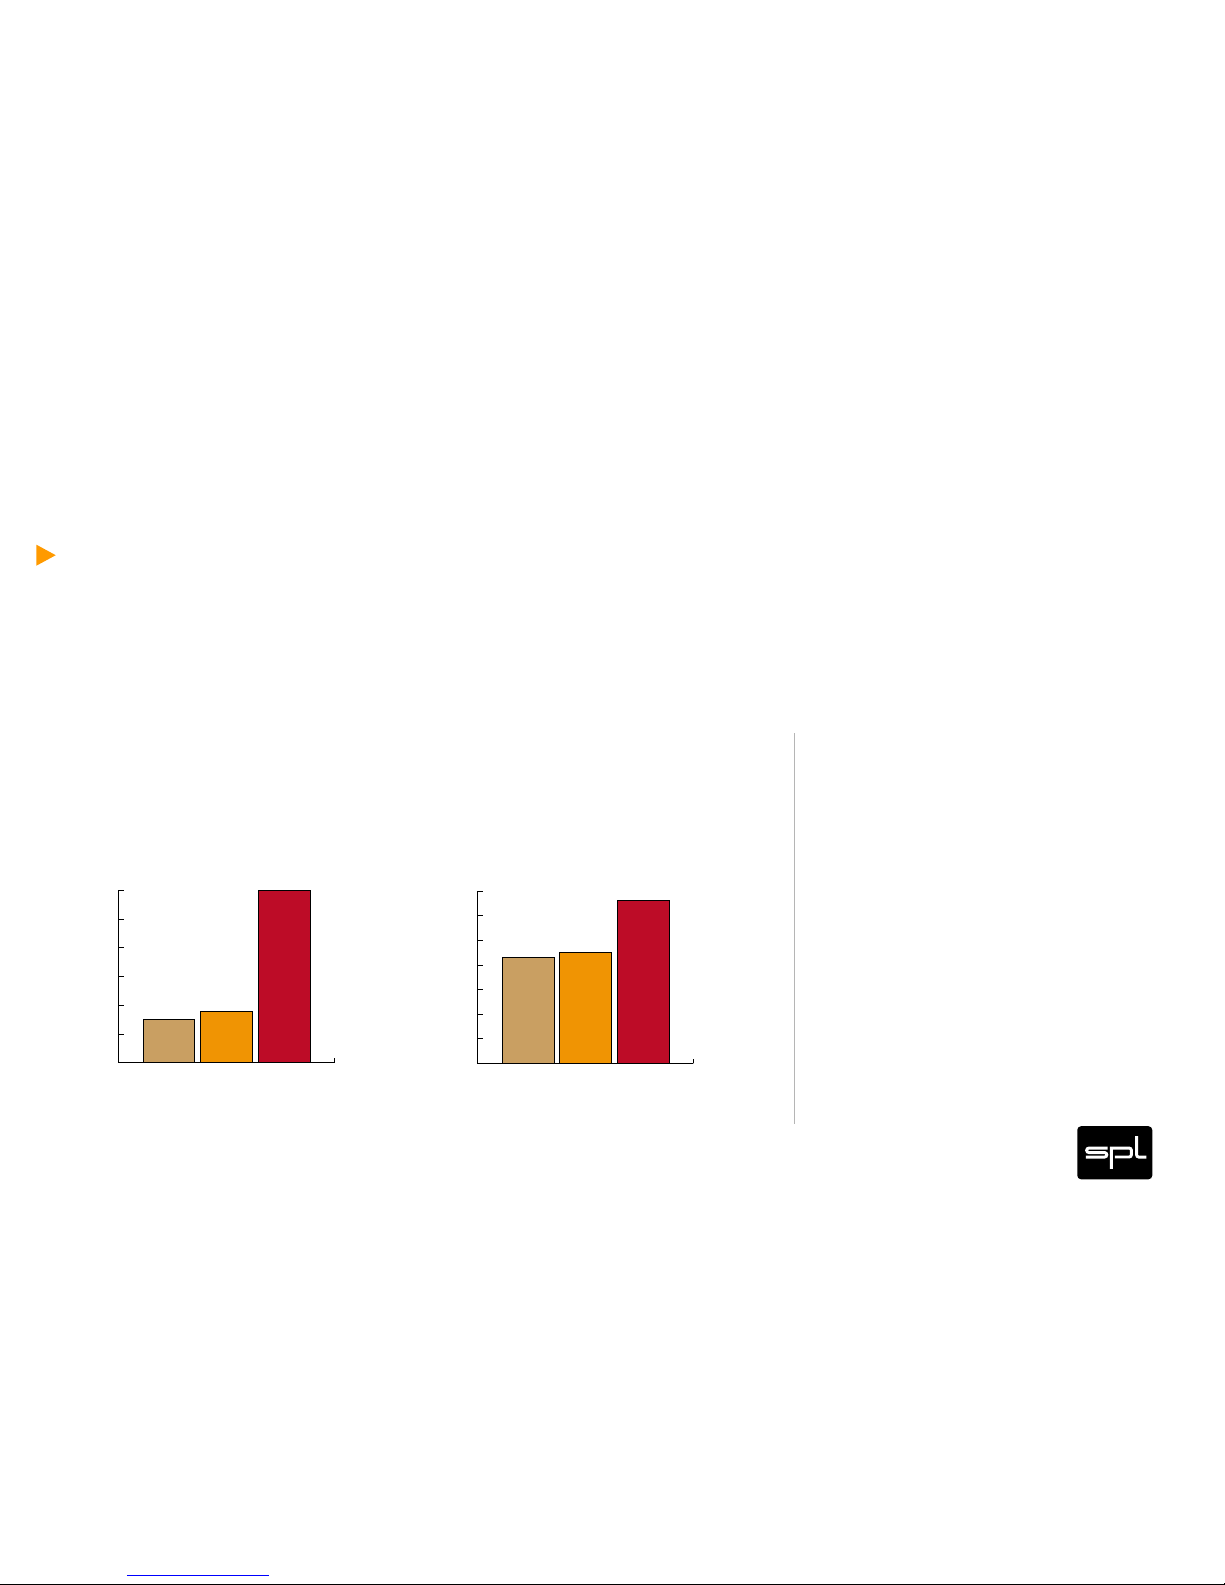
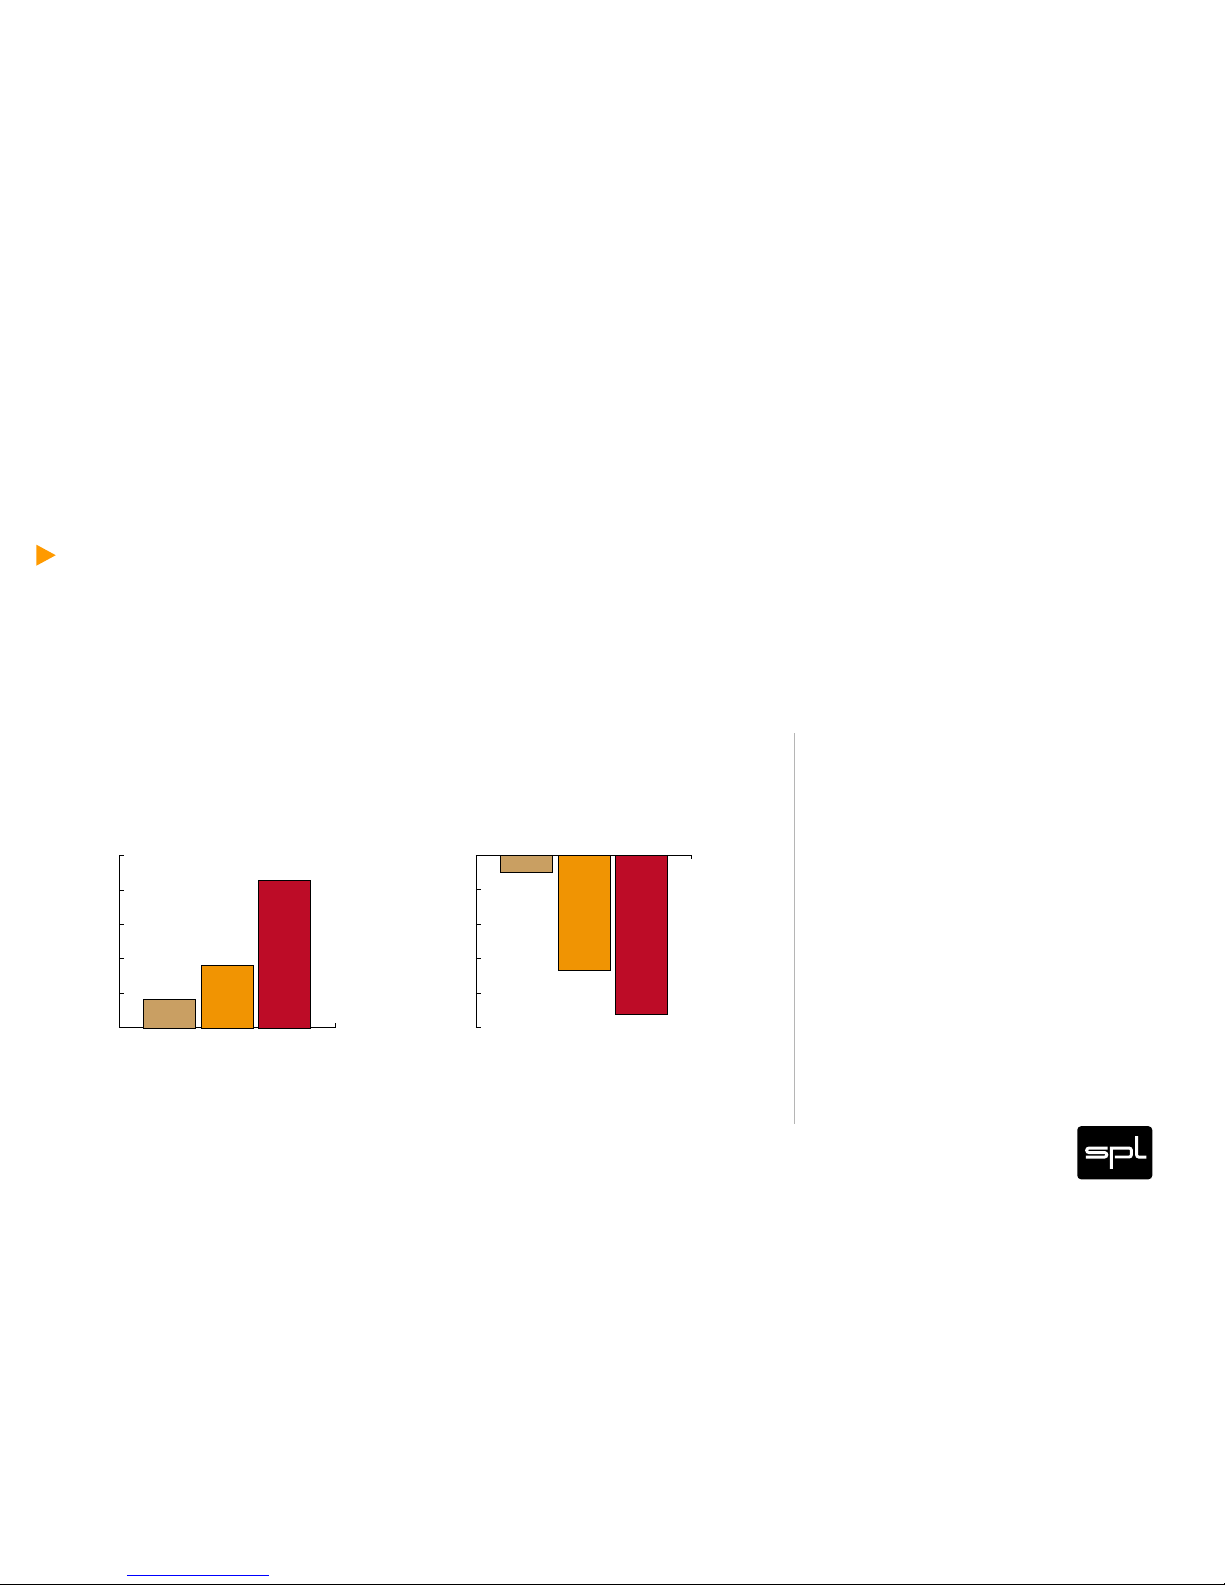
These diagrams clearly show how our 120-volt technology compares
to other circuits with a lower operating voltage. The direct relation
between operating level and maximum level is fundamental for the
classification:
the higher the operating level, the higher the maximum level a circuit
can handle.
0
5
10
15
20
25
30
35
dBu
OPA 134@30 V OPA 134@36 V SPL-OP@120 V
21,5
22,5
33,2
Comparison Maximum Levels
0
20
40
60
80
100
120
Volt
+/- 15 Volt +/- 18 Volt +/- 60 Volt
30 V
36 V
120 V
Comparison Operational Voltages
Page 16
16Phonitor mini
Tech Talk
The advantages of the 120-Volt operating voltage
Since virtually all essential acoustic and musical parameters depend
on this relation, a higher operating voltage also has a positive impact
on the dynamic range, distortion limit and signal-to-noise ratio.
120
125
130
135
140
145
dBu Comparison Dynamic Range
OPA 134@30 V OPA 134@36 V SPL-OP@ 120V
124,2
129,1
141,4
-115
-113
-111
-109
-107
-105
dBu
TL 071@30 V OPA 134@36 V SPL-OP@120 V
106
111,7
114,2
Comparison THD&N
Page 17

17Phonitor mini
Tech Talk
The advantages of the 120-Volt operating voltage
Do bear in mind that dB scales do not represent linear but rather
exponential increases. A 3dB increase corresponds to doubling the
acoustic power, +6dB correspond to twice the sound pressure level,
and +10dB correspond to twice the perceived loudness.
When it comes to volume, the 120-volt technology exhibits a performance, in regard to maximum level and dynamic range, that is twice
that of common components and circuits given that its values are
approximately 10dB higher.
THD measurements of the SPL op-amp show a difference of more
than 3dB compared to the OPA134 at 36V — in terms of sound pressure level, that corresponds to an improvement of more than 50%.
The operating level most commonly used for audio equipment is
30 volts.
Page 18

18Phonitor mini
Specications
Inputs
XLR connectors:
XLR connectors, electronically balanced
Impedance: bal. ca. 20 kΩ, unbal. ca. 10 kΩ
Max. Input Level: +32,5 dBu
RCA connectors:
RCA connectors, unbalanced
Impedance: ca. 10 kΩ
Max. Input Level: +20 dBu
Considering that the RCA input is raised from -10dBV to +4dBu (approx. 12.7dB), the input level is
comparable to that of the XLR inputs: +20dB + 12.7dB = 32.7dB
0dBu corresponds to 775mV. Subject to modifications.
Page 19

19Phonitor mini
Specications
Headphone Output
6,3-mm TRS connector
Pin wiring: Tip = Left, Ring = Right, Sleeve = GND
Impedance: 0,18 Ω
Attenuation Factor: 180 at 40 Ohm
Frequency Range: ‹10 Hz to ›300 kHz ( -3 dB)
CMR: -88 dB at 1 kHz
Crosstalk: -80 dB at 1 kHz
THD&N: 0,00052 % at 1 kHz
At 0dBu input level and unit y gain, 1 k Hz, 100 kOhm load
Noise: Unweighted -100 dB
A-weighted: - 103 dB
CCIR: -94 dB
Dynamic Range: Unweighted 133,62 dB
Power Amplifier:
2x 1W (+30dBu) at 1 kHz, 600Ω
2x 2W (+30dBu) at 1 kHz, 300Ω
L GND
R
Page 20

20Phonitor m ini
Specications
Power Supply
Voltages: 230 V AC, 50 Hz / 115 V AC, 60 Hz
Power Consumption: max. 15 W
Fuses: 100-120 V AC: T 1 A /220-240 V AC: T 500 mA
Measurement & Weight
Height x Width x Depth: 44 mm x 144 mm x 257 mm
(1,72" x 5,76" x 10,12")
Weight: 2,03 kg / 4,48 lbs
Page 21

21Phonitor m ini
Connecting to the mains
Be very careful to check that the rear chassis power selection is set
correctly before using the unit (230V/50 Hz = 220-240 V, 115V/60 Hz
= 110-120 Volt).
When in doubt about a source, contact your dealer or a professional
electrician.
Read page 35 for instructions on how to set the correct voltage.
Before connecting any equipment make sure that any machine to be
connected is turned off. Follow all safety instructions from page 45.
Hook Up
Page 22

22Phonitor m ini
Placement
Place the unit on a level and stable surface. The unit’s enclosure is EMC-safe and effectively shielded against HF interference.
Nonetheless, you should carefully consider where you place the unit
to avoid electrical disturbances. It should be positioned so that you
can easily reach it, but there are other considerations.
Try not to place it near heat sources or in direct sunlight, and avoid
exposure to vibrations, dust, heat, cold or moisture.
It should also be kept away from transformers, motors, power amplifiers and digital processors.
Always ensure sufficient air circulation by keeping a distance of 4-5
cm/2 inches to other units and to the sides of the unit.
Hook Up
Page 23
23Phonitor m ini
Before You Begin
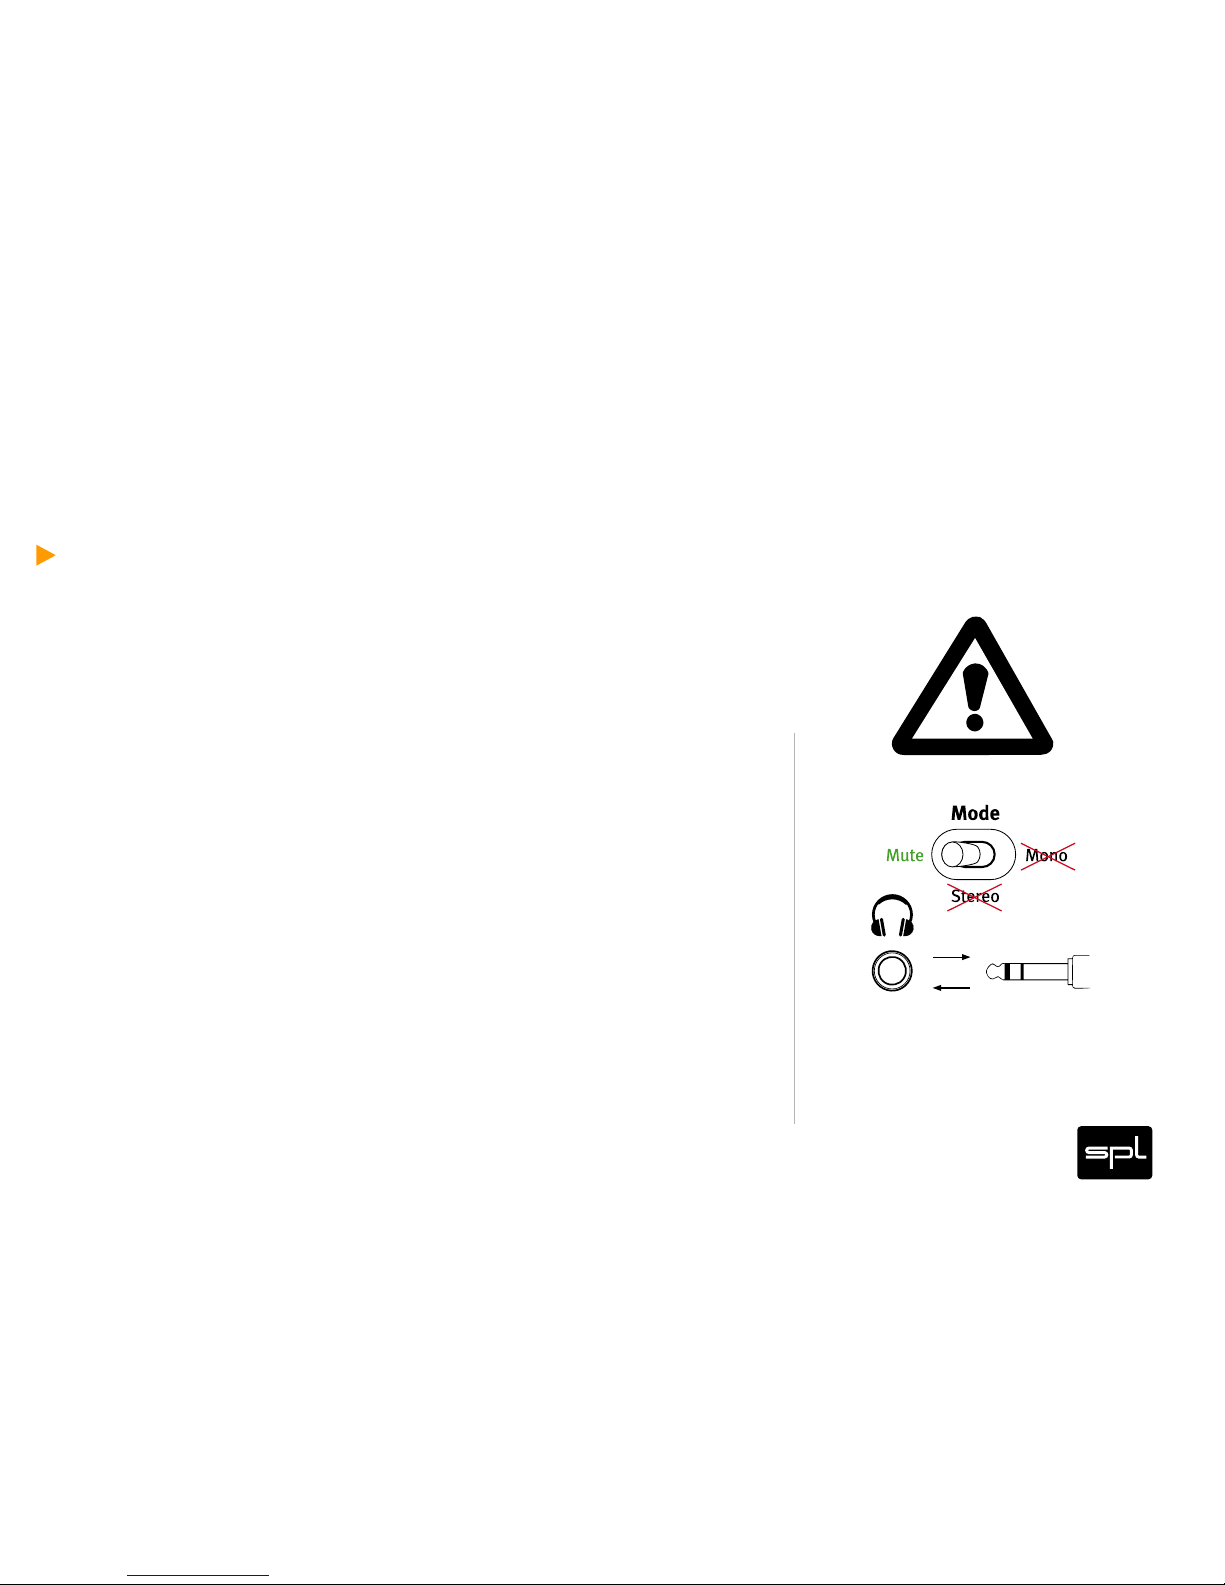
Make sure the Volume control is turned hard left before you power up
the unit. Now control Volume. Note that too high levels can damage
headphones and hearing!
Always MUTE the input before plugging in or unplugging a pair of
headphones. Otherwise the power amplier may be damaged by a
short circuit.
Hook Up
Page 24
24Phonitor m ini
Warning
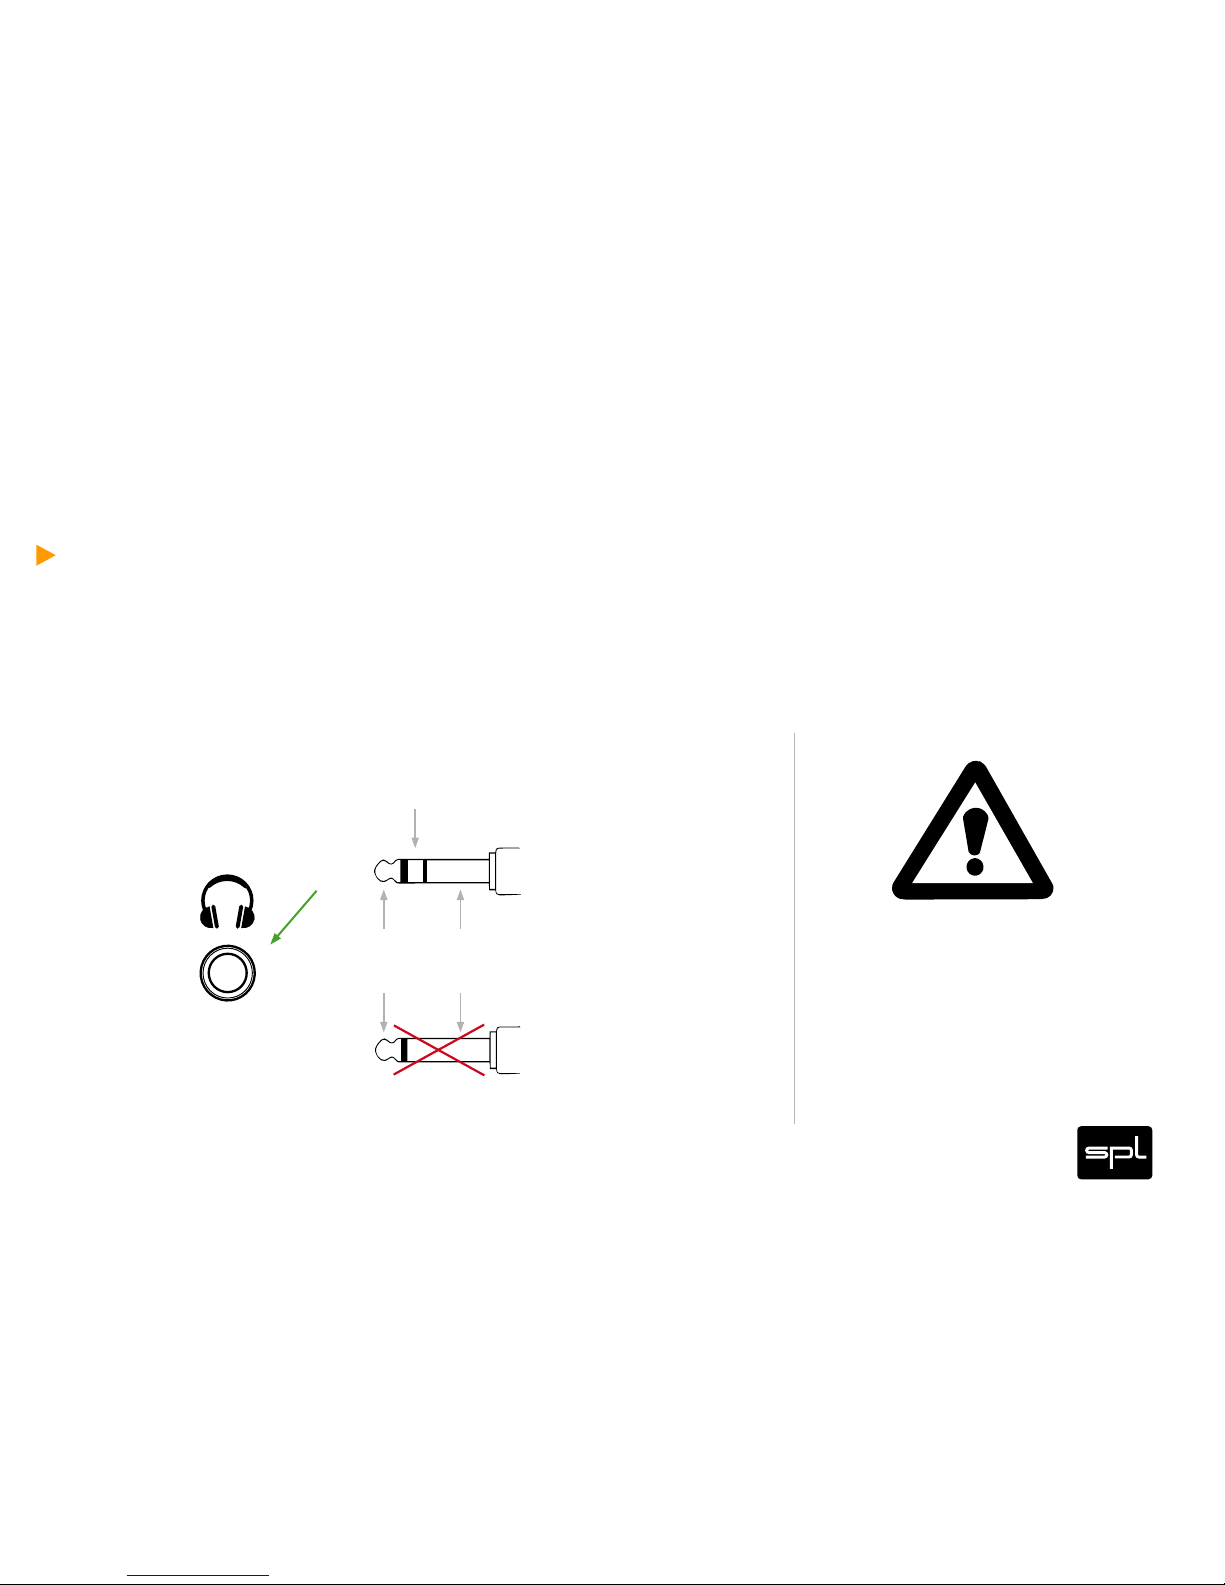
Never connect mono plugs (TS) to the stereo jacks on the front panel.
Hook Up
Tip Sleeve
TRS
TS
Ring
Page 25
25Phonitor m ini
Input: XLR or RCA
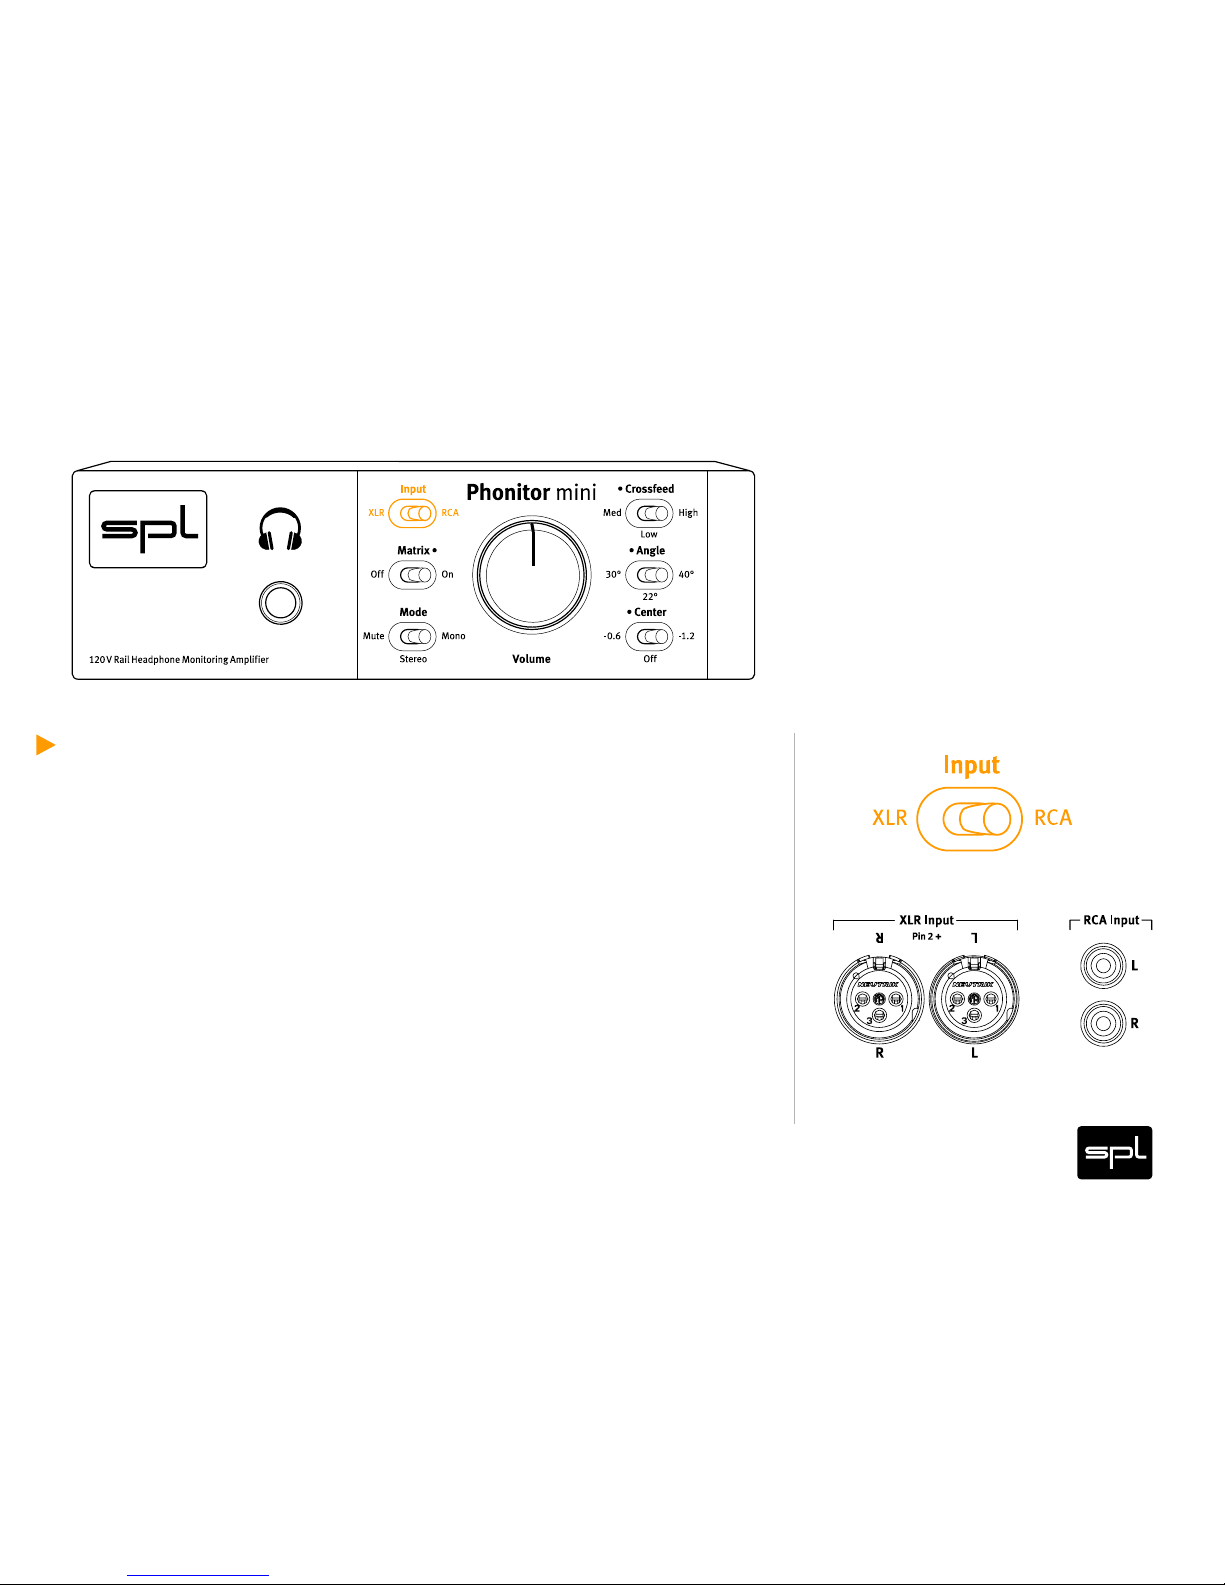
The Phonitor mini provides two different source connections. Use the
Input switch to select one. Both switches are named after the inputs
on the rear.
The RCA input is usually used to connect consumer products. Do
note, however, that the XLR inputs can also be used to connect any
unbalanced outputs .
Bear in mind that the level of the RCA input is raised from consumer
level (-10 dBV) to studio level (+4 dBu).
Control Elements
Page 26
26Phonitor m ini
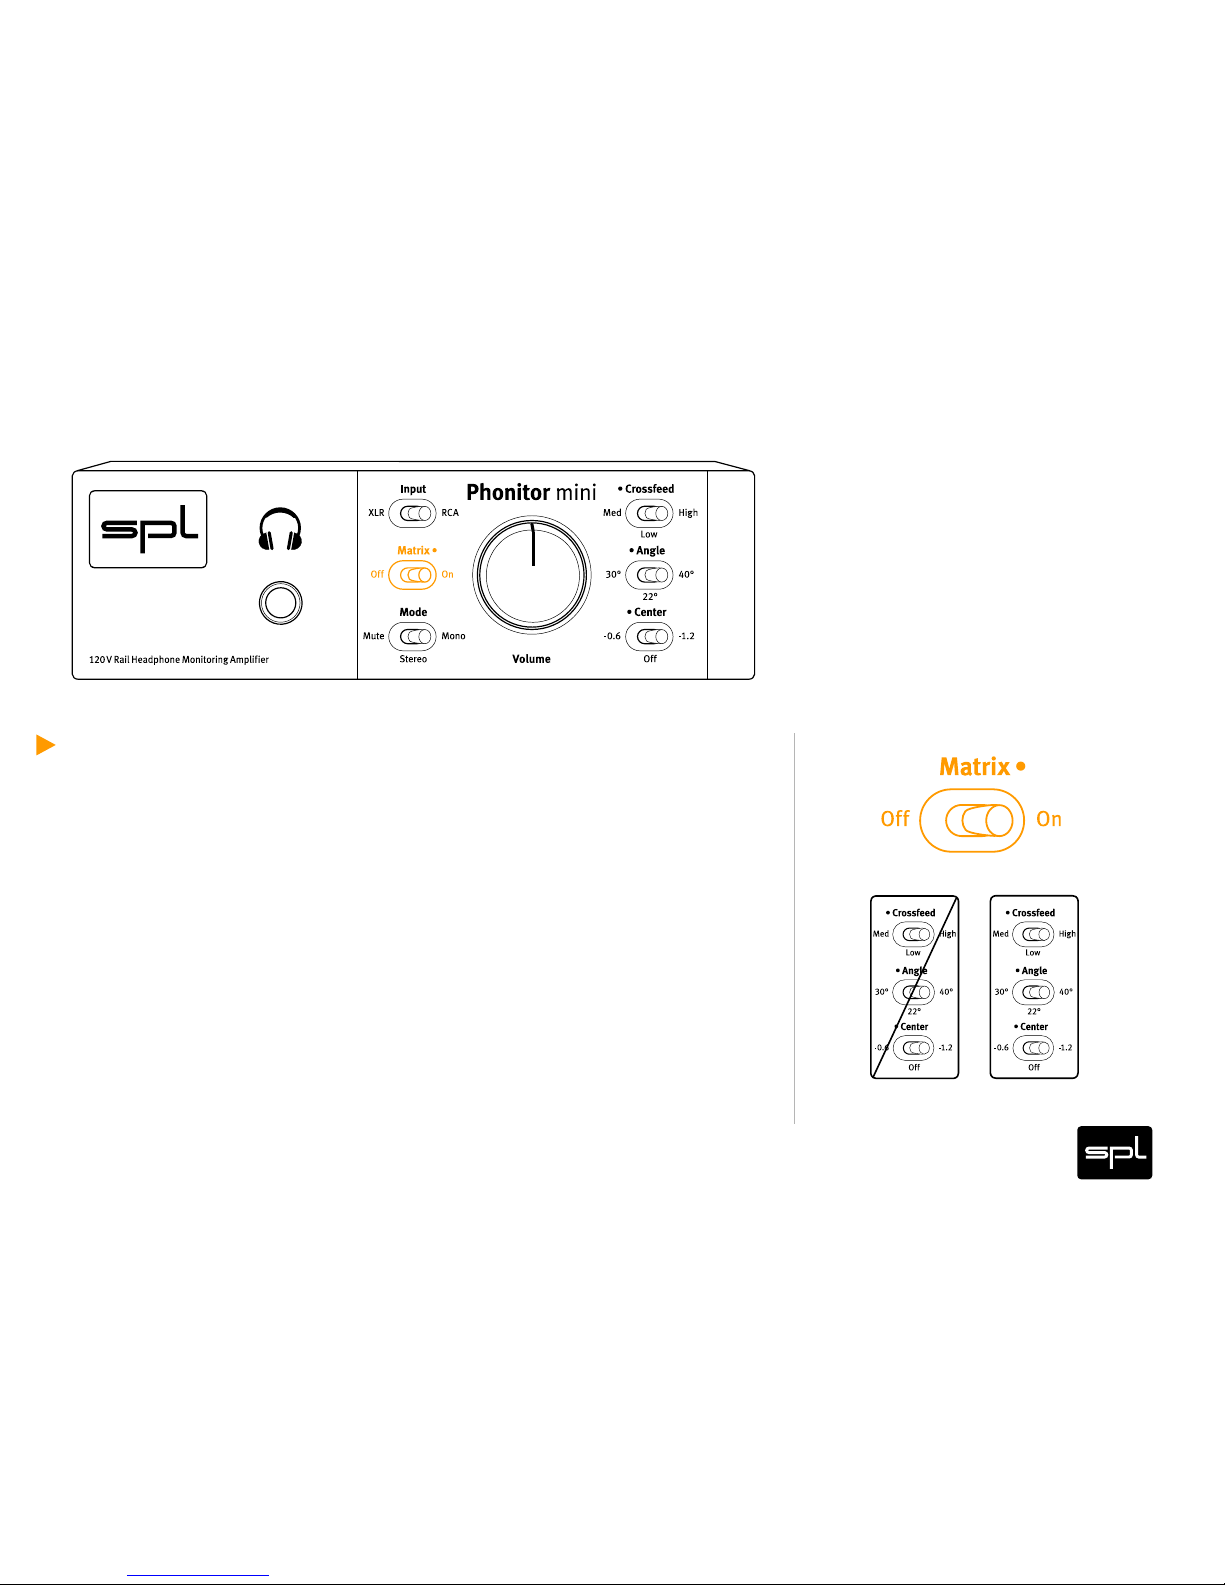
Matrix: On or Off
With Matrix On/Off you switch on or off the Phonitor-Matrix globally.
On activates Crossfeed, Angle and Center, while Off deactivates
them.
A/B comparisons can be made directly.
Control Elements
Page 27
27Phonitor m ini
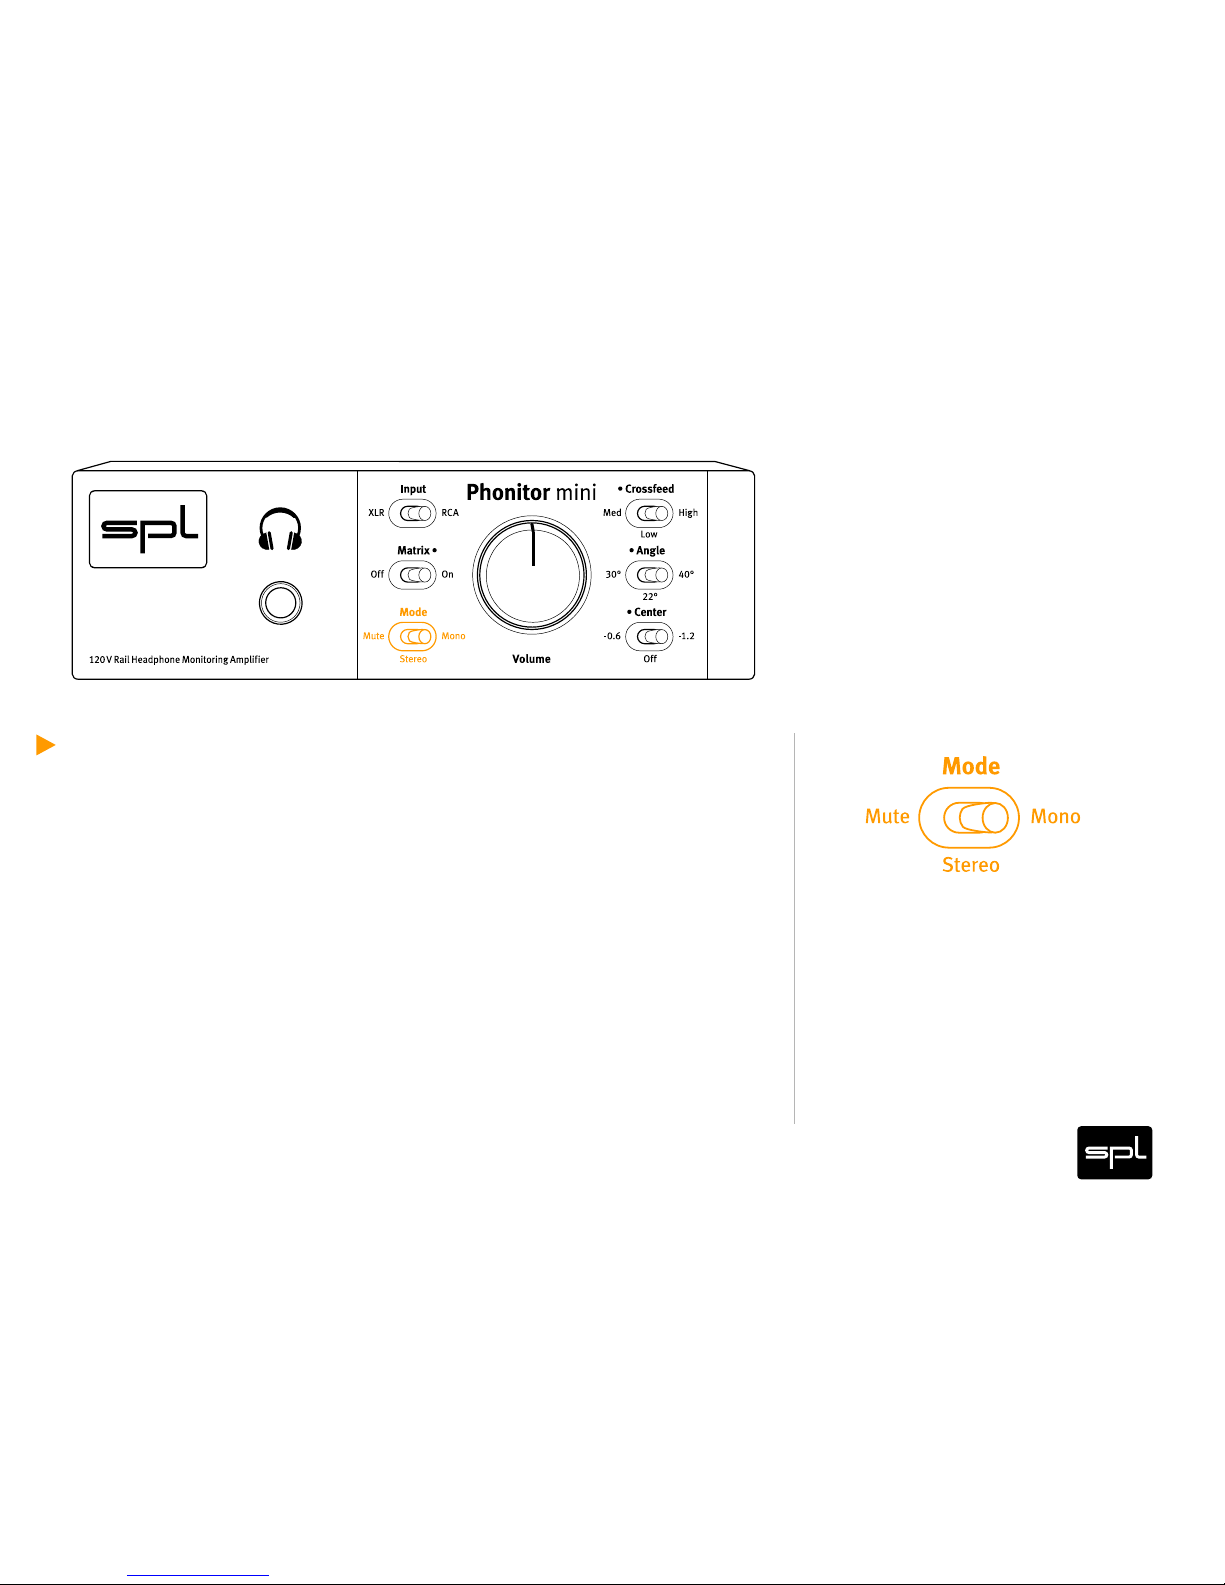
Mode: Stereo, Mono or Mute
The standard setting of the switch is „Stereo,“ to play back stereo
signals.
The mono switch sums the two channels that make up the stereo
signal.
The mono switch is important to check the mono compatibility of the
mix. Even if this mono compatibility test is not as important today as
it used to be, it is still essential for radio mixes and vinyl productions.
In the „Mute“ position, the headphones output is silenced. This is
indicated by the Volume control‘s color, which changes from yellow
to red.
Control Elements
Page 28
28Phonitor m ini
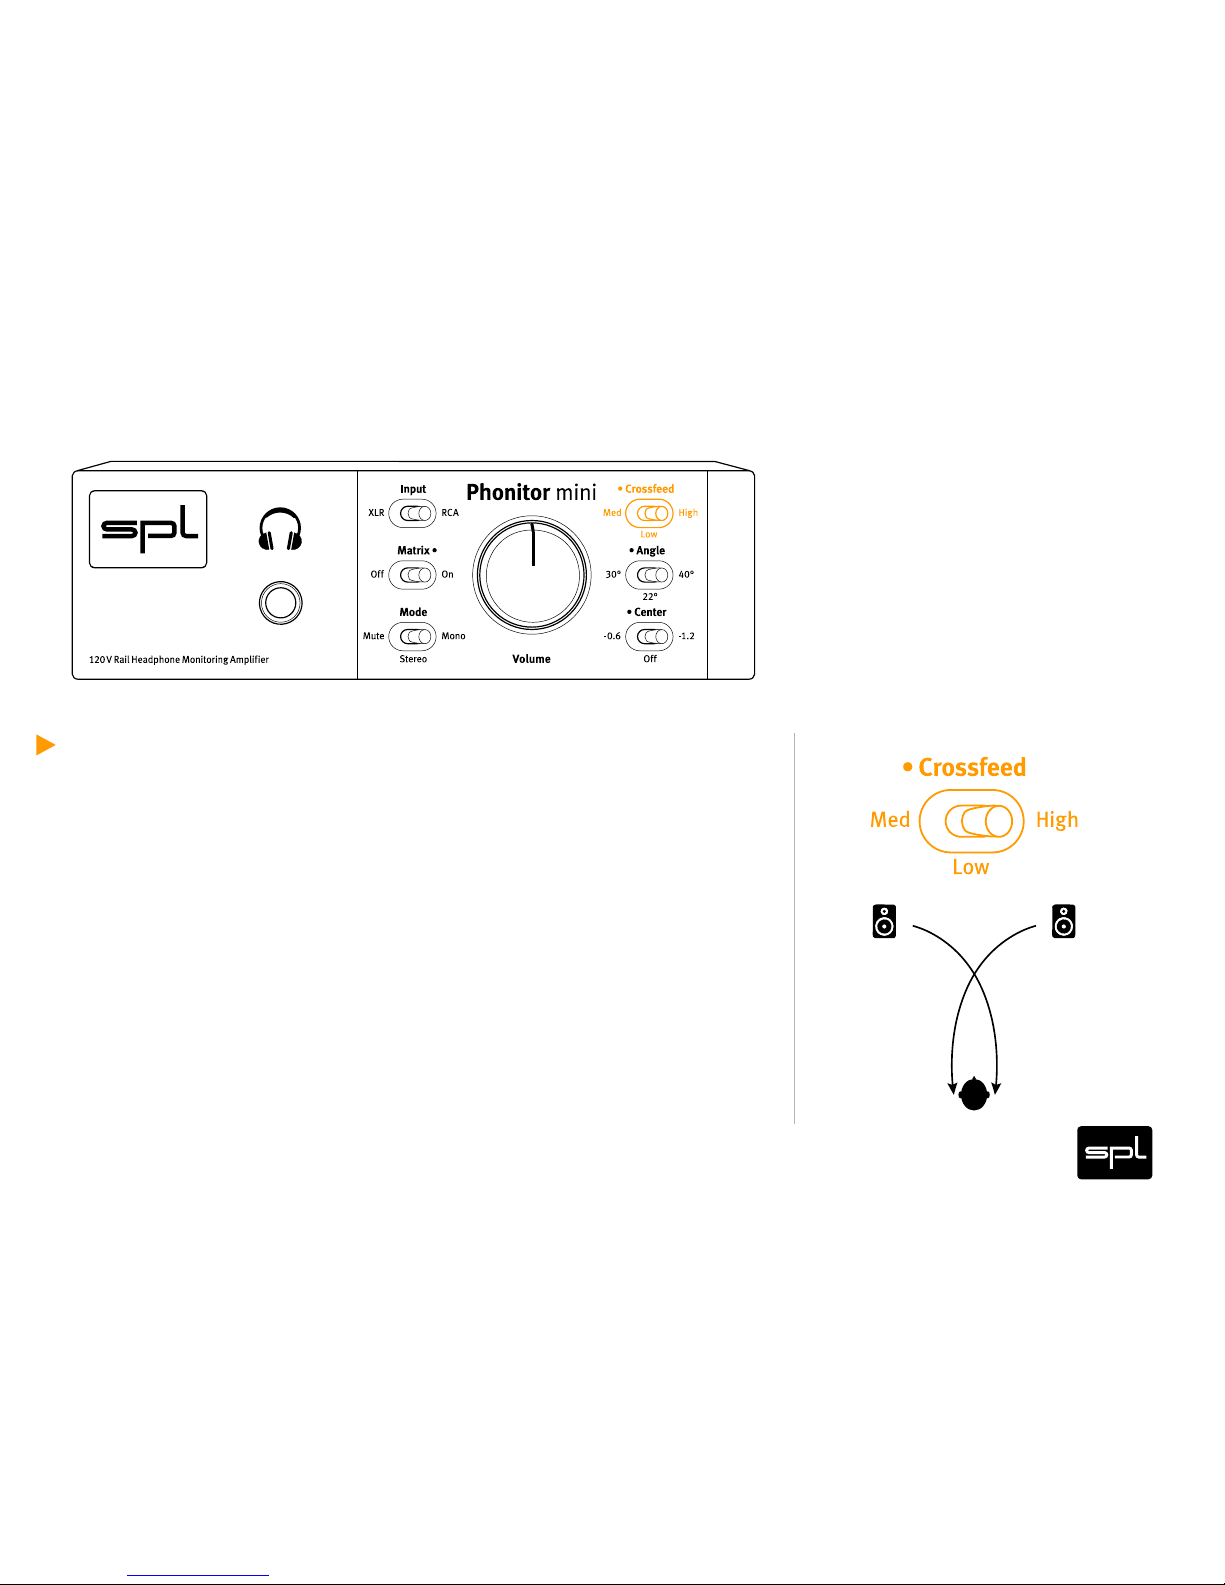
Crossfeed: Low, Med or High
The Crossfeed switch determines the volume-dependent, frequencycorrected channel crosstalk, which is something that occurs naturally with speakers, due to their sound projection into a room. This is
called „Interaural Level Difference“ (ILD).
The different Crossfeed values could be compared to the influence
of different room sizes and characteristics on the same loudspeaker
settings.
The settings available are: „Low,“ „Med“ and „High.“
Crossfeed interacts with the Angle setting to determine the stereo
image.
Control Elements
Page 29
29Phonitor m ini
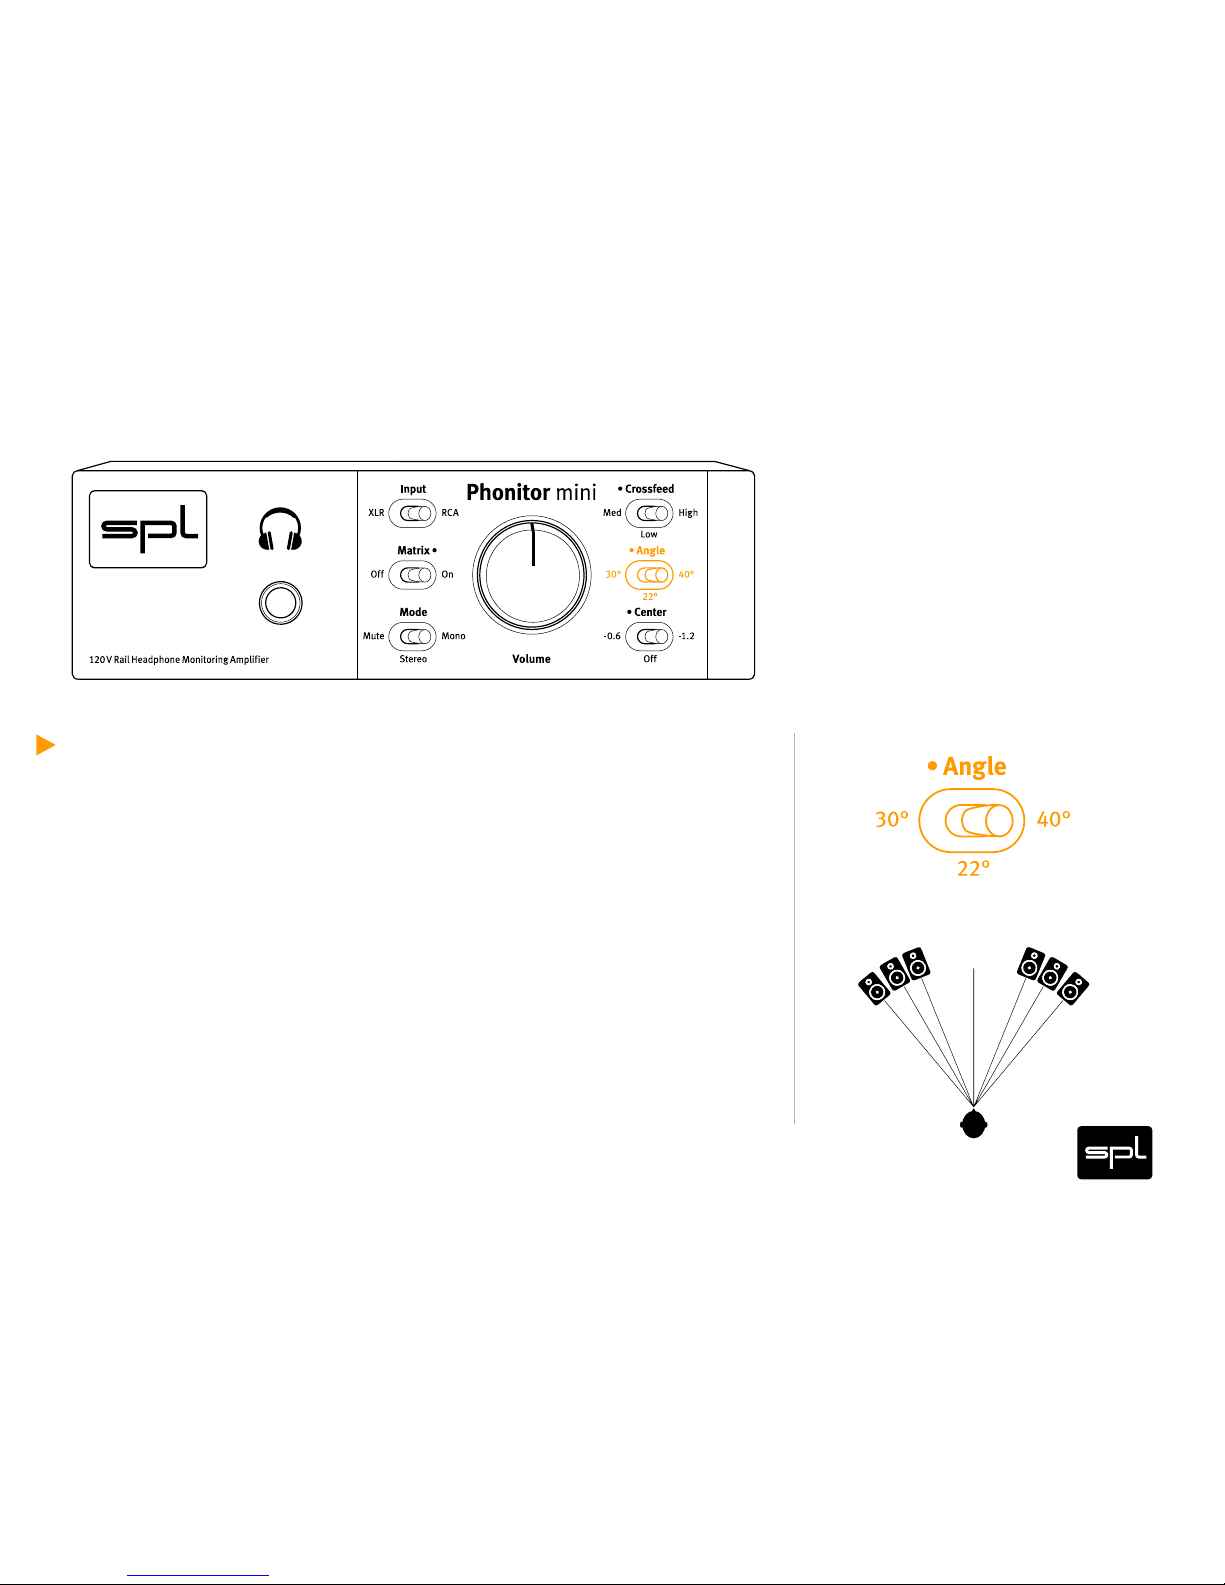
Angle: 30°, 22° or 40°
With the Angle switch you define the frequency-corrected channel
crosstalk. In this case, we are dealing with „Interaural Time Difference“
(ITD). The influence of the point in time at which the signal reaches
the opposite ear corresponds to the variation of the angle at which a
real loudspeaker pair is placed.
You can select either 30°, 22° or 40° angles.
Tip: When you use headphones whose loudspeakers are slightly tilted forward (Ultrasone with SLogic or Audeze), we recommend you not to use the 30° setting, but rather the 40° setting, to make
up for the tilting.
0°
22° 22°
30°30°
40° 40°
Control Elements
Page 30
30Phonitor m ini
Center: -0,6 dB, -1,2 dB or Off
Normally, when using headphones, the mid signal is lower than
the side signals, which seem louder due to the Super Stereo effect.
When you adjust the stereo image of the speakers with the Crossfeed
and Angle settings, the mid component may drop quite intensively.
During mixdown you would counteract this, so that the phantom
image at the center seems lower when playing back through loudspeakers. Thanks to the damping of the center, the mid signal is once
again in balance with the stereo signal.
You can choose between three different settings: -0.6 dB, -1.2 dB or
Off. When playing back music that has been already mixed down, the
Off position is the one that will render the most authentic result.
Off
-0.6dB
-1.2 dB
Control Elements
Page 31
31Phonitor m ini
Volume
The Volume level control allows you to decrease the signal level from
between 0 and -80 dB.
If the volume control is hard right, it is not set to -0 dB but rather to
+7 dB.
Always MUTE the input before plugging in or unplugging a pair of headphones. Otherwise, your
headphones, ears or the power amplifier of the Phonitor may result damaged..
Control Elements
Page 32
32Phonitor m ini
Headphone Connection
Connect headphones to the standard 1/4“ (TRS) stereo plug on the
lower left front panel.
The layout is:
Tip =left channel, Ring = right Channel, Sleeve = ground
When connecting headphones, make sure that the plug is completely
in and that is firmly attached. If the plug is not correctly connected, it
may cause a short circuit that could damage the power amplifier.
L GND
R
Control Elements
Page 33
33Phonitor m ini
Headphone Connection
Reduce volume level before you remove or plug in the headphone (or
when switching headphones).
That way you avoid loud crackles from reaching your ears or the power
amplifier of the Phonitor mini being damaged due to the brief short
circuit when plugging in or unplugging.
Warnung:
Never connect mono plugs (TS) to the stereo
jacks on the front panel. Headphones always
have stereo plugs, which is the reason why
you should always connect them directly.
Control Elements
Page 34
34Phonitor m ini
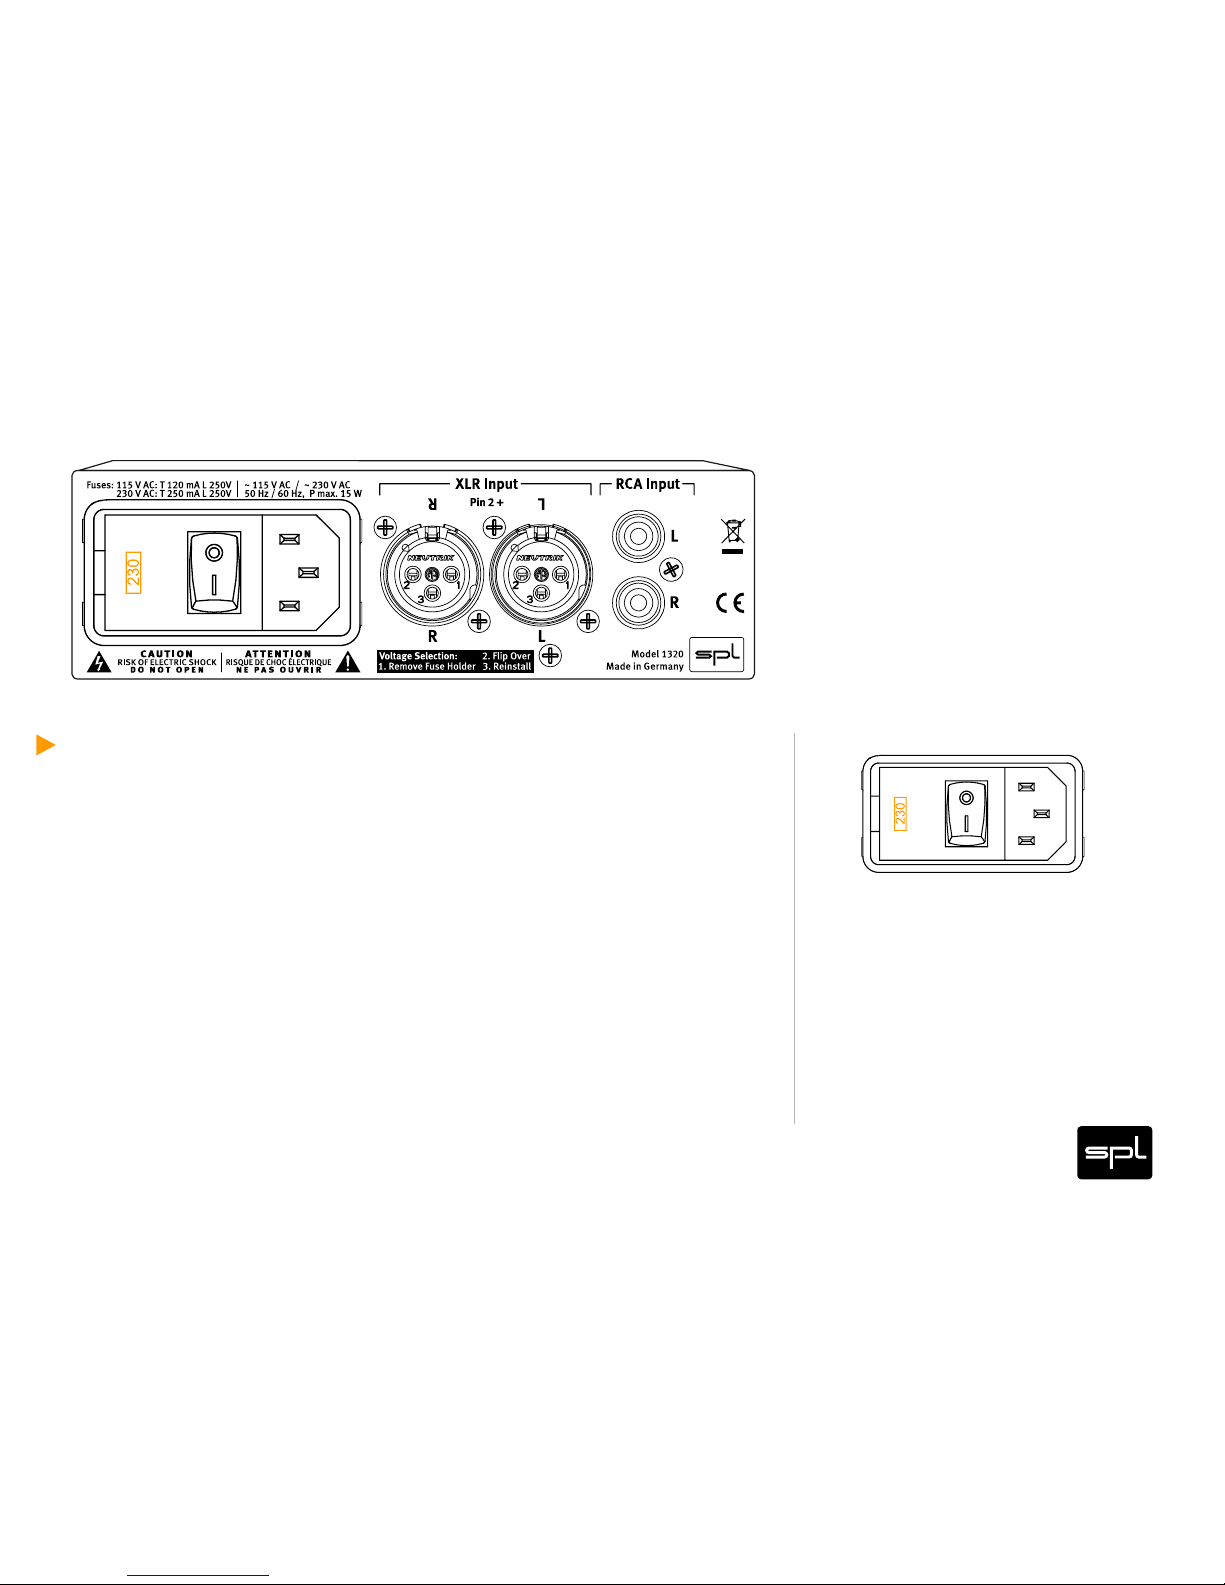
Voltage Select
Before connecting the Phonitor mini to the mains, make sure that the
voltage selection corresponds to the values of your local power grid
(230 or 115 volts).
In German-speaking regions, it is usually 230V.
The mains connector on the rear panel integrates a fuse box that inclu-
des fuses for both voltage ranges. If the voltage indicated does not
correspond to the one required, change it by following the procedure
on the next page.
Rear Panel: Power
Page 35
35Phonitor m ini
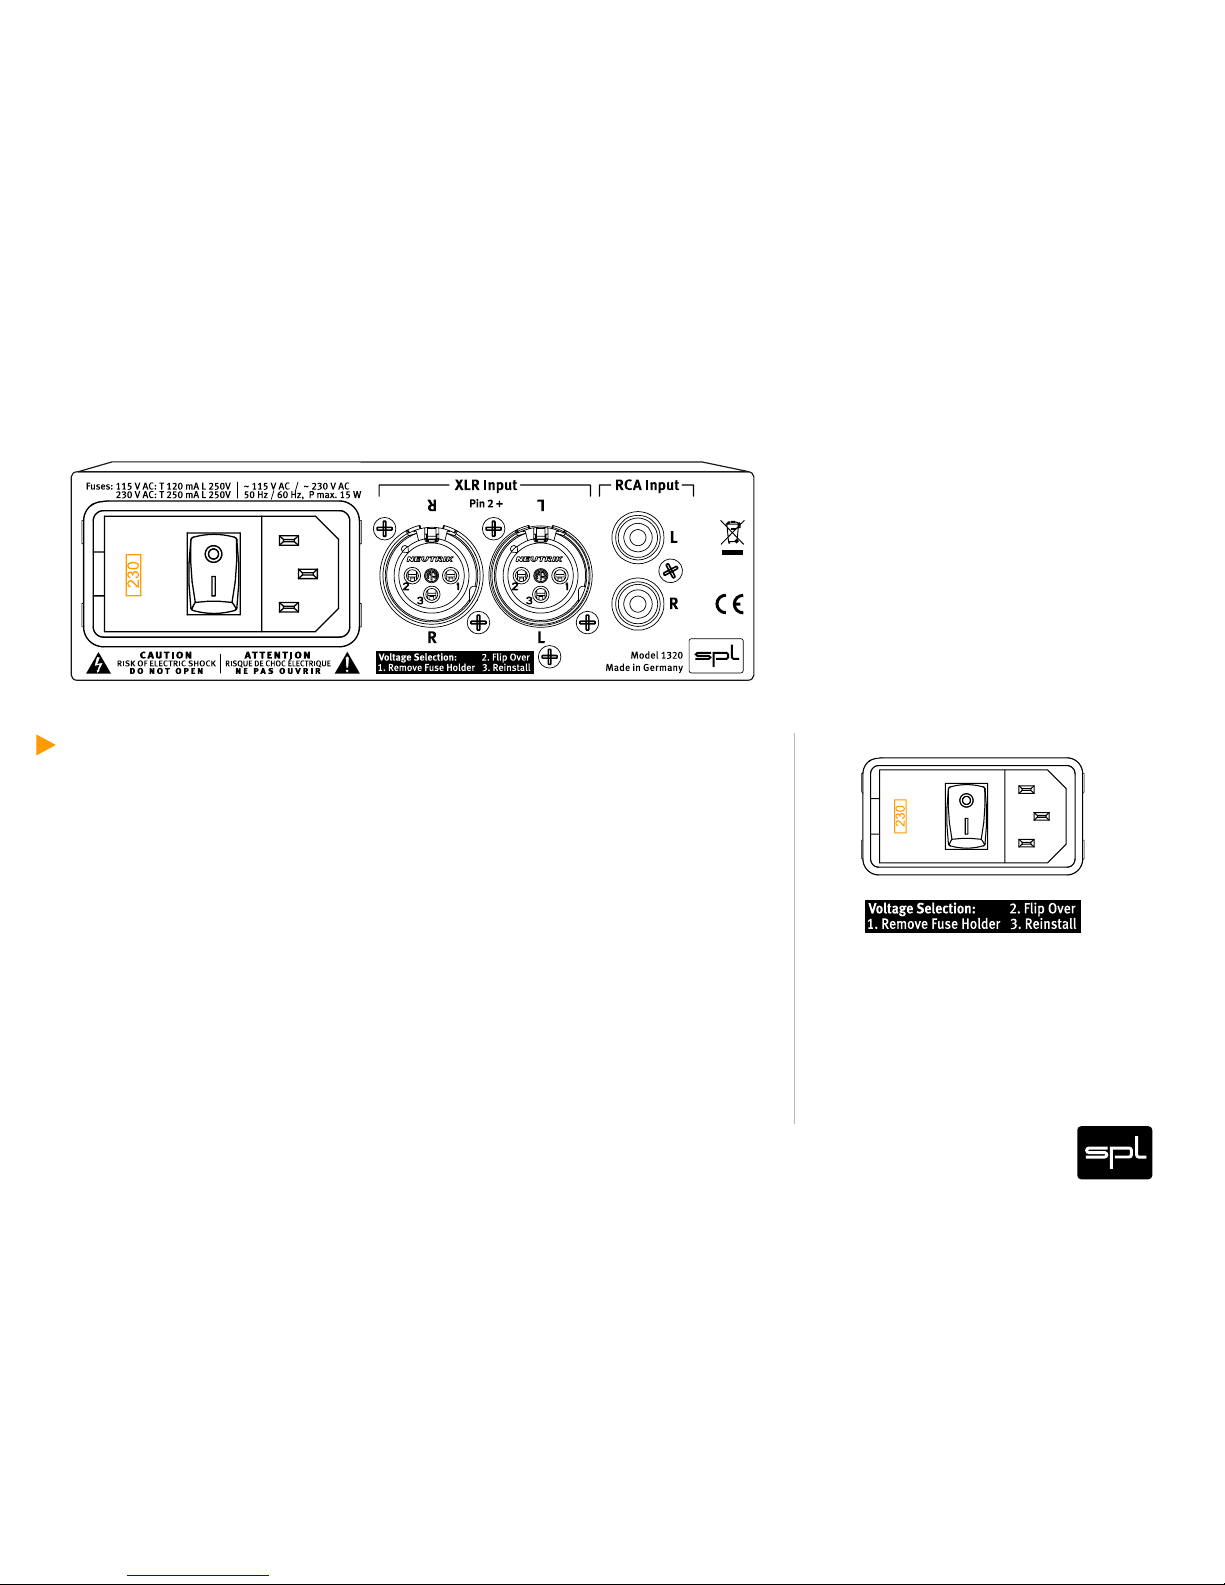
Voltage Select
Open the power connector lid with a small screwdriver. There are two
tiny slots on the outside. Use the screwdriver to lever the red fuse
box from above until you can grab it. Take the fuse box out, turn it
around 180 degrees and place it back again. When you close the lid
again, you should see the correct voltage displayed in the opening.
Rear Panel: Power
Page 36
36Phonitor m ini
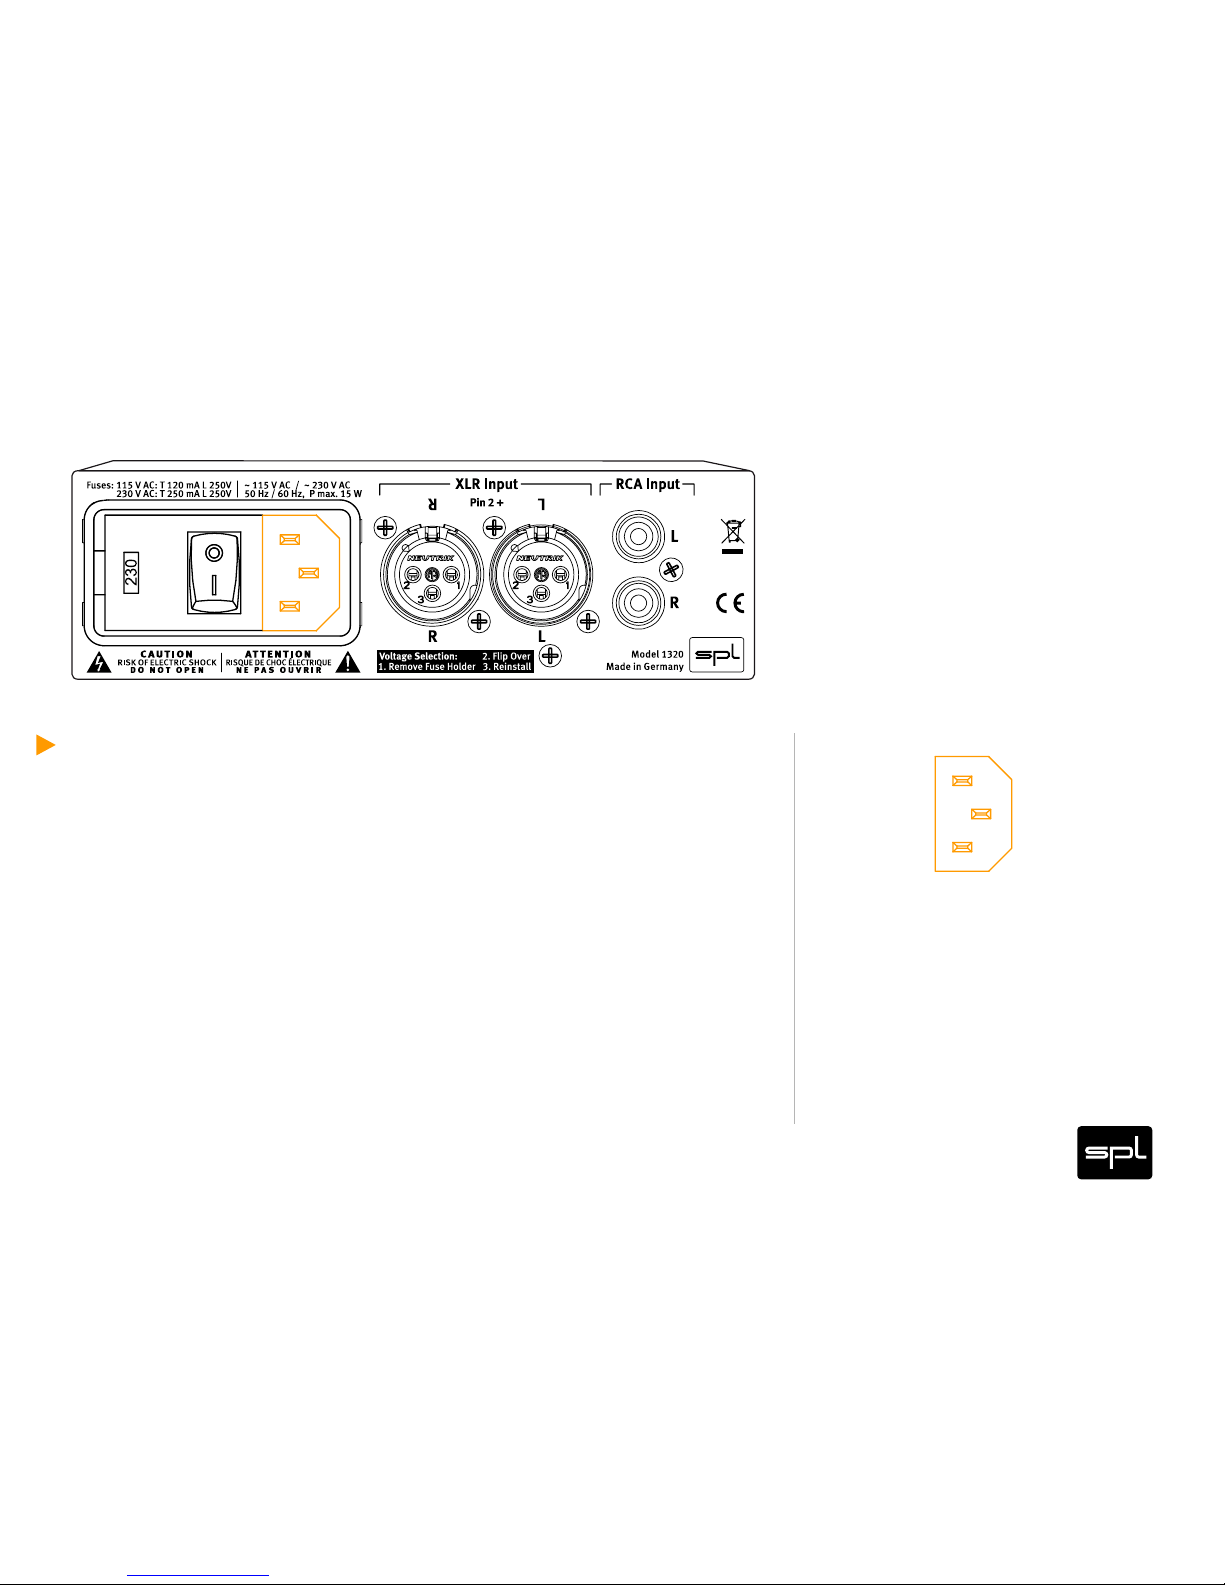
Power Connection
Connect the included power cord to the rear, 3 pin power input.
The transformer, power cord and inlet of the appliance conform to
VDE, UL and CSA requirements.
Rear Panel: Power
Page 37
37Phonitor m ini
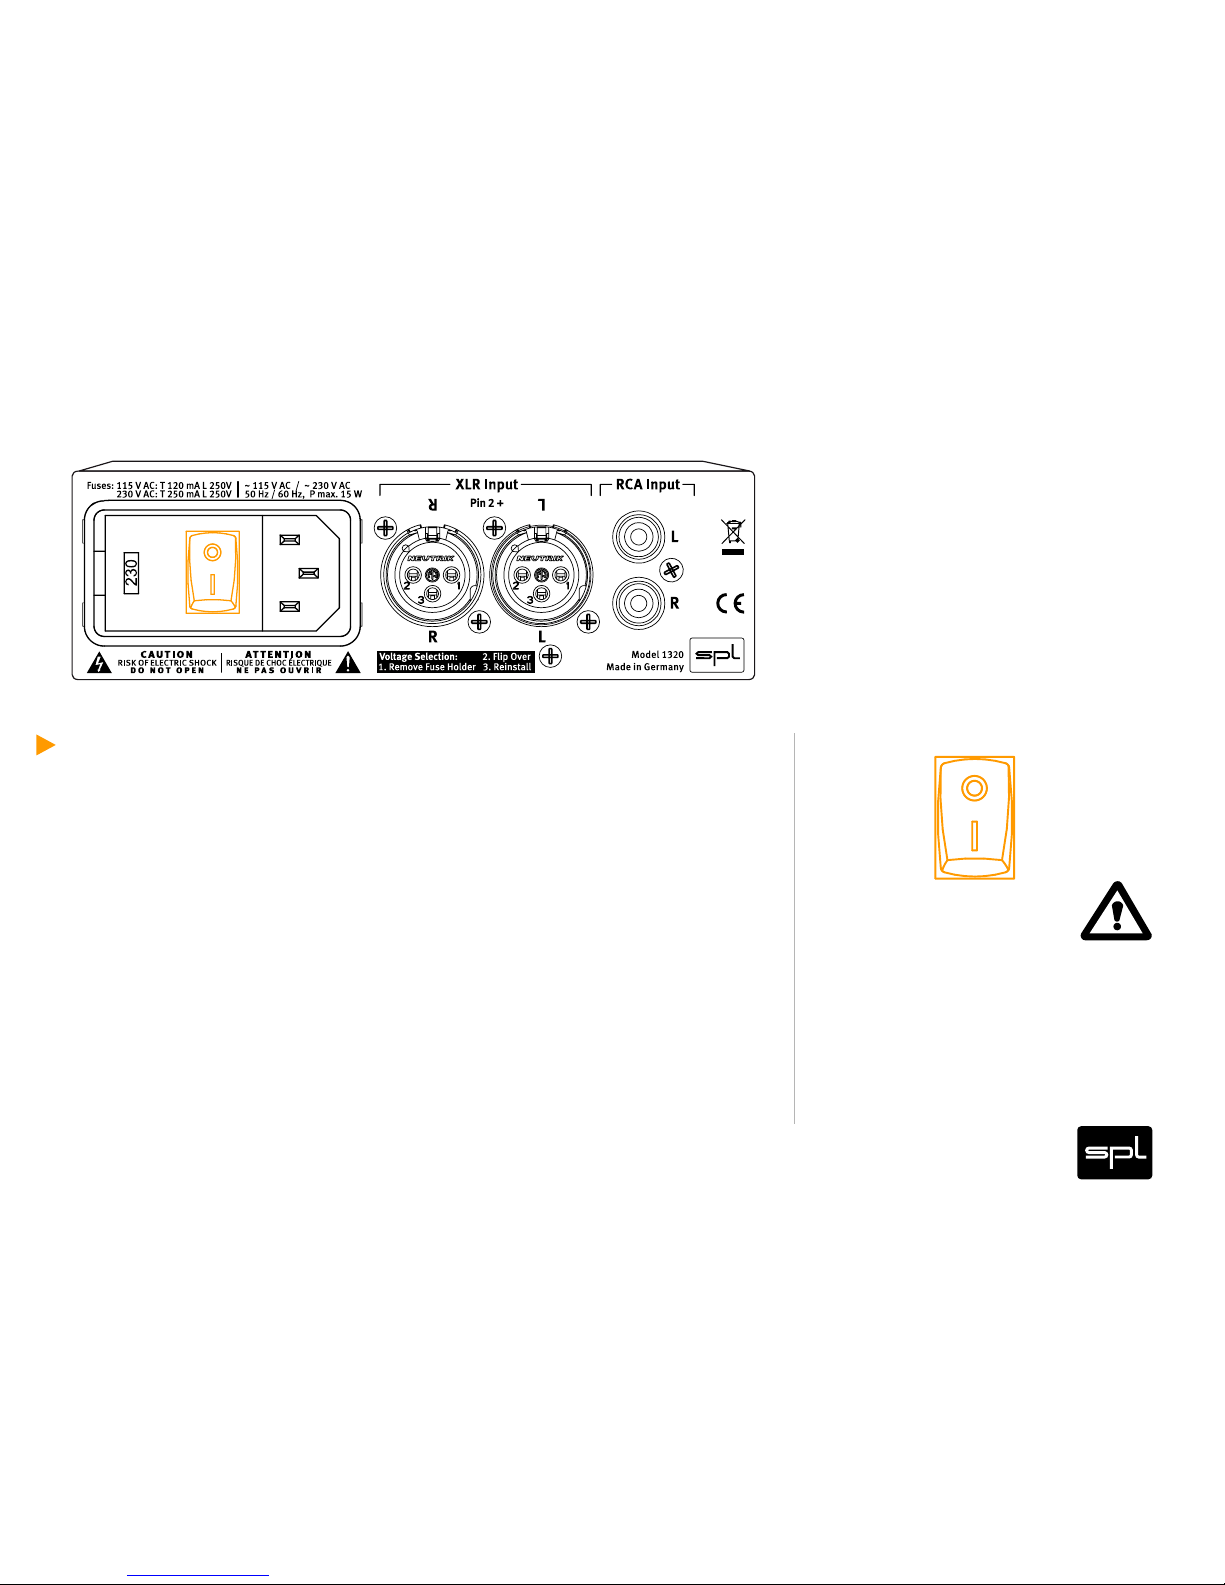
On/Off Switch
Use the rear on/off switch to activate and deactivate the unit. The
operational status is indicated by the illuminated Volume control on
the front panel. We deliberately chose to place the switch on the rear
panel in order to avoid interferences from power wiring through the
unit to the front panel.
When switching on and off, you do not need to follow any particular
sequence with connected devices in the periphery of the unit. There
is, however, a general rule for audio devices connected together:
always turn on power amplifiers last and turn them off first.
If sufficiently specified, you can also switch the unit on and off
through a multiway connector or other main switches.
Caution:
Before connecting any other equipment – and
in all other cases where you are connecting
cables with or from other sources –you should
be sure to switch off the Phonitor mini and all
other devices you want to connect it to. Otherwise you risk damaging the unit, other
connected gear and/or your ears.
Rear Panel: Power
Page 38
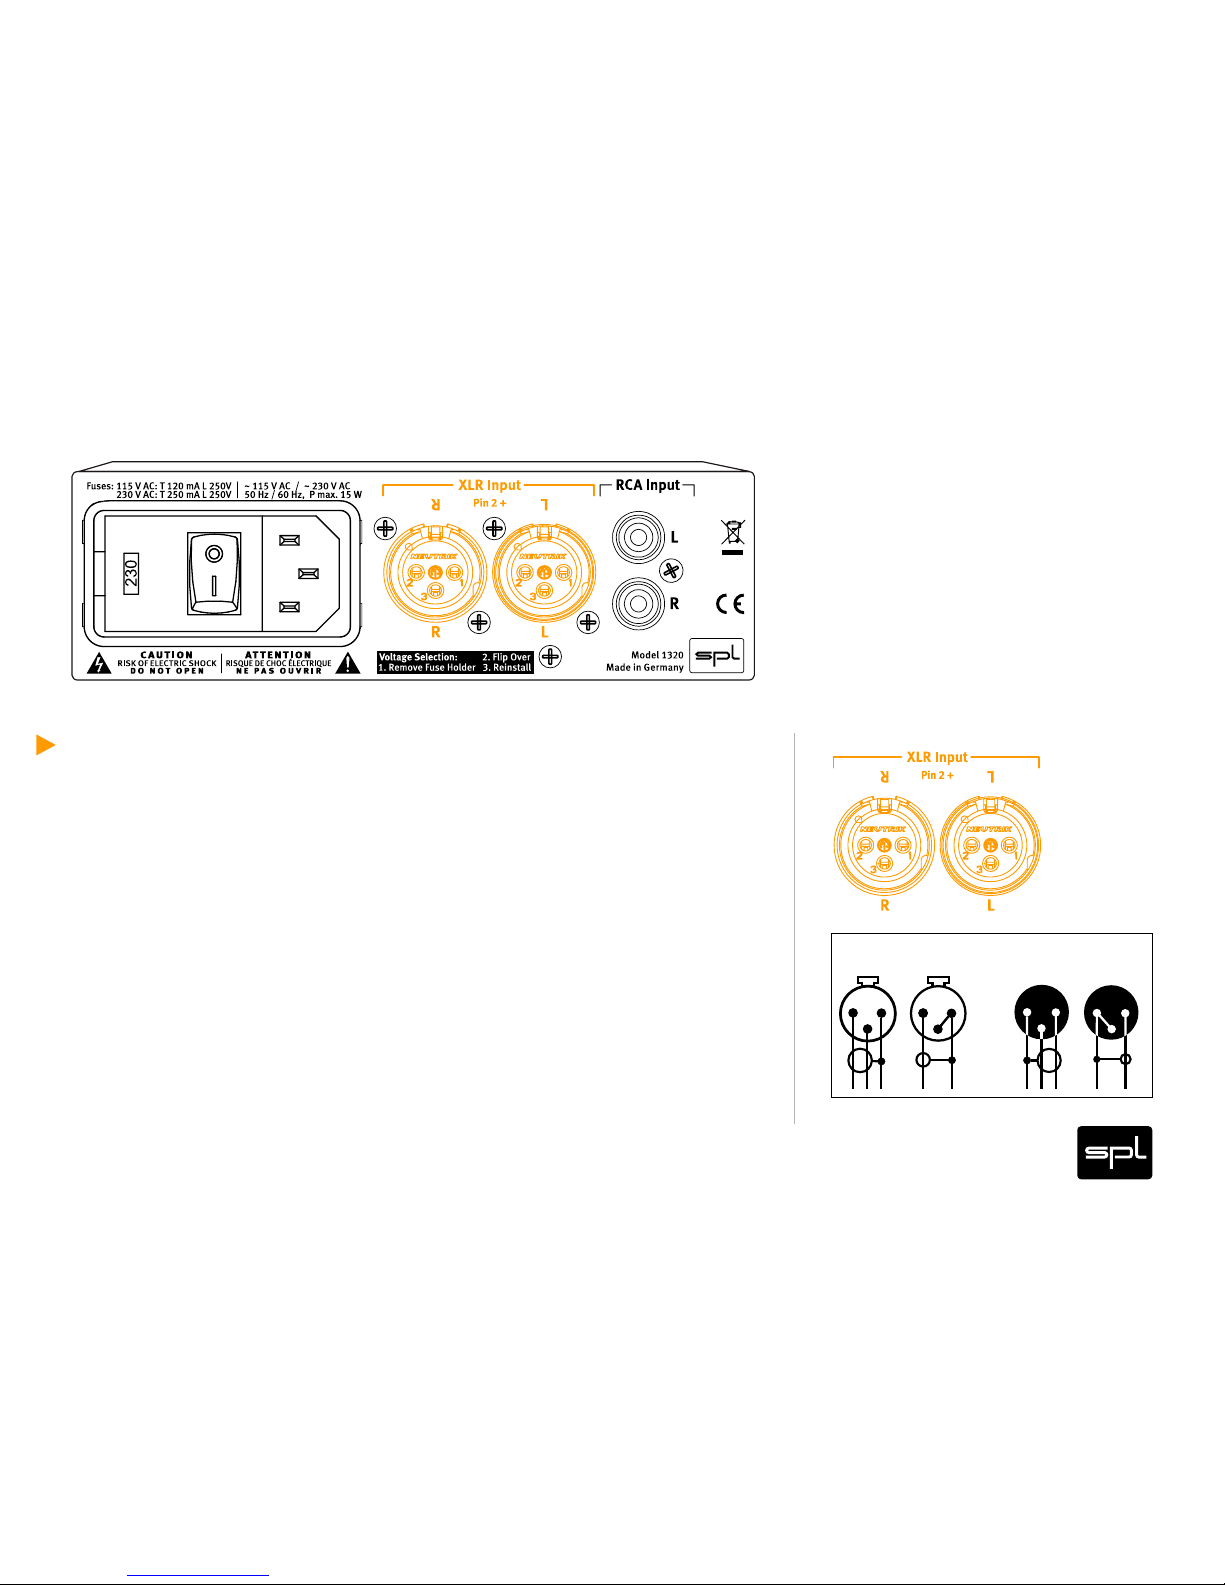
38Phonitor m ini
XLR Sockets
The image below shows the XLR connectors pinout. They are balanced and
have three conductors or wires. Conductor 2 (Pin 2) corresponds to the (+) or
hot Signal.
The diagram also shows how to wire the balanced XLR connections if unbalanced connections are required, for example to RCA or TS inputs and outputs
Eingang Ausgang
symmetrisch
unsymmetrisch
symmetrisch
unsymmetrisch
1=GND
2=heiss (+)
3=kalt (-)
1
2
3
1
2
3
1
2
3
1
2
3
Rear Panel: Signals
Page 39

39Phonitor m ini
Setting up the Phonitor Matrix in three steps
Initially choose your audio material from sources you know well, and
in a first production, that which is similar to what you wish to mix. It
is not sensible to listen to classic music while planning a Phonitor
mini setup to mix a pop production. Classic music stereophony recording involves a much more restricted stereo width than pop or rock
music, where artificial “panorama stereophony“ often provides for a
much broader imaging.
Do notice, that the Phonitor mini can be easily and quickly operated
to do listening comparisons.
Use the following settings as a starting point:
Crossfeed: Med, Angle: 30°, Center Level: Off
Operation
1.
2.
Page 40

40Phonitor m ini
Setting up the Phonitor Matrix in three steps
Activate Crossfeed, Anlge and Center
In order to hear the same as with loudspeakers, the audio channels receive now precisely calculated time, level and frequency
corrections.
First of all, you should check the correct stereo width. If the stereo
image on your headphones seems too narrow or too wide, you can
always apply two corrections: Angle or Crossfeed.
Operation
3.
Page 41

41Phonitor m ini
Setting up the Phonitor Matrix in three steps
Angle:
First of all, you should approximate the desired stereo width with the
Angle control (which corresponds to the positioning angle of a real
loudspeaker set), and then adjust the Crossfeed (which corresponds
to the influence of the room size and damping on the loudspeaker).
An increase of the angle results in the signal needing more time to
reach the opposite ear. This is called Interaural Time Difference (ITD).
Tip: When you use headphones whose loudspeakers are slightly tilted forward (Ultrasone with SLogic or Audeze), we recommend you not to use the 30° setting, but rather the 40° setting, to make
up for the tilting.
Operation
Page 42

42Phonitor m ini
Setting up the Phonitor Matrix in three steps
Crossfeed:
If you increase the Crossfeed value, a higher amount of signal is
added to the opposite side.
Which results in a smaller Interaural Level Difference.
Operation
Page 43

43Phonitor m ini
Setting up the Phonitor Matrix in three steps
Center:
After you have set up Crossfeed and Angle you can then determine
your Center Level setting.
When simply playing back audio material (home use), the Center
function can usually be set to Off.
When mixing, the phantom center is usually too low. However, it can
become too loud after applying Crossfeed and Angle corrections.
If you were to disregard the Center, mid signals could be too low in
the mix. Bring down the phantom center to avoid this effect.
Operation
Page 44

44Phonitor m ini
Exclamation mark within a triangle
An exclamation mark within a triangle is intended to make you aware
of important operational advice and/or warnings that must be followed. Be especially attentive to these and always follow the advice
they give.
Lightning symbol within a triangle
In this Manual a lightning symbol within a triangle warns you about
the potential for dangerous electrical shocks – wich can also occur
even after the device has been disconnected from a power source
Symbol of a lamp
The symbol of a lamp directs your attention to explanations of important functions or applications.
Symbols
Page 45

45Phonitor m ini
Connections
Only use the connections as described. Other connections can lead
to health risks and damage the equipment.
Water and humidity
Do not use this device anywhere near water (for example in a bath
room, a damp cellar, near swimming pools, or similar environments).
Otherwise your are dealing with an extremely high risk of fatal electrical shocks!
Insertion of objects or fluids
Be careful to not insert any object into any of the chassis openings.
You can otherwise easily come into contact with dangerous voltage
or cause a damaging short circuit. Never allow any fluids to be spilled
or sprayed on the device. Such actions can lead to dangerous electrical shocks or fire!
Security Advices
Page 46

46Phonitor m ini
Air ventilation
Chassis openings offer ventilation and serve to protect the device from overheating. Never cover or otherwise close off these openings. Never place the
device on a soft surface (carpet, sofa, etc.).
Electrical power
Operate the device only from power sources that can provide proper
power. When in doubt about a source, contact your dealer or a professional electrician. To be certain you have isolated the device, disconnect all power and signal connections. Make sure that the power
supply plug is always accessible. When not using the device for a
longer period, make sure to unplug it from your wall power socket.
Opening the unit
Simply put: DON‘T, if you are not a certified SPL technician or engineer.Really: Do not open the device housing, as there is great risk
you will damage the device, or – even after being disconnected – you
may receive a dangerous electrical shock!
Security Advices
Page 47

47Phonitor m ini
Power connection overloads
Avoid any kind of overload in connections to wall sockets, extension
or splitter power cords, or signal inputs. Always keep manufacturer
warnings and instructions in mind. Overloads create fire hazards and
risk of dangerous shocks!
Lightning
Before thunderstorms or other severe weather, disconnect the
device from wall power; do not do this during a storm in order to
avoid life threatening lightning strikes. Similarly, before any severe
weather, disconnect all the power connections of other devices and
antenna and phone/network cables which may be interconnected so
that no lightning damage or overload results from such secondary
connections.
Security Advices
Page 48

48Phonitor m ini
Controls and switches
Operate the controls and switches only as described in the manual.
Incorrect adjustments outside safe parameters can lead to damage
and unnecessary repair costs. Never use the switches or level controls to effect excessive or extreme changes.
Repairs
Unplug the unit from all power and signal connections and immediately contact a qualified technician when you think repairs are needed
– or when moisture or foreign objects may accidentally have reached
inside the housing, or in cases when the device may have fallen and
shows any sign of having been damaged. This also applies to any
situation in which the unit has not been subjected to any of these
unusual circumstances but still is not functioning normally or its performance is substantially altered. In cases of damage to the power
supply and cord, first consider
Security Advices
Page 49

49Phonitor m ini
Replacement/substitute parts
Be sure that any service technician uses original replacement parts
or those with identical specifications as the originals. Incorrectly
substituted parts can lead to fire, electrical shock or other dangers,
including further equipment damage.
Safety inspection
Be sure always to ask a service technician to conduct a thorough
safety check and ensure that the state of the repaired device is in all
respects up to factory standards.
Cleaning
Do not use any solvents, as these can damage the chassis finish.
Use a clean, dry cloth (if necessary, with an acid-free cleaning oil).
Disconnect the device from your power source before cleaning.
Security Advices
Page 50

50Phonitor m ini
Phonitor mini
Declaration of CE Conformity
The construction of this unit is in compliance with the standards and
regulations of the European Community.
Page 51

51Phonitor m ini
Phonitor mini
Notes on Environmental Protection
At the end of its operating life, this product must not be disposed of
with regular household waste but must be returned to a collection
point for the recycling of electrical and electronic equipment. The
wheelie bin symbol on the product, user‘s manual and packaging
indicates that. The materials can be reused in accordance with their
markings. Through reuse, recycling of raw materials, or other forms
of recycling of old products, you are making an important contribution to the protection of our environment.
Your local administrative office can advise you of the responsible
waste disposal point.
WEEE Registration: 973 349 88
Page 52

52Phonitor m ini
Phonitor mini
Contact
SPL electronics GmbH
Sohlweg 80
41372 Niederkrüchten
Fon (0 21 63) 98 34 0
Fax (0 21 63) 98 34 20
E-Mail: [email protected]
Or follow us on our Blog, Facebook, Twitter and YouTube:
Website & Blog: spl.info
Videos: youtube.spl.info
Twitter: twitter.spl.info
Facebook: facebook.spl.info
 Loading...