

Page 1

Professional Fidelity
EN
DE
Director Mk – Quickstart
DA Converter and Preamplifier
User manual and additional
information: spl.audio
Page 2
Director Mk2 – Quickstart Director Mk2 – Quickstart
EN
1
2
3
4
5
6
7
8
Start up
Read the security advices on page !
Make sure that the selected mains voltage of the Director Mk is according to
the mains voltage of your region.
Make sure that the mains switch on the rear of the Director Mk is set to O
(O=O/On = I).
The standby switch on the front panel has to be set to
Connect the supplied power cord to the Director Mk and to an appropriate
mains socket outlet.
If the supplied power cord does not match your mains socket outlet, please contact your dealer.
Turn o all devices you wish to connect to the Director Mk.
Connect the outputs of your analog sources (e.g. CD Player, Phonos) to the
analog inputs of the Director Mk. Please use appropriate audio cables (RCA, XLR).
Audio cables not included in the scope of delivery.
Connect the outputs of your digital sources (e.g. Mac, PC or CD Player) to the
digital inputs of the Director Mk. Please use appropiate audio cables (AES,
USB, coaxial, optical).
Digital audio cables not included in the scope of delivery.
For Windows® computers download the latest driver from director-mk.spl.audio under the “Driver” tab and have it
installed. Macs, iPhones and iPads do not require a driver since the USB port is Apple-Class compliant.
.
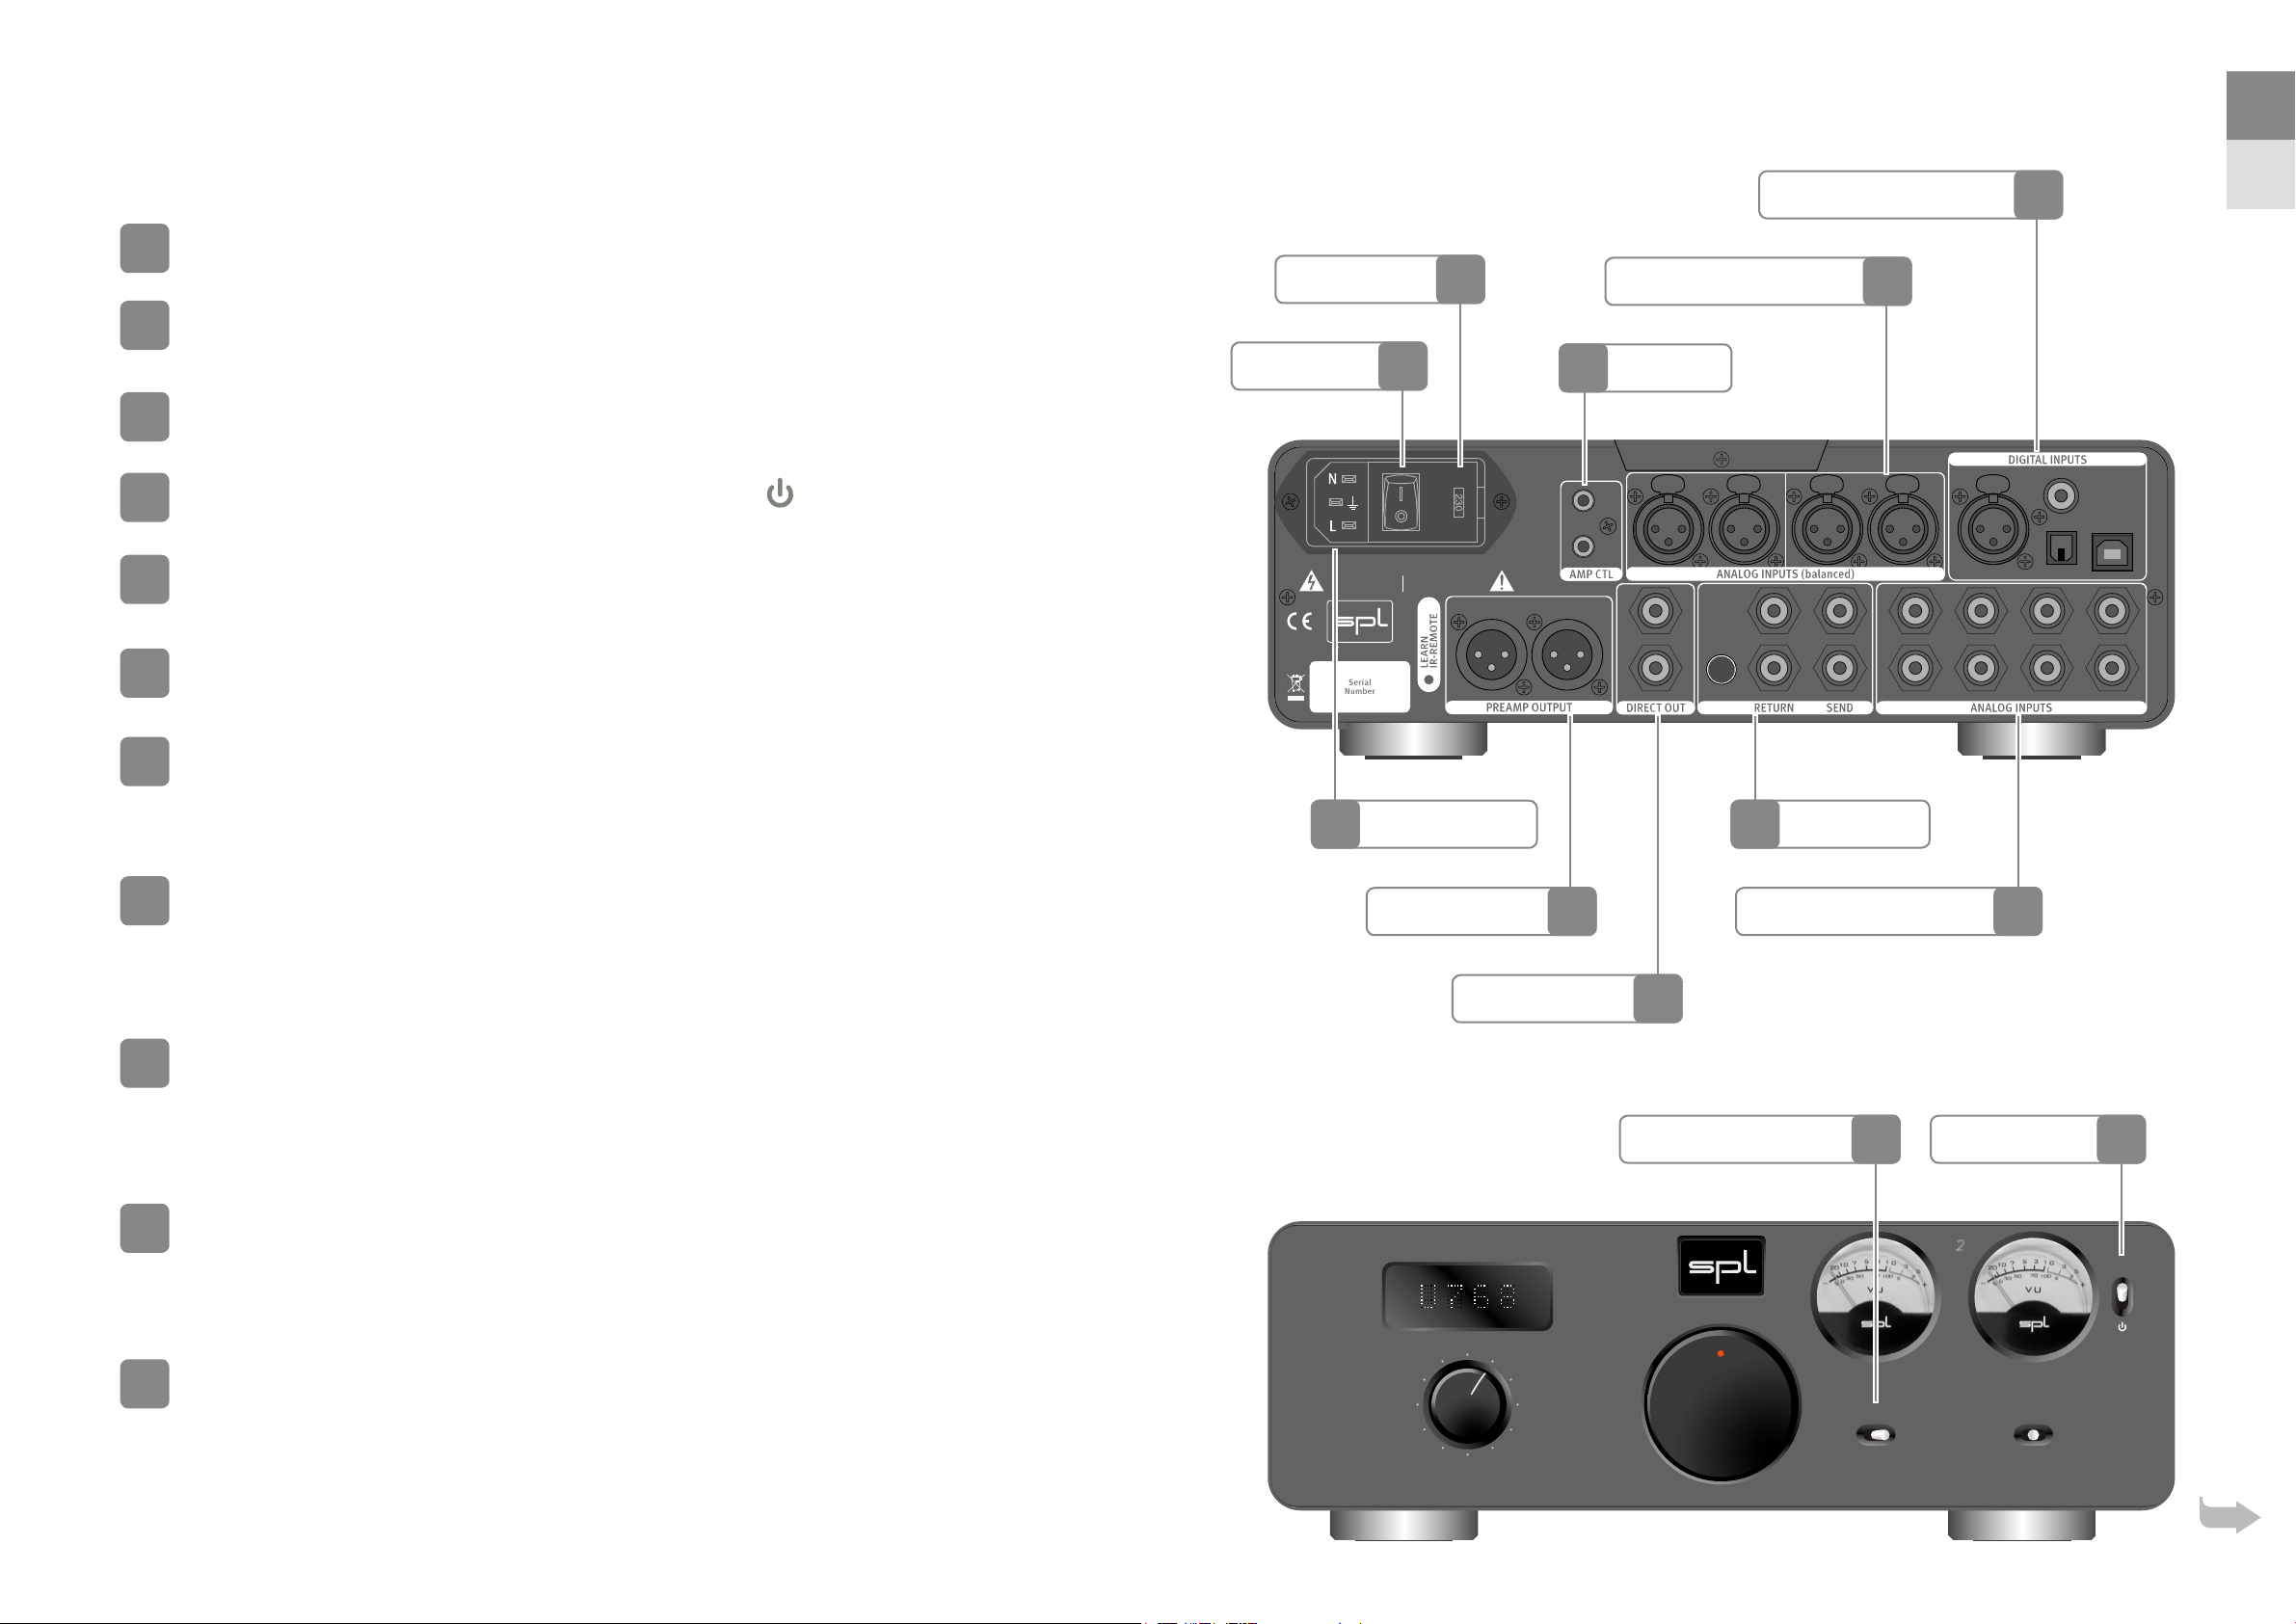
Mains Voltage
Mains Switch
~ 115V AC / ~230V AC, 50 Hz / 60 Hz, P max. 45 W
CAUTION
RISK OF ELEC TRIC SHOC K
DO NOT OPEN
Director Mk2
5 10
2
3
ATTENTION
RISQUE DE CHOC ÉLECTRIQUE
NE PAS OUVR IR
Refer to
Manual
Mains Connector
Preamp Output
Direct Output
11
Voltage Selecti on:
1. Remove Fuse H older
2. Exchan ge Fuses
3. Flip Over
4. Reinstall
Fuses:
230V AC:
T 500 mA
L 250 V
115V AC:
T 1 A
L 250 V
Made in Germany
LR
9
Analog Audio Inputs
AMP CTL
L
R
2
Tape
Monitor
SEND
–10dB
RETURN
+10dB
A
B
9
Digital Audio Inputs
7
LR
1
L
R
Tape Monitor
Analog Audio Inputs
LR
DE
8
COAX
USB
AES
L
OPTIC
L
L
3456
R
R
R
7
9
or active loudspeakers.
The level of the PREAMP OUTPUT is controlled by the volume potentiometer. The DIRECT OUTPUT has a xed level
at unity gain ( dBfs) and can be used to connect a headphone amplier.
Audio cables not included in the scope of delivery.
Tape Monitor Switch
10
Standby Switch
4
Use the Tape Monitor Send and Return to connect an analog tape machine or
Connect audio cables (XLR, RCA) between Director Mk and a following amplier
10
insert an external analog device, e.g. equalizer or vitalizer.
Director
If no external device is connected set the TAPE MONITOR switch to Off. Otherwise the audio signal is interrupted.
1
11
If you own SPL Performer power ampliers or other ampliers using V trigger
inputs you can connect the AMPCTL outputs of the Director Mk with mono
mini jack cables to the AMP CTL of the ampsto trigger on and standby.
Up to ampliers can be triggered together.
Mono mini jack cable not included in the scope of delivery.
2
3
4
5
6
Mute
VOLTAiR
120V DC Audio Rai l
USB
Remote
AES
Optic
Coax
TAPE MONITOR
Off On
V
E
O
L
M
U
Mk
ON
VU
6
12
0
Page 3
Director Mk2 – Quickstart Director Mk2 – Quickstart
EN
12
13
14
15
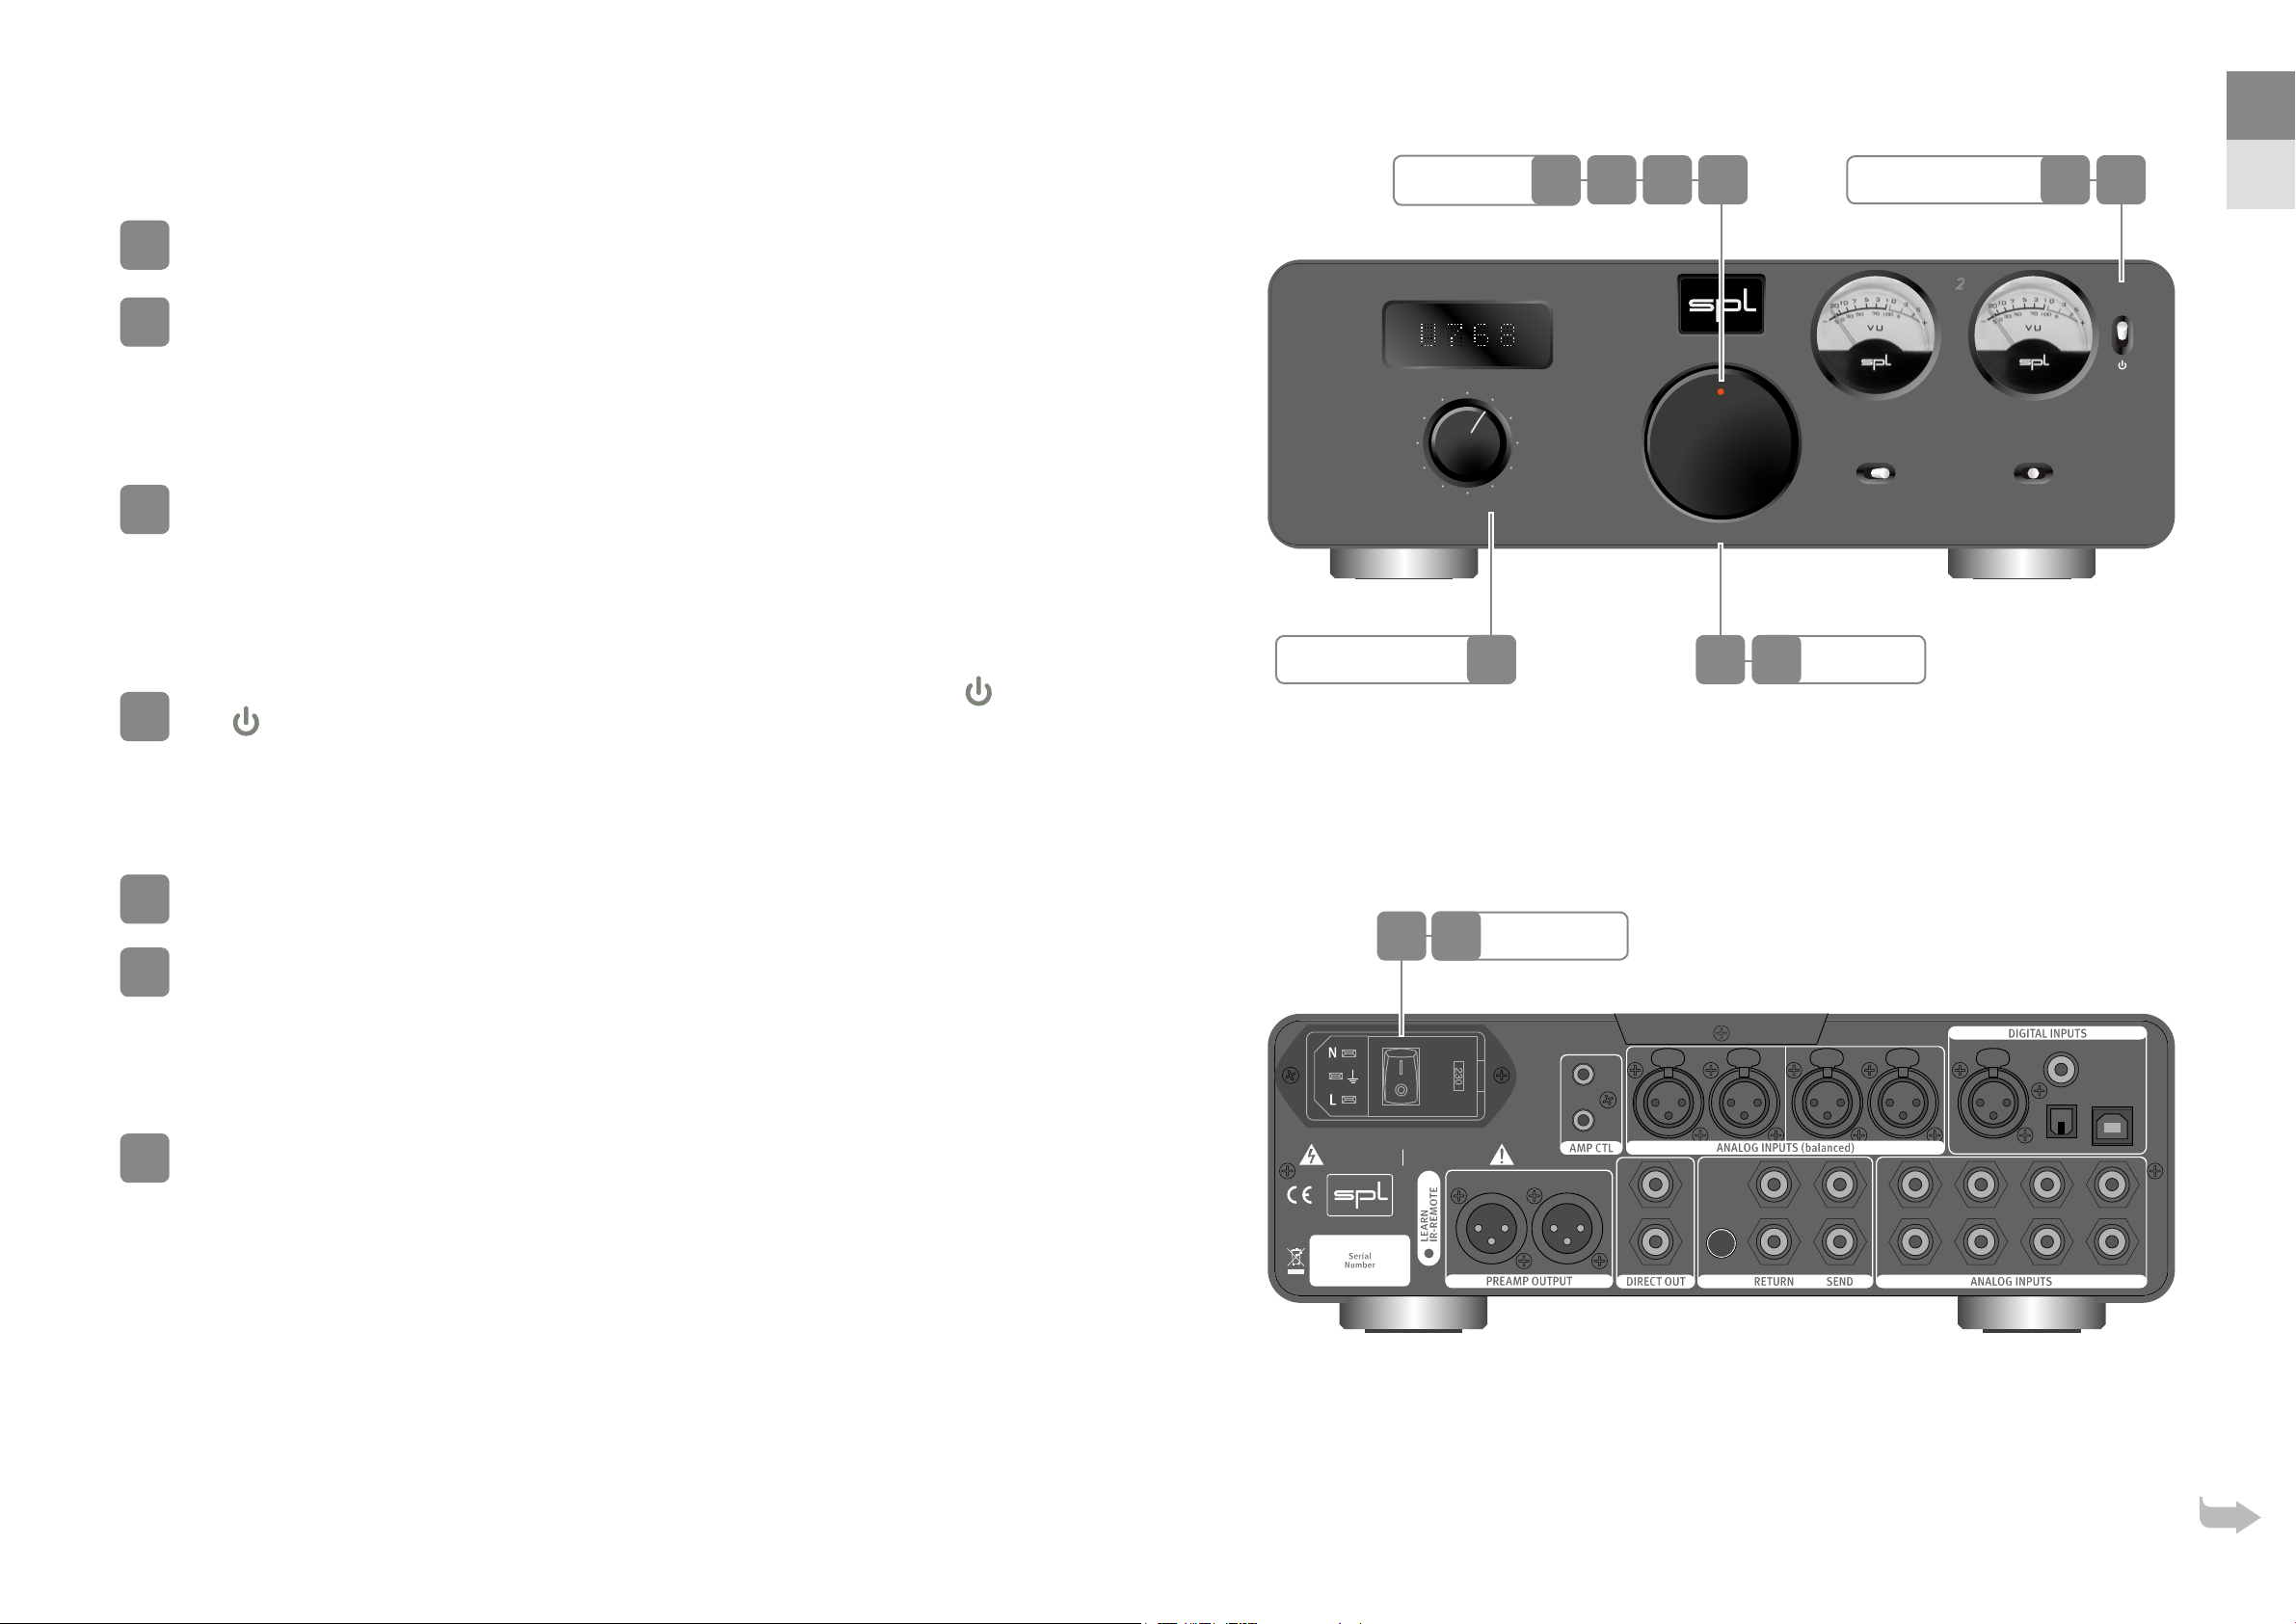
Power up
Turn down the volume of the Director Mk.
Switch on mains switch on the back of the Director Mk (On = I).
Power LED is dimly lit.
Operation
Switch the Director Mk from standby into operation by setting the standby
switch to ON.
Power LED now lights up brightly.
Standby
Switch the Director Mk in standby mode by setting the standby switch to
= Standby).
(
Power LED is dimly lit.
Power LED
3
4
5
Source Selection
Director
2
6
Mute
VOLTAiR
120V DC Audio Rai l
1
18
USB
Remote
AES
Optic
Coax
V
E
O
L
M
U
12 16
Standby Switch
TAPE MONITOR
Off On
Volume
151415 171413
Mk
ON
VU
6
12
0
DE
16
17
18
Power down
Turn down the volume of the Director Mk.
Switch o mains switch on the rear of the Director Mk (O = O).
Power LED no longer lights up.
Source selection
Choose a source by turning the Source switch: Analog - , USB, AES, Coax or
Optic.
In Mute position all outputs are switched o.
In Remote position the Director Mk receives the commands of any infrared (IR)
remote control to operate the source selection. See next section.
13 17
~ 115V AC / ~230V AC, 50 Hz / 60 Hz, P max. 45 W
CAUTION
RISK OF ELEC TRIC SHOC K
DO NOT OPEN
Director Mk2
ATTENTION
RISQUE DE CHOC ÉLECTRIQUE
NE PAS OUVR IR
Refer to
Manual
Mains Switch
Voltage Selecti on:
1. Remove Fuse H older
2. Exchan ge Fuses
3. Flip Over
4. Reinstall
Fuses:
230V AC:
T 500 mA
L 250 V
115V AC:
T 1 A
L 250 V
Made in Germany
A
B
LR
L
R
2
Tape
Monitor
SEND
–10dB
RETURN
+10dB
LR
1
L
LR
AES
L
L
COAX
USB
OPTIC
L
3456
R
R
R
R
Page 4
Director Mk2 – Quickstart Director Mk2 – Quickstart
EN
19
20
21
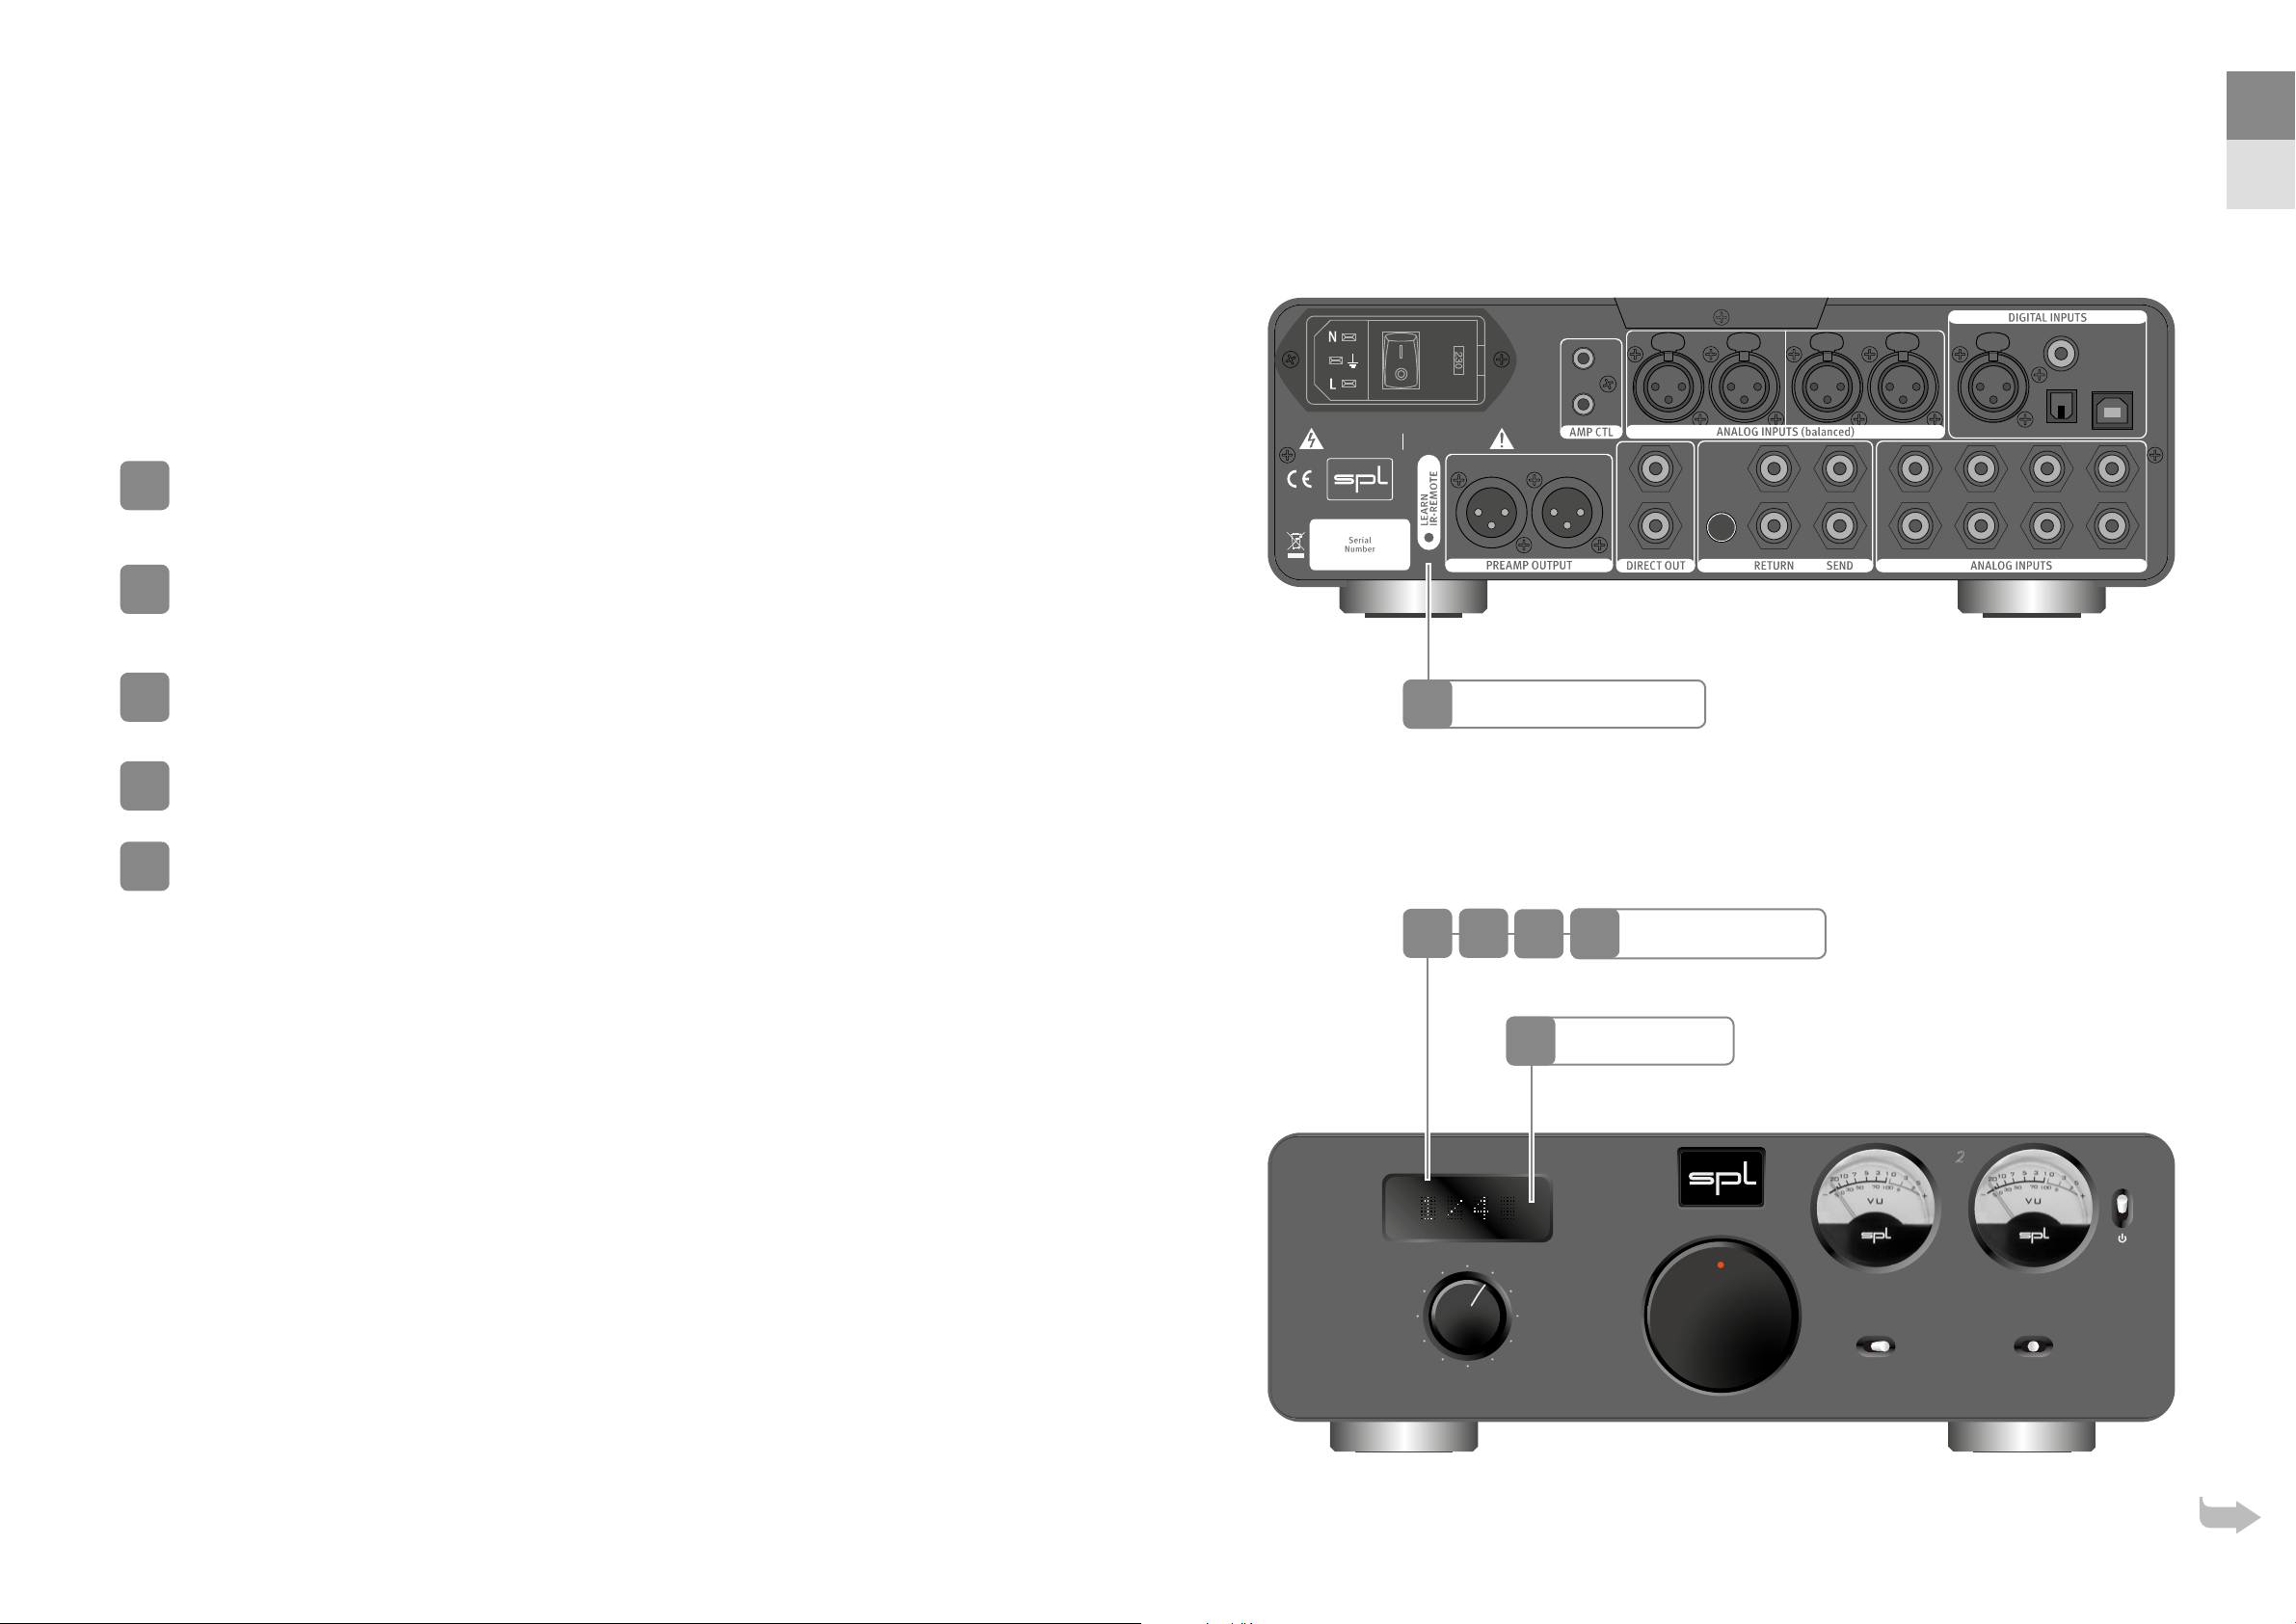
Learn IR remote control
Volume and Source selection
The volume and source selection of the Director Mk can be operated by any
infrared (IR) remote control. The programming of the DirectorMk is easy and
needs only four steps – one for each function: volume up, volume down, next
input (clockwise) and previous input (counter clockwise).
Press the Learn IR-Remote button.
The display shows / to indicate the rst programming step.
Step 1/4:
of your remote control you wish to use to
The display shows now / to indicate the next programming step.
Step 2/4:
The display shows now / to indicate the next programming step.
Point your remote control towards the IR receiver and push the button
increase
Push the button you wish to use to
the volume.
lower
the volume.
~ 115V AC / ~230V AC, 50 Hz / 60 Hz, P max. 45 W
CAUTION
RISK OF ELEC TRIC SHOC K
DO NOT OPEN
Director Mk2
ATTENTION
RISQUE DE CHOC ÉLECTRIQUE
NE PAS OUVR IR
Refer to
Manual
19
Voltage Selecti on:
1. Remove Fuse H older
2. Exchan ge Fuses
3. Flip Over
4. Reinstall
Fuses:
230V AC:
T 500 mA
L 250 V
115V AC:
T 1 A
L 250 V
Made in Germany
A
B
LR
Learn IR-Remote Button
L
R
2
Tape
Monitor
SEND
–10dB
RETURN
+10dB
DE
LR
1
L
R
LR
AES
L
L
COAX
USB
OPTIC
L
3456
R
R
R
22
23
Step 3/4:
Push the button you wish to use to switch to the
next
input source.
The display shows now / to indicate the next programming step.
Step 4/4:
Push the button you wish to use to switch to the
previous
input
source.
Programming is then completed and the display shows the selected input.
20
19 22
Director
2
3
4
5
6
Mute
VOLTAiR
120V DC Audio Rai l
21
20
1
USB
AES
Coax
Optic
Remote
IR Receiver
Programming Step
V
E
O
L
M
U
TAPE MONITOR
Off On
Mk
ON
VU
6
12
0
Page 5

Director Mk2 – Quickstart Director Mk2 – Quickstart
EN
Security Advices
Before starting up the device:
• Read thoroughly and follow the security advices.
• Read thoroughly and follow the Quickstart.
• Observe all warning instructions on the device.
• Please keep the user manual as well as the security
advices in a safe place for future reference.
Warning
Always follow the security advices listed below to avoid
serious injuries or even deadly accidents due to electric
shocks, short circuit, re or other dangers. The following
are examples of such risks and do not represent an
exhaustive list:
Power supply/Power cord
Do not place the power cord near heat sources such
as heaters or radiators and do not excessively bend or
otherwise damage the cord, do not place heavy objects
on it, or place it in a position where anyone could walk
on, trip over, or roll anything over it.
Only use the voltage indicated on the device.
Only use the supplied power cord/plug.
If you intend to use the device in an area other than in
the one you purchased it, the included power cord may
not be compatible. In this case please contact your
dealer.
Be sure to connect the device to an appropriate mains
socket outlet with a protective grounding connection.
Improper grounding can cause electrical shock.
Do not open
This device contains no user-serviceable parts. Do not
open the device or attempt to disassemble the internal
parts or modify them in any way. If it should appear to be
malfunctioning, turn o the power immediately, unplug
the power cord from the mains socket outlet and have it
inspected by a qualied professional.
Water warning
Do not expose the device to rain, or use it near water
or in damp or wet conditions, or place anything on it
(such as vases, bottles or glasses) containing liquids
which might spill into any openings. If any liquid such as
water seeps into the device, turn o the power immediately and unplug the power cord from the mains socket
outlet. Then have the device inspected by a qualied
professional.
Never insert or remove an electric plug with wet hands.
Fire warning
Do not put burning items, such as candles, on the unit.
A burning item may fall over and cause a re.
Lightning
Before thunderstorms or other severe weather, disconnect the device from the mains socket outlet; do not
do this during a storm in order to avoid life threatening
lightning strikes. Similarly, disconnect all the power
connections of other devices, antenna and phone/
network cables which may be interconnected so that no
damage results from such secondary connections.
If you notice any abnormality
When one of the following problems occur, immediately
turn o the power switch and disconnect the electric
plug from the mains socket outlet. Then have the device
inspected by a qualied professional.
• The power cord or plug gets frayed or damaged.
• The device emits unusual smells or smoke.
• An object has fallen into the unit.
• There is a sudden loss of sound during the use of the
the device.
Caution
Always follow the basic precautions listed below to
avoid the possibility of physical injury to you or others,
or damage to the device or other property. These
precautions include, but are not limited to, the following:
Power supply/Power cord
When removing the electric plug from the device or an
mains socket outlet, always pull on the plug itself and
not the cord. Pulling the cord may damage it.
Unplug the device from the mains socket outlet when
the device is not used for a while.
Location
Do not place the device in an unstable position where it
might accidentally fall over.
Do not block the vents. This device has ventilation holes
to prevent the internal temperature from rising too
high. In particular, do not place the device on its side
or upside down. Inadequate ventilation can result in
overheating, possibly causing damage to the device or
even re.
Do not place the device in a location where it may come
into contact with corrosive gases or salty air. This may
result in malfunction.
Before moving the device, remove all connected cables.
When setting up the device, make sure that the mains
socket outlet you are using is easily accessible. If some
trouble or malfunction occurs, immediately turn o the
power switch and disconnect the plug from the mains
socket outlet. Even when the power switch is turned o,
electricity is still flowing to the product at a minimum
rate. When you are not using the device for a long time,
make sure to unplug the power cord from the wall mains
socket outlet.
Connections
Before connecting the device to other devices, power
down all devices. Before power on or o the devices, set
all volume levels to minimum.
Only use appropriate cables to connect the device with
other devices. Make sure that the cables you use are
intact and comply with the electrical specications of
the connection. Other connections can lead to health
risks and damage the equipment.
Handling
Operate the controls and switches only as described in
the manual. Incorrect adjustments outside safe parameters can lead to damage. Never use excessive force
on the switches or controls.
Do not insert your ngers or hands in any gaps or openings of the device.
Avoid inserting or dropping foreign objects (paper,
plastic, metal, etc.) into any gaps or openings of the
device. If this happens, power down immediately and
unplug the power cord from the mains socket outlet.
Then have the device inspected by a qualied professional.
Do not expose the device to excessive dust or vibrations
or extreme cold or heat (such as direct sunlight, near a
heater or in a car during the day) to prevent the possibility of causing damage to the housing, the internal
components or unstable operation.
If the ambient temperature of the device suddenly
changes, condensation can occur (if for example the
device is relocated or is aected by a heater or air conditioning).
Using the device while condensation is present may
result in malfunction. Do not power on the device for a
few hours until the condensation is gone. Only then it is
safe to power on.
Cleaning
Disconnect the device from your mains socket outlet
before cleaning.
Do not use any solvents, as these can damage the
chassis nish. Use a dry cloth, if necessary, with an
acid-free cleaning oil.
Disclaimer
Windows
Corporation in the United States and other countries.
Apple, Mac and Macintosh are trademarks of Apple Inc.,
registered in the U.S. and other countries.
The company names and product names in this manual
are the trademarks or registered trademarks of their
respective companies.
SPL and the SPL Logo are registered trademarks of SPL
electronics GmbH.
SPL cannot be held responsible for damage caused by
improper use or modication of the device or data that
is lost or destroyed.
Notes on Environmental Protection
The wheelie bin symbol on the product, user manual
and packaging indicates that.
For proper treatment, recovery and recycling of old
products, please take them to applicable collection
points in accordance with your national legislation and
the Directives 2012/19/EU.
The materials can be reused in accordance with their
markings. Through reuse, recycling of raw materials, or
other forms of recycling of old products, you are making
an important contribution to the protection of our environment.
Your local administrative oce can advise you of the
responsible waste disposal point.
This directive only applies to countries inside the EU.
If you wish to discard devices outside the EU, please
contact your local authorities or dealer and ask for the
correct method of disposal.
WEEE-Reg-No.:
®
is a registered trademark of Microso®
At the end of its operating life, this product
must not be disposed with regular household
waste but must be returned to a collection
point for the recycling of electrical and electronic equipment.
DE
Page 6

Director Mk2 – Quickstart
EN
DE
Professional Fidelity
Director Mk – Quickstart
DA-Wandler und Vorverstärker
Bedienungsanleitung und
weitere Informationen: spl.audio
© SPL electronics GmbH | www.spl.audio
Page 7

Director Mk2 – Quickstart Director Mk2 – Quickstart
EN
1
2
3
4
5
6
7
Inbetriebnahme
Lesen Sie die Sicherheitshinweise auf Seite .
Stellen Sie sicher, dass die eingestellte Netzspannung des Director Mk mit der
Spannung in Ihrer Region übereinstimmt.
Achten Sie darauf, dass sich der Netzschalter auf der Rückseite des
DirectorMk in der Aus-Stellung bendet (Aus = O / Ein = I).
Der Stand-By-Schalter auf der Vorderseite muss sich in der Stellung
Schließen Sie das mitgelieferte Netzkabel am Director Mk und an eine Steckdose an.
Wenn das mitgelieferte Netzkabel nicht in Ihre Steckdose passt, wenden Sie sich bitte an Ihren Händler.
Schalten Sie alle Geräte aus, die Sie am Director Mk anschließen wollen.
Stellen Sie eine Verbindung von den Ausgängen Ihrer analogen Quellen (z.B.
CD-Player, Phonos) zu den analogen Eingängen des Director Mk mit geeigneten Audiokabeln (Cinch, XLR) her.
Audiokabel nicht im Lieferumfang enthalten.
benden.
Netzspannung
Netzschalter
~ 115V AC / ~230V AC, 50 Hz / 60 Hz, P max. 45 W
CAUTION
RISK OF ELEC TRIC SHOC K
DO NOT OPEN
Director Mk2
3
ATTENTION
RISQUE DE CHOC ÉLECTRIQUE
NE PAS OUVR IR
Refer to
Manual
2
11
Voltage Selecti on:
1. Remove Fuse H older
2. Exchan ge Fuses
3. Flip Over
4. Reinstall
Fuses:
230V AC:
T 500 mA
L 250 V
115V AC:
T 1 A
L 250 V
Made in Germany
LR
Digitale Audio-Eingänge
Analoge Audio-Eingänge
AMP CTL
A
2
B
L
Tape
Monitor
SEND
–10dB
R
RETURN
+10dB
LR
DE
8
7
1
L
R
LR
AES
L
L
COAX
USB
OPTIC
L
3456
R
R
R
8
9
10
11
Stellen Sie eine Verbindung von den Ausgängen Ihrer digitalen Quellen (z.B.
Mac oder PC, CD-Player) zu den digitalen Eingängen des Director Mk mit geeigneten digitalen Audiokabeln (AES, USB, coaxial, optisch) her.
Digitale Audiokabel nicht im Lieferumfang enthalten.
Für den Betrieb an Windows
unter dem Reiter „Treiber“ und installieren ihn. Da der USB-Anschluss Apple Class-konform ist, benötigen Macs,
iPhones und iPads keine zusätzlichen Treiber.
®
-Computern laden Sie bitte den aktuellen Treiber auf der Seite director-mk.spl.audio
Schließen Sie Audiokabel (XLR, Cinch) zwischen Director Mk und einem nachfolgenden Verstärker oder aktiven Lautsprechern an.
Der Pegel des PREAMP OUTPUT wir durch den Laustärkeregler eingestellt. Der DIRECT OUTPUT hat einen festen
Pegel von dBfs und kann zum Anschluss eines Kopörerverstärkers genutzt werden.
Audiokabel nicht im Lieferumfang enthalten.
An den Tape Monitor Send- und Return-Anschluss können analoge Bandmaschinen oder externe analoge Geräte wie z.B. Equalizer oder Vitalizer eingeschlei werden.
Wenn kein externes Gerät angeschlossen ist, stellen Sie den TAPE MONITOR Schalter in die Stellung Off.
Andernfalls ist der Audio-Signaluss unterbrochen.
Wenn Sie SPL Performer-Endstufen oder andere Endstufen mit V-Trigger
besitzen, können Sie die AMP CTL-Anschlüsse des Director Mk und der
Endstufen mit Mono-Miniklinken-Kabeln verbinden, um die Endstufen
zusammen mit den Director Mk zwischen Betrieb und Stand-By zu schalten.
Mono-Miniklinken-Kabel nicht im Lieferumfang enthalten.
5 10
Netzanschluss
Preamp Output
Direct Output
9
Analoge Audio-Eingänge
9
Tape Monitor-Schalter
Director
1
2
3
4
5
6
Mute
VOLTAiR
120V DC Audio Rai l
USB
Remote
AES
Optic
Coax
V
E
O
L
M
U
Tape Monitor
10
TAPE MONITOR
Off On
7
Stand-By-Schalter
Mk
VU
6
12
0
4
ON
Page 8

Director Mk2 – Quickstart Director Mk2 – Quickstart
EN
12
13
14
15
Einschalten
Regeln Sie die Lautstärke des Director Mk herunter.
Schalten Sie den Netzschalter auf der Rückseite des Director Mk ein (Ein = I).
Die Power-LED leuchtet nun schwach.
Betrieb
Schalten Sie den Director Mk mit dem Stand-By-Schalter aus dem Stand-ByModus in den Betrieb (ON = Betrieb).
Die Power-LED leuchtet nun stark.
Stand-By
Schalten Sie den Director Mk mit dem Stand-By-Schalter in den Stand-ByModus
= Stand-By).
(
Die Power-LED leuchtet nun schwach.
Power-LED
3
4
5
Quellenwahl
Director
2
6
Mute
VOLTAiR
120V DC Audio Rai l
1
18
USB
Remote
AES
Optic
Coax
V
E
O
L
M
U
12 16
Stand-By-Schalter
Mk
TAPE MONITOR
Off On
Lautstärkeregler
151415 171413
ON
VU
6
12
0
DE
16
17
18
Ausschalten
Regeln Sie die Lautstärke des Director Mk herunter.
Schalten Sie den Netzschalter auf der Rückseite des Director Mk aus (Aus = O).
Die Power-LED leuchtet nun nicht mehr.
Quellenwahl
Wählen Sie mit dem SOURCE-Schalter eine Eingangsquelle: Analog -, USB,
AES, coaxial oder optisch.
In der Mute-Position sind beide Ausgänge stumm geschaltet.
In der Remote-Position kann der Eingang mit einer IR-Fernbedienung gewählt
werden. Siehe nächste Seite.
13 17
~ 115V AC / ~230V AC, 50 Hz / 60 Hz, P max. 45 W
CAUTION
RISK OF ELEC TRIC SHOC K
DO NOT OPEN
Director Mk2
ATTENTION
RISQUE DE CHOC ÉLECTRIQUE
NE PAS OUVR IR
Refer to
Manual
Netzschalter
Voltage Selecti on:
1. Remove Fuse H older
2. Exchan ge Fuses
3. Flip Over
4. Reinstall
Fuses:
230V AC:
T 500 mA
L 250 V
115V AC:
T 1 A
L 250 V
Made in Germany
LR
A
2
B
L
Tape
Monitor
SEND
–10dB
R
RETURN
+10dB
LR
1
L
R
LR
AES
L
L
COAX
USB
OPTIC
L
3456
R
R
R
Page 9

Director Mk2 – Quickstart Director Mk2 – Quickstart
EN
19
20
21
IR-Fernbedienung anlernen
Lautstärke und Quellenwahl
Die Lautstärke und die Quellenwahl können mit jeder IR-Fernbedienung
gesteuert werden. Das Anlernen der IR Fernbedienung ist einfach und benötigt
nur vier Schritte – einen für jede Funktion: Laustärke erhöhen, Laustärke verringern, nächste Quelle wählen und vorherige Quelle wählen.
Drücken Sie die Learn IR-Remote-Taste.
Im Display wird der erste Schritt / angezeigt.
Schritt 1/4:
Sie die Taste, die Sie für die
Im Display wird der nächste Schritt / angezeigt.
Schritt 2/4:
Im Display wird der nächste Schritt / angezeigt.
Richten Sie Ihre Fernbedienung auf den IR-Empfänger und drücken
Lautstärkeerhöhung
Drücken Sie die Taste für die
Lautstärkeverringerung
vorgesehen haben.
.
~ 115V AC / ~230V AC, 50 Hz / 60 Hz, P max. 45 W
CAUTION
RISK OF ELEC TRIC SHOC K
DO NOT OPEN
Director Mk2
ATTENTION
RISQUE DE CHOC ÉLECTRIQUE
NE PAS OUVR IR
Refer to
Manual
19
Voltage Selecti on:
1. Remove Fuse H older
2. Exchan ge Fuses
3. Flip Over
4. Reinstall
Fuses:
230V AC:
T 500 mA
L 250 V
115V AC:
T 1 A
L 250 V
Made in Germany
A
B
LR
Learn IR-Remote-Taste
L
R
2
Tape
Monitor
SEND
–10dB
RETURN
+10dB
DE
LR
1
L
R
LR
AES
L
L
COAX
USB
OPTIC
L
3456
R
R
R
22
23
Schritt 3/4:
Quelle
Drücken Sie die Taste, die Sie für die Umschaltung zur
vorgesehen haben.
Im Display wird der nächste Schritt / angezeigt.
Schritt 4/4:
Drücken Sie die Taste für die Umschaltung zur
Der Lernmodus wird automatisch beendet.
nächsten
vorherigen Quelle
.
21
20 23
Director
2
3
4
5
6
Mute
VOLTAiR
120V DC Audio Rai l
22
20
1
USB
AES
Coax
Optic
Remote
IR-Empfänger
Programmschritt
V
E
O
L
M
U
TAPE MONITOR
Off On
Mk
ON
VU
6
12
0
Page 10

Director Mk2 – Quickstart Director Mk2 – Quickstart
EN
Sicherheitshinweise
Vor der Inbetriebnahme des Gerätes:
• Lesen und befolgen Sie diese Sicherheitshinweise.
• Lesen und befolgen Sie die Quickstart-Anleitung.
• Beachten Sie alle Warnhinweise auf dem Gerät.
• Bewahren Sie die Bedienungsanleitung mit den
Sicherheitshinweisen auf, damit Sie später darin
nachschlagen können.
Warnung
Befolgen Sie immer die nachfolgenden Sicherheitsmaßnahmen, um schwere Verletzungen oder sogar tödliche
Unfälle durch elektrischen Schlag, Kurzschluss, Feuer
oder andere Gefahren zu vermeiden. Zu diesen Sicherheitsmaßnahmen gehören folgende Punkte, die jedoch
keine abschließende Aufzählung darstellen:
Netzanschluss/Netzkabel
Verlegen Sie das Netzkabel niemals in der Nähe von
Wärmequellen, etwa Heizkörpern oder Heizstrahlern,
biegen Sie es nicht übermäßig und beschädigen Sie es
nicht auf sonstige Weise, stellen Sie keine schweren
Gegenstände darauf und verlegen Sie es nicht an einer
Stelle, wo jemand darauf treten, darüber stolpern oder
etwas darüber rollen könnte.
Betreiben Sie das Gerät nur mit der Spannung, die auf dem
Gerät angegeben ist.
Verwenden Sie ausschließlich das mitgelieferte Netzkabel bzw. Netzstecker. Wenn Sie das Gerät in einer
anderen Region als der, in der Sie es gekau haben,
verwenden möchten, kann es sein, dass das mitgelieferte Netzkabel nicht kompatibel ist. Wenden Sie sich
bitte an Ihren Händler, bei dem Sie das Gerät gekau
haben.
Achten Sie darauf, eine geeignete Steckdose mit
Sicherheitserdung zu verwenden. Durch falsche Erdung
können elektrische Schläge verursacht werden.
Das Gerät darf nicht geöffnet werden
Dieses Gerät enthält keine vom Anwender zu wartenden
Teile. Versuchen Sie nicht, das Gerät zu önen oder die
inneren Komponenten zu entfernen oder auf irgendeine
Weise zu ändern. Sollte einmal eine Fehlfunktion aureten,
schalten Sie das Gerät sofort aus und ziehen Sie das Netzkabel aus der Steckdose. Lassen Sie das Gerät anschließend von einer qualizierten Fachkra überprüfen.
Vorsicht mit Wasser
Achten Sie darauf, dass das Gerät nicht durch Regen
nass wird, verwenden Sie es nicht in der Nähe von
Wasser oder unter feuchten oder nassen Umgebungsbedingungen und stellen Sie auch keine Behälter (wie z.B.
Vasen, Flaschen oder Gläser) mit Flüssigkeiten darauf,
die herausschwappen und in Önungen hineinfließen
könnten. Wenn eine Flüssigkeit wie z.B. Wasser in das
Gerät gelangt, schalten Sie das Gerät sofort aus und
ziehen Sie das Netzkabel aus der Steckdose. Lassen Sie
das Gerät anschließend von einer qualizierten Fachkra überprüfen.
Schließen Sie den Netzstecker niemals mit nassen
Händen an oder ziehen Sie ihn heraus.
Brandschutz
Stellen Sie keine brennenden Gegenstände (z.B. Kerzen)
auf dem Gerät ab. Ein brennender Gegenstand könnte
umfallen und einen Brand verursachen.
Blitz
Ziehen Sie vor einem Gewitter den Netzstecker aus der
Steckdose (jedoch niemals während eines Gewitters).
Verfahren Sie ebenso mit verbundenen Geräten und
ziehen Sie auch ggf. über eine Gerätekette verbundene
Antennen-, Telefon- oder Computernetzkabel aus den
Anschlussdosen, um das Gerät vor Blitz oder Überspannungsschäden zu schützen.
Falls Sie etwas ungewöhnliches bemerken
Wenn eines der folgenden Probleme auritt, schalten
Sie das Gerät sofort aus und ziehen Sie den Netzstecker
aus der Steckdose. Lassen Sie das Gerät anschließend
von einer qualizierten Fachkra überprüfen.
• Netzkabel oder Netzstecker sind beschädigt.
• Das Gerät sondert ungewöhnliche Gerüche oder
Rauch ab.
• Ein Gegenstand ist in das Gerät gefallen.
• Während der Verwendung des Geräts kommt es zu
einem plötzlichen Tonausfall.
Vorsicht
Beachten Sie immer die nachstehend aufgelisteten
grundsätzlichen Vorsichtsmaßnahmen, um mögliche
Verletzungen bei Ihnen oder anderen Personen oder
Schäden am Gerät oder an anderen Gegenständen zu
vermeiden. Zu diesen Vorsichtsmaßnahmen gehören
die folgenden Punkte, die jedoch keine abschließende
Aufzählung darstellen:
Netzanschluss/Netzkabel
Fassen Sie den Netzstecker nur am Stecker selbst und
niemals am Kabel an, wenn Sie ihn vom Gerät oder von
der Steckdose abziehen. Wenn Sie am Kabel ziehen,
kann dieses beschädigt werden.
Ziehen Sie bei Nichtbenutzung des Gerätes über einen
längeren Zeitraum den Netzstecker aus der Steckdose.
Aufstellort
Achten Sie auf einen sicheren Stand des Geräts, um ein
unabsichtliches Umstürzen zu vermeiden.
Blockieren Sie nicht die Lüungsönungen. Dieses Gerät
besitzt Lüungsönungen, die eine Überhitzung des
Geräteinneren vermeiden sollen. Legen Sie das Gerät
insbesondere nicht auf die Seite oder auf den Kopf. Unzureichende Belüung kann zu Überhitzung führen und u.U.
das Gerät beschädigen oder sogar einen Brand auslösen.
Platzieren Sie das Gerät nicht an einem Ort, an dem es
in Kontakt mit korrosiven Gasen oder salzhaltiger Lu
gelangen könnte. Dadurch kann es zu Fehlfunktionen
kommen.
Entfernen Sie alle angeschlossenen Kabel, bevor Sie das
Gerät bewegen.
Vergewissern Sie sich beim Aufstellen des Geräts,
dass die von Ihnen verwendete Netzsteckdose leicht
erreichbar ist. Sollten Probleme aureten oder es zu
einer Fehlfunktion kommen, schalten Sie das Gerät
sofort aus, und ziehen Sie den Stecker aus der Steckdose.
Auch wenn das Gerät ausgeschaltet ist, fließt eine
geringe Menge Strom. Falls Sie das Gerät für längere Zeit
nicht nutzen, ziehen Sie unbedingt das Netzkabel aus
der Netzsteckdose.
Verbindungen
Bevor Sie das Gerät an andere elektronische Komponenten anschließen, schalten Sie alle Geräte aus. Stellen
Sie zunächst alle Lautstärkeregler an den Geräten auf
Minimum, bevor Sie die Geräte ein- oder ausschalten.
Verwenden Sie nur geeignete Kabel für die Verbindung
mit anderen elektronische Komponenten. Achten Sie
darauf, dass die verwendeten Kabel nicht beschädigt sind und den elektrischen Spezikationen des
Anschlusses entsprechen. Ungeeignete oder beschädigte Kabel oder Kabel, die nicht den elektrischen
Spezikationen des Anschlusses entsprechen, können
zu Beschädigungen des Gerätes führen.
Handhabung
Betätigen Sie die Regler und Schalter nur, wie es in der
Anleitung beschrieben wird. Eine fehlerhae Einstellung
kann zu Beschädigung führen. Betätigen Sie Schalter
und Regler niemals gewaltsam.
Stecken Sie nicht Ihre Finger in Schlitze oder Önungen
am Gerät.
Vermeiden Sie es, fremde Gegenstände (Papier, Plastik,
Metall usw.) in die Geräteönungen gelangen zu lassen.
Falls dies passiert, schalten Sie das Gerät sofort aus
und ziehen Sie den Netzstecker aus der Steckdose.
Lassen Sie das Gerät anschließend von einer qualizierten Fachkra überprüfen.
Setzen Sie das Gerät weder übermäßigem Staub
oder Vibrationen noch extremer Kälte oder Hitze aus
(beispielsweise direktem Sonnenlicht, in der Nähe einer
Heizung oder tagsüber in einem Fahrzeug), um eine
mögliche Gehäuseverformung, eine Beschädigung der
eingebauten Komponenten oder Fehlfunktionen beim
Betrieb zu vermeiden.
Falls sich die Umgebungstemperatur des Gerätes drastisch ändert, kann Kondensation aureten, (wenn das
Gerät zum Beispiel an einen anderen Ort bewegt wird
oder unter Einfluss einer Klima- oder Heizanlage steht).
Die Verwendung des Geräts bei auretender Kondensation kann eine Beschädigung verursachen. Schalten
Sie das Gerät mehrere Stunden lang nicht ein, bis die
Kondensation verschwunden ist. Nur dann ist es sicher,
das Gerät einzuschalten.
Reinigung
Trennen Sie das Gerät vor der Reinigung von der Stromversorgung.
Verwenden Sie zur Reinigung keine Lösemittel, damit
die Gehäuseoberfläche nicht beschädigt wird. Benutzen
Sie ein sauberes, trockenes Tuch, eventuell mit ein
wenig säurefreiem Reinigungsöl getränkt.
Haftungsausschluss
Windows
eingetragenes Warenzeichen der Microso® Corporation.
Apple, Mac und Macintosh sind in den USA und anderen
Ländern als Warenzeichen von Apple Inc. eingetragen.
Die in dieser Anleitung erwähnten Firmen- und Produktnamen sind Warenzeichen bzw. eingetragene Warenzeichen der betreenden Firmen.
SPL und das SPL-Logo sind eingetragene Warenzeichen
der SPL electronics GmbH.
SPL haet nicht für Schäden, die auf eine nicht
ordnungsgemäße Bedienung oder Änderungen am
Gerät zurückzuführen sind, oder für den Verlust oder die
Zerstörung von Daten.
Verbraucherinformation zur Sammlung und Entsorgung alter Elektrogeräte
fachgerechten Entsorgung, Wiederauereitung und
Wiederverwendung zu den entsprechenden Rücknahmeeinrichtungen.
Durch die fachgerechte Entsorgung der Elektrogeräte
helfen Sie, wertvolle Ressourcen zu schützen, und
verhindern mögliche negative Auswirkungen auf die
Gesundheit und die Umwelt, die andernfalls durch
unsachgerechte Müllentsorgung aureten könnten.
Für weitere Informationen zum Sammeln und Wiederauereiten alter Elektrogeräte kontaktieren Sie bitte
Ihre örtliche Stadt- oder Gemeindeverwaltung, Ihren
Abfallentsorgungsdienst oder den Händler, wo Sie das
Gerät gekau haben.
Diese Richtlinie gilt nur innerhalb der Europäischen
Union. Wenn Sie ausserhalb der EU Geräte ausrangieren
möchten, kontaktieren Sie bitte Ihre örtlichen Behörden
oder Ihren Händler und fragen Sie nach einer sachgerechten Entsorgungsmethode.
WEEE-Registrierung:
®
ist in den USA und anderen Ländern ein
Bendet sich dieses Symbol auf dem Gerät,
darf es nicht mit dem normalen Haushaltsabfall entsorgt werden.
In Übereinstimmung mit der Richtlinie
2012/19/EU bringen Sie alte Geräte bitte zur
DE
Page 11

Director Mk2 – Quickstart
© SPL electronics GmbH | www.spl.audio
1906
 Loading...