

SPL Director Quick Start Manual

Professional Fidelity
Mastering Grade Listening
Director – Quickstart
DA Converter and Preamplifier
User manual and additional information:
director.spl.info.
EN
DE
Director – Quickstart Director – Quickstart
RISK OF ELECTRIC SHOCK
DO NOT OPEN
CAUTION
RISQUE DE CHOC ÉLECTRIQUE
NE PAS OUVRIR
ATTENTION
USB
AES
OPTICAL
COAX
IR
L
R
L
R
L
12
ANALOG < SOURCES > DIGITAL
1 ON: RCA Direct Out
2 ON: XLR Direct Out
5 ON: Ref +15dB
6 ON: Ref +18dB
3 ON: Zero flag auto- mute enabled
4 ON: RCA In -10dBV to 0dBuON BOTTOM SIDE:
DIP SWITCHES
Made in
Germany
OUT OUT R OUT L
R
B
A
Voltage Selection: 1 . Remove Fuse Hol der
2. Exchange Fuses 3. F lip Over 4. Rei nstall
~115 V AC/~230 V AC, 50 Hz/60 Hz, P max. 45 W
Fuses: 230 V: T 500mA L 250V, 115 V: T 1 A L 250V
AMP CTL
IR
PGMIRPGM
SOURCE
VOLUME
Refer to
Manual
VOLTAiR
120V DC Audio Rail
V
O
L
U
M
E
ON
DAC Preamplifier
Director
SOURCE
Start up
Read the security advices on page !
Make sure that the selected mains voltage of the Director is according to the
mains voltage of your region.
Make sure that the mains switch on the rear of the Director is set to O
(O=O/On = I).
The standby switch on the front panel has to be set to .
Connect the supplied power cord to the director and to an appropriate mains
socket outlet.
If the supplied power cord does not match your mains socket outlet, please contact your dealer.
Turn o all devices you wish to connect to the Director.
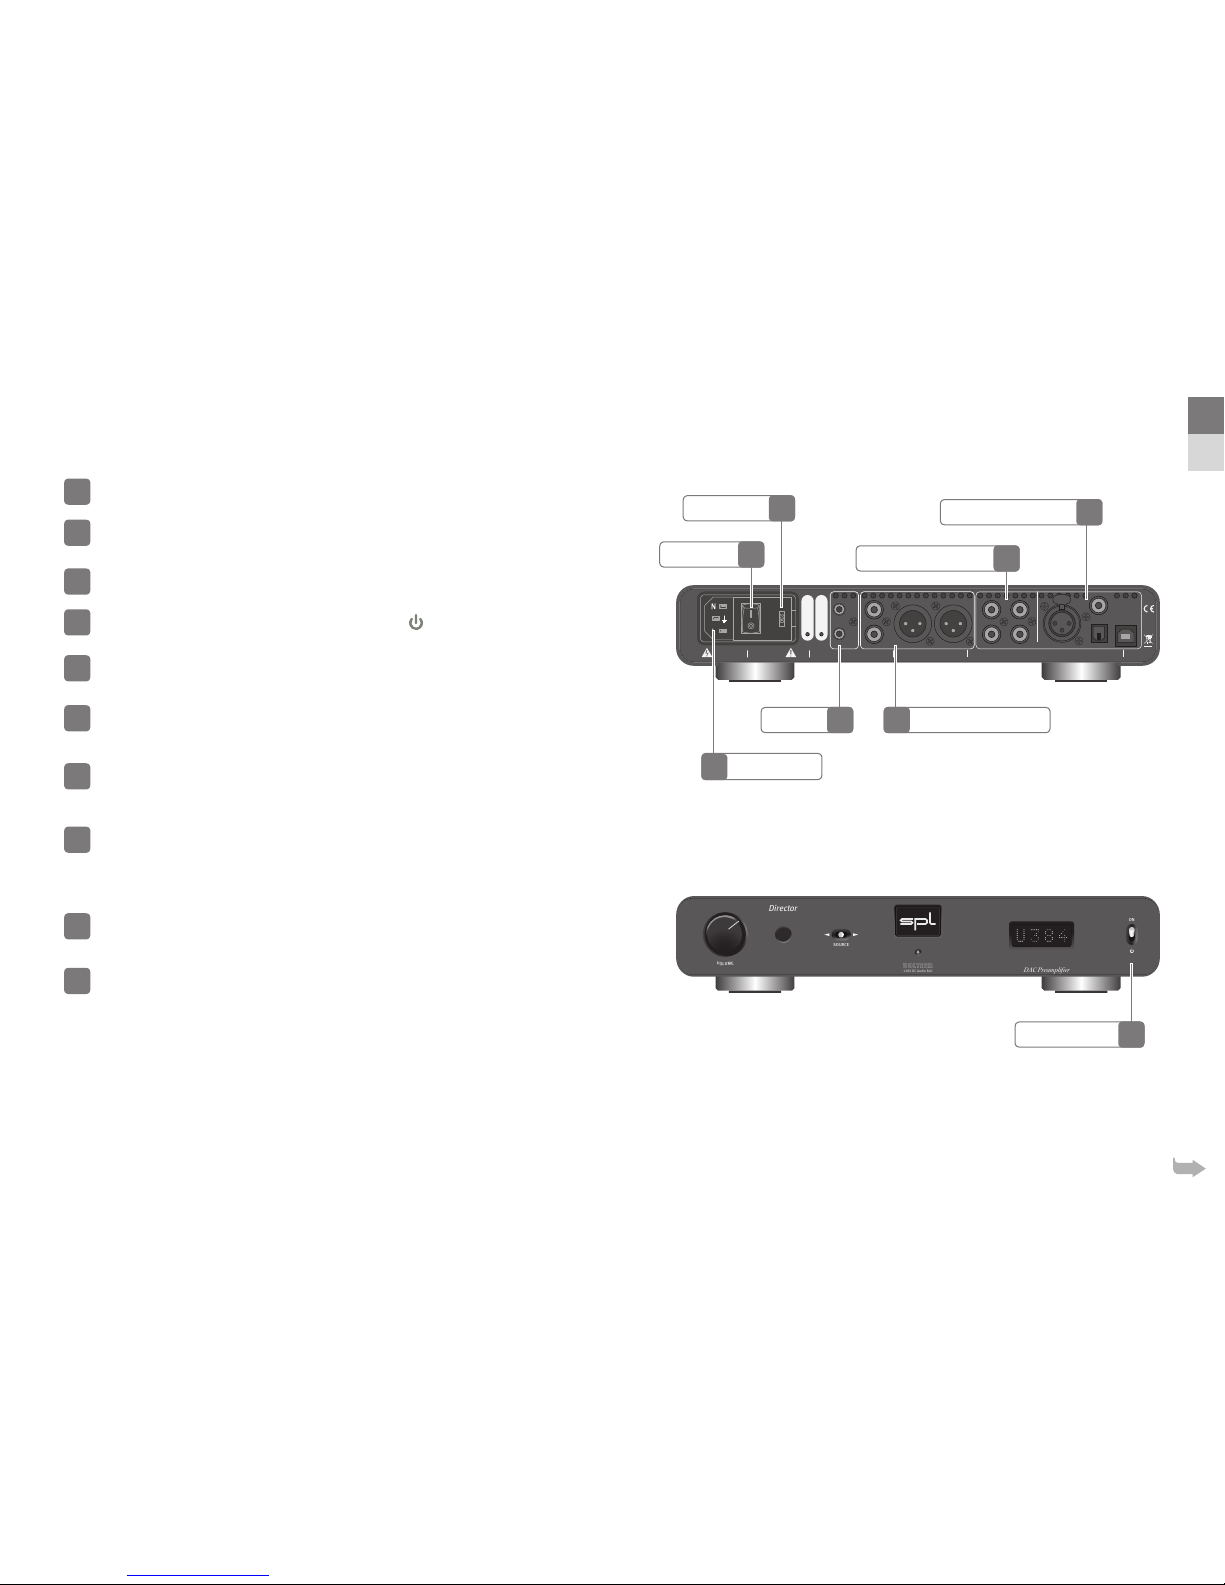
Connect the outputs of your analog sources (e.g. CD Player, Phonos) to the
analog inputs of the Director. Please use appropriate audio cables (RCA).
Audio cables not included in the scope of delivery.
Connect the outputs of your digital sources (e.g. Mac, PC or CD Player) to the
digital inputs of the Director. Please use appropiate audio cables (AES, USB,
coaxial, optical).
Digital audio cables not included in the scope of delivery.
For Windows® computers download the latest driver from director.spl.info under the “Driver” tab and have it
installed. Macs, iPhones and iPads do not require a driver since the USB port is Apple-Class compliant.
Connect audio cables (XLR, RCA) between Director and a following amplier.
Audio cables not included in the scope of delivery.
If you own a SPL Performer s power amplier you can connect the AMP CTL
of the Director with a mono mini jack cable to the AMP CTL of the Performer
s to switch both units between standby and operation together.
Mono mini jack cable not included in the scope of delivery.
1
2
3
4
5
6
7
8
9
10
Analog Audio Inputs
Digital Audio Inputs
Standby Switch
Mains Voltage
Mains Switch
Analog Audio OutputsAMP CTL
Mains Connector
7
8
4
2
3
910
EN
DE
5

Director – Quickstart Director – Quickstart
VOLTAiR
120V DC Audio Rail
V
O
L
U
M
E
ON
DAC Preamplifier
Director
SOURCE
RISK OF ELECTRIC SHOCK
DO NOT OPEN
CAUTION
RISQUE DE CHOC ÉLECTRIQUE
NE PAS OUVRIR
ATTENTION
USB
AES
OPTICAL
COAX
IR
L
R
L
R
L
12
ANALOG < SOURCES > DIGITAL
1 ON: RCA Direct Out
2 ON: XLR Direct Out
5 ON: Ref +15dB
6 ON: Ref +18dB
3 ON: Zero flag auto- mute enabled
4 ON: RCA In -10dBV to 0dBuON BOTTOM SIDE:
DIP SWITCHES
Made in
Germany
OUT OUT R OUT L
R
B
A
Voltage Selection: 1 . Remove Fuse Hol der
2. Exchange Fuses 3. F lip Over 4. Rei nstall
~115 V AC/~230 V AC, 50 Hz/60 Hz, P max. 45 W
Fuses: 230 V: T 500mA L 250V, 115 V: T 1 A L 250V
AMP CTL
IR
PGMIRPGM
SOURCE
VOLUME
Refer to
Manual
Power up
Turn down the volume of the Director.
Switch on mains switch on the back of the Director (On = I).
Power LED is dimly lit.
Operation
Switch the Director from standby into operation by setting the standby switch to
ON.
Power LED now lights up brightly.
Standby
Switch the Director in standby mode by setting the standby switch to
( = Standby).
Power LED is dimly lit.
Power down
Turn down the volume of the Director.
Switch o mains switch on the rear of the Director (O = O).
Power LED no longer lights up.
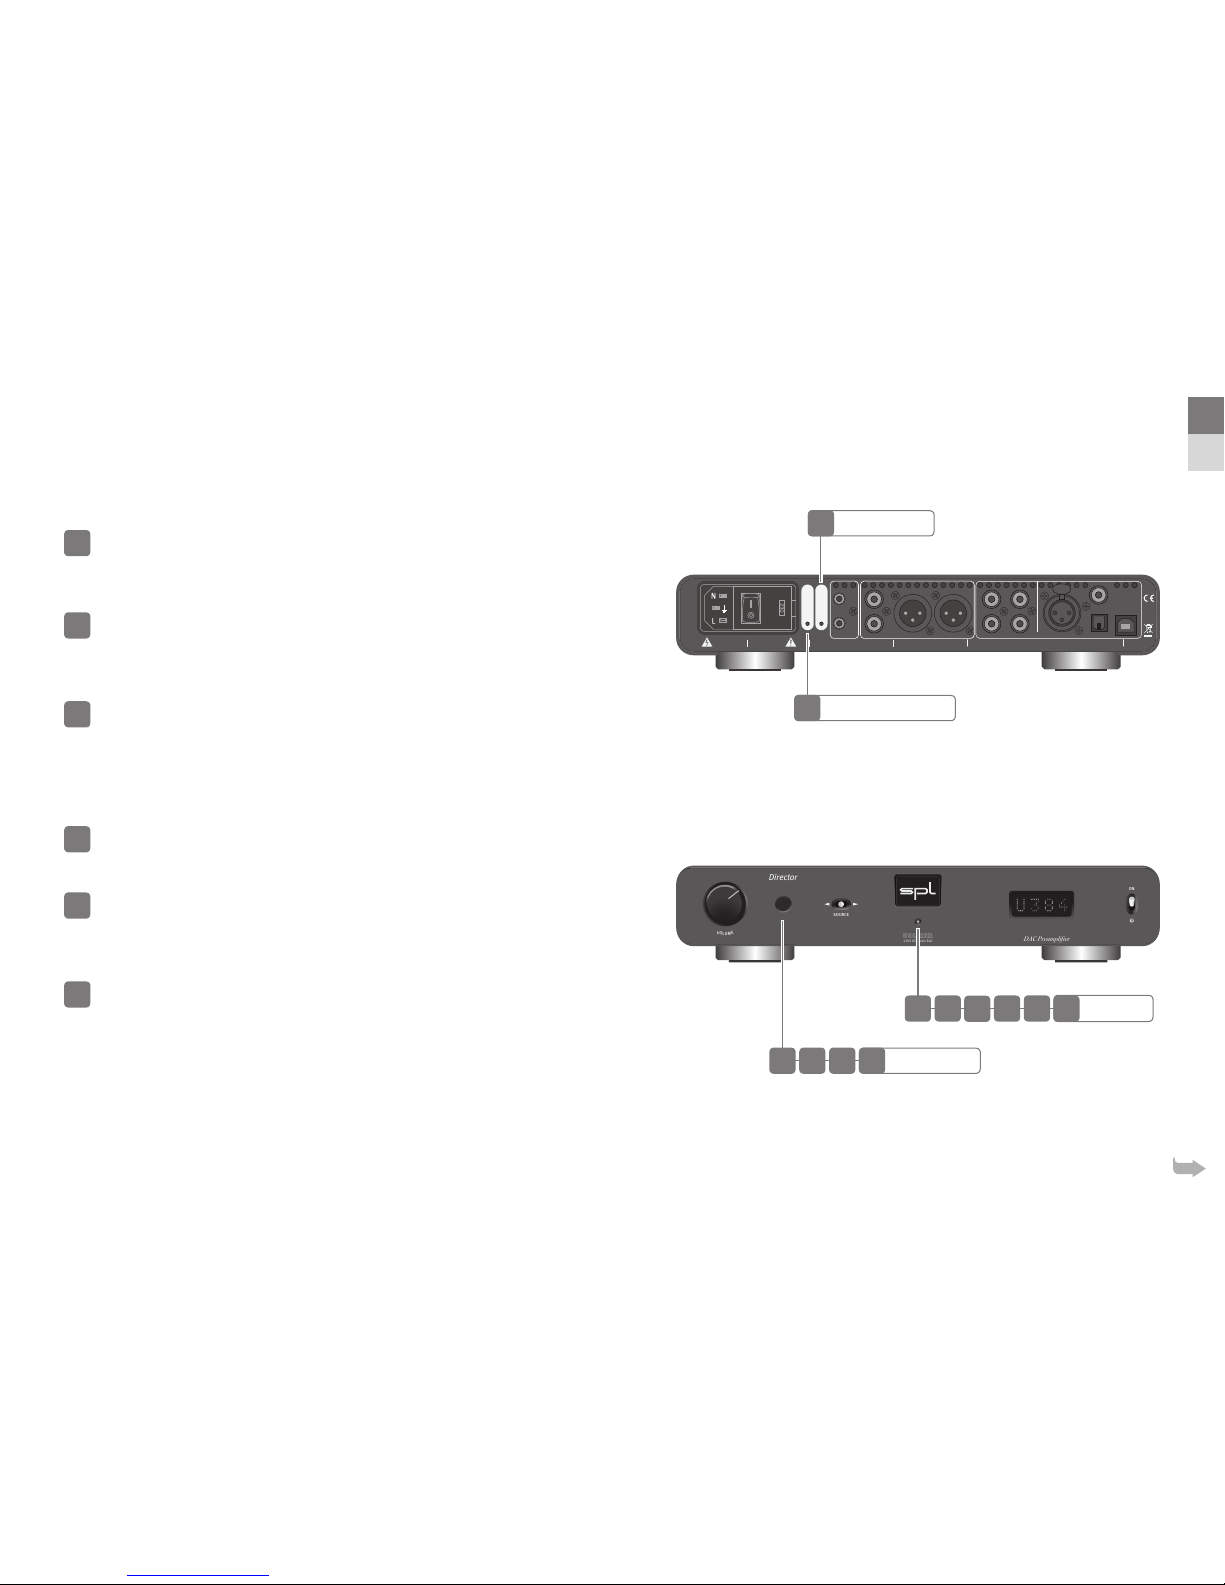
Source selection
Choose a source by using the SOURCE switch.
By using the SOURCE switch you can choose the next source when pushing
to the right. If you push the SOURCE switch to the le, the previous source is
chosen.
USB OPTI (optical) COAX IN (Analog )AES IN (Analog )
12
13
14
15
16
17
18
Source Selection
Standby Switch
Power LED
Mains Switch
Volume
18
1514
15 17
1413
13 17
12 16
EN
DE
Director – Quickstart Director – Quickstart
RISK OF ELECTRIC SHOCK
DO NOT OPEN
CAUTION
RISQUE DE CHOC ÉLECTRIQUE
NE PAS OUVRIR
ATTENTION
USB
AES
OPTICAL
COAX
IR
L
R
L
R
L
12
ANALOG < SOURCES > DIGITAL
1 ON: RCA Direct Out
2 ON: XLR Direct Out
5 ON: Ref +15dB
6 ON: Ref +18dB
3 ON: Zero flag auto- mute enabled
4 ON: RCA In -10dBV to 0dBuON BOTTOM SIDE:
DIP SWITCHES
Made in
Germany
OUT OUT R OUT L
R
B
A
Voltage Selection: 1 . Remove Fuse Hol der
2. Exchange Fuses 3. F lip Over 4. Rei nstall
~115 V AC/~230 V AC, 50 Hz/60 Hz, P max. 45 W
Fuses: 230 V: T 500mA L 250V, 115 V: T 1 A L 250V
AMP CTL
IR
PGMIRPGM
SOURCE
VOLUME
Refer to
Manual
VOLTAiR
120V DC Audio Rail
V
O
L
U
M
E
ON
DAC Preamplifier
Director
SOURCE
Learn IR remote control
Volume
The volume potentiometer of the Director is motorized and can be operated
by any infrared (IR) remote control. Press the IR PGM VOLUME button (infrared
programmable volume).
Power LED now lights up brighter.
Point your remote control towards the IR receiver and push the button you wish
to use to
lower
the volume. The Power LED lights up once per push. Press the
same button repeatedly until the Power LED lights up three times within a short
interval – programming of this button is then completed.
Point your remote control towards the IR receiver and push the button you wish
to use to
increase
the volume. The Power LED lights up once per push. Press
the same button repeatedly until the Power LED lights up three times within a
short interval – programming of this button is then completed.
Learn mode ends automatically aer the second button is learned.
Source selection
The source selection of the Director can be operated by any remote control.
Press the IR PGM SOURCE button (infrared programmable source selection).
Power LED now lights up brighter.
Point your remote control towards the IR receiver and push the button you wish
to use to switch to the
previous
source. The Power LED lights up once per push.
Press the same button repeatedly until the Power LED lights up three times
within a short interval – programming of this button is then completed.
Point your remote control towards the IR receiver and push the button you wish
to use to switch to the
next
source. The Power LED lights up once per push.
Press the same button repeatedly until the Power LED lights up three times
within a short interval – programming of this button is then completed.
Learn mode ends automatically aer the second button is learned.
19
20
21
22
23
24
IR PGM Source Selection
IR PGM Volume
IR Receiver
Power LED
22
19
20 2321 24
21 24
20 23
19 22
EN
DE
 Loading...