

Page 1
GAS GRILL
LP Gas Grill Owner’s Guide
LP Gas Grill Owner’s Guide
E -210/310
SP -210/310
#89525
#00000
YOU MUST READ THIS OWNER’S GUIDE
BEFORE OPERATING YOUR GAS GRILL
DANGER
If you smell gas:
1. Shut off gas to the appliance.
2. Extinguish any open fl ames.
3. Open lid.
4. If odor continues, keep away from the
appliance and immediately call your gas
supplier or your fi re department.
Leaking gas may cause a fi re or explosion
which can cause serious bodily injury or
death, or damage to property.
WARNING
1. Do not store or use gasoline or other
fl ammable liquids or vapors in the
vicinity of this or any other appliance .
2. An LP cylinder not connected for use
shall not be stored in the vicinity of this
or any other appliance.
WARNING: Follow all leak-check
procedures carefully in this manual prior
to barbecue operation. Do this even if the
barbecue was dealer-assembled.
NOTICE TO INSTALLER: These instructions
must be left with the owner and the owner
should keep them for future use.
THIS GAS APPLIANCE IS DESIGNED FOR
OUTDOOR USE ONLY.
WARNING: Do not try to light this
appliance without reading the “Lighting
Instructions” section of this manual.
89525 07/14/06 LP
US ENGLISH
Page 2

2
DANGERS AND WARNINGS
DANGER
Failure to follow the Dangers, Warnings and Cautions contained in this Owner’s Manual may result in serious bodily injury or
death, or in a fi re or an explosion causing damage to property.
WARNINGS
Do not store a spare or disconnected liquid propane cylinder under or near this barbecue.
Improper assembly may be dangerous. Please carefully follow the assembly instructions in this manual.
After a period of storage, and/or nonuse, the Weber® gas barbecue should be checked for gas leaks and burner obstructions
before use. See instructions in this manual for correct procedures.
Do not operate the Weber® gas barbecue if there is a gas leak present.
Do not use a fl ame to check for gas leaks.
Combustible materials should never be within 24 inches of the back or sides of your Weber® gas barbecue.
Do not put a barbecue cover or anything fl ammable on, or in the storage area under the barbecue.
Your Weber® gas barbecue should never be used by children. Accessible parts of the barbecue may be very hot. Keep young
children away while it is in use.
You should exercise reasonable care when operating your Weber® gas barbecue. It will be hot during cooking or cleaning and
should never be left unattended, or moved while in operation.
Should the burners go out while in operation, turn all gas valves off. Open the lid and wait fi ve minutes before attempting to
relight, using the lighting instructions.
Do not use charcoal or lava rock in your Weber® gas barbecue.
Never lean over open grill or place hands or fi ngers on the front edge of the cooking box.
Should a grease fi re occur, turn off all burners and leave lid closed until fi re is out.
Do not enlarge valve orifi ces or burner ports when cleaning the valves or burners.
The Weber® gas barbecue should be thoroughly cleaned on a regular basis.
Liquid propane gas is not natural gas. The conversion or attempted use of natural gas in a liquid propane unit or liquid
propane gas in a natural gas unit is dangerous and will void your warranty.
Do not attempt to disconnect any gas fi tting while your barbecue is in operation.
Use heat-resistant barbecue mitts or gloves when operating barbecue.
Keep any electrical supply cord and the fuel supply hose away from any heated surfaces.
Combustion byproducts produced when using this product contain chemicals known to the state of California to cause cancer,
birth defects, or other reproductive harm.
Do not use this barbecue unless all parts are in place. The unit must be properly assembled according to the instructions
outlined in the “Assembly Instructions”.
LIQUID PROPANE GAS UNITS ONLY:
Use the regulator that is supplied with your Weber® gas barbecue.
Do not attempt to disconnect the gas regulator or any gas fi tting while your barbecue is in operation.
A dented or rusty liquid propane cylinder may be hazardous and should be checked by your liquid propane supplier. Do not
use a liquid propane cylinder with a damaged valve.
Although your liquid propane cylinder may appear to be empty, gas may still be present, and the cylinder should be
transported and stored accordingly.
If you see, smell or hear the hiss of escaping gas from the liquid propane cylinder:
1. Move away from liquid propane cylinder.
2. Do not attempt to correct the problem yourself.
3. Call your fi re department.
WWW.WEBER.COM
®
Page 3

WARRANTY - GARANTÍA - GARANTIE
3
Weber-Stephen Products Co. (Weber) hereby warrants to the ORIGINAL PURCHASER of this Weber®
gas grill that it will be free of defects in material and workmanship from the date of purchase as follows:
Aluminum Castings, 25 years
Casting Paint, 2 years no burn-off
Porcelain Lid Section, 10 years
Stainless Steel Lid Section, 25 years no rust through or burn through
Stainless Steel Burners Tubes, 10 years no rust through
Porcelain Enameled Cast Iron
Cooking Grates, 5 years no rust through or burn through
Porcelain Enameled
Flavorizer® Bars, 3 years no rust through or burn through
Stainless Steel Cooking Grates, 7 years no rust through or burn through
Stainless Steel Flavorizer® Bars, 7 years no rust through or burn through
All Remaining Parts, 2 years
when assembled and operated in accordance with the printed instructions accompanying it.
Weber may require reasonable proof of your date of purchase. THEREFORE, YOU SHOULD RETAIN
YOUR SALES SLIP OR INVOICE.
This Limited Warranty shall be limited to the repair or replacement of parts that prove defective under
normal use and service and which on examination shall indicate, to Weber’s satisfaction, they are
defective. Before returning any parts, contact the Customer Service Representative in your area
using the contact information on our website. If Weber confi rms the defect and approves the claim,
Weber will elect to replace such parts without charge. If you are required to return defective parts,
transportation charges must be prepaid. Weber will return parts to the purchaser, freight or postage
prepaid.
This Limited Warranty does not cover any failures or operating diffi culties due to accident, abuse,
misuse, alteration, misapplication, vandalism, improper installation or improper maintenance or
service, or failure to perform normal and routine maintenance, including but not limited to damage
Weber-Stephen Products Co., (Weber) mediante el presente documento le garantiza al COMPRADOR
ORIGINAL de esta barbacoa o asador de gas Weber® que la misma estará libre defectos en cuanto a
materiales y a mano de obra a partir de la fecha de compra según lo siguiente:
Aluminum Castings, 25 years
Casting Paint, 2 years no burn-off
Porcelain Lid Section, 10 years
Stainless Steel Lid Section, 25 years no rust through or burn through
Stainless Steel Burners Tubes, 10 years no rust through
Porcelain Enameled Cast Iron
Cooking Grates, 5 years no rust through or burn through
Porcelain Enameled
Flavorizer® Bars, 3 years no rust through or burn through
Stainless Steel Cooking Grates, 7 years no rust through or burn through
Stainless Steel Flavorizer® Bars, 7 years no rust through or burn through
All Remaining Parts, 2 years
cuando se ensambla y opera de acuerdo a las instrucciones impresas que lo acompañan.
Weber pudiese requerir prueba razonable de la fecha de compra. POR LO TANTO, DEBERÁ
GUARDAR SU RECIBO O FACTURA DE VENTA.
Esta garantía limitada está limitada a la reparación o reemplazo de piezas que se resultasen
defectuosas bajo uso y servicio normal y las cuales al examinarse indiquen, a la plena satisfacción
de Weber, de que efectivamente son defectuosas. Antes de devolver cualquier parte, contacte
al Representante de Atención al Cliente en su área, cuya información de contacto la encontrará
en nuestro sitio web. Si Weber confi rma el defecto y aprueba el reclamo, ésta elegirá reparar o
reemplazar tal pieza sin cargo alguno. Si usted tiene que retornarnos las partes defectuosas, los
gastos de transporte deben ser prepagados. Weber retornará las partes al comprador con transporte
o franqueo prepagado.
Esta Garantía Limitada no cubre ninguna falla o problema de operación a causa de accidentes,
abuso, mal uso, alteración, uso en aplicaciones indebidas, vandalismo, instalación inapropiada o
mantenimiento o servicio inapropiados, o por no llevar a cabo el mantenimiento normal y rutinario,
entre los que se incluyen, pero sin limitación, los daños causados por insectos dentro de los tubos
caused by insects within the burner tubes, as set out in this owner’s manual.
Deterioration or damage due to severe weather conditions such as hail, hurricanes, earthquakes
or tornadoes, discoloration due to exposure to chemicals either directly or in the atmosphere, is not
covered by this Limited Warranty.
There are no other express warrants except as set forth herein and any applicable implied warranties
of merchantability and fi tness are limited in duration to the period of coverage of this express written
Limited Warranty. Some regions do not allow limitation on how long an implied warranty lasts, so this
limitation may not apply to you.
Weber is not liable for any special, indirect or consequential damages. Some regions do not allow the
exclusion or limitation of incidental or consequential damages, so this limitation or exclusion may not
apply to you.
Weber does not authorize any person or company to assume for it any other obligation or liability in
connection with the sale, installation, use, removal, return, or replacement of its equipment; and no
such representations are binding on Weber.
This Warranty applies only to products sold at retail.
WEBER-STEPHEN PRODUCTS CO.
Customer Service Center
1890 Roselle Road, Suite 308
Schaumburg, IL 60195
USA
3
For replacement parts call:
1-800-446-1071
www.weber.com
quemadores, según se detalla en este manual del propietario.
Esta Garantía Limitada no cubre el deterioro o daños a causa de condiciones de tiempo inclementes
tales como granizo, huracanes, terremotos o tornados ni tampoco la decoloración por exposición a
sustancias químicas bien sea por contacto directo o por las mismas contenidas en la atmósfera.
No existe ninguna otra garantía expresa que no sean las las acá indicadas y cualesquier garantías
implícitas de comerciabilidad y aptitud de uso están limitadas en duración al tiempo de cobertura de
esta expresa Garantía Limitada por escrito. Algunas regiones no permiten limitación alguna en el
tiempo que una garantía implícita pueda durar, por lo que esta limitación pudiera no aplicarle a usted.
Weber no se hace responsable de cualesquier daños especiales, indirectos o emergentes. Algunas
regiones no permiten la exclusión o limitación de daños incidentales o emergentes, por lo que esta
limitación o exclusión pudieran no aplicarle a usted.
Weber no autoriza a persona o empresa alguna a asumir en su nombre ninguna obligación o
responsabilidad en relación con la venta, instalación, uso, retiro, devolución o reemplazo de sus
equipos, y ninguna tal representación será vinculante para Weber.
Esta Garantía aplica solo a aquellos productos vendidos al por menor.
WEBER-STEPHEN PRODUCTS CO.
Customer Service Center
1890 Roselle Road, Suite 308
Schaumburg, IL 60195
USA
®
Para partes de repuesto llame a:
1-800-446-1071
www.weber.com
®
Weber-Stephen Products Co. (Weber) garantit par la présente à L”ACHETEUR D”ORIGINE que ce
gril à gaz Weber® sera sans défaut de matériau ou de fabrication à partir de la date d’achat selon les
modalités suivantes :
Aluminum Castings, 25 years
Casting Paint, 2 years no burn-off
Porcelain Lid Section, 10 years
Stainless Steel Lid Section, 25 years no rust through or burn through
Stainless Steel Burners Tubes, 10 years no rust through
Porcelain Enameled Cast Iron
Cooking Grates, 5 years no rust through or burn through
Porcelain Enameled
Flavorizer® Bars, 3 years no rust through or burn through
Stainless Steel Cooking Grates, 7 years no rust through or burn through
Stainless Steel Flavorizer
All Remaining Parts, 2 years
quand l’appareil est assemblé et utilisé en suivant les instructions imprimées qui l’accompagnent.
Weber peut demander une preuve raisonnable de la date d’achat. PAR CONSÉQUENT, IL FAUT
GARDER LE REÇU OU LA FACTURE.
Cette garantie limitée ne couvre que la réparation ou le remplacement des pièces qui s’avèrent
défectueuses en condition normales d’utilisation et de service et qui présentent un défaut selon Weber.
Avant de renvoyer des pièces, veuillez contacter le Représentant du service à la clientèle de votre
région à l’aide des coordonnées disponibles sur notre site Internet. Si Weber confi rme le défaut et
approuve la réclamation, Weber choisira de remplacer ces pièces gratuitement. S’il vous faut renvoyer
des pièces défectueuses, les frais d’expédition doivent être payés d’avance. Weber renverra les pièces
à l’acheteur en port payé.
Cette garantie limitée ne couvre pas les défauts ou diffi cultés de fonctionnement causés par un
accident, par un usage abusif, par un mauvais usage, une modifi cation, une utilisation, installation
WWW.WEBER.COM
®
®
Bars, 7 years no rust through or burn through
ou maintenance ou un entretien non conforme, par vandalisme ou par le manque de maintenance
normale et routinière, y compris mais non limitée aux dégâts provoqués par des insectes dans les
tubes des brûleurs, comme indiqué dans le manuel du propriétaire.
Les détériorations ou dommages causés par des intempéries telles que grêle, ouragan, tremblement
de terre, tornades et les décolorations causées par des produits chimiques soit en contact direct soit
dans l’atmosphère ne sont pas couverts par cette garantie.
Il n’existe aucune garantie expresse hormis celles indiquées ici et toute garantie implicite de qualité
marchande et d’adaptation à l’usage est limitée dans le temps à la durée de la couverture de cette
garantie expresse limitée. Certaines provinces ne permettant pas de restriction sur la durée d’une
garantie implicite, il est possible que cette restriction ne s’applique pas dans votre cas.
Weber n’est pas responsable pour les dommages particuliers, indirects ou consécutifs. Certaines
provinces interdisent l’exclusion ou la limitation des dommages fortuits ou consécutifs, par conséquent
cette limitation ou cette exclusion peuvent ne pas s’appliquer à votre situation.
Weber n’autorise aucune personne ou compagnie à prendre en charge pour Weber toute autre
obligation ou responsabilité en rapport avec la vente, l’installation, l’utilisation, l’enlèvement, le renvoi
ou le remplacement de son matériel et la responsabilité de Weber ne sera en aucune façon engagée
par une représentation de ce genre.
Cette garantie ne s’applique qu’aux produits vendus au détail.
WEBER-STEPHEN PRODUCTS CO.
Service à la clientèle
1890 Roselle Road, Suite 308
Schaumburg, IL 60195
États-Unis
Pour les pièces de rechange, appelez :
1-800-446-1071
www.weber.com
®
Page 4
4
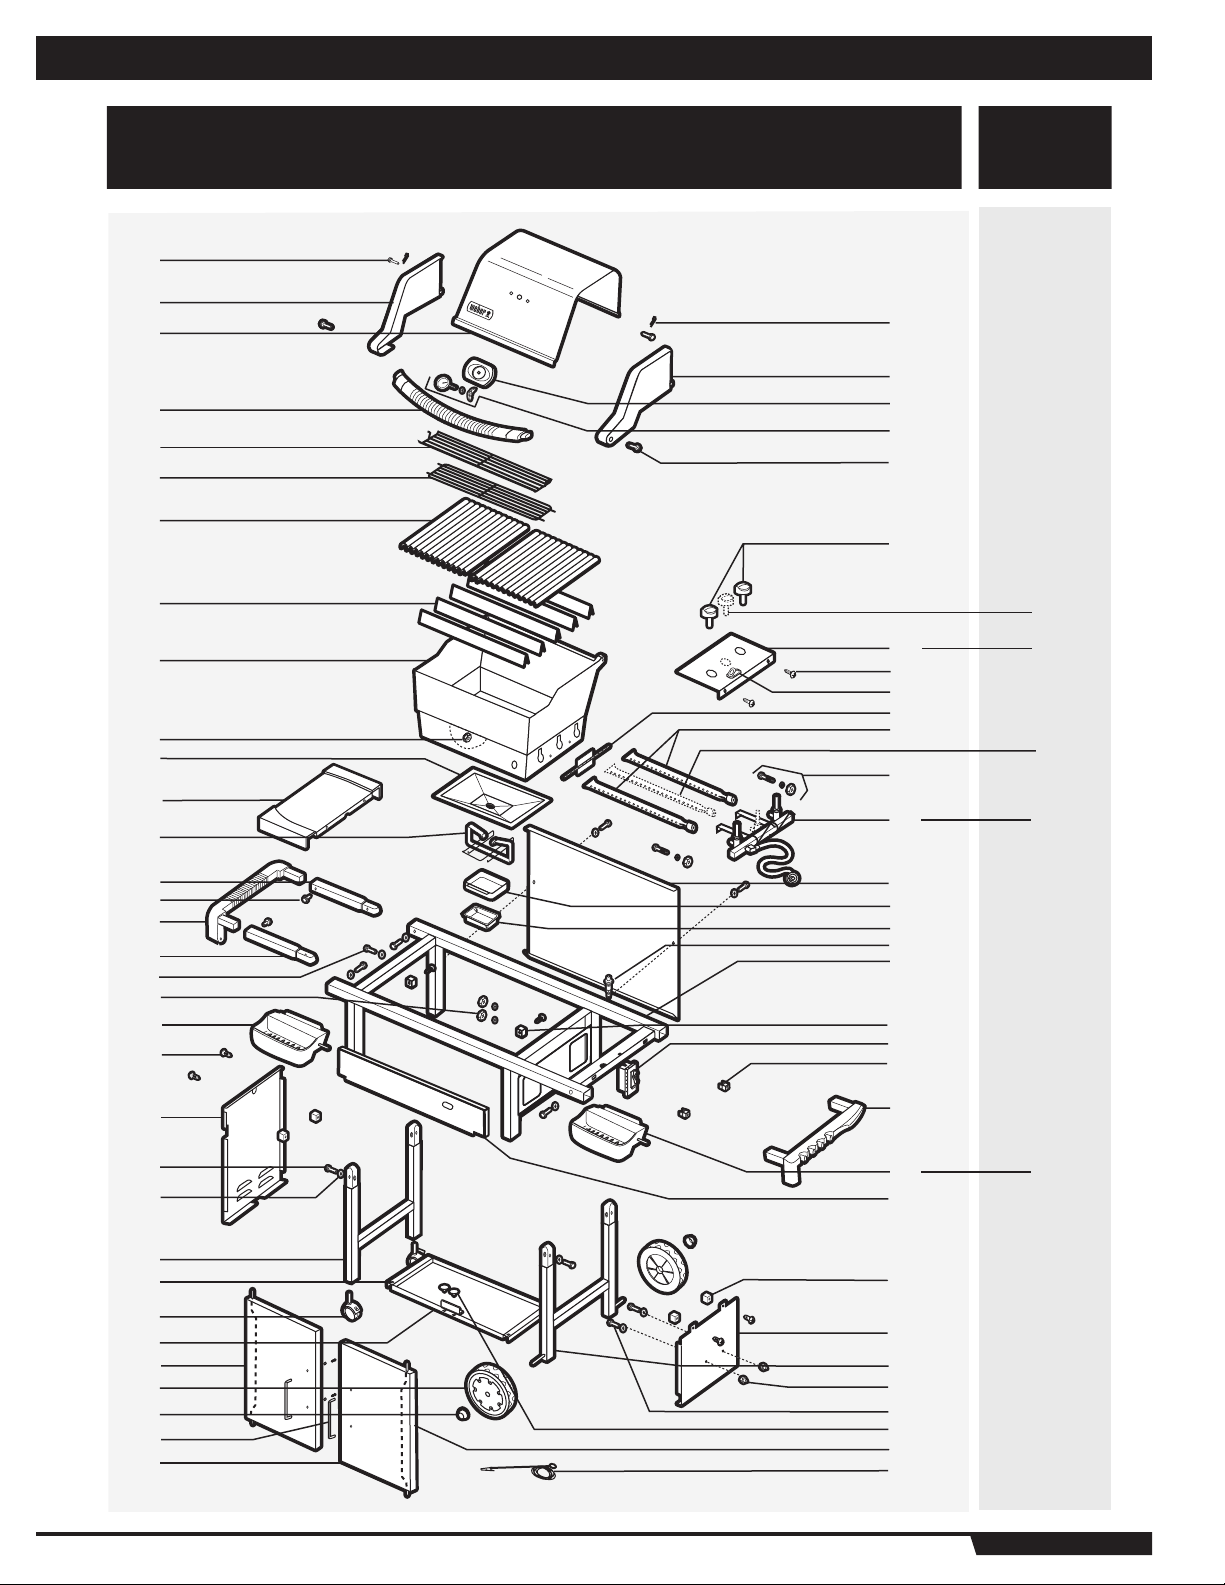
EXPLODED VIEW - DIAGRAMA DE DESPIECE - VISION ÉCLATÉE
10
11
12
13
®
SPIRIT
®
E/SP -210, E-310
SPIRIT
E/SP-310
3XX1001 - Spirit® Gas Grill LP 071406
1
2
3
4
5
6
7
8
9
34
35
36
37
38
39
41
42
43
44
45
47
48
40
41
46
48
14
15
16
17
18
19
20
21
22
23
24
25
26
27
28
29
30
31
32
33
49
50
51
52
53
54
55
56
57
58
59
60
61
62
63
64
65
66
67
58
WWW.WEBER.COM
®
Page 5

EXPLODED LIST - LISTA DEL DIAGRAMA - LISTE DE LA VISION ÉCLATÉE
5
1. Hinge Pin
Pasador de bisagra
Axe d’articulation
2. Left Endcap
Capacete izquierdo
Capuchon d’extrémité gauche
3. Shroud
Cubierta
Protection
4. Handle
Asa
Poignée
5. Warm-Up™ Basket
Canasta Warm-Up
Panier Warm-Up
6. Warming Rack
Parrilla para calentar
Grille de réchauffage
7. Cooking Grates
Parrilla para asar
Grilles de cuisson
8. Flavorizer® Bars
Barras Flavorizer
Barres Flavorizer
9. Cooking Box
Cámara para asar
Cuve
10. 1/4-20 Keps Nut
Tuerca de enclavamiento (Tuerca
de enclavamiento de 1/4” x 20)
Écrou Keps (1/4 x 20)
11. Slide-Out Bottom Tray
Bandeja del fondo
Plateau inférieur amovible
12. Work Surface
Superfi cie de trabajo
Plan de travail
13. Catch Pan Holder
Soporte de la bandeja
para recoger el exceso de grasa
Support de lèchefrite
14. Left Rear Trim Assembly Arm
Brazo de la estructura de ajuste
trasera izquierda
Bras de la garniture arrière gauche
15. 1/4 - 14 x 5/8 inch Bolt
Pernos de 5/8”
(Pernos de 1/4” x 14 x 5/8”)
Boulons de 5/8 po
(1/4 x 14 x 5/8 po)
16. Left Trim Piece
Pieza de ajuste izquierda
Garniture gauche
17. Left Front Trim Assembly Arm
Left Front Trim Assembly Arm
Bras de la garniture avant gauche
18. 1/4 - 20 x 2 1/4 inch Bolt
Pernos de 2 1/4”
(Pernos de 1/4” x 20 x 2 1/4”)
Boulons de 2 1/4 po
(1/4 x 20 x 2 1/4 po)
19. Fuel Gauge Hardware
Elementos de Medidor del gas
Boulonnerie de Jauge
de combustible
WWW.WEBER.COM
™
™
®
®
®
20. Condiment Basket
Canastilla de condimentos
Panier à condiments
21. Panel Hardware
Elementos de Panel
Boulonnerie de Panneau
22. Left Frame Panel
Tablero del bastidor izquierdo
Panneau du cadre gauche
23. 1/4 - 20 x 1 inch Bolt
Pernos de 1/4”
(Pernos de 1/4” x 20 x 1/4”)
Boulons de 1/4 po
(1/4 x 20 x 1/4 po)
24. Nylon Washer
Arandela de nilón
Rondelle en nylon
25. Caster Frame
Bastidor para los rodillos
Châssis des roulettes
26. Door Bushing
Buje de puerta
Bagne de porte
27. Caster
Rodillo
Roulette
28. Bottom Shelf
Estante inferior
Plateau inférieur
29. Left Door
Puerta izquierda
Porte gauche
30. Wheel
Ruedas
Roues
31. Hubcap
Tapacubos
Couvre-moyeux
32. Handle
Asa
Poignée
33. Right Door
Puerta derecha
Porte droite
34. Hair Pin Cotter
Pasador de horquilla
Goupille bêta
35. Right Endcap
Capacete derecho
Capuchon d’extrémité droite
36. Thermometer Bezel
Assembly
Ensamblaje biselado para
el termómetro
Montage de la collerette de fi xation
du thermomètre
37. Thermometer Assembly
Termómetro
Thermomètre
38. Handle Hardware
Elementos de Asa
Boulonnerie de Poignée
39. Control Panel Knobs
Perilla de control
Manette de réglage
40. Control Panel Knob
Perilla de control
Manette de réglage
41. Control Panel
Panel de control
Panneau de commande
42. Control Panel Hardware
Tornillería del panel de control
(Destornillador Phillips y
arandelas Visserie du panneau de
commande (vis à empreinte
cruciforme et rondelles)
43. Crossover® Ignition Button
Botón del encendedor
Bouton d’allumeur
44. Crossover® Tube
Tubo Crossover
Tube Crossover
45. Front/Rear Burner
Quemador frontal/trasero
Brûleur avant / arrière
46. Center Burner
Quemador Central
Brûleur central
47. Manifold Hardware
Tornillería del distribuidor
Boulonnerie de collecteur
48. Manifold, Hose and Regulator
Distribuidor, manguera y
regulador
Collecteur, tuyau et détendeur
49. Rear Panel
Panel trasero
Panneau arrière
50. Catch Pan
Bandeja para recoger el
exceso de grasa
Lèchefrite
51. Disposable Drip Pan
Bandejas recogegotas
Barquette jetable
52. Igniter
Encendedor
Allumeur
53. Top Frame Assembly
Estructura de bastidor superior
Longeron de cadre de châssis
sommet
54. Front Panel Hardware
Herrajes del tablero frontal
Matériel du panneau avant
55. Fuel Gauge
Medidor del gas
Jauge de combustible
56. Control Panel Hardware
Tornillería del panel de control
(Destornillador Phillips y
arandelas
Visserie du panneau de
commande (vis à empreinte
cruciforme et rondelles)
57. Right Trim Piece
Pieza de ajuste derecha
Garniture droite
®
®
®
®
58. Condiment Basket
Canastilla de condimentos
Panier à condiments
59. Front Panel
Quemador delantero
Panneau avant
60. Right Frame Panel Hardware
Elementos de Tablero del
bastidor derecho
Boulonnerie de Panneau
du cadre droit
61. Right Frame Panel
Tablero del bastidor derecho
Panneau du cadre droit
62. Wheel Frame
Bastidor para las ruedas
Châssis des roues
63. Cylinder Glides
Soportes de la bombona
Glissières de bouteille
64. 1/4 - 20 x 1 3/4 inch bolt
Pernos de 1 3/4”
(Pernos de 1/4” x 20 x 1 3/4”)
Boulons de 1 3/4 po
(1/4 x 20 x 1 3/4 po)
65. Door Glides
Deslizadores de la puerta
Glissières de la porte
66. Hinge Rods
Varilla articulada
Tige d’articulation
67. Matchlight Holder
Sujetador de Fósforo
Support d’allumage par
allumette
5
Page 6

6
GENERAL INSTRUCTIONS
Your Weber® gas barbecue is a portable outdoor cooking appliance. With the Weber®
gas barbecue you can grill, barbecue, roast and bake with results that are diffi cult to
duplicate with indoor kitchen appliances. The closed lid and Flavorizer® Bars produce
that “outdoor” fl avor in the food.
The Weber® gas barbecue is portable so you can easily change its location in your yard
or on your patio. Portability means you can take your Weber
move.
Liquid Propane (LP) gas supply is easy to use and gives you more cooking control than
charcoal fuel.
• These instructions will give you the minimum requirements for assembling your
®
Weber
gas barbecue. Please read the instructions carefully before using your
Weber® gas barbecue. Improper assembly can be dangerous.
• Not for use by children.
• If there are local codes that apply to portable gas grills, you will have to conform
to them. If there are no local codes, you must conform to the latest edition of the
National Fuel Gas Code: ANSI Z 223.1/NFPA 54, or Natural Gas and Propane
Installation Code, CSA B149.1, or Propane Storage and Handling Code, B149.2
• The pressure regulator supplied with the Weber® gas barbecue must be used. This
regulator is set for 10.5 inches of water column (pressure).
• This Weber® gas barbecue is designed for use with liquid propane (LP) gas only. Do
not use with natural (piped in city) gas. The valves, orifi ces, hose and regulator are
for LP gas only.
• Do not use with charcoal fuel.
• Check that the area under the control panel and the bottom tray are free from debris
that might obstruct the fl ow of combustion or ventilation air.
• The areas around the LP cylinder must be free and clear from debris.
• Replacement pressure regulators and hose assemblies must be those specifi ed by
the outdoor cooking gas appliance manufacturer.
®
gas barbecue with, if you
FOR INSTALLATION IN CANADA
These instructions, while generally acceptable, do not necessarily comply with the
Canadian Installation codes, particularly with piping above and below ground. In
Canada the installation of this appliance must comply with local codes and/or Standard
CSA-B149.2 (Propane Storage and Handling Code).
OPERATING
WARNING: Only use this barbecue outdoors in a well-
ventilated area. Do not use in a garage, building, breezeway
or any other enclosed area.
WARNING: Your Weber® gas barbecue shall not be used
under overhead combustible construction.
STORAGE AND/OR NONUSE
• The gas must be turned off at the liquid propane cylinder when the Weber® gas
barbecue is not in use.
• When the Weber® gas barbecue is stored indoors, the gas supply must be
DISCONNECTED and the LP cylinder stored outdoors in a well-ventilated space.
• LP cylinder must be stored outdoors in a well -ventilated area out of reach of children.
Disconnected LP cylinder must not be stored in a building, garage or any other
enclosed area.
• When the LP cylinder is not disconnected from the Weber
appliance and LP tank must be kept outdoors in a well-ventilated space.
• The Weber® gas barbecue should be checked for gas leaks and any obstructions
in the burner tubes before using. (See Sections: “General Maintenance and Annual
Maintenance.”)
• Check that the areas under the control panel and the slide out bottom tray are free
from debris that might obstruct the fl ow of combustion or ventilation air.
• The Spider /Insect Screens should also be checked for any obstructions. (See
Section: "Annual Maintenance.")
®
gas barbecue, the
WARNING: Your Weber® gas barbecue is not intended to be
installed in or on recreational vehicles and/or boats.
WARNING: Do not use the barbecue within 24 inches of
combustible materials to the back or sides of the grill.
WARNING: The entire cooking box gets hot when in use. Do
not leave unattended.
WARNING: Keep any electrical supply cord and the fuel
supply hose away from any heated surface.
WARNING: Keep the cooking area clear of fl ammable vapors
and liquids such as gasoline, alcohol, etc., and combustible
materials.
WARNING: Never store an extra (spare) LP cylinder under or
near the Weber® gas barbecue.
WARNING: The LP cylinder used with your barbecue must
be with a listed OPD (Overfi lling Prevention Device) and
a QCC1 or Type 1 (CGA810) cylinder connection. The
cylinder connection must be compatible with the barbecue
connection.
COOKING
WARNING: Do not move the Weber® gas barbecue when
operating or while barbecue is hot.
You can adjust the FRONT and BACK burners as desired. The control settings: High
(H), Medium (M), Low (L), or OFF (O) are described in your Weber® cookbook. The
cookbook uses these notations to describe the settings of the FRONT and BACK
burners. For example, to sear steaks, you would set all burners at H (High). Then to
complete cooking, you would set FRONT and BACK at M (Medium). Refer to your
®
Weber
cookbook for detailed cooking instructions.
Note: The temperature inside your cooking box for the fi rst few uses, while surfaces
are still very refl ective, may be hotter than those shown in your cookbook. Cooking
conditions. Such as wind and weather, may require the adjustment of the burner
controls to obtain the correct cooking temperatures.
Preheating - Your Weber
an economical low BTU rate. To preheat: after lighting, close lid and turn all burners to
high (HH). Preheating to between 500° and 550° F (260° and 290° C) will take 10 to 15
minutes depending on conditions such as air temperature and wind.
Drippings and grease - The Flavorizer® bars are designed to “smoke” the correct
amount of drippings for fl avorful cooking. Excess drippings and grease will accumulate
in the catch pan under the slide out bottom tray. Disposable foil drip pans are available
that fi t the catch pan.
®
gas barbecue is an energy-effi cient appliance. It operates at
WARNING: Check the bottom tray for grease build-up before
each use. Remove excess grease to avoid a grease fi re in
the slide out bottom tray.
CLEANING
WARNING: Turn your Weber® gas barbecue OFF and wait for
it to cool before cleaning.
Outside surfaces - Use a warm soapy water solution to clean, then rinse with water.
CAUTION: Do not use oven cleaner, abrasive cleansers
(kitchen cleansers) cleaners that contain citrus products, or
abrasive cleaning pads on barbecue or cart surfaces.
Flavorizer® bars and Cooking grates - Clean with a suitable brass bristle brush. As
needed, remove from grill and wash with warm soapy water, then rinse with water.
WWW.WEBER.COM
®
Page 7
GENERAL INSTRUCTIONS
7
CAUTION: Do not clean your Flavorizer® bars or cooking
grates in a self-cleaning oven.
For availability of replacement cooking grates and Flavorizer® bars Contact the
Customer Service Representative in your area using the contact information on
our web site. Log onto www.weber.com®.
Slide out Bottom tray - Remove excess grease, then wash with warm soapy water,
then rinse.
Catch pan - Disposable foil trays are available, or you can line the catch pan with
aluminum foil. To clean the catch pan, wash with warm soapy water, then rinse.
Thermometer - Wipe with warm soapy water; clean with plastic scrub ball.
Inside cooking module - Brush any debris off of burner tubes. DO NOT ENLARGE
BURNER PORTS (OPENINGS). Wash inside of cooking box with warm soapy water
and a water rinse.
Inside Lid - While lid is warm, wipe inside with paper towel to prevent grease build-up.
Flaking built-up grease resembles paint fl akes.
GAS INSTRUCTIONS
IMPORTANT LP CYLINDER INFORMATION
Failure to follow these DANGER statements exactly may result in a fi re causing death
or serious injury.
Stainless steel surfaces - Preserve Your Stainless Steel - Your grill or its cabinet,
lid, control panel and shelves may be made from stainless steel. In order to keep the
stainless steel looking its best is easy. Simply clean it with soap and water, rinse with
clean water and wipe dry. A non-metallic brush can be used for stubborn stains.
7
IMPORTANT: Do not use wire brushes or abrasive cleaners
on the stainless steel surfaces of your grill, as this will leave
scratches.
IMPORTANT: Do no use cleaners that contain chlorine
bleach on the stainless steel surface of your grill.
IMPORTANT: When cleaning surfaces, be sure to rub/wipe
in the direction of the grain to preserve the look of your
stainless steel.
Thermoset surfaces - Wash with a soft cloth and a soap and water solution.
Do not use cleaners that contain acid, mineral spirits or xylene. Rinse well after
cleaning.
Thermoset work surfaces are not to be used as cutting boards.
The proper fi lling methods for the fi lling of your cylinder are by weight or volume, as
described in NFPA 58. Please make sure your fi lling station fi lls your LP cylinder by
weight or volume. Ask your fi lling station to read purging and fi lling instructions on the
LP cylinder before attempting to fi ll.
DANGER
NEVER store a spare LP Cylinder under or near this
barbecue.
NEVER fi ll the tank beyond 80% full.
®
Your Weber
gas grill is equipped for a cylinder supply system
designed for vapor withdrawal.
WARNING: Only use this grill outdoors in a well-ventilated
area. Do not use in a garage, building, breezeway or any
other enclosed area.
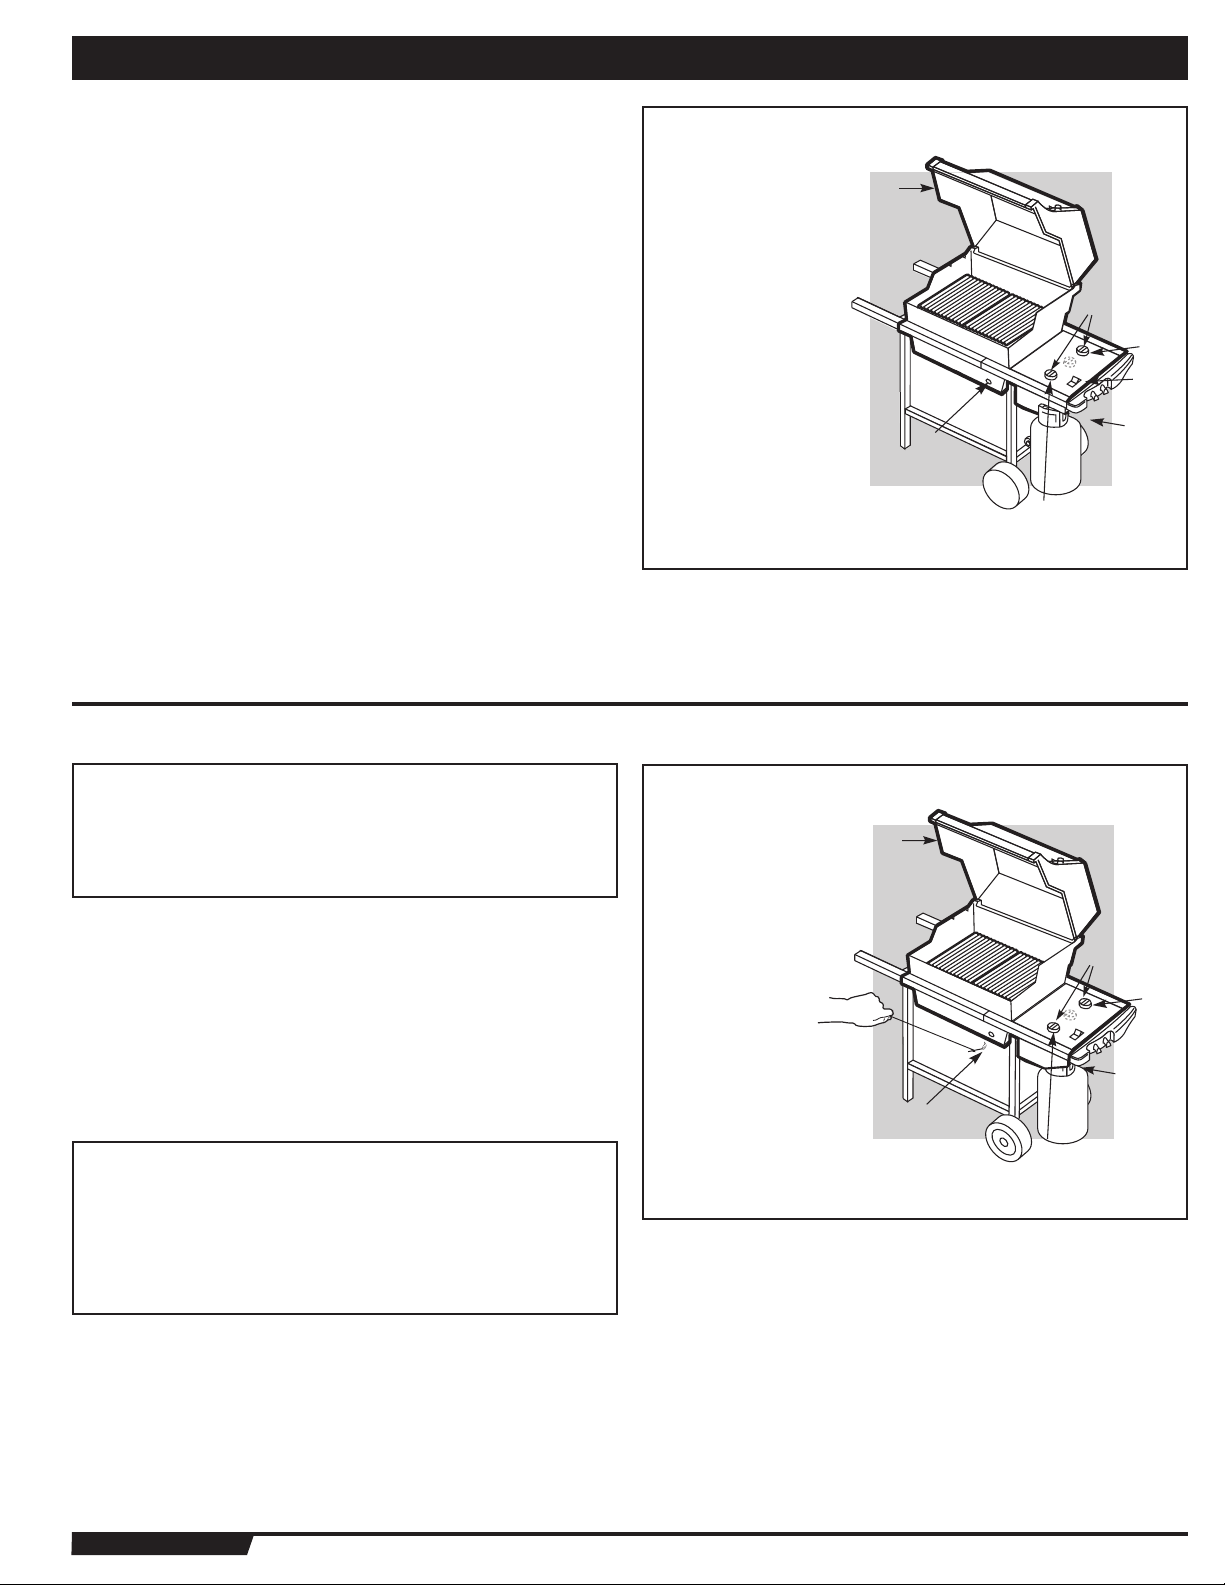
CONNECTING THE LIQUID PROPANE CYLINDER
WARNING: Make sure that the LP cylinder valve is closed.
Close by turning valve clockwise.
DANGER
Do not use an open fl ame to check for gas leaks. Be sure
there are no sparks or open fl ames in the area while you
check for leaks. Sparks or fl ames will result in a fi re or
explosion which can cause serious bodily injury or death,
and damage to property.
LEAK CHECK PREPARATION
CHECK THAT ALL BURNER VALVES ARE OFF
Valves are shipped in the OFF position, but you should check to be sure that they are
turned off. Check by pushing down and turning clockwise. If they do not turn, they are
off. Proceed to the next step. If they do turn continue turning them clockwise until they
stop, then they are off. Proceed to the next step.
(b)
(a)
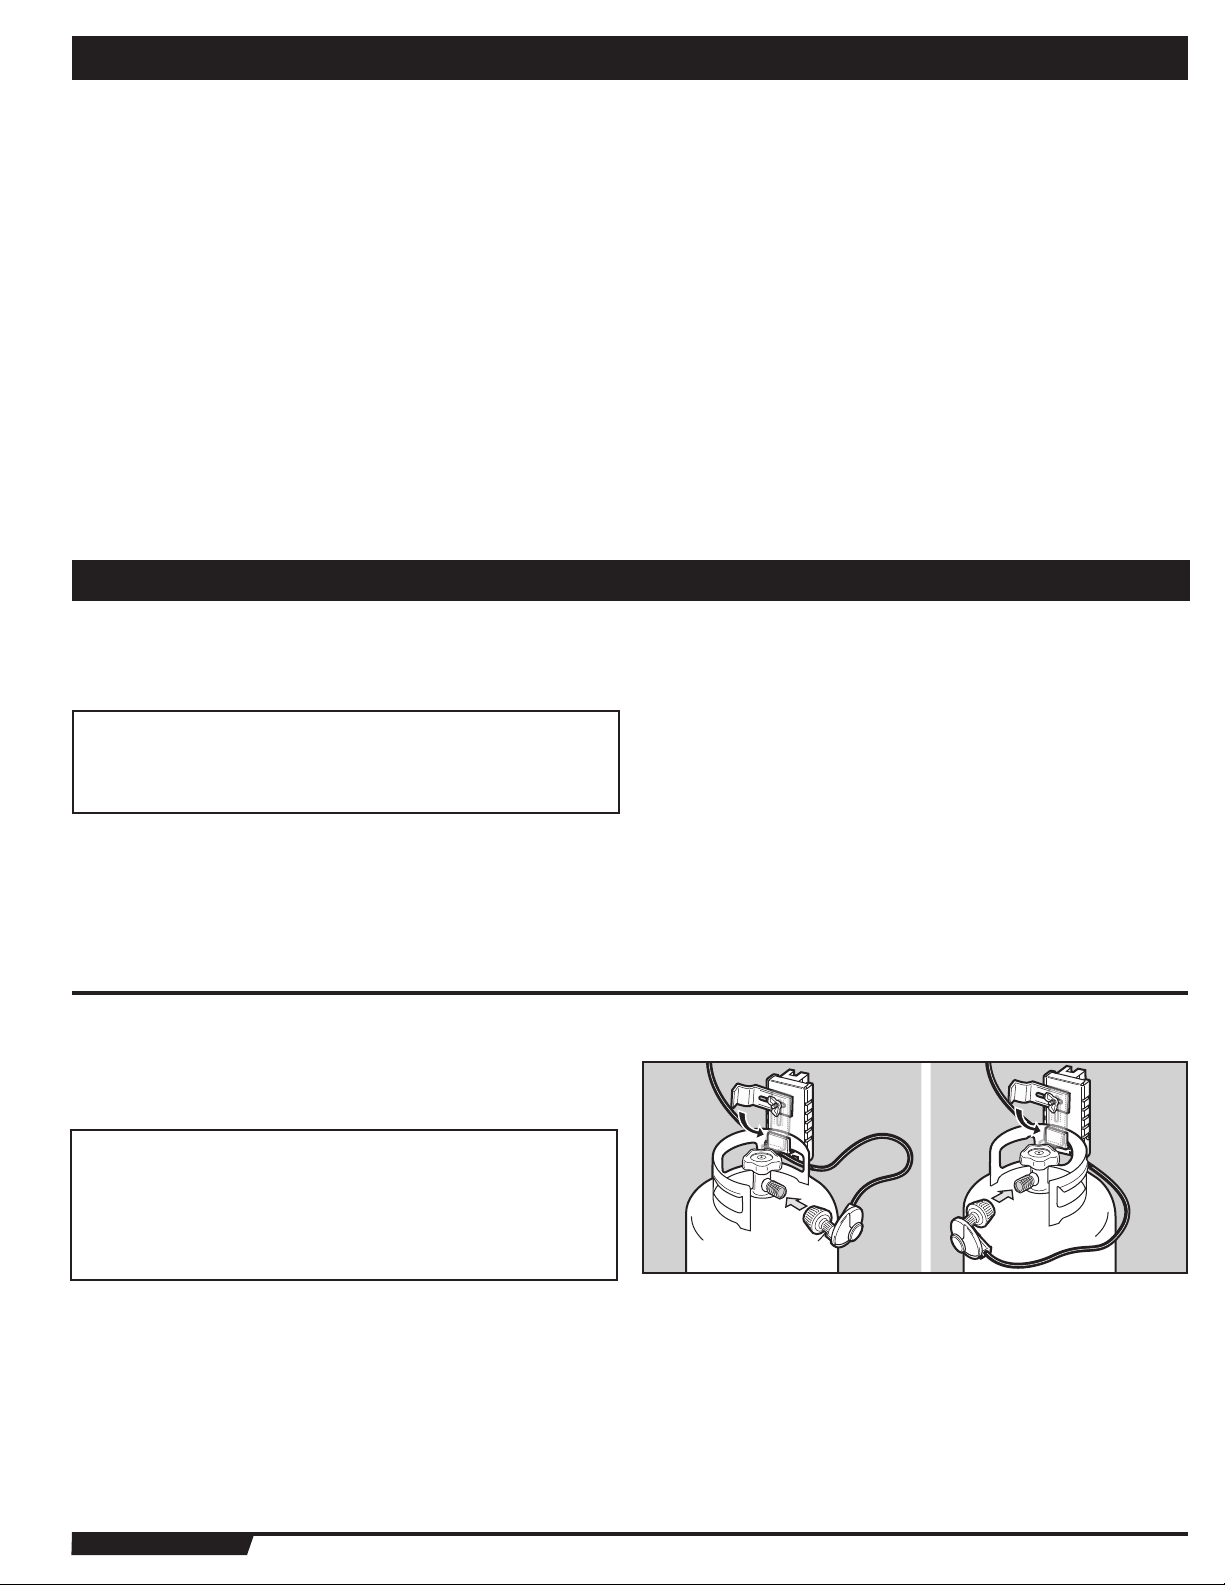
Some LP tanks have differing top collar assembles. (The top collar is the metal protective
ring around the valve.) One series of tanks mount with the valve facing front (a). The other
tanks mount with the valve facing away from the fuel scale (b).
You will need: LP cylinder, a soap and water solution and a rag or brush to apply it.
WWW.WEBER.COM
®
Page 8
8
1) Turn the LP cylinder so the opening of the valve is either to the front, side or rear of
the Weber® gas barbecue. Lift and hook the cylinder onto the fuel gauge.
2) Loosen the cylinder lock wing nut. Swing the cylinder lock down. Tighten the wing
nut.
To Connect the hose to the cylinder:
3) Remove the plastic dust cover from the valve.
4) Screw the regulator coupling onto the tank valve, clockwise, or to the right.
Hand-tighten only.
Note: This is a new type of connection. It tightens clockwise and will not allow gas to
fl ow unless the connection is tight. The connection requires tightening by hand only.
GAS INSTRUCTIONS
WARNING: Do not use a wrench to tighten the connection.
Using a wrench could damage the regulator coupling and
could cause a leak.
5) Mix soap and water.
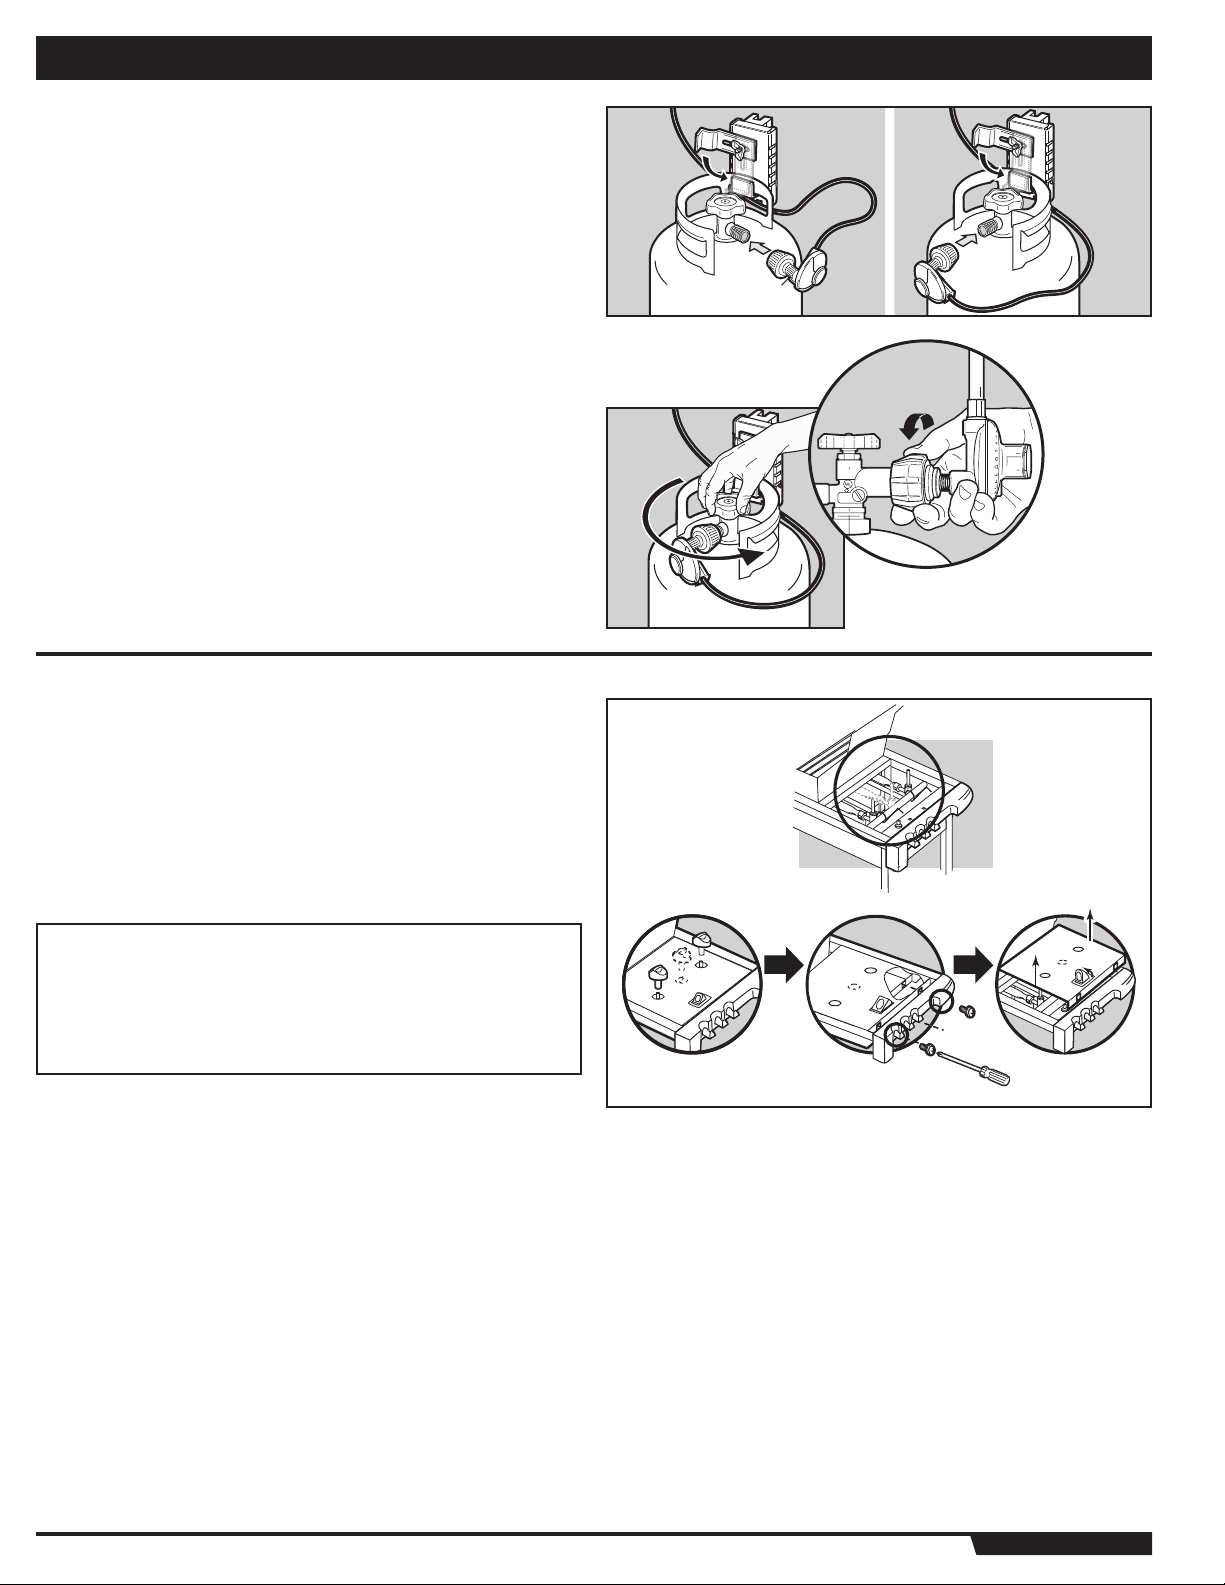
6) Turn on the cylinder valve.
7) Check for leaks by wetting the fi tting with the soap and water solution and watching
for bubbles. If bubbles form, or if a bubble grows, there is a leak.
If there is a leak, turn off the gas and tighten the fi tting. Turn the gas back on and
recheck with the soap and water solution.
If leak does not stop, Contact the Customer Service Representative in your area using
the contact information on our web site. Log onto www.weber.com®. Do not use the
barbecue.
8) When leak checking is complete, turn gas supply off at the source and rinse
connections with water.
(a)
(b)
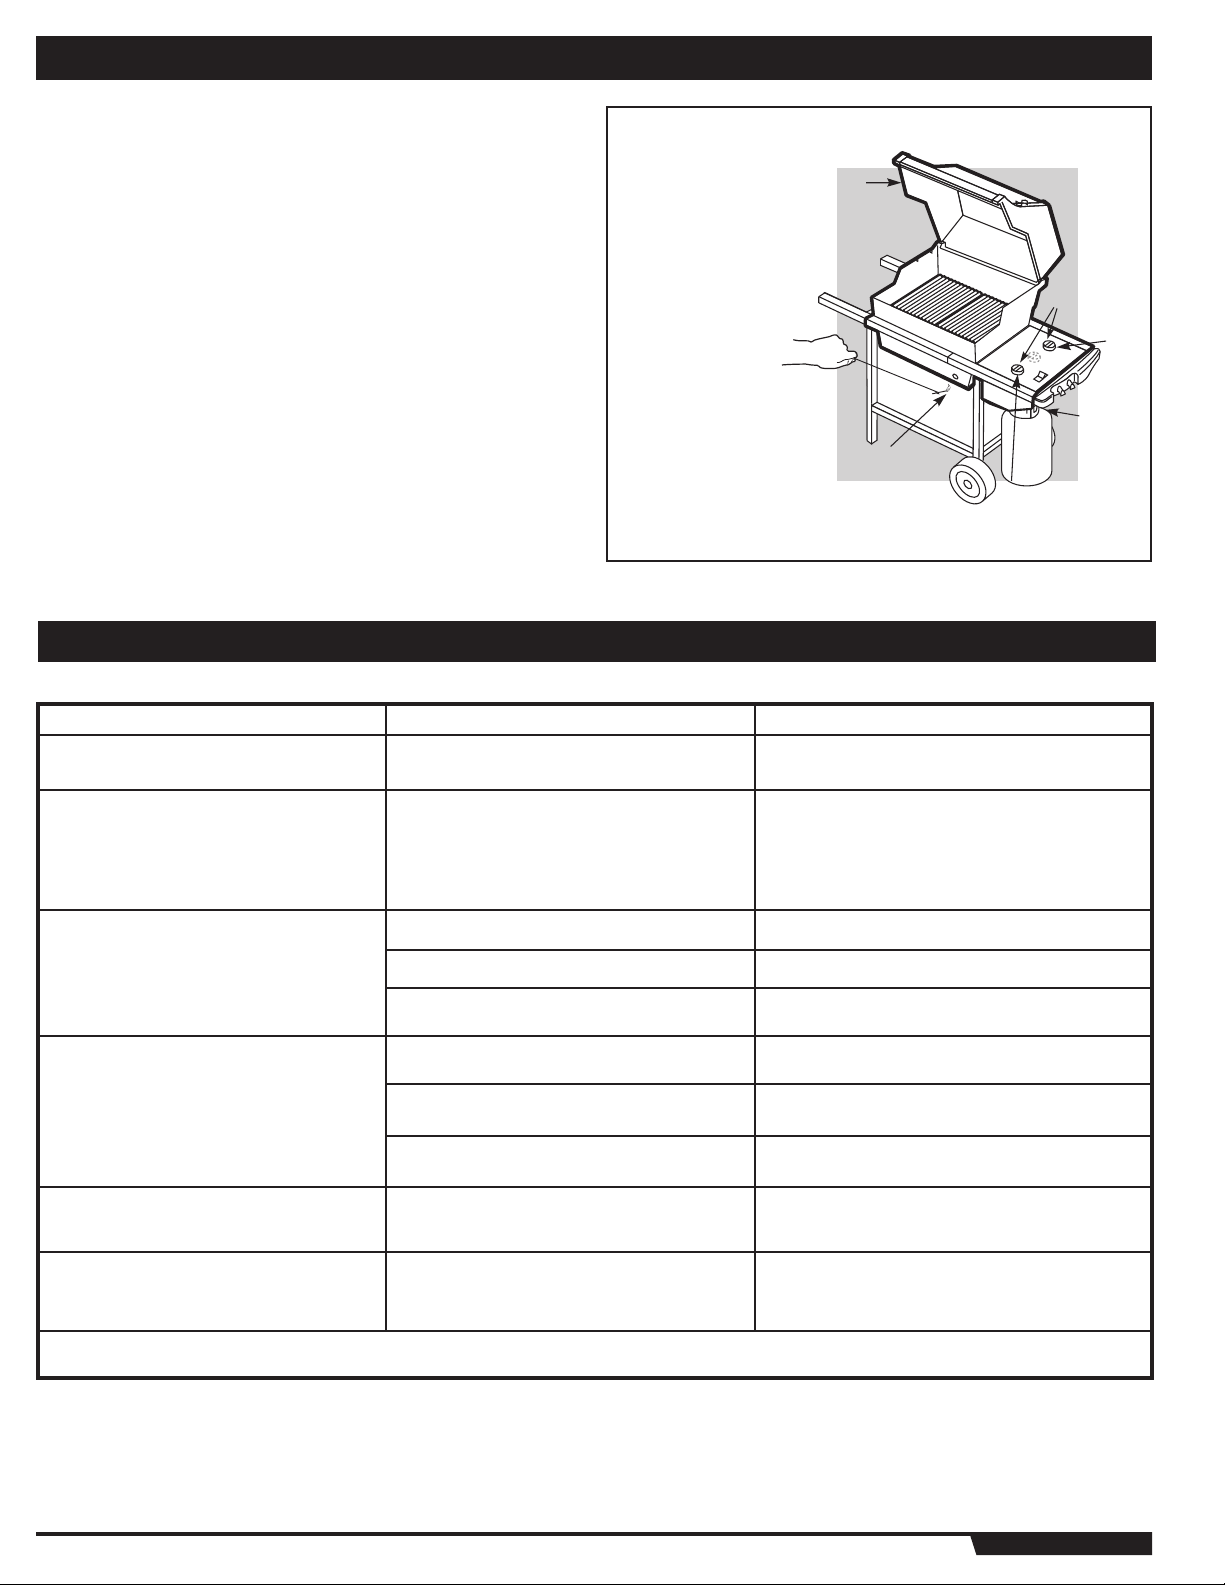
REMOVE CONTROL PANEL AND BURNER CONTROL KNOBS
You will need: Phillips screwdriver.
1) Remove control knobs.
2) Remove screws with a Phillips screwdriver
3) Pull up igniter button until it sticks in the up position and remove control panel from
grill.
4) Replace control panel when Leak Check is completed.
CHECK FOR GAS LEAKS
DANGER
Do not use an open fl ame to check for gas leaks. Be sure
there are no sparks or open fl ames in the area while you
check for leaks. Sparks or open fl ames will result in a fi re or
explosion, which can cause serious bodily injury or death
and damage to property.
WARNING: You should check for gas leaks every time you
disconnect and reconnect a gas fi tting.
Note: All factory-made connections have been thoroughly checked for gas leaks. The
burners have been fl ame-tested. As a safety precaution however, you should recheck
all fi ttings for leaks before using your Weber Gas Barbecue. Shipping and handling may
loosen or damage a gas fi tting.
WARNING: Perform these leak checks even if your barbecue
was dealer or store assembled.
You will need: a soap and water solution, and a rag or brush to apply it.
Note: Since some leak test solutions, including soap and water, may be slightly
corrosive, all connections should be rinsed with water after checking for leaks.
Make sure side burner is off.
To perform leak checks: open cylinder valve by turning the cylinder valve hand-wheel
counterclockwise.
WARNING: Do not ignite burners when leak checking.
Check for leaks by wetting the connections with the soap and water solution and
watching for bubbles. If bubbles form or if a bubble grows, there is a leak.
SPIRIT E/SP210 & 310
(1)
(2)
(3)
WWW.WEBER.COM
®
Page 9

GAS INSTRUCTIONS
Check:
1) Hose-to-manifold connection.
2) Regulator-to-Cylinder connection.
WARNING: If there is a leak at connection (1), retighten the
fi tting with a wrench and recheck for leaks with soap and water
solution.If a leak persists after retightening the fi tting, turn OFF
the gas. DO NOT OPERATE THE GRILL. Contact the Customer
Service Representative in your area using the contact
information on our web site. Log onto www.weber.com
Check:
3) Valves-to-manifold connections.
4) The hose-to-regulator connection.
WARNING: If there is a leak at connections (2), (3) or (4),
turn OFF the gas. DO NOT OPERATE THE GRILL. Contact
the Customer Service Representative in your area using the
contact information on our web site. Log onto www.weber.
®
com
When leak checks are complete, turn gas supply off at the source and rinse connections
with water.
.
REFILLING THE LIQUID PROPANE CYLINDER
We recommend that you refi ll the LP cylinder before it is completely empty.
Removal of the LP cylinder
1) Close cylinder valve (turn clockwise).
2) Unscrew regulator coupling by turning counterclockwise, by hand only.
3) Loosen cylinder lock wing nut and turn cylinder lock up out of the way.
4) Lift cylinder off.
To refi ll, take LP cylinder to a “Gas Propane” dealer.
WARNING: We recommend that your LP cylinder be fi lled
at an authorized LP gas dealer, by a qualifi ed attendant,
who fi lls the cylinder by weight. IMPROPER FILLING IS
DANGEROUS.
CAUTION: Place dust cap on cylinder valve outlet whenever
the cylinder is not in use. Only install the type of dust cap
on the cylinder valve outlet that is provided with the cylinder
valve. Other types of caps or plugs may result in leakage of
propane.
®
.
SPIRIT E/SP210 & 310
*The grill illustrated may have slight
differences than the model purchased.
(3)
(1)
9
9
(1)
(2)
(3)
(4)
(2)
CHECKING THE FUEL LEVEL IN YOUR TANK
Check the fuel level by viewing the color indicator level line on the side of the tank scale.
1) Empty
2) Medium
3) Full
SAFE HANDLING TIPS FOR LIQUID PROPANE GAS CYLINDERS
• Liquid Propane (LP) gas is a petroleum product as are gasoline and natural gas.
LP gas is a gas at regular temperatures and pressures. Under moderate pressure,
inside a cylinder, LP gas is a liquid. As the pressure is released, the liquid readily
vaporizes and becomes gas.
• LP gas has an odor similar to natural gas. You should be aware of this odor.
• LP gas is heavier than air. Leaking LP gas may collect in low areas and prevent
dispersion.
• To fi ll, take the LP cylinder to an RV center, or look up “gas-propane” in the phone
book for other sources of LP gas.
WARNING: We recommend that your LP cylinder be fi lled
at an authorized LP gas dealer, by a qualifi ed attendant,
who fi lls the tank by weight. IMPROPER FILLING IS
DANGEROUS.
(1)
• Air must be removed from a new LP cylinder before the initial fi lling. Your LP dealer
is equipped to do this.
• The LP cylinder must be installed, transported and stored in an upright position. LP
cylinders should not be dropped or handled roughly.
• Never store or transport the LP cylinder where temperatures can reach 125° F (too
hot to hold by hand - for example: do not leave the LP cylinder in a car on a hot day).
Note: A refi ll will last about 20 hours of cooking time at normal use. The fuel scale will
indicate the propane supply so you can refi ll before running out. You do not have to run
out before you refi ll.
• Treat “empty” LP cylinders with the same care as when full. Even when the LP tank
is empty of liquid there still may be gas pressure in the cylinder. Always close the
cylinder valve before disconnecting.
(2)
(3)
WWW.WEBER.COM
®
Page 10

10
GAS INSTRUCTIONS
CAUTION: Place dust cap on cylinder valve outlet whenever
the cylinder is not in use. Only install the type of dust cap
on the cylinder valve outlet that is provided with the cylinder
valve. Other types of caps or plugs may result in leakage of
propane.
• Do not use a damaged LP cylinder. Dented or rusty LP cylinders or LP cylinders
with a damaged valve may be hazardous and should be replaced with a new one
immediately.
Liquid Propane (LP) Cylinder(s)
• The joint where the hose connects to the LP cylinder must be leak tested each
time the LP cylinder is reconnected. For example, test each time the LP cylinder is
refi lled.
• Be sure the regulator is mounted with the small vent hole pointed downward so that
it will not collect water. This vent should be free of dirt, grease, bugs etc.
• The gas connections supplied with your Weber
and tested to meet 100% CSA and ANSI requirements.
®
gas barbecue have been designed
WARNING: Replacement LP tanks must match the regulator
connection supplied with this barbecue.
Liquid Propane Cylinder requirements
• Check to be sure cylinders have a D.O.T. certifi cation (1), and date tested (2) is
within fi ve years. Your LP gas supplier can do this for you.
• All LP tank supply systems must include a collar to protect the cylinder valve.
• The LP cylinder must be a 20-lb. size approximately (18¼ inches high, 12¼ inches
in diameter).
OPERATING INSTRUCTIONS
LIGHTING
Summary lighting instructions are on the control panel.
DANGER
Failure to open the lid while igniting the barbecue’s burners,
or not waiting 5 minutes to allow the gas to clear if the
barbecue does not light, may result in an explosive fl ame-up
which can cause serious bodily injury or death.
• The cylinder should be constructed and marked in accordance with the
Specifi cations for LP - Gas Cylinders of the U.S. Department of Transportation
(D.O.T.) or the National Standard of Canada, CAN/CSA-B339, Cylinders, Spheres
and Tubes or Transportation of Dangerous Goods; and Commission, as applicable.
In Canada
Liquid Propane Cylinder requirements
Note: Your retailer can help you match a replacement tank to your barbecue.
• The LP cylinder must be constructed and marked in accordance with the
specifi cations for LP gas cylinders, T.C.
1
DOT 4BA240
00/06
2
Crossover® Ignition System
Note: The Crossover® ignition system ignites the Front burner with a spark from the
igniter electrode inside the Gas Catcher™ ignition chamber. You generate the energy
for the spark by pushing the Crossover
®
ignition button until it clicks.
WARNING: Check hose before each use of barbecue for
nicks, cracking, abrasions or cuts. If the hose is found to
be damaged in any way, do not use the barbecue. Replace
using only Weber® authorized replacement hose. Contact
the Customer Service Representative in your area using the
contact information on our web site. Log onto www.weber.
com®.
1) Open the lid.
2) Make sure all burner control knobs are turned to OFF. (Push control knob down and
turn clockwise to ensure that it is in the OFF position.)
WARNING: The burner control knobs must be in the OFF
position before turning on the liquid propane cylinder tank
valve. If they are not in the OFF position, when you turn on
the LP cylinder valve, the “excess gas fl ow control” feature
will activate, limiting the fl ow of gas from the LP cylinder. If
this should occur, turn off the LP cylinder valve and burner
control knobs. Then start over.
DANGER:
When the “excess gas fl ow control” feature is activated,
a small amount of gas is still fl owing to the burners. After
turning OFF the cylinder valve, wait at least 5 minutes for the
gas to clear before attempting to light the barbecue. Failure
to do so may result in an explosive fl ame-up, which can
cause serious bodily injury or death.
MAIN BURNER LIGHTING
SPIRIT E/SP210 & 310
*The grill illustrated may have slight
differences than the model purchased.
1
6
2
7
5
3
4
WWW.WEBER.COM
®
Page 11
OPERATING INSTRUCTIONS
11
3) Turn the cylinder on by slowly turning the cylinder valve counter-clockwise.
WARNING: Do not lean over the open barbecue. Keep your
face and body at least one foot away from the matchlight
hole when lighting the barbecue.
4) Push Front burner control knob down and turn to START/HI.
5) Push the Crossover® ignition button several times, so it clicks each time.
6) Check that the burner is lit by looking through the matchlight hole on the front of the
cooking box. You should see a fl ame.
WARNING: If the burner does not light, turn the Front burner
control knob to OFF and wait 5 minutes to let the gas clear
before you try again or try to light with a match.
7) After the FRONT burner is lit you can turn on the other burner or burners.
Note: Always light the FRONT burner fi rst. The other burner or burners ignite from the
FRONT burner.
TO EXTINGUISH
Push down and turn each burner control knob clockwise to the OFF position. Turn gas
supply off at the source.
MAIN BURNER LIGHTING
SPIRIT E/SP210 & 310
*The grill illustrated may have slight
differences than the model purchased.
1
6
11
2
4
7
5
3
MANUAL LIGHTING
DANGER
Failure to open the lid while igniting the barbecue’s burners, or
not waiting 5 minutes to allow the gas to clear if the barbecue
does not light, may result in an explosive fl ame-up which can
cause serious bodily injury or death.
1) Open the lid.
2) Make sure all burner control knobs are turned to OFF. (Push each knob down and
turn clockwise to ensure they are in the OFF position.)
WARNING: The burner control knobs must be in the OFF
position before turning on the liquid propane cylinder valve.
If they are not in the OFF position, when you turn on the LP
cylinder valve, the “excess gas fl ow control” feature will
activate, limiting the fl ow of gas from the LP cylinder. If this
should occur, turn off the LP tank valve and burner control
knobs. Then start over.
DANGER
When the “excess gas fl ow control” feature is activated,
a small amount of gas is still fl owing to the burners. After
turning OFF the cylinder and burner control knobs, wait at
least 5 minutes for the gas to clear before attempting to light
the barbecue. Failure to do so may result in an explosive
fl ame-up, which can cause serious bodily injury or death.
MAIN BURNER LIGHTING
SPIRIT E/SP-
1
210 & 310
*The grill illustrated may have slight
differences than the model purchased.
2
7
3
4,6
5
WWW.WEBER.COM
®
Page 12
12
OPERATING INSTRUCTIONS
3) Turn the cylinder on by turning the cylinder valve counterclockwise.
4) Insert match holder with lit match into the matchlight hole in the front of the cooking
box.
WARNING: Do not lean over open barbecue. Keep your face
and body at least one foot away from the matchlight hole
when lighting the barbecue.
5) Push Front burner control knob down and turn to START/HI.
6) Check that the burner is lit by looking through the matchlight hole on the front of the
cooking box. You should see a fl ame
WARNING: If the burner does not light, turn the Front burner
control knob to OFF and wait 5 minutes to let the gas clear
before you try again or try to light with a match.
7) After the FRONT burner is lit you can turn on the other burner.
Note: Always light the FRONT burner fi rst. The other burner or burners ignite from the
FRONT burner.
TO EXTINGUISH
Push down and turn each burner control knob clockwise to the OFF position. Turn gas
supply off at the source.
TROUBLESHOOTING
MAIN BURNER LIGHTING
SPIRIT E/SP-
1
210 & 310
*The grill illustrated may have slight
differences than the model purchased.
2
7
3
4,6
5
PROBLEM CHECK CURE
Burners burn with a yellow or orange fl ame, in
conjunction with the smell of gas.
Symptoms:
Burners do not light. -or- Burners have a small
fl ickering fl ame in the HI position. -orBarbecue temperature only reaches 250˚ to 300˚
in the HI position.
Burner does not light, or fl ame is low in HI
position.
Experiencing fl are-ups:
CAUTION: Do not line the bottom tray
with aluminum foil.
Burner fl ame pattern is erratic. Flame is low when
burner is on HI. Flames do not run the whole
length of the burner tube.
Inside of lid appears to be “peeling.” (Resembles
paint peeling.)
If problems cannot be corrected by using these methods, please contact the Customer Service Representative in your area using the contact information on our web
site. Log onto www.weber.com
®
.
Inspect Spider / Insect Screens for possible obstructions.
(Blockage of holes.)
The excess fl ow safety device, which is part of the
barbecue to cylinder connection, may have activated.
Is LP fuel low or empty? Refi ll LP cylinder.
Is fuel hose bent or kinked? Straighten fuel hose.
Does the Left burner light with a match? If you can light the Left burner with a match, then check the
Are you preheating barbecue in the prescribed manner? All burners on high for 10 to 15 minutes for preheating.
Are the cooking grates and Flavorizer
coated with burned-on grease?
Is the bottom tray “dirty” and not allowing grease to fl ow
into catch pan?
Are burners clean? Clean burners. (See Section “Maintenance”.)
The lid is stainless steel, not paint. It cannot “peel”. What
you are seeing is baked on grease that has turned to
carbon and is fl aking off.
THIS IS NOT A DEFECT.
®
bars heavily
Clean Spider / Insect Screens. (See Section “Annual
Maintenance”)
To reset the excess fl ow safety device turn all burner control
knobs and the cylinder valve to OFF. Disconnect the regulator
from the cylinder. Turn burner control knobs to HI. Wait at
least 1 minute. Turn burner control knobs to OFF. Reconnect
the regulator to the cylinder. Turn cylinder valve on slowly.
Refer to “Lighting Instructions”.
Crossover
Clean thoroughly. (See Section “Cleaning”)
Clean bottom tray
Clean thoroughly. (See Section “Cleaning”.)
®
ignition system.
WWW.WEBER.COM
®
Page 13

MAINTENANCE
13
WEBER® SPIDER /INSECT SCREENS
Your Weber® gas barbecue, as well as any outdoor gas appliance, is a target for spiders
and other insects. They can nest in the venturi section (1) of the burner tubes. This
blocks the normal gas fl ow, and can cause the gas to fl ow back out of the combustion
air opening. This could result in a fi re in and around the combustion air openings, under
the control panel, causing serious damage to your barbecue.
The burner tube combustion air opening is fi tted with a stainless steel screen (2) to
prevent spiders and other insects access to the burner tubes through the combustion air
openings.
We recommend that you inspect the Spider/Insect screens at least once a year.
(See Section “Annual Maintenance”.) Also inspect and clean the the Spider/Insect
screens if any of the following symptoms should ever occur:
1) The smell of gas in conjunction with the burner fl ames appearing yellow and lazy.
2) Barbecue does not reach temperature.
3) Barbecue heats unevenly.
4) One or more of the burners do not ignite.
DANGER
Failure to correct the above mentioned symptoms may result
in a fi re, which can cause serious bodily injury or death, and
cause damage to property.
AnnnNNUAL MAINTENANCE
Inspection and cleaning of the Spider/Insect screens
To inspect the Spider/Insect screens, remove the control panel. If there is dust or dirt on
the screens, remove the burners for cleaning the screens.
Brush the Spider/Inspect screens, lightly, with a soft bristle brush (i.e. an old toothbrush).
CAUTION: Do not clean the Spider/Insect screens with hard
or sharp tools. Do not dislodge the Spider/Insect screens or
enlarge the screen openings.
Lightly tap the burner to get debris and dirt out of the burner tube. Once the Spider/
Insect screens and burners are clean replace the burners.
If the Spider/Insect screen becomes damaged or cannot be cleaned, please contact the
Customer Service Representative in your area using the contact information on our web
site. Log onto www.weber.com®.
MAIN BURNER FLAME PATTERN
The Weber® gas barbecue burners have been factory set for the correct air and gas
mixture. The correct fl ame pattern is shown.
1) Burner tube
2) Tips occasionally fl icker yellow
3) Light blue
4) Dark blue
If the fl ames do not appear to be uniform throughout the burner tube, follow the burner
cleaning procedures.
(1)
(2)
13
1
2
3
4
MAIN BURNER CLEANING PROCEDURE
Turn off the gas supply.
Remove the manifold (See “Replace Main Burners”).
Look inside each burner with a fl ashlight.
Clean the inside of the burners with a wire (a straightened-out coat hanger will work).
Check and clean the air shutter opening at the ends of the burners. Check and clean
the valve orifi ces at the base of the valves. Use a Steel bristle brush to clean outside of
burners. This is to make sure all the burner ports are fully open.
CAUTION: Do not enlarge the burner ports when cleaning.
WWW.WEBER.COM
®
Page 14

14
MAINTENANCE
REPLACING MAIN BURNERS
1) Your Weber® gas barbecue must be off and cool.
2) Turn gas off at source.
3) To remove control panel: take off the burner control knobs. Remove the screws
holding the control panel in place. Lift off the control panel.
4) Unhook the manifold bracket (1) and unscrew the two wing nuts (2) that hold the
manifold to the cooking box. Pull the manifold and valve assembly out of the burners
and carefully set it down.
5) Slide the burner assembly out from under the guide screw and washer (1) in the
corners of the cooking box.
6) Lift and twist the burner assembly slightly, to separate the crossover tube (1) from the
burners. Remove the burners from the cooking box.
7) To reinstall the burners, reverse 3) through 7).
CAUTION: The burner openings (1) must be positioned
properly over the valve orifi ces (2).
Check proper assembly before fastening manifold in place.
(1)
(2)
WARNING: After reinstalling the gas lines, they should be
leak checked with a soap and water solution before using
the barbecue. (See Step: “Check for gas leaks.”)
)
(2)
(2)
(1)
CROSSOVER® IGNITION SYSTEM OPERATIONS
If the Crossover® ignition system fails to ignite the Front burner, light the Front burner
with a match. If the Front burner lights with a match, then check the Crossover® ignition
system.
• Check that both the white (1) and black (2) ignition wires are attached properly.
• Check that the Crossover
returns to the up position.
If the Crossover
Representative in your area using the contact information on our web site. Log
onto www.weber.com
®
ignition system still fails to light, contact the Customer Service
®
ignition button pushes the igniter (button) down, and
®
.
SPIRIT E/SP210 & 310
(1) (2)
WWW.WEBER.COM
®
Page 15

GAS GRILL
Guía del Propietario de la Barbacoa o Asador de Gas
Propano Licuado
Guía del Propietario de la Barbacoa o Asador de Gas
Propano Licuado
E -210/310
SP -210/310
#89525
#00000
TIENE QUE LEER LA GUÍA DEL PROPIETARIO
ANTES DE OPERAR LA BARBACOA O ASADOR
DE GAS
PELIGRO
Si huele a gas:
1. Cierre la llave del gas.
2. Apague todas las llamas.
3. Abra la tapa.
4. Si continúa el olor, no se acerque
a la barbacoa o asador y llame
inmediatamente a su proveedor de gas o
al cuerpo de bomberos.
Un escape de gas puede causar un incendio
o una explosión que pueden producir
lesiones graves o la muerte, o daños
materiales.
ADVERTENCIA:
1. No guarde ni use gasolina u otros gases
o líquidos infl amables cerca de este
aparato o de cualquier otro.
2. Una bombona o cylindro de gas
desconectada no debe guardarse nunca
cerca de este aparato o de cualquier
otro.
ADVERTENCIA: Antes de encender la
barbacoa o asador siga cuidadosamente
todos los procedimientos de
comprobación de escapes de gas de este
manual, aun cuando el concesionario
haya hecho el montaje de la barbacoa o
asador.
ADVERTENCIA: No trate de encender la
barbacoa o asador de gas Weber antes
de leer las instrucciones de la sección de
“Encendido” de este manual.
INFORMACIÓN PARA EL MONTADOR:
Este manual debe entregarse al propietario
de la barbacoa o asador para que pueda
usarlo siempre que lo necesite.
SÓLO PARA USARSE AL AIRE LIBRE.
89525 ESNA
Page 16

16
PELIGROS Y ADVERTENCIAS
PELIGRO
El hacer caso omiso de los avisos de Peligros, Advertencias y Precauciones contenidos en este Manual del Propietario pudiera
resultar en lesiones corporales serias o la muerte, o en un fuego o explosión que cause daños a la propiedad.
ADVERTENCIAS
No almacene un tanque de propano licuado desconectado o de repuesto debajo o cerca de esta barbacoa o asador.
El ensamblaje incorrecto puede ser peligroso. Por favor siga cuidadosamente las instrucciones de ensamblaje en este manual.
Tras haber estado guardada o sin uso por algún tiempo, antes de usar la barbacoa o asador de gas Weber® verifi que que no
existan fugas de gas o obstrucciones en el quemador. Vea en este manual las instrucciones para los procedimientos correctos.
No opere la barbacoa o asador de gas Weber®si existe una fuga de gas.
No utilice una llama abierta para comprobar la existencia de fugas de gas.
Nunca debe haber materiales combustibles a una distancia menor de 60 centímetros de la parte superior, inferior, trasera o
lateral de su barbacoa o asador de gas Weber®.
No coloque una funda para barbacoa o asador ni cualquier otra cosa infl amable sobre o dentro del área de almacenaje ubicada
debajo e la barbacoa o asador.
Nunca deje que los niños usen la barbacoa o asador de gas Weber®. Algunas partes accesibles de la barbacoa o asador
pudieran estar muy calientes. Mantenga alejados a los niños pequeños mientras éste se esté usando.
Usted debe proceder con razonable cuidado al usar su barbacoa o asador de gas Weber®. Estará caliente al cocinar o limpiar la
misma, y nunca deberá dejarse desatendida o moverse mientras esté funcionando.
Si llegasen a apagarse los quemadores, cierre todas las válvulas de gas. Abra la tapa y espere cinco minutos antes de tratar de
volver a encender la barbacoa o asador, usando las instrucciones de encendido en este manual.
No use carbón o piedra pómez en su barbacoa o asador de gas Weber®.
No se incline sobre la barbacoa o asador abierta o coloque las manos o dedos en el borde delantero de la caja de cocción.
Si la grasa llegase a agarrar fuego, apague todos los quemadores y mantenga la tapa cerrada hasta que se haya apagado el
fuego.
Al limpiar las válvulas o los quemadores, no ensanche los orifi cios de las válvulas o las aberturas de los quemadores.
La barbacoa o asador de gas Weber® deberá limpiarse a fondo regularmente.
El propano licuado no es gas natural. El uso de gas natural en una unidad de propano licuado o viceversa, propano licuado en
una de gas natural, es peligroso y anulará su garantía.
Mientras esté funcionando la barbacoa o asador, no trate de desconectar ninguna conexión de gas.
Mientras opere la barbacoa o asador, utilice guantes resistentes al calor.
Mantenga alejados de todas las superfi cie calientes a todo cordón eléctrico y a la manguera de suministro de combustible.
Los subproductos de la combustión producidos al usar este producto contienen sustancias químicas que son conocidas por
el Estado de la California como causantes de cáncer, defectos de nacimiento, u otros daños reproductivos.
No use esta barbacoa o asador a menos que todas sus partes estén colocadas en su sitio. La unidad debe estar correctamente
ensamblada según las instrucciones indicadas en las “Instrucciones de ensamblaje”.
ÚNICAMENTE UNIDADES DE GAS PROPANO LICUADO
Use el regulador que se suministra con su barbacoa o asador de gas Weber®.
No trate de desconectar el regulador de gas o ninguna conexión de gas mientras la barbacoa o asador esté funcionando.
Un cilindro de propano licuado abollado u oxidado pudiera ser peligroso y deberá ser revisado por su suplidor de propano
licuado. No utilice ningún cilindro de propano licuado con una válvula dañada.
Aunque su cilindro de propano licuado pudiera aparentar estar vacío, algo de gas pudiera aún estar presente, por lo que el
cilindro deberá transportarse y almacenarse tomando esta posibilidad en consideración.
Si usted ve, huele o escucha el silbido de un escape de gas del cilindro de propano licuado:
1. Apártese del cilindro de propano licuado.
2. No trate de corregir el problema usted mismo.
3. Llame al cuerpo de bomberos local.
WWW.WEBER.COM
®
Page 17

INSTRUCCIONES GENERALES
17
Su barbacoa o asador de gas Weber® es un aparato portátil para cocinar al aire libre.
Con la barbacoa o asador de gas Weber® usted puede asar de manera convencional, a
la barbacoa o asador, y al horno con unos resultados que son difíciles de duplicar con
los artefactos de cocina de la casa. La tapa cerrada y las barras Flavorizer® le dan a la
comida ese sabor a “aire libre”.
La barbacoa o asador de gas Weber
fácilmente de sitio en su jardín o patio. La portabilidad signifi ca que, si usted se muda,
se puede llevar su barbacoa o asador de gas Weber
El suministro de gas propano licuado es fácil de usar y le da más control al cocinar que
el carbón.
• Estas instrucciones le indicarán los requisitos mínimos para ensamblar su barbacoa
o asador de gas Weber
utilizar su barbacoa o asador de gas Weber®. Un ensamblaje incorrecto puede ser
peligroso.
• No debe ser usado por niños.
• Si hubiesen códigos locales que aplicasen para barbacoa o asadors de gas portátil,
usted deberá acatarlos. Si no existiesen códigos locales, usted deberá cumplir
con la más reciente edición del código nacional aplicable relativo al uso de gas
combustible: ANSI Z 223.1/NFPA 54, o Código de Instalaciones de Gas Natural o
Propano, CSA B149.1, o Código de Almacenaje y Manipulación de Propano B149.2
• Debe usarse el regulador de presión suministrado con la barbacoa o asador de gas
Weber® Este regulador está ajustado para una presión de 10.5 pulgadas de columna
de agua.
• Esta barbacoa o asador de gas Weber® está diseñado para ser usado solamente
con gas propano licuado (LP). No la use con gas natural (suministrado a través de
tuberías en las ciudades). Las válvulas, los orifi cios, la manguera y regulador son
solamente para gas propano licuado.
• No la use con combustible de carbón.
• Asegúrese de que el área debajo del panel de control y la bandeja inferior no tenga
desechos que pudiesen obstruir el fl ujo de aire de combustión o de ventilación.
• Las áreas alrededor del cilindro de gas LP deben estar libres y sin acumulación de
desperdicios.
• Los reguladores de presión y ensamblajes de mangueras de reemplazo deberán
ser aquellos especifi cados por el fabricante del artefacto de gas para cocinar al aire
libre.
®
®
es portátil por lo que usted puede reubicarlo
®
consigo.
. Por favor lea cuidadosamente las instrucciones antes de
PARA LA INSTALACIÓN EN CANADÁ
Esta instrucciones, aunque de manera general son aceptables, no necesariamente
cumplen con los códigos de instalación canadienses, en particular en lo que respecta
a las tuberías bajo y sobre tierra. En Canadá la instalación de este artefacto debe
cumplir con los códigos locales y/o la Norma CSA-B149.2 (Código de Almacenaje y
Manipulación de Propano).
OPERACIÓN DE LA BARBACOA O ASADOR
ADVERTENCIA: Sólo use esta barbacoa o asador al aire
libre en un área bien ventilada. No lo use en un garaje,
edifi cio, pasadizo techado o en cualquier otra área cerrada.
ADVERTENCIA: Su barbacoa o asador de gas Weber® no
deberá usarse debajo de un techo combustible.
EN ALMACENAJE O SIN USARSE
• La válvula de gas en el cilindro de propano licuado debe mantenerse cerrada mien-
tras la barbacoa o asador de gas Weber® esté sin usarse.
• Cuando la barbacoa o asador de gas Weber® esté almacenada bajo techo, el
suministro de gas debe DESCONECTARSE y el tanque de propano licuado debe
guardarse al aire libre en un espacio bien ventilado.
• El cilindro de propano licuado debe guardarse al aire libre en un área bien ventilada
fuera del alcance de los niños. El cilindro desconectado de propano licuado no debe
almacenarse dentro de ninguna edifi cación, garaje o área cerrada.
• Cuando el cilindro de propano licuado no esté desconectado de la barbacoa o asador
de gas Weber
erse al aire libre en un espacio bien ventilado.
• La barbacoa o asador de gas Weber® deberá revisarse para asegurarse de que no
tenga fugas de gas ni obstrucciones en los tubos de los quemadores. (Vea las secciones: “Mantenimiento General y Mantenimiento Anual.”)
• Asegúrese de que el área debajo del panel de control y la bandeja inferior no tengan
desechos que pudiesen obstruir el fl ujo de aire de combustión o de ventilación.
• También deberá revisarse que la malla contra arañas e insectos no esté obstruida.
(Vea la sección: “Mantenimiento Anual”)
®
, el artefacto junto con el tanque de propano licuado deberán manten-
17
ADVERTENCIA: Su barbacoa o asador de gas Weber® no ha
sido diseñada para instalarse en o sobre vehículos o botes
recreativos.
ADVERTENCIA: No utilice la barbacoa o asador con la parte
superior, inferior, posterior, o lateral de la parrilla a menos
de 60 centímetros de distancia de materiales combustibles.
ADVERTENCIA: La caja de cocción entera se calienta al
usarse. No la deje desatendida.
ADVERTENCIA: Mantenga a cualquier cordón eléctrico y a la
manguera de suministro de gas alejados de toda superfi cie
caliente.
ADVERTENCIA: Mantenga el área de cocinar libre de
vapores y líquidos infl amables tales como gasolina, alcohol,
etc. y de materiales combustibles.
ADVERTENCIA: Nunca almacene cilindros de propano
licuado extra (de repuesto) debajo o cerca de la barbacoa o
asador de gas Weber®.
ADVERTENCIA: El cilindro de propano licuado usado con
su barbacoa o asador debe contar con un “Dispositivo de
prevención de sobrellenado” (OPD, por sus siglas en inglés)
y una conexión QCC1 o tipo 1 (CGA810). La conexión del
cilindro debe ser compatible con la de la barbacoa o asador.
COCCIÓN
ADVERTENCIA: No mueva la barbacoa o asador de gas
Puede ajustar los quemadores DELANTERO y TRASERO a su gusto. Los ajustes de
control: Alto (H), Medio (M), Bajo (L) o Apagado (O) están descritos en su recetario
Weber
DELANTERO y TRASERO. Por ejemplo, para dorar bistecs, deberá ajustar ambos
hornos a la posición H (alto). Una vez dorados, para terminar de cocinarlos ajustará los
quemadores DELANTERO y TRASERO a la posición M (medio). Refi érase a su libro de
recetas Weber
o asador.
Nota: La temperatura dentro de la caja de cocción durante las primeras ocasiones en
que se use, cuando las superfi cies sean todavía demasiado refl ectoras, podrá estar
más caliente de lo que se indica en su libro de recetas. Las condiciones ambientales
bajo las que se esté cocinando, tales como el viento y el tiempo, pueden hacer que se
requieran ajustes a los controles de los quemadores para obtener las temperaturas de
cocción correctas.
Precalentamiento - Su barbacoa o asador de gas Weber
la energía efi cientemente. Ésta opera a una baja tasa de consumo calorífi co. Para
precalentar: después de encenderla, cierre la tapa y gire los quemadores a alto (HH). El
precalentar a una temperatura entre 500° y 550° F (260° y 290° C) tardará de 10 a 15
minutos dependiendo de tales condiciones como la temperatura del aire y el viento.
Grasa escurrida - Las barras del Flavorizer® han sido diseñadas para “ahumar” la
cantidad correcta de grasa escurrida para así obtener una cocción con sazón. El
WWW.WEBER.COM
®
Weber
mientras esté en operación o esté caliente.
®
El recetario usa estas siglas para describir los ajustes a los quemadores
®
para las instrucciones detalladas sobre cómo cocinar con la barbacoa
®
es un artefacto que usa
®
exceso de grasa escurrida se acumulará en el plato recolector debajo de la bandeja
corredera inferior. Hay disponibles bandejas de goteo desechables que caben en el
plato recolector.
ADVERTENCIA: Antes de cada uso, verifi que que no haya
grasa acumulada en la bandeja inferior. Retire el exceso
de grasa para evitar que ésta se incendie en la bandeja
corredera inferior.
LIMPIEZA
ADVERTENCIA: Apague su barbacoa o asador de gas
Weber® y espere a que se enfríe antes de limpiar.
Superfi cies externas - Utilice una solución de agua jabonosa tibia para limpiarlas y
luego enjuáguelas con agua.
PRECAUCIÓN: Sobre la superfi cie de la barbacoa o asador
o del carro no utilice limpiadores de hornos, limpiadores
abrasivos (limpiadores de cocinas), limpiadores que
contengan productos cítricos, o almohadillas de limpieza
abrasivas.
Flavorizer® y parrillas de cocción - Límpielas con un cepillo de cerda de latón adec-
uado. Según se requiera, retírelas del barbacoa o asador y lávelas con agua jabonosa
tibia y luego enjuáguelas con agua.
Page 18

18
INSTRUCCIONES GENERALES
PRECAUCIÓN: No limpie las barras Flavorizer® o las
parrillas de cocción en un horno autolimpiante.
Para averiguar la disponibilidad de parrillas de cocción y barras Flavorizer®
contacte al Representante de Atención al Cliente usando la información de
contacto en nuestro sitio web. Conéctese a www.weber.com®.
Deslice hacia afuera la bandeja del fondo - Retire el exceso de grasa, luego lávela
con agua jabonosa tibia y fi nalmente enjuáguela.
Plato recolector - Hay disponibles bandejas desechables de lámina de metal, o usted
mismo puede forrar el plato recolector con papel aluminio. Para limpiar el plato recolector, lávelo con agua jabonosa tibia y luego enjuague.
Termómetro - Pásele un trapo con agua tibia jabonosa, y límpielo con una pelota o
esponja plástica de fregar.
Dentro del módulo de cocción - Cepille cualesquier restos de los tubos quemadores.
NO AGRANDE LAS ABERTURAS DE LOS QUEMADORES. Lave la parte interior de
la caja de cocción con agua jabonosa y luego enjuáguela con agua.
Parte interior de la tapa - Mientras la tapa este tibia, limpie la parte interna con una
toalla de papel para prevenir la acumulación de grasa. La grasa acumulada escamada
se asemeja a las escamas de pintura.
INSTRUCCIONES SOBRE EL GAS
INFORMACIÓN IMPORTANTE SOBRE EL CILINDRO DE PROPANO
LICUADO
El no acatar estrictamente estos avisos de PELIGRO pudiera resultar en un fuego letal
o causar lesiones serias..
PELIGRO
NUNCA almacene un cilindro de gas propano licuado de
reserva debajo o cerca de esta barbacoa o asador.
NUNCA llene el tanque más allá de un 80% lleno.
Su barbacoa o asador de gas Weber® está equipada para
usarse con un sistema de suministro desde cilindros diseñado
para el retiro del vapor.
ADVERTENCIA: Use esta barbacoa o asador sólo en un área
bien ventilada al aire libre. No la use en un garaje, edifi cio,
pasadizo techado o en cualquier otra área cerrada.
Superfi cies de acero inoxidable - Preserve su acero inoxidable - La barbacoa o
asador o el gabinete, tapa, panel de control y estantes de ésta pudieran estar hechos
de acero inoxidable. Es muy fácil mantener impecable al acero inoxidable. Simplemente
lávelo con agua y jabón, enjuáguelo con agua limpia y séquelo con un trapo. Se puede
utilizar una brocha no metálica para las manchas más difíciles.
IMPORTANTE: No utilice cepillos de alambre o limpiadores
abrasivos sobre las superfi cies de acero inoxidable ya que
las rayarán.
IMPORTANTE: No utilice limpiadores que contengan lejía a
base de cloro sobre la superfi cie de acero inoxidable de su
barbacoa o asador.
IMPORTANTE: Al limpiar las superfi cies asegúrese de
frotar/restregar en la dirección del grano para preservar la
vistosidad del acero inoxidable.
Superfi cies de plástico termocurado - Lávelas con un trapo suave y una solución de
agua y jabón.
No utilice limpiadores que contengan ácido, destilado de petróleo o xileno.
Enjuáguelas bien después de lavarlas.
Las mesas de trabajo de plástico no deberán usarse como tablas de corte.
Las maneras correctas para llenar su cilindro son por peso o por volumen, según se
describe en la norma NFPA-58. Por favor asegúrese de que su estación de llenado
llene su cilindro de gas propano licuado midiendo el peso o el volumen. Pídale al
personal de su estación de llenado que lean las instrucciones sobre cómo purgar y
llenar el cilindro de gas propano licuado antes de tratar de llenarlo.
PREPARACIONES PARA VERIFICAR LA EXISTENCIA DE FUGAS
VERIFIQUE QUE TODAS LAS VÁLVULAS DE LOS QUEMADORES ESTÉN
CERRADAS
Las válvulas son despachadas de fábrica en la posición OFF (cerradas), pero usted
debe verifi carlo para asegurarse de que efectivamente estén en dicha posición.
Verifíquelo empujándolas hacia abajo y girándolas hacia la derecha. Si no giran, están
cerradas. Proceda al paso siguiente. Si sí girasen, continúe girándolas hacia la derecha
hasta que paren; allí estarán cerradas. Proceda al paso siguiente.
CÓMO CONECTAR EL CILINDRO DE PROPANO LICUADO
ADVERTENCIA: Asegúrese de que la válvula del cilindro
de propano licuado esté cerrada. Ciérrela girándola en la
dirección de las agujas del reloj.
PELIGRO
No utilice una llama abierta para comprobar si existen fugas
de gas. Asegúrese de que no haya chispas o llamas abiertas
en el área mientras comprueba si existen fugas. Chispas o
llamas causarán un fuego o explosión, las cuales pueden
causar serias lesiones corporales o la muerte, y daños a la
propiedad.
Algunos tanques de propano licuado tienen ensamblajes de collarín superior diferentes.
(El collarín superior es el aro protector de metal alrededor de la válvula.) Una serie
de tanques se ensamblan con la válvula hacia adelante (a). Los demás tanques se
ensamblan con la válvula viendo en dirección contraria a la escala de combustible (b).
Usted necesitará: El cilindro de propano licuado, una solución de agua y jabón y un
trapo o una brocha para aplicarla.
(a)
(b)
WWW.WEBER.COM
®
Page 19

INSTRUCCIONES SOBRE EL GAS
1) Gire el cilindro de propano licuado de manera que la abertura de la válvula esté
viendo hacia la parte frontal, lateral o posterior de la barbacoa o asador de gas
Weber®. Levante y enganche el cilindro al medidor de combustible.
2) Afl oje la contratuerca de aletas del cilindro. Gire la traba del cilindro hacia abajo.
Apriete la tuerca de aletas.
Para conectar la manguera al cilindro:
3) Retire la cubierta antipolvo de plástico de la válvula.
4) Enrosque el cople del regulador a la válvula del tanque, en el sentido de las agujas
del reloj o hacia la derecha. Sólo apriete a mano.
Nota: Este es un nuevo tipo de conexión. Se aprieta hacia la derecha y no permitirá
que el gas fl uya a menos que la conexión esté apretada. La conexión sólo requiere
apretarse a mano.
ADVERTENCIA: No use una llave para apretar la conexión.
Si usa una llave, podría dañar el cople del regulador y
causar una fuga.
5) Mezcle el agua y jabón.
6) Abra la válvula del cilindro.
7) Verifi que que no existan fugas mojando las conexiones con la solución de agua
y jabón y viendo si se generan burbujas. Si se forman burbujas, o si una burbuja
crece, es que hay una fuga.
Si hay una fuga, cierre el gas y apriete la conexión. Abra el gas de nuevo y con la
solución de jabón y agua vuelva a verifi car que no existan fugas.
Si la fuga no se detiene, contacte a su Representante de Servicios al Cliente en su área
usando la información de contacto en nuestro sitio web. Conéctese a www.weber.com®.
No utilice la barbacoa o asador.
8) Cuando se haya completado la comprobación de las fugas de gas, CIERRE el
suministro de gas en la fuente y enjuague las conexiones con agua.
19
19
(b)
(a)
EXTRAIGA EL PANEL DE CONTROL Y LAS PERILLAS DE CONTROL
DE LOS QUEMADORES
Necesitará un destornillador Phillips.
1) Extraiga las perillas de control.
2) Extraiga los tornillos con un destornillador Phillips.
3) Tire hacia arriba el botón de encendido hasta que se fi je en esa posición y extraiga el
panel del asador.
4) Vuelva a colocar el panel de control cuando fi nalice la comprobación de fugas.
COMPRUEBE QUE NO HAYA FUGAS DE GAS
PELIGRO
No utilice una llama abierta para comprobar si existen fugas
de gas. Asegúrese de que no haya chispas o llamas abiertas
en el área mientras comprueba si existen fugas. Chispas o
llamas abiertas causarán un fuego o explosión, las cuales
pueden causar serias lesiones corporales o la muerte, y
daños a la propiedad.
ADVERTENCIA: Cada vez que conecte o desconecte una
conexión de gas, deberá verifi car que no hayan fugas de
gas.
Nota: Todas las conexiones hechas en la fábrica han sido revisadas a fondo en busca
de la presencia de fugas. Los quemadores han sido probados con las llamas encendidas. Como medida de precaución, sin embargo, usted deberá volver a chequear
todas las conexiones en busca de fugas antes de utilizar su barbacoa o asador de
gas Weber®. Durante el manejo y despacho puede haberse afl ojado o dañado alguna
conexión de gas.
ADVERTENCIA: Lleve a cabo estos chequeos de fugas aun
y cuando su barbacoa o asador haya sido ensamblada por
el distribuidor o en la tienda donde la compró.
Usted necesitará: una solución de agua y jabón y un trapo o una brocha para aplicarla.
Nota: Dado a que algunas soluciones para la detección de fugas, incluyendo el agua y
jabón, pueden ser ligeramente corrosivas, todas las conexiones deberán lavarse con
agua después de realizar la comprobación de las fugas.
Asegúrese de que el quemador lateral esté apagado (posición OFF).
Para realizar la comprobación de que no hay fugas: abra la válvula del cilindro girando
el manubrio de ésta en dirección contraria a las agujas del reloj.
SPIRIT E/SP210 & 310
(1)
(2)
(3)
ADVERTENCIA: No encienda los quemadores mientras esté
verifi cando la existencia de fugas.
Compruebe la existencia de fugas mojando las conexiones con la solución de agua y
jabón y viendo si se generan burbujas. Si se forman burbujas o si una burbuja, crece
existe una fuga.
WWW.WEBER.COM
®
Page 20

20
Compruebe:
1) La conexión de la manguera al múltiple.
2) La conexión del regulador al cilindro
INSTRUCCIONES SOBRE EL GAS
ADVERTENCIA: Si hubiese una fuga en la conexión (1), vuelva
a apretarla con una llave y vuelva a comprobar de que no
hay fugas usando una solución de agua y jabón. Si la fuga
persiste después de volver a apretar la conexión, cierre el gas.
NO OPERE LA Barbacoa o asador. Contacte al Representante
de Atención al Cliente usando la información de contacto en
nuestro sitio web. Conéctese a www.weber.com
Compruebe:
3) Las conexiones de las válvulas al múltiple
4) La conexión de la manguera al regulador
®
.
ADVERTENCIA: Si hubiese una fuga en las conexiones (2),
(3) o (4), CIERRE el gas. NO OPERE LA Barbacoa o asador.
Contacte al Representante de Atención al Cliente usando la
información de contacto en nuestro sitio web. Conéctese a
www.weber.com
Cuando se haya completado la comprobación de las fugas de gas, CIERRE el suministro
de gas en la fuente y enjuague las conexiones con agua.
®
.
RECARGA DEL CILINDRO DE PROPANO LICUADO
Le recomendamos que llene su cilindro de gas propano licuado antes de que éste se
vacíe por completo.
Cómo retirar el cilindro de gas propano licuado
1) Cierre la válvula del tanque (gire en sentido de las agujas del reloj).
2) Desenrosque el cople del regulador girándolo, solamente a mano, en sentido
contrario a las agujas del reloj.
3) Afl oje la contratuerca de aletas del cilindro y aparte el amarramiento del cilindro de
manera que no estorbe.
4) Levante el cilindro.
Para recargarlo, lleve el cilindro de gas propano licuado a un distribuidor de “Gas
Propano”.
ADVERTENCIA: Recomendamos llenar su cilindro de
gas propano licuado con un distribuidor de gas propano
autorizado que tenga un encargado debidamente califi cado
y que llene el tanque en base a peso. EL LLENADO
INCORRECTO ES PELIGROSO
PRECAUCIÓN: Coloque la tapa guardapolvo sobre la salida
de la válvula del cilindro siempre que éste último no se
esté usando. Solamente instale sobre la salida de la válvula
del cilindro el tipo de tapa guardapolvo provista con dicha
válvula. Otros tipos de tapas o tapones pudieran resultar en
fugas de propano.
SPIRIT E/SP210 & 310
*La barbacoa ilustrada puede tener ligeras
diferencias con respecto al modelo
comprado.
(3)
(1)
(1)
(1)
(2)
(3)
(4)
(2)
(2)
(3)
VERIFICACIÓN DEL NIVEL DE COMBUSTIBLE EN SU TANQUE
Verifi que el nivel de combustible viendo la línea de color indicadora del nivel ubicada al
lado de la escala del tanque.
1) Vacío
2) Mitad
3) Lleno
SUGERENCIAS PARA EL MANEJO SEGURO DE LOS CILINDROS DE
GAS PROPANO LICUADO
• El gas propano licuado es un producto petrolero al igual que lo son la gasolina y
el gas natural. El propano es un gas a temperaturas y presiones normales. Bajo
presión moderada, dentro de un cilindro, el gas propano es un líquido. En la medida
en que se libera la presión, el líquido se evapora fácilmente y se convierte en gas.
• El gas propano tiene un olor similar al gas natural. Usted deberá estar al tanto de
este olor.
• El gas propano es más pesado que el aire. El gas propano proveniente de una fuga
puede acumularse en áreas bajas y prevenir su dispersión.
• Para llenar un cilindro de gas propano, llévelo a un centro de vehículos recreativos,
o busque a otros suplidores bajo “gas propano” en el directorio telefónico.
ADVERTENCIA: Recomendamos llenar su cilindro de
gas propano licuado con un distribuidor de gas propano
autorizado que tenga un encargado debidamente califi cado
y que llene el tanque en base a peso. EL LLENADO
INCORRECTO ES PELIGROSO.
• Antes de su llenado inicial, el aire debe ser retirado de todo cilindro nuevo de
propano licuado. Los distribuidores de propano licuado están equipados para
hacerlo.
• El cilindro de propano licuado debe instalarse, transportarse y almacenarse en
una posición parada. Los cilindros de propano licuado no deben dejarse caer o
manipularse de manera brusca.
• Nunca almacene o transporte los cilindros de propano licuado en sitios donde la
temperatura alcance los 125 ° F (52 ° C) (demasiado caliente para sostenerlo con
la mano - por ejemplo: no deje un cilindro de gas propano dentro de un carro en un
día caluroso).
Nota: Una llenada durará alrededor de 20 horas de tiempo de cocción bajo uso normal.
La escala de combustible indica el suministro de propano disponible de manera que
pueda volver a llenar el tanque antes de éste vaciarse. No necesita vaciar el tanque
completamente antes de volver a llenarlo.
• Trate a los cilindros de propano licuado “vacíos” con el mismo cuidado que cuando
están llenos. Aun cuando el tanque de gas propano no contenga líquido todavía
puede haber presión del gas en el cilindro. Siempre cierre la válvula del cilindro
antes de desconectar.
WWW.WEBER.COM
®
Page 21

INSTRUCCIONES SOBRE EL GAS
21
PRECAUCIÓN: Coloque la tapa guardapolvo sobre la salida
de la válvula del cilindro siempre que éste último no se
esté usando. Solamente instale sobre la salida de la válvula
del cilindro el tipo de tapa guardapolvo provista con dicha
válvula. Otros tipos de tapas o tapones pudieran resultar en
fugas de propano.
• No use ningún cilindro de propano licuado dañado. Cilindros de propano
licuado abollados u oxidados o con la válvula dañada son peligrosos y deberán
reemplazarse por uno nuevo inmediatamente.
Cilindro(s) de propano licuado
• Cada vez que se reconecte un cilindro de propano licuado, se debe revisar que la
unión por donde se conecta la manguera al cilindro no presente fugas. Por ejemplo,
haga la prueba cada vez que se llena el cilindro de propano licuado.
• Asegúrese de que el regulador esté montado con el pequeño agujero respiradero
viendo hacia abajo de manera que no se acumule agua en él. Este respiradero
debe mantenerse libre de sucio, grasa, insectos, etc.
• Las conexiones de gas suministradas con su barbacoa o asador de gas Weber®
han sido diseñadas y probadas con el fi n de cumplir en un 100% los requisitos
ANSI y de la CSA.
ADVERTENCIA: Los tanques de propano licuado de
reemplazo deben tener conexiones compatibles con la del
regulador suministrado con esta barbacoa o asador.
Requisitos de los cilindros de propano licuado
• Asegúrese de que los cilindros tengan una certifi cación del D.O.T. (Departamento
de Transporte) (1), y que la fecha en que fueron probados (2) no sea más de cinco
años atrás. Su proveedor de propano licuado puede hacerlo por usted.
INSTRUCCIONES DE FUNCIONAMIENTO
ENCENDIDO
En el panel de control se encuentra un resumen de las instrucciones de encendido.
PELIGRO
El no abrir la tapa mientras se esté encendiendo el
quemador de la barbacoa o asador, o no esperar 5 minutos
para que el gas se disipe si la barbacoa o asador no se
enciende, puede resultar en una llamarada explosiva, la cual
puede causar lesiones corporales serias o la muerte.
• Todos los sistemas de tanques de suministro de propano licuado deben incluir un
collar que proteja la válvula del cilindro.
• Los cilindros de propano licuado deben tener un tamaño aproximado de 9 kg (46
cm de alto, 31 cm de diámetro).
• Los cilindros deben construirse y marcarse de acuerdo con las “Especifi caciones
para cilindros de gas propano licuado” del Departamento de Transporte (D.O.T.) de
los EE.UU. o la Norma Nacional Canadiense “CAN/CSA-B339, Cilindros, esferas y
tubos” o “Transporte de bienes peligrosos”; y Comisión, según aplique.
En Canadá
Requisitos de los cilindros de propano licuado
Nota: Su proveedor de venta al por menor puede ayudarle a buscar un tanque de
reemplazo para su barbacoa o asador.
• El cilindro de propano licuado debe estar construido y marcado de acuerdo con las
especifi caciones para cilindros de gas propano licuado, T.C.
DOT 4BA240
21
1
00/06
2
Sistema de encendido Crossover®
Nota: El sistema de encendido Crossover® enciende a los quemadores mediante
una chispa del electrodo de ignición ubicado dentro de la cámara de encendido Gas
Catcher™. Usted genera la energía para la chispa pulsando el botón de encendido
Crossover
®
hasta que haga clic.
ADVERTENCIA: Inspeccione la manguera previo a cada
uso de la barbacoa o asador y asegúrese de que no tenga
muescas, grietas, abrasiones o cortes. Si se encontrase
que la manguera estuviese dañada de cualquier manera, no
utilice la barbacoa o asador. Reemplácela solamente con una
manguera de repuesto autorizada por Weber®. Contacte al
Representante de Atención al Cliente usando la información
de contacto en nuestro sitio en la Internet. Conéctese a www.
weber.com®.
1) Abra la tapa
2) Asegúrese de que todas las perillas de control del quemador estén en la posición
OFF (apagado) (Empuje la perilla de control hacia adentro y gire en dirección de las
manecillas del reloj para asegurarse de que esté en la posición OFF (apagada).)
ADVERTENCIA: Las perillas de control del quemador
deberán estar en la posición OFF (APAGADA) antes de abrir
la válvula del tanque de propano licuado. Si no están en la
posición OFF (APAGADA) cuando abra la válvula del tanque
de propano licuado, el control de exceso de fl ujo se activará
y limitará el fl ujo de gas desde el tanque de propano
licuado. Si esto llegase a ocurrir, cierre la válvula del tanque
de propano y las perillas de control del quemador y empiece
de nuevo. Luego comience de nuevo.
PELIGRO:
Cuando se activa el control de exceso de fl ujo, una pequeña
cantidad de gas sigue fl uyendo a los quemadores. Después
de cerrar la válvula del tanque y las perillas de control del
quemador, espere por lo menos 5 minutos para que el gas se
disipe antes de tratar de encender la barbacoa o asador. El
no hacer esto podría resultar en una llamarada explosiva que
pudiera causar lesiones corporales serias o la muerte.
WWW.WEBER.COM
®
ENCENDIDO DEL QUEMADOR PRINCIPAL
SPIRIT E/SP-
1
210 & 310
6
*La barbacoa ilustrada puede tener ligeras
diferencias con respecto al modelo comprado.
2
7
5
3
4
Page 22

22
INSTRUCCIONES DE FUNCIONAMIENTO
3) Abra el suministro de gas del cilindro girando lentamente la válvula del cilindro en
dirección contraria a las manecillas del reloj.
ADVERTENCIA: No se incline sobre la barbacoa o asador
abierta. Al encender la barbacoa o asador, mantenga su
cara y cuerpo alejados por lo menos a una distancia de 30
centímetros del orifi cio de encendido con cerillo.
4) Empuje la perilla de control del quemador hacia adentro y gire hacia START/HI
(encendido/alto).
5) Pulse el botón rojo de encendido Crossover® varias veces, de manera que haga “clic”
cada vez.
6) Viendo a través del agujero de encendido con cerillo, verifi que si efectivamente se ha
encendido el quemador. Deberá ver una llama.
ADVERTENCIA: Si el quemador no se enciende, gire la
perilla del control del quemador a la posición OFF (apagado)
y espere 5 minutos para permitir que el gas se disipe antes
de tratar de nuevo o de que usted trate de encenderlo con
un cerillo.
7) Una vez se haya encendido el quemador DELANTERO ya podrá encender el otro
quemador.
Nota: Siempre encienda primero el quemador DELANTERO. Los quemadores restantes
se encienden con las llamas del quemador DELANTERO.
PARA APAGAR
Empuje la perilla de control de cada quemador hacia abajo y gírela en la dirección de
las manillas del reloj a la posición OFF (apagado). Cierre el suministro de gas en la
fuente del mismo.
ENCENDIDO DEL QUEMADOR PRINCIPAL
SPIRIT E/SP-
1
210 & 310
6
*La barbacoa ilustrada puede tener ligeras
diferencias con respecto al modelo
comprado.
2
7
5
3
4
ENCENDIDO MANUAL
PELIGRO
El no abrir la tapa mientras se esté encendiendo el quemador
de la barbacoa o asador, o no esperar 5 minutos para que el
gas se disipe si la barbacoa o asador no se enciende, puede
resultar en una llamarada explosiva, la cual puede causar
lesiones corporales serias o la muerte.
1) Abra la tapa.
2) Asegúrese de que todas las perillas de control del quemador estén en la posición
OFF (apagado) (Presione cada perilla hacia abajo y gire en dirección de las
manecillas del reloj para asegurarse de que estén cerradas en la posición OFF).
ADVERTENCIA: Las perillas de control del quemador
deberán estar en la posición OFF (apagadas)) antes de abrir
la válvula del tanque de propano licuado. Si no están en la
posición OFF (APAGADA) cuando abra la válvula del tanque
de propano licuado, el control de exceso de fl ujo se activará
y limitará el fl ujo de gas desde el tanque de propano
licuado. Si esto llegase a ocurrir, cierre la válvula del tanque
de propano líquido y las perillas del control del quemador.
Luego comience de nuevo.
PELIGRO
Cuando se activa el control de exceso de fl ujo, una pequeña
cantidad de gas sigue fl uyendo a los quemadores. Después
de cerrar la válvula del tanque y las perillas de control del
quemador, espere por lo menos 5 minutos para que el gas se
disipe antes de tratar de encender la barbacoa o asador El
no hacer esto podría resultar en una llamarada explosiva que
pudiera causar lesiones corporales serias o la muerte.
ENCENDIDO DEL QUEMADOR PRINCIPAL
SPIRIT E/SP210 & 310
*La barbacoa ilustrada puede tener
ligeras diferencias con respecto al
modelo comprado.
1
2
7
3
4,6
5
WWW.WEBER.COM
®
Page 23

INSTRUCCIONES DE FUNCIONAMIENTO
23
3) Abra el suministro de gas del cilindro girando la válvula del cilindro en dirección
contraria a las manecillas del reloj.
4) Inserte el portacerillo con el cerillo encendido en el agujero para la candela del cerillo
en frente de la caja de cocción.
ADVERTENCIA: No se incline sobre la barbacoa o asador
abierta. Al encender la barbacoa o asador, mantenga su
cara y cuerpo alejados a por lo menos una distancia de 30
centímetros del orifi cio de encendido con cerillo.
5) Empuje la perilla de control del quemador hacia adentro y gire hacia START/HI
(encendido/alto).
6) Viendo a través del agujero de encendido con cerillo en la parte delantera de la caja
de cocción, verifi que si se ha encendido el quemador. Deberá ver una llama.
ADVERTENCIA: Si el quemador no se enciende, gire la
perilla del control del quemador a la posición OFF (apagado)
y espere 5 minutos para permitir que el gas se disipe antes
de tratar de nuevo o de que usted trate de encenderlo con
un cerillo.
7) Una vez se haya encendido el quemador de ADELANTE ya podrá encender el otro
quemador.
Nota: Siempre encienda primero el quemador DELANTERO. Los demás quemadores
se encienden con las llamas del quemador DELANTERO.
PARA APAGAR
Empuje la perilla de control de cada quemador hacia abajo y gírela en la dirección de
las manillas del reloj a la posición OFF (apagado). Cierre el suministro de gas en la
fuente del mismo.
RESOLUCIÓN DE PROBLEMAS
ENCENDIDO DEL QUEMADOR PRINCIPAL
SPIRIT E/SP-
1
210 & 310
4,6
*La barbacoa ilustrada puede tener ligeras
diferencias con respecto al modelo comprado.
23
2
7
3
5
PROBLEMA REVISAR REMEDIO
Los quemadores queman con una llama amarilla
o anaranjada, conjuntamente con un olor a gas.
Síntomas:
Los quemadores no se encienden. -o- Los
quemadores presentan una llama pequeña y
parpadeante en la posición HI (fuego alto). -oLa temperatura de la barbacoa o asador no pasa
más allá de 250˚ a 300˚ en la posición HI (fuego
alto).
El quemador no enciende, o la llama se mantiene
baja en la posición HI (fuego alto).
Se producen llamaradas:
PRECAUCIÓN: No forre la bandeja
inferior con hoja de aluminio.
El quemador produce llamas con un patrón
errático. La llama se mantiene baja cuando el
quemador está en HI (fuego alto). Las llamas no
corren a lo largo de todo el tubo del quemador.
La parte interna de la tapa pareciera estar
“pelándose”. (Se parece al desprendimiento de
pintura.)
Si los problemas no pueden corregirse usando cualquiera de estos métodos, por favor contacte al Representante de Atención al Cliente en su área usando la
información de contacto en nuestro sitio web. Conéctese a www.weber.com
Revise que no haya obstrucciones en la malla contra
arañas e insectos. (Taponamiento de orifi cios.)
Puede haberse activado el dispositivo de seguridad de
caudal excesivo, el cual es parte de la conexión de la
barbacoa o asador al cilindro.
¿Está el tanque de propano licuado vacío o bajo de
combustible?
¿Está doblada la manguera de combustible? Enderece la manguera de combustible.
¿Se enciende el quemador izquierdo con una cerilla? Si usted puede encender el quemador izquierdo con un
¿Está precalentando la barbacoa o asador de la manera
prescrita?
¿Están las rejillas de cocinar y las barras
Flavorizer®recubiertas con una capa gruesa de grasa
quemada?
¿Está la bandeja del fondo “sucia” y no deja que la grasa
fl uya al plato recolector?
¿Están limpios los quemadores? Limpie los quemadores. (Vea la sección de “Mantenimiento”.)
La tapa es de acero inoxidable y no está pintada. No
puede “pelarse”. Lo que está viendo es grasa asada que
se ha convertido en carbón y se está descascarando.
ESTO NO ES UN DEFECTO.
®
.
Limpie las mallas contra arañas e insectos. (Vea la sección:
“Mantenimiento anual”)
Para restablecer el dispositivo de seguridad de caudal
excesivo gire todos las perillas de control del quemador a
la posición OFF (apagadas) y cierre la válvula del cilindro.
Desconecte el regulador del cilindro. Gire las perillas de
control del quemador a la posición HI (fuego alto). Espere
por lo menos 1 minuto. Gire las perillas de control a la
posición OFF (apagadas). Vuelva a conectar el regulador del
cilindro. Abra la válvula del cilindro lentamente. Refi érase a
las “Instrucciones de encendido”.
Rellene el tanque de propano licuado.
cerillo, entonces revise el sistema de encendido Crossover
Coloque a todos los quemadores en HI (fuego alto) durante
10 a 15 minutos para precalentar la barbacoa o asador.
Límpielas a fondo. (Vea la sección “Limpieza”.)
Limpie la bandeja del fondo
Limpie a fondo. (Vea la sección “Limpieza”.)
®
.
WWW.WEBER.COM
®
Page 24

24
MANTENIMIENTO
WEBER® MALLAS CONTRA ARAÑAS/INSECTOS
Su barbacoa o asador de gas Weber®, al igual que cualquier otro aparato de gas al
aire libre, es un blanco para las arañas y demás insectos. Pueden crear sus nidos en
la sección (1) del venturi del tubo quemador. Esto bloquea el fl ujo normal de gas, y
puede causar que el gas fl uya hacia atrás por la abertura del aire de combustión. Esto
puede resultar en un fuego en y alrededor de las aberturas para el aire de combustión,
causando un daño serio a la barbacoa o asador.
La abertura para el aire de combustión en el tubo quemador está provista con un
malla de acero inoxidable (2) para prevenir la entrada de arañas e insectos a los tubos
quemadores a través de dichas aberturas.
Le recomendamos que revise estas mallas contra arañas e insectos por lo menos
una vez al año. (Vea la sección: “Mantenimiento anual”) También inspeccione
y limpie las mallas contra arañas e insectos si cualquiera de los siguientes
síntomas llegase a presentarse.
1. Olor a gas en conjunción con llamas del quemador con una apariencia muy amarilla
y fl oja.
3) La barbacoa o asador no alcanza la temperatura requerida.
3) La barbacoa o asador se calienta de manera dispareja.
4) Uno o más quemadores no se encienden.
PELIGRO
El no corregir estos síntomas pudiera resultar en un fuego
que puede causar lesiones corporales serias o la muerte y
daños a la propiedad.
MANTENIMIENTO ANUAL
Inspección y limpieza de la malla contra arañas y demás insectos
Para inspeccionar las mallas contra arañas e insectos, retire el panel de control. Si
hubiese polvo o sucio sobre las mallas, saque los quemadores para limpiarlas.
Con un cepillo de cerdas suaves (p.ej.: un cepillo de dientes viejo), cepille suavemente
las malla contra arañas y demás insectos.
PRECAUCIÓN: No limpie las mallas contra arañas y
demás insectos con herramientas duras o afi ladas. No las
desmonte ni agrande los orifi cios de las mismas.
Golpee ligeramente el quemador para sacar la basura y suciedad fuera del tubo
quemador. Una vez limpios, vuelva a colocar a las mallas y quemadores en su sitio.
Si la malla contra arañas y demás insectos se dañase o no pudiese limpiarse, por favor
póngase en contacto con el Representante de Servicios al Cliente de su zona, cuya
datos de contacto encontrará en nuestro sitio en la Internet. Conéctese a www.weber.com®.
PATRÓN DE LA LLAMA DEL QUEMADOR PRINCIPAL
Los quemadores de las barbacoas o asadores Weber® han sido ajustados en la fabrica
para la mezcla correcta de aire y gas. Acá se muestra el patrón correcto de la llama.
1) Tubo quemador
2) Las puntas ocasionalmente titilarán con un color amarillo
3) Azul claro
4) Azul oscuro
Si las llamas no se presentan de manera uniforme a lo largo del tubo quemador, siga
las instrucciones de limpieza del quemador.
(1)
(2)
1
2
3
4
PROCEDIMIENTO PARA LA LIMPIEZA DEL QUEMADOR PRINCIPAL
Cierre el suministro de gas.
Retire el múltiple (Vea “Reemplazo de los quemadores principales”)
Revise la parte interna del quemador con una linterna.
Limpie la parte interna de los quemadores con un alambre (un colgador de ropa
enderezado funcionará bien). Revise y limpie la abertura de las compuertas de cierre
del aire en los extremos de los quemadores. Revise y limpie los orifi cios de las válvulas
en la base del orifi cio del quemador Utilice un cepillo de cerdas de acero para limpiar la
parte externa de los quemadores. Esto es para asegurarse de que las aberturas de los
quemadores estén completamente abiertas.
PRECAUCIÓN: Al limpiar, no agrande las aberturas del
quemador.
WWW.WEBER.COM
®
Page 25

MANTENIMIENTO
REEMPLAZO DE LOS QUEMADORES PRINCIPALES
1) Su asador de gas Weber® debe estar APAGADO y enfriado.
2) CIERRE el gas en la fuente.
3) Para retirar el panel de control: saque las perillas de control de los quemadores.
Saque los tornillos que mantienen al panel de control en su sitio. Levante y saque el
panel de control.
4) Desenganche el soporte del múltiple (1) y destornille las dos tuercas de aleta (2) que
unen el múltiple a la caja de cocción. Hale el conjunto de múltiple y válvula fuera de
los quemadores y póngalo cuidadosamente sobre el suelo.
5) Deslice el conjunto de quemadores por debajo del tornillo guía y arandela (1) en las
esquinas de la caja de cocción.
6) Levante y gire levemente el conjunto de quemadores, para separar al tubo Crossover
(1) de los quemadores. Saque los quemadores de la caja de cocción.
7) Para reinstalar los quemadores, proceda con los pasos 3) al 7) en reverso.
PRECAUCIÓN: Las aberturas del quemador (1) deberán
posicionarse correctamente sobre los orifi cios de la
válvula (2).
Antes de atornillar el múltiple en su sitio, verifi que que esté correctamente ensamblado.
ADVERTENCIA: Después de reinstalar las líneas de gas y
antes de usar la barbacoa o asador, deberá verifi carse que
no haya fugas usando una solución de agua y jabón. (Vea el
paso: “Verifi cación de que no existen fugas de gas”)
(1)
25
25
(2)
)
(2)
OPERACIÓN DEL SISTEMA DE ENCENDIDO CROSSOVER
Si el sistema de encendido Crossover® no logra encender el quemador delantero,
enciéndalo con una cerilla. Si el quemador delantero se enciende con una cerilla,
entonces revise el sistema de ignición Crossover®.
• Verifi que que tanto el cable de encendido blanco (1) como el negro (2) estén
conectados correctamente.
• Verifi que que el botón de encendido Crossover® empuja al (botón del) encendedor
hacia abajo y retorna a la posición de arriba.
Si el sistema de encendido Crossover
su Representante de Servicios al Cliente en su área usando la información de
contacto en nuestro sitio web. Conéctese a www.weber.com®.
®
aún no logra el encendido, contacte a
®
(2)
(1)
SPIRIT E/SP210 & 310
(1) (2)
WWW.WEBER.COM
®
Page 26

GAS GRILL
Gril À Gaz : Guide Du Propriétaire
Gril À Gaz : Guide Du Propriétaire
E -210/310
SP -210/310
#89525
#00000
VOUS DEVEZ LIRE CE GUIDE DE
L’UTILISATEUR AVANT DE VOUS SERVIR
DE VOTRE BARBECUE À GAZ
DANGER
S'il y a une odeur de gaz :
1. Coupez l'admission de gaz de l'appareil.
2. Éteindre toute fl amme nue.
3. Ouvrir le couvercle.
4. Si l’odeur persiste, éloignez-vous de
l’appareil et appelez immédiatement
le fournisseur de gaz ou le service
d’incendie.
Une fuite de gaz risque de provoquer un
incendie ou une explosion susceptible
d’occasionner des blessures graves, voire
mortelles, ou des dégâts matériels.
AVERTISSEMENT
1. Ne pas entreposer ni utiliser de
l’essence ni d’autres vapeurs ou liquides
infl ammables dans le voisinage de
l’appareil, ni de tout autre appareil.
2. Une bouteille de propane qui n’est pas
raccordée en vue de son utilisation,
ne doit pas être entreposée dans le
voisinage de cet appareil ou de tout
autre appareil.
AVERTISSEMENT : suivez à la lettre les
instructions de détection des fuites
données dans ce guide avant de faire
fonctionner le barbecue, même s’il a été
monté par le revendeur.
À L’INTENTION DE L’INSTALLATEUR :
Ce guide doit être remis au propriétaire, qui
doit le conserver pour pouvoir s’y reporter
ultérieurement.
CET APPAREIL À GAZ EST CONÇU POUR
ÊTRE UTILISÉ EN PLEIN AIR UNIQUEMENT.
AVERTISSEMENT : n'essayez pas
d'allumer cet appareil sans avoir lu la
section « Allumage » de ce guide.
89525 FC
Page 27

DANGERS ET AVERTISSEMENTS
27
DANGER
L’inobservation des avis Danger, Avertissement et Attention fi gurant dans ce guide peut entraîner des blessures graves, voire
mortelles, ainsi qu’un incendie ou une explosion susceptibles de provoquer des dégâts matériels.
AVERTISSEMENTS
N'entreposez pas une bouteille de gaz de rechange ou débranchée sous ce barbecue ni à proximité de celui-ci.
Un montage incorrect peut s'avérer dangereux. Veuillez suivre à la lettre les instructions de montage données dans ce guide.
A l'issue d'une période d’entreposage et/ou de non utilisation, il convient de contrôler le barbecue à gaz Weber® avant de s’en
servir pour s’assurer de l’absence de fuites de gaz ou d’obstruction des brûleurs. Voir les instructions données dans ce guide
pour la façon correcte d’y procéder.
Ne faites pas fonctionner le barbecue à gaz Weber® en cas de fuite de gaz.
Ne vous servez pas d'une fl amme pour rechercher des fuites de gaz.
Aucune matière combustible ne devrait jamais se trouver à moins de 24 pouces (60 cm) de l’arrière ou des côtés de votre
barbecue à gaz Weber®.
Ne placez pas une housse à barbecue ni des produits infl ammables sur ou dans l’espace de rangement qui se trouve sous le
barbecue.
Votre barbecue à gaz Weber ne doit jamais être utilisé par des enfants. Ses parties accessibles risquent d’être brûlantes. Ne
laissez pas de jeunes enfants s’approcher du barbecue quand il est allumé.
Prenez des précautions raisonnables quand vous vous servez de votre barbecue à gaz Weber®. Il devient brûlant quand vous
cuisinez ou le nettoyez et il convient de ne jamais le laisser sans surveillance ni de le déplacer alors qu’il est allumé.
Si les brûleurs s’éteignent en cours de fonctionnement, fermez tous les robinets de gaz. Ouvrez le couvercle et attendez cinq
minutes avant d’essayer de rallumer l’appareil conformément aux instructions d’allumage.
N'utilisez pas de charbon de bois, de briquettes ni de pierres de lave dans votre barbecue à gaz Weber®.
Ne vous penchez jamais au-dessus du barbecue ouvert et ne placez jamais vos mains ni vos doigts sur le rebord avant de la
cuve.
En cas d'infl ammation de graisse, éteignez tous les brûleurs et laissez le couvercle fermé jusqu’à extinction du feu.
Lorsque vous nettoyez les robinets ou les brûleurs, n’agrandissez pas leurs orifi ces.
Il convient de nettoyer régulièrement à fond le barbecue à gaz Weber®.
Le propane liquéfi é n’est pas un gaz naturel. La conversion d’un appareil à gaz naturel au propane liquéfi é ou vice versa, de
même qu’une tentative d’utilisation de l’un de ces gaz dans un appareil conçu pour l’autre, sont dangereuses et annuleront la
garantie.
N'essayez pas de débrancher tout raccord de gaz alors que le barbecue est allumé.
Portez des gants à barbecue ou de cuisine résistant à la chaleur pour vous servir du barbecue.
Gardez tout cordon d’alimentation électrique et tuyau d’alimentation en combustible à l’écart des surfaces chauffées.
N’utilisez ce barbecue que si toutes les pièces sont en place. L’appareil doit être correctement monté conformément aux
instructions présentées dans les « Instructions de montage ».
27
APPAREILS À PROPANE LIQUÉFIÉ UNIQUEMENT :
Utilisez l’ensemble régulateur de pression et tuyau fourni avec votre barbecue à gaz Weber®.
Ne tentez pas de débrancher l’ensemble régulateur de gaz et tuyau ni tout autre raccord de gaz pendant l’utilisation de votre
barbecue.
Une bouteille de propane liquéfi é cabossée ou rouillée risque d’être dangereuse et doit être contrôlée par votre fournisseur de
gaz. Ne vous servez pas d’une bouteille dont le robinet est endommagé.
Même si votre bouteille de gaz semble être vide, il se peut qu’il y reste du gaz. Il convient d’en tenir compte pour la transporter
et l’entreposer.
Si vous percevez l'odeur ou le siffl ement de gaz s'échappant de la bouteille de propane liquéfi é :
1. Éloignez-vous de la bouteille de propane liquéfi é.
2. N’essayez pas de résoudre le problème vous-même.
3. Appelez les pompiers.
WWW.WEBER.COM
®
Page 28

28
INSTRUCTIONS GÉNÉRALES
Votre barbecue à gaz Weber® est un appareil mobile permettant de pratiquer la cuisine
en plein air. Vous pouvez grâce à lui griller, rôtir et cuire en obtenant des résultats
diffi ciles à reproduire avec les appareils de votre cuisine. La cuisson avec le couvercle
fermé et les barres Flavorizer® donne aux aliments leur saveur « de plein air ».
Le barbecue à gaz Weber® est mobile, ce qui vous permet de le déplacer facilement
dans votre jardin ou sur votre patio. Sa mobilité signifi e que vous pouvez l’emmener
avec vous si vous déménagez. Le propane liquéfi é est d’un emploi facile et vous permet
de mieux contrôler la cuisson que le charbon de bois.
• Les instructions qui suivent vous indiquent les spécifi cations minima de montage de
votre barbecue à gaz Weber. Veuillez les lire attentivement avant de vous servir de
celui-ci. Les erreurs de montage risquent d’avoir des conséquences dangereuses.
• Le barbecue ne doit pas être utilisé par des enfants.
• Si des codes locaux s’appliquent aux grills à gaz portatifs, vous devrez les respecter.
En l’absence de codes locaux, vous devez vous conformer à la dernière édition
du Code national sur les carburants : ANSI Z 223.1/NFPA 54, au Code relatif aux
installations au gaz naturel et au propane, CSA B149.1 ou au Code relatif au
stockage et à la manipulation du propane, B149.2
• Vous devez utiliser le détendeur fourni avec le barbecue à gaz Weber. Il est réglé à
une pression de 26.7 cm à la colonne d’eau.
• Ce barbecue à gaz Weber
uniquement. Ne le raccordez pas à l’arrivée de gaz naturel (gaz de ville). Les robinets
et les orifi ces sont conçus exclusivement pour le propane liquéfi é.
• Ne vous en servez pas avec du charbon de bois.
• Vérifi ez que la zone qui se trouve sous le panneau de commande et le plateau
inférieur sont libres de débris risquant de gêner la circulation de l’air de combustion
ou de ventilation.
• Les alentours de la bouteille de propane liquéfi é doivent être dégagés et libres de
débris.
®
est conçu pour fonctionner au propane liquéfi é
INSTALLATION AU CANADA
Les instructions qui précèdent, bien que généralement acceptables, ne respectent
pas nécessairement les règlements d’installation canadiens, en particulier dans le
domaine des canalisations en surface et souterraines. Au Canada, l’installation de cet
appareil doit respecter les règlements locaux et/ou la norme CSA-B149.2 (Règlement
d’installation des appareils et du matériel fonctionnant au propane).
UTILISATION
AVERTISSEMENT: n’utilisez ce barbecue qu’en plein air,
dans un endroit bien aéré. Ne vous en servez pas dans un
garage, un bâtiment, un passage couvert ni dans tout autre
local fermé.
MISE EN GARDE : Votre barbecue à gaz Weber® ne doit pas
être utilisé sous une construction suspendue infl ammable.
AVERTISSEMENT: ne faites jamais fonctionner votre
barbecue à gaz Weber sous un toit ou un encorbellement
infl ammable non protégé.
AVERTISSEMENT: votre barbecue à gaz Weber® n’est pas
conçu pour être installé dans un véhicule de loisirs ni sur
un bateau.
AVERTISSEMENT: ne vous servez pas de matières
combustibles à moins de 60 cm du haut, du bas, de l’arrière
ou des côtés du barbecue.
AVERTISSEMENT: toute la cuve devient brûlante quand
le barbecue est allumé. Ne laissez jamais ce dernier sans
surveillance.
AVERTISSEMENT: n’approchez aucun cordon d’alimentation
électrique ni le tuyau d’alimentation en gaz d’une surface
chauffée quelconque
AVERTISSEMENT: veillez à ce que l’aire d’utilisation reste
libre de tout liquide ou vapeur infl ammable tel qu’essence,
alcool, etc. et de matières combustibles.
AVERTISSEMENT: n’entreposez jamais une bouteille de
propane liquéfi é de rechange sous le barbecue à gaz Weber
ni près de lui.
La bouteille de PL utilisée avec votre barbecue doit être
pourvue d’un dispositif de protection OPD (Overfi lling
Prevention Device) et d’un raccordement de bouteille QCC1
ou de type 1 (CGA810). Le raccord de la bouteille doit être
compatible avec celui du barbecue.
ENTREPOSAGE ET/OU NON-UTILISATION
• Le gaz doit être coupé à l’entrée de la bouteille de propane liquéfi é lorsque le
barbecue au gaz Weber® n’est pas utilisé.
• Lorsque le barbecue au gaz Weber® est entreposé à l’intérieur, l’alimentation en
gaz doit être DÉCONNECTÉE et la bouteille de propane liquéfi é entreposée à
l’extérieur, dans un endroit bien aéré.
• La bouteille de propane liquéfi é doit être entreposée à l’extérieur, dans un
endroit bien aéré et hors d’atteinte des enfants. La bouteille de propane liquéfi é
débranchée ne doit pas être entreposée dans un bâtiment, un garage ou tout autre
endroit fermé.
• Lorsque la bouteille de propane liquéfi é n’est pas débranchée du barbecue au gaz
Weber®, tous deux doivent être entreposés à l’extérieur, dans un endroit bien aéré.
• Le barbecue au gaz Weber® doit être vérifi é avant usage pour déceler toute fuite ou
toute obstruction dans les tuyaux des brûleurs. (Voir les sections Entretien général
et Entretien annuel.)
• S’assurer que les secteurs situés sous le panneau de commande et le plateau
inférieur amovible sont dénués de débris qui pourraient obstruer le libre passage de
l’air de combustion ou de ventilation.
• Les écrans pare-araignées/insectes doivent également être vérifi és pour déceler
toute obstruction. (Voir la section Entretien annuel.)
CUISSON
AVERTISSEMENT: ne déplacez pas le barbecue à gaz
Vous pouvez régler comme vous les souhaitez les brûleurs AVANT et ARRIÈRE. Les
réglages possibles H (High = maximum), M (Medium = moyen), L (Low = minimum) et
O (Off = fermé) sont décrits dans votre livre de cuisine Weber
utilisées dans celui-ci pour décrire le réglage des brûleurs AVANT et ARRIÈRE. Par
exemple, pour saisir des steaks, vous devez réglez tous les brûleurs sur H (maximum).
Puis, pour achever la cuisson, réglez les brûleurs AVANT et ARRIÈRE sur M (moyen).
Voir le livre de cuisine Weber
Remarque : les premières fois que vous vous servez du barbecue, il se peut que les
températures à l’intérieur de la cuve, dont les surfaces renvoient encore une grande
quantité de chaleur, soient plus élevées que celles qui sont indiquées dans le livre
de cuisine. Les conditions de cuisson, telles que le vent et le temps qu’il fait, peuvent
exiger un réglage des manettes pour obtenir les températures de cuisson correctes.
Préchauffage - votre barbecue à gaz Weber® est un appareil économique qui con-
somme peu d’énergie. Pour le préchauffer après l’avoir allumé, fermez le couvercle
et tournez tous les brûleurs en position maximum (HH). Un préchauffage à 260-290
°C demande de 10 à 15 minutes suivant les conditions atmosphériques telles que la
température et le vent.
Jus et graisse - les barres Flavorizer® sont conçues pour « faire partir en fumée »
la quantité correcte de jus requise pour donner aux aliments leur délicieuse saveur.
Weber
®
lorsqu’il est allumé ou encore chaud.
®
®
pour des instructions détaillées concernant la cuisson.
. Ces abréviations sont
L’excédent de jus et de graisse est recueilli par la lèchefrite qui se trouve sous le plateau inférieur. Des barquettes jetables en feuille d’aluminium s’adaptant à la lèchefrite
sont disponibles.
AVERTISSEMENT: vérifi ez le plateau inférieur avant chaque
utilisation pour voir si de la graisse s’y est accumulée.
Enlevez l’excédent de graisse pour éviter que celle-ci ne
s’enfl amme dans le plateau.
NETTOYAGE
AVERTISSEMENT: ÉTEIGNEZ le barbecue à gaz Weber® et
attendez qu’il ait refroidi avant de le nettoyer.
ATTENTION: ne nettoyez pas les barres Flavorizer® ni
les grilles de cuisson dans un four auto-nettoyant. Pour
connaître la disponibilité des grilles de cuisson de rechange
et des barres Flavorizer®, veuillez contacter le Représentant
du service client de votre région à l’aide des coordonnées
disponibles sur notre site Internet. Connectez-vous sur
www.weber.com®.
Surfaces extérieures - utilisez de l’eau savonneuse chaude.
WWW.WEBER.COM
®
Page 29

INSTRUCTIONS GÉNÉRALES
29
ATTENTION: N'utilisez pas de produit nettoyant pour fours,
de détergents abrasifs (poudre à récurer), de produits
d’entretien contenant du citron ni de tampons nettoyants
abrasifs sur les surfaces du barbecue et du chariot.
Plateau inférieur - enlevez l’excédent de graisse, puis lavez le plateau à l’eau
savonneuse chaude, puis rincez-le.
Barres Flavorizer
appropriée. Le cas échéant, retirez-les du barbecue et lavez-les à l’eau savonneuse
chaude, puis rincez-les à l’eau.
Lèchefrite - des barquettes jetables en aluminium sont disponibles. Vous pouvez
également couvrir la lèchefrite d’une feuille d’aluminium. Pour nettoyer la lèchefrite,
lavez-la à l’eau savonneuse chaude, et rincez-la.
Intérieur de la cuve - brossez les tubes de brûleurs pour en enlever tout débris.
N’AGRANDISSEZ PAS LES ORIFICES (OUVERTURES) DES BRÛLEURS. Lavez
l’intérieur de la cuve à l’eau savonneuse chaude, puis rincez-la.
Intérieur du couvercle - tant que le couvercle est encore chaud, essuyez-en l’intérieur
avec du papier essuie-tout pour empêcher un écaillement dû à une accumulation de
graisse.
®
et grilles de cuisson - nettoyez-les avec une brosse en laiton
INSTRUCTIONS POUR LE GAZ
IMPORTANTES INFORMATIONS CONCERNANT LA BOUTEILLE DE
PROPANE LIQUÉFIÉ
Le fait de ne pas respecter à la lettre ces avis DANGER peut résulter en un incendie
susceptible d’entraîner des blessures graves voire mortelles.
DANGER
N'entreposez JAMAIS une bouteille de propane liquéfi é de
réserve sous ce barbecue ni à proximité de celui-ci.
Ne remplissez JAMAIS la bouteille à plus de 80 %.
Votre grill à gaz Weber® est équipé pour un dispositif d’alimentation par bouteille
conçu pour un retrait par la vapeur.
AVERTISSEMENT: n'utilisez ce barbecue qu'en plein air
dans un endroit bien aéré. Ne vous en servez pas dans
un garage, un bâtiment, un passage couvert ni tout autre
endroit clos.
Surfaces en acier inoxydable - Préservez votre acier inoxydable - Votre grill ou son
meuble, son couvercle, son panneau de commande et ses étagères sont peut-être en
acier inoxydable. Il est facile de maintenir l’acier inoxydable dans son meilleur aspect.
Nettoyez-le à l’eau savonneuse, rincez à l’eau claire et essuyez-le pour le sécher. Pour
les particules tenaces, l’utilisation d’une brosse non métallique est possible.
29
IMPORTANT: N’utilisez pas de brosse métallique ni de
détergents abrasifs sur les surfaces en acier inoxydable de
votre grill car cela produirait des rayures.
IMPORTANT: Lorsque vous nettoyez les surfaces, veillez
à frotter/essuyer dans le sens du grain afi n de préserver
l’aspect de votre acier inoxydable.
Surfaces en plastique thermodurci - lavez-les avec un chiffon doux imbibé d’eau
savonneuse. N’utilisez pas de produits d’entretien contenant de l’acide, du white
spirit ou du xylène. Rincez bien après le nettoyage. Les plans de travail en plastique
thermodurci ne doivent pas être utilisés comme planches à découper.
Il s’agit d’un dispositif auxiliaire destiné à empêcher un remplissage excessif de la
bouteille. Les méthodes de remplissage correct de la bouteille sont celles qui sont
basées sur le poids ou le volume et sont décrites par la norme NFPA 58. Veuillez vous
assurer que votre fournisseur de gaz remplit la bouteille en se basant sur le poids ou
le volume. Demandez-lui de lire les instructions de purge et de remplissage qui sont
données sur la bouteille avant de procéder au remplissage de celle-ci.
VÉRIFICATION DE LA FERMETURE DE TOUS LES ROBINETS DE BRÛLEURS
Les robinets sont expédiés en position FERMÉE, mais il convient de vous assurer
qu’il en est bien ainsi. Placez une manette sur chaque robinet. Vérifi ez la fermeture en
appuyant sur les manettes et en les tournant vers la droite. Si elles ne tournent pas, les
robinets sont fermés. Passez alors à l’opération suivante. Si elles tournent, continuez à
les tourner vers la droite jusqu’à ce qu’elles s’arrêtent ; les robinets sont alors fermés.
Passez ensuite à l’opération suivante.
RACCORDEMENT DE LA BOUTEILLE DE PROPANE LIQUÉFIÉ
ATTENTION: S’assurer que le robinet de la bouteille de
propane liquéfi é est fermé. Le fermer en tournant le robinet
dans le sens des aiguilles d’une montre.
DANGER
Ne pas utiliser de fl amme nue pour vérifi er la présence
de fuites de gaz. S’assurer qu’il n’y a pas d’étincelles
ou de fl amme nue sur les lieux lorsque l’on vérifi e la
présence possible de fuites. Des étincelles ou une fl amme
provoqueront un incendie ou une explosion qui pourraient
causer de graves blessures ou la mort, ainsi que des
dommages matériels.
Certaines des bouteilles possèdent des boîtiers de manchon supérieur différents. (Le
manchon supérieur est l’anneau protecteur de métal qui entoure le robinet.) Une série
de bouteilles sont montées avec le robinet tourné vers l’avant. Les autres bouteilles sont
montées avec le robinet tournant le dos à la jauge à combustible.
Articles nécessaires: bouteille de propane liquéfi é, solution savonneuse et chiffon ou
brosse pour l’appliquer.
WWW.WEBER.COM
®
(a)
(b)
Page 30

30
1) Tourner la bouteille de propane liquéfi é pour que l’ouverture du robinet se trouve à
l’avant, sur le côté ou à l’arrière du barbecue au gaz Weber. Soulever la bouteille et
l’accrocher à la jauge de combustible.
2) Desserrer l’écrou à oreilles du verrou de la bouteille. Abaisser le verrou. Resserrer
l’écrou à oreilles.
Pour brancher le tuyau à la bouteille:
3) Retirer le capuchon anti-poussière du robinet.
4) Visser le raccord du régulateur au robinet de la bouteille dans le sens des aiguilles
d’une montre, ou vers la droite. Serrer uniquement à la main.
Remarque: Il s’agit d’un nouveau type de raccordement. Il se serre dans le sens des
aiguilles d’une montre et ne permettra l’alimentation en gaz que si le raccord est
serré. Le raccord ne doit être serré qu’à la main.
INSTRUCTIONS POUR LE GAZ
ATTENTION: Ne pas utiliser de clé pour serrer le
raccordement. Cela pourrait endommager le raccord du
régulateur et provoquer une fuite.
5) Mélanger de l’eau et du savon.
6) Ouvrir le robinet de la bouteille.
7) Vérifi er la présence éventuelle de fuites en humectant le raccord à l’aide de la
solution savonneuse et en surveillant la formation possible de bulles. Si des bulles
apparaissent, ou si une bulle grossit, il y a une fuite..
S’il y a une fuite, fermer l’arrivée de gaz et resserrer le raccord. Rouvrir l’arrivée de gaz
et vérifi er à nouveau à l’aide de la solution savonneuse.
Si la fuite persiste, veuillez contacter le Représentant du service client de votre région
à l’aide des coordonnées disponibles sur notre site Internet. Connectez-vous sur www.
weber.com®.
8) Lorsque la vérifi cation des fuites éventuelles est terminée, fermer l’alimentation en
gaz à la source et rincer les raccordements avec de l’eau.
(a)
(b)
RETIRER LE PANNEAU DE COMMANDE ET LES MANETTES DE RÉGLAGE.
Outil nécessaire : tournevis Phillips.
1) Retirer les manettes de réglage.
2) Au moyen du tournevis Phillips, retirer les vis à travers les fentes des garnitures.
3) Tirer le bouton d’allumeur jusqu’à ce qu’il se bloque en position haute et retirer le
panneau de commande du barbecue.
4) Replacer le panneau de commande une fois la vérifi cation des fuites terminée.
DÉTECTION DES FUITES DE GAZ
DANGER
Ne vous servez pas d'une fl amme nue pour la détection des
fuites de gaz. Assurez-vous qu’aucune étincelle ou fl amme
nue n’est produite à l’endroit où vous procédez à cette
opération pour éviter tout risque d’incendie ou d’explosion
susceptible d’occasionner des blessures graves, voire
mortelles, et de provoquer des dégâts matériels.
AVERTISSEMENT: vérifi ez l’absence de fuites de gaz
chaque fois que vous débranchez et rebranchez un raccord
de gaz.
Remarque: l’étanchéité de tous les branchements réalisés à l’usine a été
soigneusement vérifi ée. Les brûleurs ont été soumis à un essai de fl amme. Par mesure
de sécurité, vérifi ez qu’aucun raccord ne fuit avant de vous servir de votre barbecue à
gaz Weber. Un raccord de gaz peut en effet avoir été desserré ou endommagé en cours
de transport et de manutention.
AVERTISSEMENT: procédez à ces opérations de détection
de fuites même si votre barbecue a été monté par un
revendeur ou en magasin.
Il vous faut: de l’eau savonneuse et un chiffon ou une brosse pour l’appliquer.
Remarque: dans la mesure où certaines solutions utilisées pour contrôle d’étanchéité,
y compris l’eau savonneuse, peuvent être légèrement corrosives, il convient de rincer
tous les branchements à l’eau après une recherche de fuites.
Pour détecter les fuites : assurez-vous que tous les brûleurs sont éteints. Ouvrez
l’arrivée de gaz.
AVERTISSEMENT: n’allumez pas les brûleurs lorsque vous
contrôlez l’étanchéité.
Recherchez les fuites en mouillant les branchements avec de l’eau savonneuse et en
surveillant l’apparition éventuelle de bulles. Si des bulles se forment ou si une bulle de
savon grossit, il y a une fuite.
SPIRIT E/SP210 & 310
(1)
(2)
(3)
WWW.WEBER.COM
®
Page 31

INSTRUCTIONS POUR LE GAZ
Vérifi ez :
1) Le raccordement du tuyau au collecteur.
2) Le raccordement du détendeur à la bouteille.
AVERTISSEMENT: en cas de fuite au niveau du
raccordement (1), resserrez le raccord à l’aide d’une clé
et revérifi ez-le pour voir s’il fuit en le mouillant avec de
l’eau savonneuse. Si une fuite persiste après le resserrage
du raccord, COUPEZ l’arrivée de gaz. NE VOUS SERVEZ
PAS DU BARBECUE. Veuillez contacter le Représentant
du service client de votre région à l’aide des coordonnées
disponibles sur notre site Internet. Connectez-vous sur
www.weber.com
Vérifi ez :
3) Les raccordements des robinets au collecteur.
4) Le raccordement du tuyau au détendeur.
AVERTISSEMENT: en cas de fuite au niveau des
raccordements (2), (3) ou (4), COUPEZ l'arrivée de gaz. NE
VOUS SERVEZ PAS DU BARBECUE. Veuillez contacter le
Représentant du service client de votre région à l’aide des
coordonnées disponibles sur notre site Internet. Connectez-
vous sur www.weber.com
Une fois le contrôle d’étanchéité terminé, COUPEZ l’alimentation en gaz à la source et
rincez les raccords à l’eau.
®
.
®
.
31
31
SPIRIT E/SP210 & 310
(1)
(2)
(3)
REMPLISSAGE DE LA BOUTEILLE DE PROPANE LIQUÉFIÉ
Nous recommandons de faire remplir la bouteille de propane liquéfi é avant qu’elle soit
complètement vidée.
Retrait de la bouteille de propane liquéfi é
1) Fermez le robinet de la bouteille (en le tournant vers la droite).
2) Dévissez le raccord de détendeur en le tournant (à la main uniquement) vers la
gauche.
3) Desserrez l’écrou à oreilles de verrouillage de la bouteille et relevez le dispositif de
verrouillage pour qu’il ne vous gêne pas.
4) Soulevez la bouteille pour l’enlever.
Pour faire remplir la bouteille, amenez-la chez un revendeur de propane liquéfi é.
AVERTISSEMENT: nous vous recommandons de faire
remplir votre bouteille chez un fournisseur agréé de
propane liquéfi é par un employé qualifi é qui procède au
remplissage en se basant sur le poids. UN REMPLISSAGE
INCORRECT EST DANGEREUX.
ATTENTION: Mettre un bouchon antipoussière sur la sortie
du robinet d’une bouteille qui n’est pas utilisée. Utiliser
uniquement le type de bouchon antipoussière fourni avec
le robinet de la bouteille. D’autres types de bouchons
pourraient ne pas être étanches et permettre des fuites de
propane.
CONTRÔLE DU NIVEAU DE COMBUSTIBLE CONTENU DANS LA
BOUTEILLE
Contrôlez le niveau de combustible en regardant la ligne colorée indiquant le niveau qui
se trouve sur le côté de la jauge de combustible.
1) Vide
2) À moitié vide
3) Pleine
*Il se peut que le barbecue représenté sur
l’illustration soit légèrement différent du
modèle acheté.
(3)
(1)
(1)
(4)
(2)
(2)
(3)
CONSEILS DE MANIPULATION DES BOUTEILLES DE PROPANE
LIQUÉFIÉ EN TOUTE SÉCURITÉ
• Le propane liquéfi é est un produit pétrolier, au même titre que l’essence et le gaz
naturel. Le propane est gazeux à température et pression normales. Lorsqu’il est
sous pression modérée dans une bouteille, il prend une forme liquide. Lorsque la
pression se dissipe, le liquide se vaporise rapidement et se gazéfi e.
• Le propane liquéfi é a une odeur semblable à celle du gaz naturel. Vous devriez
pouvoir la reconnaître.
• Le propane liquéfi é est plus lourd que l’air. En cas de fuite, il risque de se concentrer
dans les zones basses, ce qui l’empêche de se dissiper.
• Faites remplir la bouteille en l'amenant dans un centre de véhicules de loisirs ou
consultez la rubrique « Gaz propane » de l’annuaire du téléphone pour y trouver
d’autres fournisseurs de propane liquéfi é.
AVERTISSEMENT: nous vous recommandons de faire
remplir votre bouteille chez un fournisseur agréé de
WWW.WEBER.COM
®
propane liquéfi é par un employé qualifi é qui procède au
remplissage en se basant sur le poids. UN REMPLISSAGE
INCORRECT EST DANGEREUX.
• Une bouteille neuve doit être purgée de l’air qu’elle contient avant d’être remplie pour
la première fois. Votre fournisseur de propane liquéfi é est équipé pour procéder à
cette opération.
• La bouteille de propane liquéfi é doit être mise en place, transportée et rangée en
position verticale. Ne la laissez pas tomber et manipulez-la avec précaution.
• Ne rangez ni ne transportez jamais la bouteille de propane liquéfi é dans un endroit
où les températures peuvent dépasser 51 °C (lorsqu’elle devient trop chaude pour
être touchée - par exemple, ne laissez jamais une bouteille dans une voiture s’il fait
chaud).
Remarque: une bouteille remplie permet de cuisiner pendant 20 heures environ dans
des conditions d’utilisation normales. La jauge de combustible indique la quantité de
propane restant dans la bouteille que vous pouvez ainsi faire remplir avant qu’elle soit
vide. Il n’est pas nécessaire d’attendre qu’elle soit vide pour la faire remplir.
Page 32

32
INSTRUCTIONS POUR LE GAZ
• Manipulez les bouteilles de propane liquéfi é « vides » avec autant de précaution
que les pleines. Même quand la bouteille ne contient plus de liquide, il se peut qu’il
y reste du gaz sous pression. Fermez toujours le robinet de la bouteille avant de
débrancher cette dernière.
ATTENTION: Mettre un bouchon antipoussière sur la sortie
du robinet d’une bouteille qui n’est pas utilisée. Utiliser
uniquement le type de bouchon antipoussière fourni avec
le robinet de la bouteille. D’autres types de bouchons
pourraient ne pas être étanches et permettre des fuites de
propane.
• N'utilisez pas une bouteille de propane liquéfi é endommagée. Les bouteilles
cabossées ou rouillées, ainsi que celles dont le robinet est endommagé, peuvent
être dangereuses et doivent être remplacées immédiatement par des neuves.
Bouteille(s) de propane liquéfi é
• Le raccordement du tuyau à la bouteille doit faire l’objet d’un contrôle d’étanchéité
chaque fois que la bouteille est rebranchée. Par exemple, effectuer ce contrôle après
chaque remplissage de la bouteille.
• Veillez à ce que le détendeur soit monté avec son petit évent en bas de façon à ce
que de l’eau ne puisse pas y pénétrer. Cet évent doit être libre de crasse, de graisse,
d’insectes, etc.
• La bouteille de propane liquéfi é et les raccords fournis avec votre barbecue à gaz
Weber ont été conçus et contrôlés pour garantir leur conformité aux spécifi cations
du gouvernement américain, de l’American Gas Association et des Underwriters
Laboratories.
MODE D’EMPLOI
ALLUMAGE
Des instructions d’allumage succinctes sont données sur le panneau de commande.
DANGER
Si vous n'ouvrez pas le couvercle pour allumer le barbecue
ou n'attendez pas 5 minutes pour laisser le gaz se dissiper
si le barbecue ne s'allume pas, vous risquez de provoquer
une fl ambée soudaine explosive pouvant occasionner des
blessures graves, voire mortelles.
Spécifi cations applicables aux bouteilles de propane liquéfi é
AVERTISSEMENT: les bouteilles de rechange doivent
pouvoir se raccorder au détendeur fourni avec ce barbecue.
Remarque: votre revendeur peut vous aider à trouver une bouteille de rechange
pouvant se raccorder à votre barbecue.
• Tous les systèmes d’alimentation par bouteille de propane liquéfi é doivent être
équipés d’’un collet destiné à protéger le robinet de la bouteille.
• La bouteille de propane liquéfi é doit être du modèle 9 kg (46,3 cm de haut et 31,1 cm
de diamètre).
• La bouteille de propane liquéfi é doit être fabriquée et marquée conformément aux
spécifi cations qui lui sont applicables.
1
DOT 4BA240
Système d’allumage Crossover
Remarque : le système d’allumage Crossover allume le brûleur avant au moyen
d’une étincelle jaillissant de l’électrode qui se trouve dans la chambre d’allumage Gas
Catcher™. Vous produisez l’énergie nécessaire pour produire l’étincelle en appuyant
sur le bouton d’allumage Crossover jusqu’à ce qu’il émette un déclic.
®
00/06
2
AVERTISSEMENT: avant chaque utilisation du barbecue,
vérifi ez que le tuyau n’est pas entaillé, fendillé, usé par
frottement ni coupé. S’il se révèle endommagé en quoi que
ce soit, ne vous servez pas du barbecue. Ne le remplacez
que par un tuyau de rechange agréé par Weber. Veuillez
contacter le Représentant du service client de votre région
à l’aide des coordonnées disponibles sur notre site Internet.
Connectez-vous sur www.weber.com®.
1) Ouvrez le couvercle.
2) Assurez-vous que toutes les manettes de réglage sont en position OFF (fermée).
(Enfoncez chaque manette de réglage et tournez-la vers la droite pour vérifi er
qu’elles sont en position fermée.)
AVERTISSEMENT: vous devez mettre les manettes de
réglage en position OFF (fermée) avant d’ouvrir le robinet de
la bouteille de propane liquéfi é. Sinon, lorsque vous ouvrez
ce robinet, le dispositif de contrôle de débit excessif de gaz
s’active pour limiter le débit du gaz sortant de la bouteille.
Si cela se produit, FERMEZ le robinet de la bouteille de
propane liquéfi é et tournez les manettes de réglage en
position OFF (fermée), puis recommencez l’opération.
DANGER
Lorsque le dispositif de contrôle de débit excessif de gaz est
activé, une petite quantité de gaz continue à alimenter les
brûleurs. Attendez au moins 5 minutes après avoir FERMÉ
le robinet de la bouteille et tourné les manettes de réglage
en position OFF (fermée) pour permettre au gaz de se
dissiper avant d’allumer le barbecue. Sinon, vous risquez de
provoquer une fl ambée soudaine explosive pouvant entraîner
des blessures graves, voire mortelles.
ALLUMAGE DU BRULEUR PRINCIPAL
SPIRIT E/SP-
1
210 & 310
*Il se peut que le barbecue représenté sur
l’illustration soit légèrement différent du
modèle acheté.
6
2
7
5
3
4
WWW.WEBER.COM
®
Page 33

MODE D’EMPLOI
33
3) Ouvrez la bouteille en tournant son robinet vers la gauche.
AVERTISSEMENT: ne vous penchez pas au-dessus du
barbecue ouvert. N'approchez pas votre visage ni le reste de
votre corps à moins de 30 centimètres du trou d’allumage
par allumette quand vous mettez le barbecue en marche.
4) Appuyez sur la manette de réglage du brûleur avant et tournez-la sur START/HI
(Allumage/Maximum).
5) Appuyez plusieurs fois sur le bouton d’allumage Crossover jusqu’à ce qu’il émette un
déclic à chaque fois.
6) Vérifi ez que le brûleur est allumé en regardant par le trou d’allumage par allumette
qui se trouve sur le devant de la cuve. Vous devez apercevoir des fl ammes.
AVERTISSEMENT: si le brûleur ne s’allume pas, tournez
la manette de réglage du brûleur avant en position OFF
(fermée) et attendez 5 minutes pour permettre au gaz de se
dissiper avant de réessayer ou d’allumer le brûleur avec une
allumette.
7) Une fois que le brûleur AVANT est allumé, vous pouvez allumer le ou les autres.
Remarque: allumez toujours le brûleur AVANT en premier. Le ou les autres sont allumés
à partir de lui.
EXTINCTION
Appuyez sur chaque manette de réglage et tournez-la vers la droite en position OFF
(Fermé), puis COUPEZ l’alimentation en gaz à la source.
ALLUMAGE DU BRULEUR PRINCIPAL
SPIRIT E/SP-
1
210 & 310
*Il se peut que le barbecue représenté sur
l’illustration soit légèrement différent du
modèle acheté.
6
33
2
4
7
5
3
ALLUMAGE MANUEL
DANGER
Le fait de ne pas ouvrir le couvercle lors de l'allumage du
barbecue ou de ne pas attendre 5 minutes pour laisser
le gaz se dissiper si le barbecue ne s'allume pas risque
de provoquer une fl ambée soudaine explosive pouvant
entraîner des blessures graves, voire mortelles.
1) Ouvrez le couvercle.
2) Assurez-vous que toutes les manettes de réglage sont en position OFF (fermée).
(Enfoncez chaque manette de réglage et tournez-la vers la droite pour vérifi er
qu’elles sont en position fermée.)
AVERTISSEMENT: vous devez mettre les manettes de
réglage en position OFF (fermée) avant d’ouvrir le robinet de
la bouteille de propane liquéfi é. Sinon, lorsque vous ouvrez
ce robinet, le dispositif de contrôle de débit excessif de gaz
s’active pour limiter le débit du gaz sortant de la bouteille.
Si cela se produit, FERMEZ le robinet de la bouteille de
propane liquéfi é et tournez les manettes de réglage en
position OFF (fermée), puis recommencez l’opération.
DANGER
Lorsque le dispositif de contrôle de débit excessif de gaz
est activé, une petite quantité de gaz continue à alimenter
les brûleurs. Attendez au moins 5 minutes après avoir
FERMÉ le robinet de la bouteille et tourné les manettes de
réglage en position OFF (fermée) pour permettre au gaz de
se dissiper avant d’allumer le barbecue. Sinon, vous risquez
de provoquer une fl ambée soudaine explosive pouvant
entraîner des blessures graves, voire mortelles.
ALLUMAGE DU BRULEUR PRINCIPAL
SPIRIT E/SP-
1
210 & 310
4,6
*Il se peut que le barbecue représenté sur
l’illustration soit légèrement différent du
modèle acheté.
2
7
3
5
WWW.WEBER.COM
®
Page 34

34
MODE D’EMPLOI
3) Ouvrez le robinet de la bouteille en le tournant vers la gauche.
4) Insérez le porte-allumette avec l’allumette allumée dans le trou d’allumage à
l’allumette situé à l’avant du boîtier de cuisson.
AVERTISSEMENT: ne vous penchez pas au-dessus du
barbecue ouvert. N'approchez pas votre visage ni le reste de
votre corps à moins de 30 centimètres du trou d’allumage
par allumette quand vous mettez le barbecue en marche.
5) Appuyez sur la manette de réglage du brûleur avant et tournez-la sur START/HI
(Allumage/Maximum).
6) Vérifi ez que le brûleur est allumé en regardant par le trou d’allumage par allumette
qui se trouve sur le devant de la cuve. Vous devez apercevoir des fl ammes.
AVERTISSEMENT: si le brûleur ne s’allume pas, tournez
la manette de réglage du brûleur avant en position OFF
(fermée) et attendez 5 minutes pour permettre au gaz de se
dissiper avant de réessayer ou d’allumer le brûleur avec une
allumette.
7) Une fois que le brûleur AVANT est allumé, vous pouvez allumer l’autre.
Remarque: allumez toujours le brûleur AVANT en premier. Le ou les autres sont allumés
à partir de lui.
EXTINCTION
Appuyez sur chaque manette de réglage et tournez-la vers la droite en position OFF
(Fermé), puis COUPEZ l’alimentation en gaz à la source.
DÉPANNAGE
ALLUMAGE DU BRULEUR PRINCIPAL
SPIRIT E/SP-
1
210 & 310
4,6
*Il se peut que le barbecue représenté sur
l’illustration soit légèrement différent du
modèle acheté.
2
7
3
5
PROBLÈME VÉRIFICATION SOLUTION
Les brûleurs produisent une fl amme jaune ou
orange et il se dégage une odeur de gaz.
Les brûleurs ne s’allument pas ou ils ont une
petite fl amme vacillante en position HI (Maximum)
ou la température du barbecue n’atteint que 127 à
149 °C en position HI.
Le brûleur ne s’allume pas, ou la fl amme est
basse en position HI (Maximum).
Des fl ambées soudaines se produisent:
ATTENTION : Ne garnissez pas le
plateau inférieur d’une feuille d’aluminium.
Les fl ammes des brûleurs sont irrégulières.
Les fl ammes sont basses alors que le brûleur
est réglé sur HI (Maximum). Les fl ammes
n’apparaissent pas sur toute la longueur du tube
de brûleur.
L’intérieur du couvercle paraît «s’écailler». (Cela
ressemble à un écaillage de peinture.)
Si vous ne parvenez pas à résoudre les problèmes grâce à ces méthodes, veuillez contacter le Représentant du service client de votre région à l’aide des
coordonnées disponibles sur notre site Internet. Connectez-vous sur www.weber.com®.
Inspecter les écrans pare-araignées/ insectes Weber® pour
déceler les obstructions possibles. (Blocage des orifi ces.)
Il se peut que le dispositif de contrôle de débit excessif,
qui fait partie du système de raccordement du barbecue
à la bouteille, se soit déclenché.
Le niveau de propane liquéfi é est-il trop
bas ou la bouteille est-elle vide ?
Le tuyau de combustible est-il plié ou vrillé ? Redressez le tuyau de combustible.
Faut-il allumer le brûleur de gauche avec une allumette ? En cas d’allumage du brûleur de gauche avec une allumette,
Préchauffez-vous le barbecue à gaz de
la manière prescrite ?
Les grils de cuisson et les barres Flavorizer
couverts d’une épaisse couche de graisse brûlée ?
Le plateau inférieur est-il sale, empêchant ainsi la
graisse de s’écouler dans la lèchefrite ?
Les brûleurs sont-ils propres ?
®
sont-ils
Nettoyer les écrans parearaignées/insectes Weber®. (Voir la
section Entretien annuel.)
Pour réarmer le dispositif de contrôle de débit excessif, tournez toutes
les manettes de réglage et le robinet de la bouteille en position OFF
(Arrêt). Débranchez le détendeur de la bouteille. Tournez les manettes
de réglage en position HI (Maximum). Attendez pendant au moins
1 minute, puis remettez les manettes de réglage en position OFF.
Raccordez le détendeur à la bouteille. Ouvrez doucement le robinet de
cette dernière. Reportezvous à la rubrique « Instructionsd’allumage ».
Faites remplir la bouteille de propane liquéfi é.
®
vérifi ez le système d’allumage Crossover
Pour le réchauffage, les trois brûleurs doivent être sur HI
(maximum) pendant 10 à 15 minutes.
Nettoyez-les à fond. (Voir la section «Nettoyage».)
Nettoyez le plateau inférieur.
.
Nettoyez les brûleurs. (Voir la section “Maintenance
genérale”)
Le couvercle est en acier émaillé. Il n’est pas peint. Il
ne peut donc pas s’écailler. Les écailles que vous voyez
sont de la graisse brûlée, qui s’est transformée en
carbone et s’écaille.
CECI N’EST PAS UN DÉFAUT.
(Voir la section «Nettoyage».)
WWW.WEBER.COM
®
Page 35

ENTRETIEN
35
ÉCRANS PARE-ARAIGNÉES/INSECTES
Votre barbecue au gaz Weber®, comme tout autre appareil au gaz utilisé à l’extérieur,
attire les araignées et autres insectes. Ils peuvent se réfugier dans la section des
venturis (Venturi (1), obturateur d’air (2), nervure des venturis (3)) des tubes des
brûleurs. Cela entrave l’acheminement normal du gaz et peut amener celui-ci à refouler
hors de l’obturateur d’air. Une telle situation pourrait provoquer un incendie dans les
obturateurs d’air et autour de ceux-ci, sous le panneau de commande, causant des
dommages sérieux à votre barbecue.
L’obturateur d’air du tube du brûleur est muni d’un écran en acier inoxydable (1), dont le
but est d’empêcher les araignées et autres insectes d’accéder aux tubes des brûleurs
par les ouvertures des obturateurs d’air.
Nous vous recommandons d’inspecter les écrans pare-araignées/insectes au
moins une fois par an. (Voir la section Entretien annuel.) Inspecter également et
nettoyer les écrans pare-araignées/insectes si les symptômes suivants venaient
jamais à se manifester:
1) Odeur de gaz associée à des fl ammes de brûleurs jaunâtres et faibles.
2) Le barbecue n’atteint pas la température voulue.
3) Le barbecue chauffe inégalement.
4) Un ou plusieurs des brûleurs ne s’allument pas.
DANGER
Le fait d’ignorer les symptômes mentionnés ci-dessus peut
entraîner un incendie qui pourrait provoquer de graves
blessures ou la mort, ainsi que des dommages matériels.
INSPECTION ET NETTOYAGE DES ÉCRANS PARE-ARAIGNÉES/INSECTES
Pour inspecter les écrans pare-araignées/insectes, retirer le panneau de commande.
S’il y a de la poussière ou de la saleté sur les écrans, retirer les brûleurs pour nettoyer
les écrans. Voir Entretien, remplacement des brûleurs principaux. Brosser légèrement
les écrans pare-araignées/insectes à l’aide d’une brosse en soies douce (p. ex., une
vieille brosse à dents).
ATTENTION: Ne pas utiliser d’outils durs ou acérés. Ne pas
déloger les écrans pare-araignées/insectes ou élargir le
treillis des écrans.
Tapoter légèrement le brûleur pour déloger les débris et la saleté du tube. Une fois les
écrans pare-araignées/insectes et les brûleurs nettoyés, replacer les brûleurs.
Si les écrans pare-araignées/insectes sont endommagés ou ne peuvent être nettoyés,
veuillez contacter le Représentant du service client de votre région à l’aide des
coordonnées disponibles sur notre site Internet. Connectez-vous sur www.weber.com®.
FLAMME DES BRÛLEURS PRINCIPAUX
Le mélange d’air et de gaz des brûleurs du barbecue à gaz Weber a été réglé à l’usine.
La fl amme correcte est illustrée.
1) Tube de brûleur
2) Pointes parfois jaunâtres
3) Bleu clair
4) Bleu foncé
Si les fl ammes ne paraissent pas uniformes sur toute la longueur du tube de brûleur,
procédez comme suit pour nettoyer ce dernier.
(1)
(2)
35
1
2
3
4
NETTOYAGE DES BRÛLEURS PRINCIPAUX
Coupez l’arrivée de gaz. Déposez le collecteur.
Regardez à l’intérieur de chaque brûleur en vous éclairant d’une lampe de poche.
Nettoyez l’intérieur des brûleurs avec un morceau de fi l de fer (un cintre redressé fera
l’affaire). Vérifi ez et nettoyez l’ouverture du registre de ventilation aux extrémités des
brûleurs. Vérifi ez et nettoyez les orifi ces au bas des robinets. Servez-vous d’une brosse
en laiton pour nettoyer l’extérieur des brûleurs afi n de garantir l’ouverture totale des
orifi ces des brûleurs.
ATTENTION: n'agrandissez pas les orifi ces des brûleurs lors
du nettoyage de ces derniers.
WWW.WEBER.COM
®
Page 36

36
ENTRETIEN
REMPLACEMENT DES BRÛLEURS PRINCIPAUX
1) Votre barbecue au gaz Weber doit être en position fermée et refroidi.
2) Fermer le gaz à la source.
3) Pour retirer le panneau de commande: enlever les manettes de réglage des brûleurs.
Retirer les vis qui maintiennent le panneau de commande en place. Soulever le
panneau de commande.
4) Décrocher le support du collecteur (1) et dévisser les deux écrous à oreilles (2) qui
fi xent le collecteur à la cuve. Retirer l’ensemble collecteur et robinets des brûleurs et
le déposer soigneusement à terre.
5) Faire coulisser le boîtier des brûleurs au-dessous de la vis guide et de la rondelle (1)
dans les coins de la cuve.
6) Soulever et faire tourner légèrement le boîtier des brûleurs, afi n de séparer le tuyau
de raccordement (1) des brûleurs. Retirer les brûleurs de la cuve.
7) Pour réinstaller les brûleurs, appliquer la procédure inverse de 3) à 7).
ATTENTION: Les orifi ces des brûleurs (1) doivent être
disposés correctement au-dessus des orifi ces des robinets
(2).
Vérifi er l’assemblage avant de fi xer le collecteur à sa place.
ATTENTION: Après avoir réinstallé les tuyauteries de
gaz, elles doivent être vérifi ées à l’aide d’une solution
savonneuse pour déceler toute fuite avant que le barbecue
ne soit utilisé. (Voir la section Vérifi cation des fuites de gaz.)
(1)
(2)
)
(2)
FONCTIONNEMENT DU SYSTÈME D’ALLUMAGE CROSSOVER®
Si le système d’allumage Crossover n’allume pas le brûleur gauche, allumez ce dernier
avec une allumette. S’il s’allume alors, vérifi ez le système d’allumage Crossover.
• Vérifi ez que les fi ls blanc (1) et noir (2) sont tous deux raccordés correctement.
• Vérifi ez que le bouton d’allumage Crossover pousse l’allumeur (bouton) vers le bas
et revient en position haute.
• Vérifi ez l’allumeur pour voir s’il a du jeu dans le châssis. Resserrez-le si nécessaire;
voir l’étape
« Mise en place de l’allumeur » pour la façon correcte de procéder.
Si le système d’allumage Crossover® ne s’allume toujours pas, veuillez contacter le
Représentant du service client de votre région à l’aide des coordonnées disponibles sur
notre site Internet. Connectez-vous sur www.weber.com®.
(2)
(1)
SPIRIT E/SP210 & 310
(1) (2)
WWW.WEBER.COM
®
Page 37

ATTENTION: This product has been safety tested and is only certifi ed for use in a specifi c country. Refer to country
designation located on outer carton.
These parts may be gas carrying or gas burning components. Please contact Weber-Stephen Products Co., Customer Service Department for genuine WeberStephen Products Co. replacement part(s) information.
WARNING: Do not attempt to make any repair to gas carrying or gas burning components without contacting Weber-
Stephen Products Co., Customer Service Department. Your actions, if you fail to follow this product Warning, may cause a
fi re or an explosion resulting in serious personal injury or death and damage to property.
ATENCIÓN: A este producto se le han realizado pruebas de seguridad y ha sido certifi cado para usarse en un país
específi co. Refi érase al país indicado en la parte externa del cartón de empaque.
Estas partes pueden ser componentes que transporten gas o lo quemen. Por favor póngase en contacto con el Departamento de Atención al Cliente de WeberStephen Products Co. para obtener información sobre las partes de repuesto Weber-Stephen Products Co. genuinas.
ADVERTENCIA: No trate de realizar reparación alguna a los componentes que transporten o quemen gas sin antes ponerse
en contacto con el Departamento de Atención al Cliente de Weber-Stephen Products Co. Si no llegase a acatar esta
advertencia, sus acciones podrían causar un fuego o una explosión que resulte en lesiones personales serias o la muerte o
daños a la propiedad.
ATTENTION: Ce produit a fait l’objet de tests de sécurité et est certifi é pour une utilisation dans un pays particulier unique-
ment. Vérifi ez la désignation de pays située sur le carton d’emballage.
Ces pièces peuvent contenir du gaz ou être des éléments dont la combustion produit du gaz. Veuillez consulter le Service clientèle de Weber-Stephen Products Co.
pour des renseignements sur les pièces de rechange originales de Weber-Stephen Products Co..
MISE EN GARDE: Ne tentez pas d’effectuer des réparations sur des éléments contenant du gaz ou sur des éléments dont
la combustion produit du gaz sans contacter le service clientèle de Weber-Stephen Products Co.. Si vous ne suivez pas la
présente Mise en garde relative au produit, vos actions risquent de provoquer un incendie ou une explosion entraînant des
blessures physiques graves voire un décès ainsi que des dégâts matériels.
Page 38

®
®
®
®
®
®
WEBER-STEPHEN PRODUCTS CO.
www.weber.com
©2007 The following trademarks are registered in the name of Weber-Stephen Products Co., an Illinois corporation, located at 200 East Daniels Road, Palatine, Illinois 60067 U.S.A.
Australia; Smokey Joe, Weber, Kettle Silhouette
tion, Botswana; Weber, Canada; Smokey Joe, Genesis, China; Kettle Silhouette
Smokey Joe, Weber, One-Touch, Germany; Smokey Joe, Weber, One-Touch, Greece; Smokey Joe, Ireland; Kettle Silhouette
Joe, Weber, Korea; Smokey Joe, Weber, New Zealand; Weber, Smokey Joe, Nigeria; Weber, Norway; Smokey Joe, Weber, Portugal; Weber, South Africa: Smokey Joe, Weber, Kettle
Confi guration, Spain; Smokey Joe, Weber, Sweden; Kettle Silhouette
One-Touch, U.S.A..; Kettle Confi guration, Kettle Silhouette
vorizer, Crossover, Flamgo, Performer, Rapidfi re, Tuck ‘N Carry, Jumbo Joe, Bar-B-Kettle, Master-Touch, Spirit, Grill Out, Summit, Platinum, 1-800-Grill-Out, Ranch, Matchless Flame,
Zimbabwe; Weber, Kettle Confi guration, Kettle Silhouette
Made in China, Hecho en China, Fabriqué en Chine
, Genesis, Austria; Kettle Silhouette®, Smokey Joe, Weber, Benelux; Kettle Silhouette®, Smokey Joe, Weber, Compact Grill Confi gura-
, Denmark; Kettle Silhouette®, Smokey Joe, Weber, Finland; Smokey Joe, France; Kettle Silhouette®,
, Smokey Joe, Switzerland; Kettle Silhouette®, Smokey Joe, Weber, United Kingdom; Smokey Joe, Weber, Weber
, Smokey Joe, Weber, One-Touch, Firespice, Go-Anywhere, U.S.A.;Kettle Confi guration, Kettle Silhouette, Genesis, Fla-
.
®
, Smokey Joe, Italy; Smokey Joe, Weber, Japan; Smokey
Page 39

FOUR GOOD REASONS TO REGISTER YOUR WEBER® GRILL RIGHT NOW
CUATRO BUENAS RAZONES PARA REGISTRAR SU ASADOR WEBER
QUATRE BONNES RAISONS D’ENREGISTRER VOTRE GRILL WEBER
Register your grill online at www.weber.com® (If you register online, you do not need to send in this registration card.)
Registre su asador en línea en www.weber.com® (Si usted se registra en línea, no necesita enviar esta tarjeta de registro.)
Enregistrez votre grill en ligne sur www.weber.com® (Si vous vous inscrivez en ligne, vous n’avez pas besoin de retourner la
présente carte d’enregistrement.)
®
AHORA MISMO
®
DES MAINTENANT
▲
Spring. Summer. Fall. Winter. Four FREE issues of Weber Nation™, our hot e-mail newsletter all about grilling, will be coming your way. Each issue is packed with grilling tips and advice, triple-tested recipes, and
everything you need to know to become a bona fide Weber Grilling Guru. All you have to do to activate your subscription is log on to www.weber.com
®
and register your grill. We’ll ask you a few short questions about
the kind of food you like to grill and the topics that interest you so we can serve up your newsletter just the way you like it. Whether you are just starting out or a practiced hand at the grill, you’ll get just what you need
to perfect your skills. So don’t put it off. Register now. Your hunger (and your pride) will thank you for it.
Primavera. Verano. Otoño. Invierno. Le estarán llegando cuatro ediciones GRATUITAS de Weber Nation™, nuestro candente boletín por correo electrónico acerca de todo lo concerniente a cocinar con asadores.
Cada edición viene repleta con sugerencias y consejos prácticos respecto al cocinar con asadores, recetas probadas por triplicado, además de todo lo que usted necesita saber para convertirse en un genuino Guru
Weber en Asar. Lo único que necesita hacer para activar su suscripción es conectarse a www.weber.com
asar y sobre los tópicos de su interés de manera que podamos servirle un boletín justo a su gusto. Bien sea que usted esté empezando a cocinar con asador o sea un veterano en el tema, usted recibirá justo lo que
®
y registrar su asador. Le preguntaremos algunas breves preguntas sobre el tipo de comidas que le gusta
necesita para perfeccionar sus destrezas. Así que no lo deje para más tarde. Inscríbase ya Su apetito (y su orgullo) se lo agradecerán.
Printemps. Été. Automne. Hiver. Vous recevrez quatre exemplaires GRATUITS de Weber Nation™, notre lettre d’information électronique contenant toutes les actualités sur les grillades. Chaque numéro regorge
d’astuces et de conseils pour les grillades, de recettes éprouvées, plus tout ce que vous devez savoir pour devenir un véritable Gourou des grillades Weber. Pour activer votre inscription, il vous suffit de vous connecter
sur www.weber.com
une lettre d’information adaptée à vos goûts. Que vous débutiez ou que vous soyez expérimenté dans le domaine des grillades, vous recevrez juste ce dont vous avez besoin pour perfectionner vos compétences. Alors
®
et d’enregistrer votre grill. Nous vous poserons quelques questions brèves sur le type d’aliments que vous aimez griller et sur les thèmes qui vous intéressent afin que nous puissions vous envoyer
n’attendez pas. Inscrivez-vous dès maintenant. Votre appétit (et votre fierté) vous en remercieront.
1. How Can We Reach You? / ¿Cómo Podemos Ponernos En Contacto Con Usted? / Comment Pouvons-nous Vous Joindre?
First Name / Nombre / Prénom M.I. / Inicial / Seconde Initiale Last Name / Apellido / Nom
Address / Dirección / Adresse Apt. # / Apt. # / Appt. # City / Ciudad / Ville
State / Estado / État Zip Code / Código Postal / Code Postal Telephone / Teléfono / Téléphone
()
E-mail Address / Dirección De Correo Electrónico / Adresse E-mail
2. How would you prefer for us to contact you? / ¿Cómo preferiría que nos
pongamos en contacto con usted? / Comment préfèreriez-vous que nous
vous contactions?
1. By US mail / Por correo / Par courrier postal américain
2.
By e-mail / Por correo electrónico / Par e-mail
3.
By phone / Por teléfono / Par téléphone
4.
No preference / Ninguna preferencia / Aucune préférence
5.
Please don’t contact me unless it is in regards to a technical matter related to my grill /
Por favor no se pongan en contacto conmigo a menos que sea sobre un tema técnico
relacionado con el asador / Merci de ne me contacter que si votre appel concerne un
problème technique concernant mon grill
6. I prefer to receive information in Spanish / Prefiero recibir información en español / Je
préfère recevoir des informations en espagnol
3. When did you buy your grill? / ¿Cuándo compró usted el asador? / Quand
avez-vous acheté votre grill?
Month / Mes / Mois Day / Día / Jour Year / Año / Année
4. Without tax, how much did you pay for your grill? / ¿Sin impuesto, cuánto
pagó por el asador? / Hors taxes, combien avez-vous payé votre grill?
$
.00
5. Where did you buy your grill? / ¿Dónde compró el asador? / Où avez-vous
acheté votre grill?
6. Which model did you purchase? / ¿Qué modelo compró? / Quel modèle
avez-vous acheté?
1. Spirit
2.
7. Have you ever owned a Weber® grill before? / ¿Ha tenido alguna vez antes
un asador Weber
1. Yes Number of Weber® gas grills owned:
Sí Número de asadores de gas Weber
Oui Nombre de grills à gaz Weber
Número de asadores de carbón Weber
Nombre de grills à charbon Weber
2. No, this is my first Weber
mon premier grill Weber
®
E-210
Spirit® E-310
®
? / Avez-vous déjà possédé un grill Weber® auparavant ?
®
possédés:
Number of Weber® charcoal grills owned:
®
grill / No, éste es mi primer asador Weber® / Non, il s’agit de
®
®
que ha tenido:
®
que ha tenido:
®
possédés :
▲
PLEASE CONTINUE ON BACK / POR FAVOR CONTINÚE EN EL REVERSO / VEUILLEZ CONTINUER AU VERSO. ➤ ➤ ➤
Page 40

Thanks for sharing your contact information with us. Again, it all stays strictly
between us — Weber does not share customers’ names with anyone else.
If
you need replacement parts or have questions about the assembly, use or
maintenance of your grill, please call Weber Customer Service.
For purchases made in the U.S.: Product Registration
Para compras hechas en los Estados Unidos:
P.O. Box 1999
Pour les achats effectués aux États-Unis: Palatine, IL 60078-1999
1-800-446-1071
▲
Gracias por compartir su información de contacto con nosotros. De nuevo,
todo quedará estrictamente entre nosotros — Weber no comparte los nombres
de sus clientes con nadie.
Si necesita partes de repuesto o tiene preguntas
acerca del ensamblaje, uso o mantenimiento del su asador, por favor llame al
Departamento de Soporte y Servicio al Cliente de Weber.
Merci de nous avoir communiqué vos coordonnées. Nous vous rappelons que ces
informaitons resteront strictement entre nous : Weber ne communique les noms
de ses clients à personne.
Si vous avez besoin de pièces de rechange ou si vous
avez des questions sur le montage, l’utilisation ou l’entretien de votre grill,
veuillez consulter le Service Client de Weber.
Knowing more about who buys our grills helps the crew back in R&D come
up with new cutting edge Weber products. Please fill in the answers you feel
comfortable sharing with us, and pass by any question you prefer to leave blank.
Thank you for being so generous.
Saber más sobre quién compra nuestros asadores ayuda al equipo de
Investigación y Desarrollo a concebir nuevos productos Weber de avanzada. Por
favor rellene las respuestas con las que se sienta más cómodo en compartir
con nosotros, y pase por alto cualquier pregunta que prefiera dejar en blanco.
Gracias por su generosidad.
Le fait de mieux connaître les personnes qui achètent nos grills aide le
personnel du service R&D à développer de nouveaux produits Weber innovants.
Veuillez répondre aux questions en fournissant les réponses pour lesquelles
vous vous sentez à l’aise, et passez toute question que vous préférez laisser
sans réponse. Nous vous remercions pour votre générosité.
8. Are you: / Es usted: / Vous êtes:
1. Male / Hombre / Un homme 2. Female / Mujer / Une femme
9. Are you married? / ¿Está casado? / Êtes-vous marié?
1. Yes / Sí / Oui 2. No / No / Non
10. What’s your date of birth? / ¿Cuál es su fecha de nacimiento? / Quelle est
votre date de naissance ?
Month / Mes / Mois Day / Día / Jour Year / Año / Année
11. Including yourself, how many people live in your household? / Incluyéndolo
a usted, ¿cuántos viven en su casa? / Vous compris, combien de personnes
composent votre foyer ?
1. Children under 18 (example 01, 02, etc.)
Niños menores de 18 (ejemplo 01, 02, etc.)
Enfants de moins de 18 ans (par exemple, 1 an, 2 ans, etc.)
2.
Adults / Adultos / Adultes
12. Do you own or r ent the place you call home? / ¿Posee o alquila el lugar que
usted llama casa? / Possédez-vous ou louez-vous le lieu que vous appelez
votre domicile ?
1. Own / Propio / Propriétaire 2. Rent / Alquiler / Locataire
13. What’s your annual household income? / ¿Cuánto es su ingreso familiar
anual? / Quel est le revenu annuel de votre foyer ?
1. <$15,000 9. $60,000-$74,999
2.
3.
4.
5. $35,000-$39,999 13. $175,000-$199,999
6.
7.
8.
$15,000-$24,999 10. $75,000-$99,999
$25,000-$29,999 11. $100,000-$149,999
$30,000-$34,999 12. $150,000-$174,999
$40,000-$44,999 14. $200,000-$249,999
$45,000-$49,999 15. $250,000-$299,999
$50,000-$59,999 16. >$300,000
For purchases made in Mexico: Weber-Stephen Products S.A. de C.V.
Para compras hechas en México: Av. López Mateos Sur No. 2077, Local 29
Pour les achats effectués au Mexique: Col. Chapalita 44510 • Guadalajara, Jalisco
Teléfono – (33) 31 22 12 23
R.F.C. WPR 030919 ND4
For purchases made in Canada: Product Registration
Para compras hechas en Canadá: P.O. Box 40530
Pour les achats effectués au Canada: Burlington, ON L7P 4W1
1-800-265-2150
14. Which activities or interests do you have that keep you (or your partner)
busy? / ¿Qué actividades o intereses tiene que lo mantienen a usted (o a
su compañero/a) ocupado? / Quelles sont les activités ou centres d’intérêt
(pour vous ou votre conjoint) qui vous occupent ?
1. Arts or antiques / Artes o
antigüedades / Arts ou antiquités
2.
3.
4.
5.
6.
7.
8.
9.
10.
11.
12.
13.
14.
15.
16.
17.
18. Needlework / Costura /
Bicycling / Ciclismo / Bicyclette
Boating or sailing / Náutica o
velerismo / Bateau ou navigation
Buying videos / Comprar videos /
Achat de vidéos
Subscribing to cable TV /
Suscripción a televisión por cable /
Inscriptions à la TV câblée
Camping or hiking / Acampar o
excursionismo a pie / Camping ou
marche
Attending cultural arts or events /
Asistir a artes culturales o eventos /
Assister à des représentations
artistiques ou à des événements
culturels
Dieting / Hacer dieta / Régime
alimentaire
Donating to charity / Donar a obras
caritativas / Dons à des organismes
caritatifs
Fishing / Pesca / Pêche
Foreign travel / Viajes al extranjero /
Voyages à l’étranger
Gardening or plants / Jardinería o
plantas / Jardinage ou plantes
Golf / Golf / Golf
Grandchildren / Nietos /
Petits-enfants
Houseplants / Plantas de interior /
Plantes d’intérieur
Hunting / Caza / Chasse
Motorcycles / Motocicletas /
Motocyclettes
Couture
19. My cat / Mi gato / Mon chat
20.
21.
22.
23.
24.
25.
26.
27.
28.
29.
30.
31.
32.
33.
34.
35. Other / Otros / Autre
My dog / Mi perro / Mon chien
Listening to music on my CD
player / Escuchar música en mi
tocadiscos CD / Écouter de la
musique sur mon lecteur CD
Listening to music on any
device / Escuchar música en algún
dispositivo / Écouter de la musique
quel que soit l’appareil utilisé
Personal computers / Computadores
personales / Ordinateurs personnels
Photography / Fotografía /
Photographie
Physical fitness or exercise /
Mantenerme en buena forma física o
ejercicio / Fitness ou exercices
physiques
Politics / Política / Politique
Running / Correr / Course
Shopping by mail order or catalog /
Comprar por ventas por correo o
catálogos / Achats par
correspondance ou sur catalogue
Snow skiing / Esquiar sobre nieve /
Ski
Stocks & bonds / Acciones y bonos
/ Actions & obligations
Tennis / Tenis / Tennis
Veterans’ affairs / Asuntos de los
veteranos de guerra / Affaires liées
aux anciens combattants
Walking / Caminar / Marche
Watching sports on TV /
Ver deportes por TV /
Regarder le sport à la TV
(_________________________)
PLACE STICKER HERE / COLOQUE LA ETIQUETA
ADHESIVA AQUÍ / PLACEZ L’AUTOCOLLANT ICI
▲
©2007 Weber-Stephen Products Co. All rights reserved. Printed in U.S.A. 61375 4/06
15. Serial number / número de serie / numéro de série
 Loading...