

Page 1

Getting Started with
TM
Spirent TestCenter
Hardware, Software, License Set Up,
and Upgrades
December 2019
P/N 71-008846 REV A
Page 2

Spirent Communications, Inc.
27349 Agoura Road
Calabasas, CA 91301
USA
Copyright
© 2019 Spirent Communications, Inc. All Rights Reserved.
All of the company names and/or brand names and/or product names referred to in this document, in particular, the
name “Spirent” and its logo device, are either registered trademarks or trademarks of Spirent plc and its subsidiaries,
pending registration in accordance with relevant national laws. All other registered trademarks or trademarks are the
property of their respective owners. The information contained in this document is subject to change without notice
and does not represent a commitment on the part of Spirent Communications. The information in this document is
believed to be accurate and reliable, however, Spirent Communications assumes no responsibility or liability for any
errors or inaccuracies that may appear in the document.
Limited Warranty
Spirent Communications, Inc. (“Spirent”) warrants that its Products will conform to the description on the face of
order, that it will convey good title thereto, and that the Product will be delivered free from any lawful security interest
or other lien or encumbrance.
Spirent further warrants to Customer that hardware which it supplies and the tangible media on which it supplies
software will be free from significant defects in materials and workmanship for a period of twelve (12) months, except
as otherwise noted, from the date of delivery (the “Hardware Warranty Period”), under normal use and conditions.
To the extent the Product is or contains software (“Software”), Spirent also warrants that, if properly used by Customer
in accordance with the Software License Agreement, the Software which it supplies will operate in material
conformity with the specifications supplied by Spirent for such Software for a period of ninety (90) days from the date
of delivery (the “Software Warranty Period”). The “Product Warranty Period” shall mean the Hardware Warranty
Period or the Software Warranty Period, as applicable. Spirent does not warrant that the functions contained in the
Software will meet a specific requirement or that the operation will be uninterrupted or error free. Spirent shall have no
warranty obligations whatsoever with respect to any Software which has been modified in any manner by Customer or
any third party.
Defective Products and Software under warranty shall be, at Spirent's discretion, repaired or replaced or a credit issued
to Customer's account for an amount equal to the price paid for such Product provided that: (a) such Product is
returned to Spirent after first obtaining a return authorization number and shipping instructions, freight prepaid, to
Spirent's location in the United States; (b) Customer provides a written explanation of the defect or Software failure
claimed by Customer; and (c) the claimed defect actually exists and was not caused by neglect, accident, misuse,
improper installation, improper repair, fire, flood, lightning, power surges, earthquake, or alteration. Spirent will ship
repaired Products to Customer, freight prepaid, based on reasonable best efforts after the receipt of defective Products.
Except as otherwise stated, any claim on account of defective materials or for any other cause whatsoever will
conclusively be deemed waived by Customer unless written notice thereof is given to Spirent within the Warranty
Period. Spirent reserves the right to change the warranty and service policy set forth above at any time, after
reasonable notice and without liability to Customer.
TO THE EXTENT PERMITTED BY APPLICABLE LAW, ALL IMPLIED WARRANTIES, INCLUDING BUT
NOT LIMITED TO IMPLIED WARRANTIES OF MERCHANTABILITY, NONINFRINGEMENT AND FITNESS
FOR A PARTICULAR PURPOSE, ARE HEREBY EXCLUDED, AND THE LIABILITY OF SPIRENT, IF ANY,
FOR DAMAGE RELATING TO ANY ALLEGEDLY DEFECTIVE PRODUCT SHALL BE LIMITED TO THE
ACTUAL PRICE PAID BY THE CUSTOMER FOR SUCH PRODUCT. THE PROVISIONS SET FORTH ABOVE
STATE SPIRENT'S ENTIRE RESPONSIBILITY AND CUSTOMER'S SOLE AND EXCLUSIVE REMEDY WITH
RESPECT TO ANY BREACH OF ANY WARRANTY.
Page 3

Contents
About this Guide . . . . . . . . . . . . . . . . . . . . . . . . . . . . . . . . . . . . . . . . . . . . . . . . . . . . . . . . . 5
Introduction . . . . . . . . . . . . . . . . . . . . . . . . . . . . . . . . . . . . . . . . . . . . . . . . . . . . . . . . . . . . . . . . 6
User Documentation . . . . . . . . . . . . . . . . . . . . . . . . . . . . . . . . . . . . . . . . . . . . . . . . . . . . . . . . . 6
Hardware Handling/Cleaning Practices . . . . . . . . . . . . . . . . . . . . . . . . . . . . . . . . . . . . . . . . . . . 8
How to Contact Us. . . . . . . . . . . . . . . . . . . . . . . . . . . . . . . . . . . . . . . . . . . . . . . . . . . . . . . . . . . 9
Getting Started . . . . . . . . . . . . . . . . . . . . . . . . . . . . . . . . . . . . . . . . . . . . . . . . . . . . . . . . . 11
About Chassis Controllers . . . . . . . . . . . . . . . . . . . . . . . . . . . . . . . . . . . . . . . . . . . . . . . . . . . . 12
To Identify Chassis Controller Versions . . . . . . . . . . . . . . . . . . . . . . . . . . . . . . . . . . . . . . . . . 12
About the Virtual Spirent LabServer . . . . . . . . . . . . . . . . . . . . . . . . . . . . . . . . . . . . . . . . . . . . 13
Summary of Installation Procedures . . . . . . . . . . . . . . . . . . . . . . . . . . . . . . . . . . . . . . . . . . . . 13
Procedure 1: Check System Requirements . . . . . . . . . . . . . . . . . . . . . . . . . . . . . . . . . . . . . . . 15
Procedure 2: Verify Contents of Shipment . . . . . . . . . . . . . . . . . . . . . . . . . . . . . . . . . . . . . . . 16
Checking the Chassis Package . . . . . . . . . . . . . . . . . . . . . . . . . . . . . . . . . . . . . . . . . . . . . 16
Checking the Appliance Package . . . . . . . . . . . . . . . . . . . . . . . . . . . . . . . . . . . . . . . . . . . 16
Procedure 3: Install Spirent TestCenter Software . . . . . . . . . . . . . . . . . . . . . . . . . . . . . . . . . . 17
Installing Spirent TestCenter [Microsoft Windows] . . . . . . . . . . . . . . . . . . . . . . . . . . . . 18
Installing Spirent TestCenter [Linux] . . . . . . . . . . . . . . . . . . . . . . . . . . . . . . . . . . . . . . . . 20
Procedure 4: Chassis and Appliance Firmware Support . . . . . . . . . . . . . . . . . . . . . . . . . . . . . 24
Procedure 5: Perform Cable Connections . . . . . . . . . . . . . . . . . . . . . . . . . . . . . . . . . . . . . . . . 26
Procedure 6: Install the Ferrite Block . . . . . . . . . . . . . . . . . . . . . . . . . . . . . . . . . . . . . . . . . . . 32
Procedure 7: Connect Power . . . . . . . . . . . . . . . . . . . . . . . . . . . . . . . . . . . . . . . . . . . . . . . . . . 34
AC Power Operation. . . . . . . . . . . . . . . . . . . . . . . . . . . . . . . . . . . . . . . . . . . . . . . . . . . . . 34
DC Power Operation. . . . . . . . . . . . . . . . . . . . . . . . . . . . . . . . . . . . . . . . . . . . . . . . . . . . . 34
Procedure 8: Set the Chassis IP Address . . . . . . . . . . . . . . . . . . . . . . . . . . . . . . . . . . . . . . . . . 40
Setting the IP Address using the SPT-N4U or SPT-N11U Front Panel Touchscreen . . . 41
Setting the IP Address using the SPT-N4U, SPT-N11U, or SPT-N12U Direct Console Con-
nection. . . . . . . . . . . . . . . . . . . . . . . . . . . . . . . . . . . . . . . . . . . . . . . . . . . . . . . . . . . . . . . . 42
Setting the IP Address using SSH (all chassis). . . . . . . . . . . . . . . . . . . . . . . . . . . . . . . . . 43
Setting the IP Address using Web Client (SPT-N4U, SPT-N11U, or SPT-N12U) . . . . . 44
Setting the SPT-C50 Addressing mode, IP Address, Netmask and Gateway . . . . . . . . . 45
Setting the Netmask and Gateway Values (all chassis) . . . . . . . . . . . . . . . . . . . . . . . . . . 46
Procedure 9: Confirm the Ethernet Link . . . . . . . . . . . . . . . . . . . . . . . . . . . . . . . . . . . . . . . . . 47
Procedure 10: Using the Authenticate Mode (optional) . . . . . . . . . . . . . . . . . . . . . . . . . . . . . 48
Procedure 11: Obtain Your License Key . . . . . . . . . . . . . . . . . . . . . . . . . . . . . . . . . . . . . . . . . 50
Procedure 12: Connect to a DUT/SUT . . . . . . . . . . . . . . . . . . . . . . . . . . . . . . . . . . . . . . . . . . 54
Procedure 13: Configure and Run Tests . . . . . . . . . . . . . . . . . . . . . . . . . . . . . . . . . . . . . . . . . 56
Getting Started with Spirent TestCenter | 3
Page 4

Contents
Appendix A: Install and Configure Spirent Virtual LabServer . . . . . . . . . . . . 57
Spirent Virtual LabServer (vLS) . . . . . . . . . . . . . . . . . . . . . . . . . . . . . . . . . . . . . . . . . . . . . . . 58
Deploying Spirent Virtual LabServer with ESXi . . . . . . . . . . . . . . . . . . . . . . . . . . . . . . . 59
Deploying Spirent Virtual LabServer with KVM. . . . . . . . . . . . . . . . . . . . . . . . . . . . . . . 60
Deploying Spirent Virtual LabServer as a Docker Container . . . . . . . . . . . . . . . . . . . . . 62
Configure Spirent vLS VM. . . . . . . . . . . . . . . . . . . . . . . . . . . . . . . . . . . . . . . . . . . . . . . . 63
Spirent vLS Commands . . . . . . . . . . . . . . . . . . . . . . . . . . . . . . . . . . . . . . . . . . . . . . . . . . 65
Appendix B: Upgrade/Downgrade Procedures . . . . . . . . . . . . . . . . . . . . . . . . . . 69
Introduction . . . . . . . . . . . . . . . . . . . . . . . . . . . . . . . . . . . . . . . . . . . . . . . . . . . . . . . . . . . . . . . 70
Before You Begin . . . . . . . . . . . . . . . . . . . . . . . . . . . . . . . . . . . . . . . . . . . . . . . . . . . . . . . . . . 70
To Verify Support Entitlement . . . . . . . . . . . . . . . . . . . . . . . . . . . . . . . . . . . . . . . . . . . . . . . . 71
About Installing on Computers Running Windows® . . . . . . . . . . . . . . . . . . . . . . . . . . . . . . . 72
Installation Option 1: Using the DVD . . . . . . . . . . . . . . . . . . . . . . . . . . . . . . . . . . . . . . . . . . . 73
To Install Software . . . . . . . . . . . . . . . . . . . . . . . . . . . . . . . . . . . . . . . . . . . . . . . . . . . . . . 73
To Download Firmware Files . . . . . . . . . . . . . . . . . . . . . . . . . . . . . . . . . . . . . . . . . . . . . . 74
Installation Option 2: Using the Website. . . . . . . . . . . . . . . . . . . . . . . . . . . . . . . . . . . . . . . . . 74
To Download and Install Spirent TestCenter Software . . . . . . . . . . . . . . . . . . . . . . . . . . 75
To Download Chassis and Test Module Firmware Files . . . . . . . . . . . . . . . . . . . . . . . . . 75
About Installing on Linux® Workstations. . . . . . . . . . . . . . . . . . . . . . . . . . . . . . . . . . . . . . . . 77
Installation Option 1: Using the DVD . . . . . . . . . . . . . . . . . . . . . . . . . . . . . . . . . . . . . . . . . . . 79
To Copy Files using a Web Browser . . . . . . . . . . . . . . . . . . . . . . . . . . . . . . . . . . . . . . . . 79
To Copy Files using the Command Line . . . . . . . . . . . . . . . . . . . . . . . . . . . . . . . . . . . . . 80
Installation Option 2: Using the Website. . . . . . . . . . . . . . . . . . . . . . . . . . . . . . . . . . . . . . . . . 81
About Upgrading Spirent TestCenter vLS Software . . . . . . . . . . . . . . . . . . . . . . . . . . . . . . . . 82
To Download and Upgrade vLS Server Software . . . . . . . . . . . . . . . . . . . . . . . . . . . . . . . . . . 82
Appendix C: ESD Requirements. . . . . . . . . . . . . . . . . . . . . . . . . . . . . . . . . . . . . . . . . 83
General Equipment Handling . . . . . . . . . . . . . . . . . . . . . . . . . . . . . . . . . . . . . . . . . . . . . . 83
Workstation Preparation . . . . . . . . . . . . . . . . . . . . . . . . . . . . . . . . . . . . . . . . . . . . . . . . . . 84
Appendix D: Fiber Optic Cleaning Guidelines . . . . . . . . . . . . . . . . . . . . . . . . . . . 85
Cleaning Guidelines . . . . . . . . . . . . . . . . . . . . . . . . . . . . . . . . . . . . . . . . . . . . . . . . . . . . . 85
4 | Getting Started with Spirent TestCenter
Page 5

About this Guide
In this chapter...
• Introduction . . . . 6
• User Documentation . . . . 6
• Hardware Handling/Cleaning Practices . . . . 8
• How to Contact Us . . . . 9
Getting Started with Spirent TestCenter | 5
Page 6

About this Guide
Introduction
Introduction
Getting Started with Spirent TestCenter provides hardware set up, software installation,
licensing, and software upgrade and downgrade instructions.
New Spirent chassis and modules are shipped with current firmware. Firmware upgrade or
downgrade instructions for installed equipment are described in Appendix B, “Upgrade/
Downgrade Procedures.”
User Documentation
Documentation is available in PDF format and as online Help files:
• Documents delivered in PDF format support product installation, provide important
system reference information, and support Spirent TestCenter Automation users.
These documents are included on the Spirent TestCenter Application DVD and are
available in the Knowledge Base on the Customer Service Center site. The “DOC” ID
numbers are provided below with each document title.
• Help files, included within Spirent TestCenter applications, provide reference and
context sensitive user support. Launch a Help file by pressing F1 in an open
application or by clicking the Help button in the menu bar or a dialog box.
Tip: For your convenience, the current Help file is also available as part of the CSC
Knowledge Base (DOC10335). This stand-alone Help file is fully functional. Use the
Table of Contents to navigate through the file, or click the Search tab and enter a
search string to find the information you need.
Release Notes
Release notes are available as a Related Resource on the Customer Service Center site on
the Downloads page with each software download. You can also refer to the Spirent
TestCenter Release Notes Index on the Knowledge Base - search on DOC10921.
Quick Start Guides and Installation Instructions
• Spirent TestCenter Enhanced L4-7 Quick Start Guide (DOC11600)
This guide will familiarize you with the Spirent Enhanced L4-7 solution and explain
how to run a simple test.
• Spirent PX3/DX3-QSFP-DD-8 Installation Guide (DOC11449)
Provides complete instructions on the set up and use of the PX3/DX3-QSFP-DD-8.
• Spirent PX3/DX3-QSFP-DD-8 Quick Reference (DOC11450)
Describes the PX3/DX3-QSFP-DD-8 and provides information about using the appli-
ance for the first time.
• Spirent C1 Quick Reference (DOC10339)
Describes the SPT-C1 and provides information about using the C1 for the first time.
• Spirent C1 Installation Instructions (DOC10338)
Provides complete instructions on the set up and use of the SPT-C1.
6 | Getting Started with Spirent TestCenter
Page 7

About this Guide
User Documentation
• SPT-N11U and SPT-N12U Installation Instructions (DOC10479)
Guides you to a safe and successful installation of the Spirent SPT-N11U chassis.
• SPT-N11U and SPT-N12U Power Supply Installation Instructions (DOC10480)
Describes the power supply installation procedure. The chassis ships with two slot
power supplies installed. The remaining power supplies should be installed after the
system has been unpacked and racked.
System Reference Guides
• Spirent Hardware Reference (DOC10031)
Describes chassis, modules, and accessories. Information is provided on module
LEDs, multiple chassis connections, cables, and chassis commands. Basic
information is provided on system administration and diagnostics.
To access the Spirent Hardware Reference, go to: https://support.spirent.com
Type DOC10031 in the Search Knowledge Base box and press Enter.
.
Automation User Guides
• Spirent TestCenter Automation Object Reference (DOC10036)
Lists and describes all test configuration objects, command objects, and protocol data
unit objects.
• Spirent TestCenter Automation Overview Manual (DOC10033)
Provides an overview of Spirent TestCenter Automation and using the API to create a
test configuration, run the test, and retrieve results. Includes a description of the
Spirent TestCenter software packages, the object model, and Tcl functions in the API.
• Spirent TestCenter Automation Programmer’s Reference (DOC10035)
Provides information about the Spirent TestCenter Automation API syntax and
functions, how-to-use information, and examples of test configurations.
• Spirent TestCenter Automation HLTAPI Programmer’s Reference (DOC11103)
Provides installation and configuration instructions for Spirent HLTAPI and provides
information on Spirent HLTAPI-related features.
• Spirent TestCenter Automation HLTAPI Command Reference (DOC10477)
Provides detailed information on how to use Spirent HTLAPI.
• Spirent TestCenter Automation HLTAPI Keywords Reference (DOC11262)
Provides information about Spirent HLTAPI keywords for ROBOT Framework.
Online Help Files
• Spirent TestCenter
• Spirent TestCenter IQ
• Spirent TestCenter Results Reporter
• Spirent TestCenter Session Manager
• Spirent TestCenter Conformance
Getting Started with Spirent TestCenter | 7
Page 8

About this Guide
Hardware Handling/Cleaning Practices
Spirent Customer Service Center
The Customer Service Center (CSC) (https://support.spirent.com) includes useful tools
such as a powerful Knowledge Base with an intelligent search that offers quick answers to
your network analysis and measurement questions.
Hardware Handling/Cleaning Practices
Spirent modules contain electronic components that are sensitive to Electrostatic
Discharge (ESD) damage. To prevent premature component failure or latent product
damage, it is crucial that you handle this equipment following industry standard ESD
handling practices. Refer to Appendix C, “ESD Requirements,” for further information.
Some Spirent equipment contains fiber optic components that are very susceptible to
contamination from particles of dirt and dust. Product performance may be damaged if
these components are not kept clean. Refer to Appendix D, “Fiber Optic Cleaning
Guidelines,” for proper cleaning practices for these components.
Environmental Considerations
This label is on all Spirent-provided electrical and electronic products that are sold and
shipped (see Figure 1).
Figure 1. Waste of Electrical and Electronic Equipment (WEEE) Label
This label indicates that the product contains material that presents an environmental
concern. Spirent encourages users of Spirent-provided electrical and electronic equipment
to not dispose of the labeled products in waste collection units where the waste is destined
for landfills. Electrical and electronic equipment should be collected separately and
recycled, reused, and processed for recovery and waste treatment in accordance with your
local, regional, and federal laws. If you have any questions regarding this labeling, please
contact your Spirent Communications representative.
8 | Getting Started with Spirent TestCenter
Page 9

How to Contact Us
To obtain technical support for any Spirent Communications product, please contact our
Customer Service Center (CSC) using any of the following methods:
Americas
E-mail: support@spirent.com
Web: https://support.spirent.com
Toll Free: +1 800-SPIRENT (+1 800-774-7368) (North America)
Phone: +1 818-676-2616
Hours: Monday through Friday, 05:00 to 17:00, Pacific Time
Europe, Middle East, Africa
E-mail: support@spirent.com
Web: https://support.spirent.com
Phone: +33 (1) 6137 2270 (France)
Phone: +44 1803 546333 (UK)
Hours: Monday through Thursday, 09:00 to 18:00, Friday, 09:00 to 17:00, Paris Time
About this Guide
How to Contact Us
Asia Pacific
E-mail: support@spirent.com
Web: https://support.spirent.com
Phone: +86 (400) 810-9529 (toll-free mainland China only)
Phone: +86 (10) 8233 0033 (China)
Hours: Monday through Friday, 09:00 to 18:00, Beijing Time
Information about Spirent Communications and its products and services can be found on
the main company website at https://www.spirent.com
.
Company Address
Spirent Communications, Inc.
27349 Agoura Road
Calabasas, CA 91301
USA
Getting Started with Spirent TestCenter | 9
Page 10

About this Guide
How to Contact Us
10 | Getting Started with Spirent TestCenter
Page 11

Getting Started
In this chapter. . .
• About Chassis Controllers . . . . 12
• About the Virtual Spirent LabServer . . . . 13
• Summary of Installation Procedures . . . . 13
• Procedure 1: Check System Requirements . . . . 15
• Procedure 2: Verify Contents of Shipment . . . . 16
• Procedure 3: Install Spirent TestCenter Software . . . . 17
• Procedure 4: Chassis and Appliance Firmware Support . . . . 24
• Procedure 5: Perform Cable Connections . . . . 26
• Procedure 6: Install the Ferrite Block . . . . 32
• Procedure 7: Connect Power . . . . 34
• Procedure 8: Set the Chassis IP Address . . . . 40
• Procedure 9: Confirm the Ethernet Link . . . . 47
• Procedure 10: Using the Authenticate Mode (optional) . . . . 48
• Procedure 11: Obtain Your License Key . . . . 50
• Procedure 12: Connect to a DUT/SUT . . . . 54
• Procedure 13: Configure and Run Tests . . . . 56
Getting Started with Spirent TestCenter | 11
Page 12
Getting Started
About Chassis Controllers
About Chassis Controllers
Note: Controller version 1 is no longer supported. Controller version 2 firmware
continues to be supported, but the chassis that support controller version 2 are obsolete,
and not are not included in this document.
• SPT-N12U, SPT-N11U, and SPT-N4U chassis contain controller version 3..
All new chassis and test modules are shipped with current firmware installed.
• For complete installation and setup information for the Spirent C1 or the PX3/DX3-
QSFP-DD-8 appliances, refer to the installation documentation that is included in
your appliance shipment.
To Identify Chassis Controller Versions
If you are not certain which controller board is installed in your chassis you can easily
look up that information. You must be connected to one or more chassis to access the
Firmware Management window and perform this task.
To identify the chassis controller version:
1 Verify that the Spirent TestCenter Application is installed on your computer.
2 Launch the Spirent TestCenter Application.
3 Connect to one or more Spirent chassis.
4 Select Tools > Equipment Information in the main window.
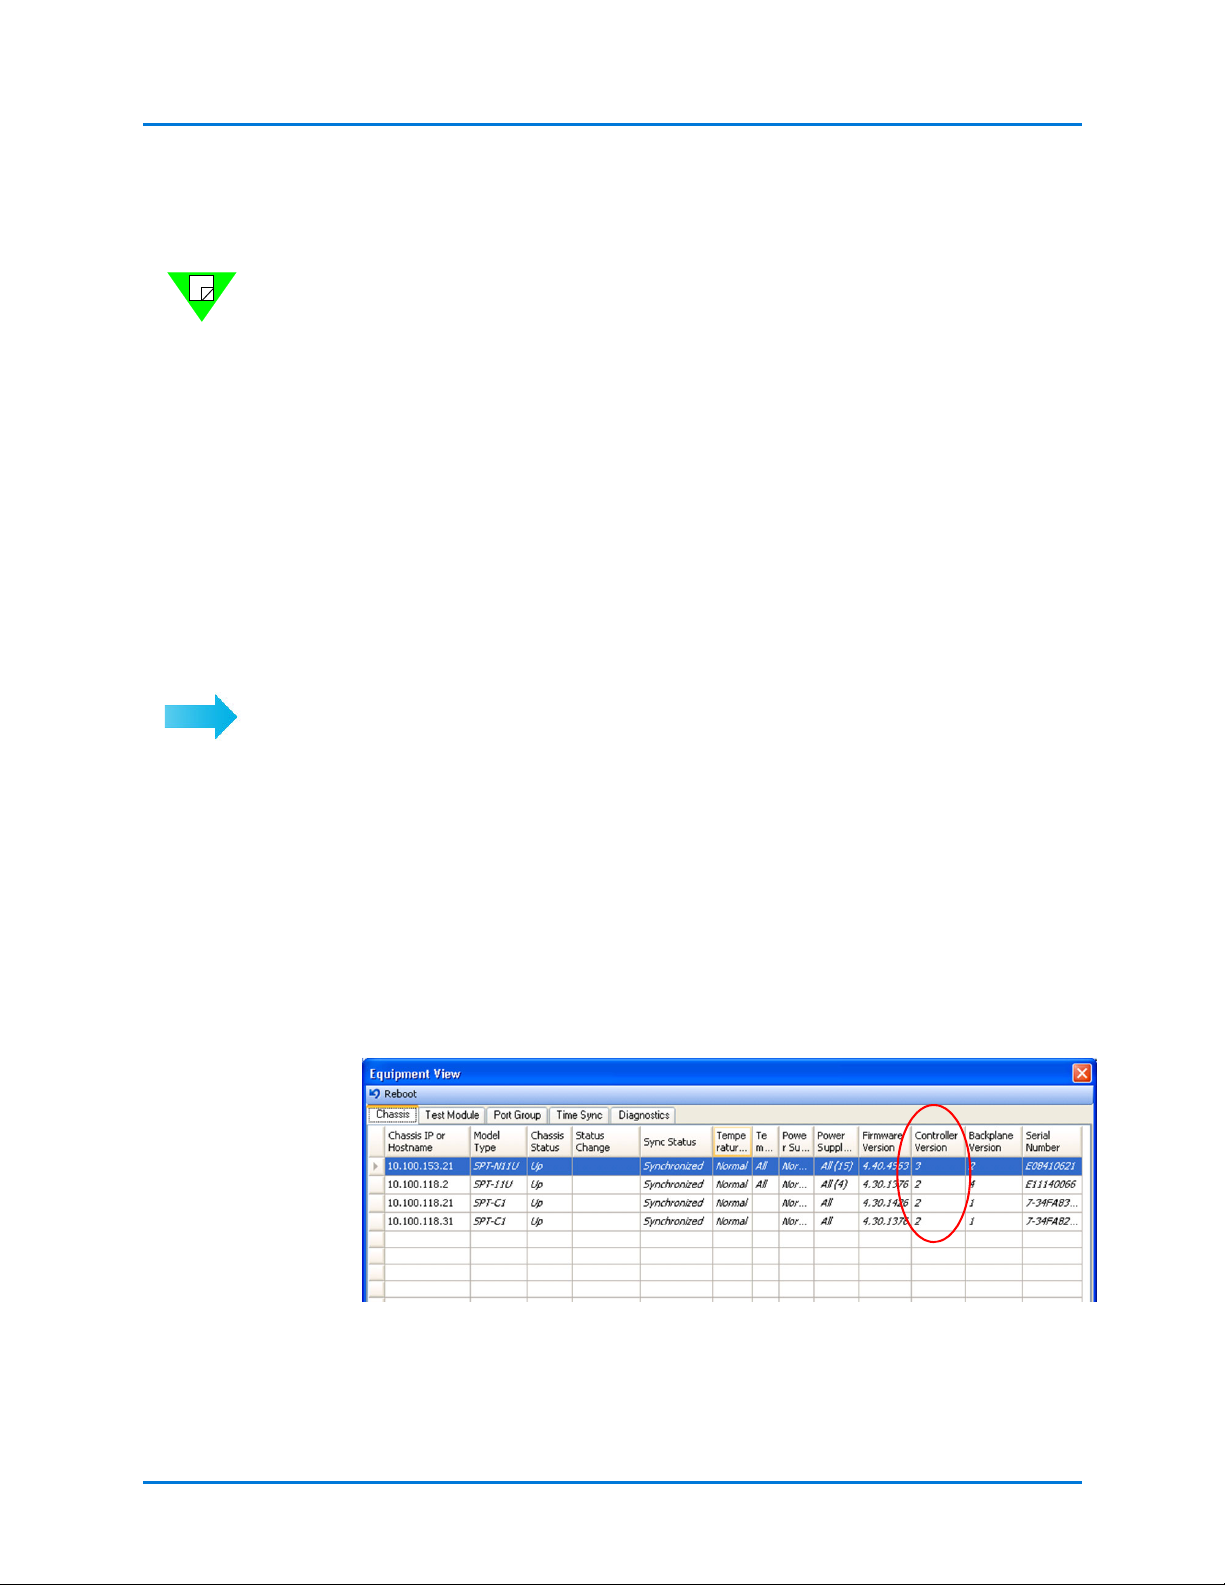
The Chassis tab in the Equipment View window displays information about each
chassis to which you are connected.
5 Scroll right (if necessary) until the Controller Version column is in view.
The version of the controller installed in each connected chassis is shown
(Figure 1-1). Your version of Spirent TestCenter may have a slightly different
interface.
Figure 1-1. Controller Version Column in Equipment View Window
6 Close the Equipment View window.
12 | Getting Started with Spirent TestCenter
Page 13

About the Virtual Spirent LabServer
The Spirent vLS (Virtual LabServer) together with Spirent TestCenter Session Manager
(client software), eliminate the need for a dedicated test management console computer
and supports team collaboration during testing.
Virtual LabServer installation instructions are in Appendix A, “Install and Configure
Spirent Virtual LabServer.”
Summary of Installation Procedures
The instructions provided in this manual support the installation of chassis and test
modules currently in production, and the installation of current application software.
Instructions for installation and configuration of the Spirent vLS are also included.
Follow these procedures to complete the installation of your Spirent system.
Check System Requirements and Package Contents
Getting Started
About the Virtual Spirent LabServer
1 Check the system requirements (page 15).
2 Verify contents of the accessory package (page 16).
Install Spirent TestCenter Applications
3 Follow the installation instructions provided for your operating system to install
applications.
•Windows OS (page 18)
•Linux (page 20)
4 Optionally, use chassis and appliance firmware support (dual boot) (page 24)
Set up Tcl, or other automation environment
Setup instructions for each environment are in readme format, located in the
<Spirent_Install_Dir>/API folder with sub-directories matching the language name.
For example:
/home/user/Spirent_TestCenter_[x.xx]/Spirent_TestCenter_Application_Linux/API/Tcl
Set up the Spirent chassis
5 Connect the Spirent chassis to a PC for initial IP address configuration and software
management, and to your LAN (page 26).
6 Install the ferrite block onto the Ethernet cable (page 32).
7 Connect power to the chassis (page 34).
Warning: You mus t use the power cord included with your chassis.
Getting Started with Spirent TestCenter | 13
Page 14

Getting Started
Summary of Installation Procedures
8 Set up the chassis IP address, netmask, and gateway (page 40).
9 Confirm the Ethernet link: Ping the Ethernet link between the PC and the Spirent
chassis. If this is unsuccessful, check the TCP/IP stack on the PC and add the
appropriate IP address (page 47).
Using the Authenticate Mode (optional)
10 Authenticate mode allows the user to set a password on the chassis or appliance, so
only authorized users can access the equipment (page 48).
Obtain and Install Your License Key
11 Obtain the license key for your Spirent chassis and copy it to your chassis (page 50).
Connect the Chassis to the DUT/SUT
12 Connect Spirent hardware to the device(s) under test, check cabling, and ensure that
EMI guidelines are met (page 54).
Install and Configure the Spirent Virtual LabServer
Virtual LabServer customers, follow the installation and configuration instructions in
Appendix A (page 57) to complete your Spirent system installation.
Configure and Run Tests
13 Open a Spirent TestCenter application and set up a test (page 56), or initialize an
automation API and set up a test.
Note: Your Spirent chassis, modules, and appliances are shipped with current operating
system firmware. All modules are installed in your chassis.
14 | Getting Started with Spirent TestCenter
Page 15

Procedure 1: Check System Requirements
Procedure 1: Check System Requirements
Review system requirements carefully to ensure successful installation and operation.
System requirements are included in the Release Notes document.
Release notes are available as a Related Resource, for each software download, on the
Spirent Customer Service website on the Downloads page.
Refer to the readme titled Spirent TestCenter Release Notes and New Feature Information
for detailed instructions on how to locate the release notes for your version of the
software.
Tip: Additional system requirements may be included in the release notes provided for
the extended applications that run on Spirent TestCenter.
Getting Started
Getting Started with Spirent TestCenter | 15
Page 16

Getting Started
Procedure 2: Verify Contents of Shipment
Procedure 2: Verify Contents of Shipment
Review the contents of the package to ensure that you have all the components necessary
for a successful installation.
Checking a Chassis Package
The following standard items are shipped with each Spirent chassis.
• One Spirent SPT-N4U, SPT-N11U, or SPT-N12U chassis with one or more test
modules, and with blank panels and firmware installed.
Note: For packaging, installation, and setup information about the Spirent C1 or the
PX3/DX3-QSFP-DD-8 appliances, refer to the installation documentation that is
included in your shipment.
• One Cable Kit, which includes:
• One (1) or two (2) power cords with the SPT-N4U, and up to seven (7) with the
SPT-N11U/SPT-N12U chassis, either domestic or international.
(see “Power supply connector” on page 30).
• One white 10 ft. (3.048 m.), crossover Ethernet LAN cable (RJ-45); used to
connect the Spirent chassis directly to a PC.
• One blue 10 ft. (3.048 m.), straight-through Ethernet LAN cable (RJ-45); used to
connect the Spirent chassis to a hub or LAN.
• One purple 3 ft. (.9144 m.), straight-through Ethernet LAN cable (RJ-45); used to
connect one Spirent chassis to another Spirent chassis.
• One Ferrite block; connects onto the Ethernet cable that attaches the Spirent
chassis to your network or a hub. The ferrite block reduces potential EMI
interference.
• DVD containing Spirent TestCenter application software (with online Help files),
documentation files in PDF format, and Spirent TestCenter License Entitlement ID
Certificate (shipped with Spirent TestCenter orders).
Checking a Spirent C50 Appliance Package
The following items are shipped with each Spirent SPT-C50. Check the package to ensure
you have received the items listed here:
• One Spirent SPT-C50 base unit with one or more NICs and firmware installed.
• One black power cord, either domestic or international
• One blue 10 ft. (3.048 m.), straight-through Ethernet LAN cable (RJ-45); used to
connect the SPT-C50 to a hub or LAN
• One purple 3 ft. (.9144 m.), straight-through Ethernet LAN cable (RJ-45); used to
connect one Spirent chassis/appliance to another Spirent chassis/appliance.
• DVD containing Spirent TestCenter application software (with online Help files),
documentation files in PDF format, and Spirent TestCenter License Entitlement ID
Certificate (shipped with Spirent TestCenter orders).
16 | Getting Started with Spirent TestCenter
Page 17
Procedure 3: Install Spirent TestCenter Software
Spirent TestCenter Application - InstallShield Wizard
Setup has detected that a 64-bit version of Spirent TestCenter <version> is
already installed. To install Spirent TestCenter <version> 32-bit version,
uninstall your 64-bit version and start the installation again.
Procedure 3: Install Spirent TestCenter Software
The instructions in this section support first-time installation of Spirent TestCenter
application software.
Appropriate licensing is required to use any Spirent TestCenter application for testing. If
you have questions about Spirent TestCenter licenses or about Support Entitlement,
contact s
Spirent TestCenter installation files are available on an installation DVD, and are available
for download from the Spirent Customer Service website (
Spirent TestCenter supports Windows® and Linux®. The Spirent TestCenter Application
(Windows version) is required for chassis and test module firmware management - all
customers must install the Windows application. After the Spirent TestCenter Application
is installed, you can select additional applications to download or copy, and install.
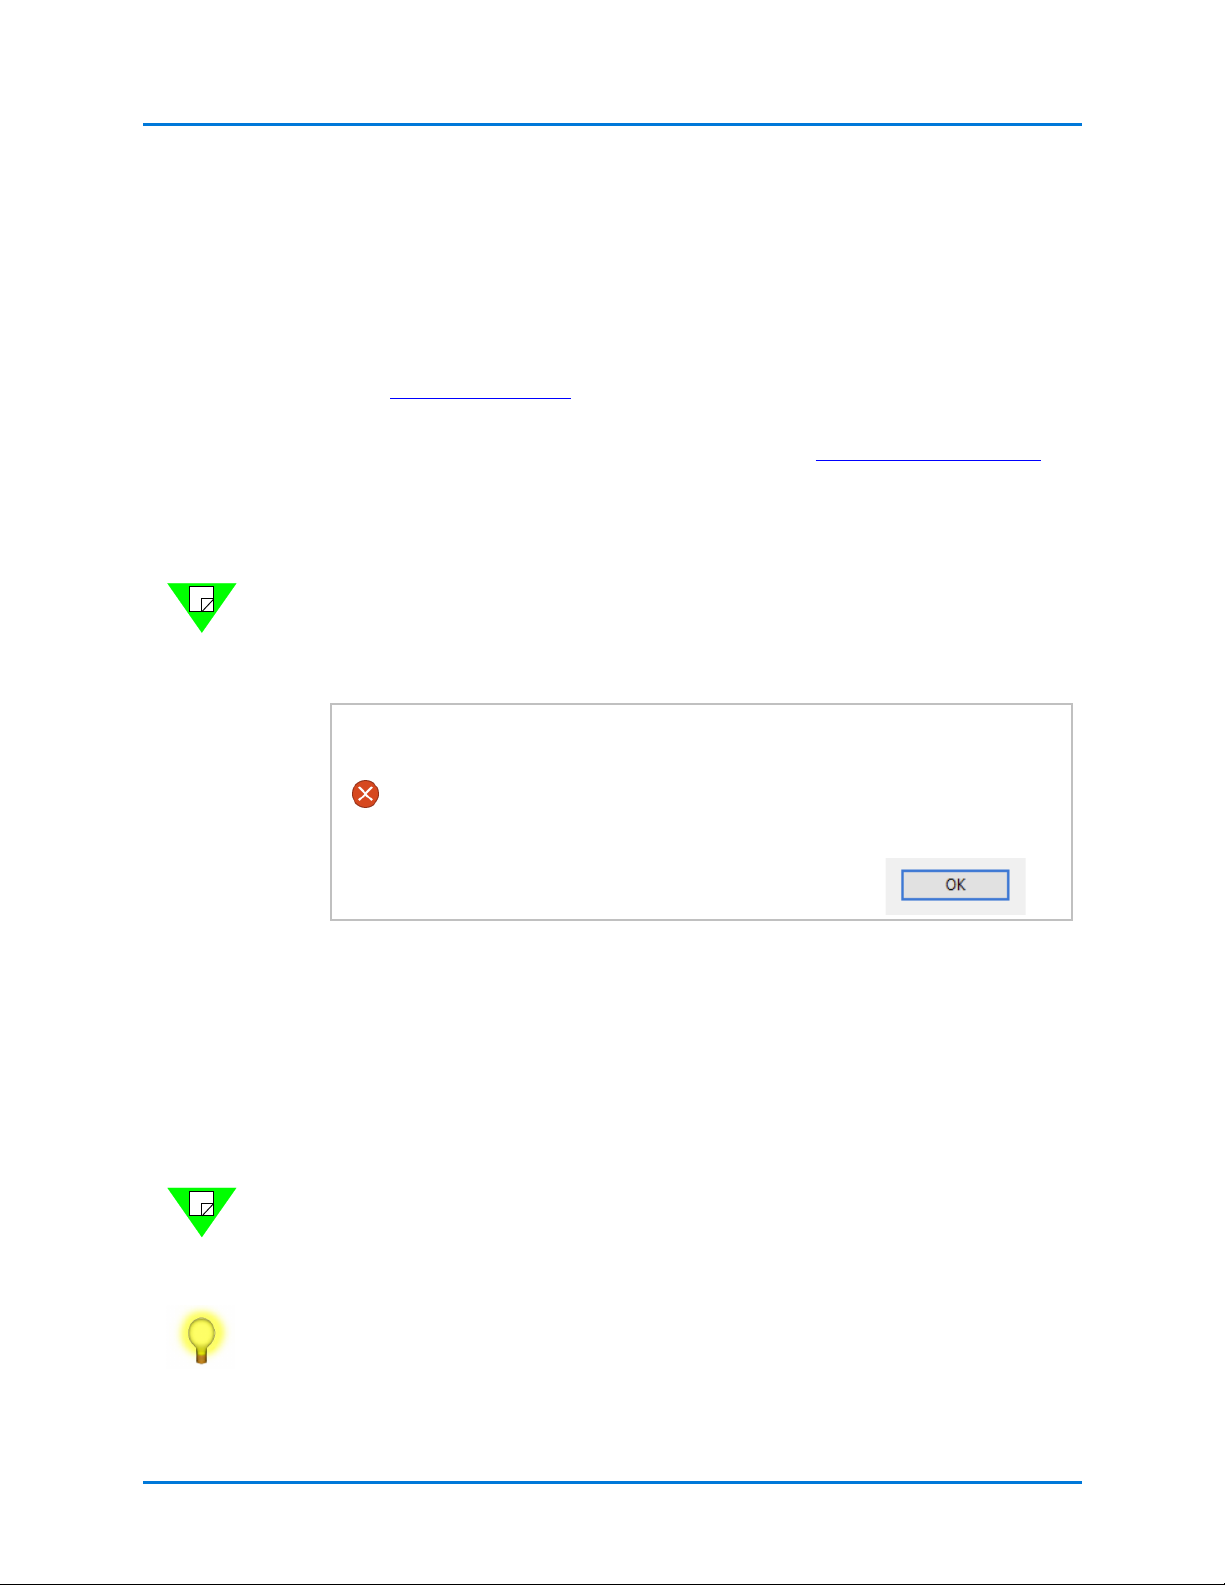
Notes: • A 32-bit and 64-bit Spirent TestCenter application of the same version cannot
upport@spirent.com.
https://support.spirent.com).
coexist. Running a 32-bit (Windows) installer when the same version of a
64-bit (Windows) Spirent TestCenter application is installed on the host PC,
will result in an error message similar to this:
Getting Started
• The 32-bit and 64-bit applications share the same user data path. As is
typical, the installer does not delete the files in user data path.
• Spirent TestCenter 32-bit and 64-bit applications of different versions can run
on the same machine.
Navigate to operating system-specific installation instructions using these links:
• All customers: “Installing Spirent TestCenter [Microsoft Windows]”
• Linux customers: “Installing Spirent TestCenter [Linux]” on page 20
Note: If the Spirent TestCenter Application, the Spirent TestCenter Conformance
Application, or a Spirent TestCenter extended application is currently installed on your
computer refer to the software and firmware installation instructions provided in
Appendix B, “Upgrade/Downgrade Procedures.”
Tips: • Some extended applications require installation steps not included in this
document. Check the relevant release notes for additional installation
information.
Getting Started with Spirent TestCenter | 17
Page 18
Getting Started
Procedure 3: Install Spirent TestCenter Software
• Spirent TestCenter Extreme Automation™ Toolkit customers: Use the
installation instructions in this document to install the Spirent TestCenter
Application, and then refer to the Spirent TestCenter Extreme Automation™
Toolkit release Notes for additional Toolkit installation and set up
instructions.
These release notes are in the Knowledge Base area of the Customer Service
Center (CSC). Search using the document title or DOC10751.
Installing Spirent TestCenter [Microsoft Windows]
Install Spirent TestCenter application files on your computer using either of two sources:
• Installation DVD (see page 18). The DVD is shipped with new chassis orders.
• Spirent Customer Service website (see page 19).
Installation Option 1: Using the DVD
Begin your installation by selecting Spirent TestCenter for Windows on the main DVD
menu. This selection launches installers for Spirent TestCenter applications,
documentation, and Tcl options.
Follow these instructions to run installers for Spirent TestCenter applications,
documentation, and Tcl options.
To install Spirent TestCenter software and documentation:
1 Load the DVD and then click Spirent TestCenter for Windows to launch the instal-
lation wizard.
2 Follow the wizard instructions until you reach the Setup Type screen, and then choose
an installation option:
• Follow on-screen prompts to run the recommended Complete installation.
•Use Custom to change the Tcl installer option:
a Click Custom and then Next.
b Deselect the Tcl [x.x.x] (configured for Spirent TestCenter Automation)
installer.
c Select the Update/Configure existing Tcl for Spirent TestCenter Automa-
tion installer.
Note: Automation customers: If you do not use the Tcl [x.x.xx] (configured for
Spirent TestCenter Automation) installer, you must manually configure your
automation environment. Setup instructions for each environment are in readme
format, located in the <Spirent_Install_Dir>/API folder with sub-directories matching
the language name.
18 | Getting Started with Spirent TestCenter
Page 19

Getting Started
Procedure 3: Install Spirent TestCenter Software
For example:
/home/user/Spirent_TestCenter_[x.xx]/Spirent_TestCenter_Application_Linux/API/
Tcl
3 Click Next to complete your installation.
4 Click Finish, when installation is complete, to return to the main DVD menu.
Tip: Click the relevant links on the DVD Contents screen to download and install
extended Spirent TestCenter applications.
When you have finished installing applications, you are ready to download Spirent
TestCenter firmware files.
Installation Option 2: Using the Website
If you have a Spirent Communications Support Entitlement, you can download Spirent
TestCenter applications, firmware, and documentation from the Spirent Customer Service
website (
support@spirent.com
https://support.spirent.com). If you do not have Support Entitlement, contact
for assistance.
Follow these instructions to download and install Spirent TestCenter files.
To install Spirent TestCenter application software:
1 Navigate to
https://support.spirent.com and log in.
First time website users, register for a login user ID and password.
2 Click the Downloads icon in the left panel menu.
3 From the Filter options, select General Release as the Release Type, and select
Spirent TestCenter from the Product Line list.
4 In the Filter by Release drop-down list, select the version to download.
5 Click the Windows Spirent TestCenter Application link associated with the version
you want to install.
6 Click Download to launch the installer.
Follow installer instructions.
You can repeat this process to select and download extended Spirent TestCenter
applications.
Getting Started with Spirent TestCenter | 19
Page 20

Getting Started
Procedure 3: Install Spirent TestCenter Software
Installing Spirent TestCenter [Linux]
The instructions in this section support installation of Spirent TestCenter applications on a
computer running a supported version of Linux. Spirent TestCenter installation files are
available on DVD and on the Spirent Customer Service website (
support.spirent.com).
Navigate to the instructions for your preferred file source by clicking one of the following
links:
• Installation DVD (shipped with new chassis orders) - See “Installation Option 1:
Using the DVD” for installation instructions.
• Spirent Customer Service website - See “Installation Option 2: Using the Website”
on page 23 for download and installation instructions.
Tips: • Version requirements for supported scripting/programming languages (Tcl,
C++, Java, Perl, Ruby, Python, C#, REST) and operating systems (Windows,
Linux)
Spirent Customer Service website (
are included in the Release Notes. Release notes are available on the
https://
https://support.spirent.com).
• Chassis and test module firmware installation and management is supported
by the Windows version of the Spirent TestCenter Application. You use the
application’s Firmware Management window to install firmware on chassis
and test modules or to activate test packages. See “Installing Spirent
TestCenter [Microsoft Windows]” on page 18 for Windows installation
instructions.
• Spirent TestCenter Extreme Automation Toolkit customers: Use the
installation instructions in this document to install the Spirent TestCenter
Application, and then refer to the Spirent TestCenter Extreme Automation™
Toolkit Release Notes for additional Toolkit instructions.
These release notes are in the Knowledge Base area of the Customer Service
Center (CSC). Search using the document title or DOC10751.
20 | Getting Started with Spirent TestCenter
Page 21

Getting Started
Procedure 3: Install Spirent TestCenter Software
Installation Option 1: Using the DVD
Installers for the Spirent TestCenter applications and a tarball for documentation are
packaged in separate files (OS specific) on the DVD.
Follow the installation instructions appropriate for your workstation:
• “To Copy Files using a Web Browser” on page 21
• “To Copy Files using the Command Line” on page 22.
To Copy Files using a Web Browser
Follow these instructions if your workstation has a web browser installed.
To install Spirent TestCenter Automation:
1 Load the installation DVD.
2 Select the Spirent TestCenter link appropriate for your operating system.
This action will result in one of two displays:
• An index page that includes links to the automation and documentation installers.
• A folder view of the two shell-based installers and the tarball for documentation
3 Use the standard procedure (for your workstation) to copy the installer appropriate for
your system and the documentation tarball to your workstation.
4 Run the shell-based installer. For example, use the following for 64-bit OS:
./install_Spirent_TestCenter_Auto_Linux64_[x.xx].sh
5 Use tar to extract the documentation from the tarball.
For example, use the following command for a Linux file:
tar -xzvf Spirent_TestCenter_Docs_Linux_Unix[x.xx].tar.gz
6 Set up Tcl [x.x.xx], or other automation environment, for use with Spirent TestCenter.
Setup instructions for each environment are in readme format, located in the
<Spirent_Install_Dir>/API folder with sub-directories matching the language name.
For example:
/home/user/Spirent_TestCenter_[x.xx]/Spirent_TestCenter_Application_Linux/API/
Tcl
Getting Started with Spirent TestCenter | 21
Page 22

Getting Started
Procedure 3: Install Spirent TestCenter Software
To Copy Files using the Command Line
Follow these instructions to use commands to copy and install Spirent TestCenter files on
your workstation.
To install Spirent TestCenter Automation:
1 Open a terminal window.
2 Navigate to your DVD drive.
On some workstations this will be identified as Media.
3 Navigate to the Spirent TestCenter Applications folder for your operating system.
These folders contain two shell-based installers and a documentation tarball required
to complete your installation.
4 Copy the installer appropriate for your system and the documentation tarball to your
workstation. For example:
cp install_Spirent_TestCenter_Auto_Linux64_[x.xx].sh /home/
user/
5 Run the shell-based installer. For example, use the following for 64-bit OS:
./install_Spirent_TestCenter_Auto_Linux64_[x.xx].sh
6 Use tar to extract the documentation from the tarball. For example, use the following
command for a Linux file:
tar -xzvf Spirent_TestCenter_Docs_Linux_Unix[x.xx].tar.gz
7 Set up Tcl [x.x.xx], or other automation environment, for use with Spirent TestCenter.
Setup instructions for each environment are in readme format, located in the
<Spirent_Install_Dir>/API folder with sub-directories matching the language name.
For example:
/home/user/Spirent_TestCenter_[x.xx]/Spirent_TestCenter_Application_Linux/API/
Tcl
22 | Getting Started with Spirent TestCenter
Page 23

Getting Started
Procedure 3: Install Spirent TestCenter Software
Installation Option 2: Using the Website
If you have a Spirent Communications Support Entitlement, you can download
installation files from the Spirent Customer Service Center (CSC) website (
https://
support.spirent.com).
If you do not have Support Entitlement, contact support@spirent.com
for assistance.
Install Spirent TestCenter Applications
To install Spirent TestCenter applications on a Linux workstation, you download shellbased installers and a documentation tarball.
Note: Refer to the Spirent TestCenter Extreme Automation™ Toolkit Release Notes for
detailed installation instructions. These release notes are available on the Customer
Service Center (CSC). Search using the document title or DOC10751.
To install Spirent TestCenter Automation:
1 Navigate to
https://support.spirent.com and then login.
First time website users, register for a login user ID and password.
2 Click the Downloads icon in the left panel menu.
3 From the Filter options, select General Release as the Release Type, and select
Spirent TestCenter from the Product Line list.
4 In the Filter by Release drop-down list, select the version to download.
5 Click the install_Spirent_TestCenter_Auto_Linux link for the version you want.
6 Click Download to save the installer.
7 Click Save in the File Download dialog box, and then use the Save As dialog to save
the file to your /home/user directory.
8 Return to the Downloads list when the download is complete.
9 Select the Spirent TestCenter documentation tarball for Linux and save it to the
/home/user directory.
10 Run the shell-based installer. For example,
use the following for a 64-bit OS:
./install_Spirent_TestCenter_Auto_Linux64_[x.xx].sh
11 Use tar to extract the documentation from the tarball. For example, use the following
command for a Linux file:
tar -xzvf Spirent_TestCenter_Docs_Linux_Unix[x.xx].tar.gz
12 Log off the website.
13 Set up Tcl [x.x.xx], or other automation environment, for use with Spirent TestCenter.
Setup instructions for each environment are in readme format, located in the
<Spirent_Install_Dir>/API folder with sub-directories matching the language name.
For example:
/home/user/Spirent_TestCenter_[x.xx] Spirent_TestCenter_Application_Linux/API/
Tcl
Getting Started with Spirent TestCenter | 23
Page 24

Getting Started
Procedure 4: Chassis and Appliance Firmware Support
Procedure 4: Chassis and Appliance Firmware Support
With the dual boot feature, you can switch between two installed versions of Spirent
TestCenter using the command line interface. You can identify the current version and
standby version using the appropriate commands. This feature is available on SPT-N12U,
SPT-N11U, SPT-N4U, SPT-C50, SPT-C1, and PX3/DX3-QSFP-DD-8.
SPT-N12U, SPT-N11U, and SPT-N4U
For SPT-N12U, SPT-N11U, and SPT-N4U chassis, this feature applies to Spirent
TestCenter releases 4.87 and later. When you initially upgrade to release 4.87 or later, both
installed versions will be 4.87 or later. Subsequent upgrades to releases later than 4.87 will
result in two separate partitions, containing the current version and the standby version,
respectively.
Notes: • Downgrading to a version below 4.87 removes this feature.
• If you are using Spirent TestCenter version 4.53 or earlier, and you want to
upgrade to version 4.87, go to the Customer Service Center Knowledge Base,
and follow the instructions in FAQ11021.
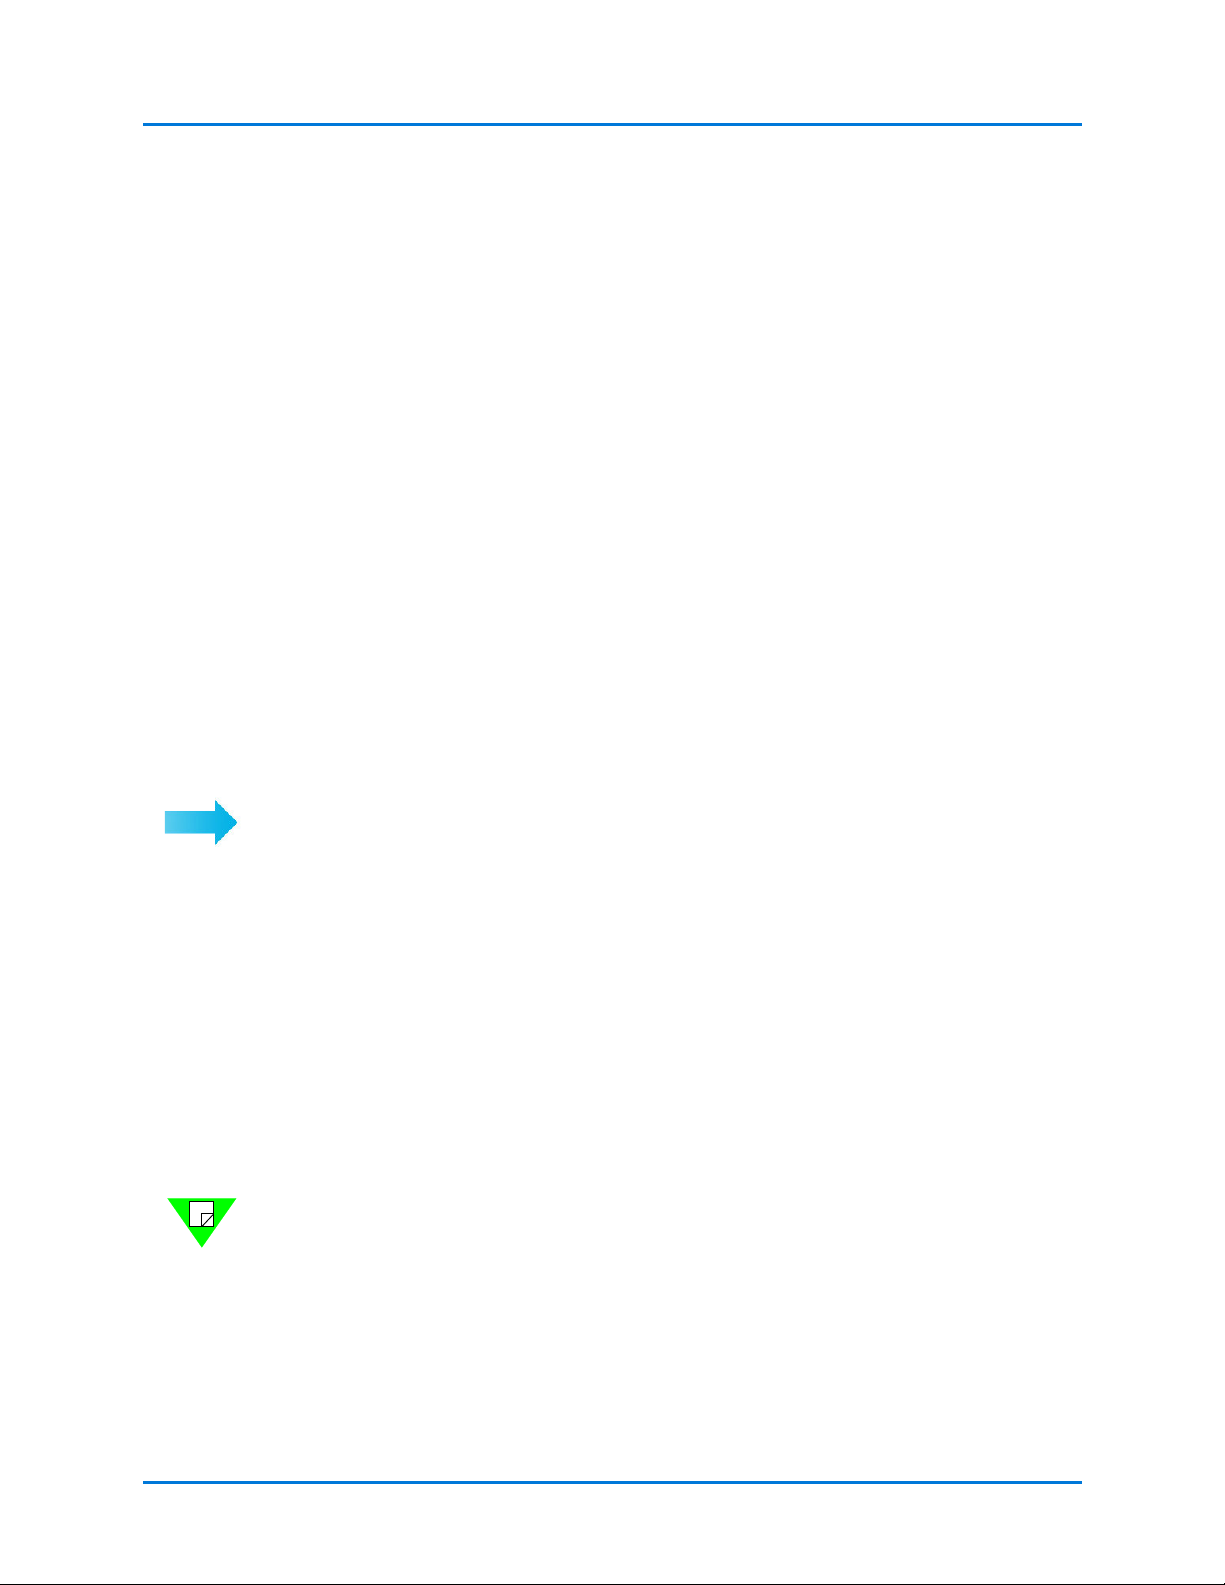
To see the available Spirent TestCenter versions using the command line interface:
1 SSH to the device using the admin username. Refer to page 43 for login instructions.
2 Use the applicable command
•Type
•Type standby_version to see the standby version.
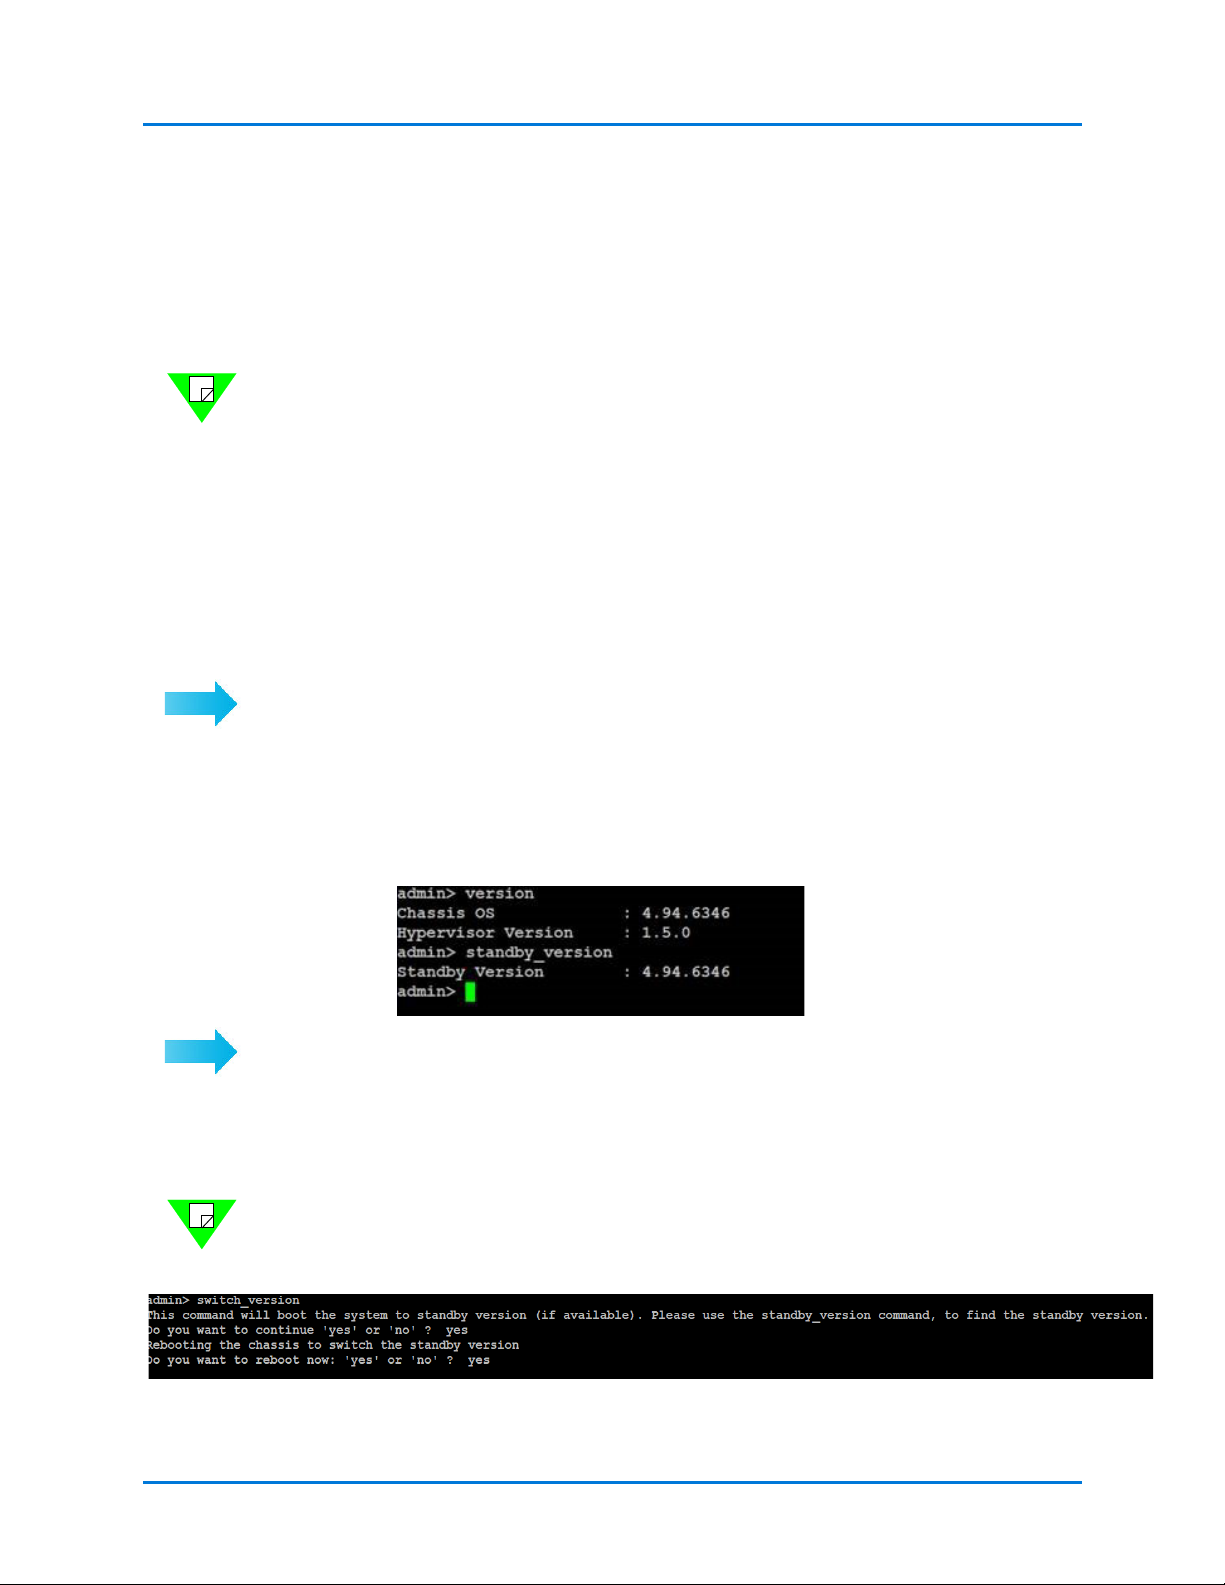
To switch between two installed versions using the command line interface:
1 SSH to the device using the admin username. Refer to page 43 for login instructions.
2 Type
3 Select switch_version with yes as an option to switch to the standby version.
Note: A reboot is required to switch versions. Select yes if you want to reboot and use the
standby version. If you select no, the switch to the standby version will take effect with
the next reboot.
version to identify the active Spirent TestCenter version.
help to view the list of options.
24 | Getting Started with Spirent TestCenter
Page 25
Getting Started
Procedure 4: Chassis and Appliance Firmware Support
SPT-C50, SPT-C1, and PX3/DX3-QSFP-DD-8
For these appliances, the feature applies to Spirent TestCenter releases 4.94 and later.
When you initially upgrade to release 4.94 or later, both installed versions will be 4.94 or
later. Subsequent upgrades to releases later than 4.94 will result in two separate partitions,
containing the current version and the standby version, respectively.
Notes: • Downgrading to a Spirent TestCenter version below 4.94 removes this
feature.
• If you are using Spirent TestCenter version 4.53 or earlier, and you want to
upgrade to version 4.94, go to the Customer Service Center (CSC)
Knowledge Base, and follow the instructions in FAQ11021.
• Downgrading to 4.81 or below is a two-step process (if you are at 4.94 or
above). First downgrade to 4.81 and then to the version you intend to use.
• On PX3/DX3-QSFP-DD-8 appliances, downgrading below 4.94 is not
allowed from the GUI. Refer to CSC Knowledge Base article FAQ18701 for
details.
To see the available Spirent TestCenter versions using the command line interface:
1 SSH to the device using the admin username. Refer to page 43 for login instructions.
2 Use the applicable command
•Type
•Type
To switch between two installed versions using the command line interface:
1 SSH to the device using the admin username. Refer to page 43 for login instructions.
2 Type
3 Select switch_version with yes as an option to switch to the standby version.
Note: A reboot is required to switch versions. Select yes if you want to reboot and use the
standby version. If you select no, the switch to the standby version will take effect with
the next reboot.
version to identify the active Spirent TestCenter version.
standby_version to see the standby version.
help to view the list of options.
Getting Started with Spirent TestCenter | 25
Page 26
Getting Started
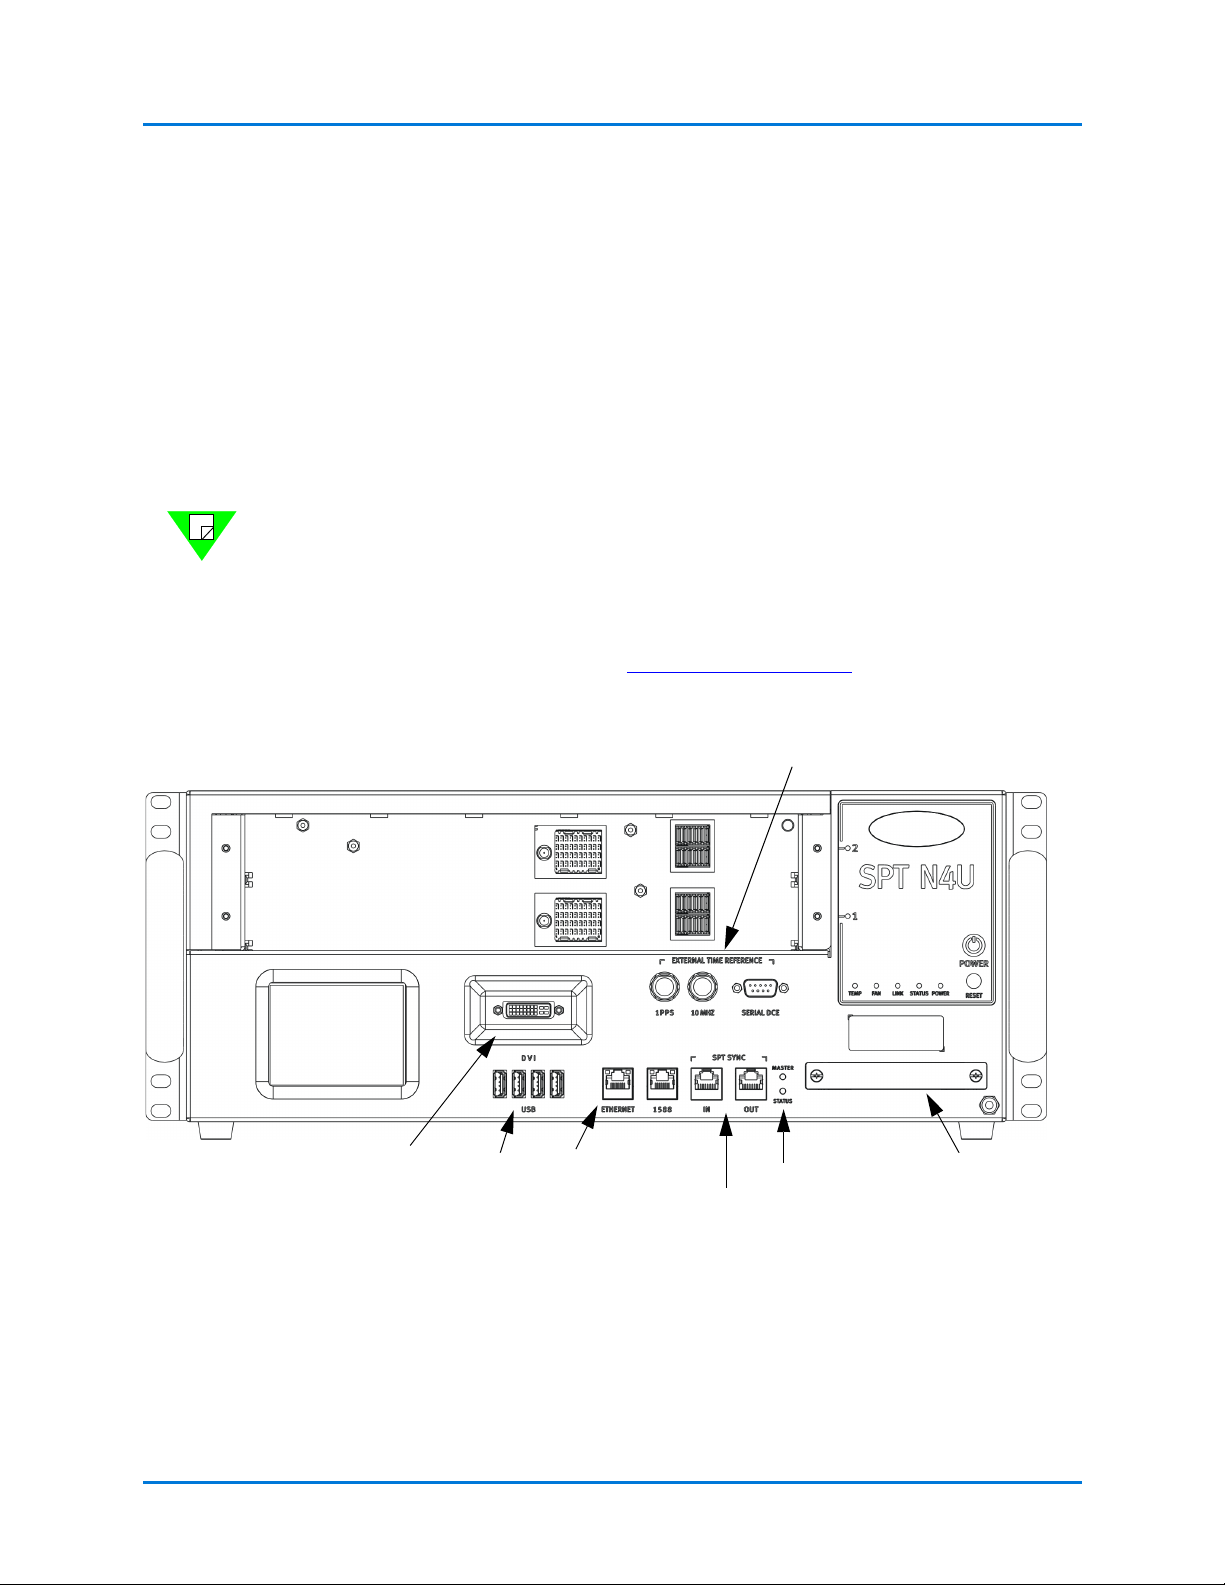
Removable Hard
Drive Tray
LEDs for Chassis
Connection Status
External Time Reference Connectors
DVI-I Connector
USB Ports
Ethernet Admin
Port
Multiple Chassis
Connection Ports
Note: The two (2) Power Cord
Connectors are on the back of the
chassis (not shown). Depending on the
model, there will be one (1) or two (2).
Procedure 5: Perform Cable Connections
Procedure 5: Perform Cable Connections
This section explains how to connect cables to the connectors. We recommend that you
complete Procedures 5 through 11 in this guide before you connect to an application or
device under test (Procedure 12).
• Panel connectors on the SPT-N4U are shown in Figure 1-2.
• Panel connectors on the SPT-N11U and SPT-N12U are shown in Figure 1-3.
• Panel connectors on the SPT-C50 are shown in Figure 1-4 and Figure 1-5.
• Panel Connectors on the SPT-C50-S2-RX are shown in Figure 1-6.
Notes: • For complete installation and setup information for the Spirent C1 or the
PX3/DX3-QSFP-DD-8 appliances, refer to the installation documentation
that is included in your appliance shipment.
• Refer to FAQ18073 for information about External Time Reference (ETR)
methods you can use to sync multiple remote chassis. Go to the Customer
Service Center (CSC) (
the Search box. Press Enter.
https://support.spirent.com) and type FAQ18073 in
Figure 1-2. SPT-N4U Front Panel
26 | Getting Started with Spirent TestCenter
Page 27

Getting Started
DVI-I Connector
Back Panel USB Ports
External Time Reference
Connectors
Removable
Hard Drive
Tray
Power Cord
Connectors
LEDs for
Chassis
Connection
Status
Multiple
Chassis
Connection
Ports
Ethernet
Admin
Port
Procedure 5: Perform Cable Connections
Figure 1-3. SPT-N11U/SPT-N12U Back Panel
Getting Started with Spirent TestCenter | 27
Page 28

Getting Started
Serial Console Port
USB Ports
Ethernet Admin Port
System Status LEDs
Tes t P or t s
External Time Reference
Connectors
Multiple Chassis
Connection Ports
VGA Port
Procedure 5: Perform Cable Connections
Figure 1-4. SPT-C50 Front Panel for Hardware Rev 80-002394
Figure 1-5. SPT-C50 Front Panel for Hardware Rev 80-002311
28 | Getting Started with Spirent TestCenter
Page 29

Getting Started
Serial Console Port
Multiple Chassis Connection Ports
External Time Reference Connectors
Tes t Por t s
USB Ports
Ethernet Admin Port
Legacy PS2 Ports
VGA Port
SPT-C50 Label for Hardware Rev 80-002394
SPT-C50 Label for Hardware Rev 80-002311
SPT-C50-S2-RX Label for Hardware Rev 80-002535
Procedure 5: Perform Cable Connections
Figure 1-6. SPT-C50-S2-RX Front Panel Connectors for Hardware Rev 80-002535
Note: The hardware “Rev” number for your SPT-C50 model is on the label on the bottom
of the appliance. See Figure 1-7.
Figure 1-7. SPT-C50 Model Labels
Getting Started with Spirent TestCenter | 29
Page 30

Getting Started
Procedure 5: Perform Cable Connections
Ta bl e 1 -1 describes the chassis back-panel connectors, their functions, and the cable used
for each connector.
Table 1-1. Spirent Chassis Connections and Cables
Connect this chassis connector … To … Using this cable...
Power supply connector Power outlet Power cord(s). On the SPT-N4U, SPT-
N11U, or SPT-N12U chassis, each power
supply must be connected to a 15A circuit
that is not shared with other equipment.
WARNING: You must use the power
cords provided with your chassis. Each
power cord must be plugged into wall
outlets that are controlled by separate 15A
circuit breakers.
ETHERNET INTERFACE (RJ-45) —To
connect a chassis directly to a PC using the
Default IP address.
ETHERNET INTERFACE (RJ-45)—To
connect a chassis to a network.
EXTERNAL TIME REFERENCE 10MHZ
(BNC)
EXTERNAL TIME REFERENCE 1 PPS
(BNC)
EXTERNAL TIME REFERENCE SERIAL
DCE (DB9)
SPT SYNC OUT and SPT SYNC IN
(RJ-45)
DVI Connectors
(SPT-N4U, SPT-N11U, SPT-N12U only)
PC White 10 ft. (3.048 m.), crossover
Ethernet LAN cable (RJ-45)
Your hub or LAN Blue 10 ft. (3.048 m.), straight-through
Ethernet LAN cable (RJ-45)
External time
External time reference cable
reference hardware
External time
External time reference cable
reference hardware
External time
External time reference cable
reference hardware
The SPT SYNC IN
or SPT SYNC OUT
(RJ-45) port of
another Spirent
chassis.
Purple 3 ft. (.9144 m.), straight-through
Ethernet LAN cable (RJ-45)
Note: If you are connecting multiple
chassis, attach the SPT SYNC OUT
connector to the SPT SYNC IN
connection on the next slave chassis.
Video monitor DVI cable (not provided), or serial cable
via DVI to serial Adapter (provided)
USB ports
(SPT-N4U, SPT-N11U, SPT-N12U only)
1588 (RJ-45)
(SPT-N4U and SPT-N11U controller Rev. B,
and SPT-N12U only)
30 | Getting Started with Spirent TestCenter
USB keyboard,
mouse, or other
User supplied USB mouse, keyboard, or
other peripheral cable
peripherals
Your 1588 LAN Straight-through Ethernet LAN cable
(RJ-45)
Page 31

Important: • The serial port on the Spirent chassis is RS-232 DCE and has default
settings of 9600 baud with 8 data bits, 1 start bit, 1 stop bit, no parity, and
no flow control. The PC used for the serial port connection should be
configured with these same settings.
Ta bl e 1 -2 describes the SPT-C50 appliance connectors, their functions, and the cable used
for each connector.
Table 1-2. Spirent SPT-C50 Appliance Connections and Cables
Getting Started
Procedure 5: Perform Cable Connections
Connect this appliance
To … Using this cable...
connector …
Power supply connector Power outlet Power cord.
WARNING: You must use the power
cord provided with your appliance.
No more than two (2) SPT-C50
appliances should be plugged into
wall outlets that are controlled by the
same 15A circuit breaker.
USB Ports USB keyboard, mouse, or other
peripherals
Serial Console Port Not enabled NA
Ethernet Admin Port Your hub or LAN Blue 10 ft. (3.048 m.), straight-
EXTERNAL TIME
REFERENCE 10MHZ (BNC)
EXTERNAL TIME
REFERENCE 1 PPS (BNC)
External time reference hardware External time reference cable
External time reference hardware External time reference cable
User supplied USB keyboard, mouse,
or other peripheral cable
through Ethernet LAN cable (RJ-45)
EXTERNAL TIME
REFERENCE SERIAL DCE
(DB9)
VGA Connectors Video monitor VGA cable (not provided)
SPT SYNC OUT and SPT
SYNC IN (RJ-45)
1588 (RJ-45) Your 1588 LAN Straight-through Ethernet LAN cable
External time reference hardware External time reference cable
The SPT SYNC IN or SPT SYNC
OUT (RJ-45) port of another Spirent
chassis/appliance
Purple 3ft. (.9144 m), straightthrough Ethernet LAN cable (RJ-45)
Note: If you are connecting multiple
chassis/appliance, attach the SPT
SYNC OUT connector to the SPT
SYNC IN connection on the next
slave chassis/appliance.
(RJ-45) (Not Provided)
Getting Started with Spirent TestCenter | 31
Page 32

Getting Started
Procedure 6: Install the Ferrite Block
Procedure 6: Install the Ferrite Block
This procedure describes how to attach the ferrite block to the Ethernet cable before
connecting the cable to your Spirent chassis.
The ferrite block is designed to absorb excess electronic magnetic interference (EMI) that
is emitted from the Ethernet cable. This prevents potential damage to your system and
helps ensure that test data is not corrupted.
The ferrite block (Figure 1-8) is packaged as part of the Cable Kit that is sent with your
chassis.
Figure 1-8. Ferrite Block
Warning: Before you begin using your chassis, make sure that you have attached the
ferrite block to the Ethernet cable using the procedure below.
Installing the Ferrite Block
To install the ferrite block:
1 Remove the ferrite block and the Ethernet cable from the Cable Kit package.
2 Release the built-in clip on the side of the ferrite block and open it so that the center of
the ferrite block faces up. Place the Ethernet cable in the open ferrite block
(see Figure 1-9 on page 33, #1).
3 Clamp the ferrite block around the Ethernet cable within a few inches of the end of the
connector, making sure that the built-in clip snaps together (see Figure 1-9 on
page 33, #2).
4 Connect the Ethernet cable to the chassis (see Figure 1-9 on page 33, #3).
32 | Getting Started with Spirent TestCenter
Page 33

Getting Started
2
Clamp the ferrite
block around the
Ethernet cable.
1
Place the Ethernet
cable in the opened
ferrite block.
3
Note:
In this example, the ferrite block is placed near the end
of the Ethernet cable that connects to the chassis.
Procedure 6: Install the Ferrite Block
Figure 1-9. Ferrite Block Installation
Getting Started with Spirent TestCenter | 33
Page 34

Getting Started
Procedure 7: Connect Power
Procedure 7: Connect Power
After making all cable connections and installing the ferrite block to the Ethernet cable,
you can connect power to the chassis or appliance.
The Spirent chassis and appliance has an on/off button on the front of the unit that controls
only the DC power. The (DC) POWER button controls the DC power from the power
supply to the components of the chassis.
The AC power is controlled by removing or attaching the AC power cord/s from the back
of the chassis.
Important: On the SPT-N4U, SPT-N11U, SPT-N12U, and SPT-C50, each power supply
must be connected to a 15A circuit that is not shared with other equipment.
Notes: • For complete setup information about the Spirent PX3/DX3-QSFP-DD-8
appliances, refer to the installation documentation that is included in your
shipment. You can also find installation and quick reference documents in the
Knowledge Base. Search on DOC11449 and DOC11450.
AC Power Operation
The SPT-N4U, SPT-N11U, SPT-N12U, and SPT-C50 do not have an AC master power
switch. Remove or attach the power cord to control AC power.
Warning: To power down the unit, use the (DC) POWER button on the front of the
chassis. Under normal circumstances, do not remove the AC power cords for this purpose.
Doing so may lead to equipment failure.
The (DC) POWER button on the front of the chassis performs an orderly (firmwarecontrolled) shutdown of the chassis systems. The removal the AC power cords should
only be used if all power needs to be removed from the chassis (e.g., during maintenance).
In such situations, the AC power cords should only be removed after DC power has been
disabled by using the (DC) POWER button. The DC power is disabled when the main
cooling fans are off, and the Power LED on the front of the chassis is off. This shut down
requires approximately 45 seconds.
DC Power Operation
• For complete setup information about the Spirent C1 appliance, refer to the
installation documentation that is included in your shipment. You can also
find installation and quick reference documents in the Knowledge Base.
Search on DOC10338 and DOC10339.
The DC power button (labeled POWER) is located on the front panel of the chassis or
appliance (refer to the appropriate figures in this section). The POWER button controls the
DC power from the units’ internal AC/DC power supply. Information about how the
button operates begins on page 39.
34 | Getting Started with Spirent TestCenter
Page 35

Figure 1-10. DC Power Button on the SPT-C50 Rev 80-002394
(DC) POWER Button
(DC) POWER Button
(DC) POWER Button
Getting Started
Procedure 7: Connect Power
Figure 1-11. DC Power Button on the SPT-C50 Rev 80-002311
Figure 1-12. DC Power Button on the SPT-C50 C50-S2-RX Rev 80-002535
Getting Started with Spirent TestCenter | 35
Page 36

Getting Started
Power Cord Connector Cooling Fans
(DC)
POWER
Button
Procedure 7: Connect Power
Figure 1-13. Power Connector and Fans on the SPT-C50 C50-S2-RX Rev 80-002535
Figure 1-14. DC Power Button on the SPT-N4U
36 | Getting Started with Spirent TestCenter
Page 37

Getting Started
(DC) Power Button
Procedure 7: Connect Power
Figure 1-15. DC Power Button on the SPT-N11U
Getting Started with Spirent TestCenter | 37
Page 38

Getting Started
DC Power Button
Procedure 7: Connect Power
Figure 1-16. DC Power Button on the SPT-N12U
38 | Getting Started with Spirent TestCenter
Page 39

Getting Started
Procedure 7: Connect Power
DC Power Button Operation for the SPT-C50
The power button on the SPT-C50 is implemented as a momentary switch. It does not
physically change to a different position in the on and off states. The switch on the SPTC50 requires only a momentary activation to switch it on or off.
• To turn the DC power on to the appliance, press the POWER button. The button itself
will be illuminated blue when the appliance is receiving DC power.
• To turn the DC power off to the appliance, press the POWER button. The button will
no longer illuminate blue when the appliance is not receiving DC power.
DC Power Button Operation for the SPT-N4U, SPT-N11U, and SPT-N12U
The power button on the SPT-N4U, SPT-N11U, and SPT-N12U is implemented as a
membrane switch. It does not physically change to a different position in the on and off
states. The membrane switch requires only a momentary activation to switch it on or off.
• To turn the DC power on to the chassis, press the POWER button inward. The
POWER LED will be green when the chassis is receiving DC power.
• To turn the DC power off to the chassis, press the POWER button inward. This
initiates a graceful shutdown of chassis and all modules. The POWER LED will be
off when the chassis is not receiving DC power.
The POWER LED located on the front panel displays the DC power setting of the chassis.
This LED is green when the chassis is receiving DC power. The LED is off when the
chassis is not receiving DC power.
Warning: The status of the POWER LED does not necessarily mean that AC power to
the chassis is on or off. For this reason, be sure to check the status of AC and DC power
before performing maintenance on the chassis. Remove or attach the power cord to control
AC power. Refer to the warning on page 34 under AC Power Operation.
Refer to Hot Swap in the Spirent Hardware Reference for information about hot swapping
test modules with the chassis AC and DC power turned on. See “Spirent Hardware
Reference (DOC10031)” on page 7.
Getting Started with Spirent TestCenter | 39
Page 40

Getting Started
Procedure 8: Set the Chassis IP Address
Procedure 8: Set the Chassis IP Address
Spirent chassis have a default IP address. The default IP address is 192.168.0.100 with a
netmask of 255.255.255.0. This enables quick and easy connection and start up of your
chassis, without the need to use the serial connection.
To view the default address:
• Use an SSH connection (all chassis)
• Use a direct console, built-in touch screen, or web client connection (SPT-N4U and
SPT-N11U)
• Use a direct console or web client connection (SPT-N12U)
When the connection is established, apply the appropriate commands.
Notes: • For complete setup information about the Spirent PX3/DX3-QSFP-DD-8
appliances, refer to the installation documentation that is included in your
shipment. You can also find installation and quick reference documents in the
Knowledge Base. Search on DOC11449 and DOC11450.
• For complete setup information about the Spirent C1 appliance (SPT-C1),
refer to the installation documentation that is included in your shipment. You
can also find installation and quick reference documents in the Knowledge
Base. Search on DOC10338 and DOC10339.
Changing the Default IP Address
SPT-N12U
For the SPT-N12U, you can set a unique IP address by using any of the following:
• Direct video and keyboard console - see “Setting the IP Address using the SPT-N4U,
SPT-N11U, or SPT-N12U Direct Console Connection” on page 42.
• SSH (Ethernet) - see “Setting the IP Address using SSH (all chassis)” on page 43.
• Web client pointed to the chassis IP address - see “Setting the IP Address using Web
Client (SPT-N4U, SPT-N11U, or SPT-N12U)” on page 44
You can also use this connection to configure the chassis’ netmask and gateway values.
SPT-N4U and SPT-N11U
For the SPT-N4U/SPT-N11U, set a unique IP address using any of the following methods:
• Front panel touchscreen - see “Setting the IP Address using the SPT-N4U or SPT-
N11U Front Panel Touchscreen” on page 41.
• Direct video and keyboard console - see “Setting the IP Address using the SPT-N4U,
SPT-N11U, or SPT-N12U Direct Console Connection” on page 42.
• SSH (Ethernet) - see “Setting the IP Address using SSH (all chassis)” on page 43.
• Web client pointed to the chassis IP address - see “Setting the IP Address using Web
Client (SPT-N4U, SPT-N11U, or SPT-N12U)” on page 44
40 | Getting Started with Spirent TestCenter
.
Page 41

Getting Started
Procedure 8: Set the Chassis IP Address
You can also use this connection to configure the chassis’ netmask and gateway values.
Refer to “Setting the Netmask and Gateway Values (all chassis)” on page 46.
Refer to “Setting the Netmask and Gateway Values (all chassis)” on page 46
SPT-C50
For the SPT-C50, set a unique IP address by using either of these methods:
• Attach a USB keyboard and VGA monitor to the appliance
• Use a communication program to SSH (secure shell) over the Ethernet administration
port to the SPT-C50 default IP address
See “Setting the SPT-C50 Addressing mode, IP Address, Netmask and Gateway”.
Setting the IP Address using the SPT-N4U or SPT-N11U Front Panel Touchscreen
The built-in touch screen interface allows reconfiguring of the chassis IP address settings.
To set the IP address using the SPT-N4U or SPT-N11U touch screen:
1 Use your finger to press the Configure button on the Wel co me screen.
2 Press on the IP Address text box to bring up a keyboard for entering the address.
3 Enter the address and press Go.
4 Repeat Step 2 to enter the IP Gateway Address and IP Netmask, if necessary.
5 Press the Submit button.
The settings will be applied and the controller will automatically reboot.
Getting Started with Spirent TestCenter | 41
Page 42

Getting Started
Procedure 8: Set the Chassis IP Address
Setting the IP Address using the SPT-N4U, SPT-N11U, or SPT-N12U Direct Console Connection
To set the IP address using the SPT-N4U, SPT-N11U, or SPT-N12U direct console
connection:
1 Connect a video monitor and USB keyboard and mouse to the chassis.
The chassis prompt appears:
login:
Password:
2 Access the chassis by logging in. Log in as admin to change chassis parameters (IP
address, gateway, netmask, etc.).
a Typ e admin <enter>.
b Type
3 Enter a chassis command.
• To view the chassis IP address, type the command
• To set the chassis IP address, type the command ipaddress <new ip address>
spt_admin <enter>
ipaddress <no parameter>
When log in is complete, you see the command prompt admin>
Note: At this time, you should change the netmask and default gateway if your controller
PC and chassis will be on different subnets. Refer to “Setting the Netmask and Gateway
Values (all chassis)” on page 46.
4 Apply and save the settings.
Enter the Spirent TestCenter command
activate.
The settings will be applied and the controller will automatically reboot.
Note: It may take up to several minutes for the new IP address to take effect after the
activate command is issued.
42 | Getting Started with Spirent TestCenter
Page 43

Setting the IP Address using SSH (all chassis)
With an SSH connection, you can use the same Spirent chassis commands that are
available on the chassis direct console. There are several methods for starting an SSH
session on your PC.
The following procedure describes the use of SSH with the PuTTY client for Windows.
Other clients and operating systems offer similar features, but the specific syntax may be
different.
To set the IP address using SSH:
1 Download and install PuTTY to your Windows controller PC.
2 Select Start > Run > <install path> putty.exe.
The PuTTY client opens.
3 Connect to the chassis by entering the chassis default IP address (192.168.0.100) for
the software.
The chassis prompt appears:
login:
Password:
Getting Started
Procedure 8: Set the Chassis IP Address
4 Access the chassis by logging in.
Log in as admin to change chassis parameters (IP address, gateway, netmask, etc.).
a Typ e
b Type
admin <enter>.
spt_admin <enter>
5 Enter a chassis command.
• To view the chassis IP address, type the command
ipaddress <no parameter>
• To set the chassis IP address, type the command ipaddress <new ip address>
When login is complete, you see the same command prompt (>>) as you would when you
are connected using the direct console.
Note: At this time you should change the netmask and default gateway if your controller
PC and chassis will be on different subnets. Refer to “Setting the Netmask and Gateway
Values (all chassis)” on page 46.
6 Apply and save the settings.
Enter the Spirent TestCenter command
activate
The settings will be applied and the controller will automatically reboot.
Note: It may take up to several minutes for the new IP address to take effect after the
activate command is issued.
Getting Started with Spirent TestCenter | 43
Page 44

Getting Started
Procedure 8: Set the Chassis IP Address
Setting the IP Address using Web Client (SPT-N4U, SPT-N11U, or SPT-N12U)
The built-in web server allows reconfiguring of the chassis IP address settings.
To set the IP address using a web client:
1 Open a web client on the controller PC and enter the default IP address in the address
bar (
http://192.168.0.100) and press Enter on the keyboard.
This launches the Wel co me screen.
2 Click on the link titled Reconfigure the Chassis.
This launches the Chassis Configuration screen.
3 Click the Configure button.
4 Click in the IP Address text box to enter the address and then press Enter.
5 Repeat Step 4 for the IP Gateway Address and IP Netmask, if necessary.
6 Click the Submit button.
The settings will be applied and the controller will automatically reboot.
Note: It may take up to several minutes for the new IP address to take effect.
Tip: Refer to the Chassis Commands section in the Spirent Hardware Reference for
information about Spirent chassis commands. This resource is available on the Spirent
Customer Service website. See “Spirent Hardware Reference (DOC10031)” on page 7.
44 | Getting Started with Spirent TestCenter
Page 45

Getting Started
Procedure 8: Set the Chassis IP Address
Setting the SPT-C50 Addressing mode, IP Address, Netmask and Gateway
If you are connecting the SPT-C50 to a LAN, you will probably need to change the IP
address information. Obtain an unused IP address, netmask, and default router from your
IT department.
There are two methods to change these SPT-C50 settings:
• Attach a USB keyboard and VGA monitor to the appliance.
• Always connect these devices while the appliance is powered off.
• Use one of the black USB 2.0 connectors for the keyboard.
• Use a communication program to SSH (secure shell) over the Ethernet administration
port to the SPT-C50 default IP address.
• The SPT-C50 default IP address is 192.168.0.100, with a netmask of
255.255.255.0
Whichever method you use to connect to the appliance, you will be presented with a login
prompt when the appliance is fully booted up. Use the system administrator login /
password. The following text shows an example login.
login as: admin
admin@192.168.0.100’s password: spt_admin
Last login: Mon Oct 15 13:28:22 2018 from 192.168.0.101
Product : C50
Chassis OS : 9.90.6363
Hypervisor Version : 1.5.0
Device (IPv4) admin : 192.168.0.100 255.255.255.0, Gateway: 192.168.0.1 (static)
Serial number : <serial number>
admin>
You can now use the following commands to set the addressing mode and/or set the IP
address, netmask and gateway. When you have made your changes, you must activate the
new settings and reboot the appliance:
admin> mode ––> shows the current IP addressing mode
New: static Current static
admin> mode dhcp ––> sets the IP addressing mode to DHCP
admin> mode static ––> sets the IP addressing mode to static
Note: You must manually set the IP address, netmask, and gateway if you use the static
setting.
admin> ipaddress ––> shows the current IP address
New: 192.168.0.100 Current: 192.168.0.100
admin> ipaddress 192.168.1.123 ––> sets the IP address
admin> netmask ––> shows the current netmask
New: 255.255.255.0 Current: 255.255.255.0
admin> netmask 255.255.254.0 ––> sets the netmask
Getting Started with Spirent TestCenter | 45
Page 46

Getting Started
Procedure 8: Set the Chassis IP Address
admin> gwaddress ––> shows the current gateway address.
New: 192.168.0.1 Current: 192.168.0.1
admin> gwaddress 192.168.1.1 ––> sets the gateway address.
admin> activate ––> activates your new settings
Note: If you are connected using SSH, you will lose connectivity when you use the
activate command. You must log back in to the appliance using the new IP address.
When the SPT-C50 appliance restores after the power cycle, it is ready for use with the
Spirent TestCenter GUI, or an automation script (if supported in your current release).
Setting the Netmask and Gateway Values (all chassis)
The netmask and gateway values are assigned by using direct console (SPT-N4U,
SPT-N11U, and SPT-N12U only) or SSH terminal. Refer to these sections for detailed
steps:
• “Setting the IP Address using the SPT-N4U, SPT-N11U, or SPT-N12U Direct Console
Connection” on page 42
• “Setting the IP Address using SSH (all chassis)” on page 43
You must be logged on as “admin” to use “set...” commands. Once connected to the
terminal, use the chassis commands in Table 1-3 to assign netmask and gateway values.
Table 1-3. Netmask and Gateway Commands
Command Description
gwaddress Displays the chassis gateway address
netmask Displays the network mask for the chassis
host network interface
gwaddress <gateway address> Sets the chassis gateway address
netmask <netmask> Sets the chassis network mask
46 | Getting Started with Spirent TestCenter
Page 47

Procedure 9: Confirm the Ethernet Link
If you have not already connected the chassis to a PC, hub, or LAN, do so now. See
Table 1-1 on page 30 for required cable connections.
Use standard network troubleshooting techniques to verify that the network can see the
chassis. Ping the Ethernet link between the PC and the chassis, and ping the chassis’ IP
address. If there are problems with the network connection, contact your network
administrator.
Getting Started
Procedure 9: Confirm the Ethernet Link
Getting Started with Spirent TestCenter | 47
Page 48

Getting Started
Procedure 10: Using the Authenticate Mode (optional)
Procedure 10: Using the Authenticate Mode (optional)
Authenticate mode allows the user to set a password on the chassis or appliance,
permitting only authorized users to access the equipment. The Authenticate commands
can only be accessed when the user is directly connected to the chassis or appliance using
a USB keyboard and DVI video monitor. If SSH is used to access the chassis or appliance,
these commands will not be available.
When authenticate is “on” or “reset,” a password must be generated using simple ASCII
text, but it cannot be left blank. Once the password is generated, the Spirent TestCenter
GUI or API user will be required to enter the generated password when they attempt to
connect to the chassis or appliance.
Note: This feature is available on the SPT-N12U, SPT-N11U, SPT-N4U, SPT-C1, SPTC50, SPT-C50-S2-RX, and the PX3/DX3-QSFP-DD-8 appliances.
• Refer to the Spirent C1 Installation Instructions for complete install, set up, and usage
information for the SPT-C1.
• Refer to the Spirent PX3/DX3-QSFP-DD-8 Installation Guide or complete install, set
up, and usage information for these appliances.
These instructions explain how to use Authenticate mode on your chassis:
Note: The Black Bold text is user input; Blue Bold text is console output.
1 Connect to chassis via console (keyboard and display connected)
2 Login as user admin (password: spt_admin)
admin>
To turn authenticate mode on
admin> authenticate on
authenticate mode is currently disabled
Enter Password to Enable Authenticate Mode:
Re-Enter Authenticate Mode Password:
Authenticate Mode is now enabled!
To turn authenticate mode off
admin> authenticate off
authenticate mode is currently enabled
Enter the Saved Password to Disable Authenticate Mode:
Authenticate Mode is now disabled!
48 | Getting Started with Spirent TestCenter
Page 49

Procedure 10: Using the Authenticate Mode (optional)
To reset the password
admin> authenticate reset
authenticate mode is currently enabled
Enter a new Password to Reset/Enable Authenticate Mode:
Re-Enter the new Authenticate Mode Password:
Authenticate Mode is now enabled with a new password!
Getting Started
Getting Started with Spirent TestCenter | 49
Page 50

Getting Started
Procedure 11: Obtain Your License Key
Procedure 11: Obtain Your License Key
There are two types of license keys.
• Chassis license keys reside on the chassis (page 50)
• Tes t mod ule license keys reside on test module (page 53)
Refer to the applicable section in this procedure for the type of license you need.
Chassis License Key
Use your License Entitlement ID (EID) to obtain your license key file from the Spirent
Communications Customer Service Center website and then use the Spirent TestCenter
License Management window to install it on your chassis controller.
• The License Entitlement ID is on the License Entitlement ID Certificate that is
shipped with the Spirent TestCenter software.
• The License Entitlement ID will also be emailed to you, if your email address was
included on your purchase order.
If you included a request for Spirent to install the license key on the chassis when you
placed your order, you may skip this section and go to Procedure 12 on page 54.
Note: Each activation screen in the process provides detailed step-by-step instructions.
The instructions in this section are an overview of the license activation process that you
will follow from the Customer Service Center home page.
To obtain your license key file:
1 Locate the License Entitlement ID (EID) that applies to your order.
2 Go to
3 Click the License Activation item in the top menu.
https://support.spirent.com
The License Activation page opens (Figure 1-17 on page 51).
Review the instructions on this screen carefully before you continue.
50 | Getting Started with Spirent TestCenter
Page 51

Getting Started
Procedure 11: Obtain Your License Key
Figure 1-17. License Activation
4 Enter your License Entitlement ID (this field is case-sensitive). Include any hyphens.
5 Click Login.
The STEP 1 window opens. This includes two options:
• Activate licenses
• Manage licenses
6 Select the license(s) you wish to activate for a specific Host ID and click Activate.
Note: If you ordered a Support Agreement, it must also be checked to be included in
the license file for the specific chassis.
The STEP 2 window opens. Confirm the correct license and click Next.
7 Click Add New Host.
The STEP 3 window opens. Enter the Host ID, review the instructions on the screen,
and click Generate.
8 Select the Host ID you entered and click Next.
The STEP 4 window opens. Select the licenses you want to save to file or email.
Getting Started with Spirent TestCenter | 51
Page 52

Getting Started
Procedure 11: Obtain Your License Key
9 Follow the instructions in the STEP 4 window to specify the method by which you
want your license file to be delivered to your computer.
•Click Save to File to browse the directory structure on your PC. After selecting a
location, rename the file according to your preference, using an .lic extension.
•Click Email to send the license key text to your email address. You can then copy
this text into a license file on a directory on your PC.
Note: You can rename the license file using Microsoft file naming parameters. The
file name should contain the chassis controller serial number for easy identification.
This provides an easy way to manage licenses and to inventory the components of
your system.
10 Click Complete.
11 On the License Fulfillment page, Click Manage Licenses to see the parameters of the
license that you generated.
12 If there are multiple licenses, follow the steps on the screen to consolidate them.
You can load your license key file onto your Spirent chassis controller. This will enable
you to use your new Spirent hardware and test applications.
To copy a license key file to a chassis controller:
1 Connect to the chassis on which you want to install the license.
2 Select Too ls > Licensing Management in the main window menu.
The Licensing Management window opens.
3 Click Install to display the Install License File dialog box.
4 Browse to the folder that contains the license file (*.lic) you want to install.
5 Select the license file and click the Open button.
This initiates license installation.
6 Disconnect from the chassis, and then reconnect to the chassis.
This action is required to reload the license into the Spirent TestCenter application
cache on your computer.
Tip: If you try to run a test before you disconnect and reconnect, Spirent TestCenter will
generate an error log message.
52 | Getting Started with Spirent TestCenter
Page 53

Getting Started
Procedure 11: Obtain Your License Key
Test Module License Key
Note: If you have purchased a new test module, the license is installed at the factory, prior
to shipment. If you have purchased additional speeds or ports, the license file will be
emailed to you. Please contact Customer Support to obtain the license key (refer to page 9
for complete contact information).
To copy a license key file to a test module:
1 Connect to the chassis with test module on which you want to install the license.
2 Select Tools > Licensing Management in the main window menu.
The Licensing Management window opens.
3 Go to the Test Module tab and make sure View By: Speed is selected.
4 Select the Test Module on which you want to install the license.
5 Click Install to display the Install License File dialog box.
6 Browse to the folder that contains the license file (*.json) you want to install.
7 Select the license file and click the Open button.
This initiates license installation.
8 Disconnect from the chassis, and then reconnect to the chassis.
This action is required to reload the license into the Spirent TestCenter application
cache on your computer.
Getting Started with Spirent TestCenter | 53
Page 54

Getting Started
DUT/SUT
Connect to the Ethernet
port on the chassis back
WAN/LAN
DUT/SUT
Connect to the Ethernet
port on the chassis back
panel
Procedure 12: Connect to a DUT/SUT
Procedure 12: Connect to a DUT/SUT
Connecting to a DUT (device under test) or SUT (system under test) involves two main
procedures:
• Connecting your chassis to a PC or network
• Connecting the Spirent test modules to the DUT/SUT
Connecting your Chassis to a PC or Network
To connect your Spirent chassis either to your PC or to the network to which your PC is
connected, use the chassis’ Ethernet port labeled
located on the chassis’ back panel.
Connect the chassis to the desired device(s) or network to be tested via either of the
methods shown in Figure 1-18 or Figure 1-19.
ETHERNET INTERFACE (RJ-45)
Figure 1-18. Connecting the PC Directly to the Chassis and to the DUT/SUT
Figure 1-19. Connecting the PC via a WAN/LAN to the Chassis and to the DUT/SUT
54 | Getting Started with Spirent TestCenter
Page 55

Getting Started
Procedure 12: Connect to a DUT/SUT
Important: You must position and install the provided ferrite block onto the Ethernet
cable (at the chassis end) that attaches the chassis to your network. The ferrite block
reduces potential EMI interference. Refer to “Procedure 6: Install the Ferrite Block” on
page 32 for details on connecting the ferrite block.
Connecting Test Modules to the DUT/SUT
Spirent test modules connect to a DUT/SUT via the connectors on each unit. To connect a
test module to a DUT/SUT, you must determine the type of ports (connectors) on your test
module and on the DUT/SUT.
To connect a test module to a DUT/SUT:
1 Determine the type of connectors used on your DUT/SUT, and then refer to Connec-
tors and Cables in the online Spirent Hardware Reference for pin-out information on
cables used to connect the test module to the DUT. (This resource is available on the
Spirent Customer Service website. See “Spirent Hardware Reference (DOC10031)”
on page 7.)
2 Match the pin-outs of the cables described in the Spirent Hardware Reference with the
requirements of the connectors on your DUT/SUT and select the correct cable.
Note: Most test setups require a minimum of two port connections to the DUT/SUT:
one port to transmit traffic, and one port to receive traffic. Many tests are also set up
as partial or full mesh, uni-directional or bi-directional, full or half duplex, single-tomany ports, or many-to-many ports. For sample test scenarios, refer to the online Help
for each test application.
3 Connect the test module to the DUT/SUT, and ensure that the chassis and DUT/SUT
are on a stable surface and that proper ESD guidelines are followed.
Your equipment is ready to use for testing.
Important: • All customers: Before you begin testing, check your environment and
make sure that you follow the EMI guidelines as described in
Appendix C, “ESD Requirements.” Once the testing environment is
properly prepared, you are ready to use the appropriate software for the
tests you want to perform. Failure to comply with these guidelines may
produce invalid test results.
• vLS customers: Proceed to Appendix A, “Install and Configure Spirent
Virtual LabServer.” Complete the vLS installation and configuration
tasks before you set up and run tests.
Getting Started with Spirent TestCenter | 55
Page 56

Getting Started
Procedure 13: Configure and Run Tests
Procedure 13: Configure and Run Tests
You are ready to configure and run tests. To get started, refer to the online Help file
included with each application. Additional user documentation is available on your
installation DVD and on the Customer Service Center (
Note: Spirent TestCenter automation user documentation is available in PDF and HTML
formats on the installation DVD and on the Spirent Customer Service Center (CSC)
website.
https://support.spirent.com).
56 | Getting Started with Spirent TestCenter
Page 57

Appendix A
Install and Configure Spirent Virtual LabServer
This appendix provides installation and configuration instructions for the Spirent Virtual
LabServer (vLS).
• Spirent Virtual LabServer (vLS) . . . . 58
• Deploying Spirent Virtual LabServer with ESXi . . . . 59
• Deploying Spirent Virtual LabServer with KVM . . . . 60
• Deploying Spirent Virtual LabServer as a Docker Container . . . . 62
• Configure Spirent vLS VM . . . . 63
• Spirent vLS Commands . . . . 65
• Configure System . . . . 66
• Shell Access . . . . 68
Getting Started with Spirent TestCenter | 57
Page 58

Appendix A: Install and Configure Spirent Virtual LabServer
Spirent Virtual LabServer (vLS)
Spirent Virtual LabServer (vLS)
Spirent provides the following files to create vLS, effective with Spirent TestCenter
version 4.99:
• OVA format VM Image (Spirent_TestCenter_LabServer-4.99.xxxx.ova)
• Checksum file (Spirent_TestCenter_LabServer-4.99.XXXX.ova.sha256)
• OVA format VM Image (Spirent_TestCenter_LabServer-4.99.xxxx-SHA1.ova)
• Checksum file (Spirent_TestCenter_LabServer-4.99.XXXX-SHA1.ova.sha1)
• QCOW2 format VM Image (Spirent_TestCenter_LabServer-4.99.xxxx.qcow2)
• Checksum file (Spirent_TestCenter_LabServer-4.99. XXXX.qcow2.sha256)
• QCOW2 format VM Image (Spirent_TestCenter_LabServer-4.97.xxxx-
compat.qcow2)
• Checksum file (Spirent_TestCenter_LabServer-4.97. XXXXcompat.qcow2.sha256)
• XZ format Docker Container Image (labserver-4.99.xxxx.tar.xz)
• Checksum file (labserver-4.99.xxxx.tar.xz.sha256)
Note: The file names provided in this section are examples of the file formats. The release
version number may be different in your product.
You can choose either the OVA or QCOW2 VM image file to create the vLS, depending
on the hypervisor in your virtualization environment. Users with older hypervisors may
use the OVA image with the -SHA1 name, if the system does not support an SHA256
checksum. The two OVA files are otherwise identical.
Users with older QEMU hypervisors should use the QCOW2 image with the -compat file
name; this file can be read by any QEMU version since 0.10. The QCOW2 image without
the -compat file name contains image format extensions that can only be understood by
QEMU version 1.1 and newer. The two QCOW2 files are otherwise identical.
Choose the Docker container image if you want to run LabServer natively on a bare metal
Linux server without a hypervisor. Checksum files (<filename>.sha256 or
<filename>.sha1) are available for the container and VM images to verify the integrity of
the downloaded files.
Notes: • Recommended system requirements for vLS:
• 4 core CPU
• 32 GB RAM
• 100 GB disk (SSD or better)
Five (5) concurrent RFC2544 benchmark tests of 90 ports each were tested on
this system configuration.
• If you need to run sensitive or long duration production tests, with a custom
array of mixed protocols, and you want to ensure the system is configured
appropriately, please contact Spirent Customer Support (refer to page 9 for
complete contact information).
58 | Getting Started with Spirent TestCenter
Page 59

Appendix A: Install and Configure Spirent Virtual LabServer
Spirent Virtual LabServer (vLS)
When using either of the VM images, the vLS virtual machine should be configured to use
bridged networking, so it will be connected directly to the physical network and have its
own external IP address, reachable from outside the host. Figure A-1 on page 59 shows
the vLS in a bridged network.
Figure A-1. Spirent LabServer VM Bridged Virtual Network
When connecting to the Virtual LabServer in the Spirent TestCenter Session Manager, the
Server Name to select in the Choose Server popup depends on how the LabServer is
deployed (VM or container):
• Use the VM host IP address or hostname, if you are running either of the VM images.
• Use the Linux server host IP address or hostname, if you are running the Docker
container image on a bare metal Linux server.
Deploying Spirent Virtual LabServer with ESXi
To deploy the LabServer VM using vSphere Client for VMware ESXi, you must load the
OVA file from the File menu option Deploy OVF Template…
Figure A-2. Deploy OVF Template...
Getting Started with Spirent TestCenter | 59
Page 60

Appendix A: Install and Configure Spirent Virtual LabServer
Spirent Virtual LabServer (vLS)
Prior to starting the VM, set the configuration settings to the number of CPUs, amount of
memory, and hard disk capacity to the values listed in the recommended system
requirements (page 58), as well as configuring for bridged networking.
Timing for the VM should be provided by the Network Time Protocol (NTP), not the
VMware clock synchronization software. The latter is turned off by disabling time sync
under VMware Tools features. The Synchronize guest time with host box should be
unchecked as shown in Figure A-3.
Figure A-3. Disable Time Sync
Deploying Spirent Virtual LabServer with KVM
To deploy the Labserver VM using KVM, execute the following commands on the
hypervisor to configure the VM network.
sudo brctl addbr br0
On BSD Linux:
sudo /sbin/ifconfig <tap name> create
sudo /sbin/ifconfig br0 adm <tap name> up
sudo /sbin/ifconfig <tap name> up
Other Linux:
sudo tunctl -t <tap name>
sudo ip link set <tap name> up
sudo brctl addif br0 <tap name>
Notes: • Each of these commands must be executed again, if the hypervisor is
rebooted. Alternatively, the commands could be put into a startup script, so
they execute automatically.
• The maximum length for tap name is 16 characters. Any additional
characters are truncated.
60 | Getting Started with Spirent TestCenter
Page 61

Appendix A: Install and Configure Spirent Virtual LabServer
Spirent Virtual LabServer (vLS)
Before starting the VM, increase the size of the VM image file system to 100 GB, so that
the recommended 100 GB of disk space will be accessible. Execute the following
command to increase the file system by 90 GB (added to the initial size of 10 GB):
sudo qemu-img resize <file path of qcow2 image> +90G
On the hypervisor, launch the VM with the QCOW2 image and the recommended 32 GB
of memory (-m 32768) by executing the following:
sudo kvm -k en-us -m 32768M -drive file=<file path of qcow2
image>,cache=none,if=virtio,discard=unmap -serial telnet:<host
IP>:<available port>,server,nowait -monitor
telnet:127.0.0.1:<available port> -net
nic,vlan=1,model=virtio,name=admin0,macaddr=<VM eth0 mac
address>,netdev=nic-0 -netdev tap,id=nic-0,ifname=<tap
name>,script=no,downscript=no,vhost=on -cpu host -smp 4 nographic &
Upon startup, a script in the VM will automatically perform the remaining steps to
configure the virtual machine so that it will have access to 100 GB of disk space.
Getting Started with Spirent TestCenter | 61
Page 62

Appendix A: Install and Configure Spirent Virtual LabServer
Spirent Virtual LabServer (vLS)
Deploying Spirent Virtual LabServer as a Docker Container
The documentation for Docker at https://docs.docker.com/engine provides instructions for
setting up Docker on Linux.
When Docker is installed, follow these steps to get the LabServer container running:
1 Copy the labserver-4.97.xxxx.tar.xz container image to the Linux host in a
temporary location, such as /tmp, then go to that directory and load the image using
the docker load command:
xzcat labserver-4.97.xxxx.tar.xz | docker load
Note: The execution of Docker commands can only be done by user root or by a user
who is a member of the
2 Perform the following command to reserve the ports LabServer uses to communicate
with Spirent TestCenter sessions:
sudo sh -c 'echo "40000-46000" >
/proc/sys/net/ipv4/ip_local_reserved_ports'
docker group.
3 Start the container by executing the docker run command:
Note: In the docker run command below, replace license.site.customer.com with
the host name of your license server. The license server is only required if you are
using a virtual chassis. It is optional for physical chassis.
docker run --name labserver -v /data:/data --detach=true -net=host --log-opt max-size=10m --log-opt max-file=5 -e
'SPIRENTD_LICENSE_FILE=@license.site.customer.com' $(docker
images -q registry.oriontest.net/lab
server:latest)
The deployment of the LabServer container is complete. You can connect to the
LabServer from the Session Manager using the IP address or hostname of the Linux host.
To change the license server of a container that is already running:
1 Use the docker stop command to stop the container.
docker stop labserver
2 Execute the docker run command again with the SPIRENTD_LICENSE_FILE
environment variable set to the new license server host.
To completely remove the container and/or the LabServer image from the host:
Use the docker rm and docker rmi commands, respectively.
docker rm -f labserver
docker rmi -f $(docker images -a -q registry.oriontest.net/
labserver:latest)
62 | Getting Started with Spirent TestCenter
Page 63

Configure Spirent vLS VM
When a VM running either the Spirent_TestCenter_LabServer-4.99.xxxx OVA or
QCOW2 image is started, it should be ready to use, if the VM is connected to a network
that provides DHCP-assigned IP addresses.
1 To obtain that address, log in to the VM with user ID admin and password spirent.
• For ESXi, log in on the ESXi admin console.
• For KVM, telnet to the telnet host and port specified in the command that created
the VM.
Note: All admin configuration can be performed from the admin console or telnet
port. Optionally, SSH can be used; however, it is disabled by default. To enable SSH,
select [1] Configure System followed by [7] SSH. At the Enable SSH prompt, enter
“y”, then select Save changes [10].
The IP address should be displayed at the login prompt (Note: If the telnet session
only responds with “Escape character is ‘^]”, press Enter one or more times). If the
address is displayed, use the escape sequence, and then quit out of telnet.
telnet <host IP> <telnet port>
Trying 10.28.226.20...
Connected to 10.28.226.20.
Appendix A: Install and Configure Spirent Virtual LabServer
Spirent Virtual LabServer (vLS)
Escape character is '^]'.
Started labserver
IP Addr: 10.28.239.108
MAC Addr: 00:a1:f5:3b:03:00
rune-00a1f53b0300 login:
If the IP is not displayed, proceed with the login at the prompt with user ID admin
and password spirent. When presented with the admin menu, select [6] Shell Access,
and then execute the
rune-00a1f53b0300 login: admin
Password:
Linux rune-00a1f53b0300 3.16.0-4-amd64 #1 SMP Debian
3.16.39-1+deb8u1 (2017-02-22) x86_64
[1] Configure System
[2] Configure Container
[3] System Information
ifconfig command to get the IP address of the eth0 interface.
Getting Started with Spirent TestCenter | 63
Page 64

Appendix A: Install and Configure Spirent Virtual LabServer
Spirent Virtual LabServer (vLS)
[4] System Status
[5] View Journal
[6] Shell Access
[7] Exit
(waiting 30 seconds) Select option [7]: 6
sudo /bin/bash
ifconfig eth0
2 To configure the license server host, select [2] Configure Container, followed by [4]
Set License Server. At the Enter license server host: prompt, enter the license
server host name, followed by [6] Apply change and start new container.
Note: The license server is only required if you are using a virtual chassis. It is
optional for physical chassis.
3 If a static IP is preferred, instead of the default DHCP method of obtaining an address,
select [1] Configure System followed by [1] Networking section menu items, and
set Use DHCP to “n”. Follow the prompts to enter the static IP address, netmask and
gateway information, along with an optional static route. When you are finished,
select [10] Save changes.
4 By default, the VM will use DHCP to obtain its NTP server(s).
If you want to configure the NTP servers manually instead, select [1] Configure
System followed by [5] NTP. Follow the prompts to configure one or more servers.
When you are finished, select [10] Save changes.
This completes the vLS VM setup. If the VM requires configuration with settings other
than the defaults, use the admin shell to perform this setup. The commands available in the
admin shell are shown in the “Spirent vLS Commands” on page 65 section.
You can launch Spirent TestCenter Session Manager and connect to the vLS using the IP
address of the VM. (Refer to the Session Manager online Help for information about
connecting to the vLS.)
64 | Getting Started with Spirent TestCenter
Page 65

Spirent vLS Commands
Administrative functionality is available by logging into the VM as admin; the default
password is spirent. The login shell for the admin account provides an interactive menu
that allows you to configure the VM from the console. This allows an administrator to
easily configure a VM appliance, via the console, if necessary. Console configuration may
be necessary if a static IP is required. You can also get various system and status
information from the console.
The top-level administration menu looks like this:
[1] Configure System
[2] Configure Container
[3] System Information
[4] System Status
[5] View Journal
[6] Shell Access
[7] Exit
(waiting 30 seconds) Select option [7]:
Appendix A: Install and Configure Spirent Virtual LabServer
Spirent Virtual LabServer (vLS)
The first two items on the top-level menu provide all of the menu-driven configuration
that is available in the admin shell.
Getting Started with Spirent TestCenter | 65
Page 66

Appendix A: Install and Configure Spirent Virtual LabServer
Spirent Virtual LabServer (vLS)
Configure System
Navigate to the first item of the top-level menu, Configure System, to see the following:
>>>>> System configuration <<<<<
[1] Networking
[2] Hostname
[3] Admin Password
[4] DNS
[5] NTP
[6] Proxy
[7] SSH
[8] SSL
[9] Exit without saving
If any configuration changes are made, an additional option Save changes will appear on
this menu. The changes must be saved, or they will be lost upon exiting the shell.
• To enable/disable DHCP, select [1] Networking and enter “y” or “n” at the Use
DHCP (y/n): prompt. If disabling, follow the subsequent prompts to set the IP
address, netmask, gateway, and any optional static routes, to configure a static IP for
the VM.
• To set the VM hostname, select [2] Hostname and enter the new name at the Current
hostname: prompt.
Note: The container must be restarted for the LabServer to display the new name in
the Host field of the Session Manager.
From the top level of the administration menu, select [2] Configure Container, [3]
Reset container, and [6] Apply change and start new container. After the restart,
newly created sessions will reflect the new hostname.
• To change the admin user’s password, select [3] Admin Password and enter the new
password at the Password: prompt.
• To configure DNS, select [4] DNS and enter nameserver IP addresses and search
domains, as necessary.
• To enable/disable NTP, select [5] NTP and enter “y” or “n” at the Enable NTP?
prompt. If enabling, follow the subsequent prompts to add the NTP server(s).
• To enable/disable HTTP/HTTPS proxy, select [6] Proxy and enter “y” or “n” at the
Enable HTTP/HTTPS Proxy? Prompt, and enter the HTTP Proxy and HTTPS
Proxy addresses.
• To enable/disable SSH, select [7] SSH and enter “y” or “n” at the Enable SSH?
prompt.
66 | Getting Started with Spirent TestCenter
Page 67

Appendix A: Install and Configure Spirent Virtual LabServer
Spirent Virtual LabServer (vLS)
• To configure SSL, select [8] SSL. If your webapp.key and webapp.crt files have been
uploaded to /etc/ssl/private, enter “y” at the Have you uploaded the private-key and
certificate? prompt. If the files have not been uploaded, enter “n” and select [9] Exit
without saving; upload the files, and execute the SSL menu item again.
For changes to any of the settings in the menu to take effect, you must select [10] Save
changes before exiting. The latter item will be added to the menu selections, if any
changes are made while running the admin shell.
Configure Container
Navigate to the second item on the top menu, Configure Container, to see the following:
>>>>> Container configuration <<<<<
[1] Load image from registry
[2] Load image from file
[3] Reset container
[4] Set environment variables
[5] Set License Server
[6] Cancel
Select option:
[1] Load image from registry is used to start the container with an image from a Docker
registry.
[2] Load image from file is used to start the container with an image copied to the /tmp
directory on the VM.
[3] Reset container stops and removes the current running container and starts a new
container instance.
[4] Set environment variables is used to add or update environment variables inside the
running container.
[5] Set License Server sets an environment variable that tells the LabServer the address
of license server.
If any changes are made in items 1 through 5, then item [7] Apply change and start new
container will appear. You must select this item for the changes to take effect.
Other than [5] Set License Server, under normal circumstances, the items at this level will
rarely be used.
Getting Started with Spirent TestCenter | 67
Page 68

Appendix A: Install and Configure Spirent Virtual LabServer
Spirent Virtual LabServer (vLS)
Shell Access
The main menu also provides the [6] Shell Access option that allows the admin user to
access a bash shell on the VM. Privileged (root) access is available via the sudo command,
if needed. This allows administrators to perform any necessary operations that are not
available from the admin menu.
Once in the bash shell, you can gain access into the LabServer container itself by
executing the following:
docker exec -ti $(docker ps -q -f ancestor=$(docker images -q
registry.oriontest.net/labserver)) /bin/bash
Other Options
The other options available from the main, System Information, System Status, and View
Journal allow the admin user to inspect various types of information describing the VM
and its current state.
68 | Getting Started with Spirent TestCenter
Page 69

Appendix B
Upgrade/Downgrade Procedures
In this appendix...
• Introduction . . . . 70
• Before You Begin . . . . 70
• To Verify Support Entitlement . . . . 71
• About Installing on Computers Running Windows® . . . . 72
• Installation Option 1: Using the DVD . . . . 73
• Installation Option 2: Using the Website . . . . 74
• About Installing on Linux® Workstations . . . . 77
• Installation Option 1: Using the DVD . . . . 79
• Installation Option 2: Using the Website . . . . 81
• About Upgrading Spirent TestCenter vLS Software . . . . 82
• To Download and Upgrade vLS Server Software . . . . 82
Getting Started with Spirent TestCenter | 69
Page 70

Appendix B: Upgrade/Downgrade Procedures
Introduction
Introduction
This appendix introduces Spirent TestCenter software installation procedures. An
installation may be either an upgrade or a downgrade.
Spirent TestCenter installation files can be downloaded from the installation DVD
(included with chassis shipments), or from the Spirent Communications support website.
If you do not already have Spirent hardware, software, and firmware installed refer to
“Getting Started” on page 11.
Before You Begin
The detailed instructions in this section support an upgrade or downgrade of Spirent
TestCenter applications on a computer running a supported version of Microsoft
Windows
Important: • If you are downgrading Spirent TestCenter, follow the instructions
®.
provided in “Installation Option 2: Using the Website” on page 74 and
select the application and firmware files for the downgrade version you
need. If the files for the version to which you want to downgrade are not
available on the Customer Service Center website, contact
support@spirent.com
®
for assistance.
• It is important to note that some Spirent modules cannot be downgraded
below a specific release. Please check the Product Alerts for your current
release on the Spirent Customer Service website before attempting to
downgrade your chassis or module firmware (
support.spirent.com). If an unsupported module downgrade is
performed, the module will be unharmed, but it will be non-operational
for that release.
Note: For Spirent TestCenter Extreme Automation™ Toolkit customers: Use the
installation instructions in this document to install the Windows and Linux versions of the
Spirent TestCenter Application.
Refer to the Spirent TestCenter Extreme Automation™ Toolkit Release Notes for
additional Toolkit installation and setup instructions. These release notes are in the
Knowledge Base area of the Customer Service Center (CSC). Search using the document
title or DOC10751.
https://
70 | Getting Started with Spirent TestCenter
Page 71

To Verify Support Entitlement
Appropriate licensing is required to use any Spirent TestCenter application for testing.
If your Spirent TestCenter Support Entitlement has expired, you will not be able to use
upgraded software. A Support Entitlement is current if its version (date) is equal to or later
than the Release Date (see below) associated with the Spirent TestCenter upgrade you
want to install.
To look up the Support Entitlement version date:
1 Launch the Spirent TestCenter Application that is installed on your computer.
2 Connect to all chassis that you plan to upgrade or downgrade.
3 Select Too ls > Licensing Management in the main window menu.
4 Expand the first chassis listing on the Chassis tab.
•The Chassis column displays the name of each licensed package and Support
Entitlement.
•The Version column displays the date on which the Support Entitlement became
effective (format is YYYY. MM).
• The information in the Expiration column indicates that the installed package is a
licensed version (Permanent) or a demo version (a date).
5 Scroll down the list of packages in the Chassis column to the first Support_Entitle-
ment entry and note its Version date.
Appendix B: Upgrade/Downgrade Procedures
To Verify Support Entitlement
To look up the new Spirent TestCenter Application Release Date:
If you are upgrading from a Spirent TestCenter DVD or from the Spirent Customer
Service Center (CSC):
1 Log in to your Spirent CSC account at
2 On the We lc om e page, click the Downloads icon on the left panel.
3 On the Downloads page, under Release Type, select General Release from the drop-
down menu.
4 Under Product Line, select Spirent TestCenter.
5 At the top of the page, use the Filter by release drop-down list to choose the Spirent
TestCenter upgrade release you want to install.
6 On the filtered results page, select the Spirent TestCenter Application option for
your operating system.
The release date for the application is shown to the left of the title.
https://support.spirent.com.
Getting Started with Spirent TestCenter | 71
Page 72

Appendix B: Upgrade/Downgrade Procedures
About Installing on Computers Running Windows®
To determine the status of your Support Entitlement:
• Valid:
SUPPORT_ENTITLEMENT Version = or > Release Date (month, year only).
Proceed with the Spirent TestCenter upgrade.
• Expired:
SUPPORT_ENTITLEMENT Version < Release Date (month, year only).
Tip: If your Support Entitlement has expired, you do not have a Support Entitlement,
or you have any questions about Spirent TestCenter licensing, contact
support@spirent.com
7 Repeat these steps as needed to look up the Support Entitlement date associated with
each chassis.
8 Proceed to file download and installation instructions when all Support Entitlements
have been verified.
for assistance.
About Installing on Computers Running Windows
All chassis and test module firmware management is supported by controls in the
Firmware Management window available in the Windows versions of the Spirent
TestCenter Application and the Spirent TestCenter Conformance Application. Automation
customers and customers who purchase extended applications must install one of these
applications on a computer running a supported Windows version in order to install
firmware and to select an active test package.
Upgrade steps for the Windows platform
These steps are described in detail on the following pages.
1 Install Spirent TestCenter Applications and select a Tcl option (see note on page 73)
2 Download chassis, module, and test package firmware files
3 Set up Spirent TestCenter Tcl Automation or
Set up Spirent TestCenter automation using Tcl (not from Spirent), C++, Java, Perl,
Ruby, Python, C#, or REST.
4 Install chassis and module firmware
®
72 | Getting Started with Spirent TestCenter
Page 73

You can install the software using either option:
“Installation Option 1: Using the DVD” on page 73
“Installation Option 2: Using the Website” on page 74
Note: For Spirent TestCenter Automation customers. Customers have the choice of
downloading “Tcl configured for Spirent TestCenter” from the Spirent Customer Service
website (
manually setting up an existing Tcl installation to work with Spirent TestCenter.
https://support.spirent.com), updating/configuring an existing Tcl installation, or
Installation Option 1: Using the DVD
Spirent TestCenter software and firmware files are included on the installation DVD that
is shipped with new chassis. If you do not have the DVD for the upgrade or downgrade
version you want to install, see “Installation Option 2: Using the Website” on page 74.
Appendix B: Upgrade/Downgrade Procedures
Installation Option 1: Using the DVD
To Install Software
Follow these instructions to run installers for Spirent TestCenter applications,
documentation, and Tcl options.
To install Spirent TestCenter software and documentation:
1 Verify that your Support Entitlement is valid (see “Upgrade steps for the Windows
2 Load the DVD and then click Spirent TestCenter for Windows to launch the instal-
3 Follow the wizard instructions until you reach the Setup Type screen.
4 Do one of the following:
Note: Automation customers: If you do not use the Tcl [x.x.xx] (configured for Spirent
TestCenter Automation) installer, you must manually configure your automation
environment. Setup instructions for each environment are in readme format, located in the
<Spirent_Install_Dir>/API folder with sub-directories matching the language name.
platform” on page 72).
lation wizard.
• Follow on-screen prompts to run the recommended Complete installation.
•Use Custom to change the Tcl installer option:
a Click Custom and then Next.
b Deselect the Tcl [x.x.x] (configured for Spirent TestCenter Automation)
installer.
c Select the Update/Configure existing Tcl for Spirent TestCenter Automa-
tion installer.
Getting Started with Spirent TestCenter | 73
Page 74

Appendix B: Upgrade/Downgrade Procedures
Installation Option 2: Using the Website
For example:
/home/user/Spirent_TestCenter_[x.xx]/Spirent_TestCenter_Application_Linux/API/Tcl
5 Click Next to complete your installation.
6 Click Finish, when installation is complete, to return to the main DVD menu.
Tip: Click the relevant links on the DVD Contents screen to download and install
extended Spirent TestCenter applications.
When you have finished installing applications, you are ready to download Spirent
TestCenter firmware files.
To Download Firmware Files
The firmware version you install must be compatible with the application version you just
installed. Downloaded firmware files must be stored in the Firmware folder in the
version-appropriate Spirent TestCenter directory on your computer.
To download Spirent TestCenter firmware files to the Firmware folder:
1 Create, or verify that there already is, a Firmware folder in the appropriate Spirent
TestCenter directory on your computer.
2 Click Browse this DVD to view the DVD folder tree.
3 Open the Spirent TestCenter Firmware folder.
4 Copy the appropriate firmware volume (Controller 2 or Controller 3) to the Firmware
folder on your computer.
When the application software is installed, and the appropriate firmware files (Controller
2 or Controller 3) have been copied to your computer, you are ready to upgrade chassis
and test module firmware.
Refer to the online Help file in the Spirent TestCenter Application or the Spirent
TestCenter Conformance Application for firmware installation instructions.
Installation Option 2: Using the Website
If you have a Spirent Communications Support Entitlement, you can download Spirent
TestCenter applications, firmware, and documentation from the Spirent Communications
support website. If you do not have Support Entitlement, contact support@spirent.com
assistance.
for
74 | Getting Started with Spirent TestCenter
Page 75

Appendix B: Upgrade/Downgrade Procedures
To Download and Install Spirent TestCenter Software
Follow these instructions to download and install Spirent TestCenter files.
To install Spirent TestCenter application software:
1 Verify that your Support Entitlement is valid (see “Upgrade steps for the Windows
platform” on page 72).
2 Navigate to
First time website users, register for a login user ID and password.
3 Click the Downloads icon in the left panel menu.
4 From the Filter options, select General Release as the Release Type, and select
Spirent TestCenter from the Product Line list.
5 In the Filter by Release drop-down list, select the version to download.
6 Click the Windows Spirent TestCenter Application link associated with the version
you want to install.
7 Click Download to launch the installer.
Follow installer instructions.
https://support.spirent.com and log in.
Installation Option 2: Using the Website
You can repeat this process to select and download extended Spirent TestCenter
applications.
When you have finished downloading applications, you are ready to download Spirent
TestCenter firmware files.
Note: Automation customers: If you do not use the Tcl [x.x.xx] (configured for Spirent
TestCenter Automation) installer, you must manually configure your automation
environment. Setup instructions for each environment are in readme format, located in the
<Spirent_Install_Dir>/API folder with sub-directories matching the language name.
For example:
/home/user/Spirent_TestCenter_[x.xx]/Spirent_TestCenter_Application_Linux/API/Tcl
To Download Chassis and Test Module Firmware Files
The firmware version you install must be compatible with the application version you just
installed. Downloaded firmware files must be stored in the Firmware folder in the
version-appropriate Spirent TestCenter directory on your computer.
To download Spirent TestCenter firmware files:
1 Create, or verify that there already is, a Firmware folder in the appropriate Spirent
TestCenter directory on your computer.
2 Locate and click on the Spirent TestCenter Firmware link for the version you need.
The download page opens.
3 Click the Download button.
Getting Started with Spirent TestCenter | 75
Page 76

Appendix B: Upgrade/Downgrade Procedures
Installation Option 2: Using the Website
The File Download dialog opens.
4 Save and then Extract the appropriate files to the Firmware folder in your Spirent
TestCenter directory.
Click Yes when you are prompted to overwrite the .map and .pdf files
5 Repeat these steps, if there is more than one firmware volume file for the Spirent
TestCenter version you need.
When the application software is installed, and the appropriate firmware files have been
extracted, you are ready to upgrade chassis and test module firmware.
Refer to the online Help file in the Spirent TestCenter Application or the Spirent
TestCenter Conformance Application for firmware installation instructions.
76 | Getting Started with Spirent TestCenter
Page 77

Appendix B: Upgrade/Downgrade Procedures
About Installing on Linux® Workstations
The instructions in this section support installation of Spirent TestCenter applications on a
computer running a supported version of Linux. An installation may be either an upgrade
or a downgrade. Refer to the Spirent TestCenter release notes for information about
supported versions.
Notes: • The Spirent TestCenter Application Windows version is required for chassis
and test module firmware management. Linux customers must install the
Spirent TestCenter Application on a computer running a supported version of
Windows, and then install the appropriate Linux version of the application on
a workstation.
Upgrade steps using a Linux Workstation
These steps are described in detail in the following pages.
1 Install Spirent TestCenter Applications and select a Tcl option (see note)
2 Download chassis, module, and test package firmware files
3 Set up STC directory
4 Copy installer to workstation
5 Run installer
6 Set up Automation
About Installing on Linux® Workstations
You can install the software using either option:
“Installation Option 1: Using the DVD” on page 73
“Installation Option 2: Using the Website” on page 74
Note: For Spirent TestCenter Automation customers. Customers have the choice of
downloading “Tcl configured for Spirent TestCenter” from the Spirent Customer Service
website (
manually setting up an existing Tcl installation to work with Spirent TestCenter.
Appropriate licensing is required to use any Spirent TestCenter application for testing. If
you have questions about Spirent TestCenter licenses or about Support Entitlement,
contact support@spirent.com.
“To Verify Support Entitlement” on page 71.
Tip: Version requirements for supported scripting/programming languages (Tcl, C++,
Java, Perl, Ruby, Python, C#, or REST) and operating systems (Windows, Linux)
in the Release Notes. Release notes are available on the Spirent Customer Service Center
website (
https://support.spirent.com), updating/configuring an existing Tcl installation, or
To find out how to verify Support Entitlement status, see
are included
https://support.spirent.com).
Getting Started with Spirent TestCenter | 77
Page 78

Appendix B: Upgrade/Downgrade Procedures
About Installing on Linux® Workstations
• Spirent TestCenter firmware management is supported by the Windows
version of the Spirent TestCenter Application and of the Spirent TestCenter
Conformance Application. Linux customers must install one of these
applications on a computer running a supported version of Windows and use
the application to install Spirent TestCenter firmware. See “About Installing
on Computers Running Windows®” on page 72 for Windows installation
instructions.
• For Spirent TestCenter™ Extreme Automation™ Toolkit customers:
Use the instructions in this installation document to install the Windows and
Linux versions of the Spirent TestCenter Application, and then refer to the
release notes for additional Toolkit installation and setup instructions. These
release notes are in the Knowledge Base area of the Customer Service Center
(CSC). Search using the document title or DOC10751.
78 | Getting Started with Spirent TestCenter
Page 79

Installation Option 1: Using the DVD
Installers for the Spirent TestCenter applications and a tarball for documentation are
packaged in OS-specific files on the DVD.
Follow the installation instructions appropriate for your workstation:
• “To Copy Files using a Web Browser”
• “To Copy Files using the Command Line” on page 80
To Copy Files using a Web Browser
Follow these instructions if your workstation has a web browser installed.
To install Spirent TestCenter Automation:
1 Load the installation DVD.
2 Select the Spirent TestCenter link appropriate for your operating system.
This action will result in one of two displays:
• Index page with links to the automation installers and the documentation tarball.
• Folder view of the two shell-based installers and the tarball for documentation.
3 Use the standard procedure (for your workstation) to copy the installer appropriate for
your system and the documentation tarball to your workstation.
4 Run the shell-based installer. For example, use the following for 64-bit OS:
./install_Spirent_TestCenter_Auto_Linux64_[x.xx].sh
5 Use tar to extract the documentation from the tarball. For example, use the following
command for a Linux file:
tar -xzvf Spirent_TestCenter_Docs_Linux_Unix[x.xx].tar.gz
Appendix B: Upgrade/Downgrade Procedures
Installation Option 1: Using the DVD
6 Set up Tcl [x.x.xx], Perl, C++, Java, Ruby, Python, C#, or REST for use with Spirent
TestCenter.
Note: Automation customers: If you do not use the Tcl [x.x.xx] (configured for
Spirent TestCenter Automation) installer, you must manually configure your
automation environment. Setup instructions for each environment are in readme
format, located in the <Spirent_Install_Dir>/API folder with sub-directories matching
the language name.
For example:
/home/user/Spirent_TestCenter_[x.xx]/Spirent_TestCenter_Application_Linux/API/
Tcl
Getting Started with Spirent TestCenter | 79
Page 80

Appendix B: Upgrade/Downgrade Procedures
Installation Option 1: Using the DVD
To Copy Files using the Command Line
Follow these instructions to use commands to copy and install Spirent TestCenter files on
your workstation.
To install Spirent TestCenter Automation:
1 Open a terminal window.
2 Navigate to your DVD drive.
On some workstations this will be identified as Media.
3 Navigate to the Spirent TestCenter Applications folder for your operating system.
These folders contain two shell-based installers and a documentation tarball required
to complete your installation.
4 Copy the installer appropriated for your system and the documentation tarball to your
workstation. For example:
cp install_Spirent_TestCenter_Auto_Linux64_[x.xx].sh /home/
user/
5 Run the shell-based installer. For example, use the following for a 64-bit OS:
./install_Spirent_TestCenter_Auto_Linux64_[x.xx].sh
6 Use tar to extract the documentation from the tarball. For example, use the following
commands for a Linux file:
tar -xzvf Spirent_TestCenter_Docs_Linux_Unix[x.xx].tar.gz
7 Set up Tcl [x.x.xx], Perl, C++, Java, Ruby, Python, C#, or REST for use with Spirent
TestCenter.
Note: Automation customers: If you do not use the Tcl [x.x.xx] (configured for
Spirent TestCenter Automation) installer, you must manually configure your
automation environment. Setup instructions for each environment are in readme
format, located in the <Spirent_Install_Dir>/API folder with sub-directories matching
the language name.
For example:
/home/user/Spirent_TestCenter_[x.xx]/Spirent_TestCenter_Application_Linux/API/
Tcl
80 | Getting Started with Spirent TestCenter
Page 81

Appendix B: Upgrade/Downgrade Procedures
Installation Option 2: Using the Website
If you have a Spirent Communications Support Entitlement, you can download Spirent
TestCenter installation files from the Spirent Customer Service (CSC) website. If you do
not have Support Entitlement, contact support@spirent.com
Install Spirent TestCenter Applications
To install Spirent TestCenter applications on a Linux workstation, download shell-based
installers and a documentation tarball.
Tip: Spirent TestCenter Extreme Automation Toolkit users: Refer to the Spirent
TestCenter Extreme Automation Toolkit Release Notes for installation instructions. Go to
the Spirent Knowledge Base and search using the document title or DOC10751.
To install Spirent TestCenter Automation:
Installation Option 2: Using the Website
for assistance.
1 Navigate to
First time website users, register for a login user ID and password.
2 Click the Downloads icon in the left panel menu.
3 From the Filter options, select General Release as the Release Type, and select
Spirent TestCenter from the Product Line list.
4 In the Filter by Release drop-down list, select the version to download.
5 Click the install_Spirent_TestCenter_Auto_Linux link for the version you want.
6 Click Download to save the installer.
7 Click Save in the File Download dialog box, and then use the Save As dialog to save
the file to your
8 Return to the Downloads list when the download is complete.
9 Select the Spirent TestCenter documentation tarball for Linux and save it to the
/home/user directory.
10 Run the shell-based installer. For example:
./install_Spirent_TestCenter_Auto_Linux64_[x.xx].sh
11 Use tar to extract the documentation from the tarball. For example, use the following
command for a Linux file:
tar -xzvf Spirent_TestCenter_Docs_Linux_Unix[x.xx].tar.gz
12 Log off the website.
13 Set up Tcl [x.x.xx], Perl, C++, Java, Ruby, Python, C#, or REST for use with Spirent
TestCenter.
https://support.spirent.com and then login.
/home/user directory.
Note: If you do not use the Tcl [x.x.xx] (configured for Spirent TestCenter Automation)
installer, you must manually configure your automation environment. Setup instructions
for each environment are in readme format, located in the <Spirent_Install_Dir>/API
folder with sub-directories matching the language name. For example:
/home/user/Spirent_TestCenter_[x.xx]/Spirent_TestCenter_Application_Linux/API/Tcl
Getting Started with Spirent TestCenter | 81
Page 82

Appendix B: Upgrade/Downgrade Procedures
About Upgrading Spirent TestCenter vLS Software
About Upgrading Spirent TestCenter vLS Software
When you upgrade the Spirent TestCenter application, you automatically upgrade the Spirent
TestCenter Session Manager application, too. The Session Manager version and the vLS server
software version must match. When you upgrade Session Manager you must also upgrade the
vLS server software.
To Download and Upgrade vLS Server Software
After you have installed your Spirent TestCenter upgrade, download the vLS upgrade file to
your computer and then use the Session Manager application to upgrade the vLS server
software.
Note: The vLS server upgrade file must be stored in the STC Server file in your Spirent
TestCenter Application [X.xx] directory.
To upgrade vLS server software:
1 Navigate to the Downloads page on the Spirent Communications support website
support.spirent.com.
2 Select the vLS upgrade file for the installed version of Spirent TestCenter.
• Use these filters:
–Release Type: General Release
– Product Line: Spirent TestCenter
– Categories: Virtual
– Description: Spirent TestCenter Virtual LabServer, vX.xx for Docker
3 Save the labserver-x.xx.xxxx.tar.xz file to the STC Server folder in the Spirent TestCenter
Application directory on your computer.
4 Launch Session Manager.
5 Click Upgrade Server in the menu bar.
The Upgrade Server dialog opens.
6 Enter the server address or server name in the Server Name field.
7 Click Browse to navigate to the upgrade file in the STC Server folder on your PC.
8 Select the file.
9 Click Upgrade.
After the upgrade has completed, the vLS server will be ready to use for testing.
https://
82 | Getting Started with Spirent TestCenter
Page 83

Appendix C
!
ESD Requirements
Spirent Communications manufactures and sells products that require industry standard
precautions to protect against damage from electrostatic discharge (ESD). This document
explains the proper process for handling and storing electrostatic discharge sensitive
(ESDS) devices, assemblies, and equipment.
The requirements presented in this document comply with the EIA Standard, ANSI/ESD
S20.20-1999: Development of an Electrostatic Discharge Control Program, and apply to
anyone who handles equipment that is sensitive to electrostatic discharge. Such equipment
includes, but it not limited to:
• All electronic assemblies manufactured by Spirent Communications
• Discrete and integrated circuit semiconductors
• Hybrid microcircuits
• Thin film passive devices
• Memory modules
Caution: Failure to comply with the requirements explained in this document poses risks
to the performance of ESDS devices, as well as to your investment in the equipment.
General Equipment Handling
Whenever you handle a piece of ESDS equipment, you must be properly grounded to
avoid harming the equipment. Also, when transporting the equipment, it must be packaged
properly. Follow the requirements below to help ensure equipment protection.
• Wrist straps must be worn by any person handling the equipment to provide normal
grounding.
• The use of foot straps is encouraged to supplement normal grounding. If foot straps
are used exclusively, two straps (one on each foot) should be used. Note that foot
straps are only applicable in environments that use ESD flooring and/or floor mats.
• Hold ESDS equipment by the edges only; do not touch the electronic components or
gold connectors.
• When transporting equipment between ESD protected work areas, the equipment
must be contained in ESD protective packaging. Equipment that is received in ESD
protective packaging must be opened either by a person who is properly grounded or
at an ESD protected workstation.
Getting Started with Spirent TestCenter | 83
Page 84

Appendix Appendix C: ESD Requirements
ESD protective
surface or mat
Optional resistor
Wrist strap
ESD protective
floor mat (optional)
• Any racks or carts used for the temporary storage or transport of ESDS equipment
must be grounded either by drag chains or through direct connection to earth ground.
Loose parts that are not protected by ESD-safe packaging must not be transported on
carts.
Workstation Preparation
The ideal setup for working with ESDS equipment is a workstation designed specifically
for that purpose. Figure C-1 illustrates an ESD protected workstation. Please follow the
requirements listed below to prepare a proper ESD protected workstation.
• The ESD Ground must be the equipment earth ground. Equipment earth ground is the
electrical ground (green) wire at the receptacles.
• An ESD protected workstation consists of a table or workbench with a static
dissipative surface or mat that is connected to earth ground. A resistor in the
grounding wire is optional, providing that surface resistance to ground is ≥ 10
9
≤ 10
Ω.
5
to
• The workstation must provide for the connection of a wrist strap. The wrist strap must
contain a current limiting resistor with a value from ≥ 250K Ω to ≤ 10M Ω.
• ESD protective flooring or floor mats are required when floor-grounding devices (foot
straps/footwear) are used or when it is necessary to move in between ESD protected
workstations when handling ESDS equipment.
Figure C-1. ESD Protected Workstation
Note: The equipment needed for proper grounding is available in ESD service kits from
various suppliers. Refer to the Buyer’s Guide on the ESDA website (h
84 | Getting Started with Spirent TestCenter
ttp://www.esda.org).
Page 85

Appendix D
!
Fiber Optic Cleaning Guidelines
Spirent Communications manufactures and sells products that contain fiber optic
components, including fiber optic transmitters and receivers. These components are
extremely susceptible to contamination by particles of dirt or dust, which can obstruct the
optic path and cause performance degradation. To ensure optimum product performance,
it is important that all optics and connector ferrules are kept clean.
This document provides guidelines for maintaining clean fiber optic components. Spirent
Communications recommends that these guidelines be followed closely.
Caution: • Failure to comply with the guidelines explained in this document poses
risks to the performance of fiber optic-based devices, as well as to your
investment in the equipment.
• Whenever you handle a piece of equipment that contains fiber optic
components, you must be properly grounded to avoid harming the
equipment. Refer to Appendix C, “ESD Requirements,” for more details
on electrostatic discharge (ESD).
Cleaning Guidelines
To ensure the cleanliness of fiber optic components, follow these guidelines:
• Use fiber patch cords (or connectors if you terminate your own fiber) only from a
reputable supplier. Low-quality components can cause many hard-to-diagnose
problems during an installation.
• Dust caps are typically installed on fiber optic components to ensure factory-clean
optical devices. These protective caps should not be removed until the moment of
connecting the fiber cable to the device. Ensure that the fiber is properly terminated,
polished, and free of any dust or dirt. Also make sure that the location of installation is
as free of dust and dirt as possible.
• If you must disconnect the fiber device, reinstall the protective dust caps.
• If you suspect that the optics have been contaminated, alternate between blasting with
clean, dry, compressed air and flushing with methanol to remove particles of dirt.
Getting Started with Spirent TestCenter | 85
Page 86

 Loading...