

Page 1
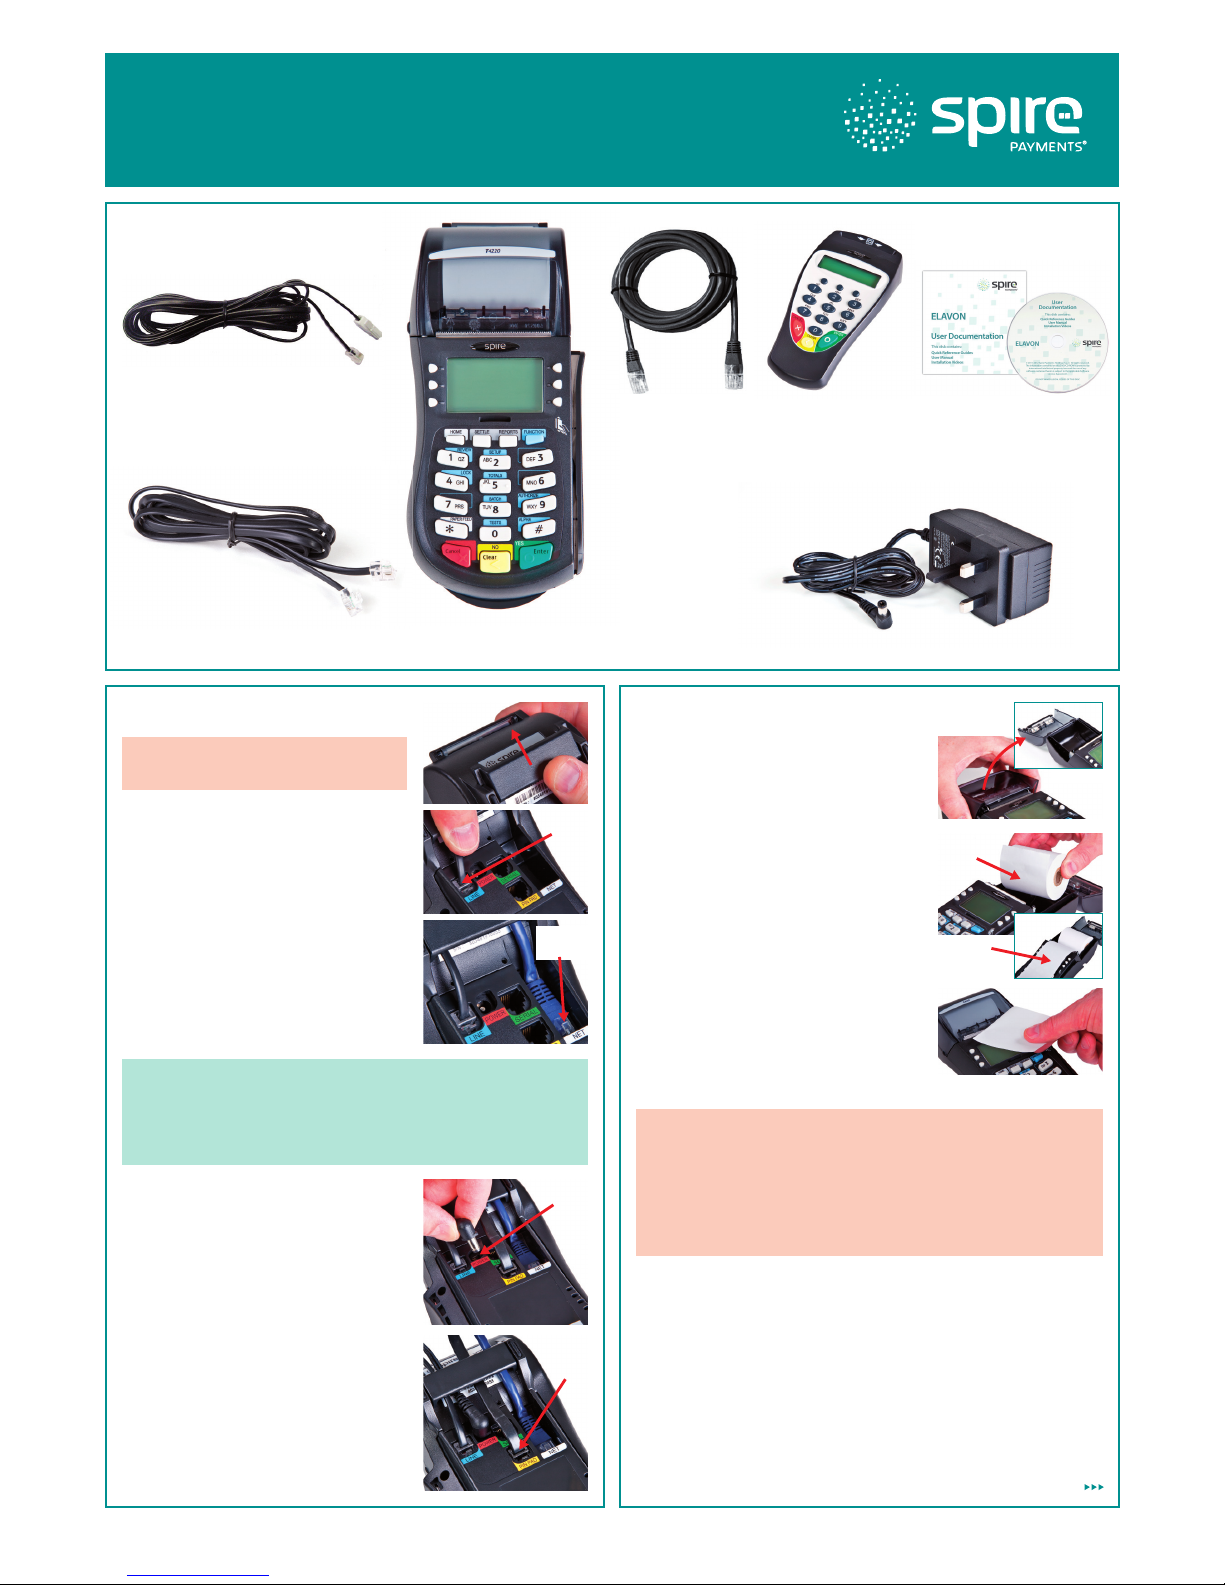
What’s in the box*:
Quick Reference Guide
T4220 (Elavon)
Ethernet Cable **
Thicker cable with RJ45
Connectors at each end
S9-PCI PIN-Pad
Optional extra, only
supplied if ordered
OR
T4220 terminal
Power Supply
22136-02Page 1
Slide Cable
Tidy out
LINE port
(for phone
line)
NET port
(for network
connection)
Drop paper roll
Pull paper roll
Insert into
POWER
port and
twist
to lock
PIN pad
port
UK Telephone Cable
Cable with small transparent connector
at one end and larger white connector at
the other
ROI Telephone Cable
Has two small transparent
connectors at each end
*Box contents may vary for replacement/swaps, **Ethernet cables are optional depending upon terminal model and order configuration
1. Connect the cables 2. Insert a paper roll & switch on
DO NOT CONNECT ELECTRICAL
SUPPLY UNTIL INSTRUCTED
PABX/Prex digit(s):
If the phone line you intend to use needs a PABX/prefix digit(s) in order to dial out, your
terminal will need to be configured for this.
Please read the User Manual for more information or call the helpdesk for assistance.
DCHP: (relevant if you are using a network connection)
Your terminal will be pre-configured for use on standard networks featuring DHCP (automatic
allocation of IP address). In the unlikely event that your network does not have this feature,
please call the helpdesk for assistance.
Useful tips:
• If connecting to a broadband phone line, ensure the terminal is
connected to the link through a DSL filter.
• If connecting via Ethernet, ensure your firewall settings are set to
allow the terminal to send and receive data over your network.
• Remove the Cable Tidy by sliding it out as
shown.
• Connect one end of the telephone cable to
the blue LINE port and the other end to an
analogue telephone line wall socket.
• If an Ethernet cable was included in the
box and you wish to use a network
connection, connect one end to the white
NET port and the other end to a network
connection point.
It may help to bend the cable end slightly
before attempting to insert it.
• Using your fingers, pinch the sides of the
Printer Cover and pull up firmly.
If this is a new terminal, remove the roll
from the holder and remove any outer
packaging that may be present.
• Drop the paper roll into the holder with the
paper feeding from underneath the roll.
• Pull a short length of the paper over
the screen.
• Shut the Printer Cover over the paper
until you hear it ‘click’.
• Pull and tear the paper over the serrated
edge as shown.
• Plug the Power Supply into an electrical
socket and switch on the supply.
After a few seconds the screen will show the desktop with
icons and then the SALE / REFUND (Idle) Screen.
Updates
Once a month, your terminal will connect to Spire systems to download
any new software and/or important changes*. This update will typically
occur during the night. For this reason, Spire suggests you leave your
terminal powered on at all times. In the event of it being switched off
when the update tried to take place, your terminal will notify you to leave
its power on for another update attempt the following night.
* For Dial-Up Products: In the UK, calls for updates will be charged at £0.10 per minute from a BT
landline. In ROI, calls will be charged at €0.065 per minute from an Eircom landline.
The charges for other networks may vary. Prices correct at the time of printing.
• Insert the Power Supply connector into the
red POWER port in the 3 o’clock position
shown.
• Turn the cable anti-clockwise from the 3
o’clock to the 12 o’clock position to lock it
in place.
• DO NOT plug power supply into electrical
wall socket
• If you have a separate PIN Pad, connect its
lead to the yellow PIN PAD socket on the
terminal.
• Arrange all cables to lay between the feet
of the terminal, as shown. Slide the Cable
Tidy back into position until you hear it
click into place.
Please turn over to continue...
Document pack
Page 2

Quick Reference Guide
T4220 (Elavon)
22136-02Page 2
Sale (Inserting a Chip Card)
Step 1. You can start a Chip and PIN-Pad sale transaction in one of two ways:
• Select SALE from the Idle Screen and insert a Chip Card into
the terminal’s Chip Card reader (or into the optional PIN-Pad)
• Insert the Chip Card straight into the terminal’s Chip Card reader
(or into the optional PIN-Pad).
Step 2. Type in the SALE AMOUNT in pence or cents (in ROI) and
press Enter.
Example: Typing in 1000 would equate
to a value of £10.00 (€10.00 in ROI).
Step 3. The customer must type in their Personal Identification Number
(PIN) on the terminal keypad (or into the optional PIN-Pad). After the
PIN has been typed in, the customer should press Enter.
The terminal will now attempt to connect to Elavon. The terminal
will then display a response. If the transaction is APPROVED, the
Approval Code will then be displayed and the terminal will print
the Merchant Copy of the receipt.
Step 4. Remove the card and tear off the Merchant Copy of the receipt and
press OK/Enter. The terminal will then print the Customer Copy of the
receipt and display the response again.
Step 5. Tear off the Customer Copy and hand it to the customer along with
their card. Then press Enter to return to the idle screen.
Refund (Inserting a Chip Card)
Step 1. Select REFUND from the Idle Screen.
Step 2. Insert the customer’s Chip Card into the terminal’s Chip Card
reader (or into the optional PIN-Pad).
Step 3. Type in the REFUND AMOUNT in pence or cents, and press Enter.
Example: Typing in 1000 would equate
to a value of £10.00 (€10.00 in ROI).
The terminal will now attempt to connect to Elavon.
The terminal will then display a response.
If the transaction is APPROVED the terminal will display APPROVAL
and print the Merchant Copy of the receipt.
Step 4. Remove the card and the Merchant Copy of the receipt.
Step 5. Press Enter to confirm, the terminal will print the Customer
Copy of the receipt.
Press Enter to return to the Idle Screen.
Sale Keyed (Keyed Entry, for Customer Not Present)
Step 1. Select SALE from the Idle Screen and carefully type in the long
number on the front of the card. As you type, you will notice that the
messages changes from SWIPE/INSERT CARD to ENTER CARD NUMBER
and the number begins to appear in the box on the screen. Once the
number has been typed in correctly, press Enter.
Step 2. Type in the EXPIRATION DATE and press Enter.
Step 3. You will then be asked if the card holder is present. Press NO/Clear
to continue or Cancel to cancel the transaction.
Step 4. Type in the SALE AMOUNT in pence (or cents in ROI)
and press Enter.
Example: Typing in 1000 would equate
to a value of £10.00 (€10.00 in ROI).
Step 5. Type in the 3 digit CVV2 code (security code) on the back of the
card (4 digits on the front of the card for American Express) and press
Enter.
The terminal will now attempt to connect to Elavon.
Step 6. Now you must decide if you are willing to continue with the
transaction based upon Elavon response displayed.
If you press NO/Clear, the terminal will print out the Reversal Copy
of the receipt and connect to Elavon to reverse the transaction. If
successful, the terminal will display REVERSAL ACCEPTED.
Press Enter to return to the idle screen.
If you press YES/Enter, the Approval Code will be displayed and
the terminal will print the Merchant Copy of the receipt.
Step 7. Tear off the Merchant Copy of the receipt and press OK/ Enter.
Step 8. Tear off the Customer Copy and press Enter to return
to the idle screen.
Please refer to User Manual for instructions
including all screen prompts.
Settlement/Batch
Please Note: At the end of each business day, the Settlement procedure
must be performed on the terminal.
• If any transactions have been stored in the terminal, a successful
Settlement will force them through to Elavon
• If you do not complete this procedure, funds will not be paid into
your bank
Step 1. Ensure the Idle Screen is displayed. Then press the SETTLE button
on the keypad.
Step 2. The terminal will display the current total of Sales since the last
Settlement. Check this total against your records and press Yes or No
as appropriate.
If you choose No, then the Settlement procedure will be terminated
whilst you check your records against the current Audit Report.
Step 3. The terminal will then display the current total of Refunds since
the last Settlement. Check this total against your records and press
Yes or No as appropriate.
If you choose No, then the Settlement procedure will be terminated
whilst you check your records against the current Audit Report.
The terminal will now attempt to connect to Elavon
When all transactions have been verified by the bank, the terminal
will print a detailed Settlement report.
The Settlement report includes summaries of sales and refunds by
card type and by currency (if applicable), in addition to a detailed
report of all transactions since the last settlement.
© Copyright 2011 – 2013 Spire Payments Holdings S.a.r.l. All rights reserved.
Spire Payments is a registered trademark of Spire Payments Holdings S.a.r.l.
Spire Payments and the Spire Payments logo are trademarks, service marks or registered trademarks or service marks of Spire Payments Holdings S.a.r.l..
All other trademarks are the property of their respective owners.
All information is subject to change without notice and Spire Payments Holdings S.a.r.l. does not warrant the information’s accuracy or correctness.
Any Spire Payments software described in this document is subject to a Software Licence Agreement. Please refer to the Software Licence Agreement
for information regarding the terms of use.
 Loading...