

Page 1
June 2013
The Mach III Spinning Wheel
© 2013 SpinOlution
http://www.spinolution.com/
Page 2

© 2013 SpinOlution - http://www.spinolution.com/
The Mach III Spinning Wheel
Contents
Your Mach III........................................... 3
Unpacking your Mach III ....................... 4
Assembling your Mach III...................... 5
Treadling ................................................... 6
Bobbins ...................................................... 7
Setting the Ratio ...................................... 8
Working with Open Threading .............. 9
Adjusting the Tension ........................... 10
While you are Spinning ......................... 11
Learning to Spin .................................... 12
Twists and Turns ................................... 14
Maintaining your Mach III ................... 15
Technical Specifications ....................... 16
Mach III Accessories ............................. 16
Additional Resources ............................ 16
About the Author ................................... 16
Meet the Makers… .................................. 17
© 2013 SpinOlution. All Rights Reserved.
Please use the information in this guide in a responsible manner. A spinning wheel is a complex
machine, and needs to be treated with care and respect. Please contact your dealer or the makers if you
have any questions or concerns about your SpinOlution Mach III Spinning Wheel.
2
Page 3
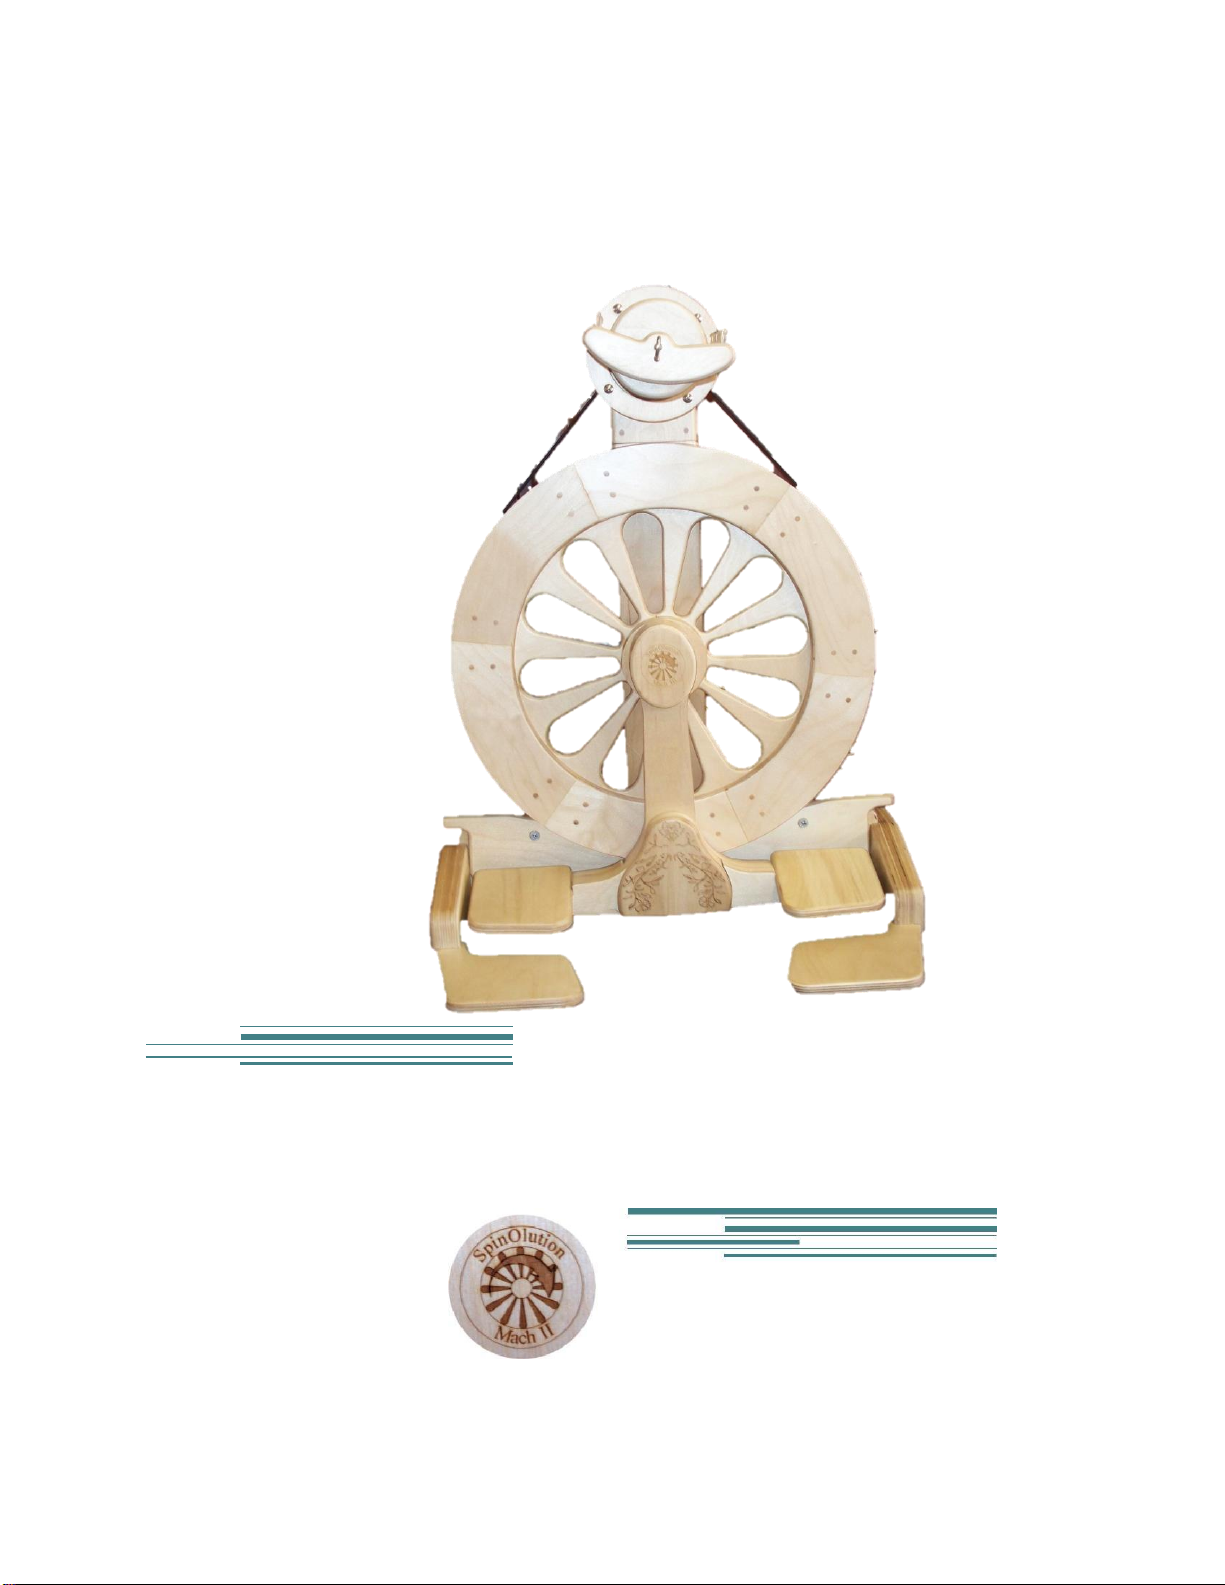
The Mach II Spinning Wheel
------------------Tension Knob (Behind Flyer)
Your Mach III
----------------------Peg (on Flyer)
Orifice Bar------------------------------------ -------------------------------Orifice Hook
Flyer-----------------------------------------
Head--------------------------------------------
Drive Band-------------------------
Drive Wheel--------------------------
Base-------------------------------------------------
Wheel Hub--------------------------------------
Pitman (Behind Treadle)----------------------
Treadle------------------------------------------------
Left Brake--------------------- -----------Right Brake
--Right Leg
Treadle Pad-------------------- ----------Right Pad
Left Leg------------------
-----Right Heal Pad
Left Heal Pad--------------
The Mach III Spinning Wheel by SpinOlution combines traditional functionality with innovative
features.
I’ve used traditional names for traditional parts on this diagram. SpinOlution wheels use a pitman to drive
the wheel. The pitman guide is located on the inside of the Treadle, driving the pitman bearings, which are
mounted on the drive wheel.
Your Mach III might have a standard flyer or an art yarn flyer (used in this manual, it has higher pegs
and a larger hook than the standard flyer. The Mach III has unique features in its orifice Bar (usually part
of the flyer assembly), orifice hook, flyer pegs (usually hooks), cordless scotch tension brake, rocker-
treadles, wheel brakes, and heel rests.
Model Changes …
Prior to the Mach III, SpinOlution released the Mach I and Mach II. Differences include:
The Mach I orifice arm was released from the flyer arms by squeezing the arms, using a pressure
fit, rather than the Mach II’s magnetic attachment.
An additional ratio was added to the Mach II, and metal flyer pulley grooves were added for the
fastest/highest two ratios. An upgraded flyer with both improvements is available from SpinOlution.
The bobbins now have rounded edges, before they had flat discs at each end.
The treadles and heel rests now have rounded edges.
The Mach III has a inverted T Base and two hand- holds that can be used for the Lazy-Kate .
3
Page 4

© 2013 SpinOlution - http://www.spinolution.com/
The Mach III Spinning Wheel
SpinOlution's goal is to provide the most advanced and easy to use spinning wheels that have ever
been seen or used. The evolution of the spinning wheel is finally here!
Your Mach III is a unique wheel – so even if you usually skip manuals, please take a look through this
for an overview of its special features. Its scotch tension mechanism is unique, the bobbins and orifice
are novel, and the treadling you’ll have to experience to believe.
If you are new to spinning on a wheel, I heartily recommend you hook up with a book, video, class, or
local guild – check with the vendor you purchased your wheel from, they may teach, or be able to point
you to a local teacher or guild. Maggie Casey’s Start Spinning is an excellent book, and Patsy
Zawistowski’s video Spinning Wool: Basics and Beyond teaches spinning in a similar format to my
own classes.
The Mach III invites you to spin art yarn with all its capabilities and large bobbin. For that, I recommend
Lexi Boeger’s book Intertwined or Jacey Bogg’s DVD Sit and Spin.
I want to state clearly up front – this guide introduces the key features for success on your Mach III;
however, it is not a complete book for learning to spin. Please see the recommended material above,
for that.
Now, if you take a class, it’s likely your teacher hasn’t spun on a SpinOlution wheel before – unless she
also owns one. You might want to bring this guide along to help her understand the special features of
your Mach II.
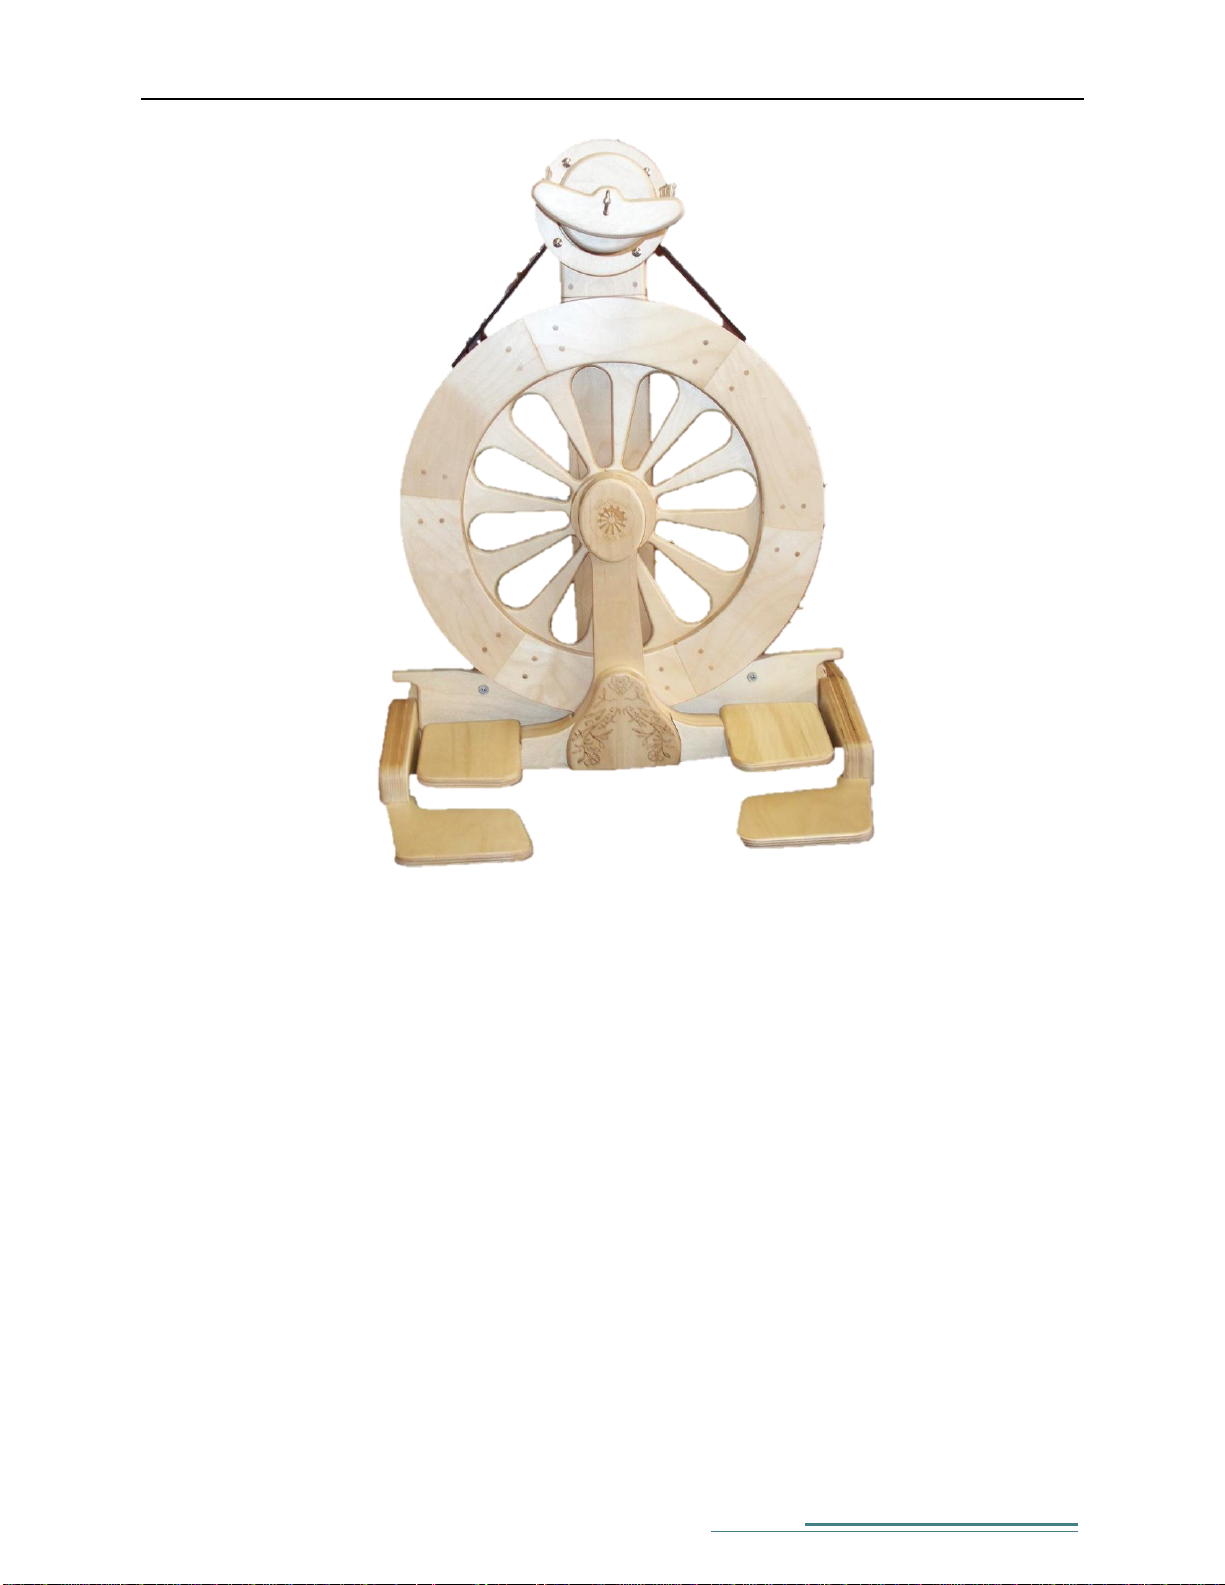
Unpacking your Mach III
If mailed, your Mach III arrives packed in a large box. Lift out any covering pieces of packing material,
then check carefully – the flyer assembly, bobbins, drive band, and any extra accessories will be tucked in
amidst the packing material. Look through the packing material to be sure you have taken all of the items
out of your box. Check for loose pieces that may have come off during shipping, to be safe.
You will find, as laid out here:
Main wheel with base
Legs with heel rests (2), 4 screws and finishing washers
Flyer assembly with head (with bobbin on)
Two additional bobbins
Drive band
(not shown) Any accessories you ordered – the wheel kit has 2 wheels, 8 screws, and 1 nylon strap.
(not shown) Any additional bobbins you ordered.
4
Page 5
The Mach III Spinning Wheel
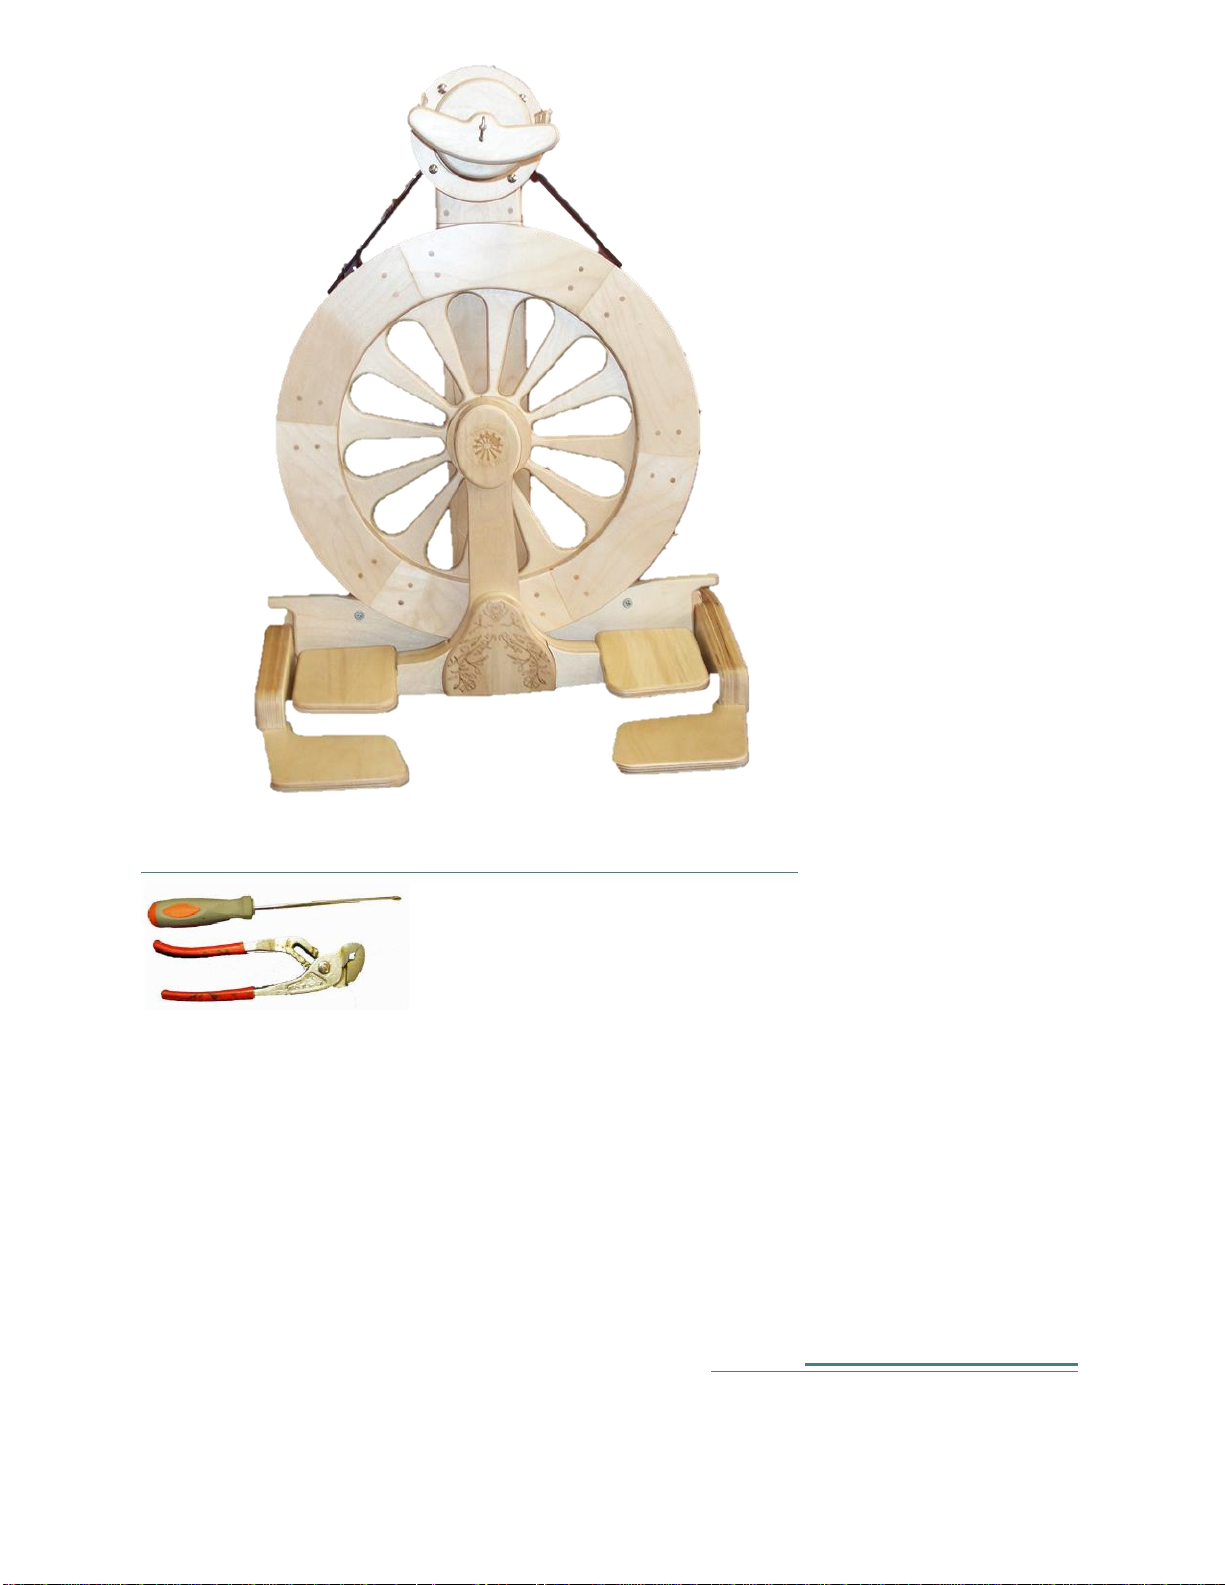
Assembling your Mach III
You will need a Phillips screwdriver or
an electric drill with a Phillips
screwdriver bit
A screw tip: after each
few twists in, loosen
the screw back out a
turn and then continue.
This helps it seat well.
First, lay the wheel body down so that the engraved large logo side is on the floor (the small logo faces
up). Now, attach the legs with heel rests. There is a left and right heel rest; put them on so that the flat
heel rest faces in. Each rest is held in place with tw0 screws. Start by putting one in position, and check
that the brake pedals are correctly positioned, as shown here. Thread the screw through a finishing
washer, and then screw it into the highest pre-drilled hole on the outside edge of the base of the stand,
and into the heel rest. Another screw goes into a finishing washer and the bottom hole. Start each screw
so the heel rest is properly in place, verify that the brake pedal isn’t trapped in the wrong position, then go
back and tighten the screws. Put both heel rests on, then stand the wheel on its base for the next step.
5
Page 6
© 2013 SpinOlution - http://www.spinolution.com/
Next, attach the flyer head assembly. Slid the head into the top of the base and tighten the two 3 wing
knobs.
If the drive band came off in transit, the band can now be positioned. If it is trapped behind the drive
wheel, push the wheel forward slightly by pushing the center of it from the audience side of the wheel,
where an e-clip holds the central bearing rod in place. If the drive band is not on your wheel, lift on
each of the treadle pads, this will split the treadle to allow the Drive Band to go onto the wheel. Close
the treadle
To ensure a good seating of the pitman guide on the pitman bearings, squeeze the top of the treadle at
the hub to insure that both bearings are engaged with the treadle.
Before spinning, check that the drive band is set up for the ratio you desire. The lowest ratio, 3:1, is
used by putting the drive band in the largest groove on the flyer. The drive band needs to be placed
in the groove so that the band does not rub on the flyer.
Treadling
The Mach III uses a treadling system unique to
SpinOlution wheels. It is a left-right treadling, with the
ball of each foot on each treadle. Place the ball of each
foot, or just toes, on each treadle. Depress one treadle
fully, and then the other. Your heels rest on the heelrests in front of the treadles, only your toes need to go
up and down. If you try to push down a treadle with
one foot before the other treadle has gone completely
down, you will find the treadle difficult to push. With a
little practice, you will soon find where each side is
completely depressed and adapt your rhythm to the
upswing of the other treadle.
Treadling moves the drive wheel, which turns the flyer when the drive band is properly placed. If the
wheel or the flyer is not moving, or it feels like you are pushing a refrigerator, check that the drive band
is in a groove (sometimes called a pulley) on the flyer whorl, not resting on the flyer spindle behind the
grooves.
6
Page 7
The Mach III Spinning Wheel
The treadling is very light on the lowest ratios; it will take hardly any effort at all to keep the wheel
going. You may be able to keep the wheel spinning with only the toes of one foot treadling on one
treadle. The amount of effort needed increases on the higher ratios, though still less than that used on
traditional treadled wheels.
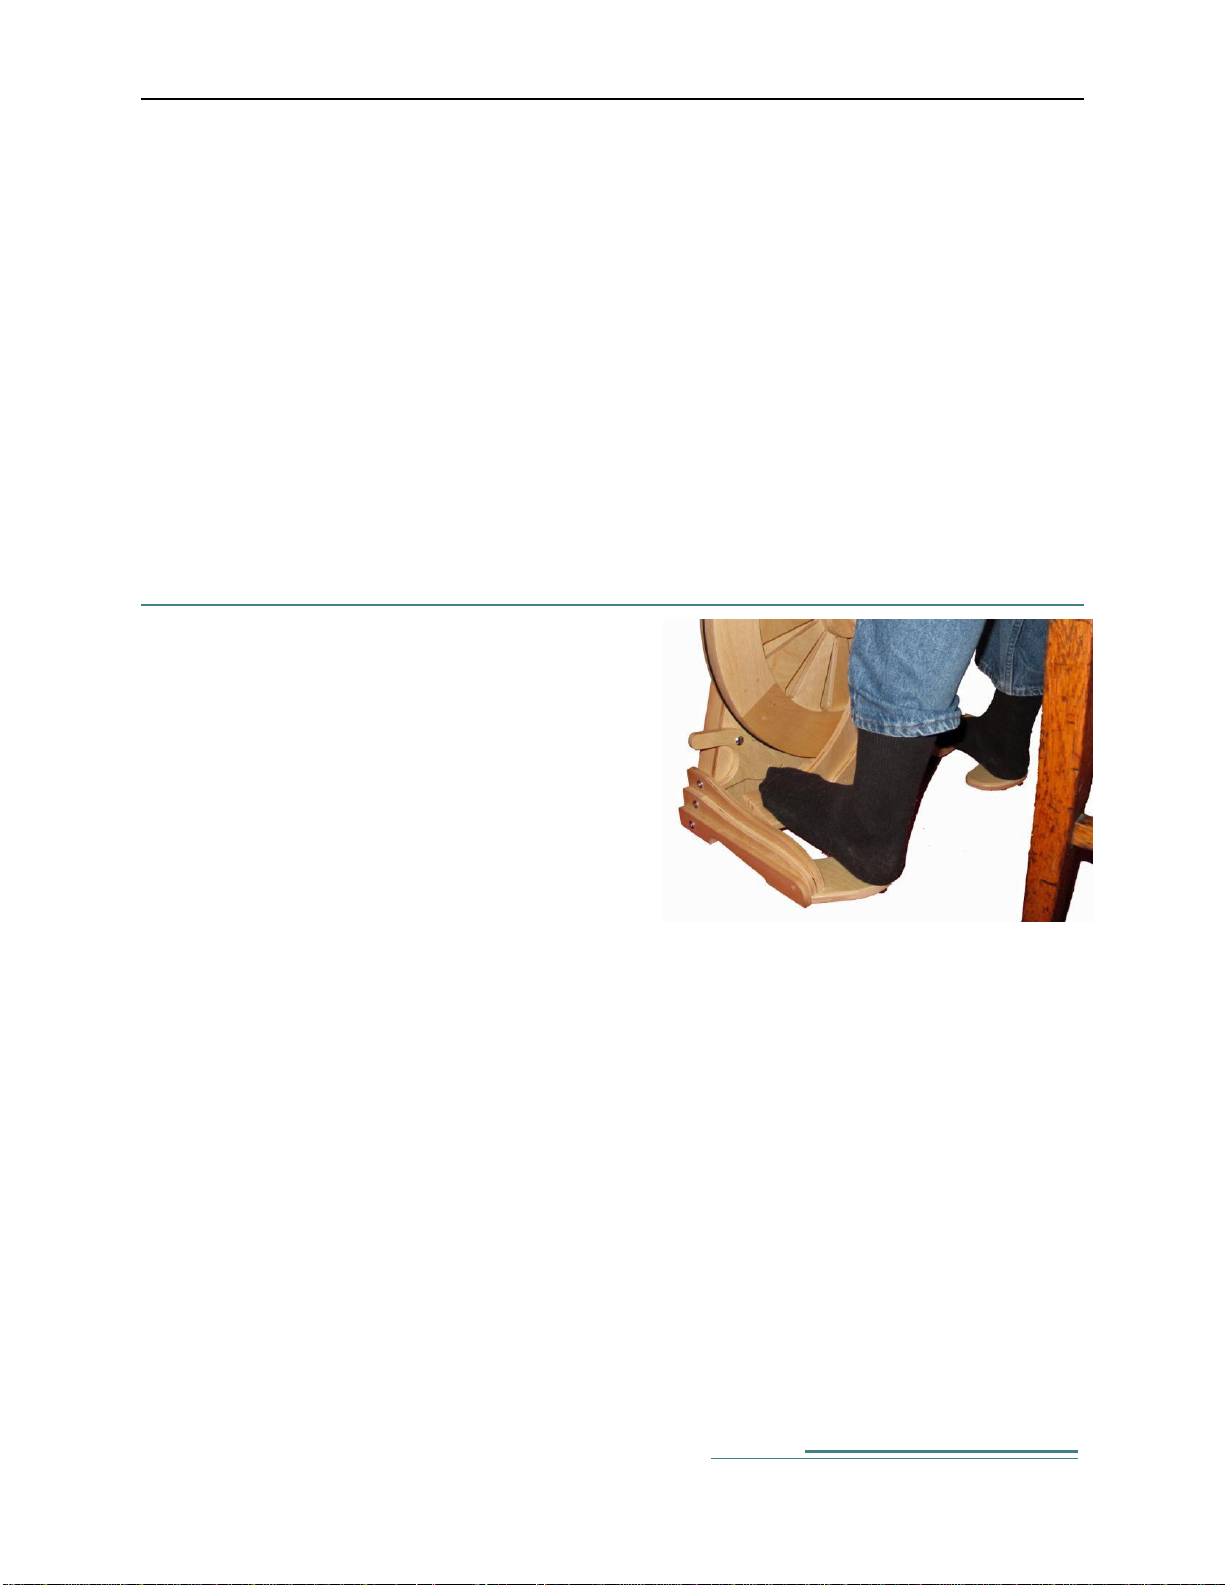
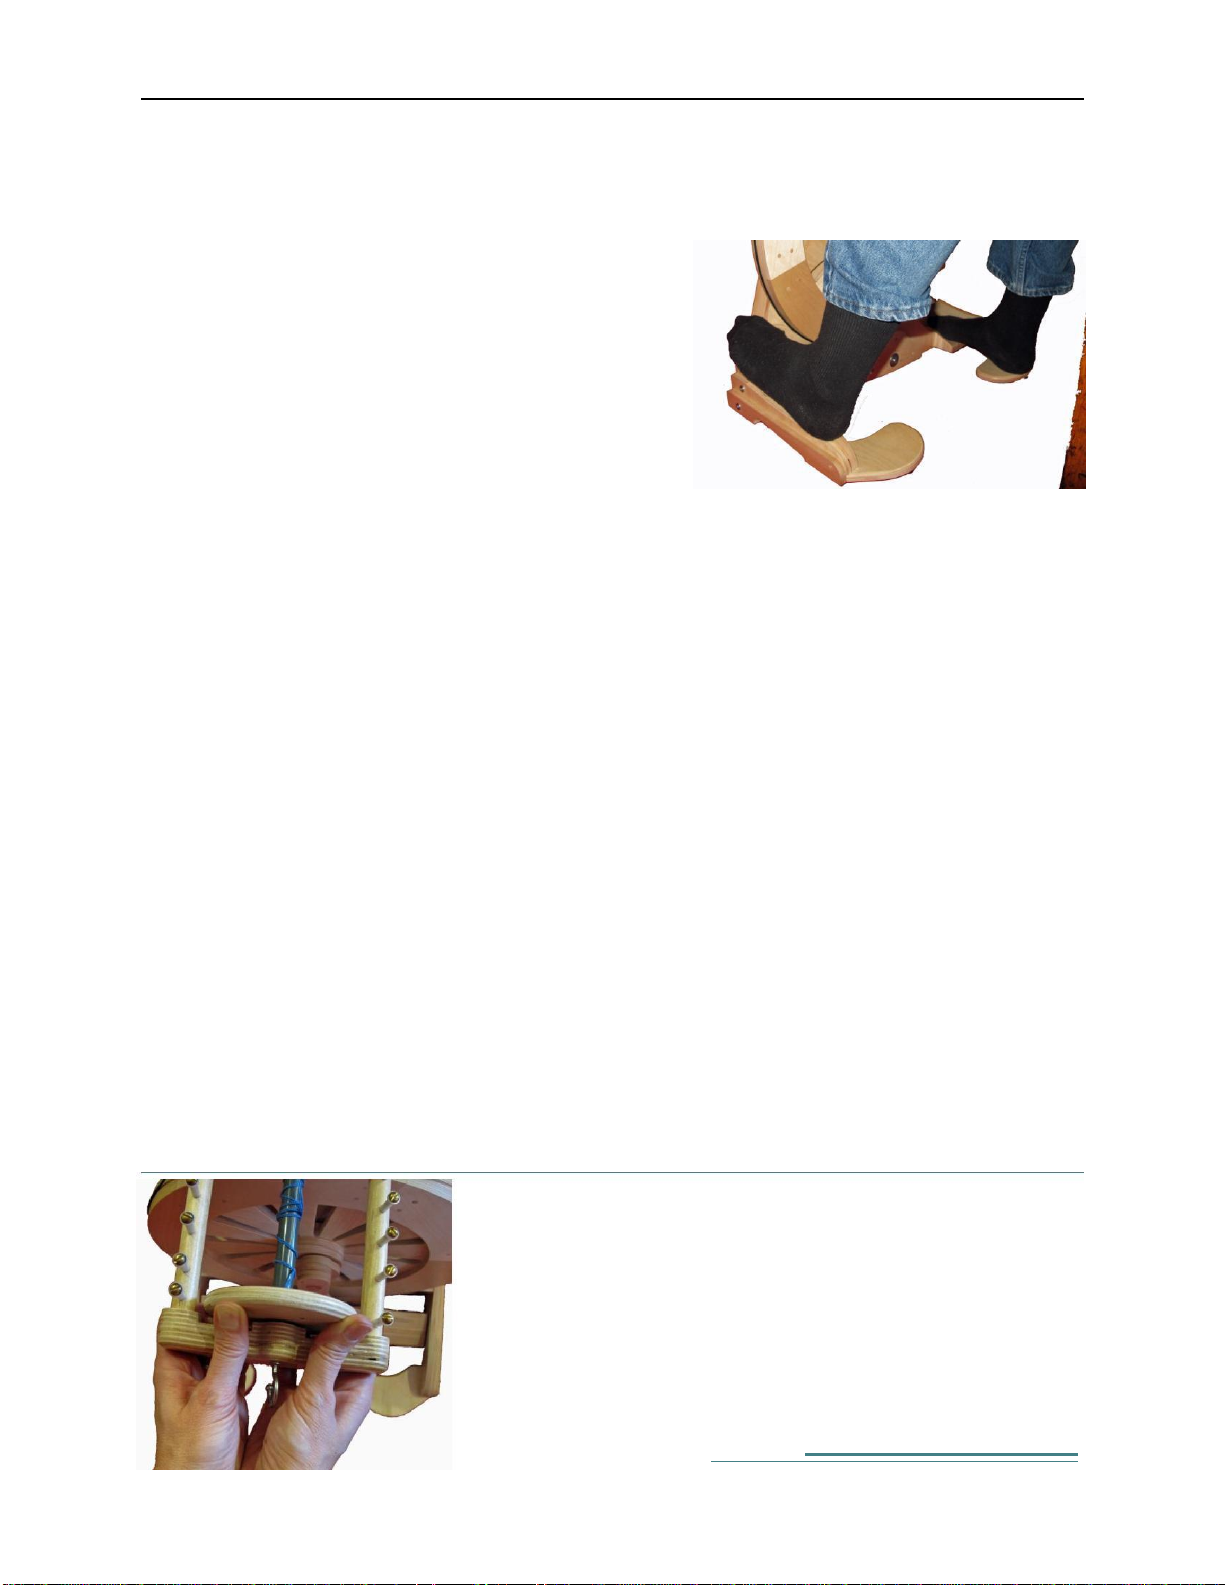
The Mach III drive wheel has enough mass that the wheel
keeps spinning even when you remove your feet from the
treadles. To stop the drive wheel, there is a foot brake on
each side of the wheel. Reach forward with one foot and
press on the break; the wheel will quickly halt. The picture
here shows my left foot raised to push down the left
brake; the right foot is unmoving, resting on its treadle.
You can use either brake to stop the wheel.
Please note that as with all spinning wheels with drive bands, it is possible to trap things between drive
band and wheel when the wheel is spinning – keep pets, audience members, and paper airplanes away
from the wheel when it is in motion, to prevent accidents. Be sure to stop the wheel before walking away
from it.
As you may have noticed from these pictures, I prefer to treadle in my socks (handspun for special
occasions), as this keeps my treadles and heel rests clean of anything my shoes may have picked up.
As with all wheels, practice treadling your wheel until you can start it going the direction you desire.
Traditionally, spinners learn to spin singles clockwise and to ply counterclockwise, so start there. Or buck
tradition; just make sure to ply in the opposite direction to that used to spin your singles.
The key to being able to start your wheel in the direction you desire is stopping the wheel at the right part
of the treadle swing. Don’t stop with either treadle completely depressed. If your first (slow) push down
starts the wheel going the wrong direction, give a little push the other way to get the wheel started in the
desired direction. Practice treadling until you can get the wheel turning slowly in the desired direction
automatically.
Don’t combine this direction-change trick with a fast start – the yarn is likely to jump off the flyer pegs
and twist around the flyer spindle, requiring you to stop and fix things before you can continue.
It should not be necessary to start the wheel in the desired direction by touching the drive wheel with
your hands. That said, beginners can struggle with learning this magic trick on any wheel – you may find
a short push on the top of the wheel in the desired direction gets you up and treadling in the direction you
desire while you are still new to spinning. Practice until you no longer need this push to start.
Bobbins
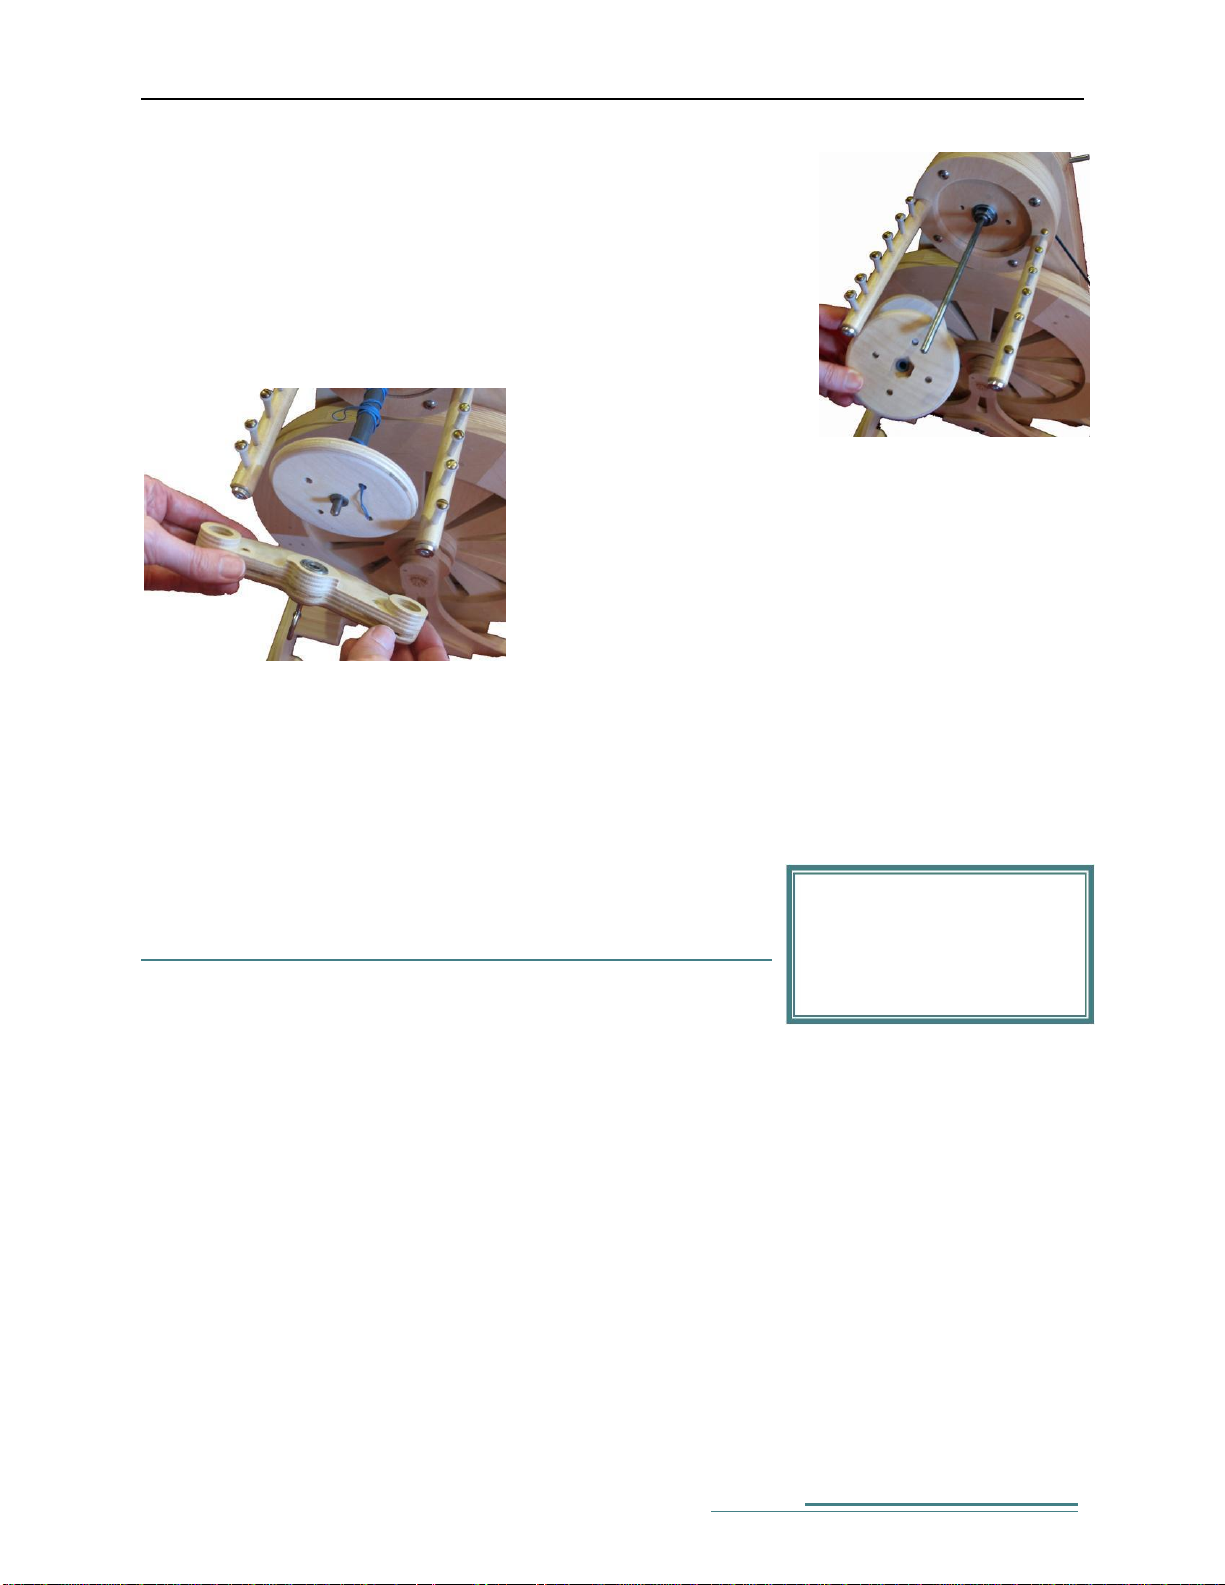
Remove the bobbin from the flyer spindle by pulling off the orifice arm.
It is held in place by magnets. I usually push against the bobbin on the
wheel with my fingers under the orifice arm and thumbs above, as
shown here, to break the magnetic bond, pulling squarely at the middle
of the Orifice bar.
7
Page 8
© 2013 SpinOlution - http://www.spinolution.com/
1:3, 1:5, 1:10, 1:15, 1:21
The Mach III ratios are:
The orifice bar comes off, and then you can take the bobbin off the flyer’s spindle (rod).
To put a bobbin on the flyer spindle, make sure to match the hexagon cutout at the back of the bobbin with the hex nut at the back of the flyer
spindle. The bobbin is keyed onto the flyer spindle, as its rotation is
braked by the tension knob on the top left of the folding arm. The inner
face of the back whorl on the bobbin should sit almost flush to the back of
the flyer. If the bobbin is not far enough back, the orifice arm will not fit
back onto the flyer in the grooves that holds it in place.
Replace the orifice bar on the
flyer arms by seating it
squarely, matching both ends of the flyer arms at the same
time. If one side seats but not the other remove the orifice arm
and place it more squarely so both seat at the same time. The
flyer spindle also keys into a bearing in the orifice arm.
The Mach III’s bobbins have four
holes around the back end s. These
can be used to hold the leader. For a
two yarns of strong yarn – I use perle cotton, acrylic yarn, or a cabled wool yarn.
Tie the loop with a simple overhand knot, and position the knot so it’s not at
either end of the loop. Push the string through one of the holes and back
through another, so the ends of the loop are on the inside of the bobbin. Put one
end of the loop through the other, and tighten this up as shown in the picture.
This leader will stay secure and works for both clockwise and counter-clockwise
spinning. Attach the leader to the front holes of the bobbin for smoothest spinning; if you put it on the
back of the bobbin, it can rub against the back of the flyer.
leader, make a large loop from about
Setting the Ratio
Your Mach III has five ratios to choose from. Are you are wondering
– what’s a ratio? The ratio is the number of times the orifice hook will
rotate – the number of twists it will put into the fiber you are spinning
– For each complete rotation of the drive wheel. The drive wheel
makes a complete rotation with each complete trip of the treadles (both as a combination) up and
down.
Ratios are set by moving which groove (pulley) behind the flyer you place the drive band in. The drive
band will automatically seat itself on the drive wheel to align with the groove used, over the first few
rotations of the wheel. The largest groove, closest to the bobbin, provides the lowest ratio; the
smallest groove, a metal one, furthest from the bobbin, provides the highest ratio.
The effort to treadle increases slightly with each ratio; but even at the highest ratio, it is lighter than
traditional treadle wheels. For easiest treadling at the higher ratios, start treadling slowly, then
gain speed. Once you get it started, it keeps going easily with regular treadling.
In the picture series here, we see the drive band first in the largest pulley, then moving down to the
smaller pulleys, for ratios of 1:3, 1:5, 1:10, 1:15, and 1:21. The largest three pulleys are wood, and the
smallest two pulleys are metal.
8
Page 9

The Mach III Spinning Wheel
Ratios, left to right: 1:3, 1:5, 1:10, 1:15, 1:21.
How do you pick a ratio? Some spinners go by feel – they fiddle around until they find a ratio they like,
and then they stick with it. Then, they take a technical spinning class and find out how their teacher
recommends they adjust ratios, up or down, for plying, spinning sock yarns, or whichever technical
skill the teacher is presenting. I can heartily recommend the book The Intentional Spinner by Judith
MacKenzie McCuin, which provides several charts and diagrams showing when and why to apply ratio
changes when spinning. A lower ratio is typically used to spin a thicker, lower twist yarn, while a
higher ratio is used to spin a finer, higher twist yarn.
Generally, the higher the ratio, the more twists you put in your yarn for a complete treadle revolution,
and the less drag there is on the flyer (draw-in tension is lower). The lower the ratio, the fewer twists you
put in your yarn per treadle, and the more drag there is on the flyer. So, when you adjust the ratio, you
may also then need to follow up by adjusting the tension – but honestly, this change is pretty subtle, so if
you don’t notice, you aren’t alone.
If you are just learning to spin, start at the lowest ratio, 1:3, and increase to 1:5 and then 1:10 as you find
your drafting speed increases. The jumps to 1:15 and 1:21 can be made as you find you need more twist in
your yarn.
I recommend moving the drive band to the highest ratio at the end of each spinning session, so that the
band can “recover” from being stretched. This maintains its stretchiness so it will be ready for you, when
you are ready for spinning at the higher ratios.
Working with Open Threading
No doubt you noticed that your Mach III wheel
has a unique open threading system. It uses pegs
rather than traditional hooks – no more getting
fibers or boucle loops caught on the tip of a hook
as you spin! And it has an orifice hook rather
than the traditional orifice tube – no need for an
orifice threader!
For me, this is priceless – I can interrupt a plying
job in mid-stride without breaking off the singles. I don’t have an extra tool to keep track of (that orifice
threader, and I can spin all the crazy yarns I want without getting hung up on the hooks. The orifice peg
has a smooth ball tip too, so it’s not going to catch stray fibers.
The flyer shown here is the art yarn flyer – the standard flyer has shorter pegs, closer together and a
smaller hook at the orifice. It should be noted that the art yard flyer will spin all weights of yarn, but
the smaller standard flyer will not do art yards.
9
Page 10
10
If your leader is short, you might add a yard or two of
string to the end for this step… now treadle, and see if
the bobbin will take up the leader or not. If not, twist the
brake knob clockwise half a turn and try again.
Once the leader does take up, you will want to fine-tune
the tension with turns less than 1/8 of a rotation of the knob, clockwise to increase take-up or counter-clockwise
to decrease take-up, until you can easily pull the leader off while you are treadling but still have
The Mach III is a Scotch tension wheel.
Adjusting the brake knob changes the
brake pressure on the bobbin via the
flyer spindle. The flyer spindle turns
independently from the flyer arms,
making this a true Scotch Tension,
slowing the bobbin, not the flyer arms
(Irish tension brakes the flyer arms).
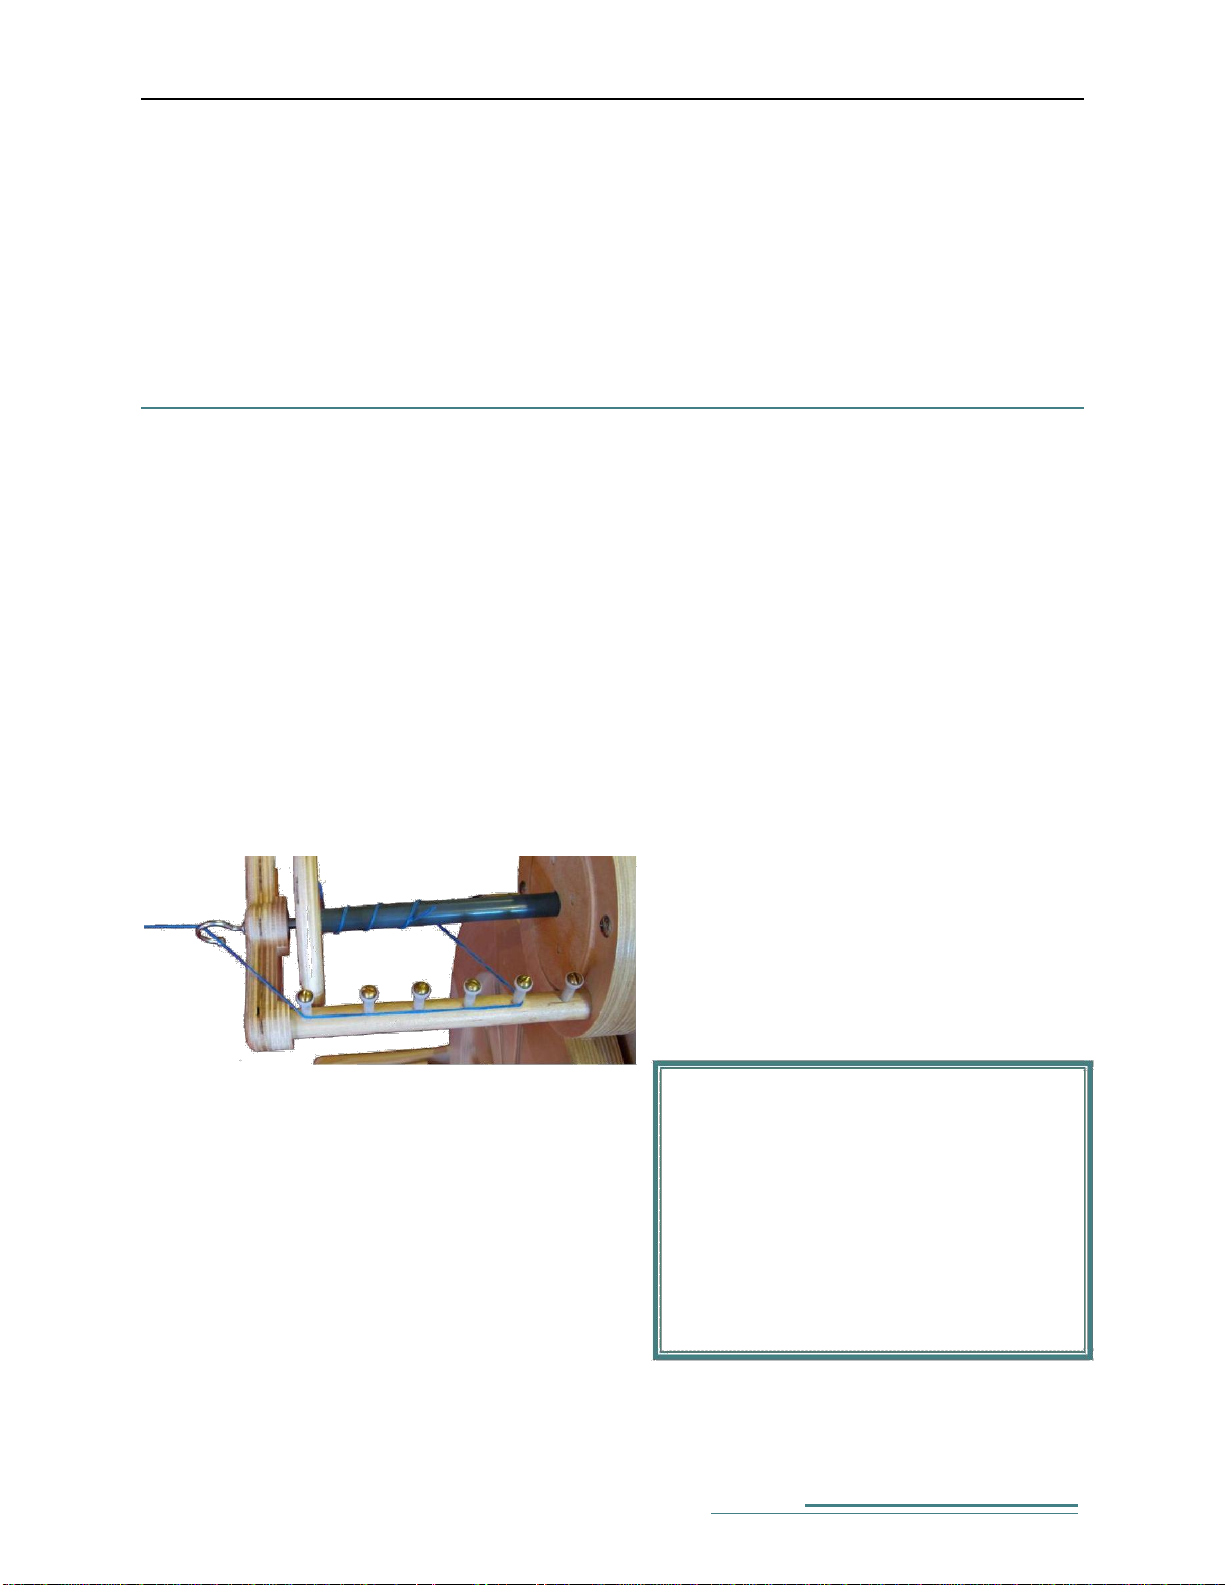
Always go along all the pegs from the first one you come
to, to the front of the flyer arm. If you skip some pegs,
your yarn will rub against the end of the bobbin. (Okay,
except when lacing… what’s that? See “Twists and
Turns - Tips to Make Spinning Easier‟ at the end of this
guide.)
© 2013 SpinOlution - http://www.spinolution.com/
If you’ve used a delta orifice before, the theory is very similar. You bring the yarn or leader from the
outermost point of the orifice hook horizontally toward you. At first, the yarn may slip out of the leader as
you are learning to spin – work on keeping the angle of yarn from orifice to you horizontal, and work on
keeping the wheel going in the same direction as you treadle. If you’re just starting out, changing direction
in treadling will cause the yarn on the bobbin to loosen and wind off the bobbin, leaping off the pegs and
out of the hooks – stop, breathe in, breathe out, thread it back up, and start again. You’re learning, give
yourself a break.
Adjusting the Tension
Once you have assembled your Mach III and put a bobbin with a leader on your wheel, you will need to
check the tension on the bobbin to ensure your yarn will take up onto the bobbin as you spin. Tension on
the bobbin is controlled by adjusting the brake knob at the top of the wheel. Clockwise rotation of the knob
(looking at it face on) increases the brake pressure, and counterclockwise rotation decreases it. Very minor
adjustments are needed to fine-tune the tension – less than 1/8 of a turn – so only use full rotations for the
initial adjustment.
Let’s explore the braking system briefly. The brake knob screws onto a threaded rod; it pushes on a spring,
which pushes on a nylon flange, which in turn pushes on a wooden block. The wooden block goes into the
flyer mounting; on its inside edge, it is curved, and has a piece of suede attached. The suede pushes on the
rod (technically, the flyer spindle) that the bobbin rides on. About once a year (or when you notice the
brake not being as effective), undo the brake knob completely, and take the spring, flange, and wooden
block off. Check the suede – over time its rough surface is smoothed; if needed, rough it up with a stifftoothed comb, an emery board, your fingernail, or coarse sandpaper.
To set the initial bobbin tension, start by twisting the knob until there is no pressure on the spring resting
on it, so that any more clockwise twisting of the knob would cause the spring to start to compress.
Bring the leader to the orifice by taking it from
the bobbin out to a peg directly to the side from
it, then forward outside the remaining pegs to
the front of the flyer arms, and from there under
the orifice hook and toward you. Hold the leader
straight from the orifice hook toward you, not at
an angle.
Page 11

The Mach III Spinning Wheel
the leader be taken up onto the bobbin if you are not resisting the take-up. If this testing takes a while,
be sure to let the twist out of your leader from time to time – treadling with a corkscrewed leader is an
exercise in not-fun.
Note: new wheels may have a strong initial pull until the first few bobbins of yarn have been spun on
them. Try lacing the leader to perform the above exercise if you cannot overcome the pull even when
the knob is not putting any pressure on the flyer spindle.
You might want to have a tighter tension than I’ve described setting above when you want to make a
low twist yarn; when you’re drafting quickly enough that you want faster take-up onto the bobbin; or for
the stronger take-up needed for a thicker yarn, plying, or a fuller bobbin.
A great SpinOlution feature is that you will not have to adjust the tension when you change bobbins –
most Scotch tension wheels put the brake band on a groove in the bobbin, so you have to remove the
brake band, and then replace it, when you change bobbins. Not so with the Mach III.
While you are Spinning
When spinning clockwise, it’s usually best to start on the right-side pegs; counter-clockwise start on the
left-side pegs. That way, the yarn will want to stay against the pegs as you spin. You will need to stop and
change pegs from time to time so that the little hills of yarn that build up don’t collapse into messes on
the bobbin. Move regularly toward the back and then back toward the front, up and down. You can
simply take the yarn off one peg, leaving it on the rest in the row, or add it around another peg in the row.
Don’t slalom the yarn around the pegs – it always goes to the outside, and then stays outside along the
row of pegs until the last one, when you bring it to the orifice. The last peg before the orifice hook is
important – it prevents the yarn from rubbing against the edge of the bobbin: be sure to be on the
outside the final peg.
With experience, you’ll find it won’t matter too much which side of the flyer arm you are on – you can use
the pegs on both arms to more completely and evenly fill the bobbins. Note that when you change which
flyer arm you come along, you will need to unhook from the orifice hook to come from that side of the
flyer arm to the orifice hook. Otherwise your yarn will wrap around the orifice hook and won’t take up
onto the bobbin (at all, or as easily… your experience may be either).
Hold the yarn you are making in a line from the center of the orifice hook to you. I keep my forward hand
in a fairly neutral position in front of my body, so the yarn is coming in a horizontal line, from the hook
to my hand. If you hold it at too extreme of an angle up, down or to the side, the yarn will thump as you
spin it. Most spinners don’t like that…
You may find you need to increase tension slightly – only a millimeter-sized nudge at a time – as the
bobbin approaches full. The fuller the bobbin is, the more it can overcome the braking pressure. This
is true of any Scotch tension based flyer system.
For learning to spin, I highly recommend:
Start Spinning by Maggie Casey
The Intentional Spinner by Judith MacKenzie McCuin
11
Page 12

© 2013 SpinOlution - http://www.spinolution.com/
Learning to Spin
If the Mach III is your first wheel, I recommend starting out on the lowest ratio – put the drive band on
the largest flyer whorl.
The First Steps…
With nothing on the bobbin, practice treadling as described earlier until you can start and stop the wheel
going the direction you want.
Then put a leader on the bobbin and attach some yarn leftovers to your leader (acrylic’s great for this!) –
wrap the end of the practice yarn through and around the leader’s loop a few times to catch it in place, or
use a half-hitch so it stays attached. Treadle so the wheel spins clockwise, letting the acrylic be drawn onto
the wheel. Be sure to adjust the tension as described before. Doesn’t the feel of treadling change a lot
when you add yarn to the mix? Hold this practice yarn so that it feeds onto the wheel easily, and then
hang onto it, so that it gets a little clockwise twist before it draws onto the wheel. You’ll be hanging onto
your fiber like this while you are drafting it, so get used to that “holding back” feeling.
Once you’ve had enough of that, put the bobbin on a lazy-kate and put an empty bobbin on the wheel.
Then do the exercise again with the yarn from the bobbin on the kate, but this time spin the wheel
counterclockwise. Not only is this good practice, but you can put back in the twist you took out
spinning clockwise.
Adding Fiber
Whew! You’re really going to learn to spin from these small notes? Remember what I said at the opening…
this is really abbreviated! I recommend taking breaks – try these things in 15 minute increments, not more
than 4 a day, so your brain has time to learn the muscle skills involved. It easily takes at least a month to
develop basic spinning skills – and it takes practice, not just one concentrated session.
I recommend starting to spin with a Romney or Corriedale roving. Ask – roving is better than commercial
top for this first lesson, as top is very compressed and harder to draft. Drafting is pulling the fiber along
its length to make it thinner. Tear off a piece of fiber a foot long, and if needed, break it lengthwise into
pieces about as wide as your thumb. Now hold one of these pieces with your hands 8 inches apart and tug
gently. See how it gets longer, but doesn’t separate? Do this along the length until your piece is twice its
original length. You are pre-drafting the fiber. Eventually, you can skip this step and do all the drafting
while you spin.
Now pull out just a bit of fibers at the tip, so you have a skinny piece at the tip of your length of predrafted roving that is about 6 inches long. Sit at your wheel with an empty bobbin and a leader on the
bobbin. Put the leader on the pegs and orifice hook as described earlier in this guide, and then put 3
inches of the pre-drafted fiber through the loop at the end of your leader, pinching both ends about
an inch from the leader with your primary hand (primary = right for right handers, left for left
handers). With your other hand, hold the fiber about 8 inches back from your primary hand.
Treadle slowly, clockwise. Keep pinching that fiber! You’ll very soon feel twist at your thumb. Slide your
pinching, primary hand back about an inch (while treadling s.l.o.w.l.y). See how the twist follows it?
Now things get exciting… your other hand holds the fiber, while your primary hand pulls forward to both
pull fiber out of the fiber mass, drafting it, and to feed the yarn you’ve made onto the bobbin. Every so
often, your other hand will need to slide back to provide more fiber for drafting to your primary hand.
That back hand should only be holding the fiber gently, as if it were a baby bird, not gripping it. A tight
grip will matt the fiber and keep your primary hand from being able to draft from the whole mass.
12
Page 13

The Mach III Spinning Wheel
Your drafted out, twisted fiber is yarn when it doesn’t pull apart any longer. Stop, test a length by tugging
on it, and adjust. Usually beginners have the opposite problem – their yarn is kinky-crazy with
corkscrews. Treadle slower if that happens to you… your hands are learning a skill much more difficult
than what your feet are learning!
How much twist, then? If you plan to ply, fold a length of singles back on itself to see what the 2-ply will
look like, and adjust the amount of twist in the singles until you like the plyback test.
You’ve been taking breaks, right?
Sooner or later, you’ll reach the end of your piece of roving; stop with 4 inches of it still unspun. To join a
new pre-drafted length to it, overlay the last 4 inches of unspun end of your old piece with 4 inches of predrafted out end of your new piece. Draft them together just a bit, then hold at the start and start treadling
again. Go back to drafting and sliding, and voila! They join! Do this as you need to.
Eventually, you’ll fill a bobbin. Then another. Then, it’s time to…
Ply!
With two bobbins on a lazy kate and an empty bobbin on your wheel, you will be treadling so the wheel
spins counter-clockwise now. Take both ends from the full bobbins, bring them together to the leader and
loop them through it and around through it a second time to keep them on the leader. Tension the strands
with your right hand, bringing them through two different pairs of fingers, and then pinch the two strands
together with your left hand. Start pinching near the leader so you have the ends folded back on the two
strands. Treadle… twist enters and your yarn is plying! Slide your left hand back a bit as twist enters, then
as needed feed it onto the bobbin and pull more yarn off the bobbins on the lazy kate.
The amount of twist you need when plying is set by the amount of twist in your singles – put plying twist
in until the individual fibers in the plied yarn lie along the length of the yarn. This will give you balanced
singles. Your plied yarn should look like the plyback tests you made when you spun your singles.
When the plying bobbin is full, wind the yarn off into a skein around your arm - under your elbow, up
between thumb and palm, around and around. Tie the skein in 2-3 places with cotton, and soak the skein in a
sink of warm water and wool wash to help set the twist. Repeat in a rinse bath the same temperature.
Always fill the sink first, so the yarn isn’t agitated, or it may felt. Squeeze the water out and hang your
skein to dry.
Refining your spinning
Try not to let the twist past your forward hand – in singles, this makes the fiber harder to draft,
causing you to spin thicker yarn; in plying, it makes it harder to have an even plied yarn.
Your backward hand holds onto the fiber, but should not squeeze it – if it does, the fiber will bunch up
and get matted. Treat it like a baby bird with your back hand.
Go backwards a step –go back to practicing treadling during idle moments and pre-draft a few lengths of
fiber at a time, so you can separate out the skills in spinning and focus on individual tasks.
If the fiber is drawing on too quickly, decrease the brake pressure on the wheel, and treadle more slowly.
If the fiber isn’t drawing in, first check – if the wheel is spinning the wrong way at first, the yarn may be
jumping off the pegs and feeding off the wheel instead of on, wrapping the flyer spindle between the
bobbin and the orifice, or wrapping around a peg or the orifice hook; check and fix those things, then after
that, try increasing the brake pressure.
13
Page 14

© 2013 SpinOlution - http://www.spinolution.com/
If you are having difficulties joining fiber, be sure both the old and new are completely unspun, and
draft them together a bit before starting to spin. If your yarn has snapped at a thin spot, unwind yarn
from the bobbin to find a thicker spot that can be unspun for a good join.
Thick and thin spots occur during spinning when different amounts of fiber are drafted – look at the
thickness of the fiber between your two hands, and keep it consistent for a consistent yarn diameter. Give
yourself time to improve at this, it’s a very detailed task.
If your yarn is falling apart during plying, put more twist in when spinning the singles.
If your yarn is corkscrewing while spinning the singles, it needs less twist. Treadle slower, check that
you are on the lowest ratio, pre-draft your fiber a bit more, and work on drafting more quickly. That last
one will come with practice.
If a strand breaks during plying, overlap the broken ends by 1-2 inches and continue plying.
If one strand is wrapping around the other during plying, check that your right hand is tensioning
the strands off the bobbin evenly.
Twists and Turns - Tips to Make Spinning Easier
Yarn is not taking up on the bobbin… increase the tension on the bobbin brake, turn the brake knob
by ¼ turns clockwise until yarn takes up. As the bobbin fills, you will find draw-in decreases – this is
standard behavior in scotch tension wheels; increase the brake tension and continue filling your bobbin.
However, first check – if your yarn has jumped off the pegs, it could wrap around the flyer spindle
between the bobbin and orifice arm. Remove the orifice arm, unwrap this yarn, and then restart spinning.
Take up is too strong, yarn is pulling out of your hands too quickly… decrease the tension on the
bobbin brake. Turn the brake knob by miniscule increments counterclockwise once you have yarn taking
onto the bobbin (1/8 turn or less). Very minor adjustments can have a large apparent effect.
For very fine spinning, start with a half full bobbin
(of anything, even a piece of pipe insulation as
shown here) and/or lace the yarn across the flyer
arms like one shoe lace, to decrease the drag-in of
the yarn. This is shown in the picture here. I find
the half-full bobbin is the same as one lacing across
the flyer arm, and that 2-3 lacings will reduce the
draw in enough for very fine spinning.
You may find that lacing decreases draw in too much
– if this occurs, give the bobbin a small nudge in the
wind-on direction as you start to treadle – this is
usually enough that yarn will continue to wind on as
you spin.
Yarn is thump-thumping as you spin… be sure your yarn is coming from the center of the orifice
hook toward your body in a fairly straight horizontal line. This minimizes any thumping. I have found
that a slight angle is possible, but I definitely don’t put the yarn at a 45 degree angle up, down, or
sideways from the center of the orifice hook.
14
Page 15

The Mach II Spinning Wheel
Drive band is slipping… increase speed slowly, over 5-10 treadling’s, from nothing to the speed
you want to spin, to minimize or avoid drive band slippage. Going from zero to top speed on the very
first down stroke will almost always make the drive band slip.
The band may slip more in the highest ratio position if you often use it at the low ratio settings. Store
your drive band in the highest ratio groove or even on the rod behind the grooves (only if the rod is oil
free!) between spinning sessions to help it regain its high ratio size.
If you have overstretched the drive band, you may find it will recover elasticity by removing it and
placing it in a warm room for a few days. As a last resort, consider cutting and re-gluing them shorter –
but be sure to let them dry completely before using, or they will separate under the strain of being used
on your wheel. New drive bands can be purchased from your dealer. In a pinch, try cotton carpet warp or
string until your replacement bands arrive.
Replacing a drive band… if you need to replace the drive band, it can be removed and replaced on the
Mach II by pulling the treadle forward to make a gap between it and the drive wheel. Grasp the treadle at the
base of the footman, on both sides, and pull it gently forward. It should move forward about one inch.
Flyer does not rotate as you treadle… check that the drive band is in one of the grooves on the back
of the flyer, and not on the metal rod behind them. If it is, check if the drive band is loose and slipping
during treadling: see “Drive band is slipping”.
Treadling is hard… check if the brake band tension is set too strong; check if something’s gotten under
the treadles, jamming them; check if one of the foot brakes is pressing against the drive wheel; check if
the drive band is out of the grooves on the flyer; try sitting closer to the wheel; if you are on the highest
ratio, try switching to the lowest ratio for a few minutes to stretch the band just a bit, and then returning
to the highest ratio; or if you are trying to start fast, start with a slower first few treadles, increasing speed
gradually over the first few treadling’s; as a last resort, check for wear on the pitman guide or a loose
pitman bearing.
A knocking sound when treadling… the pitman guide, on the inside of the footman, can get worn,
causing the pitman (a bearing) on the drive wheel to knock. You can reduce or remove the knocking
sound by putting one coat of clear nail polish or light glue on the inside of the pitman guide. Let it dry
completely before putting it back on the pitman.
Uneven or noisy treadling… check for damage where the footman connects to the drive wheel – grasp
the treadles at the base of the footman and slide them forward, exposing the pitman ball bearing on the
drive wheel. Make sure the ball bearing screw is completely screwed in, and that the pitman guide on the
inside of the footman is not damaged – it is a regular flat-sided oval. You will need to contact SpinOlution
for information on addressing any damage here.
Maintaining your Mach III
Your Mach III has a polyurethane finish, and so can be cleaned with a light dusting as needed.
Oiling: the Mach III in general does not need oiling, working on sealed bearings and its unique keyed
bobbin system. You may find a light coating of oil on the flyer spindle and the bobbin pegs helps you slide
the bobbins on and off more easily.
If a squeak develops on your wheel, locate the source. Metal-on-metal squeaks can usually be
resolved with a small drop of oil.
15
Page 16

© 2013 SpinOlution - http://www.spinolution.com/
Height
32 in
Width
24 in
Depth
12 in
Every 6 months (or as needed), check the suede on the inside end of the brake block as described in
Technical Specifications
Furniture grade Birch plywood with a lacquer finish
Weight: 23 lbs.
Drive wheel: 20 in. diameter, 1.5 in. thick
Bobbin capacity: 8-10 ounces plied yarn
Mach III Accessories
Lazy-Kate: holds up to 4 bobbins that attach to the
Mach III or on its own legs, $97.
Skein winder: that mounts in place of the bobbin,
$175.
32 Oz Flyer and head, $445.
Additional Mach III Bobbins, $30 each
Drive Band (replacement band) $6
Wheel and Strap Kit: caster wheels and strap for
ready transport $20
Additional Resources
There is a SpinOlution group on Ravelry, if you have a spinning question about your wheel, you can
often find an answer there: http://www.ravelry.com/groups/spinolution. Not on Ravelry yet?
Membership is free.
There are several videos on YouTube showing spinning on the Mach I and Mach II wheels.
For a video showing assembly of the Mach II, see this YouTube video:
http://www.tinuyrl.com/machassembly
About the Author
Amelia Garripoli has been spinning and blogging since 2001, when she purchased a house that came with
two llamas. She blogs as Ask The Bellwether (http://www.askthebellwether. com/blog) and is an active
mentor in several online forums. You can find her as askthebellwether on Ravelry, thebellwether on
YouTube, and ask@thebellwether.com on email. She was thrilled to win Best Finished Item From
Handspun Yarn at her county fair in 2009, a great follow-on to winning Best Handspun Skein in 2008.
Amelia has written articles in Knitty, Spin-Off, and Yarn Magazine, knitting patterns for Fiber Trends,
Crosspatch Creations and The Bellwether, and has published two books, Spindling: The Basics (2004)
and Productive Spindling (2009). She teaches a wide variety of workshops on fiber preparation,
spindling, spinning, dyeing, and more. Amelia loves exploring ways to turn fiber into textiles.
16
Page 17
The Mach III Spinning Wheel
Meet the Makers… Wind Mach II
The Pauly family built their first spinning wheel in 1983. They
started SpinOlution after 25 years of designing and building
several wheels for personal use and experimentation. The
company's goal is to provide the most advanced and easy to use
spinning wheels that have ever been seen or used.
SpinOlution is pleased to offer the Mach III, Mach II, Wind
production wheels, the Queen Bee, King Bee travel wheel, the
Echo entry level wheel, the Hopper art yarn/travel wheel, and
an assortment of drop spindles and accessories.
SpinOlution wheels are guaranteed for 1 year. The Pauly’s are
happy to assist you with any questions you may have concerning
your wheel. They will work with you to resolve any questions
you may have about its operation or maintenance.
They can be contacted via
Email:
Mike Pauly: mike@spinolution.com
Phone: (951) 765-0643 (PT)
www.spinolution.com
SpinOlution
196 Hawkins
Road
Winlock, WA
98596
Echo Queen Bee King Bee
Hopper
17
 Loading...