

Spinning SPINPower Studio Crank Owner's Manual
STUDIO CRANK
OWNER’S MANUAL

CONTENTS
The SPINPower® Studio Crank
What’s Inside
SPINPower® Studio Crank Features
Checking or Replacing the Batteries
Pairing the SPINPower® Studio Crank
Removing your Existing Crank and Pedal
Installing the SPINPower® Studio Crank
Care and Maintenence
Frequently Asked Questions
Certification and Limitations
Warranty Information and Customer Support
4
5
6
7
8
9
13
14
15
16
17

4
THE SPINPOWER®
STUDIO CRANK
Thank you for purchasing the SPINPower®
Studio Crank. Power measurement is a key
component of the SPINPower® program that
was developed by the leader of the indoor
cycling world: Spinning®. This crank will measure a
rider’s eort and is designed to be compatible with
Bluetooth and ANT+ devices to provide a rider with
real (and not estimated) power measurement. The
crank is also compatible with many popular cycling
apps and most leaderboard systems.
This owner’s manual will explain all of the key features
of this crank as well as take you through each step
of installing the crank onto your commercial Spinner®
bike. Be sure to log on to spinning.com for all of the
latest updates and information about SPINPower® and
the Spinning® program.
©2019 Mad Dogg Athletics, Inc. All rights reserved.
Spin®, Spinner®, Spinning®, Spin Fitness® and the Spinning logo
are registered trademarks that are owned by Mad Dogg Athletics, Inc.

SPINPOWER® STUDIO CRANK OWNER’S MANUAL
1 2
3
4
WHAT’S INSIDE
1. SPINPower® Studio Crank
2. 3mm allen wrench (for the battery compartment)
3. 3 AA batteries
4. 8mm crank bolt (NOT for the pedal)
Tools Needed to Install the SPINPower® Crank
1. Spinning® or Park CWP-7 crank removal tool (not included).
2. Corresponding wrenches to fit the crank removal tool.
3. 8mm Allen torque wrench for the crank and pedal bolt.
4. 3mm Allen wrench for the battery door (included).
5. White lithium grease or light oil.

6
FEATURES
General
Proprietary oversized steel crank design with Morse
Taper threadless connections for both the pedal
and crank.
Proprietary battery configuration with 3 AA batteries
and energy-saving firmware for longer time between
battery changes (battery life depends upon usage).
Single sliding battery door access for ease of use
and security.
Dual mode design allows for compatibility with both
ANT+ and Bluetooth devices.
Powder coated finish for durability.
Specifications
Compatible only with Spinning® branded bikes.
More specifically, compatible with all commercial
Spinner® bikes manufactured by Precor. Also
compatible with some previous versions of Spinner®
bikes that featrure a Morse Taper connection to the
crank and pedals.
Powered by 3 AA batteries.
Compatible with ANT+ (Studio SpinPower Computer) and Bluetooth Smart devices (smart phones,
tablets, smart TVs).
D powermeter technology (patent pending)
measures tri-axial strain on your crank arm for
accurate, consistent data.
Crank calibration and maintenance is supported
by the SPINPower® Crank Connect App which is
available in the iOS and Android stores.
Data accuracy: +/- 1% error margin
SPINPOWER® STUDIO CRANK OWNER’S MANUAL
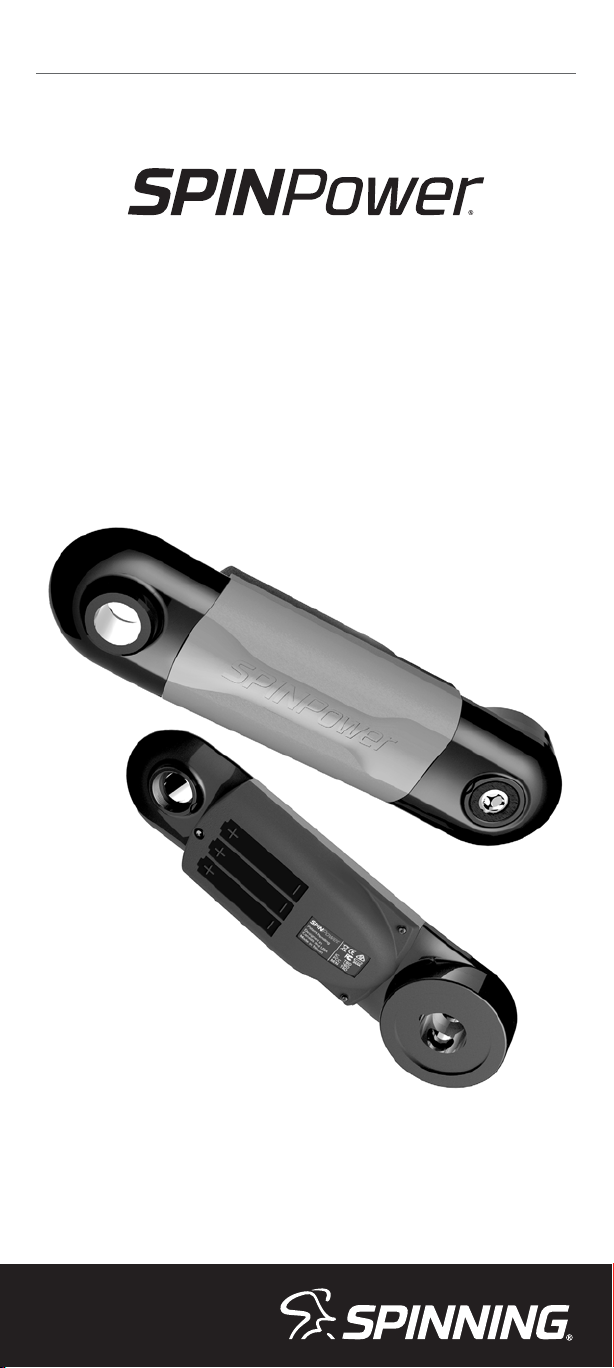
INSTALLING THE BATTERIES
1. Use the 3mm allen wrench to remove the single
allen bolt on the battery door (as shown).
7
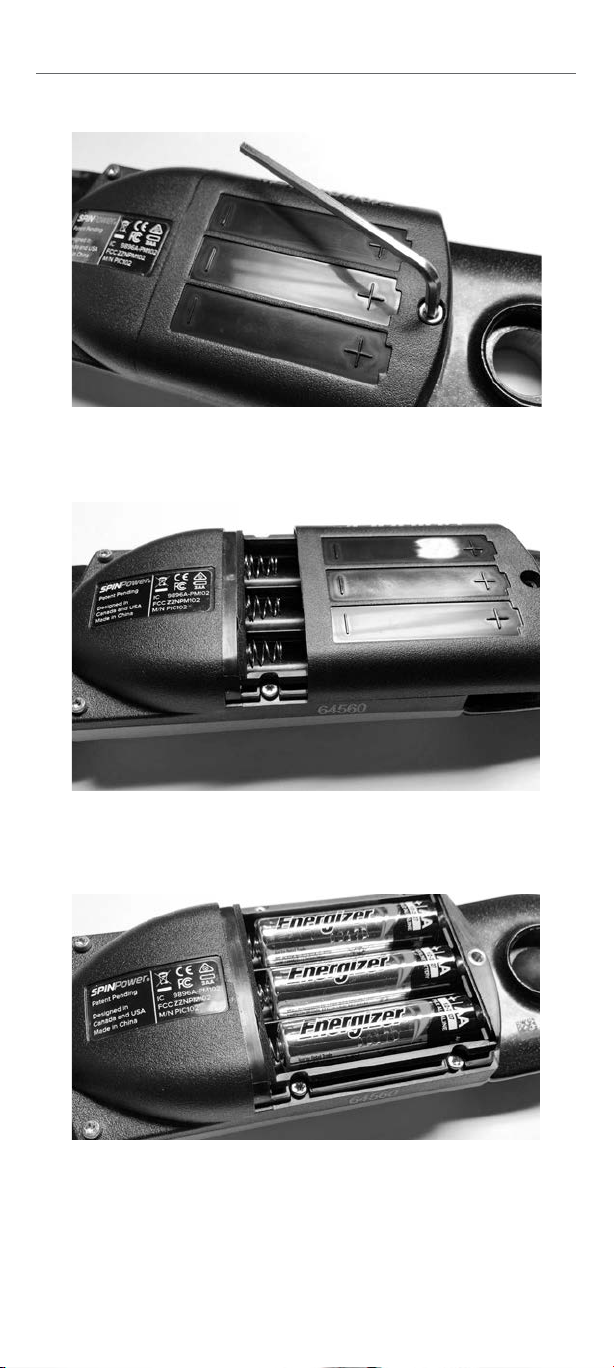
2. Slide the cover forward (towards the pedal side) as
shown to reveal the battery compartment. Note the
orientation of the 3 AA batteries.
3. Place the batteries as shown with all three positive
ends pointing towards the pedal end of the crank.
4. Slide the cover back onto the crank and secure it
with the screw that was previously removed. The screw
should be snug. DO NOT OVER TIGHTEN THE SCREW.
 Loading...