

Spin Master Toys Far East 44395TX27145 Users Manual
PROBLEM
T
T
The Osprey™ is not reacting to
the controller/charger.
Osprey™ is losing control.
Osprey™ is not holding a charge.
Osprey™ will not lift off the ground.
Osprey™ only turns in one direction.
Suddenly stops and drops while
flying.
NOTE: If normal function of the product is disturbed or interrupted, strong
electro-magnetic interference may be causing the issue. To reset product,
turn it completely off, then turn it back on. If normal operation does not
TROUBLESHOOTING cont’d...
Osprey™ may not be turned ON.
There may be another device around using the
same frequency.
Osprey™ may be too far away from the
controller/charger.
Osprey™ might be turned ON during charging.
Controller/charger is low on battery power.
Osprey™ may not be fully charged.
Osprey™ is not trimmed correctly.
NOTE: Osprey™ only moves forward and sideways.
Weak power.
Osprey™ may be out of range of controller/charger.
NOTE: Maximum range of controller/charger from
Osprey™ is approximately 30 metres (100 feet).
CAUSE
resume, move the product to another location and try again.
To ensure normal performance, change the batteries, as low batteries may
not allow full function.
Turn Osprey™ ON.
Avoid these if possible, or choose another place to
operate the Osprey™.
Move closer to the Osprey™ with the controller/charger.
Turn OFF the Osprey™ so that it is not flashing.
Replace batteries in the controller/charger.
Charge Osprey™ fully until green light turns off.
Refer to the TRIMMING section in the instruction sheet.
Re-charge Osprey™ or check battery power in
controller/charger.
Move closer to the Osprey™ with the controller/charger.
SOLUTION
For further questions and problems, please visit our website www.airhogs.com.
Safety Precautions:
rotors when power switch is turned ON.
- Turn off controller/charger and Osprey™ when not in use
- Remove battery from controller/charger when not in use.
- Parental guidance is recommended for the flight.
- Keep your Osprey™ in your sight so that you can supervise it all the time.
his product complies with Part 15 of the FCC rules. Operation is subject to the following two conditions: (1) This device may not cause harmful interference, and (2) This device must
This product complies with Part 15 of the FCC rules. Operation is subject to the
accept any interference received, including interference that may cause undesirable operation.
following two conditions: (1) This device may not cause harmful interference,
his equipment has been tested and found to comply with the limits for Class B digital devices pursuant to Part 15 of the FCC rules. These limits are designed to provide reasonable
and (2) This device must accept any interference received, including interference that
protection against harmful interference to radio communications. Because this toy generates, uses, and can radiate radio frequency energy, if not installed and used in accordance with
may cause undesirable operation. This equipment has been tested and found to comply
the instructions, may cause harmful interference to radio communications. There can be no guarantee that interference will not occur. If this toy does cause interference to radio or
with the limits for Class B digital devices pursuant to Part 15 of the FCC rules. These
television reception (you can check this by turning the toy off and on while listening for the interference), one or more of the following measures may be useful: • Reorient or relocate the
limits are designed to provide reasonable protection against harmful interference to
receiving antenna • Increase the separation between the toy and the radio or the TV • Consult the dealer or an experienced TV-radio technician for help. NOTE:Changes, adjustments or
radio communications. Because this toy generates, uses, and can radiate radio
modifications to this unit, including but not limited to, replacement of any transmitter component (crystal, semiconductor, etc.) could result in a violation of FCC rules under part 15 and/
frequency energy, there can be no guarantee that interference will not occur. If this toy
or 95 and must be expressly approved by Spin Master Ltd. or they could void the user’s authority to operate the equipment.
does cause interference to radio or television reception (you can check this by turning
CANADIAN Class B statement: This Class B digitalapparatus complies with Canadian ICES-003.
CANADIAN Class B statement: This class B digital apparatus meets all the requirements of the Canadian Interference-Causing Equipment Regulations.
CANADIAN RSS-310 statement: This Category II radio communication device complies with Industry Canada Standard RSS-310.
CANADIAN RSS-310 statement: This Category II radiocommunication devicecomplies with Industry Canada Standard RSS-310.
Carrier frequency: 27.145MHz Field strength: 69.5dBuV/m at 3m.
Care and Maintenance:
- Always remove batteries from the toy when
it is not being used for a long period of time.
(controller/charger only)
BATTERY SAFETY INFORMATION:
- Requires 8 x 1.5-V AA alkaline batteries
(not included).
- Batteries are small objects.
- Replacement of batteries must be done by
adults.
- Follow the polarity (+/-) diagram in the
battery compartment.
- Promptly remove dead batteries from the toy.
- Dispose of used batteries properly.
Your Osprey™ is equipped with a Lithium
Polymer battery.
SPECIAL LiPO BATTERY INSTRUCTIONS:
- Never charge battery unattended.
- Charge battery in isolated area. Keep away
from flammable materials.
- Do not expose to direct sunlight. There is a
risk of the batteries exploding, overheating,
or igniting.
- Do not disassemble, modify heat, or short
circuit the batteries. Do not place them in
fires or leave them in hot places.
- Do not drop or subject to strong impacts.
Note:
- Parental guidance is recommended when
installing or replacing batteries.
Spin Master Ltd., 450 Front Street West, Toronto, ON M5V 1B6 Canada
Spin Master Inc., PMB #10053, 300 International Drive, Suite 100,
Williamsville, NY 14221, USA
Spin Master Toys Far East Limited. Rm #1113, 11/F,
Chinachem Golden Plaza, 77 Mody Rd., Tsimshatsui E., Kowloon, HK
North American Consumer Information
Phone: 1-800-622-8339
Email: customercare@spinmaster.com
www.spinmaster.com
- Keep hands, hair and loose clothing away from the
- Wipe the toy gently with a clean damp cloth.
- Keep the toy away from direct heat.
- Do not submerge the toy in water. This can
damage the electronic assemblies.
- Remove batteries for prolonged storage
- DO NOT incinerate used batteries.
- DO NOT dispose of batteries in fire, as
batteries may explode or leak.
- DO NOT mix old and new batteries or types
of batteries (i.e. alkaline/standard).
- DO NOT use rechargeable batteries.
- DO NOT recharge non-rechargeable
batteries.
- DO NOT short-circuit the supply terminals.
- Do not allow the batteries to get wet.
- Only charge the batteries with the specified
Spin Master™ battery charger.
- Only use the batteries in the device
specified by Spin Master™.
- Carefully read the instruction guide and use
the batteries correctly.
- In the unlikely event of leakage or explosion
use sand or a chemical fire extinguisher for
the battery.
- Batteries must be recycled or disposed of
properly.
- Under the environment with electrostatic
discharge, the toy may malfunction and
require user to reset the toy.
Air Hogs®, related trademarks & © 2010 Spin Master Ltd. All rights reserved. This product
CONFORMS¬TO¬SAFETY¬REQUIREMENTS¬OF¬!34-¬&¬¬#(0!¬s¬0LEASE¬RETAIN¬THIS¬INFORMATION¬FOR¬
FUTURE¬REFERENCE¬s¬0LEASE¬REMOVE¬ALL¬PACKAGING¬MATERIALS¬BEFORE¬GIVING¬TO¬CHILDREN¬s¬!N¬ADULT¬
should periodically check this toy to ensure no damage or hazards exist, if so, remove from
USE¬s¬#HILDREN¬SHOULD¬BE¬SUPERVISED¬DURING¬PLAY¬s¬+EEP¬ADDRESSES¬AND¬PHONE¬NUMBERS¬
FOR¬FUTURE¬REFERENCE¬s¬4HE¬ITEM¬INSIDE¬THIS¬PACKAGE¬MAY¬VARY¬FROM¬THE¬PHOTOGRAPHS¬
ANDOR¬ILLUSTRATIONS¬$ESIGNED¬AND¬%NGINEERED¬BY¬3ILVERLIT¬4OYS¬-!$%¬).¬#().!
20029902, 20041455
T44395_0001_20029902_NBL_IS_R1
- New alkaline batteries are recommended for use in controller/charger to obtain
maximum performance.
- Users should keep strict accordance with the instruction manual while operation
the product.
- Your controller/charger is tailor-made for the Li-Poly rechargeable battery used in your
Osprey™. Do not use it to charge any battery other than that in the Osprey™.
the toy off and on while listening for the interference), one or more of the following
MEASURESæMAYæBEæUSEFULæsæ2EORIENTæORæRELOCATEæTHEæRECEIVINGæANTENNAæsæ)NCREASEæTHEæ
SEPARATIONæBETWEENæTHEæTOYæANDæTHEæRADIOæORæTHEæ46æsæ#ONSULTæTHEæDEALERæORæANæ
experienced TV-radio technician for help. NOTE: Changes, adjustments or
modifications to this unit, including but not limited to, replacement of any transmitter
component (crystal, semiconductor, etc.) could result in a violation of FCC rules under
part 15 and/or 95 and must be expressly approved by Spin Master Ltd. or they could
void the user’s authority to operate the equipment.
Special Note to Adults:
- Regularly examine for damage to the
plug, enclosure and other parts. In the
event of any damage, the toy must not
be used with the controller/charger until
the damage has been repaired.
Battery requirement for Osprey™:
Power Supply :
Rating : DC 3.7 V, 1,8 W
Batteries : 1 x 3.7 V Li-Poly Rechargeable Battery Pack
Requires 1 x 3.7 V Li-Poly Rechargeable Battery Pack
Battery requirement for Controller/charger:
Power Supply :
Rating : DC 12 V, 0,45 W
Batteries : 8 x 1.5 V "AA"/LR6/AM3
Requires 8 x 1.5 V "AA" size batteries (not included)
PRODUCT BATTERY REMOVAL INSTRUCTIONS: Internal battery is factory
installed, product disassembly and battery removal must be performed by an adult.
Do not use any tools for disassembly. Pulling, tearing, and deforming of the product
during disassembly, while necessary, should be as limited as possible. Do not
compress the product at any time. Ensure product is turned off. Find a point where
the two body halves meet; the nose of the aircraft or where the wing meets the body.
Start to peel the halves apart, separating them where they are glued together;
remove any tape as necessary. Separate product body halves to expose internal
electronics. To separate battery from product use scissors to cut a single battery
wire, immediately wrap the cut wire end with tape to isolate it, repeat until all battery
wires are cut and isolated. Dispose of battery in accordance with your local battery
recycling or disposal laws. NOTE: Opening of product and/or removal of battery will
render product inoperative and voids manufacturer warranties, dispose of remaining
product components in accordance with local laws.
NBL English REV 0
- This toy is not intended for children
under 3 years old.
- This toy must only be used with the
recommended controller/charger.
- Do not try to charge other batteries with
controller/charger.
(included)
Developed by
4 1
10-12
ADVANCED
AH OSPREY™
ATTACHING WHEELS
CONTROLLER/CHARGER
Attach antenna to the
controller/charger by
TM
screwing into hole on top.
®
YRS
FrontFront
RearRear
Small parts.
Controller/
Charger
AH Osprey™
Attach the front and rear wheels
to the Osprey™ as shown. The
wires on the wheels slide into
the slots on the Osprey™ and
snap into place.
Front Wheels
Images to come
Rear Wheel
WARNING:
CHOKING HAZARD
Not for Children under 3 years.
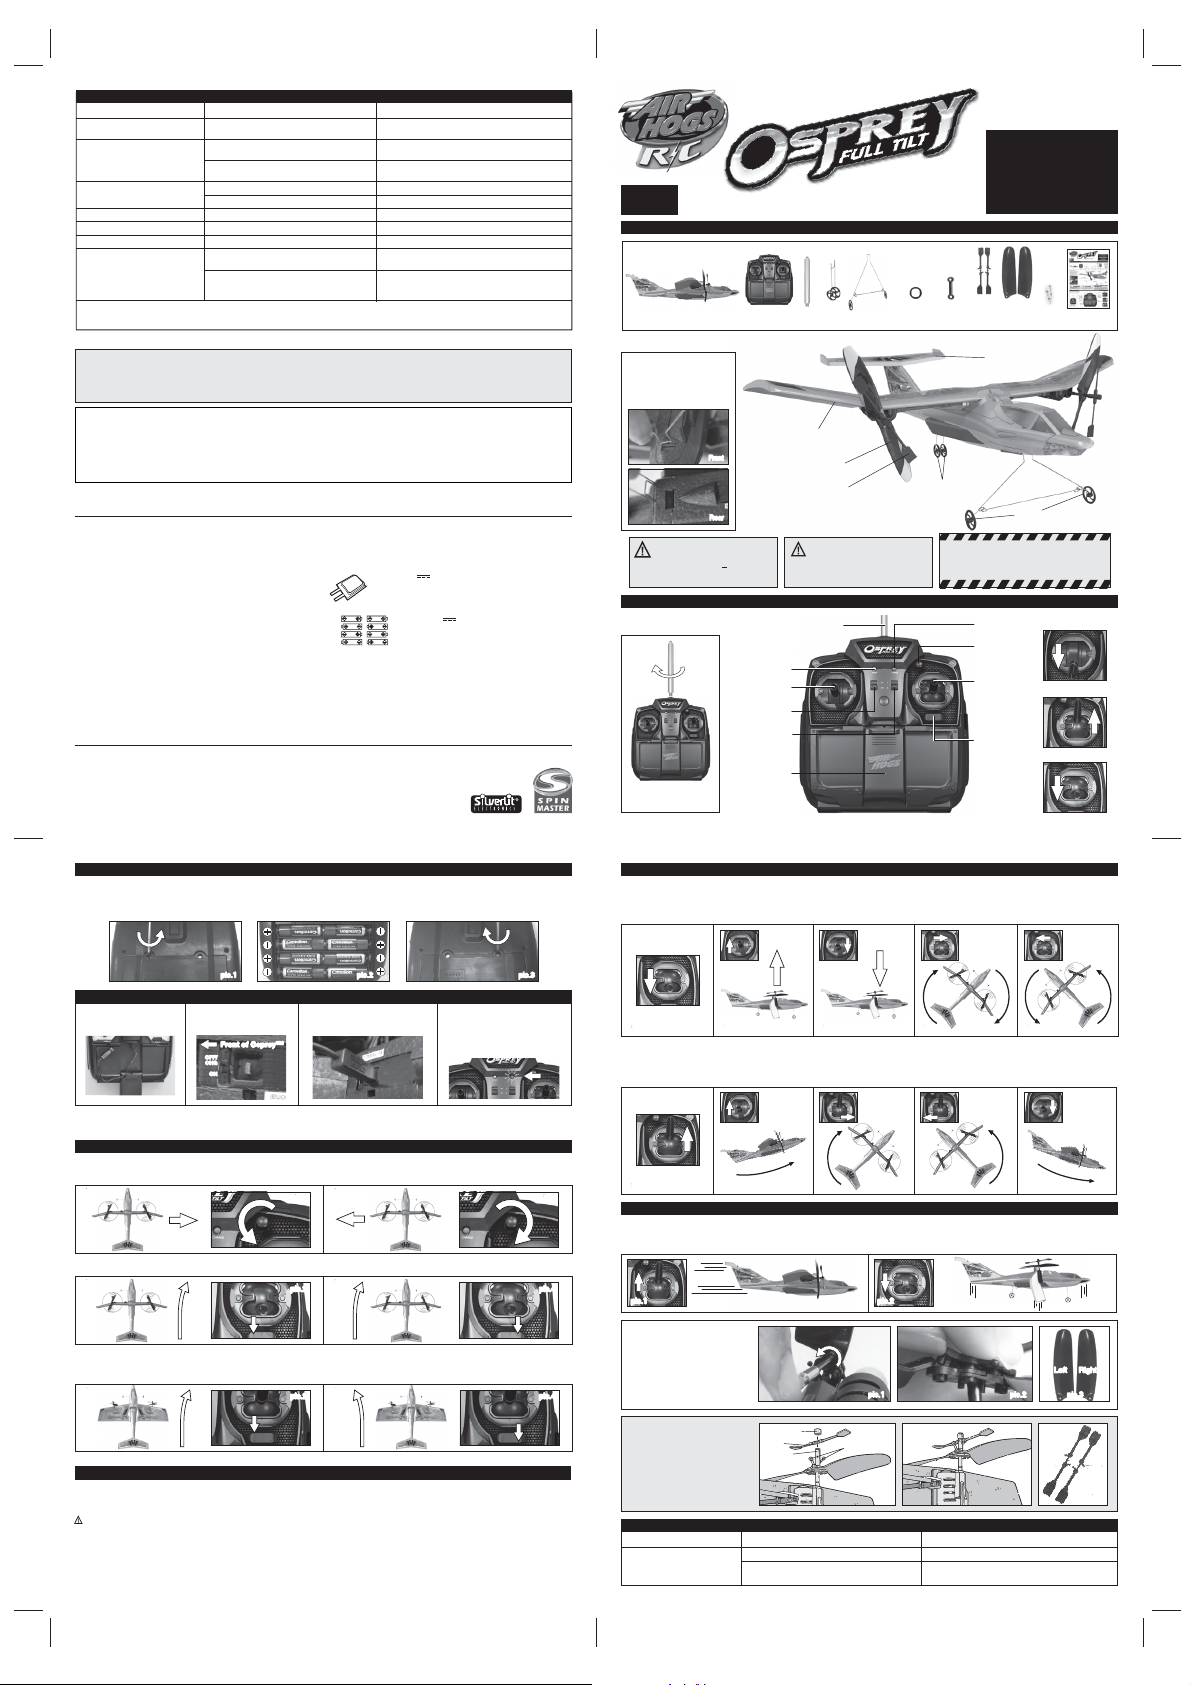
BECOMING FAMILIAR WITH YOUR CONTROLLER/CHARGER
Power Indicator
Altitude Stick
(UP/DOWN)/
Speed Control
ON/OFF Button
Frequency
Button (A, B)
Cover and
Charging
Connector
INSTRUCTION GUIDE
CONTENTS LIST AND PARTS IDENTIFICATION
2 x
2 x
2 x
1 x
Rear
Antenna
Wheels
Front Tilt-Wing for
Heli Mode or Plane Mode
Propeller/Rotor
Flybar
CAUTION:
Do not touch the running propeller!
Do not play above someone’s head!
Adult supervision is required!
Antenna
Front
Wheels
4 x
Locking
Connecting
Rings
Bars
Rear Wheels
DANGER!
NEVER INSERT ANY SHARP OBJECTS, PINS
OR SCREWS INTO THE HELICOPTER AS THIS
MAY PUNCTURE THE INTERNAL BATTERY!
TM
Problems flying?
Do not return your Air Hogs
to the store. Email us at
customercare@spinmaster.com
or call us toll-free at
1.800.622.8339
WWW.AIRHOGS.COM
2 x
4 x
Flybars
Propellers
Tail Wing
2 left,
2 right
Front
Wheels
4 x
Screws
Minimum
Throttle Position
1 left,
1 right
Horizontal
Charging Indicator
Roll Trim Knob
Transition Stick
Heli/Plane Mode/
(LEFT/RIGHT
direction control)
Direction/
Yaw Trim Button
Plane Mode
Heli Mode
Instruction
Guide
®
BATTERY INSTALLATION – CONTROLLER/CHARGER
HOW TO INSTALL YOUR BATTERIES
1. Open the battery door with a screwdriver (pic.1). 2. If used batteries are present, remove these batteries from the unit by pulling up on one end of
each battery. 3. Install new batteries as shown in the polarity diagram (+/-) inside the battery compartment (pic.2). 4.Replace battery door securely (pic.3).
5. Check your local laws and regulations for correct recycling and/or battery disposal.
pic.1pic.1 pic.2pic.2
1. Turn controller/charger off
and lift up the cover. Take out
the charging wire.
Things to remember:
- Flight times and charge times are influenced by numerous factors. Typical flight times vary from 4-7 minutes with a 30 to 45 + minute charge time.
- Before you recharge the battery, wait 10-15 minutes to let the battery cool down.
TRIMMING FOR HELI MODE
1. If the plane moves toward the right (pic.1) when flying, rotate the roll-trim dial to the left until the plane flies straight (pic.2).
Roll Trimming:
2. If the plane moves toward the left (pic.3) when flying, rotate the roll-trim dial right until the plane fly straight (PIC.4).
pic.1pic.1 pic.3pic.3
Yaw Trimming:
1. When the plane turns right involuntarily (pic.1), press the left side of the yaw trim button ("L") repeatedly until the plane flies straight (pic.2).
2. When the plane turns left involuntarily (pic.3), press the right side of the yaw trim button ("R") repeatedly until the plane flies straight (pic.4).
pic.1pic.1 pic.3pic.3
TRIMMING FOR PLANE MODE
1. If the plane turns right involuntarily (pic.1), press the left side of the yaw trim button ("L") repeatedly until the plane flies straight (pic.2).
2. If the plane turns left involuntarily (pic.3), press the right side of the yaw trim button ("R") repeatedly until the plane flies straight (pic.4).
NOTE: The roll-trim dial has no function in plane mode.
pic.1pic.1 pic.3pic.3
NOTE: Your Osprey™ loses its trim EACH time you turn it off. So remember these helpful tips to stabilize it each time.
1. Location – Fly in a large wide-open, grassy location that is free of buildings, trees, overhead wires, and other obstructions.
2. Weather – Fly on mild, sunny days. Do not fly in electrical storms, rain, sleet, snow or other adverse weather conditions. Do not fly if the temperature is below
7°C/45°F. In very cold temperatures, the Osprey will become fragile and the engine performance will decrease.
3. Wind Conditions – Do not fly in strong winds. Strong winds may overpower the Osprey™ and make it difficult to control.
CAUTION: Never fly near your face. Keep propellers/rotors away from your fingers, hair, eyes and other body parts. Always lift off from a flat surface. Never
hold the Osprey™ in your hand when lifting off. DO NOT launch Osprey™ near people or animals. Stay away from obstacles and electrical hazards.
HOW TO CHARGE YOUR OSPREY™
2. Turn the Osprey™ OFF using
the ON/CHG/OFF switch on the
underside of the Osprey™.
Front of Osprey™Front of Osprey™
OFF/
OFF/
CHG
CHG
ON
ON
HOW TO TRIM YOUR OSPREY™
WHERE TO FLY YOUR OSPREY™
3. Insert the charge plug into
the charge socket located on
the underside of the Osprey™.
4. Turn the controller/charger ON/OFF
switch ON. The charging LED will light
up. Once fully charged the charging
LED turns off. Pull the charge plug
out of the Osprey™ and store in
controller/charger.
pic.2pic.2 pic.4pic.4
pic.2 pic.4pic.4
pic.2
pic.2
pic.2 pic.4pic.4
pic.3pic.3
HELI MODE:
Vertical Take-off: Move the transition stick to the lower position (pic.1). Gently push the altitude stick forward to make the Osprey™ hover up
(pic.2). Gently pull the altitude stick back to make the Osprey™ hover down (pic.3). To turn right (pic.4) or left (pic.5) give short, small inputs to the transition
stick. DO NOT look at the controller/charger but focus on the Osprey™. NOTE: Once the Osprey™ leaves the ground it automatically flies forward slowly.
NOTE: If, on initial lift-off, without using the transition stick, the Osprey™ turns to the left or right, you will need to trim the Osprey™ to make it fly straight.
See trimming the Osprey™ in HELI MODE.
pic.2pic.2pic.1pic.1 pic.3pic.3 pic.4pic.4 pic.5pic.5
PLANE MODE:
and climb, push the altitude stick up slowly (pic.2). NOTE: Once the Osprey™ leaves the ground it should automatically fly forward. To fly to the right (pic.3) or
left (pic.4) move the transition stick in the direction you wish to go. To land, pull altitude stick back slowly until it flies at a lower altitude to allow for vertical
landing. Move transition stick down to tilt wings 90 into heli mode. Reduce throttle slowly to land plane. (pic.5). NOTE: If, on initial take-off, without using the
transition stick, the Osprey™ turns to the left or right, you will need to trim the Osprey™ to make it fly straight. See trimming for PLANE MODE.
After establishing vertical take-off, you can change to plane mode by shifting the transition stick to the upper position (pic.1). To accelerate
pic.2pic.2pic.1pic.1 pic.3pic.3 pic.4pic.4 pic.5pic.5
- While flying the Osprey™ in either plane or heli mode you can change modes in flight. - With transition stick in the up position the Osprey™ will fly horizontally
like a plane with propeller/rotors acting like propellers (pic.1). - Moving the transition stick down will rotate the main wing 90° into the heli mode with the
propeller/rotors acting like rotors. The Osprey™ will start to rise vertically and fly like a helicopter (pic.2). - Change to plane mode while in mid-air for awesome
flights and land either in plane or heli mode.
pic.1pic.1 pic.2pic.2
HOW TO REPLACE
DAMAGED PROPELLERS
Remove screw holding propeller (pic.1).
Spread bars and remove damaged
propeller (pic.2). Insert new propeller
making sure pin in bar goes through
hole in propeller. Replace screw.
NOTE: Make sure you use correct
propeller for correct side (pic.3).
HOW TO REPLACE
DAMAGED FLYBAR
If flybar is damaged and needs to be
replaced, remove locking ring, detach
connecting bars carefully, separate split
post holding flybar and remove. Ensure
that the flat side end faces forward.
Reverse procedure to replace.
NOTE: Make sure you use correct flybar
for correct side (pic.1).
PROBLEM
Propeller/rotor won’t move.
2
HOW TO FLY YOUR OSPREY™
Hover Up Hover Down Turn Right Turn Left
To Climb Fly Right Fly Left To Land
CHANGING FLIGHT MODES
pic.1pic.1 pic.2pic.2 pic.3pic.3
Locking RingLocking Ring
FlybarFlybar
Split PostSplit Post
ON/OFF switch is set to OFF.
Weak battery.
CAUSE
Connecting
Connecting
Bars
Bars
TROUBLESHOOTING
Assembled
Assembled
Flybar
Flybar
Left
Left RightRight
Set switch to ON.
Re-charge the Osprey™ using the charging port AND/OR
3
replace batteries in the controller/charger.
SOLUTION
Left
Left RightRight
pic.1pic.1
 Loading...