

Spin Master Toys Far East 44319TX27, 44319RX49, 44319TX49 User Manual
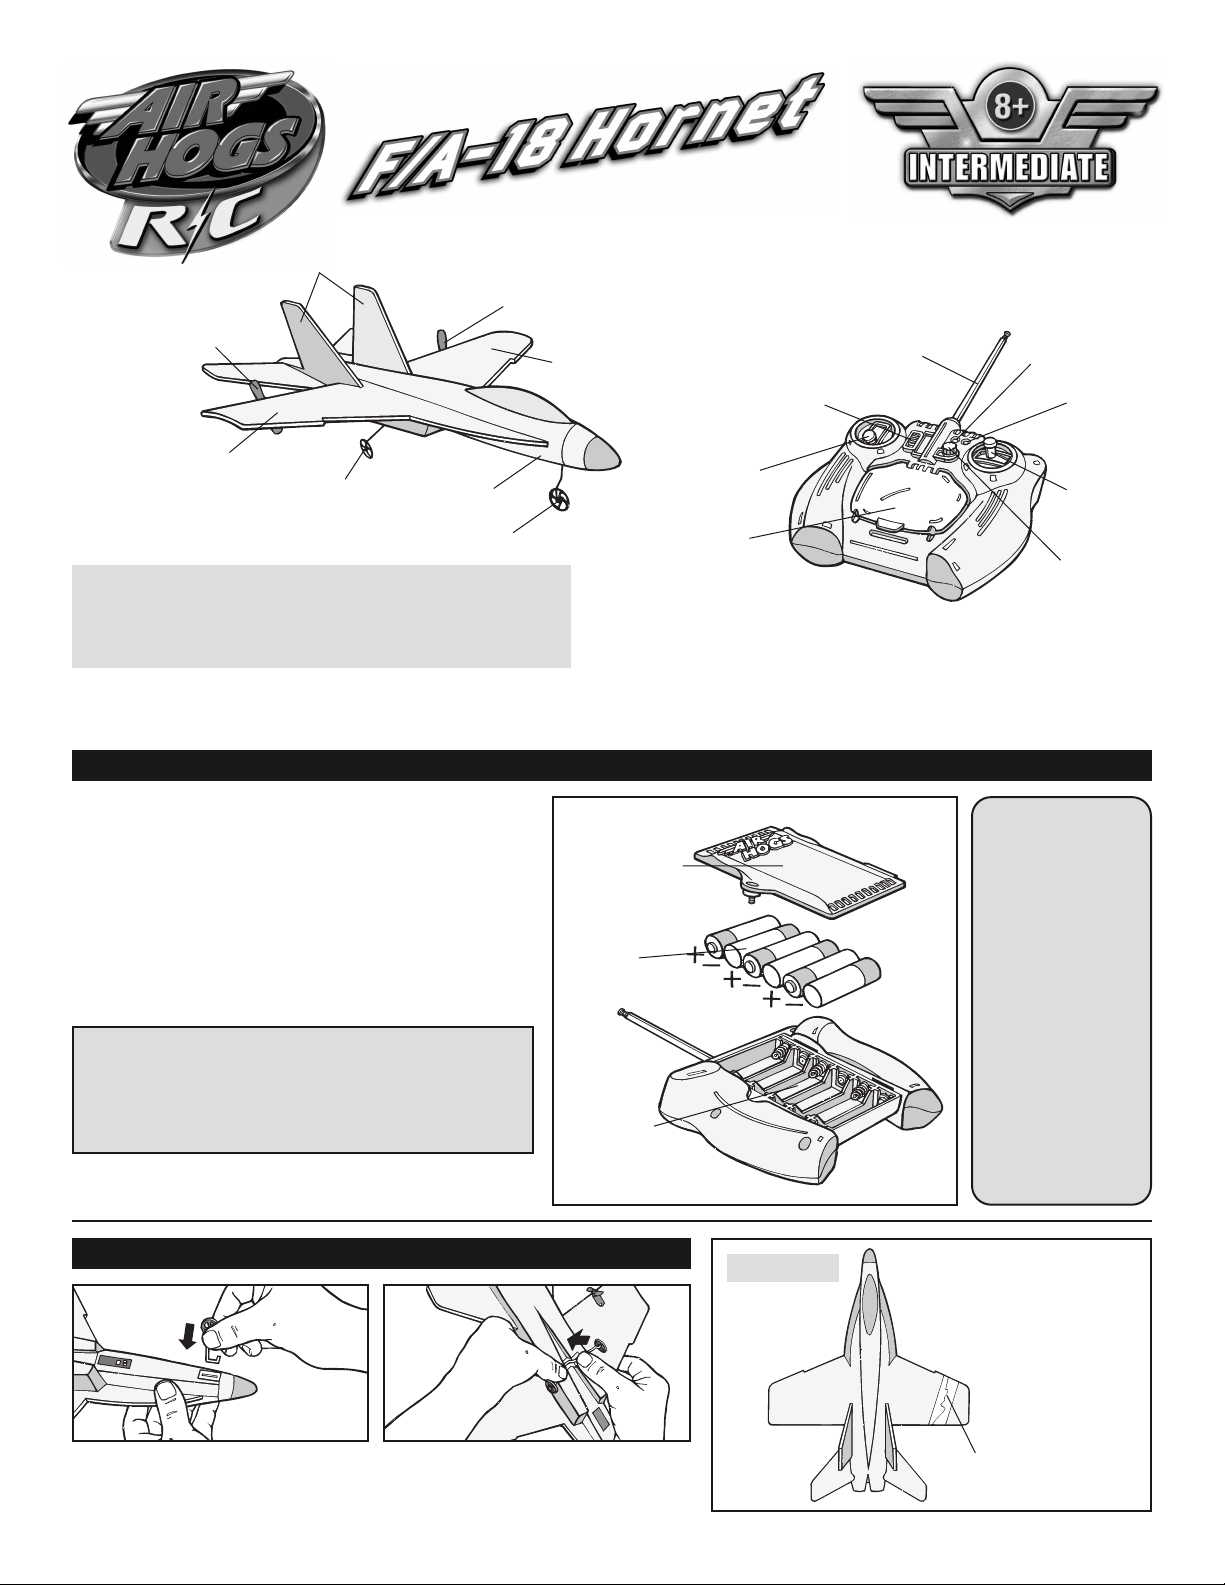
Propeller
Vertical
Tail Wing
INSTRUCTIONS
ropeller
P
Main Wing
ON/OFF/CHARGE
Switch
TM
ntenna
A
harge
C
L
ED
Power
LED
Main Wing
Fuselage Wheel
F/A-18 Hornet™
Fuselage
Nose Wheel
Check to make sure contents are complete:
• 1 Air Hogs®F/A-18 Hornet™ • 1 Controller/Charger
Throttle
Charge Door
(to access
Charge Nozzle)
Controller/Charger
Left/Right
Toggle
Steering
Trim Knob
• 1 Nose Wheel • 1 Fuselage Wheel Set
• 2 Extra Propellers • 1 Instruction Sheet
The Air Hogs®F/A-18 Hornet™ is a revolutionary radio controlled jet that is a true backyard flyer. You can hand toss or
take off from the ground using the landing gear. The F/A-18 Hornet™ uses digital proportional control which provides
hobby like flight performance. Comes ready to fly – no assembly required.
CONTROLLER/CHARGER BATTERY INSTALLATION
1. Use a Phillips screwdriver to loosen the
battery door.
2. Slide the battery door towards the bottom of the
unit and remove. Install six AA 1.5-V alkaline
batteries (not included). Be careful to align the
positive (+) and negative (-) polarities with
the corresponding markings inside the battery
compartment as shown.
3. Reinstall the battery compartment door and
retighten the hold down screw.
1
Battery
Compartment
Door
2
Six AA
1.5-V
Alkaline
Batteries
Your
F/A-18 Hornet™
jet has
preinstalled
rechargeable
batteries in the
jet’s fuselage.
Because the
Controller’s
AA batteries
are used
IMPORTANT TIP: TURN YOUR CONTROLLER
ON TO ENSURE THAT THE BATTERIES ARE
INSTALLED PROPERLY. THE RED LED LIGHT
ON THE FRONT OF THE CONTROLLER
SHOULD TURN RED.
3
Battery
Compartment
for 2 functions –
charging and
controlling, they
will need to be
replaced after
every 20 – 25
After each flight, store the jet in the package to
prevent damage.
Controller/Charger
flights.
ADDING WHEELS TO THE FUSELAGE
1
1. Add nose wheel to slot in
bottom of jet as shown.
NOTE: Wheels may pop off during flight but are easy to re-attach.
2
2. Add fuselage wheels to slot in
bottom of jet as shown.
REPAIRS
If the wings
on your jet get
damaged they
can be easily
repaired with
clear tape as
shown.
Repair
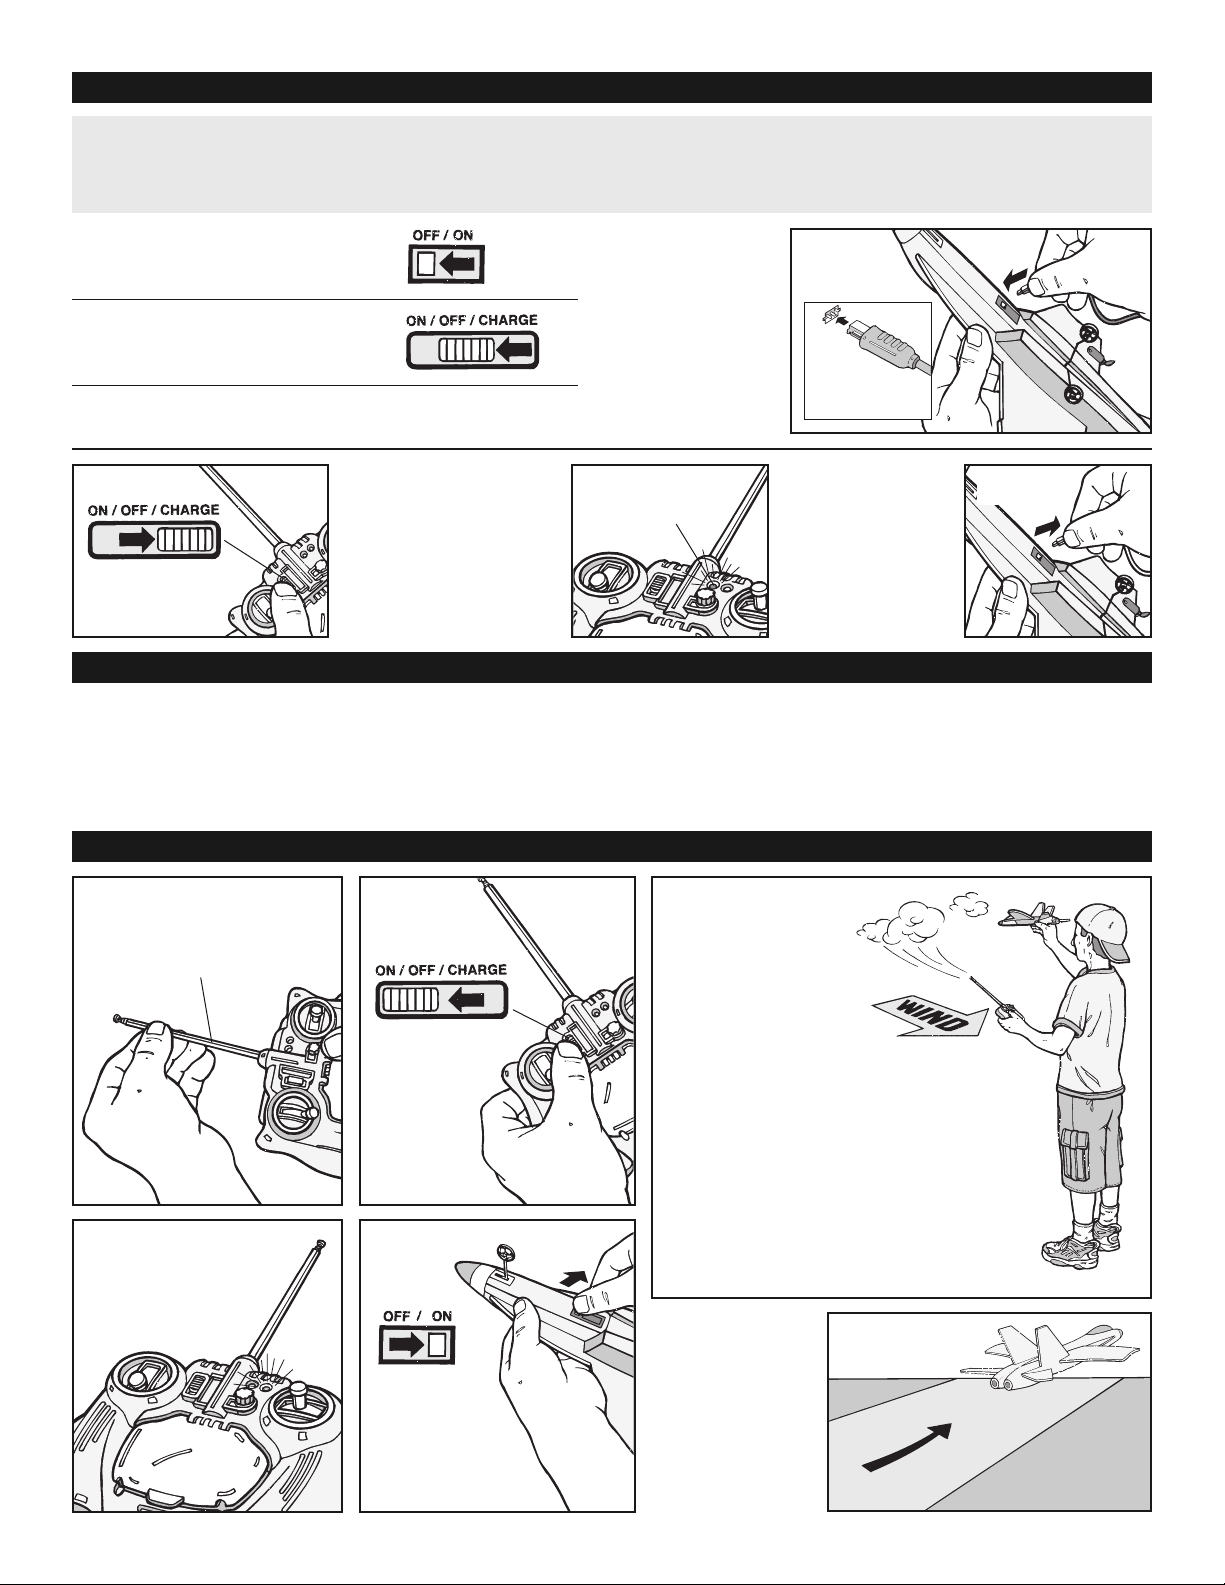
• Before taking your initial flight, charge the jet for a complete charge cycle on your charger.
• Depending upon the length of future play, you will not need to complete a full charge before each flight.
NOTE: A shortened charge results in a shorter playtime (may take up to 1/2 hour to fully charge).
1. Push the ON/OFF switch on the
bottom of the jet to the LEFT to
turn the jet OFF.
2. Set the controller/charger
switch to OFF.
3. Flip the charge door open to
reveal the charge nozzle.
CHARGING YOUR F/A-18 HORNET™
Important Charging Information:
. Carefully
4
ush the charge
p
ozzle all the
n
ay into the jet’s
w
charge port
located on the
bottom of the jet.
4
Holes
in charge
nozzle must
align with pins in
charge por t.
5
Set the controller/
charger switch
to CHARGE.
1. Location – Fly in a large wide open, grassy location that is free of buildings, trees, overhead wires, and other
obstructions. Do not fly near people or animals.
2. Weather – Fly on mild, sunny days. Do not fly in electrical storms, rain, sleet, snow or other adverse weather
conditions. Do not fly if the temperature is below 7°C. In very cold temperatures, the jet will become fragile and the
engine performance will decrease.
3. Wind Conditions – Do not fly in wind. Winds may overpower the aircraft and make it difficult to control.
1
Fully extend
controller/charger
antenna.
3
Power light will
turn RED.
5. During the charging
process, the green
charge light will turn
ON. When the jet is
completely charged,
the green charging
light will turn OFF.
PRE-FLIGHT ENVIRONMENT CHECK
FLYING INSTRUCTIONS
2
Push the
controller/
charger
switch to
ON.
4
Push the
jet’s ON/OFF
switch to the
right to turn the
jet to ON.
5
Charge Light
Green
5
NOTE:
We recommend that
you start flying by
hand launching to
get used to the controls.
When preparing for take-off,
check the direction of the wind.
Always launch the jet
against the wind for best
take-off and flight results.
Use your left hand to apply at least
half throttle on the controller/charger.
Gently toss the jet forward into the
wind and parallel to the ground.
Refrain from using the directional
toggle while launching the jet.
If you are taking
off from the
ground, make
sure you are on a
smooth paved
surface, and put
the throttle all the
way forward for
fast acceleration.
6. Remove charge
nozzle gently
from the jet’s
charge port.
Store charge
nozzle and
close the
charge door.
6

Controller/Charger
CONTROLLING JET FLIGHT
To ACCELERATE or climb
Push the throttle (left toggle) forward.
LEFT TURN
Move the direction toggle
to the left.
RIGHT TURN
Move the direction toggle
to the right.
CONTROL REVERSAL
IMPORTANT: When the
jet is flying towards you,
the controls are reversed.
Controller/Charger
If you want to straighten out
your flight path, turn the
Steering Trim Knob to the
left or right during flight.
TO LAND
Select a soft grassy area and pull
the throttle (left toggle) back slowly
and then release.
FLIGHT ADJUSTMENTS
Steering
Trim Knob
For example: To make the jet
move to the LEFT, move the
toggle to the RIGHT.
1
Turn the
controller/
charger
OFF by
pulling
the switch
down.
ONCE THE JET HAS LANDED
2
Turn jet OFF by
pushing switch to
the left.
CAUTION:
PLEASE READ BEFORE CHARGING OR USING BATTERY.
EPLACING THE PROPELLERS
If at any time in the future you should
need to dispose of this product please
note that Waste Electrical Products
should NOT be disposed of with
household waste. Please recycle where
facilities exist. Check with your Local
Authority or retailer for recycling advice.
(Waste Electrical and Electronic
Equipment Directive).
Contains Lithium Polymer battery. Battery
must be recycled or disposed of properly.
1177
Hereby, Spin Master Ltd., declares
that this F/A-18 Hornet™ is in
compliance with the essential
requirements and other relevant
provisions of Directive 1999/5/EC
R
1. Remove the broken
propeller as shown
in photo.
2. Check the direction
of the propeller
before attaching a
new one.
ide with
S
roove
g
S
w
roove
g
ide
ithout
Side with groove facing
outward.
groove
right
left
TROUBLESHOOTING GUIDE
PROBLEM CAUSE
Red Charging Light is not
blinking.
Engines will not start.
No Control.
Jet turns in the wrong
direction.
1. Charge Nozzle is not installed all the way.
1. Jet is not fully charged.
2. Electric motor safety protection.
3. Electric battery safety protection.
1. No batteries in controller/charger or low battery
power.
2. Jet antenna is not fully extended all the way.
3. Flight controller antenna not fully extended.
4. IT IS A WINDY DAY.
1. Jet is flying toward you and you have not
reversed the way you use the throttle.
1. Insert the Charge Nozzle all the way into the
Charge port.
1. Charge the jet following “CHARGING YOUR JET” instructions.
2. Turn jet OFF and back ON to reset.
3. If jet was left on for more than 15 minutes and not used, it au-
tomatically shuts off. To reset, turn jet OFF then ON again.
1. Replace the batteries in the controller/charger following the
“BATTERY INSTALLATION” instructions.
2. Gently uncoil the jet’s antenna all the way.
3. Extend the silver flight controller antenna all the way.
4. DO NOT FLY ON WINDY DAYS. WIND MAY OVERPOWER
YOUR PLANE’S ENGINES AND YOU WILL BE UNABLE TO
CONTROL THE PLANE.
1. See the control reversal instruction section page 3.
IMPORTANT BATTERY INFORMATION
REQUIRED BATTERIES: Jet includes 150mAH rechargeable Lithium Polymer (LiPo) battery.
Controller/charger takes 6 AA 1.5-V alkaline batteries (not included).
Battery installation should be performed by an adult.
Use only batteries recommended in the instruction
sheet. Be careful to install the batteries with the correct
polarity, as indicated.
• Do not mix old and new batteries.
• Do not mix alkaline, standard or rechargeable batteries.
• Battery installation should be done by an adult.
• Non-rechargeable batteries are not to be recharged.
• Rechargeable batteries are to be removed from the
toy before being charged (if removable).
• Rechargeable batteries are only to be charged under
adult supervision (if removable).
• Only batteries of the same or equivalent type as
recommended are to be used.
Side with groove facing
the motor.
right
left
OLUTION
S
• Batteries are to be inserted with the correct polarity.
• Exhausted batteries are to be removed from the toy.
• The supply terminals are not to be short-circuited.
• Different types of batteries, or new and used batteries
are not to be mixed.
• Exhausted batteries are to be removed, as they will
adversely affect the performance.
Caution:
Sharp point on the
motor shaft. The
propeller must be
replaced by an adult!
Your jet is equipped with a Lithium Polymer (LiPo) battery; please also pay
attention to the following cautions for safe use:
• Do not dispose of the battery in fire or heat.
• Do not use or leave the battery near a heat source such as fire or heater.
• Do not strike or throw the battery against hard surfaces.
• Do not immerse the battery in water. Keep the battery in a cool dry
environment.
This device complies with part 15 of the FCC Rules. Operation is subject to the following two conditions:
(1) This device may not cause harmful interference, and
(2) This device must accept any interference received, including interference that may cause undesired operation.
Warning: Changes or modifications not expressly approved by the party responsible for compliance could void the user’s authority to operate the equipment.
NOTE: This equipment has been tested and found to comply with the limits for a Class B digital device, pursuant to Part 15 of the FCC Rules. These limits are designed
to provide reasonable protection against harmful interference in a residential installation. This equipment generates, uses, and can radiate radio frequency energy and, if
not installed and used in accordance with the instructions, may cause harmful interference to radio communications. However, there is no guarantee that interference will
not occur in a particular installation. If this equipment does cause harmful interference to radio or television reception, which can be determined by turning the equipment
off and on, the user is encouraged to try to correct the interference by one or more of the following measures :
• Reorient or relocated the receiving antenna. • Increase the separation between the equipment and receiver. • Connect the equipment into an outlet on a circuit
different from that to which the receiver is connected. • Consult the dealer or an experienced radio/TV technician for help.
This Category II radiocommunication device complies with Industry Canada Standard RSS-310.
Spin Master Ltd., 450 Front Street West, Toronto, ON M5V 1B6 Canada
Customer Care: 1-800-622-8339 www.spinmaster.com/customercare
Fax: 416-364-8005 Web: www.spinmaster.com Email: toys@spinmaster.com
Spin Master Inc., PMB #10053, 300 International Drive, Suite 100, Williamsville,
NY 14221, USA
Spin Master Toys Far East Limited, Rm #1113, 11/F, Chinachem Golden Plaza,
77 Mody Rd., Tsimshatsui E., Kowloon, HK
Spin Master Toys UK Ltd., Meadowbank, Furlong Road, Bourne End, Bucks, SL8 5AJ,
United Kingdom Customer Service: 0870 850 8408 Email:
ukservice@spinmaster.com
Spin Master France – 36 rue de Silly – 92100 Boulogne Billancourt – France
Service Après-Vente – Numéro vert : 0800 803 355 ou
E-mail : Jouets@spinmaster.com – Site internet : www.spinmaster.fr
• When charging, only use the battery charger specifically for that purpose.
• Do not over-charge the battery.
• Do not connect the battery to an electrical outlet.
• Do not directly solder the battery or pierce the battery with a nail or other
sharp objects.
• Do not transport or store the battery together with metal objects such as
necklaces, hairpins, etc.
• Do not disassemble or alter the battery.
• Charge the battery every 6 months.
• Turn off your equipment power switch after use.
• As for a used battery, please recycle the battery by covering the terminals with
insulation tape or inserting into an individual polybag.
FCC REQUIREMENTS
TM and © 2008 Spin Master Ltd. Air Hogs ®
is a registered trademark of Spin Master Ltd.
All rights reserved. Conforms to product
safety standards ASTM F963, EN71 regulatory
requirements. Products and colours may vary.
Please retain this information for future
reference. Patent Pending. MADE IN CHINA.
Asst. #44319
GTL English REV 0
T44319_0001_20011754_GTL_IS_R1
20011754
Carrier frequency 27.145 MHz Field strength : 73.6 dBuV/3m
TM
 Loading...