

Spin Master Toys Far East 44292TX27145 User Manual
TM
Problems flying?
®
INSTRUCTIONS
Do not return
your Air Hogs®to the
store. Call the Air Hogs
®
flight training centre at
Vertical
Stabilizers
ucted Fan
D
Ducted Fan
Engine
Fox Fire™
Fuselage
Check to make sure contents are complete:
• 1 Air Hogs®Fox Fire™
• 1 Charger/Controller • 1 Instruction Sheet
Experience radio-controlled flight with the Air Hogs®Fox Fire™! The Fox Fire™ makes flying fun & easy! Just choose the direction you
want to fly and move the controller toggle. The ultra-light Fox Fire™ is powered by a lithium battery for long flights, features precision
speed control and damage-resistant foam. The Fox Fire™ also includes an integrated Charger/Controller unit for convenient portability
and easy handling on the field. This is an outdoor plane, do not fly indoors.
Main Wing
Throttle
Charging
LED
Charge Door
(to access Charge Nozzle)
Channel
Switch
1-800-622-8339
Antenna
Charger/Controller
Charge/OFF/ON
Switch
Power
LED
Left/Right
Toggle
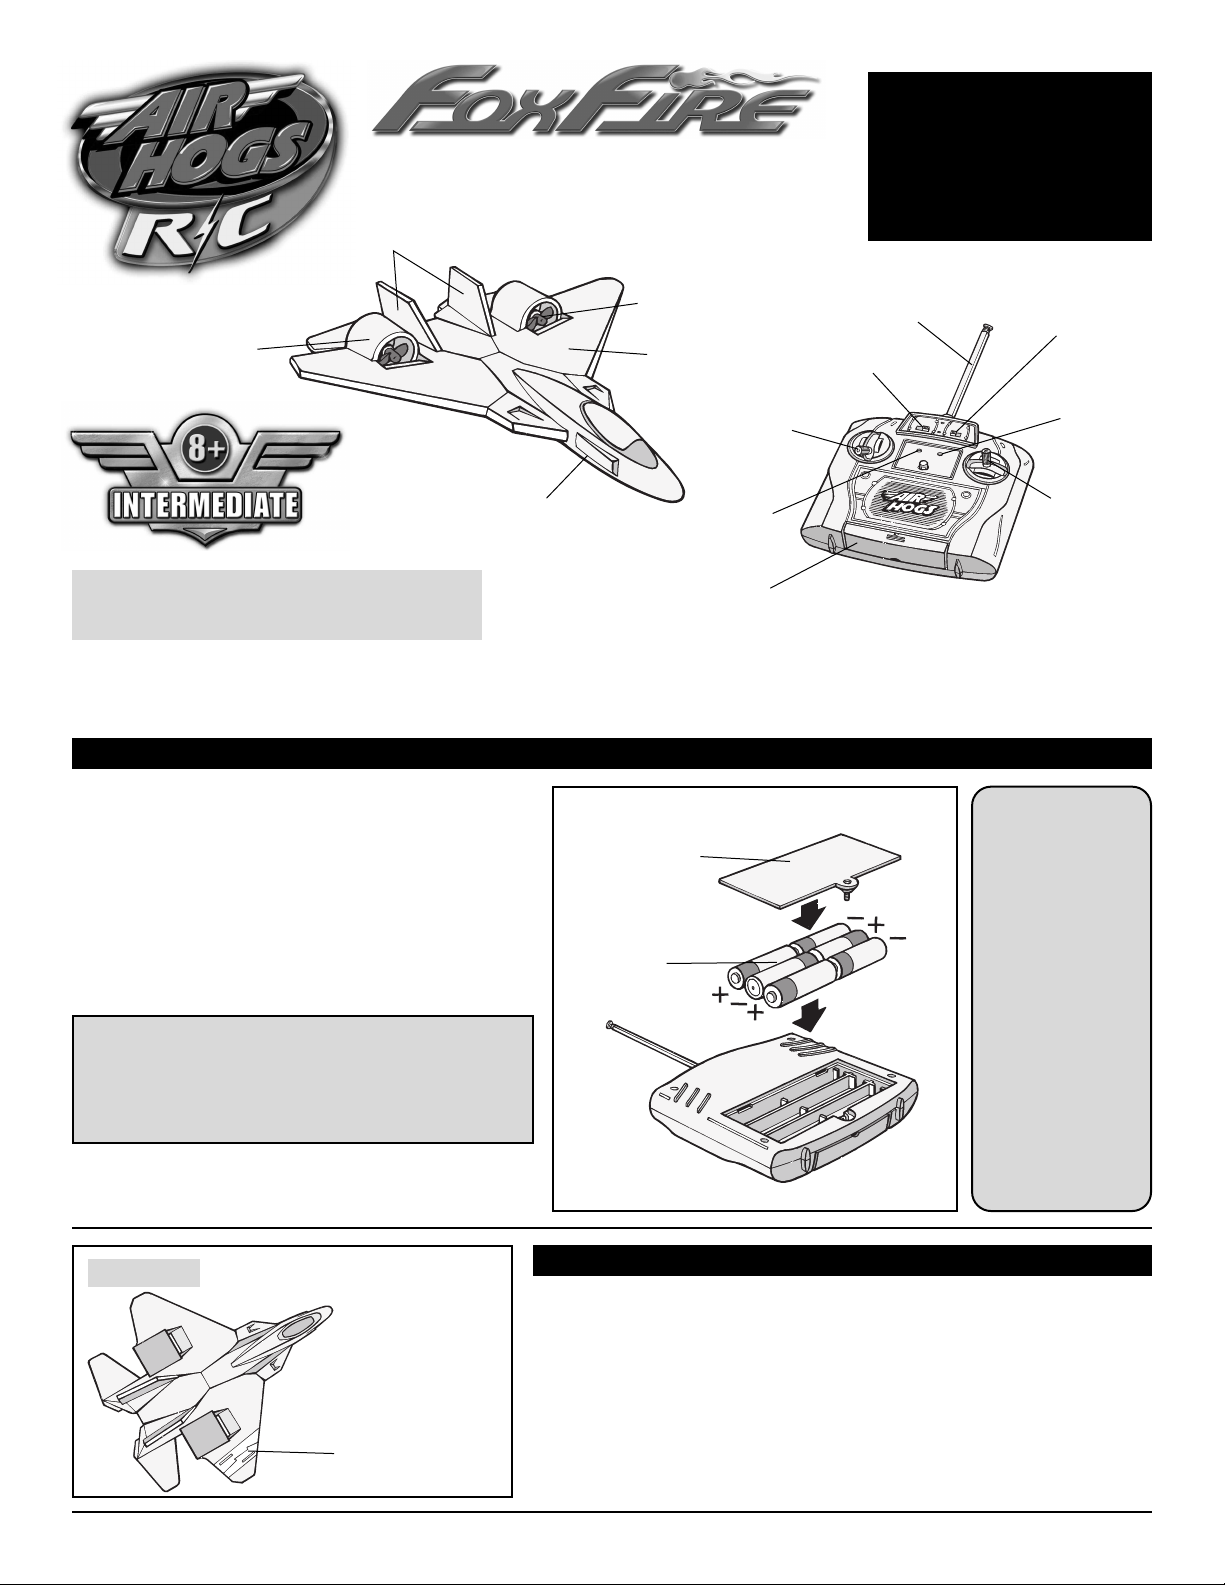
CHARGER/CONTROLLER BATTERY INSTALLATION
1. Use a Phillips screwdriver to loosen the
battery door.
2. Slide the battery door towards the bottom of the
unit and remove. Install six AA 1.5-V alkaline
batteries (not included). Be careful to align the
positive (+) and negative (-) polarities with
the corresponding markings inside the battery
compartment as shown.
3. Reinstall the battery compartment door and
re-tighten the hold down screw.
IMPORTANT TIP: TURN YOUR CONTROLLER
ON TO ENSURE THAT THE BATTERIES ARE
INSTALLED PROPERLY. THE RED LIGHT ON
THE FRONT OF THE CONTROLLER SHOULD
TURN RED.
After each flight, store the jet in the package to
prevent damage.
REPAIRS
If the wings
on your jet get
damaged they
can be easily
repaired with
clear tape as
shown.
Repair
1
Battery
Compartment
Door
2
Six AA
1.5-V
Alkaline
Batteries
Your
Fox Fire™
jet has
preinstalled
rechargeable
batteries
in the jet’s
fuselage.
Because the
Controller’s
AA batteries
are used
for 2 functions –
charging and
controlling, they
will need to be
replaced after
around 15
Charger/Controller
flights.
CARE AROUND DUCTED FAN ENGINES
Ensure the Fans can spin freely. You may use a toothpick or
tweezers to clear debris out of the Ducted Fan engines. Never stick
your finger into the path of the fan blades.
CAUTION: Never place fingers or hair in or near Ducted Fan
engines. Never run Ducted Fans when examining Fan Engines,
as debris from grass or dust may get in your eyes and cause injury.
IMPORTANT – Adult Supervision is Recommended.
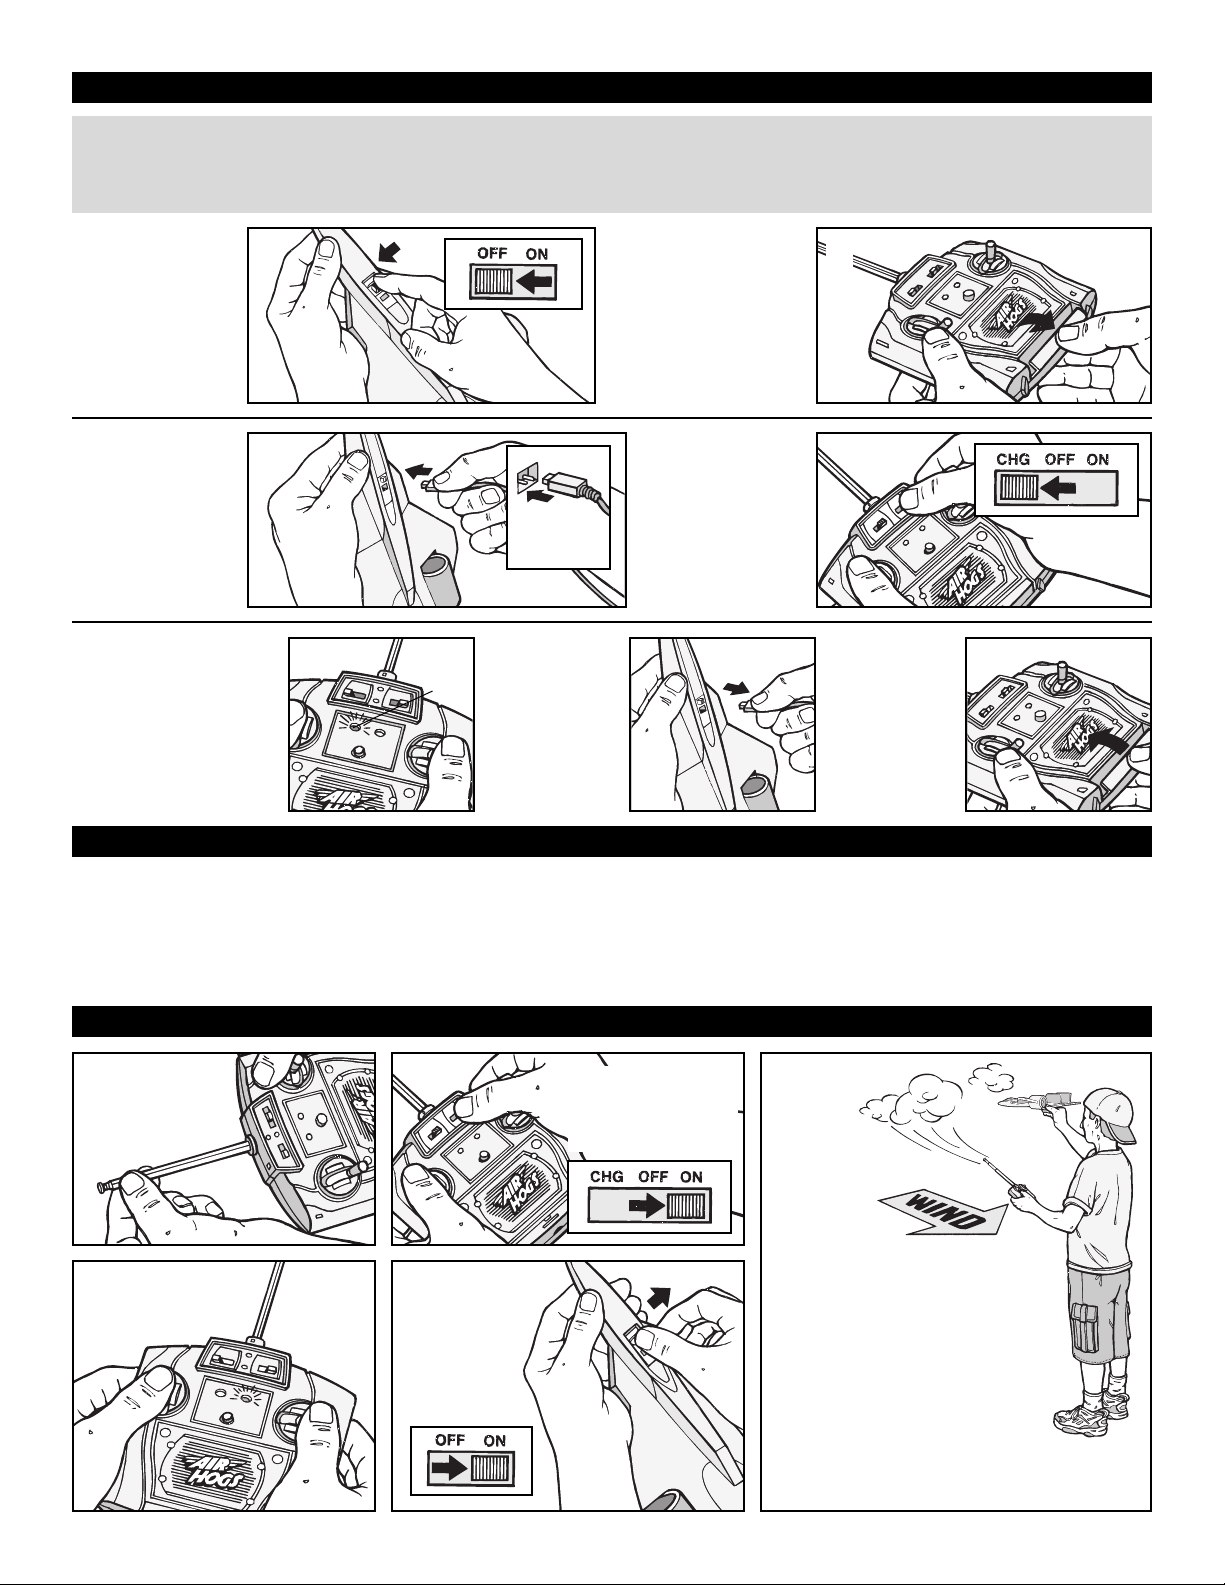
CHARGING YOUR JET
• Before taking your initial flight, charge the jet for a complete charge cycle on your charger.
• Depending upon the length of future play, you will not need to complete a full charge before each flight.
NOTE: A shortened charge results in a shorter playtime (may take 1/2 hour to fully charge).
1. Push the
ON/OFF
switch to the
LEFT to turn
the jet OFF.
3. Push the
charge nozzle
all the way into
the jet’s charge
port located on
the bottom of
the jet.
5. During the charging
process, the green
LED will blink.
When the jet is fully
charged the light
will switch to a
steady GREEN.
Important Charging Information:
1
3
Holes in plug
must align with
pins in jet.
5
Green
LED
6. Remove
charge
nozzle
gently from
the jet’s
charge
port.
2. Flip the charge
door open to
reveal the charge
nozzle.
4. Set the
Charge/OFF/
ON switch
to the left
CHARGE
position.
6
2
4
7. Store the
charge
nozzle and
close the
charge
door.
7
PRE-FLIGHT ENVIRONMENT CHECK
1. Location – Fly in a large wide-open, grassy location
that is free of buildings, trees, overhead wires, and
other obstructions. Do not fly near people or animals.
2. Weather – Fly on mild, sunny days. Do not fly in
electrical storms, rain, sleet, snow or other adverse
weather conditions. Do not fly if the temperature is
FLYING INSTRUCTIONS
1. Fully extend
the controller
antenna.
3. The Red
LED light will
glow solid.
4. Push the
jet’s ON/OFF
switch to the
ON position
to start the
engine.
2. Set the
Charge/OFF/ON
switch to the ON
position.
below 7°C/45°F. In very cold temperatures, the jet
will become fragile and the engine performance will
decrease.
3. Wind Conditions – Do not fly in windy conditions.
Winds may overpower the jet and make it difficult to
control.
5. When
launching
the jet, use
partial throttle.
Refrain
from using
the directional
toggle while launching the jet.
Launch the jet against the wind
and parallel to the ground.
When preparing for take off,
check the direction of the wind.
Always launch your jet against
the wind for the best take off
and flight results.
TIP: The wind will blow against
your face, if you are facing
the correct direction.
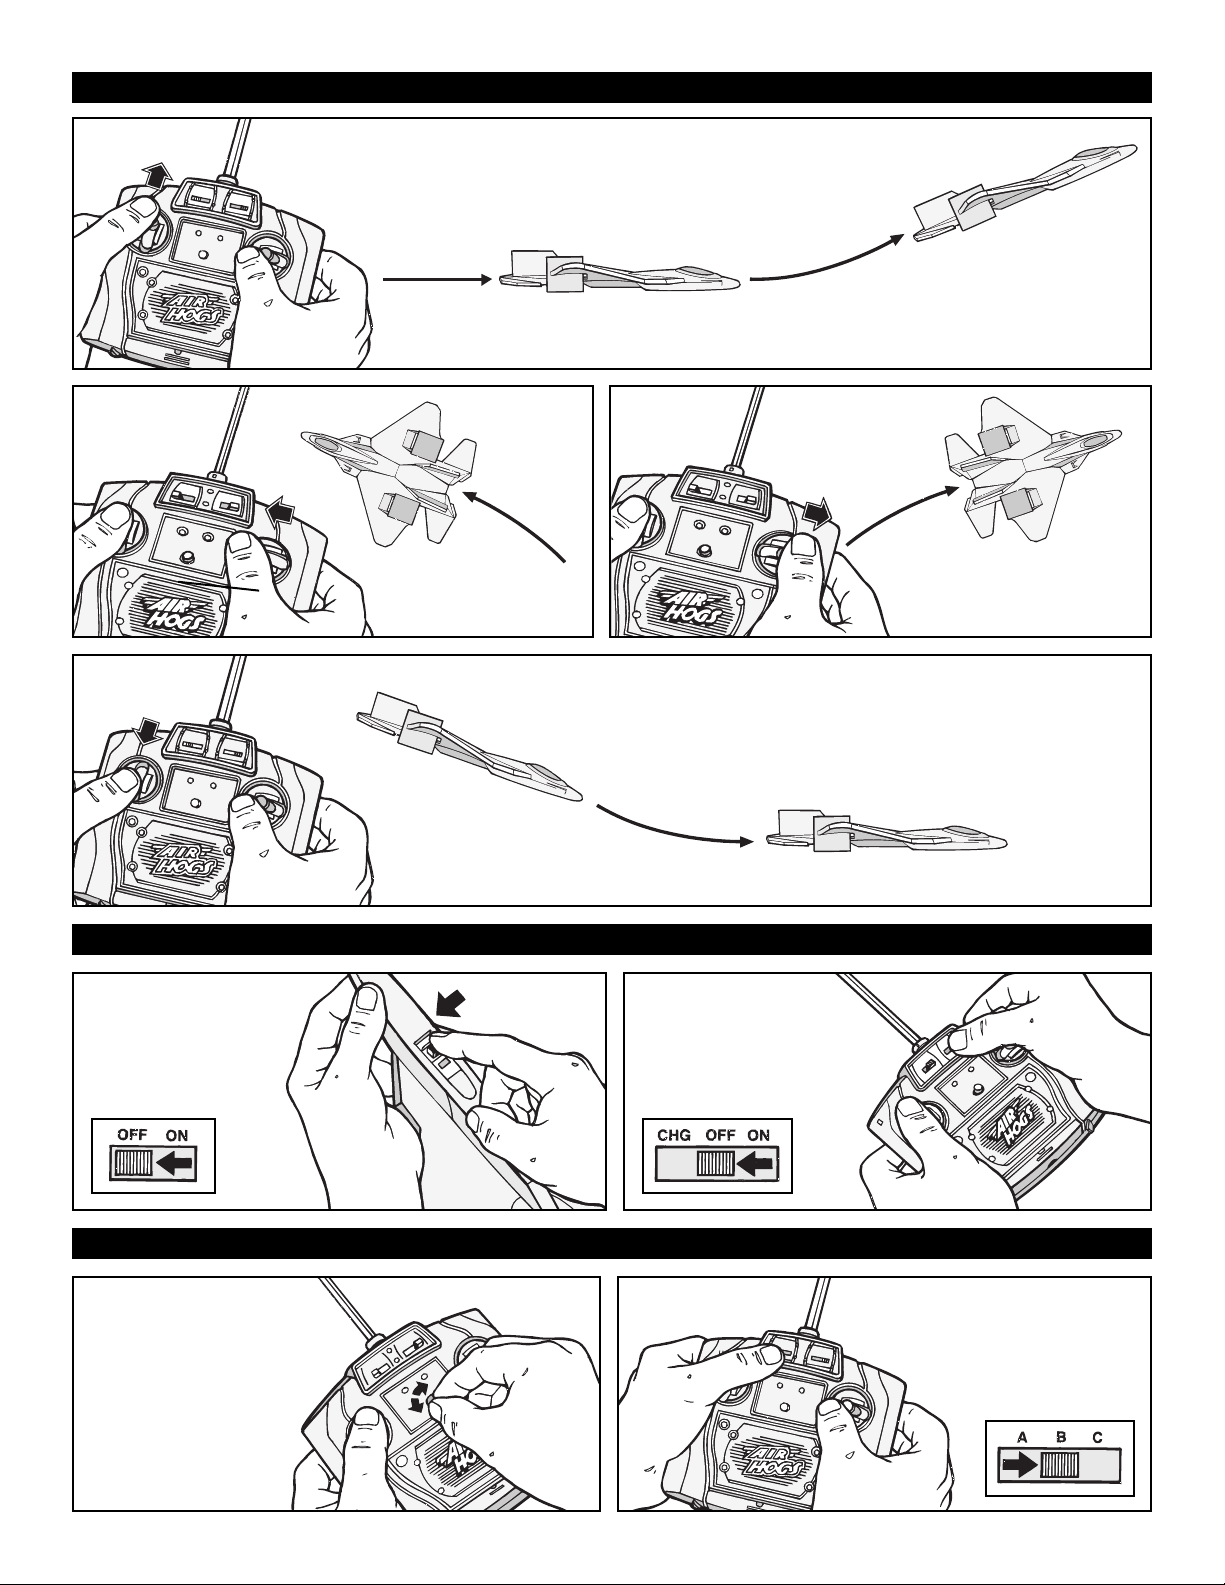
CONTROLLING JET FLIGHT
To make the jet climb, ease the throttle forward.
Too much throttle can cause the plane to climb too
steeply resulting in a stall (where the nose will
abruptly point towards the ground).
To ACCELERATE upwards
Push the throttle further UP.
1. Turn the jet OFF
by pushing the switch
to the left position.
LEFT TURN
Move the direction
toggle LEFT.
ONCE THE JET HAS LANDED
RIGHT TURN
Move the directional
toggle RIGHT.
TO LAND
Select a soft grassy area, and
pull the THROTTLE down.
2. Turn the
Charger/ON/OFF to
OFF by pushing the
switch to the left.
1. If you want to
straighten out your
flight path, adjust
by turning the
Steering Trim
Knob to the left or
right during flight.
FLIGHT ADJUSTMENTS
2. Check which letter is on
the underside of the jet.
Move the channel switch
to the corresponding
letter to get power.
 Loading...