

Page 1
TM
+
–
+
–
+
–
Scramble the Air Hogs™ RC F-16 Falcon™ in park sorties to protect the
skies. The Air Hogs™ RC F-16 Falcon™ is a fully licensed Fighter Jet
from Lockheed Martin. Follow these instructions to quickly develop your
pilot skills to become a Fighter Ace that dominates the skies.
ADULT SUPERVISION RECOMMENDED.
PLEASE READ THESE INSTRUCTIONS BEFORE FLYING!
TM
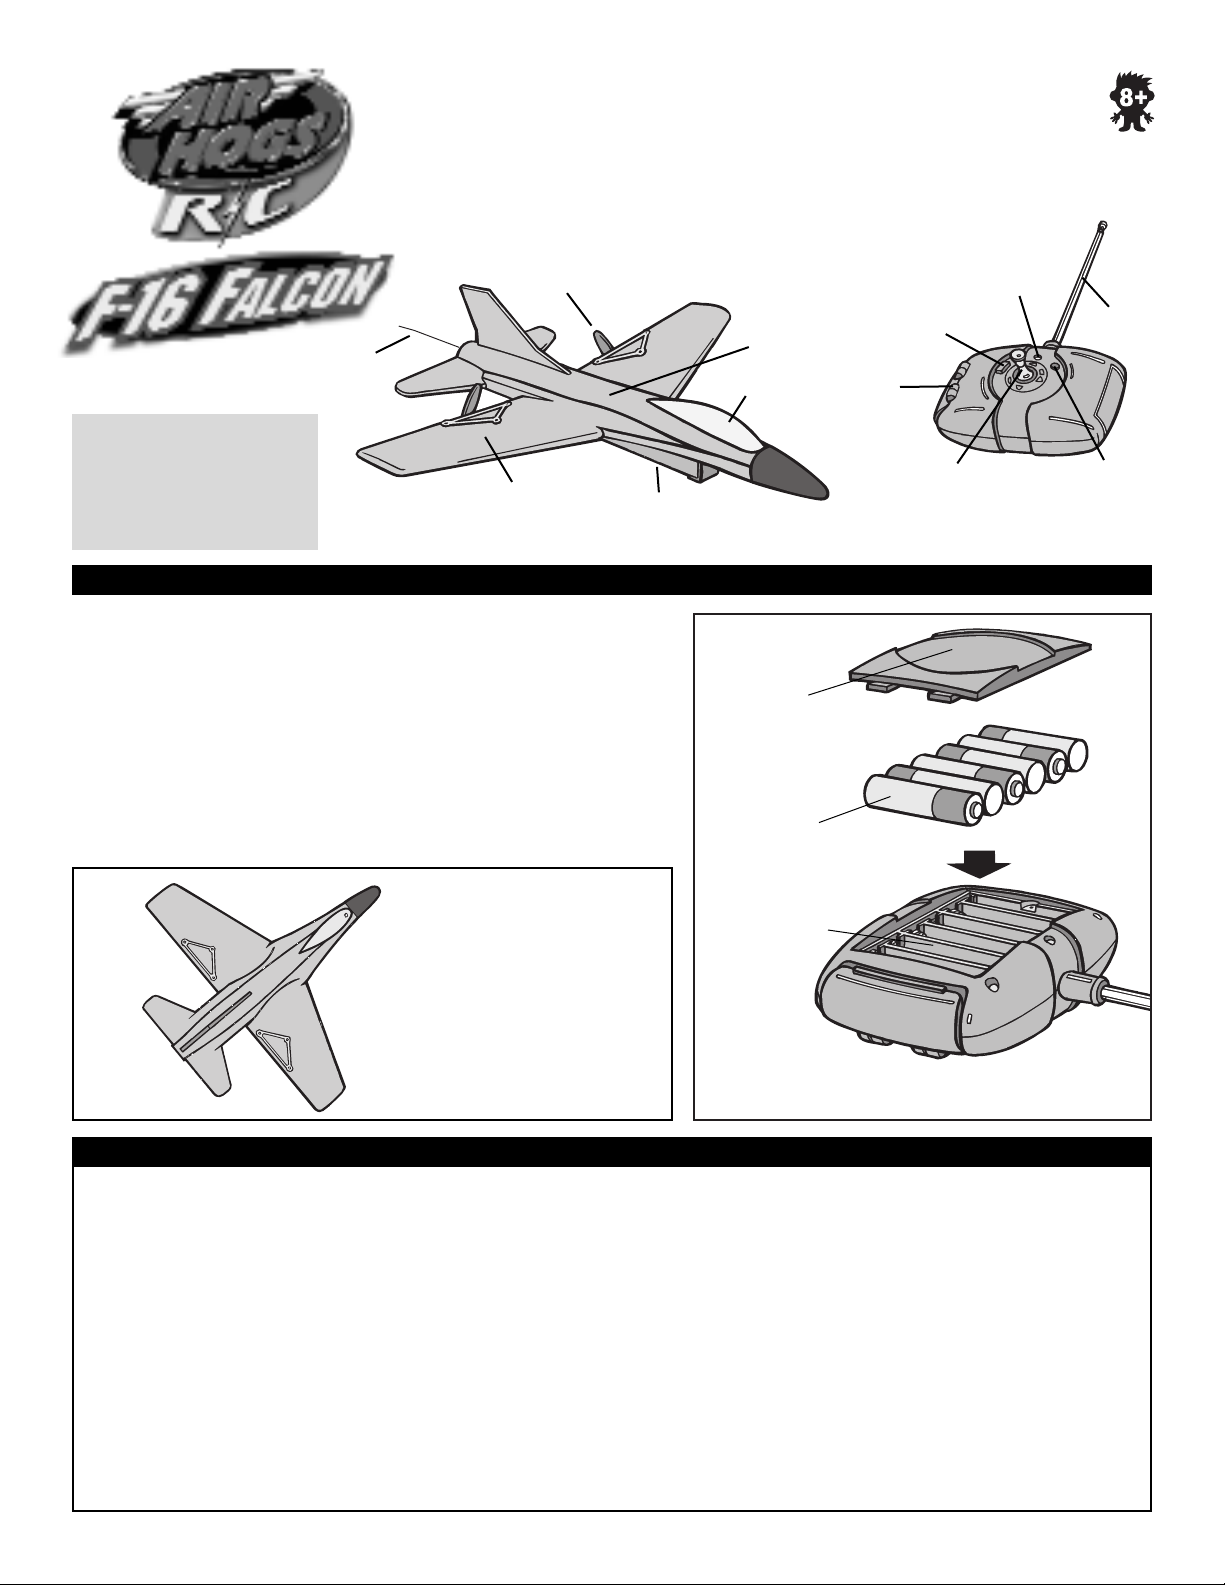
Propeller
INSTRUCTIONS
Check to make sure
contents are complete:
1 Air Hogs™
RC F-16 Falcon™
1 Charger/Flight Controller
1 Decal Sheet
Antenna
Main Wing
F-16 FALCON™
ON/OFF Switch
BATTERY INSTALLATION
1. Use a Phillips screwdriver to unscrew the battery compartment
door.
2. Install six AA 1.5 Volt alkaline batteries (not included) as
shown. Be careful to align the positive (+) and negative (-)
polarities with the corresponding markings inside the battery
compartment.
3. Replace the battery compartment door and re-tighten the screw.
IMPORTANT TIP: TURN YOUR CONTROLLER ON TO
ENSURE THAT THE BATTERIES ARE INSTALLED PROPERLY.
THE RED LIGHT ON THE FRONT OF THE CONTROLLER
SHOULD TURN RED.
Fuselage
Canopy
1
Battery
Compartment
Door
2
Six ‘AA’
1.5 Volt
Alkaline
Batteries
Controller
Charger ON
Charge
Nozzle
Storage
Directional
Charging
Light
ON
Toggle
CHARGER/FLIGHT
CONTROLLER
Antenna
Charge
Button
The F-16 Falcon™
has preinstalled
rechargeable
Compartment
batteries in the
plane’s fuselage.
IMPORTANT BATTERY IMFORMATION
REQUIRED BATTERIES: Plane includes rechargeable battery pack.
Charger/Flight Controller takes six ‘AA’ 1.5 Volt batteries (not included).
Battery installation should be performed by an adult. Use only
batteries recommended in the instruction sheet. Be careful to
install the batteries with the correct polarity, as indicated.
• Do not mix old and new batteries.
• Do not mix alkaline, standard or rechargeable batteries.
• Battery installation should be done by an adult.
• Non-rechargeable batteries are not to be recharged.
• Rechargeable batteries are to be removed from the toy before
being charged (if removable).
• Rechargeable batteries are only to be charged under adult
supervision (if removable).
ONLY USE DOCKING STATION CHARGER SUPPLIED WITH THE AIR HOGS™ RC F-16 FALCON™.
DO NOT USE ANY OTHER SOURCE TO CHARGE THE AIR HOGS™ RC F-16 FALCON™.
• Only batteries of the same or equivalent type as
recommended are to be used.
• Batteries are to be inserted with the correct polarity.
• Exhausted batteries are to be removed from the toy.
• The supply terminals are not to be short-circuited.
• Different types of batteries, or new and used batteries are
not to be mixed
• Exhausted batteries are to be removed, as they will adversely
affect the performance.
CAUTION: Plane contains rechargeable cells(s). If fluid leaks
from plane avoid contact with eyes and dispose of plane.
3
Battery
Charger/Flight Controller
Page 2
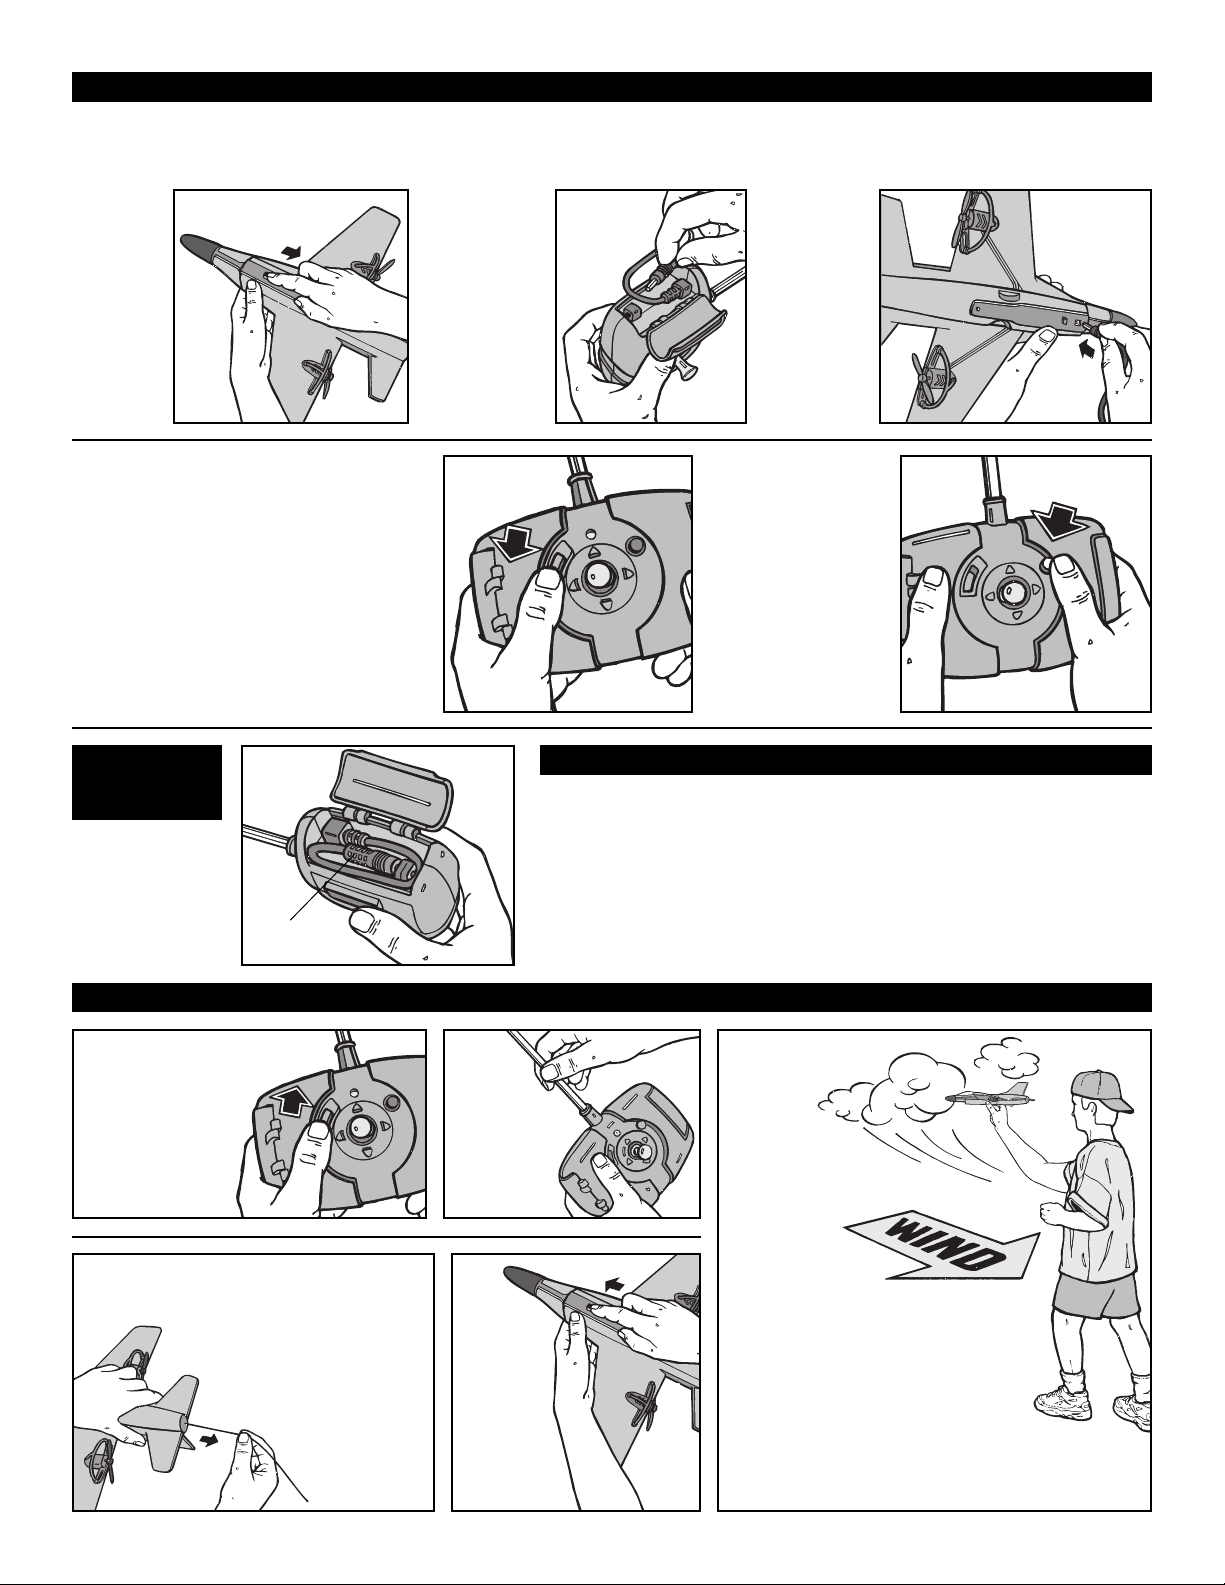
CHARGING YOUR AIRPLANE
IMPORTANT CHARGING INFORMATION: Charge the plane’s internal batteries for 4 minutes. Note: If you notice your
flight time decreasing over time, you may increase the charge time up to 8 minutes for better performance. Never charge
more than 8 minutes or you may burn out the batteries.
1. Push
the
planes
ON/OFF
switch to
OFF.
1
2. Open
the charge
nozzle
access door
and remove
the charge
nozzle.
2
3. Insert
the charge
nozzle all
the way
into the
planes
charger
port.
3
NOTE: If controller is
in ON position with
plane on charger
the LED will be off to
tell user nothing is
happening.
STORING
CHARGE
NOZZLE
When finished
charging the
plane, store the
charge nozzle
as shown.
4. Turn
controller OFF,
charger ON.
Charge
Nozzle
4
1. Location – Always fly your F-16 Falcon™ in a wide open
grassy area that is free of buildings, trees, overhead wires,
and other obstructions. Do not fly near people or animals.
2. Weather – Do not fly your plane if the temperature is less than
45°F/7°C or above 104°F/40°C.
3. Wind Conditions – Avoid flying your plane in windy conditions,
because winds may overpower the plane and make it difficult to
control.
FLYING INSTRUCTIONS
5. The red light
will blink to
indicate charging
is occurring.
When the red light
stops blinking, the
plane is fully
charged.
PRE-FLIGHT ENVIRONMENT CHECK
5
1
Move the
ON/OFF switch
on the charger/
flight controller
to the ON
position.
Uncoil the plane’s antenna.
3
Ensure that the antenna is
straight to have the optimal
control of the plane.
Do not pull or yank on
the fragile antenna.
It can be loosened or
lost by using
strong force.
2
Extend
the
antenna
all the
way.
4
Push
the
planes
ON/OFF
switch
to ON.
5
Launch the
plane against
the wind.
Ensure that
the plane
is parallel to
the ground level.
When preparing for take-off,
check the direction of the wind.
Always toss your plane against
the wind for the best take off and
flight results.
TIP: The wind will blow against
your face, if you are facing the
correct direction.
Page 3

CONTROLLING THE AIRPLANE
RIGHT TURN
Move the directional
toggle RIGHT.
CONTROL
REVERSAL
When the
plane is flying
towards you,
the controls
are reversed!
LEFT TURN
Move the direction
toggle LEFT.
To ACCELERATE upwards,
push the direction
toggle upwards.
To LAND, select a soft grassy
area, and pull the direction
toggle downward.
ONCE THE PLANE HAS LANDED
Pull the
controller
button down
to the
OFF
position.
For example, to make
the plane move left,
move the toggle switch
to the right.
Just imagine that you
are in the pilot’s seat!
Once, the propellers
stop spinning turn the
plane OFF.
REPAIRS
USING THE RUDDER
USE IF:
1. You are having trouble
turning left.
2. The plane seems to
constantly turn right.
USE IF:
1. You are having trouble
turning right.
2. The plane seems to
constantly turn left.
If the wings
on your
plane get
damaged
they can
be easily
repaired with
clear tape
as shown.
After each flight, store the plane in the
package to prevent damage.
Page 4

TROUBLESHOOTING GUIDE
PROBLEM
Red Charging Light is
not blinking.
Engines will not start.
No Control.
Plane turns in the
wrong direction.
1. Charge Nozzle is not installed all the way.
1. Plane is not fully charged.
2. Electric motor safety protection.
3. Electric battery safety protection.
1. No batteries in charger/flight controller or
low battery power.
2. Airplane antenna is not fully extended all
the way.
3. Flight controller antenna not fully extended.
4. IT IS A WINDY DAY
1. Plane is flying toward you and you have
not reversed the way you use the throttle.
CAUSE
SOLUTION
1. Insert the Charge Nozzle all the way into the Charge
port.
1. Charge the plane following “CHARGING YOUR
AIRPLANE” instructions.
2. Turn plane OFF and back ON to reset.
3. If plane was left on for more than 15 minutes and not
used, it automatically shuts off. To reset, turn plane OFF
then ON again.
1. Replace the batteries in the charger/flight controller
following the “BATTERY INSTALLATION” instructions.
2. Gently uncoil the plane’s antenna all the way.
3. Extend the silver flight controller antenna all the way.
4. DO NOT FLY ON WINDY DAYS.WIND MAY
OVERPOWER YOUR PLANE’S ENGINES AND YOU
WILL BE UNABLE TO CONTROL THE PLANE.
1. See the control reversal instruction section page 3.
FCC REQUIREMENTS
CAUTION: Changes or modifications to this product not expressly approved by the party responsible for compliance may void the
user’s authority to operate the equipment.
IMPORTANT SAFETY INFORMATION
Keep plane clear from face and eyes. Keep fingers away from moving propeller(s). Do not launch at people or animals. Use caution:
make sure people know you are playing with AIR HOGS™. Recommended for use in wide open grassy areas. Do not fly near
overhead wires. Do not use F-16 Falcon™ during electrical storms. Point plane away from face when launching. Use only the docking
station charger included in this package. Use only the controller included in this package. Use alkaline batteries only.
WARNING: DO NOT PLACE ANYTHING ON TOP OF YOUR PLANE. DO NOT LEAVE YOUR PLANE UPSIDE DOWN
RESTING ON ITS WING TIPS. IF YOU DO EITHER OF THESE THINGS,THEY MAY CAUSE THE FOAM TO DEFORM AND
THE WINGS TO BECOME MISSHAPEN. IF THIS HAPPENS, YOUR PLANE MAY NOT FLY.TO PRESERVE THE LIFE OF YOUR
F-16 FALCON™, BE CAREFUL TO STORE THE PLANE IN THE FOAM BOX IT CAME IN AND NEVER STORE THE PLANE IN
AN UPSIDE DOWN POSITION.
WARRANTY
Spin Master Ltd. warrants to the original consumer purchaser that this product is thoroughly tested and inspected before shipment and is guaranteed to be
free of factory defects in material and workmanship for ninety (90) days (unless specified in alternate warranties) from the date of purchase.
In the event of such a defect within the warranty period, Spin Master Ltd., at our sole option, will repair or replace the product or provide you with another
product of equal value. Repair or replacement shipment is free of charge. Shipping replacement may take 2 to 6 weeks depending on customer’s location.
In the event of a defect covered under this warranty, please call the toll-free number listed below many problems can be solved in this
manner. If necessary, you will be instructed to return the defective part or unit, packed securely, postage prepaid and insured by customer, to the address
below. Enclose your name, address, dated sales receipt, and a brief explanation of the defect. There may be an additional handling charge if you send the
entire toy.
This warranty is valid if and only if the product has been operated in accordance with the instructions.This warranty does not cover worn
or defective batteries, damage resulting from neglect, unauthorized modification, accident, misuse, abuse, any action or omission which
constitutes a deviation from the instructions or from the use of accessories or parts not manufactured by Spin Master Ltd. If the product is returned without a
dated sales receipt the product is excluded from coverage under this warranty.
Spin Master Ltd.’s liability for breach of contract, breach of fiduciary duty, negligence, negligent design, negligent manufacturing, failure to warn, for defects
in design, material or workmanship, under any statute, consumer protection legislation, or any regulations passed thereunder, or for absolutely any other potential cause of action or absolutely any other basis upon which liability might otherwise be found, is strictly
limited, without exception, to repair or replacement of the product, at our sole option, and in absolutely no event shall we be responsible for
incidental, consequential, resultant or contingent damages of absolutely any type, whatsoever, whether these damages were caused or incurred by our breach
of contract or negligence or by any other cause, whatsoever. If any provision of this WARRANTY, EXCLUSION, DISCLAIMER AND LIMITATION OF LIABILITY
CLAUSE is determined to be invalid or unenforceable in whole or in part, such invalidity or unenforceable
provision will attach only to such provision or part thereof and the remaining part of such provision and all other provisions will continue in full force and effect.
Spin Master Ltd. reserves the right to improve the design of any product without assuming any obligation to modify any product previously manufactured.
If you have a problem, Please contact our Customer Care Center below for help.
© 2005 Spin Master Ltd. All rights reserved. TM Spin Master Ltd.
Spin Master Ltd., 450 Front Street West,
Toronto, ON M5V 1B6 Canada
Spin Master, Inc., PMB #10053, 300 International Drive,
Suite 100, Williamsville, NY 14221, USA
Spin Master Toys Far East Limited, Rm # 1113, 11/F,
Chinachem Golden Plaza, 77 Mody Rd., Tsimshatsui E., Kowloon, HK
Spin Master France SAS, 36 rue de Silly, 92100 Boulogne, France
North American Consumer Information
Phone: 1-800-622-8339
www.spinmaster.com
AIR HOGS TM and F-16 Falcon TM are trademarks
of Spin Master Ltd. © 2005 Spin Master Ltd.
All Rights Reserved. Manufactured for and distributed
by Spin Master Ltd.
Products and colors may vary. Retain package for
future reference. Please remove all packaging
material before giving to children. Conforms to
safety standards ASTM F963-03, EN71 regulatory
requirements. MADE IN CHINA.
Asst. #44075 Item #44076 REV 1 U.S. English
Contains NiMH battery
pack. Battery pack
must be recycled or
disposed of properly.
TM
 Loading...