

Page 1
ww
w
ww
w
ww
w
..
.
gg
g
oo
o
yy
y
oo
o
ee
e
cc
c
aa
a
rr
r
mm
m
oo
o
cc
c
..
.
rr
r
Page 2
-
-
I
I
N
N
D
E
E
2
2
G
G
A
A
P
P
D
E
E
X
X
Page 3: Getting Started.
Page 8: Using As A Regular Yoyo.
Page 9: Racing – Beginner’s Mode.
Page 11: Racing – Standard Mode.
Page 14: For Best Performance.
Page 16: Changing Your Tires
And Mags.
Page 17: Tricks.
Page 20: Accessories.
ww
w
ww
w
ww
w
..
.
gg
g
oo
o
yy
y
oo
o
aa
a
rr
r
mm
m
oo
o
cc
c
..
.
rr
r
ee
e
cc
c
Page 3
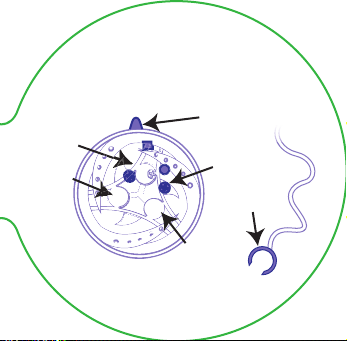
Square
Button
Screw
-
-
3
3
E
E
G
G
A
A
P
P
GOYO OVERVIEW
w
w
w
w
w
w
.
.
g
g
T
T
T
T
I
I
E
E
N
N
G
G
o
o
G
G
S
S
T
T
A
A
R
R
T
T
E
E
D
D
Trigger
Round
Button
C-Clip
Screw
m
m
o
o
c
c
.
.
r
r
e
e
y
y
c
c
o
o
a
a
r
r
Page 4
T
T
T
T
I
I
E
E
N
N
G
G
-
-
4
4
E
E
G
G
A
A
P
P
G
G
S
S
T
T
A
A
R
R
T
T
E
E
D
D
STEP 1:
UNLOCKING GOYO
Hold down
SQUARE button
and flick
TRIGGER up.
The ROUND
button will
pop out.
w
w
w
w
w
w
.
.
g
g
o
o
y
y
o
o
a
a
r
r
m
m
o
o
c
c
.
.
r
r
e
e
c
c
Page 5
-
-
5
5
E
E
G
G
A
A
P
P
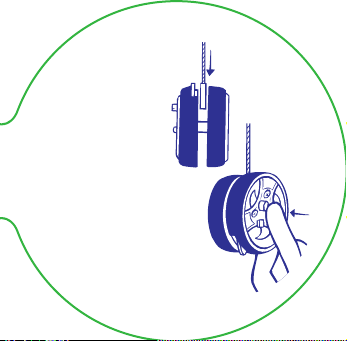
STEP 2:
ATTACHING
STRING
Lower C-CLIP string
into GOYO until it
rests on centre axle.
Press ROUND button.
You r string should now
be securely attached to
the GOYO.
w
w
w
w
w
w
.
.
g
g
T
T
T
T
I
I
E
E
N
N
G
G
o
o
G
G
S
S
T
T
A
A
R
R
T
T
E
E
D
D
m
m
o
o
c
c
.
.
r
r
e
e
y
y
c
c
o
o
a
a
r
r
Page 6
T
T
T
T
I
I
E
E
N
N
G
G
-
-
6
6
E
E
G
G
A
A
P
P
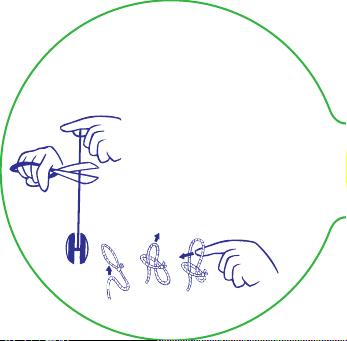
STEP 3:
STRING SETUP
G
G
S
S
T
T
A
A
R
R
T
T
E
E
D
D
Cut string to the correct
height by letting the GOYO
unwind until it touches the
ground and cut at WAIST
height.
Tie a loop in the string then
create a slipknot to wrap
around your finger.
w
w
w
w
w
w
.
.
g
g
o
o
y
y
o
o
a
a
r
r
m
m
o
o
c
c
.
.
r
r
e
e
c
c
Page 7

T
T
T
T
I
I
E
E
N
N
G
G
-
-
7
7
E
E
G
G
A
A
P
P
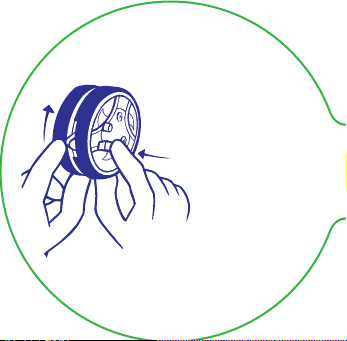
STEP 4:
WINDING STRING
For correct winding, use your
THUMB to pinch the string to
the side of the GOYO. Wind
string TIGHTLY around twice
and release thumb as you
continue winding.
w
w
w
w
w
w
.
.
g
g
o
o
y
y
c
c
o
o
a
a
r
r
G
G
S
S
T
T
A
A
R
R
T
T
E
E
D
D
m
m
o
o
c
c
.
.
r
r
e
e
Page 8

S
S
A
A
A
A
G
G
N
N
I
I
S
S
U
U
-
-
8
8
E
E
G
G
A
A
TO USE AS A
P
P
REGULAR YOYO
After following the steps in
“Getting Started”, flick the
TRIGGER DOWN to use as
a regular yoyo.
Ensure ROUND Button
is pressed in before each
throw.
w
w
w
w
w
w
.
.
g
g
o
o
y
y
c
c
o
o
a
a
r
r
R
R
E
E
G
G
U
U
L
L
A
A
R
R
Y
Y
O
O
Y
Y
O
O
m
m
o
o
c
c
.
.
r
r
e
e
Page 9

B
B
:
:
G
G
E
E
N
N
G
I
I
C
C
A
A
R
R
-
-
TO RACE IN
9
9
E
E
BEGINNER’S MODE
G
G
A
A
P
P
When string is
G
I
I
N
N
N
N
E
E
R
R
’
’
S
S
attached and wound up,
hold down
and flick
ROUND
SQUARE
TRIGGER
up. The
button will pop up.
M
M
button
If the ROUND button
is up, your GOYO will not
sleep, but roll directly off the string.
Ensure you throw your GOYO with a fast,
overhand motion downwards towards
the ground.
See warning overleaf.
w
w
w
w
w
w
.
.
g
g
o
o
y
y
o
o
a
a
r
r
m
m
o
o
c
c
.
.
r
r
e
e
c
c
O
O
D
D
E
E
Page 10

:
:
G
G
B
B
N
N
E
E
I
I
C
C
A
A
R
R
-
-
0
0
1
1
E
E
G
G
A
A
P
P
G
G
I
I
N
N
N
N
E
E
R
R
’
’
S
S
M
M
O
O
D
D
E
E
Page 11

R
R
-
-
1
1
1
1
STEP 1:
E
E
G
G
SETUP AND THROW
A
A
P
P
Flick the
TRIGGER UP
and you’re ready
to race.
w
w
w
w
w
w
N
N
I
I
C
C
A
A
.
.
g
g
o
o
y
y
o
o
G
G
:
:
S
S
T
T
A
A
N
N
D
D
A
A
To race,
GOYO has to
be thrown with
a sharp OVER-
HAND fling.
m
m
o
o
c
c
.
.
r
r
e
e
c
c
a
a
r
r
R
R
D
D
M
M
O
O
D
D
E
E
Page 12

G
G
N
N
:
:
I
I
S
S
C
C
A
A
R
R
-
-
2
2
1
1
E
E
G
G
A
A
P
P
T
T
A
A
N
N
D
D
A
A
R
R
STEP 2:
SLEEPING AND
RELEASE
D
D
M
M
O
O
D
D
E
E
Once your GOYO is
spinning on the end of the
string (sleeping), gently
lower. When it touches
the ground it will
release from the
string and race
away.
w
w
w
w
w
w
.
.
g
g
o
o
y
y
o
o
a
a
r
r
m
m
o
o
c
c
.
.
r
r
e
e
c
c
Page 13

G
G
N
N
:
:
I
I
S
S
T
C
C
A
A
R
R
-
-
3
3
1
1
E
E
G
G
A
A
RESETTING YOUR GOYO
P
P
To reset your GOYO, follow steps 1, 2
STEP 3:
T
A
A
N
N
and 4 in the “Getting Started” section.
STEP 2
STEP 1
w
w
w
w
w
w
.
.
g
g
o
o
y
y
o
o
c
c
.
.
r
r
e
e
c
c
a
a
r
r
D
D
A
A
m
m
o
o
R
R
D
D
M
M
STEP 4
O
O
D
D
E
E
Page 14

E
E
S
S
B
B
R
R
O
O
F
F
-
-
4
4
1
1
E
E
G
G
A
A
FOR BEST
P
P
PERFORMANCE
Race your GOYO on a
HARD surface like concrete,
floorboards, tiles, etc.
TO ENSURE GOYO RACES
OFF THE STRING
Always throw the GOYO
down towards the ground
with a sharp, hard and fast
overhand motion.
w
w
w
w
w
w
.
.
g
g
o
o
y
y
c
c
o
o
a
a
r
r
T
T
P
P
E
E
R
R
F
F
O
O
R
R
M
M
A
A
N
N
C
C
E
E
m
m
o
o
c
c
.
.
r
r
e
e
Page 15

E
E
S
S
B
B
T
T
R
R
O
O
F
F
-
-
5
5
1
1
E
E
G
G
A
A
P
P
CAUTION
Ensure ROUND
P
P
E
E
R
R
F
F
O
O
Button is pressed in
before each throw.
When racing: Use
GOYO outdoors in
safe open areas away from
traffic and parked cars. Pavement use
not recommended. Do not chase your
GOYO racer onto the road.
w
w
w
w
w
w
.
.
g
g
o
o
y
y
o
o
a
a
r
r
m
m
o
o
c
c
.
.
r
r
e
e
c
c
R
R
M
M
A
A
N
N
C
C
E
E
Page 16

N
N
A
A
H
H
C
C
-
-
6
6
1
1
E
E
G
G
A
A
P
P
Do not leave GOYO
lying around in
2 parts. Always
assemble when
not in use.
N
N
I
I
G
G
G
G
T
T
I
I
R
R
E
E
S
S
A
A
N
N
D
D
M
M
A
Line up
guide holes
with guide
A
G
G
S
S
pins
Using a small
screwdriver,
unscrew screws
to change tires
and mags.
TM
Page 17

-
-
7
7
1
1
E
E
G
G
A
A
P
P
DOWN THE
STRAIGHT
With the spare hubcaps set
up check points in a straight
line. Stand at one end and
see how close to each
check point you can get.
LIFTOFF
Set up 2 chairs about 15 inches
apart. Tie a string from one chair
to the other. Set a jump up and
try to jump the string. If you
jump the string, move it
up and then try and
jump the string
again.
w
w
w
w
w
w
.
.
g
g
o
o
y
y
o
o
r
r
T
T
R
R
I
I
C
C
K
K
S
S
m
m
o
o
c
c
.
.
r
r
e
e
c
c
a
a
Page 18

-
-
T
T
R
R
8
8
1
1
E
E
G
G
A
A
P
P
QUARTER MILE
Make a start line, then make
a finish line about 19 feet
away using spare hubcaps.
See who gets to the finish
line first!
BULLSEYE
Pick a target 19 feet away from you. Take it
in turns to see who can get closest to the
target. Place a spare hubcap where the
GOYO rests. After using a ll the spare
hubcaps, the winner is
the one who has the
hubcap closest to
the target.
w
w
w
w
w
w
.
.
g
g
o
o
y
y
I
I
C
C
c
c
.
.
r
r
e
e
c
c
o
o
a
a
r
r
K
K
S
S
m
m
o
o
Page 19

9
9
1
1
E
E
G
G
A
A
P
P
CRASH AND BASH
Set up some pins to knock
down (eg. empty cans). The
aim is to knock over as many
pins as possible. Start from
3 feet away and when you
get better, move further
backwards.
OUTRUN
Start at the same place and
"Ready, set, go!", see who can
race the furthest
away.
w
w
w
w
w
w
.
.
g
g
o
o
y
y
o
o
-
-
T
T
R
R
I
I
C
C
K
K
S
S
m
m
o
o
c
c
.
.
r
r
e
e
c
c
a
a
r
r
Page 20

A
A
C
C
-
-
C
C
E
E
S
S
S
0
0
2
2
E
E
G
G
A
A
P
P
w
w
w
.
.
g
g
o
o
y
y
o
o
S
O
O
R
R
I
I
E
E
S
S
y
r
a
v
y
a
m
g
n
i
g
a
k
c
a
P
m
o
c
.
.
r
r
e
e
c
c
a
a
r
r
 Loading...