

Page 1
®
CLOSE
OPEN
TO GET THE MOST OUT OF
YOUR ZERO GRAVITY MICRO™
WALL RACER PLEASE READ THESE
INSTRUCTIONS FIRST!
NOTE:
USE ON SMOOTH, CLEAN
SURFACES ONLY!
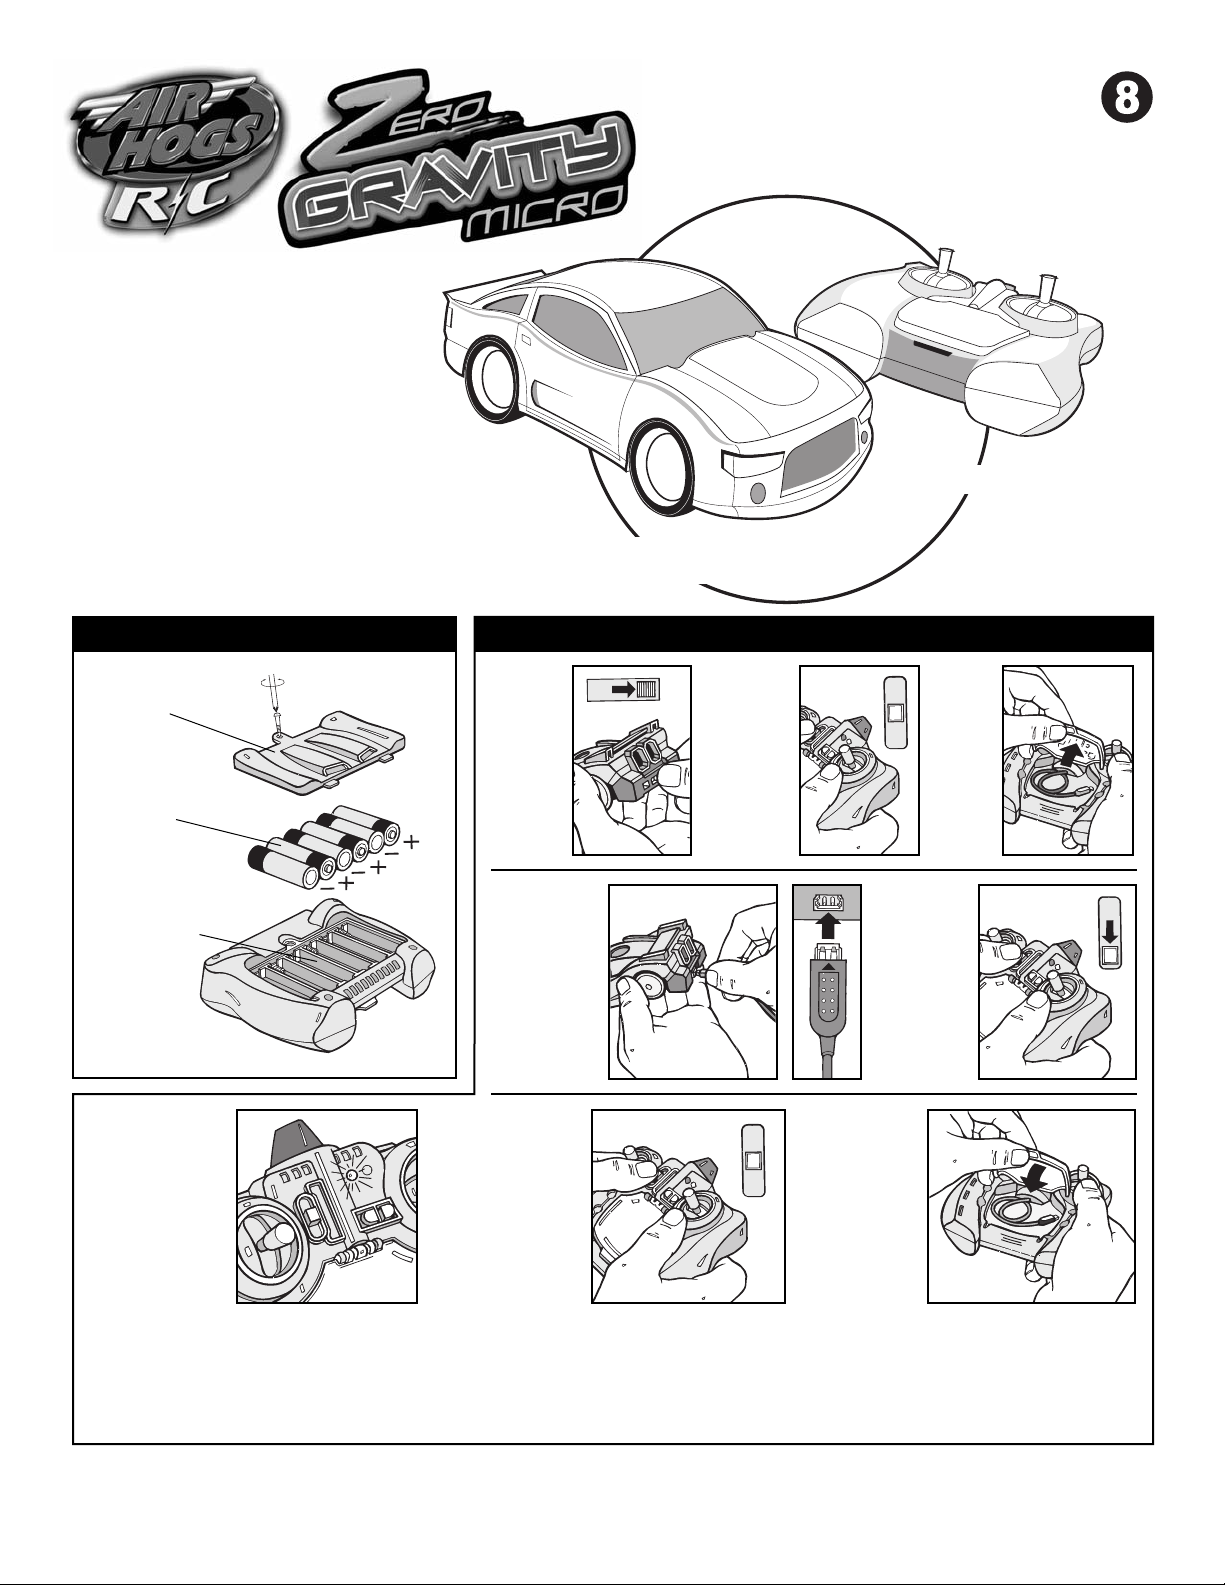
Check to make sure contents are
complete:
• 1 Zero Gravity Micro™ Wall R acer
• 1 Controller/Charger
• 1 Instruct ion Sheet
INSTRUCTIONS
FOR INDOOR USE ONLY.
ADULT SUPERVISION RECOMMENDED!
TM
Controller/Charger
Zero Gravity Micro™
Wall Racer
Battery
Compartment
1.5-V AA
Alk aline
Batteries or
Recharge able
Batteries
Battery
Compartment
Controller/Charger
6. Green light
flashing: Vehicle
is charging.
Green light off:
Vehicle is charged.
INSTALL BATTERIES
Door
Six
1. Switch
car to
“OFF”.
4. Plug c able
into port
of vehicle.
Make sure
the arrow is
on top.
7. When charged,
turn controller/
charger switch
“OFF”.
CHARGING YOUR ZERO GRAVITY MICRO™ WALL RACER
2. Switch
cont roller/
charger to
“OFF”.
8. Stow
charge cable
in s torage
compartment.
3. Take
out
charge
nozzle .
5. Slide
switch on
cont roller/
charger to
“CHARGE”.
• Charging should take be t ween 30 and 50 minutes depending on how much charge is left in car.
• NOTE: Do not charge bat ter y immediately after use. Le t car battery cool for at leas t 10 minutes. If charging is not comple te in 50 minutes,
replace the charger bat teries.
Your Zero Gravity Micro™ Wall Racer has a pre-installed rechargeable
battery inside the vehicle body.
PROBLEMS? Before you return to retailer, please call our HOTLINE for assistance,
1-800-622-8339
Page 2
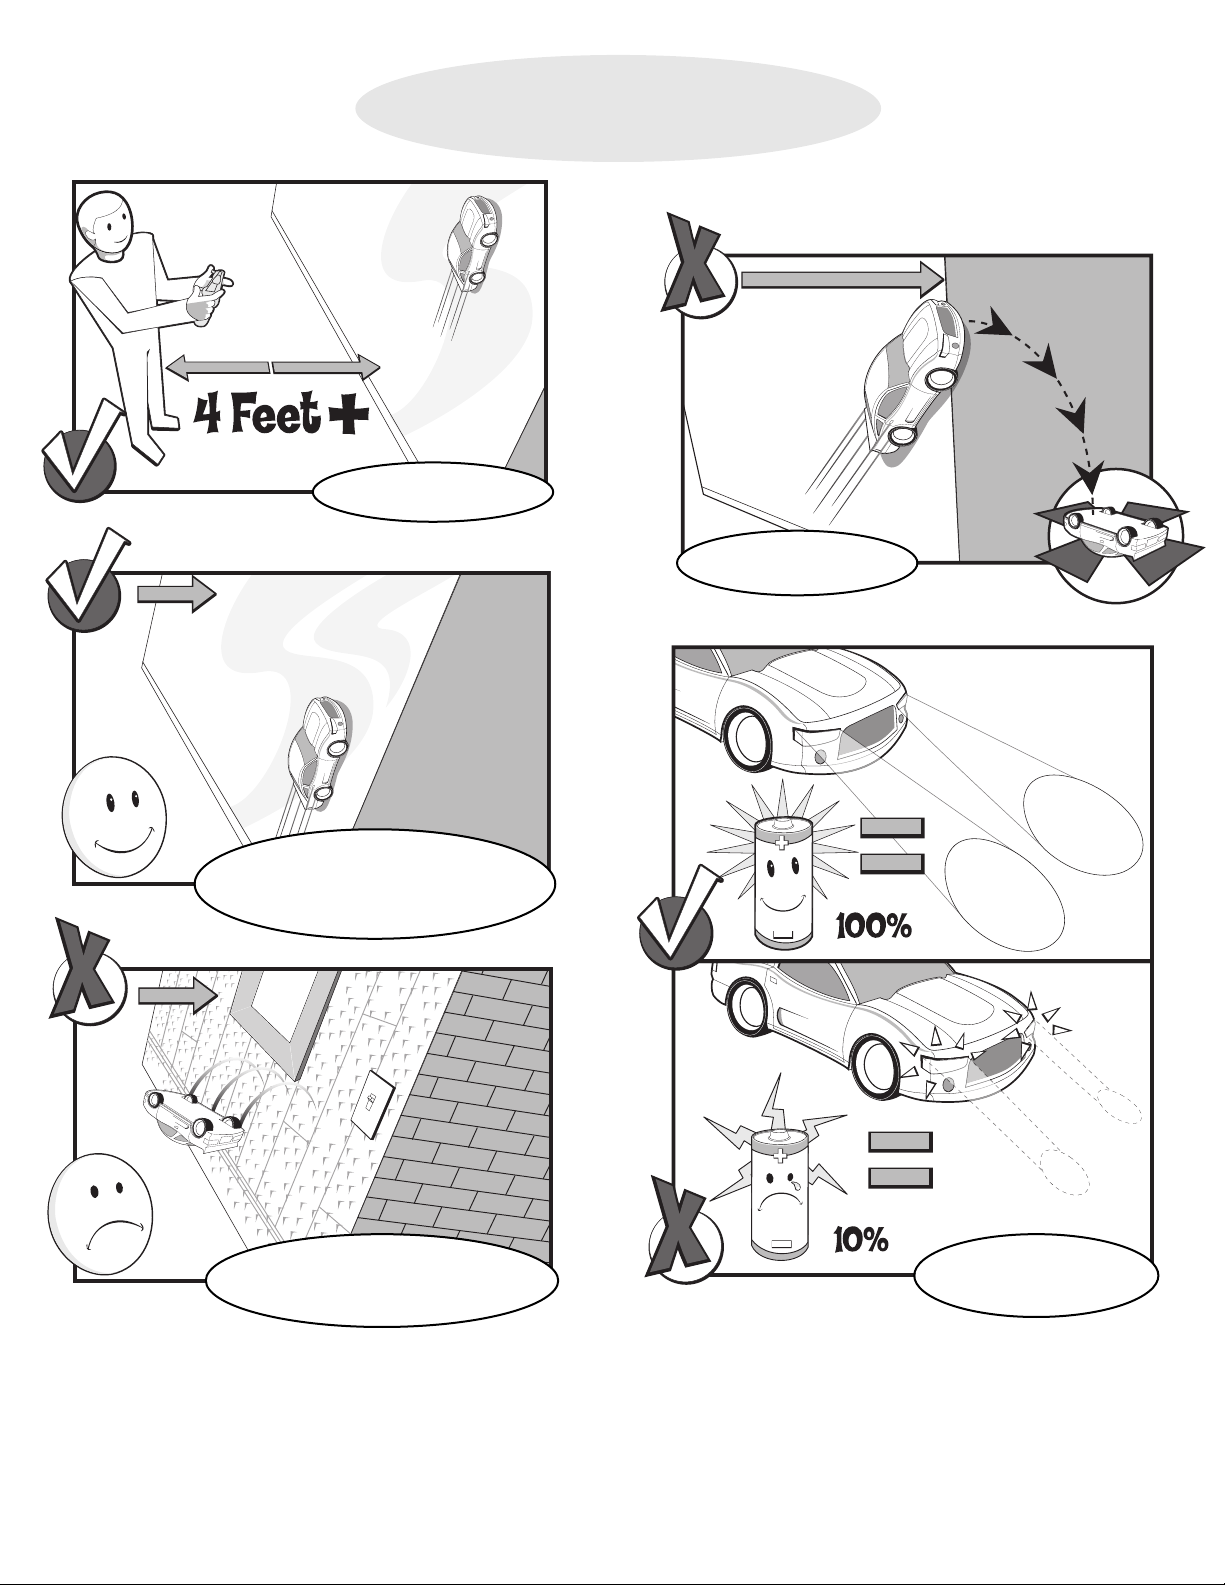
WHILE DRIVING YOUR ZERO GRAVITY MICRO™ WALL RACER,
MAKE SURE TO FOLLOW THESE RULES
Stand at least
4’ from the wall.
Do not dri ve to or off
the edge of the wall.
Only drive on smooth, cle an,
dry surfaces. Make sure walls are cle ar
of obstacles, including hanging pictures,
light switche s, etc...
Do not dri ve on uneven,
porous, or broken surfaces, as vehicle
will not adhere and can fall off.
The Zero Gravit y
Micro™ Wall Racer has
working headlights.
IMPORTANT: When the headlights begin to blink , the
rechargeable bat tery is running low on power. Car should
be removed from the wall immediately. Other wise the
vehicle may fall off the wall.
PROBLEMS? Before you return to retailer, ple ase call our HOTLINE for assistance,
1-800-622-8339
Page 3

L
R
L
R
L
R
L
R
R
L
L
R
L
L
R
DRIVING ON WALLS OR UPSIDE DOWN
To drive on walls upside down you must put the vehicle in
the WALL mode.
NOTE: Avoid driving overhe ad when other people are
around. Do not stand underneath when driving overhead.
DRIVING ON THE GROUND
To drive on the ground you must put the vehicle in the
GROUND mode.
The fan will not turn ON, but the he adlights will turn on and
the vehicle will drive full function on the ground. (The ground
mode saves the battery charge).
TRIM ADJUSTMENT
Place the vehicle in the ground mode and dri ve forward
without touching the right joystick.
The fabric air skirts can be adjusted out ward at a 45° angle
to ensure a proper wall suction.
IMPORTANT: The Zero Gravit y Micro™ should only be
driven on a smooth, cle an, flat surface. Dirt or debris can
get inside the fan and cause damage.
A
B
If the vehicle turns to the LEFT, press the Right trim button
until it dri ves straight (A).
If the vehicle turns to the RIGHT, press the Lef t t rim button
until it dri ves straight (B).
When finished playing with your Zero Gravity Micro™, remove vehicle f rom wall.
Turn vehicle OFF. Turn the controller OFF. NOTE: The trim setting will reset when the vehicle and cont roller are turned off.
PROBLEMS? Before you return to retailer, ple ase call our HOTLINE for assistance,
1-800-622-8339
Page 4

SPINS
!
By pushing the joystick on the controller/charger, you can make your Wall Racer spin around on the spot.
RIGHT SPIN
PROBLEM
Vehicle will no t run.
Vehicle doe s no t climb.
Vehicle doe s no t drive straight.
Vehicle slips climbing the walls.
Vehicle falls off the wall.
Vehicle will no t climb walls.
Push the RIGHT joystick to the right to
make the vehicle spin clockwise.
TROUBLESHOOTING
SOLUTION
1. Power swi tch is of f. Turn on.
2. Cont roller bat tery is inst alled wi th incorrect polarit y. Check the (+) and (-) markings to make sure the
bat ter y is properly aligned.
3. Batterie s are drained. Charge batteries and/or install new bat teries.
1. O ve r current pro tection is engaged. Turn vehicle of f for 30 seconds the n restart.
1. Check t rim.
2. Make sure surf ace is cle an of dirt/dust.
3. Make sure surface is nei ther too rough or to o smoot h.
4. Make sure surface is flat.
1. Cle an the t ires with a damp rag.
2. Fold up the fabric skirts for a be tter seal prior to use.
1. Make sure to discharge and the n charge again for 30 to 50 minutes.
2. Clean tires and make sure your wall and f lo or are also clean.
3. Check the fabric skirts for damage. If they have been pulled loose, tape them back on with fle xible tape.
4. Make sure surface is flat.
1. Suction jammed. CALL 1-800-622-8339.
LEFT SPIN
Push the RIGHT joystick to the lef t make
the vehicle spin counter-clock wise.
STILL HAVING PROBLEMS? Before you return to retailer, please call our HOTLINE for assistance,
1-800-622-8339
FCC REQUIREMENTS
Warning: Changes or modifications not ex pre ssly approved by the party responsible for compliance could void t he use r’ s authority to operate the equi pment.
NOTE: This equi pmen t has been tested and found to comply wit h the limits f or a Class B digital device, pursuant to Part 15 of t he FCC Rules. These limi ts are des igned to provide
reasonable protec tion against harmf ul in terference in a re side ntial ins ta llation . This equipment generate s, uses, and can radiate radio frequency e nergy and, if not inst alled and used in
accordance wi th the ins truc tions, may c ause h armful interfere nce to radio communicat ions. Ho wever, there is no guarantee th at inter ference will not occur in a particular installat ion.
If this equipmen t does c ause h armful interfere nce to radio or telev ision reception, which can be de termined by turning the equ ipme nt of f and on, the user is encouraged to tr y to cor rect
the inte rference by one or more of the following measures: • Reorien t or re located the re ce iving antenna. • Increase the separat ion bet we en the equipment and recei ve r.
• Connect t he equipment into an out le t on a ci rcuit dif fe rent from t hat to which the recei ver is connected. • Co nsult the dealer or an e xper ience d radio/TV technician for help.
This Class B digital apparatus c omplie s with Canadian ICES-003.
IMPORTANT BATTERY INFORMATION:
• Do no t mix old and new batteries.
• Do not mix alkaline, standard or rech argeable batter ie s.
• Batte ry i nstallation should be perf ormed by a n adul t.
• No n-re chargeable batte ries are no t to be re charged.
• Rech argeable batteries are to be remove d from t he toy be fo re
being charge d (if remo vable).
• Rech argeable batteries are only to be ch arged under adult
super vision.
• Only batteries of the same or equivalen t type as
recommended are to be used.
• Batteries are to be inse rte d with the corre ct po larity.
• Exhausted batteries are to be remove d from t he toy.
• The suppl y termin als are not to be short circui ted.
• Different t ypes of batter ie s, or new and used batteries are
not to be mixed.
• Exhausted batte ries are to be removed, as t hey w ill adve rse ly
affect t he performance.
Spin Master Ltd., 450 Front Stree t Wes t, Toron to, ON M5V 1B6 Can ada
Spin Master Inc., PMB #10053, 300 In ternation al Drive, Sui te 100, Wi lliamsvi lle,
NY 14221, USA
Spin Master Toys Far East Limi ted. Rm #1113, 11/F, Chinachem Go lden Plaza,
77 Mody Rd., Tsimsh atsui E., Kowloon, HK
Spin Master Toys UK Ltd., Meadowbank, Furlong Road, Bou rne End, Buck s,
SL8 5AJ, Uni te d K ingdom
Spin Master France – 36 rue de Silly – 92100 Boulogne Bill ancourt – France
Nort h American C onsumer Information
Pho ne: 1-800-622-8339
ww w.spinmaster.com
Your Zero Gravity Micro™ is equipped with a Lithium Polymer battery.
WARNING:
• Do no t leave t he toy unat te nde d w hile charging i t.
• Batter y charging should be done by adults.
• Charge the toy on a non-flammable surface and ke ep it away from flammable items.
• Do not e xpose b at tery to direct sunlight. There is a r isk of the bat te ry e xploding, overhe ating , or igniting.
• Do no t disassemble, modif y, he at, or short circui t the batter y.
• Do no t place bat tery in fires or leave i n h ot places.
• Do no t drop or subje ct to strong impacts.
• Do no t allow the battery to get we t.
• Only ch arge t he batter y with the specified Air Hogs®bat te ry charger.
• Only use t he battery i n the device specif ie d by Air Hogs®.
• Turn the charger of f when t he toy’ s bat te ry is charged, and always unplug it from t he toy.
• Disconnec t AC wall charge rs from out le ts whi le not in use.
• If the toy has been damaged, imme diately stop use, unplug, and s afely move the toy away from f lammable mate ri als.
• Follo w the manufac tu rer’ s instruction s f or charging the toy. Do not charge longer than recommended.
• Carefully re ad the instr uction manual and use t he batter y cor rec tly.
TM and © 2008 Spin Master Ltd. Air Hogs ® is a
registered t rademark of Spin Master Ltd. All rights
reser ve d. Conforms to product safet y standards
ASTM F963, regulatory req uirements . Products and
colors may vary. Please retain t his information for
fu ture refe rence. Paten t Pending.
MADE IN CHINA.
Asst. #44317 NEN REV 1
Contains LiPo battery
pack. Battery pack
must be recycled or
disposed of properly.
TM
 Loading...