

Page 1
Assembly Instructions & Flight Manual
Congratulations! You are the proud owner
of one of the loudest, fastest and farthest
TM
flying air-powered plane ever! AIR HOGS
Red HornetTMcan fly over 90 metres (100 yards)!
TM
Red Hornet
speeds of up to 240KMH (150MPH)
read and follow these instructions to assemble
TM
and fly your plane.
PLEASE READ THESE INSTRUCTIONS
BEFORE FLYING!
is also incredibly fast with top
1
. Please
Happy Flying!
TM
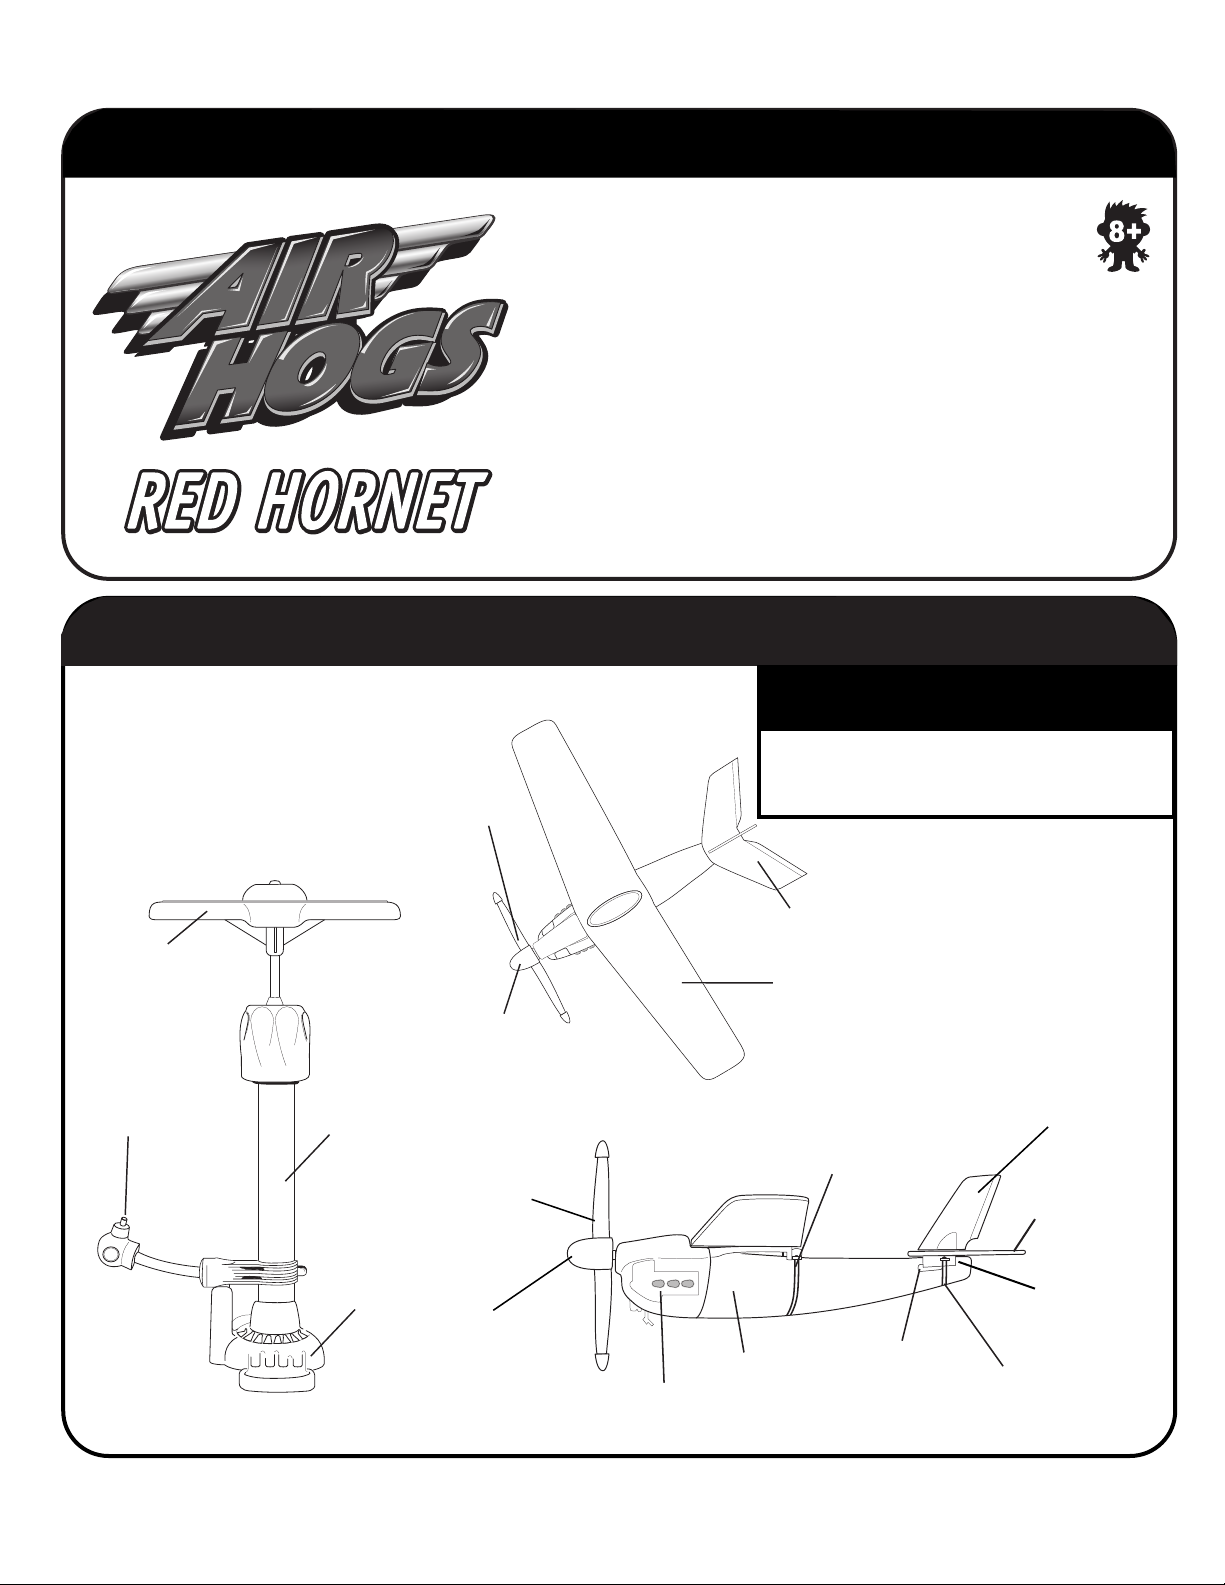
Getting To Know Your AIR HOGS
TOP ELEVATION
PROPELLER
DOCKING STATION/PUMP
PUMP HANDLE
NOSE CONE
NOZZLE
PUMP SHAFT
PROPELLER
SIDE ELEVATION
TM
Red Hornet
TM
Check to make sure the contents are
complete:
1 Plane
1 Pump
1 Main Wings
REAR WING ASSEMBLY
MAIN WING
MAIN WING ELASTIC
1 Rear Wing Assembly
1 Set of Stickers
VERTICAL REAR WING
HORIZONTAL REAR
WING
BASE
NOSE CONE
ENGINE HOUSING
FUSELAGE
REAR WING
CLIP
REAR WING
SLOT
1. 240KMH (150MPH) SCALE SPEED, 1:15 SCALE.
REAR WING
ELASTIC
Page 2
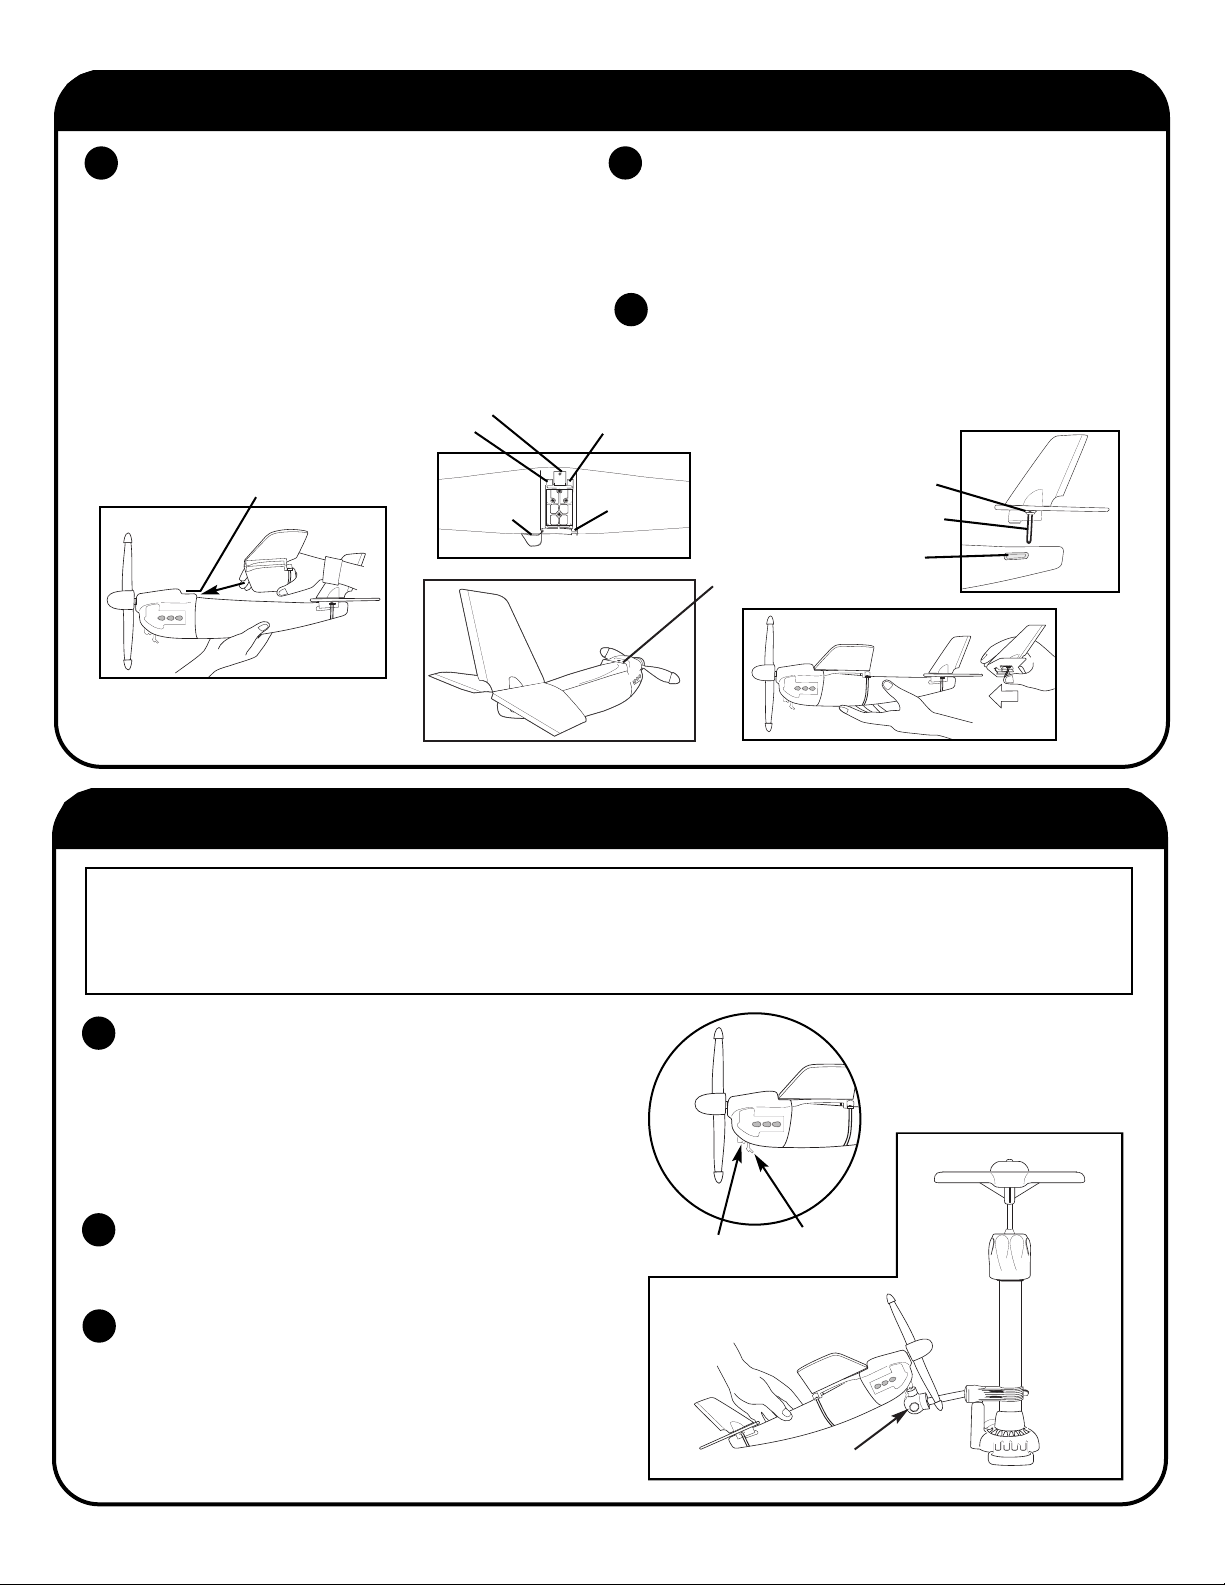
Assembly Instructions
1
ATTACHING THE MAIN WING
Place the MAIN WING over the FUSELAGE. Gently
slide the MAIN WING CLIPS into the FRONT
FUSELAGE TOP SLOT ensuring that the MAIN WING
SLIDE is still above the FRONT FUSELAGE TOP
SLOT and the MAIN WING CLIPS are below the
FRONT FUSELAGE TOP SLOT. Make sure you slide
it in ALL THE WAY or your plane will not fly. Finish
attaching the MAIN WING by wrapping the MAIN
WING ELASTIC around the FUSELAGE and slipping
it over the MAIN WING HOOK.
MAIN WING SLIDE
MAIN WING CLIP
ATTACHING REAR WING
2
Slide the REAR WING CLIPS into the REAR WING SLOT.
Make sure you gently push the REAR WING CLIPS ALL
THE WAY into the REAR WING SLOTS or the plane will be
unstable. NOTE: the REAR WING ELASTIC should be
placed around the rear end of the FUSELAGE as shown.
3
APPLYING STICKERS
See packaging for placement of your AIR HOGS
TM
stickers. Make sure your stickers are pressed flat to
the plane, because creases in the stickers will
adversely affect the flight.
MAIN WING CLIP
TOP SLOT
Flying your AIR HOGS
ALWAYS FLY YOUR PLANE IN A WIDE OPEN GRASSY AREA; THIS WILL ENSURE A LONGER LIFE FOR YOUR PLANE.
ALWAYS USE CAUTION WHEN FLYING YOUR PLANE! ALWAYS POINT YOUR PLANE AWAY FROM YOUR FACE AND
OTHER PEOPLE WHEN LAUNCHING!
DO NOT FLY THE PLANE IN VERY WINDY CONDITIONS. DO NOT FLY THE PLANE IN TEMPERATURES BELOW
7°C/45°F. THE WINGS WILL BECOME BRITTLE AND MAY BREAK, AND ENGINE PERFORMANCE WILL DECREASE.
1
ATTACHING PLANE TO PUMP
MAIN WING
ELASTIC
TM
Plane
MAIN WING
HOOK
TOP SLOT
REAR WING CLIP
REAR WING ELASTIC
REAR WING SLOT
Attach the plane to the PUMP as shown. Gently push the
AIR HOLE (under the engine) onto the NOZZLE of the
PUMPstation. Make sure you push the AIR HOLE all the
way down onto the NOZZLE. The NOZZLE CLIP should
be secure to the nozzle. If the plane is not pushed
securely onto the NOZZLE, the tank will not fill with air,
and the plane will not fly.
2
POSITIONING FOR PUMPING
Put the pump on the ground and place one foot on each
side of the base.
3
PUMPING UP THE PLANE
Pump up the plane until you feel a lot of pressure and it
becomes very difficult to pump. It will take 40 to 60 pumps
to pressurize your plane (Tip: For maximum performance,
try 60 to 80 pumps.). When pumping, make sure you push
the pump handle all the way down.
AIR HOLE
NOZZLE CLIP
NOZZLE
CONTINUED...
Page 3

Flying your AIR HOGS
Left Flap Up
Right Flap Up
Left Flap Down
Right Flap Down
Left Flap Up
Right Flap Down
Left Flap Down
Right Flap Up
Vertical Rear
Wing Flap
Vertical Rear
Wing Flap
TM
Plane continued…
REMOVING THE PLANE FROM THE PUMP
4
Holding the plane by the ENGINE HOUSING, gently
remove the plane from the pump, ensuring that the
NOZZLE CLIP is detached from the NOZZLE.
STARTING THE RAID ENGINE™
5
Make sure the MAIN WING and the TAIL WINGS are
straight before every flight to ensure maximum performance!
Hold the plane by the fuselage in your throwing hand.To
start the engine, flick the propeller firmly in the direction
shown by the arrow on the nose cone. If the propeller is
turning the wrong direction, the plane will not fly.
NOTE: IF YOU DO NOT FLICK THE PROPELLER
HARD ENOUGH, IT MAY “KICK” BACK IN THE OTHER
DIRECTION AND THE PLANE WILL NOT FLY.
PREPARING FOR TAKE OFF
6
Before flying your plane, check the wind direction.
You should always toss your plane against the wind for best
take off and flight results. If you can feel the wind against
your face, you are facing the correct direction. If the wind is
at your back, turn around until you feel the wind on your
face.You are now ready to fly your plane.
THROWING THE PLANE
7
Gently toss the plane upward into the air against the
wind at the angle shown in the picture to the right.
If you throw your plane in the same direction as the
wind, the plane will not perform well.
STOPPING THE PLANE’S PROPELLER
To stop the propeller from spinning, simply touch the
nose cone to the grass and the propeller will stop
immediately.
WARNING: Do not leave your Red HornetTMin direct sunlight and/or extreme heat for excessive amounts of time.
TM
AIR HOGS
MAKING PLANE CLIMB
1
Gently bend BOTH FLAPS UP and the plane will climb.
Flying Techniques
MAKING PLANE BANK
3
Gently bend the LEFT FLAP UP and the plane will bank
left. Gently bend the RIGHT FLAP UP and the plane
will bank right.
RIGHT
BANK
LEFT
BANK
MAKING PLANE DIVE
2
Gently bend BOTH FLAPS DOWN and the plane will dive.
CONTROLLING DIRECTION
4
To make your plane turn left (without
banking) bend the VERTICAL REAR
WING FLAP left.
To make your plane turn right (without
banking) bend the VERTICAL REAR
WING FLAP right.
Page 4

REPAIR CENTRE
If the wings on your AIR HOGS®plane get damaged, they can be easily
repaired with clear tape.
CLEAR TAPE
TROUBLESHOOTING GUIDE
PROBLEM
Engine will not start.
Engine starts, but plane will not fly.
Plane takes off, turns sharply
and crashes.
Plane will not fit on pump.
Rear wing assembly falls off.
1. No air in tank.
2. Air hole on engine, or nozzle on
pump is clogged with dirt.
1. Fuselage is not full.
2. Propeller is spinning the wrong way.
1. Wings are not straight.
2. Rear wing flap(s) are bent.
3. Wings are damaged.
1. Air hole on engine, or nozzle on
pump is clogged with dirt.
1. Rear wing clip is not all the way into
the rear wing slot.
2. Rear wing elastic is not around the
rear fuselage.
IMPORTANT SAFETY INFORMATION
CAUSE
SOLUTION
1. Pump up plane.
2. Clean out with a toothpick
and re-pump.
1. Pump up plane until air tank is full.
2. Flick propeller firmly in the direction
shown by the arrow on the
nose cone.
1. Make sure all wings are aligned
properly
2. Straighten out horizontal
stabilizer(s).
3. Repair with clear tape.
1. Clean out with a toothpick.
1. Slide the rear wing clip forward all
the way into the rear wing slot.
2. Slide the rear wing elastic over the
end of the rear fuselage.
Keep propeller clear from face, eyes and fingers. Do
not launch at people or animals.
Pay Attention: Make sure people around you know you
are playing with AIR HOGS™. Point plane away from
face when launching.
Use only the pump included in this package. Other
pumps may damage the plane or lead to injury. Never
pump anything except air into the engine.
Do not leave air in the plane. After your last flight, spin
the propeller to make sure all the air has been used
up. Only use your AIR HOGS™ plane in grassy, open
ADULT SUPERVISION RECOMMENDED.
Manufactured for Spin Master Ltd.
Spin Master Ltd., 450 Front Street West, Toronto, ON M5V 1B6 Canada
Spin Master, Inc., PMB #10053, 300 International Drive, Suite 100,
Williamsville, NY 14221, USA
Spin Master Toys Far East Limited, Rm # 1113, 11/F, Chinachem Golden Plaza,
77 Mody Rd., Tsimshatsui E., Kowloon, HK
Spin Master France SAS, 36 rue de Silly, 92100 Boulogne, France
North American Consumer Information
Phone: 1-800-622-8339
www.spinmaster.com
In France call: 0800 803 355
Fax: 03 88 47 95 04
Email: jouets@spinmaster.com
areas. To stop the propeller, gently touch the nose
cone to the grass.
Do not fly in very windy conditions.
Do not fly plane in temperatures below 7°C/45°F or the
wings will become brittle and may break, and engine
performance will decrease.
Do not fly near overhead wires, buildings, trees, or
other obstructions.
Do not leave your Red Hornet™ in direct sunlight
and/or extreme heat for excessive amounts of time.
Air Hogs TM and Red Hornet TM are trademarks of Spin Master Ltd.
© 2003 Spin Master Ltd. All rights reserved.
Conforms to product safety standards ASTM F963-03, CPSC,
EN71 Regulatory Requirements.
Please retain this information for future reference.
Please remove all packaging material before giving to children.
Products and colours may vary. MADE IN CHINA.
Asst. #45068, Item #45136. Mint’l English REV 0
TM
 Loading...