

Page 1
INSTRUCTIONS
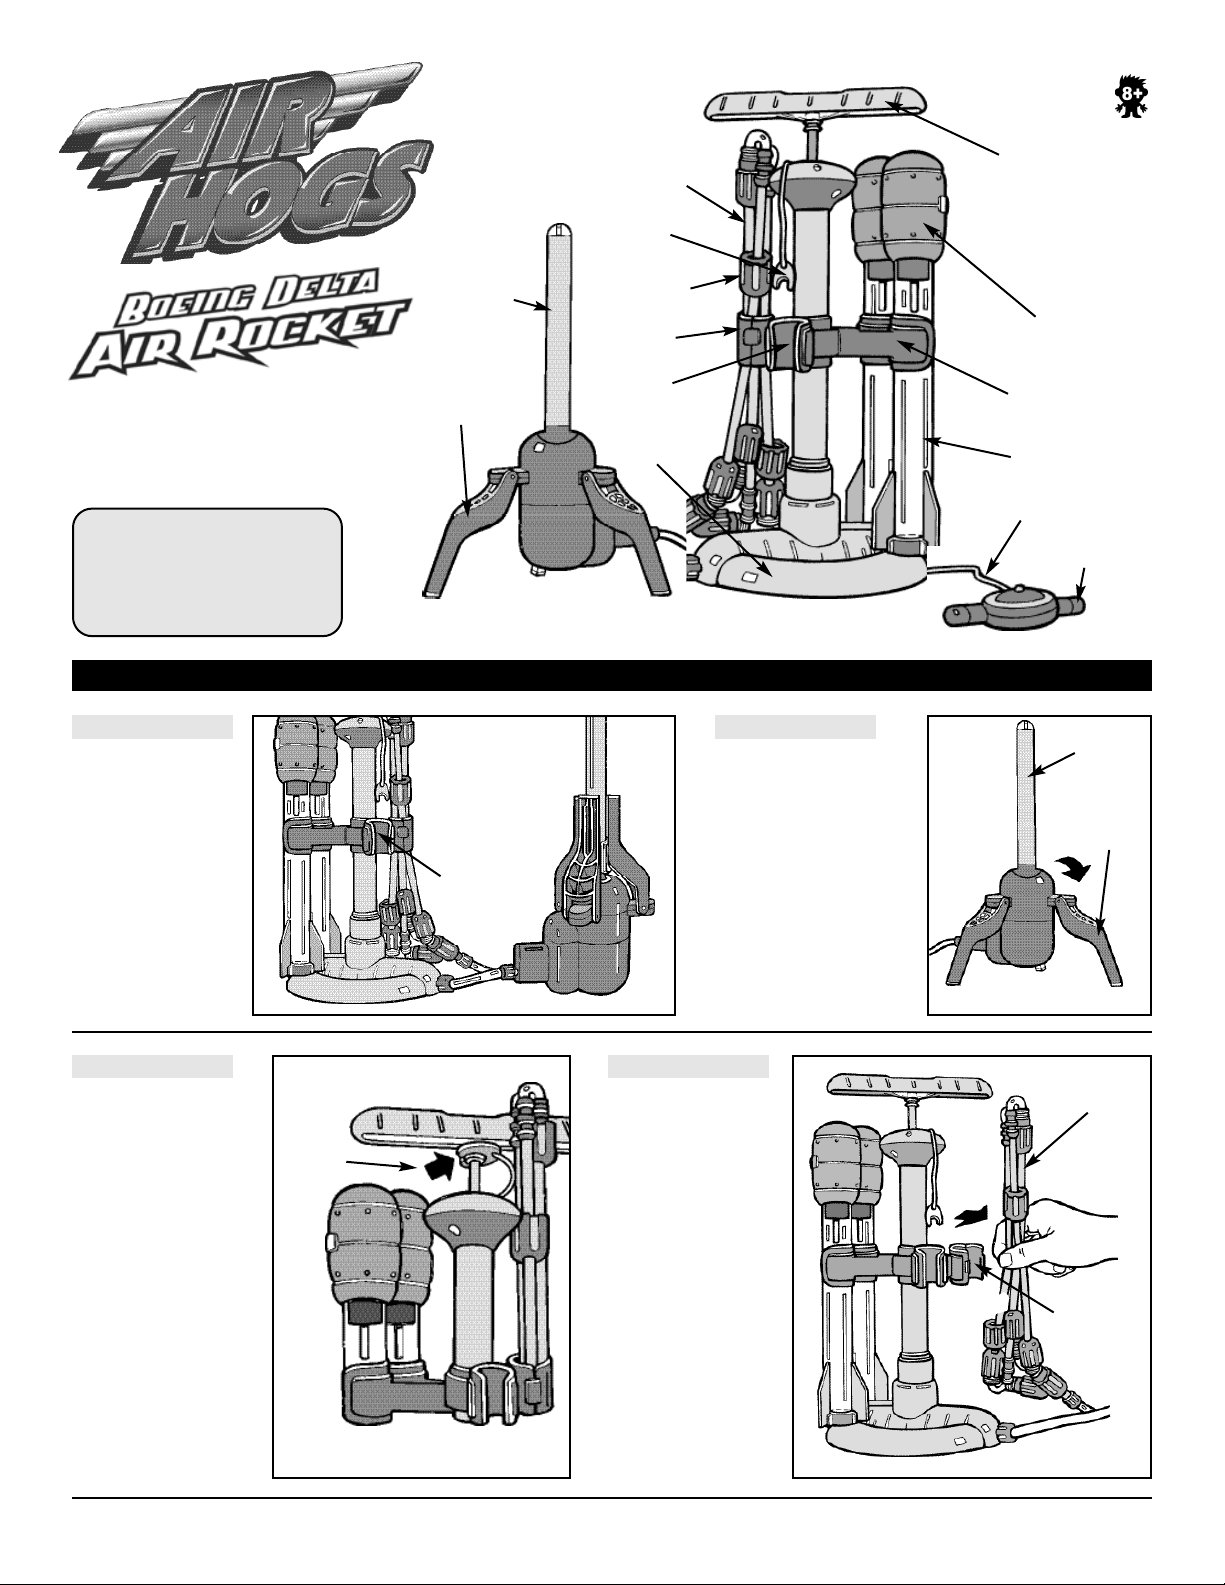
Contents
1 Launcher/Accumulator
1 Pumping Station
2 Rockets
TM
TM
Air Tubing
(Non-flexible)
Handle
Lock
Launcher
Shaft
Launcher
Leg
LAUNCHER/
ACCUMULATOR
Connectors
Air Tubing
Clamp
Launcher
Holder
Pumping
Station Base
PREPARING FOR LAUNCH
Pump
Handle
ROCKETS
Nose
Cone
Rocket Holder
Rocket Shaft
Launch
Release Cable
Launch
Release Handle
PUMPING STATION
STEP 1
Remove the
LAUNCHER/
ACCUMULATOR
from the
LAUNCHER
HOLDER.
STEP 3
Remove HANDLE
LOCK from its
mounting area under
the PUMP HANDLE.
Handle
Lock
LAUNCHER/
ACCUMULATOR
Launcher
Holder
STEP 2
Fold the LAUNCHER
LEGS down so that it
can stand on the ground.
IMPORTANT:
The LAUNCHER LEGS
must be level and placed
on a flat surface or the
ROCKET will not launch.
STEP 4
Unlock AIR TUBING
CLAMP so that the
AIR TUBING
(Non-flexible) can
be removed.
Launcher
Shaft
Launcher
Legs
LAUNCHER
Air Tubing
(Non-flexible)
Air Tubing
Clamp
Page 2
LAUNCHER/
ACCUMULATOR
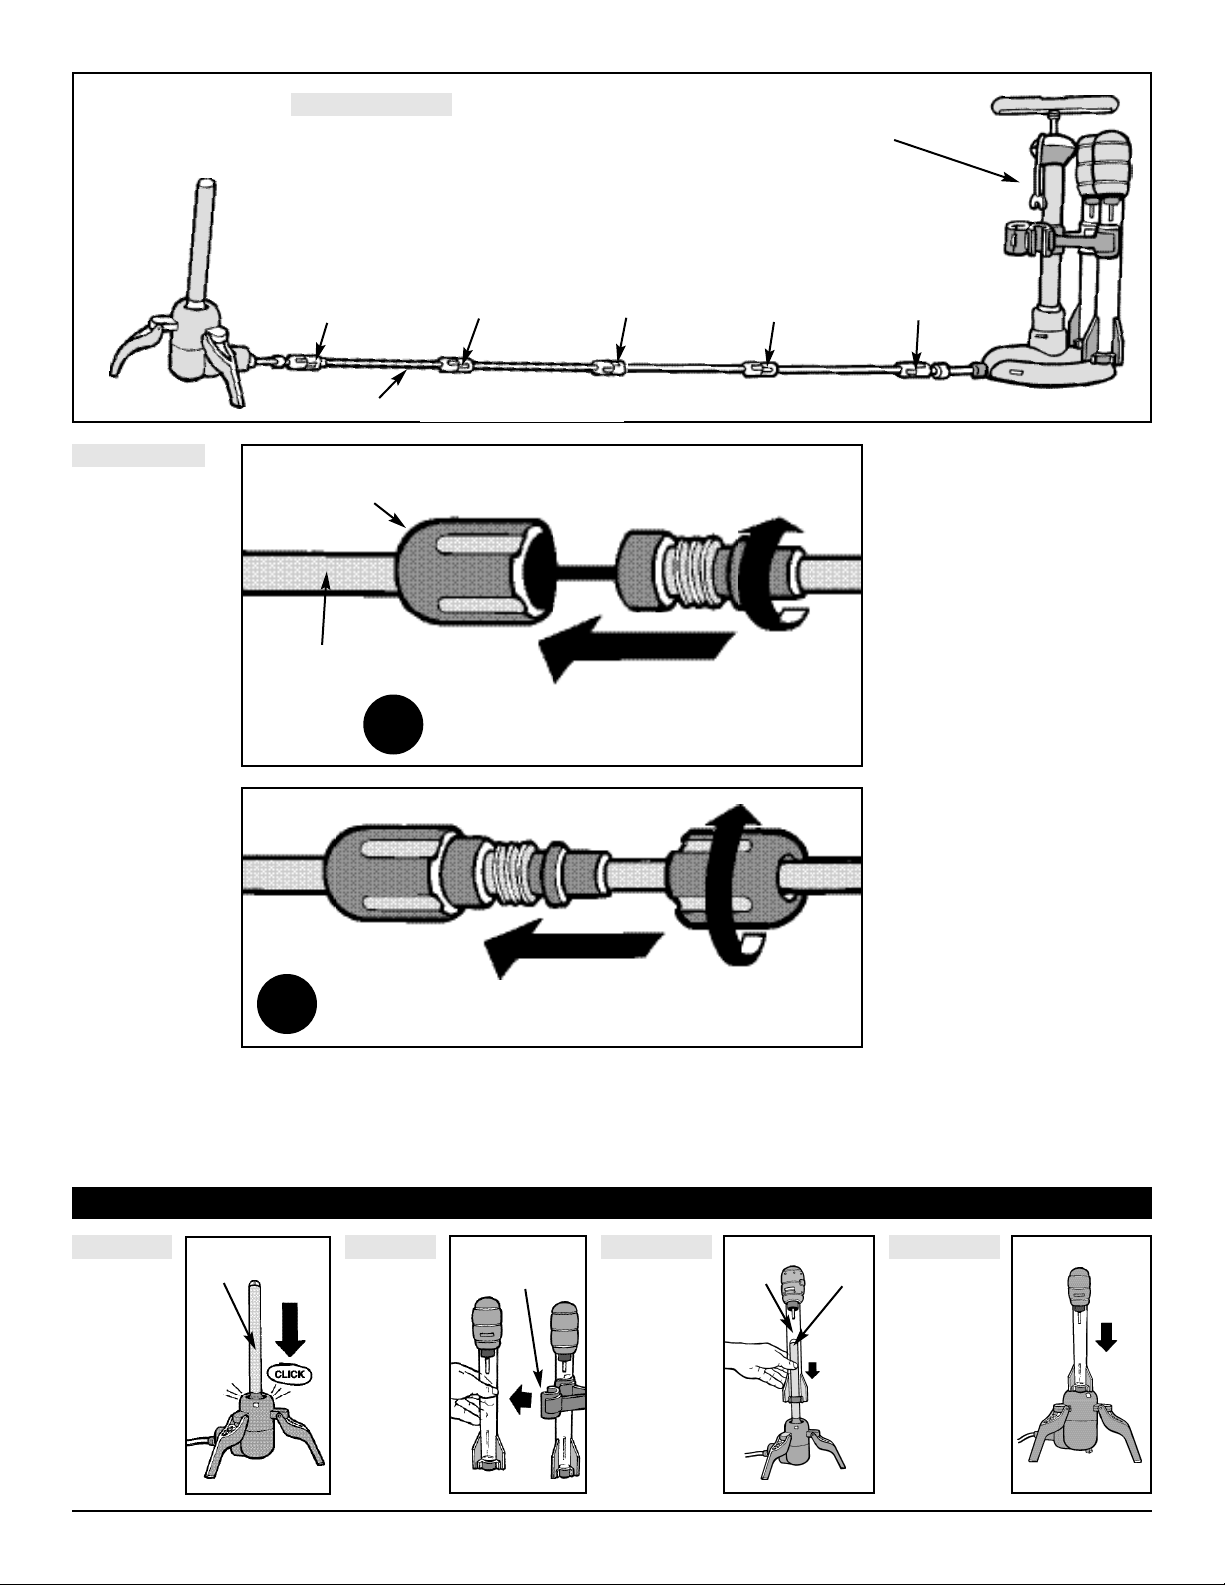
STEP 5
Straighten the
AIR TUBING.
PUMPING STATION
IMPORTANT:
The non-flexible AIR TUBING must be completely
straight or the ROCKET will not launch.
STEP 6
Screw together
each of the
CONNECTORS
(A,B,C,D and E).
Connector A
Air Tubing
Connector
Air Tubing
1
Connector B
Connector C
ROTATE & PUSH!
Connector D
Connector E
2
SLIDE & SCREW TOGETHER!
IMPORTANT:
• Before screwing together each CONNECTOR, be sure that the LAUNCH RELEASE CABLE
is tightened. Loose wire can be tightened by pulling the LAUNCH RELEASE HANDLE.
• For easier assembly, the AIR TUBING should be rotated when it is being inserted into the CONNECTOR.
LAUNCHING INSTRUCTIONS
STEP 1
Push the
LAUNCHER
SHAFT down
until it
“CLICKS”.
Launcher
Shaft
Push
Down
STEP 2 STEP 3
Unclip
ROCKET
from its
ROCKET
HOLDER.
Rocket
Holder
Place the
ROCKET
on the
LAUNCHER
SHAFT.
Rocket
Shaft
Launcher
Shaft
STEP 4
Push the
ROCKET down
until the bottom
of the ROCKET
touches the
RED LINE.
IMPORTANT: If
ROCKET is not
pushed down all
the way, the
ROCKET WILL
NOT launch.
Push
Down
Page 3

LAUNCHING INSTRUCTIONS continued
STEP 4
With both feet on the
PUMPING STATION
BASE, use the PUMP
HANDLE to pump
15 times. Use only the
pump that comes with
your BOEING DELTA
AIR ROCKET.
NOTE: For safety,
this pump has a unique
built-in pressure
relief valve to release
air or whistle if the
LAUNCHER/
ACCUMULATOR is full.
TM
STEP 1
Store the
ROCKETS in
the ROCKET
HOLDERS.
STEP 5
Ensure that people
and animals are not
within a four foot
radius of the rocket.
STEP 6
While holding the PUMPING STATION steady, slowly
pull the LAUNCH RELEASE HANDLE from the
PUMPING STATION and watch your BOEING DELTA
AIR ROCKET reach heights of up to 120 feet.
Release Handle
STORING YOUR BOEING DELTA™ AIR ROCKET
Rocket
Holder
STEP 2
Unscrew all the CONNECTORS on the
AIR TUBING.
TM
Launch
STEP 3
Fold the AIR TUBING and store it
vertically in the AIR TUBING
CLAMP. Snap the clamp closed.
Air
Tubing
Clamp
STEP 4
Fold the LAUNCHER
LEGS back up on the
LAUNCHER/
ACCUMULATOR and
secure it to the PUMPING
STATION by clipping the
LAUNCHER SHAFT into
the LAUNCHER HOLDER.
Launcher
Holder
PUMPING STATION
Launcher
Shaft
LAUNCHER
STEP 5
Attach HANDLE
LOCK to its
mounting area
under the PUMP
HANDLE.
Handle
Lock
IMPORTANT SAFETY INFORMATION
Keep clear from face and eyes. Do not launch at people or animals. Use caution; make sure people
around you know you are playing with AIR HOGS
fly near overhead wires, trees, buildings, or other obstructions. Point toy away from face when launching.
Do NOT fly in rain, sleet, electrical storms, or other adverse weather conditions.
ADULT SUPERVISION RECOMMENDED.
TM
. Recommended for use in wide open areas. Do NOT
Page 4

TROUBLE SHOOTING GUIDE
PROBLEM
ROCKET does not
launch.
1. No air in LAUNCHER/
ACCUMULATOR.
2. LAUNCHER/ACCUMULATOR is
not positioned on a level surface.
3. AIR TUBING and/or CONNECTORS
are not completely straight.
4. CONNECTORS on AIR TUBING
not properly assembled/tightened.
5. LAUNCHER SHAFT not locked in
place for launch.
6. LAUNCHER SHAFT is JAMMED.
SOLUTIONCAUSE
1. Use the PUMP HANDLE and pump 15 times before
pulling the LAUNCH RELEASE HANDLE.
2. Re-adjust the LAUNCHER LEGS and make sure
that the LAUNCHER is sitting on a level surface. If
the LAUNCHER is tilted more than 15° to any side,
the rocket WILL NOT LAUNCH.
3. Ensure that all CONNECTORS are securely
fastened, and that the AIR TUBING is in a straight
line with the PUMPING STATION before launching.
4. Unscrew each CONNECTOR and repeat Step 6
in the “Preparing to Launch” section. Remember
to tighten any loose cable before screwing the
CONNECTORS together.
5. Push the LAUNCHER SHAFT down until
it
CLICKS.
6. The LAUNCHER SHAFT may have become
jammed if it was pushed TOO HARD when you
tried to
CLICK it into position for launch. To un-jam
it, 1. ASK AN ADULT FOR HELP. 2. Raise up the
3 LAUNCHER LEGS, 3. remove ROCKET from
launcher shaft, 4. have the child pull on the
LAUNCH RELEASE TRIGGER at the same time
as the ADULT pulls up on the LAUNCHER SHAFT
to un-jam it.
WARRANTY (U.S.A.)
Spin Master Ltd. warrants to the original consumer purchaser, that this product is thoroughly tested and
inspected before shipment and is guaranteed to be free of factory defects in materials and workmanship for thirty
(30) days (unless specified in alternate warranties) from the date of purchase.
In the event of such a defect within the warranty period, Spin Master Ltd., at our sole option, will repair or
replace the product or provide you with another product of equal value. Repair or replacement shipment is free of
charge. Shipping replacement may take 2 to 6 weeks, depending on customer’s location.
In the event of a defect covered under this warranty, please call the toll-free number listed below. Many
problems can be solved in this manner. If necessary, you will be instructed to return the defective part or unit,
packed securely, postage prepaid and insured by the customer, to the address below. Enclose your name, address,
dated sales receipt, and a brief explanation of the defect. There may be an additional handling charge if you send
the entire toy.
The warranty is valid if and only if the product has been operated in accordance with the instructions.This
warranty does not cover worn or defective batteries, damage resulting from neglect, unauthorized modification, accident, misuse, abuse, any action or omission which constitutes a deviation from the instructions or from the use of
accessories or parts not manufactured by Spin Master Ltd. If the product is returned without a dated sales receipt
the product is excluded from coverage under this warranty.
Spin Master Ltd.’s liability for defects in material and workmanship under this warranty shall be limited to repair
or replacement, at our sole option, and in no event shall we be responsible for accidental, consequential. or
contingent damages (except in those states that do not allow this exclusion or limitation) or refunds. This warranty is
exclusive, and is made in lieu of any express or implied warranty. This warranty is valid only for products sold in the
U.S.A.This warranty gives you specific legal rights and you may have other rights, which vary from state to state.
Some states do not allow the exclusion of incidental or consequential damages, so the above exclusions or limitations may not apply to you.
Spin Master Ltd. reserves the right to improve the design of any product without assuming any obligation to
modify any product previously manufactured.
If you need assistance, please contact our Customer Care Center (below) for help.
SPIN MASTER LTD.
CUSTOMER CARE CENTRE
450 Front Street West
Toronto, Ontario M5V 1B6 CANADA
TOLL-FREE NUMBER 1-800-622-8339
(valid only in North America)
Hours: 8:00 A.M. – 5:00 P.M.
Eastern Time: Monday – Friday.
Air Hogs TM is a trademark of Spin Master Ltd.
© 2003 Spin Master Ltd. All rights reserved.
Produced under license from Boeing Management Company.
Delta and Boeing are among the trademarks owned by Boeing.
Manufactured for and distributed by Spin Master Ltd.
MADE IN CHINA
Item #45044 REV 4 U.S. English
TM
 Loading...