

Page 1
Horizontal
Elevator
Lower Wing
Vertical Tail Wing
Antenna
Propellers
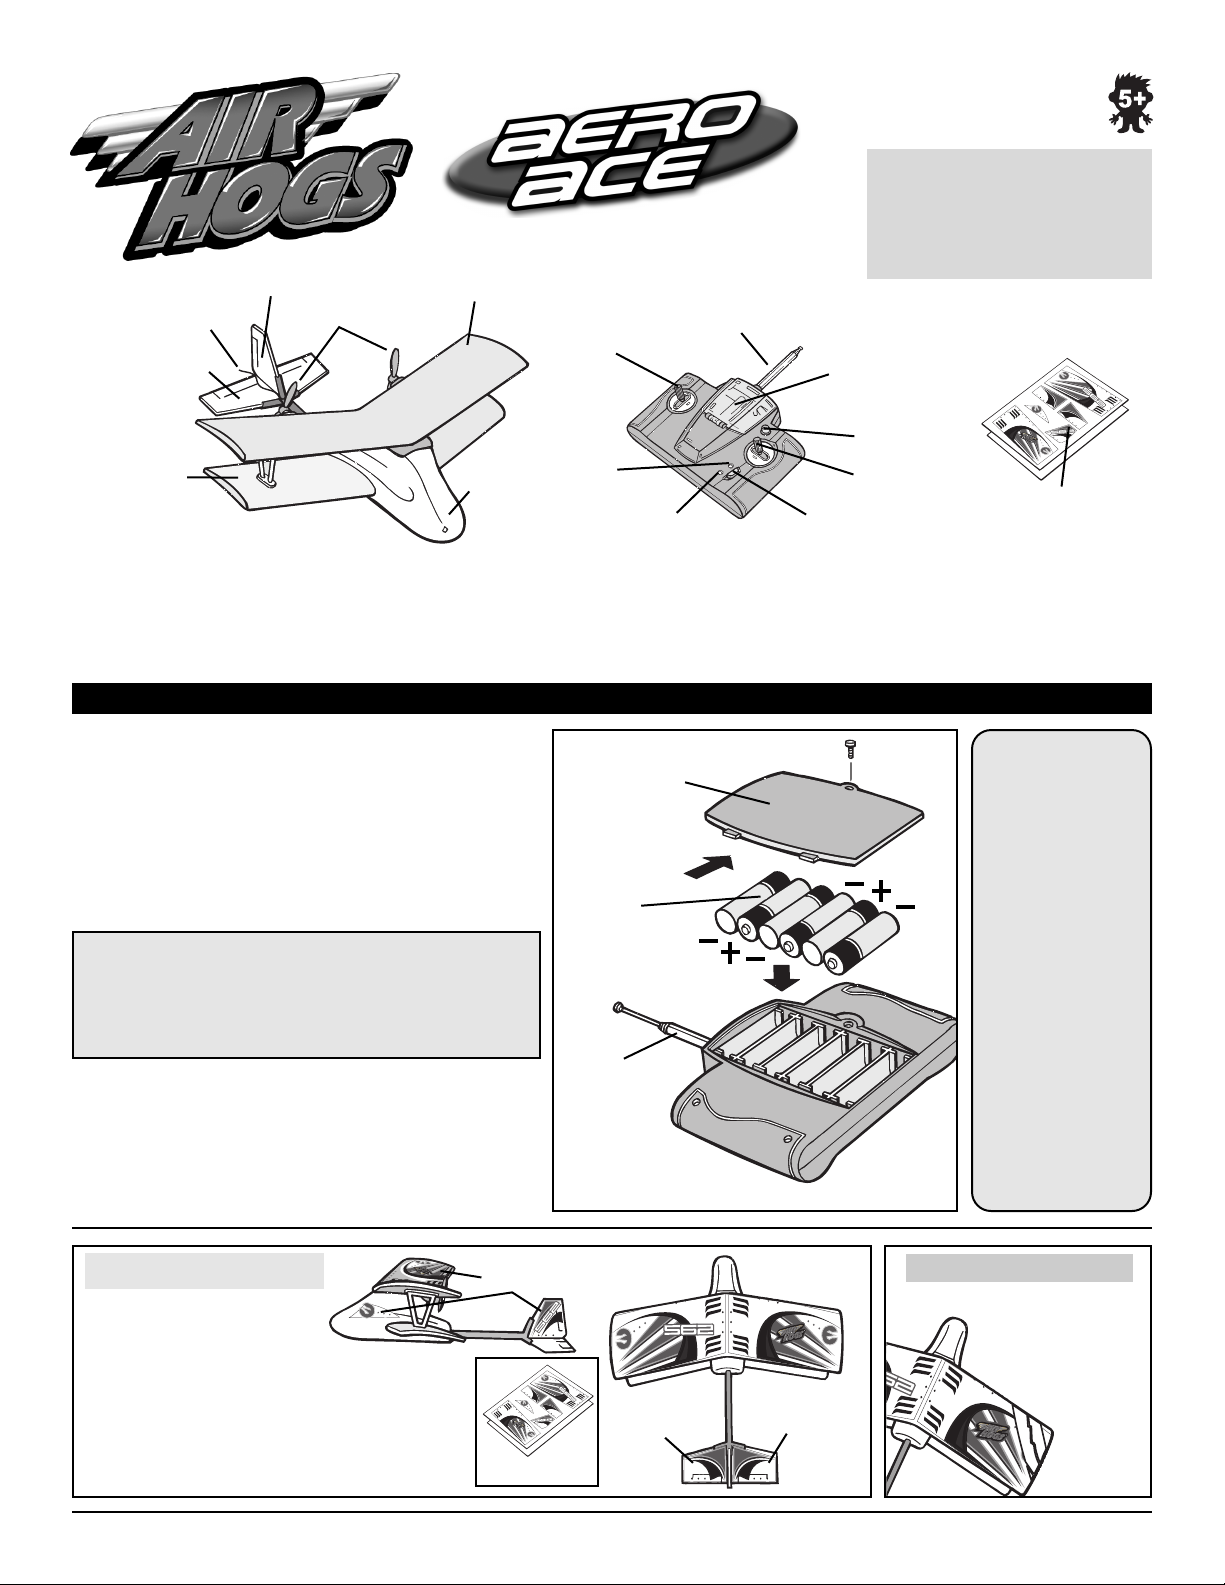
Aero Ace™ Plane
TM
Upper Wing
Fuselage
INSTRUCTIONS
Throttle
Power
LED
Charging
LED
Charger/Controller
TM
Antenna
Check to make sure contents
are complete:
• 1 Air HogsTMRC Aero Ace
• 1 Charger/Controller
• 1 Decal Sticker Sheet
• 3 Aluminum Stickers
Charge Door
(to access
Charge Nozzle)
Steering
Trim Knob
Left/Right
Toggle
ON/OFF Switch
TM
Decal Sticker
Sheet
Experience radio-controlled flight with the Air HogsTMRC Aero
AceTM! The Aero AceTMmakes flying fun & easy! Just choose
the direction you want to fly and press the controller toggle. The
ultra-light Aero AceTMis powered by a lithium battery for long
CHARGER/CONTROLLER BATTERY INSTALLATION
1. Use a Phillips screwdriver to loosen
the battery door.
2. Slide the battery door to the back and remove.
3. Install 6 AA 1.5-V alkaline batteries
(not included).
Be careful to align the positive (+) and negative
(-) polarities with the corresponding markings
inside the battery compartment.
4. Reinstall the battery door and tighten the screw.
IMPORTANT TIP: TURN YOUR CONTROLLER
ON TO ENSURE THAT THE BATTERIES ARE
INSTALLED PROPERLY.THE RED LIGHT ON
THE FRONT OF THE CONTROLLER SHOULD
TURN RED.
After each flight, store the plane in the package
to prevent damage.
Charger/Controller
flights, features precision speed control and damage-resistant
high density foam. The Aero AceTMalso includes an integrated
Charger/Controller unit for convenient portability and easy
handling on the field. Perfect for both indoor and outdoor flights.
Battery
1
Door
Aero Ace™
Plane has
preinstalled
2
3
Six AA
1.5-V
Alkaline
Batteries
rechargeable
batteries
in the plane’s
fuselage
Because the
Controller’s
AA batteries
are used
for 2 functions –
charging and
Antenna
controlling, it is
recommended
replaced after
every 20 – 25
Your
.
they be
flights.
APPLYING DECALS
Peel each Mylar label
from the adhesive
backing and apply the
sticker as shown.
IMPORTANT: PLACE THE LABELS ON
A FLAT SURFACE TO AVOID CREASES
AND BUMPS THAT WILL ADVERSELY
AFFECT THE PLANE’S FLIGHT.
Apply
Decals
Decal Sheet
Apply
Decal
Apply
Decal
REPAIRS
If the wings on
your plane get
damaged they
can be easily
repaired with
clear
tape as
shown.
Page 2
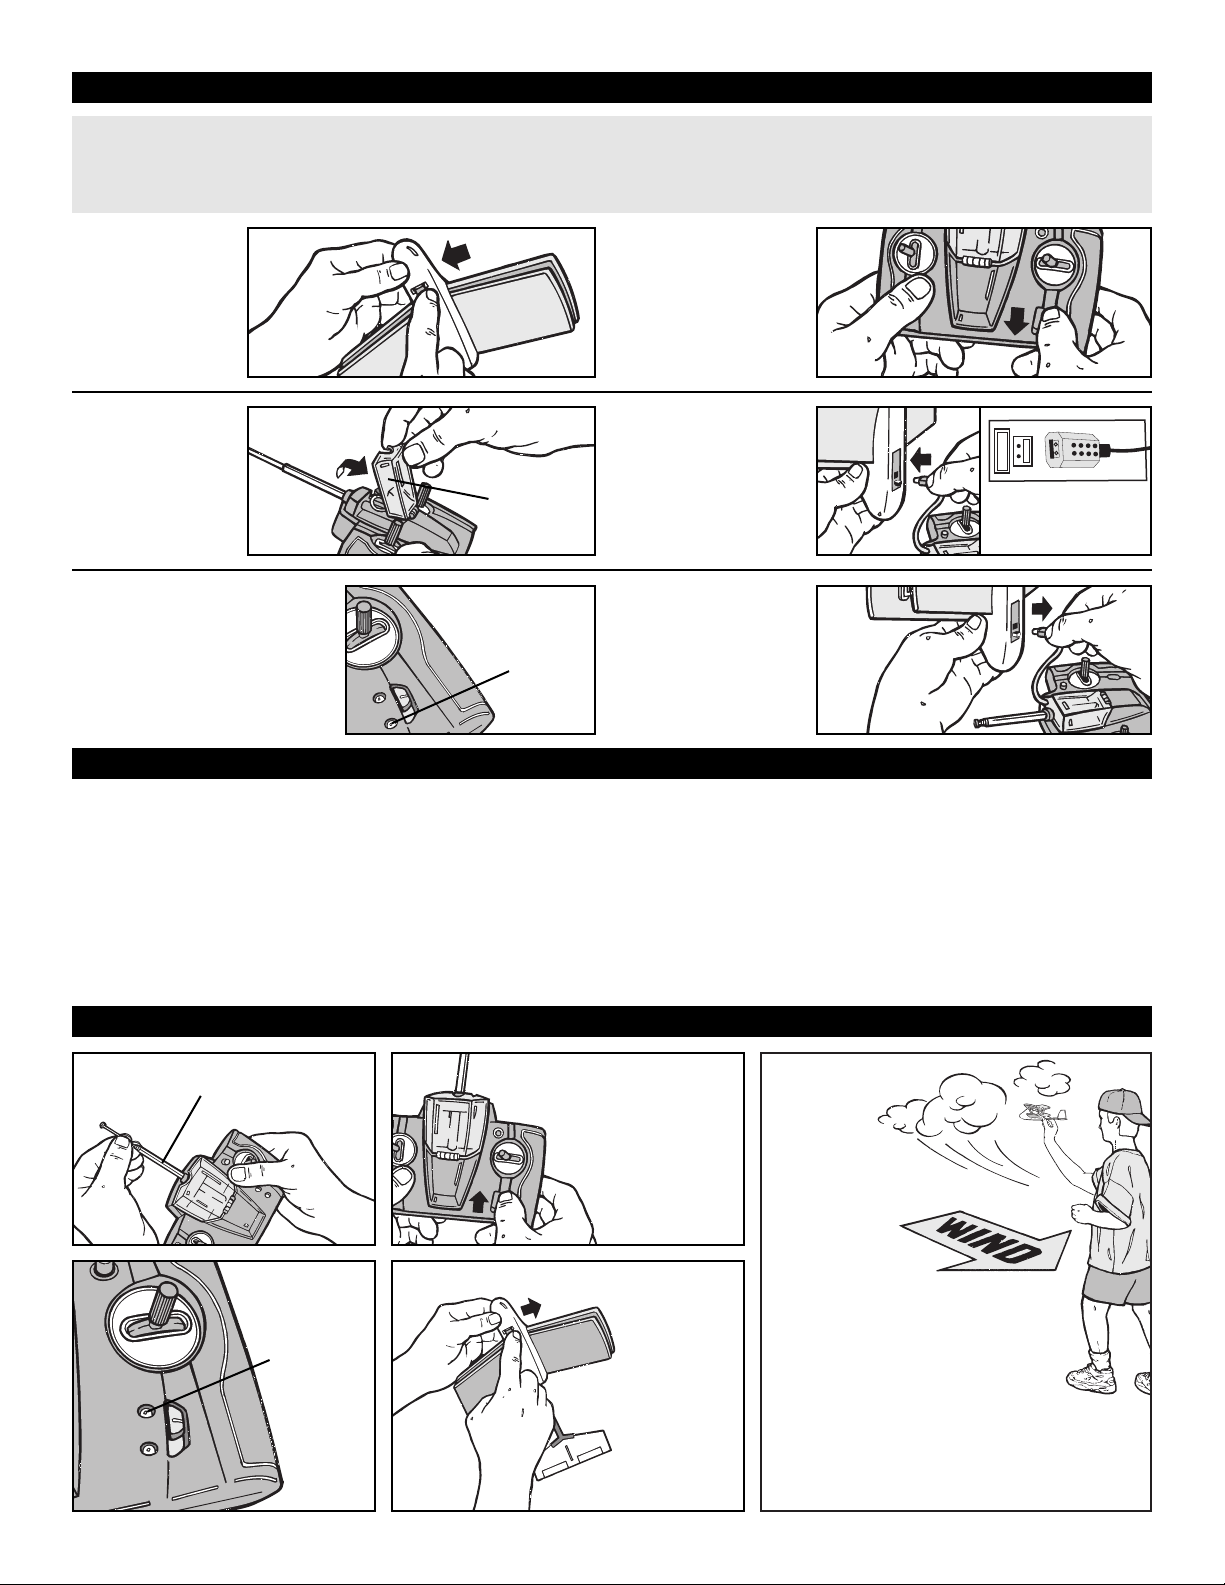
CHARGING YOUR AIRPLANE
Important Charging Information:
• Before taking your initial flight, charge the plane for a complete charge cycle on your charger.
• Depending upon the length of future play, you will not need to complete a full charge before each flight.
NOTE: A shortened charge results in a shorter playtime (may take up to 1/2 hour to fully charge).
1. Push the
plane’s
ON/OFF
Switch to the
left to set the
plane to OFF.
3. Flip the Charge
Door open to
reveal the
Charge Nozzle.
5. During the charging
process, the green charge
light will turn ON. When
the Aero Ace™ is
completely charged, the
green charging light will
turn OFF.
1. Location – Fly in a large wide open, grassy location that is free of
buildings, trees, overhead wires, and other obstructions. Do not fly
near people or animals.
2. Weather – Fly on mild, sunny days. Do not fly in electrical storms, rain,
sleet, snow or other adverse weather conditions. Do not fly if the
temperature is below 7°C/45°F. In very cold temperatures, the plane will
become fragile and the engine performance will decrease.
3. Wind Conditions – Do not fly in wind. Winds may overpower the plane
and make it difficult to control. In windy conditions, it may appear as
though you have no control over the plane.
1
3
Charge
Door
Green
Charge
Light
PRE-FLIGHT ENVIRONMENT CHECK
2. Set the Charger/
Controller switch
to OFF.
4. Push the Charge
Nozzle all the
way into the
plane’s Charger
Port located at
the bottom of the
airplane.
6. Remove Charge
5
Nozzle gently
from the plane’s
charge port and
close the charge
door.
2
4
Holes in plug
must align with
pins in plane.
6
FLYING INDOORS?
Note: Always get a parent’s permission
to fly your Aero Ace™ indoors.
Location – Fly in a wide open room, far
from breakable items – an empty double
car garage or unfinished basement are
great options. Avoid flying near vents
and/or fans, as they may overpower the
plane and make it difficult to control.
FLYING INSTRUCTIONS
1
Fully extend Controller
antenna.
3
Power
light will
turn red.
2
4
Push the
Charger/Controller
Switch up to
to start the plane’s
engine.
ON
Push the
plane’s
ON/OFF
to the right
to set the
plane to
ON.
5
Launch the
plane against
the wind.
Ensure that
the plane is
parallel to the
ground level.
When preparing for take off,
check the direction of the
wind.
Always toss your plane against
the wind for the best take off
and flight results.
TIP: The wind will blow against
your face, if you are facing the
correct direction.
Page 3

CONTROLLING AIRPLANE FLIGHT
Throttle
Charger/Controller
Vertical lift does not require pushing
the throttle all the way UP.
A lift of 30% or more will keep your
airplane in flight.
Direction
Toggle
LEFT TURN
Move the direction toggle LEFT.
To ACCELERATE upwards
push the throttle further UP.
Direction
Toggle
RIGHT TURN
Move the direction toggle RIGHT.
ONCE THE PLANE HAS LANDED
1
If you want to
straighten out your
flight path, adjust
by turning the
Steering Trim
Knob to the left
or right during
flight.
3
If you are having
trouble turning right
or the plane seems
to constantly turn
left, adjust the
vertical tail wing
to the right.
Vertical Tail Wing
TO LAND
Select a soft area,
and pull the
THROTTLE down.
FLIGHT ADJUSTMENTS
Steering Trim Knob
Turn plane OFF by
pushing switch to
the left.
2
If you are having
trouble turning left
or the plane seems
to constantly turn
right, adjust the
vertical tail wing
to the left.
4
The horizontal
elevator tabs can
be adjusted up
or down to help
maintain
horizontal flight.
Horizontal Elevator
Vertical Tail Wing
Turn the charger/
controller
pulling the switch
down.
OFF by
Page 4

TROUBLESHOOTING GUIDE
CAUTION:
PLEASE READ BEFORE CHARGING OR USING BAT TERY.
PROBLEM
Plane will not start or
has low power.
Plane will not turn.
Plane is flying too low.
Plane is flying too high.
Level flight is hard to maintain.
Motors don’t stop when
Controller is turned OFF.
CAUSE
1. Plane not charged.
2. Battery power is drained.
3. Plane was not set to OFF during
charging.
4. Charger/Controller was not set to
“Charger OFF”.
1. Control is not ON.
2. Controller antenna is not extended.
3. It’s a windy day or you’re flying by a
vent/fan.
4. Trim knob needs adjusting.
5. Rudder needs adjusting.
1. Needs more power.
2. The six AA batteries in the Charger/
Controller are drained.
3. Horizontal Stabilizer needs adjusting.
1. Need to decrease power.
1. Horizontal Elevator needs adjustment.
1. Set to full throttle.
SOLUTION
1. Charge plane for a complete charge cycle.
2. Replace the Charger/Controller batteries after 20 flights.
3. The plane won’t accept a charge in the ON position. Always set to
“OFF” before charging.
4. The Charger/Controller will NOT charge in the “Control ON” position.
Always set the Charger/Controller to “OFF” before attempting to charge.
1. Set Controller to “Controller ON”
2. Fully extend Controller antenna before flying.
3. Do not fly in winds.Windy conditions will limit and prevent your ability
to control the plane. If flying indoors, do not fly near a vent/ fan.
4. See Flight Adjustments #2 and #3.
1. Press the Toggle UP.
2. Install new batteries.
3. See Flight Adjustments #4.
1. Press the Toggle DOWN.
1. See Flight Adjustments #4.
1. Turn Controller ON, reduce throttle to 0 and turn Controller OFF.
IMPORTANT BATTERY INFORMATION
REQUIRED BATTERIES: Charger/Controller takes 6 AA Alkaline Batteries (not included).
Battery installation should be performed by an adult. Use only batteries
recommended in the instruction sheet. Be careful to install the batteries
with the correct polarity, as indicated.
• Do not mix old and new batteries.
• Do not mix alkaline, standard or rechargeable batteries.
• Battery installation should be done by an adult.
• Non-rechargeable batteries are not to be recharged.
• Rechargeable batteries are to be removed from the toy before being
charged (if removable).
• Rechargeable batteries are only to be charged under adult supervision
Your plane is equipped with a Lithium Polymer battery; please also
pay attention to the following cautions for safe use:
• Do not dispose the battery in fire or heat.
• Do not use or leave the battery near a heat source such as fire or heater.
• Do not strike or throw the battery against hard surfaces.
• Do not immerse the battery in water. Keep the battery in a cool dry
environment.
(if removable).
• Only batteries of the same or equivalent type as recommended are
to be used.
• Batteries are to be inserted with the correct polarity.
• Exhausted batteries are to be removed from the toy.
• The supply terminals are not to be short-circuited.
• Different types of batteries, or new and used batteries are not to
be mixed.
• Exhausted batteries are to be removed, as they will adversely affect the
performance.
• When charging, only use the battery charger specifically for that purpose.
• Do not over-charge the battery.
• Do not connect the battery to an electrical outlet.
• Do not directly solder the battery or pierce the battery with a nail or other
sharp objects.
• Do not transport or store the battery together with metal objects such as
necklaces, hairpins, etc.
• Do not disassemble or alter the battery.
• Charge the battery every 6 months.
• Turn off your equipment power switch after use.
• As for a used battery, please recycle the battery by covering the terminals
with insulation tape or inserting into an individual polybag.
This device compiles with part 15 of the FCC rules. Operation is subject to
the following two conditions:
1. This device may not cause harmful interference, and
2. This device must accept any interference received, including interference
that may cause undesired operation.
NOTE: This equipment has been tested and found to comply with the limits
for a Class B digital device, pursuant to Part 15 of the FCC Rules.
These limits are designed to provide reasonable protection against
harmful interference in a residential installation. This may cause harmful
interference to radio communications.
Spin Master Ltd., 450 Front Street West, Toronto, ON M5V 1B6 Canada
Spin Master, Inc., PMB #10053, 300 International Drive, Suite 100,
Williamsville, NY 14221, USA
Spin Master Toys Far East Limited, Rm #1113, 11/F,
Chinachem Golden Plaza, 77 Mody Rd., Tsimshatsui E., Kowloon, HK
Spin Master France SAS, 36 rue de Silly, 92100 Boulogne, France
North American Consumer Information
Phone: 1-800-622-8339
www.spinmaster.com
FCC STATEMENTS:
However, there is no guarantee that interference will not occur in a
particular installation. If this equipment does cause harmful interference to
radio or television reception, which can be determined by turning the
equipment off and on, the user is encouraged to try to correct the
interference by one of more of the following measures:
• Reorient or relocate the receiving antenna.
• Increase the separation between the equipment and the receiver.
• Connect the equipment into an outlet on a circuit different from that to
which the receiver is needed.
• Consult the dealer or an experienced radio/TV technician for help.
Air Hogs TM and Aero Ace TM
are trademarks of Spin Master Ltd.
© 2004 Spin Master Ltd. All rights reserved.
Manufactured for and distributed by Spin Master Ltd.
Conforms to safety standards ASTM F963-03,
EN71 Regulatory Requirements. Products and colors may vary.
Please retain this information for future reference.
MADE IN CHINA.
Asst. #44197 U.S. English REV 1
Contains Lithium Polymer
battery. Battery must be
recycled or disposed
of properly.
TM
 Loading...