

Page 1
150N Automatic Lifejacket with
integral Deck Harness
approved to CE European & ISO International Standards
Includes essential Sprayhood, Thigh straps,
Emergency line cutter, and Water-activated
high intensity flashing Light
Unrestricted working at speed
Soft contoured to fit the body, the clean, cutaway
shape is strikingly comfortable to wear in all
weathers.
ESSENTIAL INFORMATION: DO NOT REMOVE
UNTIL SOLD.
It is essential you read these instructions before
using your Deckvest.
ISO 12402-3 - 150N Lifejacket
ISO 12401 - Deck Harness
50kg+
Automatic inflation
Latest UML Pro Sensor
designed to inflate when submerged. Visual
indicator shows the ‘armed’ status of the cylinder
and the firing head.
Instantly fitted
The high tensile 2T front fastener provides instant
access. Twin adjuster buckles ensure a snug and
secure fit when tightened.
WARNING:
WHEN NOT CORRECTLY FITTED, THIS PRODUCT
MAY NOT PERFORM AS A LIFEJACKET OR HARNESS
RISKING SERIOUS DANGER TO THE USER.
For users aged above 16 years and weighing
not less than 50 kg.
Do not use for white water paddling or with
personal watercraft.
Do not use as a cushion.
Gas cylinders are dangerous goods. They
should be kept out of reach of children and
not be misused.
®
automatic firing head
DECKVEST AUTOMATIC GAS INFLATION
This device is designed to inflate automatically upon immersion. Pulling the manual inflation handle will
also activate the inflation mechanism or it can be inflated by blowing into the oral inflation tube. It can
be converted to non-automatic operation using a Spinlock Deckware Series Manual Conversion Kit.
www.spinlock.co.uk
Page 2
Product features
Inflated:
7
8
3
1
4
2
5
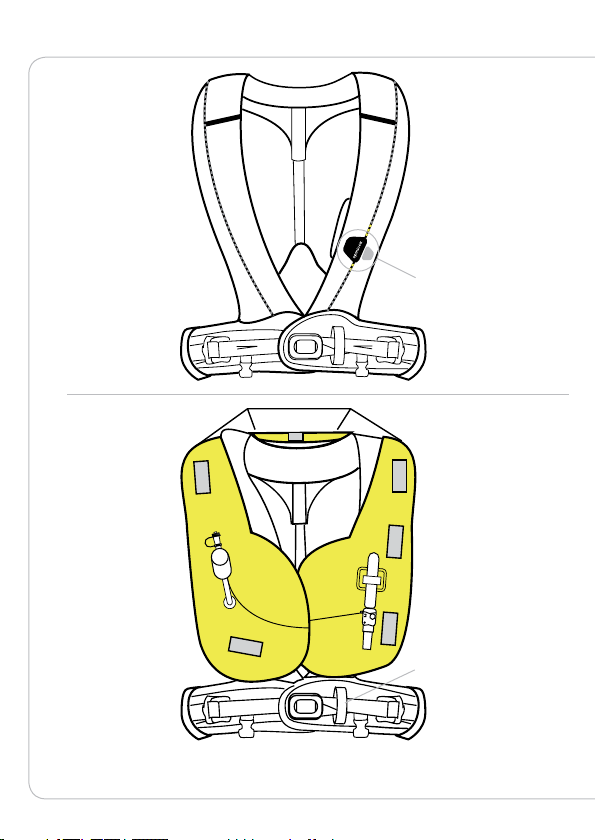
Ultra-compact personal deck safety wear.
1
6
Page 3

features
Automatic Lifejacket (150N) with integral
1.
Deck harness.
Automatic inflation - Latest UML Pro Sensor
2.
firing head designed to activate when submerged.
Spray hood, to prevent inhalation of sea water. Easily
3.
accessible and structured to stand free of the face.
Visual indicator shows the ‘armed’ status of the
4.
cylinder and the firing head.
High intensity flashing light - activates upon contact
5.
with water.
Contoured thigh straps - shaped for maximum comfort
6.
to hold the jacket in position.
Safety line attachment loop. High tensile fibre -
7.
lighter, quieter and stronger than steel.
QBZ split zip. Instant access to oral inflator tube.
8.
Ensures rapid inflation and easy repacking.
Emergency safety line cutter. Stowed in snag-free
9.
pouch for instant access.
‘Through Life Support Program’ for registered owners
10.
including extended 5 year guarantee.
Please register within 30 days of purchase at
www.spinlock.co.uk
®
automatic
2
Page 4
Fitting and adjusting
A B C D E
A B C D E
A B C D E
3
Page 5
Tightening / loosening
Threading buckles
A B C D E
Fitting thigh straps
2x
Back of harness
!
4
Page 6
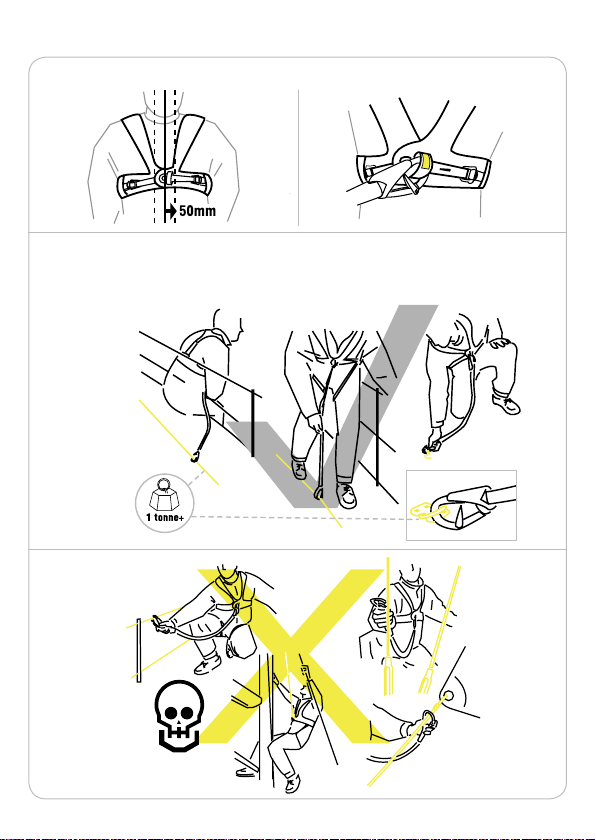
How to use
Safety line attachment point - Only use marked loop for attachment.
Guidance
Jackstays / Fixed eyes
Anchorage points must be able to withstand forces more than 1 tonne.
(Safety line for illustration only)
5
Page 7
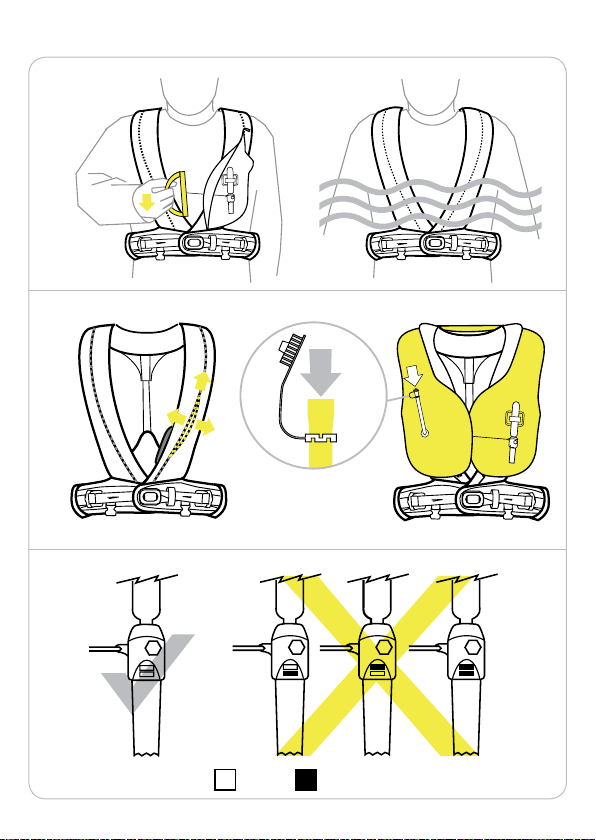
Lifejacket inflation: UML Pro Sensor
Manual / Auto
Oral inflation
Auto
®
A B
Firing head
A B
Green Red
6
Page 8
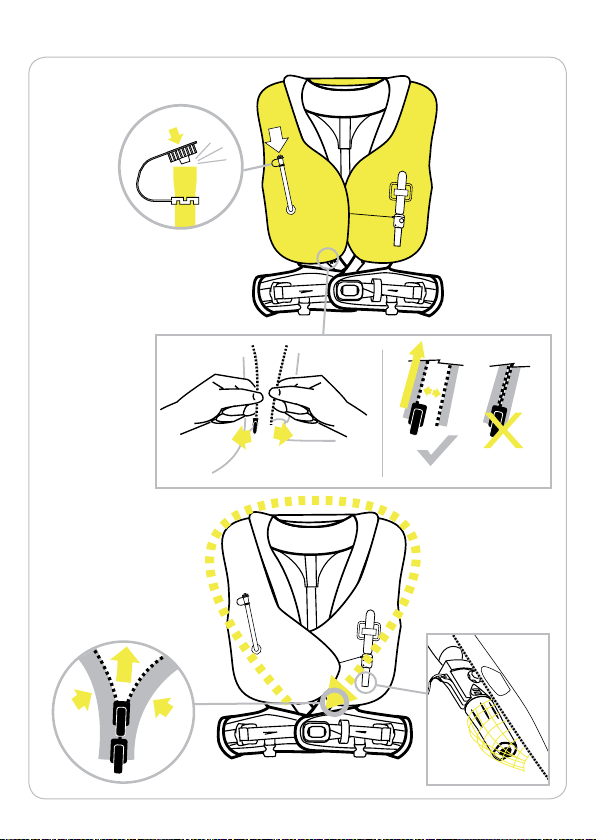
Lifejacket repacking See video at www.spinlock.co.uk
1.
A B C D
Remove all air.
A B C D
Open zips.
A B C D
Run right hand slider
round to left hand side.
A B C D
RE-attach zips on side
with Firing head.
7
Insert firing-head
into mesh pocket
on the cover.
Page 9
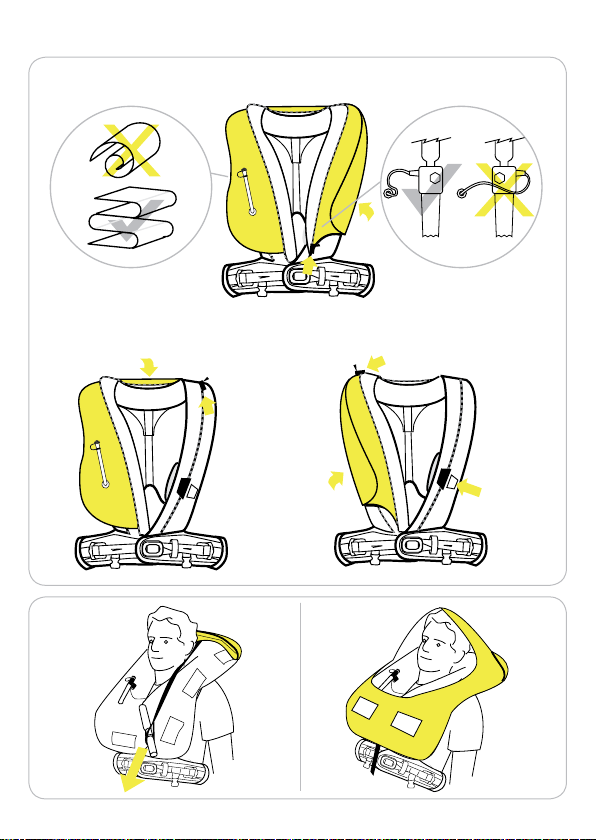
2. Concertina bladder onto itself ensuring a smooth flow for the manual lanyard.
3. Concertina top in.
Sprayhood
4. Run zip round to close and fasten flap across
breakout point and ensure firing head is
aligned in the window
8
Page 10

Contents
Page no:
Introduction 9
Approval conditions 9
Inflating and deflating your lifejacket 10
Maintaining your Deckvest 11
Testing your lifejacket 12
Re-arming and re-packing your lifejacket 13-14
Instructions for use 15-17
Inspection record sheet 18
Spinlock Deckvest
This Deckvest is an integrated lifejacket and harness approved to ISO 12402-3 (150N).
It is important to get into the habit of wearing Deckvest. It is comfortable, safe and
a pleasure to wear.
A lifejacket or harness only works if it is fitted and secured correctly.
Inflatable lifejackets only become buoyant when inflated: they contain no inherently
buoyant materials.
As user, it is your personal responsibility to understand the operation and maintenance
requirements of your inflatable lifejacket and be familiar with its limitations.
Approval conditions:
This Deckvest is an integrated CE approved lifejacket according to ISO 12402-3
(150N) and a CE approved Deck harness according to ISO 12401.
9
Page 11

Inflating your lifejacket
It is recommended that the following inflation procedures are followed:
1. MANUAL INFLATION
To manually inflate the lifejacket, sharply pull the rubber handle downwards.
The CO2 gas cylinder should inflate the bladder within seconds.
2. ORAL INFLATION
To inflate the lifejacket by mouth, locate the oral inflation tube by opening the
zip at the yellow breakout point on the front panel of the lifejacket. Then after
removing the end cap, blow into the tube until the lifejacket is fully inflated.
3. AUTOMATIC INFLATION
Inflation should occur automatically within seconds of the inflator being
submerged. The automatic capsule is designed to activate the sprung pin
to puncture the CO2 cylinder and inflate the bladder.
CO2 Cylinder size
Model 150N: use 33g
INFORMATION: PRESSURE VARIANCE
With variations in air or water temperatures, topping up by oral inflation may
be required to maintain full buoyancy-especially after prolonged immersion.
Deflating the lifejacket
To deflate the lifejacket, invert the oral-inflation tube end cap and insert it into the
valve. Holding the cap firmly in this position, gently squeeze the lifejacket until all
air or gas has been expelled. Return the cap to its normal position.
Usage below freezing
When the temperature is below freezing, even a fully charged cylinder may not
adequately inflate your lifejacket. Do not use your lifejacket under these conditions
unless it has been partially inflated by mouth.
WARNING: Using the CO2 inflation when your jacket is already fully
inflated can over-pressurise and damage your lifejacket.
10
Page 12

Maintaining your Deckvest
Maintaining this Deckvest should be the responsibility of one sole user. As the user
you are strongly advised to familiarise yourself fully with the Deckvest before using
it as a lifejacket.
We advise that you follow a 3-level checking routine, easily carried out by yourself:
1. During Use, check buckles and other fastenings regularly.
2. Before and after use, examine for damage or excessive abrasion, wear, tear or
contamination. Particular attention must be paid to the stitching and webbing,
including the less accessible areas.
3. Every three months, carry out a complete inspection, checking:
a. The fabric: for cuts, tears, abrasion and damage caused by heat,
chemicals etc.
b. The lifejacket: to check for leaks inflate your lifejacket through the oral
tube until firm and leave for 24hrs. Any loss of firmness indicates leakage
and means it is unsafe.
To check the oral valve, fully inflate the lifejacket and hold the tube under
water. If bubbles appear, deflate and re-inflate to test.
If a leak persists, do not use your lifejacket until it has been professionally
serviced at your nearest service centre.
c. The components: removing and inspecting all components as detailed in
the section ‘Re-arming your lifejacket’ page 13.
WARNING:
If in doubt, send your Deckvest to your nearest service centre for
evaluation and/or servicing.
If you are not completely confident about undertaking the self-inspection
and servicing of your lifejacket in accordance with these instructions,
you must not use your lifejacket again until it has been professionally
inspected and serviced. (For details of your nearest service centre see
www.spinlock.co.uk).
Any modification or repair to any part of the Deckvest is expressly
forbidden unless carried out by Spinlock Ltd.
11
Page 13

Testing your lifejacket
You should always test the inflation of your lifejacket to ensure you are fully aware
of how it functions.
This can be done with the Oral, Manual or Automatic inflators.
If planning to test the lifejacket with the Oral inflator you will not need any spare
parts or rearming kits as long as you remove the CO2 cylinder and automatic capsule
before entering the water.
If you are a weak swimmer it is strongly recommended to use an automatic lifejacket
or an inherently buoyant device.
1. Put on the Deckvest and adjust to fit.
2. Stand in shallow water or swimming pool, just deep enough for your head to be
above the surface.
3. Inflation:
Automatic: lifejacket should fully inflate within five seconds of water
contacting the firing head.
Manual: lifejacket can be activated by a sharp pull on the inflation handle.
Oral inflation: Ensure that cylinder and firing head have been removed before
entering the water. Open the lifejacket cover from the zip breakout point, locate
the oral inflator, remove cap and blow through tube.
4. After testing completely deflate the lifejacket using the oral inflator.
5. Let the Deckvest dry thoroughly. Do not expose to direct heat.
REMEMBER: RE-ARM AND RE-PACK THE LIFEJACKET IN ACCORDANCE WITH
THESE INSTRUCTIONS - See video at www.spinlock.co.uk
WE RECOMMEND THAT THE AUTOMATIC CAPSULE IS REPLACED ANNUALLY.
ALSO UNSCREW AND INSPECT THE THREADED END OF THE CO2 CYLINDER
TO CONFIRM IT IS UNUSED. (SEE FIG 1, PAGE 13)
12
Page 14
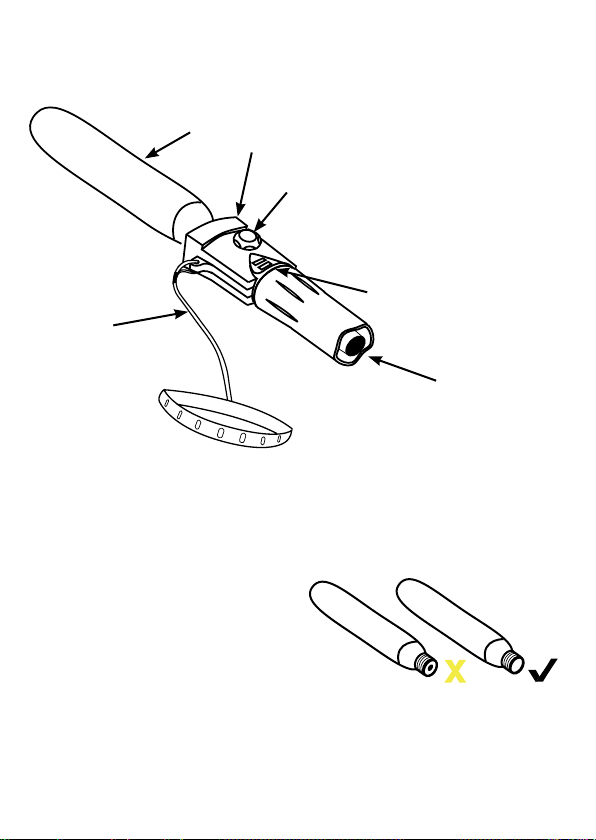
Re-arming and re-packing your lifejacket after inflation
1 33 g CO2 cylinder
2 Automatic firing capsule
1
3
4
3 United Moulders
Pro Sensor® inflator
4 Valve retaining nut
5 Manual firing lanyard
6 Activation indicator window
All Green - ready to go
Red - needs rearming
6
5
2
Examine the automatic capsule.
Ensure that the cap is screwed
hand tight onto the inflator.
Check the components and assemble the inflator following these steps:
1. Unscrew and remove the 33g
CO2 gas cylinder from the inflator
and inspect its piercing cap. If it has
been pierced, replace it! (Fig.1).
13
Fig. 1
Page 15
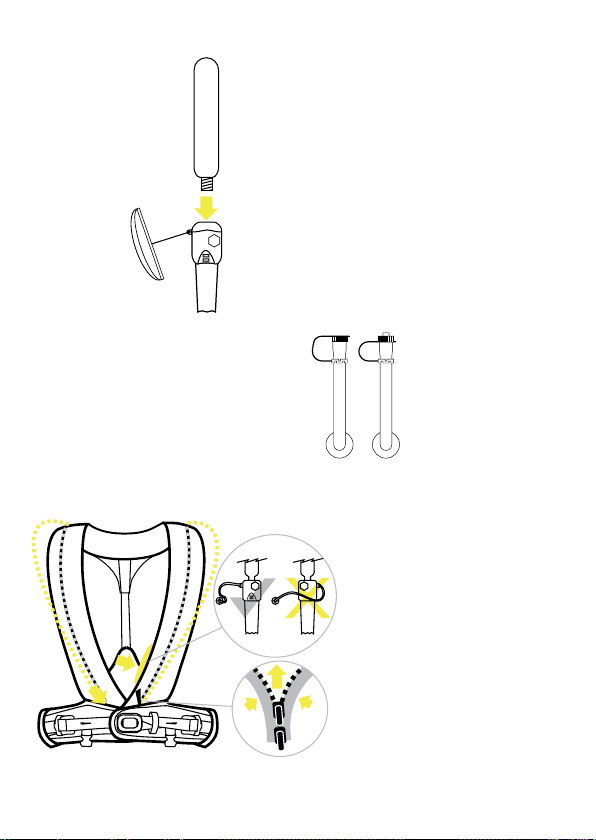
Fig. 2
3. Check that the oral-inflation tube
cap is in stowed position B (Fig.3).
A Dust cap in deflate position
B Dust cap in stowed position
Fig. 4
2. Make sure the manual lever is in the
up and ready position. Install the CO2
cylinder into the inflator by screwing it
until hand-tight (Fig.2). Check that the
automatic capsule has not been fired by
ensuring that the bottom indicator is
showing green.
Fig. 3
A B
4. Ensure the cord runs freely
from the firing head to the
eyelet in the cover. Re-fasten
the zipper. If everything
conforms to the preceding
instructions, your lifejacket
is ready for use. Re-run the
zip back around the cover to
close (Fig.4).
14
Page 16

(EN) English
Safety Notices
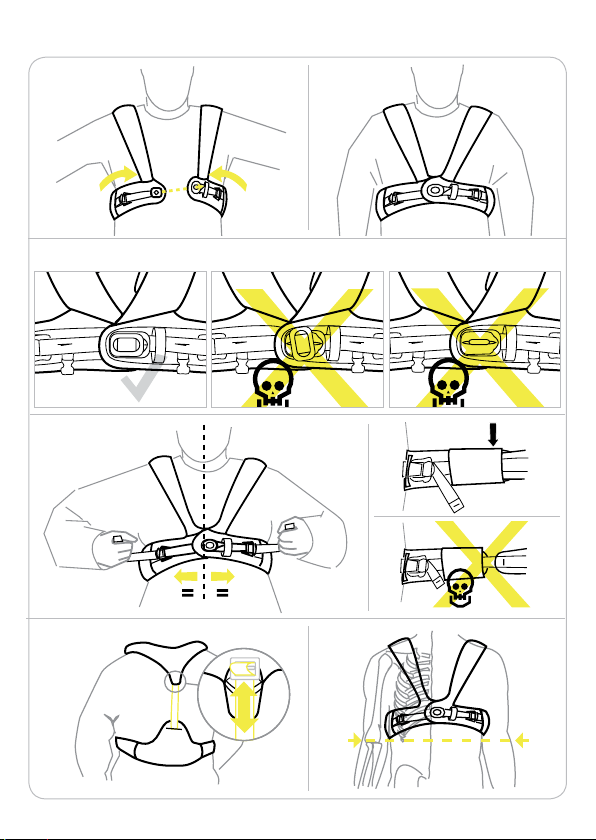
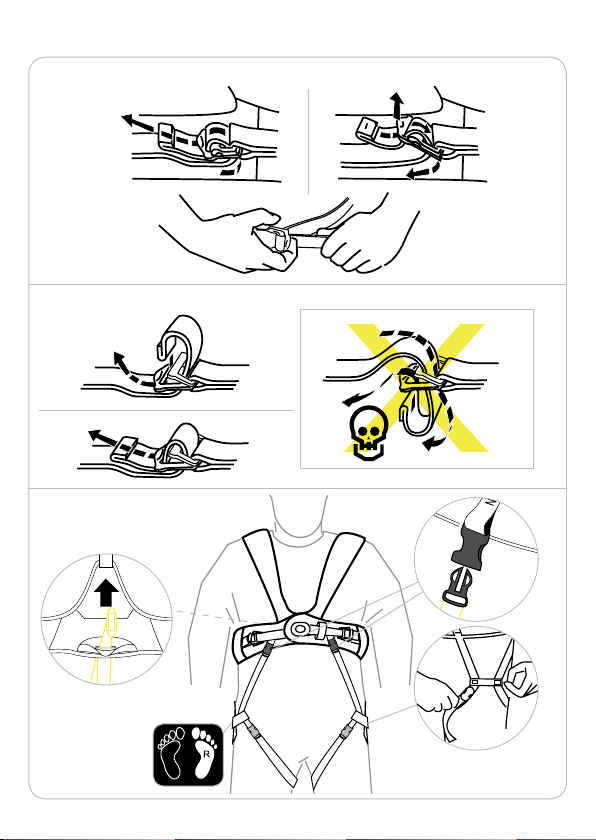
FITTING ADJUSTMENTS (PAGES 3 & 4)
A. Put on as jacket, B. Fasten Button, C. Pull chest
belt tight – it is unsafe to wear any lifejacket or
harness loosely. D. Adjust back strap so that chest
belt is positioned above lowest point of rib cage.
E. Attach thigh straps - passing thigh strap through
legs before fastening plastic buckle on front.
HOW TO USE (PAGES 5 & 6)
A. Anchorage point should be located at the centre
of the chest. Note: safety line is for illustration
only. Ensure no sharp edges on safety line
attachment point. Use with an approved personal
safety line only. Attach to Jack line / fixed eyes.
Anchorage points must be able to withstand forces
of more than 1 tonne. Never attach to lifelines /
standing or running rigging.
GENERAL INFORMATION
Important notice: Specific training is essential
before use
Read this notice carefully before use. This technical
notice illustrates ways of using this product. Only
some types of misuse and forbidden uses currently
known are represented (shown in crossed out
diagrams). Many other types of misuse exist which
are impossible to list or even imagine. Only the
techniques shown in the diagrams and not crossed
out are authorised. All other uses are expressly
excluded; danger of death. In case of doubt or
any problem of understanding, contact Spinlock.
Water sports are dangerous activities which may
lead to severe injuries or even death. Adequate
training in appropriate safety techniques and
methods is essential and acquiring this training is
your own responsibility. You personally assume all
risks and responsibilities for all damage, injury or
death which may occur during or following wrong
use of our products in any manner whatsoever. If
you are not able, or are not in a position to assume
this responsibility or to take such risks do not use
this equipment.
15
USE
This product must only be used by competent
and responsible persons, or those placed under
the direct and visual control of a competent
and responsible person. Check that this product
is compatible with other components of your
equipment. To prolong the life of this product, care
in use is necessary. Avoid rubbing against abrasive
surfaces or sharp edges.
A deck harness and safety line are intended to
prevent the user falling overboard: they do not
provide protection against falls from height.
In a fall the deck safety harness and safety line
may transmit very large forces to the
anchorage point.
Full performance may not be achieved if using
watertight/waterproof clothing or in other
circumstances. Gas cylinders are dangerous goods
and should be kept away from children and not
misused. Do not use as a cushion. Train yourself in
the use of this device.
WARNING: WHEN NOT CORRECTLY FITTED,
THIS DECKVEST MAY NOT PERFORM AS A
LIFEJACKET OR HARNESS AND MAY ENDANGER
THE USER.
MAJOR FALLS
In the event that your full body weight is dropped a
distance and then stopped, do not continue to use
this product. Even if no external changes are visible,
internal damage may have reduced its strength
and its margin of safety. Do not hesitate to contact
Spinlock in case of doubt.
CLEANING, MAINTENANCE, STORAGE
Remove gas cylinder and automatic components
and then clean by hand and rinse in clean fresh
water (maximum temperature 30° C). Dry in a cool,
ventilated dark room. Grease spots may be removed
with trichlorethylene. Webbing shrinks very slightly
in drying. Always carry and store your Deckvest
in a well ventilated bag. Though UV protected,
this product is best stored away from direct light,
in a well ventilated place away from extreme
temperatures.
Page 17

CHEMICALS
All chemicals, (including petrol, battery acid),
corrosive materials and solvents should be regarded
as harmful. If your Deckvest comes in contact with
chemicals, please notify Spinlock, stating the precise
chemicals concerned. We will investigate and give
our advice.
LIFETIME = SHELF LIFE + USEFUL LIFE
After first use this product should last 5 years.
Certain environmental elements will considerably
accelerate wear: salt, sand and chemicals.
In exceptional circumstances, wear or damage could
occur on the first use which reduces the
lifetime of the product to that one, single use.
However wear or damage can shorten the
product life. Shelf-life of this product in good
condition is up to 5 years before first use.
TEMPERATURE
Use this product only above a minimum of -30° C
and below a maximum of +60° C.
DISINFECTING THE PRODUCT
When necessary, use a disinfectant that
is compatible with polyamide, polyester,
polycarbonate, PVC etc. Use diluted with clean
water at a maximum temperature of 30° C. After
soaking for an hour, rinse in clean cold water. Dry
slowly, away from direct heat.
RESPONSIBILITY
Spinlock is not responsible for the consequences,
direct, indirect or accidental, or any type of damage
befalling or resulting from the use of its products.
GUARANTEE
This product is guaranteed against any faults in
materials or manufacture for two years from the
date of manufacture. This guarantee is extended to
five years conditional on registration of ownership
by the first owner. Exclusions from the guarantee
include: normal wear and tear, modifications or
alterations, incorrect storage, damage due to
accident, negligence and any use for which the
product was not designed.
Certain environmental elements will considerably
accelerate wear: salt, sand, moisture, chemicals. In
exceptional circumstances, wear or damage could
occur on the first use which reduces the lifetime
of the product to that one single use. See www.
spinlock.co.uk for full details.
16
Page 18
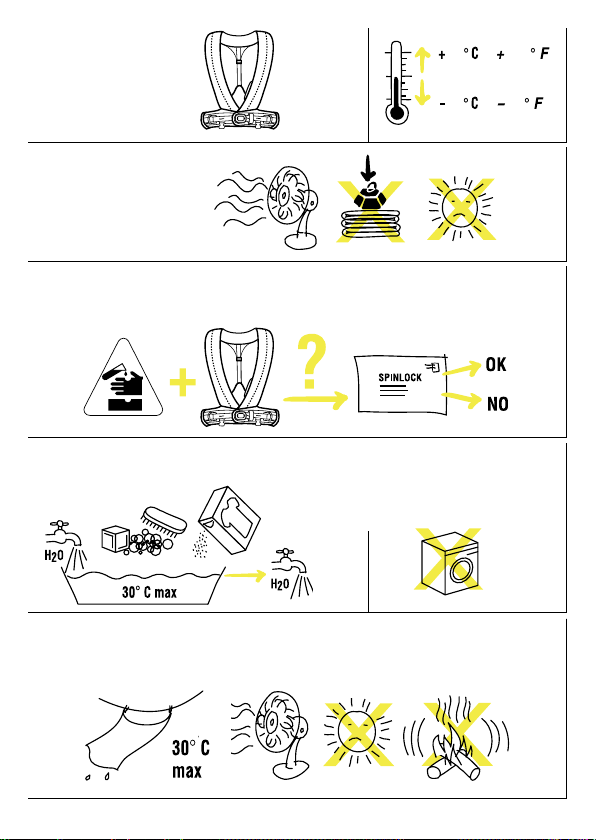
60
30
140
22
60
30
140
22
60
30
140
22
60
30
140
22
60
30
140
22
60
30
140
22
(EN)Temperature
(FR) Température
(DE) Temperatur
(IT) Temperatura
(ES) Temperatura
(NL) Temperatuur
(DK) Temperatur
(S) Temperatur
(EN) Storage
(FR) Stockage
(DE) Lagerung
(IT) Conservazione
(ES) Almacenamiento
(NL) Berging
(DK) Opbevares
(S) Förvaring
(EN) Dangerous products
(FR) Produits dangereux
(DE) Gefährliche Produkte
(IT) Prodotti pericolosi
(ES) Productos peligrosos
(NL) Gevaarlijke producten
(DK) Farlige væsker
(S) Farliga produkter
(EN) Cleaning / Disinfection
(FR) Nettoyage / Désinfection
(DE) Reinigung / Desinfektion
(IT) Pulizia / Disinfezione
(EN) Drying
(FR) Séchage
(DE) Trocknen
(IT) Asciugamento
17
(ES) Limpieza / Desinfección
(NL) Reiniging / Ontsmetting
(DK) Rengøres / Decinficeres
(S) Rengöring/ Desinfektion
(ES) Secado
(NL) Het drogen
(DK) Tørrer
(S) Torkning
Page 19

(EN) Model :
(F) Modèle :
(D) Modell :
(IT) Modello :
(ES) Modelo :
(NL) Model :
(DK) Model :
(S) Modell :
(EN) Batch nº :
(F) Nº de série :
(D) Seriennummer :
(IT) Nºdi serie :
(ES) Nº de serie :
(NL) Serienummer :
(DK) Serienummer :
(S) Serienummer :
(EN) Year of manufacture :
(F) Année de fabrication :
(D) Herstellungsjahr :
(IT) Anno di fabbricazione :
(ES) Año de fabricación :
(NL) Productie jaar :
(DK) Produceret år :
(S) Produktions år :
(EN) Comments :
(F) Commentaires :
(D) Bemerkungen :
(IT) Note :
(ES) Comentarios :
(NL) Aantekeningen :
(DK) Bemærkninger :
(S) Anteckningar :
(EN) Purchase date :
(F) Date de l’achat :
(D) Kaufdatum :
(IT) Data di acquisto :
(ES) Fecha de compra :
(NL) Aankoop datum :
(DK) Købs dato :
(S) Köpdatum :
(EN) Date of first use :
(F) Date de la première utilisation :
(D) Datum der ersten Verwendung :
(IT) Data del primo utilizzo :
(ES) Fecha de la primera utilización :
(NL) Datum eerste gebruik :
(DK) Dato for ibrugtagning :
(S) Första användnings datum :
(EN) User :
(F) Utilisateur :
(D) Benutzer :
(IT) Utilizzatore :
(ES) Usuario :
(NL) Gebruiker :
(DK) Bruger :
(S) Användare :
(EN) Inspection every 3 months
(F) Inspection tous les 3 mois
(D) Kontrolle alle 3 Monate
(IT) Controllo ogni 3 mesi
(EN) DATE OK INSPECTOR
(F) DATE INSPECTEUR HABILITE
(D) DATUM KONTROLLBEAUFTRAGTER
(IT) DATA CONTROLLORE
(ES) FECHA INSPECTOR
(NL) DATUM INSPECTEUR
(DK) DATO KONTROLLERET AF
(S) DATUM INSPEKTÖR
(ES) Inspección cada 3 meses
(NL) Inspectie iedere 3 maanden
(DK) Inspektion hver 3 måned
(S) Inspektion var tredje månad
18
Page 20
Deckvest Serial number
Spinlock supports the
Royal National Lifeboat Institution (RNLI)
‘Sea Safety Lifejacket Campaign’
Please register your Deckvest serial number now at www.spinlock.co.uk
Spinlock Ltd
41 Birmingham Road
Cowes PO31 7BH
United Kingdom
3R425A_2
The Spinlock Deckvest is extensively protected under
various National, European and International Patents and
Design Rights owned by Spinlock Ltd.
For continuously updated user guidance go to
www.spinlock.co.uk
 Loading...