

Page 1
M2
VIRTUAL REALITY
Smartphone
headset
with magnet button
USER MANUAL
Page 2

Thank you
for choosing
spieltek.
Page 3

Precautions
•
Please read and follow these instructions, and keep this manual in
a safe place.
• Keep this unit away from water and any flammable gases or liquids.
• Prolonged use may cause fatigue.
• Use of the device may cause a loss of balance. Make sure that your
surroundings are safe and secure before putting on the headset
• Do not use while driving a vehicle.
• Clean the unit with only a soft, dry cloth.
• All images are for illustrative purposes only.
3
Page 4
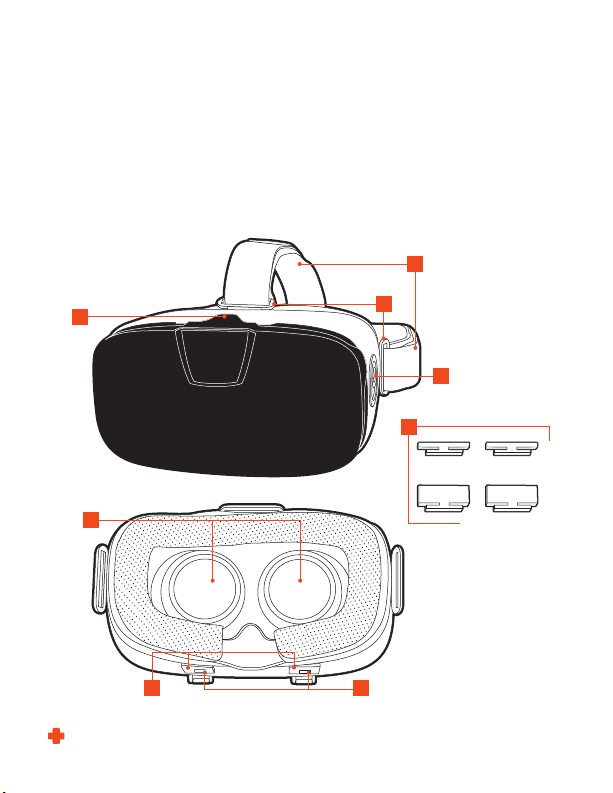
Overview
A. Visor locking tab
B. Head strap
C. Head strap loops
D. Magnet button
A
E
F G
E. Lenses
F. Focal adjusters
G. Interpupillary adjusters
H. Size adjustment feet (×4)
B
C
D
H
4
Page 5
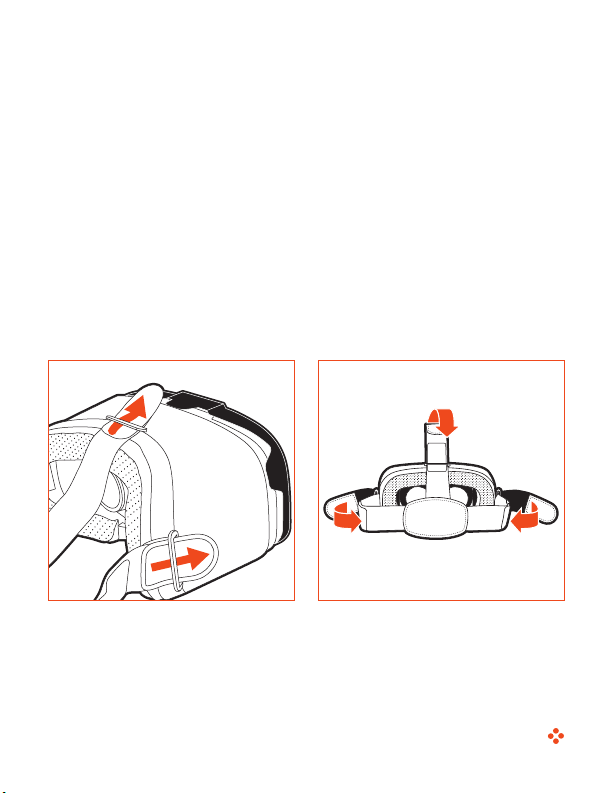
Attaching the Head Strap
1.
Orient the T-strap with the fuzzy side facing out, and fit
the three ends through the attachment loops on the
sides and top of the headset.
2.
Loop the ends over, and press them onto the touchfastener strips.
3.
Continue to adjust the length of the straps until the
visor sits comfortably on your face without putting too
much pressure on the bridge of your nose.
5
Page 6
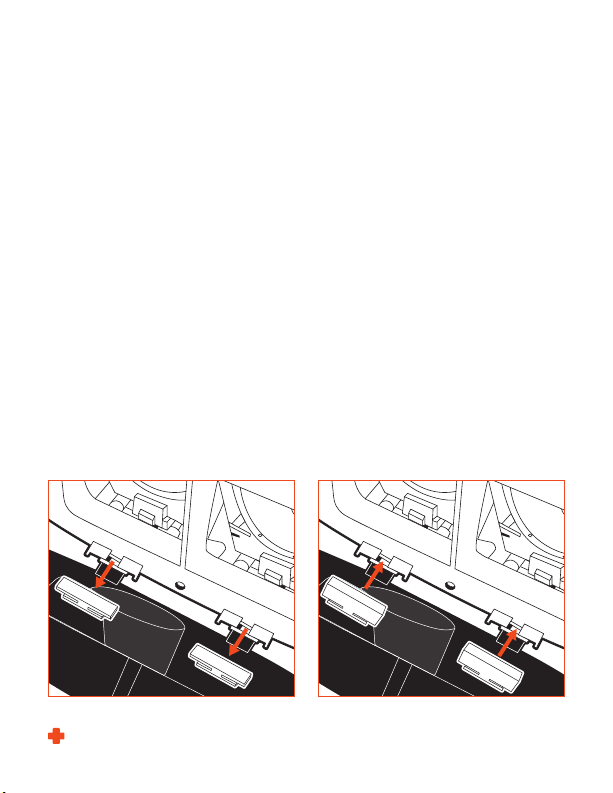
Inserting the Phone
1.
Open the visor by pulling the locking tab at the top of
the headset.
2.
Rest your phone on the two feet inside the visor. For
smaller phones, remove the adjustment feet by sliding
them off of the mounts, and replace them with the
larger feet that are included with the headset.
3.
Align the middle of the screen with the center bar
inside the headset.
4. Close the visor so it snaps shut.
Important!
proceeding.
6
Be sure the visor is securely closed before
Page 7
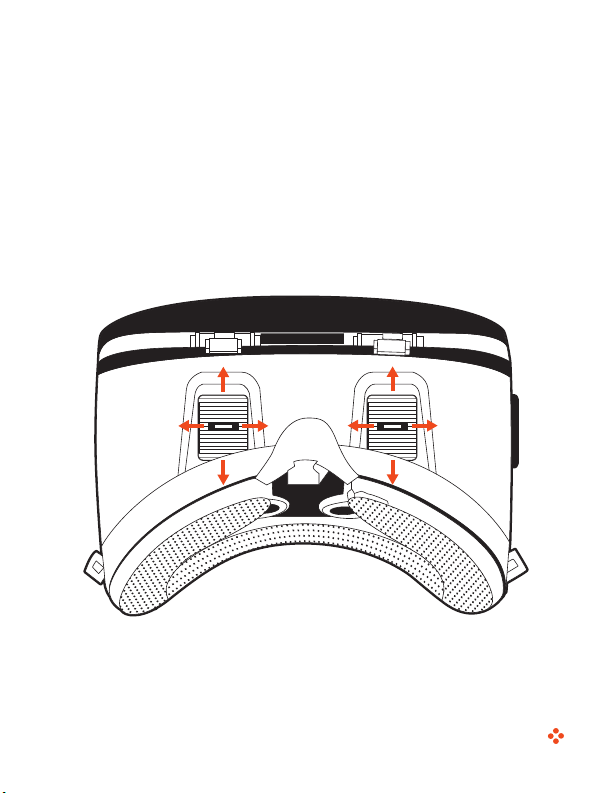
Adjusting the Lenses
Use the lens adjusters on the bottom of the headset to
move each lens forward or back to compensate for nearor farsightedness until the picture is sharp and clear.
7
Page 8
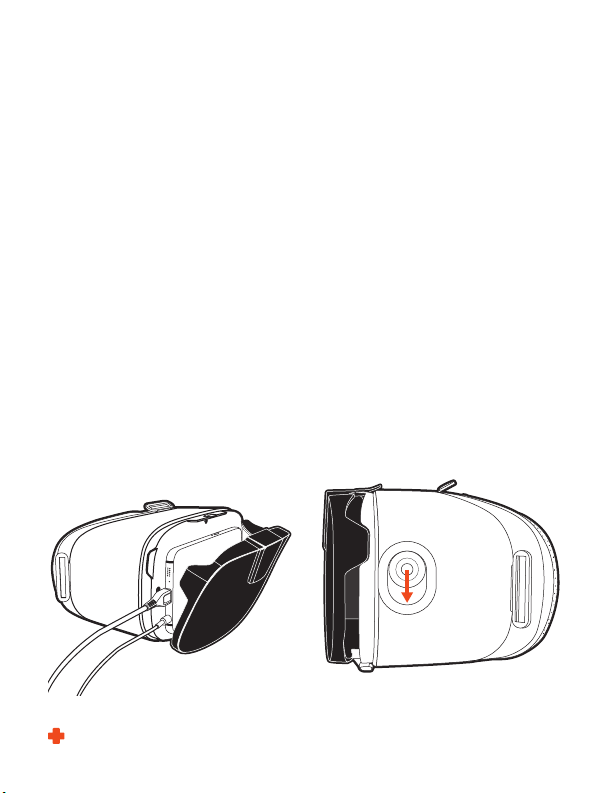
Using Your Phone with the
VR-M2
Insert your phone into the headset, and close the visor.
You can use wired headphones or attach a charging cable
while using the headset by extending the cables through
the gap between the visor and the headset.
The magnet button
This lets you interact with your screen. Pull the magnet
button down quickly, and immediately release it to
simulate a screen touch.
Your phone will not respond if you pull the button down
too slowly, or hold it down too long.
8
Page 9
Important!
Your access to the screen is limited to the
magnet button. For more control of your phone and
camera while using the headset, use a Bluetooth remote
like the Spieltek VR-BTR (available separately).
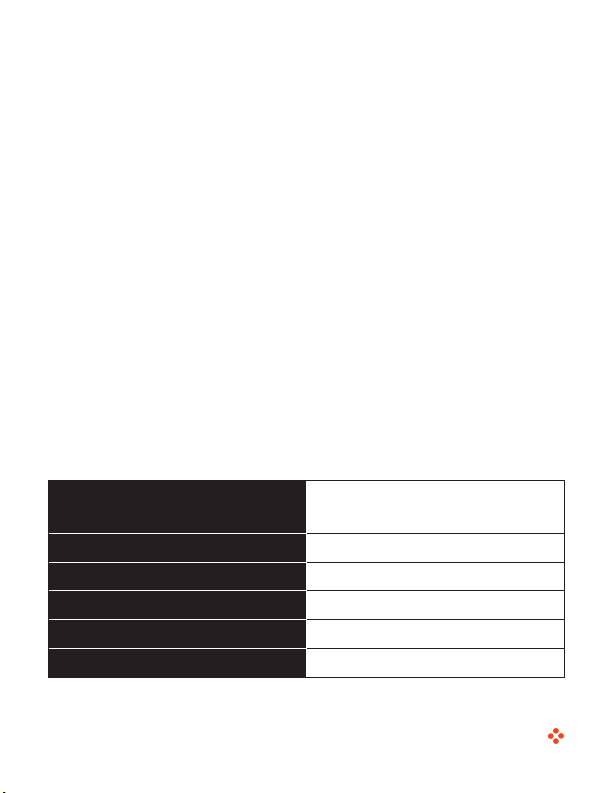
Specifications
Compatibility
Lens size
Lens material
Field of view
Dimensions (W × D × H) 7 × 5 × 4 in. (17.8 × 12.7 × 10.2 cm)
Weight (without phone)
Phones with screens 3.5 to 6 in.
(8.9 to 15.2 cm)
40 mm
Spherical resin
95° to 100°
12.2 oz. (344.7 g)
9
Page 10

One-Year Limited Warranty
This Spieltek product is warranted to the original purchaser to be free
from defects in materials and workmanship under normal consumer
use for a period of one (1) year from the original purchase date or
thirty (30) days after replacement, whichever occurs later. The
warranty provider’s responsibility with respect to this limited warranty
shall be limited solely to repair or replacement, at the provider’s
discretion, of any product that fails during normal use of this product
in its intended manner and in its intended environment. Inoperability
of the product or part(s) shall be determined by the warranty provider.
If the product has been discontinued, the warranty provider reserves
the right to replace it with a model of equivalent quality and function.
This warranty does not cover damage or defect caused by misuse,
neglect, accident, alteration, abuse, improper installation or
maintenance. EXCEPT AS PROVIDED HEREIN, THE WARRANTY
PROVIDER MAKES NEITHER ANY EXPRESS WARRANTIES NOR
ANY IMPLIED WARRANTIES, INCLUDING BUT NOT LIMITED TO ANY
IMPLIED WARRANTY OF MERCHANTABILITY OR FITNESS FOR A
PARTICULAR PURPOSE. This warranty provides you with specific legal
rights, and you may also have additional rights that vary from state to
state.
10
Page 11

To obtain warranty coverage, contact the Spieltek Customer Service
Department to obtain a return merchandise authorization (“RMA”)
number, and return the defective product to Spieltek along with
the RMA number and proof of purchase. Shipment of the defective
product is at the purchaser’s own risk and expense.
For more information or to arrange service, visit
www.spieltekgaming.com or call Customer Service at 212-594-2353.
Product warranty provided by the Gradus Group.
www.gradusgroup.com
Spieltek is a registered trademark of the Gradus Group.
© 2016 Gradus Group LLC. All Rights Reserved.
11
Page 12

www.spieltekgaming.com
GG1
 Loading...