

SPIEGEL 60609 Operation Manual
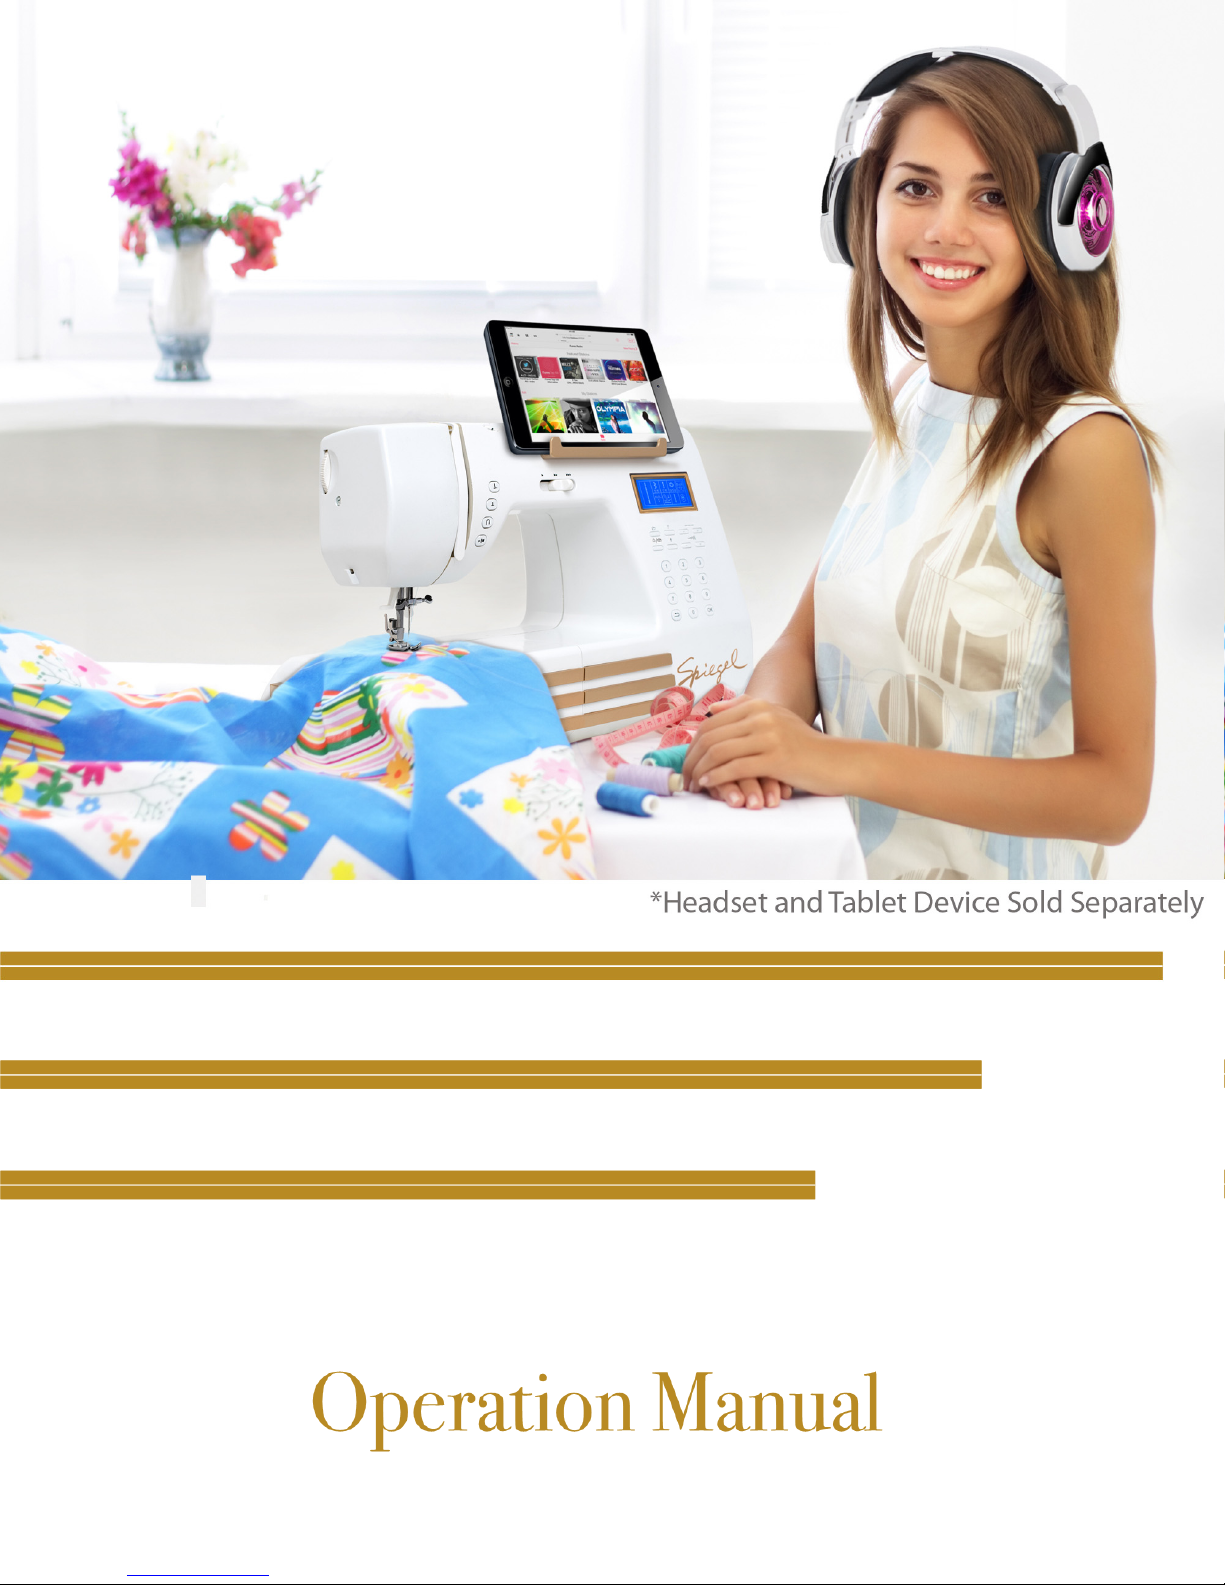
SPIEGEL 60609 LIMITED EDITION COMPUTERIZED SEWING MACHINE
M
(headset and tablet device sold separately)
Computerized Spiegel Sewing Machine
odel 60609

DO NOT RETURN YOUR
SEWING MACHINE
TO THE STORE
FOR PRODUCT SUPPORT AND RETURNS, VISIT US ONLINE AT...
www.SpiegelSewing.com
RETAIN ALL ORIGINAL PACKAGING FOR USE WHEN SHIPPING YOUR MACHINE TO US
For customer service by telephone, (U.S. only) call...
U.S. +1.800.842.2878
CONGRATULATIONS ON PURCHASING YOUR SPIEGEL
COMPUTERIZED SEWING MACHINE!
Dear Customer,
To celebrate our 150th Anniversary, Spiegel is
proud to introduce one of its most innovative
products ever manufactured. Working hand-inhand with engineers from Universal
Instruments, our sister company, we believe
this sewing machine will uncover new frontiers
in home sewing.
New patent-pending technology and Wi-Fi
connectivity facilitate a connected sewing
experience unlike any other. Our proprietary
technology allows seamless connection from
your Spiegel home sewing machine to your
smart phone or tablet, affording new ways to
“Share” your love of sewing on social media.
Our signature Spiegel Social Sewing app also
allows you to unlock hidden feature-sets on
your machine.
Your Spiegel sewing machine is one of the most advanced computerized sewing
machines on the market. To fully enjoy all of the machine’s advanced features, we
suggest that you study these instructions before using your new machine. It is also
extremely important that you download the Spiegel sewing application from your
device’s app store before you get started. This specially designed app will help you
set up your machine and provide you with useful video tutorials, pattern instructions,
tools, tips and tricks.
Sew and shop our website today!
— Richard Lowe
International Creative Director - Spiegel, LLC
Download the Spiegel Sewing Application available for free
on Google Play, the iTunes Store or the Amazon App Store.
www.SpiegelSewing.com
SAVE THESE INSTRUCTIONS
~ Please Read All Instructions Before Using Your Sewing Machine ~
Your Model 60609 Computerized SpiegelTM Sewing Machine incorporates multiple electric and
electronic technologies. Please follow all guidelines listed herein to ensure safe operation and use of the
machine. This machine is intended for indoor household use ONLY. Outdoor use is not recommended.
Safety Conventions Used In This Documentation
WARNING —
CAUTION —
Throughout the sewing machine manual, you will also see the icon used to indicate information of which you should take special notice.
The contents of this manual and all the listed machine specifications for this product are subject to
update or change without notice. Check our website regularly for updates concerning this product.
Warnings indicate a potentially hazardous situation which, if not avoided,
could result in personal injury.
Cautions alert the user to unsafe practices that could cause damage to the
sewing machine or its accessories.
If you haven not already downloaded the Spiegel sewing app from Google Play,
the iTunes Store, or the Amazon App Store, you should do so now.
Not only will the app guide you through the process of controlling your Stitch
CamTM, but our website www.SpiegelSewing.com, contains many video tutorials
that will help you get the most out of your Model 60609 sewing machine. You can
access SpiegelSewing.com through the QR code shown here.
NOTE
© 2015 Universal Instruments Corporation. All rights reserved. Use, duplication, disclosure, or transfer restricted
by license from Universal Instruments Corporation. Certain terms are trademarks of Universal Instruments
Corporation in the United States and/or other countries. For a list of Universal Instruments Corporation
trademarks, see www.uic.com. All other trademarks are the property of their respective corporations.

FOR REPAIR OR ADJUSTMENT
In the event of a machine malfunction or other problem, please consult www.SpiegelSewing.com for
online assistance and customer support. You may also contact your local authorized Spiegel Sewing
Machine dealer.
For additional information and new product updates, and to contact customer
service, please visit our website at www.SpiegelSewing.com, which is also
accessible through the QR code shown here.
The contents of this manual and all the listed machine specifications for this
product are subject to update or change without notice. Please check regularly for
updates concerning this product.

CERTIFICATE OF AUTHENTICITY
THIS CERTIFIES THAT THE BEARER OF THIS
DOCUMENT IS THE OWNER OF A LIMITED EDITION
MODEL OF A SERIES OF SPECIALIZED SEWING
MACHINES BY SPIEGEL.
PROUDLY CELEBRATING 150 YEARS OF STYLE,
SPIEGEL LAUNCHED THIS COMPUTERIZED SEWING
MACHINE TO CELEBRATE ITS RICH HISTORY IN
FASHION AND TECHNOLOGY.
THIS LIMITED EDITION MODEL 60609 WAS CREATED
TO DEFINE AND DISRUPT THE MARKETPLACE.
WITH ITS SLEEK RETRO LOOK AND UNIQUE STYLING,
THIS IS INDEED A ONE-OF-A-KIND MACHINE.

SPIEGEL 60609 LIMITED EDITION COMPUTERIZED SEWING MACHINE
TABLE OF CONTENTS
IMPORTANT SAFETY AND CUSTOMER NOTICES ........................................................................... 1
GETTING TO KNOW YOUR SEWING MACHINE ............................................................................... 5
Machine Power and Sockets ................................................................................................................. 7
Accessories ........................................................................................................................................... 8
Controls Overview ................................................................................................................................ 9
Needle and Presser Foot ...................................................................................................................... 10
Operation Buttons ............................................................................................................................... 11
Numeric Selection Keypad Arrows .................................................................................................... 13
LCD (Liquid Crystal Display) ............................................................................................................ 13
LCD ICONS.............................................................................................................................................. 14
Status Icons ......................................................................................................................................... 14
Presser Foot Icons ............................................................................................................................... 15
CONTROLLING YOUR SEWING MACHINE ...................................................................................... 17
Using The Foot Controller .................................................................................................................. 18
Speed Control Slider ........................................................................................................................... 18
CONNECTING TO YOUR STITCH CAMTM ......................................................................................... 19
Overview ............................................................................................................................................. 19
Using the Handy HookTM ................................................................................................................... 20
Setting Up Your Sewing Machine ...................................................................................................... 20
Using the USB Charging Station (Optional) ...................................................................................... 21
HOW TO THREAD AND USE YOUR MACHINE ............................................................................... 22
Upper Threading ................................................................................................................................. 22
Winding the Bobbin in Preparation for Lower Threading .................................................................. 24
Lower (Bobbin) Threading ................................................................................................................. 25
Bringing up the Lower Thread ............................................................................................................ 26
Needle Types for Different Fabrics .................................................................................................... 26
Changing the Needle ........................................................................................................................... 27
Selecting Stitches ................................................................................................................................ 27
Attaching, Removing, & Replacing the Presser Foot ......................................................................... 28
Adjusting the Presser Foot Pressure ................................................................................................... 29
Thread Tension ................................................................................................................................... 29
Lower Thread Tension .................................................................................................................. 29
Upper Thread Tension .................................................................................................................. 29
Buttonhole Foot Sewing ..................................................................................................................... 30
Sewing Zippers ................................................................................................................................... 31
SEWING TIPS .......................................................................................................................................... 32
~i~

SPIEGEL 60609 LIMITED EDITION COMPUTERIZED SEWING MACHINE
Reverse Sewing ................................................................................................................................... 32
Sewing Stretch Fabrics ....................................................................................................................... 32
Sewing Free-Arm ................................................................................................................................ 32
Applique, Patchwork, and Quilting .................................................................................................... 32
Free-Motion Quilting .......................................................................................................................... 32
Blind Hem Stitching ........................................................................................................................... 33
Reinforcement Stitching ..................................................................................................................... 33
Decorative Stitching ............................................................................................................................ 33
TROUBLESHOOTING ............................................................................................................................ 34
APPENDIX: STITCH TABLES............................................................................................................... 38
Standard Stitches ................................................................................................................................. 38
Premium Stitches Available Through the Spiegel Sewing App ......................................................... 74
~ii~
Revision Date 23 September 2015

SPIEGEL 60609 LIMITED EDITION COMPUTERIZED SEWING MACHINE
FEDERAL COMMUNICATIONS COMMISSION (FCC)
~ Declaration of Conformity (For USA Only) ~
Responsible Party:
Declares that the product
Product Name: Spiegel Computerized Sewing Machine
This device complies with Part 15 of the FCC Rules. Operation is subject to the following two
conditions: (1) this device may not cause harmful interference, and (2) this device must accept any
interference received, including interference that may cause undesired operation.
This equipment has been tested and found to comply with the limits for a Class B digital device,
pursuant to Part 15 of the FCC Rules. These limits are designed to provide reasonable protection against
harmful interference in a residential installation. This equipment generates, uses, and can radiate radio
frequency energy and, if not installed and used in accordance with the instructions, may cause harmful
interference to radio communications. However, there is no guarantee that interference will not occur in
a particular installation. If this equipment does cause harmful interference to radio or television
reception, which can be determined by turning the equipment off and on, the user is encouraged to try to
correct the interference by one or more of the following measures:
Universal Instruments Corporation
33 Broome Corporate Parkway
Conklin, New York 13748 USA
Model Number: 60609
Reorient or relocate the receiving antenna.
Increase the separation between the equipment and receiver.
Connect the equipment into an outlet on a circuit different from that to which the receiver
is connected.
Consult the retailer or an experienced radio/TV technician for help.
Changes or modifications not expressly approved by Universal Instruments could void
the user’s authority to operate the equipment.
~1~

SPIEGEL 60609 LIMITED EDITION COMPUTERIZED SEWING MACHINE
TO AVOID THE RISK OF ELECTRIC SHOCK,
FIRE, BURNS, OR PERSONAL INJURY
WARNING —
Outdoor use is not recommended. Use the sewing machine only as designed
and intended. Do not use the machine with accessories not provided for sale
by Spiegel. Use of unapproved accessories could result in injury and/or
damage to the machine, and will void your limited Spiegel product warranty.
This machine should not be operated near oxygen tanks or where oxygen is
being administered. Do not operate the machine in proximity to any aerosol
chemical.
Your sewing machine has a polarized electrical plug (one blade is wider than
the other). Always plug the blades in correctly to an approved, listed wall
outlet to reduce your risk for electrical shock. Never force the plug. If the
plug does not fit, make sure you have aligned the polarized blades correctly.
If the plug still does not fit, contact a qualified electrical technician. Never
modify the electrical plug in any way.
NEVER operate the sewing machine if the power cord is damaged or
exposed wires are visible. The sewing machine should not be operated after it
has been exposed to water, after it has been subjected to impact damage, or if
it has otherwise been damaged. Always have your sewing machine examined
and repaired by an authorized Spiegel dealer if it has been damaged.
Do not leave the sewing machine plugged in while it is unattended. Always
unplug the sewing machine from the electrical outlet when it is not in use.
Never clean or maintain your sewing machine while it is plugged in. Do not
unplug the machine while power is switched on. Always switch the power
off before unplugging the machine, and never pull the power cord by the
cord itself. Always hold the power cord by the plug.
Always switch off the sewing machine whenever you are changing the
needle or whenever you are otherwise adjusting the sewing machine.
Do not block the ventilation slots of the sewing machine. Proper air flow is
required for operation of the machine. Do not allow fabric, dust, or debris to
block the air vents. Never insert objects into any openings or seams on the
machine.
~2~

SPIEGEL 60609 LIMITED EDITION COMPUTERIZED SEWING MACHINE
TO AVOID THE RISK OF PERSONAL INJURY
OR DAMAGE TO THE SEWING MACHINE
WARNING —
Be extremely careful when placing your hands close to the needle and presser
foot, components that always have the potential to cause injury to the hand.
Never push or pull fabric into and through the needle and presser foot area,
which can cause a feed dog failure, clog the bobbin, break the needle, or
make the needle jump.
Never permit children to operate the machine unsupervised or to play on or
around it. Your Spiegel computerized sewing machine is not a toy. Adult
supervision is required for younger users.
Never use a damaged needle in the sewing machine. Bent or broken needles
should be discarded immediately.
Unplug the machine when storing it and when it is not in use, even for short
periods of time. This is especially important when children are present in the
household.
Repair and service of your Spiegel computerized sewing machine must be
conducted through and by an authorized dealer. Contact Spiegel customer
service for more information. Complete contact information may be found at
www.SpiegelSewing.com.
~3~

SPIEGEL 60609 LIMITED EDITION COMPUTERIZED SEWING MACHINE
THANK YOU FOR YOUR PURCHASE!
PLEASE READ BEFORE STARTING YOUR NEW JOURNEY:
Safety Operation Instructions
WARNING —
Be extremely careful when placing your hands close to the needle and presser
foot, which always has the potential to cause injury to the hand. NEVER stop
the hand wheel or touch it while it is moving. NEVER touch the needle or
use the presser foot lever while the machine is operating.
Never push or pull fabric into and through the needle and presser foot area,
which can cause a feed dog failure, clog the bobbin, break the needle, or
make the needle jump. Always switch off the sewing machine whenever you
are threading the needle or bobbin, whenever you are changing the needle,
and whenever you are otherwise adjusting the sewing machine.
Always plug the machine directly into the wall outlet. Do not use the sewing
machine with extension cords or outlet multipliers.
Always switch off AND UNPLUG the sewing machine before replacing
parts or changing accessories, during any power failure (especially if your
household lights are flickering), or before cleaning or servicing the machine.
Never hold the foot pedal down with any heavy object, or otherwise keep the
foot pedal pressed using anything but your own foot.
Extended Lifetime Recommendations
1. When storing this machine, avoid direct sunlight and humid/hot locations. Do not use or store
the machine near a space heater, iron, halogen lamp, or other heat sources.
2. Avoid dropping or hitting the machine.
3. Consult the manual whenever installing any accessories, including presser feet, needles, or
other components.
~4~
SPIEGEL 60609 LIMITED EDITION COMPUTERIZED SEWING MACHINE
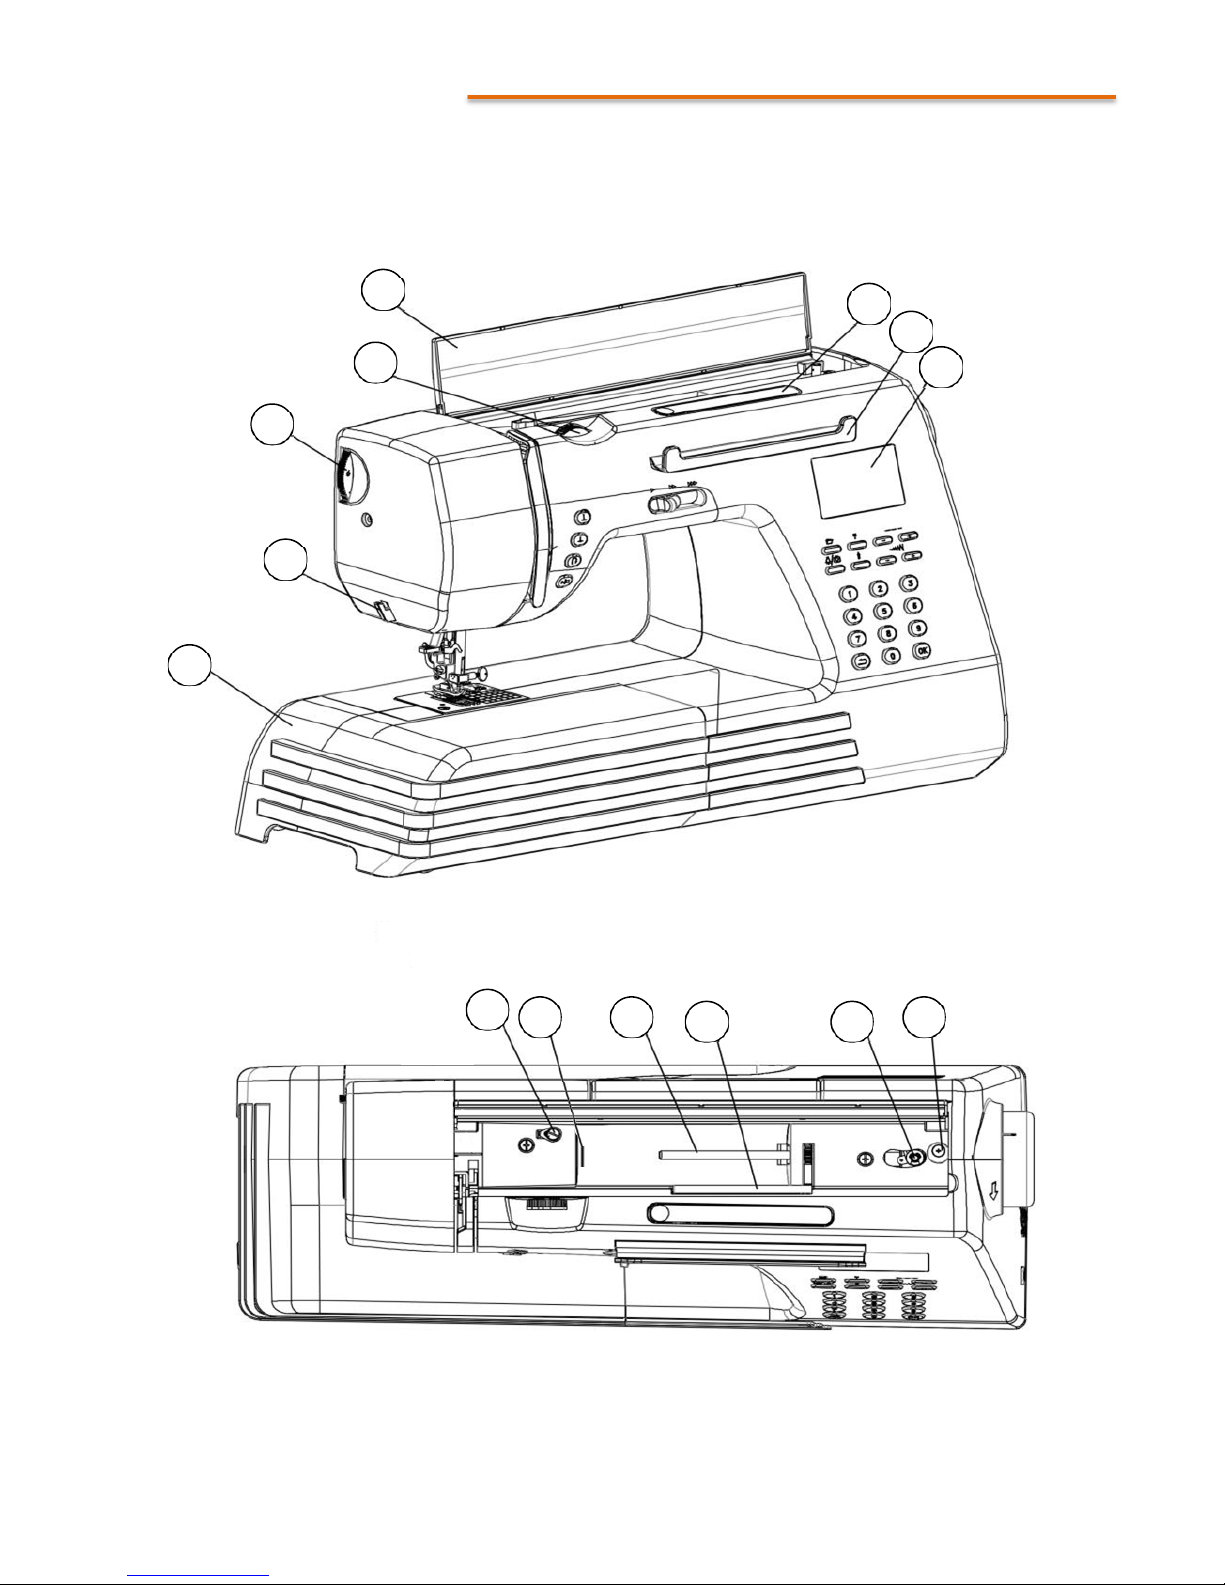
GETTING TO KNOW YOUR SEWING MACHINE
~ SPIEGEL 60609 OVERVIEW ~
1
2
3
4
21
1. Top Cap
2. Thread Tension Dial
3. Presser Foot Pressure Dial
4. Thread Cutter
5. Handy HookTM
7. LCD Display
8. Thread Guide
9. Bobbin Winder Thread Dial
10. Main Spool Pin
9
8 10
11. Minor Spool Pin
12. Bobbin Winder Spindle
13. Bobbin Stop
21. Accessories Box
11 12
5
6
7
13
~5~
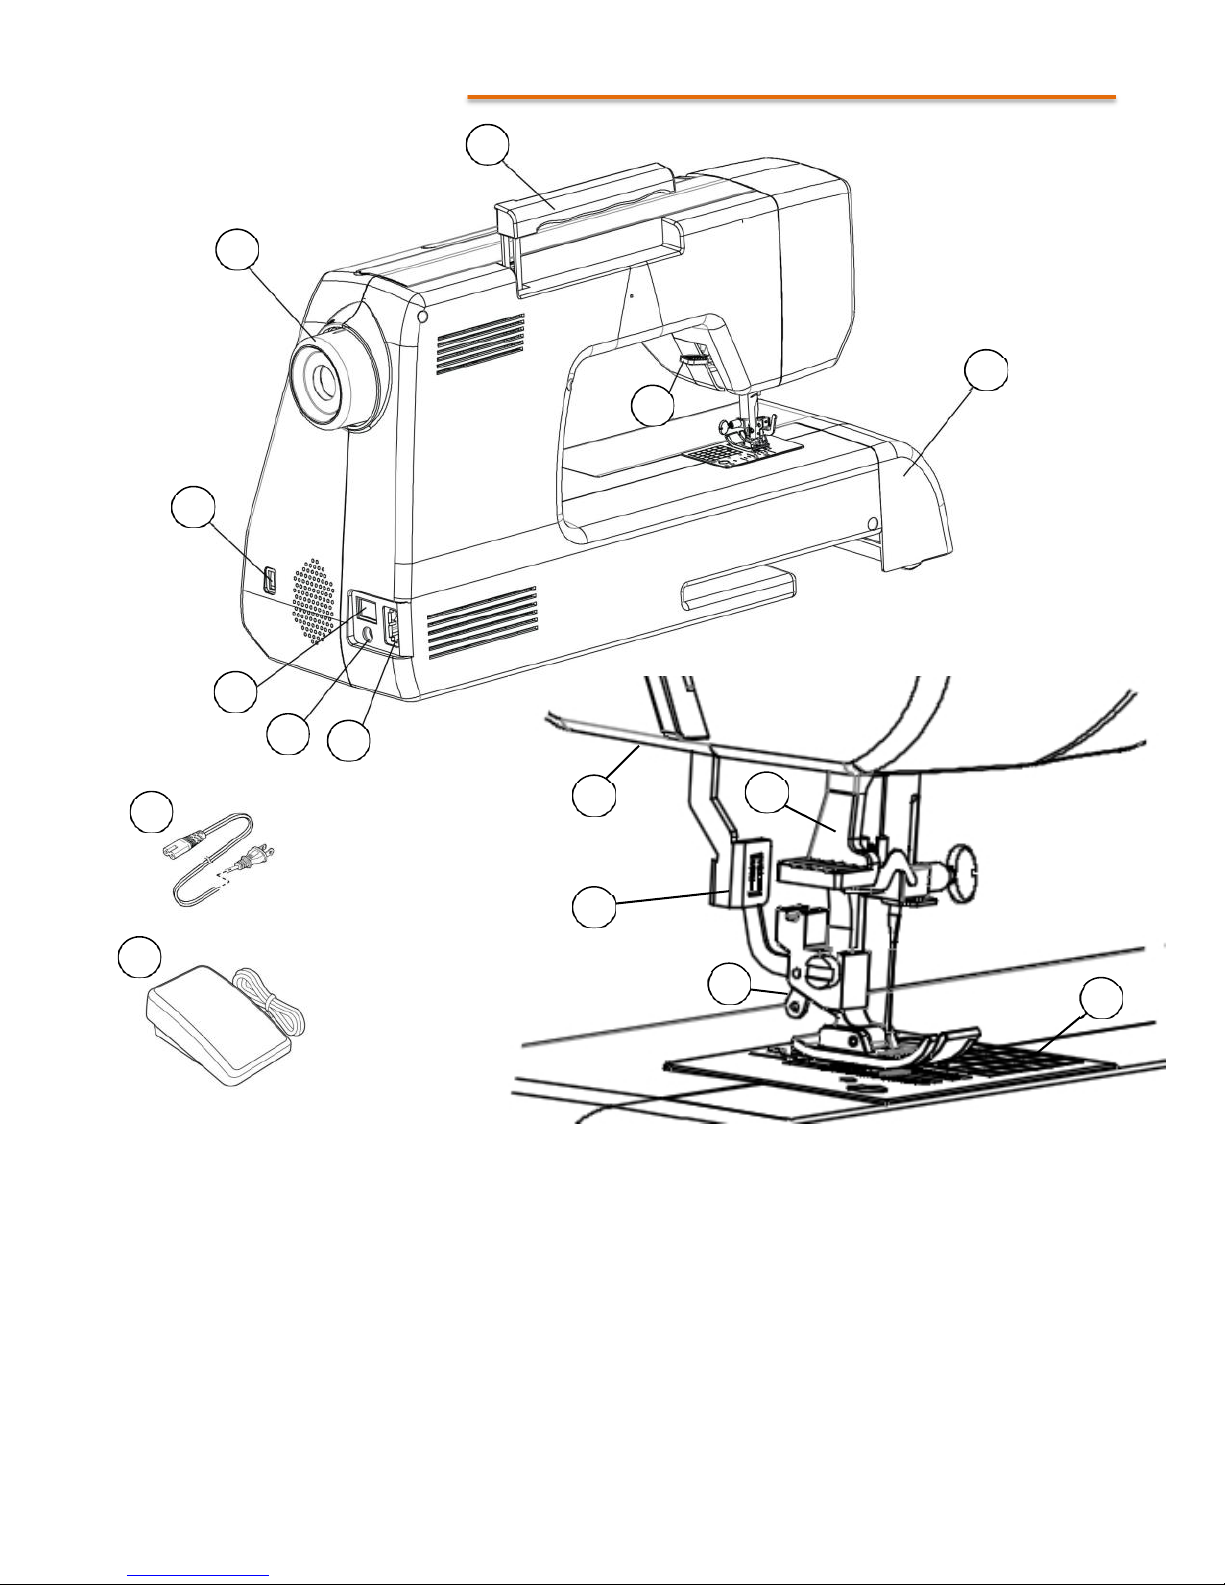
SPIEGEL 60609 LIMITED EDITION COMPUTERIZED SEWING MACHINE
14
16
17
18
26
27
14. Hand Wheel
15. Carrying Handle
16. USB Charging Station
17. Main Power Switch
15
19
18. Foot Control Socket
19. Main Power Socket
20. Presser Foot Lever
21. Accessories Box
20
28
24
22
23
22. Automatic Threader Lever
23. Fast-Change Foot Lever
24. Buttonhole Lever Arm
25. Needle Plate
21
25
26. Power Cord
27. Foot Pedal
28. Camera and Light
(not visible)
~6~
SPIEGEL 60609 LIMITED EDITION COMPUTERIZED SEWING MACHINE
Machine Power and Sockets
(1) Main Power Switch — This switch toggles the main power on and off.
(2) Main Power Socket — Connect the power cord to the power socket, then to the wall outlet.
(3) Foot Control Socket — Connect the foot controller to this port.
(4) Air Vent — Make sure the air vent is never obstructed in any way.
(5) USB Charging Station — The USB charging station is available to charge your mobile devices.
(6) Power Plug — This is the power cord.
(7) Foot Controller — This controls the sewing speed (up to the speed selected by the slider).
NOTE
If a power outage occurs while sewing, immediately switch off the machine power and
unplug the power cord. When power is restored, restart the sewing machine normally.
6
WARNING —
Your sewing machine has a polarized electrical plug (one blade is wider than
the other). Always plug the blades in correctly to an approved, listed wall
outlet to reduce your risk for electrical shock. Never force the plug. If the
plug does not fit, make sure you have aligned the polarized blades correctly.
If the plug still does not fit, contact a qualified electrical technician. Never
modify the electrical plug in any way.
This sewing machine is intended for indoor household use only. Never use
this sewing machine outside or expose it to the elements. Using this machine
outdoors or exposing it to the elements could result in electric shock or
damage to the machine. This machine is not intended for industrial use.
Never expose the machine to extreme heat. Proper ventilation is required for
normal operation. Poor ventilation or extreme heat could lead to machine
failure, electrical fire, and increased risk of electric shock.
~7~
SPIEGEL 60609 LIMITED EDITION COMPUTERIZED SEWING MACHINE
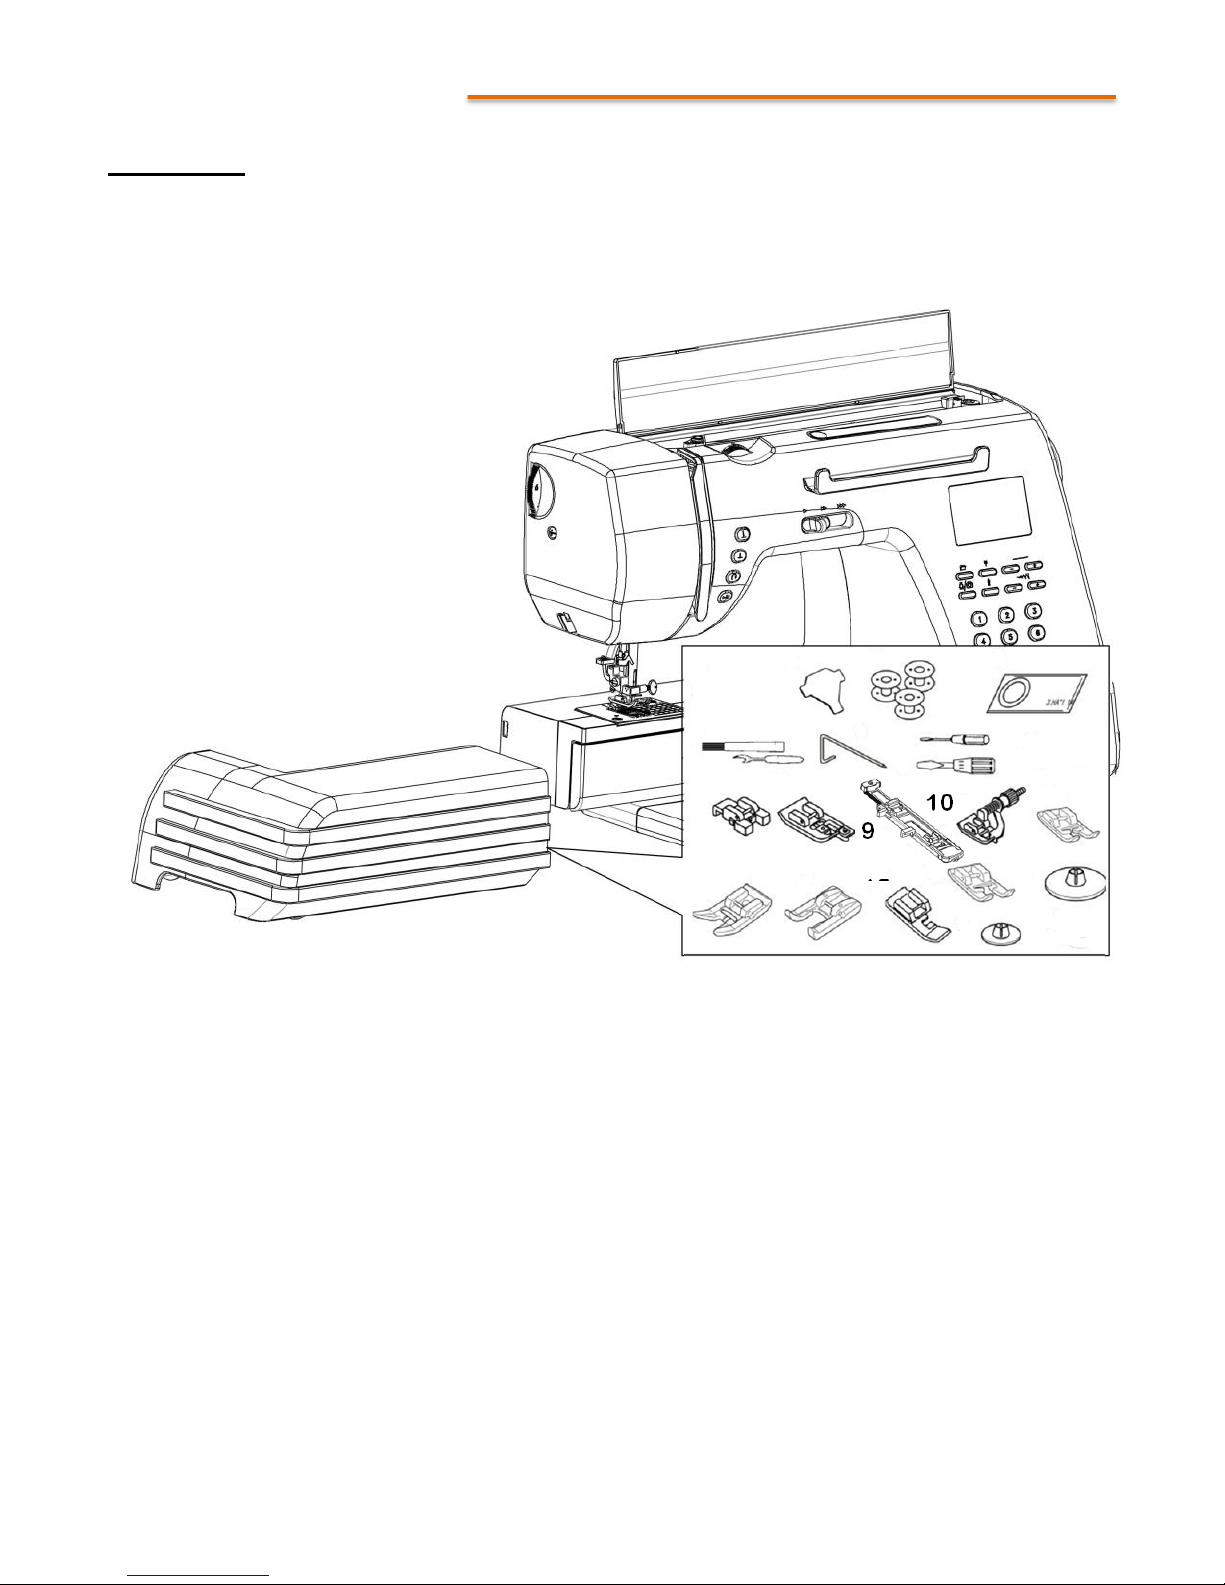
Accessories
Your sewing machine ships with all the accessories you need to begin sewing right away. These include
the following items:
1. T-Shaped Screwdriver
2. Bobbins (6 pcs.)
3. Needle Pack
4. Seam Ripper/Brush
5. Edge/Quilting Guide
6. Screwdriver (Small)
7. Screwdriver (Large)
8. Button Fitting Foot
9. Overcasting Foot
10. Buttonhole Foot
11. Blind Hem Foot
12. Zigzag Foot
13. Non-stick Foot
14. Open Toe Foot
15. Zipper Foot
16. Monogramming Foot (installed)
17. Spool Cap (Large) (x2)
18. Spool Cap (Small) (x2)
1 2 3
4 5 6, 7
10 12
8 9 11
13 14 15 16
17
18
~8~
SPIEGEL 60609 LIMITED EDITION COMPUTERIZED SEWING MACHINE
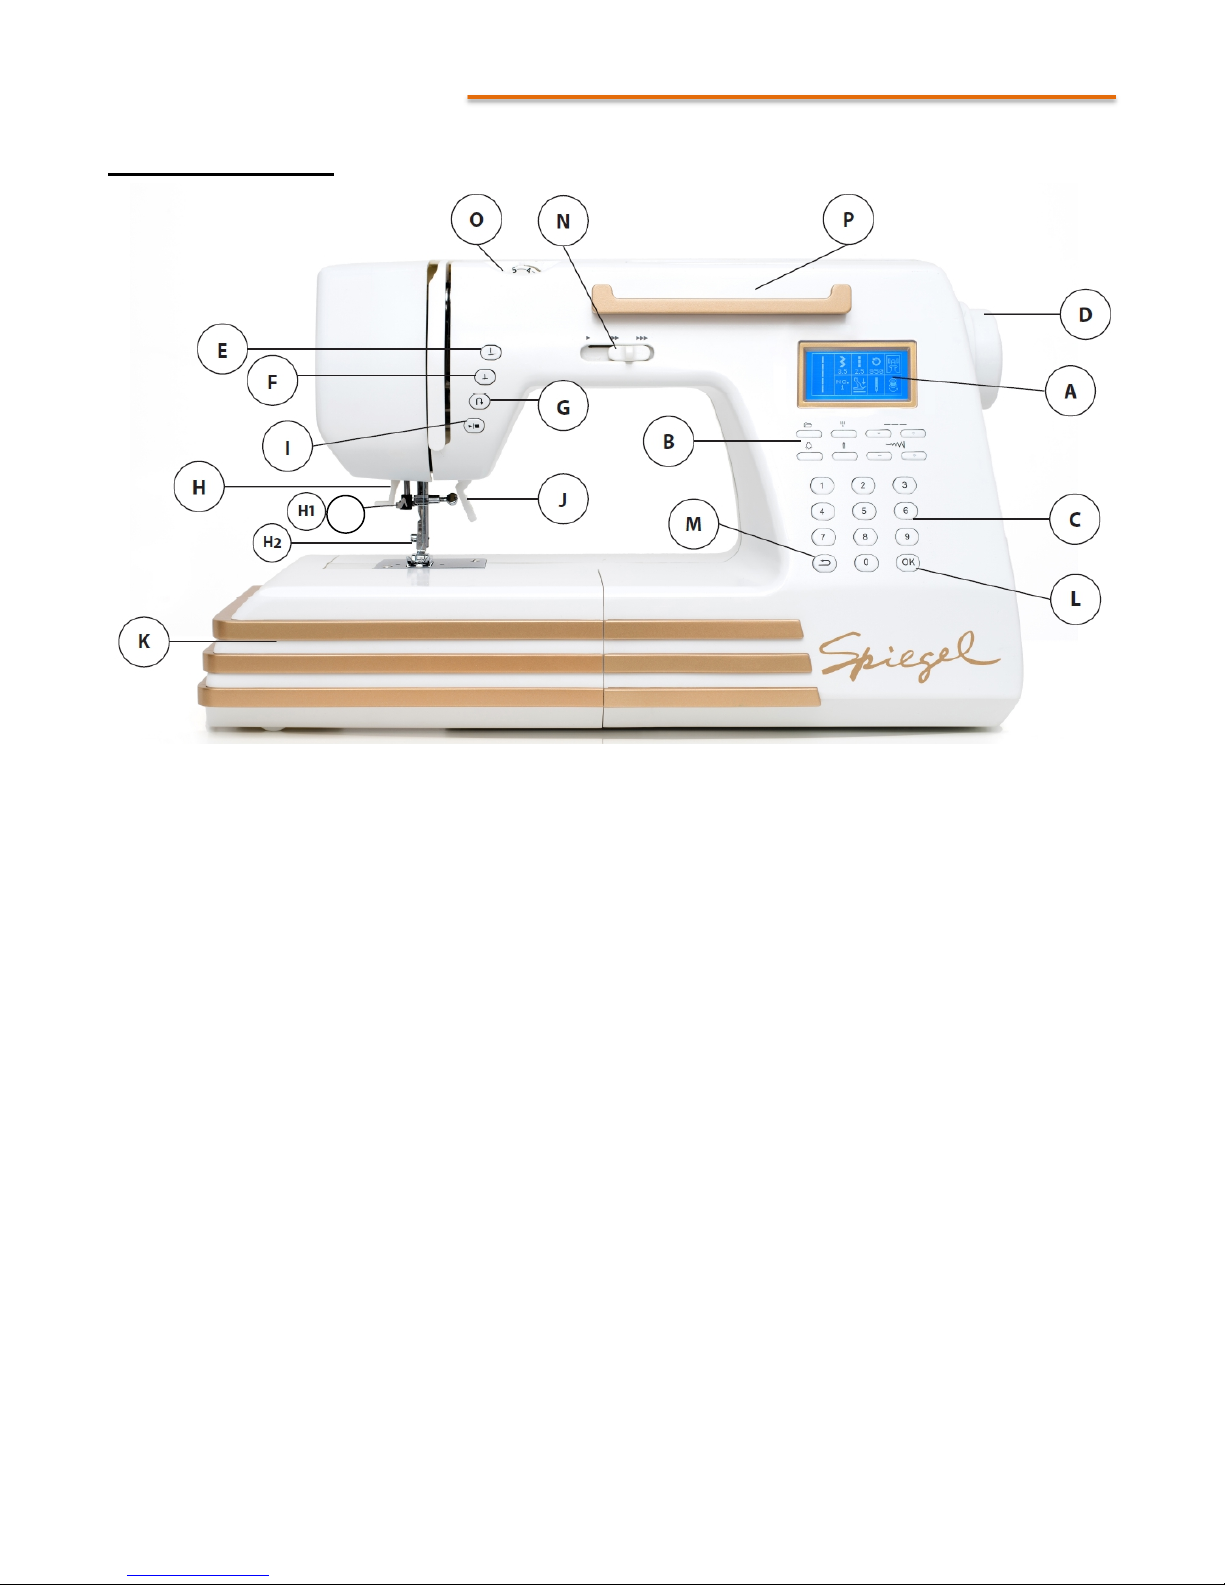
Controls Overview
H3
(A) LCD Display — This backlit panel provides
feedback on operation selections.
(B) Menu Function Keys — These keys allow the user
to enter menu selections.
(C) Numeric Selection Keys — These keys allow the
user to enter stitch selections.
(D) Handwheel — This allows the user to raise and
lower the needle manually.
(E) Needle Up Key — This automatically raises the
needle, allowing the user to move and trim fabric.
(F) Needle Down Key— This automatically lowers the
needle, preventing slippage.
(G) Reverse Stitch Key — When this key is pressed, the
sewing machine automatically sews in reverse.
(H) Automatic Threader Lever — This lever actuates
the automatic threader.
(H1) Automatic Threader — This device makes it easy
to thread the needle automatically.
(H2) Fast-Change Foot Lever — Press the release lever
on the back of the presser foot to change the presser
foot.
(H3) Buttonhole Lever Arm — This arm is used with the
one-step buttonhole foot when sewing buttons. Refer
TM
feature.
to the Needle and Presser Foot section.
(I) Start/Stop Key — This key allows the user to start
and stop the sewing machine.
(J) Presser Foot Lever — This lever allows the user to
raise and lower the presser foot.
(K) Accessories Box — This detachable tray holds
accessories for your sewing machine.
(L) OK Key — This key allows the user to confirm
entries.
(M) Cancel/Clear Key — Press this key to cancel the
previous entry.
(N) Speed Control Slider — The user may slide this
lever left or right to control the speed of the machine.
(O) Thread Tension Dial — This dial is used to adjust
the upper thread tension. Tension is adjusted
automatically to the setting selected.
(P) Smart Device Holder — This tray can be used to
hold your smartphone, tablet, or other wireless
device for use with the Stitch Cam
~9~

SPIEGEL 60609 LIMITED EDITION COMPUTERIZED SEWING MACHINE
Needle and Presser Foot
C
E
A
D
B
(A) Needle — The needle of your sewing machine can be changed by turning the screw on the shaft
above the needle. The flat side of the needle must be flush to the shaft (if the needle is installed
backwards, it will fall out). Your sewing machine also incorporates an automatic threading mechanism
that threads the needle when you pull the lever connected to the mechanism.
(B) Presser Foot — The presser foot maintains pressure on the fabric during stitching, keeping fabric
smooth and in position. Open areas within the shape of the presser foot accommodate different stitches.
There are different presser feet for zigzag stitches, for buttonhole stitches, and for zipper stitches. Your
sewing machine ships from the factory with a basic presser foot already installed. This is sufficient for
sewing basic stitches.
(C) Thread Cutter — Your sewing machine is equipped with a thread cutter. Simply draw the thread
through the opening in the cutter and pull down gently over the blade set in the plastic hook, using
enough pressure to separate the thread. You may then remove the fabric.
(D) Needle Plate — The needle plate incorporates moving grooves beneath the presser foot (“feed
dogs”), which pull the fabric through the machine as you sew. The feed dogs can be dropped (lowered)
for quilting projects.
(E) Buttonhole Lever Arm — This arm is used with the one-step buttonhole foot when sewing buttons.
NOTE
Always remove pins prior to sewing. Always keep feed dogs free of debris, pins, and
scraps of fabric or thread, to prevent clogging and jamming of the bobbin.
~10~
SPIEGEL 60609 LIMITED EDITION COMPUTERIZED SEWING MACHINE
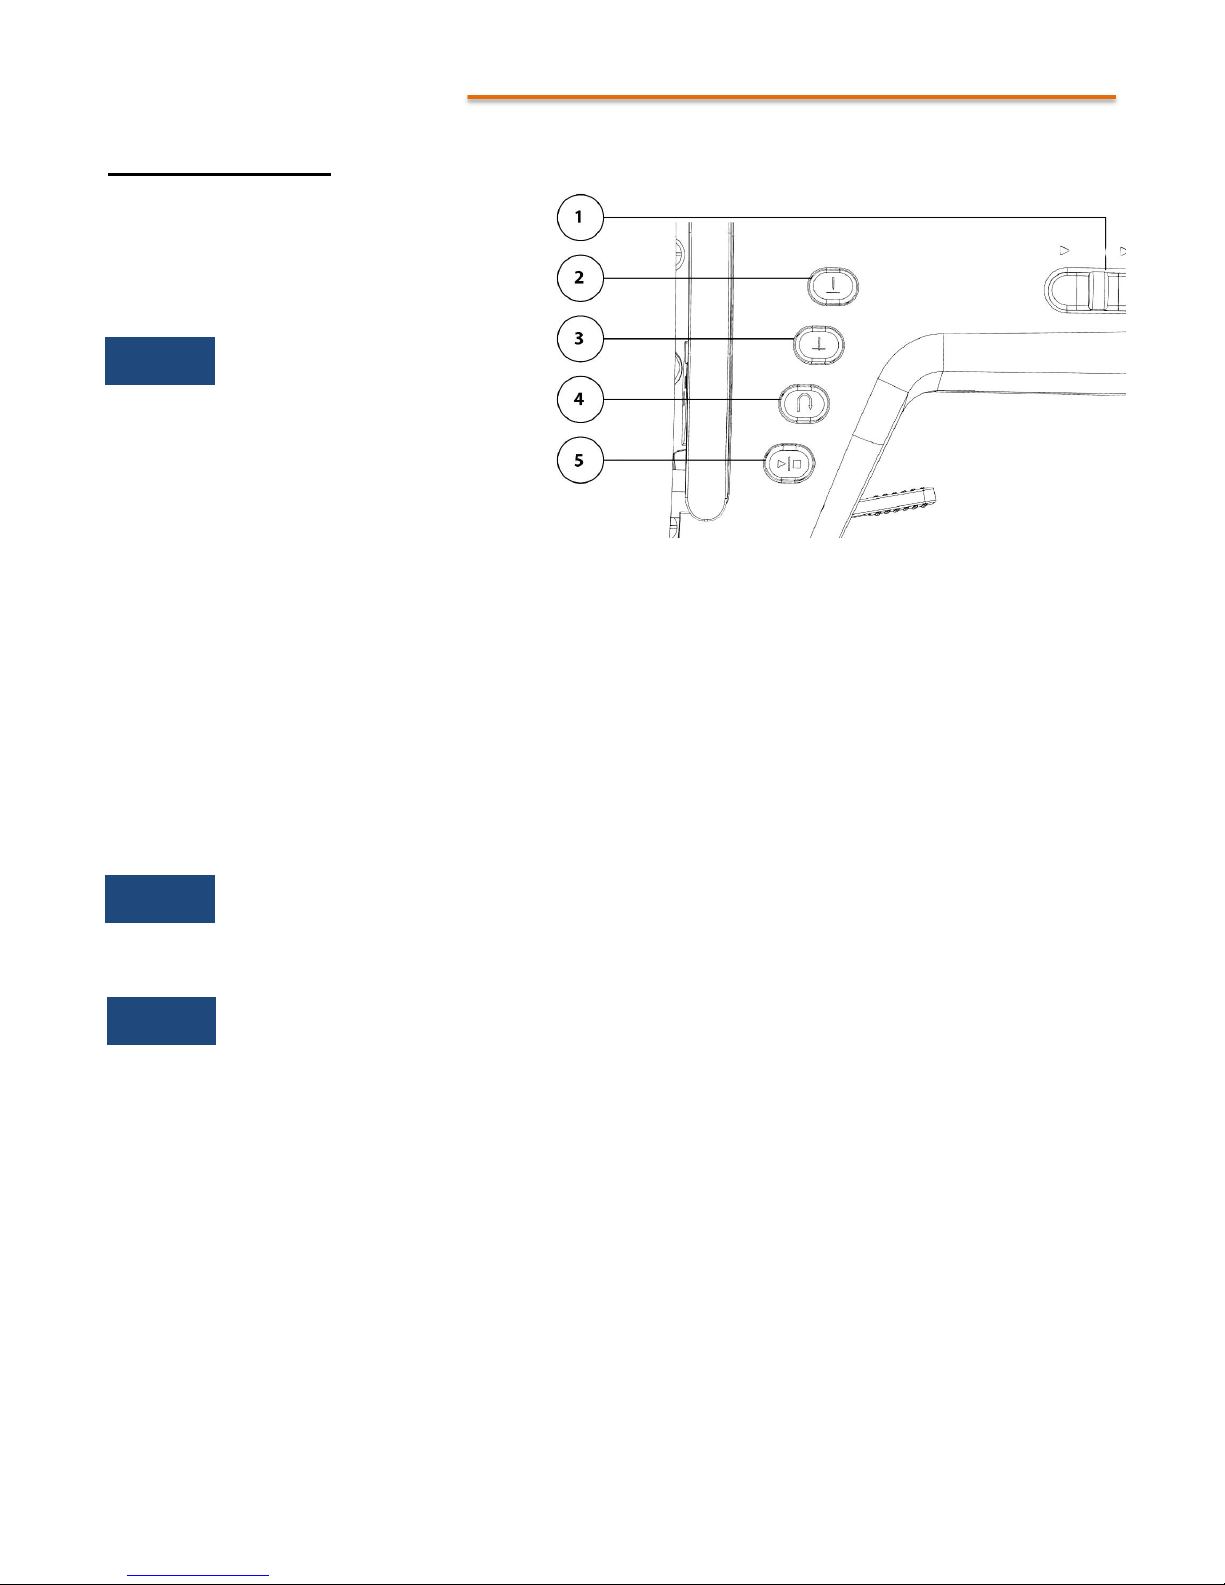
Operation Buttons
(1) Sewing Speed Control Slider —
Moving the slider from left (slow) to right
(faster) changes the speed (for those
stitches where faster speeds are available).
NOTE
The highest speed of 950
stitches per minute is available
only in straight-stitch sewing.
Certain stitches have different
maximum speeds, which are
set in the sewing machine
software. These maximum
speeds cannot be exceeded.
Changing the speed controller
will not increase the speed of
the stitch past this point.
(2) Needle Up Key — Press the Needle Up key to stop the needle in the upper position. This is used
when operating the automatic needle threader and when removing fabric from the machine.
(3) Needle Down Key — Press the Needle Down key to stop the needle in the lower position. This is
used to more easily trim and maneuver fabric.
(4) Reverse Stitch Key — Press the Reverse Stitch key to sew reverse stitches.
NOTE
The key must be held down for reverse stitching. Release the key to stop sewing. Only
straight stitches can be reversed evenly.
(5) Start/Stop Key — Press the Start/Stop key to start or stop sewing.
NOTE
The Start/Stop key functions ONLY when the foot controller is NOT plugged in. Once the
Start/Stop key has been pressed to start the machine, the machine WILL NOT STOP until
the key is pressed again.
~11~
SPIEGEL 60609 LIMITED EDITION COMPUTERIZED SEWING MACHINE
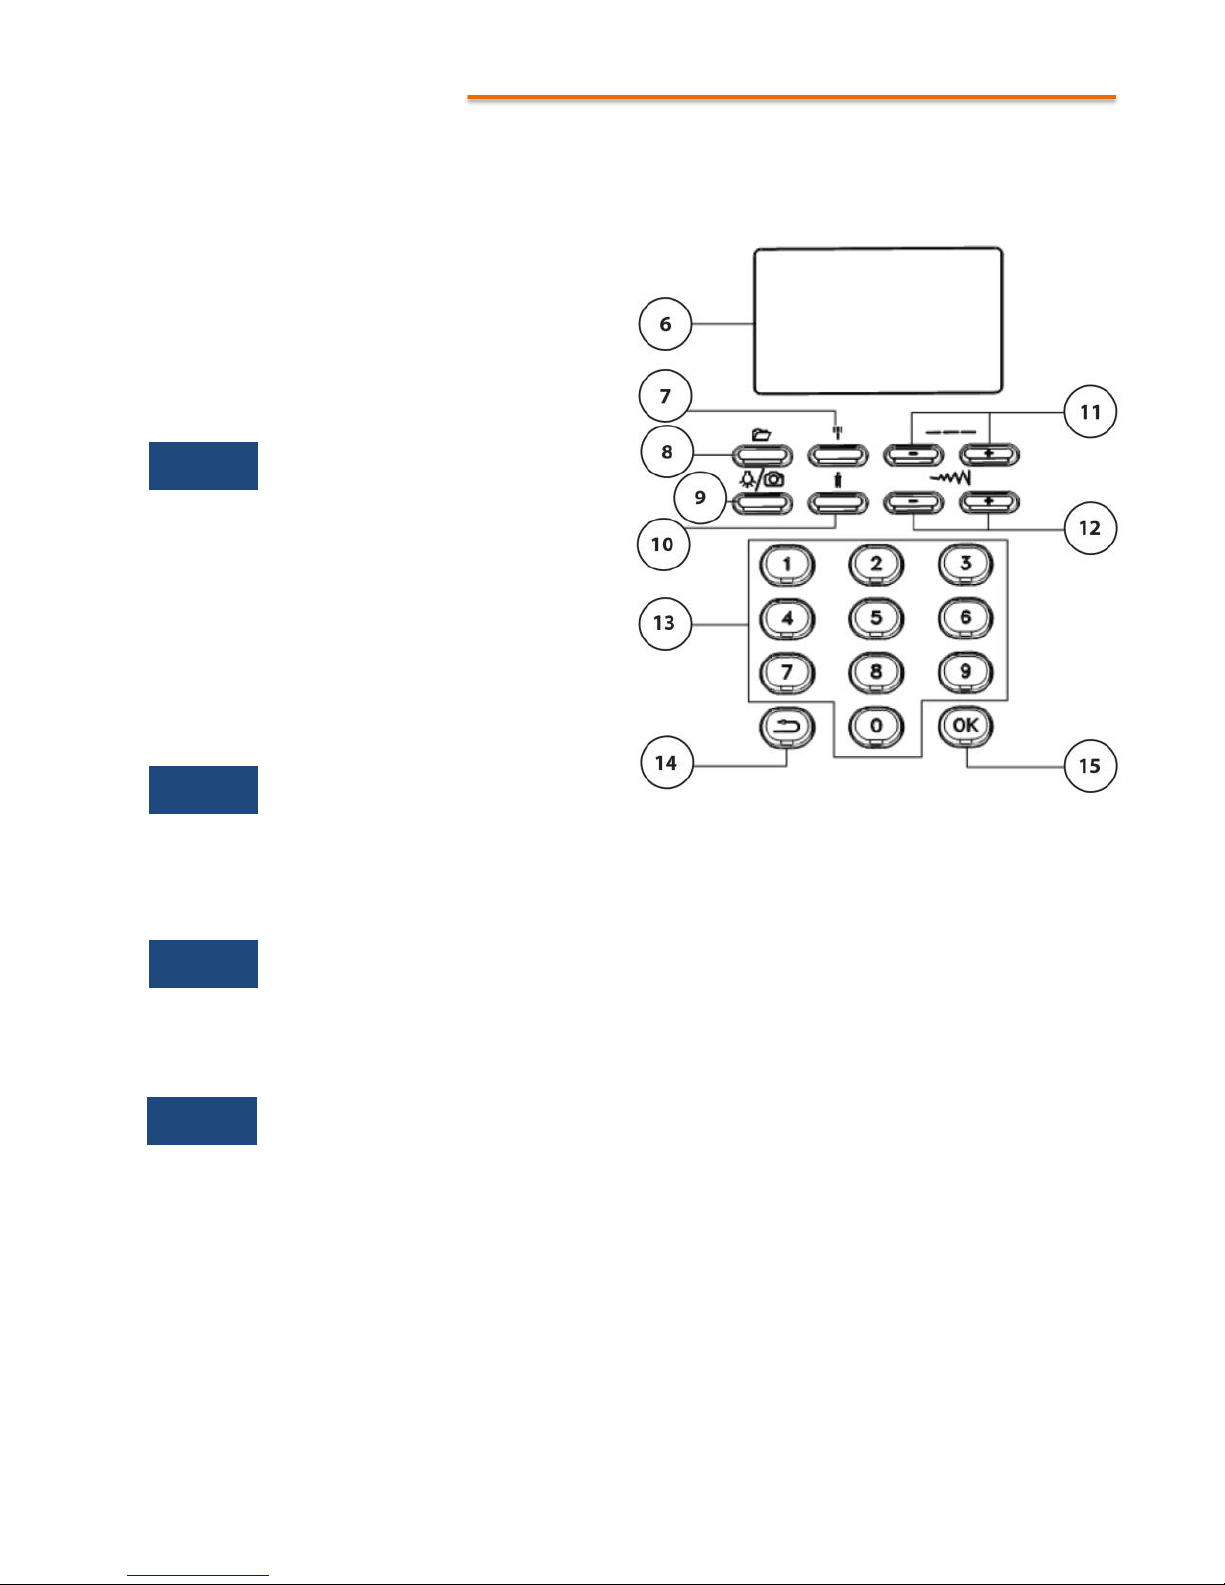
(6) LCD (Liquid Crystal Display) — This
provides visual indication of settings for
the selected stitch and also displays
status and error messages.
(7) Stretch Stitch Key — Press this key to
reverse 3-5 stitches, which reinforces the
stitching.
NOTE
This feature works with
straight stitches only.
(8) Folder Setting Key — Press this key to
enter the numeric designation for a
specific stitch (which is confirmed with
the OK key).
(9) LED Light/Camera Key — Press this
key to turn on/off the LED light and
camera.
NOTE
Switching off the light and
camera also switches off
WiFi connectivity.
(10) Needle Type Key (Single/Twin) — Press this key to toggle between single needle sewing and
twin needle sewing.
NOTE
Stitch width automatically adjusts to 4mm when twin needle sewing is toggled on.
(11) Stitch Length Keys — Press " - " or "+" to adjust the stitch length.
(12) Stitch Width Keys — Press " - " or "+" to adjust the stitch width.
NOTE
Stitch width cannot be changed on certain preprogrammed stitches.
(13) Numeric Selection Keys (0-9) — These keys are used to enter the numeric designations for
specific stitches.
(14) Cancel/Clear Key — Press this key to cancel the entry.
(15) OK Key — Press this key to confirm entries when entering stitch code numbers.
~12~
SPIEGEL 60609 LIMITED EDITION COMPUTERIZED SEWING MACHINE
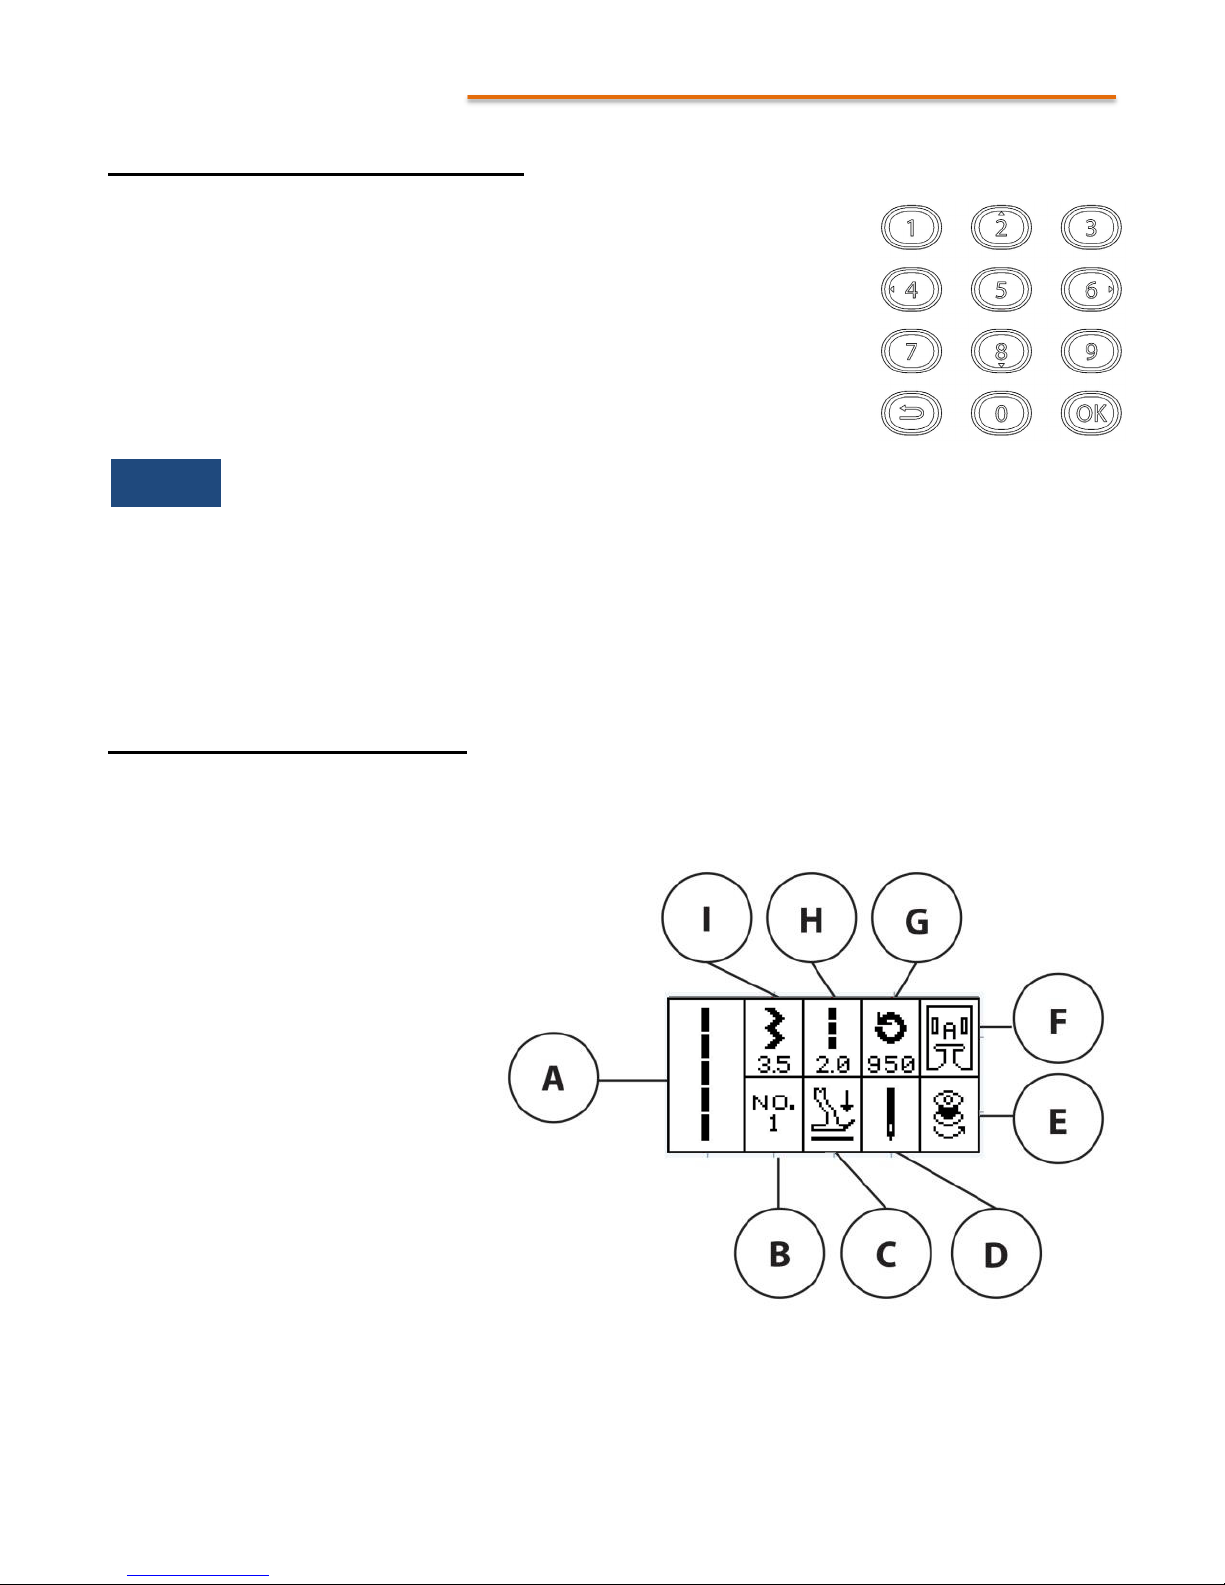
Numeric Selection Keypad Arrows
Arrows on the 2, 4, 6, and 8 keys of the Numeric Selection Keypad can be
used when selecting stitches (refer to Selecting Stitches for more
information). Normally, to select a specific stitch, you would press the Folder
Setting key, then the number of the stitch you want. If you do not first press
the Folder Setting key, the 2, 4, 6, and 8 keys function as directional inputs.
Left Arrow (4 Key): This lets you scroll backwards through previously used
stitches. For example, if you used stitch #1, stitch #5, and stitch #10, you
could left-arrow back to stitch #5 from stitch #10.
NOTE
Stitches only become available in this “scroll back” list after you have sewn with them.
Simply entering the stitch and confirming with the OK key does not add the stitch.
Right Arrow (6 Key): This lets you scroll forward through previously used stitches if you have already
scrolled backward. For example, if you used stitch #1, stitch #5, and stitch #10, you could left-arrow
back to stitch #5 from stitch #10, then right-arrow forward to stitch #10 again.
Up Arrow (2 Key): This lets you scroll up through the stitch catalog stitch by stitch.
Down Arrow (8 Key): This lets you scroll down through the stitch catalog stitch by stitch.
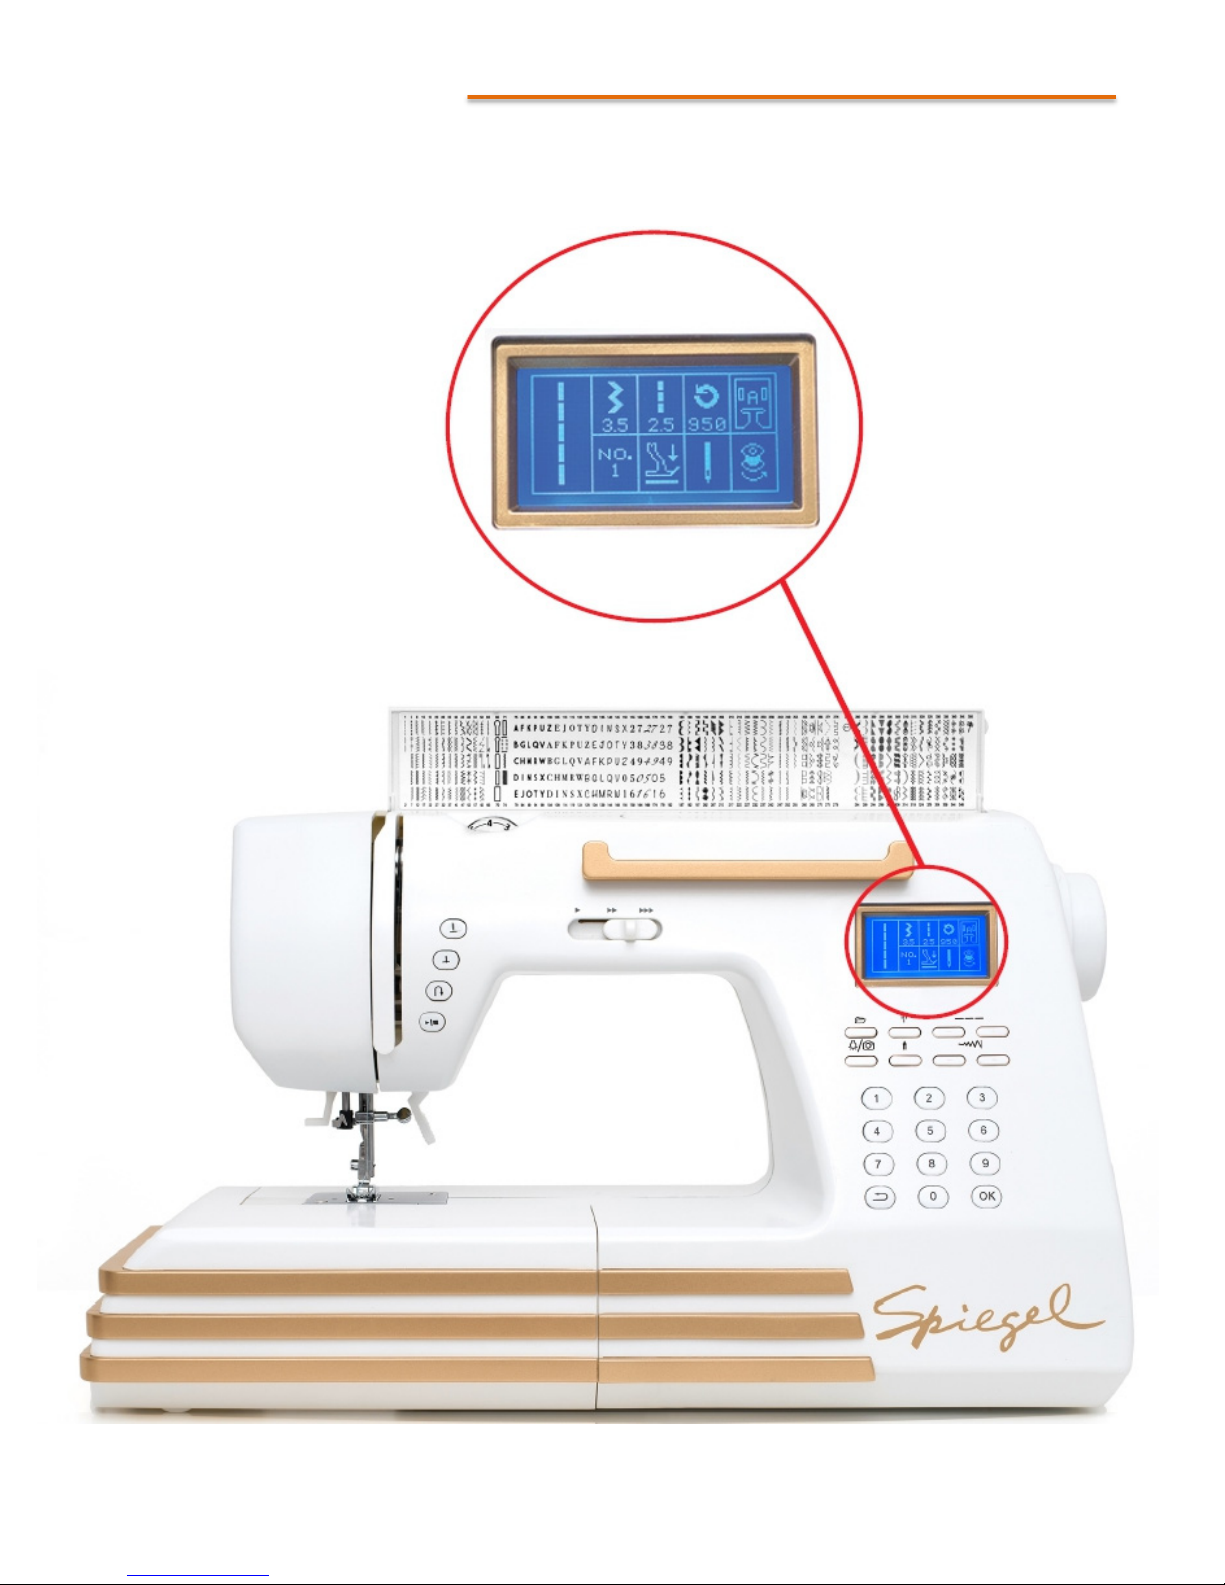
LCD (Liquid Crystal Display)
The LCD displays status and error codes for your sewing machine. These are displayed in the form of
icons. The icons are arranged as follows:
(A) — Selected Stitch
(B) — Numeric designation for the
selected stitch
(C) — Presser foot status (raised or
lowered)
(D) — Twin/single needle
sewing status
(E) — Winding status (highlighted
while winding bobbins)
(F) — Presser foot type that is installed (refer to the
Presser Foot Icons section)
(G) — Maximum sewing speed (which ranges from
90 to 950 stitches per minute)
(H) — Stitch length (0mm to 5mm)
( I ) — Stitch width (0mm to 7mm)
~13~
SPIEGEL 60609 LIMITED EDITION COMPUTERIZED SEWING MACHINE
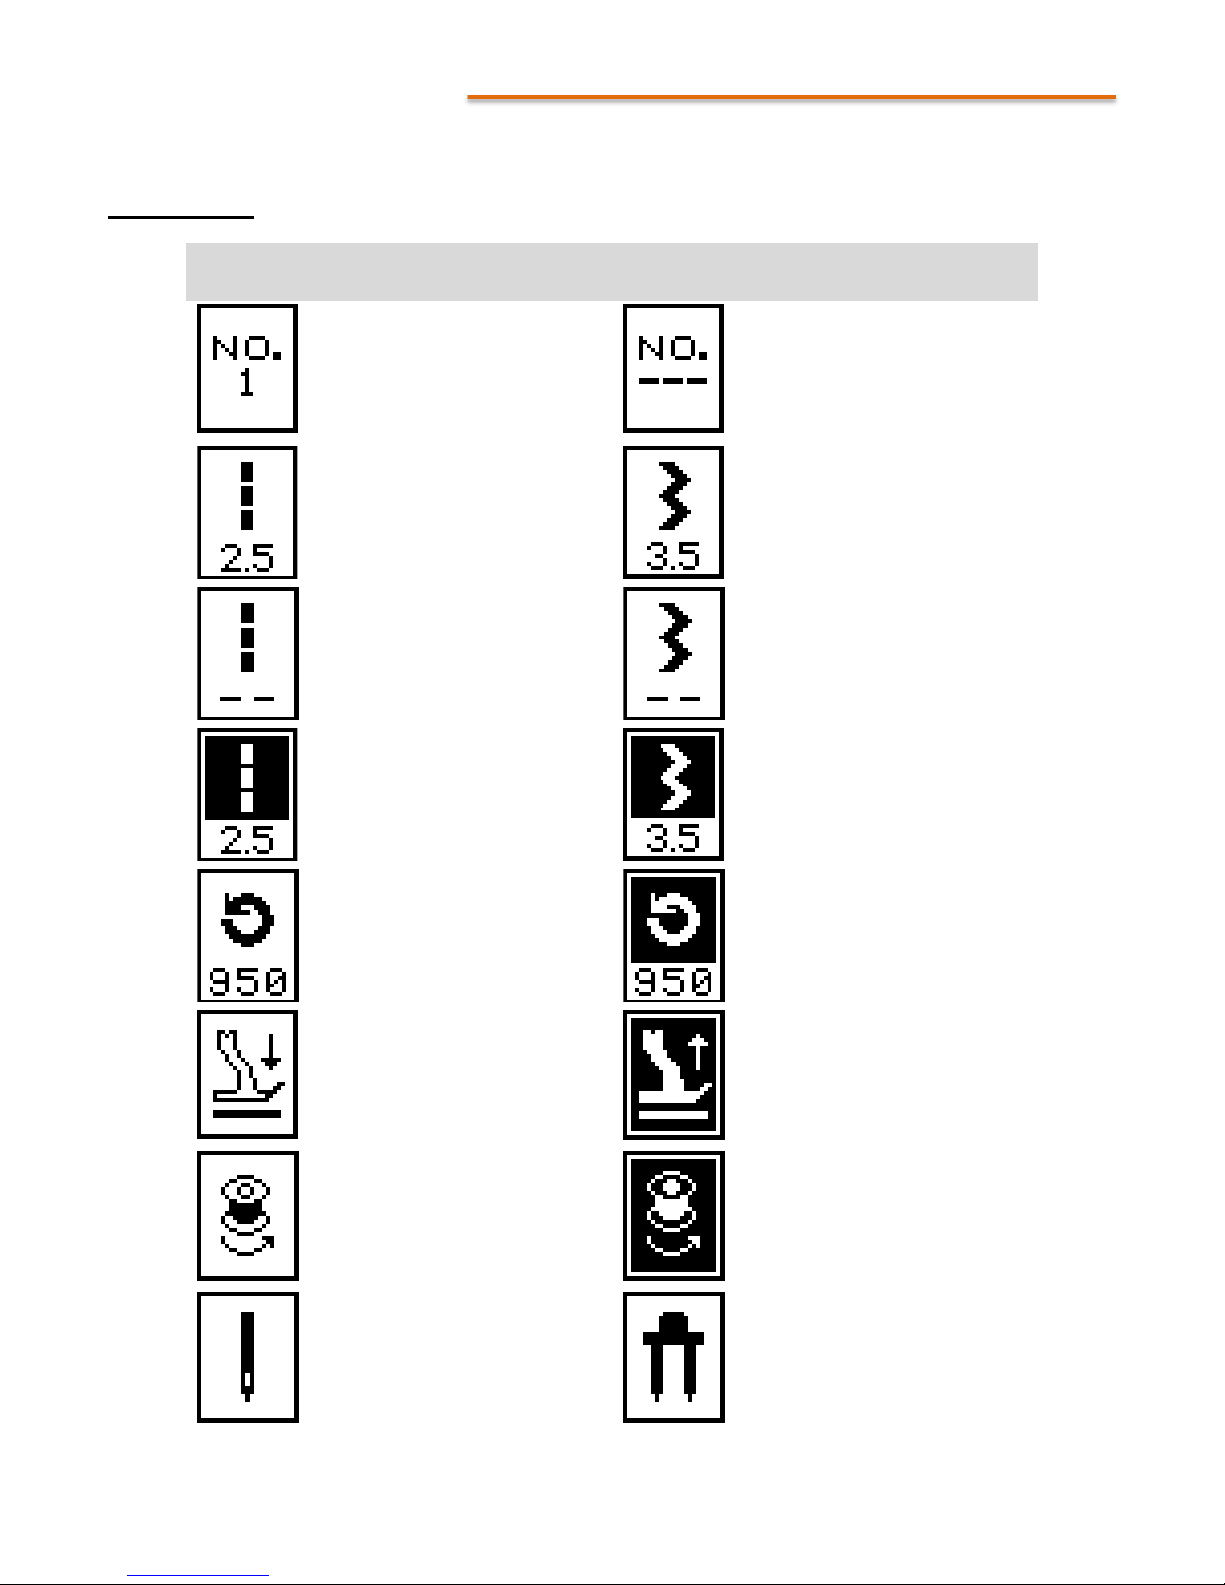
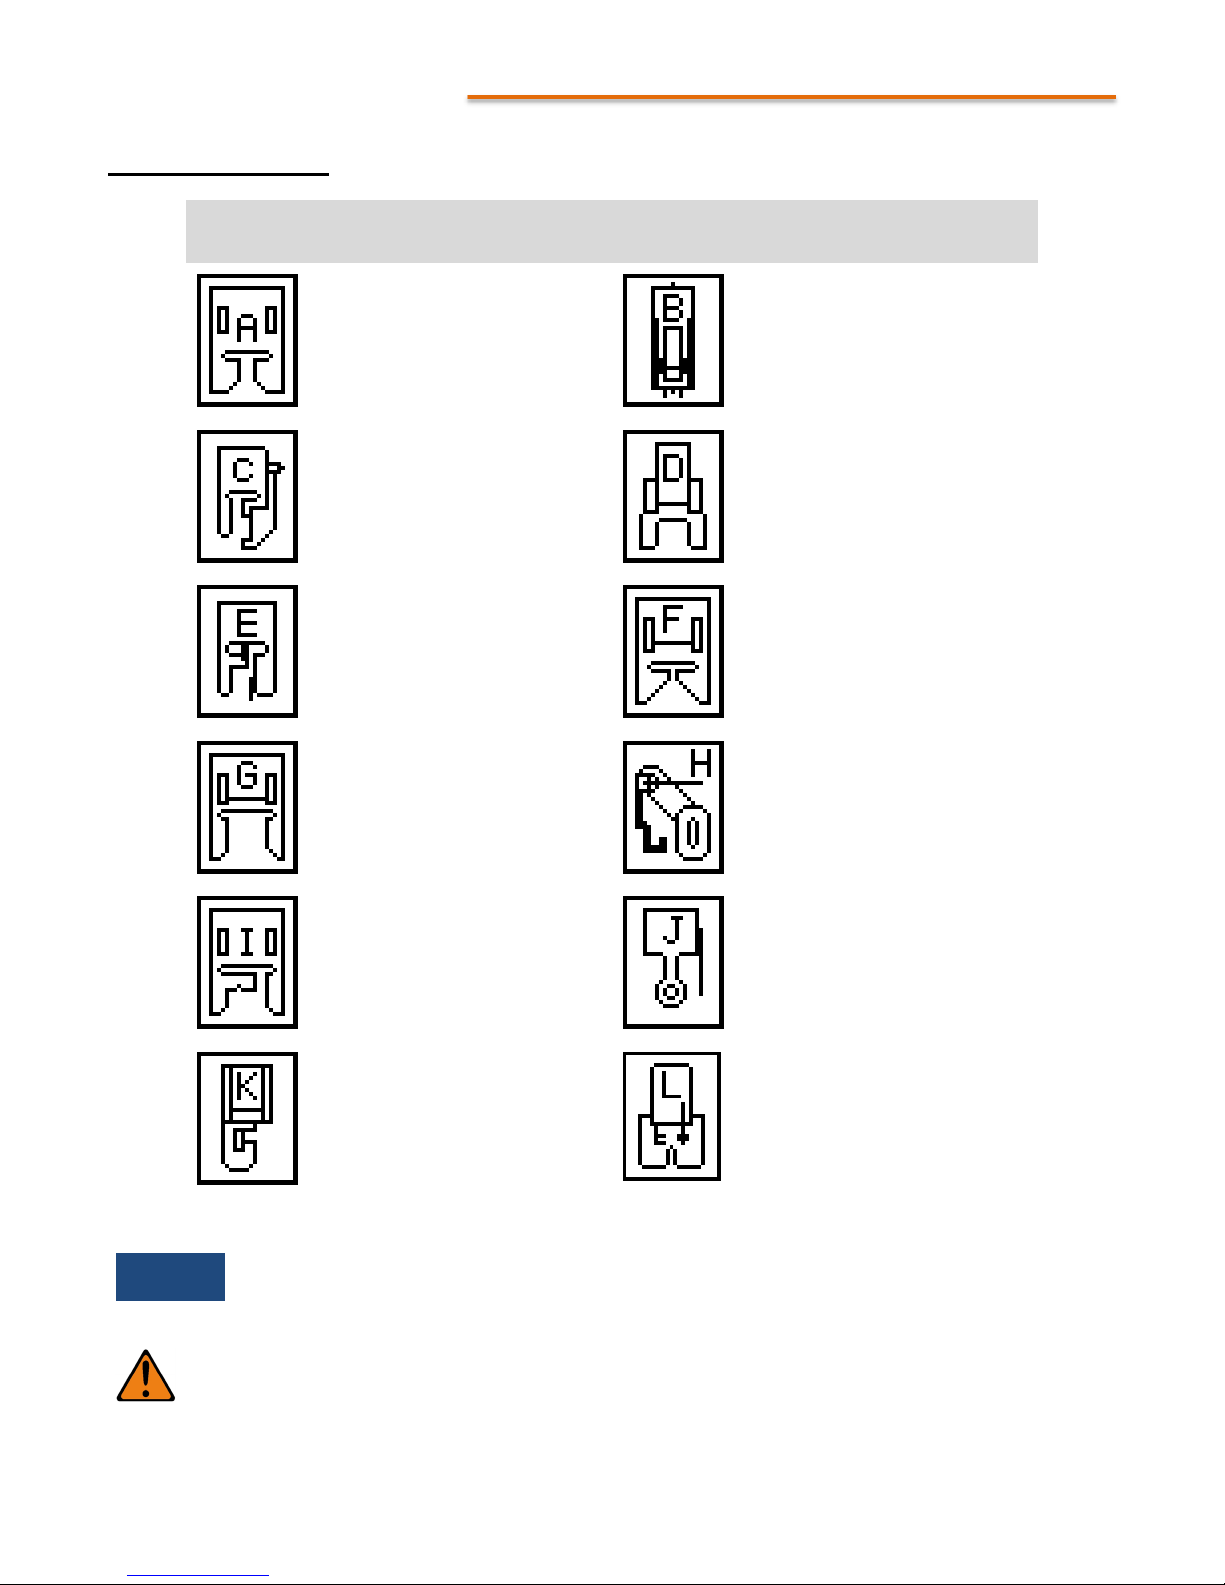
LCD ICONS
Status Icons
Icon Explanation Icon Explanation
This is how the display
Selected stitch number
Stitch length (system set) Stitch width (system set)
appears when editing the
stitch number
Stitch length cannot be
adjusted
Stitch length
(manually adjusted)
The highest sewing speed
for the current stitch (in
standby mode)
Stitch width cannot be
adjusted
Stitch width
(manually adjusted)
The highest sewing speed
for the current stitch when
sewing
Presser foot is lowered Presser foot is raised
Bobbin winding in dormant
mode
Bobbin winding is working
Single needle for current
stitch
Twin-needle for current
stitch
~14~
SPIEGEL 60609 LIMITED EDITION COMPUTERIZED SEWING MACHINE
LCD SCREEN STATUS EXAMPLE
~15~
SPIEGEL 60609 LIMITED EDITION COMPUTERIZED SEWING MACHINE
Presser Foot Icons
Icon Explanation Icon Explanation
A- Zigzag Foot B- Buttonhole Foot
C- Blind Hem Foot D- Button Fitting Foot
E- Overcasting Foot F- Non-Stick Foot
NOTE
Please refer to our online support center and video tutorials for instructions on selecting
and easily changing the presser foot. The Embroidery/Darning Foot and Walking Foot
presser foot are sold separately at www.spiegelsewing.com.
WARNING —
G- Open Toe Foot
I- Monogramming Foot
K- Zipper Foot
Always switch off the sewing machine when changing the presser foot. Be
extremely careful when placing your hands close to the needle.
H- Quilting Foot
(not included)
J- Embroidery/Darning Foot
(not included)
L- Walking Foot
(not included)
~16~

SPIEGEL 60609 LIMITED EDITION COMPUTERIZED SEWING MACHINE
CONTROLLING YOUR SEWING MACHINE
Your computerized sewing machine uses electrical power. Follow all relevant safety guidelines to avoid
the risk of shock, fire, and injury.
WARNING —
Outdoor use is not recommended. Use the sewing machine only as designed
and intended. Do not use the machine with accessories not provided for sale
by Spiegel. Use of unapproved accessories could result in injury and/or
damage to the machine, and will void your limited Spiegel product warranty.
This machine should not be operated near oxygen tanks or where oxygen is
being administered. Do not operate the machine in proximity to any aerosol
chemical.
Your sewing machine has a polarized electrical plug (one blade is wider than
the other). Always plug the blades in correctly to an approved, listed wall
outlet to reduce your risk for electrical shock. Never force the plug. If the
plug does not fit, make sure you have aligned the polarized blades correctly.
If the plug still does not fit, contact a qualified electrical technician. Never
modify the electrical plug in any way.
NEVER operate the sewing machine if the power cord is damaged or
exposed wires are visible. The sewing machine should not be operated after it
has been exposed to water, after it has been subjected to impact damage, or if
it has otherwise been damaged. Always have your sewing machine examined
and repaired by an authorized Spiegel dealer if it has been damaged.
Do not leave the sewing machine plugged in while it is unattended. Always
unplug the sewing machine from the electrical outlet when it is not in use.
Never clean or maintain your sewing machine while it is plugged in. Do not
unplug the machine while power is switched on. Always switch the power
off before unplugging the machine, and never pull the power cord by the
cord itself. Always hold the power cord by the plug.
Always switch off the sewing machine whenever you are changing the
needle or whenever you are otherwise adjusting the sewing machine.
Do not block the ventilation slots of the sewing machine. Proper air flow is
required for operation of the machine. Do not allow fabric, dust, or debris to
block the air vents. Never insert objects into any openings or seams on the
machine.
~17~
SPIEGEL 60609 LIMITED EDITION COMPUTERIZED SEWING MACHINE
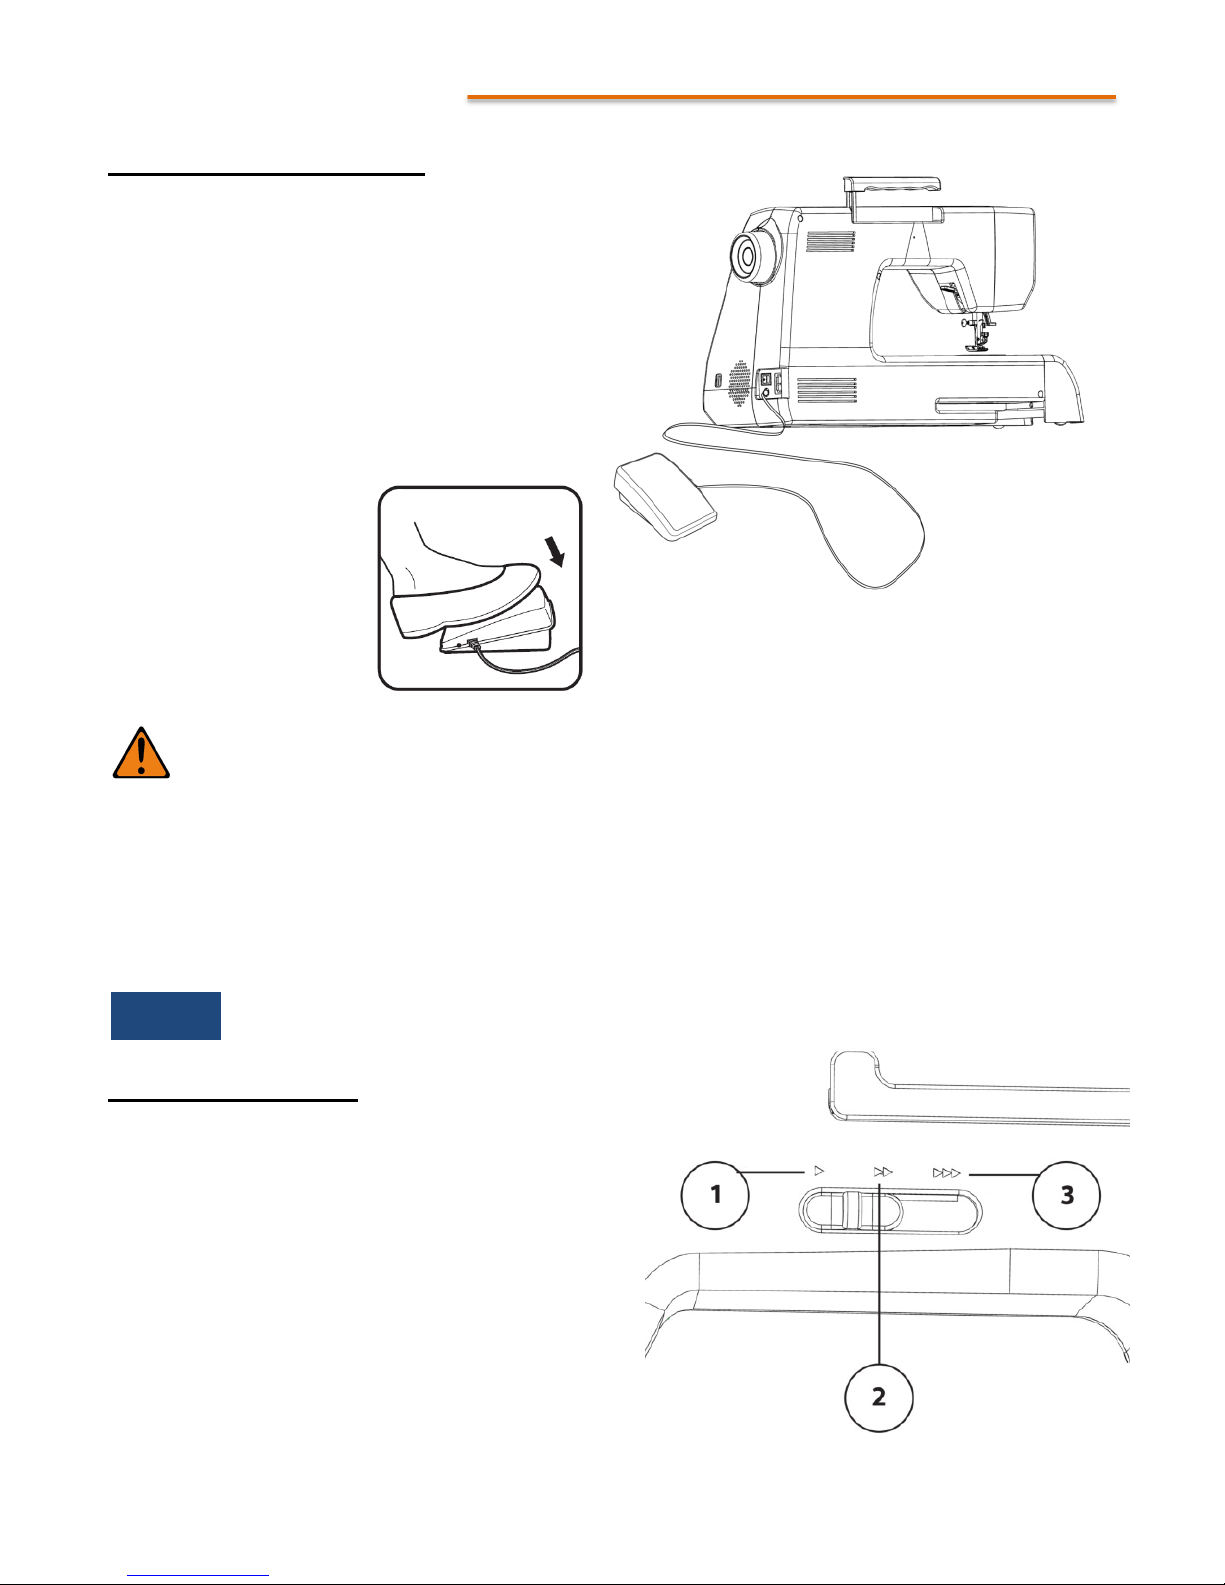
Using The Foot Controller
The speed control slider sets the maximum
speed at which you sew, but the foot controller
allows you to control the actual speed at
which you sew, from zero up to the maximum
speed selected by the slider.
Connect the foot controller to the socket on
the sewing machine. Then simply press lightly
on the foot controller with your heel resting at
the base.
The more pressure you
exert, the faster the
sewing machine operates.
When you release
pressure on the foot
control, the sewing
machine will stop.
WARNING —
Always watch the needle or the Stitch CamTM when sewing. Keep fingers
away from the needle area. You may feel the natural urge to look down at
the foot pedal the first few times you use it, but resist this urge to reduce the
risk of personal injury. Operate the foot pedal through feel and watch the
needle or the Stitch CamTM as you sew.
Always switch off the sewing machine before connecting the foot controller.
This prevents the machine from running accidentally when the controller is
connected.
NOTE
The Start/Stop key cannot be used to start and stop the sewing machine when the foot
controller is connected to the sewing machine.
Speed Control Slider
Slide the speed control to the left (1) for slower
speed and to the right (3) for the highest speed.
You can adjust the speed only to the maximum
for the selected stitch, which varies from stitch
to stitch. The setting selected by the slider
becomes the foot controller’s maximum speed.
The speeds are as follows:
1. Low — 90-300 stitches per minute
2. Medium — 300-500 stitches per minute
3. High — 500-950 stitches per minute
~18~
 Loading...