Page 1

Spicer
®
Single Drive Axles
Service Manual
Single Reduction & Single Reduction
with Differential Lock
AXSM0048
September 2008
15040S
17060S/D
19050S
19055S/D
19060S/D
20060S/D/R
21060S/D
21065S/D
21090S/D
22060S/D/R
22065S/D
P20060S/D/R
P22060S/D/R
23070S/D
23080S/D
23085S/D
23090S/D
23105S/D
26080S/D
26085S/D
26090S/D
26105S/D
30105S/D
Page 2
General Information
General Information
The description and specifications contained in this service
publication are current at the time of printing. Dana reserves
the right to discontinue or to modify its models and/or
procedures and to change specifications at any time
without notice.
Important Notice
This symbol is used throughout this
manual to call attention to procedures
where carelessness or failure to follow
specific instructions may result in personal
injury and/or component damage.
Departure from the instructions, choice of
tools, materials and recommended parts
mentioned in this publication may
jeopardize the personal safety of the
service technician or vehicle operator.
Any reference to brand names in this publication is made simply as an example of the types of tools and materials recommended for use and should not be considered an
endorsement. Equivalents, if available, may be used.
WARNING
Failure to follow indicated
procedures creates a high risk of personal
injury to the servicing technician.
CAUTION
Failure to follow indicated procedures
may cause component damage or malfunction.
IMPORTANT
Highly recommended procedures
for proper service of this unit.
NOTE: Additional service information not covered
in the service procedures.
Always use genuine Spicer replacement parts.
TIP: Helpful removal and installation procedures
to aid in the service of this unit.
i
Page 3

Table of Contents
Table of Contents
Table of Contents - Visual ............................................ 1
Introduction ................................................................2
Model Identification .................................................... 3
Ring Gear and Pinion .................................................. 4
Failure Analysis ........................................................... 5
Prepare the Parts for Inspection ................................. 6
Inspection ................................................................... 7
Differential Carrier Assembly - Exploded View ............ 8
Remove Differential Carrier ......................................... 9
Install Differential Carrier .......................................... 10
Disassemble Carrier Assembly - (Rear Axles) ........... 11
Rear Axle Pinion Assembly - Exploded View ............. 13
Remove Pinion Assembly ......................................... 14
Disassemble and Overhaul Drive Pinion .................... 15
Replace Pinion Bearing Cage Cups ........................... 17
Adjust Pinion Bearing Preload - (Trial Buildup) ......... 18
Adjust Pinion Bearing Preload - (Final Buildup) ........ 20
Install Drive Pinion Assembly .................................... 24
Install Pinion Oil Seal and Yoke ................................. 25
Wheel differential - Exploded View............................. 26
Remove Wheel Differential - (All Standard Models) ..27
Disassemble, Overhaul and Assemble
Wheel Differential ...................................................... 28
Overhaul and Assemble Wheel Differential ................ 29
Measure and Adjust Carrier Assembly ...................... 31
Change Backlash Setting ........................................... 32
Table of Contents
Adjust Ring and Pinion Tooth Contact Pattern ...........33
Adjust Pinion Position ...............................................34
Differential Lock Shifting Parts - Exploded View ........35
Wheel Differential Locking Axles ...............................36
Install and Adjust Differential Lock - Type 1 Axles .....37
Shift Fork Adjustment - Type 1 Axles .........................39
Install and Adjust Differential Lock - Type 2 Axles .....40
Install and Adjust Wheel Differential Lock .................42
Install New Axle Housing Breather -
(Metal and Plastic) .............................................44
Axle Housing - Exploded View ...................................45
Inter-Axle Speed Sensor Parts - Exploded View ........46
Disassemble and Overhaul Inter-Axle Speed Sensor .47
Install Inter-Axle Speed Sensor .................................48
Wheel End Seal Parts - Exploded View ......................49
Remove and Overhaul Wheel End Seal ......................50
Adjust Wheel Bearing ................................................51
Verify Wheel End-play Procedure ..............................53
Lubricate Information .................................................54
Proper Vehicle Towing ...............................................55
Operate Wheel Differential Assembly .........................56
Wheel Differential Lock ..............................................57
Wheel Differential Lock Operation .............................58
Rear Drive Axle Parts - Exploded View .......................59
Inter-Axle Speed Sensor Parts - Exploded View .. 60-61
Housing and Output Shaft Assembly Parts - Exploded
View ..........................................................................62
Fastener Torque Specifications ............................ 63-65
ii
Page 4
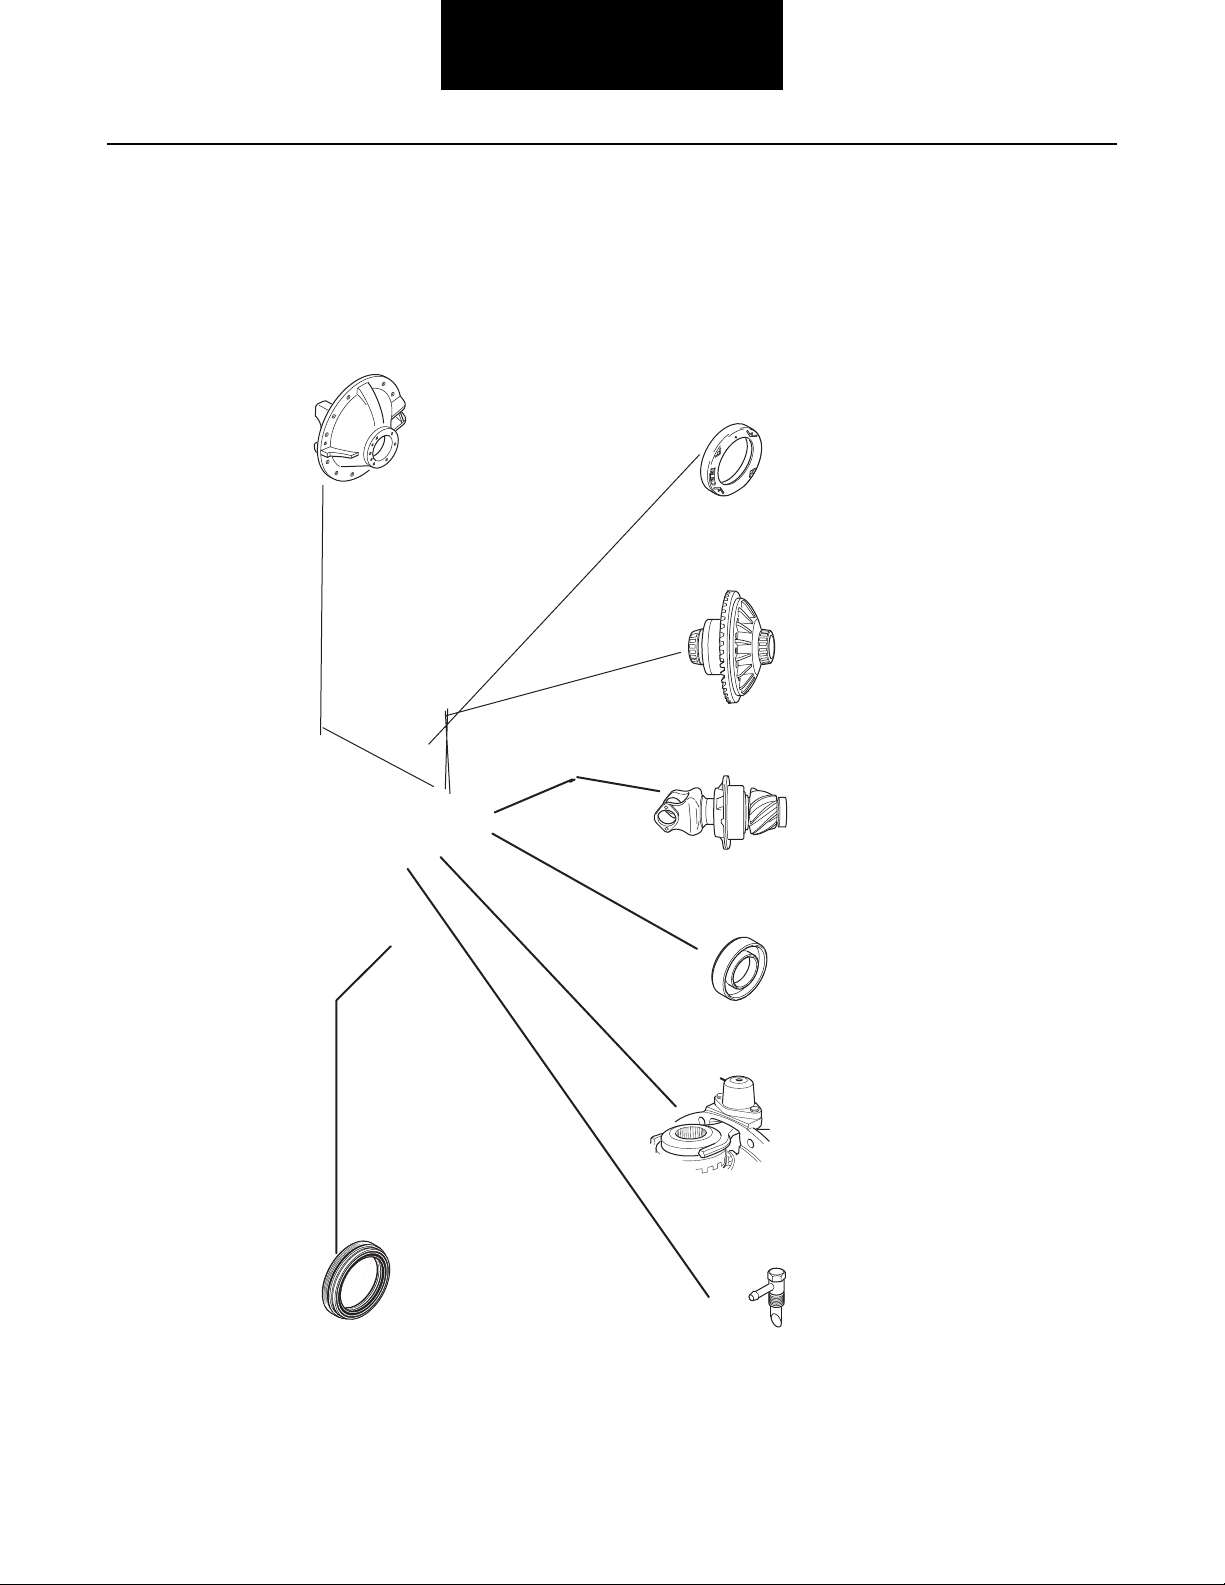
Table of Contents - Visual
page 44
Carrier
Assembly
page 8
General Information
Inter-Axle
Speed Sensor
page 46
Differential
Assembly
page 11-12
Wheel End Seals
page 49
Drive Pinion
page 13
Seals
page 25
Wheel
Differential
Lock
page 36
Housing Breather
page 44
1
Page 5
General Information
Introduction
Dana presents this publication to aid in maintenance and
overhaul of Spicer single reduction drive axles. Instructions
contained cover the models listed below. Their design is
common, with differences in load capacity. Capacity
variations are achieved by combining basic differential
carrier assemblies with different axle housings, axle shafts
and wheel equipment. The suffix letter “P” in the model
number indicates a lube pump is standard. Pump models
are equipped with a gerotor pump, designed to provide
additional lubrication to the inter-axle differential and
related parts.
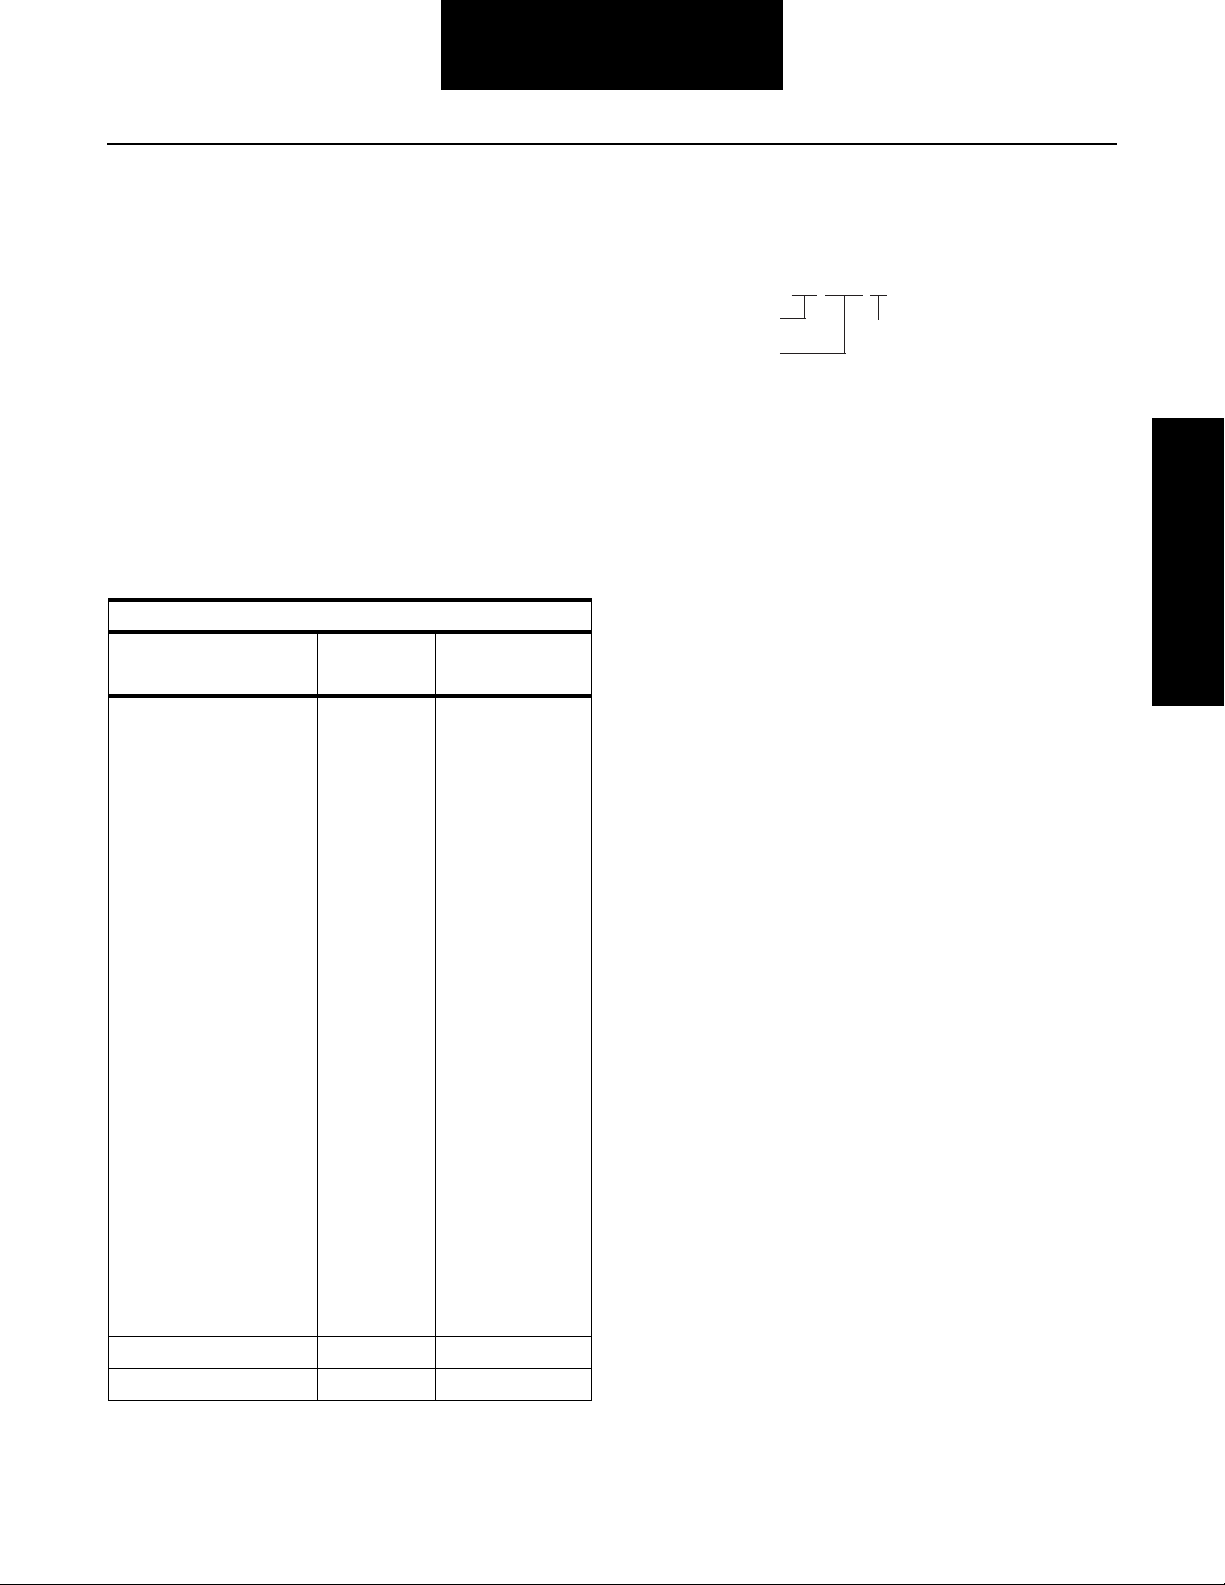
Model Listing
The following models are included in this publication.
Spicer Single Reduction Axles
With Standard With With Wheel
Wheel Differential IASS Differential Lock
15040S – –
17060S _ 17060D
19050S – –
19055S – 19055D
19060S 19060A 19060D
21060S 21060A 21060D
21065S – 21065D
21080S 21080A 21080D
21090S 21090A 21090D
22060S 22060A 22060
5S – 22065D
2206
23070S – 23070D
23080S 23080A 23080D
23085S – 23085D
23090S 23090A 23090D
23105S 23105A 23105D
26080S 26080A 26080D
26090S 26090A 26090D
26105S 26105A 26105D
30105S 30105A 30105D
P22060S - P20060D
P22060S - P22060D
D
(GAWR x 1000 lbs.)
(GCW x 1000 lbs.)
23 080 S
Gearing:
A - Single Reduction with In-Axle
Speed Sensing
B - Bus Specific
D - Single Reduction with
Wheel Differential Lock
H - Heavy Wall
L - Limited Slip
P - Planetary Double Reduction
R - Retarder/Parking Brake Ready
S - Single Reduction
T - 2-Speed
General Information
2
Page 6
Model Identification
General Information
4
3
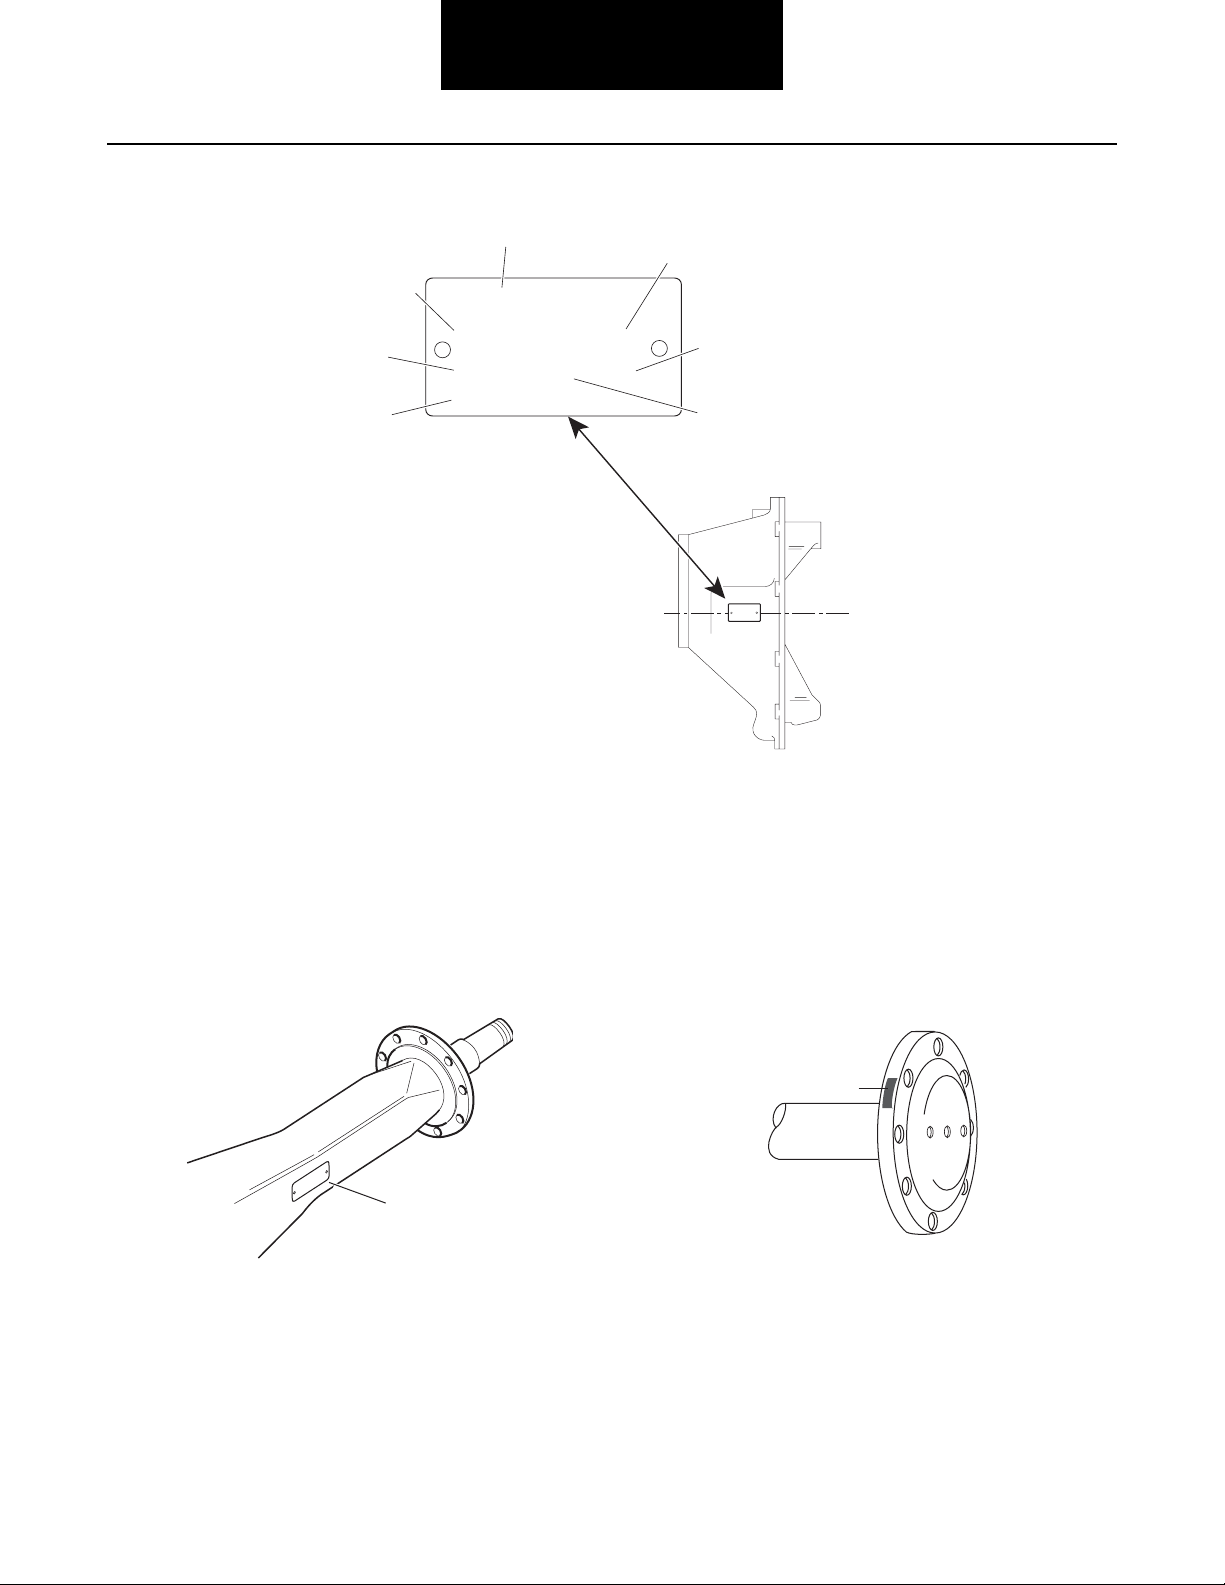
CUST. PART NO.
SPEC. SERIAL NO.
Spicer
®
2
MODEL PART NO. RATIO
1
MADE IN:
1 - Country of origin
2 - Axle modle identification
3 - Specification number assigned to the axle
built by Spicer. Identifies all component parts
of the axle including special OEM requirements
such as yoke or flanges.
4 - OEM part number assigned to the axle build
5 - Carrier assembly serial number assigned by
the manufacturing plant
6 - Axle gear ratio
7 - Carrier assembly production or service part number
5
6
7
®
CUST. PART NO.
Spicer
SPEC. SERIAL NO.
MODEL PART NO. RATIO
MADE IN:
Rear Axle (Top View)
Data plate is located on
the axle centerline
Parts Identification
Axle Housing
Spicer
PT. NO.
O.
HSG. CAP. LBS.
ADE IN
HSG. I.D. N
HOUSING M
1 - ID Tag
Axle Shaft
2
®
1
2 - Axle shaft part number
3
Page 7
General Information
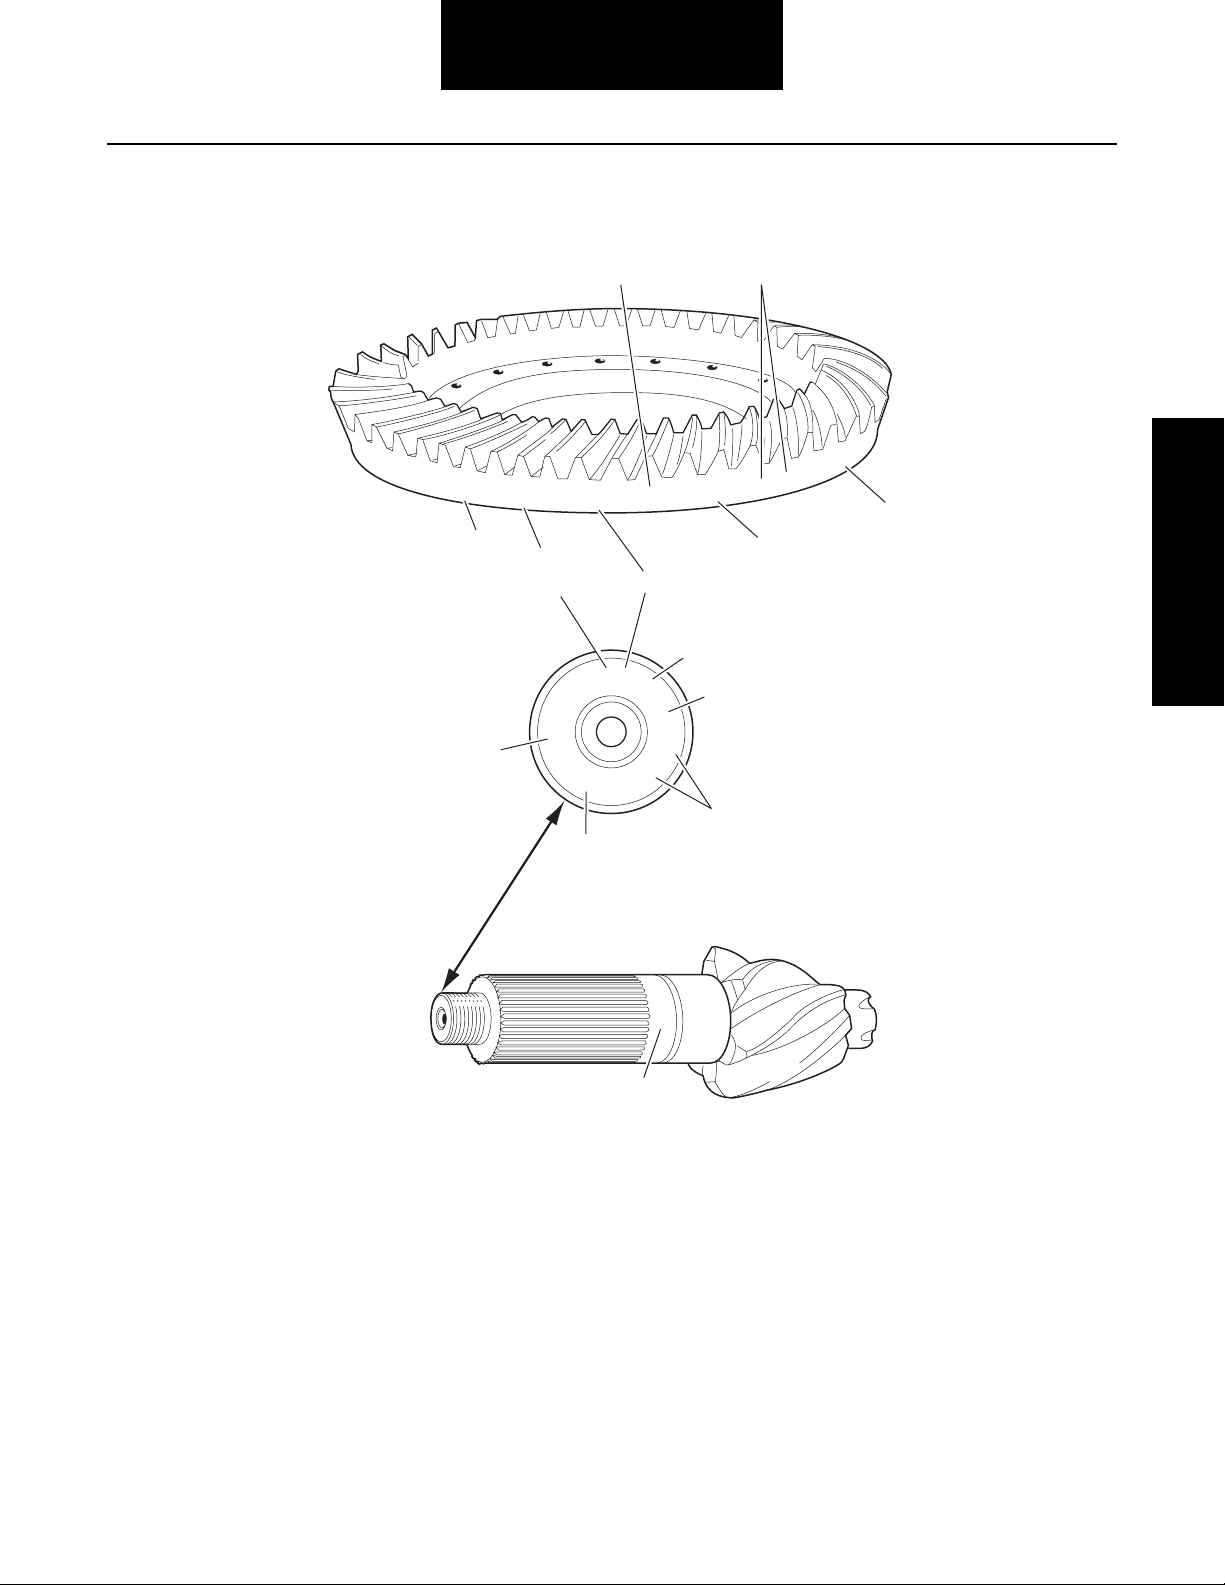
Ring Gear and Pinion
Note: Ring gear and drive pinion are matched parts and must be replaced in sets.
127381
1
SPICER
7
7
5
SPICER
127
1
41-8
8-41
127428
8
NL2
3
L7038
G
17
OF
4
General Information
6
2
8
127
G
0H
6
17
3
1—Part number
2—Number of ring gear teeth
3—Manufacturing numbers
4—Matching gear set number
5—Number of pinion teeth
6—Date code
7—Indicates genuine Spicer parts
8—Heat code
L
7
6-39
JD77
85405
86
DANA
0
3
8
4
4
Page 8

Failure Analysis
Inspection
Failure analysis is the process of determining the original
cause of a component failure in order to keep it from happening again. Too often, when a failed component is replaced
without determining its cause, there will be a recurring failure.
If a carrier housing is opened, revealing a ring gear with a broken tooth, it is not enough to settle on the broken tooth as the
cause of the carrier failure. Other parts of the carrier must be
examined. For a thorough understanding of the failure and
possible insight into related problems, the technician needs to
observe the overall condition of the vehicle.
No one benefits when a failed component goes on the junk
pile with the cause unknown. Nothing is more disturbing to a
customer than a repeat failure. Systematically analyzing a failure to prevent a repeat occurrence assures quality service by
avoiding unnecessary downtime and further expense to the
customer.
The true cause of a failure can be better determined by knowing what to look for, determining how a piece of the equipment was running and learning about previous problems. In
the case of a rebuilt rear axle, mismatched gears may have
been installed.
The more successful shops prevent repeat equipment failures
by developing good failure analysis practices. Knowing how
to diagnose the cause of a premature failure is one of the prerequisites of a good heavy-equipment technician.
How to Diagnose a Failure
The following five steps are an effective approach to good failure diagnostics.
1. Document the problem.
2. Make a preliminary investigation.
You need to be a good listener. Sometimes, insignificant or
unrelated symptoms can point to the cause of the failure.
• Ask: Was the vehicle operating at normal temperatures?
• Ask: Were the gauges showing normal ranges of
operation?
• Ask: Was there any unusual noise or vibration?
After listening, review the previous repair and maintenance
records. If there is more than one driver, talk to all of them
and compare their observations for consistency with the service and maintenance records. Verify the chassis Vehicle
Identification Number (VIN) number from the vehicle identification plate, as well as the mileage and hours on the vehicle.
Make a Preliminary Investigation
These steps consist of external inspections and observations
that will be valuable when combined with the results of the
parts examination.
• Look for leaks, cracks or other damage that can
point to the cause of the failure.
• Make note of obvious leaks around plugs and seals.
A missing fill or drain plug would be an obvious
cause for concern.
• Look for cracks in the carrier housing (harder to see,
but sometimes visible).
• Does the general mechanical condition of the vehicle
indicate proper maintenance or are there signs of
neglect?
• Are the tires in good condition and do the sizes
match?
3. Prepare the parts for inspection.
4. Find the cause of the failure
5. Correct the cause of the problem.
Document the Problem
Here are some guidelines for starting to learn about a failure,
including questions to ask:
• Talk to the operator of the truck.
• Look at the service records.
• Find out when the truck was last serviced.
• Ask: In what type of service is the truck being used?
• Ask: Has this particular failure occurred before?
• Ask: How was the truck working prior to the failure?
5
• If equipped with a torque-limiting device, is it working properly?
During the preliminary investigation, write down anything out
of the ordinary for later reference. Items that appear insignificant now may take on more importance when the subassemblies are torn down.
Page 9

Prepare the Parts for Inspection
Inspection
After the preliminary investigation, locate the failure and prepare the part for examination. In carrier failure analysis, it may
be necessary to disassemble the unit.
• When disassembling subassemblies and parts, do
not clean the parts immediately since cleaning may
destroy some of the evidence.
• When tearing down the drive axle, do it in the recommended manner. Minimize any further damage to the
unit.
• Ask more questions when examining the interior of
the carrier. Does the lubricant meet the manufacturer
specifications regarding quality, quantity and viscosity? As soon as you have located the failed part, take
time to analyze the data.
Find the Cause of the Failure
Here begins the real challenge to determine the exact cause of
the failure. Keep in mind that there is no benefit to replacing a
failed part without determining the cause of the failure. For
example, after examining a failed part and finding that the failure is caused by a lack of lubrication, you must determine if
there was an external leak. Obviously, if there is an external
leak, just replacing the failed gear is not going to correct the
situation.
Another important consideration here is to determine the specific type of failure which can be a valuable indicator for the
cause of failure. The following pages show different types of
failures and possible causes. Use this as a guide in determining types of failures and in correcting problems.
Correct the Cause of the Problem
Once the cause of the problem has been determined, refer to
the appropriate service manual to perform the repairs.
Service Procedure
6
Page 10
Inspect Assembly
Inspection
Clean
1. Wash steel parts with ground or polished surfaces in
solvent. There are many suitable commercial solvents available. Kerosene and diesel fuel are acceptable.
WARNING
Gasoline is not an acceptable solvent because of its
extreme combustibility. It is unsafe in the workshop environment.
2. Wash castings or other rough parts in solvent or
clean in hot solution tanks using mild alkali solutions.
Note: If a hot solution tank is used, make sure parts are
heated thoroughly before rinsing.
3. Rinse thoroughly to remove all traces of the cleaning
solution.
4. Dry parts immediately with clean rags.
5. Oil parts.
• If parts are to be reused immediately: Lightly oil.
• If parts are to be stored: Coat with oil, wrap in corrosion resistant paper and store in a clean, dry place.
Note: Replace conventional gaskets with silicone rubber gas-
ket compound (included in many repair kits). The compound provides a more effective seal against lube
seepage and is easier to remove from mating surfaces
when replacing parts.
1
2
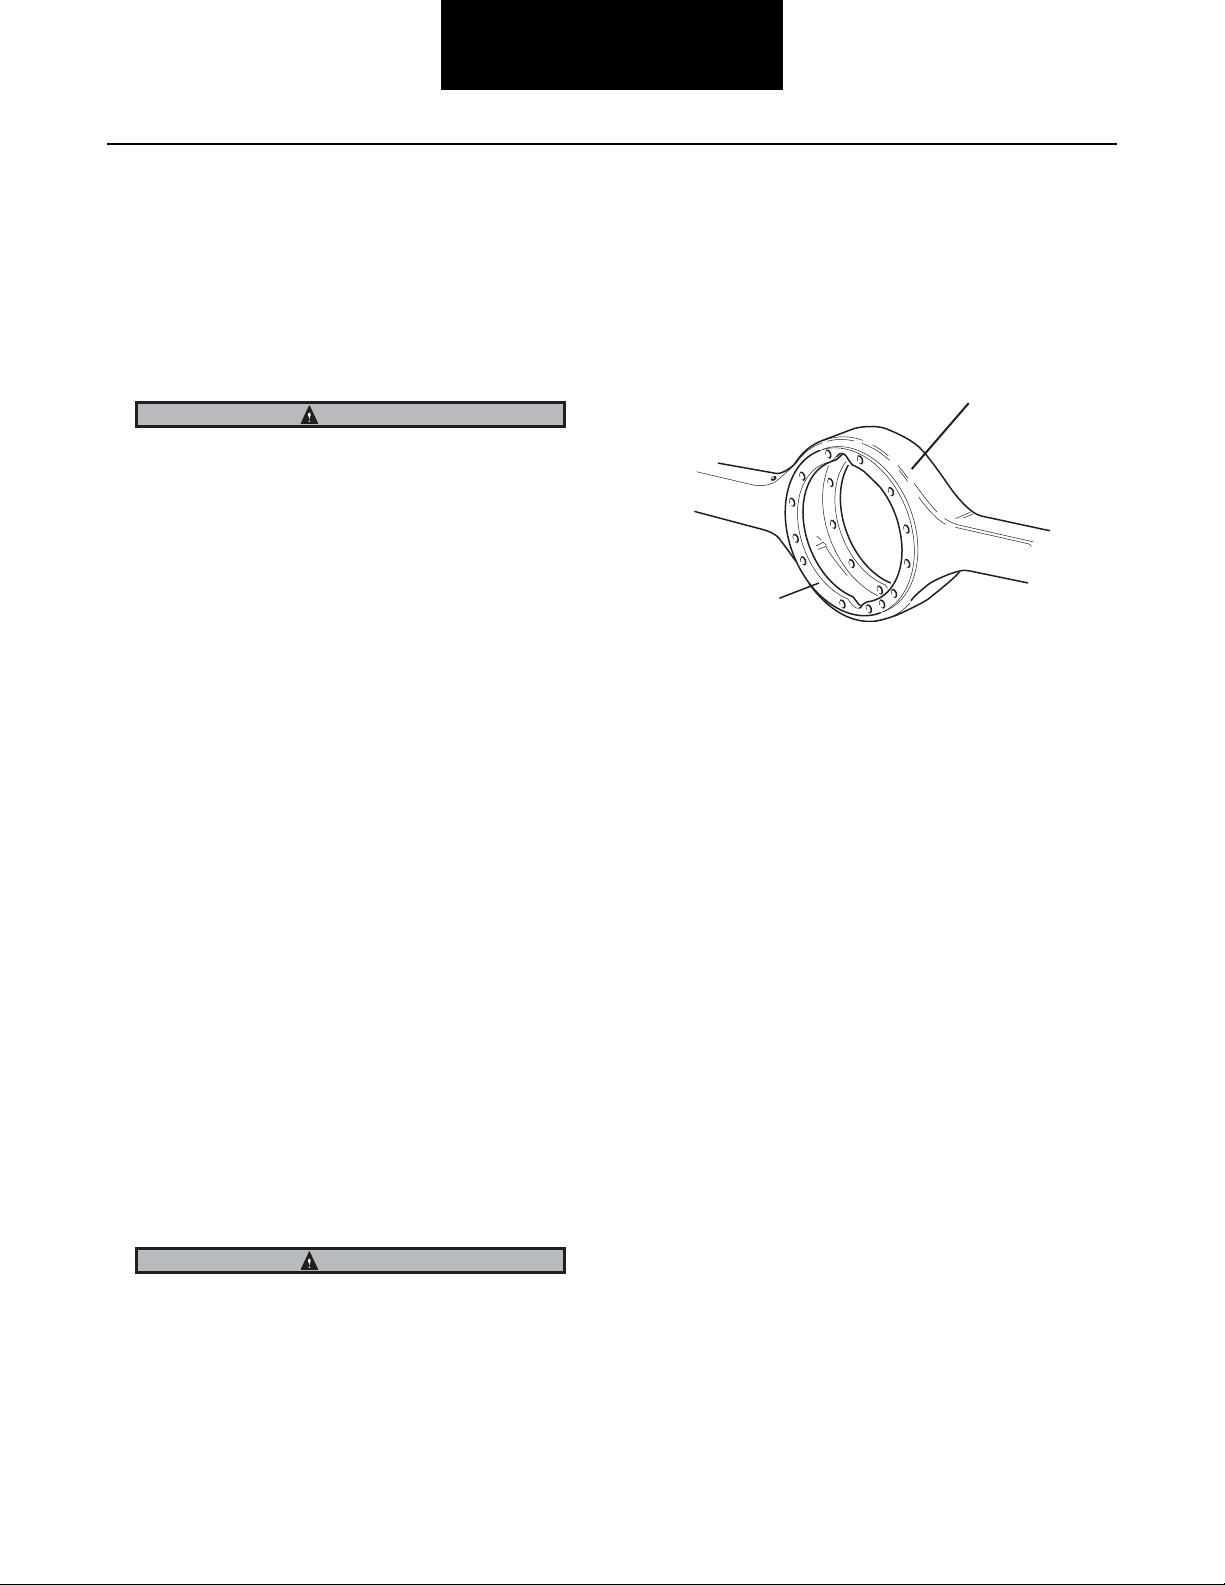
1 - Axle housing
2 - Machined surface
Inspect all steel parts for:
• Notches, visible steps or grooves created by wear.
• Pitting or cracking along gear contact lines.
• Scuffing, deformation or discolorations. These are
signs of excessive heat in the axle and are usually
related to low lubrication levels or improper lubrication practices.
Inspect Axle Housing
Axle housing inspection and repairs are limited to the following checks or repairs:
• Visually inspect axle housing for cracks, nicks and
burrs on machined surfaces.
• Check carrier bolt holes and studs for foreign material.
• Replace damaged fasteners. Look for loose studs or
cross threaded holes.
CAUTION
Any damage which affects the alignment or structural integrity of the housing requires housing replacement. Do not
repair by bending or straightening. This process can affect
the material’s properties and cause it to fail completely
under load.
• Check all seals and gaskets.
7
In addition, inspect the following for damage:
• Differential gearing.
• Bearings for loose fit on drive pinion, pilot bearing,
and differential bearings.
• All fasteners for rounded heads, bends, cracks or
damaged threads.
• Inspect machined surfaces of cast or malleable
parts. They must be free of nicks, burrs, cracks,
scoring, and wear.
• Look for elongation of drilled holes, wear on surfaces machined for bearing fits and nicks or burrs in
mating surfaces.
Inspect Primary Gearing
Before reusing a primary gear set, inspect teeth for signs of
excessive wear. Check tooth contact pattern for evidence of
incorrect adjustment.
Page 11

Differential Carrier Assembly -
Parts
Differential Carrier Assembly - Exploded View
2
1
1 - Carrier Fasteners
2 - Carrier Assembly
3 - Single Axle Assembly
3
Service Procedure
8
Page 12
Remove Differential Carrier
Differential Carrier
Procedure -
1. Block the vehicle.
2. Drain axle lubricant.
3. Disconnect main driveline.
4. Disconnect differential lockout air line.
5. Disconnect lead wires to the selector switch and air
line at shift cylinder.
6. Remove axle shafts.
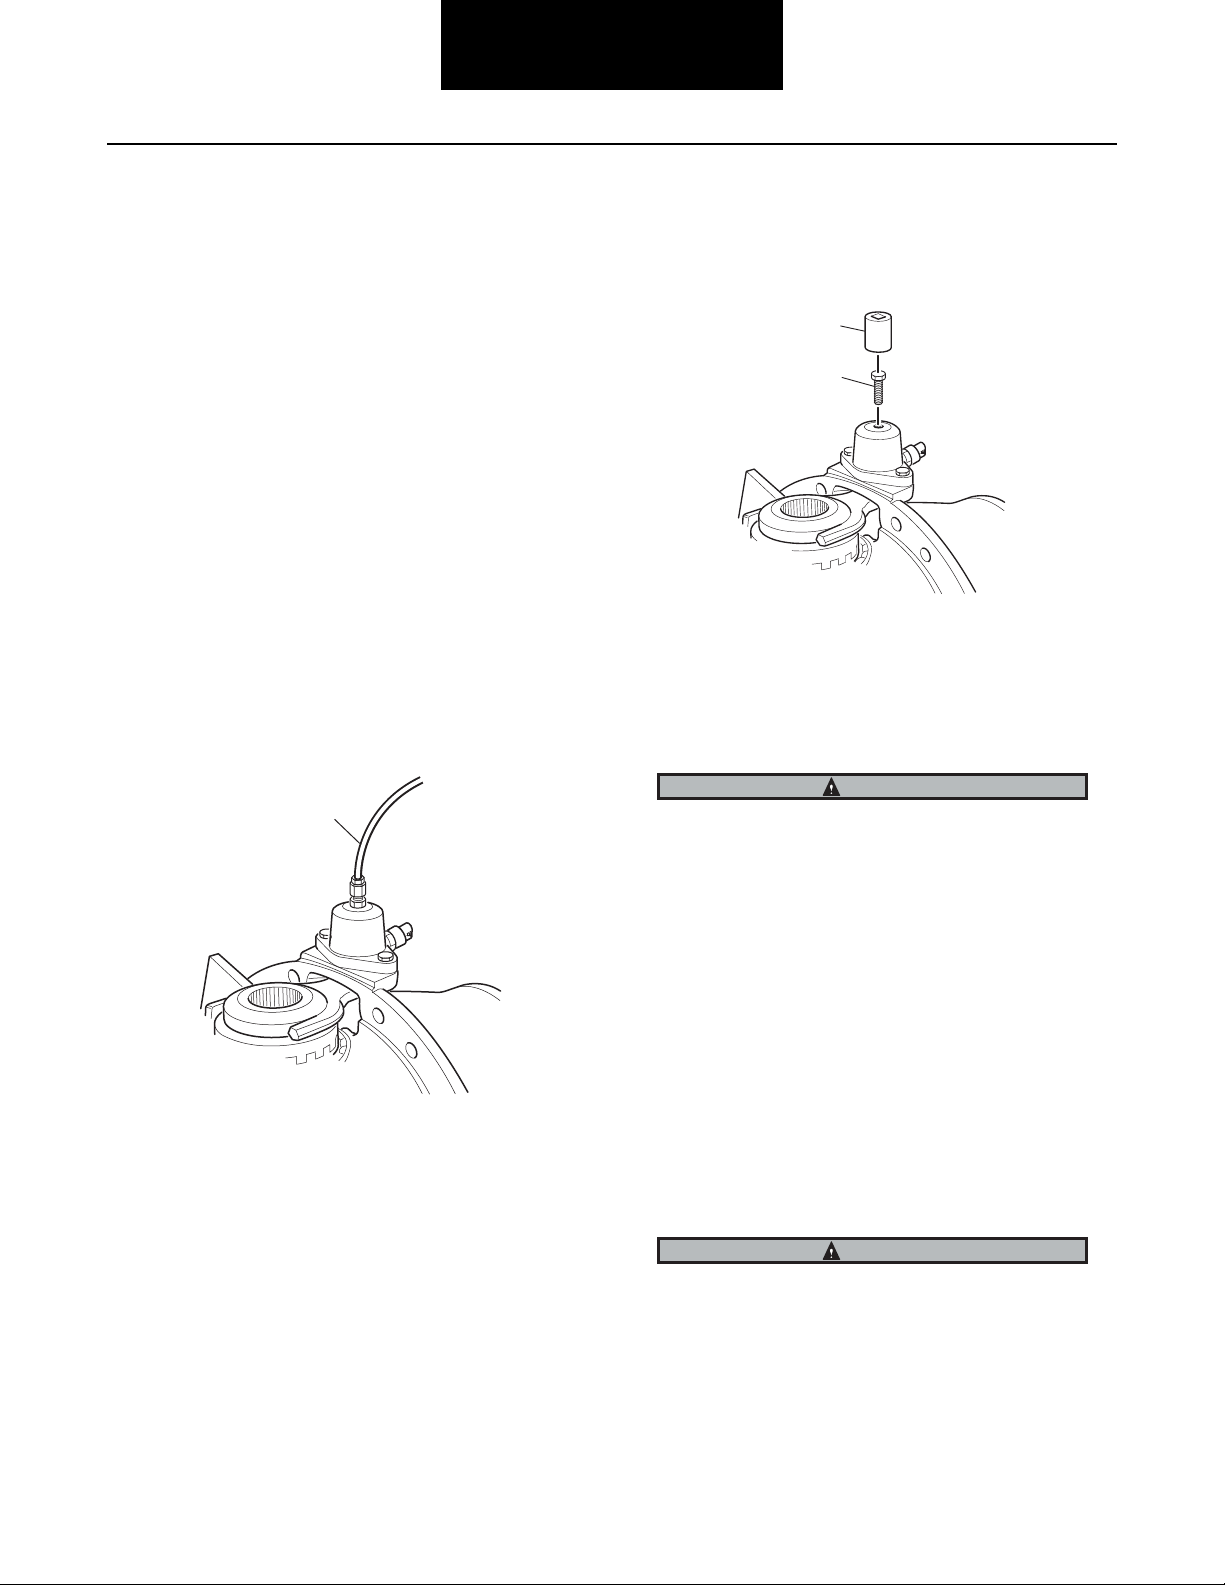
Diff-Lock Models
• For removal of the locking wheel differential carrier
assembly, the differential lock must be engaged and
held in the engaged position. This can be accomplished by one of two methods; either engage via air
pressure or engage manually.
Engage via Air Pressure
• Using an auxiliary air line, apply 80–120 PSI air pressure to shift cylinder air port to engage clutch.
1
Note: Hand-tighten the bolt, over-torquing may cause damage
to the shift unit. To facilitate hand-tightening, coat bolt
threads with axle lube.
1
2
1—Hand tighten with socket
2—M12 x 1.5 x 38mm bolt – GM only .250 – 18
NPTF – all models except GM
Note: With either method, the axle shaft may have to be
rotated to permit the clutch to become engaged.
WARNING
Do not lie under carrier after fasteners are removed. Use
transmission jack to support differential carrier assembly
prior to loosening fasteners
1—Connect 80-120 PSI air line to cylinder port
Engage Manually
• Install a .250 – 18 NPTF bolt over 1.5" long in the
cylinder air port to manually engage the clutches.
GM models require a M12 X 1.5 X 38mm bolt.
7. To remove axle shaft, remove axle stud nuts. (If
used, remove lock washers and taper dowels.)
8. Remove axle shafts.
Note: All models in this publication use axle shafts with
unequal lengths. Axle shafts may also be location specific with various wheel equipment. Do not misplace axle
shafts from their intended location. Identify left and right
shafts for reference during reassembly.
TIP: If necessary, loosen dowels by holding a brass
drift in the center of the shaft head and strike drift a
sharp blow with a hammer.
CAUTION
Do not strike the shaft head with a steel hammer. Do not
use chisels or wedges to loosen shaft or dowels.
9. Remove carrier cap screws, nuts and lock washers.
10. Remove differential carrier assembly.
9
Page 13
Differential Carrier
Install Differential Carrier
IMPORTANT
Before installing carrier assembly, inspect and thoroughly
clean interior of axle housing using an appropriate solvent
and clean rag.
Procedure -
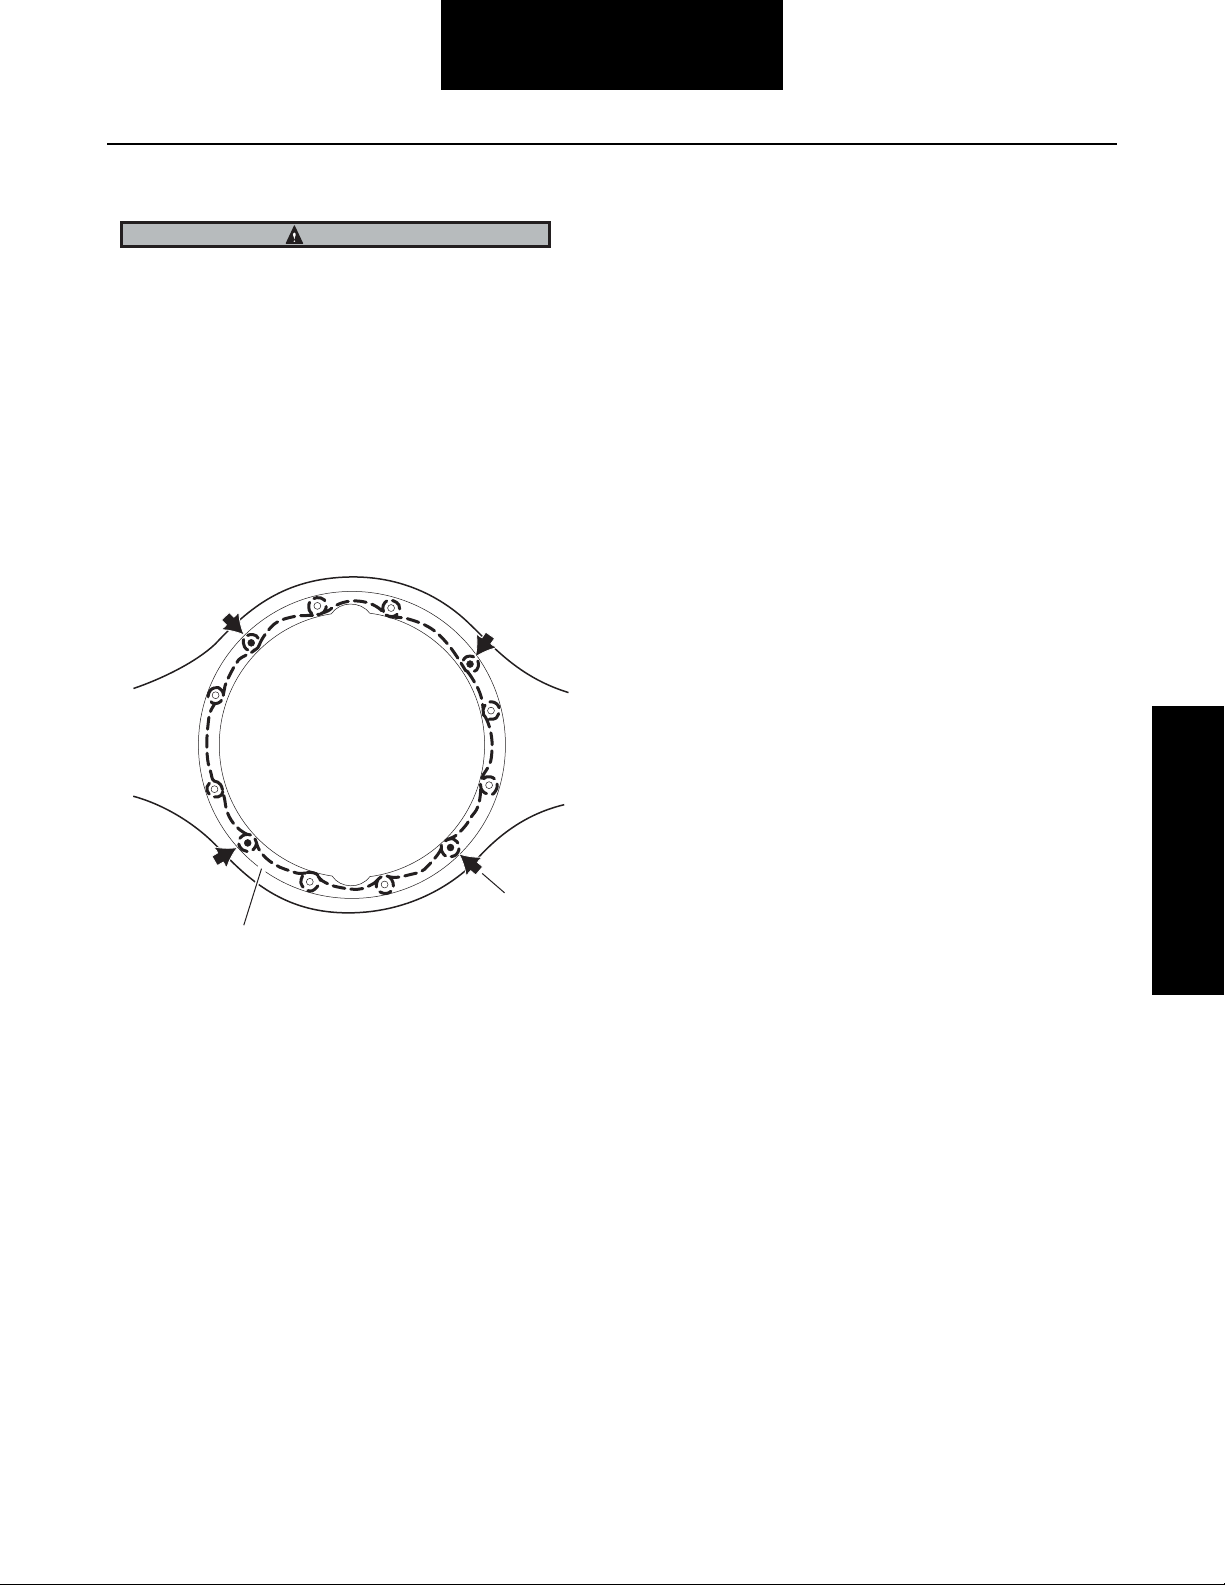
1. Apply Spicer approved RTV compound on axle housing mating surface as shown in the illustration. Completely remove all old gasket material prior to
applying new material. Compound will set in 20 minutes. Install carrier before compound sets or reapply.
2
1
1— Apply silicone gasket in this pattern
2— Common stud locations
TIP: To assist in installing complete differential carrier
use two pieces of threaded rod threaded into carrier cap
screw holes. Rod should be approximately 6" long. Use
these to pilot the carrier into the housing.
2. Install carrier to housing, washers, cap screws and
nuts. Torque to proper specifications. See torque
chart of page 66.
3. Install axle shafts and axle stud nuts (if
lock washers and tapered dowels).
install
4. Add axle lubricant. Fill to bottom of filler hole.
used, also
Service Procedure
5. Rear Only: Connect inter-axle driveline, making sure
all yokes are in phase. Lubricate U-joints.
10
Page 14
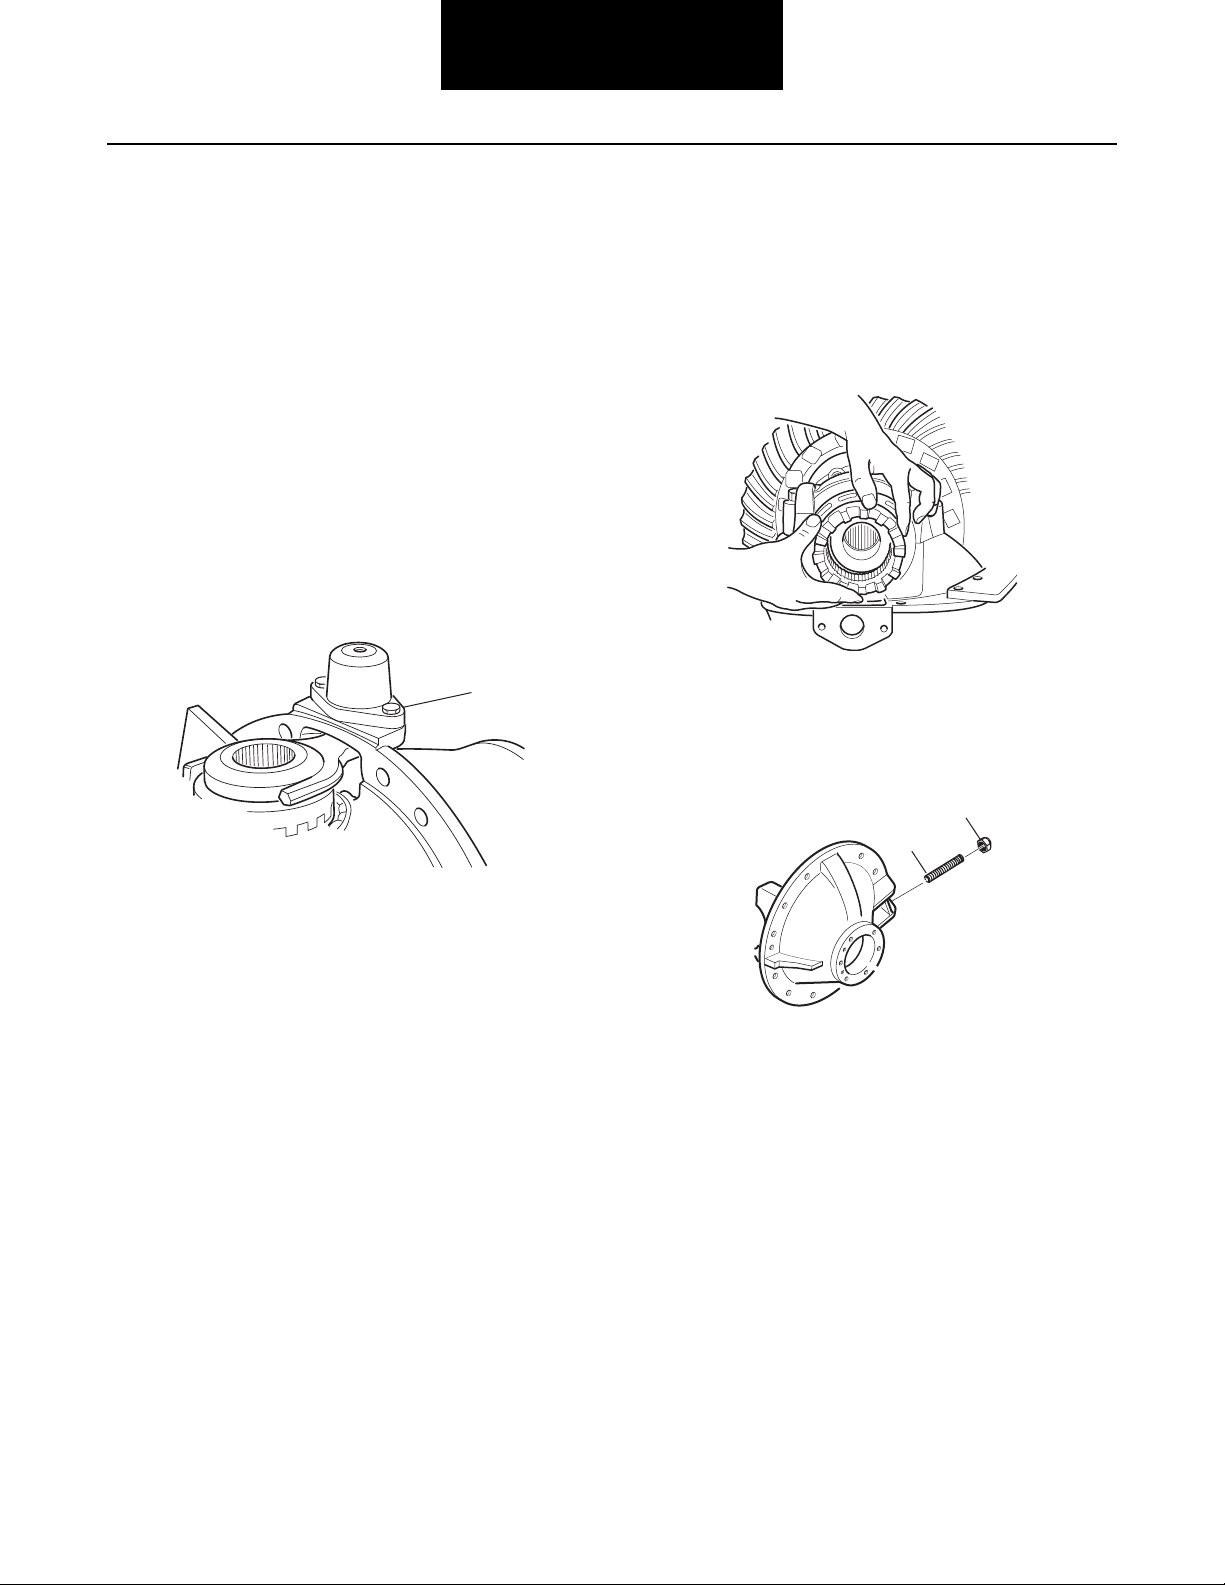
Differential Carrier
Disassemble Carrier Assembly - (Rear Axles)
Note: For models having the wheel differential lock option or a
carrier thrust bolt follow the steps below. These parts
must be removed first before further removal of the
wheel differential and/or pinion can take place.
Procedure - Remove Wheel Differential - Models with
Wheel Differential Lock
1. For ease of servicing, mount differential carrier in
stand with differential lock facing up.
Note: To remove the pinion assembly, the shift fork, clutch
hand wheel Diff. assembly, must be removed from carrier. See instructions below.
2. Remove shift cylinder mounting screws, then lift
shift cylinder, piston and o-ring assembly off carrier
and end of push rod.
1
Procedure - Models with Ring Gear Thrust Bolt
1. Loosen thrust bolt jam nut.
Note: If the carrier model has a ring gear thrust bolt installed,
it must be backed away from the ring gear before you
can remove the wheel differential.
2. Back out thrust bolt from the carrier until the end of
the bolt is flush with the inside of the carrier casting.
This will allow enough clearance between the ring
gear and the carrier pilot web.
2
1 - Shift cylinder
3. To disassemble shift cylinder for inspection, first
remove or back off actuator switch. The piston and
o-ring assembly can be removed by inserting a pencil-size tool through the cylinder air port.
4. Grasp push rod end and pull it out of the shift fork,
spring and carrier.
Note: When the push rod is disengaged from the shift fork,
the fork and sliding curvic clutch assembly can be
removed from carrier.
Note: Do not disassemble shift fork from the sliding curvic
clutch unless parts replacement is necessary. To disassemble, use pin punch to remove spring pin from long
leg of fork. The fork can now be disengaged from the
clutch.
5. Remove the snap ring, then lift fixed curvic clutch off
differential case hub spline. Further disassembly of
carrier is the same for axles without differential lock.
1
1 - Thrust bolt
2 - Jam nut
11
Page 15
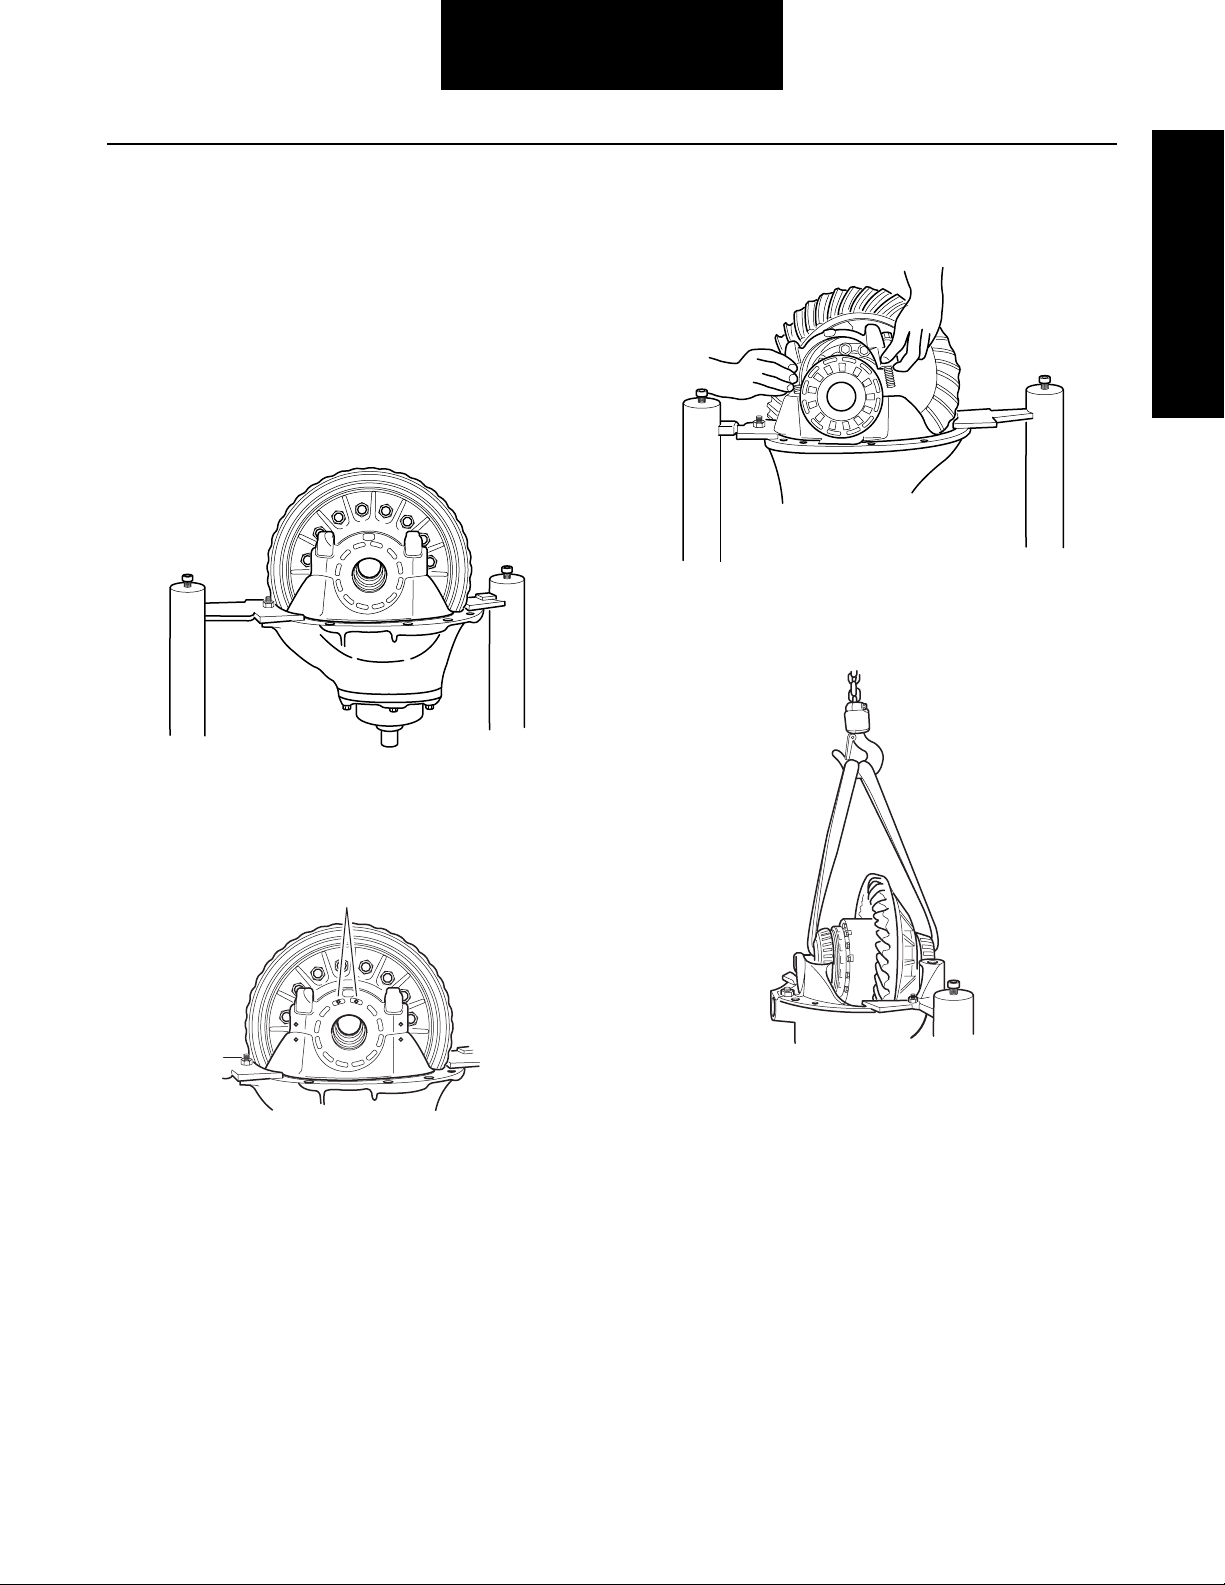
Differential Carrier
Procedure - Remove Wheel Differential - All Standard Mod-
els
1. Mount differential carrier in repair stand.
Note: Omit this step if the gear set is to be replaced. If gear
set is to be reused, check tooth contact pattern and ring
gear backlash before disassembling differential carrier.
When checking backlash, a yoke or helical gear must be
installed and torqued to get an accurate reading. Best
results are obtained when established wear patterns are
maintained in used gearing.
3. Remove cap screws, flat washers and bearing caps.
General Information
Loosen bearing adjusters and remove adjusters and
bearing cups.
4. Using a chain hoist, lift ring gear and differential
assembly out of carrier.
2. If reusing gear set, also punch mark bearing adjusters for reference during assembly.
1
1 - Thrust bolt
12
Page 16
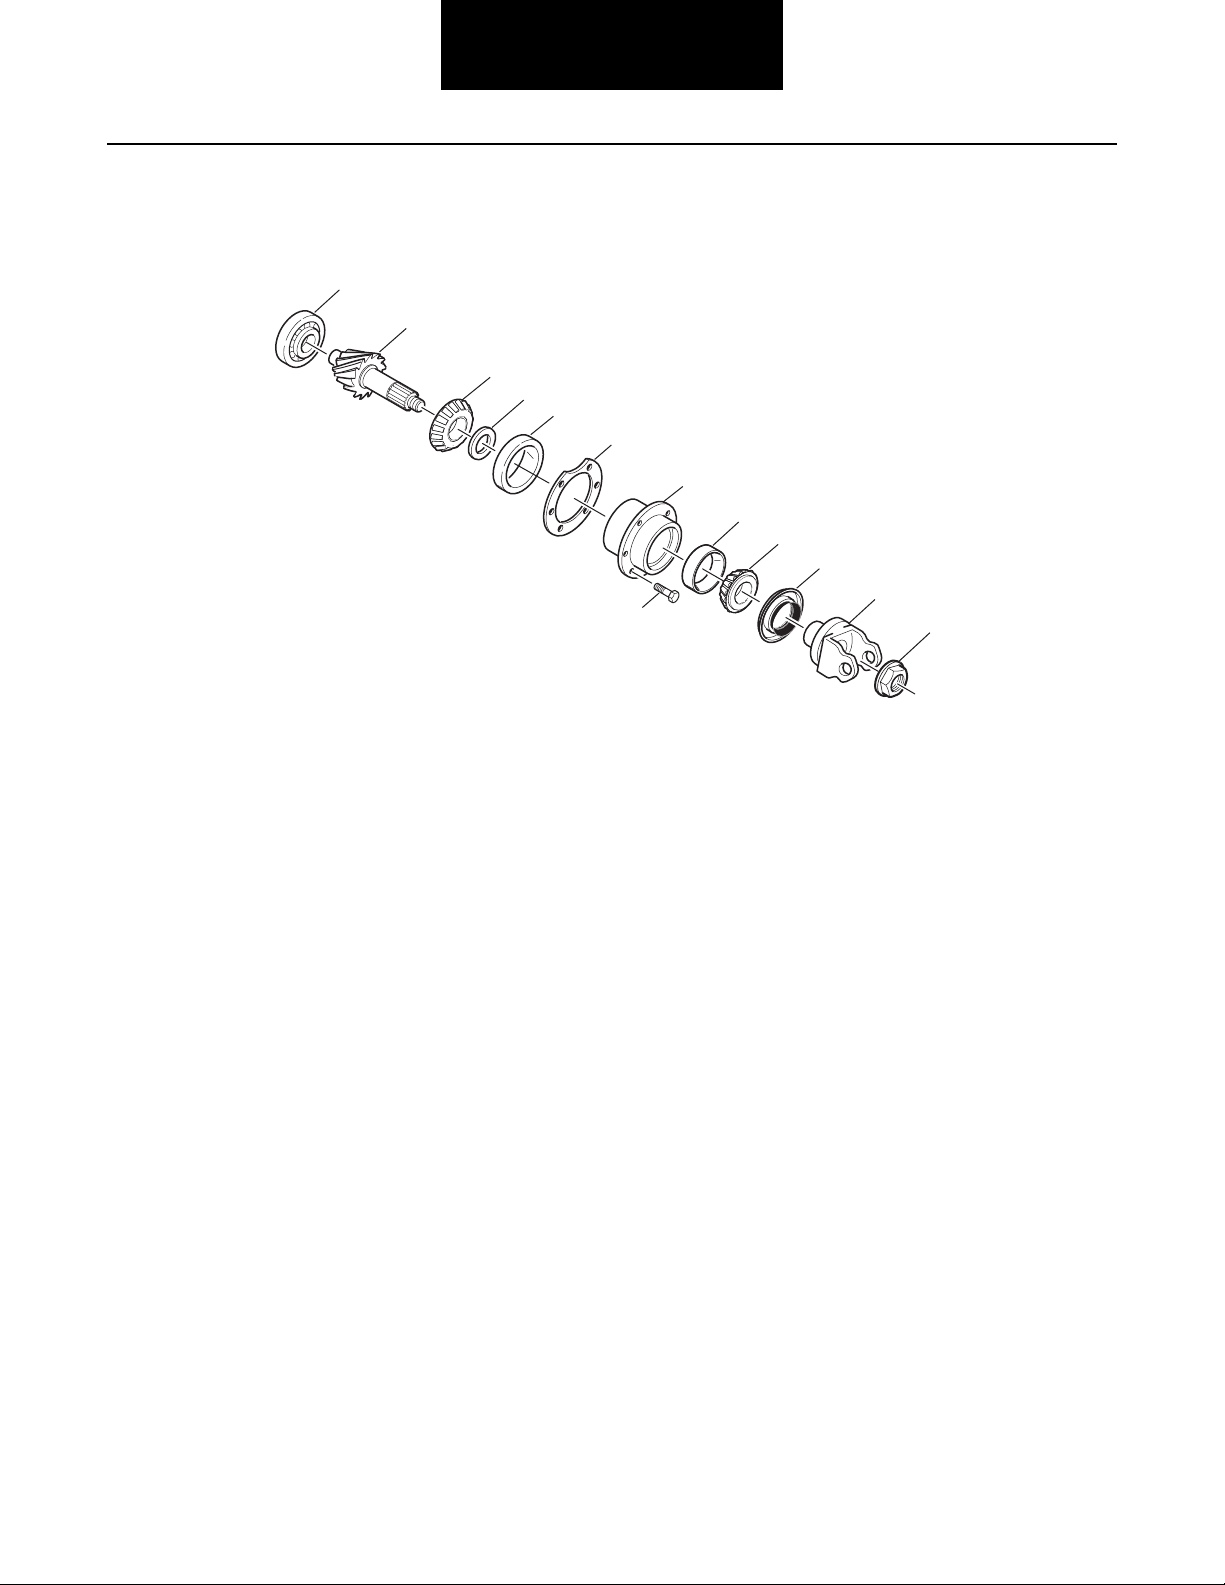
Pinion Assembly
Rear Axle Pinion Assembly - Exploded View
1
2
3
4
5
6
7
9
10
11
12
8
13
1—Pinion pilot bearing
2—Pinion
3—Pinion bearing cone - inner
4—Pinion bearing spacer
5—Pinion bearing cup - inner
6—Shim
7—Pinion bearing cage
8—Cap screw
9—Pinion bearing cup - outer
10—Pinion bearing cone - outer
11—Oil seal
12—Yoke
13—Pinion nut
13
Page 17
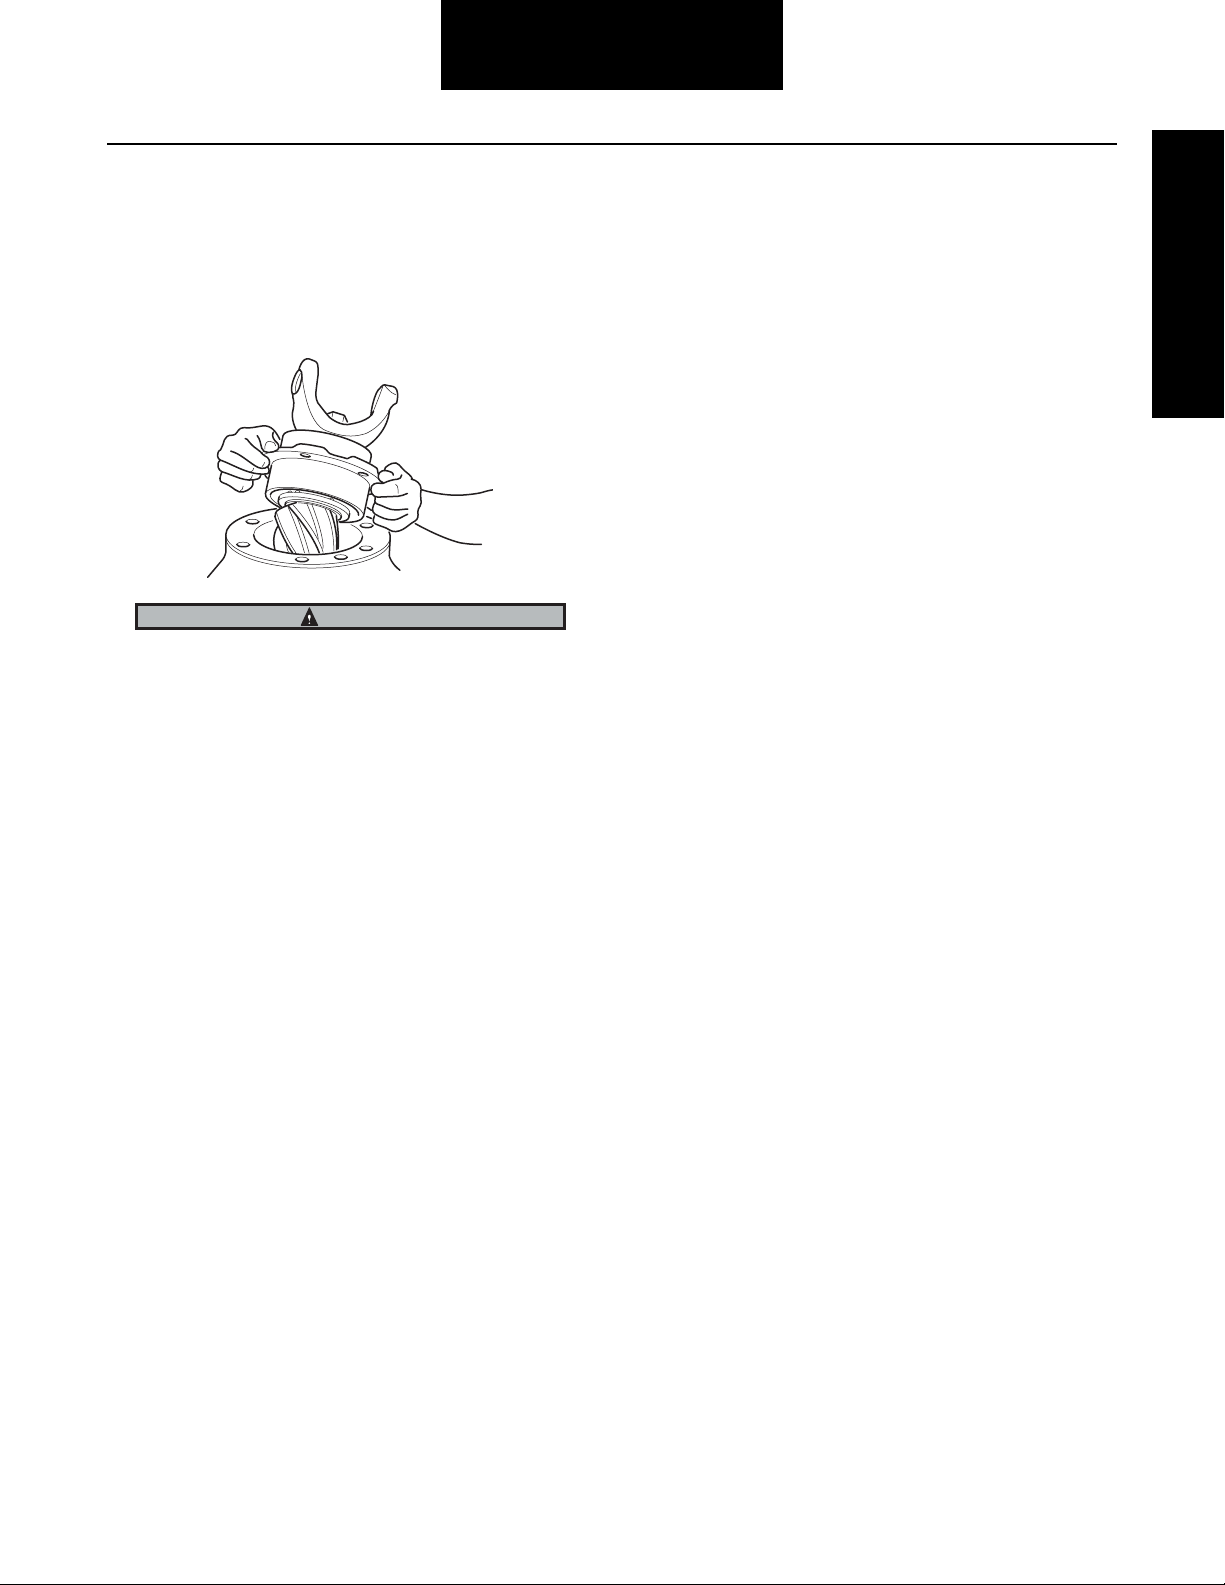
Remove Pinion Assembly
Procedure -
1. Remove pinion bearing cage cap screws. Remove
pinion and cage assembly from carrier. Remove
shim pack.
WARNING
Pinion Assembly
General Information
Do not allow pinion to drop on hard surface
If gear set is to be reused, keep pinion bearing cage shim
pack intact for use in reassembly. If the original shims cannot be reused, record the number and size of shims in the
pack.
14
Page 18
Pinion Assembly
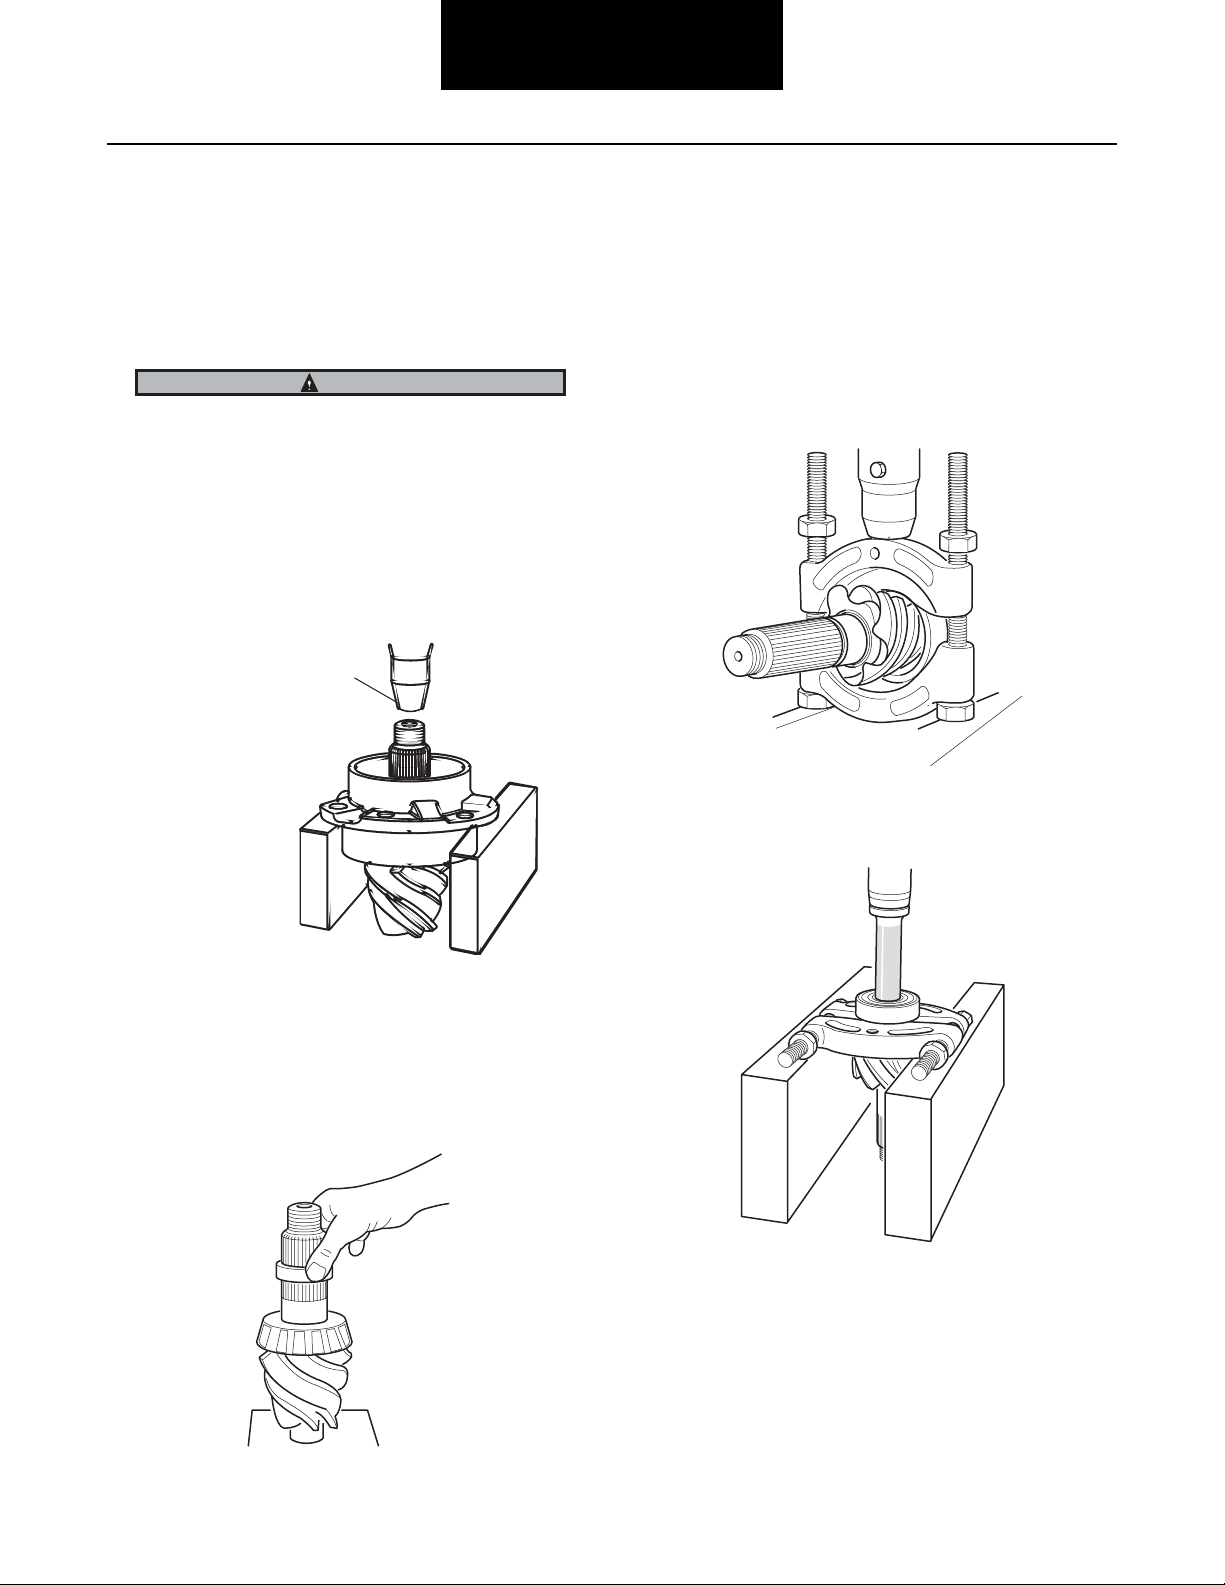
Disassemble and Overhaul Drive Pinion
The following procedures cover both forward and rear differential drive carrier disassembly.
Rear Axle Pinion Yoke
1. Remove yoke.
CAUTION
If pinion nut was not loosened during earlier disassembly,
clamp assembly in vise jaws, use brass pads to prevent
damage.
2. Loosen and remove pinion nut and flat washer.
Remove yoke from pinion using an appropriate tool.
Forward and Rear Axle Pinion Bearing Cage
3. Press pinion out of bearing cage and bearing cone.
1
5. Remove bearing spacer from pinion.
6. Remove pilot bearing from pinion using a split-type
puller. Use two procedure steps to remove each
bearing.
a. Mount puller vertically to separate the bearing. This
action will force puller halves under bearing and start
moving bearing off pinion.
b. Mount puller horizontally to press pinion out of bear-
ing.
1 - Press Ram
Rear Axle Pinion Oil Seal and Outer Bearing Cone
4. Remove oil seal and bearing cone from cage. Discard oil seal. Remove bearing cups with suitable
puller.
15
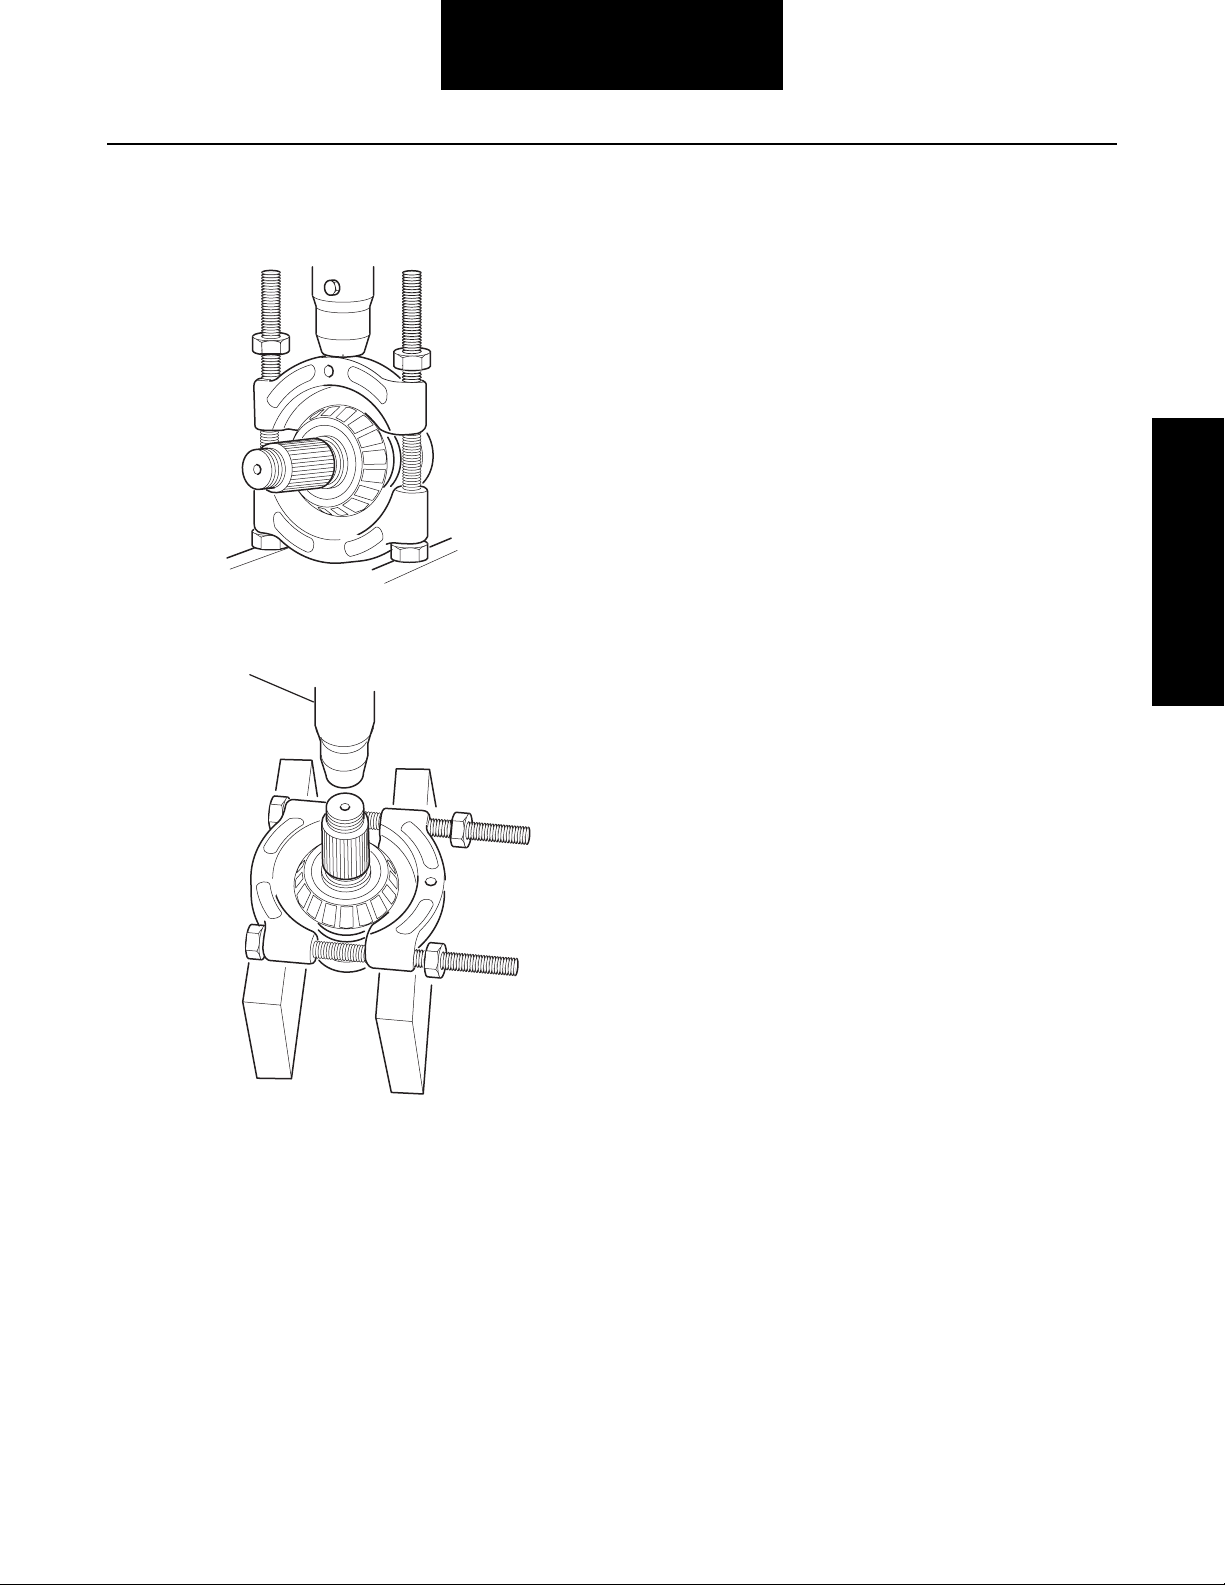
7. Remove inner bearing cone from pinion using a
split-type puller. Use two procedure steps to remove
each bearing.
Page 19
Pinion Assembly
a. Mount puller vertically to separate the bearing. This
action will force puller halves under bearing and start
moving bearing off pinion.
Service Procedure
b. Mount puller horizontally to press pinion out of bear-
ing.
1
1 - Press
16
Page 20
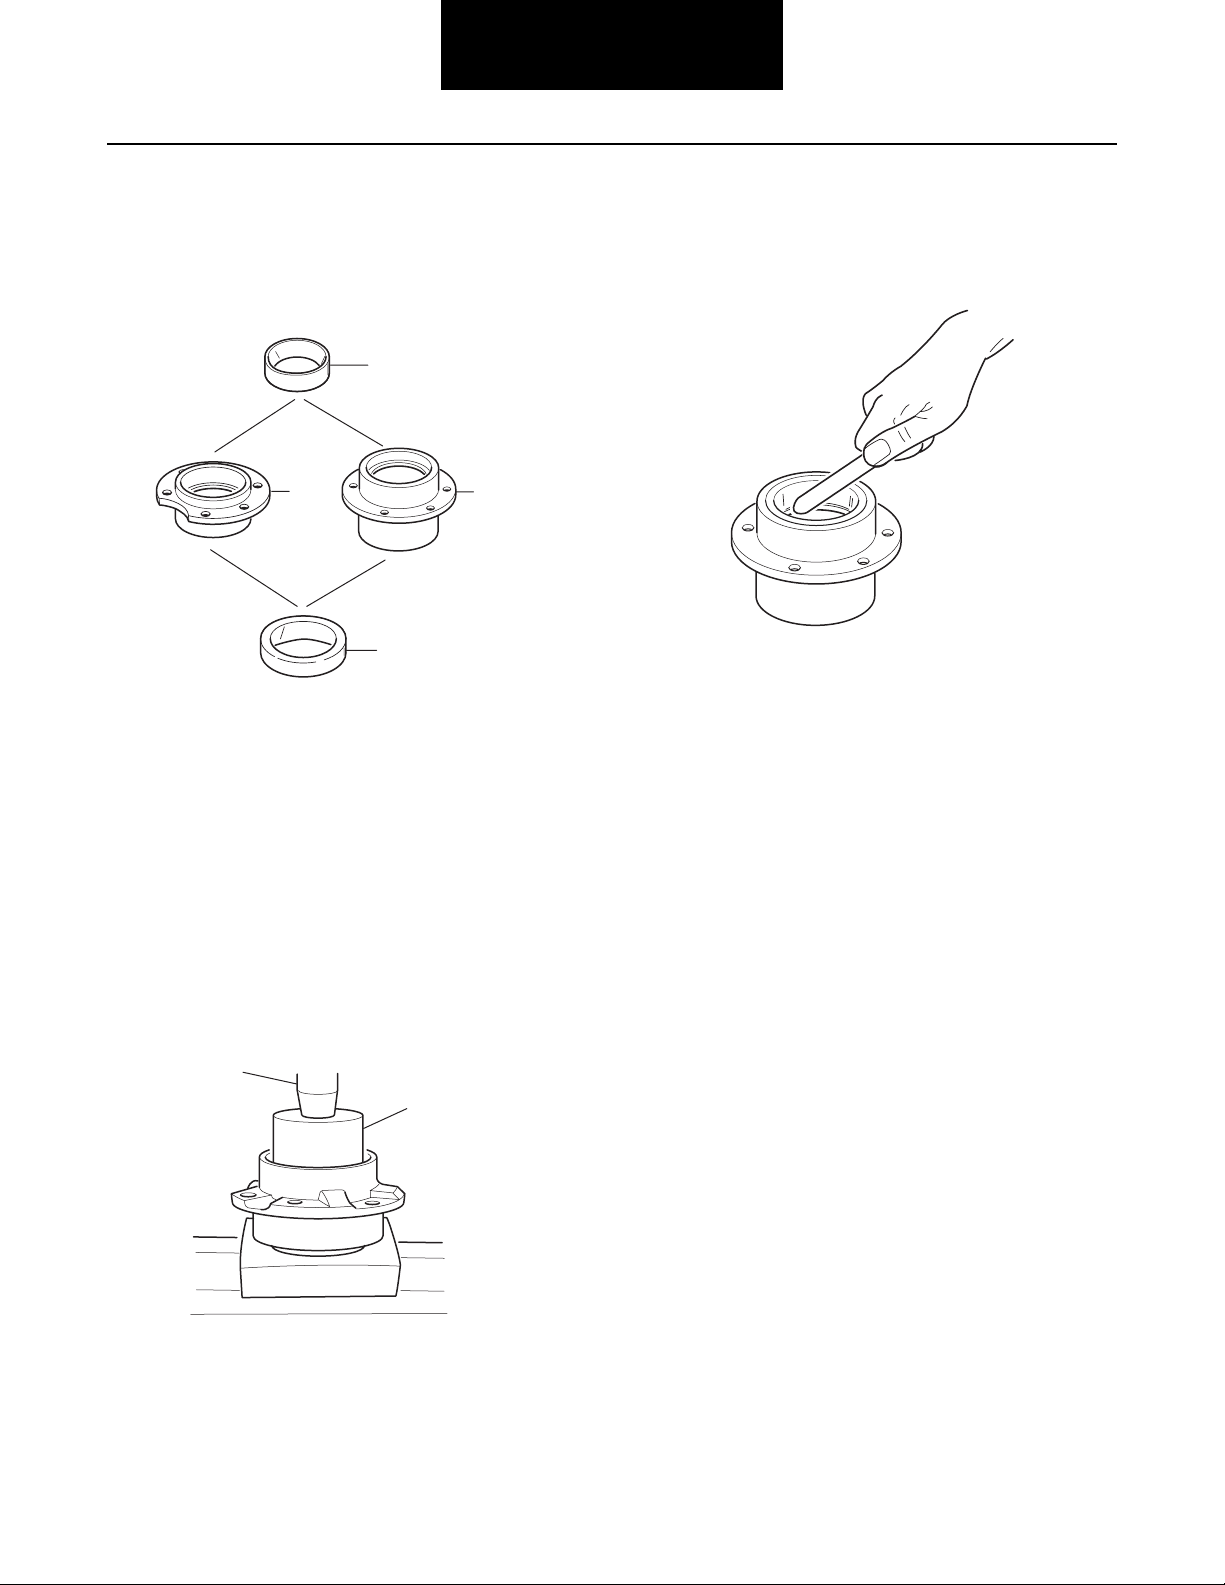
Replace Pinion Bearing Cage Cups
Pinion Assembly
1. Remove cups.
Front
1 - Cup ( Outer)
2 - Bearing cage
3 - Cup ( inner )
4. Seat cups securely to shoulder. Check clearance
between cup and bearing cage. Must be less than
.001”.
1
Rear
2
3
2
2. Clean and inspect bearing cages for damage, nicks
and burrs.
3. Install inner and outer pinion bearing cups. Use a
press and an appropriate drive sleeve. Make certain
bearing cup is evenly and firmly seated.
1
2
1 - Press ram
2 - Sleeve must apply pressure
to back face of outer bearing cone
17
Page 21
Pinion Assembly
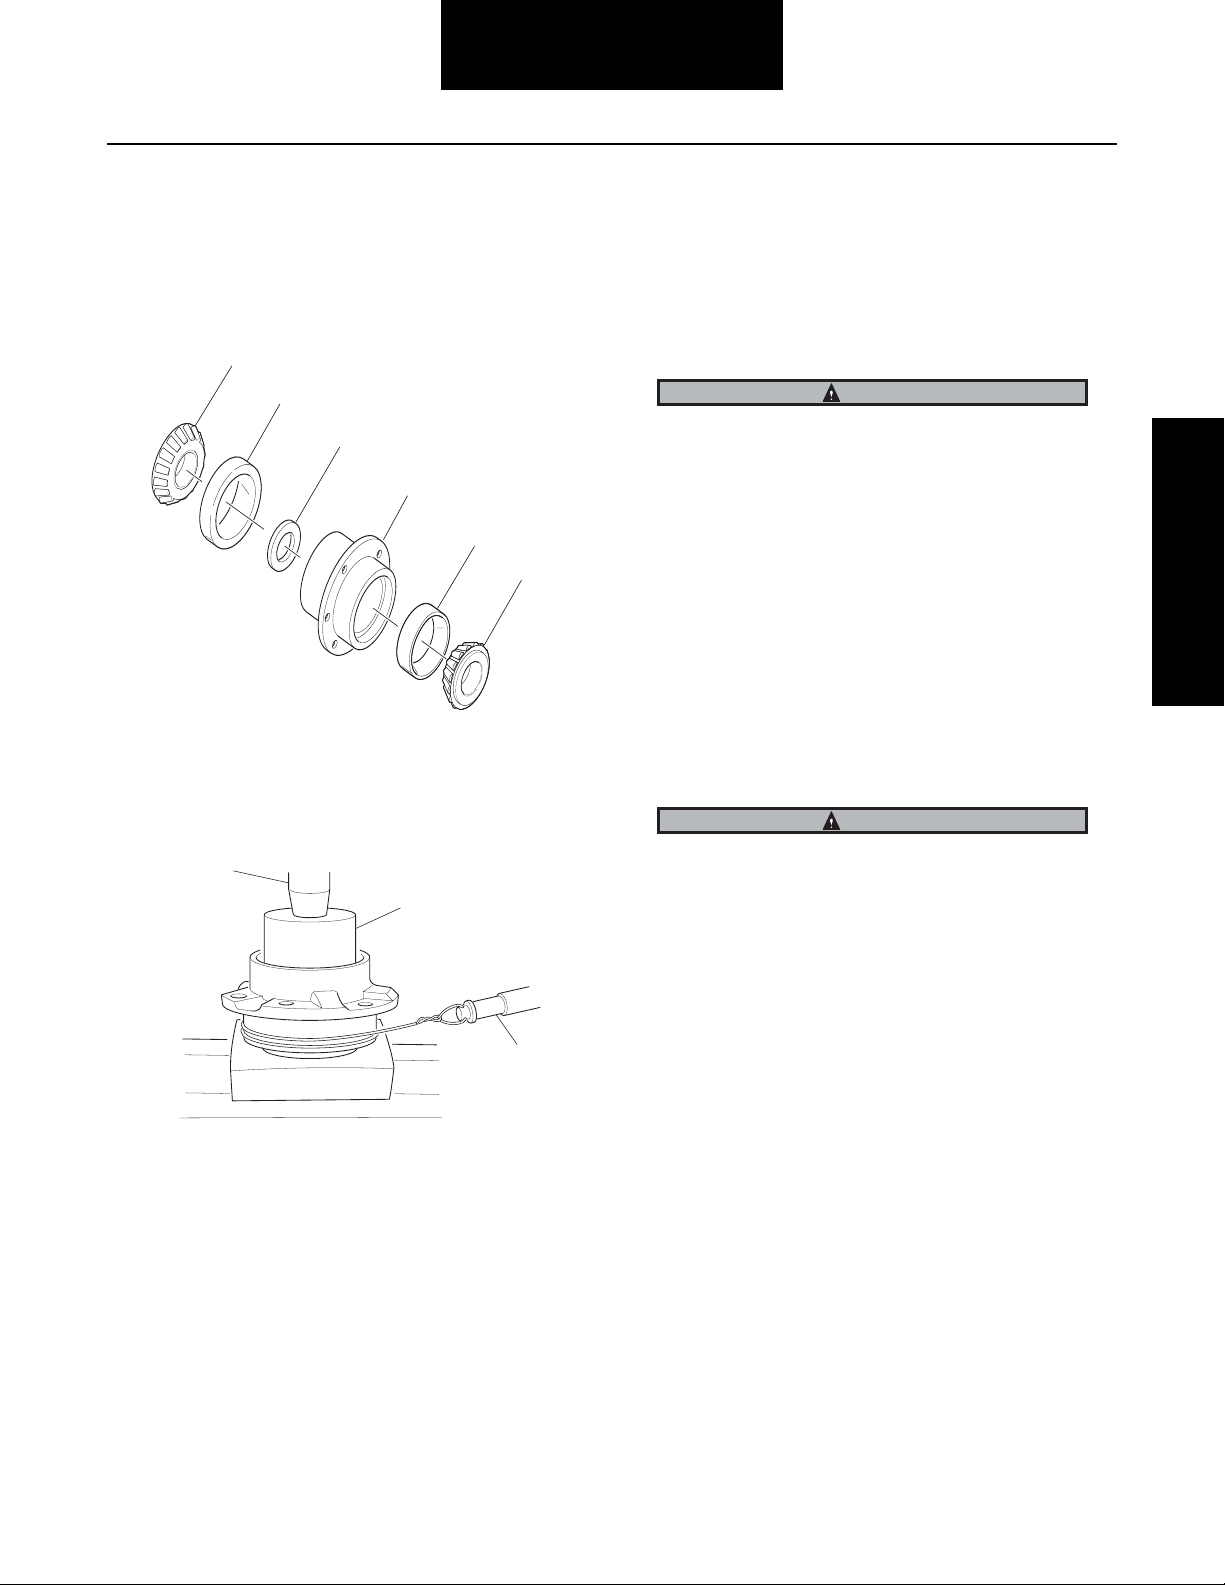
Adjust Pinion Bearing Preload - (Trial Buildup)
1. Assemble pinion bearing cage, bearings, spacer and
spacer washer (without drive pinion or oil seal). Center bearing spacer between two bearing cones.
Lubricate bearing cups and cones.
Bearing
Cup
Washer
Cage
Cup
Cone
Note: When new gear set or pinion bearings are used, select
nominal size spacer from the specification chart below.
If original parts are used, use spacer removed during
disassembly.
1
2
3. Rotate pinion cage while applying press load to the
assembly and check rolling torque. Wrap soft wire
around the bearing cage, attach spring scale and
pull. Preload is correct when torque required to
rotate the pinion bearing cage is within the specifications listed in the chart below.
CAUTION
Read only the torque value after the bearing cage starts to
rotate.
4. If necessary, adjust pinion bearing preload by changing the pinion bearing spacer. A thicker spacer will
decrease preload. A thinner spacer will increase preload.
Note: Once correct bearing preload has been established,
note the spacer size used. Select a spacer .001" larger
for use in the final pinion bearing cage assembly. The
larger spacer compensates for slight “growth” in the
bearings which occurs when they are pressed on the
pinion shank.
CAUTION
Do not assume that all assemblies will retain proper preload once bearings are pressed on pinion shank. FINAL
PRELOAD TEST MUST BE MADE IN EVERY CASE.
Service Procedure
3
1 - Press ram
2 - Sleeve must apply pressure to
back face of outer bearing cone
3 - Spring scale
2. With the bearings well lubricated, place the assembly
in the press. Position sleeve so load is applied
directly to the back-face of the outer bearing cone.
18
Page 22

Pinion Assembly
Nominal Bearing
Axle Model Spacer Thickness Press Loads Spring Scale Adjustments*
in. mm Tons Metric Tons lbs. N•m
15040, 19050, 19055 .703 17.86 12 - 13 11 - 12 4 - 7 17 - 33
17060, 19060, 21060, 22060 .638 16.21 14 - 15 13 - 14 4 - 8 17 - 35
21065, 22065 .720 18.29 15 - 16 14 - 15 3 - 7 15 - 30
21080, 21090, 23070, 23080, 23085,
23090, 26080, 26085, 26090
23105, 26105, 30105 .527 13.40 18 - 19 16 - 17 3 - 6 12 - 24
Note: *Spring scale reading (w/o pinion seal) torque to rotate
bearing cage 10 - 20 lbs.in. (1.1-2.3 N•m).
.672 17.07 18 - 19 16 - 17 3 - 6 12 - 24
19
Page 23

Pinion Assembly
Adjust Pinion Bearing Preload - (Final Buildup)
Note: On rear axles, do not install oil seal in cage until bearing
preload is correctly adjusted.
IMPORTANT
After bearing cups are installed, preselect pinion bearing
spacer using the “trial buildup” procedure.
Note: During pinion bearing installation, locate each part in
same position that was used in “trial buildup” preload
test.
Procedure -
1. Press inner bearing cone Pinion Assemblyon pinion.
2. Install preselected bearing spacer.
Service Procedure
3. Install bearing cage on drive pinion.
CAUTION
To prevent bearing damage, use suitable sleeve that only
contacts inner race of bearing cone
20
Page 24

Pinion Assembly
4. Press outer bearing cone on pinion.
CAUTION
To prevent bearing damage, spin cage while pressing outer
bearing on.
5. Apply clamp load to the pinion bearing cage assembly. Either install the yoke (or helical gear) and
torque the pinion nut to specifications or use the
press to simulate nut torque (see chart below).
*Torque nut to 840 ft.lbs. (1,140 N•m), then continue
tightening nut to align nut slot to nearest hole in pinion
shank.
Note: *Specifications for finial Pinion Bearing Preload Test.
Torque to rotate bearing cage 15 -35 in.lbs. (1.7 - 4.0
N•m)
Vise Method
a. If the yoke and nut are used, mount the assembly in
a vise, clamping yoke firmly.
Press Method
a. If a press is used, position a sleeve or spacer so that
load is applied directly to the back face of the outer
bearing cone.
1
1 - Press
6. Measure Pinion Bearing Preload: Use a spring scale
to test the assembly rolling torque. To use the spring
scale, wrap flexible wire around the bearing cage,
attach the scale and pull. Preload is correct when
torque required to rotate the pinion bearing cage is
within the specifications Listed in the previous chart.
CAUTION
Read only the torque value after the bearing cage starts to
rotate.
7. Adjust Pinion Bearing Preload: If necessary, adjust
pinion bearing preload. Disassemble the pinion bearing cage as recommended in this manual and
change the pinion bearing spacer. A thicker spacer
will decrease preload. A thinner spacer will increase
preload.
21
1
1 - Vise
Page 25

Pinion Assembly
Axle Model Pinion Nut Torque Press Loads Spring Scale Adjustments
Lbs.- ft. N•m Tons Metric Tons lbs. N•m
15040, 19050, 19055 376 - 461 510 - 625 12 - 13 11 - 12 6 - 13 25 - 58
17060, 19060, 21060, 22060 575 - 703 780 - 953 14 - 15 13 - 14 6 - 14 25 - 60
21065, 22065, 22080 542 - 664 735 - 900 15 - 16 14 - 15 5 - 11 23 -52
21080, 21090, 23070, 23080, 23085,
789 - 966 1070 - 1310 18 - 19 16 - 17 4 - 10 18 - 43
23090, 26080, 26085, 26090,
23105, 26105, 30105 840 - 1020 1140 - 1383 18 - 19 16 - 17 4 - 10 18 - 43
9. Stake pilot bearing using staking tool. This is essen-
CAUTION
Use the correctly sized spacer. Do not use shim stock or
tial to retain the bearing.
Stake Pattern
grind spacers. These practices can lead to loss of bearing
preload and gear or bearing failure
8. Press pilot bearing on pinion.
CAUTION
To prevent bearing damage, use suitable sleeve that only
contacts the inner race of bearing cone.
10. With pinion installed and bearing preload adjustment complete, install oil seal. Use properly sized
installation tool as described on the next page to prevent distortion.
Service Procedure
1
2
3
1 - Tool
2 - Seal
3 - Bearing cage
22
Page 26

Pinion Assembly
11. Prior to installation of yoke, make sure yoke is clean
and dry.
12. Install yoke.
13. Install yoke nut using one of the following options:
• Install a new nut with the pre-applied thread
adhesive compound. Tighten the nut to the
specified torque as specified in the back of this
publication.
• If a new nut with pre-applied thread adhesive
compound is unavailable, apply “Loctite 277” or
“271” to the nut along two threads, for at least
two flats (120°) of the nut midway through the
thickness.
IMPORTANT
Follow the instructions specified by the thread adhesive
manufacturer when applying thread adhesive compound.
2 Flats
(120 deg.)
Midway thru
thickness of nut
Note: Use of a torque multiplier is recommended.
TIP: If you can't get the correct torque on yoke nut,
try torquing the nut with the truck wheels on the
ground and with the axle shafts installed.
23
Page 27

Install Drive Pinion Assembly
Pinion Assembly
Procedure -
1. Place shim pack on carrier making sure lube holes
are clear.
1
-
Nominal Shim Pack
15040, 19050, 19055, 21065, 21090, 22065, 23070, 23080, 23085, 23090, 26080, 26085, 26090 .024 in (.61 mm)
17060, 19060, 21060, 22060 .023 in (.58 mm)
23105, 26105, 30105 .021 in (.53 mm)
Note: If gear set is to be reused, install same quantity and size
of shims removed during disassembly. When installing a
new gear set, use nominal shim pack indicated.
2. Install pinion assembly. Install bearing cage cap
screws and lock washers. Torque to proper specifications as outlined in back of this publication.
Service Procedure
24
Page 28

Install Pinion Oil Seal and Yoke
Seals / Yokes
1. With pinion bearing preload adjustment complete,
install oil seal. If available, use a properly sized
installation tool to install the oil seal. Otherwise, use
a press and properly sized sleeve to prevent distortion or contact with seal lips during installation (see
illustration).
Press
Sleeve
"A"
"A" - Sleeve must be sized to
press on seal outer flange.
Pinion
Pinion
"A"
Bearing
cage
Note: Do not rework the yoke with abrasives such as emery
paper or crocus cloth. Clean the surface of the yoke as
necessary using chemical cleaners. Remove all trace of
the chemicals from the yoke after cleaning.
Note: Do not use wear sleeves. Wear sleeves increase the
yoke hub surface diameter and cause premature seal
wear and repeat seal failure.
Seal Replacement
Tool
Seal
Pinion
bearing
cage
2. Make sure yoke is clean and dry. Install yoke and nut
(or nut washer on some models). Tighten nut to correct torque (see torque chart).
Note: After tightening nut, recheck pinion bearing rolling
torque, then proceed with pinion installation in carrier.
Yoke Reuse Guidelines
CAUTION
Do not use the yoke if it has any damage on the seal surface
(nicks or scratches).
The surface of the yoke and the lips of the seal form a critical
interface which retains the axle’s lubricant while sealing the
axle from outside contaminants. The condition of the yoke
hub’s surface is a very important factor in determining seal
life.
sea
Carefully inspect the
signs of wear and damage. Do not reuse the yoke if there is
noticeable wear such as heavy grooving, beyond normal polishing from the seal lips.
l surface area of the yoke hub for
Note: Spicer strongly recommends using seal drivers when
installing new seals. Use the proper driver to ensure the
seal is square and installed to the proper depth.
CAUTION
Oil seals can be easily damaged prior to installation. Use
care when handling the new seal to prevent damage or contamination. Leave the seal in
On
new yokes, leave the protector on the yoke until it is
its package until installation.
installed on the shaft to prevent damage or contamination.
25
Page 29

Wheel Differential - Exploded View
3
2
Wheel Differential
4
5
8
76
9
1. Ring Gear
2. Capscrew
3. Flat washer
1
Flange Half ( LH )
10
14
13
12
11
20
19
18
4
17
16
15
16
17
Service Procedure
17. Side gear
18. Diff. spider
19. Side pinion
4. Diff. carrier bearing caps
5. Cotter pin
6. Diff. case - LH (flange half)
7. Bearing cone - flange half
8. Bearing cup - flange half
9. Diff. brg. adjuster - flange half
10. Bolt
11. Nut
12. Diff. bearing adjuster - plain half
13. Bearing cup - plain half
14. Bearing cone - plain half
15. Diff. case - RH (plain half)
16. Side gear thrust washer
20. Side pinion thrust washer
®
No-SPIN
Differential
(Optional)
TrueTrac
26
Page 30

Wheel Differential
Remove Wheel Differential - (All Standard Models)
Note: Omit this step if the gear set is to be replaced. If gear
set is to be reused, check tooth contact pattern and ring
gear backlash before disassembling differential carrier.
When checking backlash, a yoke or helical gear must be
installed and torqued to get an accurate reading. Best
results are obtained when established wear patterns are
maintained in used gearing.
1. Mount differential carrier in repair stand.
Note: For easier disassembly, loosen but do not remove pin-
ion (self-locking) nut. Forward axle pinion is equipped
with slotted nut, remove roll pin with a pin punch then
loosen nut.
2. If reusing gear set, also punch mark bearing adjusters for reference during assembly.
3. Remove cap screws, flat washers and bearing caps.
Back off bearing adjusters and remove adjusters and
bearing cups.
4. Using a chain hoist, lift ring gear and differential
assembly out of carrier.
1 - Punch marks
27
1
Page 31

Wheel Differential
Disassemble, Overhaul and Assemble Wheel Differential
Disassemble Wheel Differential
CAUTION
During following procedure, place differential assembly on
malleable surface to prevent damage when ring gear falls
off its mounting position.
Procedure -
1. Remove nuts and bolts fastening ring gear to differential cases, allowing gear to fall free. If gear does
not fall, tap outer diameter with soft mallet to loosen.
2. Punch mark differential cases for correct location
during reassembly. Remove cap screws and lift off
plain differential case half.
4. Lift out spider, side pinions and thrust washers.
Service Procedure
5. Remove remaining side gear and thrust washer.
6. Remove bearing cones from case halves using suitable puller.
7. Remove bearing cone from plain case half in two
steps:
a. Mount puller vertically to split bearing. This action
will start moving bearing off case.
1 - Punch marks
3. Lift out side gear and thrust washer.
1
b. Mount puller horizontally to remove cone.
8. Remove bearing cone from flanged case half using
suitable puller.
28
Page 32

Wheel Differential
Overhaul and Assemble Wheel Differential
CAUTION
To prevent bearing damage, use suitable sleeve that only
contacts the inner race of the cone. A used bearing race
would be a suitable tool. This tool should have a slit cut if
the ID is the same as the flange OD.
Procedure -
1. Press new flange half bearing cones on differential
case halves.
2. Press new plain half bearing cones on differential
case halves.
3. Place thrust washer and side gear in flanged differential case.
4. Lubricate all differential parts.
5. Assemble side pinion and thrust washers on spider.
Place this assembly in flanged differential case.
Rotate gears and check for proper mesh.
29
6. Place side gear and thrust washer on side pinions.
Page 33

Wheel Differential
7. Align punch marks and install plain case half. Install
cap screws and tighten to proper specifications as
outlined in the back of this publication. Check differential for free rotation by turning side gear hub.
1
1 - Punch marks
8. Install ring gear. Secure with bolts and nuts.
Note: For 17060, 19060, 21060, 22060 model axles, flange
half differential cases were redesigned starting with production axles built in January 1997. New style ring gear
bolts are also required with the new style flange case.
Torque bolt to proper specifications. listed on page 70.
11. Install the bearing cup and bearing adjuster to the
plain half side. Use a long screwdriver or bar to lift
the differential up while installing the cup and bearing adjuster.
Service Procedure
9. Lower assembled differential assembly in to the carrier using a hoist and a strap. Be careful not to damage the differential bearings lowering the assembly.
10. Install the bearing cup and bearing adjuster to the
flange half side first.
30
Page 34

Wheel Differential Adjustments
Measure and Adjust Carrier Assembly
Adjust Backlash and Preload
Procedure -
1. Turn the flange half bearing adjuster in until the ring
gear contacts the pinion (zero backlash) than back
the adjuster out two notches of the adjuster lugs.
1
3. Tighten the plain half adjuster two lug notches. Start
with the notch at the top, count two notches counterclockwise on the adjuster, and turn the adjuster so
the notch is facing straight up. You now have a two
notch preload.
2
1
2
1 - Lugs
2 - One notch
4. Use a rubber mallet to make certain both bearing
adjusters are fully seated.
1 - Flange half
2 - Plain half
2. Tighten the plain half adjuster until the bearing cup
just starts to turn, this is a zero bearing preload.
5. Measure backlash. Make sure it is within specification of .008"–.018”.
TIP: To give yourself room to adjust contact pattern,
set it between .010"– .012".
31
Page 35

Change Backlash Setting
Wheel Differential Adjustments
If you have too much backlash the ring gear needs to move
closer to the pinion. Back off the plain half adjuster, and count
the number of notches you backed it off. Each notch equals
about .003" of backlash.
IMPORTANT
In order to maintain the differential bearing preload you will
need to turn the flange half bearing adjuster the same
amount in the same direction. If you need more backlash
reverse this procedure.
Procedure -
1. Install carrier bearing caps and torque carrier cap
bolts to specifications outlined in the back of this
publication.
2. Recheck Backlash: If the bearing adjusters were not
in straight or fully seated the backlash will change.
a. Used Gearing: Reset to backlash recorded before
disassembly.
b. New Gearing: Backlash should be between .008 and
.018".
Measure Ring Gear Runout
Procedure -
1. Measure ring gear total radial run out. (Indicator
reading should not exceed .010").
Service Procedure
2. Measure ring gear total backface runout. (Indicator
reading should not exceed .010").
3. Check ring gear tooth contact pattern. Paint ring gear
teeth and check tooth contact pattern. Correct tooth
patterns. Check adjusting procedures outlined in
this section.
4. Install bearing adjuster cotter pins.Measure Ring
Gear Runout.
32
Page 36

Adjust Tooth Contact Pattern
Adjust Ring and Pinion Tooth Contact Pattern
Note: Rear axle gearing is shown in the following instructions.
Correct tooth contact patterns and adjustments are the
same for forward and rear axles.
2
1
3
4
5
6
1 - Face width
2 - Tooth Depth
3 - Heel
4 - Top land
5 - Root
6 - Toe
1. Identify if new or used gearing.
2. Check tooth contact pattern (new or used gearing).
Used Gearing - Correct Pattern
Used gearing will not usually display the square, even contact
pattern found in new gear sets. The gear will normally have a
“pocket” at the heal end of the gear tooth. The more use a
gear has had, the more the line becomes the dominant characteristic of the pattern.
Adjust used gear sets to display the same contact pattern
observed before disassembly. A correct pattern is up off the
toe and centers evenly along the face width between the top
land and root. Otherwise, the length and shape of the pattern
are highly variable and is considered acceptable as long as it
does not run off the tooth at any point.
New Gearing - Correct Pattern
Paint six ring gear teeth 180° apart with marking compound
and roll the gear to obtain a contact pattern. The correct pattern is slightly below center on the ring gear tooth with lengthwise contact up off the toe. The length of the pattern in an
unloaded condition is approximately one-half to two-thirds of
the ring gear tooth in most models and ratios.
The pattern could vary in length and should cover 1/2 tooth or
more (face width). The pattern should be evenly centered
between tooth top land and root and should be up off the
tooth toe.
1 - Pattern along the face width could be longer
Adjust Contact Pattern
If necessary, adjust the contact pattern by moving the ring
gear and drive pinion.
• Ring gear position controls the backlash. This
adjustment moves the contact pattern along the face
width of the gear tooth.
• Pinion position is determined by the size of the pinion bearing cage shim pack. It controls contact on
the tooth depth of the gear tooth.
These adjustments are interrelated. As a result, they must be
considered together even though the pattern is altered by two
distinct operations. When making adjustments, first adjust the
pinion, then the backlash. Continue this sequence until the
pattern is satisfactory.
33
Page 37

Adjust Pinion Position
Adjust Tooth Contact Pattern
If the gear pattern shows incorrect tooth depth contact,
change drive pinion position by altering the shim pack. Used
gears should achieve proper contact with the same shims
removed from the axle at disassembly.
Note: Check ring gear backlash after each shim change and
adjust if necessary to maintain the .006" to .018" specifications.
If the pattern is too close to the top land of the gear tooth,
remove pinion shims. Move pinion toward the ring gear.
If the pattern is too close to the root of the gear tooth, add
pinion shims. Move pinion away from the ring gear.
Adjust Ring Gear Position (Backlash)
If the gear pattern shows incorrect face width contact, change
backlash by adjusting the ring gear.
If the pattern is too close to the edge of the tooth toe, move
the ring gear away from the pinion to increase backlash.
Service Procedure
1. Loosen the bearing adjuster on the teeth side of the
ring gear several notches.
2. Loosen the opposite adjuster one notch.
3. Return to adjuster on teeth side of ring gear and
tighten adjuster until it contacts the bearing cup.
4. Continue tightening the same adjuster 2 or 3 notches
and recheck backlash.
• If the pattern is concentrated at the heel (too far
up the tooth), move the ring gear toward the
pinion to decrease backlash.
5. Loosen the bearing adjuster on the teeth side of the
ring gear several notches.
6. Tighten the opposite adjuster one notch.
7. Return to adjuster on teeth side of ring gear and
tighten adjuster until it contacts the bearing cup.
8. Continue tightening the same adjuster 2 or 3 notches
and recheck backlash.
34
Page 38

Wheel Differential lock
Differential Lock Shifting Parts - Exploded View
Type 1
For Models: 19055D, 21065D, 21080D, 21090D, 22065D,
23070D, 23080D, 23085D, 23090D, 23105D, 26080D,
26090D, 26105D, 30105D
1a
2a
3a
4a
8
2
9
3
4
5
6
10
1
7
15
Type 2
For models: 17060D, 19060D, 21060D, 22060D
5a
3
4
5
8
9
2
1
6
18
13
15
17
16
14
7
11
10
12
14
13
11
12
1 - Shoulder washer 9 - Switch actuator
2 - Piston 10 - Shift fork cap screw
3 - O-ring 11 - Pushrod
4 - Shift cylinder body 12 - Shift fork spring pin
5 - Bracket cap screw 13 - Shift fork
6 - Mounting bracket 14 - Sliding curvic clutch
7 - Fixed curvic clutch 15 - Fixed curvic clutch snap ring
8 - Compression spring
1a - Piston 3a - Shift cylinder gasket
2a - piston O-ring 4a - Shift cylinder
5a - Housing cap screw
1 - Fixed curvic clutch 9 - Cap screw
2 - Fixed curvic snap ring 10 - Piston cover
3 - Sliding curvic clutch 11 - Washer
4 - Shift fork spring pin 12 - Switch
5 - Shift fork 13 - Gasket
6 - Compression spring 14 - O-ring
7 - Cap screw 15 - Piston
8 - Manual engagement scew 16 - Set screw
17 - Piston Driver
18 - Push rod
35
Page 39

Wheel Differential Locking Axles
Wheel Differential Lock
Comparison Information on Spicer Wheel Differential
Locking Axles
This section covers Spicer “Wheel Differential Locking” axles.
The basic concept of Dana’s Wheel Differential Locking axles
are the same, but the designs vary model to model. When
servicing your Diff Lock axle, pay close attention to all
NOTES, TIPS and WARNING signs that will assist you while
you work on your axle. The Diff Lock axles listed below are
grouped together by design type. In this section they will be
referred to as Type 1, or Type 2.
Type 1
2
3
5
4
1
1 - Case bolt 8 - Switch
2 - Cover 9 - Differential carrier
3 - Cylinder seal 10 - Switch actuator
4 - O-ring 11 - Compression spring
5 - Piston 12 - Fixed cirvic clutch
6 - Push rod 13 - Sliding cervic clutch
7 - Gasket 14 - Shift fork
8
7
6
9
10
14
13
11
12
Type 1 Style Diff Lock Axles Feature:
• A sliding curvic clutch
• A fixed curvic clutch
• The Flange Half Diff Case is externally splined
• Uses double spline or extended spline axle shaft (11"
spline length) on Flange Half Side of axle
• Uses standard spline axle shaft (4" spline length) on
plain half side of axle
• The
Diff Lock
selector switch is located on the car-
rier/ cap assembly
Type 2
1
2
3
4
5
6
1 - Fixed clutch 4 - Piston driver
2 - Sliding clutch 5 - Gasket
3 - Pushrod 6 - Switch
Service Procedure
Type 2 Style Diff Lock Axles Feature:
• A sliding curvic clutch
• A fixed curvic clutch
• The Plain Half Diff Case is externally splined
• Uses extended spline axle shaft (11" spline length)
on plain half side of axle
• Uses standard spline axle shaft (4" spline length) on
flange half side of axle
• The Diff Lock selector switch is located on the Diff
Lock shift cylinder
36
Page 40

Wheel Differential lock
Install and Adjust Differential Lock - Type 1 Axles
Special Instructions
Note: With differential carrier completely assembled and
adjusted, install differential lock assembly for Type 1
axles as follows:
Procedure -
1. Install fixed curvic clutch on splined hub of flanged
differential case.
Type 1
2. Install Snap ring
3. If shift fork and sliding curvic clutch are disassembled, engage fork with clutch hub and install spring
pin in end of fork long leg to hold components
together. See illustration for fork mounting position
on clutch. Install clamp screw in fork and tighten finger-tight.
Long leg
of shift
fork
4. Place compression spring and switch actuator in
shift box.
Switch
actuator
37
Compression
spring
Page 41

Wheel Differential lock
5. Position shift fork and clutch assembly on carrier,
inserting fork head in shift box on top of actuator.
Install pushrod, engaging fork head, switch actuator,
compression spring and pilot hole in carrier.
2
1
1 - Cover capscrew 4 - O-ring
2 - Cover 5 - Piston
3 - Cover gasket 6 - Push rod
3
5
4
6
Note: The shift cylinder is serviced only as an assembly. How-
ever, if the cylinder is disassembled and parts are serviceable, assemble as described in Steps 5 thru 8.
6. Install new O-ring on piston.
10. Place shift cylinder assembly on end of pushrod.
Compress cylinder assembly by hand to keep pushrod piloted in carrier, and install mounting bracket
cap screws. Torque to 28-35 lbs.ft. (38-47 N•m).
Service Procedure
Note: At this stage of assembly, adjust shift fork position.
7. Lubricate piston and O-ring with silicone grease and
install piston with small diameter hub toward closed
end of cylinder.
8. Install seal on cylinder, piloting seal shoulder inside
cylinder.
9. Install mounting bracket on cylinder.
38
Page 42

Wheel Differential Lock
Shift Fork Adjustment - Type 1 Axles
Procedure -
1. With clutches disengaged, adjust position of shift
fork on pushrod to set a clearance of .120"
(3.05mm) between the clutch teeth.
2. Adjust as follows: Place two .120" (3.05mm) feeler
gauges (one on each side of the clutches) between
the tips of the clutch teeth. Slide shift fork on pushrod to set clutch clearance. Working through carrier
pipe plug opening, tighten shift fork cap screw to 1215 lbs.ft. (16-20 N•m) torque.
0.120" (3.05mm)
0.120"
Two 0.120" (3.05mm) feeler gauges
3. Check differential lock clutch engagement by one of
the following methods:
Air Pressure Engagement: Apply air pressure (80-120
psi) to shift cylinder port to engage clutches.
Manual Engagement: Install an M12x1.5 bolt, over
38mm (1.5") long, in the cylinder air port to manually
engage clutches.
Note: Hand-tighten the bolt. Over-torquing may cause
damage to the shift unit. To facilitate hand-tightening,
lubricate bolt threads with axle lube.
4. Correct Fork Adjustment: Fork adjustment is correct
when clutch curvic teeth are fully engaged with the
fork free when moved by hand (see illustration).
When air pressure is released or manual bolt is
removed, the shift assembly should disengage
freely.
5. Recheck the .120" (3.05mm) clutch teeth clearance
with shift cylinder fully disengaged. If not correct,
readjust fork position (see Steps 1 and 2).
6. With differential lock correctly adjusted, coat pipe
plug with sealant and install plug in carrier shift box.
7. Install selector switch and plastic washer in carrier
shift box. Torque switch to 10-12 lbs.ft. (14-16
N•m).
8. Check Selector Switch Operation: Check switch
electrically with an ohmmeter or continuity tester.
Switch should close (show continuity) when
clutches are engaged and should open (no continuity) when clutches are disengaged.
39
Page 43

Wheel Differental lock
Install and Adjust Differential Lock - Type 2 Axles
Note: With differential carrier completely assembled and
adjusted, install differential lock as follows:
Procedure -
1. Install fixed curvic clutch on splined hub of flanged
differential case, then install snap ring.
2. If shift fork and sliding curvic clutch are disassembled, engage fork with clutch hub, and install spring
pin in the long leg of the fork. See illustration for fork
mounting position on clutch.
3. Position compression spring, shift fork and clutch
assembly in shift opening of the carrier. Align pilot
hole of shift fork with pilot hole of carrier. Install
pushrod, engaging shift fork head and compression
spring in carrier.
Note: The shift cylinder is serviced only as an assembly. How-
ever, if the cylinder is disassembled and parts are serviceable, assemble as described in Steps 4 and 5.
4. Install new O-ring on piston.
5. Lubricate piston and O-ring with silicone grease and
install piston assembly in cylinder. Position piston
with small diameter hub toward closed end of cylinder.
6. Screw piston driver on pushrod.
13. When adjustment is complete, torque fasteners to
28-35 lbs.ft. (38-47 N•m).
Manual
engagement
screw
Capscrew
Switch
Washer
Gasket
O-ring
Piston
Setscrew
Piston
driver
Pushrod
Pin
Sliding
clutch
Clutch
fork
Spring
Insert
spring
here
Service Procedure
7. Tighten piston driver until shift fork clutch is approximately .030 of an inch from the fixed clutch.
8. Push down by hand on the piston driver, both
clutches must be completely engaged.
9. Install set screw in piston driver and torque to 12-15
lbs.ft. (16-20 N•m).
10. Trial fit, install piston cover assembly. Hand tighten
cap screws.
11. Screw in manual engagement screw by hand
approximately 1 inch or until snug fit (light resistance pressure is felt). Both clutches must be completely engaged.
12. Remove manual engagement screw clutches until
completely disengaged.
• Repeat above procedure if clutches are not
completely disengaged.
Note: Fork adjustment is correct when curvic clutch teeth are
fully engaged with the fork free when moved by hand.
When air pressure is released or the manual bolt is
removed, the shift assembly should disengage freely.
40
Page 44

Wheel Differental lock
Install and Adjust Differential Lock - Type
2 Axles Continued
Procedure -
1. Install selector switch in cylinder cover. Torque
switch to 10-12 lbs.ft (14-16 N•m).
Note: Effective July 1, 1996, Dana will standardize on the
selector switch and wiring harness. Reference Bulletin
ABIB-9609. Types 1 and 2 switches with 12 mm threads
will be discontinued. The selector switch and wiring har-
nesses are interchangeable with each other.
Check Selector Switch Operation: Check switch electrically
with an ohmmeter or continuity tester. Switch should close
(show continuity) when clutches are engaged and should
open (no continuity) when clutches are disengaged
Install Differential Carrier Assembly in Axle Housing: The
differential lock must be engaged and held in the engaged
position for installation of carrier assembly in axle housing.
This can be accomplished by one of the following two methods:
Air Pressure Engagement: Using an auxiliary air line,
apply 80-120 psi air pressure to shift cylinder air port to
engag
e clutch.
Manual Engagement: Install an M12x1.5 bolt, over
38mm (1.5") long, in the cylinder air port to manually
engage the clutches
Note: Hand-tighten the bolt, over-torquing may cause damage
to the shift unit. To facilitate hand tightening, lubricate
bolt threads with axle lube.
2. Complete the installation of the carrier following
instructions for your specific axle.
CAUTION
When installing axle shafts, make sure the long/splined
shaft is installed in the shift unit side of differential carrier
3. After carrier and axle shaft installation, disconnect auxiliary air line or remove bolt from cylinder air port. Connect vehicle air supply to shift
cylinder and electrical
lead wires to
switch
4. Check differential lock operation from driver’s
cab before releasing vehicle for service.
5. Verify the driver caution label is in the vehicle
cab and is easily visible by the driver.
TH IS VEHIC LE IS EQU IPPED WI TH
THE DRIVER CONTROLLED WH EEL
DIFFER ENTIAL LOCK.
En gage o nly whe n tract ion is poor
Do not e ngag e w hen t ires are slipping
Diseng age wh en go ing do wn hill
Diseng age at speeds above 25 mph
WARNING
St eering will be ad versely
affected when engaged
ENGAGED
DISENGAGED
selector
With clutches engaged, grasp fork long leg between thumb
and forefinger. Move fork back and forth to check for free
movement.
Some GM models use a .250 x 18 NPSM (128642), manual
engagement bolt.
41
For further i nfor matio n
consult your o wn ers ma nual
or Spicer publication AXDR-0 130
Warning Label 128045
DRIVE C A R FULLY
WHEN E N GAG ED
128045
Page 45

Jam Nut Option
"
Install and Adjust Wheel Differential Lock
Note: With differential carrier completely assembled and
adjusted, install differential lock as follows:
Procedure -
1. Install fixed curvic clutch on splined hub of flanged
differential case, then install snap ring.
2. If shift fork and sliding curvic clutch are disassembled, engage fork with clutch hub and install spring
pin in the long leg of the fork. See illustration for fork
mounting position on clutch.
3. Position compression spring, shift fork and clutch
assembly in shift opening of the carrier. Align pilot
hole of shift fork with pilot hole of carrier. Install
pushrod, engaging shift fork head, and compression
spring in carrier.
4. Install new O-ring on piston.
5. Lubricate piston and O-ring with silicone grease and
install piston assembly in cylinder. Position piston
with small diameter hub toward closed end of cylinder.
6. Screw piston driver on pushrod.
12. Remove manual engagement screw, clutches must
be completely disengaged.
13. Repeat above procedure if clutches not completely
disengaged.
Note: Fork adjustment is correct when curvic clutch teeth are
fully engaged with the fork free when moved by hand.
When air pressure is released or the manual bolt is
removed, the shift assembly should disengage freely.
14. When adjustment is complete, torque fasteners to
28–35 ft.lbs. (38–47 N•m).
15. Install selector switch in cylinder cover. Torque
switch to 10–12 ft.lbs. (14–16 N•m).
16. Check selector switch operation: Check switch electrically with an ohmmeter or continuity tester. Switch
should close (show continuity) when clutches are
engaged and should open (no continuity) when
clutches are disengaged.
Service Procedure
7. Tighten piston driver until shift fork clutch is approximately .030" from the fixed clutch.
.030
8. Push down by hand on the piston drive. Both
clutches must be completely engaged.
9. Install set screw in piston driver, and torque to 12–
15 ft.lbs. (16–20 N•m).
10. Trial fit, install piston cover assembly. Hand tighten
cap screws.
11. Screw in manual engagement screw, by hand
approximately 1 inch or until snug fit (light resistance pressure is felt) both clutches must be completely engaged.
42
Page 46

Wheel Differential Lock
Install and Adjust Ring Gear Thrust Bolt
Procedure -
1. Thread thrust screw into the carrier until firm contact
with the back face of the ring gear is made.
2. Loosen the thrust screw 1/4 turn to obtain the correct adjustment of .020" (.50mm) clearance between
gear face and screw. Tighten jam nut, holding thrust
screw stationary with a wrench, torque jam nut 150–
190 ft. lbs. (203–258 N•m).
3. Recheck to assure minimum clearance during full
rotation of ring gear.
2
1
1 - Rear carrier or front carrier
2 - Thrust bolt
3 - Thrust bolt jam nut
43
Page 47

Axle Housing
Install New Axle Housing Breather - (Metal and Plastic)
Spicer uses an axle housing breather that consists of a fitting,
hose, and clamp assembly. This breather design has improved
resistance to water ingestion, and clogging caused by dirt,
ice or snow buildup around the base of the breather.
See installation instructions below (all views from rear).
Procedure -
1. Install fitting in breather hole.
Plastic only: Tighten until one thread is showing.
4. Insert hose onto fitting, long end down.
Service Procedure
2. Tighten fitting finger tight.
3. Using a 3/4” wrench:
Metal only: Rotate the fitting at least 1/2 turn until nipple
points to rear.
5. Push hose firmly against fitting. Rotate hose to point
down.
44
Page 48

Axle Housing - Exploded View
5
4
3
Axle Housing
2
10
11
12
14
6
7
12
13
8
9
61510-8-95
1 - Axle Shaft
2 - Axle Housing Assembly
3 - Outer Nut
4 - Lock Washer
5 - Inner Nut
6 - Housing Breather Tube
7 - Housing Fitting
8 - Fill Plug
9 - Oil Sensor Plug
10 - Drain Plug
11 - Housing Stud
12 - Hardened Washer
13 - Carrier Capscrew
14 - Nut, Stud
1
45
Page 49

Inter Axle Speed Sensor
Inter-Axle Speed Sensor Parts - Exploded View
4
1
1 - Axle shaft
2 - Speed sensor
3 - Differential bearing adjuster
4 - Plated connector
5 - ABS Harness connector
3
5
Service Procedure
2
46
Page 50

Inter Axle Speed Sensor
Disassemble and Overhaul Inter-Axle Speed Sensor
Disassemble
The design of the drive axle sensor allows replacement of several individual components without disassembling the complete sensor system. For example:
• The differential bearing adjuster does not need to be
removed in order to replace any other component.
• The sensor and rotor can be replaced without
removing or replacing the plated connector.
At every stage of drive axle service, try to isolate the problem
to specific components in order to avoid unnecessary disassembly.
Procedure -
1. Disconnect two wires from sensor terminals.
2. Carefully inspect wires and connector. If connector
is intact and if there is no prior indication that connectors and wires require replacement, do not
unscrew plated connector. The sensor may be
replaced without replacing connector and wire.
3. Remove four screws from face of sensor.
Overhaul
Note: If plated connector was damaged during axle disassem-
bly or if there is indication of a wiring fault, the connector assembly must be replaced.
There are two different connectors with two different lengths
of terminal wires. See Inter-Axle Speed Sensor Service Manual AXSM-0034.
If sensor assembly is to be replaced, install new sensor before
finishing installation of new connector. The final position of
the sensor terminals must be fixed before wires can be sealed
in place.
To install new connector:
1. Clean threaded hole in carrier and wire path to allow
proper seal for new connector. (Male threads on the
new connector have microencapsulated Loctite).
2. Insert connector and torque to 20–28 lbs.ft. (27–38
N•m).
3. Route wires to the sensor location.
4. Remove sensor from differential bearing adjuster.
47
Page 51

Install Inter-Axle Speed Sensor
Inter Axle Speed Sensor
Except for routing the wires between the sensor and the
plated connector, procedures for installing both drive axle
speed sensors are identical. The instructions which follow
cover the long arm (plain half) side speed sensor and require
careful routing of the 6 inch long connector wires to prevent
pinching between the head and housing.
1
4
2
3
1 - Wires seated in channel
2 - Connector hole is on carrier mounting surface
3 - 6 inch long wires
6. Attach the two round terminals to sensor. Either wire
can connect to either sensor blade. Make sure terminals are not bridged and connectors are not touching. Torque to 10–15 in.lbs. (1.1–1.7 N•m).
7. Before sealing wires in place, check sensor continuity by measuring the resistance between pins on the
outside of the connector. Resistance between connector pins should be 1125 to 1375 ohms.
8. Check wire routing. Make sure wire is seated in the
cast-in channel and will not get pinched when the
head is reassembled to the housing. Seal wire in
place with RTV.
9. To replace sensor on the short arm (flanged half)
side, repeat previous steps. Since connector location
is inside the mounting surface, there is less concern
for pinching of the shorter 4 inch connector wires.
However, before final assembly, check wire position
and routing to make sure it is not crimped or
pinched.
1
Service Procedure
4 - Sensor terminals positioned near carrier mounting surface
Procedure -
1. Lubricate interior rotor with axle lube or grease.
Check that the rotor turns freely by hand.
2. Mate the rotor and the sensor assembly.
3. Align the sensor/rotor assembly with the face of the
adjuster so the terminals are nearest the carrier
mounting surface.
4. Orient the sensor to line up the holes in the sensor
with the threaded holes in the adjuster. Rotate the
sensor in either direction to get the fit that keeps the
terminals near the carrier mounting surface. This
final adjustment should only require a slight shift in
sensor position.
5. Apply Loctite to the four mounting screws. Install
the screws and tighten in a “star” pattern to maintain
sensor alignment. Torque to 28–32 in.lbs. (3.2–3.6
N•m). (A preferred tightening approach is the “turn
of bolt” method: torque screws finger tight then
tighten additional 1/4 turn).
2
3
4
6
1 - Installed position of axle shaft
2 - Sensor terminals positioned near connector hole
3 - Axle housing
4 - 4 inch long wires
5 - Connector hole is not on carrier mounting surface
6 - Axle carrier
5
48
Page 52

Wheel End Seal Parts - Exploded View
Wheel End Seal
1
1 - Installation tool
2 - Seal
3 - Rear hub
2
3
49
Page 53

Remove and Overhaul Wheel End Seal
WARNING
Wheel End Seal
Never work under a vehicle supported by only a jack.
Always support vehicle with stands. Block the wheels and
make sure the vehicle will not roll before releasing the
brakes.
CAUTION
Wheel end seals can be easily damaged during handling.
Leave the seal in its package until installation to prevent
damage or contamination.
Procedure -
1. Remove outer bearing and wheel.
2. Remove oil seal.
3. Remove inner bearing.
4. Remove old wear sleeve (2-piece design only) with a
ball peen hammer and discard.
CAUTION
Do not cut through the old wear sleeve. Damage to the
housing may result.
Install Wheel End Seal
Procedure -
1. Before installation, lubricate the following with the
same lubricant used in the axle sump.
• Inner bearing
• Wheel seal (follow the directions provided by
the seal supplier)
2. Place seal on installation tool.
3. Drive seal with installation tool onto hub.
Service Procedure
Note: Deep gouges can be repaired by filling gouge with hard-
ening gasket cement and smoothing with emery cloth.
5. Inspect spindle journal and hub bore for scratches or
burrs. Recondition with an emery cloth as required.
6. Clean hub cavity and bearing bores before reassembly. Be sure to remove contaminants from all
recesses and corners.
7. Clean bearings thoroughly with solvent and examine
for damage. Replace damaged or worn bearings.
CAUTION
Always use the seal installation tool specified by the seal
manufacturer. Using an improper tool can distort or damage the seal and cause premature seal failure.
50
Page 54

Adjust Wheel Bearing
WARNING
Wheel Adjustment Systems
Do not mix spindle nuts and lock washers from different
systems. Mixing spindle nuts and lock washers can cause
wheel separation
Note: The lock washer for a four-piece tang/dowel-type wheel
nut system is thinner than the lock washer for a threepiece tang-type wheel nut system and is not designed to
bear against the inner nut.
Procedure -
1. Inspect the spindle and nut threads for corrosion
and clean thoroughly or replace as required.
Note: Proper assembly and adjustment is not possible if the
spindle or nut threads are corroded.
2. Inspect the tang-type washer (if used). Replace the
washer if the tangs are broken, cracked, or damaged.
3. Install the hub and drum on the spindle with care to
prevent damage or distortion to the wheel seal.
CAUTION
A wheel dolly is recommended during installation to make
sure that the wheel seal is not damaged by the weight of the
hub and drum. Never support the hub on the spindle with
just the inner bearing and seal. This c an damage the seal
and cause premature failure.
4. Completely fill the hub cavity between the inner and
outer bearing races with the same lubricant used in
the axle sump.
8. Back off the inner nut one full turn. Rotate the wheel
hub.
9. Retighten the inner nut to 50 ft. lbs. (68 N•m) while
rotating the wheel hub.
10. Back off the inner nut exactly 1/4 turn.
Note: This adjustment procedure allows the wheel to rotate
freely with 0.001" -.005” (0.025 mm–0.127 mm) endplay.
11. Install the correct lock washer for the wheel nut system being used.
Three-piece Dowel-type Lock Washer System
1
2
3
4
1 - Inner nut
2 - Dowel pin
3 - Dowel-type lock washer
4 - Outer nut
a. Install the Dowel-type lock washer on the spindle.
5. Before installation, lubricate the outer bearing with
the same lubricant used in the axle sump.
Note: Lubricate only with clean axle lubricant of the same type
used in the axle sump. Do not pack the bearings with
grease before installation. Grease will prevent the proper
circulation of axle lubricant and may cause wheel seal
failure.
6. Install the outer bearing on the spindle.
7. Install the inner nut on the spindle. Tighten the inner
nut to 200 ft.lbs. (271 N•m) while rotating the wheel
hub.
CAUTION
Never use an impact wrench to adjust wheel bearings. A
torque wrench is required to assure the nuts are properly
tightened
51
Note: If the dowel pin and washer are not aligned, remove
washer, turn it over and reinstall. If required, loosen the
inner nut just enough for alignment.
Note: Never tighten the inner nut for alignment. This can pre-
load the bearing and cause premature failure.
b. Install the outer nut on the spindle and tighten to
350 ft.lbs. (475 N•m).
c. Verify end-play, see “Verify Wheel End Play Proce-
dure”.
Page 55

Wheel Adjustment Systems
Three-piece Tang-type Lock Washer System
1
2
3
1 - Inner nut
2 - Tang-type lock washer .123” thick
3 - Outer nut
a. Install the Tang-type lock washer on the spindle.
Note: Never tighten the inner nut for alignment. This can pre-
load the bearing and cause premature failure.
b. Install the outer nut on the spindle and tighten to 250
ft.lbs. (339 N•m).
c. Verify end-play, see “Verify Wheel End Play Proce-
dure”.
Note: If the dowel pin and washer are not aligned, remove
washer, turn it over and reinstall. If required, loosen the
inner nut just enough for alignment.
Note: Never tighten the inner nut for alignment. This can pre-
load the bearing and cause premature failure.
b. Install the Tang-type lock washer on the spindle.
c. Install the outer nut on the spindle and tighten to 250
ft.lbs. (339 N•m).
d. Verify end-play, see “Verify Wheel End Play Proce-
dure”.
e. After verifying end-play, secure the outer nut by
bending (180° apart) two opposing tangs of the
locking washer over the outer nut.
12. Install the following:
• New gasket at axle shaft flange.
• Axle shaft.
• Axle flange nuts and tighten to specified torque.
13. Lubricate axle wheel ends.
Service Procedure
d. After verifying end-play, secure wheel nuts by bend-
ing one of the locking washer tangs over the outer
wheel nut and another tang over the inner wheel nut.
e. Go to step 12.
Four-piece Tang/Dowel-type Lock Washer System
3
4
5
1
2
1 - Inner nut
2 - Dowel pin
3 - Dowel-type lock washer
4 - Tang-type lock washer .0478” thick
5 - Outer nut
a. Install the Dowel-type lock washer on the spindle.
52
Page 56

Wheel Ends
Verify Wheel End-Play Procedure
Verify end-play meets specification using a dial indicator. An
indicator with .001" (.03 mm) resolution is required. Wheel
end play is the free movement of the tire and wheel assembly
along the spindle axis.
Correct end-play is .001" -.005” (.025–.125 mm ).
Adjust End-Play with Tire and Wheel Assembly
Procedure -
1. Attach a dial indicator with its magnetic base to the
hub or brake drum.
Adjust End-play with Wheel Hub
Insufficient End-play--If end-play is not present, remove the
outer nut and pull the lock washer away from the inner nut,
but not off the spindle. Loosen the inner nut to the next
adjustment hole of the dowel-type washer (if used). Reassemble the washer and re-torque the outer nut. Verify end-play
with a dial indicator.
2. Adjust the dial indicator so its plunger or pointer is
against the end of the spindle with its line of action
approximately parallel to the axis of the spindle.
3. Grasp the wheel assembly at the 3 o’clock and 9
o’clock positions. Push the wheel assembly in and
out while oscillating it to seat the bearings. Read
bearing end-play as the total indicator movement.
CAUTION
If end-play is not within specification, readjustment is
required.
Excessive End-play--If end-play is greater than .005" (.127
mm), remove the outer nut and pull the lock washer away
from the inner nut, but not off the spindle. Tighten the inner
nut to the next alignment hole of the dowel-type washer (if
used). Reassemble the washer and re-torque the outer nut.
Verify end-play with a dial indicator.
Fine Tuning the End-play--If, after performing the readjustment procedures, end-play is still not within the .001"- .005”
(.025–.127 mm) range, disassemble and inspect the components. If parts are found to be defective, replace the defective
parts, reassemble and repeat wheel bearing adjustment procedure. Verify end-play with a dial indicator.
53
Page 57

Lubrication
Lubrication Information
Note: For Lubrication information see TCMT 0021 Lubrication
Manual
Service Procedure
54
Page 58

Proper Vehicle Towing
Towing
Towing of Axles Equipped with Wheel Differential Lock
1. Engage the wheel differential lock until the indicator
light is on (move vehicle to verify engagement).
2. Shift transmission into neutral.
3. With vehicle stationary, release the air pressure on
the wheel differential. lock shift system and apply the
parking brake.
4. Disconnect the air supply and fitting at the shift cylinder.
5. Install the shipping cap screw or 128274 (M12 X 1.5
screw) or 128642 (.250 X 18 NPSM screw). Manually engage the wheel diff. lock until the indicator
light is on and the main differential lock is completely engaged.
6. Remove the axle shafts.
Note: Axle shafts are location specific. Remember the double-
splined or extended splined axle shafts are located on
the “shift cylinder” side of the axle.
7. Install temporary cover on hub to prevent contamination entering and also to prevent the loss of lubricant.
The Differential Lock also includes a selector switch (electric)
which senses clutch engagement and sends an electrical signal to a cab mounted indicator
device)
.
light (or an audible signal
Without Wheel Differential Lock
Lift the drive wheels completely off of the ground or damage
will occur.
WARNING
Do not lift the front wheels (non-drive wheels). This alters
the oil’s position in the drive axle, draining it away from the
drive pinion and its bearings. If the pinion is rotated under
these conditions for any period of time, bearings will overheat resulting in axle damage or failure
If this is impossible to lift the drive wheels, remove all axle
shafts to prevent gear rotation and cap the wheel hubs to prevent loss of lubricant and a possible road hazard. See the previous section “Proper Vehicle Towing with Wheel Differential
Lock” for removal procedure.
Description
The Spicer Wheel Differential Lock is an optional feature for
Spicer Axles. In
ferential to provide improved traction under adverse road
conditions.
The differential lock is driver-controlled through an electric
switch or air valve mounted in the cab. The locking mechanism is air-operated to engage a mechanical clutch and lock
the wheel differential. It is spring-operated to disengage the
lock and permit the wheel differential to function normally.
The Wheel Differential Lock consists of three major assemblies .
• A shift cylinder assembly which operates a shift fork
• A shift fork and push rod assembly which engages
• A curvic clutch assembly which consists of a sliding
operation, it positively locks the wheel dif-
and push rod assembly.
and disengages the differential lock curvic clutch
assembly.
clutch splined to a axle shaft and a fixed clutch which
is splined to the differential case hub.
55
Page 59

Theory of Operation
Operate Wheel Differential Assembly
The Spicer Wheel Differential Lock is driver-controlled and
operated by a carrier mounted air-actuated shift unit. In
operation, it positively locks the wheel differential to provide
improved traction under adverse road conditions.
Control Systems for Differential Lock
Two systems may be used to control the differential lock
operation.
Transmission Low-Range Interlock Control System
The wheel differential is locked manually with the transmission in Low-Range. It is unlocked by the driver or unlocked
when the transmission is shifted out of Low-Range.
Note: The interlock system is preferred for vehicles equipped
with an air-shifted, Low-Range transmission. It is
designed to ensure the differential lock is not left
engaged (and to prevent accidental engagement) when
the transmission is in high range.
Direct Driver-controlled System
The driver manually locks and unlocks the wheel differential,
using a cab-mounted electric switch (or air valve). The following description assumes the system includes a cab-mounted
electric switch and a solenoid valve as shown in the illustration. An
air valve
may be substituted for these components.
3. When the control switch is placed in the “unlock”
position, air pressure supply to the shift cylinder is
shut off and air pressure is released from the cylinder. A compression spring moves the shift fork to
disengage the curvic clutch and unlock the wheel differential.
1
2
5
3
4
6
7
8
Service Procedure
Operation is as follows:
1. With control switch in the “unlock” position, the
wheel differential functions normally.
2. When the control switch is placed in the “lock” position, the air supply solenoid valve opens and air
pressure activates the shift cylinder. The shift fork is
moved to engage the curvic clutches, which, in turn,
lock the wheel differential.
1— Cab-mounted control valve (plunger in—valve open)
2— Dry air supply tank 80–120 PSI
3— Preferably equal in length
4— Power supply
5— Fuse or circuit breaker
6— Indicator light or audible signal
7— Wheel differential lock indicator switch (part of axle
assembly)
8— Rear axle wheel
of axle assembly)
differential
lock air shift cylinder (part
56
Page 60

Wheel Differential Lock
Theory of Operation
The Spicer Wheel Differential Lock is an optional feature
for Spicer Axles. In operation, it positively locks the wheel
differential, to provide improved traction under adverse
road conditions.
The differential lock is driver-controlled through an electric
switch or air valve mounted in the cab. The locking mechanism is air-operated to engage a mechanical clutch and lock
the wheel differential. It is spring-operated to disengage the
lock and permit the wheel differential to function normally.
The wheel differential lock consists of three major assemblies.
Shift Cylinder Assembly
• Operates a shift fork and push rod assembly.
1
1b
1a
Shift Fork and Push Rod Assembly
• Engages and disengages the differential lock curvic
clutch assembly.
Curvic Clutch Assembly
• Consists of a sliding clutch splined to a axle shaft
and a fixed clutch which is splined to the differential
case hub.
The differential lock also includes a selector
switch (electric)
which senses clutch engagement and sends an electrical signal to a cab mounted indicator light (or an audible signal
device).
3
1— Curvic clutch assembly
1a—Sliding clutch
1b—Fixed clutch
2— Shift fork and pushrod assembly
2a—Shift fork
2b—Pushrod
3— Shift cylinder assembly
3a—Piston driver
3b—Selector switch
2a
2b
3a
2
3b
57
Page 61

Theory of Operation
Wheel Differential Lock Operation
Differential Lock Engaged
Air pressure applied to the shift cylinder moves the piston,
push rod, shift fork and the sliding curvic clutch as an assembly. The sliding curvic clutch engages the fixed curvic clutch.
The sliding clutch is splined to the axle shaft. The fixed clutch
is splined to the differential case hub. Engaging the two
clutches locks the wheel differential thus preventing wheel differential action.
Differential Lock Disengaged
When air pressure at the shift cylinder is released, a compression spring (mounted on the push rod) moves the push rod,
shift fork and sliding clutch as an assembly. The sliding clutch
moves out of engagement with the fixed clutch. The wheel differential is unlocked and operates normally.
Differential Lock Engagement Indicator
Differential lock engagement is detected by a switch (electric)
mounted on the differential carrier. An actuator, mounted in
the piston cover, operates the switch.
When the shift fork moves to engage the differential lock, the
switch actuator moves away from the switch, allows the
switch to close and sends an electrical signal to turn on a cabmounted indicator light (or an audible signal).
When the shift fork moves to disengage the differential lock,
the compression spring also moves the pushrod actuator to
contact the switch. The switch is opened and turns off the
cab-mounted indicator light (or the audible signal).
Service Procedure
2
1
8
3
9
Differential Lock Engaged
1 - Spring is compressed
2 - Shift Fork
3 - Pushrod
4 - Selector switch
5 - Piston
6 - Shift cylinder
7 - Air pressure applied engages clutches
8 - Fixed clutch splined to differential case
9 - Sliding clutch splined to axle shaft
2
4
1
5
6
7
8
3
9
4
5
6
7
Differential Lock Disengaged
1 - Spring is decompressed
2 - Shift fork
3 - Pushrod
4 - Selector switch
5 - Piston
6 - Shift cylinder
7 - Air pressure applied disengages clutches
8 - Fixed clutch splined to differential case
9 - Sliding clutch splined to axle shaft
58
Page 62

Parts Identification
Rear Drive Axle Parts - Exploded View
3
14
4
5
76
4
37
2
1
10
13
12
35
16
9
8
11
20
19
18
17
15
22
21
35
1— Ring gear
2— Carrier cap bolt
3— Washer
4— Flange half carrier cap
5— Cotter pin
6— Flange half differential case
7— Flange half bearing cone
8— Flange half bearing cup
9— Flange half bearing adjuster
10—Ring gear bolt
11— Nut
12— Plain half bearing adjuster
13— Plain half bearing cup
36
23
24
25
26
14—Plain half bearing cone
15— Plain half differential case
16— Side gear thrust washer
17— Side gear
18— Wheel differential spider
19— Side pinion
20— Side pinion thrust washer
21— Side gear
22— Side gear thrust washer
23— Pinion pilot bearing
24— Pinion
25— Inner pinion bearing cone
26— Pinion bearing spacer
27
28
29
30
31
32
33
27— Inner pinion bearing cup
28— Pinion cage shim
29— Pinion cage
30— Outer pinion bearing cup
31— Outer pinion bearing cone
32— Pinion seal
33— Pinion yoke
34— Pinion nut
35—R-head carrier or rear carrier
36—Thrust bolt
37—Thrust bolt jam nut
34
59
Page 63

Parts Identification
Inter-Axle Speed Sensor Parts - Exploded View
Inter-Axle speed Sensor
Service Procedure
E
D
A— Sensor assembly
B— Fastener
C— Rotor assembly
D— Differential bearing adjuster
E— Sensor connector
C
A
B
60
Page 64

Parts Identification
Wheel Differential Lock Assembly
1 - Seal
2 - Piston
3 - O-ring
4 -Piston cover
5 -Capscrew
6 -Cover retainer
7 -Cervic clutch
8 - Spring
9 - Spring washer
10 - Set Screw
11 - Push rod
12 - Set screw
13 - Clutch fork
14 - Sliding cervic clutch
15 - Snap ring
Type 2
7
15
1
14
Type 1
8
2
13
3
4
5
6
9
10
11
12
1
1 - Fixed cervic clutch gear
2 - Snap ring
3 - Sliding clutch gear
4 - Spring pin
5 - Shift fork
6 - Compression spring
7 - Push rod
8 - Piston driver
9 - Set screw
10 - Piston
11 - O-ring
12 - Switch
13 - Plastic washer
14 - Piston cover
15 - Capscrew—flange head
16 - Capscrew—manual engagement
17 - Gasket
16
15
4
14
3
2
6
5
7
17
8
9
10
11
13
12
61
Page 65

Parts Identification
Housing and Output Shaft Assembly Parts - Exploded View
2
5
4
3
10
11
12
14
6
7
12
13
8
9
Service Procedure
61510-8-95
1 - Axle shaft
2 - Housing
3 - Outer nut
4 - Lock washer
5 - Inner nut
6 - Housing breather tube
7 - Housing breather fitting
8 - Fill plug
9 - Oil sensor plug
10 - Drain plug
11 - Housing stud
12 - Hardened washer
13 - Carrier capscrew
14 - Nut, stud
1
62
Page 66

Fastener Specifications
Fastener Torque Specifications
Fastener Axle Model Class Size Tool Size Lbs.-ft. N•m
Differential Case Capscrew
Ring Gear Nut 15040, 17060, 19060, 21060 12 M14 x 1.5 21mm 215 - 255 292 - 346
Pinion Bearing Cage
Capscrew
15040, 19050, 19055 10.9 M12 x
1.75
19060, 21/22 series axles 10.9 M14 x 2 18mm
23070, 23080, 23085, 23090,
26080, 26085,26090, 30080
23105, 26105, 30105 8 .625-11 15/16 165 - 195 224 - 264
19/21/22 series axles (except
21080)
21080, 23070, 23080, 23085,
26080, 26085, 30080
23105, 26105, 30105 .750-16 1 1/8 275 - 300 373 - 407
15/19 series axles 10.9 M14 x 2 21mm 114 - 140 155 - 190
21060, 21065, 21080, 22060,
22065, 23070, 23080, 23085,
23090, 26080, 26085, 26090,
30080
23105, 26105, 30105 5 .750-10 1 1/8 240 - 300 325 - 407
10.9 M16 x 2 24mm 177 - 218 240 - 296
12 M16 x 1.5 24mm 215 - 255 292 - 346
12 M18 x 1.5 27mm 325 - 395 441 - 536
10.9 M16 x 2 24mm 117 - 218 240 - 296
18mm 70 - 88 95 - 119
114 - 140 155 - 190
12pt
Diff Bearing Cap Capscrew
Diff Carrier To Housing
Capscrew
Carrier to Housing Nut All 19/21/22/23/30 series axles 12 M16 x 1.5 24mm 199 - 244 270 - 331
Magnetic Plug (Fill) All Models 13/16 7/8
Oil Drain Plug All Models 1/2 drive 40 - 60 54 - 81
Thrust Screw Jam Nut All Models 4 M24 x 2 36mm 148 - 181 201 - 245
Pinion Nut 15040, 19050, 19055 - M30 x 1.5 41mm 376 - 461 510 - 625
15040 12.9 M16 x 2 24mm 117 - 218 240 - 296
19/21/22 series axles, 23070,
23080, 23085, 26080, 26085,
30080
23105, 26105, 30105 8 .8125-10 1 1/8 370 - 430 502 - 583
15040, 19050 12.9 M12 x
19055, 19060, 21/22 series axles
23070, 23080, 23085 ,23090,
26080, 26085, 26090, 30080
23105, 26105, 30105 5 .625-11 15/16 160 - 176 217 - 239
12.9 M20 x 2.5 30mm 350 - 428 475 - 580
18mm 85 - 103 115 - 140
1.75
12.9 M16 x 2 24mm 230 - 270 312-- 366
40 - 60 54 - 81
wrench
63
Page 67

Fastener Specifications
Fastener Axle Model Class Size Tool Size Lbs.-ft. N•m
Pinion Nut (Continued) 17060, 19060, 21/22 series axles - M36 x 1.5 55mm 575 - 703 780 - 953
21080, 23080, 26080, 30080 - M42 x 1.5 55mm 840 - 1020 1139 - 1383
23070, 23085, 2608
23105, 26105, 30105
ABS Sensor Assy Fasteners 8
Axle Shaft to Wheel Hub
Nut
Misc. Diff Lock Only Specifications
Fastener Axle Model Class Size Tool Size Lbs.-ft. N•m
Diff Lock Shift Cylinder
Bracke
Shift
Fork Capscrew All Axles where used 12.
Selector Switch
Diff Lock Cylinder Shipping Screw
w 1.5
t Scre
All Models
All Models
All Models
All Models
All Models
5 - M42 x 1.5 55mm 789 - 966 1070 - 1310
- 1.75-12 2 1/4 840 - 1020 1139 - 1383
- #1024 x 7/ 1/8 Allen Finger Tight + 1 Turn
- .500-20 11/16 55 - 71 75 - 96
- .625-18 15/16 170 - 190 230 - 258
- .750-16 1 1/8 285 - 345 386 - 468
8.8 M10- x 13mm 28 - 35 38 - 47
9 M8 x 1.25 6mm
M12 x 1.5 24mm
-
.250-18 Snug to Engage Clutch Teeth
Allen
12 - 15 16 - 20
10 - 12 14 - 16
Service Procedure
Note: In the previous charts, axle models are listed either spe-
cifically or referred to by “Series” axles. The chart below
denotes the possible models being referred to in this
manual and in the previous charts.
Series Possible Models
15 15040
17 17060
19 19050, 19055, 19060
21 21060, 21065, 21080, 21090
22 22060, 22065
23 23070, 23080, 23085 ,23090, 23105
26 26080, 26085,26090, 26105
30 30080, 30105
Note: Fasteners using self-locking thread “Patches” may be
reused if not damaged, but should be secured by a few
drops of Loctite #277 on threaded surface. Reused fasteners should be wiped clean of excess oil but do not
require special cleaning.
Note: Correct tightening torque values are extremely
important to assure long Spicer life and dependable
erformance. Under-tightening of attaching parts is
p
just as harmful as over-tightening.
64
Page 68

Fastener Specifications
Note: Exact compliance with recommended torque values will
assure the best results.
Axle Model Pinion Nut
Part No.
Washer Part
No.
Thread Size Socket Size
15040 210133 210144 M30 x 1.5 41mm
19050 210133 210144 M30 x 1.5 41mm
19055 210089 210090 M36 x 1.5 55mm
17060 127589 not used M36 x 1.5 55mm
19060 127589 not used M36 x 1.5 55mm
21060 127589 not used M36 x 1.5 55mm
21065 210089 210090 M36 x 1.5 55mm
21080 128049 not used M36 x 1.5 55mm
21090 210089 not used M36 x 1.5 55mm
22060 127589 not used M36 x 1.5 55mm
22065 210089 210090 M36 x 1.5 55mm
23070 210508 210509 M42 x 1.5 55mm
23080 128049 not used M42 x 1.5 55mm
23085 128049 not used M42 x 1.5 55mm
23090 128049 not used M42 x 1.5 55mm
23105 95262 not used 1.75-12 2.25”
26080 128049 not used M42 x 1.5 55mm
26085 210508 210509 M42 x 1.5 55mm
26090 210508 210509 M42 x 1.5 55mm
26105 95262 not used 1.75-12 2.25”
30080 128049 not used M42 x 1.5 55mm
30105 95262 not used 1.75-12 2.25”
Thread Size Identification Class Identification (Fastener Strength)
Strength (class) is identified by numbers on the bolt head or
nut face. Increasing numbers represent increasing strength.
M12 X 1.75
Nominal
Diameter
(mm)
Thread
Pitch (mm)
Bolts and cap screws
8.8 10.9
Nuts
10 12
10
12.9
12
65
Page 69

Page 70

For spec‘ing or service assistance, call 1-877-777-5360 or visit our website at www.dana.com
Dana Commercial Vehicle Products Group
3939 Technology Drive
Maumee, Ohio, USA 43537
www.dana.com
All applications must be approved by the Application Engineering Department. Specifications and/or design are subject to change without notice or obligation. Printed in USA AXSM-0048 09/08
 Loading...