

Page 1

User’s Guide
Model: Spice S-9
Please read this guide
carefully before using the
phone for the first time.
Spice Mobile Phone
1
Page 2

Thanks for Choosing Spice products.
For the safe and efficient operation of this prod uct , please
read this manual and other materials carefully before you first
operate it. Spice shall bear no liability for any losses caused by
improper operation of this product not in compliance with the
instructions and requirements of this manual or by your
misunderstanding of this manual, except for loss es ca use d by the
improper installation or operation of Spice professional
maintenance staff.
Spice has performed careful proofreadi ng of thi s m an ual;
however, we cannot ensure that there are no mistakes or
omissions of any kind in this manual.
Spice strives to continuously improve the functions of its
products and the quality of its services. Therefore, the company
reserves the right to make chan ges to any of the products and
software programs described in this Manual a s w ell as the co nten t
of this Manual without giving prior notice.
This manual intends to help you to operate this Spice product
properly and represents no statements on the software and
hardware configuration of this Product. For det ail ed information
about the product configuration, please refe r to the contract
related to this product (if any) or consult the de ale r of this product.
The pictures in this Manual are on ly for reference. In the event
that there are any inconsistencies betw een picture s and th e actual
product, the form of the actual product shall be taken as final.
Many network functions introduced in this manual are special
2
Page 3

services provided by the network service operator, therefore
whether these network functions can be used or not depends on
your network service operator.
The content of this Manual is protected by copyright law. Without
the prior authorization of Spice, you are not permitted to duplicate or
copy this Manual in any way, transmit in any way via wired or wireless
networks or translate it into any other languages.
3
Page 4

CONTNETS
Chapter I Security and Maintenance -------------------------------------------- 9
Chapter II Before Using Your Phone ------------------------------------------ 15
2.1 PHONE VIEWS................................................................................ 15
2.1.1 Keys Description ...................................................................17
2.1.2 Display ..................................................................................20
2.1.3 Icons......................................................................................21
2.2 BATTERY .......................................................................................22
2.2.1 Removing and Installing Your Battery....................................22
2.2.2 Charging the Battery..............................................................24
2.3 CONNECTING THE NETWORK............................................................ 25
2.3.1 SIM Card............................................................................... 26
2.3.2 Installing and Removing Your SIM Card................................ 26
2.3.3 Turning On/Off Your Phone................................................... 27
2.3.4 Unlocking Your Phone........................................................... 27
2.3.5 Unlocking Your SIM Card ...................................................... 29
2.3.6 Connecting the Network........................................................ 30
2.4 MEMORY CARD ..............................................................................30
Chapter III Quick Start Guide ---------------------------------------------------- 35
3.1 HIGHLIGHT FEATURES..................................................................... 35
3.2 FEATURE KEYS............................................................................... 38
3.3 MAKING A CALL.............................................................................. 39
3.3.1 Dial Directly........................................................................... 39
3.3.2 Dialing an Extension of a Wired Phone ................................. 39
3.3.3 Dialing International Numbers............................................... 39
3.3.4 Dialing a Number in the List...................................................39
4
Page 5

3.3.5 Dialing an Emergency Number.............................................. 40
3.4 ANSWERING/REJECTING INCOMING CALLS ........................................ 40
3.5 ENDING A CALL .............................................................................. 40
3.6 CALL OPTIONS ............................................................................... 41
3.7 MAKING A SECOND CALL................................................................. 42
3.8 ANSWERING A SECOND CALL........................................................... 42
Chapter IV Feature Menu---------------------------------------------------------- 43
4.1 USING THE FEATURE MENU ............................................................. 43
4.1.1 Option Menu.......................................................................... 43
4.1.2 Shortcuts............................................................................... 43
4.1.3 Quitting the Menu.................................................................. 43
4.1.4 Feature Menu Structure......................................................... 43
4.2 PHONE BOOK................................................................................. 50
4.2.1 Phone Book List.................................................................... 50
4.2.2 Add New Entry......................................................................52
4.2.3 Mark Multiple......................................................................... 53
4.2.4 List Filter................................................................................ 53
4.2.5 Preferred Storage:................................................................. 54
4.2.6 Copy All................................................................................. 54
4.2.7 Caller Group .......................................................................... 54
4.2.8 Speed Dial Setting................................................................. 55
4.2.9 Owner Number...................................................................... 55
4.2.10 Memory Status.................................................................... 56
4.2.11 Fields................................................................................... 56
4.3 MESSAGES .................................................................................... 56
4.3.1 Messages.............................................................................. 56
4.3.2 Chat.......................................................................................70
4.3.3 Voice Mail Server.................................................................. 70
5
Page 6

4.3.4 Broadcast Message............................................................... 71
4.4 CALL HISTORY................................................................................72
4.4.1 Missed Calls.......................................................................... 72
4.4.2 Received Calls ......................................................................73
4.4.3 Dialed Calls........................................................................... 73
4.4.4 Rejected Calls....................................................................... 73
4.4.5 Delete Call Log...................................................................... 73
4.4.6 Call Time............................................................................... 74
4.4.7 Call Cost................................................................................ 74
4.4.8 SMS Counter......................................................................... 75
4.4.9 GPRS Counter ......................................................................75
4.5 SETTINGS ......................................................................................75
4.5.1 Display Characteristic............................................................ 75
4.5.2 Phone Setup.......................................................................... 77
4.5.3 Call Setup.............................................................................. 79
4.5.4 Flight Mode............................................................................83
4.5.5 Network Setup....................................................................... 84
4.5.6 Security Setup....................................................................... 85
4.5.7 Restore Factory Settings....................................................... 88
4.6 MULTIMEDIA................................................................................... 89
4.6.1 Audio Player.......................................................................... 89
4.6.2 Video Player.......................................................................... 91
4.6.3 Camera .................................................................................92
4.6.4 Video Recorder .....................................................................93
4.6.5 Image Viewer ........................................................................94
4.6.6 Sound Recorder.................................................................... 95
4.6.7 Photo Artist............................................................................ 95
4.6.8 E-Book ..................................................................................95
6
Page 7

4.6.9 Melody Compose ..................................................................97
4.7 FILE MANAGER............................................................................... 98
4.7.1 DRM Rights........................................................................... 99
4.7.2 Memory Card.........................................................................99
4.8 FUN & GAMES.............................................................................. 102
4.8.1 Java Fun ............................................................................. 102
4.8.2 Games................................................................................. 103
4.9 PROFILE ......................................................................................104
4.10 ORGANIZER................................................................................ 107
4.10.1 Bluetooth........................................................................... 107
4.10.2 Alarm................................................................................. 109
4.10.3 Calendar............................................................................ 110
4.10.4 To Do List.......................................................................... 111
4.10.5 Stopwatch..........................................................................111
4.10.6 World Clock ....................................................................... 111
4.11 SERVICES .................................................................................. 111
4.11.1 Opera Mini......................................................................... 111
4.11.2 WAP.................................................................................. 112
4.11.3 Data Account..................................................................... 116
4.11.4 E-mail................................................................................ 117
4.11.5 *STK.................................................................................. 120
4.12 EXTRAS..................................................................................... 120
4.12.1 Calculator.......................................................................... 120
4.12.2 Units Converter.................................................................121
4.12.3 Currency Converter........................................................... 122
4.12.4 Health................................................................................ 122
4.13 SHORTCUTS............................................................................... 122
Chapter V Input Method ----------------------------------------------------------124
7
Page 8

5.1 GENERAL DESCRIPTION ................................................................ 124
5.2 DESCRIPTION OF INPUT METHODS.................................................. 124
5.2.1 Smart English Input............................................................. 125
5.2.2 English Input........................................................................ 126
5.2.3 Number Inputs..................................................................... 127
Chapter VI Troubleshooting ----------------------------------------------------128
Chapter VII Definitions------------------------------------------------------------131
Chapter VIII Technical Parameters -------------------------------------------133
8
Page 9

Chapter I Security and Maintenance
For the efficient and safe operation of your mobile phone, please
observe the guidelines given below.
•Please read this manual carefully before using this phone.
•You are prohibited to use a mobile phone while in the aircraft. If
the alarming and calendar features of your mobile phone can
automatically power on your phone, check and disable thes e features
before boarding an aircraft.
•The mobile phone should be kept well away from heat sources or
high-voltage surroundings, such as electrical appliances or
electric-heat cooking devices. You should use your phone in
environments with a normal ambient temperature. Extreme
temperatures (over 55 or below ℃ -10 ) are harmful to your mobile ℃
phone.
•Avoid fire. Power off your mobile phone when in areas such as
gasoline stations and fuel storage facilities .
•Don’t hold your phone when driving. Do not place your mobile
phone in the area over the air bag or in the air bag deployment area. If
a phone is placed in the air bag deployment area and the air bag
inflates, the phone may be propelled with great force and cause
serious injury to you.
•Use only the standard batteries, charger and accessories
specified by your phone manufacturer. Our company shall not be liable
for any damage to the phone resulting from the use of batteries,
chargers and other accessories of a third-party manufacturer.
•Do not disassemble your mobile phone without permission.
9
Page 10

•Your mobile phone may interfere with some electronic devices
when they are at a short distance. Keep your phone away from
electronic devices, such as the TV, radio, personal computer,
pacemaker and hearing aids. Keep your mobile phone away from a
credit card or a magnetic field. Follow the relev ant stipulations for
special places when using your mobile phone in hospitals or other
special places.
• Avoid mechanical vibration or shock. Avoid scratching the
display of your mobile phone.
•Use of a mobile phone case or a plastic mobile phone sheath
may damage the film on your phone cover.
•Do not use solutes, such as benzene, thinner or alcohol, to clean
your mobile phone. Keep your phone away from detergents or other
corrosive chemicals. Clean your mobile phone with clean, soft cloth.
•Never expose your mobile phone to direct sunlight or heavy smog
or dust.
•Keep your mobile phone dry. Do not use your phone in highly
humid environments, such as in the bathroom. This device is not
waterproof. Don't let the unit get wet or damp.
•If your mobile phone is equipped with an external antenna, do not
touch the antenna. And use only the supplied or approved replacement
antenna. Unauthorized antennas could damage your phone.
•Grasp the plug (not the wire) to disconnect the charger from your
phone.
•Never rely on your mobile phone as the only emergency
communication facility, such as for first aid.
•Keep your mobile phone out of children’s reach to preclude any
danger.
10
Page 11

Read and follow the precautions given below before using the
battery.
•Please carefully read the instructions and labels on the surface of
the battery before using it.
•Please charge the battery in a cool and well-ventilated room.
Overheat charging environment may make the battery heat, fume,
burn, deform or even explode.
•There are special protection circuits and mechanisms inside the
battery. Never disassemble the battery w ithout pe rmission, othe rw ise a
short circuit may be caused or the electrolyte fluid may leak out. If
battery fluid splashes into your eyes you may be in the danger of l osing
your eyesight. In this case, rinse with clean water immediately (but do
not knead the eye) and see your doctor.
•Never squash the battery. Avoid mechanical vibration or shock.
Avoid short circuit. Otherwise the battery or the attached parts may be
damaged. Short circuit may result from direct connection between the
positive pole and the negative pole of the battery, by metal articles
such as a coin, pen, or clip. So never leave the battery together with
metal articles.
•Keep its exposed terminals and the battery clean.
•Never use damaged or exhausted batteries.
•Replace the battery when it cannot meet the performance
requirements. Your battery can be recharged hundreds of times before
replacement is necessary. The battery is consumable. Although it can
be recharged hundreds of times, its capacity will decrease gradually. If
11
Page 12

you notice a significant decrease in operation time (talk time and
standby time), it is time to replace with a new battery.
•Never expose your battery to direct sunlight or heavy smog or
dust. Never use your battery in a highly humid environme nt, such as in
a bathroom. This device is not waterproof. Don't let the unit get wet or
damp.
•Do not expose your battery to extreme temperatures.
Temperatures above 55 or below ℃ -10 will affect your battery ℃
performance.
•Never dispose of batteries in a fire as they ma y explode.
•Never leave your battery in water. Otherwise internal short circuit
may occur, which will make the battery heat, fume, deform, be
damaged or even explode.
•The battery must be disposed of properly and may need to be
recycled. Never dispose of batteries as you do with ordinary garbage,
because they may explode or lead to contamination accidents.
•Your battery can only be recharged with the specified charger.
Never charge the battery for more than 12 hours in a row.
•Keep your battery out of children's reac h to preclude any danger.
Please follow the precautions described below when using the
charger.
•Please read the instruction manual and the labels on the surface
of the charger carefully before using it.
•Do not disassemble or modify your charger. Never use your
charger with impaired wire because that may lead to an electric shock,
fire and charger damage.
12
Page 13

•Never touch the charger with a wet hand. If your charger comes
into contact with water or other liquid, switch off the power
immediately.
• Never short-circuit your charger. Avoid mechanical vibration or
shock. Never expose your charger to direct sunlight or high humidity
(such as in a bathroom).This device is not waterproof. Don't let the unit
get wet or damp.
•Do not use your charger in the vicinity of electric devices such as
TV sets and radios.
•Pull the charger plug (not the wire) to disconnect the charger.
•You should put your mobile phone and charger in a
well-ventilated environment with an ambient temperature between
-10 ~℃ +55 during charging up. Only use a manufacturer approved ℃
charger. Using other chargers may be dangerous and it also violates
the warranty terms stipulated by the manufacturer.
•Keep your charger in a safe place out of the reach of children.
Please follow the following precautions while using the earphone
(which may need to be bought by yourself).
•Please control the earphone at a proper volume in case of
damage to your hearing.
•Don't drag the earphone wire forcefully in case of breakage.
•The long use of earphone in environments with high temperature
or high humidity can easily lead to earphone damage or shorter serv ice
life.
•Don't use the earphone while driving a car, riding a bike or
walking on the road in case of traffic accidents.
13
Page 14

•Keep your earphone out of children’s reach to preclude any
danger.
14
Page 15
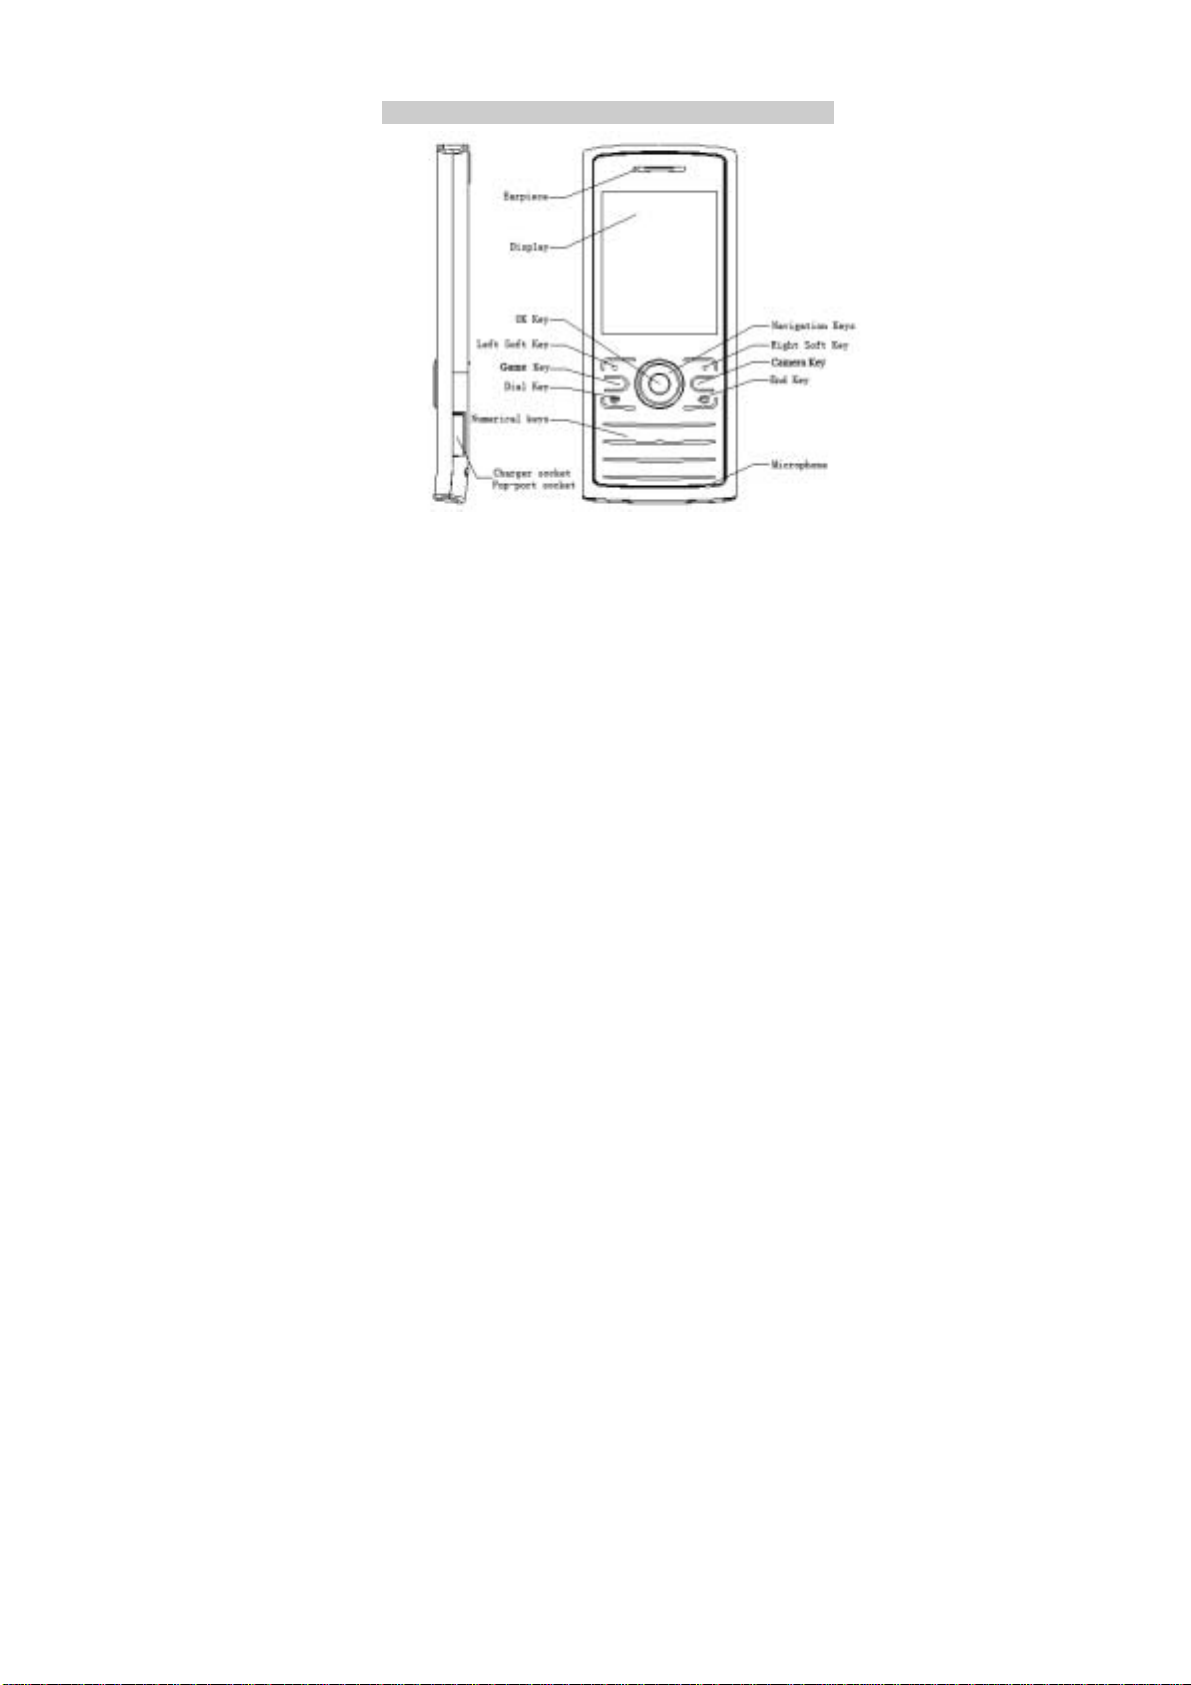
Chapter II Before Using Your Phone
2.1 Phone Views
15
Page 16

16
Page 17
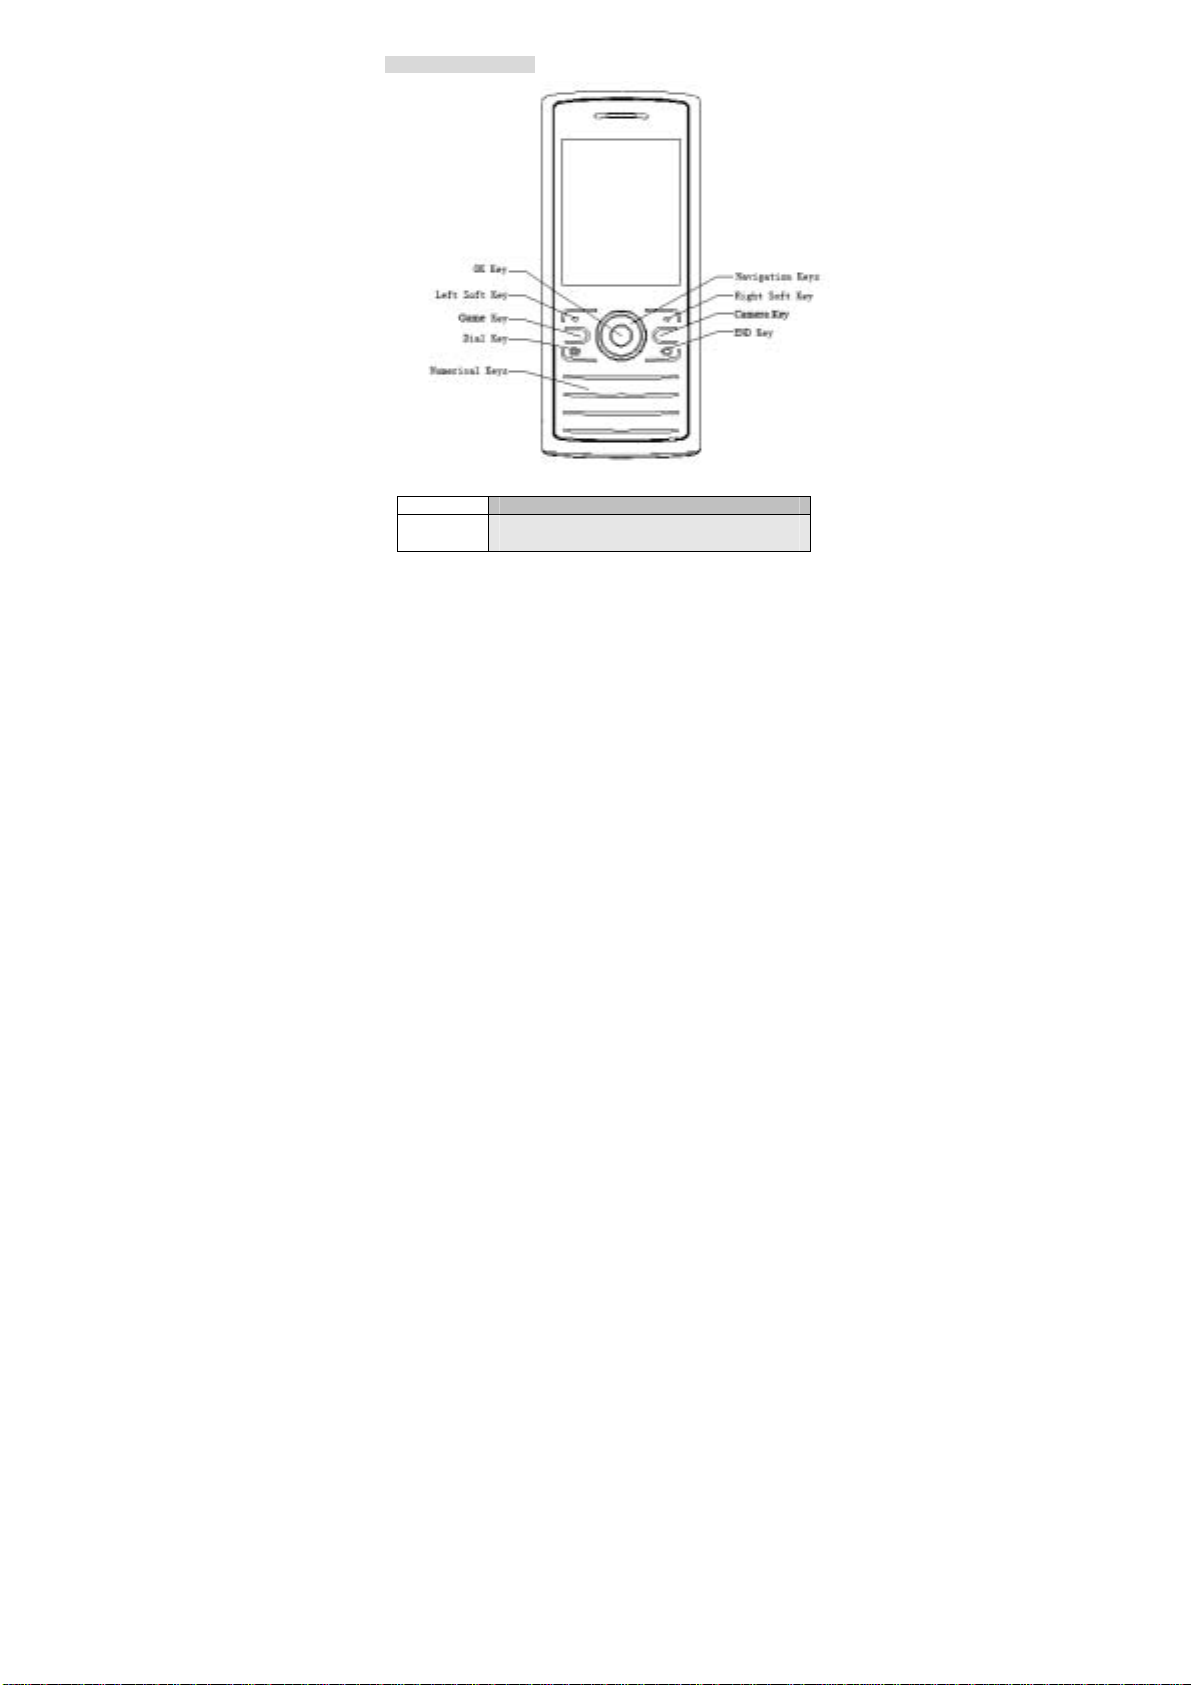
2.1.1 Keys Description
Keys
Description
[Dial key] Dial a phone number or answer an incoming
call. When the phone is in idle mode, press this
17
Page 18

[End key] Ending a call.
key to show the call history list of dialed calls.
Hold down this key to turn on/off your mobile
phone.
In the menu, pressing this key briefly will make
the phone return to idle mode.
With the background music playing, briefly
pressing this key will pop up the prompt of
turning off the background play or not.
[Left soft
key]
Perform the function shown by the label at the
bottom left corner of the display.
Press this key in idle mode to enter the main
menu.
[Right soft
key]
Perform the function shown by the label at the
bottom right corner of the display.
Press this key to return to the previous page
when in the menu.
Tap this button to delete the character in front of
the cursor when in edit mode. Hold this key
down to delete all of the characters in the editing
window.
Press this key in idle mode to enter the Phone
Book list.
[Game
key]
[Camera
key]
Press this key when the phone is idle to enter
the Fun & Games menu.
Press this key when the phone is idle to enter
the camera.
[OK key] Press this key when the phone is idle to enter
18
Page 19

the Audio Player.
In the menu, press it to confirm your operation
and to enter the menu that has been selected.
[Number
Keys]
Number keys are used to input numbers, letters
and special characters.
Hold down the 0 key and enter a “+" symbol
(international access code) when the phone is
idle.
They can also be used as shortcut keys to
quickly access the options within the main
menu.
[* key] Press this key continuously when the phone is
idle to switch between “*”, “P” and “W” in turn.
Press this key to lock the keypad when the
shortcut menu has just been entered.
[# key] Hold down this key when the phone is idle to
switch to the Silent Mode.
Press this key to switch between different
language input modes when in edit mode.
[Navigation
Keys]
The key is split into 4 directional keys: up, down,
left and right. Move the curser up, down, left and
right in edit mode.
Press the directional key in idle interface to en ter
the corresponding function interface.
19
Page 20
Note: In this manual, “Press a key” means to press a key and
release it immediately; while “hold down a key” means to press a
key and hold it for 2 or more seconds.
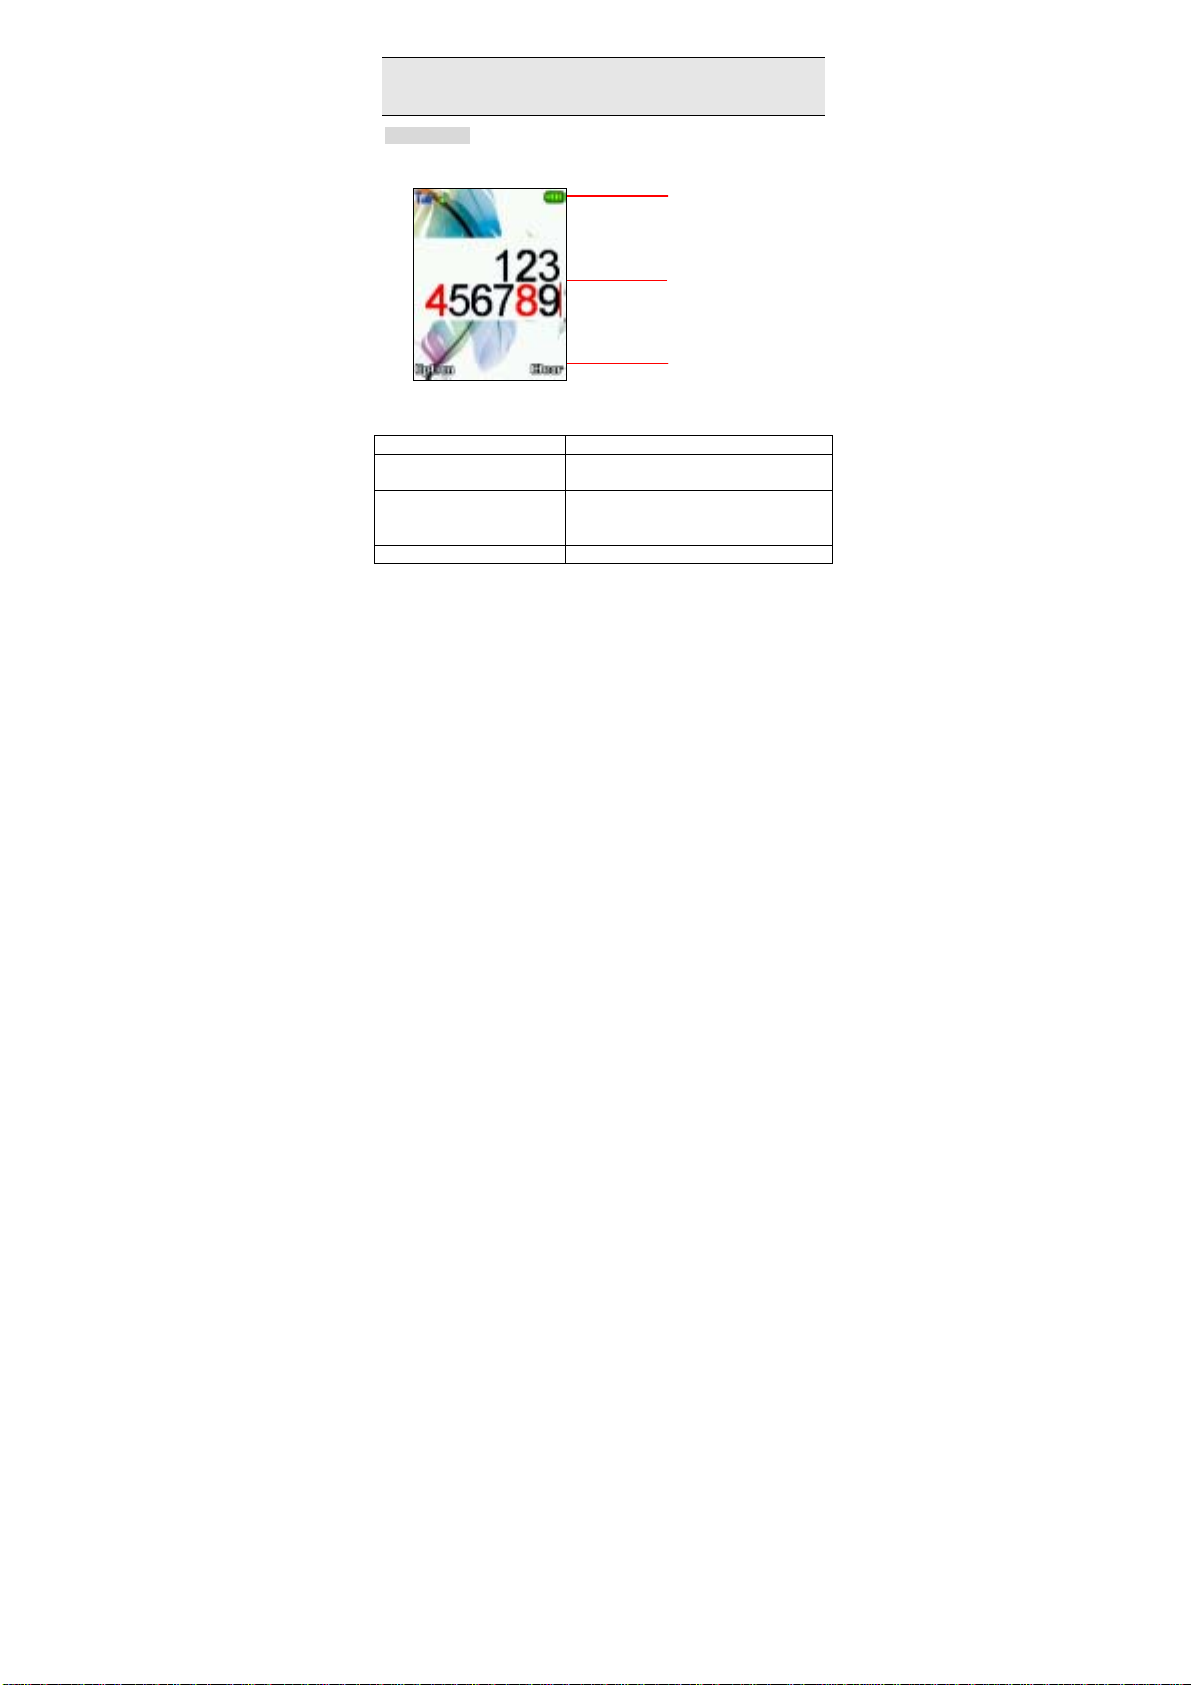
2.1.2 Display
The display can be divided into three sections. The idle dialing
interface is taken as an example for the following description.
System Icons
Text/Graphics Area
Softkey Prompt
Area Description
The first line/System Icons
Area
The middle lines/
Text/Graphics Area
Various prompt icons are displayed
here.
The area displays information, prompt
information and any information that
you enter (such as the number to dial).
The last line/Softkey The functions assigned to the two soft
20
Page 21
Prompt Area keys are displayed here.
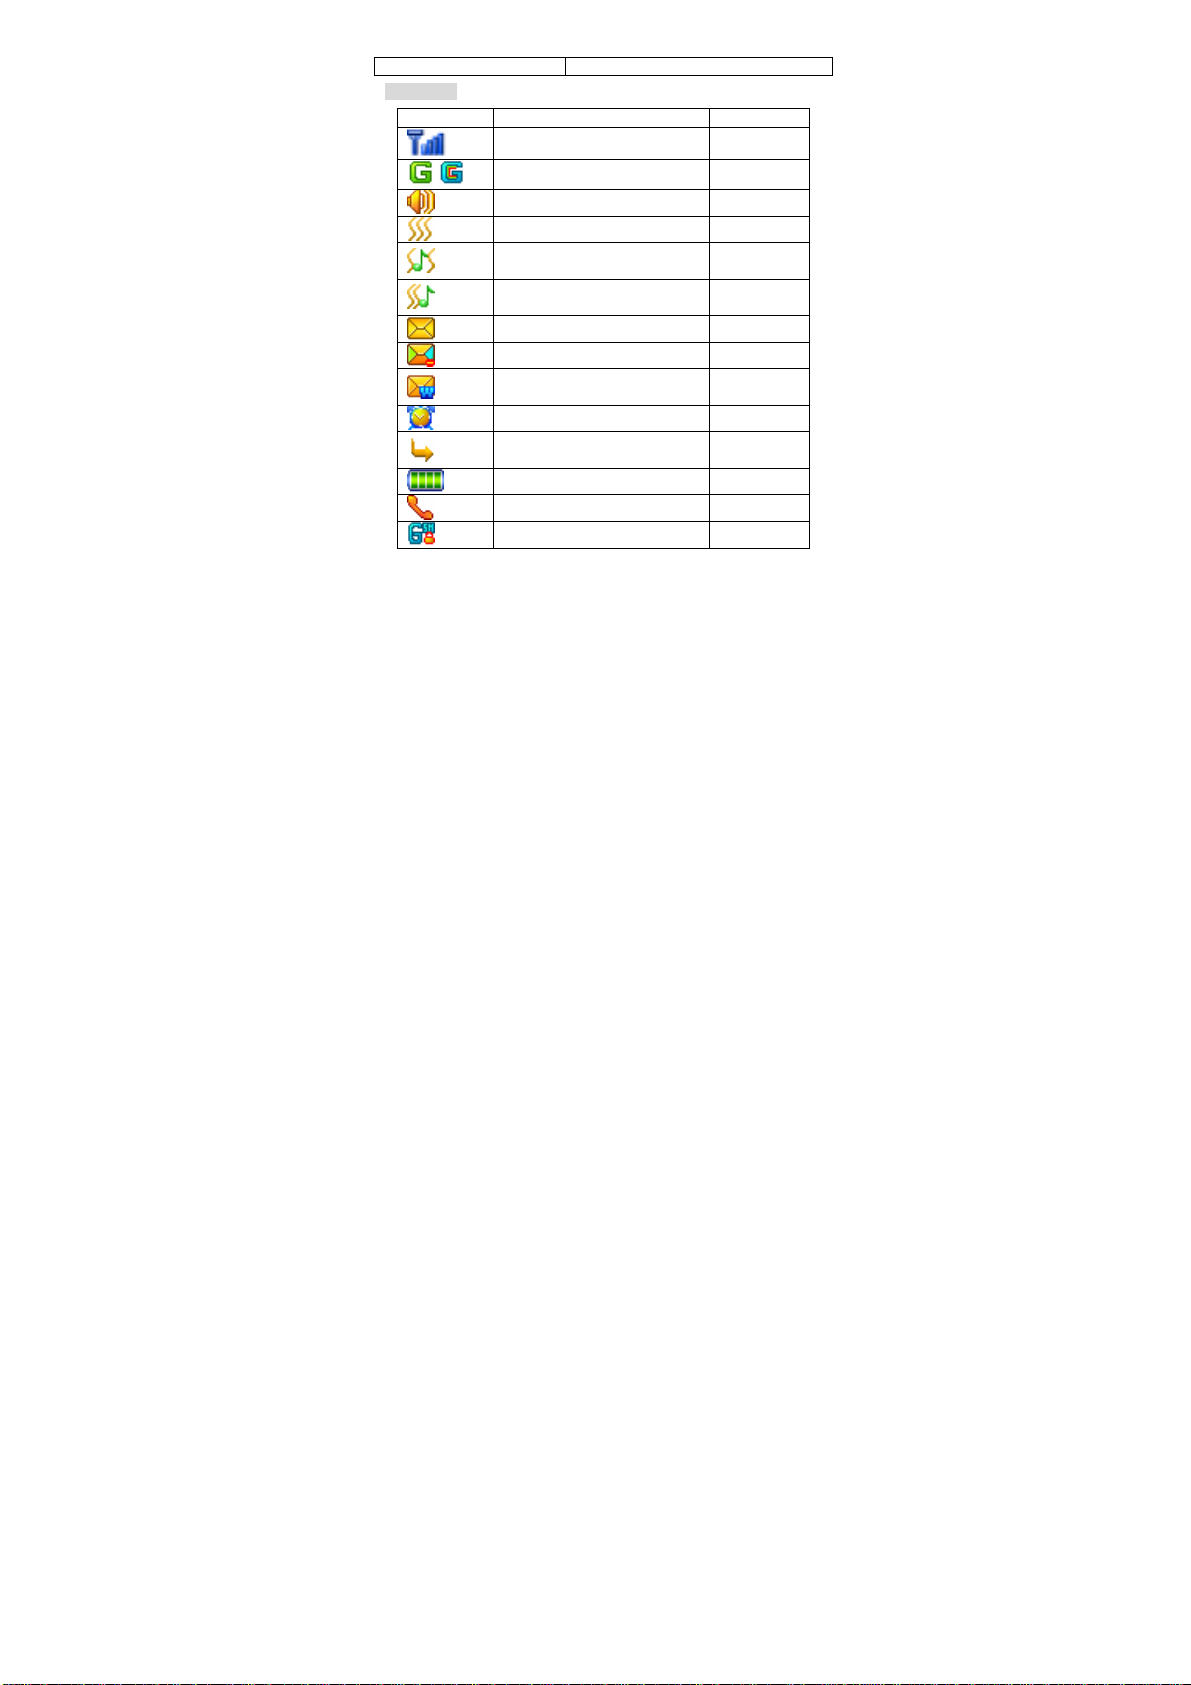
2.1.3 Icons
Icons Description Location
Signal strength indicator. Icons Area
/
GPRS connected Icons Area
Alert Type is Ring Icons Area
Alert Type is Vibration Icons Area
Alert Type is Vibration and
Icons Area
Ring
Alert Type is Vibration then
Icons Area
Ring
Unread SMS Icons Area
New unread MMS Icons Area
New unread WAP service
Icons Area
information
Alarm Enabled Icons Area
Call Forwarding On
Icons Area
Unconditional.
Battery level Icons Area
New missed calls. Icons Area
Encrypt GSM connection Icons Area
21
Page 22
/
Bluetooth feature enabled Icons Area
Bluetooth earphone connected Icons Area
Keypad locked Icons Area
New rejected calls Icons Area
Reject List enabled Icons Area
Stopwatch enabled Icons Area
2.2 Battery
In order to get the best performance of your battery, please fully
charge the battery for the first three times only when the battery is
completely flat.
2.2.1 Removing and Installing Your Battery
Follow the steps given below to remove your battery.
Push the battery compartment cover about 3.5 millimeters in ①
the direction as shown by the arrow in the following Figure (2).
Lift up the compartment cover as shown by the arrow in the ②
following Figure (3), so that the battery compartment cover is
completely separated from the phone.
Take out the battery as shown in Figure(4).③
Warning: Make sure that you have powered off your phone and
removed any external power sources before removing the battery.
Never remove or install a SIM card when the phone is powered on.
Otherwise, the SIM card or mobile phone may be damaged.
22
Page 23

Follow the steps given below to install your battery:
Make sure the metal contacts of your battery and those of the ①
battery compartment are properly aligned and clip the battery into the
compartment as shown by the arrow in Figure (1).
Slightly put the compartment cover into the slot of your phone ②
as shown in Figure (2).
Push the compartment cover as shown by the arrow in Figure ③
(3) until it clicks into place.
23
Page 24

2.2.2 Charging the Battery
Plug the charger into a power socket.
24
Page 25

And plug the other end of the charger into the charger jack in the
bottom of your phone.
The battery level indicator in the Icons Area will flash cyclically to
show that the battery is being charged. If you have powered off the
phone, a charging prompt will be displayed on the screen.
Note: If the phone has been overused when the battery is low, it
may take a while for the charging prompt to be displayed after
charging has begun.
Charging is complete when the battery indicator in the system
icons area is full. If the battery is charged when the phone is powered
off, a Charge Complete screen will be displayed. It is normal for your
battery, phone and charger to become warm during charging.
When the charging is completed, disconnect your charger from
the power socket as well as your phone.
Note: You should charge your battery in a well-ventilated
environment with an ambient temperature between -10℃~+55℃.
Only use a manufacturer approved charger. Using other chargers
may be dangerous and it also violates the warranty terms
stipulated by the manufacturer.
When your phone turns off automatically or prompts “Battery Low”,
the battery should be charged promptly. If the battery is charged when
it doesn't use up, the charging time will be shortened automatically.
2.3 Connecting the Network
25
Page 26

2.3.1 SIM Card
You must insert a valid SIM (Subscriber Identity Module) card
before you can use the mobile phone. The SIM card is provided by
your network service provider.
All information necessary to establish a network connection is
stored in the chip of the SIM card. The ca ll history that you h ave
chosen to save into the SIM Phone Book and the SMS messages on
the SIM card are also stored here.
To avoid losing or damaging the information stored on your SIM
card, never touch the metal contacts of the card. Also, keep the card
well away from electro-magnetic sources. If your SIM card is damaged,
your mobile phone will not be able to be used normally.
Warning: Make sure that you have powered off your phone before
removing the SIM card. Never remove or install a SIM card when
the phone is connected to an external power source. Otherwise,
the SIM card or mobile phone may be damaged.
2.3.2 Installing and Removing Your SIM Card
Pull out the SIM card with the pull rod for about 7mm as shown ①
by the arrow in the following Figure (1).
Push the SIM card upward as shown by the arrow in the ②
following Figure(2) and remove the SIM card.
Insert the SIM card. Lay the SIM card on the housing. Push the ③
SIM card downwards as shown by the arrow in the Figure (2) until it
stops.
26
Page 27

2.3.3 Turning On/Off Your Phone
Hold down the End Key for a few seconds to turn on/off your
mobile phone.
The phone will not be able to be used properly if it has be en turned
on without a SIM card inside. Once a SIM card is inserted, your phone
will automatically check the validity of the SIM card.
And then the following prompts will be shown successively on the
display:
Enter Phone Lock Code -- when the phone lock code feature has
been enabled.
Enter PIN code -- when the SIM lock has been enabled.
Searching -- The phone searches until it finds a suitable
network.
2.3.4 Unlocking Your Phone
27
Page 28

The Phone Lock mechanism can be enabled to protect your
phone from unauthorized use. When this feature is enabled, you have
to enter the phone lock code every time you turn on your mobile phone.
Otherwise your phone can not be used.
Use the Number keys to enter your phone lock code, use the
Right Soft Key to erase input errors, ending with a press of OK. For
example, if your phone lock code is "1122", you should enter:
1 1 2 2 then OK
If you have forgotten your phone lock code, you have to contact
your local dealer or authorized maintenance service center to unlock
your mobile phone.
28
Page 29

2.3.5 Unlocking Your SIM Card
To protect your SIM card from unauthorized use, your SIM card is
enciphered with a PIN (Personal Identification Number) code. When
this feature is enabled, you have to enter your PIN code every time
when you turn on your mobile phone, otherwise the phone will not w ork
properly.
Hold down the End key to turn on your mobile phone.
Use the Number Keys to enter your PIN Code, use the Right
Soft Key to erase input errors, ending with a pre ss of OK. For example,
if your SIM lock code is “1234”, you should enter:
1 2 3 4 and OK
29
Page 30

If you enter the wrong PIN code 3 times in a row, your SIM card
will be locked, and your phone will prompt you to enter your PUK code.
Note: Your network service provider has set a default PIN (4-8
digits) on your SIM card. You should change it to a private code
as soon as possible.
2.3.6 Connecting the Network
Your phone will automatically search for and register a proper
network. Once a network connection is established, the name of your
network service provider will be shown in the middle of the upper part
of the Text/Graphics Area. At this stage, your phone is idle. Besides
making or answering a call, you can also:
Press the Left Soft Key to access the main menu.
Press the OK key to access the Audio Player.
Press the Right Soft Key to access the Phone Book list
Press the Game key to access the Fun & Game menu
Press the Camere key to access the Camera.
2.4 Memory Card
The multi-functional memory card of Micro SD format is supported
by your Spice S-9 mobile phone. Users can store the video, photo,
pictures, MP3, sound recording files, etc. in the Micro SD card.
Installing and Removing Your Micro SD Card
30
Page 31

Please follow the following installing steps:
Note: During installation, please pay attention to your operation.
Forceful operation may damage your Micro SD card holder or
make it unable to take out the card after it is inserted. Please don't
conduct the operation forcefully in case of any obstruction or a
sloping Micro SD while inserting the card. Make sure the metal
interface of your Micro SD card faces the front side of the phone
(see Directional Diagram of Installing Micro SD Card as
reference).
Directional Diagram of Installing Micro SD Card
Remove the Micro SD cover as shown by the arrow in the ①
following Figure (2);
31
Page 32

Keep the metal side of the Micro SD card facing the front side ②
of the phone and insert the card into the slot as shown by the arrow in
the following Figure (3) until it clicks into place;
Restore the Micro SD cover as shown by the arrow in the ③
following Figure (4).
Follow the following steps to remove your Micro SD card:
Remove the Micro SD cover as shown by the arrow in the ①
following Figure (2).
Slightly press the Mi② cro SD card in the inserting direction and
unlock the card upon the sound of click. Remove the Micro SD card as
shown by the arrow in the following Figure (3).
Restore the Micro SD cover as shown by the arrow in the ③
following Figure (4).
32
Page 33

33
Page 34

34
Page 35

Chapter III Quick Start Guide
3.1 Highlight Features
The Spice S-9 Phone also has rich, useful and fast multimedia
features besides the basic features of mobile phones. The main
functions of the phone are briefly introduced as follows:
Phone Book: Up to 1,000 entries can be stored on your phone.
The phone supports the phone book of business card type and
customized ring tones, pictures and videos. Features including quick
search in Phone Book, sending SMS messages from the phone book
and copying one entry to the SIM card or phone are supported.
Call History: Information of calls will be stored automatically for
checking. You can conveniently dial a number or send an SMS to a
number stored in the call history. You can al so save a number from the
call history to your phonebook.
Messages: EMS are supported by your phone. Phone numbers
can be taken from SMS messages. Information such as contact details
and commonly-used phrases can be added into text messages.
MMS: MMS is supported. Messages of multi-media format like
text, picture and audio messages can be received and sent.
Bluetooth: Features including Bluetooth Stereo Headphone and
Bluetooth File Transfer are supported.
Video Recorder: Video Recorder is supported by your phone.
The duration for video recording is related to the available space of the
memory card.
35
Page 36

Video Player: Full-screen and horizontal-screen playing are
supported, as well as the features like Pause/Continue, Fast Forward
and Fast Rewind.
MP3 Play: Your phone supports music files of MP3, *.wav, *.amr,
and *.mid formats, as well as the features like background play and
lyric synchronization.
Sound Recording Feature: Your phone supports the recording
feature during and after a call. During a call, you can select the
recording feature from Options in the call interface and conveniently
record the call. The record file is then stored in My Documents in the
format of amr or wav according to your settings for checking. You can
also enter the menu when no call is in progress to select the Sound
Recorder and set the recording file as the incoming ring tone. The
duration for sound recording depends on the available space of the
memory card.
Camera: Your phone supports 2 megapixel camera feature
subject to customized settings like: white balance, time lapse,
continuous shooting, photo effect, shooting mode and photo frame.
Tools: Many practical features are available. Features such as
Alarm, Calendar, Calculator, To Do List, Unit Converter, Currency
Converter and World Clock are supported.
U Disk: Spice S-9 Mobile Phone supports mobile storage feature,
i.e. U disk. Connect the phone and PC with the attached USB data
cable when the phone is off, so that the phone becomes a U disk
applicable for mobile data storage. Connect the USB data cable to PC
when the phone is on and select the storage unit (supporting U disk
feature) or the serial port (supporting PC synchronization feature).
36
Page 37

Note: If the U disk is activated when the phone is on, neither the
memory card nor its relevant feature modules can be used
temporarily.
PC Synchronization: After the PC synchronization software
stored in the memory card is installed in PC, connect the phone and
PC with the USB data cable when the phone is on, select the option of
serial port and run the PC synchronization so ftw are, so tha t the v arious
functions of the PC synchronization are available. Please see relevant
descriptions for details.
Customized Settings: Your phone can be customized as
required. Setting categories include Profiles, Display Characteristics,
System Setup, Call Setup, Network Setup, Security Setup, Shortcut
Menu Setup and Connection Setting. There are multiple options in
each category for you to customize. For ex ample, Incoming Ring Tone,
Wall Paper Setup, Time and Date, Scheduled Power On/Off, IP Dial
Setup, Incoming Call Filters and Privacy Protect.
WAP Service: WAP service is supported by your phone. Access
and enjoy the wireless network with the W AP browser for extensive
information.
Java: Java program is supported by your phone. You can
conveniently download, install and run such Java application as the
Java games, Java electronic books, etc.
Input Method: Input modes like Smart English (both upper and
lower case letters) input, English Letters (both upper and lower case
letters) input and Number input, etc. are available in your phone for the
input of English upper and lower case letters, numbers, symbols, etc.
Please see the chapter of Input Methods for more information.
37
Page 38

3.2 Feature Keys
Feature Hot keys Status Description
Powering on the
phone
Powering off the
phone
Accessing the main
menu
Accessing voice
mail
Entering the list of
dialed numbers
Accessing the
Phone Book list
Accessing the
camera preview
interface
Rejecting call Press the End key Incoming call
Accessing the Fun
& Game menu
Accessing the
Audio Player
Entering a phone
number
Hanging up Press the End key During a call
38
Hold down the End
key
Hold down the End
key
Press the Left Soft
Key
Hold down “1” Idle interface
Press the Dial key When your phone
Press the Right Soft
key
Press the Camera
Key
Press the Game
key
Press the OK key When your phone
Press the Number
keys
When your phone
is powered off
When your phone
is powered on
When your phone
is idle
is idle
When your phone
is idle
When your phone
is idle
prompt interface
When your phone
is idle
is idle
Idle interface
Page 39

3.3 Making a Call
3.3.1 Dial Directly
1. Enter the number you intend to call when your phone is idle.
You may need to add area code when dialing a land-line
phone. (Press the <delete> soft key to delete the digit in front
of the cursor. Hold down the <delete> soft key to delete all the
numbers that have been entered.)
2. Press the Dial key to dial the number.
3. Press the End key to end the call that is currently being dialed.
3.3.2 Dialing an Extension of a Wired Phone
1. Enter the area code and central phone number
2. Press the “*” key in succession to enter P or W.
3. Enter the number of the extension and press the Dial Key to
dial the number.
3.3.3 Dialing International Numbers
1. Hold down the 0 key and input a + symbol.
2. Enter the code of the country, as well as the area code and
phone number, following which press the Dial Key to dial the
number.
3.3.4 Dialing a Number in the List
You can dial numbers that are stored in your Call Hi story or Pho ne
Book.
1. Press the Right Soft key to access Phone Book or press Dial
key to access the list of call history.
39
Page 40

2. Press the Up Key and Down Key to scroll between the
numbers in the list.
3. Press the Dial key to dial the number.
3.3.5 Dialing an Emergency Number
You can call an emergency number as long as your phone is
within the coverage range of a wireless network. Your phone can be
used to call emergency numbers even if you have not registered a
network or if no SIM card has been inserted. Enter 112 and press the
Dial Key to call emergency services.
Note: A prompt to enter the PIN code or Phone Password will
appear when your phone is turned on. Press the "Emergency"
soft key to call emergency services directly.
3.4 Answering/Rejecting Incoming Calls
1. You can answer incoming calls by pressing the Dial key or the
Answer soft key.
2. Press the End key or the <Reject> soft key to reject an
incoming call.
If you have selected Any Key from Answering/Rejecting Mode
under the Call Setup, you can answer calls by pressing any key
(except for the End Key, Left key, Right key and <Reject> soft key).
3.5 Ending a Call
Press the End Key to end the current call.
40
Page 41

3.6 Call Options
Certain options require network support when calls are being
made. Please contact your service provider for any questions
regarding services.
Enter the call options menu by pressing the <Options> soft key
when a call is in progress. The following options are available:
Options available for one-way calls include:
z Keep/Resume (requiring network support): to keep the
current call or resume a held call. When the current call is held,
both the callers cannot hear each other’s voices.
z New Call: to access a new dialing interface.
z Phone Book: to access the Phone Book.
z SMS: to access the SMS menu.
z Call History: to access the Call History menu.
z Sound Recording: to record the current call.
z DTMF: to turn on/off the DTMF feature.
2. Options available in conference calls include:
z Swap (requiring network support): to switch between the
current call and the held call.
z (Network service): to add the current call to a telephone
meeting and hold a multi-party meeting.
z End: to end the current call.
z End All: to end all the active calls.
z Phone Book: to access the Phone Book.
z SMS: to access the SMS menu.
z Call History: to access the Call History menu.
z Sound Recording: to record the current call.
41
Page 42

z DTMF: to turn on/off the DTMF feature.
You can press the <hands-free> or <speaker> soft keys during
calls to turn the hands-free function on or off.
3.7 Making a Second Call
You can make a second call (whilst the first is still in progress) if
your network allows.
To make a second call:
1. Enter the second phone number or access the Phone Book
and find the number that you want to dial.
2. Press the Dial key to dial the number. The first call will be kept
automatically after the Dial Key has been pressed.
3.8 Answering a Second Call
You can answer a second call (while the first is still in progress) if
you have activated the Call Waiting function and if the network allow s.
To answer a second call:
1. Press the Dial Key to answer a second call. The first call will
be kept automatically.
2. Press the End key to end the current call.
42
Page 43

Chapter IV Feature Menu
4.1 Using the Feature Menu
4.1.1 Option Menu
Press the Left Soft key when your phone is idle to a cce ss the main
menu. During a call, press the <Options> soft key to access the call
options menu.
In the main menu, submenu or options menu, press the Up/Down
keys by the cursor to select the feature that you want to use and press
the Left soft key for the options of this feature.
4.1.2 Shortcuts
On many menu interfaces, after selecting a cert ain menu option,
an index number will be displayed on the upper right corner of the
screen. You can access the shortcuts to the menu with this index
number.
For instance, after you access the Messages menu, press the
number key 3 (3 is the corresponding number of the Voi ce Mail Serv er)
and the Voice Mail Server will be selected.
4.1.3 Quitting the Menu
When the feature menu is displayed, press the Right soft key to
quit a menu option, or press the End key to return to the idle interface.
4.1.4 Feature Menu Structure
The main menu of Spice S-9 Mobile Phone displays in the style of
matrix. The main menu structure is as follows:
43
Page 44

1 Phone Book
1-1 Phone Book List
1-2 Add New Entry
1-3 Mark Multiple
1-4 List Filter
1-5 Preferred Storage
1-6 Copy all
1-7 Caller Group
1-8 Speed Dial Setting
1-9 Owner Number
1-10 Memory Status
1-11 Fields
2 Messages
2-1Message
2-1-1 New Message
2-1-2 Inbox
2-1-3 Sentbox
2-1-4 Draftbox
2-1-5 Schedule SMS
2-1-6 Message Templates
2-1-7 Empty Boxes
2-1-8 Message Setting
2-1-9 Memory Status
2-2 Chat
2-3 Voice Mail Server
2-4 Broadcast Message
44
Page 45

2-4-1 Receive Mode
2-4-2 Read Message
2-4-3 Languages
2-4-4 Channel Setting
3 Call History
3-1 Missed Calls
3-2 Received Calls
3-3 Dialed Calls
3-4 Rejected Calls
3-5 Delete Call log
3-5-1 Delete All
3-5-2 Missed Calls
3-5-3 Received Calls
3-5-4 Dialed Calls
3-5-5 Rejected Calls
3-6 Call Time
3-6 -1 Last Call Time
3-6-2 Total Received
3-6-3 Total Sent
3-6-4 Reset All Time
3-7 Call Cost
3-7-1 Last Call Cost
3-7-2 Total Cost
3-7-3 Reset Cost
3-7-4 Max Cost
3-7-5 Price Per Unit
3-8 SMS Counter
45
Page 46

3-8-1 Sent
3-8-2 Received
3-9 GPRS Counter
3-9-1 Last Sent
3-9-2 Last Received
3-9-3 All Sent
3-9-4 All Received
3-9-5 Reset Counter
4 Settings
4-1 Display Characteristic
4-1-1 Wallpaper
4-1-2 Screen Saver
4-1-3 Themes
4-1-4 Set Idle Display
4- 1-5 Power On/Off Display
4-1-6 LCD Backlight
4-1-7 MainMenu Style
4-2 Phone Setup
4-2-1 Time and Date
4-2-2 Schedule Power On/Off
4-2-3 Input Methods
4-2-4 Greeting Text
4-2 -5 Dazzle Ring List
4-2-6 Dedicated key
4-2-7 FunKey Setting
4-3 Call Setup
4-3-1 Call Divert
46
Page 47

4-3-2 Call Reminder Main
4-3-3 Answeri Mode
4-3-4 Auto Redial
4-3-5 Call Filter
4-3-6 Call Waiting
4-3-7 Call Barring
4-3-8 Caller ID
4-4 Flight Mode
4-5 Network setup
4-5-1 Network Selection
4-5-2 Preferred Networks
4-5-3 GPRS Connection
4-6 Security Setup
4-6-1 SIM Lock
4-6-2 Phone Lock
4-6-3 Auto Keypad Lock
4-6-4 Fixed Dial
4-6-5 Barried Dial
4-6-6 Privacy Protect
4-6-7 Change Password
4-7 Restore Factory Settings
5 Media Center
5-1 Audio Player
5-2 Video Player
5-3 Camera
5-4 Video Recorder
5-5 ImageViewer
47
Page 48

5-6 Sound Recorder
5-7 Photo Artist
5-8 E-book
5-9 Melody Composer
6 File Manager
7 Fun & Games
7-1 Java Fun
7-2 Games
8 Profile
8-1 Normal
8-2 Meeting
8-3 Outdoor
8-4 Indoor
8-5 Bluetooth
9 Organizer
9-1 Bluetooth
9-2 Alarm
9-3 Calendar
9-4 To Do List
9-5 Stopwatch
9-6 World Clock
10 Services
10-1 Opera Mini
48
Page 49

10-2 WAP
10-1-1 Homepage
10-1-2 Bookmark
10-1-3 Go to URL
10-1-4 History
10-1-5 Offline Browser
10-1-6 Settings
10-3 Data Account
10-3-1 GSM Data
10-3-2 GPRS
10-4 E-mail
10-5 STK*
11 Extras
11-1 Calculator
11-2 Units Converter
11-3 Currency Converter
11-4 Health
12 Shortcuts
Note: Menu items with a “*” are only available under certain
circumstances; the actual content depends on the network
service provider that provides you with the SIM card.
49
Page 50

4.2 Phone Book
You can save phone numbers and names in your SIM Card or
your phone. Your phone supports 1,000 entries. The number of entries
that can be stored in your SIM Card is determined by its capacity.
Press the Left Soft Key to access the main menu when the phone
is idle, and select Phone Book.
4.2.1 Phone Book List
Browse the records of all the Contacts, Phone Contacts and SIM
Contacts. You can access List Filter to choose the needed view
mode.
You can conduct quick searching by name or number. English
Input are available for searching by name, while Number Input for
searching by number.
Searching by name: Use English Input to input the needed name
in the Search Bar, then you'll find the entry.
Searching by number only matches with the number, including the
cellphone, home phone, office phone and fax. Any number containing
the input number segments will be shown in the order of alphabet.
When the Search Bar is displayed, press # to change the input
method.
Highlight an entry in the phone book and press Options. The
following options will be available.
z View: View the name and cellphone number of the current
entry. If the entry is more than one screen in length, use the
Up and Down keys to scroll up and down. If you've set the
incoming image, press View to view the current incoming
image.
50
Page 51

z Send SMS to selected phone number.
z Send MMS: Send MMS to selected phone number.
z Dial: Dial the selected phone number.
z Edit Before Dial: You can edit the selected number and
press OK after the edit to dial the number. No modification of
the feature will influence the original entry.
z Add New Entry: Add a new entry to SIM card or the phone.
z Modify: Delete the selected entries.
z Send vCard: You can send the current entry to other user s by
SMS or Bluetooth. Or select Save in Archive to save it to the
memory card.
z Mark Multiple: One or more entries can be selected to be
sent or deleted etc.
z Delete: Delete the selected entries.
z Copy To SIM/Copy To Phone: If the selected entry is stored
in the phone, the option of Copy to SIM will appear and the
entry will be copied into the SIM card; If the selected entry is
stored on the SIM card, the option of Copy to Phone will
appear and the entry will be copied into the phone.
z Move To SIM/Move To Phone: If the selected entry is stored
in the phone, the option of Move to SIM will appear and the
entry will be moved into the SIM card. If the selected entry is
stored on the SIM card, the option of Move to Phone will
appear and the entry will be moved into the phone
z Send Number To SMS Firewall: Add the number to SMS
Firewall list.
51
Page 52

Tips: You can press the Dial Key to dial the number directly in the
number list screen. If multiple numbers exist in the entry, after
pressing the Dial Key, a list will be displayed that will allow you to
choose the one you want to dial. Select the one you want and
press the Dial Key again to dial.
4.2.2 Add New Entry
Add a new Phone Book entry into the SIM card or the phone. You
can access Preferred Storage to set the preferred storage location
of the phone number.
If the storage location is set to be SI M card, the entry will include
the name and number only. If the storage location is set to be the
phone, the entry may include the following information: name,
cellphone, home phone, office phone, E-mail, fax, address, birt hday,
incoming image, movie connection, customized tone and group.
Incoming Image: Set the customized incoming image of the
current entry. You can also choose the suitable image from My
Documents besides the preset image.
Movie Connection: Set the customized incoming movie of the
current entry. You can choose the suitable movie from My Documents.
Play a movie when there is an incoming call will take up more
resources of the phone. It is not recommended to choose an oversized
movie.
Customized Tone: Set the customized incoming tone of the
current entry. If you've set the customized incoming tone, the phone
will play such tone other than the tone set in the Profile when the
corresponding number calls.
52
Page 53

Note: If you've set the movie connection, the phone will play such
movie other than the customized incoming tone or the tone set in
the Profile when the corresponding number calls.
Group: You can arrange the entries stored in the phon e in diffe rent
groups according to the relations.
4.2.3 Mark Multiple
Access the current contact list and press Options for the following
operations:
z On/Off:Mark the selected entries or cancel such mark.
z All On:Mark all the entries.
z Send SMS to all the marked entries.
z Copy To SIM/Copy To Phone: If the selected entries are
stored in the phone, the option of Copy to SIM will appear and
all the entries will be copied into the SIM card; If the selected
entries are stored on the SIM card, the option of Copy to
Phone will appear and all the entries will be copied into the
phone.
z All Off: Cancel all the entry marks.
z Delete: Delete all the marked entries.
4.2.4 List Filter
The display mode of the contact list can be set.
z Phone + SIM Card: Choose this option to access the contact
list and see all the contact lists.
z Phone: Choose this option to access the contact list and see
the contact lists of the phone.
53
Page 54

z SIM Card: Choose this option to access the contact list and
see the contact lists of the SIM card.
4.2.5 Preferred Storage:
The preferred storage location of the phone number can be
set.
z SIM Card: With this option selected, you'll directly access the
edit interface of new SIM entries.
z Phone: With this option selected, you'll directly access the
edit interface of new Phone entries.
4.2.6 Copy All
You can select to copy all the SIM/Phone entries to Phone/SIM.
z To Phone: Copy all the SIM entries to Phone.
z To SIM: Copy all the Phone entries to SIM.
4.2.7 Caller Group
There are 4 default caller groups in the caller group list. And a
customized caller group can also be added.
Access the caller group list and press Options for the following
operations:
z View: View the members of the selected caller group list.
z New: Create a new caller group.
z Rename: Rename the selected caller group.
z Group Send SMS: Send SMS to all the members of the
current caller group.
z Caller Group Ring Tone: Set the incoming ring tone of the
current caller group.
54
Page 55

Access the member list of the caller group and press Options
for the following operations:
z View: View the details of the selected entry.
Send SMS to the selected phone number.
z Call: Dial the selected phone number.
z Edit Before Dial: You can edit the current number in the
number edit interface and press OK after the edit to dial the
number. No modification of the feature will influence the
original entry.
z Add Member: Add new members to the current caller group.
z New: Add a new entry to SIM card or Phone.
z Modify: Delete the selected entries.
z Copy To SIM: Copy the selected entry to SIM card.
z Multi-Flag: One or more caller groups can be sent by SMS,
copied to SIM card and deleted.
z Delete: Delete the selected contact from the Phone Book.
Note: You can only add or delete group members for entries
on your phone.
4.2.8 Speed Dial Setting
You can align the number keys from 2 - 9 to eight most commonly
used numbers. Hold down the corresponding number key to dial the
set number in idle interface.
Note: Align 1 to the Voice Mail Server by default.
4.2.9 Owner Number
You can set max. 2 owner numbers. Changing this number w ill not
have any effect on the actual number of the SIM card.
55
Page 56

4.2.10 Memory Status
You can check the number of used entries on the SIM and phone
as well as the capacity for entries
4.2.11 Fields
You can set whether or not the entry displays the home phone,
office phone, E-mail, fax, address, birthday, incoming image, movie
connection, customized tone and group.
4.3 Messages
SMS and MMS can be sent and received with the Messages
feature. Chat, Voice Mail Server and Broadcast Message are also
available.
Press Left Soft key when the phone is idle and select Messages.
4.3.1 Messages
In Messages, you can create, send, receive, view, edit and
arrange SMS and MMS.
New Message
You can write and send SMS and MMS with this feature.
Write Message
With EMS, SMS with texts, images, animations, tones and
melodies can be sent and received. Long message feature is also
supported.
56
Page 57

Press Options when in the Edit Message interface for the follow ing
features:
z Done: End the edit, and enter the Send options menu.
z Insert Entry From Phone Book: Select and add contact
details from the Phone Book.
z Use Template: Select this to add pre-defined text phrases.
z Insert Object: Access the Selected Objects menu.
Picture: Insert the pictures built in the system.
My Picture: Select and insert the pictures in the "Images"
folder of My Documents.
Predefined Animation: Insert the animation icons built in the
system.
My Animation: Select and insert the animations in the
"Images" folder of My Documents.
Melody: Insert the melodies built in the system.
My Melody: Select and insert the melodies in the "Images"
folder of My Documents.
Predefined Sound:Insert the sounds built in the system.
z Format Text: Set the format of your message text.
Text Style: Options such as Bold, Italics, Underline and
Strikethrough are available.
Alignment: Options available include Automatic, Left, Centre,
and Right.
New Paragraph: Choose this option to end the current
paragraph and create a new paragraph.
z Input Method: You can choose an input method to input
words.
57
Page 58

Press Done to access the send options menu after the edit for the
following available operations:
z Save And Send: The message will be saved in the Sent upon
successful sending. The message will be saved in the
Draftbox upon unsuccessful sending.
z Send Only: Input the receiver's number and send the
message.
z Save: Save the message in the Draftbox.
z Send To Many: Send the message to multiple numbers.
z Send By Group: Send the message to all numbers in a
certain caller group. Caller groups are set up in the
phonebook.
New MMS
Words, pictures and sounds can be contained in MMS. The phone
will not receive or send the MMS with the size surpas sing the limit.
Note: The feature is available only when it is supported by your
network service provider or service provider. The MMS will not be
received or displayed if its format is not supported by the phone.
The highlight of MMS is the multimedia feature. More contents and
information can thus be delivered. Such messages are those that
contain words, pictures and sounds etc. MMS service enables the
delivery of multimedia messages from phone to phone and from
internet to phone.
Access New MMS to edit and send MMS according to the
following steps:
58
Page 59

1. Select To, Cc and Bcc respectively to edit the receivers, men
of Cc and men of Bcc. The total number of receivers, men of
Cc and men of Bcc should not exceed 10.
2. Select and edit the Subject for a clearer meaning of your
MMS.
3. Select and edit the Content of your MMS. Press Options in the
interface for the following operations:
z Text Edit: Write or Delete the text of the MMS on the frame.
z Add Image/Remove Image: Add images from My
Documents or remove the existing ones on the frame.
z Add Music/Remove Music: Add music from My Documents
or remove the existing one on the frame.
z Add Accessory/Remove Accessory: Add accessories from
My Documents or remove the existing ones on the frame (only
Vcard supported).
z Frame Time: Set the frame time of the MMS content.
z Previous Frame:Display the MMS content on the previous
frame.(This item is disabled for single-frame MMS)
z Next Frame: Display the MMS content on the next
frame.(This item is disabled for single-frame MMS)
z New Frame: Create a new frame of empty MMS.
z Delete Frame: Delete the MMS on the frame.
z Preview: Check the effect of the MMS.
4. Select Send Options for the following operations:
5. Send: Send MMS.
6. Preview: Check the effect of the MMS.
7. Save: Save MMS in the Draftbox.
8. Save And Send: Save MMS in Sent after it is sent.
59
Page 60

Inbox
In this menu you can choose to read SMS, MMS, MMS Push and
WAP Push.
Corresponding icons will be shown to remind you of new SMS,
MMS, MMS Push and WAP Push. Icons of Full SMS and Full MMS will
be shown when there's no extra space for message storage in the
phone. At this time, you can receive no more SMS or MMS. You can
delete old messages to receive new ones.
Different types of messages refer to different operations:
SMS
Select the SMS to be read from the SMS list and press OK to
access the message d isplay interface. Press Options for the following
operations:
z Reply: Make a reply to SMS or MMS.
z Delete: Delete the SMS.
z Edit: Edit the current SMS.
z Forward: Forward this SMS.
z Copy to Phone (SIM): Copy the current SMS to your phone if
it is saved in the SIM card; Copy the current SMS to the
SIM card if it is saved in your phone.
z Move to Phone (SIM): Move the current SMS to your pho ne if
it is saved in the SIM card; move the current SMS to the SIM
card if it is saved in your phone.
z Chat: Access the feature of chatting w ith the receiver.
60
Page 61

z Same Number Delete: Delete the SMS in the Inbox whose
number is the same as that of the receiver.
z Delete All SMS: Delete all SMS in your Inbox.
z Copy All: Choose to copy from SIM: copy all of the received
SMS in your SIM card to the phone; Choose to copy from
Phone: copy all of the received SMS in your phone to the SIM
card.
z Move All: Choose to move from SIM: move all of the received
SMS in your SIM card to the phone; Choose to move from
Phone: move all of the received SMS in your phone to the SIM
card.
z Get Number: Get the sender number of the current SMS or
get the number in the message. The numbers will be show n in
a list. You can conveniently dial or save the number by
choosing one from the list.
z Save Objects: Get the pictures and sounds contained in this
SMS and save them in the phone.
z Dial: Dial the phone number of the selected SMS.
z Send Number To SMS Firewall: Access the number edition
interface of SMS Firewall and preset the edited number as the
number of the selected SMS.
MMS
Select the MMS to be read from the MMS list and press OK to
access the message display interface for the following operations.
z View: View the content of the MMS.
z Reply: Make a reply to SMS or MMS.
z Details: Check the details of the MMS.
61
Page 62

z Forward: Access the MMS forward interface.
z Save Image: Save the pictures in the MMS into the "Images"
folder of My Documents.
z Save Music: Save the music in the MMS into the "Audio"
folder of My Documents.
z Save Accessory: Save the accessories (only Vcard
supported) in the MMS into My Documents.
z Get Number:Get the sender number of the MMS, or get the
number in the text. The numbers will be shown in a list. You
can conveniently dial or save the number by choosing one
from the list.
z Delete: Delete the MMS.
z Delete All MMS: Delete all MMS in your Inbox.
z Same Number Delete: Delete the MMS Push in the Inbox
whose number is the same as that of the receiver.
z Dial: Dial the phone number of the selected MMS.
MMS Push
Select the MMS Push to be read from the message list and press
OK to access the message display interface for the following
operations:
z Retrieve: Download the corresponding MMS of the MMS
Push.
z Details: Check the corresponding MMS details of the MMS
Push.
z Delete: Delete the MMS Push.
Wap Push
62
Page 63

Select the Wap Push to be read from the message list and press
OK to access the message display interface. Press Options for the
following operations:
z Link: Link to the specified website of the Wap Push.
z Delete: Delete the Wap Push.
z Delete All Push: Delete all Wap Push.
Outbox
Successfully sent messages will be stored in the Outbox if you
selected Save and Send for a sent message.
Different types of messages refer to different operations:
SMS
Select the SMS to be read from the SMS list and press OK to
access the message display interface. Press Options for the following
operations:
z Send: Enter the send options screen to Send, Send to Many
or Send by Group.
z Edit: Edit the current SMS.
z Delete: Delete the SMS.
z Copy to Phone (SIM): Copy the current SMS message to
your phone if it is saved in the SIM card; Copy the current
SMS message to the SIM card if it is saved in your phone.
z Move to Phone (SIM): Move the current SMS to your pho ne if
it is saved in the SIM card; move the current SMS to the SIM
card if it is saved in your phone.
z Delete All SMS: Delete all SMS in your Outbox.
63
Page 64

z Copy All: Choose to copy from SIM: copy all of the sent SMS
in your SIM card to the phone; Choose to copy from Phone:
copy all of the sent SMS in your phone to the SIM card.
z Move All: Choose to move from SIM: move all of the sent
SMS your SIM card to the phone; Choose to move from
Phone: move all of the sent SMS in your phone to the SIM
card.
z Get Number:Get the sender number of the current SMS or
get the number in the message. The numbers will be show n in
a list. You can conveniently dial or save the number by
choosing one from the list.
z Dial: Dial the phone number of the selected SMS.
z Send Number To SMS Firewall: Access the number edition
interface of SMS Firewall and preset the edited number as the
number of the selected SMS.
MMS
Select the MMS to be read from the MMS list and press OK to
access the message display interface for the following operations.
z Send: Send the MMS.
z Forward: Access the MMS forward interface.
z View: View the content of the MMS.
z Details: Check the details of the MMS.
z Delete: Delete the MMS.
z Delete All MMS: Delete all MMS in your Outbox.
z Dial: Dial the phone number of the selected MMS.
64
Page 65

z Send Number To SMS Firewall: Access the number edit
interface of SMS Firewall and preset the edited number as the
number of the selected SMS.
Unsentbox
MMS will be stored in the Unsentbox upon unsuccessful sending.
Select the MMS to be read from the MMS list and pre ss O K for the
following operations.
z Send: Send the MMS.
z View: View the content of the MMS.
z Details: Check the details of the MMS.
z Delete: Delete the MMS.
z Delete All MMS: Delete all MMS in your Outbox.
Draftbox
The phone will save messages that have not yet been sent into
the Draftbox when you select Save. SMS will be stored in the Draftbox
upon unsuccessful sending.
Here you can check messages that have been saved but not yet
sent or those that are not successfully sent.
Different types of messages refer to different operations:
SMS
Select the SMS to be read from the SMS list and press OK to
access the message display interface. Press Options for the following
operations:
65
Page 66

z Send: Enter the send options screen to Send, Send To Many
and Send By Group.
z Edit: Edit the current SMS.
z Delete: Delete the SM S.
z Copy to Phone (SIM): Copy the current SMS to your phone if
it is saved in the SIM card; Copy the current SMS to the SIM
card if it is saved in your phone.
z Move to Phone (SIM): Move the current SMS to your pho ne if
it is saved in the SIM card; move the current SMS to the SIM
card if it is saved in your phone.
z Delete All SMS: Delete all SMS messages in your Draftbox.
l Copy All: Choose to copy from SIM: copy all of the SMS in the
Draftbox in your SIM card to the phone; Choose to copy from Phone:
copy all of the SMS in the Draftbox in your phone to the SIM card.
z Move All: Choose to move from SIM: move all of the SMS in
the Draftbox in your SIM card to the phone; Choose to move
from Phone: move all of the SMS in the Draftbox in your
phone to the SIM card.
z Get Number:Extract the sender number of the current SMS
message, or extract the number in the message. The
numbers will be shown in a list. If you choose one from the list,
the dialing interface will be displayed for you to conveniently
dial or save the number.
z Dial: Dial the phone number of the selected SMS.
z Send Number To SMS Firewall: Access the number edition
interface of SMS Firewall and preset the edited number as the
number of the selected SMS.
66
Page 67

MMS
Select the MMS to be read from the MMS list and press OK to
access the message display interface for the following operations:
z Send: Send the MMS.
z View: View the content of the MMS.
z Edit: Access the MMS edit interface.
z Details: Check the details of the MMS.
z Delete: Delete the MMS.
z Delete All MMS: Delete all SMS in your Draftbox.
z Save And Send: Save the MMS in Outbox after it is sent.
z Dial: Dial the phone number of the selected MMS.
z Send Number To SMS Firewall: Access the number edit
interface of SMS Firewall and preset the edited number as the
number of the selected SMS.
Schedule SMS
Schedule SMS refers to the fact that the preset SMS is sent in
preset time and mode. Access the Schedule SMS setting interface to
set the sending time and contents.
Select a SMS Booking from the SMS Booking list and press
Options for the following operations:
z View: View the information including the contents and time of
the selected SMS Booking.
: Add new SMS Booking.
Add
Edit Task: Edit the selected SMS Booking.
Delete Task: Delete the selected SMS Book ing.
Delete All: Delete all the SMS Booking.
67
Page 68

Send Now: Send the selected SMS Booking at once.
Note: The SMS Booking won't be sent when the time is up if the
phone is off or in flight mode.
Message Templates
Message Templates offer many preset SMS Templates and MMS
Templates for your daily use.
SMS Templates: Set the contents of preset messages that can b e
input directly when messages are edited. You can edit and delete the
contents.
MMS Templates: Set the contents of preset messages that can
be used as templates while creating a new MMS. You can preview
them, check the details and conduct the edit again.
Delete folders
Delete Folders are used to empty all the messages in the Inbox,
Sent, Outbox and Draftbox or all the boxes.
Message Setting:
SMS Settings: Various settings related to SMS can be
conducted.
z Profile Setting:
Profile Name: Set the name of the profile.
SC Address: Set the number of the SMS Center. The number
68
Page 69

can be gained from your network service provider.
Valid Period: Set the validity period within which your SMS is
kept in the SMS center. You can set the validity period to be 1
hour, 6 hours, 12 hours, 1 day, 3 days, 1 week or Maximum.
Message Text: You can choose the formats of your SMS
from text, fax, Pager and E-mail.
Note: Not all networks support all formats.
z Common Setting: Turn on/off the Delivery Reports to let you
know whether or not messages were delivered successfully.
The feature requires network support.
z Preferred Storage: This menu allows you to choose your
preferred storage location, namely, SIM Card or your Phone.
z SMS Firewall: You can filter out the unneeded SMS
according to your setting.
MMS Settings: Various settings related to MMS can be
conducted.
z Send Setting:
Expire: Set the time that your MMS is kept in the network
terminal. The MMS that has not been sent to the receiver will
be deleted by the network service provider if the time is up.
Delivery Report: The Delivery Report will be provided when
the receiver receives the MMS. The feature requires network
support.
Read Report: The receiver cannot see the sender's number
while beginning to read the MMS. The feature requires
network support.
Priority: Set the priority of the MMS.
69
Page 70

Max Send: Set the maximum sending capacity of MMS.
Frame Time: Set the default play time of each MMS frame.
z Retrieve Setting:
Retrieve Mode : Set to receive MMS manually or
automatically.
Max Retrieve:Set the maximum receiving capacity of MMS.
z Edit Setting:
Edit the network setting applied by MMS. The setting
options include:
Modify Name: Modify the name of the setting option.
MMS Centre: Set the address of the MMS Centre Server
MMS Gateway: Set the IP address of the Gateway of the MMS
Centre Server.
Port: Set the service port of the MMS Centre Server.
Connection Mode: Select the account applied by MMS.
Memory Status
You can check the use status and remaining space of both the
SMS and MMS capacity.
4.3.2 Chat
Access the Chat menu and select Chat Room1 or Chat Room2
to chat in. Once the chat room is selected, then you are able to set
Chat Room Info and Start New.
4.3.3 Voice Mail Server
70
Page 71

Voice Mail Server is similar to answering an incoming call for you.
When you are not reachable, your phone can automaticall y transfer the
incoming call to the Voice Mail number, which will allow the caller to
leave a voice mail for you. Firstly edit the number for Voice Mail Server
(the number is available from the Service Provider).Then select
Connect To Voice and the phone will dial the number for Voice Mail
Server that you have set.
Hold down the 1 key when the phone is idle to directly dial the
preset number for your voice mail server.
Note: The voice mail feature requires network support. For more
information on voice mail, please contact your local netw ork
service provider.
4.3.4 Broadcast Message
CB messages are messages sent publicly by your netw ork serv ice
provider. With broadcast messages, you can get information on
various subjects, such as on weather, taxis or hospitals. For more
information on subjects available, please contact your local network
service provider.
Enter the Broadcast Message submenu and you will be able to
see 4 options:
z Receive Mode: Turn on/off the receipt of broadcast
messages.
z Read Message: Open the received broadcast message.
z Language: You can choose whether or not to receive
broadcast messages in all languages.
71
Page 72

z Channel Setting:
Select: Turn on/off the spare channel to filter out unne cessary
broadcast messages.
Add: Add a new broadcast channel and set up the channel
title as well as the channel ID.
Edit: Reconfigure the selected channel.
Delete: Delete the selected channel.
Note: This feature is not available if not supported by your service
provider.
4.4 Call History
You can view records of recent missed calls, received calls dialed
numbers and rejected numbers. Pressing the Left and Right keys will
allow you switch between the display of missed calls, received calls,
dialed numbers and rejected numbers.
Press the Left Soft Key to access the main menu when the phone
is idle and select Call History.
4.4.1 Missed Calls
Lists recent missed calls. Enter the missed call list and press
Options for the following operations:
z Detail Information: View information of the select ed entry,
including phone number, contact name, date and time of call
and number of missed calls. Press OK in the missed call list to
view the detailed information of the selected item.
72
Page 73

z Send SMS to the selected phone number.
z Send MMS: Send MMS to the selected phone number.
z Save To Phone Book: Save the selected number to the
Phone Book.
z Dial: Dial the selected phone number.
z Edit Before Dial: Modify the incoming number for saving or
dialing.
z Delete: Delete the selected entries.
z Add To Reject List/Remove From Reject List: Add/Remove
this number to/from the Reject List.
z Send Number To SMS Firewall: Add this number to the SMS
Firewall. See Help of SMS Firewall in your phone for rules that
numbers in the SMS Firewall have to follow.
4.4.2 Received Calls
Lists recent received calls.
The number list options are the same as those for missed calls.
4.4.3 Dialed Calls
List recent dialed calls.
The number list options are the same as those for missed calls.
4.4.4 Rejected Calls
Rejected call records are records of calls that were rejected
automatically or manually as a result of the activated reject and accept
lists. When there is a rejected call, the rejected icon will be displayed in
the icon bar in the idle interface.
The number list options are the same as those for missed calls.
4.4.5 Delete Call Log
73
Page 74

From this menu you can choose to delete all call records, missed
call records, received call records, dialed number records and rejected
call records.
4.4.6 Call Time
You can view total the call time of the phone. There might be
some discrepancies between this figure and the actual call duration
figures that are provided by your service provider.
Last Call Time: Display the duration of your last call.
Total Received: Display the total duration of your received calls.
Total Sent: Display the total duration of your dialed calls.
Reset All Time: Reset all of the recorded calling times.
4.4.7 Call Cost
Press the Left soft key OK to access the Call Cost menu.
Last Call Cost: To display the cost of your last call with a floating
bar.
Total Cost: To display the total cost of your calls with a floating
bar.
Reset Cost: Enter your PIN2 to reset the call cost.
Max Cost: To display the current limitation on cost with a floating
bar. “0” indicates no limitation. Press the Left soft key to set the
limitation on your cost.
Price Per Unit: To display the current charging rate with a floating
bar. Press the Left soft key to set the unit.
Notice: The Call Cost feature requires support from your service
provider. When trying to set the Max Cost and Price Per Unit, you
74
Page 75

have to enter your PIN2. Please contact your network service
provider to get your PIN2.
4.4.8 SMS Counter
Check the number of SMS sent and received.
4.4.9 GPRS Counter
Check the data flowrate on the GPRS network (in KB). You can
check the GPRS data flowrate of Last Sent, Last Received, All Sent
and All Received. You can also reset all the records with the counter
resetting function. The information is provided for users as reference
only. The actual GPRS data flowrate is subject to that provided by the
network service provider.
4.5 Settings
Your phone supports multiple phone setup options, by which you
can set up your phone according to your interests and needs. You can
also revert to default settings.
4.5.1 Display Characteristic
Set up the screen display and backlight.
Wallpaper
The background image displayed in idle mode can be modified.
You can choose from the 10 pictures (including Simulation Clock and
Digital Clock) that are pre-stored in the phone or you can choose from
75
Page 76

My Documents through More Wallpapers. The pictures can be in the
format of JPG, BMP or GIF.
Note: If the wallpaper is set as "Simulation Clock" or "Digital
Clock", information like the name of the song being played
currently by the Audio Player and the owner number etc. will not
be displayed in the idle interface.
Screen Saver
Edit screen saver activation/deactivation, w aiting time a nd display .
Setting: Set the state of the Screen Saver and the waiting time
before activation.
Select: You can choose from the 10 pi ctu res (includ ing Si mulation
Clock and Digital Clock) that are pre-stored in the phone or from one
segment of a film. Or you can choose screen saver picture or video
from My Documents. The pictures can be in the format of JPG, BMP or
GIF while videos 3GP or MP4.
Themes
Options available are 3 themes.
Set Idle Display
You can set the display contents in idle interface like Time,
Service Provider and Owner Number.
Power On/Off Display
You can modify the Power On/Off screen display.
76
Page 77

Power On Display: Modify the Power On screen display. You can
choose from the 9 animations that are pre-stored in the phone or you
can choose from My Documents through More Animations. The
pictures can be in the format of JPG, BMP or GIF while videos 3GP or
MP4.
Power On Display: Modify the Power Off screen di splay. You can
choose from the 9 animations that are pre-stored in the phone or you
can choose from My Documents through More Animations. The
pictures can be in the format of JPG, BMP or GIF while videos 3GP or
MP4.
LCD Backlight
You can modify the brightness of the backlight and the time that
the backlight stays fully lit.
MainMenu Style
Two options are available – Matrix and Page. When the Page
style is chosen, there is always one menu on your display.
4.5.2 Phone Setup
Time and Date
Use this menu to set the date and time of your mobile phone. This
menu has the three submenus:
Set Time/Date: Use this menu to set the format of you r phone
time/date.
77
Page 78

Set Format: Both 12-hour format and 24-hour format are available
for time. Date formats available include formats such as YY YY/MM/DD
and DD/MM/YYYY.
Set Home City: 58 international cities are available. By choosing a
different city, you can change the area in which your phone works.
Notice: This setting has no impact on time setting.
Schedule Power On/Off
Max. 4 times of Schedule Power On/Off can be set. Each
schedule time has the following available settings:
Type: Select the schedule ty pe: Power On or Power Off.
Status: Turn on/off the schedule.
Enter Time: Enter the schedule time with the number keys. When
12-hour time format is set, choice of time is available.
Set Frequency: Frequency can be set to be Once, Weekday,
Daily and Customized (i.e. Schedule Power On/Off on certain specifie d
days of one week).When Frequency is Customized, you can select or
cancel the date with the OK key.
Input Methods
Choose one input method available on your phone as the default
input method for text editing.
Greeting Text
You can decide whether to show greeting text when your phone is
turned on. You can also edit your greeting text.
78
Page 79

Dazzle Ring List
Edit the dazzle ring list with the available operations such as Add,
Replace, Delete and Empty.
Dedicated key
Modify the specified features of Up, Down, Left and Right key in
idle interface.
Funkey Setting
Choose one Funkey available for your dialing screen.
4.5.3 Call Setup
Certain options require network support when calls are being
made. Please contact your service provider if you require these
functions.
Call Divert (requiring network support)
With this service, incoming calls are diverted to a number that you
have designated. This can be set up in the following ways:
Divert All Voice Calls: Divert all incoming calls unconditionally.
Divert If Busy: Calls are diverted when the line is engaged
Divert If No Answer: Calls are diverted if you do not answer.
Diver If Unreachable: Calls are diverted when the network
cannot reach your phone or when your phone is powered off.
Enter the menu of the divert type you want and you will have the
following options:
79
Page 80

z Activate: Activate the call divert feature and set the target
phone number
z Deactivate: Deactivate the call divert feature.
z Query Status: Check the status of this call divert.
You can also select the option of Cancel All Divert to cancel all
the set call diverts.
Call Reminder Main
Call Time Reminder:
Set whether or not a call time reminder w ill be g iv en if calls ex ceed
a certain duration. The following options are available:
z Off: Cancel the Call Time Reminder.
z Single: Single reminder is activated according to your set
time.
z Periodic: Periodic reminder is activated according to your set
time.
Call Time Display: Set whether or not to display the call time
during a call.
Connect Notice: After you've connected with the other end of the
line, the phone will remind you according to the notices as you've
set. The notices include Tone Only, Vibration Only and Tone &
Vibration. None can also be set to cancel Connect Notice.
Answer Mode
Set the Answering Mode and Reply By SMS After Rejecting Calls.
z Any Key: This allows you to answer a call by pressing any
key except for the End key, the Right soft key, Left key and
the Right key.
80
Page 81

z Reply By SMS After Rejecting Calls: With this feature
activated, you are able to reply by SMS directly after rejecting
a call.
Auto Redial
When this function is enabled, the phone will automati cally redial a
number after waiting for a certain period of time if the first call failed.
z On: Activate this feature.
z Off: Deactivate this feature.
Note: The interval time between re-dialings always changes.
This feature is subject to network status.
Call Filter
Select whether or not to activate the feature of Call-in Filter. When
the feature is activated, the activation icon of Call-in Filter will be
displayed in the icon area of the idle system.
Setting: Select the mode of Call-in Filter.
z Deactivate: Deactivate this feature.
z Activate Reject List: The phone will not allow numbers in the
Reject List to call.
z Activate Accept List: The phone will not allow numbers
other than those in the Accept List to call.
Reject List: Numbers stored here are restricted to call.
Accept List: Numbers stored here are permitted to call.
Edit Reject/Accept List:
81
Page 82

Enter the number to be barred. An area code is required if it is a
fixed phone. You can also press Options soft key for the following
operations:
z Add From Phone Book: Add the needed numbers from
Phone Book into the list.
z Add From Caller Group: Add the needed caller groups into
the list.
z Add From Call History: Add the needed numbers from Call
History into the list.
z Delete: Delete the selected number.
z Delete All: Delete all of the numbers in the list.
Call Waiting (requiring network support)
When this feature is enabled, you will be informed of a new
incoming call when you are answering a call.
z Activate:Activate this feature.
z Deactivate:Deactivate this feature.
z Query Status: Check the status of the feature.
Call Barring (requiring network support)
This network feature allows you to prohibit all incoming and
outgoing calls. You are required to enter the barring password that has
been provided by your service provider before this function can be
used.
The following options are available:
All Outgoing Calls: The available operations of this feature
include Activate, Deactivate and Query Status.
82
Page 83

International Calls: The available operations of this feature
include Activate, Deactivate and Query Status .
International Except Home: The available operations of this
feature include Activate, Deactivate and Query Status.
All Incoming Calls: The available operations of this feature
include Activate, Deactivate and Query Status .
When Roaming: The available operations of this feature include
Activate, Deactivate and Query Status.
Cancel All: Cancel all restriction settings.
Change Barring Password: You may change the barring
password provided by your network service provider. You are required
to enter the current password before a new one can be set.
Caller ID (requiring network support)
You can choose whether or not your number is displayed on the
screen of the mobile that you are calling.
z Hide Id: Choosing this option enables your number not to be
displayed on the screen of the mobile that you are calling.
z Send Id: If the mobile that you are calli ng has activated the
Caller Display feature, your number will be displayed on their
screen.
z Set By Network: Use the default settings of the network.
4.5.4 Flight Mode
Activate/Deactivate the communication feature of your phone.
Normal Mode: The phone works normally.
Flight Mode: Features in the phone related to the network is
restricted. For example: Dialing and answering calls, receiving and
83
Page 84

sending messages and visiting websites are unavailable, while
multimedia features like MP3, videos and photography available.
Query When Power On: When the phone is powered on, there
appears a query interface about whether or not to deactivate the
communication feature.
4.5.5 Network Setup
This function allows you to choose a network when you are
roaming (when you are not within the range of your own network)
Note: Do not subscribe to a network that is not in accordance with
your SIM card. Otherwise your mobile phone may not operate
normally. Contact your service provider for details
Automatic/Manual Network Selection
1. Network Selection
2. If Automatic is selected, you'll be connected with your own
network. If Manual is selected, the phone will search for the
available network. Please follow Step 3.
3.
Edit Preferred Network
1. Select Preferred Network.
2. Press Option soft key for the following operations:
Add From List: Add the needed service provider from the preset
list of PLMN service providers in the phone into the current list of
preferred network.
84
Page 85

Create New: You can customize the code of the network service
provider and the related priority.
Change Priority: Change the priority of the currently selected
network service provider.
Delete: Delete the currently selected network service provider.
Change GPRS Connection
1. Select GPRS Connection.
2. Press the Switch soft key.
GPRS connection can be changed to the following two states:
z When Needed: The phone will connect GPRS when it is
needed by the applied feature and disconnect upon the
completion of the feature.
z Always: The phone will keep connecting GPRS network
when powered on.
4.5.6 Security Setup
Set SIM Lock with PIN code.
This function allows you to protect your SIM card from
unauthorized use. When PIN Code Setting is activated, you have to
verify the PIN code every time you turn on your mobile phone.
You can activate/deactivate the PIN Code Setting in the following
way:
1. Select the PIN Code Setting, then choose from On and Off.
2. Enter PIN code.
85
Page 86

Note: SIM card will be locked permanently if the PIN code is input
incorrectly 3 times in a row. If this is the case, use the PUK
password to unlock the SIM card. Your PIN code and PUK code
may be provided to you together with the SIM card. If you don’t
know your PIN or PUK code, please contact your network
provider.
Phone Lock
When the feature is activated, you have to verify the phone
password every time the phone is turned on. The phone won't be
normally used without a successful verification.
You can Lock/Unlock the phone in the following wa y:
1. Select Phone Lock, then choose from Activate and
Deactivate.
2. Enter the phone lock password.
Note: The default phone lock password is 1122.
Auto Keypad Lock
With this function enabled, the keypad will lock itself if the user
does no operation on the phone within a set period of time (when in
idle mode).
You can set the Auto Key Lock function as follows:
1. Press the Up and Down key to choose Auto Keypad
Lock,then press OK soft key.
86
Page 87

2. Press the Up and Down key to choose the time you want, then
press OK soft key.If you want to cancel this feature, please
select Off.
Fixed Dial
With this function enabled, you can dial the numbers stored in the
fixed dialing list or the ones that start with the numbers in the list.
In this menu, you can set the mode of the fix ed dialing and edit th e
fixed dialing list.
Note:PIN2 Code is necessary for the setting and activating of
fixed dialing feature. Please contact your network service
provider. With the fixed dialing feature enabled, the local SMS
centre number and the destination number should both be stored
in the fixed dialing list before sending SMS.
Barried Dial
With this function enabled, the numbers in the barried dialing list
are prohibited to call out.
Note: The feature requires network support. Contact your service
provider for details.
Privacy Protect
You can activate the Privacy Protect towards Message, Call
History, Phone Book, File Manager and To do List. With the Privacy
87
Page 88

Protect enabled, you have to enter the phone password before using
the protected features.
You can activate/deactivate the Privacy Protect in the following
way:
1. Press the Up and Down keys to select the features to be
protected and press Options/Cancel soft key.
2. Enter the phone lock password and press OK soft key.
Change Password
The PIN, PIN2 and Phone Passwords can be changed.
Passwords can be changed in the following way:
1. Press the Up and Down key to choose the password to be
changed, then press OK soft key.
2. Enter the current password.
3. Enter the new password.
4. Re-enter the new password to confirm.
Note: SIM Lock must be enabled before the PIN code can be
changed. Passwords must be between 4-8 digits.
4.5.7 Restore Factory Settings
Restore certain settings to their original factory settings
Note: Your correct phone lock password is required to restore
factory defaults. Your phone will restart automatically after
settings are restored.
88
Page 89

4.6 Multimedia
4.6.1 Audio Player
You can appreciate music with this feature. Access the Audio
Player interface and adjust the Play and Pause of the music by the OK
key. Choose the previous or next song by the Left and Right key.
Adjust the volume by the Up and Down key. Quickly set of the play
mode by the * key. Set the effect of Equalizer fast by the # key.
Press Options in the interface of Audio Player for the following
operations:
z Play/Pause: Start to play the music or have the currently
playing music paused. This menu won't display when the
current play list is empty.
z Hide: Return to the idle interface and start to play the
background music. This menu won't display when the current
play list is empty.
z Present Play List: Display the present play list.
z Load Default Card List: Load the default list containing all
the music in the folder of “My Music” in the memory card.
z Load New Play List: Load the music files with .lml suffix from
My Documents.
z Create New Play List: The user can choose the music
randomly, create music files (with .lml suffix) of different styles
and save them in My Documents.
z Set As Ring Tone: The present song can be set to be the
incoming ring tone. This menu won't display when the current
play list is empty.
89
Page 90

z Forward: The present song can be sent To Profile, To MMS,
To E-mail and To Bluetooth. Songs of different styles have
different send options. This menu won't display when the
current play list is empty.
z Delete From Current List: Remove the current song from the
current play list. This menu won't display when the current
play list is empty.
z Music Settings: The Audio Player can be set in the following
way:
Play Mode: The play modes include Play in Order, Repeat
One, Repeat All and Random.
Background Play: With this setting activated, the phone is
able to play the background music while conducting other
operations (except the operations related to audio, camera
and video player).
Equalizer: The sound modes include Standard, Bass, Dance,
Classic, High, Feast, Pop, and Rock.
Spectrum Display Style: The spectrum display style can be
set in the interface of the Audio player.
Backlight: The backlight can be set to Stay On or Default. In
case of Say On, the backlight
will keep On in the player interface.
Lyric Synchronization: The lyric display feature can be
activated or deactivated. If there is a lyric file (with .lrc suffix)
possessing the same name under the path of the music file
and if the Lyric Synchronization is activated, then the lyric can
be displayed simultaneously while the music is played.
90
Page 91

z Detail: View the relevant properties of the current music, such
as its file path, track, tone, size, duration, name, singer and
album etc (subject to the specific file).This menu won't display
when the current play list is empty.
z Jump To: You can jump to the specified play time to start the
music. This menu will not display when the current play list is
empty or the music format does not support Jump To.
4.6.2 Video Player
You can appreciate videos of 3GP and MP4 formats with this
feature. Access the Video Player interface and adjust the Play and
Pause of the music by the OK key. Choose the previous or next video
by the Up and Down key. Adjust the Fast Forward and Fast Rewind by
holding down the Up and Down key. Adjust the v olume by the Left and
Right key. Adjust the play speed by 6 and 4 key. Switch to the full
screen mode by the * key.
Press the Left soft key to pop up the options menu in the
interface of Video Player.
z Present Play List: Display the present play list.
z Play/Pause: Start to play the video or have the currently
playing music paused. This menu will not be displayed when
the current play list is empty.
z View Detail: View the relevant properties of the current music,
such as its name, date, size, duration, resolution, format and
bit rate etc. (subject to the specific file).This menu won't
display when the current play list is empty.
91
Page 92

z Forward: The current video can be sent To E-mail and To
Bluetooth etc. This menu won't display when the current play
list is empty.
z Set As Power On Display: The current video can be set as
the Power On Display. This menu won't display when the
current play list is empty.
z Set As Power Off Display: The current video can be set as
the Power Off Display. This menu won't display when the
current play list is empty.
z Video Setting: The brightness, contrast and play mode (Play
in Order, Repeat and Random) of the Video Player can be
set.
z Load Default Card List: Load the default list containing all
the videos in the folder of “My Music” in the memory card.
z Load New Play List: Load the video files with .lvl suffix from
My Documents.
z Create New Play List: The user can choose the video
randomly, create video files (with .lvl suffix) of different styles
and save them in My Documents.
4.6.3 Camera
Capture Setting
Access the preview interface and press Up, Down, Left and Right
key to access the photo setting interface to set the exposure, focus,
white balance, time lapse, continuous shooting and photo effect,
shooting mode and photo frame. Use Up and Down key to select the
92
Page 93

setting option in the interface and switch the parameter of the current
setting option with the Left and Right key.
Capture
Access the preview int er face.
Focus the camera on the subject and adjust the image.
Press the OK key to shoot. After the shooting, save the current
photo according to the saving prompt setting of photo setting.
Press Options in the preview interface to access the menu.
z Capture: Take a picture.
z View Album: Access the Album to see the photo list in the
current album.
z Show Setting: Access the capture setting interface.
z Photo Setting: The quality and size of the photo, shutter
sound and the saving prompt can be set.
z Setting Restore: Restore the default settings of the Camera.
z MultiMedia Stat.: You can check the total capacity and the
remaining capacity of the memory card.
4.6.4 Video Recorder
Your phone supports digital video recorder.
Recorder Setting
Access the preview interface and press Up and Down key to
adjust the exposure compensation. Zoom with the Left and Right key.
You can also fast set the effect with 1, the w hite balance w ith 2 and the
93
Page 94

capture mode with 3.Press Left soft key in the preview interface to
access the menu:
z Record: Return to the record interface to start recording.
z To Player: Access the list of video files.
z Camcoder Setting: The white balance, exposure
compensation, camcoder mode and avoiding flicker etc. can
be set.
z Video Setting: The quality and si ze o f the v ideo, the time limit
of record, the record effect and the compression format can
be set.
z Effect Setting: The screen effects o f re cord include grayscale,
retro, retro-green, retro-blue, negative, grey negative, black
board, white board, copper plate engraving, blue engraving,
emboss, contrast and sketch.
z Restore Setting: Restore the default settings of the Video
Player.
z MultiMedia Stat.: You can check the total capacity and the
remaining capacity of the memory card.
Record
Access the preview interface of record.
Press the OK key to start recording and press it again to
Pause/Continue the record.
Press the Right soft key to stop the recording and save the video
automatically.
4.6.5 Image Viewer
94
Page 95

Select the menu of ImageViewer where you can conveniently
check the list of images taken by the camera and saved in the
ImageViewer. Press the Left soft key “O ptions” to view, set to, forward,
rename, delete, delete all files , sort or change browse style. Please
press the Up and Down Keys to browse them.
They can be set to Wallpaper, power on display, power off display
or Phone Book. The successful operations may be affected by image
size.
4.6.6 Sound Recorder
Your phone can record call voice or other sound. During a call,
choose “Record” on the Options menu of the call interface to record
call voice. The recorded file will be saved in File Manager in the
formats of .amr or .wav for your checking. When not during a call, you
can choose Recorder to record the sound and sav e the recorded audi o
file as a call ring tone. The time length of your recording depends on
the free space available.
4.6.7 Photo Artist
The photos stored in the memory card can be edited and
composed artistically.
In the option of photo edition, the photo can be saved as others,
apply effects, apply photo frame, be stamped, be added with w ords, be
adjusted, be reversed and expand canvas, etc.
4.6.8 E-Book
The user can read text files of TXT or LRC formats with this
feature.
95
Page 96

Access the E-book interface and press Options for the following
operations: Open, Recent Files, Bookmark, Jump to, Encode Type,
Display, Auto Scrolling, Backlight Always On, Restore Default
Settings and Help.
z Open: You can open the text files of TXT or LRC formats
stored in the memory card.
z Recent Files: 5 text file records recently read are stored.
Each record has the following available operations :
Jump to: That is to jump to the corresponding file of the
selected record for reading.
Delete: Delete the record and close its corresponding file.
Delete All: Delete all the records and close their
corresponding files.
z Bookmark: 5 bookmarks can be set. The existing bookmark
has the following available operations: Jump to: That is to
open the corresponding file of the selected bookmark and
jump to the location of the bookmark for reading.
Refresh: Refresh the original bookmarks.
Refresh and Rename: Refresh the original bookmarks and
edit the bookmark name by yourself.
Rename: Rename the bookmark.
Delete: Delete the selected bookmark.
Delete All: Delete all the bookmarks.
z Jump to: You can Jump to the Previous Location, First Page
or Last Page for reading.
z Encode Type: You can choose the encode type of the
currently open file.
96
Page 97

z Display: The user can set w hether to v iew in full screen mode
and modify the foreground and background color.
z Auto Scrolling: The feature of auto scrolling line by line or
page by page can be activated.
z Backlight Always: You can activate the mode of Backlight
Always On to read conveniently.
z Restore Default Settings: Restore all the parameters of the
E-book to the default settings.
z Help: The specifications of shortcuts in read interface are
offered.
4.6.9 Melody Compose
You can compose melodies as you like with this feature and can
send them from "Audio" to Profile as your ring tones.
You'll see the staff in the melody composition interface. You can
compose the melody according to the following spec ifications.
0: Insert a pause.
1: Insert a note "Do".
2: Insert a note “Re”.
3: Insert a note “Mi”.
4: Insert a note “Fa”.
5: Insert a note “So”.
6: Insert a note “La”.
7: Insert a note “Si”.
8: Activate Vibration and deactivate it with Down key.
9: Activate LCD and deactivate it with Down key.
[# Key]: If the current symbol is a note, then hav e the current note
switch between halftone rise, normal and halftone fall.
97
Page 98

[* Key]: If the current symbol is a note or a pause, then modify the
beat of the current note.
[Up key]: If the current symbol is a note, then have the current
note rise for one tone, i.e. 8 degrees.
[Down key]: If the current symbol is a note, then have the current
note fall for one tone, i.e. 8 degrees.
[Left Key]: Remove for one note towards the left.
[Right key]: Remove for one note towards the right.
Press Options in the melody composition interf ace for the
following:
z Play: Play the composed melody.
z Play Speed: Set the play speed of the composed melody.
Fast, Normal and Slow.
z Select Musical Instruments: There are 10 kinds of musical
instruments available: Piano, guitar, violin, sax, steel drum,
flute, harmonicon, trumpet, music box and marimba.
z Storage: Store the melody file after editing its name.
4.7 File Manager
Press Up and Down keys in the main menu to scroll the File
Manager. Pressing the Left soft key to access this feature can help the
user to check the status of the memory card and the image, video,
music and audio files, etc., as well as to check or delete the files
in the DRM rights list.
Access the File Manager to see two memorizers in the interface:
DRM Rights List and Memory Card. Both the total and the
98
Page 99

remaining capacity of the currently selected memorizer are
shown on the top of the interface.
4.7.1 DRM Rights
You can access the view interface of the DRM rights list where
DRM rights files are stored. If you have received relevant DRM
resource files, then the corresponding DRM rights support is
necessary before such files can be used. Such files can be deleted by
the user.
Note: If the DRM right file is deleted, then the corresponding
files will be unable to use.
4.7.2 Memory Card
Select Memory Card and press Options for the following available
operations:
z Open: Contents and files under the root directory are listed.
z Create Folder: New subfolders can be created with the
function of renaming available.
z Detail: Relevant information of the memorizer is listed,
including complete path, type, number of inclusive folders,
number of inclusive files, total size of inclusive files and the
available and used space of DRM rights list and the memory
card.
z Format: Format the current memorize r with all the data inside
deleted.
z Remove: Remove the memory card.
Select one of the folders in the Memory Card and press Options
for the following available operations:
99
Page 100

z Open: Open the fol der to see the files inside and the directory
of the next level.
z Create Folder: New subfolders can be created with the
function of renaming available.
z Delete Folder: Delete the current fold er.
z Rename: Rename the current folder.
z Sort: The files can be arranged according to the names, types,
times or sizes. You can also choose None so as not to sort.
z Detail: Relevant information of the current folder is listed,
including its complete path, type, number of inclusive folders,
number of inclusive files, total size of inclusive files and date
of creation.
Select one of the files in the Memory Card and press Options for
the following available operations:
z Play: If the file is a multimedia music or video file supported
by the phone, this item will be displayed.
z Load To Audio Player: This item will be displayed in case of
files with .lml suffix.
z Load To Video Player: This item will be displayed in case of
files with .lvl suffix.
z View: If the file is a image or text file supported by the phone,
this item will be displayed.
z You can use the Camera Artist to edit the JPG image files.
z Forward: Files of different formats have different contents of
forward options. As for image files, there are options like To
MMS, To E-mail and To Bluetooth. As for video files, there
are options like To E-mail and To Bluetooth. You can
100
 Loading...