

Page 1

PN: 5839001447
Page 2

Spice Mobiles Ltd. © 2008. All rights are reserved. No part of this document
may be reproduced without permission. All trademarks and brand names
mentioned in this publication are property of their respective owners.
While all efforts have been made to ensure the accuracy of all contents in
this manual, we assume no liability for errors or omissions or statements of
any kind in this manual, whether such errors or omissions or statements
resulting from negligence, accidents, or any other cause. The contents of
this manual are subject to change without notice.
Protect our environment! We strive to produce products in compliance with
global environmental standards. Please consult your local authorities for
proper disposal.
Note: User’s Manual is Just to guide the user about the functionality of the
phone. This dose not seems any certificate of technology. Some functions
may very due to modifications and up gradations of software or due to print
mistake.
Page 3
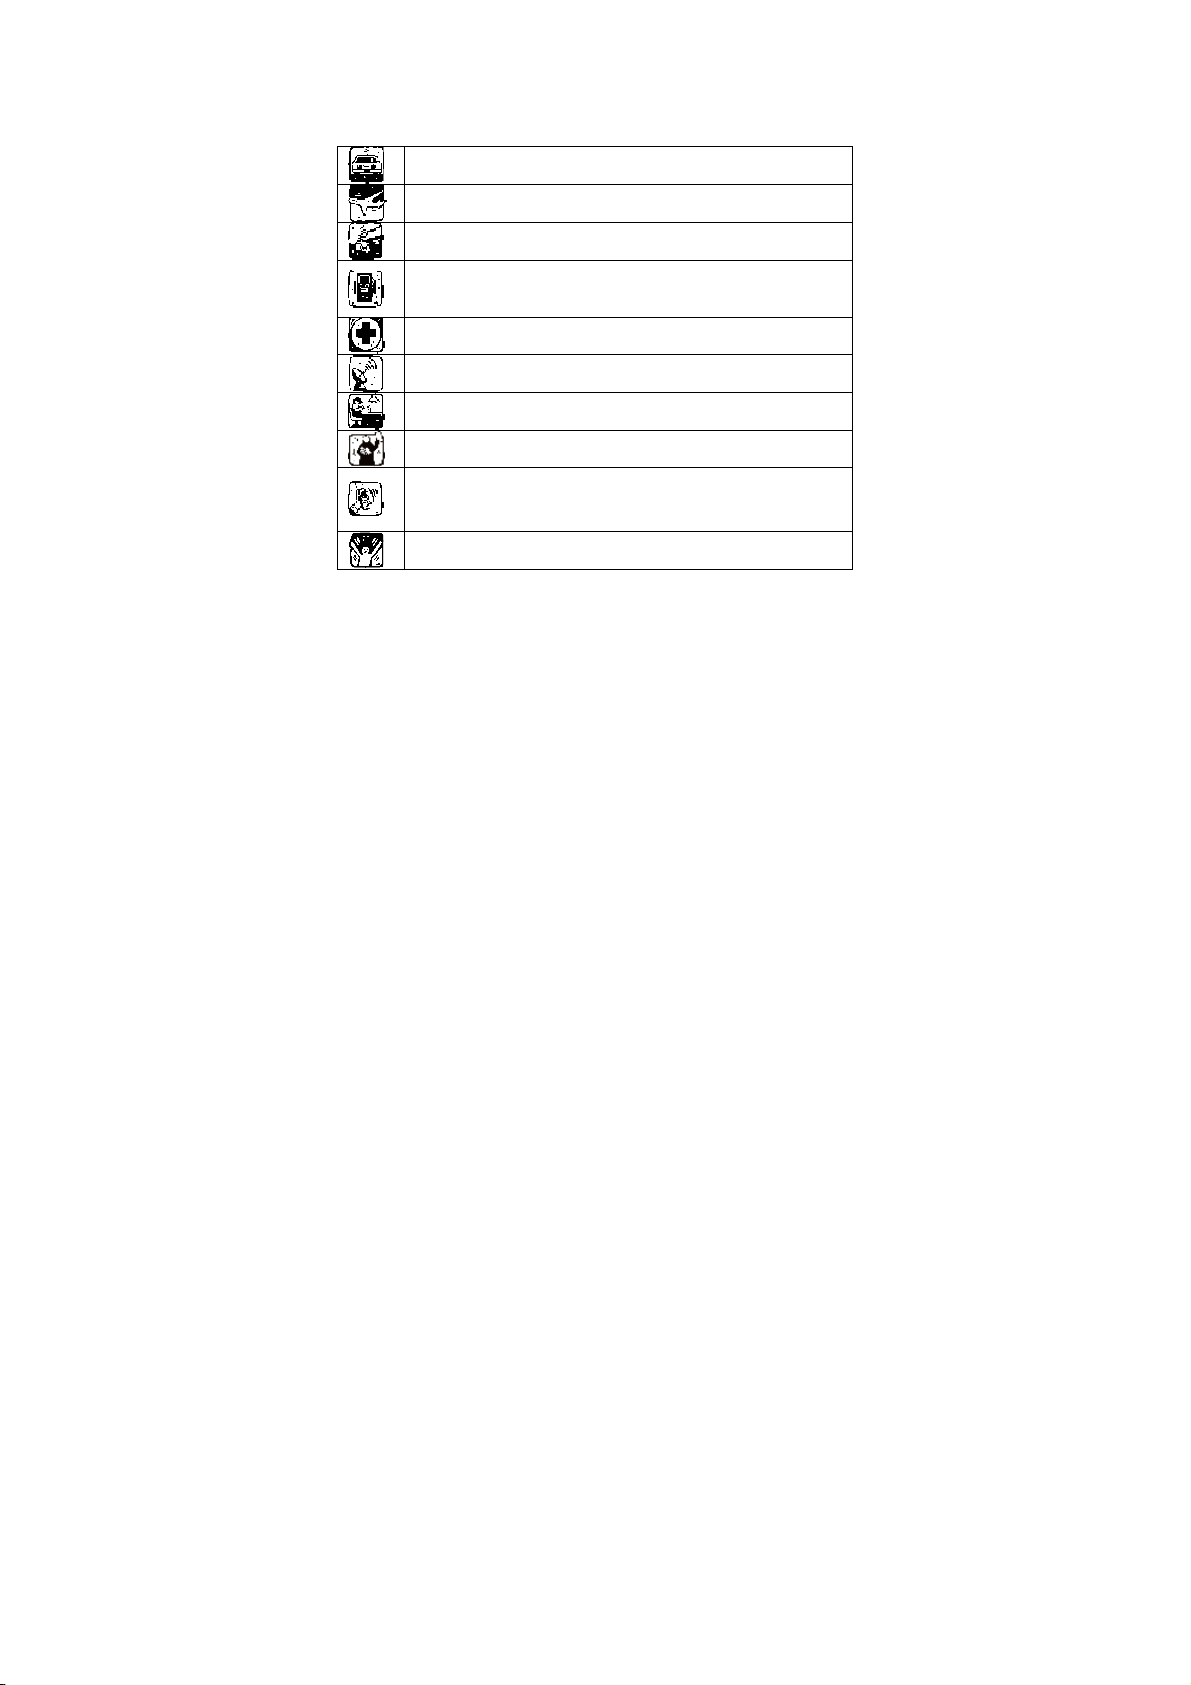
SAFETY PRECAUTIONS
Before using your phone, please read the following important information
to eliminate or reduce any possibility of causing damage and personal
injury.
Improper use will invalidate the warranty! These safety instructions also
apply to original accessories.
Do not use wireless phones while driving.
Switch off wireless devices in aircraft. The signal may cause
interference. Using them on aircraft is illegal.
Do not use mobile phones where blasting is in progress.
Follow any regulations and rules strictly.
Do not use mobile phones at Petrol stations. Don’t use near
fuel or chemicals. Do not dispose your battery or mobile in a
fire.
Follow any regulations or rules in hospital and health care
facilities. Switch phone off near medical equipment.
All wireless devices may get interference that could affect
performance.
The repair or installation of the device should be done at
Authorized service centers
Use only approved accessories and batteries.
Use only in normal position. Do not expose your phone to
extreme high temperatures above +60
use anything static to clean your phone.
Do not throw your battery or mobile device in the trash. Your
device is not water-resistant. Keep it dry.
°
C(+140°F). Do not
Page 4

Table Of Content
GENERAL INFORMATION........................................................ 1
Antenna................................................................................................. 1
Network Service.....................................................................................1
Accessories ........................................................................................... 1
Privacy...................................................................................................1
KNOW YOUR MOBILE PHONE................................................ 2
Positions of Phone Keys ........................................................................ 2
Functions of Keys .................................................................................. 2
Display Screen.......................................................................................4
Status Icons ...........................................................................................4
IMPORTANT INFORMATION .................................................... 5
Use of Passwords.................................................................................. 5
Battery Information................................................................................. 6
Usage & Maintenance............................................................................ 8
Emergency Calls....................................................................................9
GETTING STARTED ............................................................... 10
First Call .............................................................................................. 10
Mounting the SIM Card ........................................................................ 10
Mounting the T-Flash Card................................................................... 11
Charging the Battery............................................................................ 12
Switching Your Phone On/Off............................................................... 12
CALLING ................................................................................. 13
Making Calls........................................................................................ 13
Answering Calls................................................................................... 14
Options In Call ..................................................................................... 14
GUIDE TO MENU OPERATIONS............................................ 16
Page 5

Messages ............................................................................................ 16
Phone Book......................................................................................... 20
Call History .......................................................................................... 23
Settings ............................................................................................... 24
Multimedia ........................................................................................... 31
Fun & Games ...................................................................................... 38
Organizer............................................................................................. 38
Services............................................................................................... 39
User Profiles........................................................................................ 40
APPENDIX............................................................................... 43
Appendix A: Guidance On Entry Methods............................................. 43
Appendix B: Troubleshooting................................................................ 44
Appendix C: FCC Statement................................................................ 45
Page 6

GENERAL INFORMATION
Antenna
Use of other antenna devices could damage your mobile phone and
reduce performance. Your phone has a built-in antenna. Don’t touch the
antenna area unnecessarily when the phone is switched on. Contact with
the antenna affects call quality and may cause the phone to operate at a
higher power level than otherwise needed.
Network Service
A lot of features described in this manual are called network service. They
are special services provided by wireless service providers. You should
subscribe to these services from your home service provider and learn
instructions on uses before you select the network you want to use.
Accessories
Li-Ion battery is the manufacturer-approved rechargeable battery available
for your phone. May be some batteries performs best after several full
charge/discharge cycles.
Use only batteries, chargers and accessories approved by the phone
manufacturer for use with this particular model. The use of any other types
will invalidate any approval or warranty applying to the phone, and may be
dangerous.
Please consult with your dealer for availability of approved accessories.
Privacy
The shoot or recording of photos, images or sounds privately may be
prohibited by law and/or subject to criminal prosecution. We recommend
you to be responsible and respectful of privacy laws when you are taking
photos, shooting videos, or doing records.
1
Page 7
KNOW YOUR MOBILE PHONE
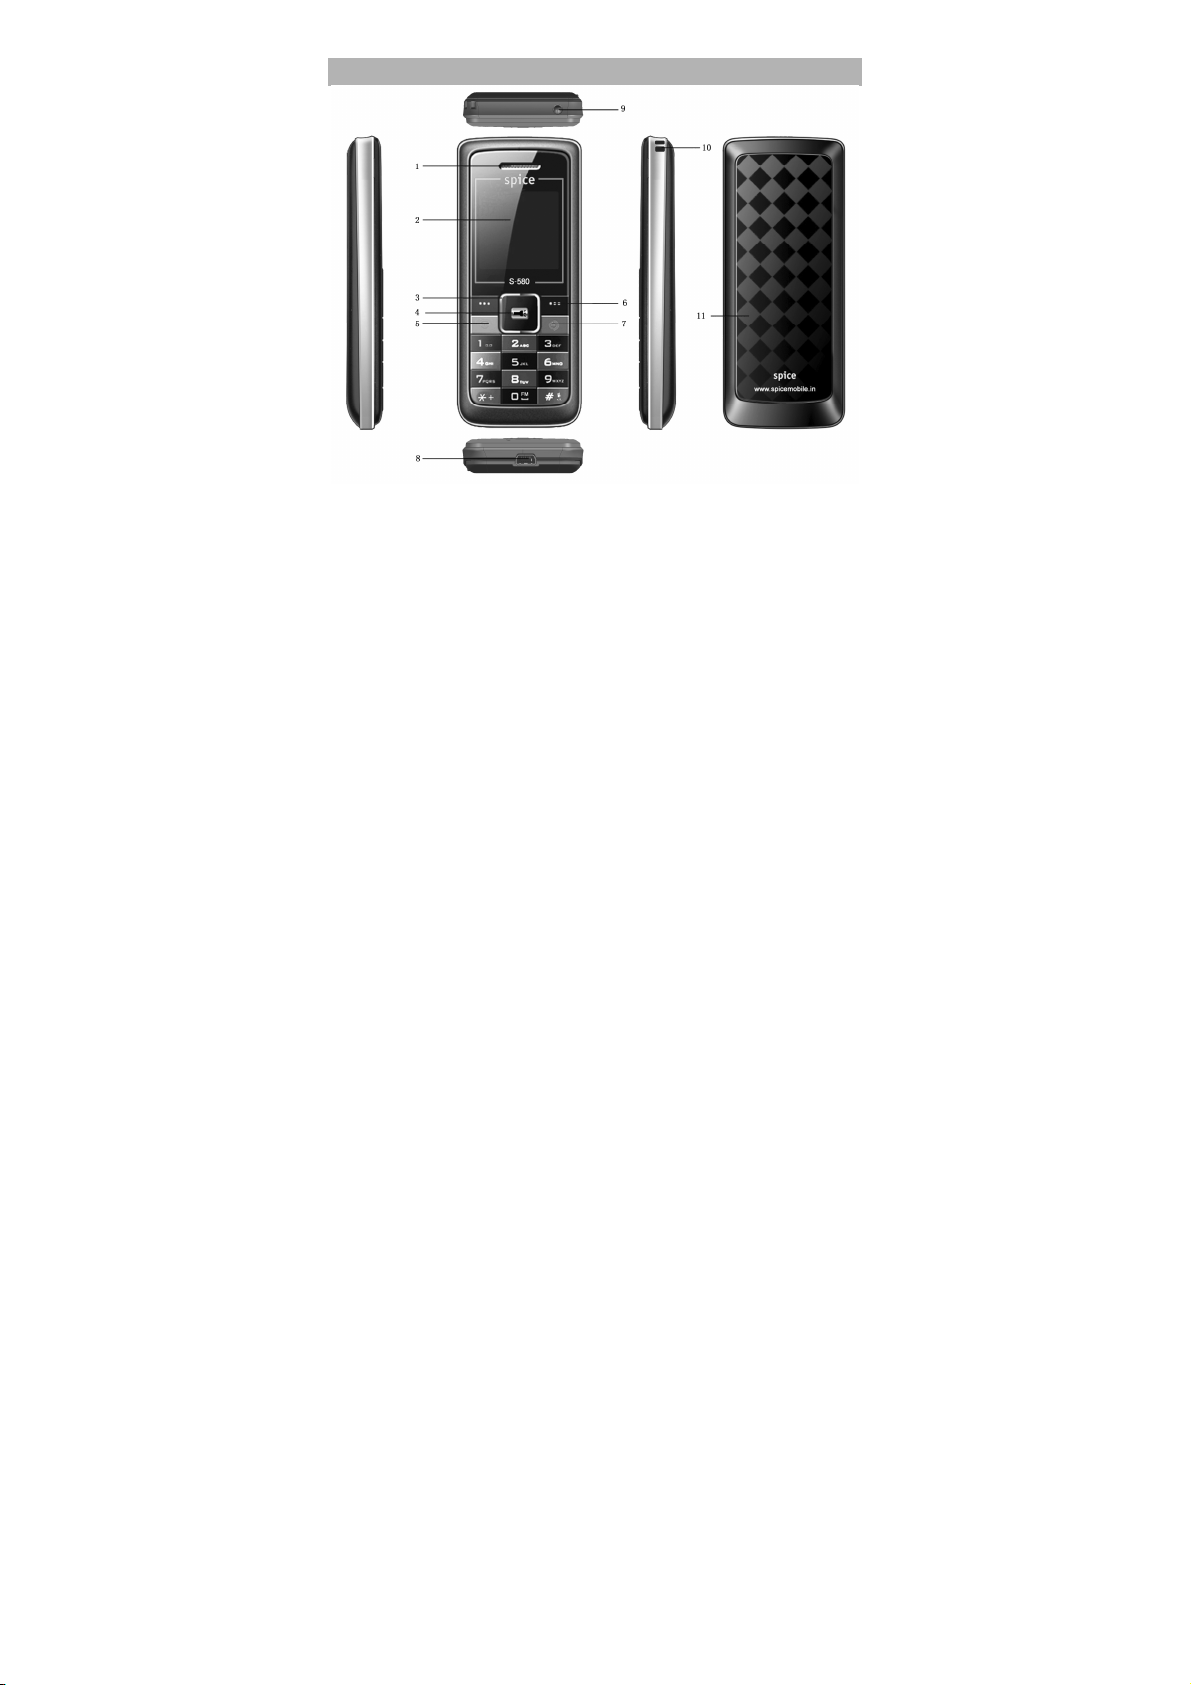
Positions of Phone Keys
1. Earpiece 7. Hang up key / Power key
2. Screen 8. Charger and accessories connector
3. Selection key 9. Flash Light
4. OK key 10. Cord hole
5. Pick up key 11. Battery Cover
6. Soft keys
Functions of Keys
2
Page 8
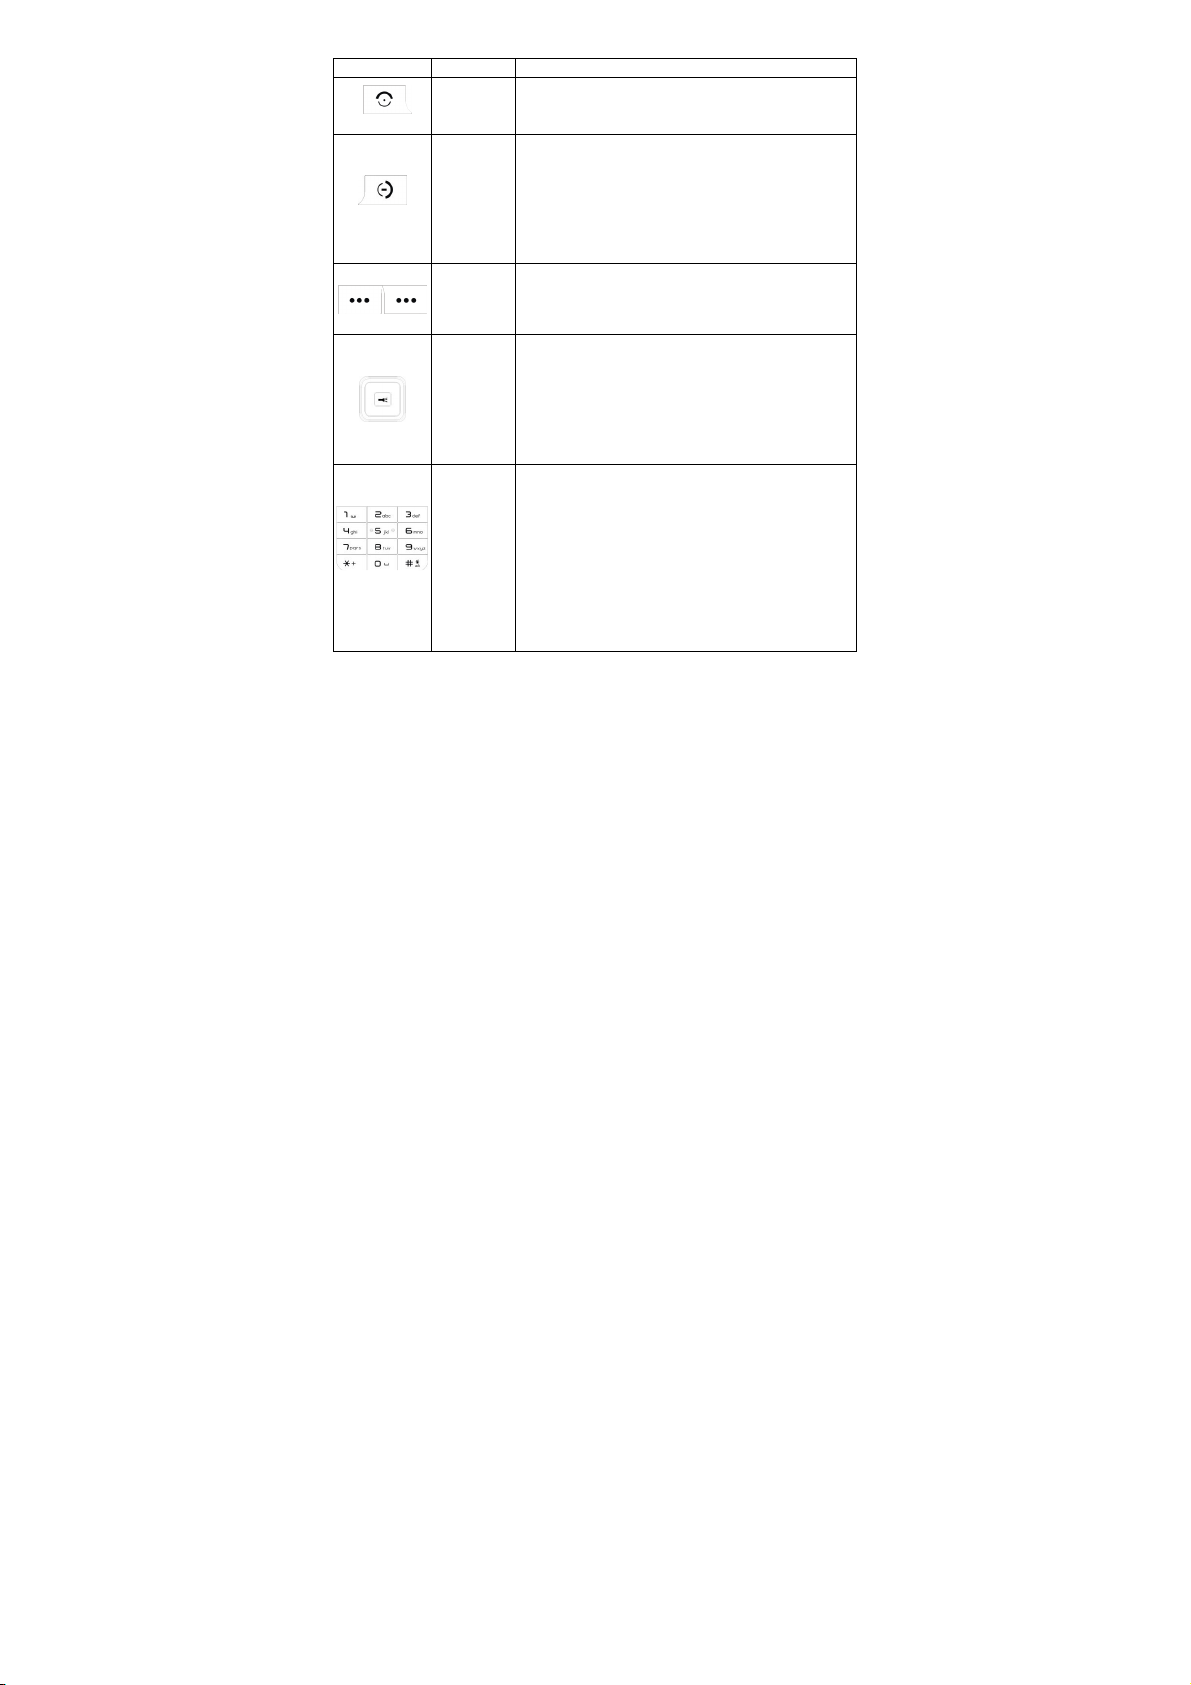
Key Name Description
In the standby mode, press this key to access
Press and hold this key to turn on or off the
In the menu mode, press this key to return the
Press this key to stop the alarm ringing once
Use the left and right soft keys to execute to
of the prompt
Scrolling options in the function list or the
used for moving the
o activate a
specified function; press OK key a few
Used to enter numbers, letters and some
In the standby mode, press and hold # key to
“0” key to activate
switch
to display the
, # key to
Pick Up
Hang Up
Key /
Power
Making or answering a call.
Key
the Call Logs.
End an ongoing call.
mobile phone.
standby mode and cancel current operations.
key
the alarm rings.
Soft Keys
functions indicated at the left/right
bar on the screen.
Selection
Keys / OK
phone book.
In the edit mode, it is
cursor.
Key
In the standby mode, press it t
seconds, activate Flash Light On/Off.
Numeric
Keys
special characters.
activate Silent mode and the
FM.
In the edit mode, you can press # key to
the input method. press the * Key
symbols.
In the Audio Player mode, press *
adjust volume.
3
Page 9

Display Screen
Your mobile phone has a single screen display, which consists of three
main areas:
The First line displays status icons, which indicate the signal strength, the
remaining power of the battery, etc.
The Middle lines display text and graphics, including numbers, text,
animated icons and the information you enter.
The Last line displays the currently available operations assigned to the left
or right soft key.
Status Icons
Network Signal
Connecting GPRS and using GPRS
Connecting GPRS but no data alternating
Divert all Voice Calls
Auto Keypad Lock
Alarm Clock is activated
Battery Status
Missed Calls
New Message or Message Memory Full
MMS is busy
New MMS
Mute Startup during call
Roaming Startup
Stopwatch Startup
WAP Message
Sound Status
Ringing
Vibrating
Vibrating then Ringing
Vibrating and Ringing
4
Page 10

IMPORTANT INFORMATION
Use of Passwords
Your mobile phone and SIM card have various passwords. Those
passwords avoid unauthorized use of your phone and SIM card. You can
change PIN, PIN2 and phone password in the “Settings > Security
Setup>Change Password”
Phone Code
The Phone code can be used to avoid unauthorized use of your phone.
The factory setting for the phone code is 1122. If phone lock is enabled,
you will be asked to input the phone password when you switch on your
phone.
PIN (4 to 8 digits)
The PIN (Personal Identification Number) code protects your SIM card
from unauthorized use. The PIN code is usually supplied with the SIM
card. When the PIN code request is enabled, the password is asked every
time the phone is turned on.
Three times wrong PIN input, the SIM card will be locked and you will need
to use the PUK to unlock it. PUK is usually set by the network operator.
1. Enter the correct PUK to unlock the SIM card, and then enter the
new PIN and press OK.
2. If you are prompted to enter the new PIN again, enter it and press
OK.
3. If the PUK is correct, the SIM card will be unlocked and the PIN will
be reset.
PUK (8 digits)
The PUK (Personal Unblocking Key) code is required to change a blocked
PIN code. Please contact your network operator for the code.
Note: Ten times wrong input in succession, the SIM card will be invalid and
you need to consult with your network operator for a new SIM card.
5
Page 11

PIN2 (4 to 8 digits)
The PIN2 code, supplied with some SIM card, is used for some functions,
such as Call Cost, Fixed Dial and so on. Please consult your network
operator to confirm whether your SIM card supports those services or not.
Three times wrong PIN2 code input, the SIM card will be locked and you
will need to use the PUK2 to unlock it.
1. Enter the correct PUK2 to unlock PIN2, and then enter the new PIN2
and press OK.
2. If you are prompted to enter the new PIN2 again, enter it and press
OK.
PUK2 (8 digits)
The PUK2 code, supplied with some SIM card, is required to change a
blocked PIN2 code. It may be supplied with the SIM card. If not, contact
your network operator.
Note: Ten times wrong input in succession, the SIM card will be invalid and
you need to consult with your network operator for a new SIM card.
Barring Code
To activate call barring, you need a Barring Code. You obtain the password
from your service provider.
Battery Information
Charing and Discharging
The charger is designed to be used in temperatures between 0°C to
40°C.
Do not charge the phone in wet and damp conditions.
Use only batteries approved by the phone manufacturer and
recharge your battery only with the charges approved by the
manufacturer.
We strive to produce products in compliance with global
environmental standards
The charger meets the standard for safety of information technology
equipment and office equipment use. It must be used for this purpose
only.
6
Page 12

Your phone is powered by a rechargeable battery. Full performance
of the battery is achieved only after two or three complete charge and
discharge cycles.
When the battery level is low, “Low Battery” will be displayed on the
LCD screen. If you have selected Alert Tone (Warning Tone of any
profile in Profiles), the phone will sound the alert tone.
When a charger is not in use, disconnect it from the power source.
Do not leave the battery connected to a charger for longer than 12
hours, since overcharging may shorten its life.
Temperature extremes will affect the ability of your battery to charge.
Tips for Battery
Placing the battery in hot or cold places, such as in a closed car in
summer or winter, will reduce the capacity and lifetime of the battery.
Do not let the metal contacts on the battery touch other metal
contacts. It could short-circuit and damage the battery. Use the
battery only for its intended purpose.
Do not disassemble or modify the battery by yourself.
Do not clean the battery with water or any organic solvent.
Always keep the battery dry.
The battery can be charged and discharged many times but it will
wear out as last. When the talk and standby time is obviously shorter
than normal, please change the original battery approved by
manufacturer.
Do not short-circuit the battery.
Turn off mobile phone before removing the battery.
Do not dispose of batteries in fire.
If you smell anything strange from the battery or find that the battery
is overheated, you should stop using it immediately and contact the
authorized After Service Center in your region.
If you don’t use the battery for a long time, please fully charge the
battery before you store it.
7
Page 13

Batteries should never be placed in municipal waste. Batteries
must be recycled or disposed of properly. Please follow local
regulations for disposal of batteries.
Usage & Maintenance
To keep your product working well, take a moment to review the following
usage & maintenance tips, which will help you to fulfill any warranty
obligations and to enjoy this product for many years.
Keep your phone and all its parts and accessories out of children’s
reach.
Your products are not water-resistant. Keep it dry. Precipitation,
humidity and liquids contain minerals that will corrode the connectors.
Always treat your products with care and keep it in a clean and
dust-free place.
Do not expose your product to extreme high or low temperatures.
Your phone operates best in temperature between 15 °C and 25°C.
Minimum and maximum temperatures recommended by the
manufacturer are -10°C and 55°C.
Do not expose your product to open flames or lit tobacco products.
Do not attempt to disassemble or modify your product. Only
authorized personnel should perform service.
Do not drop, throw or try to bend your product.
Do not paint your product.
Do not use harsh chemicals, cleaning solvents, or strong detergents
to clean it.
Keep anything magnetic, such as credit cards, far away from your
product.
If you find that the battery has any crack, deformation or anything
else, you should stop using the battery immediately.
If the electrolyte leak out and contact your skin or clothes, you should
immediately use soap and clean water to clean it. In case the
electrolyte spatters into your eyes, you must use the clean water to
wash your eyes thoroughly and go to the hospital immediately.
8
Page 14

If your phone or any accessory doesn’t function normally, please
send them to the nearest authorized service facility. The qualified
personnel there will assist you, and if necessary, arrange for service.
Emergency Calls
This phone, like any wireless phones, operates using radio signals,
wireless and landline networks which cannot guarantee connection in all
conditions. Therefore, you should never rely solely upon any wireless
phone for essential communications (e.g. medical emergencies)
To make an emergency call:
1> Switch your phone on.
Some networks may require that a valid SIM card is properly inserted
in the phone
2> Dial the official emergency number. Emergency numbers vary by
location.
While making an emergency call, please remember to give all information
as particularly as possible. Never hand off the call please until you are
given permission to do so.
9
Page 15

GETTING STARTED
First Call
Insert a SIM card (Switch off your phone at first, and then remove the
battery). Enter the area code and the phone number and press Pick
Up Key.
Tip: Before you get started, you must insert a valid SIM card in your
phone and charge the battery first.
SIM Card: Please refer to “Mounting The SIM Card” for more
reference on installation.
Charging the battery: please refer to “Battery and Charging” for more
details.
Mounting the SIM Card
Your mobile phone number, PIN (Personal Identification Number), PIN2,
PUK (Personal Unlock Key), PUK2 (Personal Unlock Key2), IMSI
(International Mobile Subscriber Identity), the network information, the
phonebook data, SMS (short messages) and other data are stored in your
SIM card.
Note: This particular phone model only supports the SIM cards of 1.8V and
3V.
Some network operators don’t offer PIN2 and PUK2, so functions
using those passwords will be unavailable.
The SIM card and its contacts can be damaged by scratches or
bending easily, so be careful while handling, inserting or removing
the card.
Keep all miniature SIM cards out of children’s reach.
Note: Always make sure the phone is switched off before you insert or
remove the SIM card, otherwise it may damage the SIM card.
Mounting
1. Remove the battery cover by sliding it, as the following picture
shows:
10
Page 16

2. Insert the SIM card, with the notch at the bottom left and the gold
contacts face down, into the card slot.
Note:
If the SIM Card is installed improperly or damaged, the prompt words
“Insert SIM” will display on the screen after you switch on your phone.
Remove the SIM Card and check the way that performs as pictures
show, and then mount it again.
If “Insert SIM” still appears on the screen after you have inserted the
SIM correctly, there may be something wrong with your SIM card.
Please ask the network operator to repair it.
If the screen displays that the SIM card is locked permanently, please
consult with your network operator.
Mounting the T-Flash Card
Insert the T-Flash card, with the notch at the lower left and the gold
contacts face down, into the card slot.
11
Page 17

Charging the Battery
Note: Please always keep your phone connector and charger dry.
1. Connect the connector of the travel adapter to the phone.
2. Plug the travel adapter into a proper AC wall outlet.
3. When your phone indicates that the battery is fully charged, please
pull the ravel adapter out from the I/O socket of the phone.
Tip: 1. If the battery is totally empty or not enough, it may take a few
Warning: Make sure that the standard voltage/power of the place where
you charge the battery matches with the rated voltage/power of our travel
adapter.
minutes before the charging indicator appears on the screen.
2. You can turn on/off, and use the phone while charging.
Switching Your Phone On/Off
Press and hold Power Key for a few seconds to switch your phone
on.
If the phone ask for a phone lock code:
Enter the phone lock code, and press OK.
If the phone ask for a PIN code:
Enter the PIN code, and press OK. The PIN code is usually supplied
with the SIM card. Please consult your network operator for more
information.
Access the standby mode.
Press and hold Power Key for a few seconds to switch your phone
off.
12
Page 18

CALLING
Making Calls
1. Enter the phone number (with the area code)
2. Press the Pick Up Key to make a call.
3. Press the Hang Up Key to end a call.
Making International Calls
1. Press the * Key twice for the international prefix symbol +.
2. Enter the country code, area code and phone number.
3. Press the Pick Up Key to make a call.
Making Extension Calls
1. Enter the host number, and press the * Key three or four times for the
extension prefix symbol P or W.
2. Enter the extension number, and press the Pick Up Key to make a
call.
Clear Wrong Enters
Press the right soft key to delete the last character on the screen. Hold the
right soft key will clear all you entered.
Making a call from the Phone Book
1. Press the right soft key to access the Phone Book.
2. Scroll the Up/Down key to select the number you want, and press the
Pick Up Key to call the number.
Last Number Redial
1. In the standby mode, press the Pick Up Key to access the Call Logs.
2. Press the Up/Down key to reach the desired number or name and
press the Pick Up Key.
Speed Dialing
You can save 8 Speed Dial Numbers you often dial to positions titled with
number keys from “2” to “9” respectively. Select “Settings > Phone setup
> Speed dial > Set Number”, and then set “Enable speed dial” on. In the
standby mode, press and hold the number key to dial the corresponding
number.
13
Page 19

Adjusting the Sound Volume
During a call, you can press the Up/Down Selection Key to adjust the
earpiece volume.
Answering Calls
1. To answer an incoming call, press the Pick Up Key.
2. To end or reject an incoming/ongoing call, press the Hang Up Key.
Tip: If the caller can be identified, the screen will display the caller’s name.
If the caller can’t be identified, the screen will only display the caller’s
number.
Options In Call
Your phone provides a number of functions that you can use during a call.
Call Waiting
If the network supports the service and you have activated the Call Waiting,
you will hear a beep when you have a second incoming call.
Press the Pick Up Key or the left soft key, the first call is put on hold.
(Refer to “Hold/Switch” for more details)
Press the left soft key to select End to end the current call and switch
to the incoming call.
Hold/Switch
When you have a call on hold and another one in progress:
You can press the left soft key to switch between the two calls.
Press the left soft key to select End Call to end the current call or hold
the call. Press the Hang Up Key to end the current call.
Press the left soft key to select End All to end both calls at the same
time.
Call Hold
If the network supports Call Holding, you can make another call while you
have a call in progress:
Method 1:
1. Enter the phone number directly or press the left soft key to access
the Phone Book to reach the desired number, or press the left soft
14
Page 20

key to select New Call and enter the number, and then press the Pick
Up Key to make the second call.
2. The first call is put on hold automatically.
Method 2:
1. Press the left soft key to select Mute to hold on the current call, and
then make another call.
2. One call is in progress and another one is put on hold. You can
switch between the two calls. (Refer to “Hold/Switch” for more
details)
Other Options In-call
During a call, you can access Phone Book, SMS, Sound Recorder and
other functions.
15
Page 21

GUIDE TO MENU OPERATIONS
All function options about the mobile phone are listed as below with brief
descriptions.
Messages
SMS
Write Message
Please consult your home network operator for the SMS service.
1. Please press # Key to switch input methods while editing a message.
You can enter letters and numbers, and insert pictures, rings and so
on. (Support EMS service)
2. Edit your message, and press * Key to insert special symbols.
Inbox
The icon
won't receive new messages once the message box is full. Please delete
unnecessary messages.
1. If the message is an unread text message, press the left soft key to
− Select Options, and then you can do the following
operations: Done, Use Templates, Insert Object, Format
Text, Insert Number, Insert Contact, Insert Bookmark,
Input Method.
means unread messages or the message box is full. You
read. Select Options, and then you can do the following operations:
Reply: to reply the message.
Delete: to delete the message.
Forward: to forward the message to the purpose.
Copy to phone/SIM: to copy the message to the phone/SIM
card.
Move to phone/SIM: to move the message to the phone/SIM
card.
Chat: to chat with the sender.
16
Page 22

Delete All: to delete all messages in the inbox.
Copy all: to copy all messages both from the SIM card and the
phone’s memory.
Move all: to move all messages both from the SIM card and
the phone’s memory.
Use Number: to obtain the phone numbers from the message,
and save it to the SIM Card or the phone, and send SMS to
sender or make a call with the sender.
Use URL: to obtain the URL from the message.
Outbox
In the Outbox, please select Options, and then you can send, edit or
select other operations. Please refer to Inbox for more information.
Templates
You mobile phone saves many messages in common use. You can edit or
erase them.
SMS Settings
Profile Setting: You can set Profile Name, SC Address, Valid Period
and Message Type as desired. Please consult your network operator
for the number.
Common Setting: You can set Delivery Report and Reply Path.
Delivery Report function enables you to receive the status report on
whether short messages are sent out successfully or not. Please
consult your network operator to obtain the function.
Memory Status: Check the rate of the SIM card and the phone's
capacity compared to the total capacity. The exact capacity depends
on the message content, the phone and the SIM card.
Preferred Storage: You can select the SIM card or Phone to save.
Pref.Network: You can select GPRS, GSM or GSM Only.
Schedule SMS
Press the left soft key to access the Add or Options > Add, and then you
can set the date, time, message and Phone number. Press Done and Save
17
Page 23

the message will sent out the message to the number as your desire.
Note: The time format of this function is 24 hours.
MMS
Write Message
Please consult your network operator to obtain the MMS service.
While writing messages, you can select To, Cc, Bcc, Subject or Edit
content.
To: the phone number or E-mail address are both OK.
Cc: send the MMS to others at the same time. Phone numbers or
E-mail addresses are both OK
Bcc: send the MMS to others secretly at the same time. Phone
numbers or E-mail addresses are both OK.
Subject: edit the Subject of the MMS.
Edit content: enter the text or add image, audio, attachment etc.
Inbox
The phone saves the received MMS into the inbox.
All received Messages display in the inbox, and the icon
MMS is unread. Use the Up / Down key to scroll the cursor to check the list,
and the sender's name and number will display. If the MMS has been read,
the icon will change to the read icon. Please press the left soft key to
access Options, and follow steps described as below:
View: to read this MMS.
Reply: to reply the sender.
Reply by SMS: to reply the sender by SMS.
Reply all: to reply all senders.
Forward: to forward this MMS to others.
Delete: to delete this MMS.
Delete All: to delete all MMS in the inbox.
Save as Template: You saves messages both for MMS in
common use.
Properties: to check details for this MMS.
18
means the
Page 24

Use Details: to obtain the phone numbers from the message,
and save it to the SIM Card or the phone, and send SMS to
sender or make a call with the sender.
Outbox
In the Outbox, please select Options, and then you can view, reply or
select other operations. Please refer to Inbox for more information.
Drafts
In the Drafts, please select Options, and then you can send, edit or select
other operations. Please refer to Inbox for more information.
Templates
You mobile phone saves many MMS in common use. What you can do for
those MMS are View, Properties, and Write Message.
MMS Settings
follow steps described as below:
Compose: You can configure Creation Mode, Image Resizing, and
Auto Signature.
Send: You can configure Validity period, Delivery Report, Read
Report, Priority, Slide Timing, and Delivery Time.
Retrieve: You can configure Home Network, Roaming, Read Report,
and Delivery Report.
Filter: You can configure Anonymous and Advertisement.
Server Profile: You can select any one of Profiles to activate or edit.
Memory Status: You can check the Usage, Used Space and Free
Space.
Chat
Use this function to chat with the specified people after you input the
specified number.
Voice Mail Server
Scroll the Up/Down key to select Voice Mail Server in the Messages
menu, and select OK to access Voice Mail Server.
Edit: Input or modify the number and the name of voice mailbox.
19
Page 25

Connect to Voice: You can hear messages in the voice mailbox.
Note: This service is supplied by the network, such as the message
machine service. It enables the caller to leave messages when you can't or
you are unwilling to answer the coming call. Your number for the voice
mailbox is saved in this phone. In standby mode, hold the number key 1 to
dial the number of the voice mailbox after the number is configured. Please
consult your network operator for more details.
Broadcast Message
This network service enables you to receive all kinds of text messages,
such as weather reports or transportation information. Until now, there are
several networks afford the service in this world. Please consult your
network operator for more reference.
Receive Mode: Turn on or off the Cell Broadcast.
Read Message: Scroll the Up/Down Key to select the message.
Languages: Select the desired language to display the broadcast
message.
Note: Your network operator decides whether the language is
supported or not.
Channel Settings: You can choose Select, Add, Edit or Delete to
receive the Broadcast information.
Phone Book
You can save many phone numbers in your mobile phone. The capacity of
your SIM card decides how many phone numbers can be saved in. You
can access the Phone Book to search all records saved in this mobile
phone and your SIM card.
Quick Search
You can fast locate the number of the person you want to contact. Please
enter the initial letter of the person’s name, and related records about it will
display in the middle of the screen. Please use the Up/Down key to select
the number as desired, and then press Pick up key to make a call.
20
Page 26

Search Contact
You can find the desired phone number from the phone book easily and
quickly. In the standby mode, press the left soft key to access Menu >
Phone Book > Search Contact. Please follow steps described as below:
1. In the Name box, enter all letters of the name or the initial letters of
the name.
2. Press the left soft key to access Options > Search > Phone Book
List, and then all related information of the desired contact will be
listed. Please use the Up/Down key to browse all entries, and then
press Pick up key to make a call.
3. Press the left soft key to access Options, and then you can perform
following operations for each entry:
Send SMS: Send messages to the selected number.
View: Check the record for the selected number.
Edit: Edit the selected entry.
Delete: Delete the entry from the Phone Book.
Copy: All entries can be copied alternately from the SIM card
to the phone or from the phone to the SIM card. i.e. SIM to
Phone Copy or Phone to SIM Copy.
Move: All entries can be moved alternately from the SIM card
to the phone or from the phone to the SIM card.
Duplicate: Entries saved in the SIM card can be copied to the
SIM card, and entries saved in the phone can be copied to the
phone. i.e. Local Copy.
Send vCard: Send your phone number by SMS or MMS, or
save to file.
Tip: Pressing one of the number keys from 2 to 9, the first one of the
entries whose names is initialized by the letter corresponding to the
key you pressed will be highlighted at once. For example, in order to
search for the record of someone whose name is initialized with C,
please press the key 2 quickly for 3 times, and then the cursor skip to
the first entry of the contacts whose name are initialized with C.
21
Page 27

Add New Contact
You can add a new contact entry to the Phone Book, both for the SIM card
and your phone. Steps described as below:
1. From the Phone Book menu, press the left soft key to select Add
New Contact > To SIM/To Phone.
2. If the To SIM is selected, press the left key to select OK to start to
edit the contact's name and phone number.
3. If the To Phone is selected, you can add the contact’s name, phone
number, home number, company name, email, and so on.
Tip: This mobile phone offers you 5 input methods, such as Multitap ABC
(ABC), Multitap abc (abc), Numeric (123), Smart ABC (eZi ABC), Smart
abc (eZi abc), etc. Please refer to “Appendix A: Guidance of Entry
Methods” for more details.
Copy All
This function enables you copy all entries both from the SIM card and the
phone.
Note: If the capacity of this phone book is different from the SIM card's, the
copy content takes the smaller one as standard.
Move All
This function enables you move all entries from the SIM card or the phone.
Delete
You can select delete entries form the SIM card, the Phone or one by one.
Caller Groups
You can set group name, associated sound, associated picture, and
members for different caller group.
Extra Number
You can set Owner Number, Service Dialing Number and SOS Number.
Owner Number: You can enter a group of a number and a name and
can also edit or erase it.
Service dialing number: You can enter Service dialing number.
SOS Number: You can enter five groups of SOS numbers.
22
Page 28

Tracker number: You can set a number for the mobile tracker function.
Please refer to Tracker Mode function to more information.
Note: If the keypad is locked, you can dial SOS numbers that you edit.
Settings
Memory Status: display the occupied storage and the total storage.
Preferred Storage: select the SIM or Phone as the preferred storage
for the new number.
Fields: select the desired options when you add a new number.
My vCard: can edit and send my card.
Caller Picture / Ring Tone
Each of picture /ring tone can be selected to the new contact/the selected
contact/the caller group.
Call History
In the standby mode, press the left soft key to access Menu > History.
Missed Calls
With this function, you can check recent missed calls.
1. Scroll the Up/Down key to select a missed call.
2. Press the left soft key to access Missed Call Information, and then
you can Delete, Save to Phone book, Call, Edit and so on.
Dialed Calls
With this function, you can check recent dialed calls. In this function, you
can Delete, Save to Phone Book, Call, Edit and so on.
Received Calls
With this function, you can check recent received calls. In this function, you
can Delete, Save to Phone Book, Call, Edit and so on.
Delete Call Log
You can remove all records of missed, dialed or received calls with this
function.
Call Time
Last Call time: The last call time can be checked.
Total Dialed: The total time for all dialed calls can be checked.
23
Page 29

Total Received: The total time for all received calls can be checked.
Reset All: Reset the counters.
Call cost
You can check or reset Last call cost, Total cost, Reset cost, Max cost,
Price per unit.
SMS Counter
Sent: You can check and clear the number of sent messages.
Received: You can check and clear the number of received
messages.
Note: This function has nothing to do with the SIM card. The amount of
sent or received messages will not change even if you change the SIM
card.
GPRS Counter
You can check or reset the Last Sent, Last Received, Total Dialed, Total
Received and Reset Counter.
Auto Quick End
You can set it On or Off and the auto quick end time 1~9999 seconds.
Settings
In the standby mode, press the left soft key to access Menu > Settings.
Phone Setup
Time and Date:
Set Home City: Select the desired home city.
Set Time/Date: Enter the current time and date.
Set Format: Select a time and a date format.
Schedule Power On/Off: You can set the time for auto power on /off. Do
turn the status on before using that function.
Note: Please disable the Schedule Power On function before you board an
airplane.
Language: Select the desired language for the display text.
Preferred Input Methods: Select the desired input method for the default
input method.
24
Page 30

Greeting Text: Set ON, input words as your greeting text once you switch
the phone on.
Speed Dial: Set the status on, and then you can set 8 groups for the speed
dial. (Corresponding number keys are 2 to 9). In the standby mode, press
and hold the number key to dial the corresponding number.
Shortcuts: You can set shortcuts for those functions you often use.
Dazzle Ringtone: With this function, you can set 10 ring tones as desired.
If you select dazzle ringtone in User Profiles > General\ Outdoor\ Indoor\
Headset > Customize > Tone Setup > Incoming call, and then your
mobile will repeat one of the ring tones for each incoming call.
Dedicated Key: You can configure short cut functions for the Up, Down,
Left and Right key respectively. In the standby mode, press any one of
them to access the appointed function.
Auto update of date and time: It can be set to On or Off.
Flight Mode: You can set the normal mode, flight mode and Query When
Power On.
Display Setup
Wallpaper: You can select the default pictures that are available in
the phone.
Screen Saver: First, set the status to be on, and then set the waiting
time. At last, select a picture for the Screen Saver. You can download
pictures for the Screen Saver or use the pictures provided in the
phone or memory card.
Power On Display: Besides the pictures provide in the phone, you
can also download pictures for the Power On Display.
Power Off Display: Besides the pictures provide in the phone, you
can also download pictures for the Power Off display.
Main Menu Style: You can select a display style for the main menu
screen.
Show Date and Time: Time and date will display on the standby
frame when set it On.
25
Page 31

Show Owner Number: The Owner Number or the owner name will
display on the standby screen when set it ON.
Note: The phone number will be displayed only if you have edited the
name or call of the phone number, and line 1 and line 2 are
corresponding to the two sets of phone numbers respectively.
Keypad Light Setting: You can set the Start time and the End time
of the keypad light brightening up.
Call Setup
Caller ID: You can select Set By Network, Hide ID or Send ID. The
default status is Set by Network.
Note: This function is related with your network. Select Hide ID may
cause failure to dial. Please test the calling function is ok before you
enable Hide ID.
Call Waiting:
1> Activate: The mobile phone will connect to the network when
Call Wait is enabled. After a while, the network will take a
response by sending messages to ensure your operation. If
Call Wait is enabled, the network will warn you. At the same
time, another coming call number will display on the screen
when the first call is ongoing and a new call is coming.
2> Deactivate: If you cancel Call Waiting, the network won't warn
you when the first call is ongoing and a new call is coming.
3> Query Status: With this function, you can inquire about the
Call Divert: This function allows your phone divert coming calls to
current status from the network.
another phone. In Settings, select Call Setup > Call Divert:
1> Divert All Voice Calls: When this function is enabled, all
coming calls will be diverted to another phone. Set it On or Off,
the phone will connect to the network. After a while, the network
will take a response and tell you the result on operation.
26
Page 32

2> Divert If Unreachable: When this function is enabled, the
coming call will be diverted to another phone number if the
phone is unreachable.
3> Divert If No Answer: When this function is enabled, the
coming call will be diverted to another phone number if there is
no answer in some time.
4> Divert If Busy: When this function is enabled, the coming call
will be diverted to another phone number if the phone number
you dialed is busing.
5> Divert All Data Calls: You can divert all data calls with the
need of your network operator's support.
Note: Five operations described as above:
− Activate: Activate it after input the diverting number.
− Deactivate: Cancel the function.
− Query Status: Used to inquire about the current status for
some diverting function from the network. The phone will
connect to the network. After a while, the network will take
6> Cancel All Divert: Use to cancel all diverting functions.
Call Barring:
This function makes use of Call Barring to limit some selected calls. When
you configure this function, you should consult your network operator for
the password. If the password is wrong, the phone will prompt the fault
message. After the desired number is selected, please continue to select
On or Off. After a while, the network will take a response and tell you the
result.
1> Outgoing Calls:
− All Calls: When this option is enabled, you can’t make any
− International Calls: When this option is enabled, you can’t
a response and tell you the result.
calls.
make any international calls.
27
Page 33

− International Calls Except To Home PLMN: When this option
is enabled, you can only make local calls when you are abroad
2> Incoming Calls:
3> Cancel All: Cancel the call barring. It also needs the bar password
4> Change Barring PW: Use to modify the bar password. It needs to
Line Switching: Switch to Line 1 or Line 2, the default is Line 1.
Call Time Reminder:
In order to save the call cost, this function prompts you to end the call in
time. You can select Off, Once or Periodic. There is no prompt when Off is
selected. You should enter a specific time between 1 and 3000 seconds
when Single is selected. The phone will ring once when the time is up. You
should enter a specific time between 30 and 60 seconds when Periodic is
selected. The phone will ring once automatically at the specific time before
the integral minute is up.
Call Time Display:
You can set Call Time Display On or Off. The call time will display when set
it on, .The call time won't display when set it off.
Auto Redial:
or dial to the country in which the network provider is.
− All Calls: When this option is enabled, you can’t make any
calls.
− When Roaming: When this option is enabled, you can’t receive
any incoming calls if you are out of reach of the network service.
Note: Three operations described as above:
Activate: Activate it after input the barring number.
Deactivate: Cancel the barring function.
Query Status: Use to inquire about the current status for some
barring function from the network. The phone will connect to the
network. After a while, the network will take a response and tell
you the result.
provided by the network operator.
input the original password before you modify.
28
Page 34

You can set the Auto Redial function On or Off. When set it ON, the phone
will automatically redial the last called number after a while if you fail to
connect to the number. The times for auto redial are up to 10 times. You
can’t make any other calls when the Auto Redial is ongoing. Press Cancel
to end Auto Redial.
Closed User Group:
Press the left soft key to access Group List, and then select Add to input
the group's name. Press the left soft key to select Done, and then add the
number. Press the left key to finish. Select Options to Edit, Add, Activate,
Deactivate or Delete the existent group.
Note: This service needs the network support.
Black list: In the Blacklist, you can set five numbers (at most 20
digits for each number). When this Blacklist is enabled, you won’t
receive the calls from the numbers entered in the Blacklist.
Network Setup
Please contact the network operator for the following network service.
1. Network Selection
New Search or Select Network can help search the network where you are
in. You can select the selection mode: Automatic or Manual. When you
select Automatic, the phone will make the preferential selection according
to the network where the SIM card belongs. When you select Manual, you
are required to select the same network as the registered network with the
network operator by SIM card for your use.
2. Preferred Networks
Select the Preferred Networks. The default network is the network where
the SIM card belongs. Select Options to perform the following operations:
Add From List: Display all PLMN list.
New: Create a new network and set the network priority.
Change Priority: Reset the selected Network Priority.
Delete: Delete the current preferred network.
3. GPRS Connection
You can set it When Needed or Always to GPRS connection.
29
Page 35

Security Setup
SIM Lock:
It is asked to input the PIN. It can be configured if the PIN is correct. If SIM
card is set on, it needs to input the PIN every time you power on. Three
times wrong PIN input, it's asked to input PUK. PUK is used to release and
modify the locked PIN. If PUK isn't provided or missed, please consult your
network operator.
Phone Lock:
You can lock or unlock the phone. Enter the password to activate or
deactivate the phone lock. When the phone is locked, you will be required
to enter the phone password. 4-8 numbers can be used for the phone
password.
Auto Keypad Lock:
You can lock/unlock the phone keyboard and set the Key Lock Time to 5
seconds or 30 seconds.
Tracker Mode:
This function requires your network support. You can set ON or OFF. When
the function ON and the phone change a SIM card, the phone will sent a
message to the number which you set in Extra number > Tracker number.
The message will tell you that which number is using your phone now.
Fixed Dial:
If this function is enabled, only phone numbers in the Fixed Dial List can be
dialed. PIN2 is required for this function. Network support is also required.
Note: If you enter PIN2 after the phone is switched on, PIN2 is not required
before the phone is switched off. Therefore, please switch the phone off
and switch it on again after configuration, if you do not want others to
change the status of the Fixed Dial.
Barred Dial:
If this function is activated, the phone numbers in the barred dial list cannot
be dialed. PIN2 is required for the function. Network support is also
required.
Change Password:
30
Page 36

You can change PIN, PIN2, and phone lock password.
1> PIN
− The original PIN is required before change the PIN.
− Enter the new PIN. 4-8 numbers can be used for PIN.
− Enter New PIN to ensure the New PIN.
2> PIN2
− The original PIN2 is required before change PIN2.
− Enter the new PIN2. 8 figures can be used for PIN2.
− Enter the New PIN2 again to ensure the new PIN2.
3> Phone Password
− The current phone password is required before change the
phone password.
− Enter the new phone password.
− Enter the new phone password again to ensure the new phone
4> Tracker Password: please refer to Phone Lock Password for more
Restore Factory Settings
Access Settings to select Restore Factory Settings, and input password
then press OK. All settings can be restored to factory settings with this
function.
password.
details.
Multimedia
Audio Player
The Play, Stop, Back, Forward functions correspond to the Up, Down, Left
and Right Key respectively. Select List to access the Play List, and then
select Options to perform the following functions:
1. Play: You can play the specified music;
2. Details: Size, Time and so on;
3. Add To Rings: You can use MP3 music as the ring tone for incoming
calls.
4. Refresh List: to refresh list before you enjoy music.
31
Page 37

5. Settings: You can configure with the List Auto Gen, Pre.play list,
Repeat, Shuffle, Background play and Sound effects.
Note: You should set Player Settings > List Auto Gen OFF at first if you
want to add music from other folder.
Sound Recorder
The mobile phone supports two recording formats: WAV and AMR. You can
record conversations, which may be saved to the Audio folder under File
Manager. If there is a record, press the left soft key you can do: Record,
Play, Append (only for AMR), Rename, Delete, Delete All, Settings and
Forward.
Note: If a call is incoming while recording, the record will abort and the
data will be saved into the record folder automatically. AMR adopts
dynamic compression and provides a longer recording time than WAV‘s
while utilizing the same storage space.
FM Radio
You can use your phone to listen to FM radio stations once the original
Headset is plugged into the accessories connector. Select FM Radio in the
Multimedia to access the radio controls.
1. Press the Up key to change the icon
2. When the screen display the icon
Left/Right key to search and set the previous or next active FM
station.
3. When screen display the icon
to step down/up to the next frequency setting.
4. Press the Down key to turn on or off the radio.
5. Press the * Key and the # Key to adjust radio volume
6. Press Options to access the following options:
− Channel List: you can save 10 FM channels. Save a channel:
select edit to enter the channel name and frequency, press done
to save. Delete a channel: select edit, press right soft key to
clear name and frequency, then press “done”.
or alternately.
, you can press the
, you can press Left/Right key
32
Page 38

− Manual Input: you can set the channel and receive the channel
directly.
− Preset Auto Search: the phone can search the useful channel
automatically and reset the channel list.
− Settings: Includes the “Background Play Mode”, “Loud
speaker”, “Record format”, “Audio quality”, “Record storage” and
“Channel effect” setting. If you set the “Background Play Mode”
on, you can listen to the FM broadcast when you use other
function of the phone. If you set the “Loud Speaker” on, it will
become an amplifier. You can listen to the FM broadcast without
fitting the earphone over your ears.
− Record: You can record FM program while you are enjoying it.
− Append: If there is a record, you can append record after it(only
for AMR).
− File List: You can skim over all of the records. Press Options,
Schedule FM Record
This function is used to set when and how to enable the radio function and
save the radio record to your phone or card. Select one schedule to edit:
1. Select On or Off.
2. Set the date and time.
3. Set the Repeat type: Once, Everyday, Days, Weekly or monthly.
4. Set the Channel Settings.
5. Record Setting:
Melody Compose
The mobile phone enables you to compose your favorite music as the tune
of the incoming call, alarm or memo.
and then you can do: Play, Forward, view detail and so on.
− Select AMR or WAV.
− Select Audio quality.
− Select Phone or Card to save the radio record.
− Select the record file: New file or Append file.
33
Page 39

Note: The phone can save multiple tones edited by you according to the
volume of tones.
When the Tune Editing List is blank, you can edit your favorite tunes by
pressing “Add”. After you have finished editing, press Options to select a
music instrument or playing speed to play the editing tunes. You also can
save the editing tunes.
Select the edited music, and press Options to perform the following
operations:
− Play: You can play the specified self-edit tunes.
− Edit: You can edit the specified self-edit tunes.
− Add: You can add new self-edit tunes.
Note: A maximum of 150 notes can be edited with a piece of self-edit
tune.
− Rename: You can modify the name of the selected self-edit tune.
− Delete: You can delete the selected self-edit tune.
− Delete All Files: You can delete all self-edit tunes.
− Forward: You can send the self-edit tones to User Profile, MMS or
EMS.
In the window of Tone Editing, press Options to perform the following
operations:
− Play: You can preview the edited tone.
− Play Speed: You can set the playing speed of the current editing
tone.
− Select Instrument: You can select the music instrument playing the
tone.
− Save: You can save the tone.
The rules by which the tone is composed as follows:
0: Insert one pause;
1: Insert Do;
2: Insert Re;
3: Insert Mi;
4: Insert Fa;
34
Page 40

5: Insert So;
6: Insert La;
7: Insert Si;
8: Insert a vibration note;
9: Insert a backlight;
*: Modify the playing rhythm of the current tone;
#: Modify the current note with halftone;
↑: Modify the tone of current note (high, middle, low);
↓: Modify the tone of current note (high, middle, low)
File Manager
You can use the function to manage all types of files saved in the phone or
memory card. Please access Menu > Multimedia > File Manager, and
then select Options.
Note: The USB function of this mobile phone is only available when
powered off. When powered on, the USB port can be only used for
charging.
Phone
There are all of files saved in your phone. You can do Open, New Folder, or
Format.
1> Open
Use the function to access the root directory. It will list the default folders in
system, the folder created by user and user files. (There are only system
default folders at the first time of power on condition that the user never
changes the root directory).
If the specified one is ‘folder’, press Options to perform the following
operations:
− Open: You can open the specified folder.
− New Folder: You can create a new folder in the specified folder.
− Rename: You can rename the specified folder.
− Delete: You can delete the specified folder.
35
Page 41

− Sort by: You can sort all files in the specified folder of root
directory and display them in a new order; you can select to Sort
Press Options if the specified item is a file. For different kinds, you
2> New Folder: Use the function to create a new folder at a specified
3> Format: Use the function to format all data in the Removable disk.
Memory Card
There are all of files saved in your Memory Card. You can do Open, New
Folder, Format or Remove.
By Name, By Type, By Time, By Size and None.
can perform the following operations:
− View (Play): to browse or play the music/photo file.
− Forward: to send the audio file to User Profile or MMS,Or send
the picture file to the wallpaper, screen saver or Phone Book
and so on.
− Details: to list the date and size of the appointed file.
− Rename: to rename the appointed file.
− Copy: to copy any types of authorized files on your phone/card
as the phone’s memory is recognized as a removable Drive by
your PC/Laptop. Press “Back” to cancel the Copy function. If the
space is not enough to finish the operation of Copy, the phone
will prompt you.
− Move: to move the specified file to a specified place.
− Delete: to delete the specified file.
− Delete All Files: to delete all the files subject to the list that the
specified file locates.
− Sort by: to sort all files in the Removable disk and display them
in a new order; you can select to Sort By Name, By Type, By
Time, By Size and None.
place.
The system will recreate a new folder. The formatted data cannot be
recovered, so please use this function carefully.
36
Page 42

1> Open
Use the function to access the root directory of USB disk. It will list the
default folders in system, the folder created by user and user files. (There
are only system default folders at the first time of power on or on condition
that the user never changes the root directory).
If the specified one is ‘folder’, press Options to perform the following
operations:
− Open: You can open the specified folder.
− New Folder: You can create a new folder in the specified folder.
− Rename: You can rename the specified folder.
− Delete: You can delete the specified folder.
− Sort by: You can sort all files in the USB disk and display them in
a new order; you can select to Sort By Name, By Type, By Time,
By Size and None.
− Press Options if the specified item is a file. For different kinds,
you can perform the following operations:
− View (Play): to browse or play the music/photo file.
− Forward: to send the audio file to User Profile etc. or send the
picture file to the screen saver or Phone Book and so on.
− Details: to list the date and size of the appointed file.
− Rename: to rename the appointed file.
− Copy: to copy any types of authorized files on your phone as
the phone’s memory is recognized as a USB Drive by your
PC/Laptop. Press “Back” to cancel the Copy function. If the
space is not enough to finish the operation of Copy, the phone
will prompt you.
− Move: to move the specified file to a specified place.
− Delete: to delete the specified file.
− Delete All Files: to delete all the files subject to the list that the
specified file locates.
37
Page 43

− Sort by: to sort all files in the USB disk and display them in a
new order; you can select to Sort By Name, By Type, By Time,
2> New Folder: Use the function to create a new folder at a specified
3> Format: Use the function to format all data in the USB disk. The
4> Remove: to remove the memory card.
By Size and None.
place.
system will recreate a new folder. The formatted data cannot be
recovered, so please use this function carefully.
Fun & Games
There are several interesting games in the phone. Please refer to Help
from the game menu for more details.
Tip: The game menu includes Start Game, Best Grades and Game Help
and so on.
Game Setting
This function includes the setting of BGM, Sound effect and Game
vibration. You can select to turn it On or Off.
Organizer
Calendar
You can Add task, View task, Jump to a specified date and Go to weekly
view.
To Do List
You can View, Add, Edit Task, Delete Task, Delete All and Send vCalendar
as desired. Start up the Memo and press OK. Press Options to access to
the next step to add a new memo.
1. Set the date of activating the To Do List.
2. Set the time of activating the To Do List.
3. Input the note text of the To Do List.
4. Start up the alarm and set the way of ringing.
5. Input the location address and set the Priority.
6. When you have finished, press “Done”.
38
Page 44

Alarm
The mobile phone provides several alarms and you can set them as your
need. If you have configured an alarm, an icon indicated that you have
configured the alarm will appear. No icon will show if you don’t set an alarm.
Select “Edit” to set the alarm.
Calculator
The calculator can add, subtract, multiply and divide. To use the calculator:
1. Press the # key to enter the decimal point
2. Press the up, down, left and right key and OK key to select +, -, *, /, =
respectively.
3. Press Clear to delete the figure.
Stopwatch
The stopwatch has two modes - Split Timing and Lap Timing, and you can
view the records of both the modes.
Units Converter
You can make the units conversion for weight and length. Enter the
number into the column, and then press “OK” to get the result.
Currency Converter
You can make currency conversions. Press OK after enter the exchange
rate, and then enter the number of the currency, and press OK to get the
result.
World Clock
Scroll to browse every city’s time zones in the world map. The related date
and time will display at the bottom of the screen.
Health
This function provides the reference of body mass index.
flash light
You can set it On or Off.
Services
39
Page 45

STK Service
In addition to the functions available in the phone, your SIM card may
provide additional services, which is supported by your SIM card. Please
consult your network operator for more information.
WAP
WAP enable you tour around the Internet world easily and pleasantly.
Please follow the steps described as below:
1. HomePage: The default Internet Web Address.
2. Bookmarks: Save the Web address you often use.
− Go to: Press the left soft key to connect the Internet.
− Edit: Modify the title and address.
− Send: Send the Web address.
− Delete: Delete this bookmark.
− Delete all: Delete all bookmarks.
− Add Bookmark: Add a new bookmark.
3. Recent Pages: Records after you browse the Website.
4. Offline Pages: to view the offline pages.
5. Input Address: Press the left soft key to access Enter Address, and
then input the web address to go to the Internet.
6. Service Inbox: Messages sent to users from the Web site.
7. Settings: You can configure: Edit Profile, Browse Options, Service
Message Settings, Clear Cache, Clear Cookies and Trusted
Certificates options.
Data Account
Press the left soft key to perform following steps:
1. GSM Data:Edit the GSM account.
2. GPRS:Edit the GPRS account.
User Profiles
General
1. Activate
2. Customize
40
Page 46

Tone Setup: Includes Incoming Call, Power on, Power off, Message
Tone, and Keypad Tone.
Volume: Includes the volume setting of Ring Tone and Key Tone.
The volume degree is from 1 to 7.
Alert Type:
− Ring: Just ringing, no vibration.
− Vib. Only: Just Vibrating, no ringing.
− Vib. and Ring: Vibrating and ringing.
− Vib. Then Ring: Ringing after vibration.
Ring Type:
− Single: Rings once when a call is coming.
− Repeat: Rings continuously when a call is coming.
− Ascending: Rings continuously and the volume increases
gradually.
Extra Tone:
Answer Mode:
Meeting
Please refer to “General” for more details.
Outdoor
Please refer to “General” for more details.
Tip: Human singing tone cannot be played in Ascending Ring.
− Warning: If necessary, you will be warned by the prompt tone.
− Error: You will be warned by a tone if you make a mistake.
− Camp On: A prompt tone will be heard after searching the
network successfully.
− Connect: A prompt tone will be heard after getting through to the
dialed number.
− Any Key: Press any key to answer a call (Except of Hang Up
Key and Right Soft Key)
41
Page 47

Indoor
Please refer to “General” for more details.
Headset
Insert the earphone and access the Headset mode automatically. This
mode has no Activate options. Please refer to “General” for more details.
Note: Press and hold the # key to enable or cancel the silent mode. In the
Silent mode you can’t hear any sounds except the vibration indicates a call
or a SMS is coming.
42
Page 48

APPENDIX
Appendix A: Guidance On Entry Methods
This phone provides input methods, which can be used in editing the
Phone Book, short messages, memos, greetings, alarms and other text
applications.
The Icons of Input Methods
After entering different kinds of edit windows (including edit phonebook,
short messages. etc.), the icons of input are as follows:
“123”: The Entry method of Numeric appears as: “123”
“ABC”: The entry method of Multitap ABC appears as: “ABC”
“abc”: The entry method of Mulitap abc appears as: “abc”
“eZi ABC”: The entry method of eZiTextSmart ABC appears as: “eZi
ABC”
“eZi abc”: The entry method of eZiText Smart abc appears as: “eZi
abc”
How to Switch Between the Input Methods
Press the # key to switch the input methods.
e.g.: If the current input is Smart ABC the screen will show “eZi ABC”.
Press the # key, to go to Smart abc, and the screen will show “eZi abc”.
Numeric, Multitap ABC and Multitap abc Input Methods
Numeric
When the icon of the input method is “123”, press the number keys to
enter the numbers directly.
Multitap ABC and Multitap abc
When the icon is “ABC” or “abc”, press the number keys(2 to 9)repeatedly
until desired letters appear in the text area. Press the number key once for
the first letter. Press twice for the second letter. So, press number keys to
reach the desired letter in the same way.
Press 0 to enter a blank space or “0”.
43
Page 49

Note: while using the Numeric entry, please switch to the method of
swer or
Multitap ABC and Multitap abc first if a blank space is required, and then
press 0 to enter a blank space.
How to Input Special Symbols
If you want to input special symbols, such as ". ! ? = < >”, Etc., please
following steps as below:
Press the left soft key to access Menu of “options > Input Method >
Insert Symbols > Select Symbol”. Press the Up/Down, or Left/Right Key
to move the cursor in the symbol table, and select one symbol. Press the
right soft key to cancel the symbols selection.
In the edit mode, you can press the * Key to display the symbols.
Appendix B: Troubleshooting
This section lists some problems that you might meet while using your
phone. If you feel that your phone do not operate normally, please reset
settings first, and then follow Troubleshooting Guide. If you are still unable
to solve problems, please contact the authorized service center or the
store from where you purchased the phone.
Problems Solutions
Make sure that the phone has been switched on.
Make sure that the battery is charged.
Make sure that the signal intensity is high enough.
Can not
an
make a call
Low voice Check if the volume has been set too low.
Make sure the own number function in the call setting
is system preset or number sending.
Make sure the line switch in call setting is the system
preset line. Check whether you have set up call
barring or fixed dialing or any other safety function.
Check whether you have set up call diverts. Check
whether you have inserted the proper SIM card
correctly.
44
Page 50

Check whether you have set up the”Vibrating Only”
option.
No ring
LCD unclear Check whether the contrast has been set too low.
T-Flash card
detect
slowly
Check whether the ring volume is not too low
Move away from a noisy place to check if you can
hear the phone ringing.
Check whether you have set up call diverts.
Format your T-Flash card with your phone.
Note: To protect your files from getting lost, please
backup the important information into the safe place
before you formatting card.
Appendix C: FCC Statement
This device has been tested and found to comply with Part 15 of the FCC
rules. Performance is subject to the following conditions:
1. This device may not cause harmful interference.
2. This device must accept any interference received, including
interference that may cause undesired operation.
3. Changes or modifications not expressly approved by the
manufacturer or authorized service center could void the user’s
authority to operate this equipment.
45
 Loading...