

Page 1
Page 2

l Please read this manual before using your phone.
l All illustrations in this user manual are for illustration only and may not accurately
depict the actual phone.
l We operate a policy of continuous development and reserve the right to make
changes and improvements to any of the products described in this manual without
prior notice.
l In this manual, press a key means to press and release it immediately. Press and
hold a key means to keep pressing it for about 2 seconds and then release it.
Page 1 of 37 Copyright©2008 Spice Mobiles Ltd.
Page 3

Table of Contents
1. Safety information.....................................................................................................4
2. General information................................................................................................11
2.1 Checking the phone and accessories...............................................................11
2.2 Illustrations of the phone and function...............................................................11
2.3 Idle mode display..............................................................................................12
2.4 Technical specifications....................................................................................13
2.5 SIM card & battery............................................................................................13
2.5.1 Installing SIM card & battery...................................................................13
2.5.2 Removing SIM card & battery.................................................................14
2.5.3 Charging the battery...............................................................................14
2.6 Power the phone on/off.....................................................................................15
2.7 Idle mode operations........................................................................................15
3. Basic Operations.....................................................................................................16
3.1 Making a call....................................................................................................16
3.1.1 Making a call from idle............................................................................16
3.1.2 Inserting a pause sign when dialing ........................................................17
3.1.3 Call History dialing..................................................................................18
3.1.4 Phone Book dialing.................................................................................18
3.2 Answering/rejecting a call.................................................................................18
3.3 Missed calls......................................................................................................18
3.4 During a call.....................................................................................................18
3.4.1 Muting a call...........................................................................................18
3.4.2 Handsfree earpiece................................................................................19
3.4.3 Adjusting earpiece volume......................................................................19
3.4.4 Searching for a number from the phonebook..........................................19
3.4.5 DTMF.....................................................................................................19
3.5 SIM lock ...........................................................................................................19
3.6 Phone lock.......................................................................................................19
3.7 Call waiting.......................................................................................................20
3.8 Making a three party call...................................................................................20
4. Entering text ............................................................................................................20
4.1 Keypad mapping...............................................................................................21
4.2 ABC/abc input ...................................................................................................23
4.3 123 input..........................................................................................................23
4.4 Entering symbols..............................................................................................23
5. The menus...............................................................................................................24
5.1 Menu Tree........................................................................................................24
5.2 Phone book......................................................................................................26
5.2.1 Add New Entry........................................................................................26
5.2.1.1 Add New Entry to Phone...............................................................26
5.2.1.2 Add New Entry to SIM...................................................................26
5.2.2 Search Entry...........................................................................................26
5.2.3 View.......................................................................................................27
Page 2 of 37 Copyright©2008 Spice Mobiles Ltd.
Page 4

5.2.4 Edit.........................................................................................................27
5.2.5 Delete.....................................................................................................27
5.2.6 Copy.......................................................................................................27
5.2.7 Move......................................................................................................27
5.2.8 Owner Info..............................................................................................28
5.2.9 Memory Status........................................................................................28
5.3 Messages.........................................................................................................28
5.3.1 Write Message........................................................................................28
5.3.2 Inbox......................................................................................................28
5.3.3 Outbox....................................................................................................29
5.3.4 Message Settings...................................................................................29
5.3.5 Broadcast...............................................................................................29
5.4 Call History.......................................................................................................30
5.4.1 Missed Calls/Dialed Calls/Received Calls...............................................30
5.4.2 Delete.....................................................................................................30
5.4.3 Call Time ................................................................................................30
5.5 Settings............................................................................................................30
5.5.1 Phone Setup...........................................................................................30
5.5.1.1 Time/Date.....................................................................................30
5.5.1.2 Language.....................................................................................30
5.5.1.3 Input Method.................................................................................31
5.5.1.4 Display.........................................................................................31
5.5.1.5 Contrast........................................................................................31
5.5.1.6 Greeting Text ................................................................................31
5.5.2 Call Setup...............................................................................................31
5.5.2.1 Caller ID .......................................................................................31
5.5.2.2 Call Waiting..................................................................................31
5.5.2.3 Call Divert.....................................................................................32
5.5.2.4 Call Barring...................................................................................32
5.5.2.5 Line Switching ..............................................................................32
5.5.2.6 Reminder......................................................................................32
5.5.2.7 Auto Redial...................................................................................32
5.5.3 Network..................................................................................................33
5.5.3.1 Network........................................................................................33
5.5.3.2 Band.............................................................................................33
5.5.4 Security..................................................................................................33
5.5.4.1 SIM Lock ......................................................................................33
5.5.4.2 Phone Lock..................................................................................33
5.5.4.3 KeyLock........................................................................................33
5.5.4.4 Change Pwd.................................................................................33
5.5.5 Predict....................................................................................................34
5.5.6 Restore Factory Settings........................................................................34
5.6 Fun&Games.....................................................................................................34
5.7 User Profiles.....................................................................................................34
Page 3 of 37 Copyright©2008 Spice Mobiles Ltd.
Page 5
5.7.1 Activating a profile..................................................................................34
5.7.2 Customizing a profile..............................................................................34
5.7.2.1 Tone Setup ...................................................................................35
5.7.2.2 Volume .........................................................................................35
5.7.2.3 Alert Type.....................................................................................35
5.7.2.4 Ring Type.....................................................................................35
5.7.2.5 Extra Tone ....................................................................................35
5.7.2.6 Answer Mode................................................................................36
5.7.2.7 LCD Backlight...............................................................................36
5.8 Organizer .........................................................................................................36
5.8.1 Alarm......................................................................................................36
5.8.2 Calculator...............................................................................................36
5.9 Services...........................................................................................................37
6. Troubleshooting ......................................................................................................37
7. After-sale service.....................................................................................................38
1. Safety information
Read these precautions carefully before you use your phone to ensure that you use the
phone safely and correctly.
l The precautions listed here are intended to prevent injury to the phone user and to
others, and to prevent unintended damage to property.
l The designations below Indicates the severity of the injury or damage that may be
incurred if the designated precautions are not followed and the product is used
incorrectly.
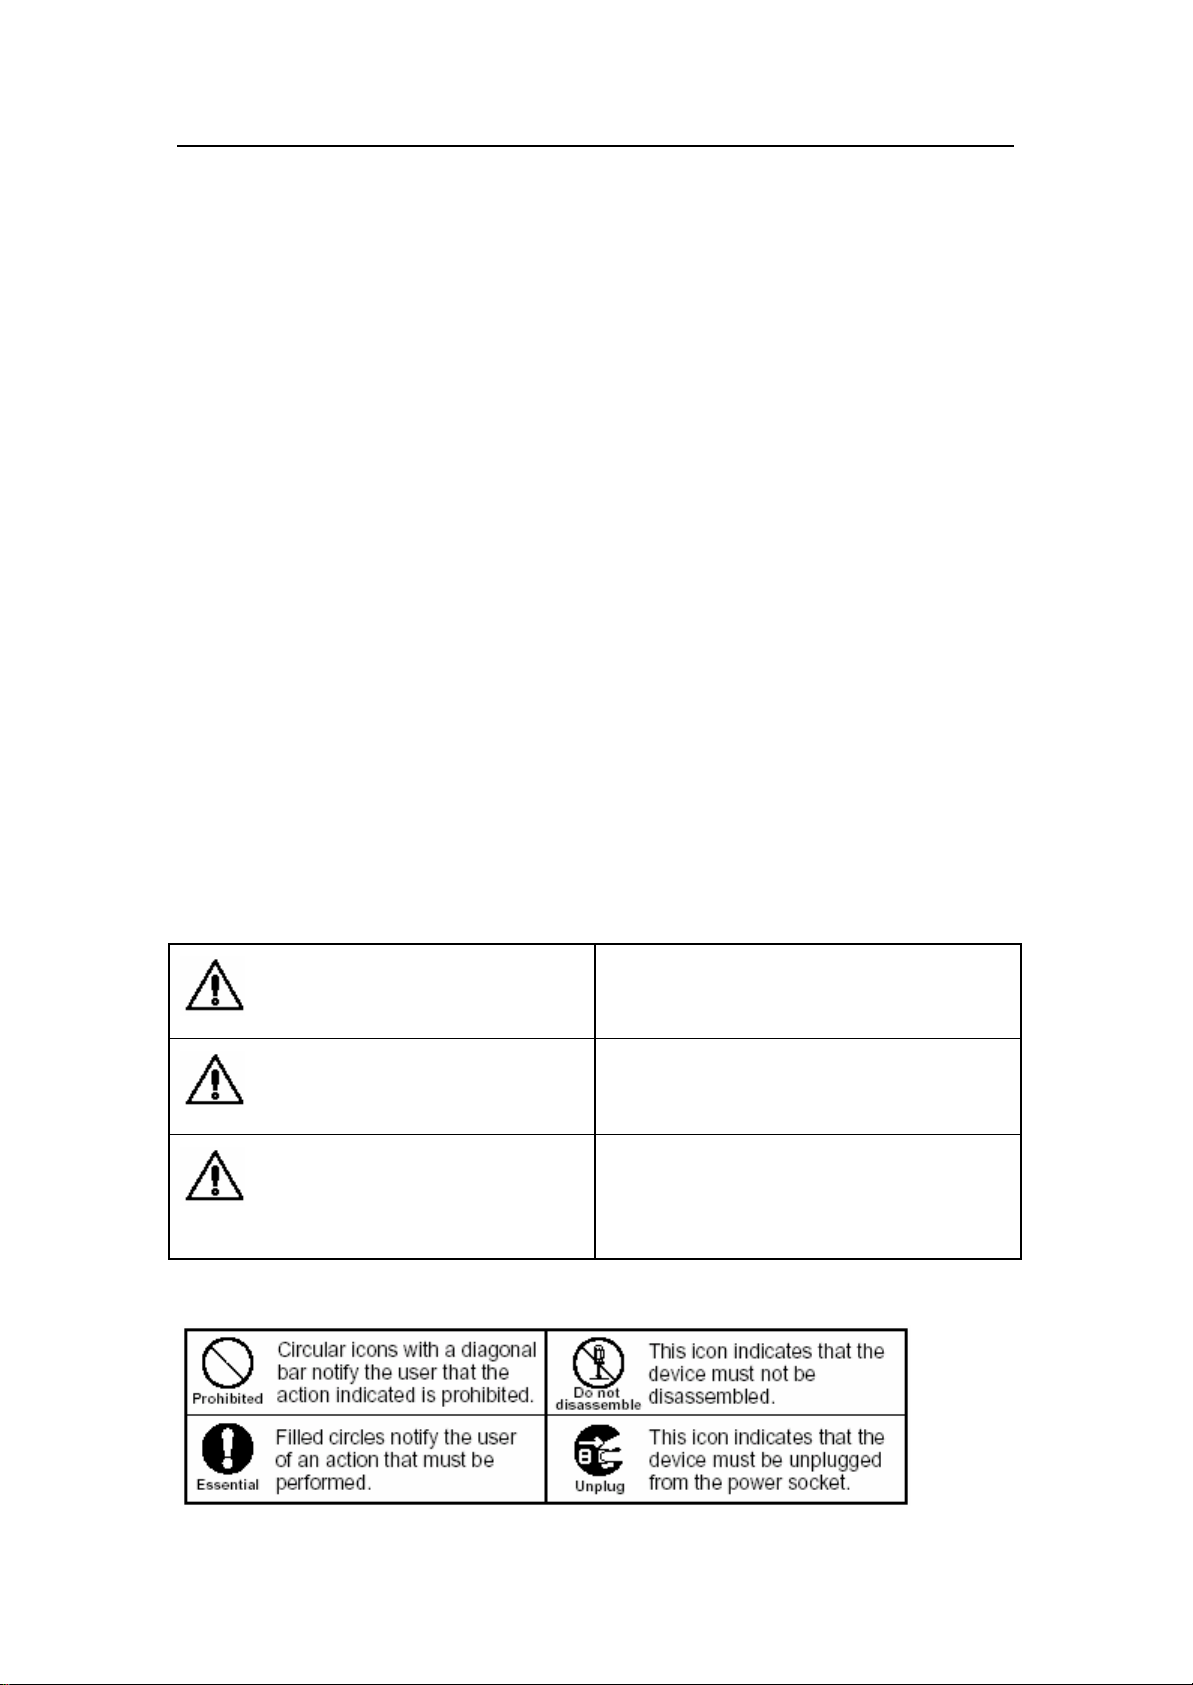
Indicates that, if this warning is ignored,
DANGER
WARNING
CAUTION
The icons shown below are used to indicate instructions that should be observed.
improper handling of the product is likely to
result in death or serious injury.
Indicates that, if this warning is ignored,
improper handling of the product could
result in death or serious injury.
Indicates that, if this warning is ignored,
improper handling of the product could
result in personal injury or material
damage.
Page 4 of 37 Copyright©2008 Spice Mobiles Ltd.
Page 6

Page 5 of 37 Copyright©2008 Spice Mobiles Ltd.
Page 7
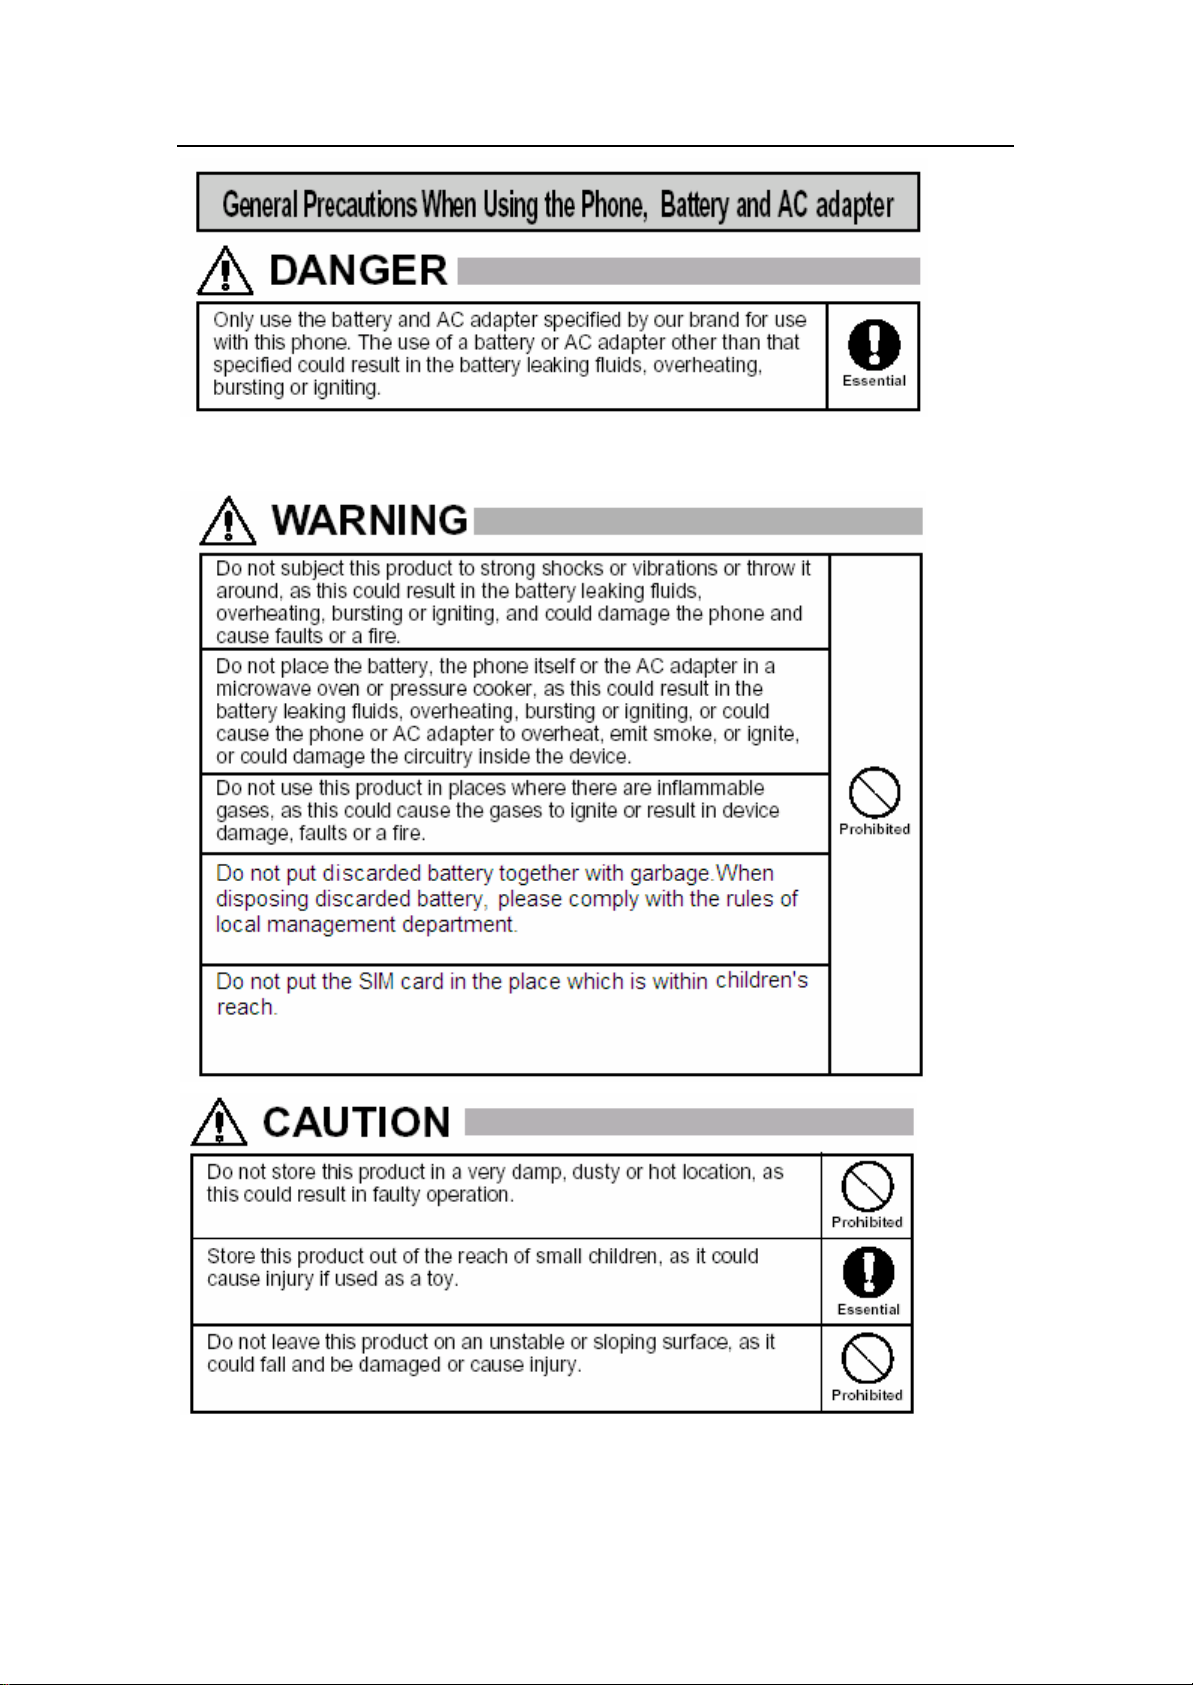
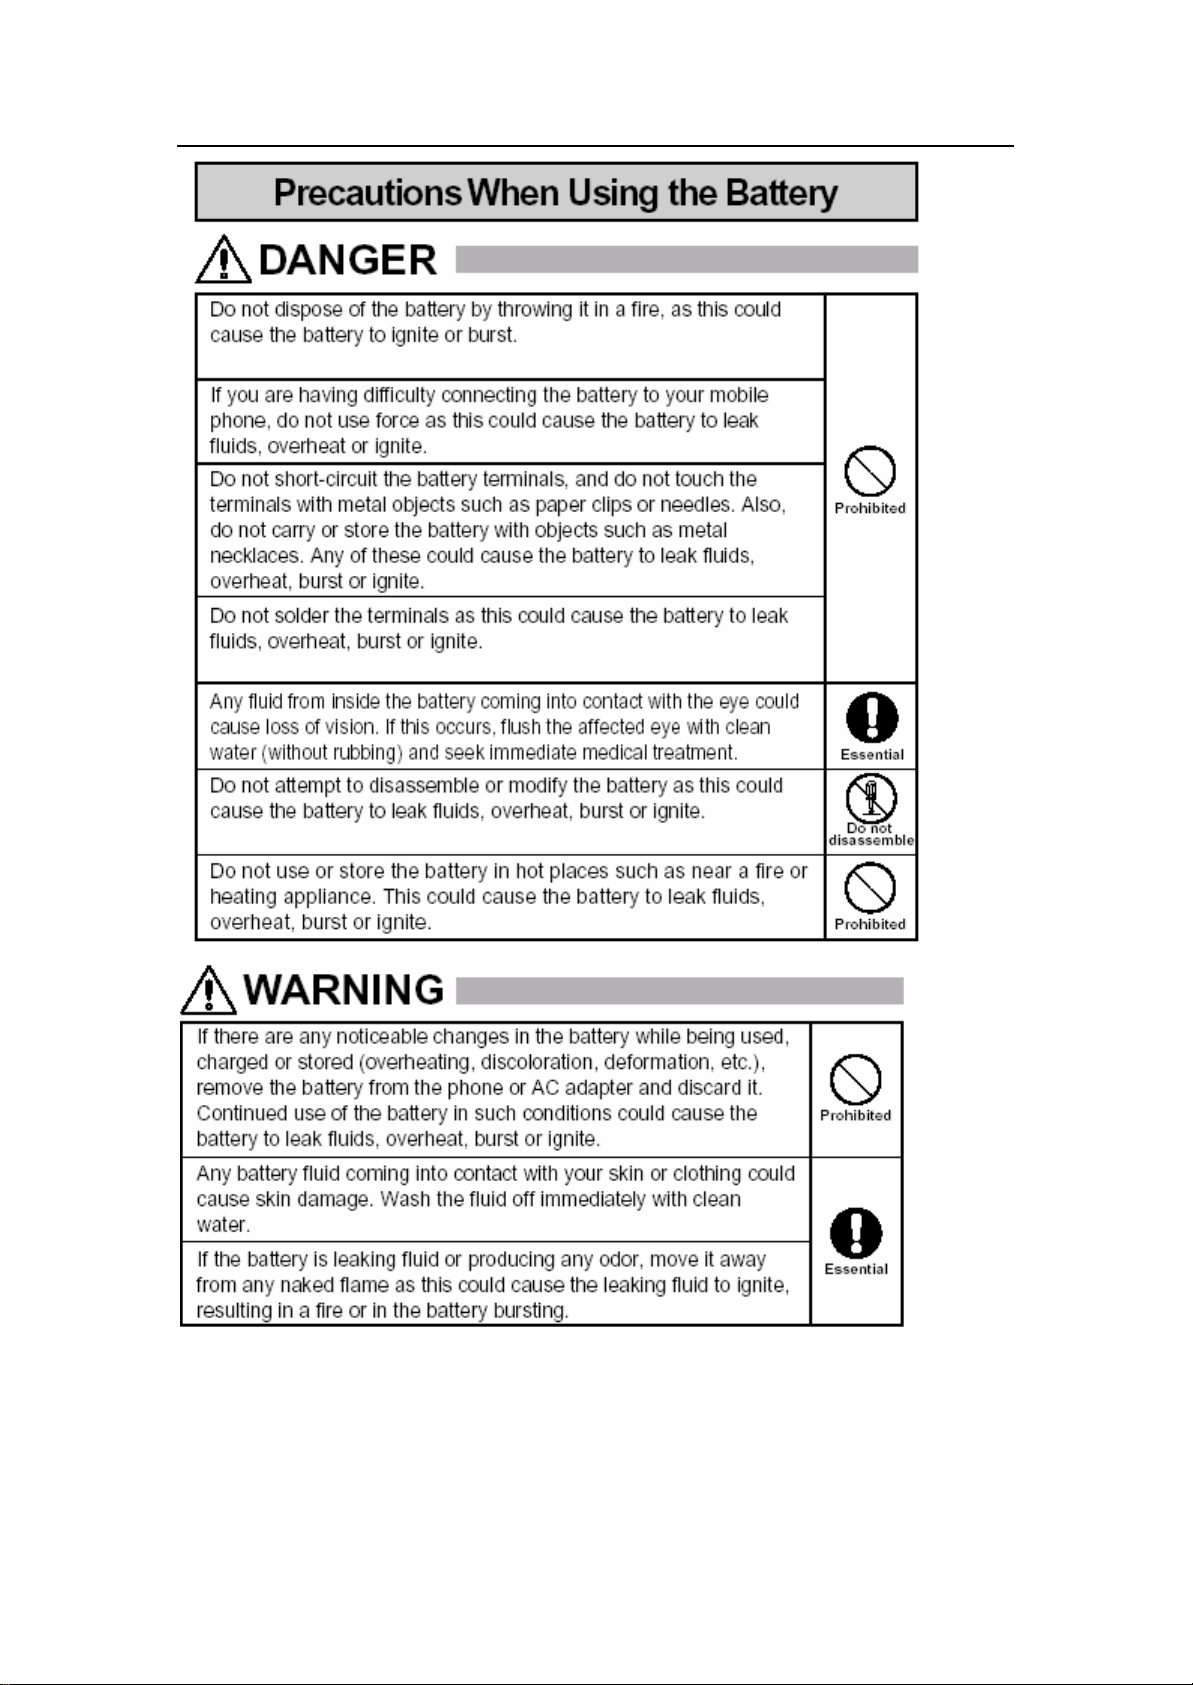
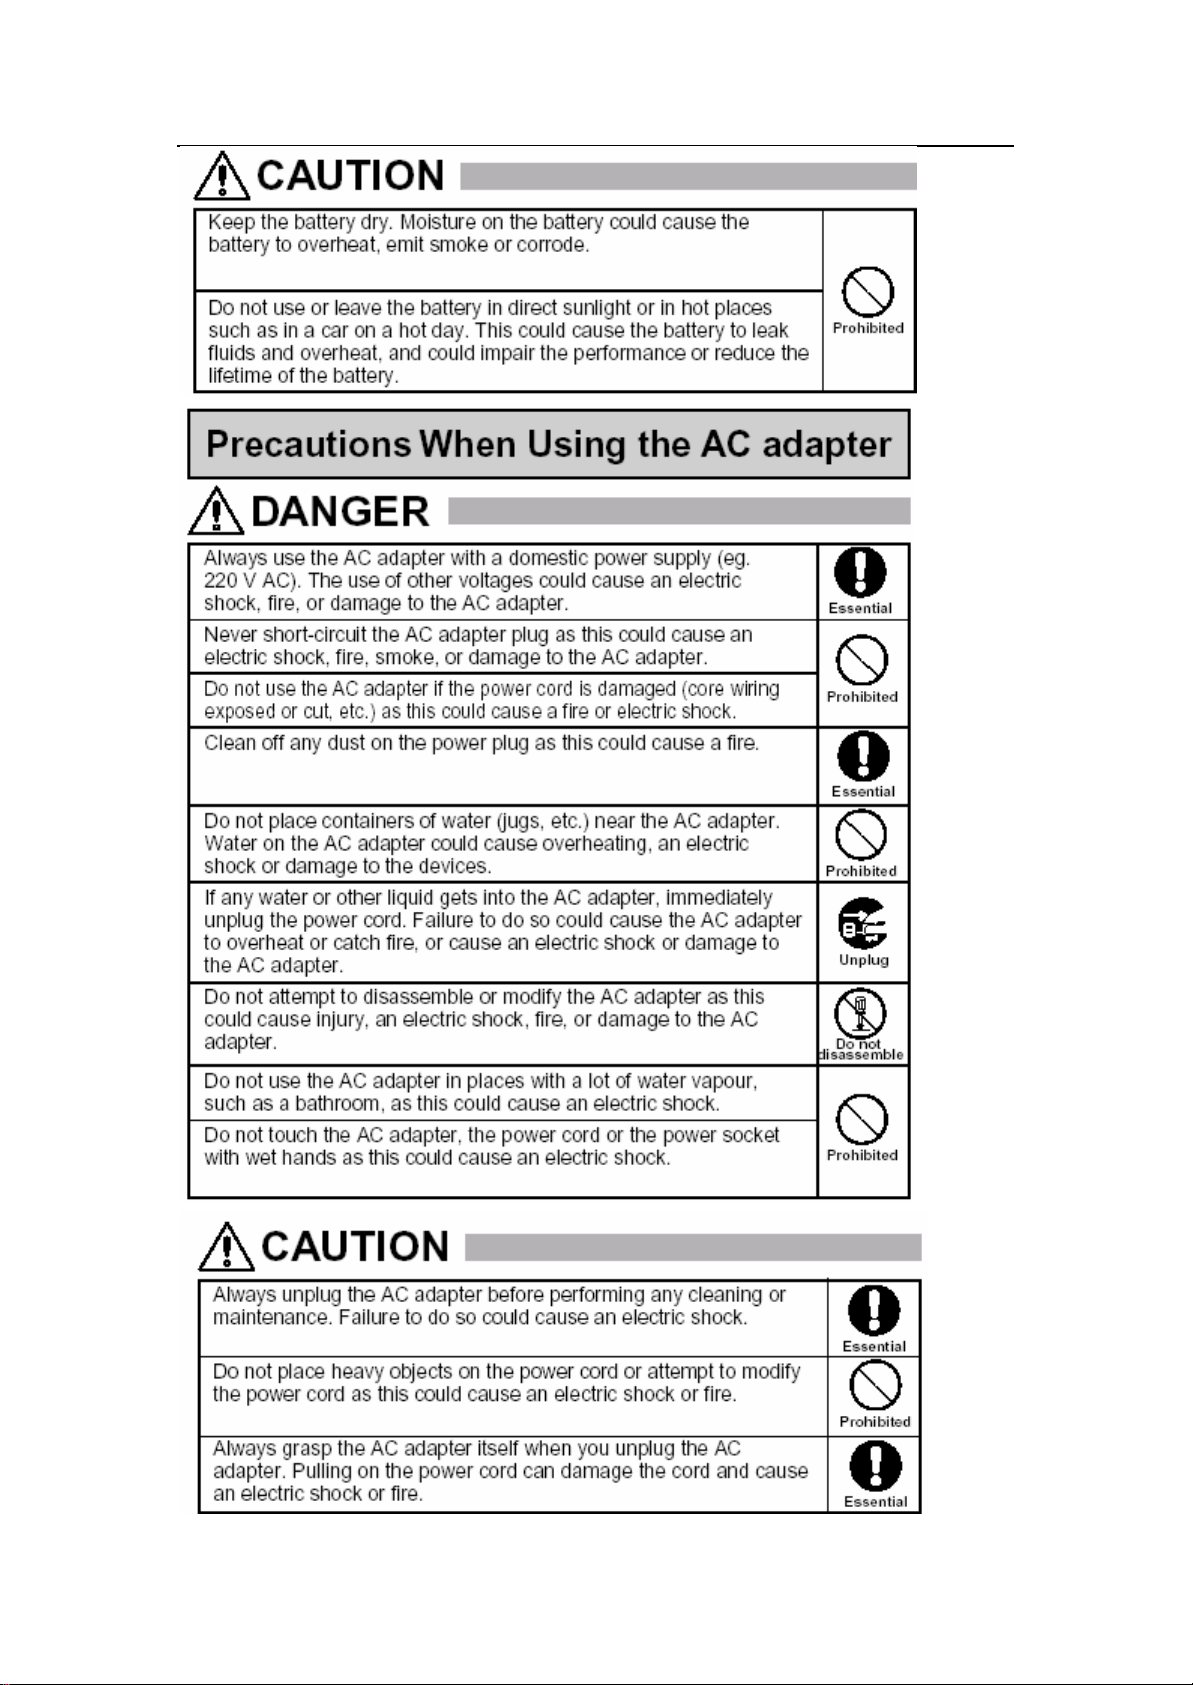
Only use SPICE specified battery and AC adapter for use with this phone.
Page 6 of 37 Copyright©2008 Spice Mobiles Ltd.
Page 8
Page 7 of 37 Copyright©2008 Spice Mobiles Ltd.
Page 9
Page 8 of 37 Copyright©2008 Spice Mobiles Ltd.
Page 10
Page 9 of 37 Copyright©2008 Spice Mobiles Ltd.
Page 11
Page 10 of 37 Copyright©2008 Spice Mobiles Ltd.
Page 12
2. General information
2.1 Checking the phone and accessories
After unpacking, please check the accessories. If there is anything missing or there are
pages lost in the user’s manual, which cause it unreadable, please contact the local seller
that you purchased the phone from.
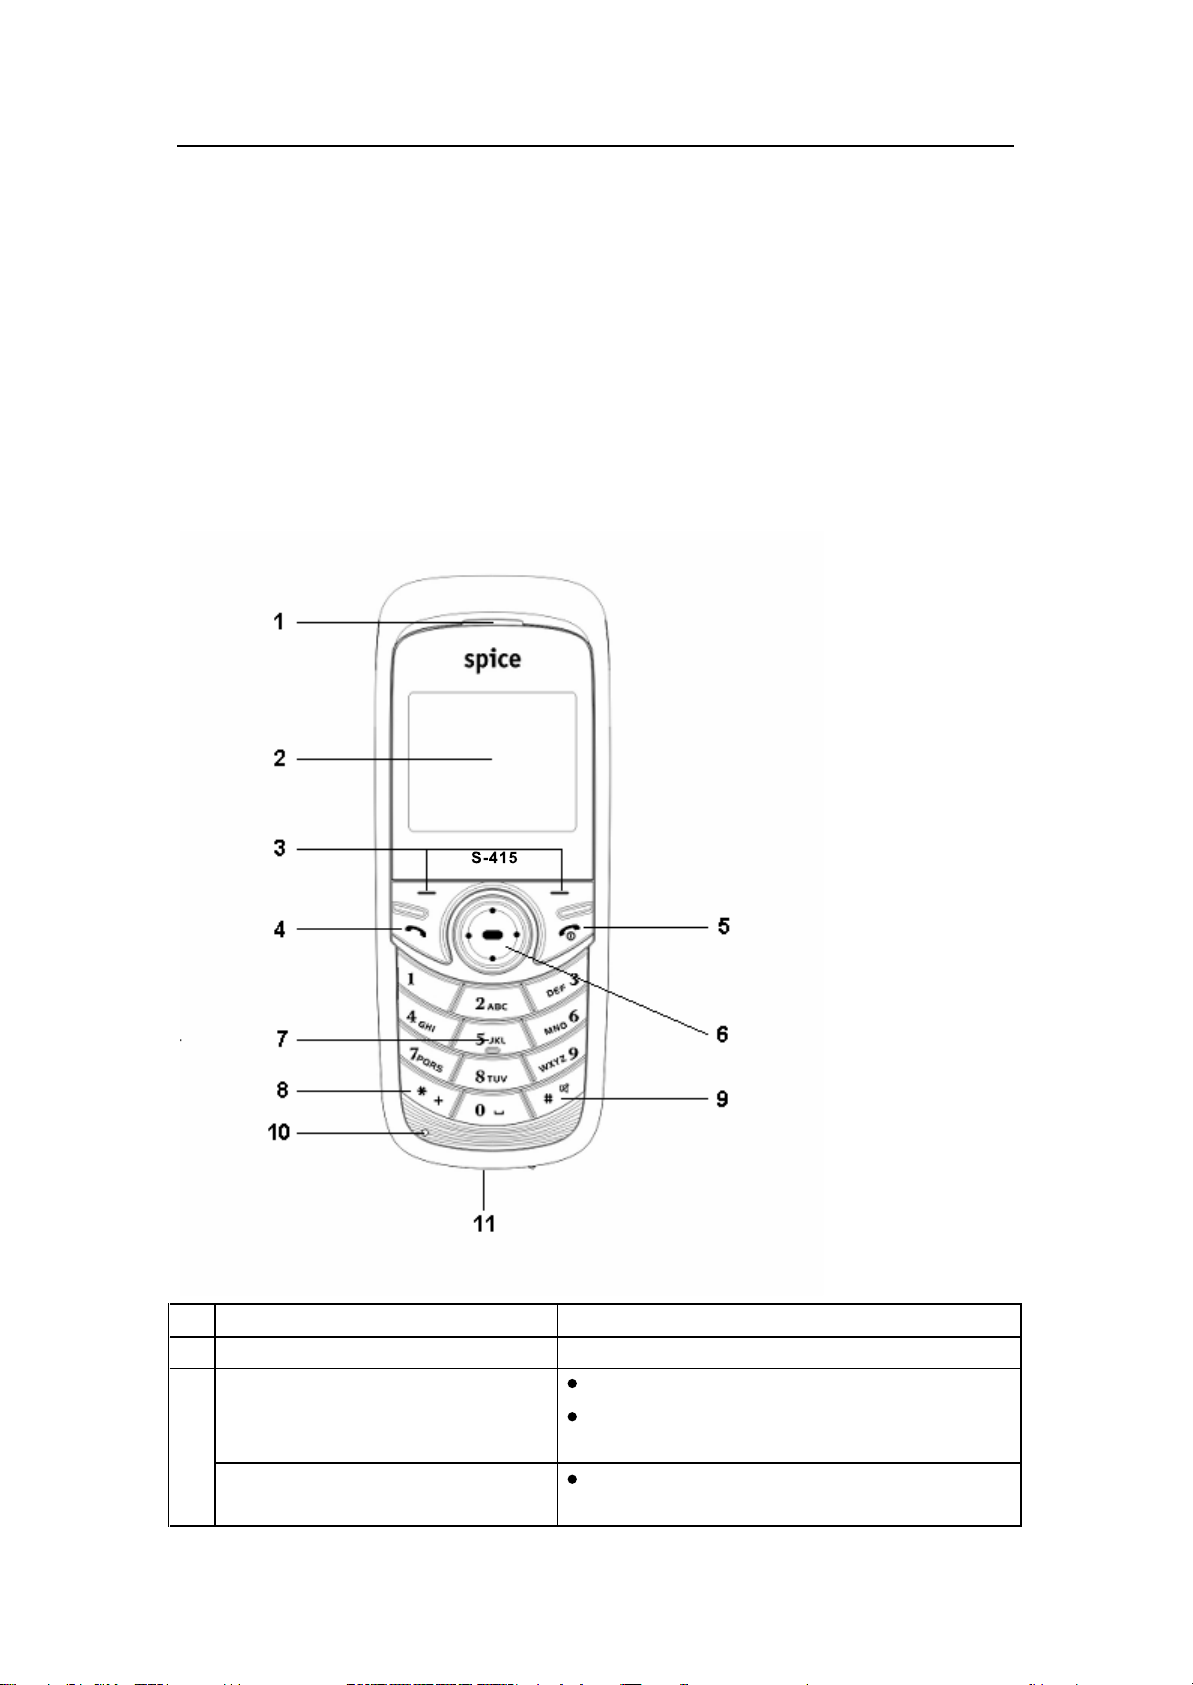
2.2 Illustrations of the phone and function
1 Earpiece
2 Display
Left Soft key
3
Right
Soft key
En
ter the phone book in idle
Execute the function shown at the bottom left
of the display
En
ter the main menu in idle
Execute the function shown at the bottom
Page 11 of 37 Copyright©2008 Spice Mobiles Ltd.
Page 13
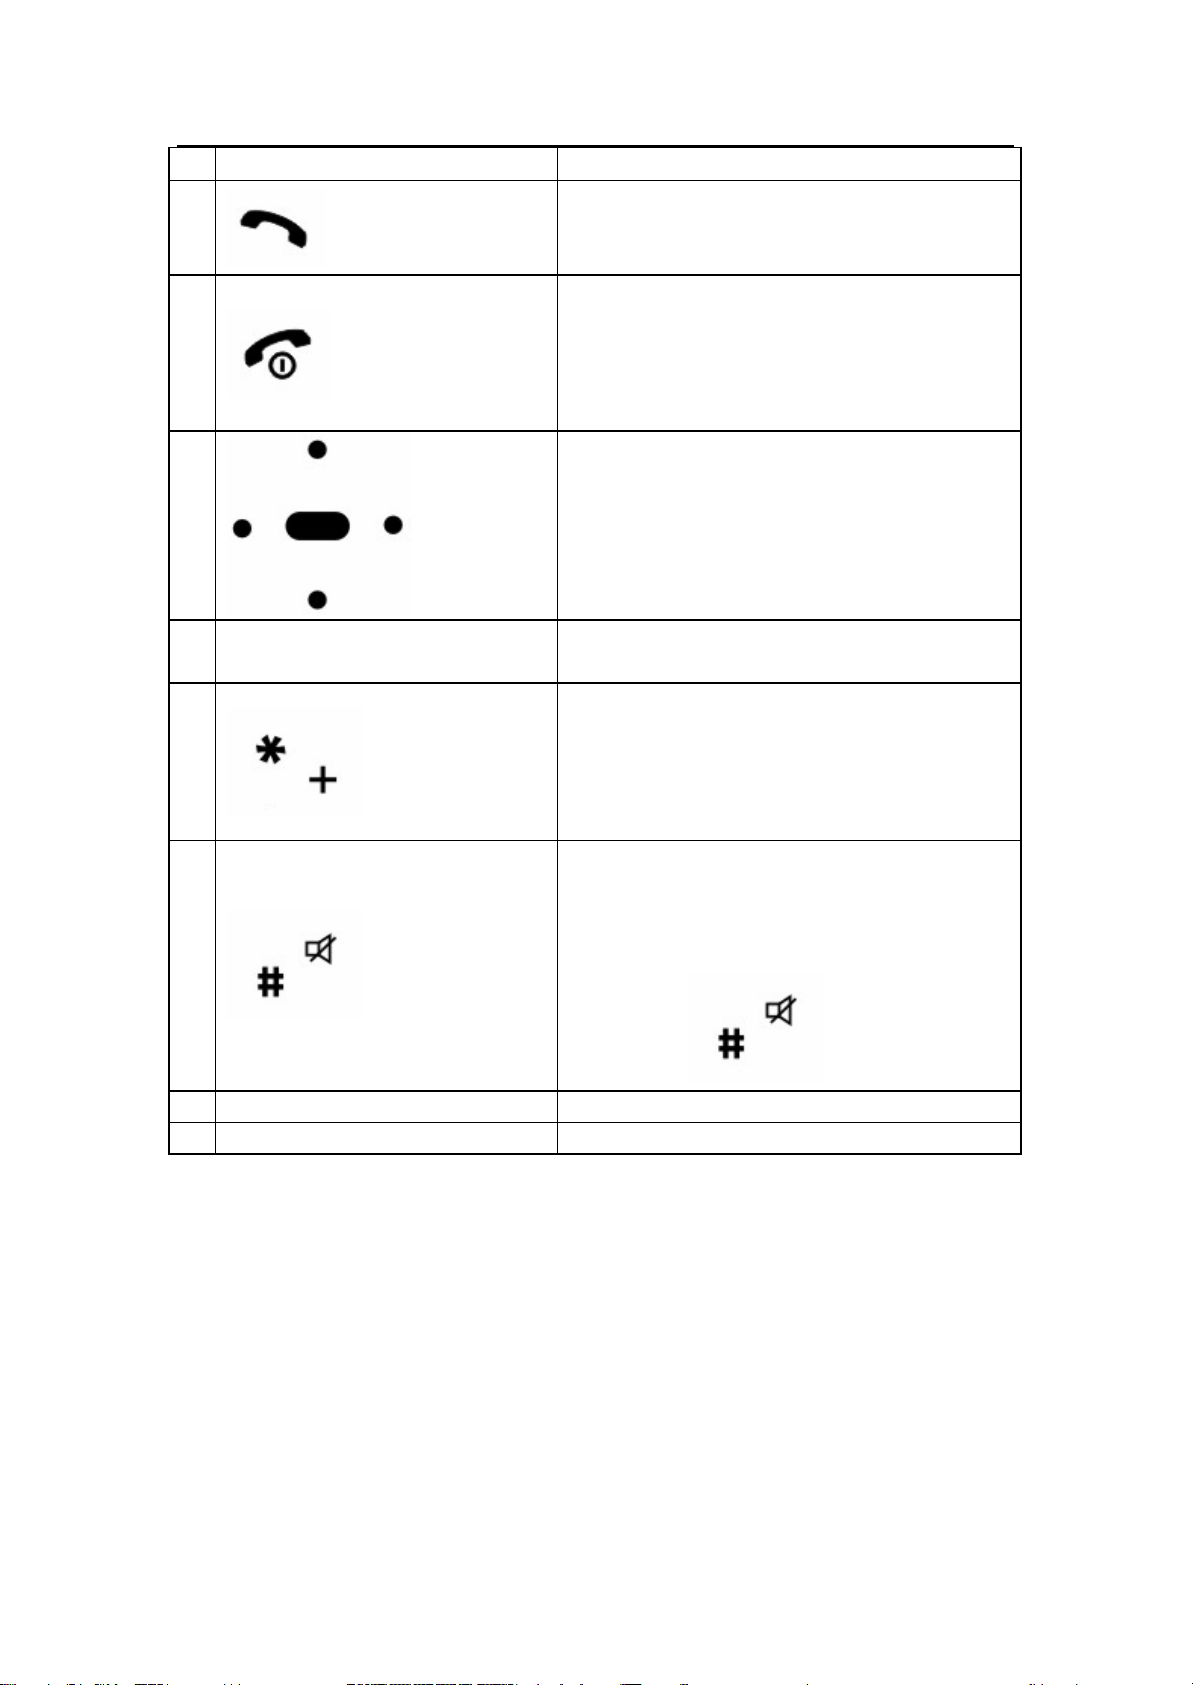
4
5
6
7 Numeric key
8
9
right of the display
l Make or answer a call
l Enter call History in idle
l Press and hold to power the phone on when
the phone is off
l Press and hold to power the phone off
l End or reject a call.
l Return to idle display
l Move the cursor
l Enter the shortcut menu in idle
l Enter phone numbers, characters or select
the function
l When enter numbers, press once for “*”,
twice for “+”, three times for “P” and four
times for “W”. Or press and hold to display
“*”, “+”, “P”, “W” in a loop.
l When edit, enter the symbol list.
l When edit, switch input methods
l Press and hold to enter or exit the silent
mode in idle
l Unlock the keypad by pressing right soft key
and then
10 Microphone
11 Charger connector
2.3 Idle mode display
TIP: The locations of signal strength and battery power are fixed. Others are displayed
according to the actual status of the phone.
Page 12 of 37 Copyright©2008 Spice Mobiles Ltd.
Page 14
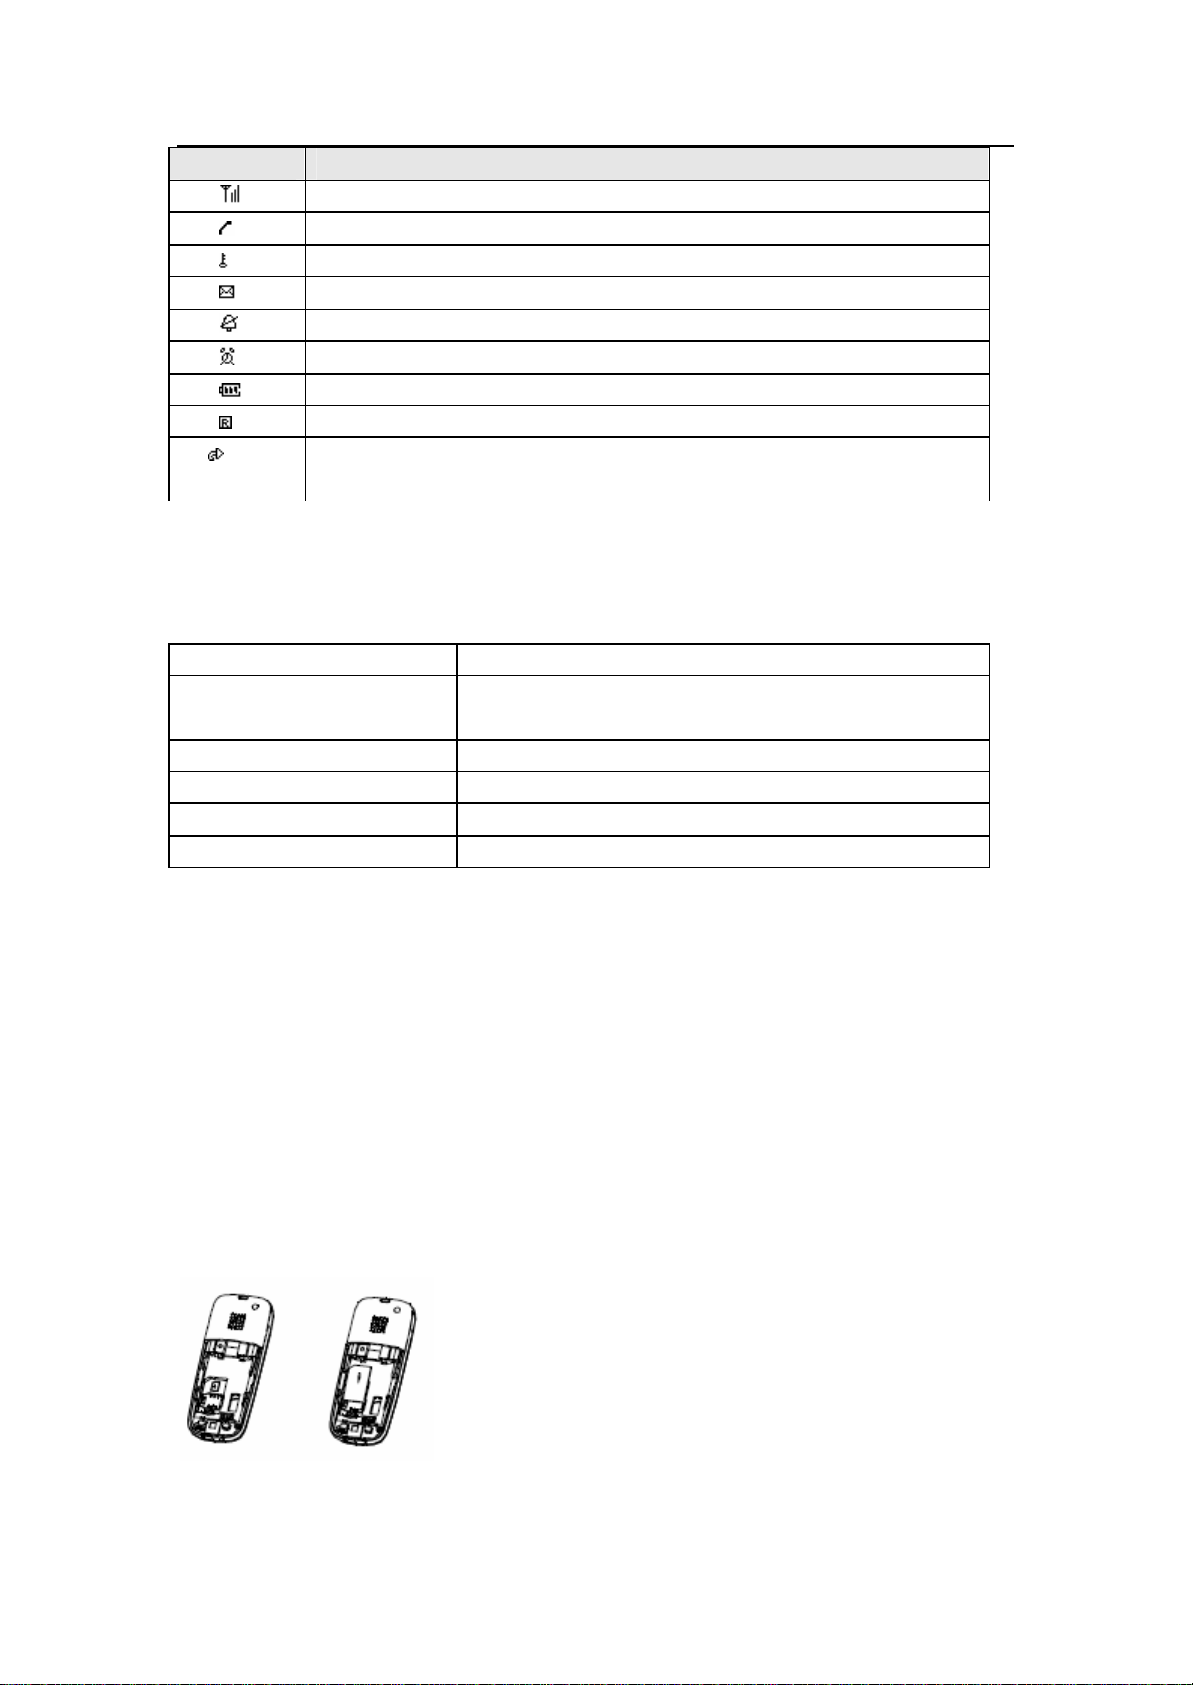
Icon Descriptions
1. Indicates signal strength level and more bars means better signal
2. Indicates the phone is in the connecting or connected status
3. Indicates the keypad is locked
4. Indicates you have unread messages
5. Indicates the alert type is “ Vibration Only”
6. Indicates the alarm is set on
7. Indicates battery power
8. Indicates the phone is in roaming status
9. Indicates all voice incoming calls have been diverted to a specified
number
2.4 Techni cal specifications
Battery Lithium battery, 650mAh
Charger
Dimensions 103.9*41.8*17.4(mm)
Weight About 65g
Standby time* Up to 150 hours
Talk time* Up to 4 hours
* The idle time and call time depend on the network.
Input: AC 100~240V, 50/60Hz
Output: DC 5V/400mA
2.5 SIM card & battery
l Keep all SIM cards out of the reach of small children.
l The SIM card and its contacts can be easily damaged by scratches or bending, so be
careful while handling, inserting or removing the card.
l Power off the phone before installing or removing the battery or SIM card to prevent
damage to the phone.
2.5.1 Installing SIM card & battery
1. Place the SIM card into the slot with the metal contact facing down.
2. Attach the battery to the phone as shown below.
Page 13 of 37 Copyright©2008 Spice Mobiles Ltd.
Page 15
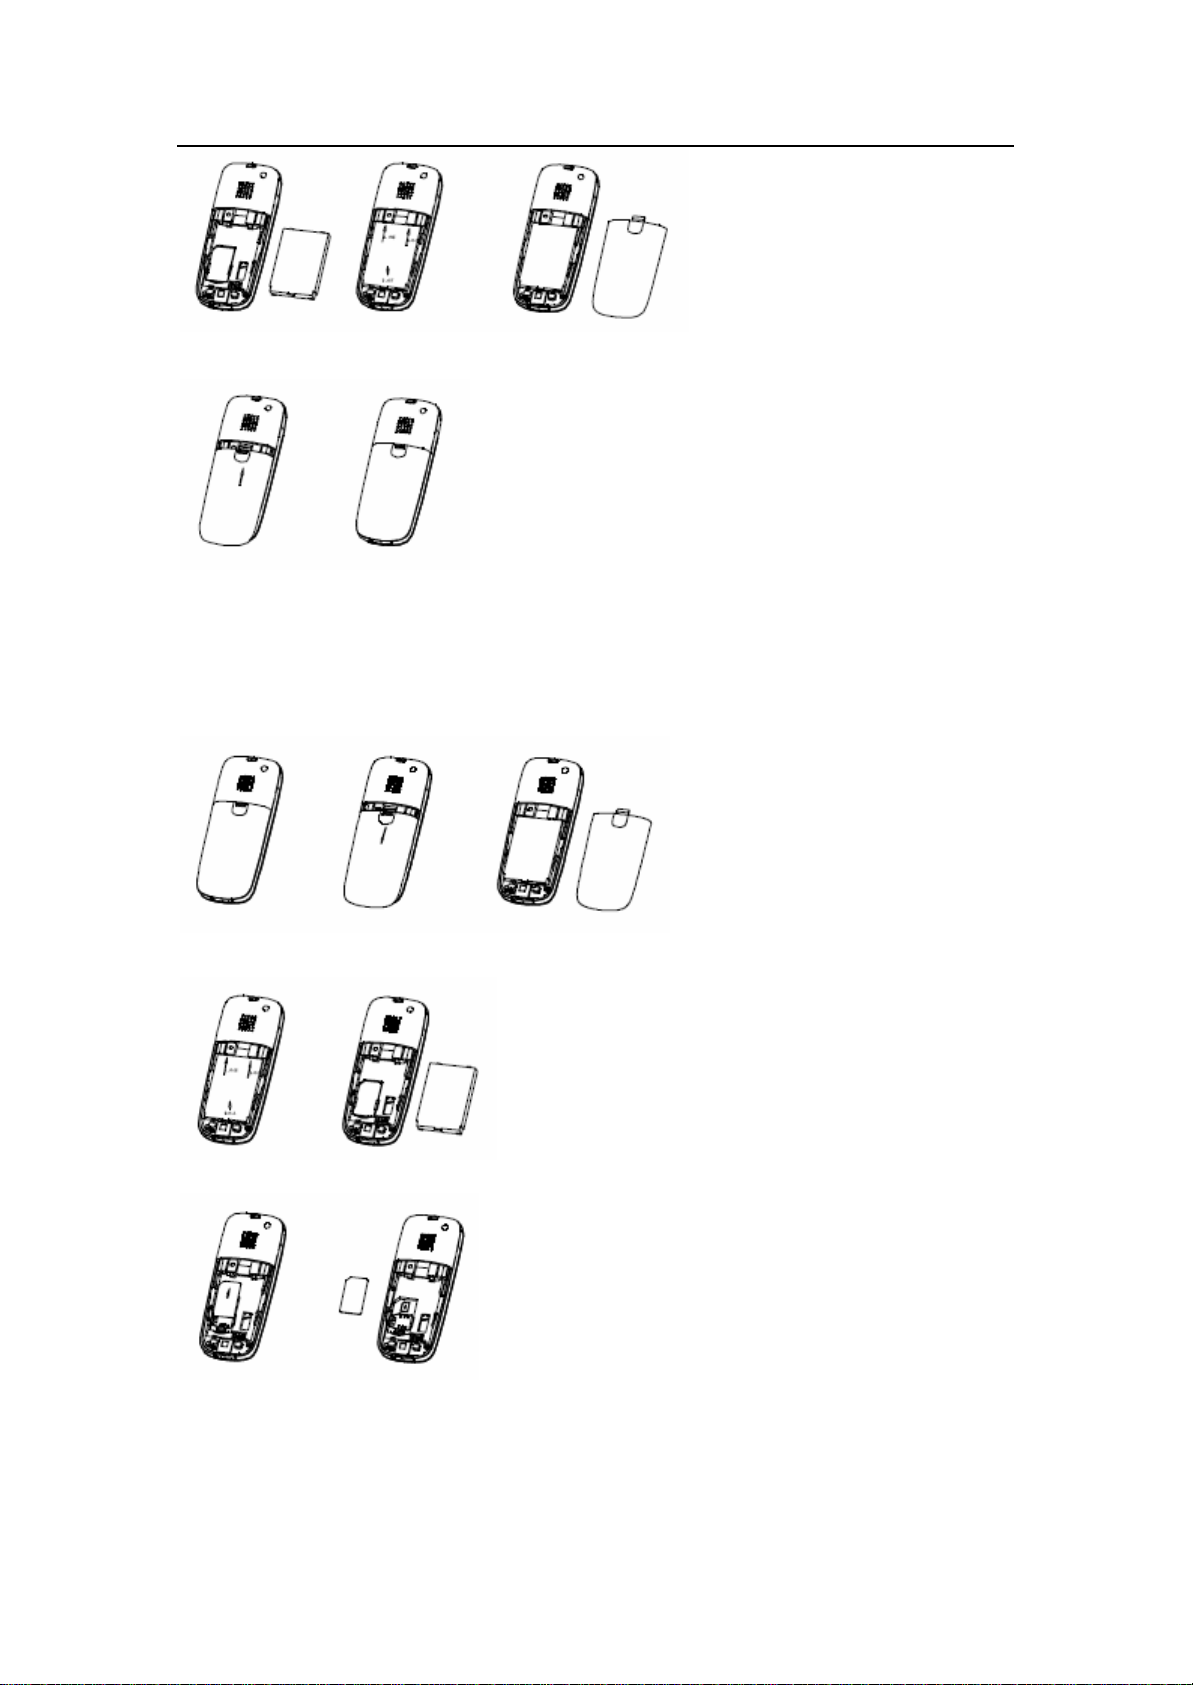
3. Push the battery cover upwards until it clicks into place.
2.5.2 Removing SIM card & battery
1. Power off the phone.
2. Push the battery latch shown as below.
3. Remove the battery.
4. Slide the SIM card.
2.5.3 Charging the battery
1. Plug the connector of the charger into the jack at the bottom of the phone, and plug
the charger into a standard AC wall outlet. During charging, the battery icon is
Page 14 of 37 Copyright©2008 Spice Mobiles Ltd.
Page 16

flashing.
2. When charging is completed, the battery icon stops flashing.
Charging……. Fully Charged
Notice:
l When is shown in the screen, it indicates that there is not enough power, please
charge the phone.
l You must fully charge the battery before using the phone for the first time. It is
recommended you charge the battery for four hours for the first time.
l If the phone is turned on during charging, you can still make or answer calls, but this
will consume battery power, thus extend the charging time of the phone.
l It is recommended you charge the battery when it runs out to enhance the battery life.
2.6 Power the phone on/off
To power the phone on, press and hold when it is off.
l If phone lock is set on, you are required to enter the password. The phone password
is preset to “1122” at the factory. See “5.5.4 Security”.
l If SIM lock is set on, you are required to enter the PIN. See “5.5.4 Security”. If you
enter wrong PIN three times in a row, you need the PUK to unlock it. PIN and PUK
are both provided by the network operator.
To power the phone off, press and hold when it is in idle.
2.7 Idle mode operations
In idle
l Press (Menu) to enter the main menu. Press to select the
desired one and press (Ok). Y ou can also enter the menu by pressing the
corresponding numeric key .
Page 15 of 37 Copyright©2008 Spice Mobiles Ltd.
Page 17

l Press (Name) to enter Phone Book.
l Press to write the message.
l Press to enter alarm.
l Press to enter the inbox.
l Press to enter User profiles.
l Press to enter the Call logs.
l Press to cancel the Broadcast.
l Press and hold to enter the silent mode or return to the previous
mode.
3. Basic Operations
3.1 Making a call
You can make or receive calls within the service area and with sufficient signal strength.
Notice: The signal strength affects the quality of your call.
3.1.1 Making a call from idle
1. In idle enter phone numbers you want to call
l If you make a mistake, press (Clear) to erase the last number; press
Page 16 of 37 Copyright©2008 Spice Mobiles Ltd.
Page 18

to move the cursor, press (Clear) to erase the number left to
the cursor, press and hold (Clear) to erase all numbers.
l To save the numbers to phone book, press (Save) to select the location (SIM or
phone) and then enter phone book editor display.
2. Press to call.
3. Press to end the call.
3.1.2 Inserting a pause sign when dialing
You can use the pause sign to dial an extension number automatically or manually.
In an automatic way
1. In idle enter the phone number.
2. Press continuously three times to insert a “P”.
3. Enter the extension number.
4. Press to dial the number before “P”. After the line is connected, the phone
will dial the number after “P” automatically.
Notice: The suspending time depends on the number of the “P” you entered.
In a manual way
1. In idle enter the phone number.
2. Press continuously four times to insert a “W”.
3. Enter the extension number .
4. Press to dial the number before “W”. After the line is connected, the
phone will ask you whether to dial the number after “W”.
Page 17 of 37 Copyright©2008 Spice Mobiles Ltd.
Page 19

3.1.3 Call History dialing
Select Menu?Call History (Or press in idle).
Select a record from Missed, Dialed or Received calls list, then press to call.
3.1.4 Phone Book dialing
In idle press (Name) or enter phone book from the main menu. Select one entry you want
to call and press .
3.2 Answering/rejecting a call.
When there is an incoming call:
1. Press to answer the call, press (Mute) to mute the ring.
2. Press to reject the call.
3. Press to end the call.
3.3 Missed calls
The missed calls are displayed in the display. Press (Read) to enter missed calls list to
check.
3.4 During a call
3.4.1 Muting a call
You can mute the call during the conversation, and then the other party would not hear
your voice.
1. During the call press (Option) and select Mute. Press (On) to mute the call.
2. To unmute the call, select Mute and press (Off) in the Option display.
Page 18 of 37 Copyright©2008 Spice Mobiles Ltd.
Page 20

3.4.2 Handsfree earpiece
1. Press (H-Free) to activate handsfree earpiece.
2. To deactivate handsfree earpiece, press (H-Held).
3.4.3 Adjusting earpiece volume
During a call press to adjust earpiece volume.
3.4.4 Searching for a number from the phonebook
During a call, press (Option) and select Phone book.
3.4.5 DTMF
When DTMF is turned off, the entered numbers will not be responded as DTMF signals
during a call.
1. During the call press (Option) and select DTMF. Press (Off) to deactivate DTMF.
2. To activate DTMF, select DTMF and press (On) in the Option display.
3.5 SIM lock
SIM lock protects the SIM card from unauthorized usage. With this function activated, the
phone asks for a PIN each time you power ON the phone.
1. Select Menu? Settings? Security? SIM Lock.
2. Select On and press (Ok) to activate SIM lock.
3. Enter the PIN and press (Ok).
To deactivate SIM lock, you also need to enter the PIN which is provided by the network
operator.
3.6 Phone lock
Phone lock protects the phone from any unauthorized usage. With this function activated,
you need the password of the phone to unlock it.
1. Select Menu? Settings? Security? Phone Lock.
2. Select On and press (Ok) to activate phone lock.
3. Enter the password and press (Ok).
To deactivate phone lock, you also need to enter the password which is preset to “1122” at
the factory.
Page 19 of 37 Copyright©2008 Spice Mobiles Ltd.
Page 21

3.7 Call waiting
This function allows you to put the current call on hold and then make or answer a second
one. This feature is network dependent and before you can use it you need to get it
activated from your telecom operator.
If another call comes when you are during a call, you will be notified of it by a call waiting
tone and the phone number is displayed.
l Press (Reject) to reject the waiting call.
l Press (Option) and select End to end the current call.
l Press or (Option) and select Answer, to hold the current call and answer
the waiting call. Press (Option) and select Swap repeatedly to switch calls.
If you want to make a second call without ending the current one,
l Press (Option) and select Hold to hold the current call. Then call the second in the
normal way. Press (Option) and select Swap repeatedly to switch calls.
Notice: Press or (Option) and select End Single to end the call you selected.
Press (Option) and select End All to end both calls.
3.8 Making a three party call
This function needs to be supported by the network. It allows up to five people to take part
in simultaneously in a conference call.
l Press (Option) and select Hold to put the first participant on hold.
l Call the second participant in the normal way. Press (Option) and select Conference
to join the participant to the conference call.
l Following instructions above to join the new person to the conference call.
4. Entering text
The phone provides several input methods including ABC input, abc input, ENG input, eng
input and 123 input. Press to switch input methods.
Page 20 of 37 Copyright©2008 Spice Mobiles Ltd.
Page 22
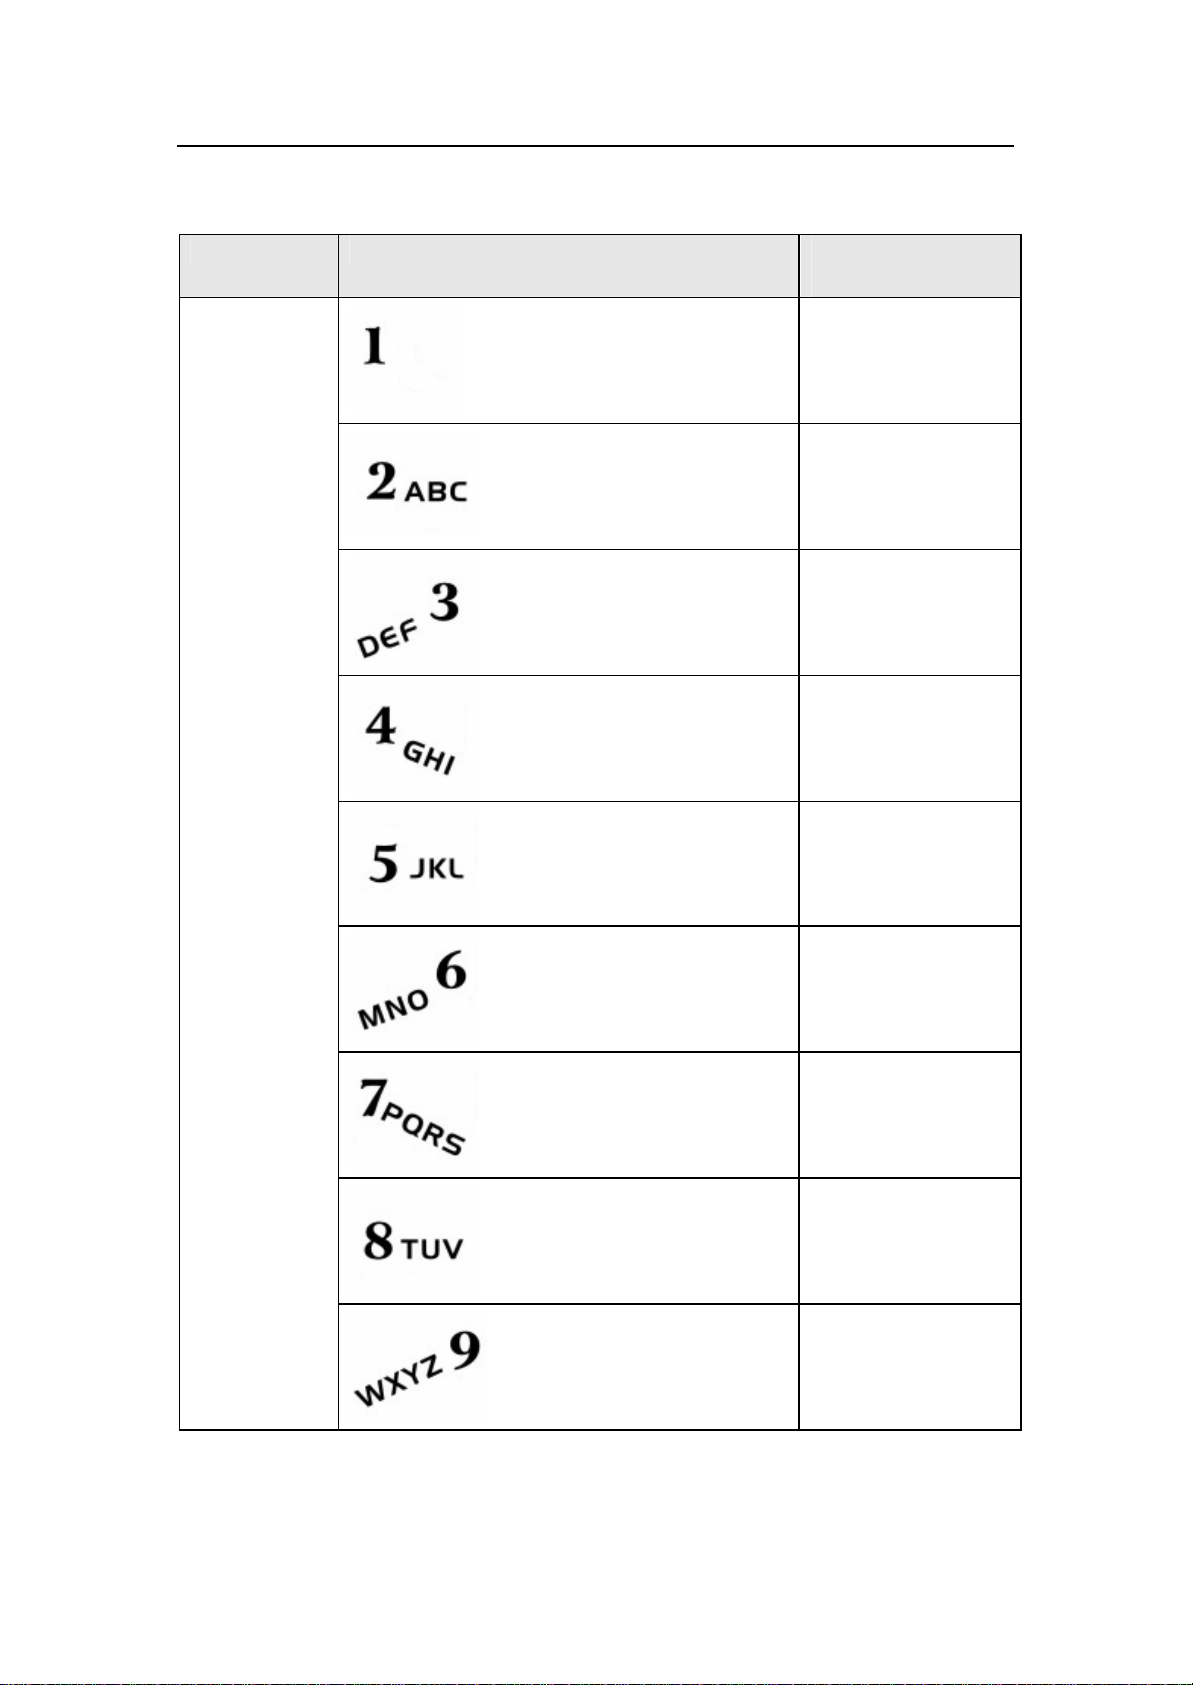
4.1 Keypad mapping
Input method
abc/ABC
key Characters or
functions
Display frequently
used symbols
a/b/c/2 (A/B/C/2)
d/e/f/3 (D/E/F/3)
g/h/i/4 (G/H/I/4)
j/k/l/5 (J/K/L/5)
m/n/o/6 (M/N/O/6)
p/q/r/s/7 (P/Q/R/S/7)
t/u/v/8 (T/U/V/8)
w/x/y/z/9 (W/X/Y/Z/9)
Page 21 of 37 Copyright©2008 Spice Mobiles Ltd.
Page 23
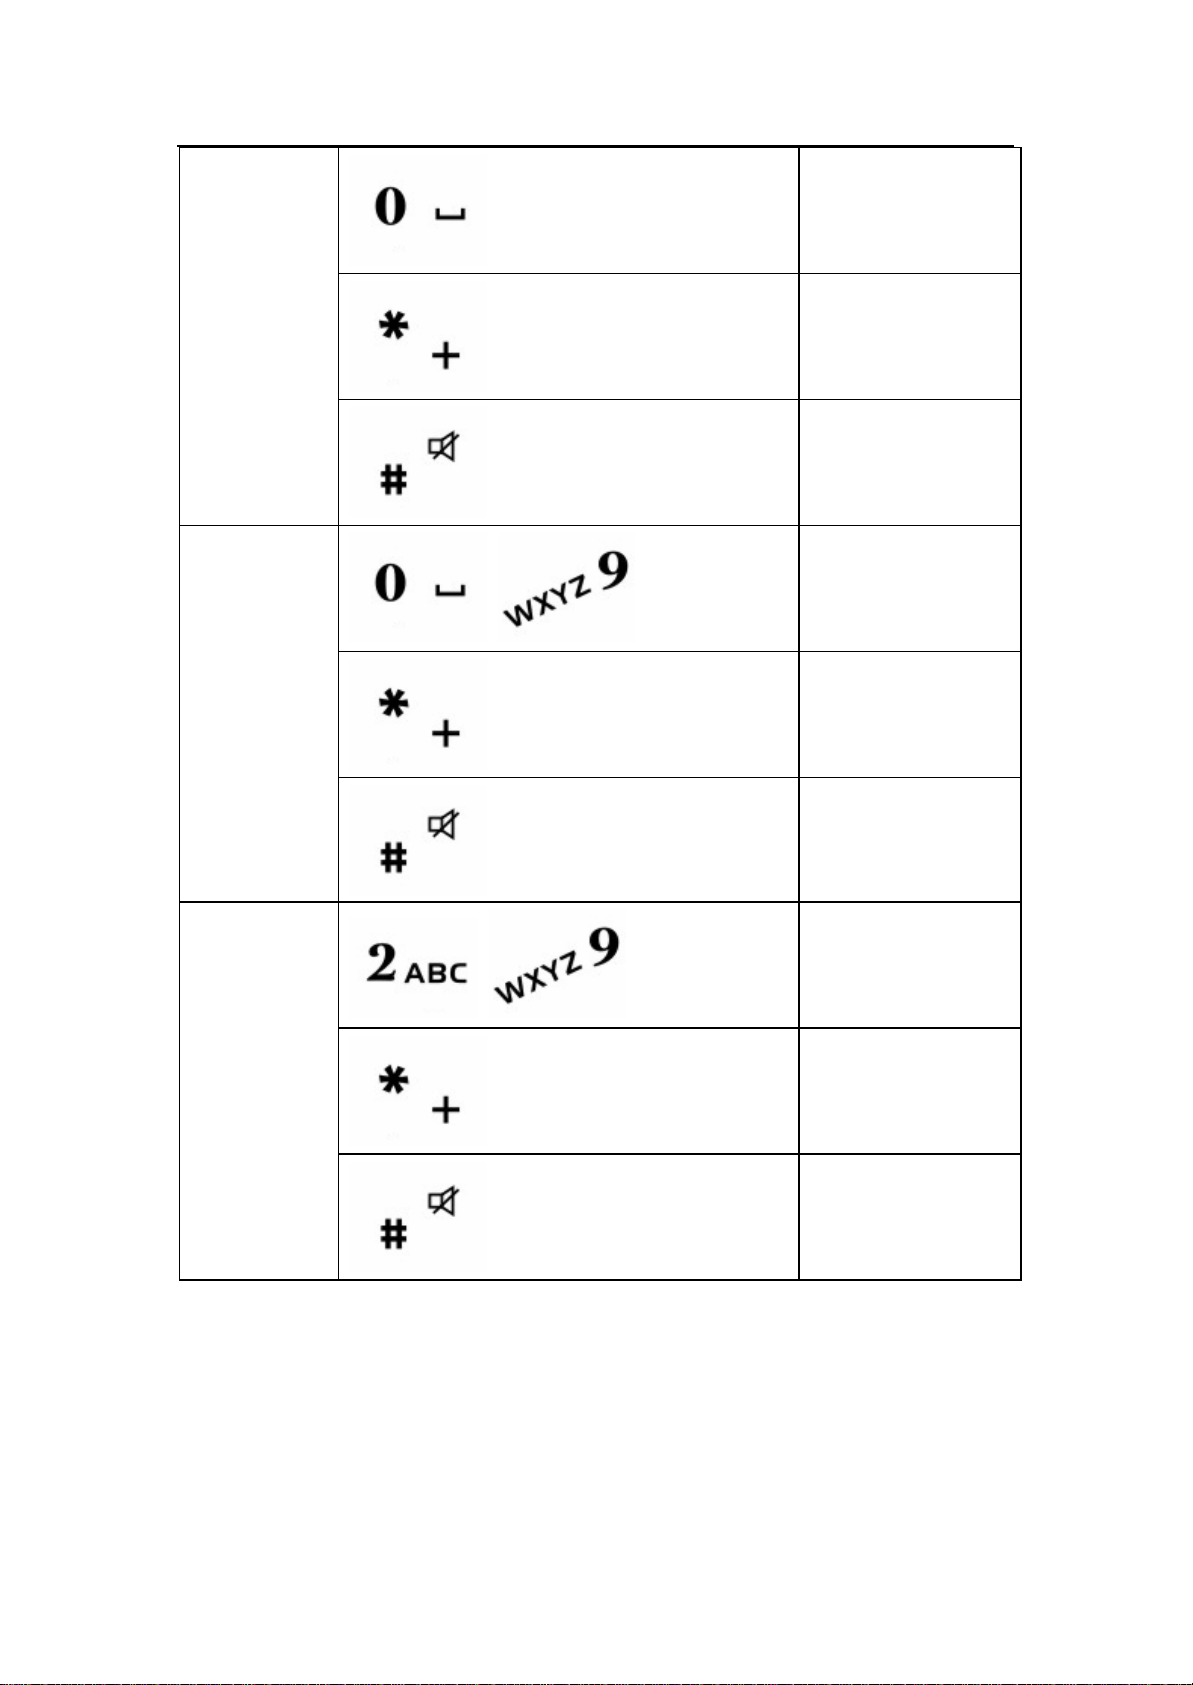
123
space, 0
Display frequently
used symbols
Display symbols
Switch input methods
0~9
~
Display symbols
ENG/eng
~
Switch input methods
Multitap input,
display dynamic
English words for
your choice.
Display symbols
Switch input methods
Page 22 of 37 Copyright©2008 Spice Mobiles Ltd.
Page 24
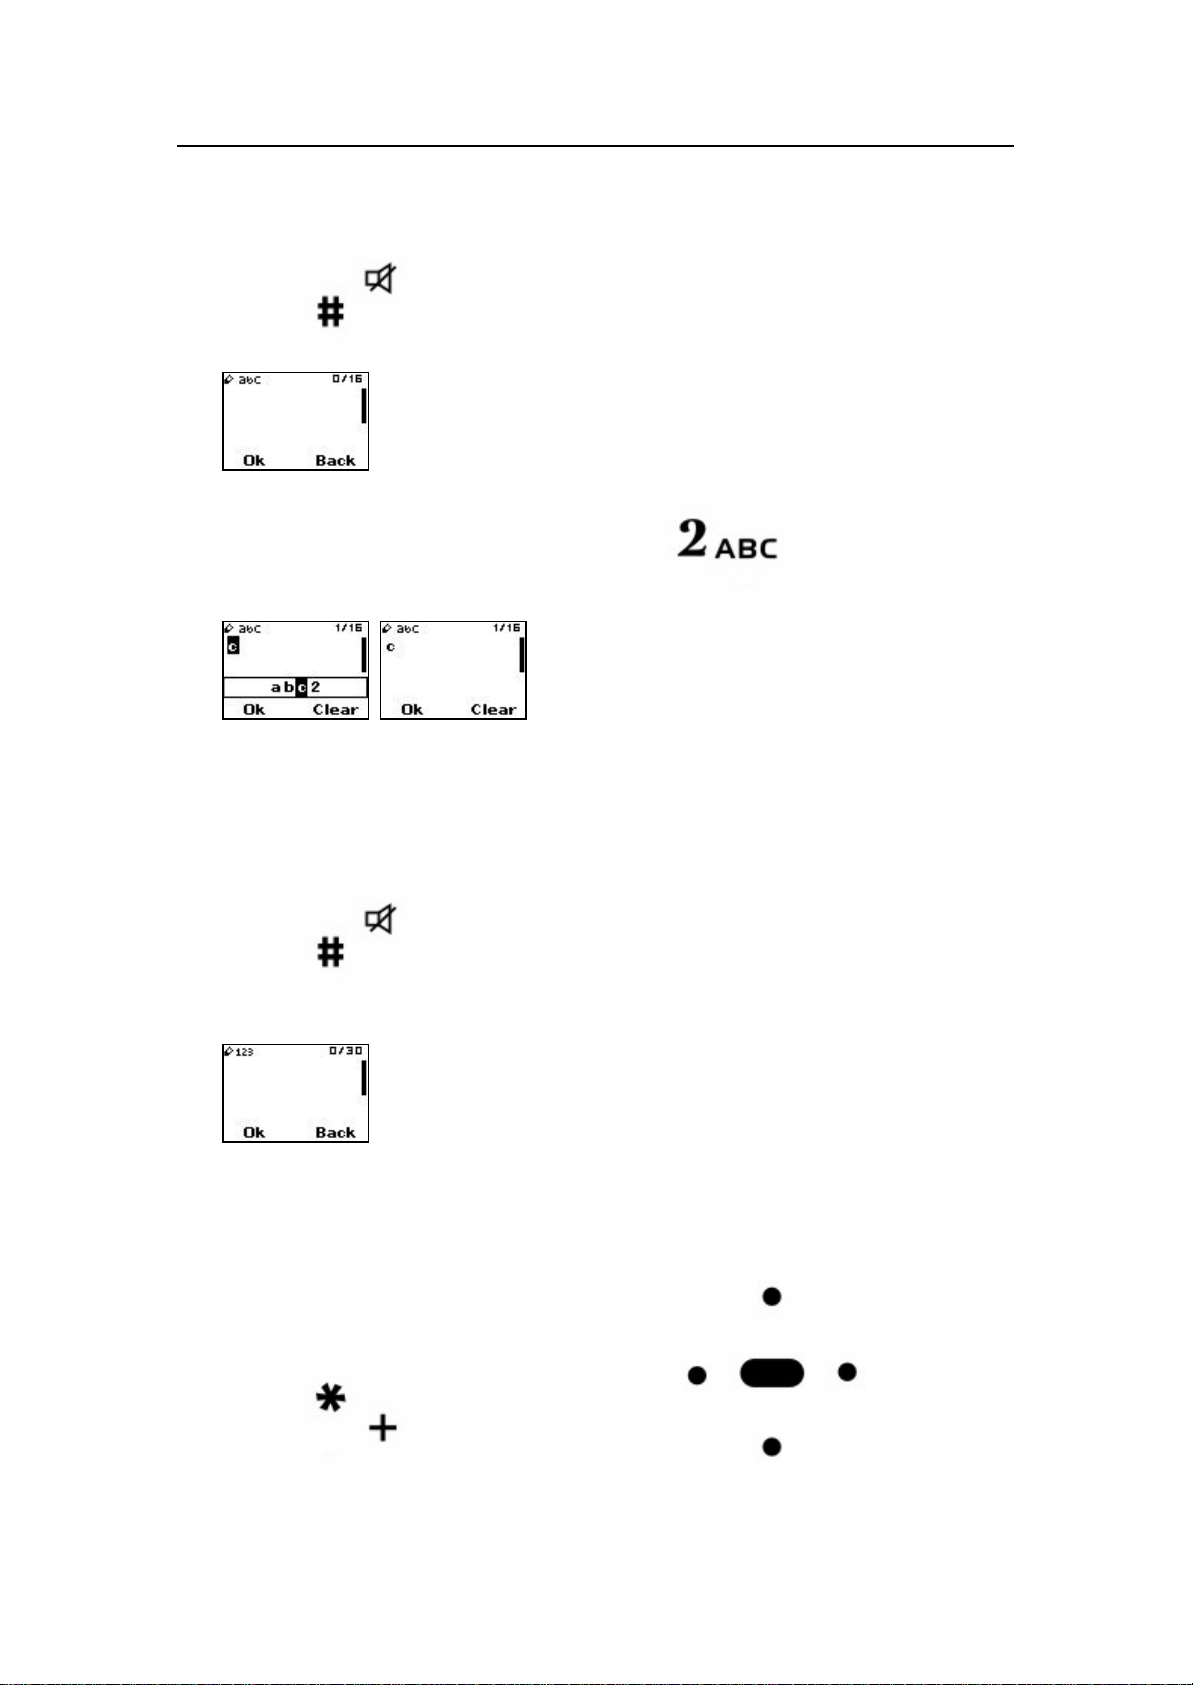
4.2 ABC/abc input
1. Press to switch to abc input.
l Press the numeric key. For example, press three times for “c”.
2. Press (Ok) to save and exit.
4.3 123 input
1. Press to switch to 123 input. Press the numeric key directly to enter
the number.
4.4 Entering symbols
1. Press to display symbols. Press for the desired
one and press (Ok). Press (Back) to exit the symbol display.
Page 23 of 37 Copyright©2008 Spice Mobiles Ltd.
Page 25
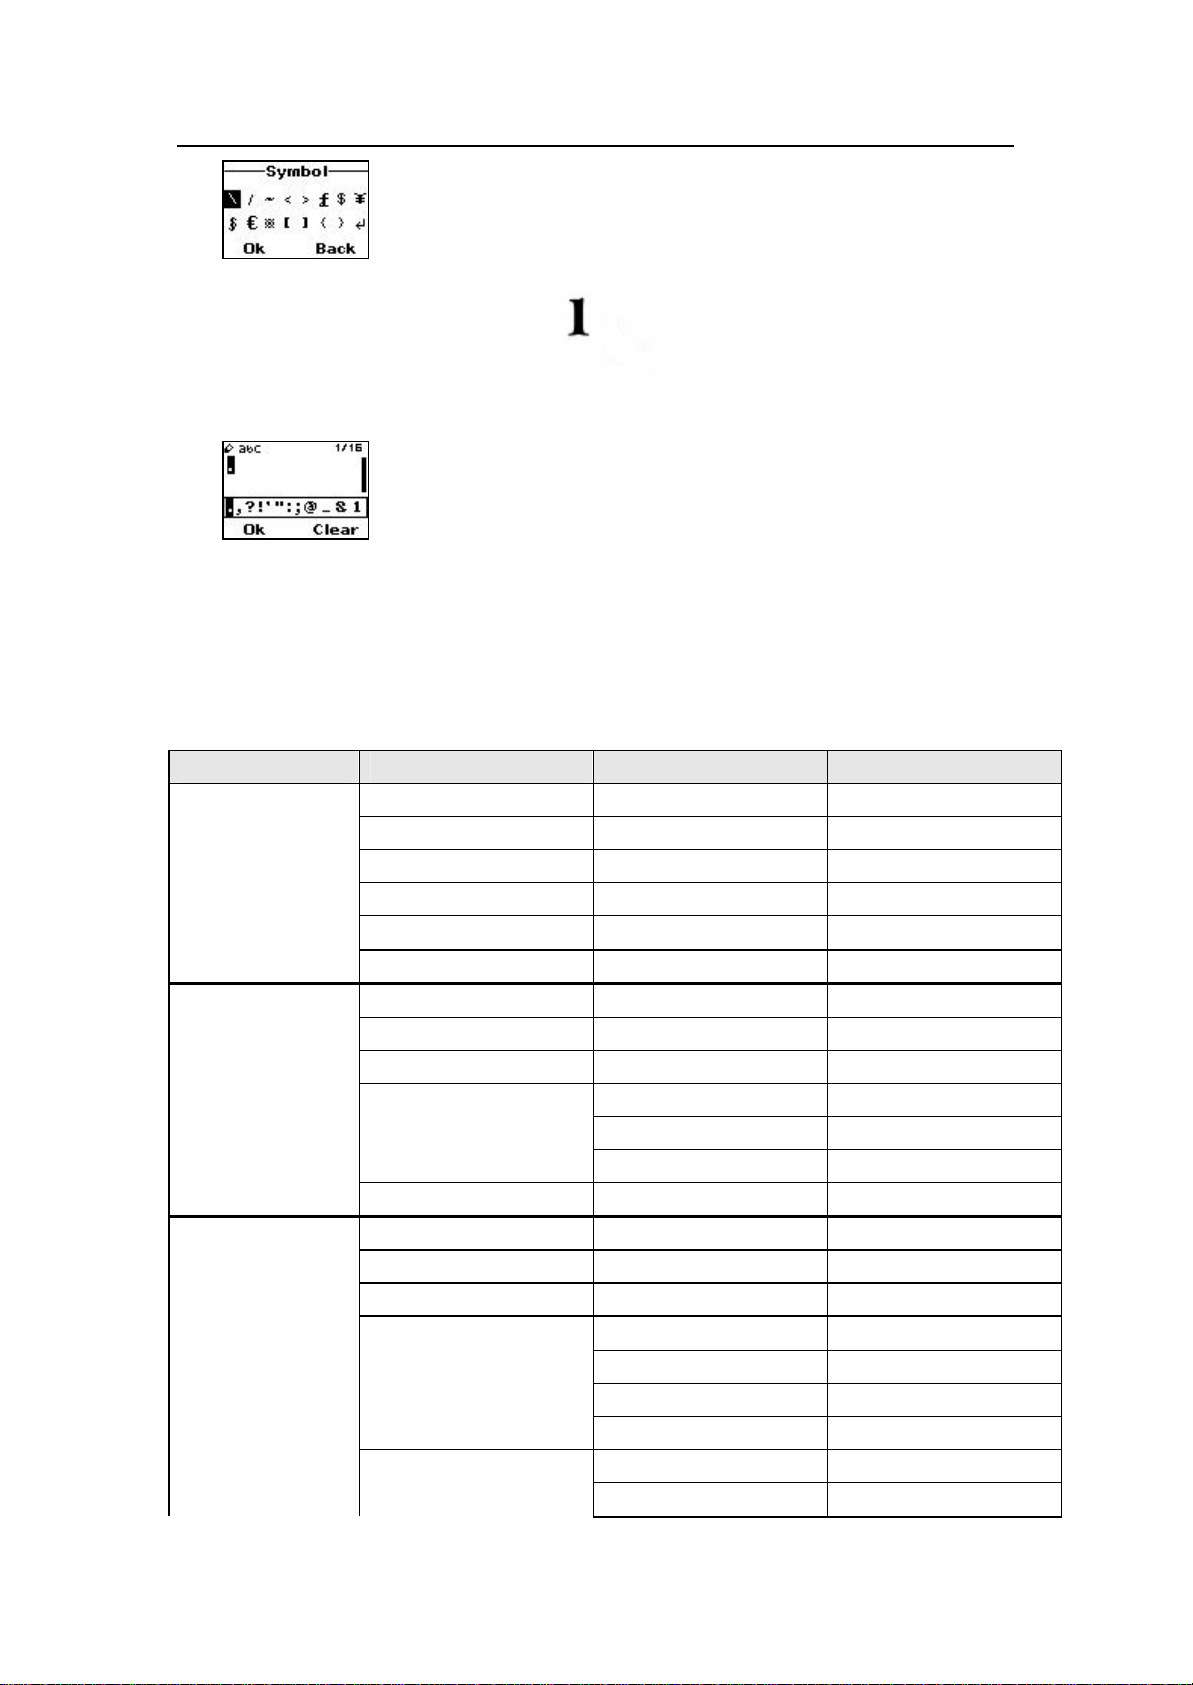
2. In abc/ABC input method, press repeatedly for the frequently used
symbols.
5. The menus
5.1 Menu Tree
Main menu Sub-menu Sub-menu Sub-menu
1 Phone book*
2 Messages*
3 Call History*
1 Search Entry
2 Add New Entry
3 Delete All
4 Copy All
5 Owner Info
6 Memory Status
1Write Message
2 Inbox
3 Outbox
4 Message Settings
5 Broadcast
1 Missed
2 Dialed
3 Received
4 Delete
1 Profile
2 Common
3 Memory Status
1 Missed Calls
2 Dialed Calls
3 Received Calls
4 Delete All
5 Call Time
Page 24 of 37 Copyright©2008 Spice Mobiles Ltd.
1 Last Call Time
2 Total Sent
Page 26

3 Total Received
4 Reset All Time
4 Settings*
1 Phone Setup
2 Call Setup
1 Time/Date
2 Language
3 Input Method
4 Display
5 Contrast
6 Greeting Text
1 Caller ID
2 Call Waiting
3 Call Divert
4 Call Barring
1 Home City
2 Set Time/Date
3Time Format
1 Set by Network
2 Hide ID
3 Send ID
1 All Voice Calls
2 If Unreachable
3 If no Answer
4 If busy
5 All Data Calls
6 Cancel All Divert
1 Outgoing
2 Incoming
3 Cancel All
5 Line Switching
6 Reminder
7 Auto Redial
1 Network 3 Network
2 Band
4 Security
1 SIM Lock
2 Phone Lock
3 KeyLock
4 Change Pwd.
5 Predict
6 Restore Factory
Settings
5 Fun&Games 1 Games
1 General 6 User Profiles
2 Meeting
1 Alarm 7 Organizer
2 Calculator
4 Change Barring PW
Page 25 of 37 Copyright©2008 Spice Mobiles Ltd.
Page 27

8 Services*
*Unavailable when the phone has no SIM card inserted
5.2 Phone book
You can store names and phone numbers in the memory of the phone or SIM card.
l Phone memory stores up to 100 entries.
l The storage of SIM card memory depends on its type. To check your sim card
memory please check with your telecom operator.
l In idle, press (Name) to enter phone book list. The storage location of entries is
indicated by different icons .
5.2.1 Add New Entry
5.2.1.1 Add New Entry to Phone
Enter phone numbers in idle and press (Save). Select To Phone to store it.
Or
1. Select Menu? Phone book.
2. Select Add New Entry and press (Ok).
3. Select To Phone and then press (Ok).
4. Select Name and press (Edit). Enter the name and press (Ok).
5. Select Number and press (Edit). Enter the number and press (Ok)
6. Press (Done) to save.
5.2.1.2 Add New Entry to SIM
Enter phone numbers in idle and press (Save). Select To SIM to store it.
Or:
1. Select Menu? Phone book.
2. Select Add New Entry and then press (Ok).
3. Select To SIM and then press (Ok).
4. Follow instructions in “Add New Entry to Phone” to enter the name and numbers.
5. Press (Done) to save.
5.2.2 Search Entry
1. Select Menu? Phone book.
2. Select Search Entry and press (Ok).
3. Enter characters (up to 8 characters), the phone lists matched entries. Press (Clear)
to erase the characters entered and press to switch the input
methods.
Page 26 of 37 Copyright©2008 Spice Mobiles Ltd.
Page 28

Notice:
- As characters entered, the entries matched are listed accordingly.
- You cannot find the entries which name is empty.
5.2.3 View
1. In phone book list select the entry you want to view.
2. Press (Option) and select View.
3. Press (Ok) to view.
5.2.4 Edit
1. In phone book list select the entry you want to edit.
2. Press (Option) and select Edit, then press (Ok).
3. Press (Done) to save.
5.2.5 Delete
There are two ways to delete entries.
1. In phone book list
l Select the entry you want to delete, press (Option) and select Delete. Press (Ok).
l The message “Delete?” appears in the display.
l Press (Yes) to confirm and press (No) to cancel the message.
2. Select Menu? Phone book. Select Delete All and press (Ok).
l From SIM: Delete all entries stored in the SIM card memory.
l From Phone: Delete all entries stored in the phone memory.
5.2.6 Copy
There are two ways to copy entries between the phone and the SIM card memory.
1. In phone book list
l Select the entry you want to copy, press (Option) and select Copy. Press (Ok).
l The message “Copy?” appears in the display.
l Press (Yes) to confirm and press (No) to cancel the message.
2. Select Menu? Phone book. Select Copy All and press (Ok).
l From SIM: Copy all entries stored in the SIM card to the phone memory.
l From Phone: Copy all entries stored in the phone memory to the SIM card.
5.2.7 Move
Move entries between the phone and the SIM card memory.
1. In phone book list, select the entry you want to move, press (Option) and select Move.
Page 27 of 37 Copyright©2008 Spice Mobiles Ltd.
Page 29

Press (Ok).
2. The message “Move?” appears in the display .
3. Press (Yes) to confirm and press (No) to cancel the message.
5.2.8 Owner Info
Set the own number for the different lines. After the own number is set and Show Owner
Info function (see 5.5.1.4 Display: Show Owner Info) is activated, the number is shown in
the idle display.
1. Select one and press (Option).
l Edit: Edit the name and number.
l Erase: Erase the selected number.
5.2.9 Memory Status
Select Menu? Phone book?Memory Status. The memory status of the SIM card and
phone memory is shown in the display.
5.3 Messages
You can store up to 10 messages in the phone memory. The SMS memory in SIM varies
according to the capacity of SIM card.
5.3.1 Write Message
1. Select Menu? Messages? Write Message.
2. Write down the message you want. Press (Option) for the following options.
l Done: Complete editing and enter the Send Option display.
l Insert Number:Sending contact info to others.
3. In the Send Option display, there are for the following options:
l Send Only: You can enter recipient’s phone number directly or press (Search) to
select one entry from the phone book. Press (Ok) to send the message.
l Save and Send: You can enter recipient’s phone number directly or press
(Search) to select one entry from the phone book. Press (Ok) to send the
message. After the message is sent, it will be saved to Outbox.
l Save: Save the message to Outbox.
l Send To Many : You can send up to 10 recipients at one time.
5.3.2 Inbox
1. Select Menu? Messages? Inbox. The messages you have read and unread are
listed here.
l Indicates the message is unread.
l Indicates the message is read.
Page 28 of 37 Copyright©2008 Spice Mobiles Ltd.
Page 30

2. When view a detailed message, press (Option) for the following options:
l Reply: Reply to the message.
l Forward: Forward the message to other person.
l Edit: Edit the message.
l Delete: Delete the message.
l Delete All: Delete all messages in Inbox.
l Use Number: List the number of the sender as well as contained in the message
for you to dial or store to the phone book.
5.3.3 Outbox
1. Select Menu? Messages? Outbox. Messages sent and unsent are listed here. Press
(Ok) to read the selected message.
2. When view a detailed message, press (Option) for the following options:
l Send: Send the message again.
l Edit: Edit the message.
l Delete: Delete the selected message.
l Delete All: Delete all messages in Outbox.
l Use Number: List the number of the recipient as well as contained in the
message for you to dial or store to the phone book.
5.3.4 Message Settings
Select Menu? Messages? Message Settings.
Profile
l Edit the number of the message service center. With the SIM card inserted, the phone
automatically searches for the number. You need to make sure the number is correct
before sending and receiving the message.
l Select the period for the message saved. It is the time the service center’s attempt to
send the message. Please contact the network operator for more information.
l Select the format of the message to be sent. Please contact the network operator for
more information.
Common
l Delivery Report: Get the delivery report when the message is successfully delivered to
the recipient.
l Reply Path: Whether to use the service center which send the message to reply.
Memory Status
l Check the message memory status of the SIM and the phone.
5.3.5 Broadcast
This function needs to be supported by the network. Please contact the network operator
for more information.
Before using the Broadcast, you need to:
1. Set Receive Mode to On.
2. Set the channel title and ID. You can store up to 10 channels.
Page 29 of 37 Copyright©2008 Spice Mobiles Ltd.
Page 31

3. Set the language.
4. The contents of the Broadcast is shown in the idle display.
5. Select Read Message to view the Broadcast (up to 3 messages) you have received.
The old message will be replaced by the latest one.
5.4 Call History
5.4.1 Missed Calls/Dialed Calls/Received Calls
The phone registers the phone numbers of missed, dialed and received calls (up to 10
records each).
Below takes Missed Calls for example.
1. Select Menu? Call History? Missed.
2. Press (Ok) to view the selected record.
3. Press (Option) for the following options:
l Delete: Delete the record.
l Save: Save the phone number to phone book.
l Dial: Dial the phone number.
l Edit: Pick the phone number to the idle display to modify, then save or dial.
5.4.2 Delete
Select Menu?Call History? Delete. You can choose to delete records of missed calls,
dialed calls or received calls respectively or delete them at one time.
5.4.3 Call Time
Select Menu?Call History?Call Time. You can view last call time, total sent time, total
received time and reset all time.
5.5 Settings
5.5.1 Phone Setup
5.5.1.1 Time/Date
1. Select Menu? Settings? Phone Setup? Time/Date.
2. Set the home city, time, date and the format.
3. Press (Ok) to save.
5.5.1.2 Language
Set a language for the display language. The preset language is English.
1. Select Menu? Settings? Phone Setup? Language.
Page 30 of 37 Copyright©2008 Spice Mobiles Ltd.
Page 32

5.5.1.3 Input Method
1. Select Menu? Settings? Phone Setup? Input Method.
2. Select the desired one and press (Ok) to save.
5.5.1.4 Display
Select Menu?Settings? Phone Setup? Display.
l Off: Hide date, time and Owner Info in idle display.
l Show Date and Time: Show date and time in idle display.
l Show Owner Number: Show the own number in idle display. To show the number,
you should first store the own number in the phone book.
5.5.1.5 Contrast
1. Select Menu?Settings? Phone Setup? Contrast.
2. Press to adjust the contrast
3. Press (Ok) to save.
5.5.1.6 Greeting Text
Select Menu?Settings? Phone Setup? Greeting Text.
If you edit the text and activate the function, the text is shown in the display each time you
power the phone on.
Set the status on or off. Enter the greeting texts. Press (Done) to save.
5.5.2 Call Setup
5.5.2.1 Caller ID
Select Menu?Settings?Call Setup? Caller ID. Decide whether to send the phone
number to the person you are calling. This needs to be supported by the network.
l Set by Network: Send or hide the phone number depending on the network.
l Hide ID: Hide the phone number to the person you are calling. You may fail to make a
call with this function in some areas. Please contact the network operator for more
information.
l Send ID: Send the phone number to the person you are calling.
Select the desired one and press (Ok) to save.
5.5.2.2 Call Waiting
Select Menu?Settings?Call Setup? Call Waiting.
This function allows you to put the current call on hold and then make or answer a second
Page 31 of 37 Copyright©2008 Spice Mobiles Ltd.
Page 33

one. You can switch between calls.
5.5.2.3 Call Divert
Select Menu?Settings?Call Setup? Call Divert.
With this function you can divert the incoming calls to a specified number.
l All Voice Calls: Divert all voice incoming calls.
l If Unreachable: Divert incoming calls when the phone is outside the network service
area.
l If No Answer: Divert incoming calls when they are not answered.
l If Busy: Divert incoming calls when the phone is busy.
l All Data Calls: Divert all data incoming calls.
l Cancel All Divert: Cancel all divert calls.
Press (Ok) when done.
5.5.2.4 Call Barring
Select Menu?Settings?Call Setup? Call Barring.
Call barring is a network-dependant service. Please contact your network operator for
more information.
Outgoing
l All Calls: Bar all outgoing calls except the emergency call.
l International Calls: Bar outgoing international calls.
l International Except Home : Bar outgoing international calls except calls to the
home country.
Incoming
l All Calls: Bar all incoming calls.
l When Roaming: Bar incoming calls when roaming.
Press (Ok) to save.
5.5.2.5 Line Switching
Select Menu?Settings?Call Setup? Line Switching. Select to use Line 1 or Line 2.
Press (Ok) to save.
5.5.2.6 Reminder
Select Menu?Settings?Call Setup? Reminder.
l Off: Deactivate the reminder.
l Single: Remind you only once during the period you set.
l Periodic: Remind you every XX seconds during the period you set .
Press (Ok) to save.
5.5.2.7 Auto Redial
Select Menu?Settings?Call Setup? Auto Redial.
Page 32 of 37 Copyright©2008 Spice Mobiles Ltd.
Page 34

If this function is activated, the phone redials the number up to 10 times automatically if
the call is not answered.
5.5.3 Network
5.5.3.1 Network
The phone should access the network before making and receiving calls.
Select Menu?Settings? Network? Network.
l Automatic: The phone selected automatically a network available.
l Manual: The phone lists networks available for your choice.
5.5.3.2 Band
The phone provides 900, 1800 and Dual Band for your choice.
5.5.4 Security
Select Menu?Settings? Security.
5.5.4.1 SIM Lock
Select Menu?Settings? Security?SIM Lock. You are required to enter the PIN before
changing its status.
With this function activated, the phone asks for a PIN each time you power the phone on.
If the PIN is entered incorrectly three times in a row, you need to unblock it using the PUK.
The PIN and PUK are provided by the network operator.
5.5.4.2 Phone Lock
Phone lock protects the phone from being unauthorized use. With this function activated,
you need the password of the phone to unlock it.
You are required to enter the password before changing its status. The preset password is
“1122”.
Select Menu?Settings? Security? Phone Lock. Enter the password and press (Ok).
5.5.4.3 KeyLock
Select Menu?Settings? Security? KeyLock. Select the time for the KeyLock and press
(Ok).
5.5.4.4 Change Pwd.
You can change the PIN, PIN2 and the phone password. Select
Menu?Settings? Security? Change Pwd.
You need to activate the SIM Lock before changing the PIN. First enter the old PIN to
verity then enter the new PIN .
Page 33 of 37 Copyright©2008 Spice Mobiles Ltd.
Page 35

When change the password, you need to enter the new password and enter it again to
confirm it.
The password should be 4~8 digits from 0 to 9. Press (Ok) when done.
5.5.5 Predict
Predict saves the most frequently used words. When enter texts, the phone automatically
lists the relevant words for your choice.
5.5.6 Restore Factory Settings
Reset some settings to factory default.
Select Menu?Settings? Restore Factory Settings.
Notice: The phone’s password is also required when restore to the factory settings. The
preset password is “1122”. If you forget your password, please contact the local service
provider’s service center.
5.6 Fun& Games
The phone comes with a game: memory.
Before starting the game, you can
l View the game rules by selecting Menu? Fun&Games? Games. Then select one
game and Game Help.
5.7 User Profiles
Select Menu? User Profiles. The preset profile is General.
Tip: The handset supports TRUE TONES.
5.7.1 Activating a profile
Select one profile you want and press (Option). Select Activate and press (Ok). The
activated profile is ticked.
5.7.2 Customizing a profile
You can customize a profile to suit your needs. Select one profile you want and press
(Option). Select Customize and press (Ok).
Below takes General for example to explain how to customize the profile.
Page 34 of 37 Copyright©2008 Spice Mobiles Ltd.
Page 36

5.7.2.1 Tone Setup
l Call: The phone has 10 preset rings. Press to select the ring
and press (Ok) to save.
l Alarm: Select a ring when alarm time reaches. See “Call” for detailed operations.
l Power On: Select a ring when the phone is powered on. Press
to select the ring and press (Ok) to save.
l Power Off: Select a ring when the phone is powered off. See “Power On” for detailed
operations.
l Message: Select a tone when a message has been received. See “Power On” for
detailed operations.
l Keypad Tone : Select a tone when the key is pressed. The options include Silent,
Click and Tone.
5.7.2.2 Volume
Set the volume level for ring and key tones. Press to adjust the
volume and press (Ok) to save.
5.7.2.3 Alert Type
Set the alert type to Ring, Vibration Only, Vibrate and Ring, Vibrate Then Ring, Light Only.
Press (Ok) to save.
5.7.2.4 Ring Type
Set the ring type to Single, Repeat, or Ascending. Press (Ok) to save.
5.7.2.5 Extra Tone
Press (On / Off) to tick it and press (Done) to save.
Page 35 of 37 Copyright©2008 Spice Mobiles Ltd.
Page 37

5.7.2.6 Answer Mode
Set the answer mode to Any Key or not.
Press (On / Off) to tick it and press (Done) to save.
5.7.2.7 LCD Backlight
Set the duration of the LCD Backlight.
Press (Ok) to save.
5.8 Organizer
5.8.1 Alarm
1. Select Menu? Organizer? Alarm.
2. Select one alarm and press (Edit).
3. Set the alarm off/ once/ every day , the alarm time.
4. Press (Done) to save.
Notice: When the alarm time reaches, the phone reminds you even when it is powered
off.
When the alarm time reaches, the phone rings or vibrates.
l Press (Stop) to turn off the alarm.
l Press (Snooze) to turn off the alarm temporarily. It reminds you again about 4 minutes
latter. If you do not handle the alarm, it by default reminds you again about 4 minutes
latter.
5.8.2 Calculator
The calculated numbers cannot exceed 8 digits due to accuracy limitation.
1. Select Menu? Organizer? Calculator.
2. Key definitions in the calculator function are shown below.
Page 36 of 37 Copyright©2008 Spice Mobiles Ltd.
Page 38
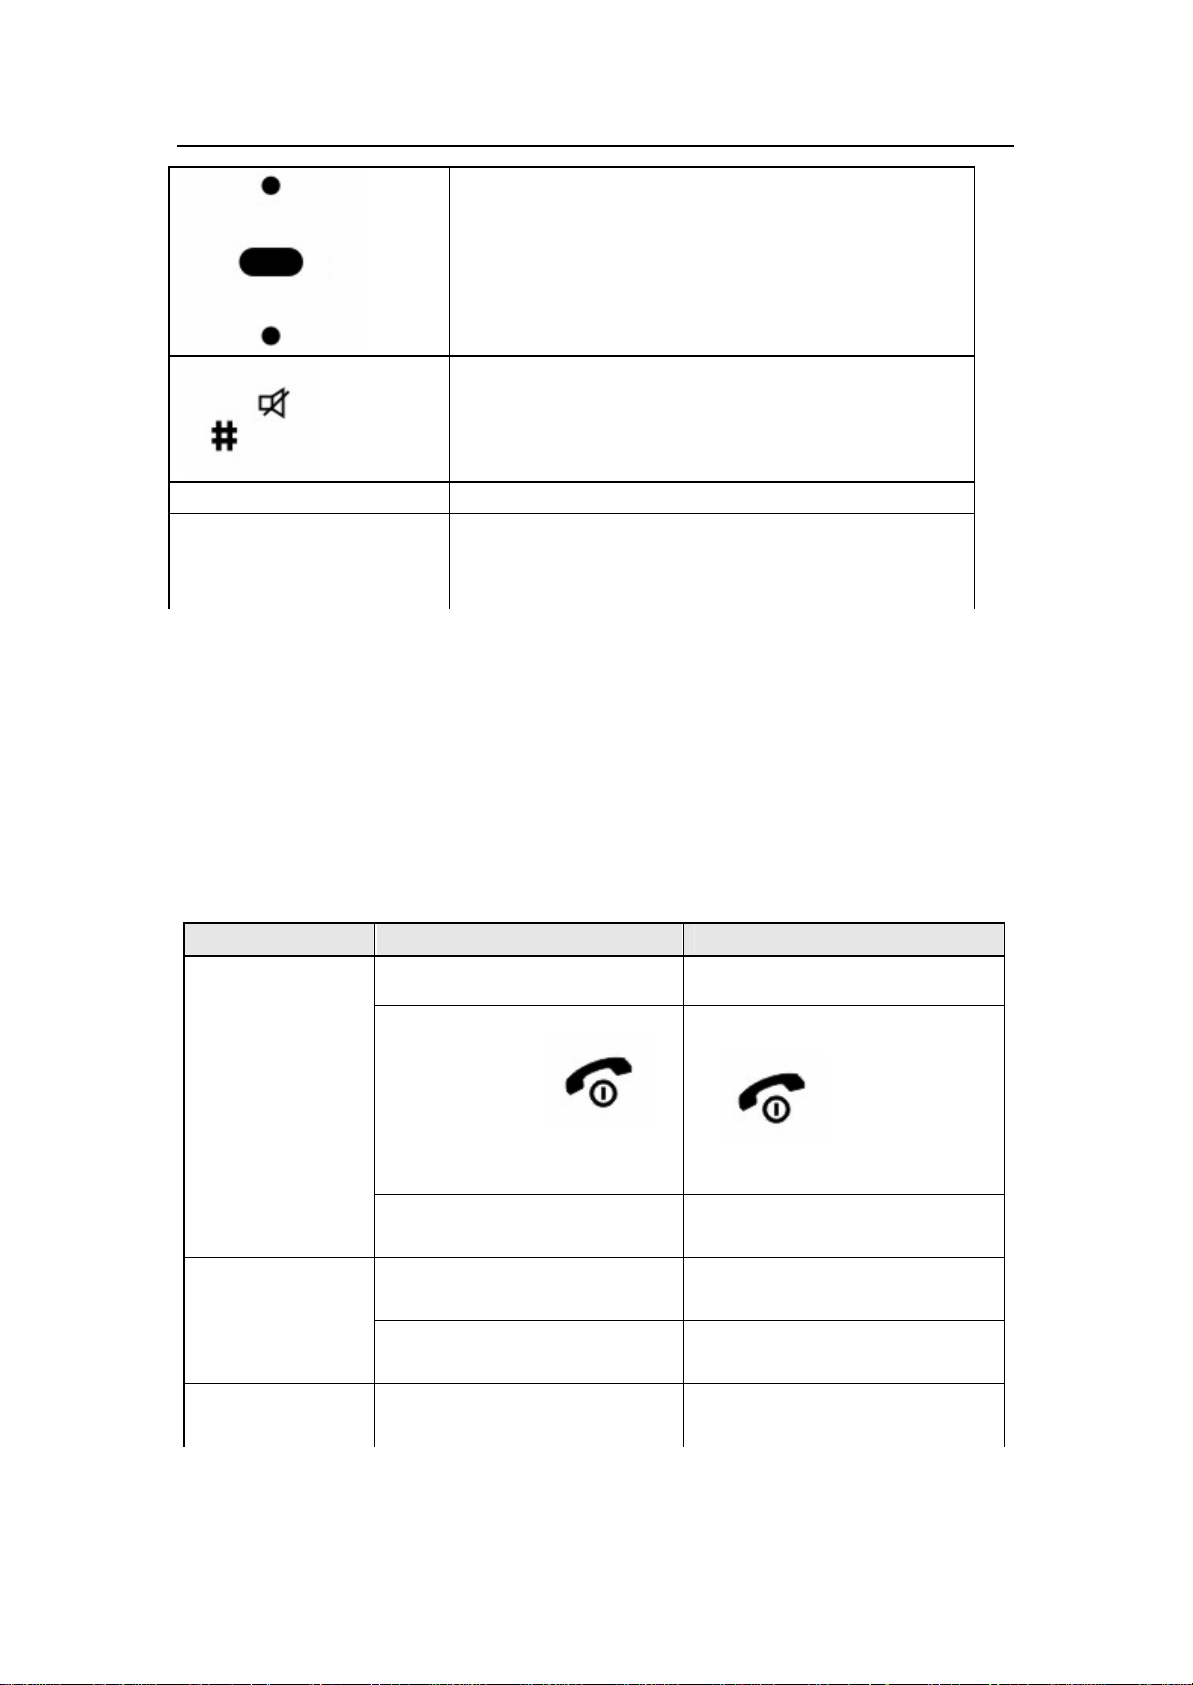
Select the operator
Decimal point
Left soft key Equal, confirm
Right soft key Erase numbers entered
Erase the result and return to the initial state
Exit the calculator
5.9 Services
Select Menu? Services.
The content of the service depends on the SIM card. Please contact the operator for
detailed information.
6. Troubleshooting
Problem Possible cause Solution
l Is the battery power low? l Please charge the battery.
l Please press and hold
Unable to power
on
Unable to make
a call
l Do you press
long enough?
l Is the battery installed
correctly?
l Is the phone outside of the
service area?
l Is the number you dial
correct?
l Is the phone outside of the
service area?
for 2 seconds or
longer.
l Please install the battery
correctly.
l Move to a place where signal
can be received strongly.
l Check the number and dial
again.
l Move to a place where signal
can be received strongly.
Page 37 of 37 Copyright©2008 Spice Mobiles Ltd.
Page 39

suddenly
l Are you moving in high
speed during conversation?
l Do you insert the SIM card
correctly?
Insert the SIM
card
Unable to
charge the
battery
l Is the SIM card connector
dirty?
l Is the SIM card damaged? l Please check the SIM card
l Is the charger plugged to
the phone correctly?
l Is the connections OK?
l Is the battery old?
7. After-sale service
l The signal will interrupt when
the phone switch between 2
cell station. Please move in
low speed.
l Please insert the SIM card
correctly.
l Please clean the SIM card.
and return it to the service
provider.
l Please plug the charger to
the phone correctly.
l Please check the connection.
l Replace the phone with a
new battery.
For after-sale service, please refer to Warranty Card attached to this booklet.
Page 38 of 37 Copyright©2008 Spice Mobiles Ltd.
Page 40

 Loading...