

Page 1
Page 2

WWeellccoommee ttoo uussee DD--11111111
This is a dual-mode mobile phone which supports both GSM and CDMA2000 1X, 262K color
TFT display, 2.0 mega pixel camera, Pocket Word,Excel,PowerPoint ,MSN , Outlook, WAP
service and common PDA functions and can provides Pocket Internet Explorer and Windows
Media Player for user.
Note: In this user manual, to “press” or “tap” a key means to press shortly; to “long press” a
key means to press and hold for a while (> 2 seconds).
² Please carefully read this manual before you use the phone.
² For a newly bought phone, charge it for 4 hours before the first time of use, and charge the
second time only after the power has been used up. Repeat this several times, and the battery
will reach the best use effect.
² This manual is for illustration purposes only. The phone and its accessories are subject to
update without notice.
Page 1 of 84 Copyright©2009 Spice
Page 3

Table of contents
WWeellccoommee ttoo uussee DD--1111111
11.. SSaaffeetty
y........................................................................................................................................5
1 ....................................................................................................................1
1.1. Notice to the Use of Battery and Charger.................................................................6
22.. IInnttrroodduuccttiioon
.
22..11.
.
22..22.
.
22..33.
.
22..44.
.
22..55.
.
22..66.
n..............................................................................................................................8
NNaammee aanndd FFuunnccttiioonnss ooff tthhee PPaarrttss ooff tthhee PPhhoonne
DDeessccrriippttiioonn ooff DDiissppllaayy CCoonntteenntts
PPhhoonnee aanndd AAcccceessssoorriiees
SSppeecciiffiiccaattiioonns
s..........................................................................................................10
s............................................................................................10
SSttaannddbbyy TTiimmee // MMaaxx.. TTaallkk TTiimme
d
AAbboouutt SSIIMM CCaarrd
、
、
UUIIMM CCaarrdd aanndd tthhee BBaatttteerry
s...............................................................................9
e..............................................................................11
e.........................................................8
y........................................................11
2.6.1. To insert SIM card, UIM card and battery......................................................11
2.6.2. To remove the battery, SIM card and UIM card..............................................12
2.6.3. To charge the battery.......................................................................................13
2.7. To switch on and off................................................................................................13
2.8. Standby Mode.........................................................................................................14
2.9. Today screen...........................................................................................................15
2.10. Using the Input Panel..............................................................................................16
2.10.1. Using the ABC Input.......................................................................................16
2.10.2. Using the Block Recognizer............................................................................17
2.10.3. Using English Input........................................................................................17
2.10.4. Using the on- screen keyboard........................................................................18
2.10.5. Using the Letter Recognizer............................................................................19
2.10.6. Using Transcriber............................................................................................19
33.. CCaalllliinng
g....................................................................................................................................21
3.1. To make calls..........................................................................................................21
3.1.1. To Dial in standby mode.................................................................................21
3.1.2. To insert a pause symbol when dialing...........................................................22
3.1.3. Use the Phone Dialing Application.................................................................23
3.1.4. Speed Dialing..................................................................................................24
3.1.5. To Dial from Contacts List..............................................................................24
3.1.6. To dial from the phonebook............................................................................24
3.1.7. GSM Three-Way Conference..........................................................................24
3.1.8. CDMA Three-Way Conference.......................................................................25
3.2. To answer or reject a call........................................................................................25
3.3. Missed Calls............................................................................................................25
3.4. Call History.............................................................................................................25
3.5. Call Option..............................................................................................................26
3.5.1. To be mute during a call..................................................................................26
3.5.2. Call Hold.........................................................................................................26
3.5.3. Create Call Notes............................................................................................26
3.5.4. To adjust volume of the speaker during a call.................................................26
3.5.5. DTMF (Dual Tone MultiFrequency) Tone......................................................27
3.6. UIM / SIM Lock.....................................................................................................27
Page 2 of 84 Copyright©2009 Spice
Page 4

3.7. GSM Call Waiting...................................................................................................27
3.8. CDMA Call Waiting................................................................................................27
44.. MMaannaaggiinngg PPeerrssoonnaall IInnffoorrmmaattiioon
n...........................................................................................28
4.1. Contacts..................................................................................................................28
4.1.1. Contacts List...................................................................................................28
4.1.2. To add New Contacts......................................................................................29
4.1.3. To search Contact............................................................................................29
4.1.4. Contact Backup...............................................................................................29
4.2. Calendar..................................................................................................................30
4.2.1. Open the Calendar Application.......................................................................30
4.2.2. To add New Appointments..............................................................................31
4.2.3. View and Edit Appointments..........................................................................32
4.3. Task.........................................................................................................................33
4.3.1. Open the Tasks Application.............................................................................33
4.3.2. To add new tasks.............................................................................................34
4.4. Notes.......................................................................................................................34
4.4.1. Open the Notes Application............................................................................35
4.4.2. To add new notes.............................................................................................35
55.. EExxcchhaannggiinngg MMeessssaaggees
s ...........................................................................................................36
5.1. Types of Accounts...................................................................................................36
5.2. GSM SMS...............................................................................................................37
5.2.1. Send GSM SMS..............................................................................................37
5.2.2. Inbox...............................................................................................................37
5.2.3. Outbox/Drafts.................................................................................................38
5.3. CDMA SMS............................................................................................................38
5.3.1. Send CDMA SMS...........................................................................................38
5.3.2. Inbox...............................................................................................................39
5.3.3. Outbox/Drafts.................................................................................................40
5.4. MMS.......................................................................................................................40
5.4.1. To send MMS..................................................................................................40
5.4.2. Inbox...............................................................................................................40
5.4.3. Outbox/Drafts.................................................................................................41
66.. SSeettttiinngg UUpp YYoouurr PPDDAA PPhhoonne
e..................................................................................................42
6.1. Personal Settings.....................................................................................................42
6.1.1. CDMA Phone Settings....................................................................................42
6.1.2. GSM Phone Settings.......................................................................................42
6.1.3. Owner Information..........................................................................................43
6.1.4. Today Screen Settings.....................................................................................43
6.1.5. Sounds & Notifications...................................................................................44
6.1.6. Buttons Settings..............................................................................................45
6.1.7. Menus Settings................................................................................................46
6.1.8. Input Settings..................................................................................................47
6.1.9. Lock................................................................................................................48
6.1.10. Card Information.............................................................................................49
Page 3 of 84 Copyright©2009 Spice
Page 5

6.2. System Settings.......................................................................................................49
6.2.1. GPS Settings...................................................................................................49
6.2.2. To change the device name.............................................................................50
6.2.3. Memory...........................................................................................................50
6.2.4. To remove programs.......................................................................................51
6.2.5. Regional Settings............................................................................................51
6.2.6. Screen Settings................................................................................................52
6.2.7. Reset to factory Settings.................................................................................52
6.2.8. Clock and Alarms............................................................................................53
6.2.9. Power..............................................................................................................54
6.2.10. Backlight Settings...........................................................................................54
6.2.11. Certificates......................................................................................................55
6.3. Connections Settings...............................................................................................56
6.3.1. Standby Mode Settings...................................................................................56
6.3.2. Beam...............................................................................................................56
6.3.3. USB to PC.......................................................................................................57
6.3.4. Network Cards................................................................................................57
6.3.5. Bluetooth.........................................................................................................58
6.3.6. Connections.....................................................................................................59
6.3.7. Setting a GPRS Connection............................................................................60
6.3.8. Connect GPRS................................................................................................63
6.3.9. Disconnecting GPRS.......................................................................................64
77.. WWoorrkkiinngg wwiitthh DDooccuummeennttss aanndd FFiillees
s......................................................................................65
7.1. Microsoft Office Word Mobile...............................................................................65
7.2. Microsoft Office Excel Mobile...............................................................................65
7.3. Microsoft Office PowerPoint Mobile......................................................................66
88.. EExxppeerriieenncciinngg MMuullttiimmeeddiia
a......................................................................................................67
8.1. Pictures & Videos....................................................................................................67
8.1.1. To Open Pictures&Videos...............................................................................67
8.1.2. To copy media files to your device.................................................................67
8.1.3. To view media files.........................................................................................67
8.1.4. Pictures and Videos Menu...............................................................................67
8.1.5. Edit a picture...................................................................................................67
8.2. Camera....................................................................................................................67
8.3. Video.......................................................................................................................68
8.4. Windows Media Player Mobile..............................................................................68
8.4.1. To play media..................................................................................................68
8.5. Games.....................................................................................................................69
8.6. Calculator................................................................................................................69
99.. KKJJaavva
1100.. IInntteerrnneett SShhaarriinng
1111.. UUssiinngg BBlluueettooootth
a......................................................................................................................................70
g.....................................................................................................................71
h .....................................................................................................................72
11.1. Bluetooth modes.....................................................................................................72
11.2. To turn Bluetooth on and make your device visible................................................72
Page 4 of 84 Copyright©2009 Spice
Page 6

11.3. Bluetooth partnerships............................................................................................72
11.4. Beam information using Bluetooth.........................................................................73
1122.. RReeuutteerrs
1133.. NNiimmbbuuzzz
1144.. SSTTKK//UUTTK
1155.. OOppeerraa MMiinni
1166.. EEmmaaiill22SSMMS
1177.. MMiittr
1188.. AAbboouutt SSyynncchhrroonniizzaattiioon
s....................................................................................................................................73
z..................................................................................................................................74
K................................................................................................................................75
i.............................................................................................................................75
S ............................................................................................................................75
r.........................................................................................................................................76
n ..........................................................................................................78
18.1. Synchronizing with Your PC...................................................................................78
18.2. Synchronizing with Exchange Server.....................................................................79
1199.. FFiillee EExxpplloorreer
2200.. SSeeaarrcchhiinngg IInnffoorrmmaattiioon
2211.. MMaaiinntteennaanncce
2222.. TTrroouubblleesshhoooottiinng
2233.. AAfftteerr SSeerrvviiccees
r..........................................................................................................................81
n ..........................................................................................................82
e...........................................................................................................................83
g .....................................................................................................................84
s..........................................................................................................................84
11.. SSaaffeettyy
l Before you use the phone, please carefully read this section to grasp the correct method of use
and ensure the safety of the holder, others and properties.
l All the screens in this manual are for reference only, and some contents actually displayed may
depend on the presetting of the service provider or the network operator, or the SIM/UIM card.
If any functions referred to in this manual are different from those of your phone, please follow
your phone.
l The specifications and appearance of this product are subject to change due to improvement of
functions without notice.
l For GSM service-related problems, consult your GSM service provider.
l For CDMA service-related problems, consult your CDMA service provider.
l Please back up your important data timely and keep them properly. The company is not liable
for any failure to call or loss of data due to misoperation, poor signal or power cut, etc.
l Do not use the phone in an environment of extremely high or low temperature, otherwise,
malfunctions may be caused. Use the phone in temperatures between 5ºC and 35ºC and a
humidity of 35% to 85%.
l Using the phone in an environment of moist or high humidity may cause malfunctions of the
phone, the charger and the battery.
l Do not drop or strongly impact the phone, otherwise, malfunctions may be caused and the
phone can’t be used.
l Do not use the phone near any electronic device vulnerable to interference. Otherwise,
malfunctions of electronic device may be caused. Such electronic devices include medical
electronic devices, such as hearing aids and pacemaker, fire alarms, auto doors and other
automatic equipment. If you have to use the phone near such devices, please first consult the
manufacturers and dealers of these devices to avoid interference.
l Switch off the phone when you are on the plane or in the hospital where the use of mobile
phones is prohibited to avoid interfering with electronic and medical equipment. If you have to
Page 5 of 84 Copyright©2009 Spice
Page 7

use the phone in such places, please follow the regulations of the sites.
l The phone has an internal antenna. When switched on, do not hold the antenna area on the top
of the phone, otherwise, the quality of connection and the performance of the antenna may be
influenced, and the max. talk time may be reduced.
l To avoid degaussing, do not put financial cards, phone cards or other magnetic cards near the
charger and the phone to avoid failure of use due to the cards.
l Do not place the phone and the battery under direct sunlight or in a car under burning sun or
other places of high temperature to avoid injury due to overheating, leakage, cracking,
distortion, or even fire of the battery.
l Do not put the phone in a place with excessive dust or vibration (which may cause failure) to
avoid malfunctions of the phone.
l Do not take apart the phone, the charger and the battery, or modify the internal structure
without permission to avoid malfunctions and accidents.
l Do not let children fiddle with the phone or the accessories to avoid injuring themselves or
others, or damaging the phone or the accessories. The phone or the accessories may contain
small removable components which may easily cause suffocation of children。
l If the phone is contaminated, please wipe it with a dry cloth. Do not use organic solvent such
as gasoline to wipe the phone to avoid causing damages of the outer surface.
l If smoke or peculiar smell is produced during use, please immediately switch off the phone and
remove the battery. Please have the phone repaired as arranged by the store where you bought
the phone. Do not continue to use to avoid causing injury.
l Do not dispose the phone as urban waste. For details, please refer to the local regulations for
the disposition of waste electronics.
1.1. Notice to the Use of Battery and Charger
l The time for using the battery is an estimated time under 25 and stable signal. If used in a ℃
place with weak signal, extremely high or low temperature, or outside the service area, the
consumption of battery power will be faster, thus the standby time and max. talk time may be
reduced.
l Please use the accessories, such as battery and charger, specified by the company to avoid risks
due to overheating, leakage, explosion, or even fire of the battery caused by non-compliance
with the specifications.
l The battery should be put in a cool, ventilative and sunlight-free place. If the battery is in the
exhausting status for a long time, it can’t be charged. Therefore, if you do not use the phone for
long, please charge the battery periodically.
l The battery is expendable goods. All the batteries have a certain life. If the performance of the
battery can’t be improved after repeated charging, the battery may be discarded as useless and
must be replaced with a new one.
l Please fully charge the battery before you use the newly bought phone.
l Do not charge the battery in a place with direct sunlight, a temperature equaling to or below
0 or equaling to or above 45, high humidity, excessive dust or vibration (which may cause ℃℃
failure), or a place near TV or radio (as it may produce noise interference to video or sound
signal).
l Please switch off the phone and wait over 2 seconds before removing the battery.
Page 6 of 84 Copyright©2009 Spice
Page 8

l Do not dismantle the phone and the charger for modification without permission to avoid
malfunctions or injury.
l Do not strongly impact or throw the phone or the battery to avoid leakage or overheating of the
battery, or malfunctions of the phone.
l Do not short the two polarities of the battery to avoid leakage, overheating, fire or explosion of
the battery.
l If leakage of the battery enters the eyes accidentally, please immediately wash the eyes with
fresh water and go to a doctor. If it is not treated quickly, it may cause serious injury, such as
blindness.
l If the battery is contaminated with liquid, it may cause burn or malfunctions due to overheating
of the battery. The charger may also cause overheating, damages, electric shock and
malfunctions. If the charger is accidentally sunk in water, or smoke or peculiar smell is
produced during charging, please immediately switch off the phone and unplug the AC cable
from the socket. Please have the phone repaired as arranged by the store where you bought the
phone. Do not continue to use to avoid causing injury.
l Do not put the charger and the AC cable in a place with flame or ovens to avoid causing injury
due to overheating, leakage or fire of the battery.
l Do not touch the charger, the power cable and the plug of AC power supply with wet hands to
avoid electric shock or malfunctions.
l Do not strongly pull the wire of the charger, or put heavy objects on the power cable, or change
the power cable optionally, otherwise, electric shock or fire may be caused.
l When the battery is fully charged, please unplug the charger from the socket.
l Do not dispose the used battery together with daily waste. Please dispose the used battery in
accordance with the regulations issued by the local authority.
Page 7 of 84 Copyright©2009 Spice
Page 9
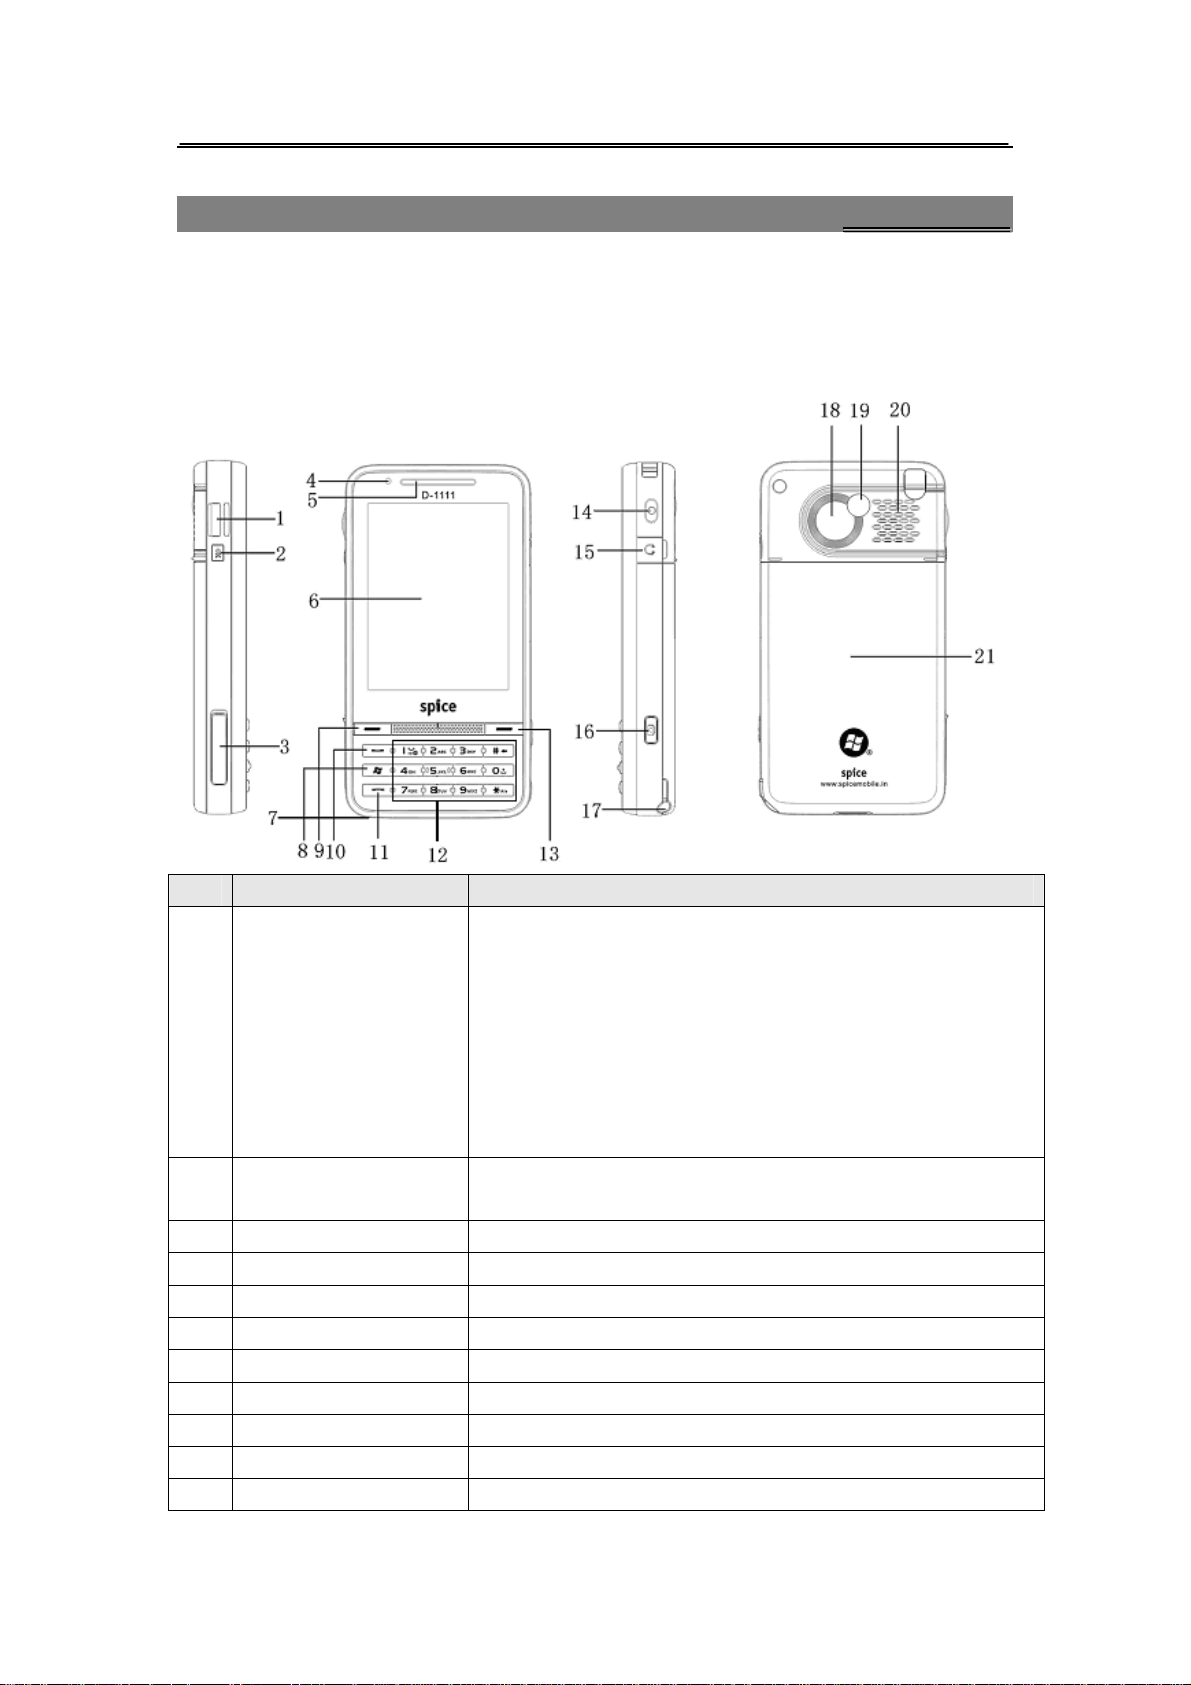
22..11.. NNaammee aanndd FFuunnccttiioonnss ooff tthhee PPaarrttss ooff tthhee PPhhoonnee
22.. IInnttrroodduuccttiioonn
Parts of the Phone
1
Scroll key
2
OK key
3
USB/charger interface
4 LED
5 Receiver
6 Touch screen
7 Mic
8 WIN key
9 Left function key
10 Send key
11 End key
Description of Functions
l Under the default status, you can scroll up or down to
navigate through menus, program instructions, confirm
an operation.
l Long press it to switch to the other status; you can adjust
the volume under the other status.You can deactivate the
ringtone by the Scroll key when you have an incoming
call.
l Long press it to switch between the two statuses.
l To confirm your data entries, or to exit the program in
use.
l To enter start menu.
l To answer a call.
l To end a call.
Page 8 of 84 Copyright©2009 Spice
Page 10
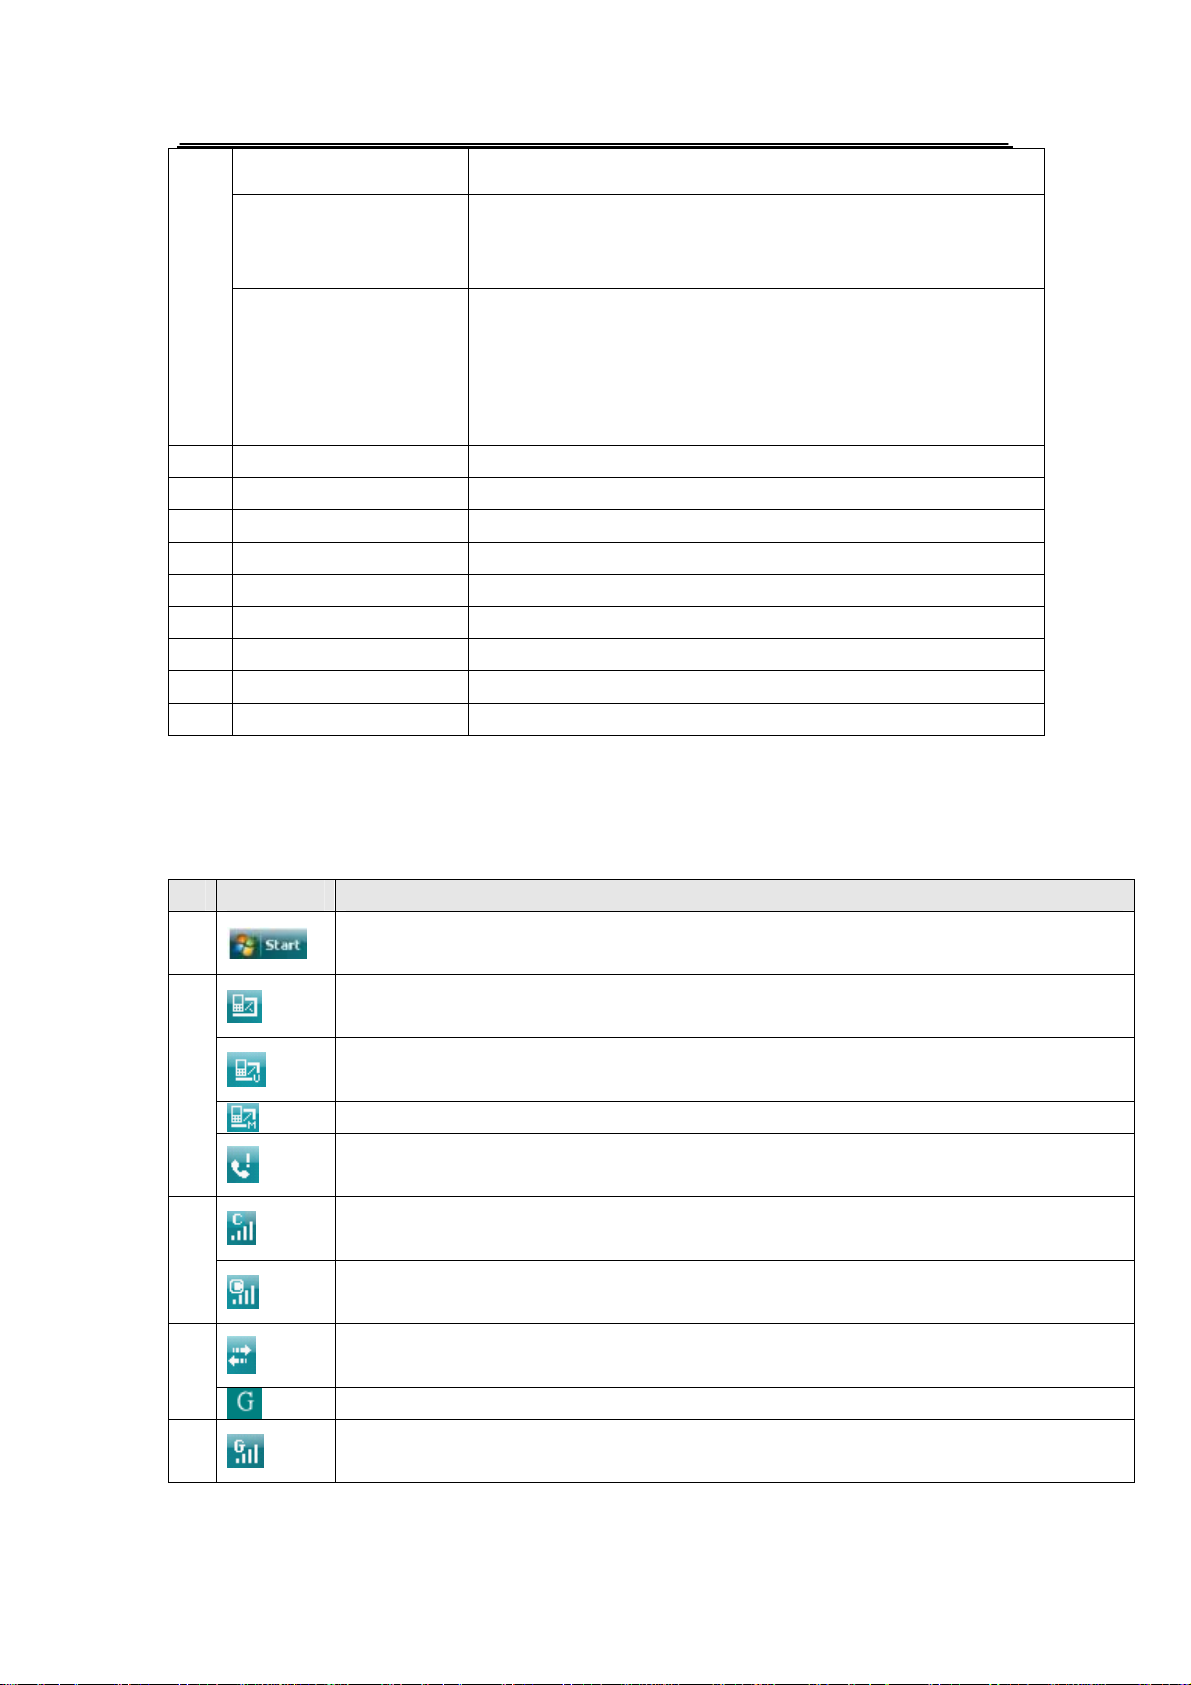
Number/letter keys
* key
12
# key
13 Right function key
14 Power key
15
Earphone interface
16 Camera key
17 Stylus
18 Camera
19 Self-Portrait Mirror
20 Speaker
21 Battery
l On the Today screen, press the key once to input “*”.
l To switch between ABC/abc when you are using ABC
Input or English Input.
l On the Today screen, press the key once to input “#”.
l To delete the previous characters when you are using
ABC Input.
l To delete the previous text or the highlighted text using
English Input.
22..22.. DDeessccrriippttiioonn ooff DDiissppllaayy CCoonntteennttss
The table below lists the icons that may appear on the phone. Except the icons for mode and the
power icon, other icons are sorted according to the current mode and priority of the phone.
Icons Description
1
Select to open the start menu.
2
There are some unread GSM messages.
There are some unread CDMA messages.
Indicates you have unread MMS.
There are some missed numbers.
3
Show the signal strength.
CDMA data connectivity is on
4
Connection is active.
5
GPRS service available.
Show the signal strength.
Page 9 of 84 Copyright©2009 Spice
Page 11
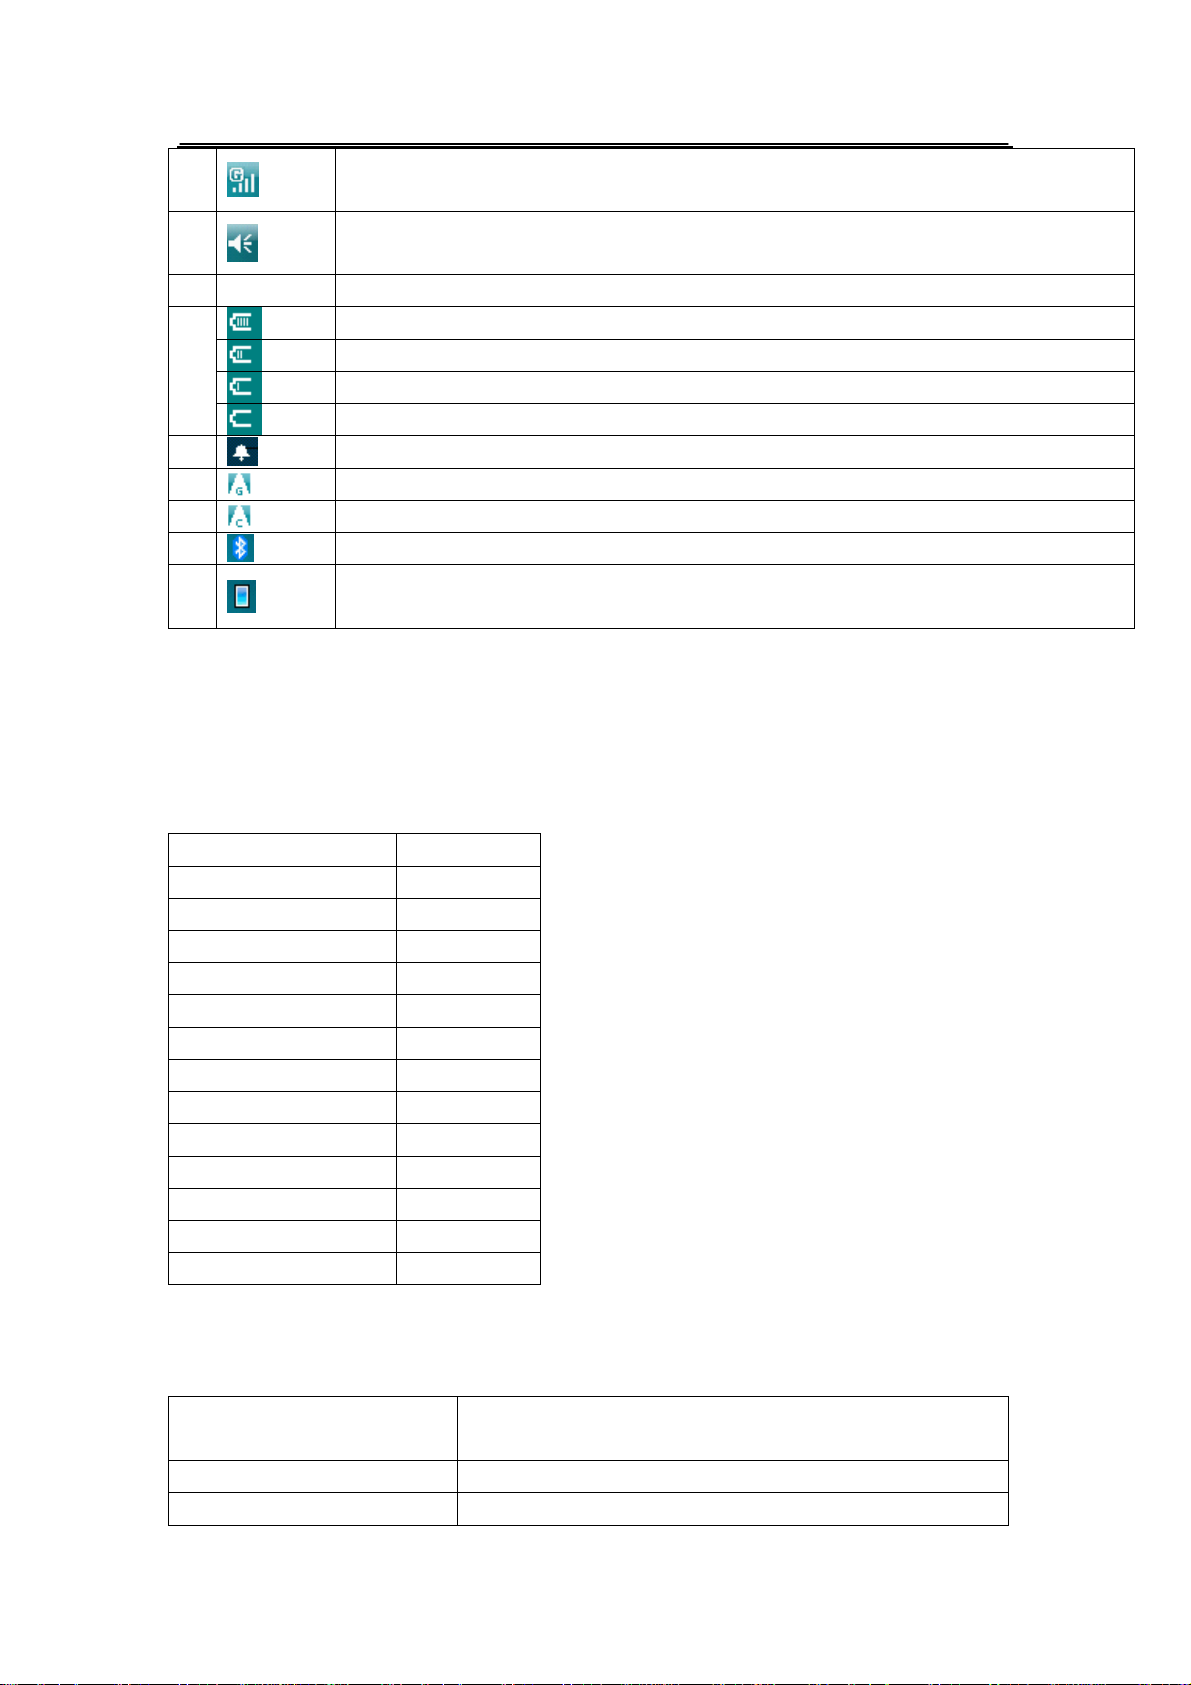
GSM data connectivity is on.
6
7
Indicating the current residual battery power, including:
8
9
10
11
12
22..33.. PPhhoonnee aanndd AAcccceessssoorriieess
Open the packing box of the phone and check that your have all the accessories to the phone. If
anything is missed, or any mistake is found in the user manual, such as missing pages, please
contact the local dealer.
Item Quantity
D-1111 phone 1
Battery 1
Earphone 1
Data cable 1
Micro SD card 1
Micro SD to SD socket 1
USB card reader 1
LCD protector 1
Leather cover 1
Stylus 2
CD 1
Charger 1
User Manual 1
Select to adjust vibrate/ring one volume level.
The power is full.
The power is moderate.
The power is low.
The power is to be used up.
It appears when the alarm is activated.
Indicates the SIM card is in GSM roaming status.
Indicates the UIM card is in CDMA roaming status.
Select to enter Bluetooth.
Select to toggle the screen.
22..44.. SSppeecciiffiiccaattiioonnss
Network GSM /GPRS:850/900/1800/1900MHz
Battery 1350mAh Li-ion Battery
Charger Input: 110V-240 AC,50/60Hz
CDMA2000 1X: 800 MHz
Page 10 of 84 Copyright©2009 Spice
Page 12
Output: 5V DC,750mA
Dimension 110.8mm*58.3mm*16.8mm
Weight 130.2g
22..55.. SSttaannddbbyy TTiimmee // MMaaxx.. TTaallkk TTiimmee
Standby Time
Standby Mode Standby Time
Dual Mode About100 hours
GSM Mode About 120 hours
CDMA Mode About 120 hours
Max. Talk Time
GSM About 510 minutes
CDMA About 270 minutes
*The standby time is the time for continuous working when the phone is not in any call or
moved. The standby time and max. Talk time depend on the specific network.
d
22..66.. AAbboouutt SSIIMM CCaarrd
l Please store the cards out of the reach of children.
l The cards and the contacts are vulnerable to damages due to scratching or bending. Therefore,
be careful when using, inserting or removing the cards.
l Be sure to switch off the phone before you insert or remove the battery or the cards,
otherwise, the phone may be damaged.
、
、
UUIIMM CCaarrdd aanndd tthhee BBaatttteerryy
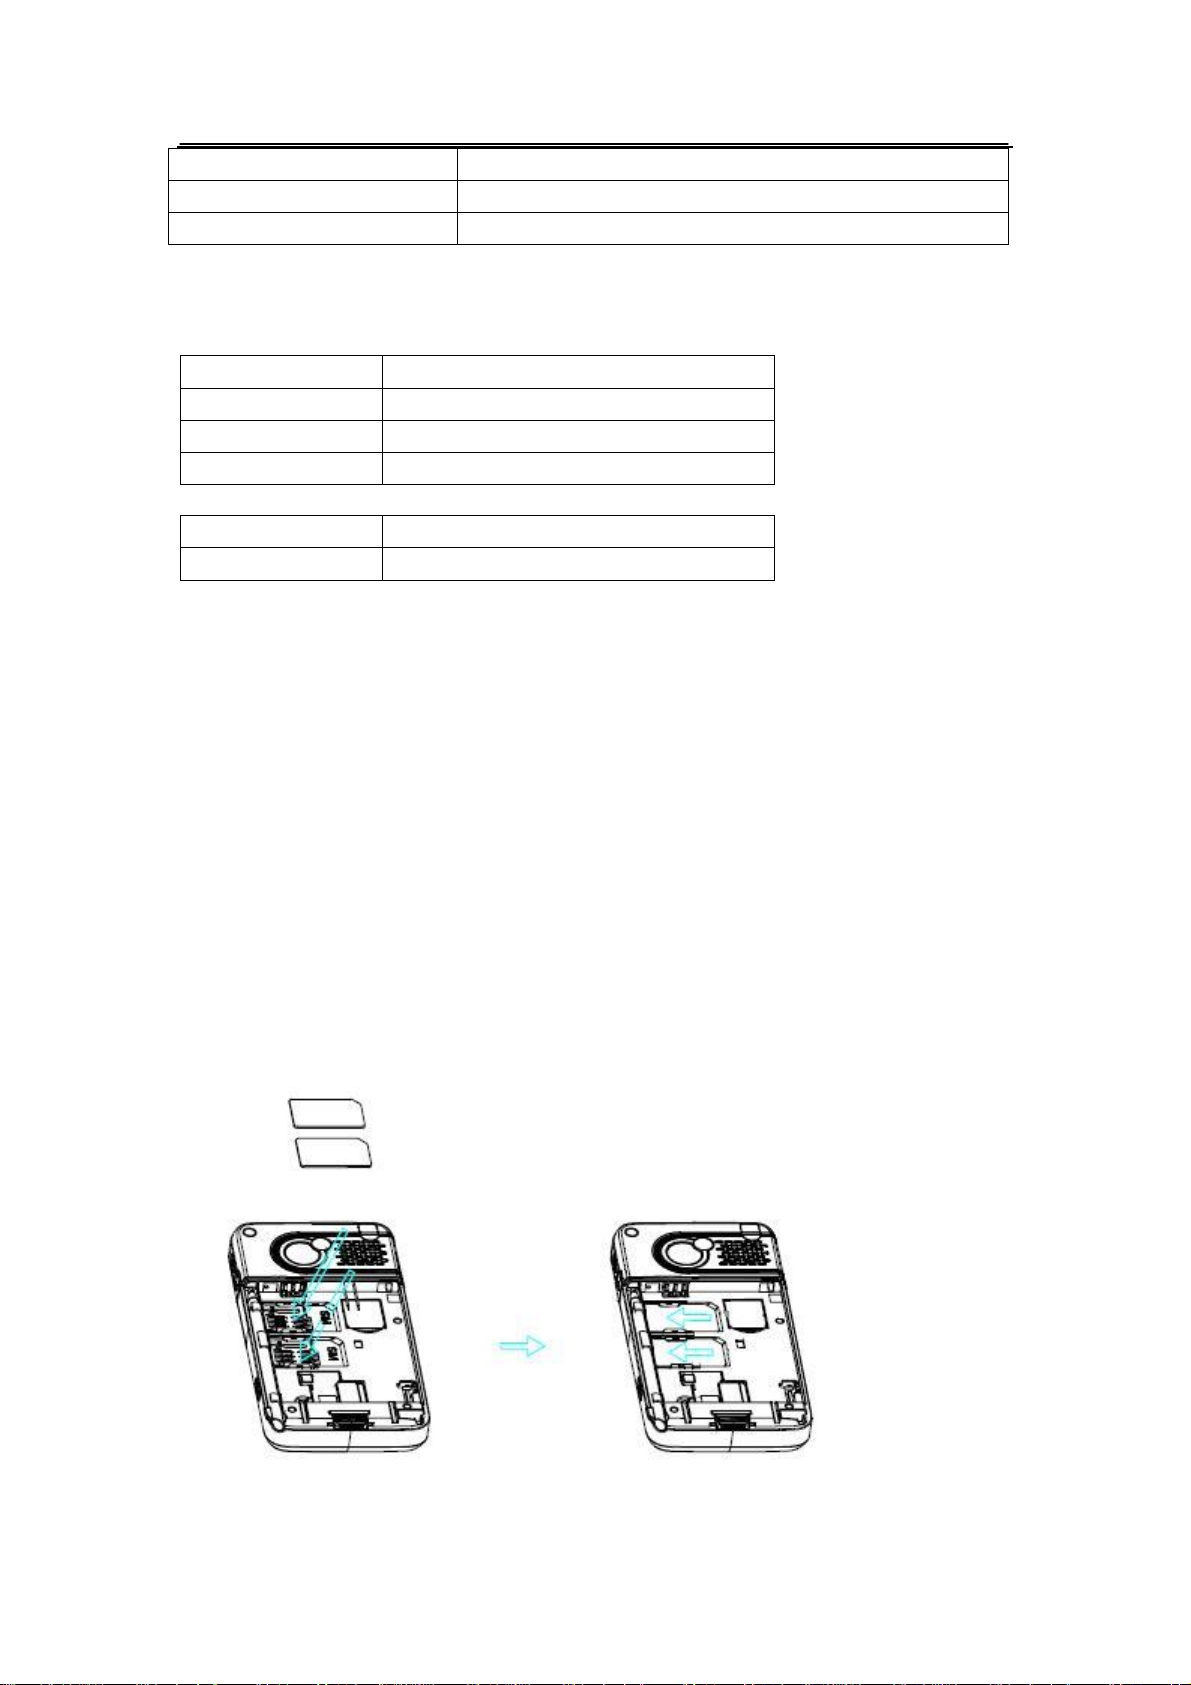
2.6.1. To insert SIM card, UIM card and battery
1. Insert the card in the slot in the direction indicated by the arrow. (Up: the card slot for UIM
card. Down: the card slot for SIM card.). Please insert the card with the metal contact of the
card facing downwards.
2. Insert the battery.
Page 11 of 84 Copyright©2009 Spice
Page 13
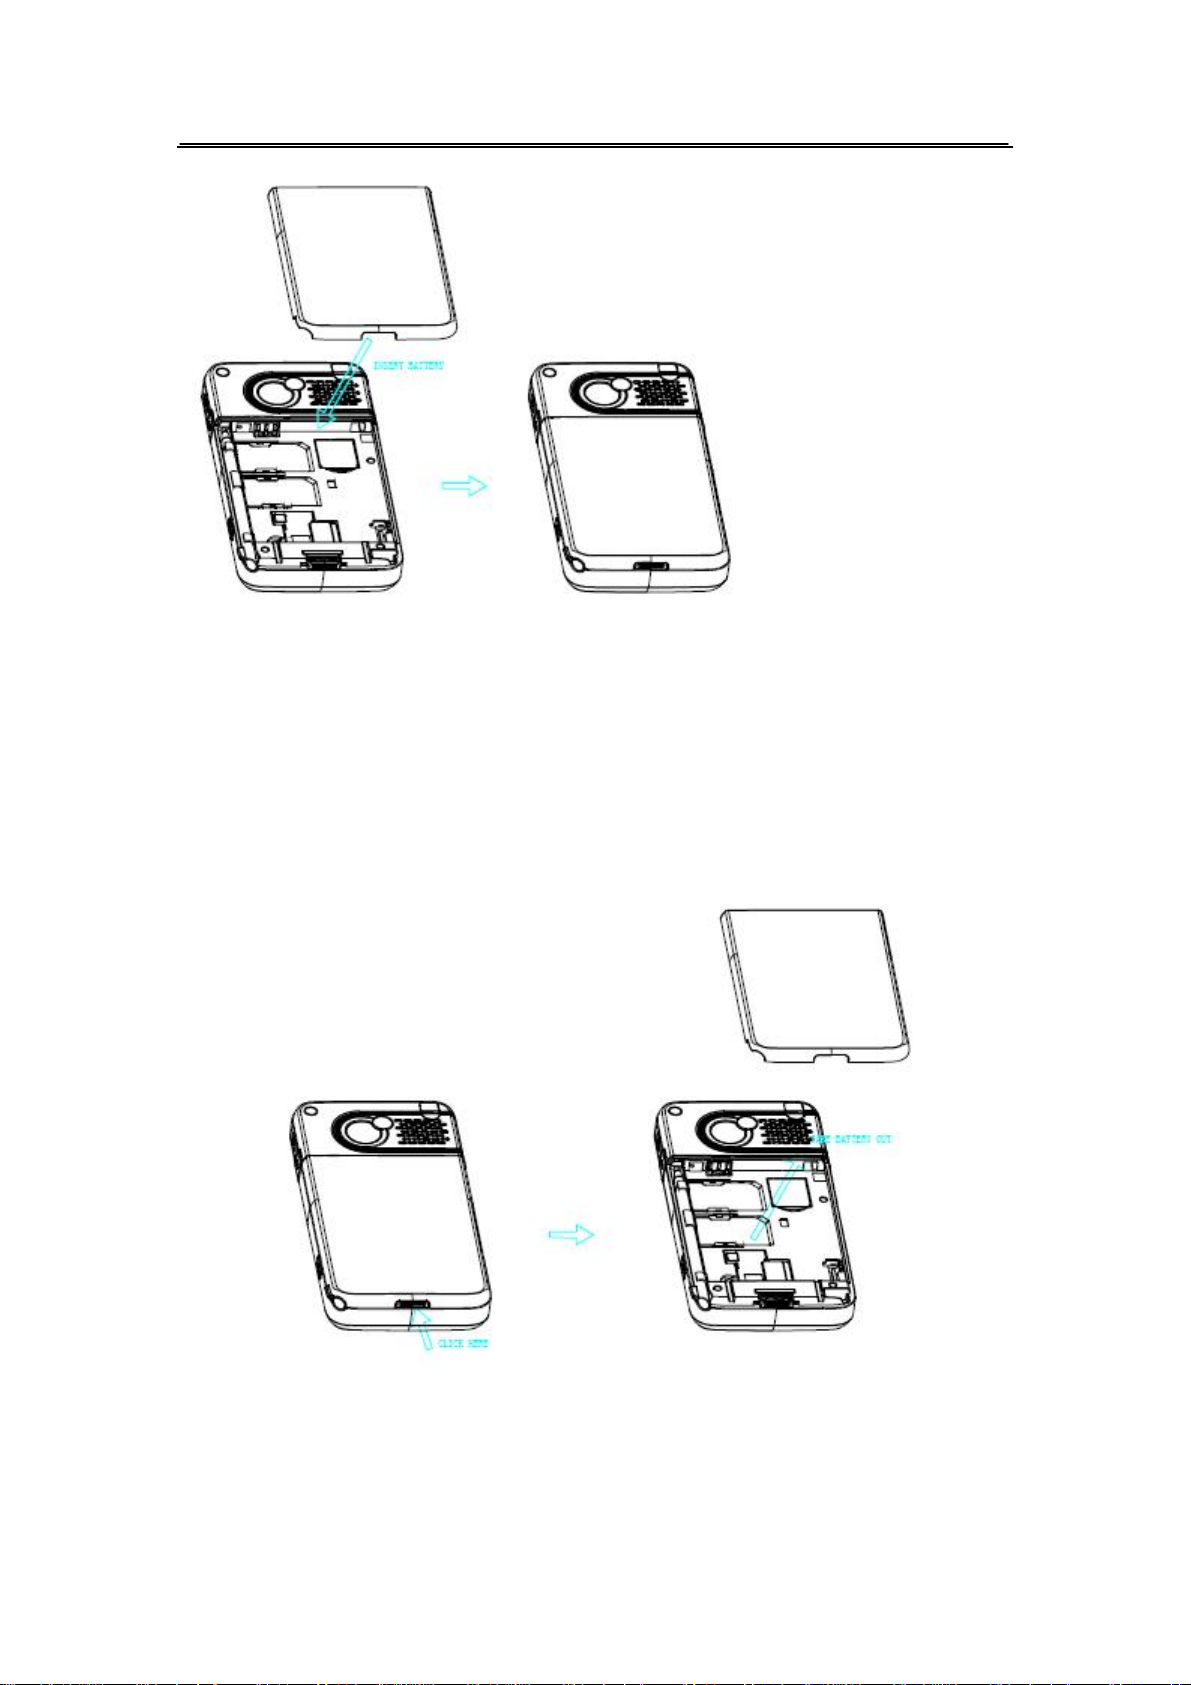
Tip: Be sure to use the original battery.
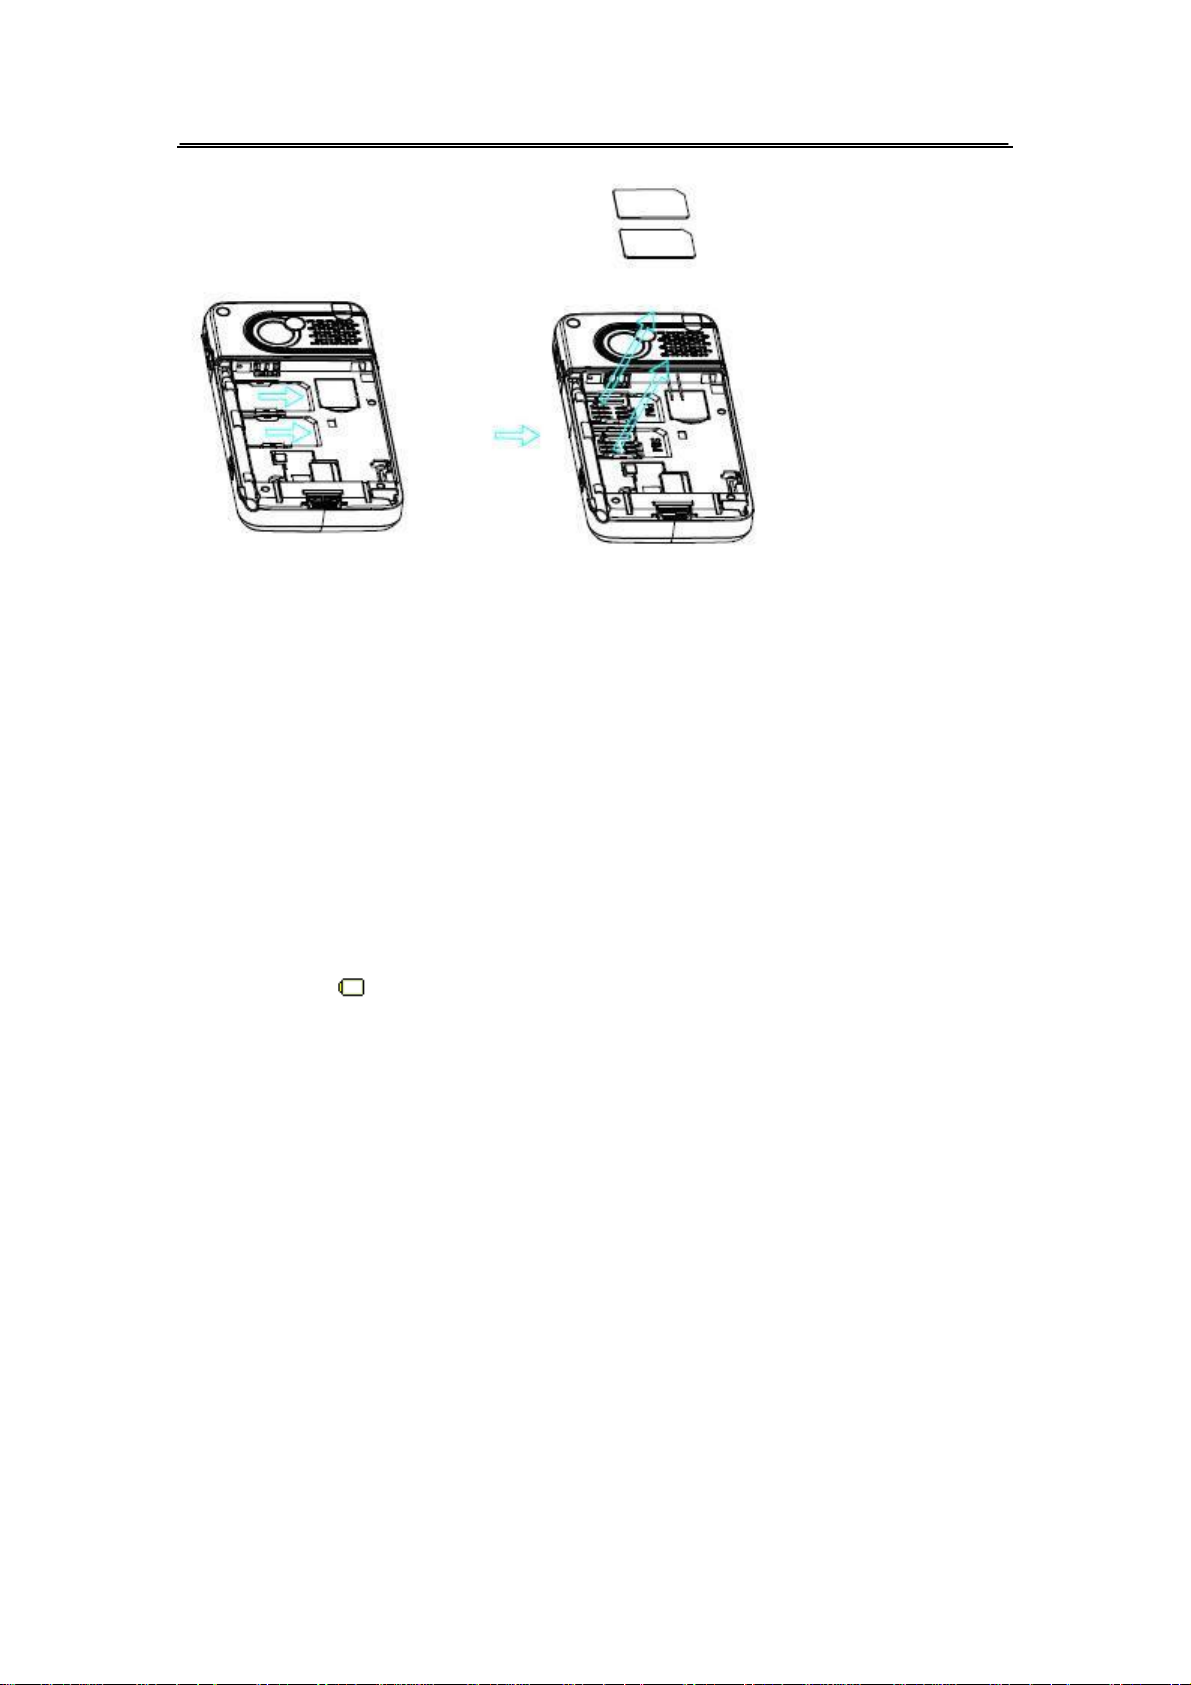
2.6.2. To remove the battery, SIM card and UIM card
1. Switch off the phone.
2. Push and remove the battery cover.
Push out the card from the slot with a finger in the direction indicated by the arrow. (Up: the card
slot for UIM card. Down: the card slot SIM card).
Page 12 of 84 Copyright©2009 Spice
Page 14
2.6.3. To charge the battery
1. Insert the plug of the charger into the interface of the phone, and insert the charger into the
power socket carefully. The battery icon will blink.
2. When the phone is off, the red light is lit during charging. When the battery icon stops
blinking or the green light is lit, it indicates that the charging is finished.
3. After the charging, unplug the charger from the socket, and press and hold the left and right
buttons on the plug of the charger to pull out the plug from the phone.
Tips:
The battery icon displayed on the screen indicates that the battery power is low. Please
charge the battery following the steps above.
Please charge the battery before you use the newly bought phone. We suggest you charge the
battery for 4 hours continuously for the first time.
Charging when the phone is in the ON mode will not influence the normal dialing and answering,
but this needs to consume power, thus the time of charging will increase.
We suggest you recharge the battery when the power is used up so as to prolong the life of the
battery.
2.7. To switch on and off
To switch on: Press Power key when the phone is in the OFF mode.
If the phone lock has been activated, you need to input the corresponding password to unlock.
If the SIM/UIM card has been inserted in the phone, and the related PIN code protection is
activated, you need to input the 4-8 passwords to unlock.
Warning: If you input wrong PIN codes three times, the SIM/UIM card will be locked and you
need to input the PUK code to unlock. Both the PIN code and PUK code are provided by the
Page 13 of 84 Copyright©2009 Spice
Page 15
network operator.
To switch off: In the standby mode, long press Power key.
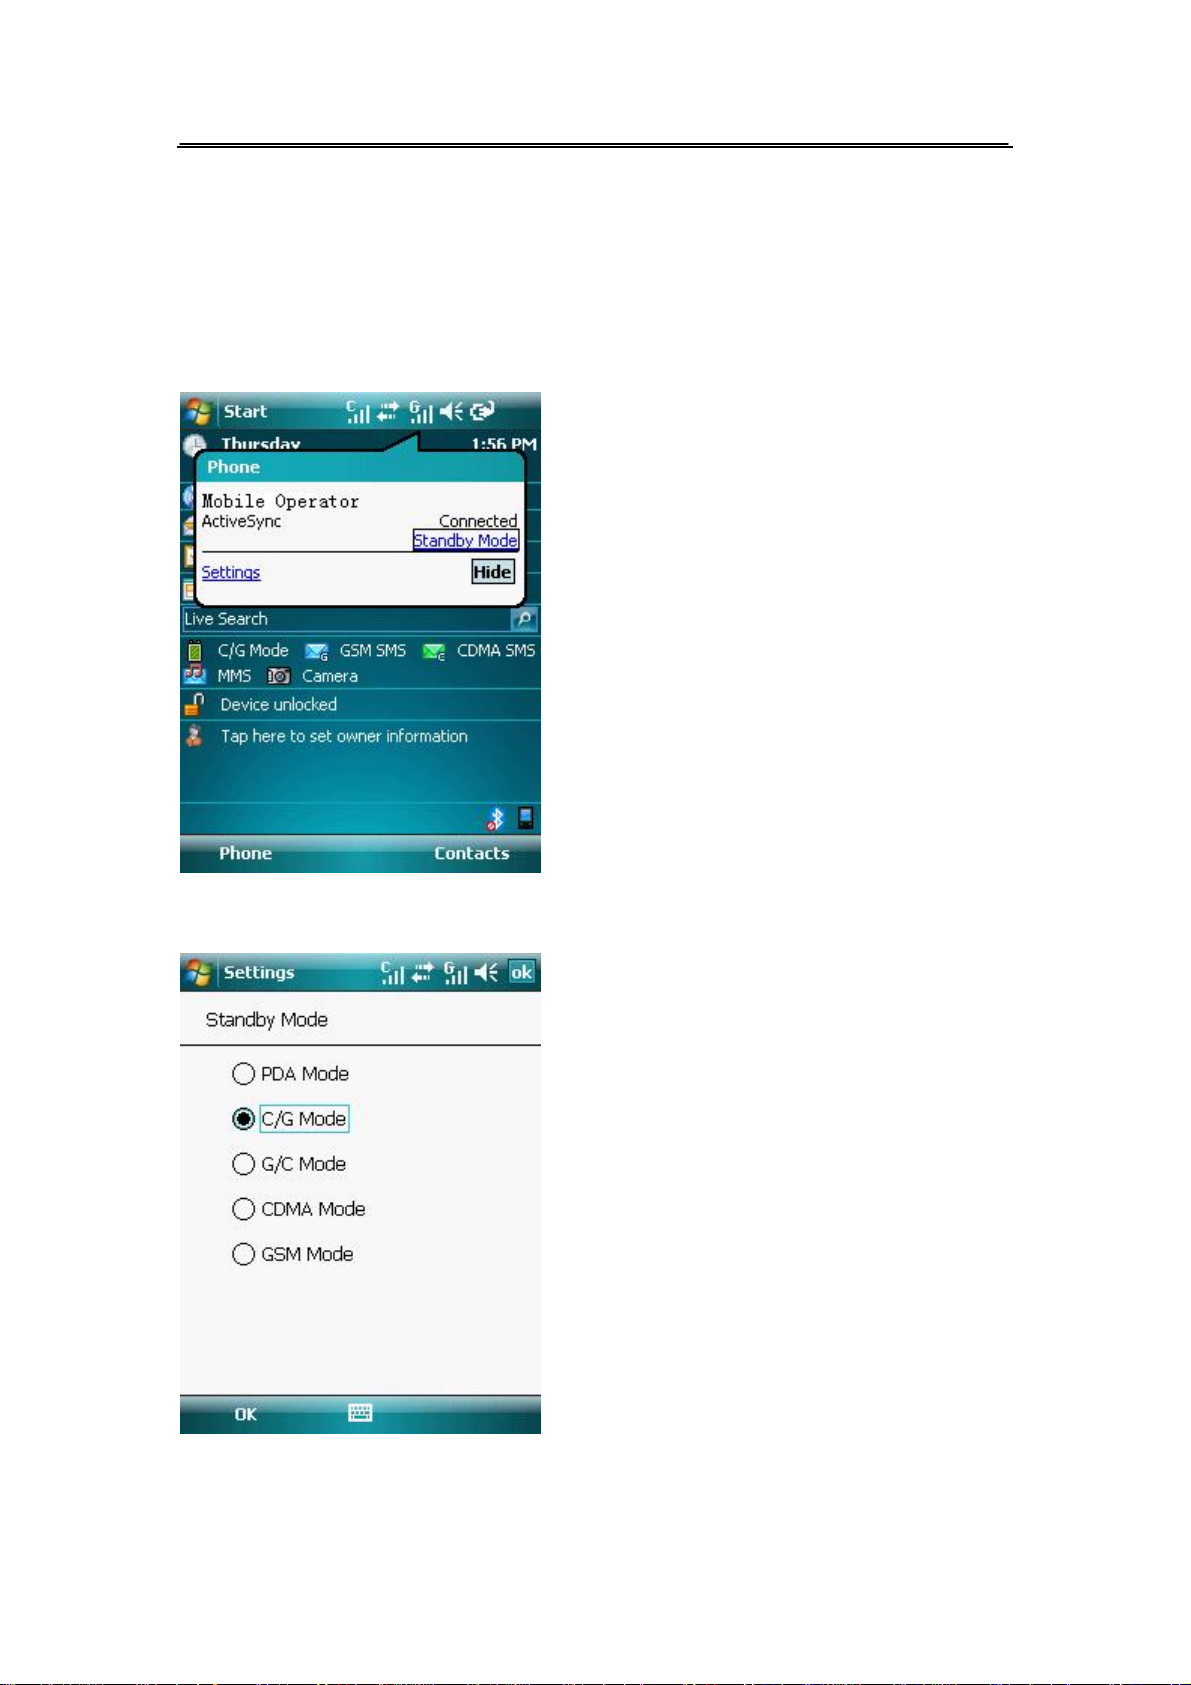
2.8. Standby Mode
1. Tap the signal strength to activate phone configuration.
2. Tap Standby Mode to select Standby Mode.
There are five standby modes:
l PDA Mode: Close telephone communication function.
l C/G Mode: Both CDMA and GSM can receive incoming calls or messages, but CDMA is
Page 14 of 84 Copyright©2009 Spice
Page 16
prior to GSM when you make calls. If you want to make a call from GSM, you should input
the phone number and tap (Menu), select Dial GSM. Then the number will be dialed from
SIM network.
Tip: When you make calls next time, CDMA is still prior to GSM by default.
l G/C Mode: Both GSM and CDMA can receive incoming calls or messages, but GSM is
prior to CDMA when you make calls. If you want to make a call from CDMA, you should
input the phone number and tap (Menu), select Dial CDMA. Then the number will be dialed
from CDMA network.
l CDMA Mode: To make/answer calls and receive/send messages through CDMA and use
all kinds of value-added CDMA services.
l GSM Mode: To make/answer calls and receive/send messages through GSM and use all
kinds of value-added GSM services.
2.9. Today screen
The Today screen displays important information, such as upcoming appointments and status
indicators, you can tap a section on the screen to open the associated program.
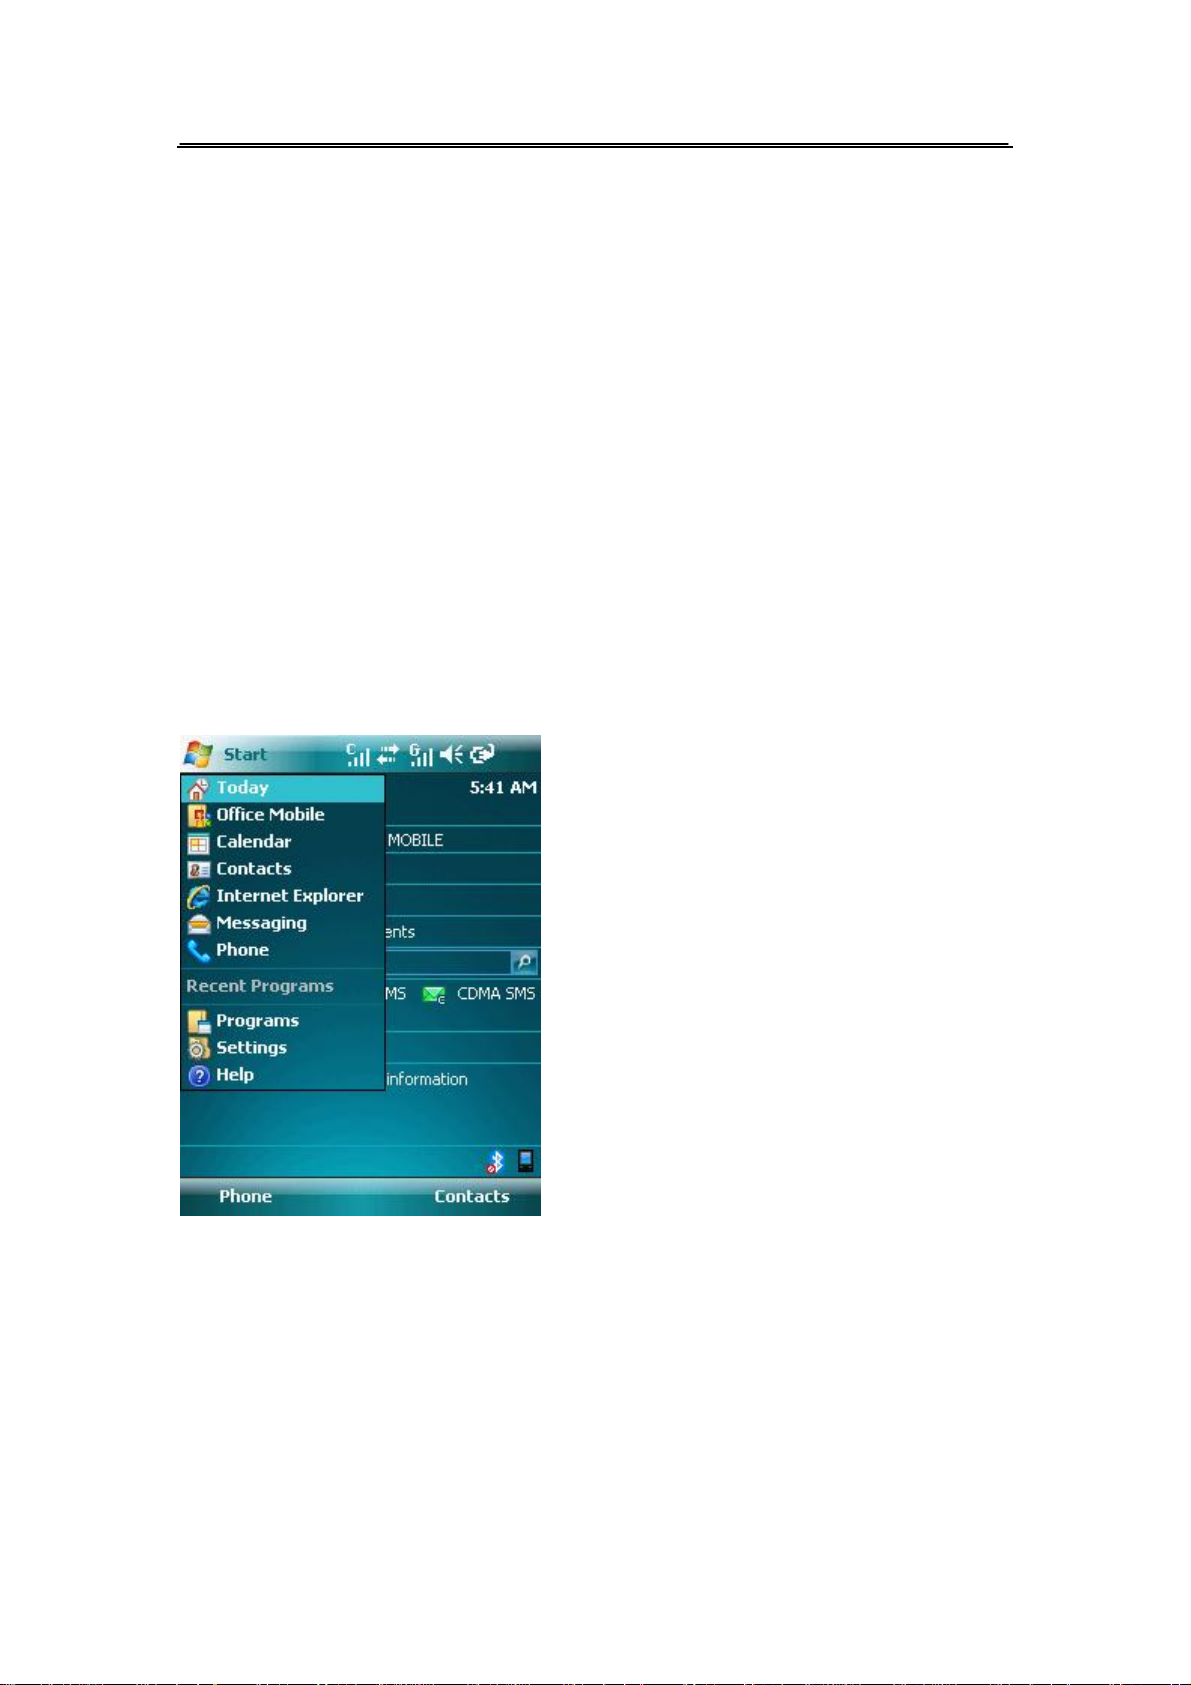
After opening up the Start menu:
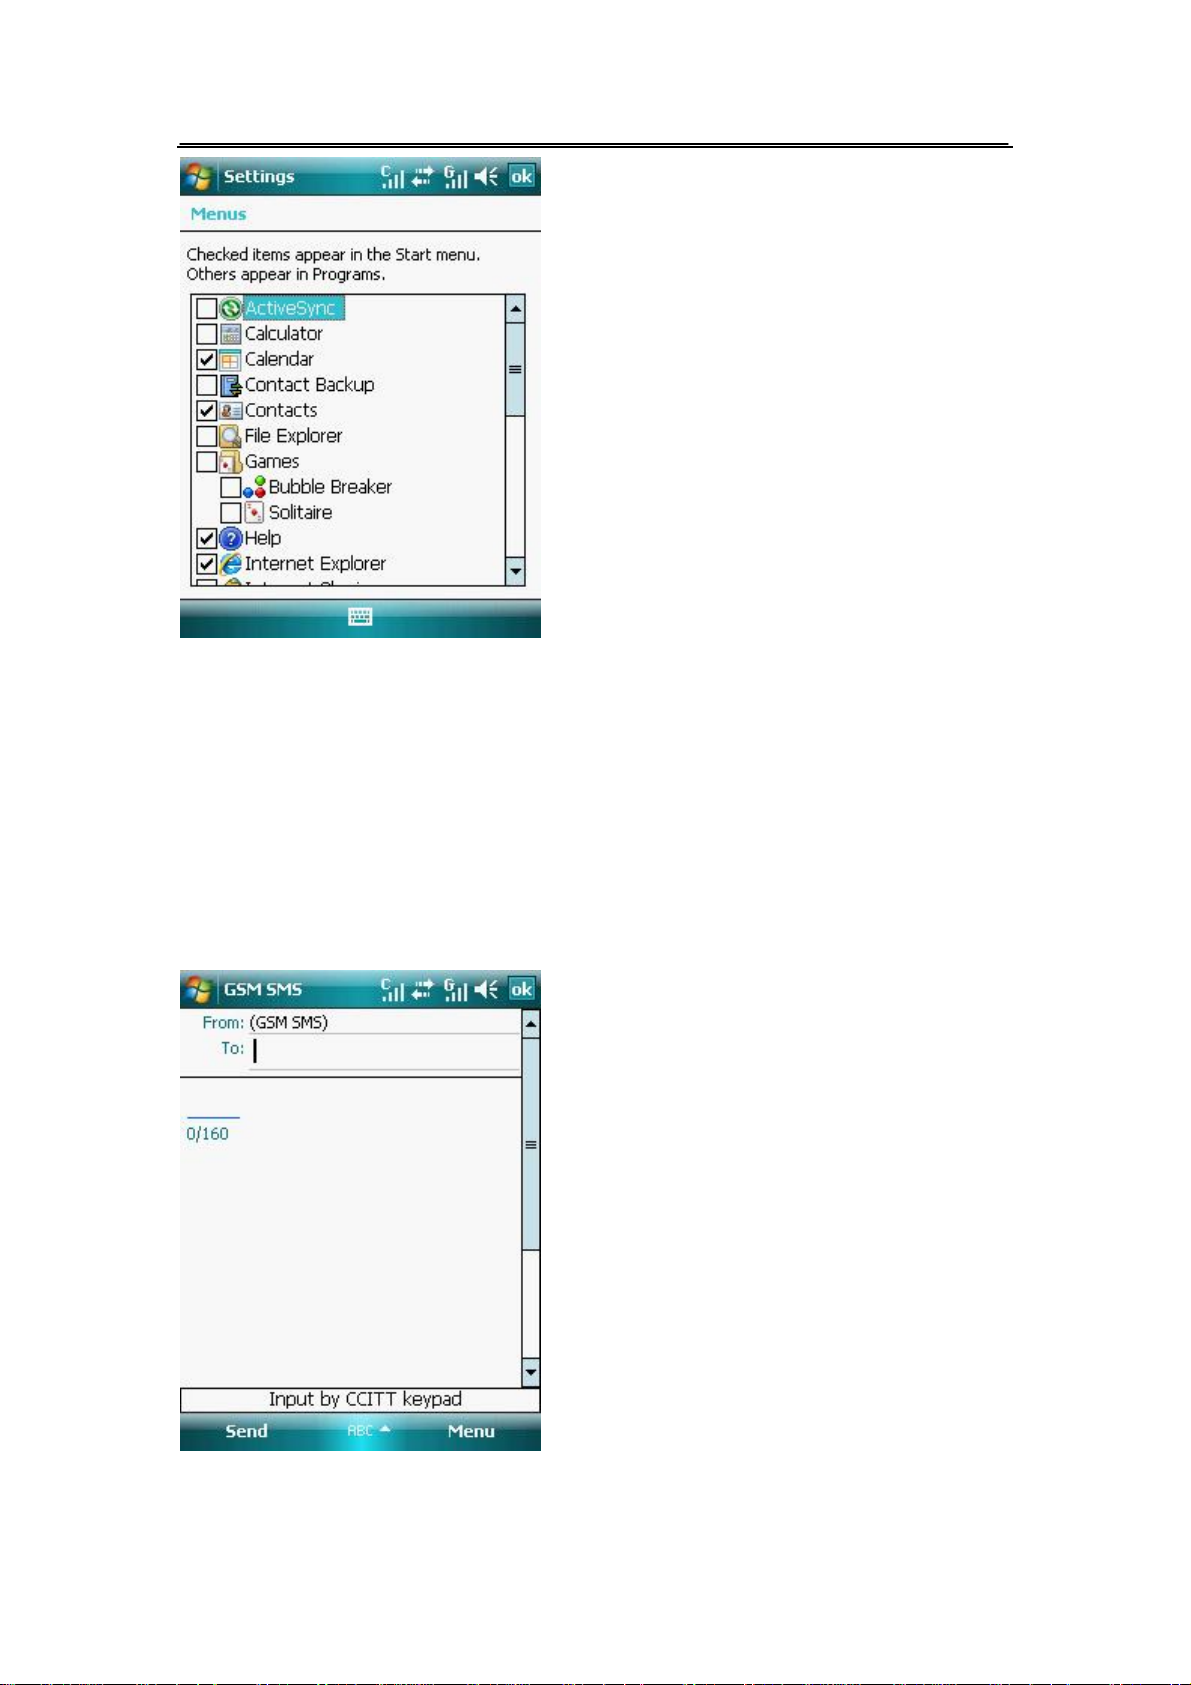
The items displayed in the Start menu can be customized by taping Start > Setting >Menus
Page 15 of 84 Copyright©2009 Spice
Page 17
2.10. Using the Input Panel
The input panel provides you with various input methods including: ABC Input, Block Recognizer,
English Input, Keyboard, Letter Recognizer, Transcriber. You can input letters, numbers, symbols,
or punctuations.
2.10.1. Using the ABC Input
ABC Input allows you to enter characters by pressing keys on the keyboard.
1. In an application, tap the input panel arrow, then tap ABC Input.
l Press the keys on the keyboard to input characters and numbers, press the key repeatedly
Page 16 of 84 Copyright©2009 Spice
Page 18
to select characters and numbers.
l Press 1 key to input frequently used symbols and press 1 repeatedly to select symbols.
l Press # key to delete previous characters.
l Press 0 key once to input “space”, press 0 key twice to input “0”.
Tip: Press *key to switch between ABC and abc.
2.10.2. Using the Block Recognizer
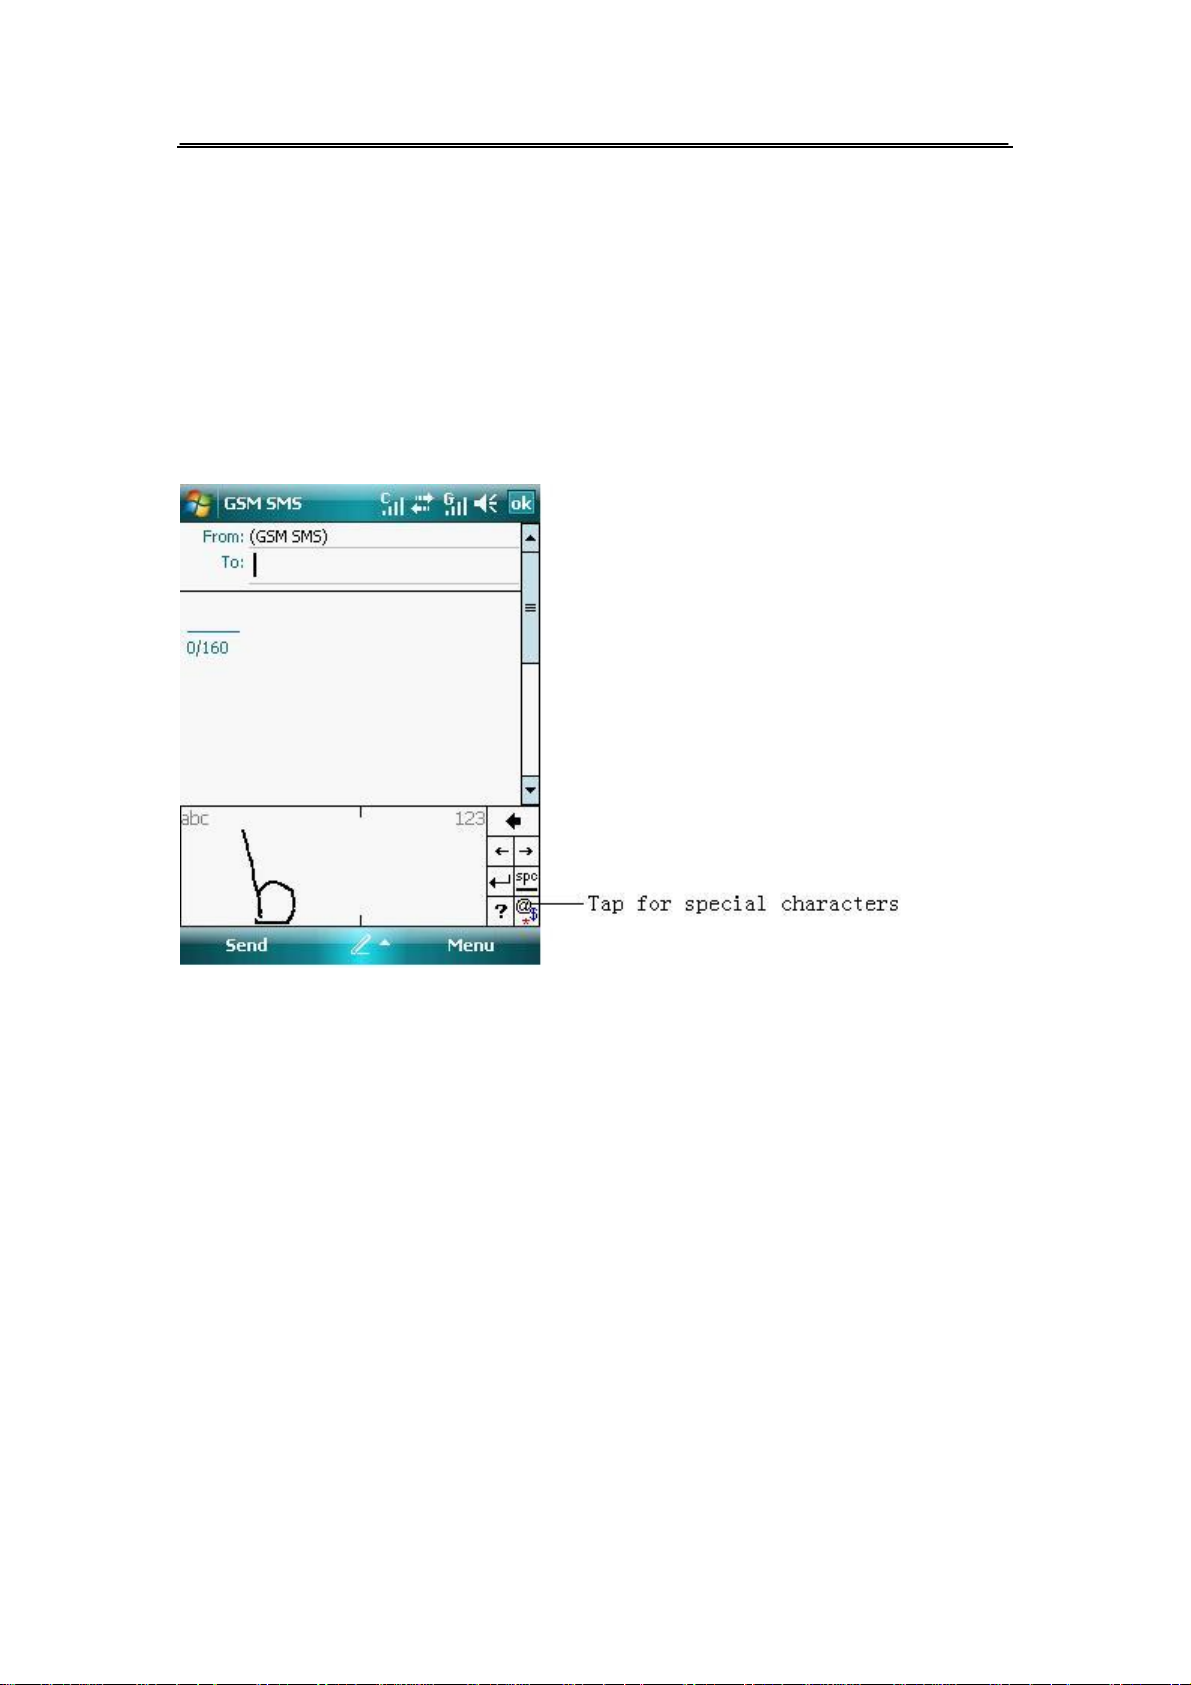
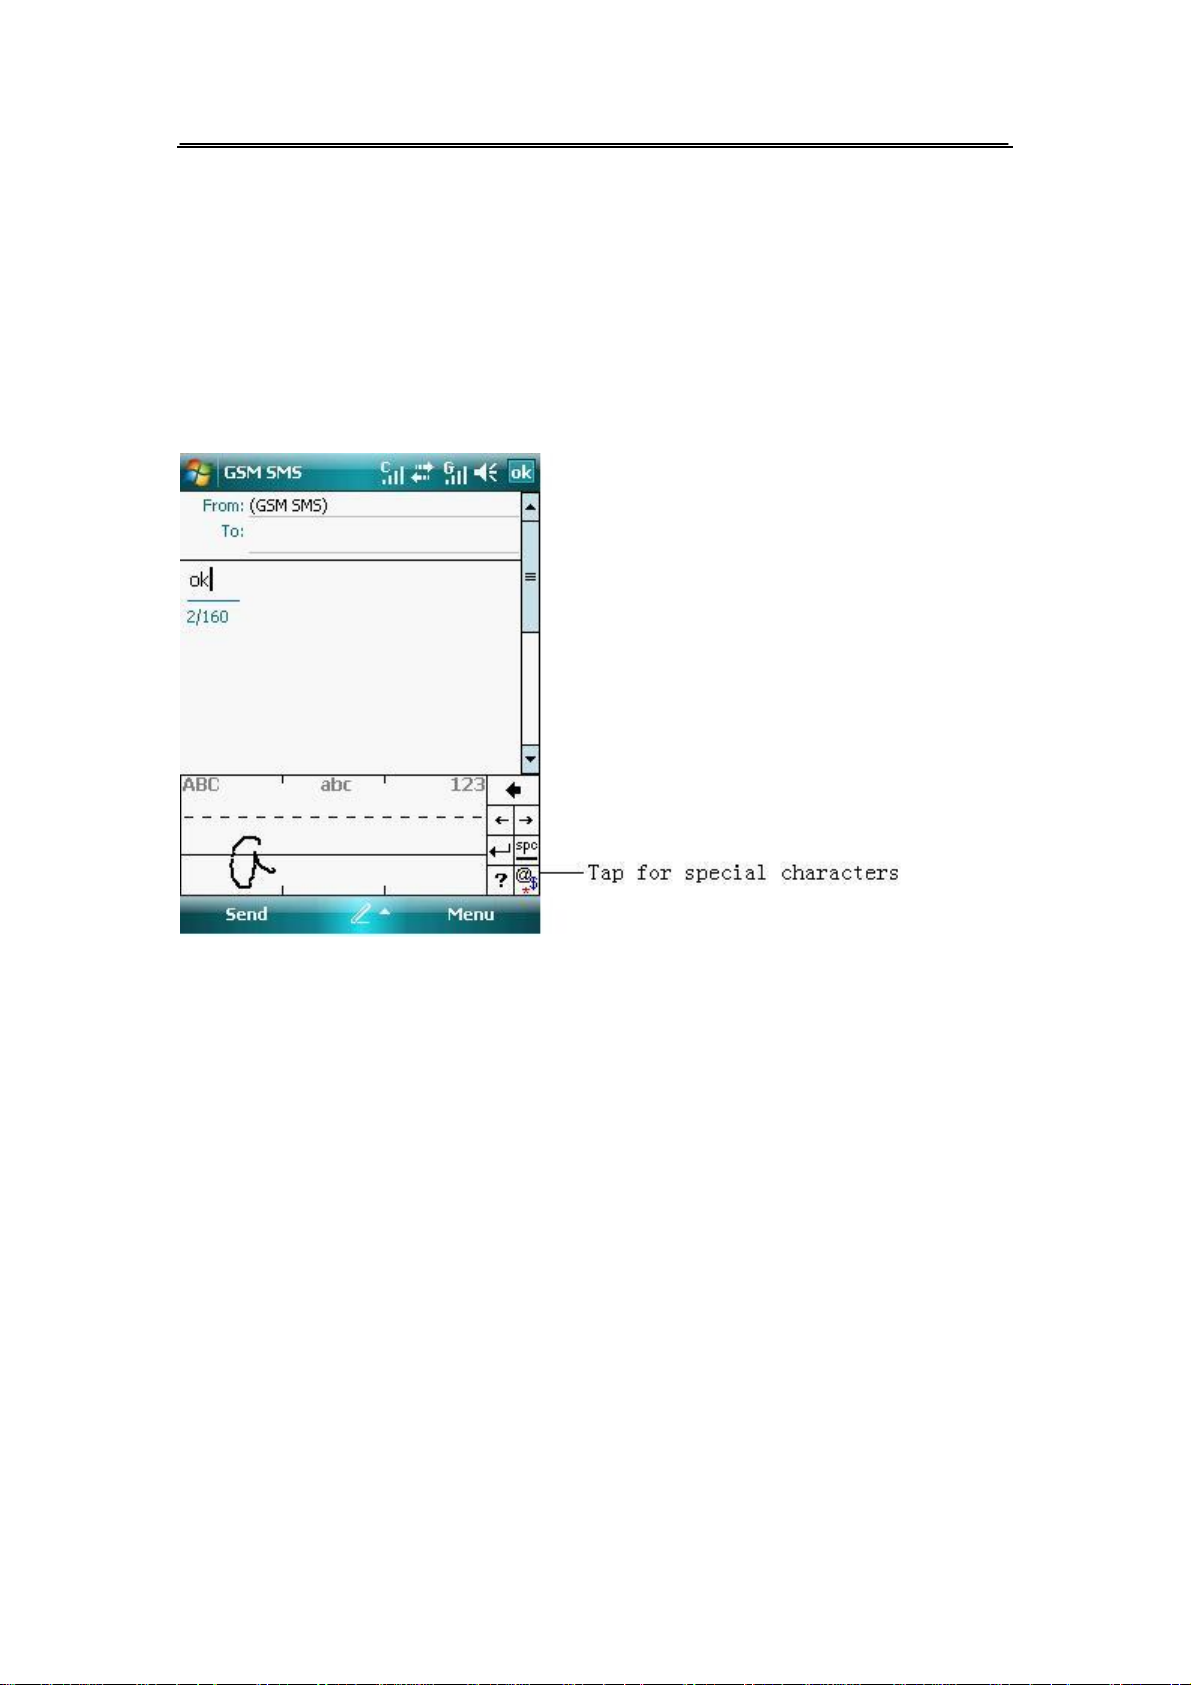
The Block Recognizer allows you to use a single stroke to write letters, numbers, symbols or
punctuations, which are converted into typed text.
1. In an application, tap the input panel arrow, then tap Block Recognizer.
2. Write letters, numbers, symbols, or punctuations in the designated area.
l Write letters on the abc area of the box.
l Write numbers on the 123 area of the box.
l Tap the special symbols button to key in symbols, punctuations and other special
characters.
l Tap “?” help button for help on how to input characters.
2.10.3. Using English Input
English Input allows you to enter texts by pressing keys on the keyboard.
Page 17 of 84 Copyright©2009 Spice
Page 19
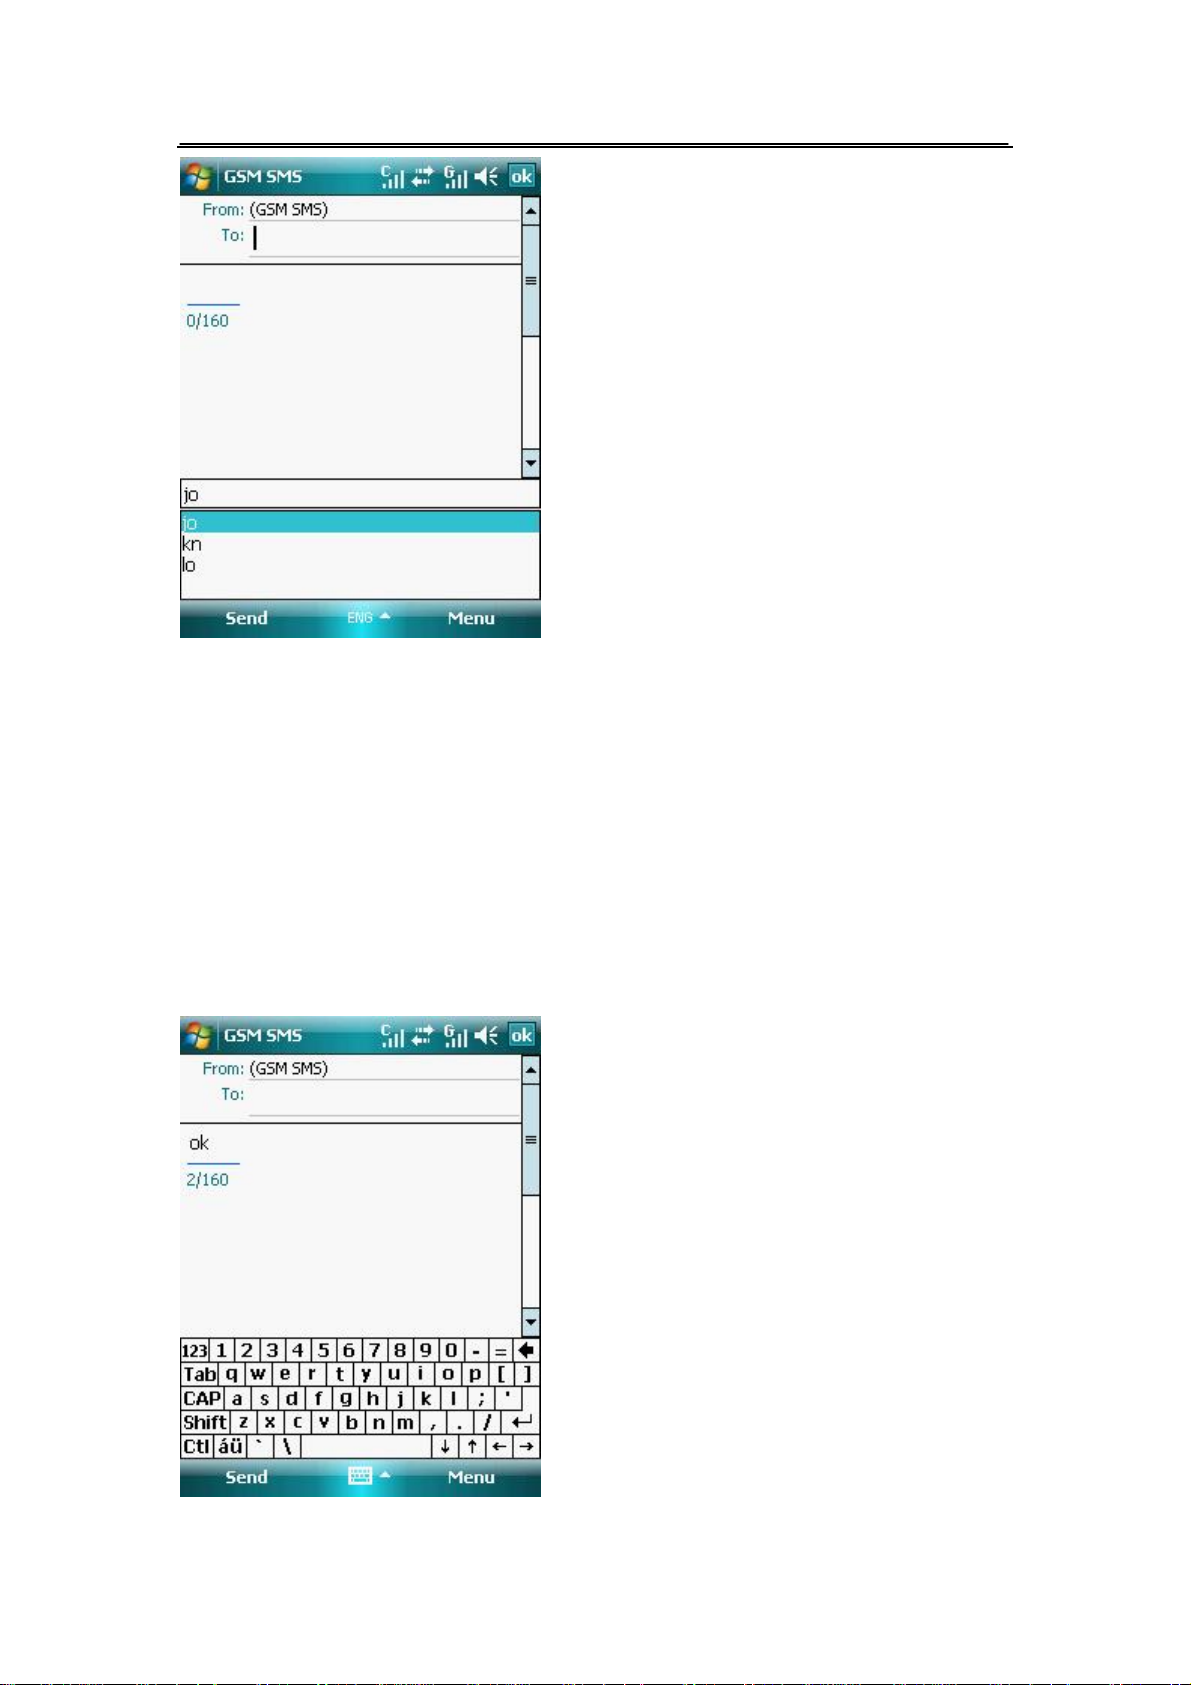
1. In an application, tap the input panel arrow, then tap English Input.
l To key in a word, press the keys on the keyboard.
l Press * key to move highlighted bar in the wordlist.
l Press 0 key to add selected word.
l Press # key to delete previous text or highlighted text.
Tip: Before you input, press *key to switch between ABC and abc.
2.10.4. Using the on- screen keyboard
With the on-screen keyboard you can key in text, symbols, numbers, or other special characters
when input is possible.
1. In an application, tap the input panel arrow, then tap Keyboard.
Page 18 of 84 Copyright©2009 Spice
Page 20
2. Key in text by tapping keys on the on-screen keyboard.
To enlarge the on-screen keyboard:
1. Tap the input panel arrow and then tap Option.
2. Select Keyboard from the input Method list.
3. Tap Large keys.
2.10.5. Using the Letter Recognizer
With the Letter Recognizer you can write individual letters, numbers, or special characters, which
are converted into typed text.
1. In an application, tap the input panel arrow, then tap Letter Recognizer.
2. Write letters, numbers, symbols and punctuations in the designated writing area.
l Write capital letters on the ABC area of the box.
l Write lowercase letters on the abc area of the box.
l Write numbers on the 123 area of the box.
l Tap the special symbols button to key in symbols, punctuations and other special
characters.
l Tap “?” help button for help on how to input characters.
2.10.6. Using Transcriber
Transcriber is a handwriting recognition program that allows you to write in cursive, print, or
mixed styles. It can recognize not only written text but also numbers and symbols. Make sure to
write legibly. See help for more information on the transcriber.
Page 19 of 84 Copyright©2009 Spice
Page 21
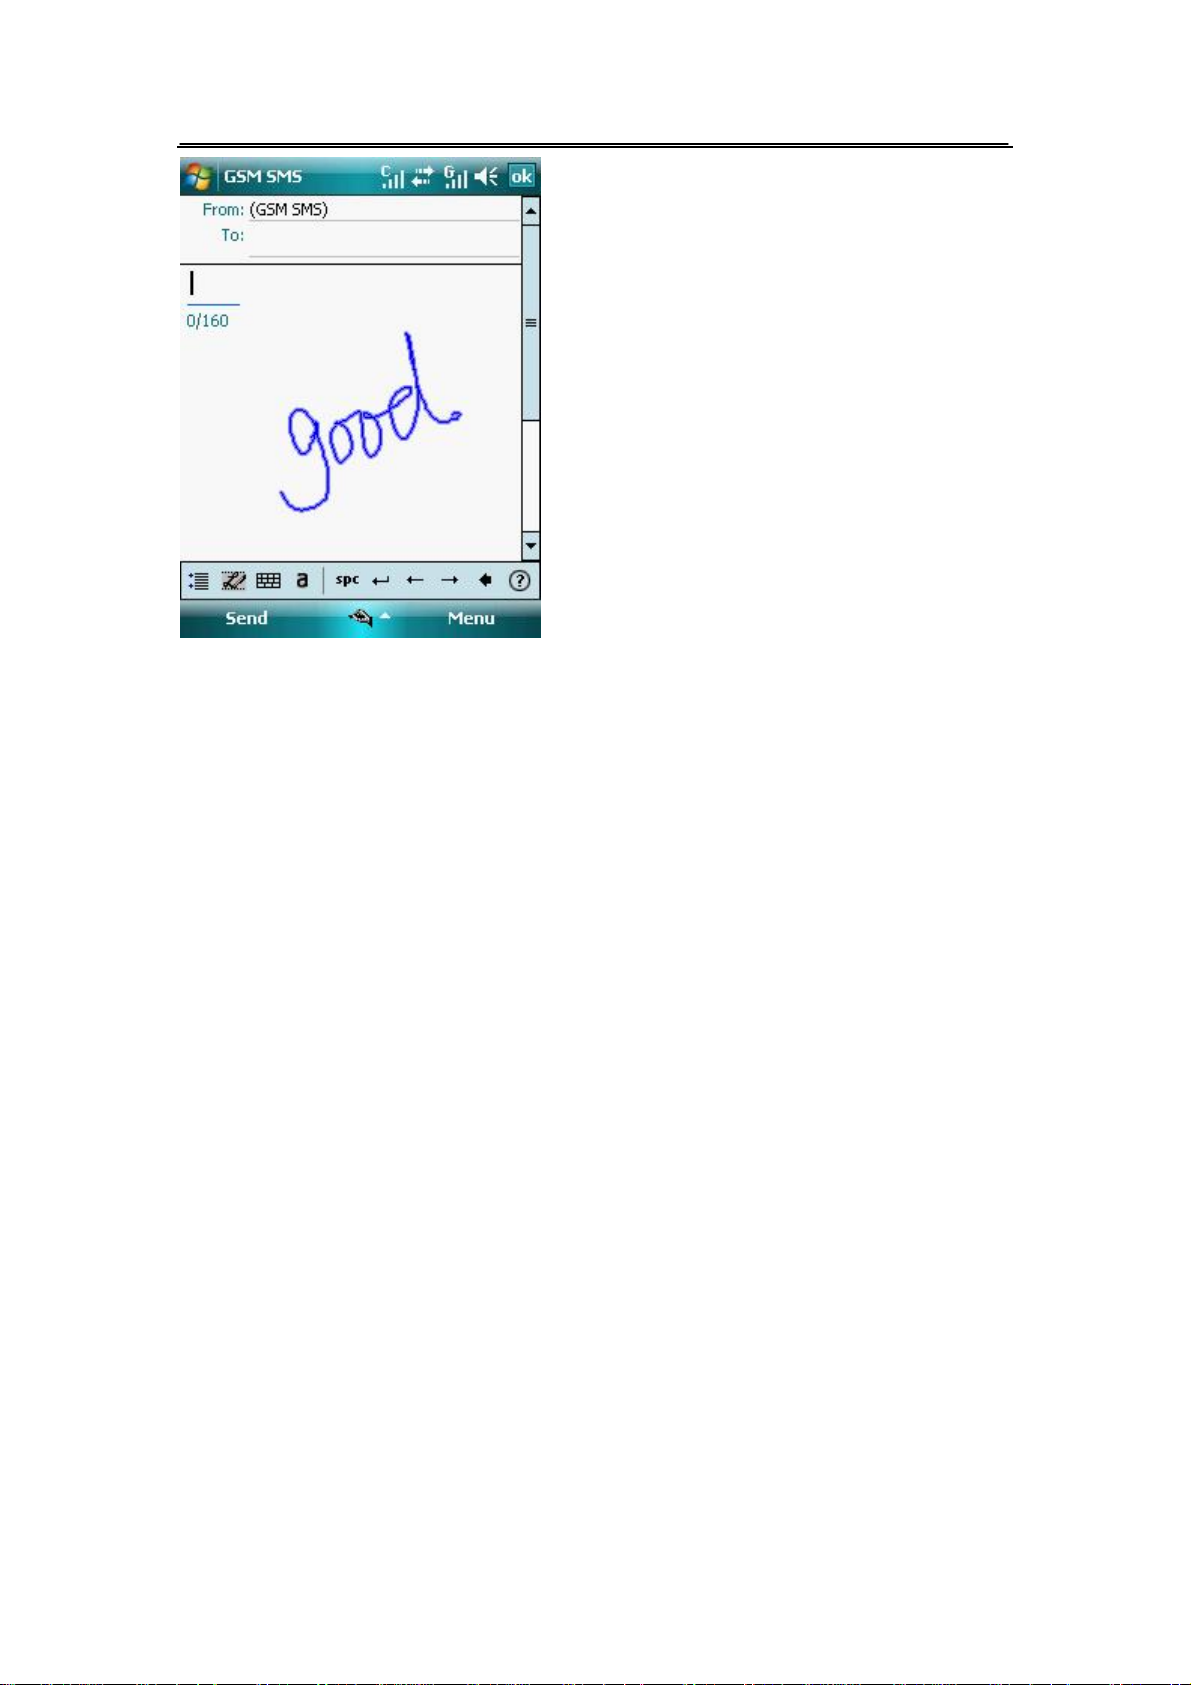
1. Start an application that accepts user input, such as Notes or Word Mobile.
2. Tap the input panel arrow, then tap Transcriber.
To write using Transcriber:
1. Tap screen to position the cursor where you want the text to appear.
2. Use the stylus to write on the screen .The handwriting will convert to text after you lift the
stylus from the screen.
To edit text
1. Draw a line across the text you want to edit .After you lift the stylus from the screen, the line
will disappear and the selected text will be highlighted.
2. You can rewrite the text or use the Transcriber gestures to edit your selected text. See Help for
the Transcriber gestures.
Page 20 of 84 Copyright©2009 Spice
Page 22
33.. CCaalllliinngg
3.1. To make calls
If the icon or is displayed on the screen, you can make or Answer calls.
Tip: The signal strength may influence the quality of connection.
You can also make the emergency call through the available network when the phone is
on.
1. You can make the emergency call(100,101,102) through CDMA network when the
phone is unlock.
2. You can make the emergency call(911,999,112) through GSM network .
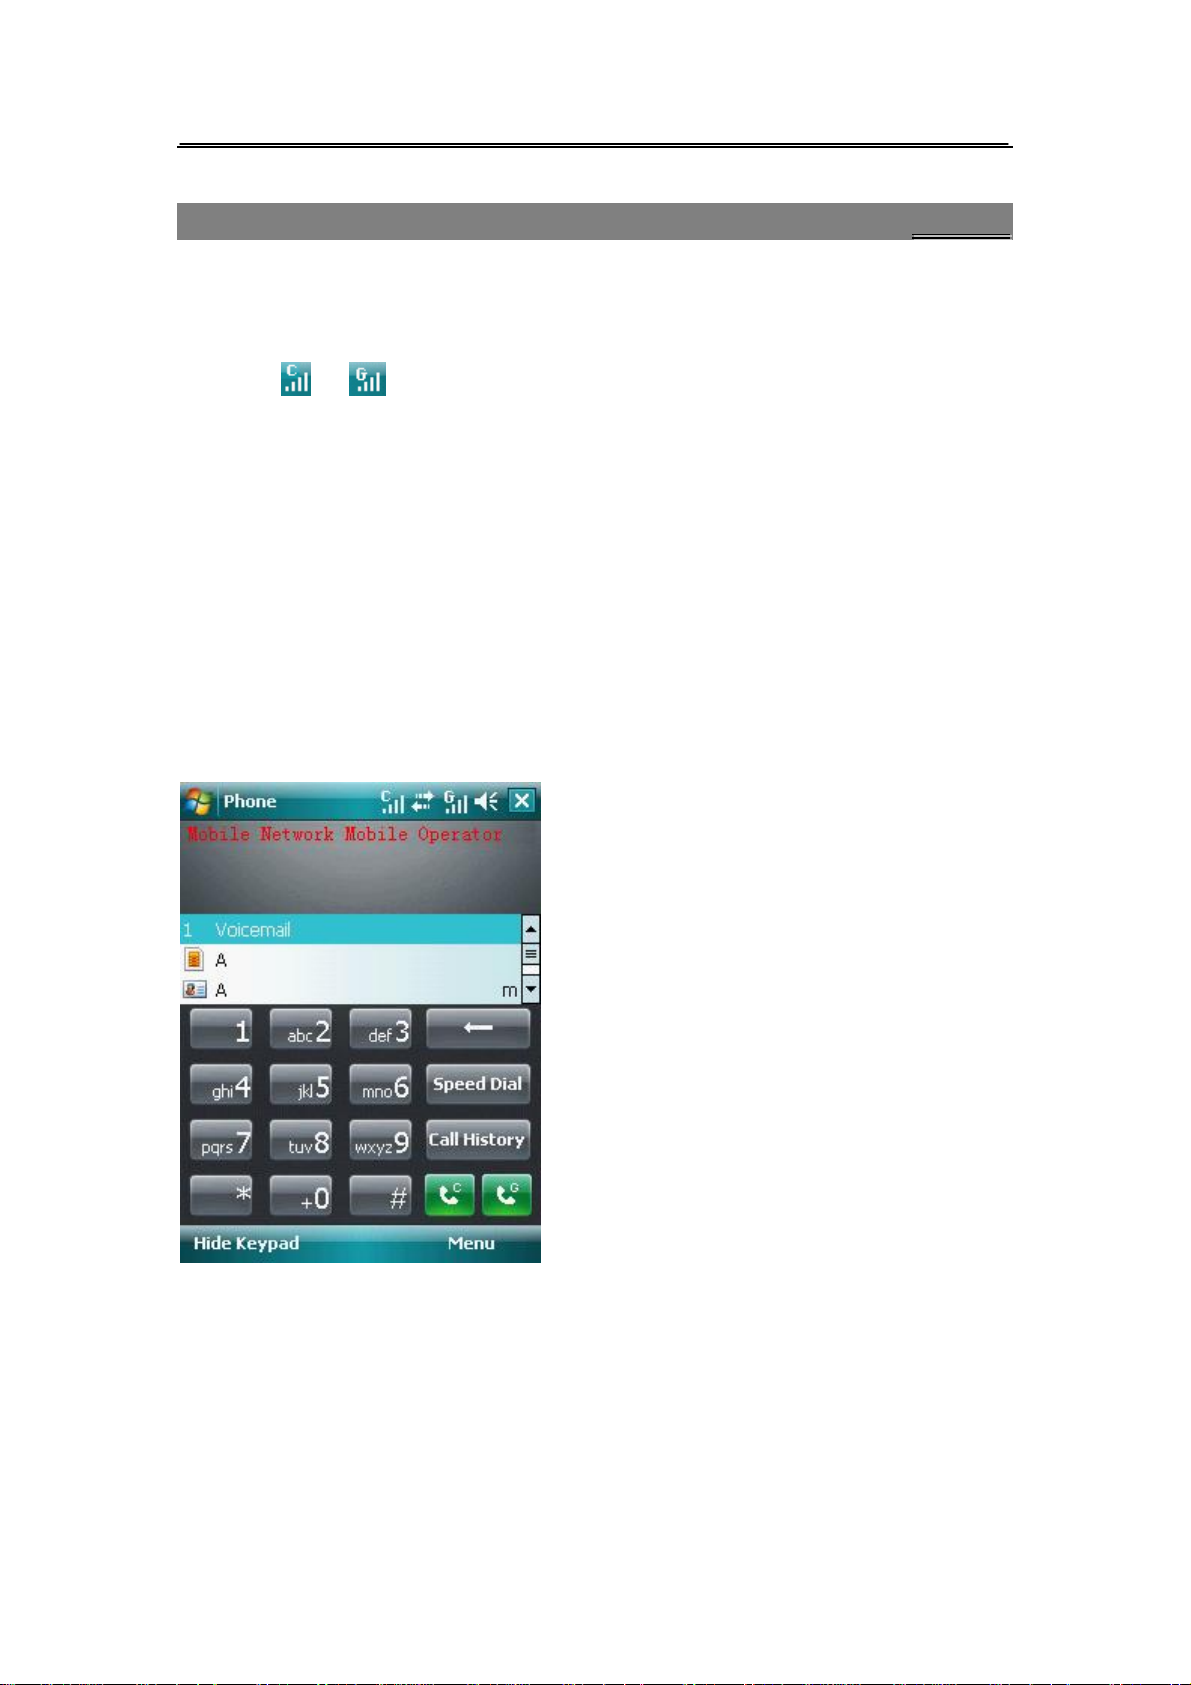
3.1.1. To Dial in standby mode
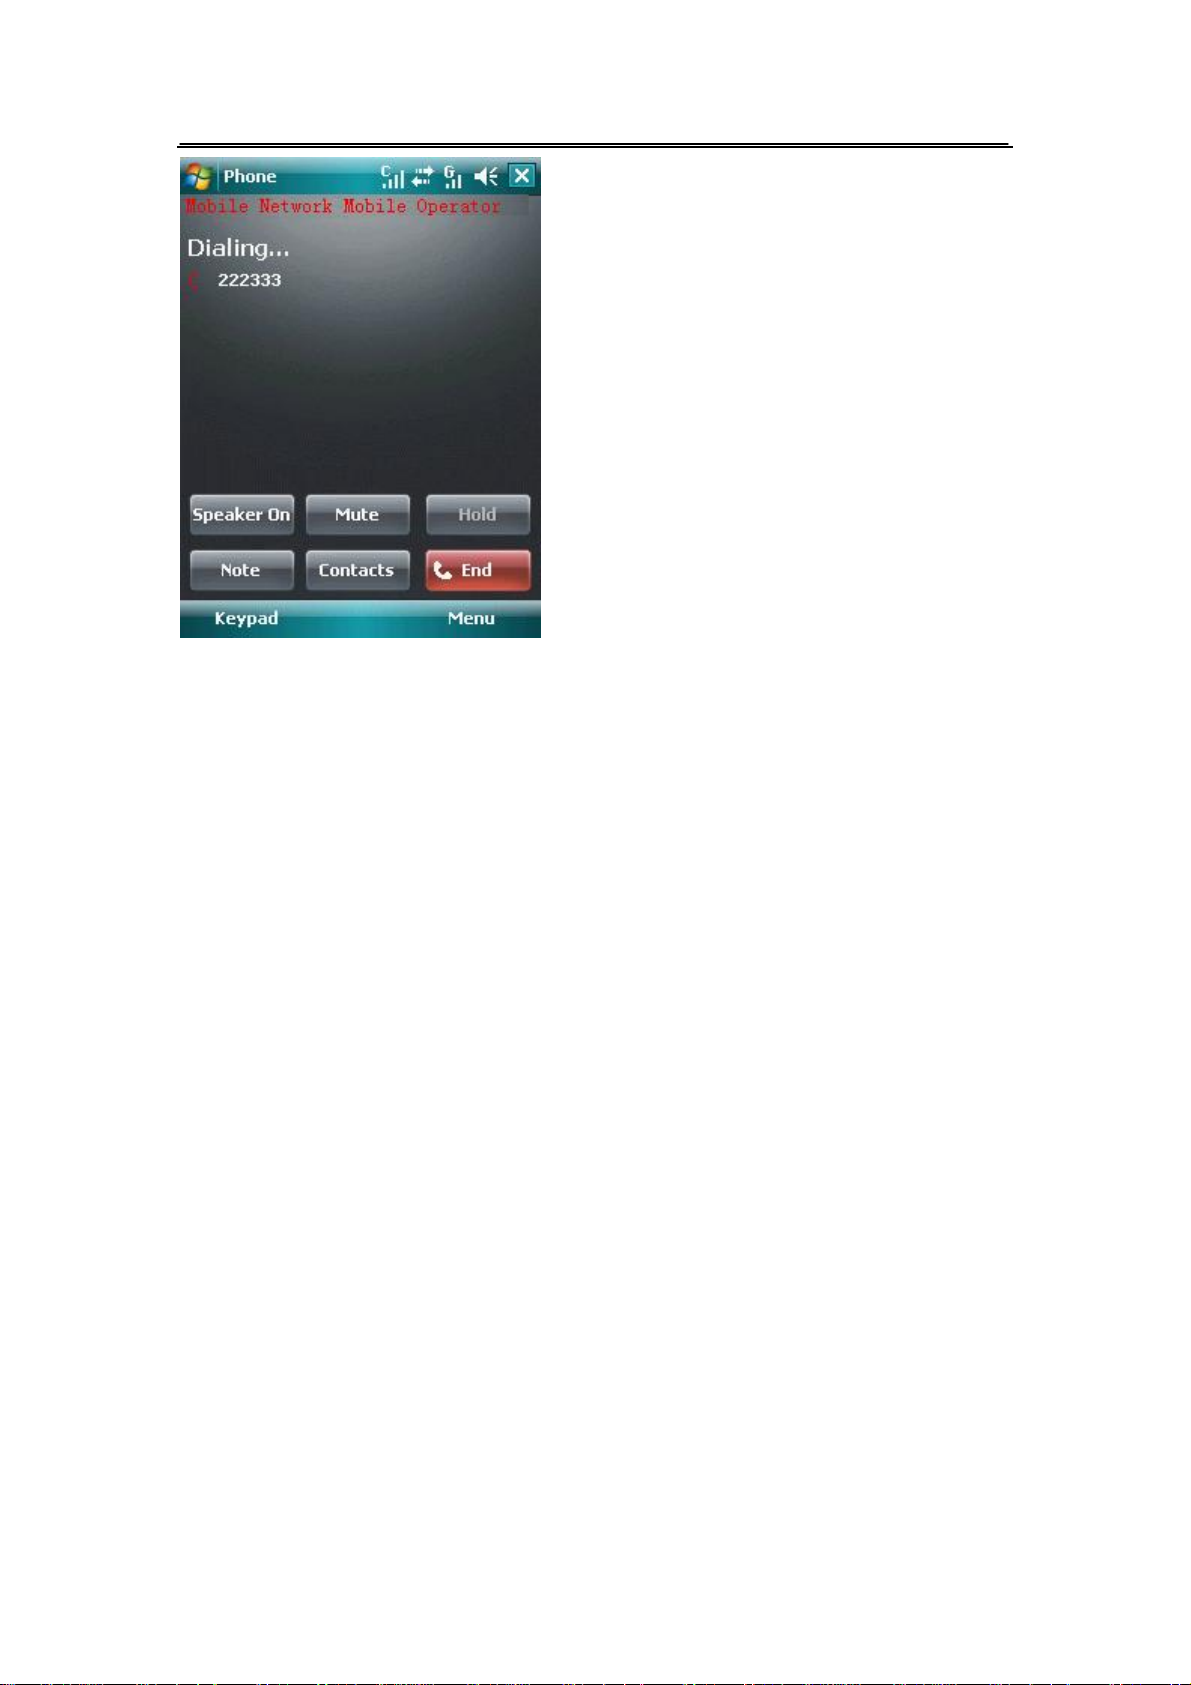
1. In standby mode ,tap Phone to display the dial plate.
2. Tap Number Keys to input the number you wish to dial.
Page 21 of 84 Copyright©2009 Spice
Page 23
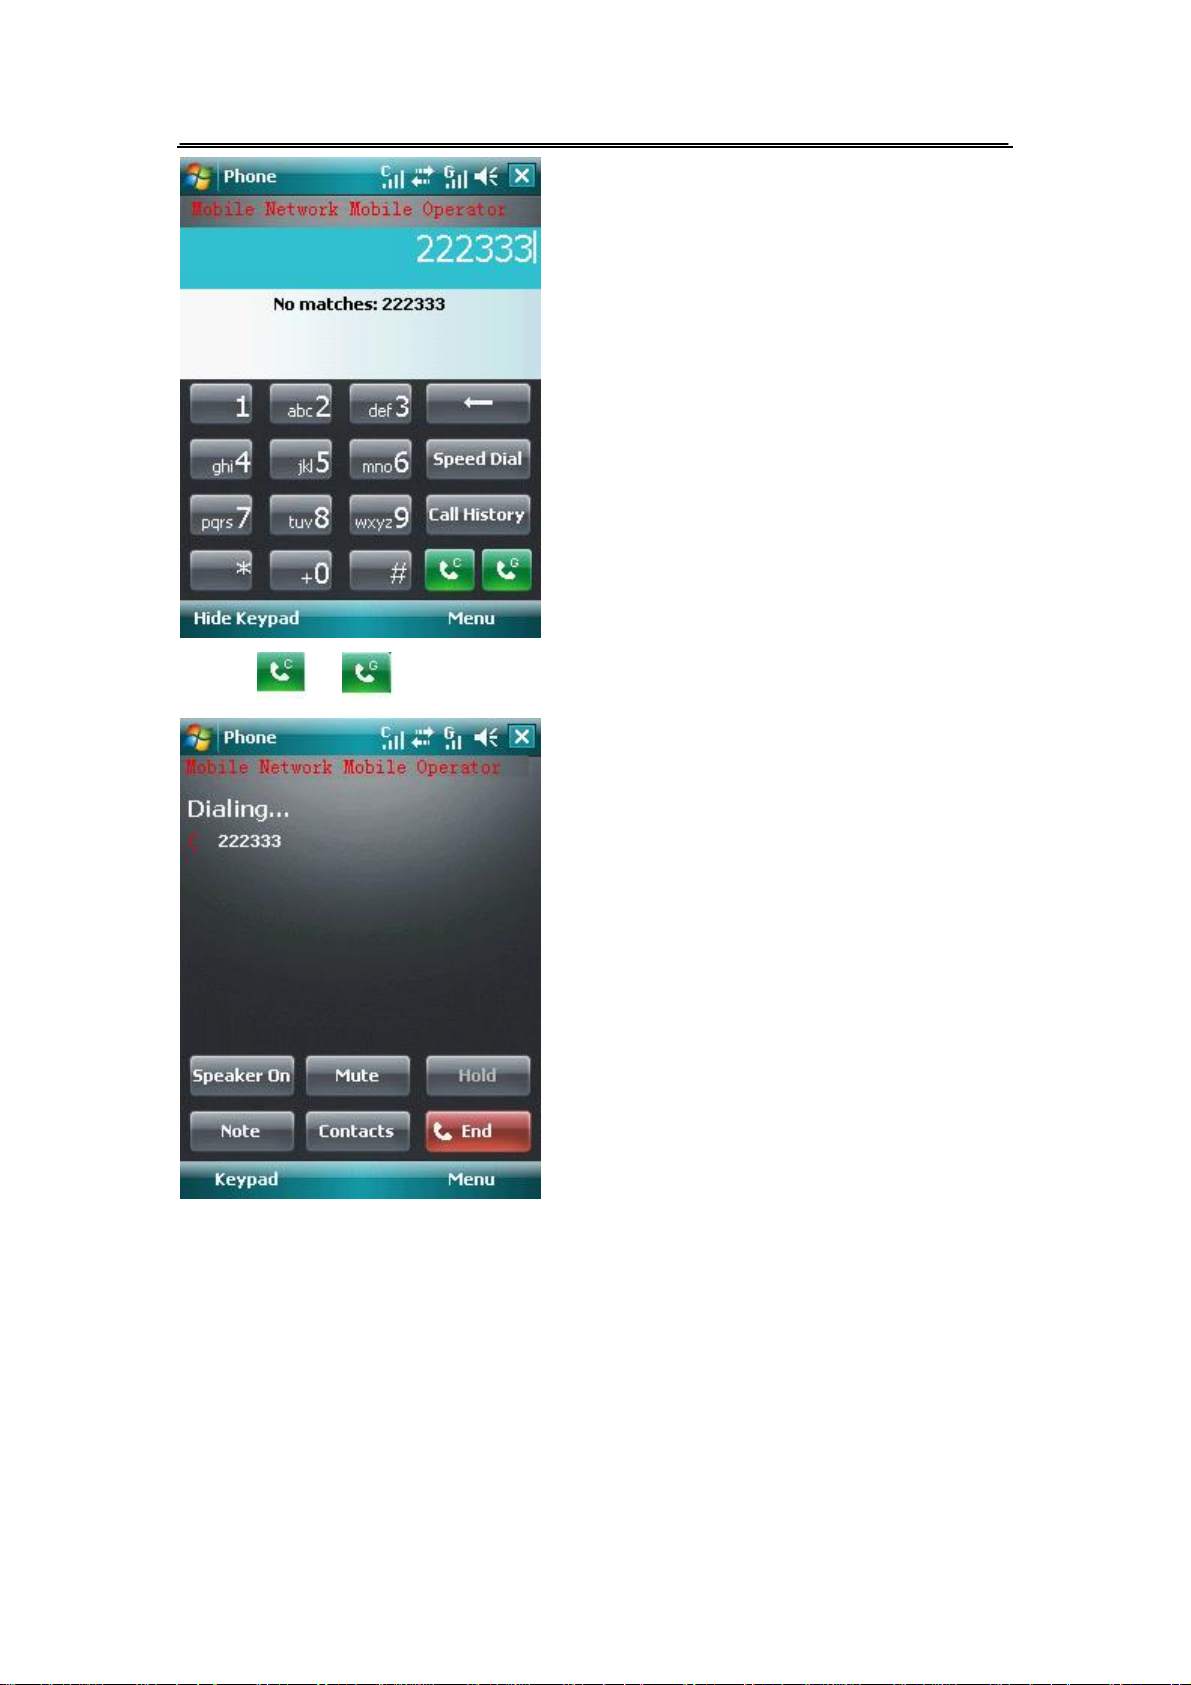
3. Tap or or press Send Key to make a call.
3.1.2. To insert a pause symbol when dialing
There is one method to dial an extension number with a pause symbol: to dial the extension
number automatically (the pause time is controlled automatically). The phone supports the
application of the pause symbol.
To dial the extension number by automatic switching:
On the idle screen, display the dial plate to input a phone number.
Long press * key to input the pause symbol P.
Input the extension number.
Press Send key or tap Talk to dial the phone number, then the phone will dial the extension
Page 22 of 84 Copyright©2009 Spice
Page 24
number after P automatically.
Tip: The pause time depends on the number of “P” input.
3.1.3. Use the Phone Dialing Application
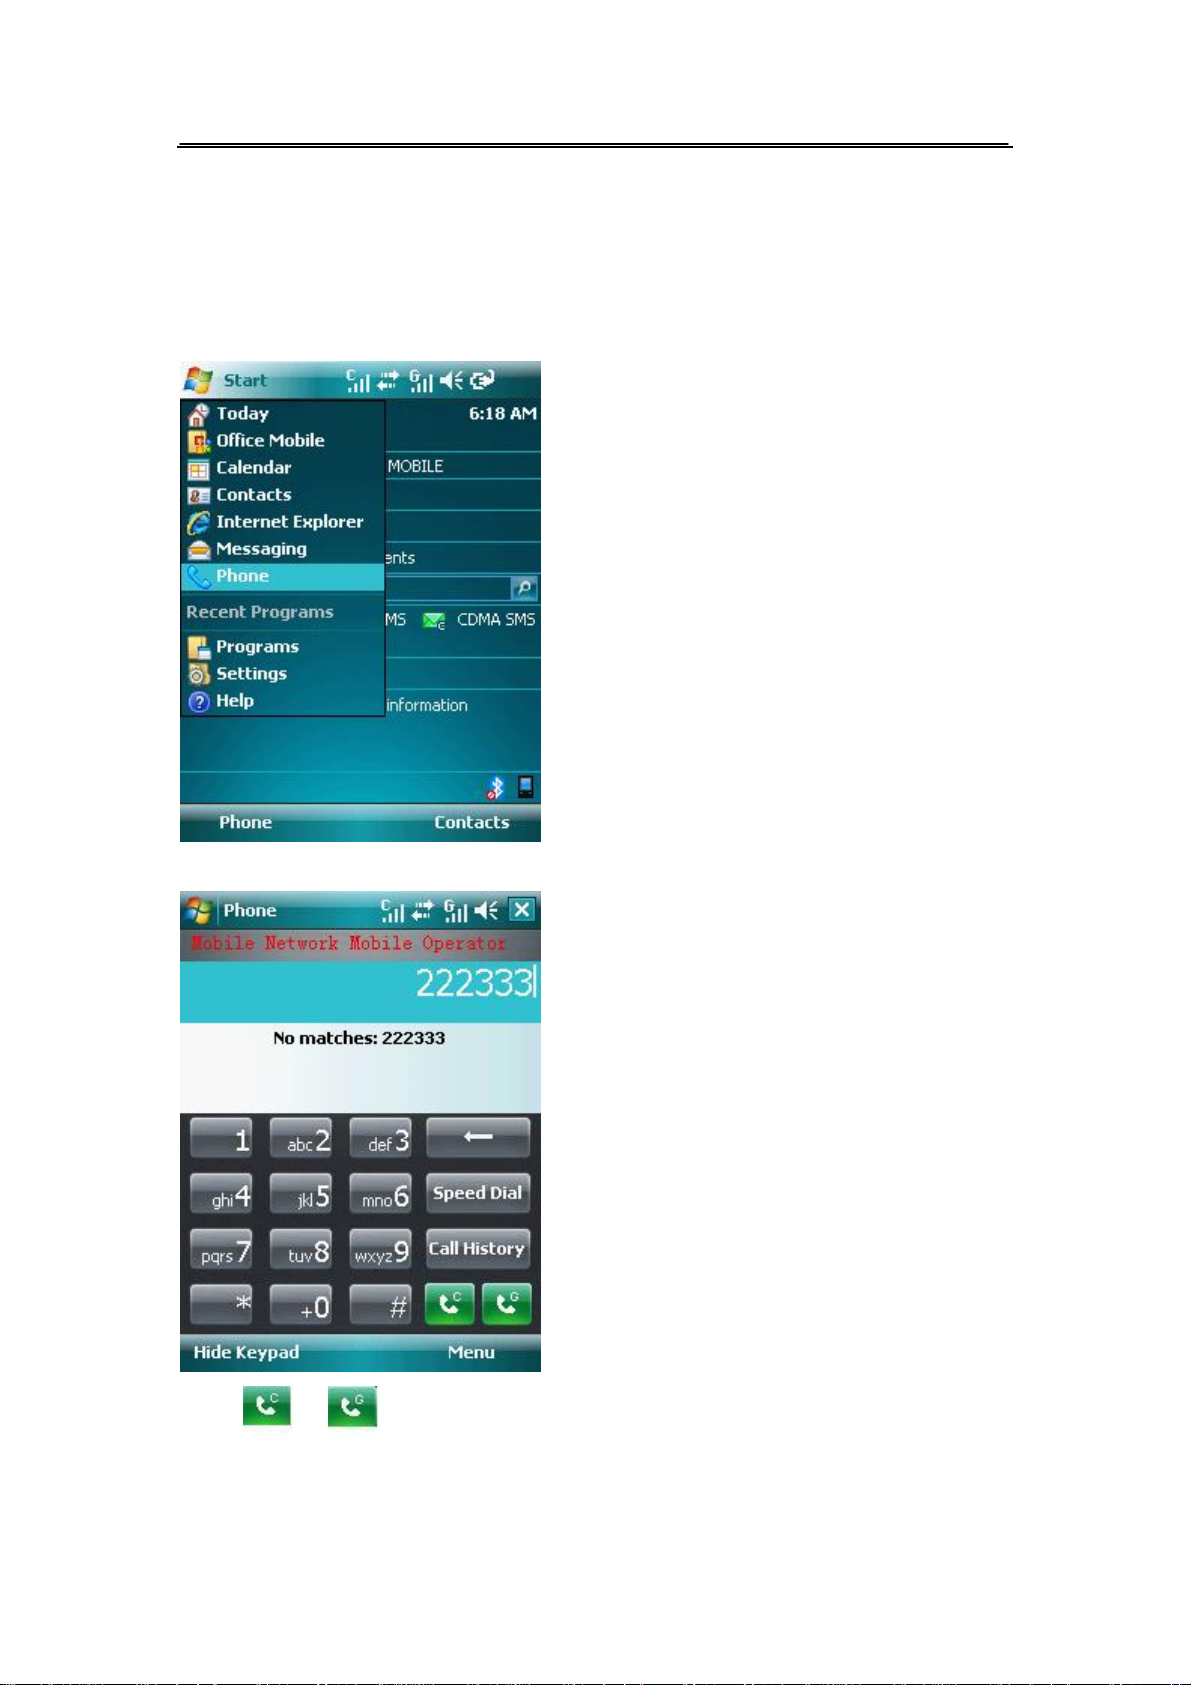
1. Tap Start >Phone
2. Tap Number keys to input the number you wish to dial.
3. Tap or or press Send Key to make a call.
Page 23 of 84 Copyright©2009 Spice
Page 25
3.1.4. Speed Dialing
You can specify speed dial numbers to frequently used phone numbers.
Long press the number keys on the dial plate to dial the phone number.
Tip: You must have set a speed dial number for that number key, and the Speed Dial function has
been activated.
3.1.5. To Dial from Contacts List
Display the dial plate, tap Call History, choose the desired contact,tap Call or press
Send Key to make a call.
3.1.6. To dial from the phonebook
In standby mode, tap Start >Contacts
l Select an entry from the entry list and tap Call or press Send key to dial.
Tip: If the entry contains more than one numbers, the number selection screen will be displayed.
You can select one and tap Call or press Send key to dial.
3.1.7. GSM Three-Way Conference
A Three-Way Calling, also called a multiparty call or a conference call, is a service based on call
waiting.
The function needs the support from the local network. In some districts, you can use the function
only after you apply with the local network operator.
During a call, you may dial other numbers without hanging up the current call, and use the
functions provided during the call to connect new parties and make a three-way calling.
Page 24 of 84 Copyright©2009 Spice
Page 26

1. Ask the other party of the current call not to end, and tap Hold to hold the current call.
2. Dial a new number, and talk with him after he answers your call.
3. Select Menu> Conference to connect all the parties and form a conference.
4. Continue to dial new numbers, and repeat the steps above to add more parties to the
conference.
Tip: After a conference is formed, if you tap End key, you will end all the calls.
3.1.8. CDMA Three-Way Conference
For instance, you are in a call with B and need to add a third party C. You can input the phone
number of C and press Send key. If C answers, the call with B will be held automatically.
During the call with C, you may:
l Make a three-way Conference calling: Select Menu> Conference to make a three-way
calling.
l End all the calls: Tap End key.
3.2. To answer or reject a call
l When a call comes in, if an entry in the phone book corresponds to the number, the
related information will be matched.
1. When the phone prompts that a call is coming in,tap Answer or press Send Key, tap
Ignore or press End Key.
2. Press End to end all calls.
Tip: If you have plugged the earphones in the phone, you need to long press the button on the
earphones to answer the incoming call (except when you have set to automatic answering). To end
a call, you also need to long press the same button.
3.3. Missed Calls
If there are some missed calls, the top of the screen will show an icon to remind you that you have
missed calls.
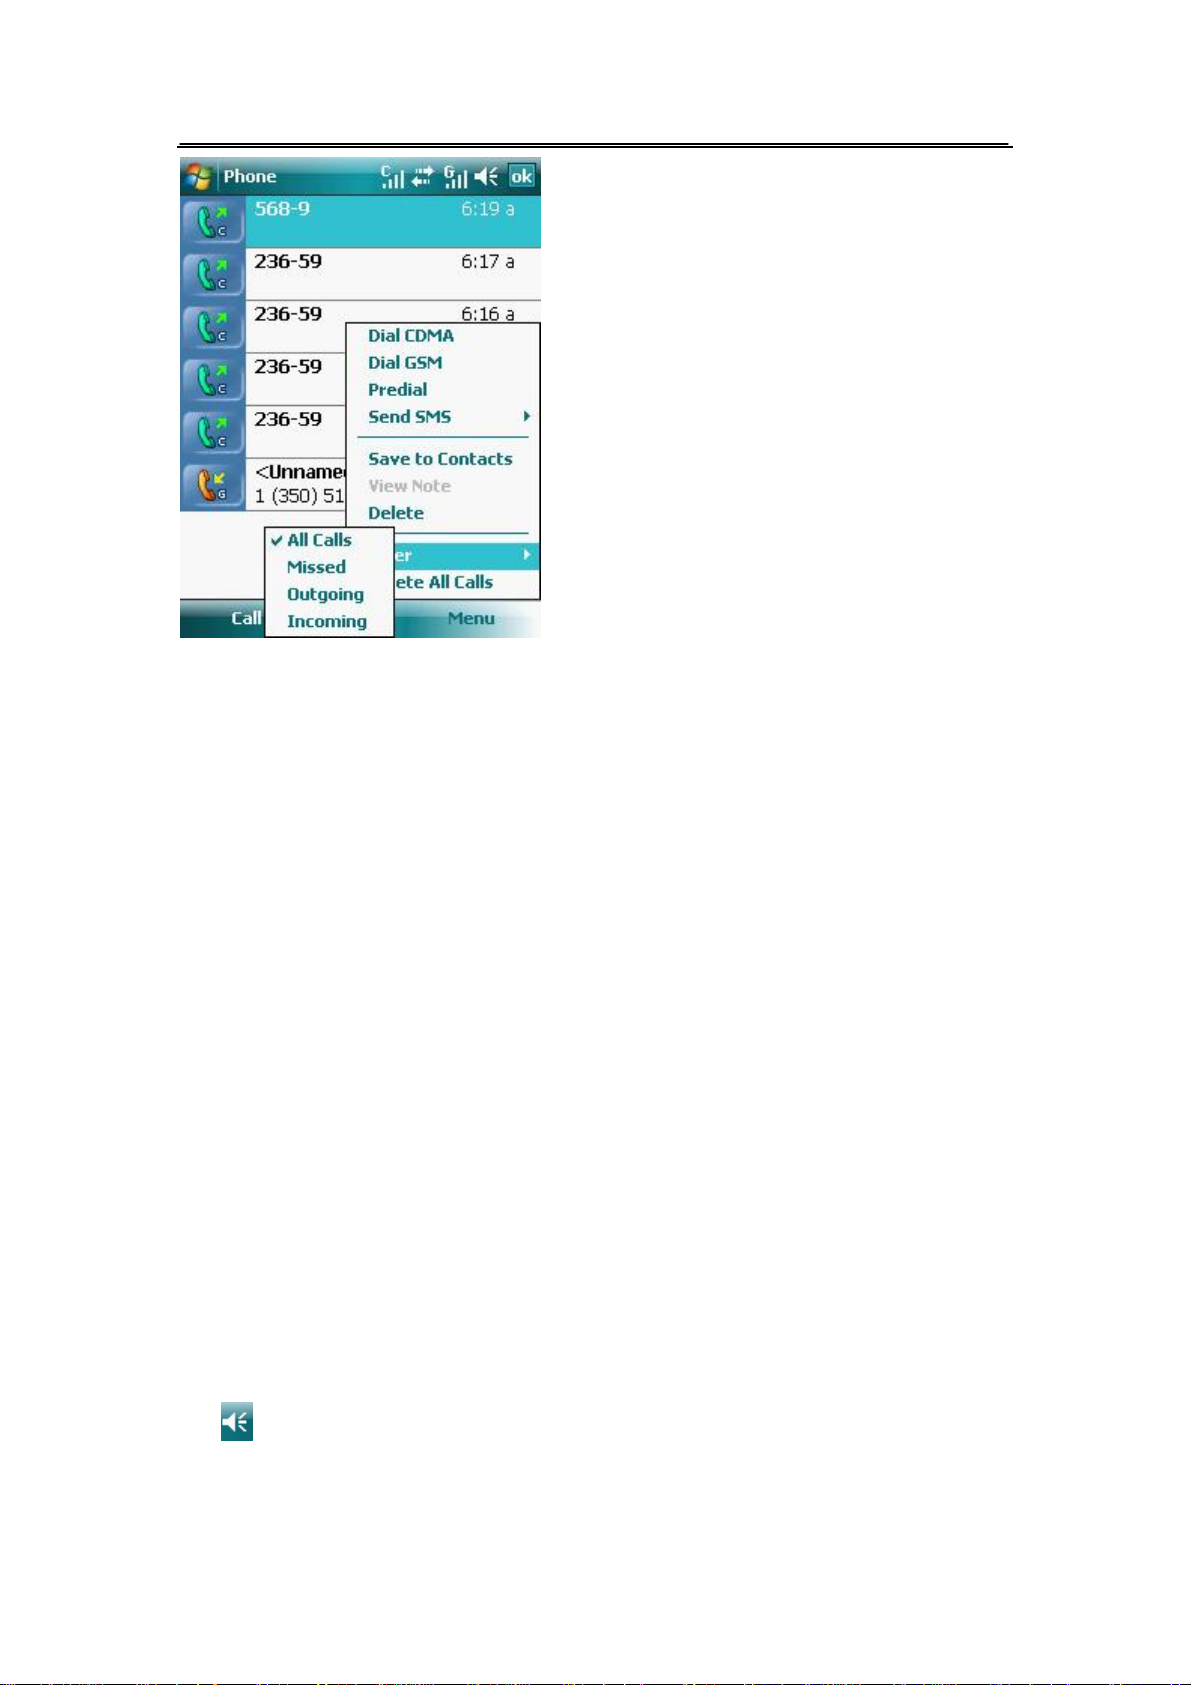
3.4. Call History
Display the dial plate, tap Call History, tap Menu >Filter to view Call History by the categories.
Page 25 of 84 Copyright©2009 Spice
Page 27
3.5. Call Option
3.5.1. To be mute during a call
During a call, you can prevent the other party from hearing you:
1. Tap Mute on call screen, Mute is activated.
2. Tap Unmute on call screen, Mute function is turned off. The other side can hear you.
3.5.2. Call Hold
During a call, you can hold an original call.
1. Tap Hold on call screen .Hold is activated.
2. Tap Unhold on call screen, Hold function is turned off.
3.5.3. Create Call Notes
During a call, you can create a Call Note and it will be attached to Call Log.
1. Tap Note on call screen.
2. You can finish your note during a call or after you end the call.
3.5.4. To adjust volume of the speaker during a call
Tap to adjust volume of the speaker during a call.
Page 26 of 84 Copyright©2009 Spice
Page 28

3.5.5. DTMF (Dual Tone MultiFrequency) Tone
During a call, tap Keypad to input the digits.
The digits input will be regarded as a DTMF signal response.
3.6. UIM / SIM Lock
You can set SIM lock to protect your SIM card.
l Tap Start >Settings>CDMA Phone/GSM Phone
l You should input PIN codes
l To turn off SIM Lock, you need to input PIN codes.
3.7. GSM Call Waiting
This function allows you to put the current call on hold and then answer a second one.
The function needs the support from the local network. In some districts, you can use the function
only after you apply with the local network operator.
3.8. CDMA Call Waiting
The function needs the support from the local network. In some districts, you can use the function
only after you apply with the local network operator. The detailed operations may vary for
different networks. For assistance, please consult the local network operator.
Page 27 of 84 Copyright©2009 Spice
Page 29
44.. MMaannaaggiinngg PPeerrssoonnaall IInnffoorrmmaattiioonn
4.1. Contacts
Use the contacts application to manage your contact information, to quickly connect with or send
messages to your contacts.
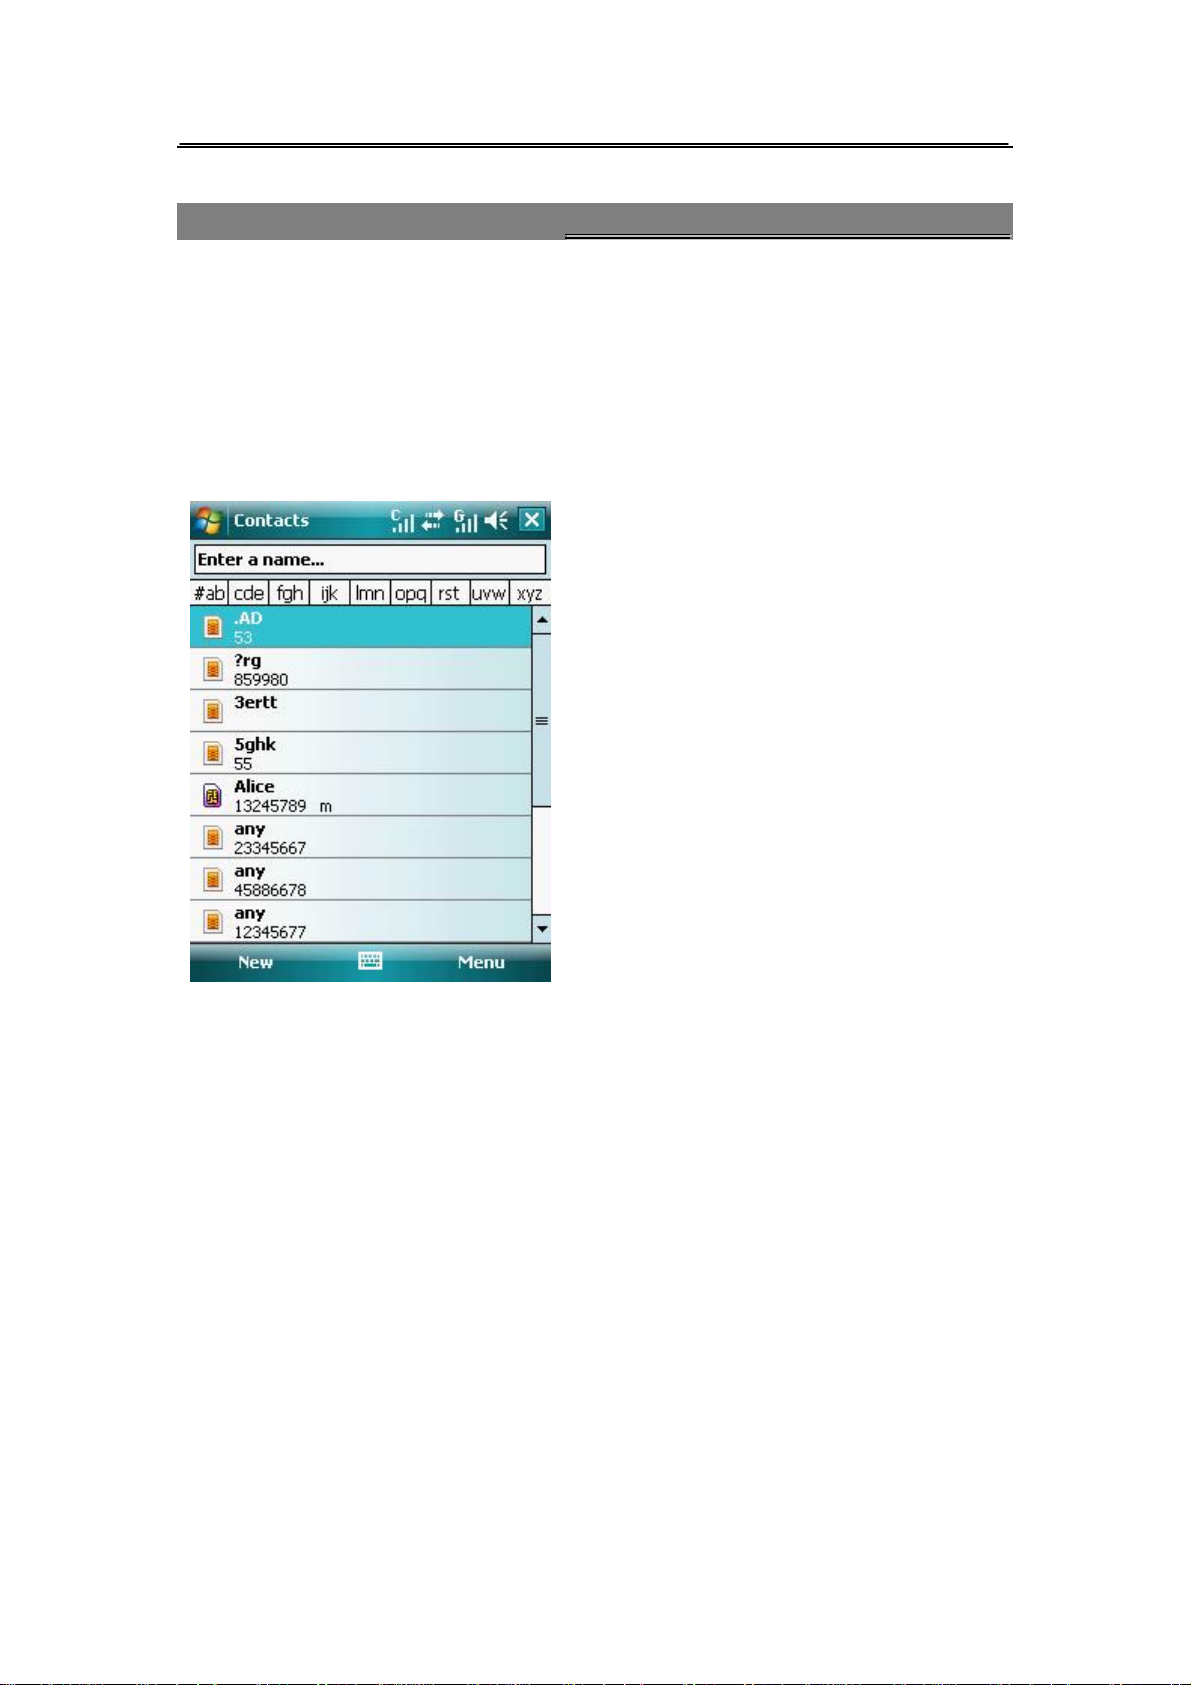
4.1.1. Contacts List
l Tap Start >Contacts
l You can browse and manage the contacts list at this screen.
Page 28 of 84 Copyright©2009 Spice
Page 30
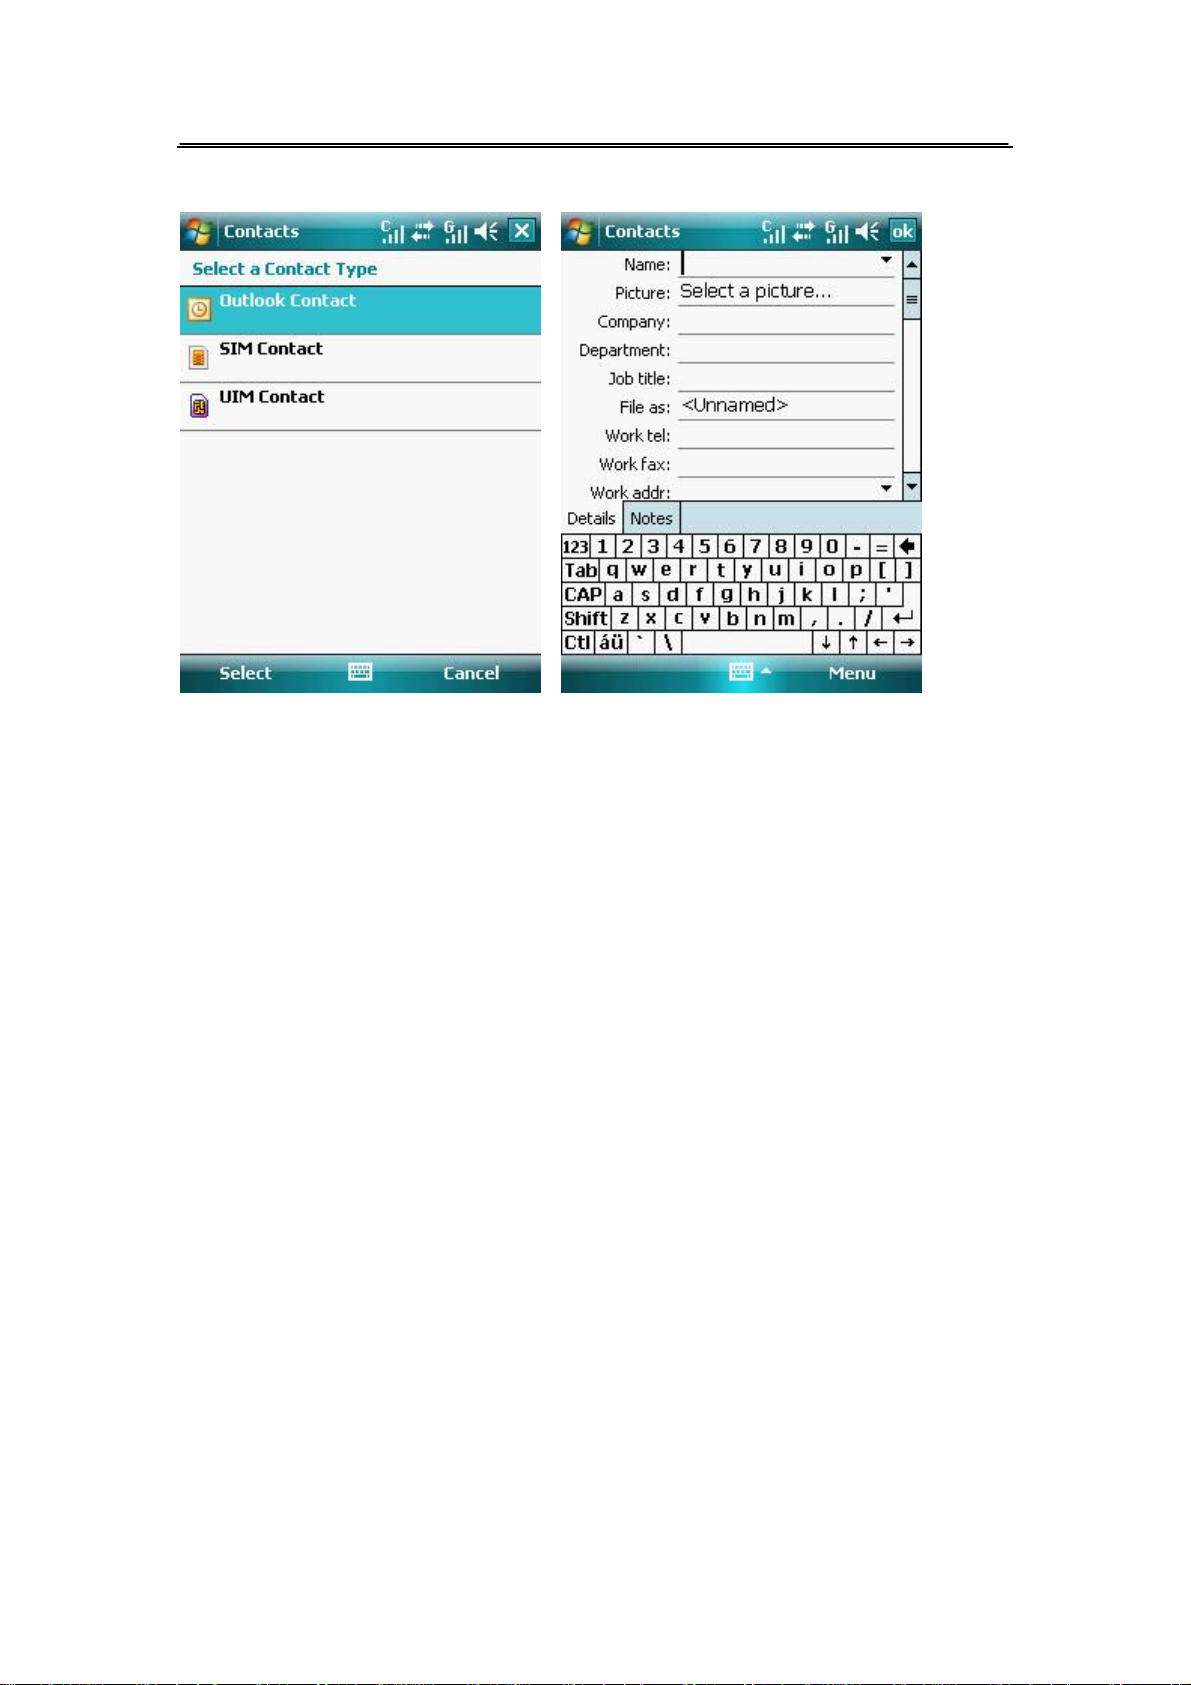
4.1.2. To add New Contacts
l Tap Start > Contacts > New > Outlook Contact
l Input Name and other information,you need to move scroll bar to view all the information.
Tap ok, return to contacts main screen, you have added a new contact entry.
l You can add SIM Contacts or UIM Contacts as above.
4.1.3. To search Contact
You can find the desired contact by the following
1. Tap Start > Contacts, move the scroll bar to find the desired contact entry.
2. Tap the enter area, enter name, or tap the Search Criteria, you can find the desired contact
entry。
3. Tap Start > Contacts,tap Menu>Filter > Contact category, lists the contacts under the
category.
4. Tap Start > Programs > Search, Input the information about the contact, select contacts from
the Type, tap Search.
4.1.4. Contact Backup
With the Micro SD card inserted, you can select the check box of contacts that you want to export
or import.
Page 29 of 84 Copyright©2009 Spice
Page 31
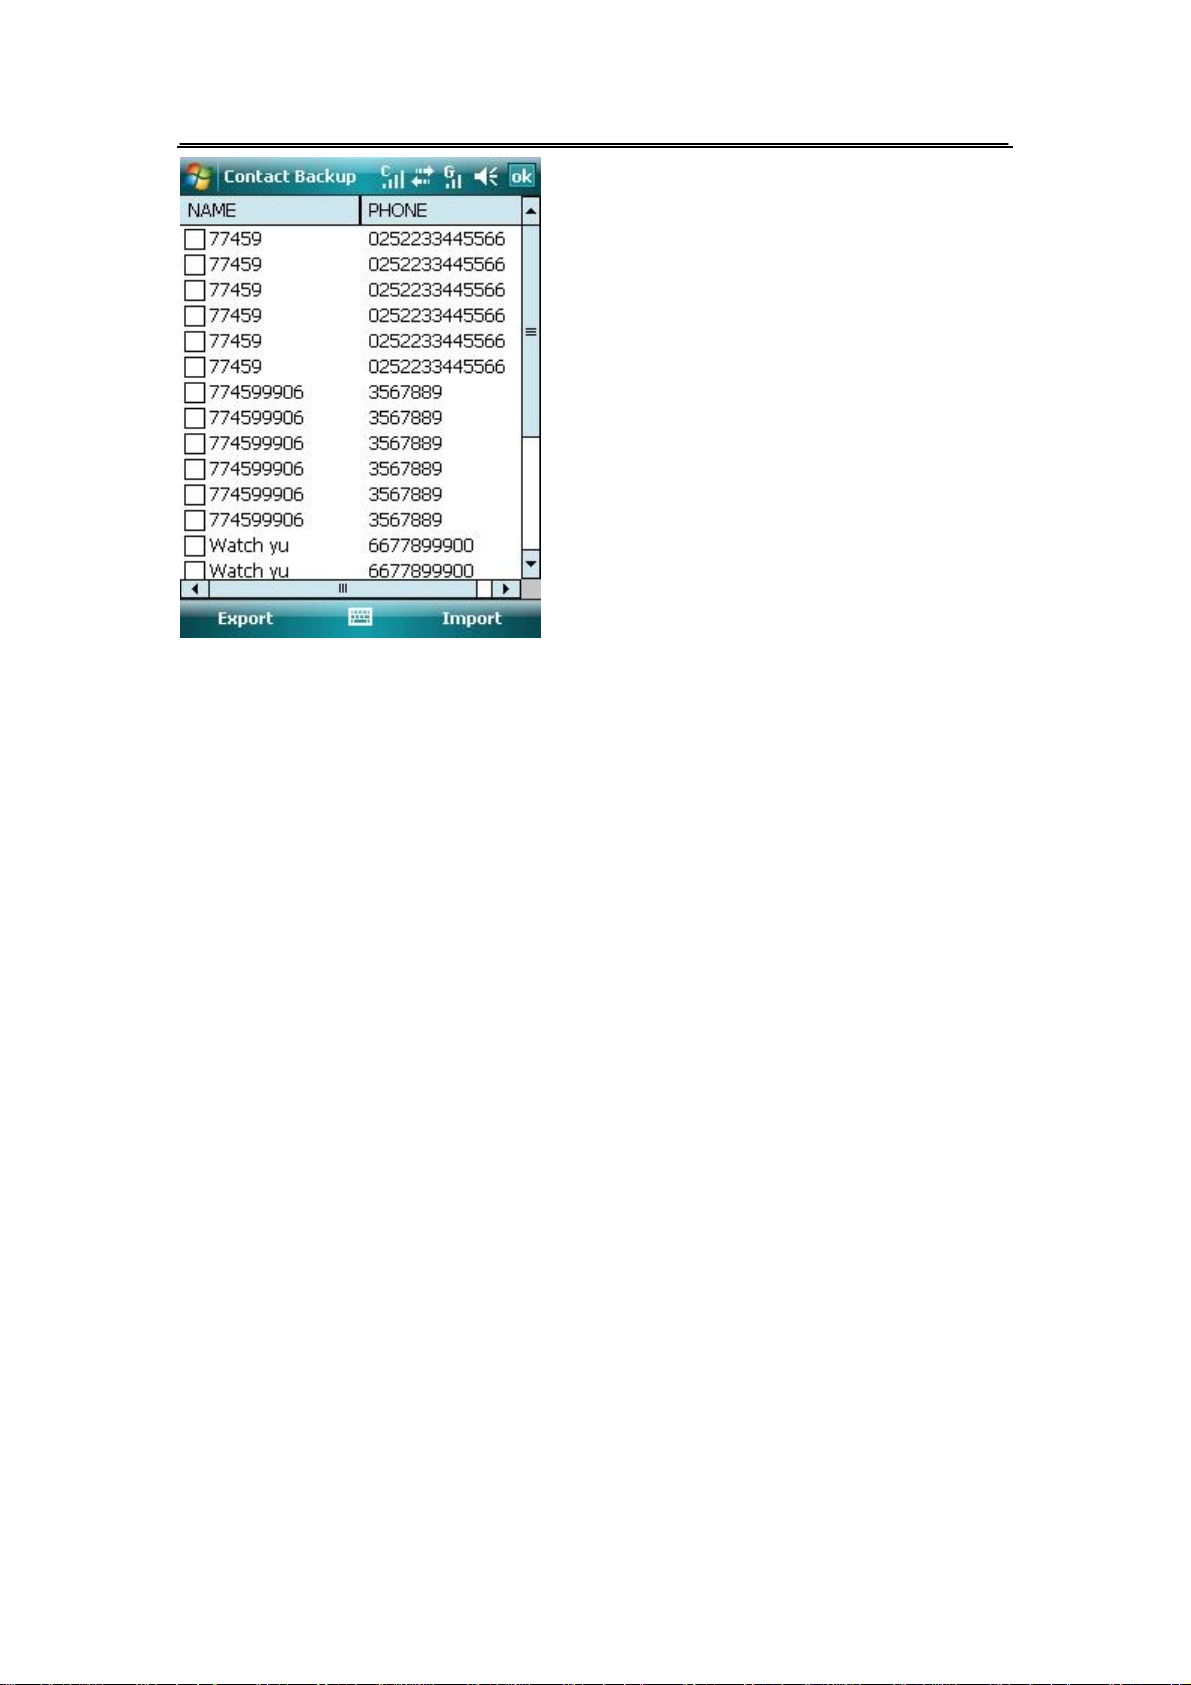
l You can export all the phone book entries stored in the phone 、SIM and UIM card to the
folder Contacts of Storage Card under File Explorer.
l You can import all contacts from the folder Contacts of Storage Card under File Explorer to
the Outlook Contact.
4.2. Calendar
You can use the calendar application to schedule, search and create reminders of appointments.
4.2.1. Open the Calendar Application
Select Start > Programs> Calendar
Page 30 of 84 Copyright©2009 Spice
Page 32
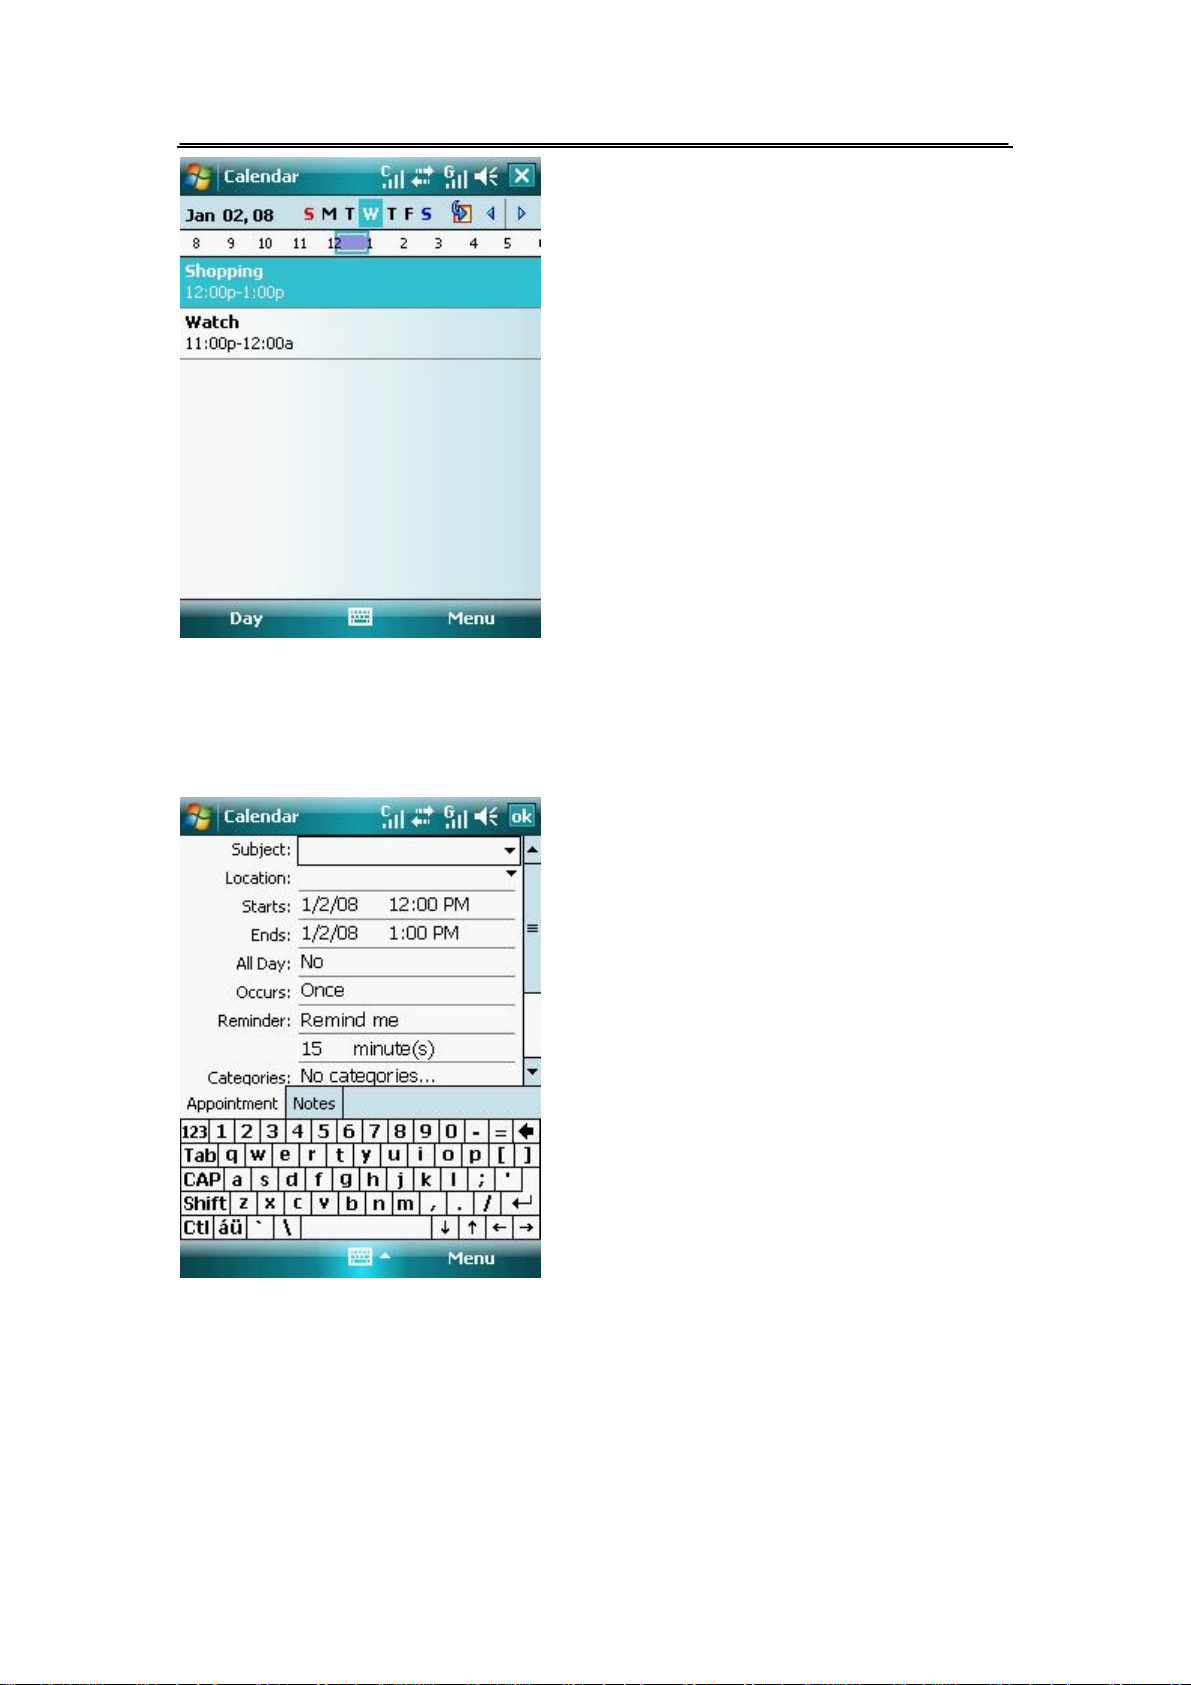
l Change Calendar view method:
You can select Day, Week, Month, Year or Agenda to arrange your appointments.
4.2.2. To add New Appointments
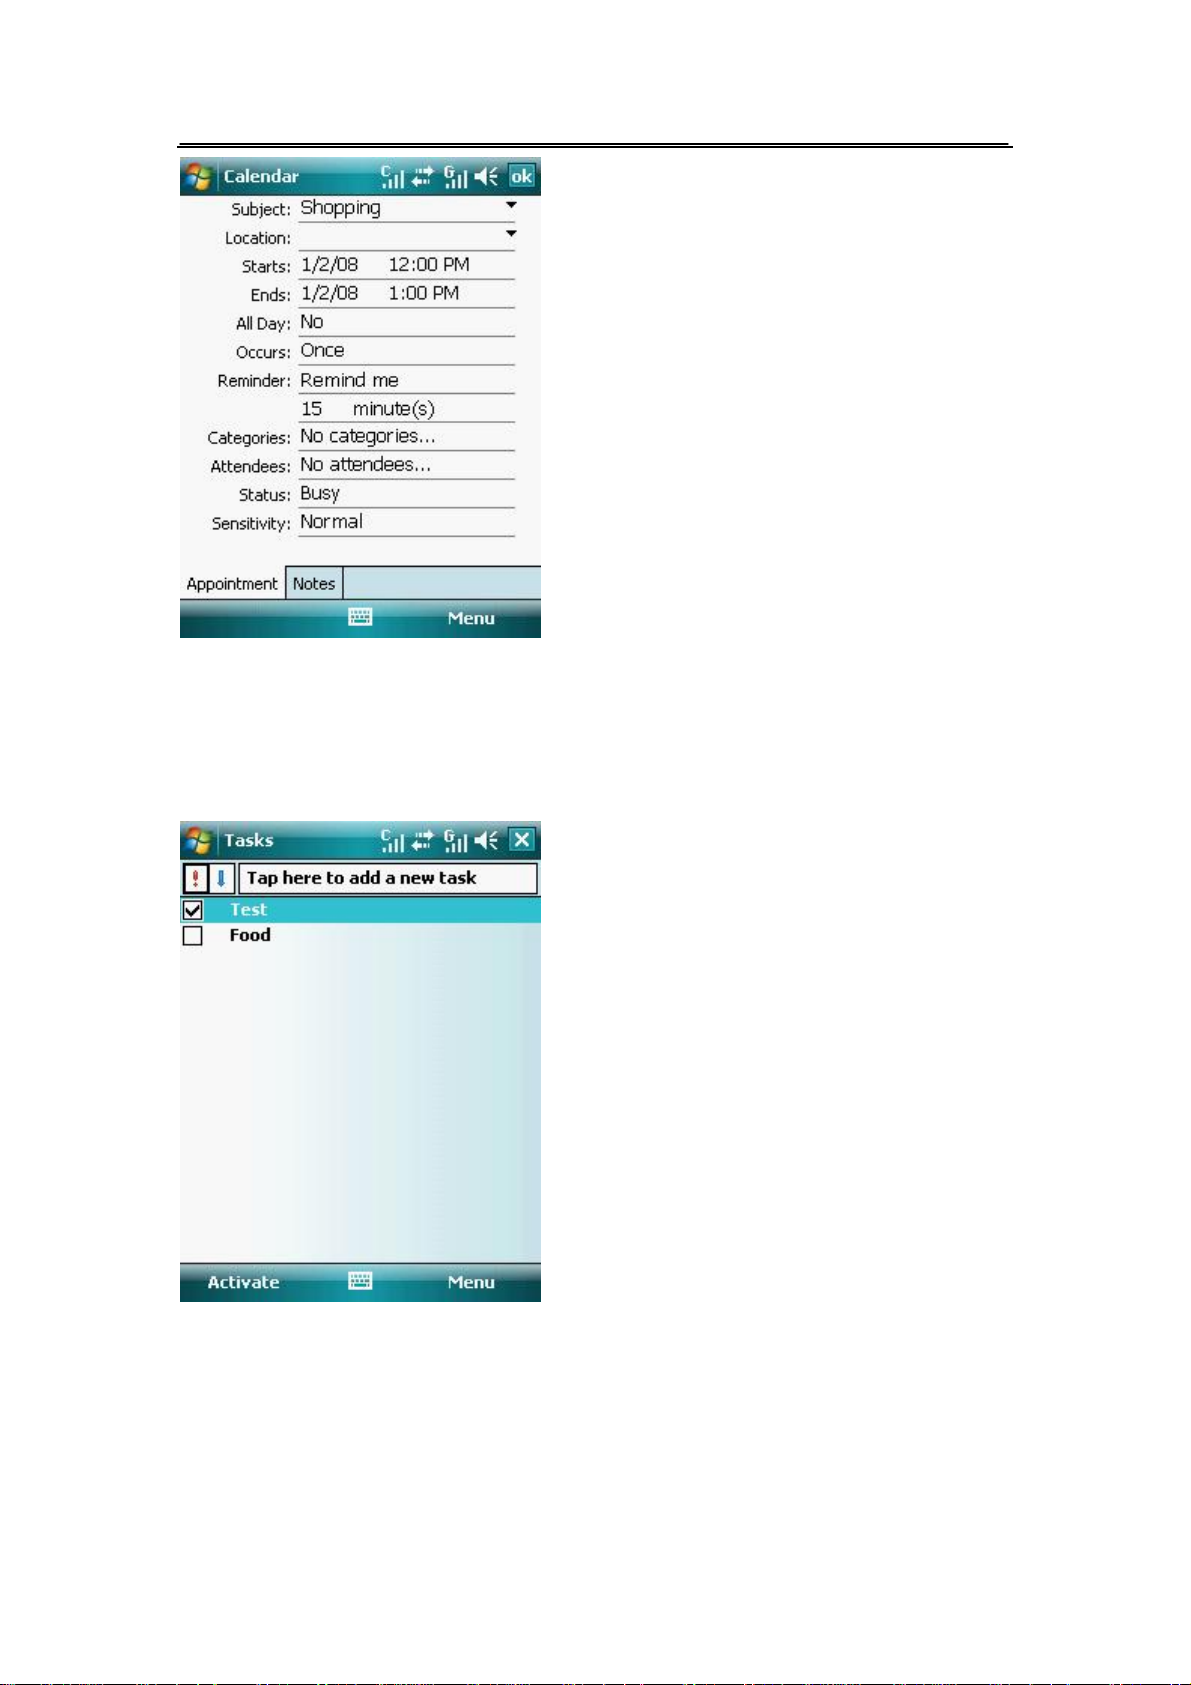
1. Tap Menu > New Appointment.
2. Input subject, location, etc.
3. Select Notes to enter a memo.
4. After finishing adding a new appointment, return to calendar main screen, you can browse the
added appointment.
Tip: At the appointment reminder time, the phone will show the reminder screen and sound the
ring tone.
Page 31 of 84 Copyright©2009 Spice
Page 33
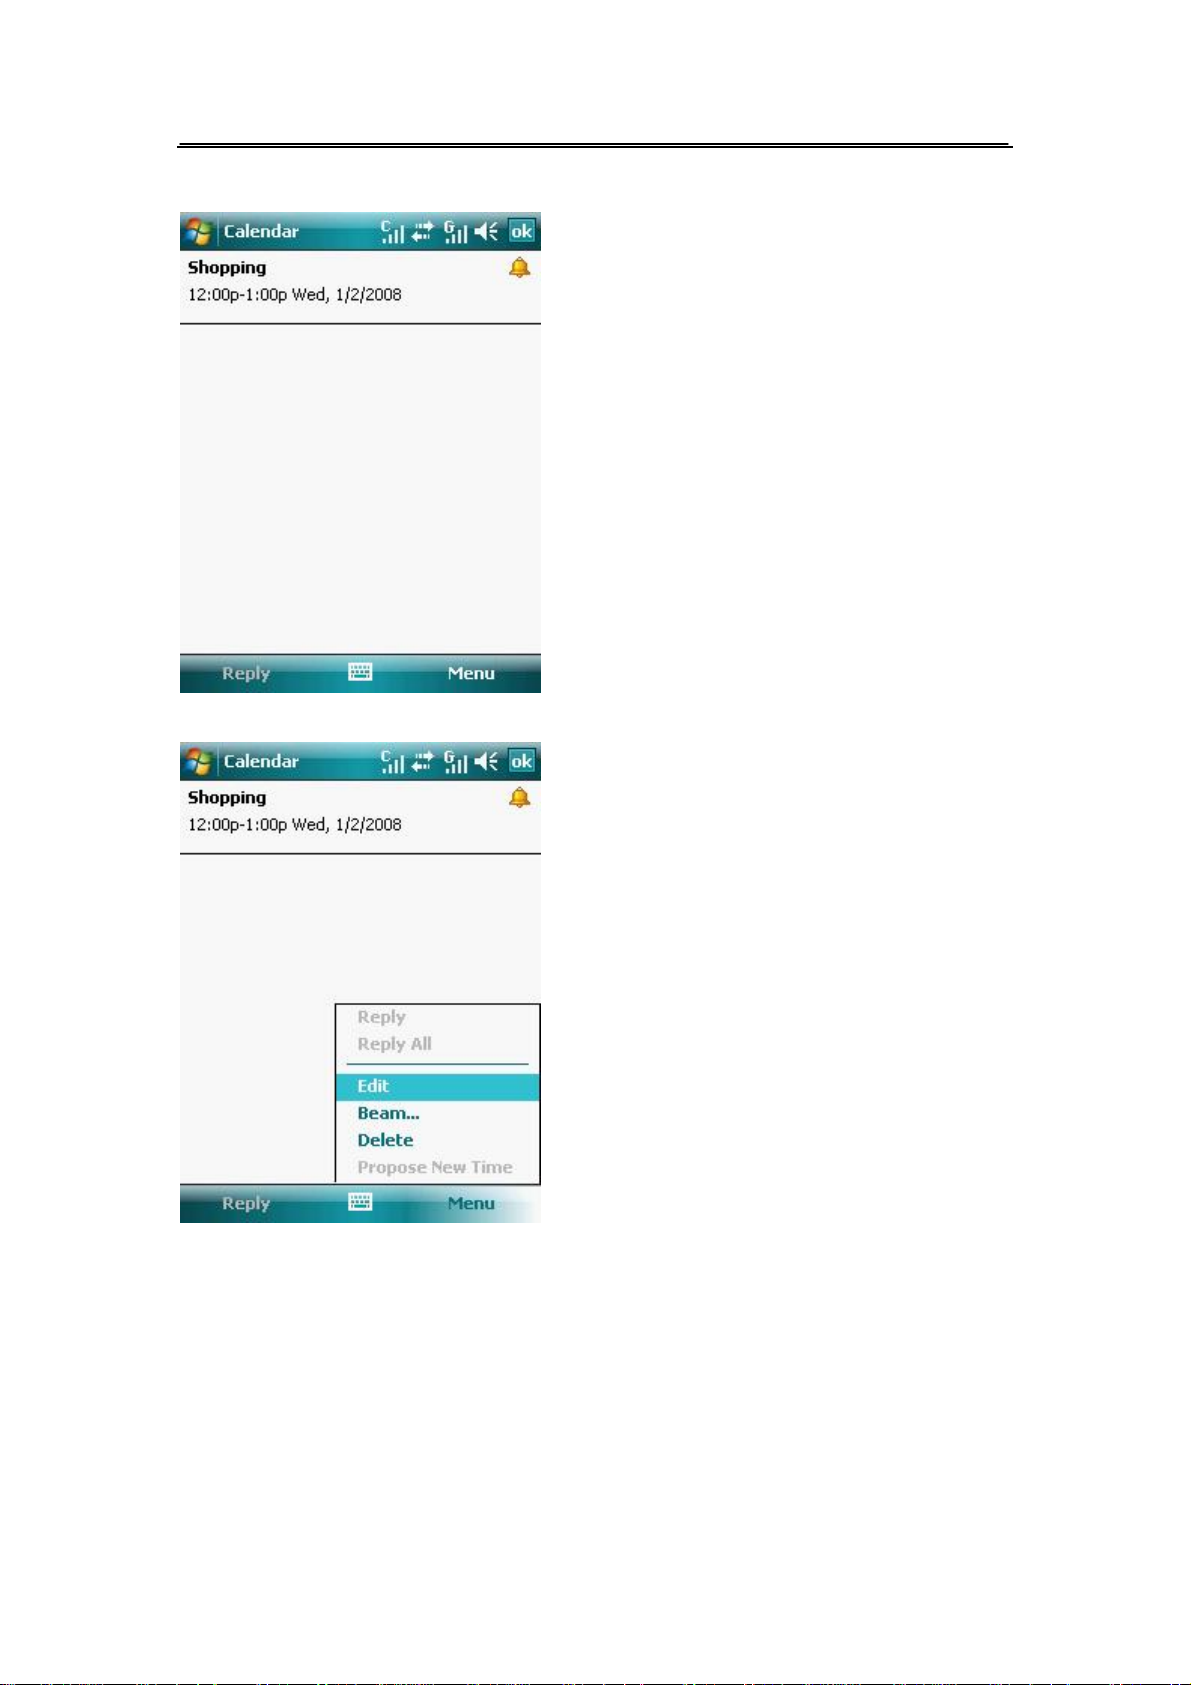
4.2.3. View and Edit Appointments
At the calendar inspection screen, select the appointment to view.
At the appointment information screen, tap Menu> Edit, edit appointments.
Page 32 of 84 Copyright©2009 Spice
Page 34
4.3. Task
4.3.1. Open the Tasks Application
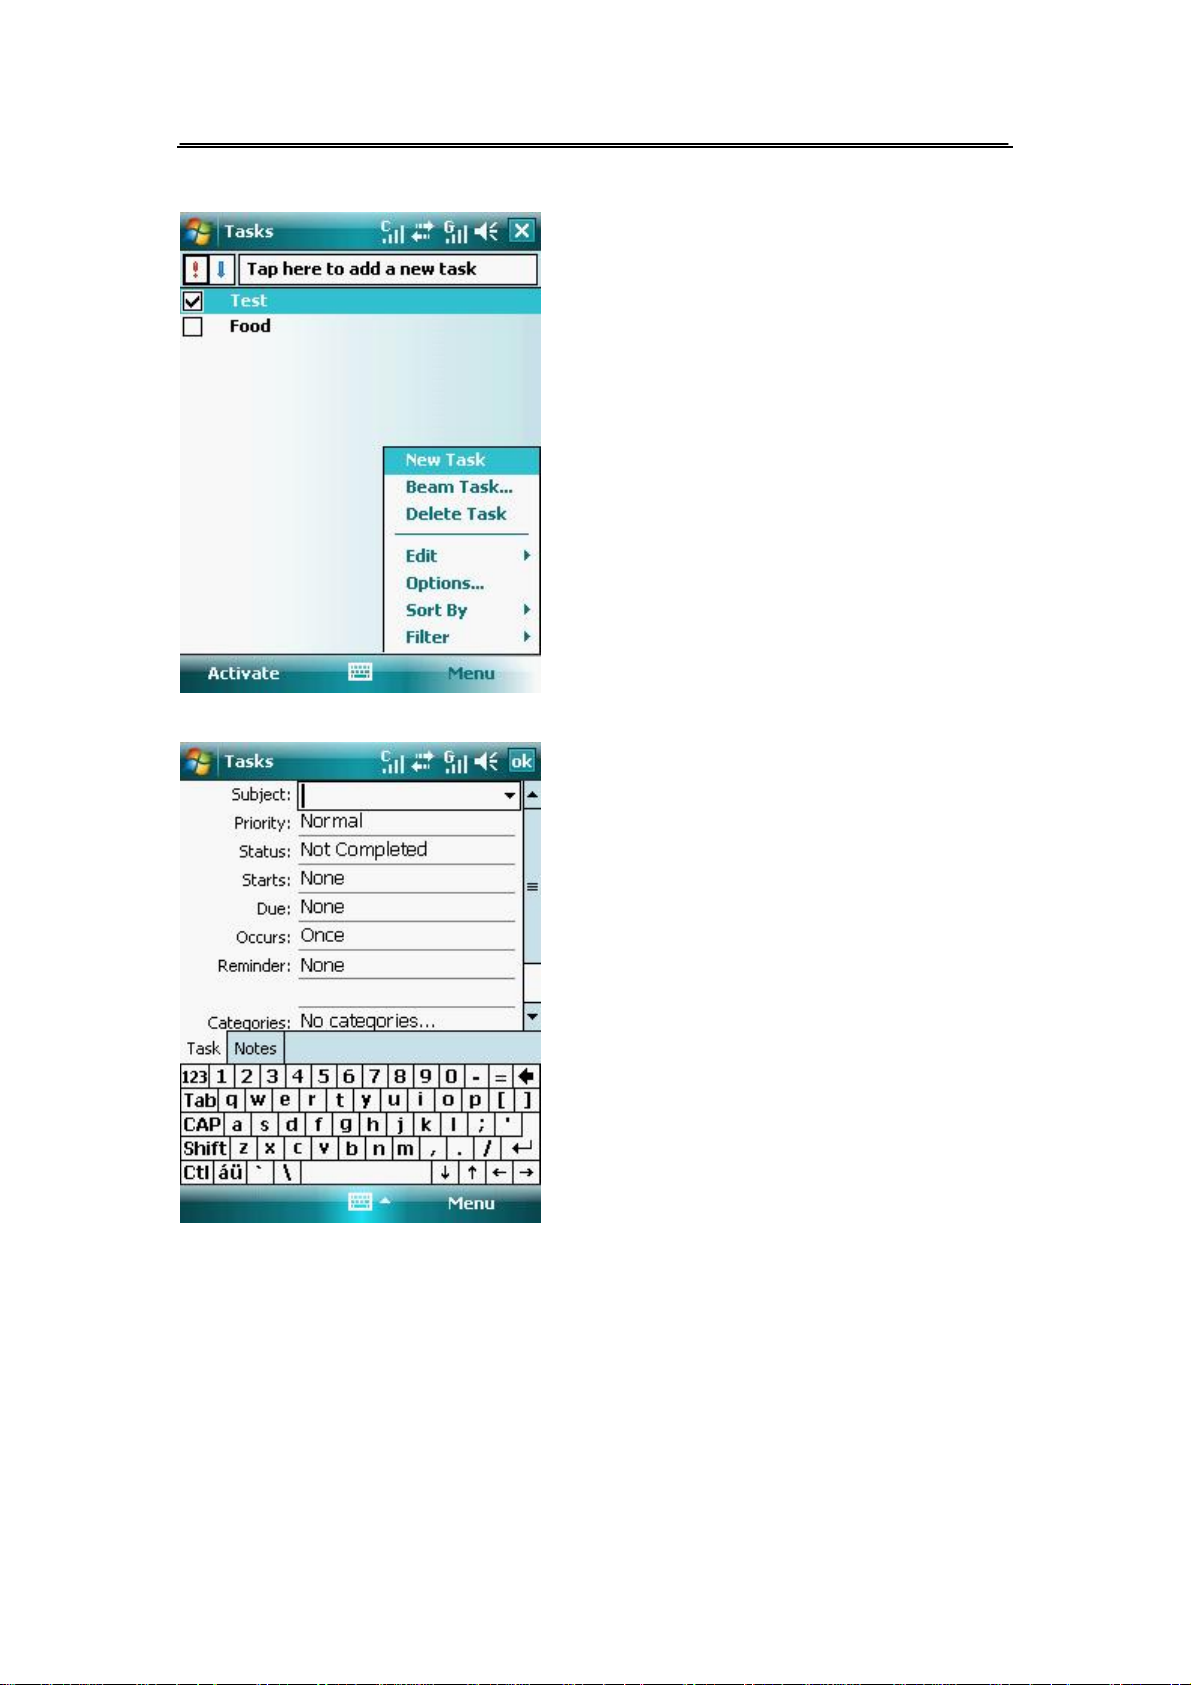
l Tap Start > Programs >Tasks
l Tap Menu>Options, change display of the tasks application.
Page 33 of 84 Copyright©2009 Spice
Page 35
4.3.2. To add new tasks
l Tap Menu> New Task.
l Input subject, choose the task priority, select the task start date, etc.
l Select ok to finish adding.
4.4. Notes
You can write or draw directly on the screen and save notes in your own handwriting. If you prefer
to use your own handwriting or use drawings in your notes, set the default input mode to writing.
If you prefer text, set the default input mode to typing
Page 34 of 84 Copyright©2009 Spice
Page 36
4.4.1. Open the Notes Application
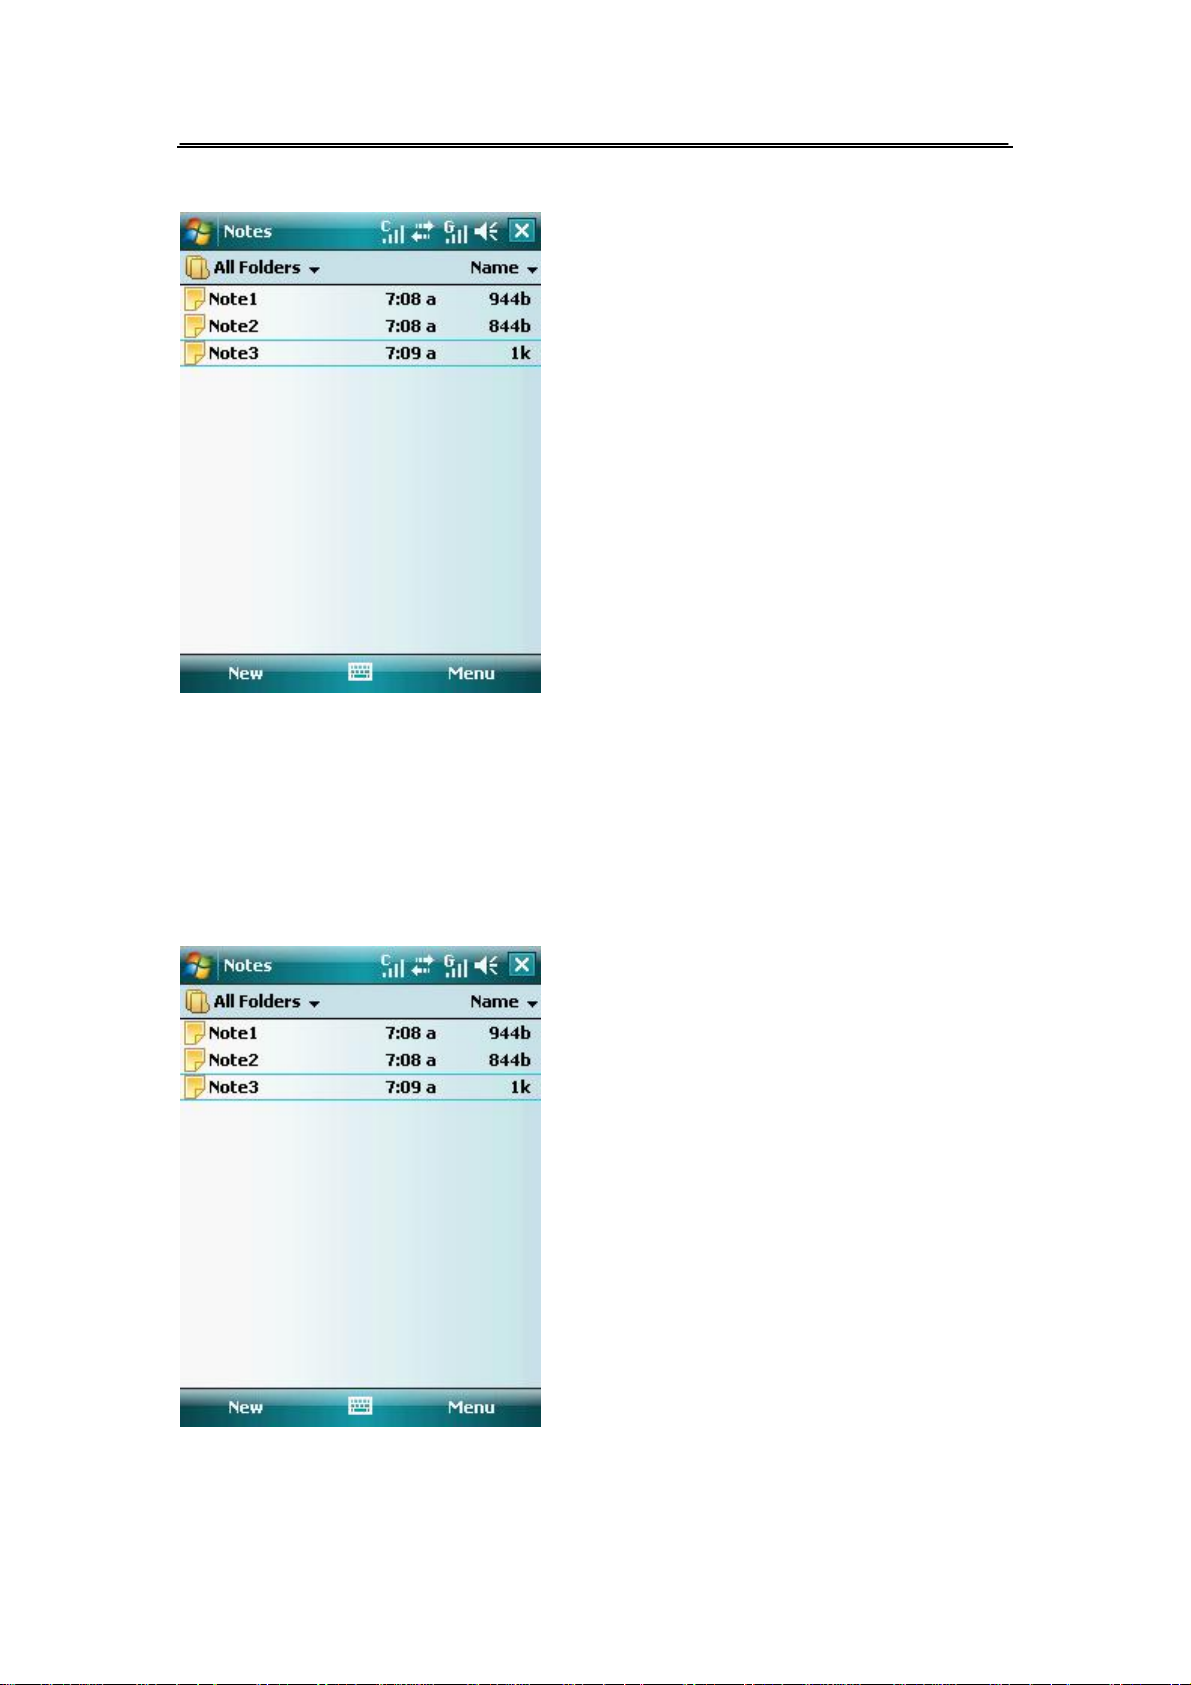
l Tap Start >Programs>Notes.
The Notes applications can help you to note down your thoughts, reminders, questions and
meeting recorders, you can use the virtual keyboard or hardware keyboard, handwriting
recognition and audio recording to edit note contents.
In the notes program, you can edit, review, rename, move and delete notes.
4.4.2. To add new notes
Page 35 of 84 Copyright©2009 Spice
Page 37
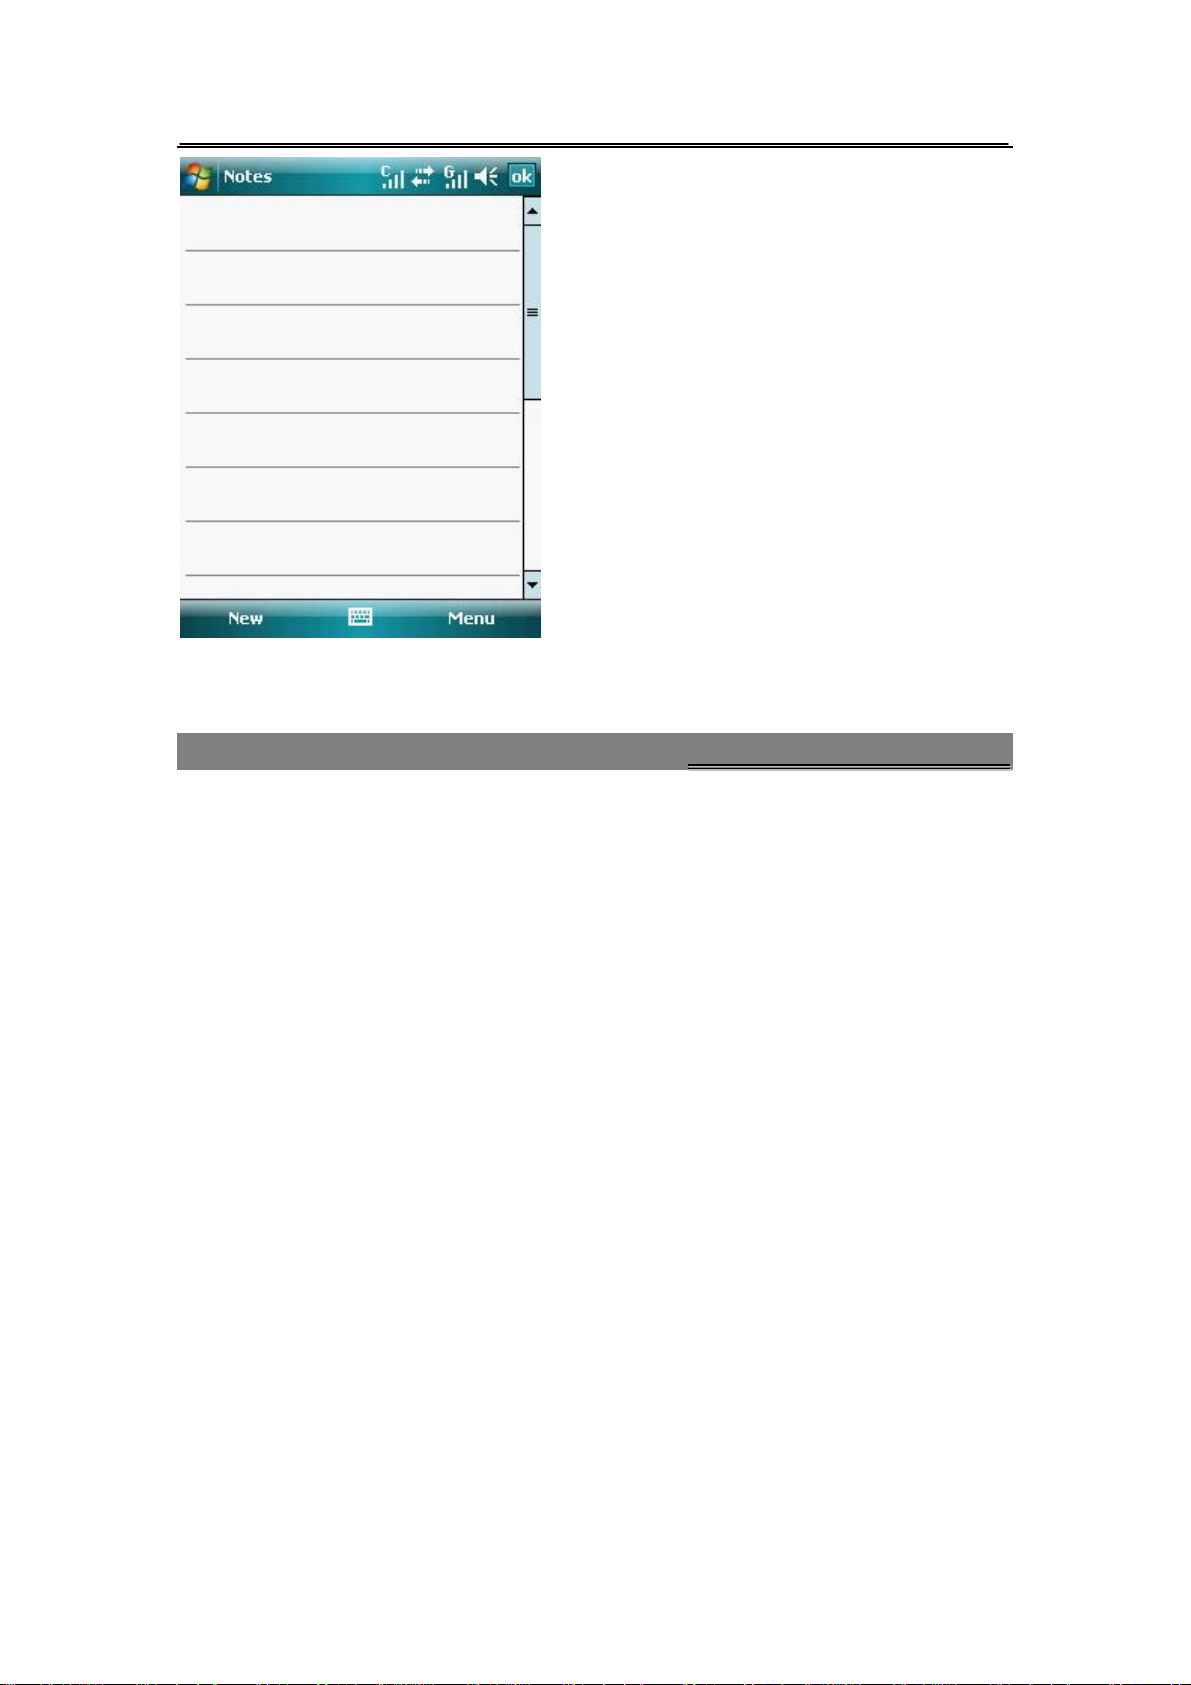
l Tap New to add a new note entry.
55.. EExxcchhaannggiinngg MMeessssaaggeess
5.1. Types of Accounts
Before you can send and receive e-mail, you need to set up your e-mail account on your device.
You can set up the following types of e-mail account on your device.
l E-mail account that you have from the Internet Service Provider(ISP)
l Outlook e-mail that you synchronize your PC or your company’s Exchange Server.
l Work account that you access using a VPN connection.
l Web e-mail accounts.
Set up your device to synchronize Microsoft Office Outlook
e-mail with the computer
If you have installed the synchronize software on your computer and create a partnership, then
your device is ready to send and receive Outlook e-mail.
Set up a POP3/IMAP4 e-mail account
Set up a POP3/IMAP4 e –mail account on your device, if you have an e-mail account from an
Internet Service Provider (ISP) or other e-mail provider, or a Web -based account such as Yahoo!
Mail Plus, Gmail, etc. You can also add a work account that you access using a VPN server
connection as a POP3/IMAP4 account.
1. Tap Start >Programs > Messaging>New E-mail Account
Page 36 of 84 Copyright©2009 Spice
Page 38

2. Enter your e-mail address, and select the Try to get e-mail settings automatically from the
Internet check box .By selecting the option ,the device attempts to download e-mail server
settings so that you do not need to enter them manually. Tap Next.
3. After Auto Setup finishes, tap Next.
4. Enter your name, you can also edit the Account display name field to specify the name of
your ISP or e-mail provider. Tap Next.
5. Enter your login name if it does not show automatically in the User name field. Also enter
your password and select the Save password check box .Tap Next.
6. E-mail setup is complete, in the Automatic Send/Receive list, choose how frequent you want
e-mail messages to be automatically sent and downloaded on your device.
7. Tap Finish.
After setting up e-mail accounts on your device, you can start sending and receiving e- mail
messages.
5.2. GSM SMS
5.2.1. Send GSM SMS
1. Tap Start >Messaging>GSM SMS.
2. Tap Menu> New.
3. Write the content of the SMS, and select Menu>
l Add Recipient…: To select the number of one or more recipients from the contacts
list.
l Check Names: To search the name or the number of one or more recipients from the
contacts list according to your input and displayed automatically in the SMS.
l My text: To select a phrase from the list to insert it in the SMS.
l Save to Drafts: To save the SMS to the drafts.
l Spell Check: To check the spelling.
l Cancel Message: To cancel editing.
4. Tap Send to send the SMS.
5.2.2. Inbox
1. Tap Start >Messaging>GSM SMS
2. When view the inbox list, tap Menu>
Page 37 of 84 Copyright©2009 Spice
Page 39
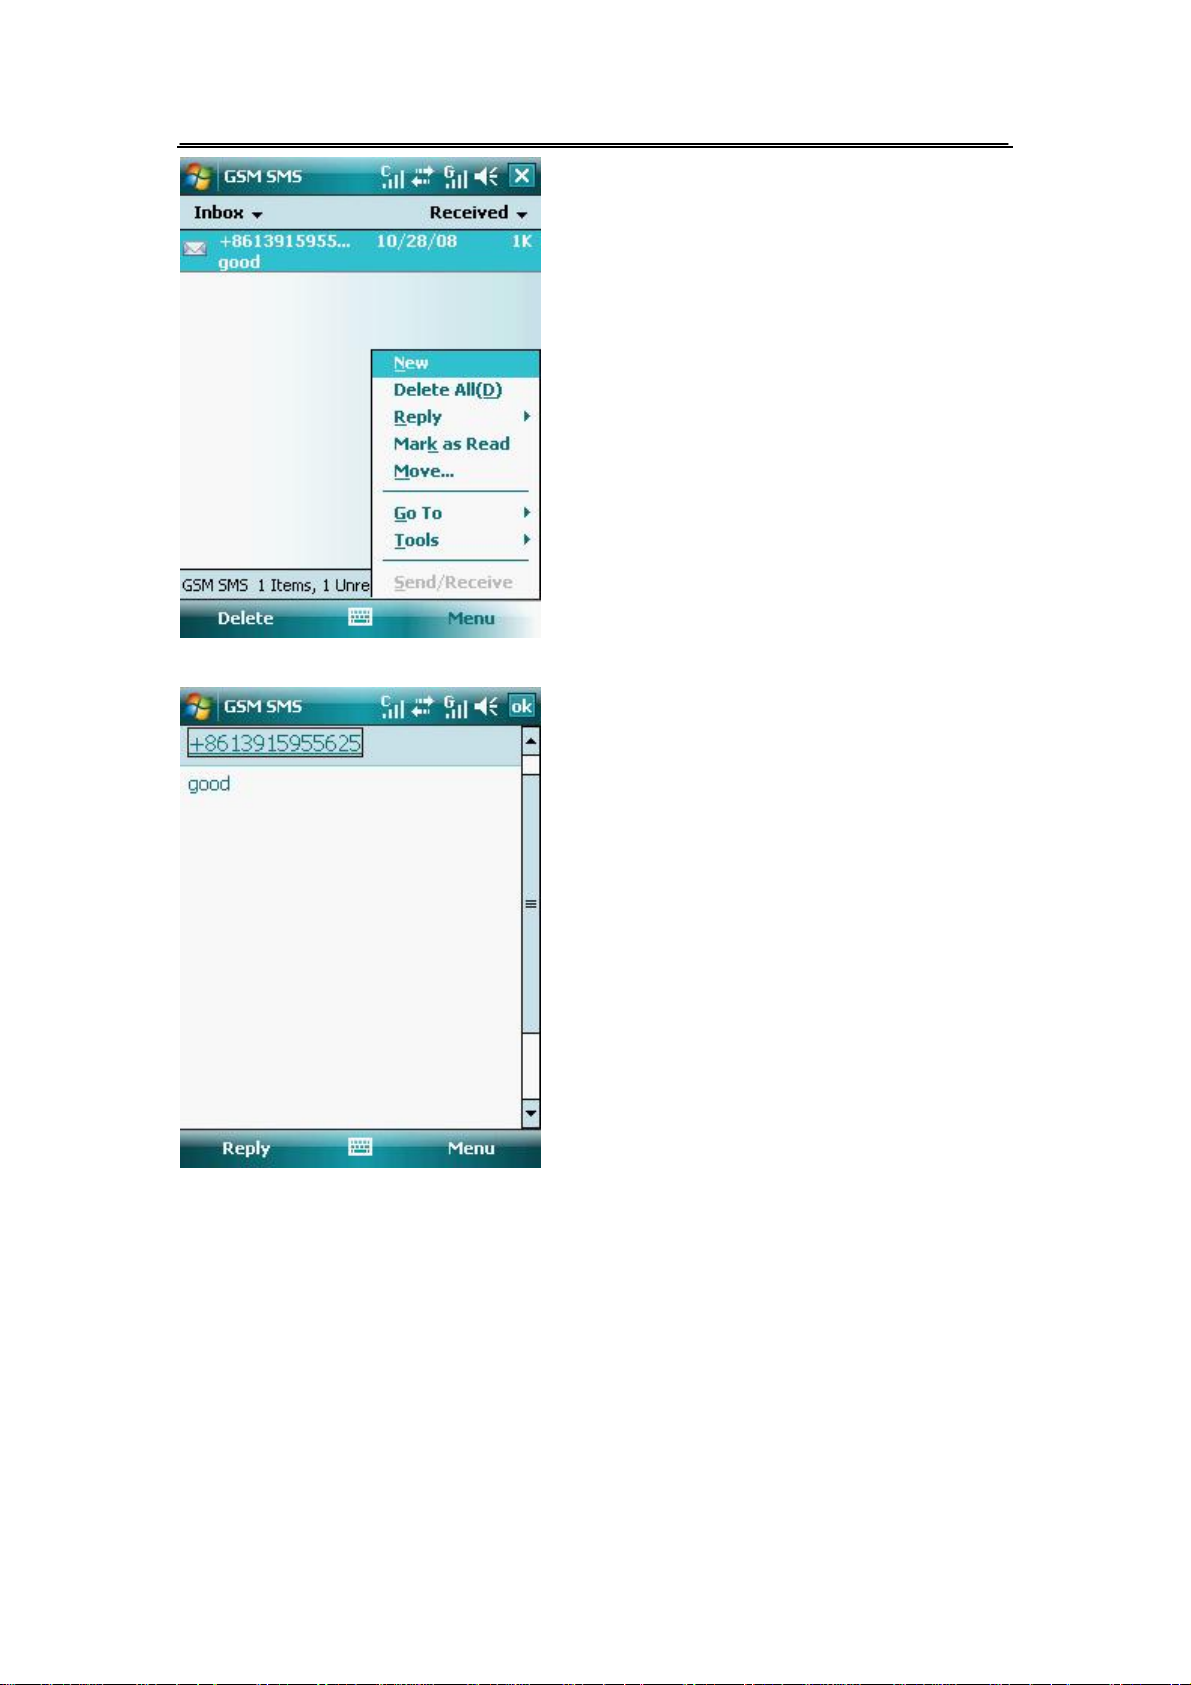
3 .When reading a SMS,tap Menu>
5.2.3. Outbox/Drafts
Please refer to the Inbox.
5.3. CDMA SMS
5.3.1. Send CDMA SMS
1. Tap Start >Messaging>CDMA SMS
Page 38 of 84 Copyright©2009 Spice
Page 40
2. Tap Menu >New.
3. Write the content of the SMS, and select Menu>
l Add Recipients: To select the number of one or more recipients from the contacts
list.
l Check Names: To search the name or the number of one or more recipients from the
contacts list according to your input and displayed automatically in the SMS.
l My text: To select a phrase from the list to insert it in the SMS.
l Save to Drafts: To save the SMS to the drafts.
l Spell Check: To check the spelling.
l Cancel Message: To cancel editing.
4. Tap Send to send the SMS.
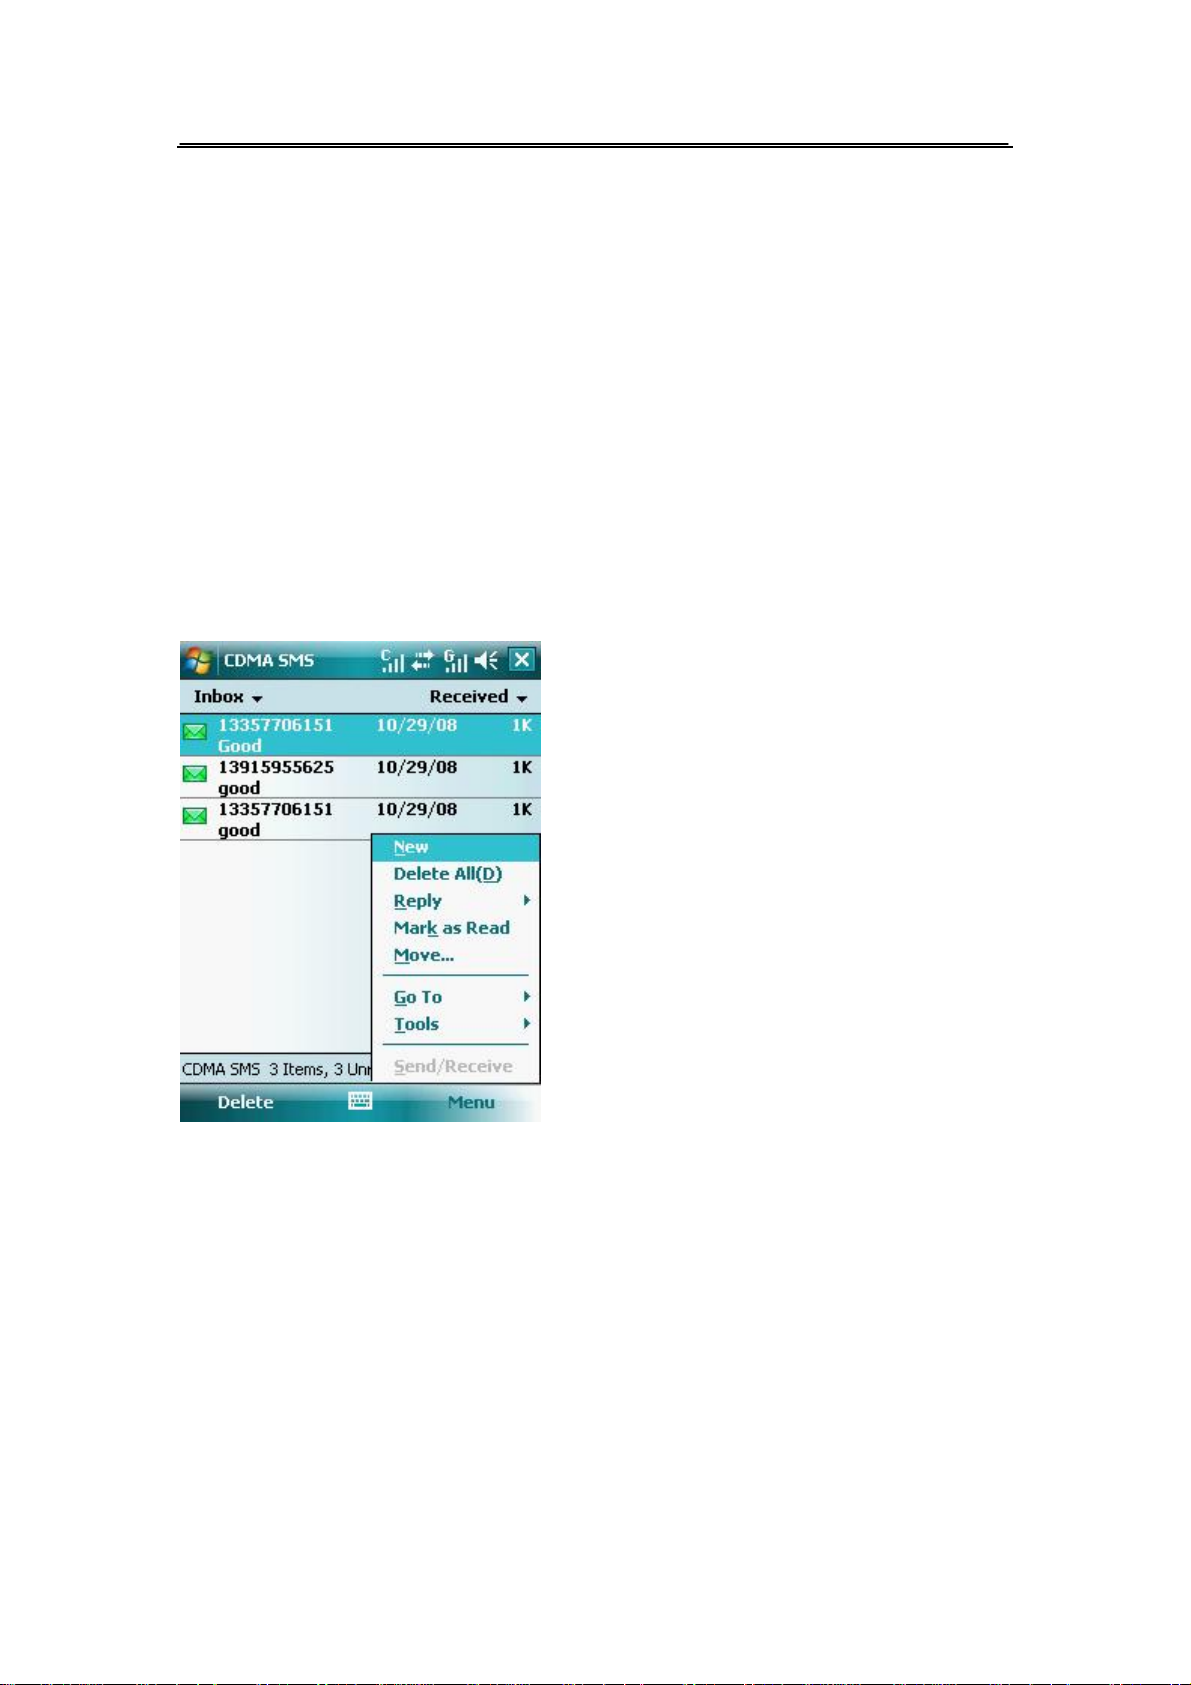
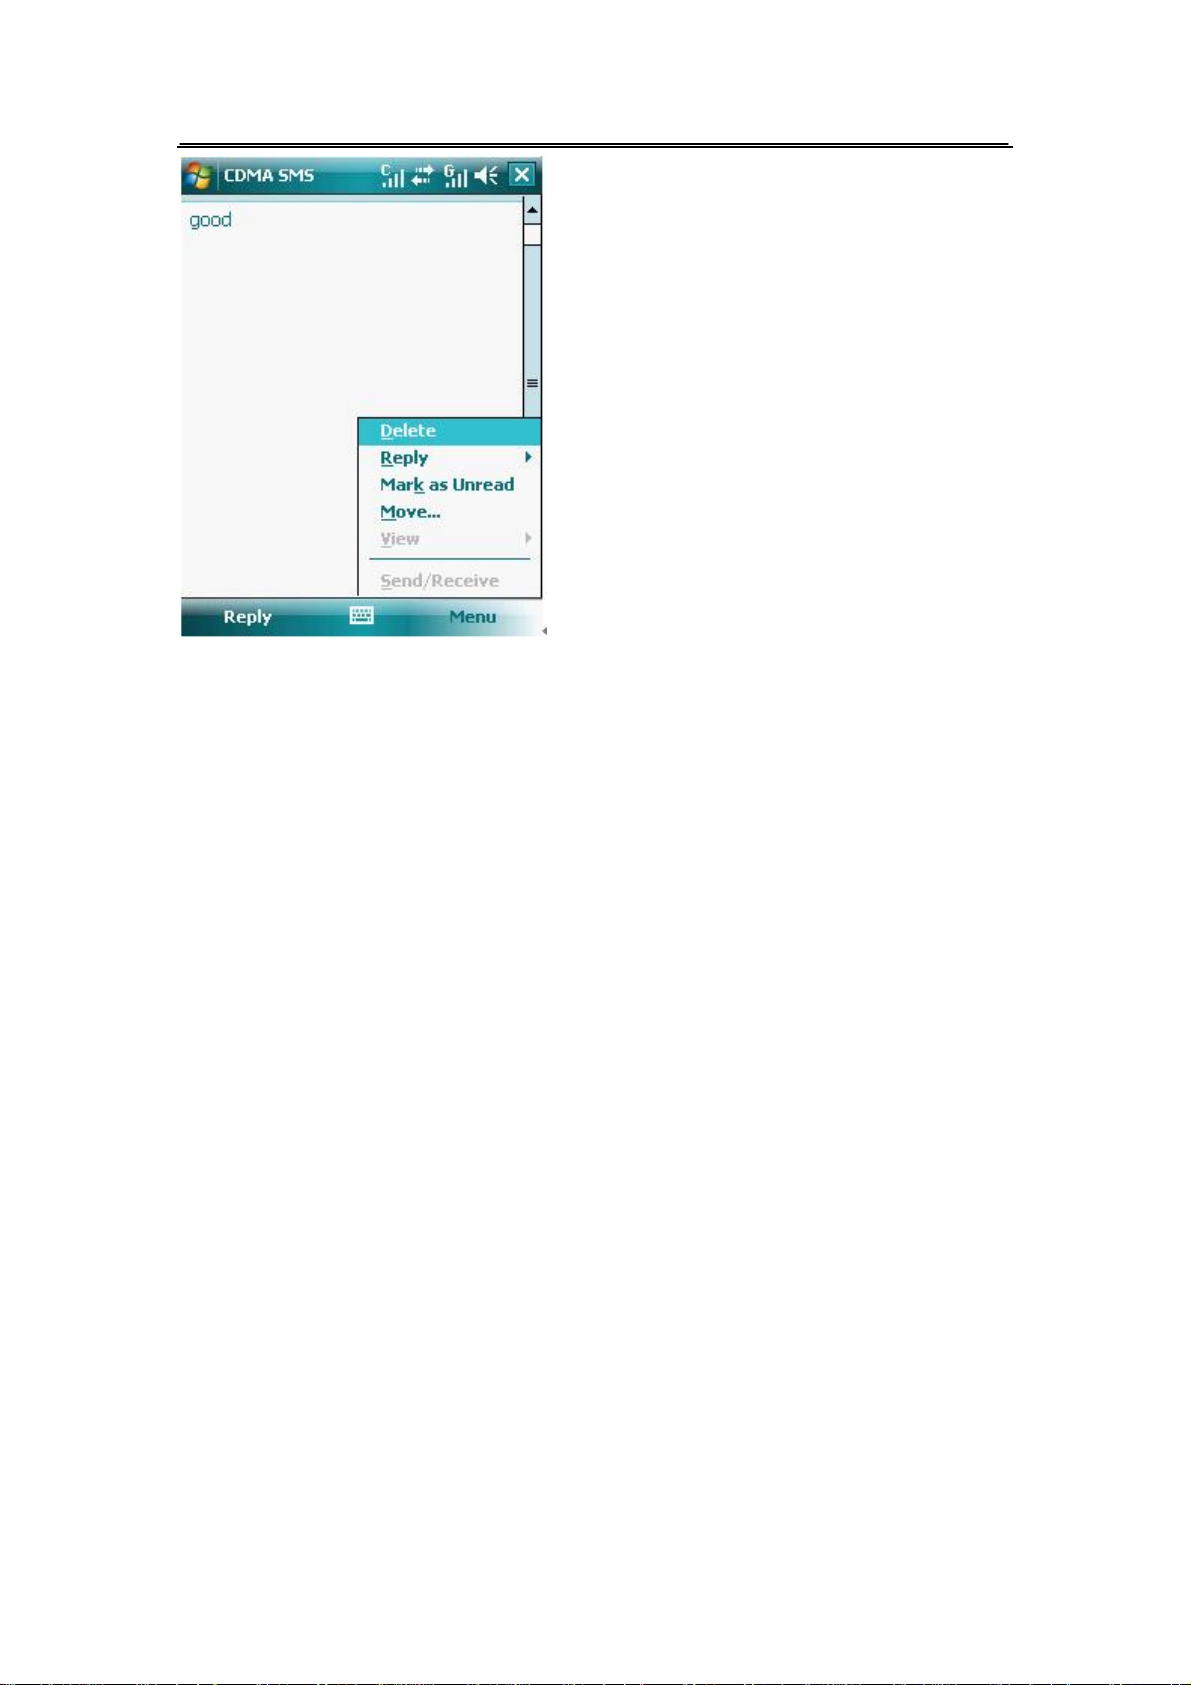
5.3.2. Inbox
1. Tap Start >Messaging>CDMA SMS
2. When view the inbox list, tap Menu>
When reading a SMS,tap Menu>
Page 39 of 84 Copyright©2009 Spice
Page 41
5.3.3. Outbox/Drafts
Please refer to the Inbox.
5.4. MMS
5.4.1. To send MMS
1. Tap Start >Messaging> MMS
2. Tap Menu>New.
3. Write the content of the MMS, you can
l Add Image: To select an image from My Device and add it into the MMS.
l Add Video: To select a video from My Device and add it into the MMS.
l New Video: To record a video and add it into the MMS.
l Add Text: To write text.
l Add Music: To select an audio from My Device and add it to the MMS.
4. Tap send to send the MMS.
Tip: The maximal size of MMS is 100K, the detailed limiting factors may vary for different
network, please consult the local network operator.
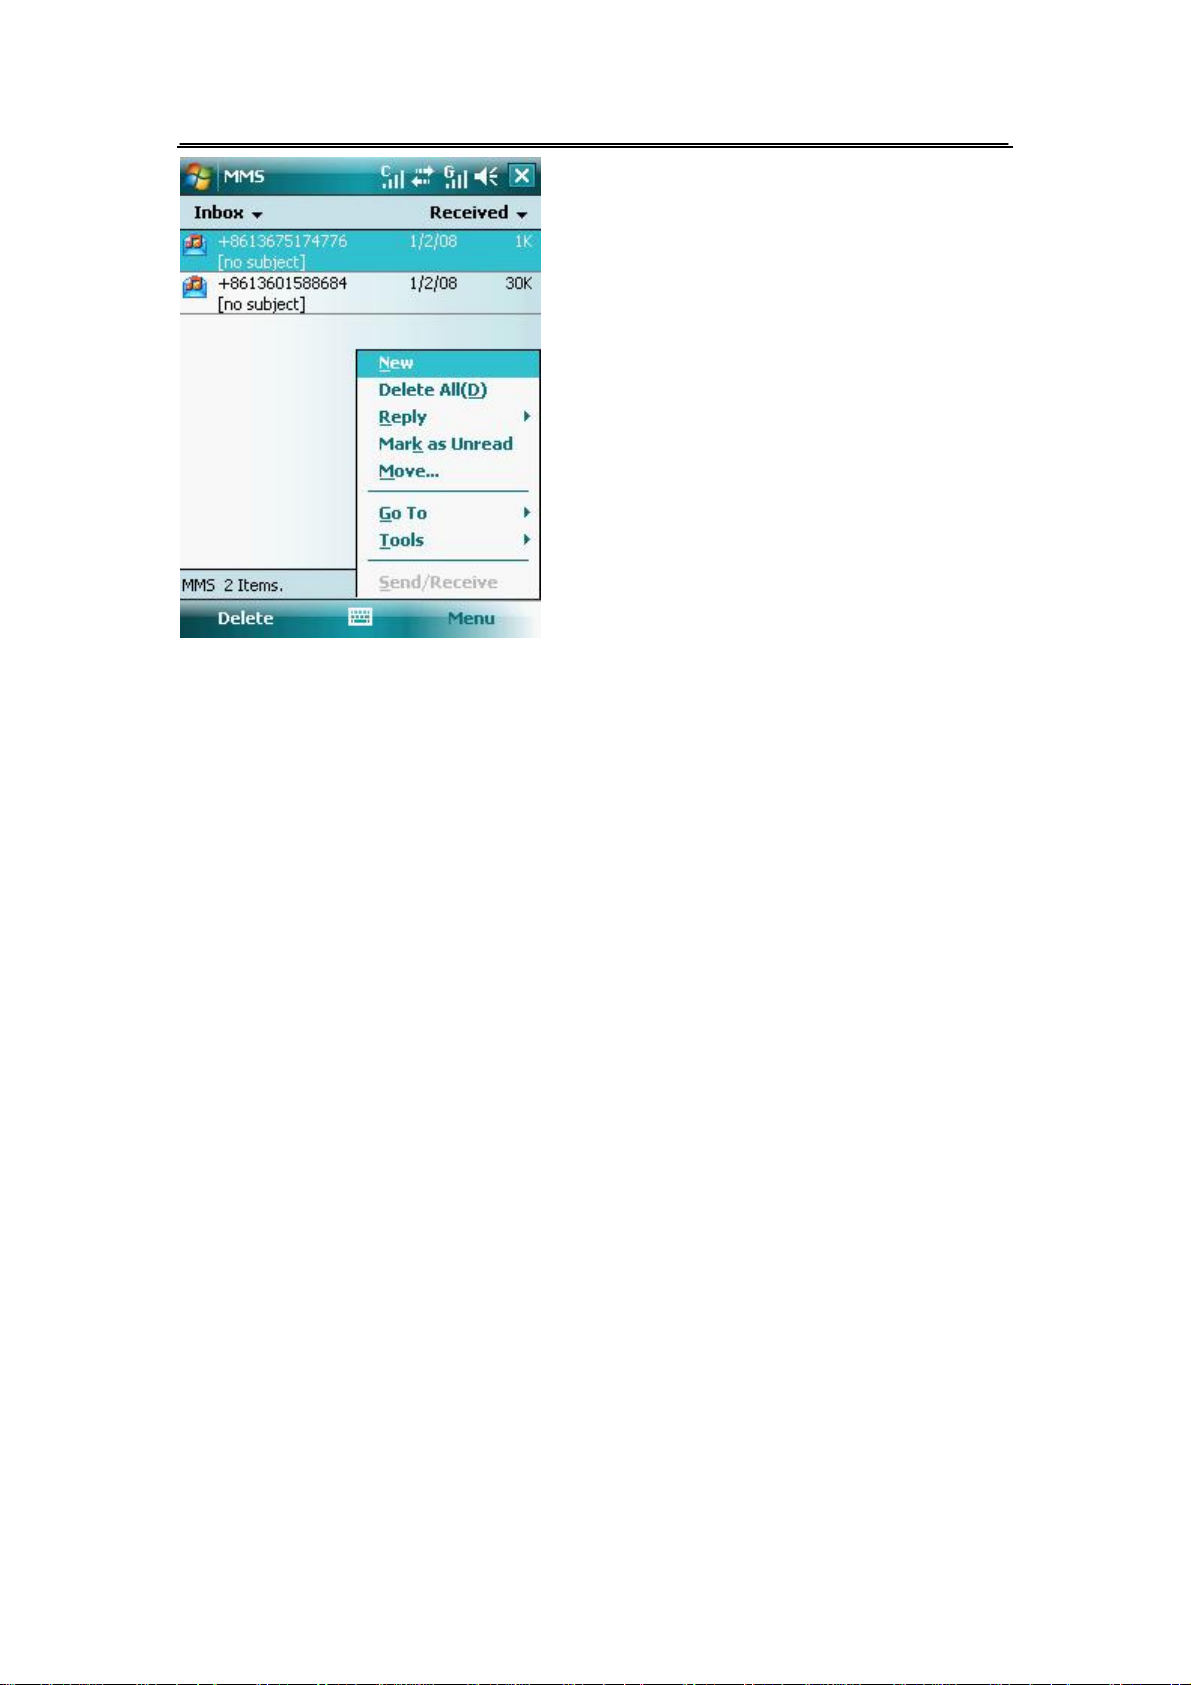
5.4.2. Inbox
1. Tap Start >Messaging>MMS
2. When view the inbox list, tap Menu>
Page 40 of 84 Copyright©2009 Spice
Page 42
5.4.3. Outbox/Drafts
Please refer to the Inbox.
Tip: The MMS is only supported by GSM network.
Page 41 of 84 Copyright©2009 Spice
Page 43
66.. SSeettttiinngg UUpp YYoouurr PPDDAA PPhhoonnee
6.1. Personal Settings
6.1.1. CDMA Phone Settings
You can customize your phone settings, such as the ring type and the ring tone to be used for
incoming calls, and the keypad tone to be used when entering phone numbers. You can also set
your device use phone services, such as Call Waiting, Call Forwarding, and more.
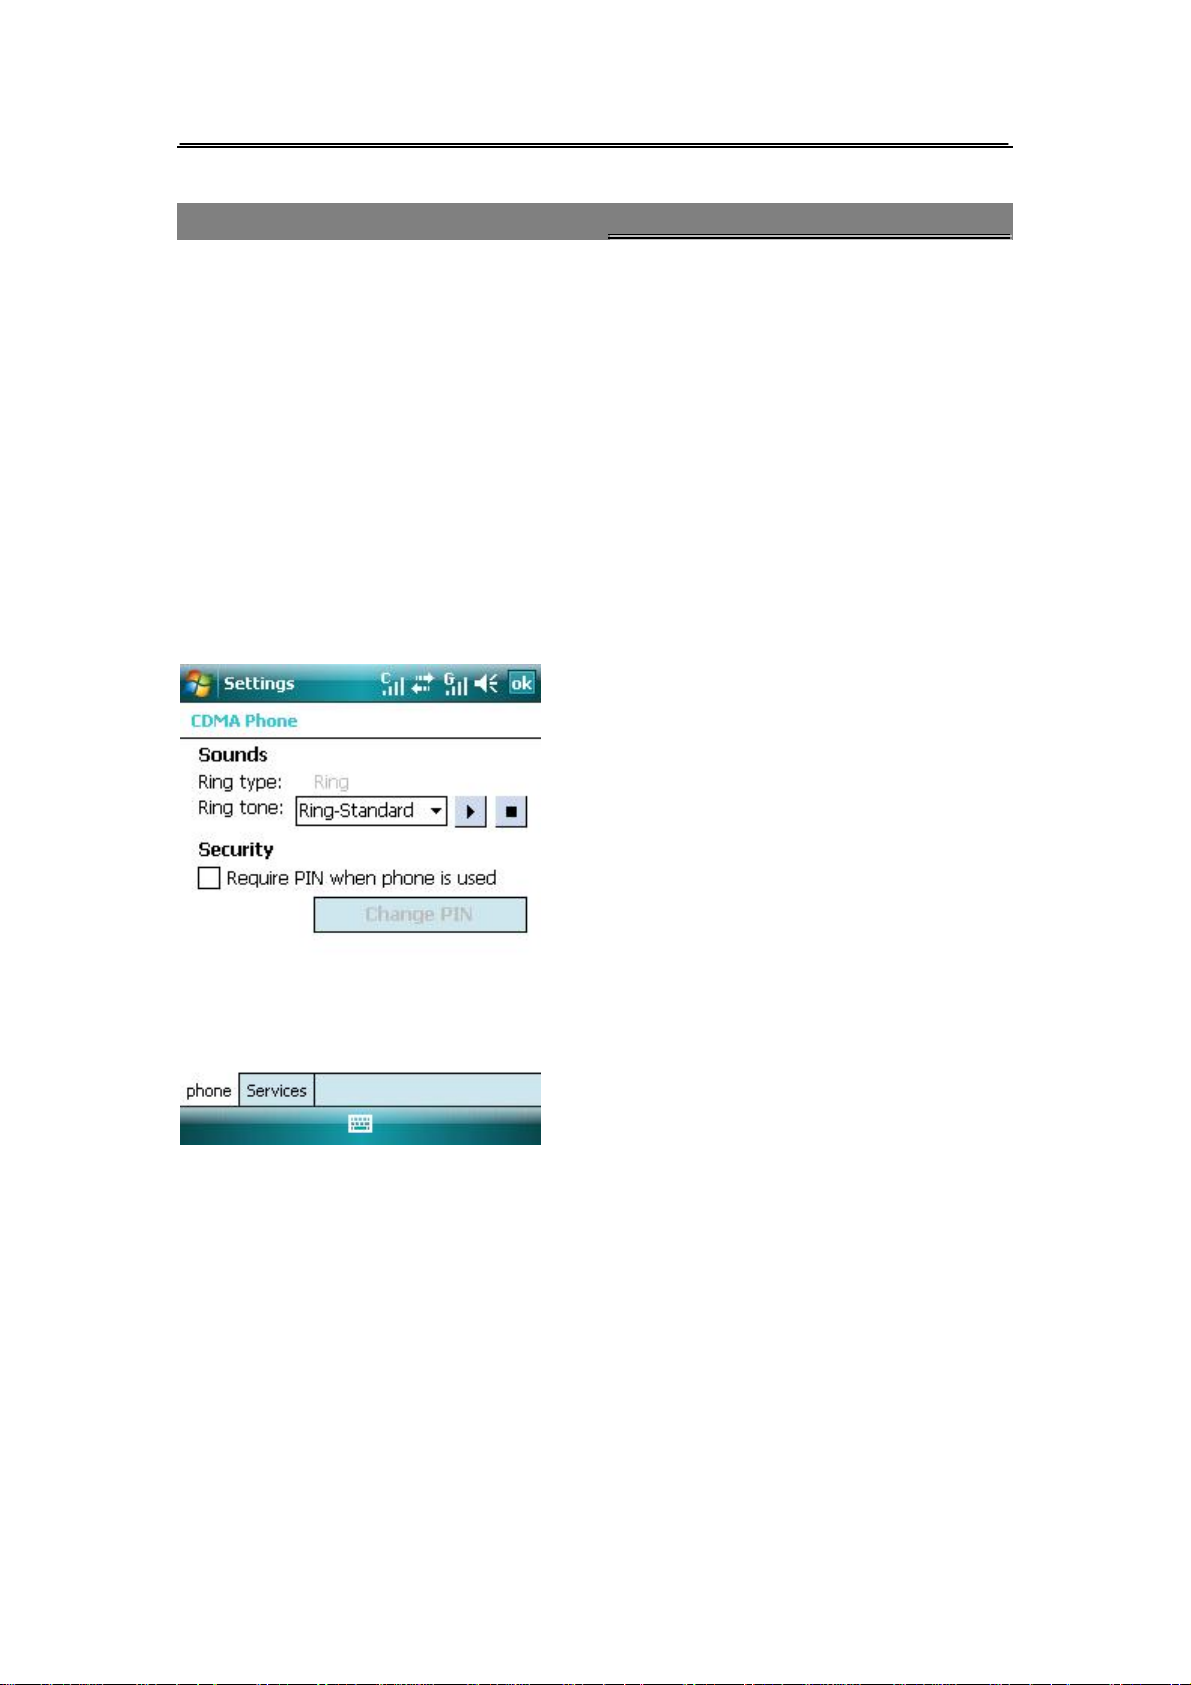
l Tap Start > Settings > Personal tab >CDMA Phone
You can
l Change the ring tone.
l Protect your CDMA Card with a PIN
l Choose the services
6.1.2. GSM Phone Settings
l Tap Start > Settings > Personal tab >GSM Phone
You can
l Change the ring tone.
l Choose the services
l View on your device which mobile phone networks are available to you, and arrange them in
the order that you want your device to access them.
l Protect your SIM Card with a PIN
l Set the Broadcast, and you can choose the language for the display of the broadcast, you can
also set the Channel Title and the Channel ID for the broadcast.
Page 42 of 84 Copyright©2009 Spice
Page 44
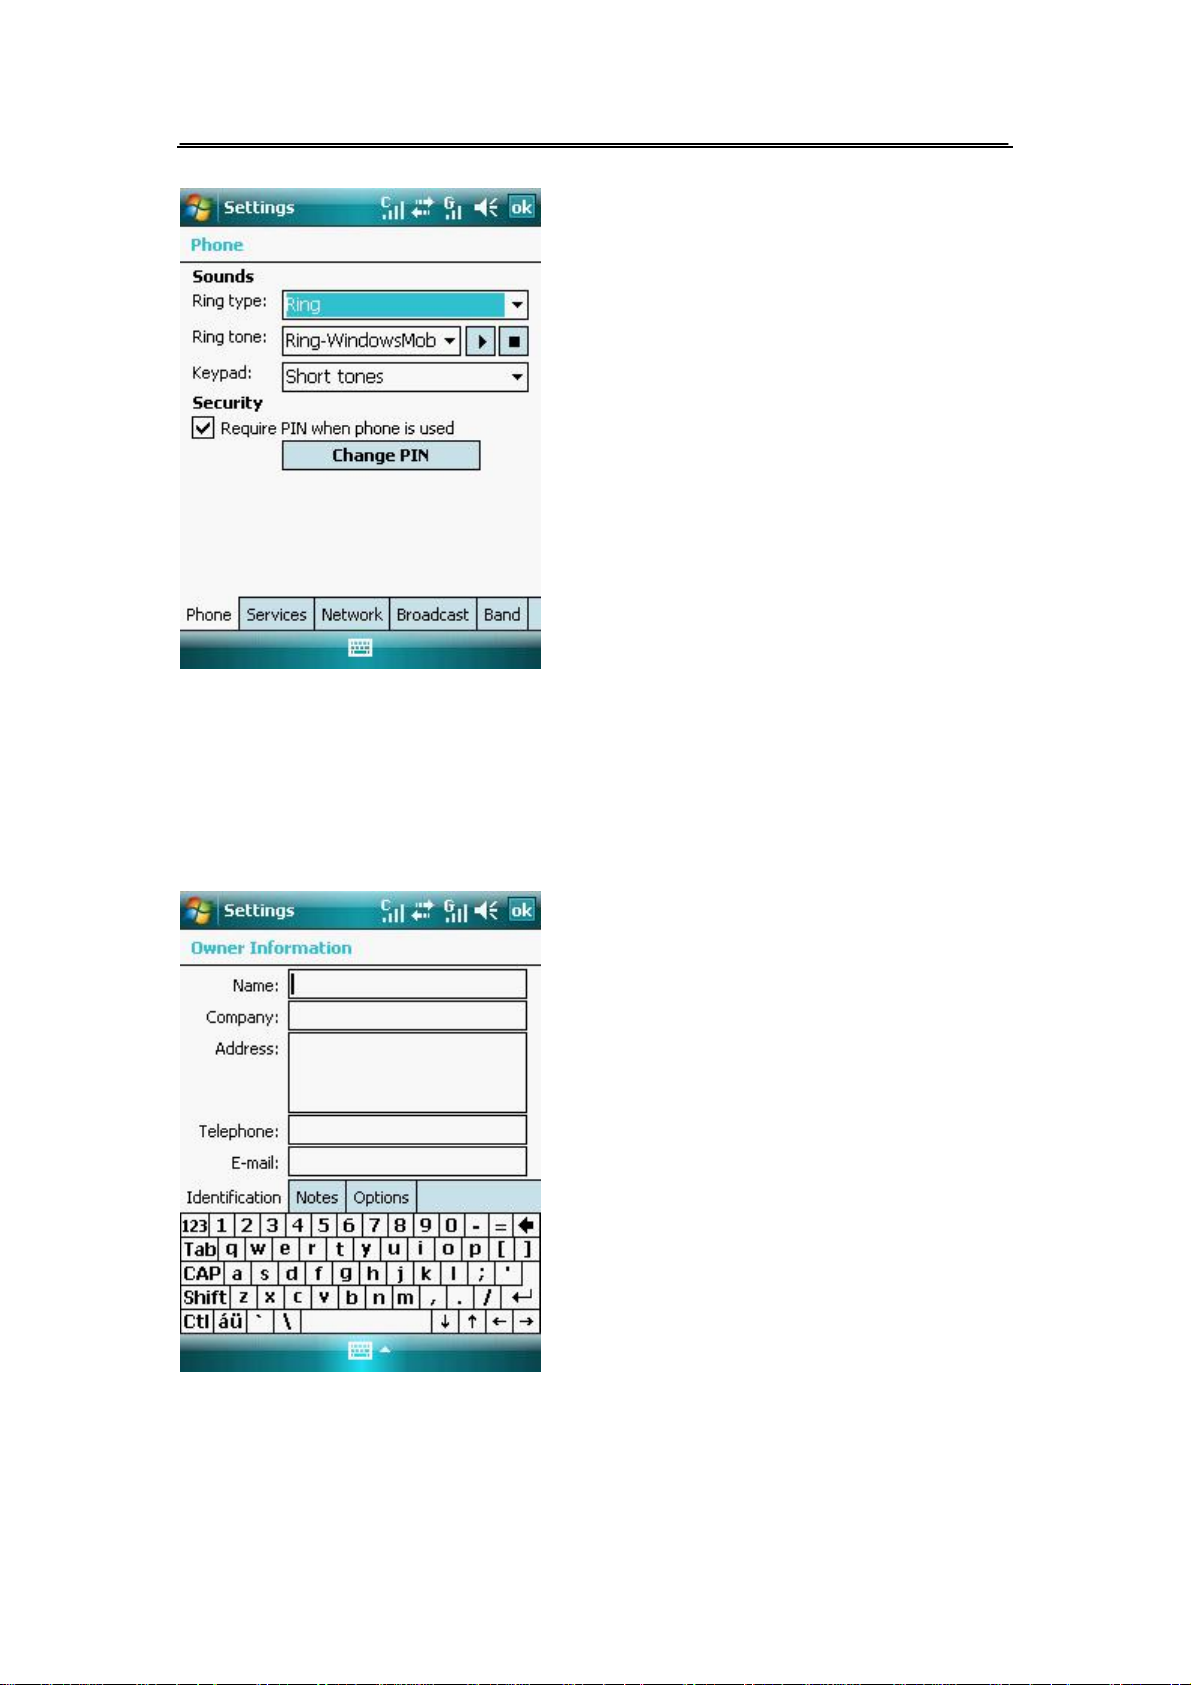
l Select a GSM Band for your device.
6.1.3. Owner Information
l Tap Start >Settings > Personal tab> Owner Information
l To enter your Owner Information.
6.1.4. Today Screen Settings
l The Today Screen shows your upcoming appointments, active tasks, etc.
l You can customize the Today screen on your device.
Page 43 of 84 Copyright©2009 Spice
Page 45
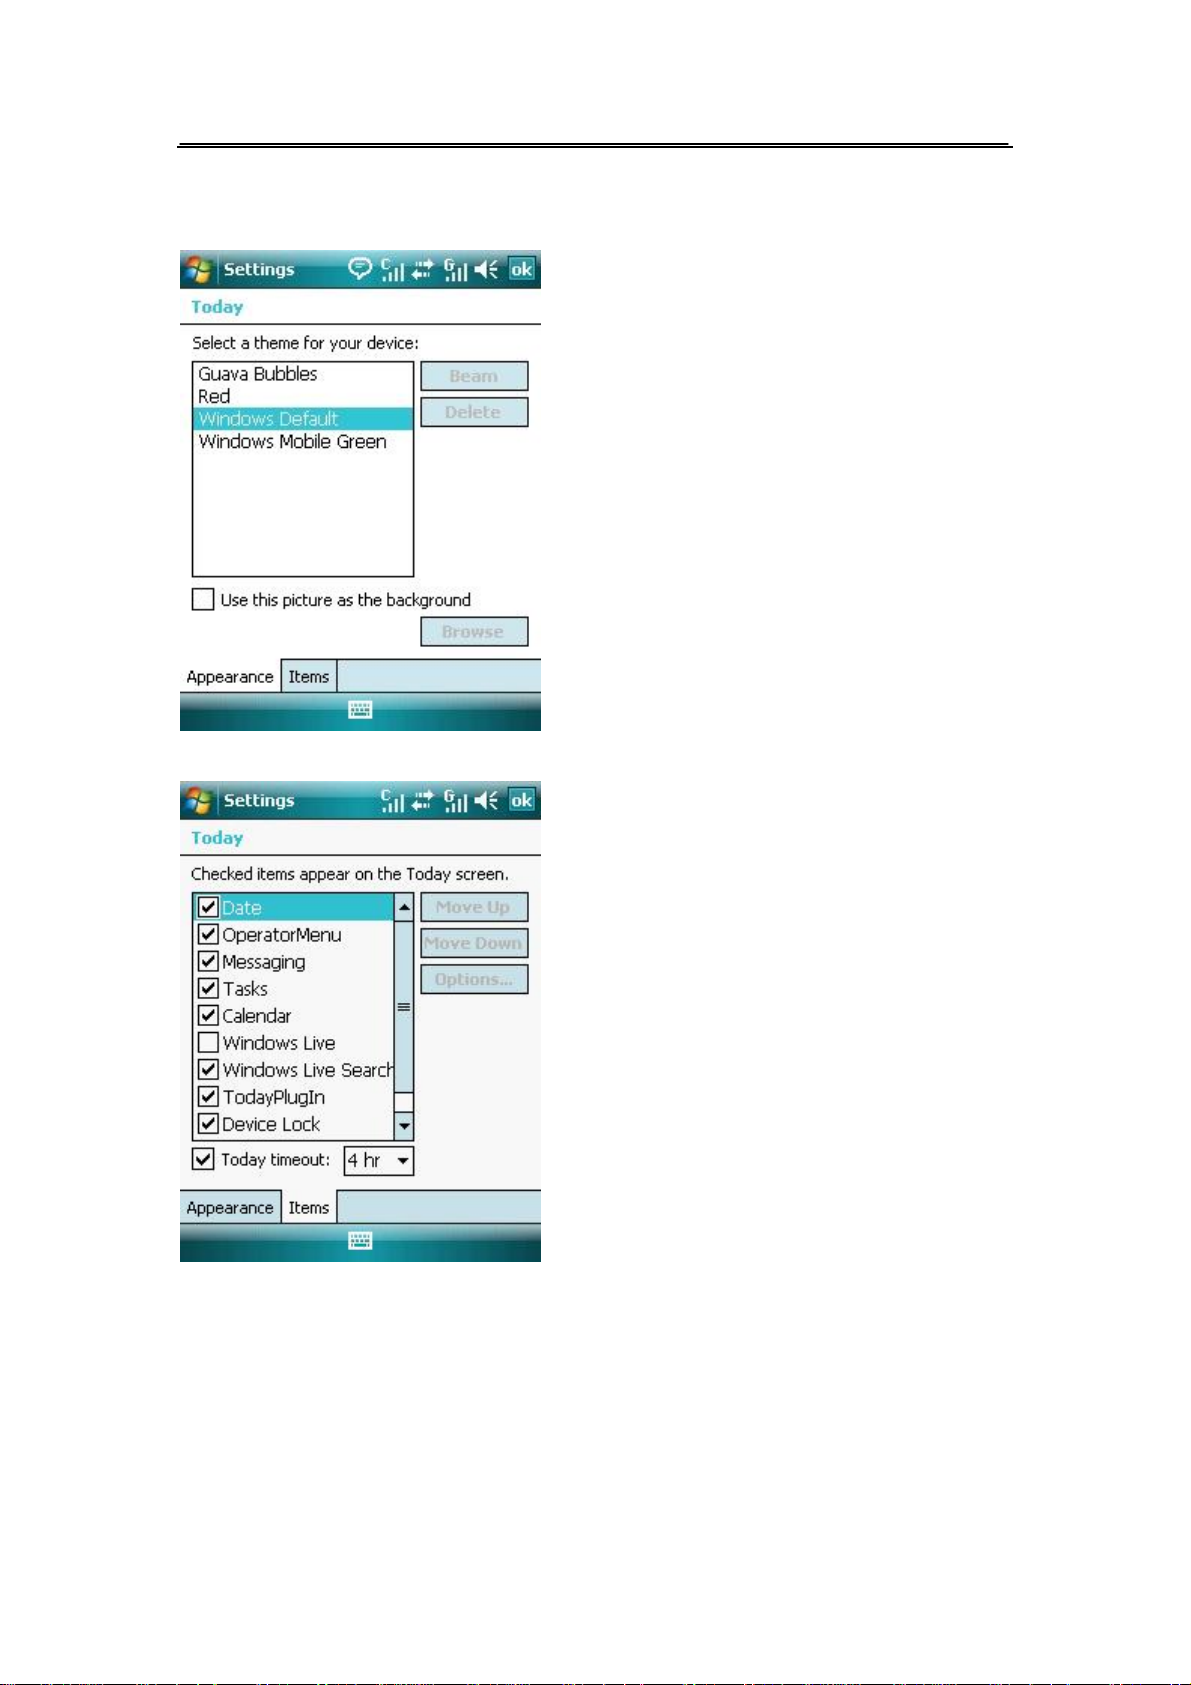
l Tap Start >Settings> Personal tab >Today
l On the Appearance tab, select the desired theme for the background of the Today Screen,
you can use one of your own pictures as the background image on the Today Screen.
l On the Items tab, select the items you want to appear on the Today screen.
6.1.5. Sounds & Notifications
l To choose how to be notified about events or actions.
l Start >Settings > Personal tab> Sounds &Notifications
l On the Sounds tab, choose how you want to be notified by selecting the appropriate check
boxes.
Page 44 of 84 Copyright©2009 Spice
Page 46
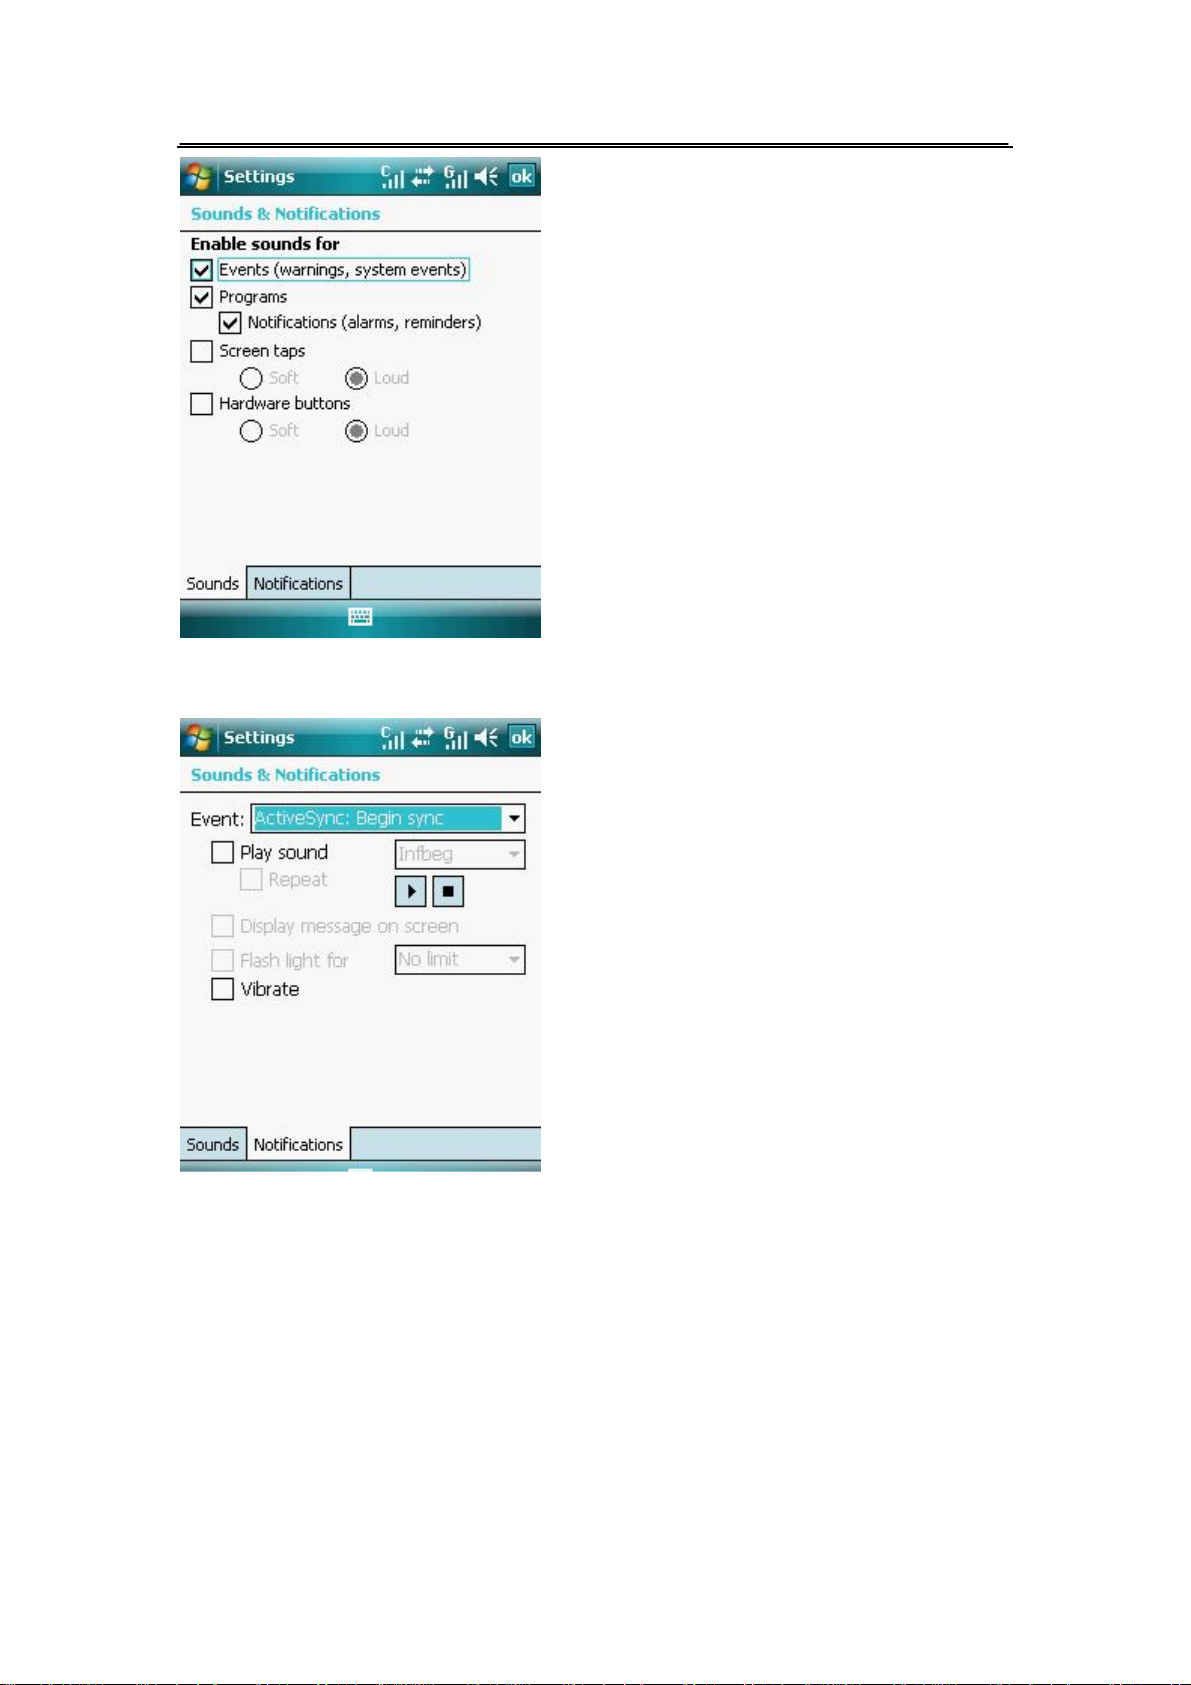
l On the Notifications tab, in Event, tap an event name and choose how you want to be
notified by selecting the appropriate check boxes.
6.1.6. Buttons Settings
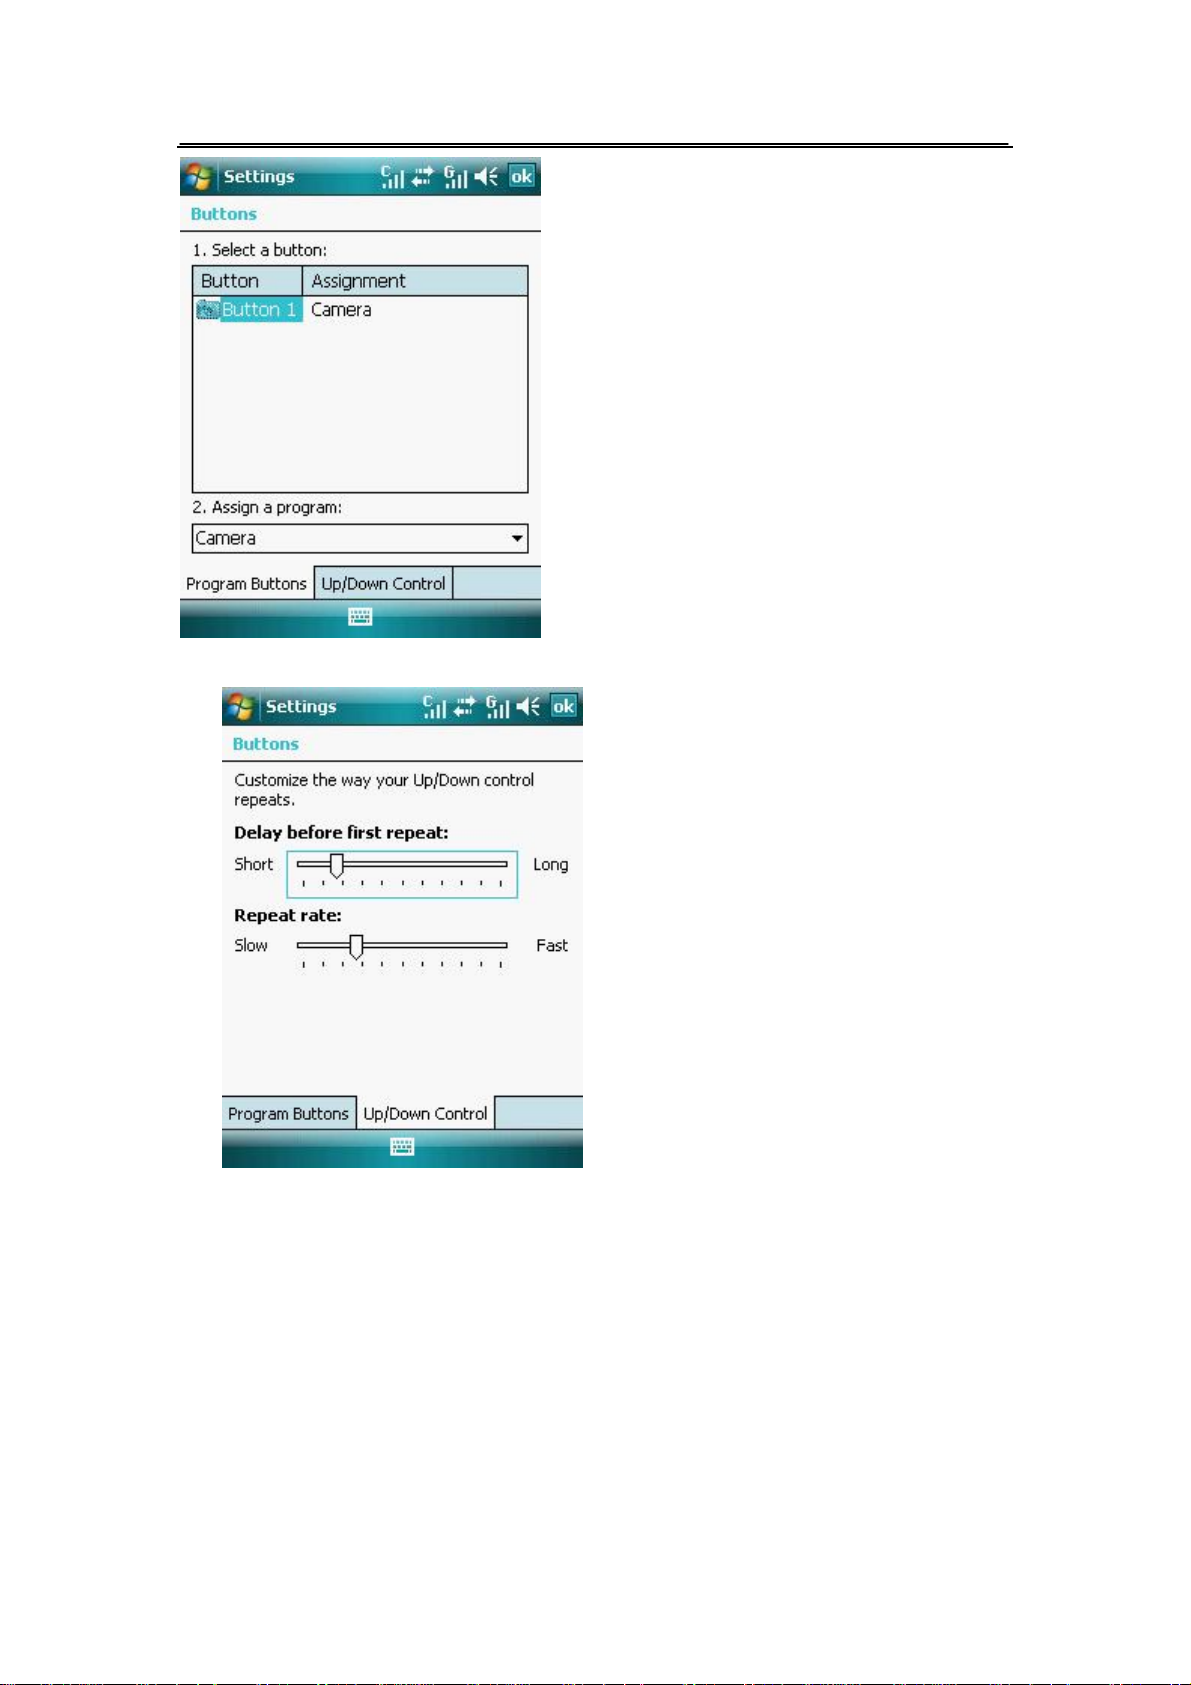
l To reassign programs or shortcut to program buttons
l Tap Start >Settings > Personal tab>Buttons
Page 45 of 84 Copyright©2009 Spice
Page 47
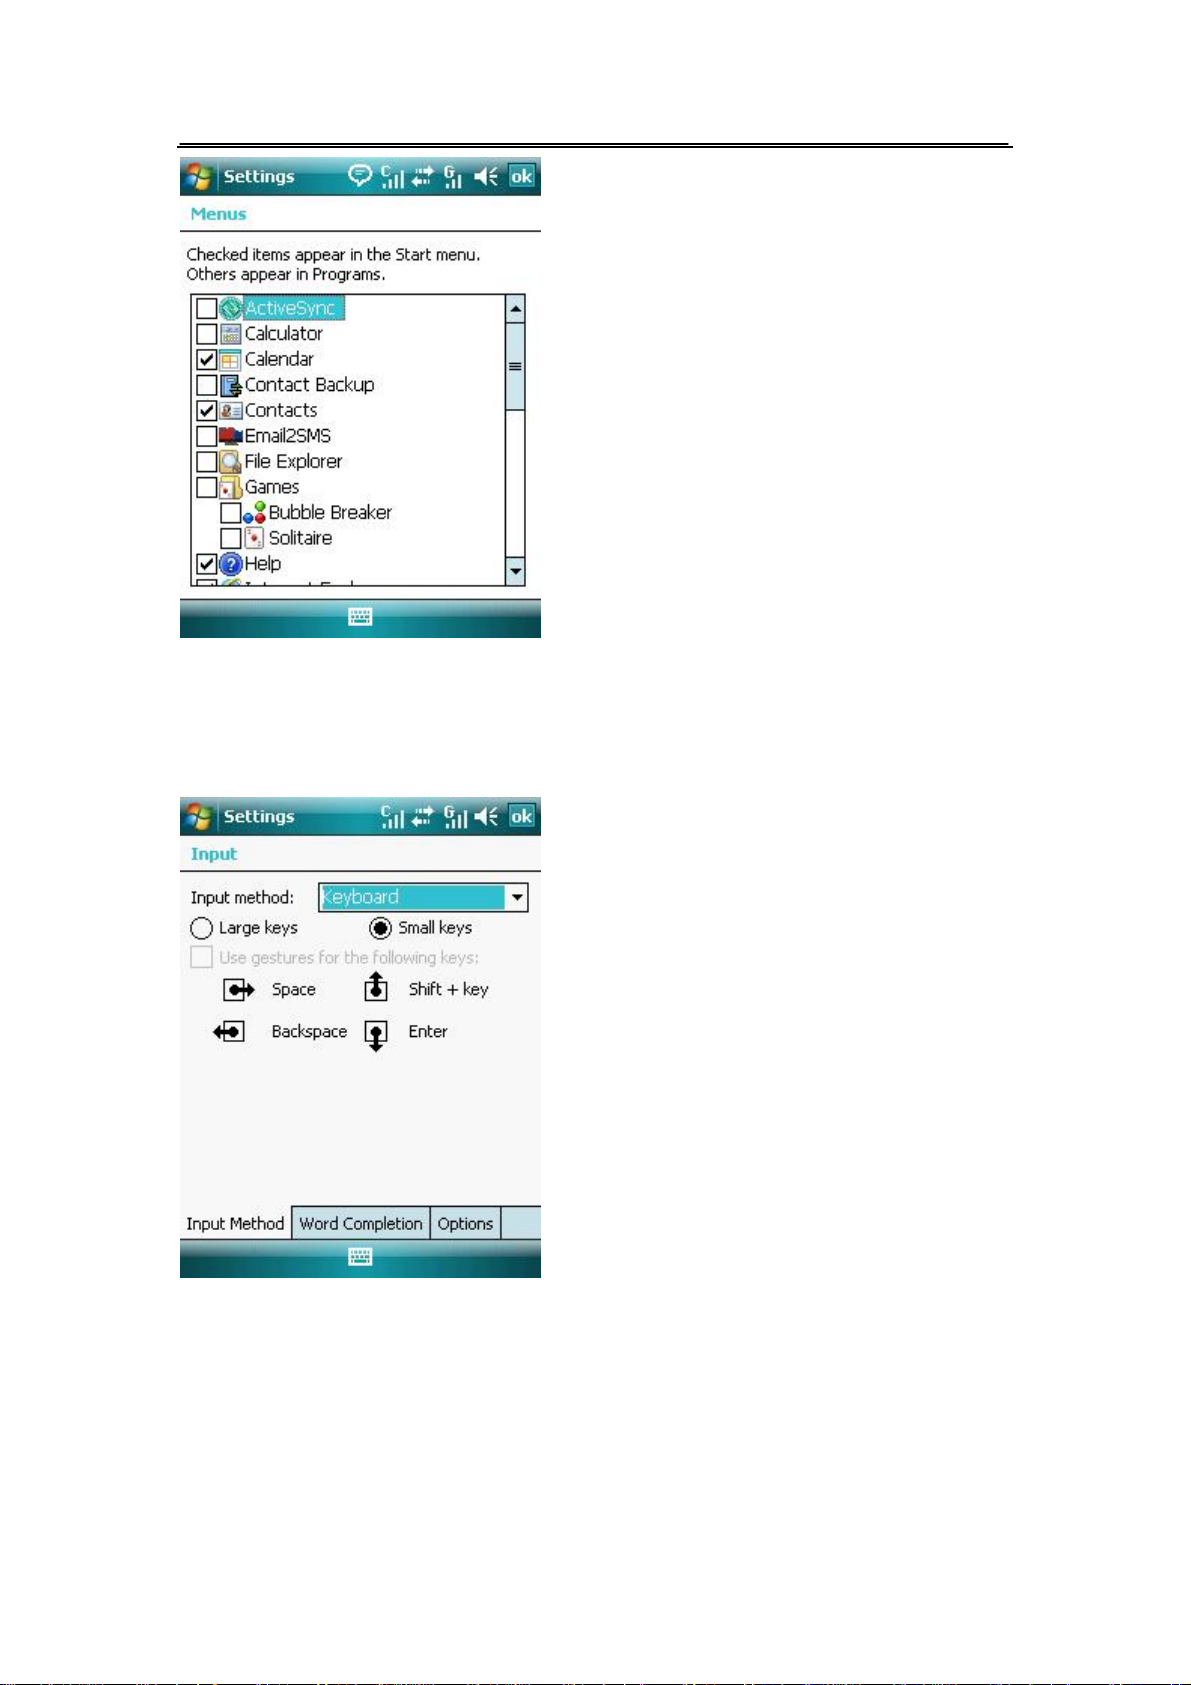
l On the Up/Down Control tab, you can customize the way your Up/Down control repeats.
6.1.7. Menus Settings
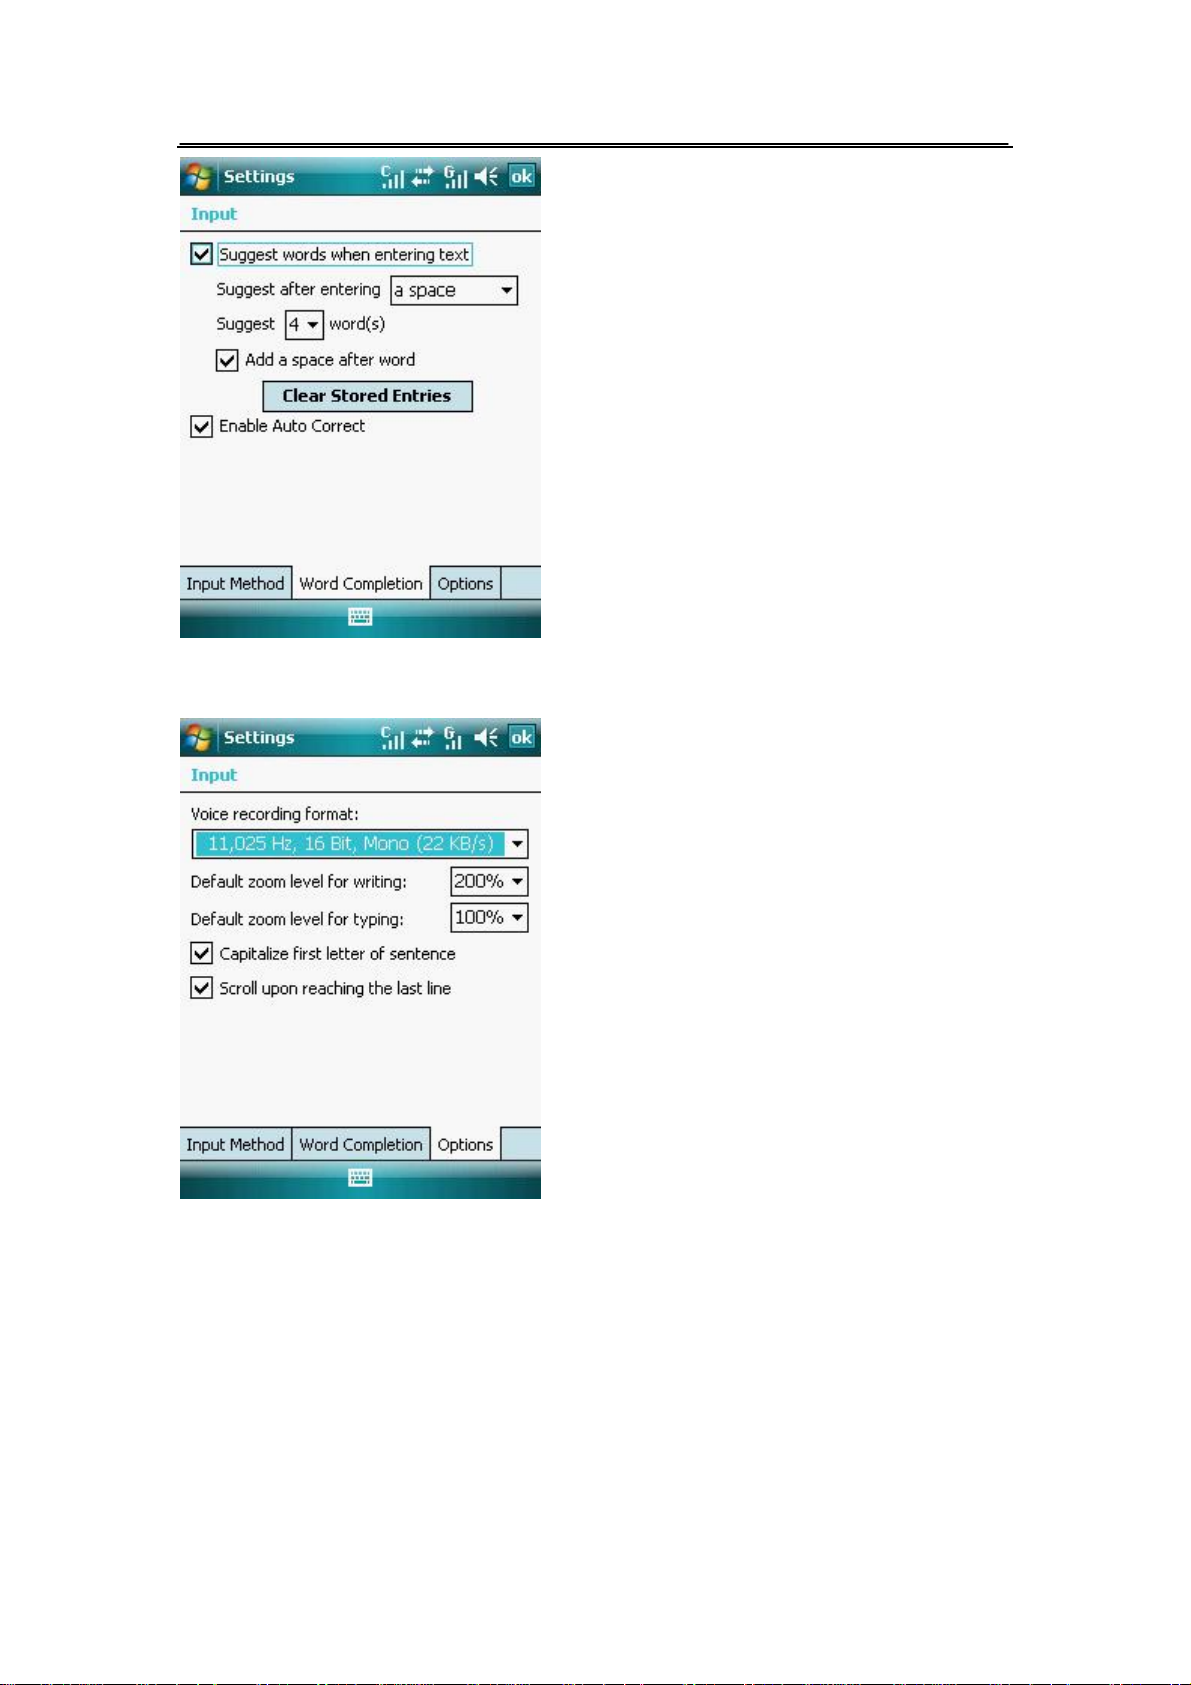
l You can choose which Items appear in the Start menu.
l Start >Settings > Personal tab>Menus
Page 46 of 84 Copyright©2009 Spice
Page 48
6.1.8. Input Settings
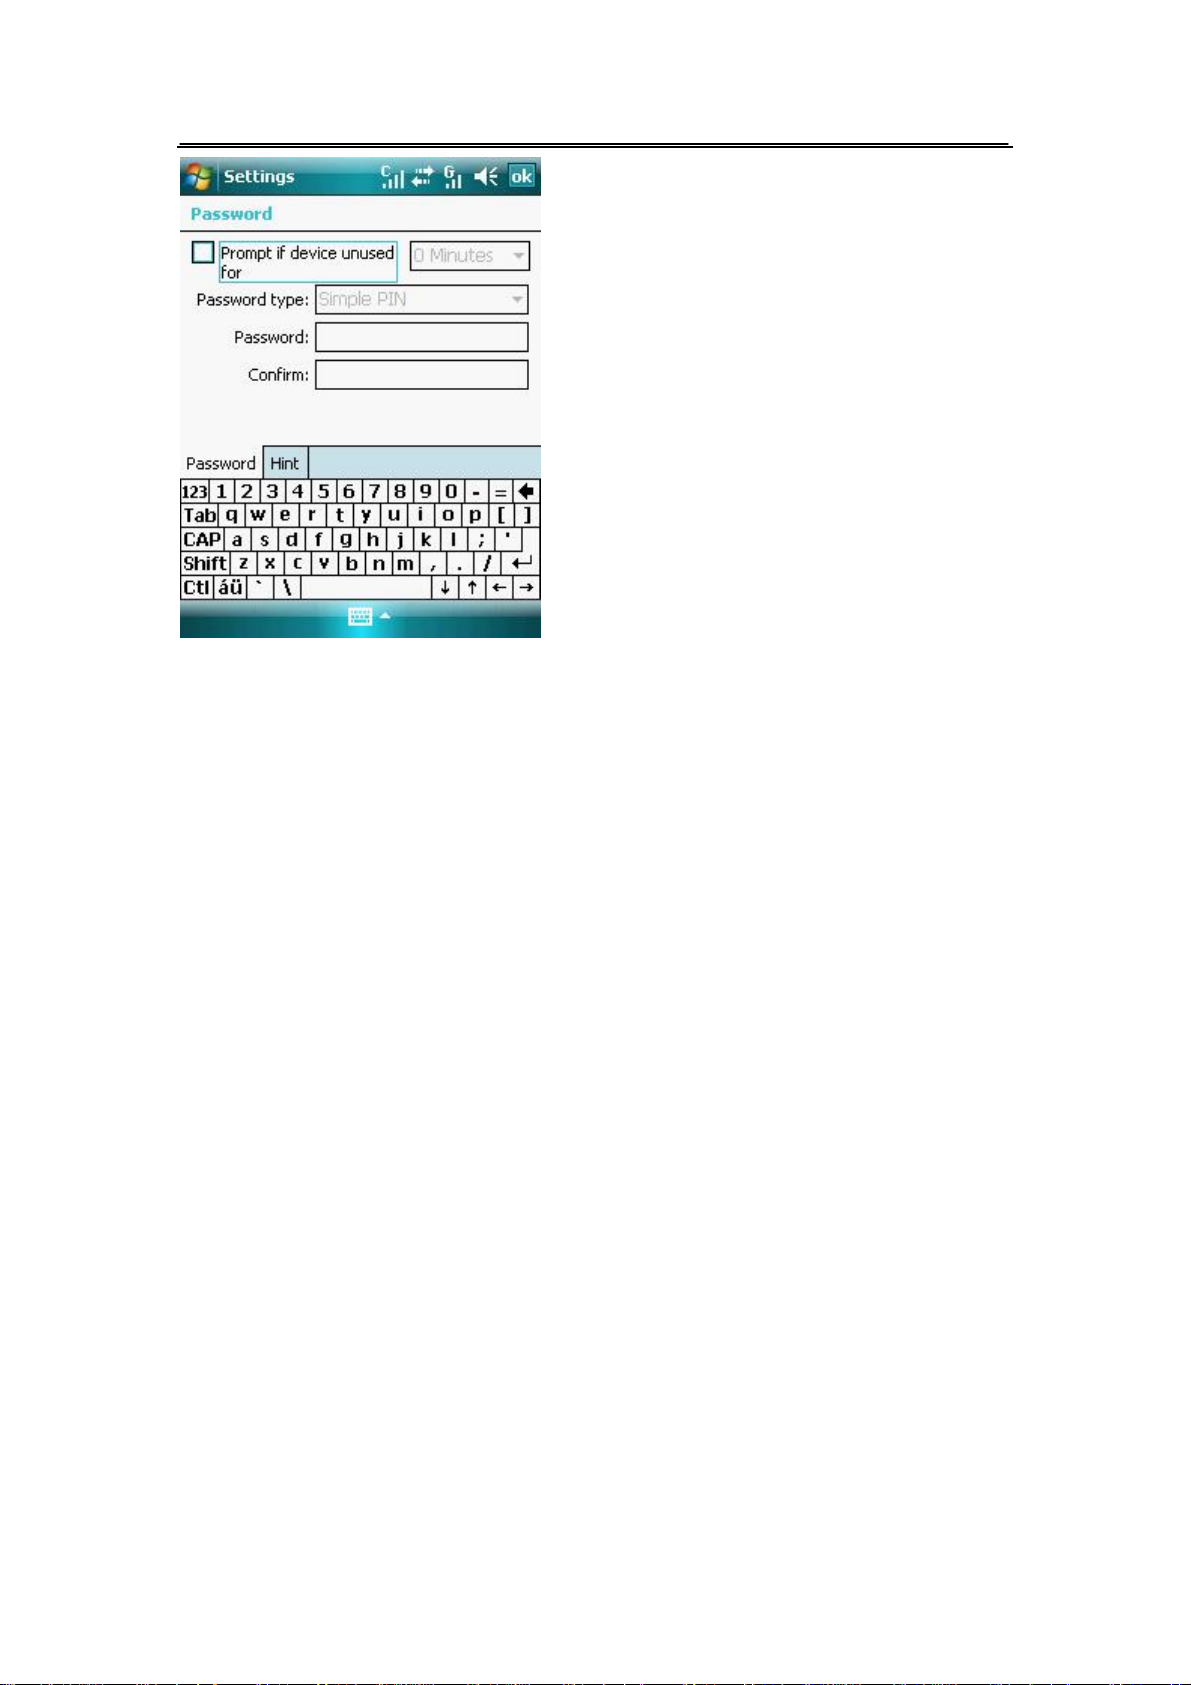
l To set the desired Input method.
l Start >Settings > Personal tab>Input
l On the Word Completion tab, you can enter text faster by suggesting words as you enter
letters use the hardware keyboard or the input methods. You can set the number you
suggested words to display.
Page 47 of 84 Copyright©2009 Spice
Page 49
l On the Options tab, you can choose the Voice recording format, the Default zoom level for
writing and the Default zoom level for typing.
6.1.9. Lock
l You can help your device more secure by requiring a password every time the device is
turned on.
l Start >Settings > Personal tab>Lock
Page 48 of 84 Copyright©2009 Spice
Page 50
l On the Hint tab, enter a phrase that will help you to remember your password.
6.1.10. Card Information
Tap Start >Settings > Personal tab >Card Information>UIM tab
l To display the current memory status of the phonebooks of the UIM Card.
l To display the current memory status of the messages of the UIM Card.
l You can also edit the number of the UIM Card.
Tap Start >Settings > Personal tab > Card Information> SIM tab
l To display the current memory status of the phonebooks of the SIM Card.
l To display the current memory status of the messages of the SIM Card.
l You can also edit the name and the number of the SIM Card.
6.2. System Settings
6.2.1. GPS Settings
l Tap Start >Settings > System tab>External GPS
Page 49 of 84 Copyright©2009 Spice
Page 51
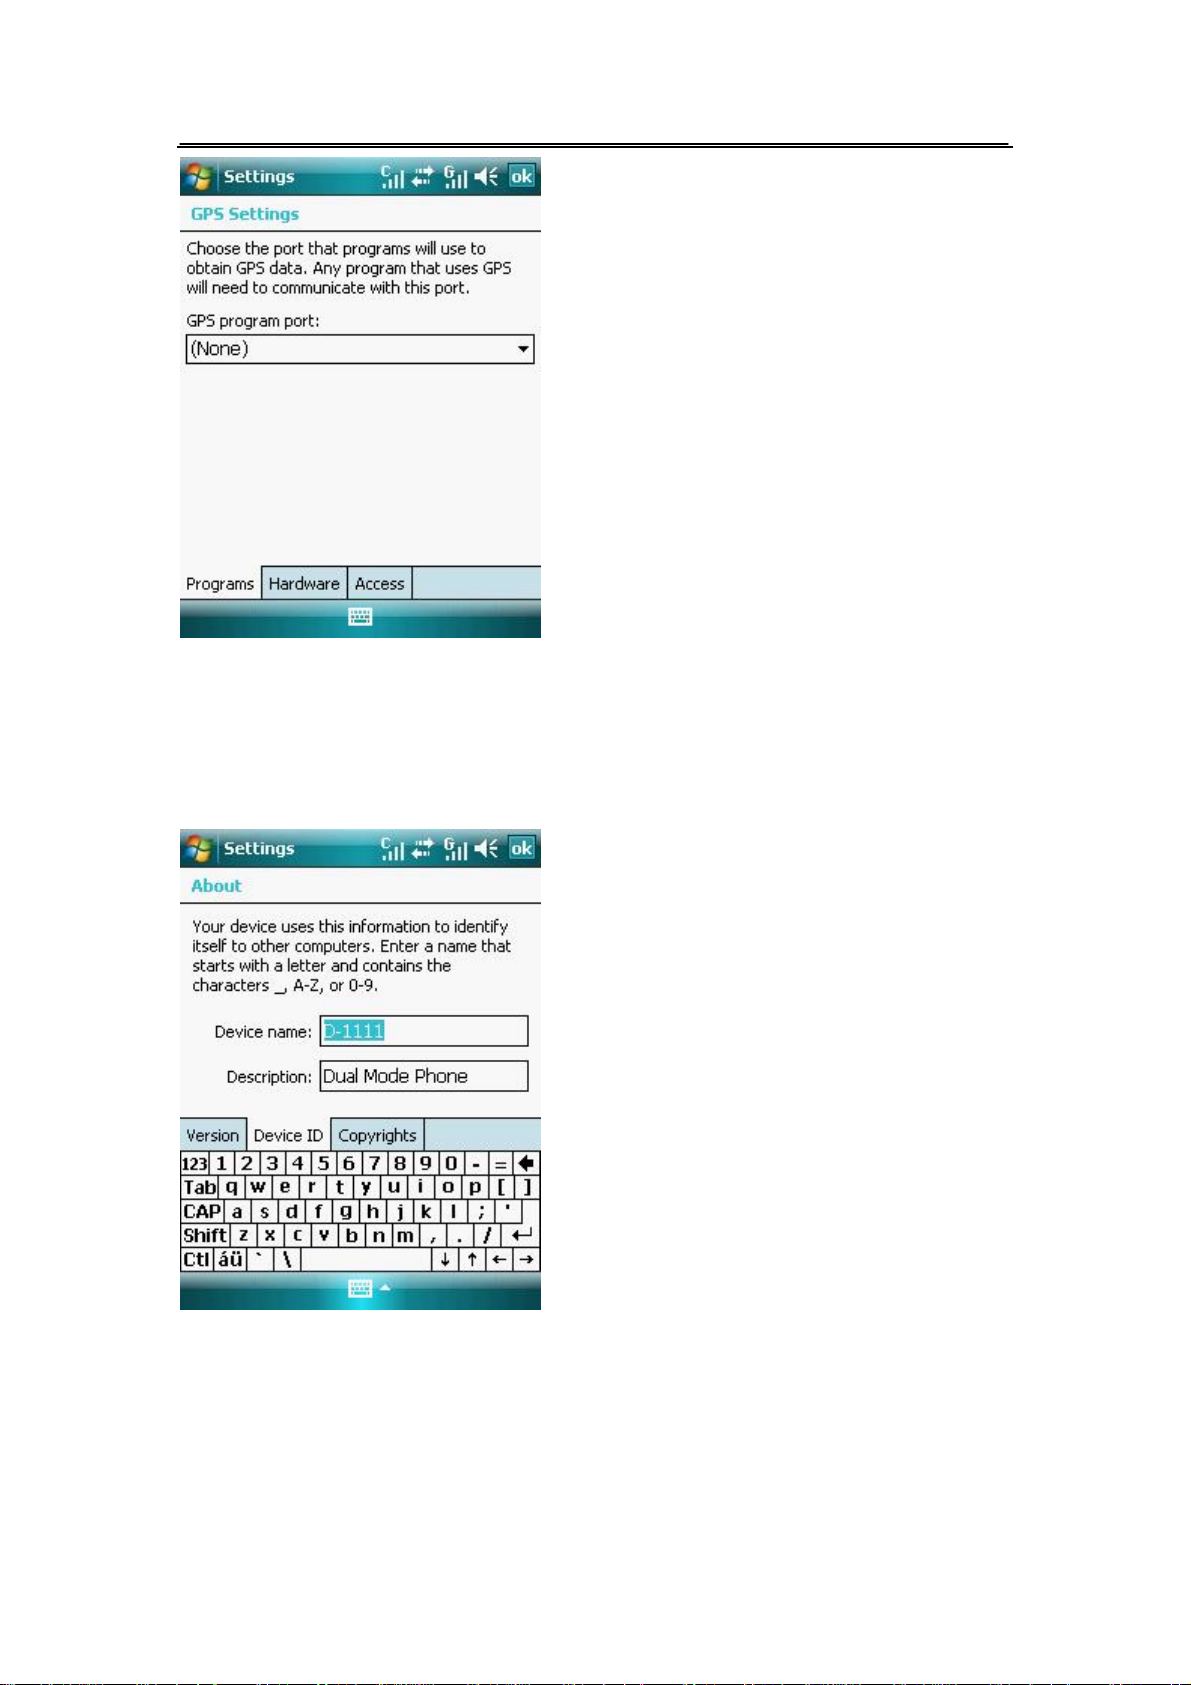
6.2.2. To change the device name
l Tap Start >Settings > System tab> About
l Tap the Device ID tab.
l Enter a name.
6.2.3. Memory
l To display the allocations status and memory card information, you can also stop currently
running programs.
Page 50 of 84 Copyright©2009 Spice
Page 52
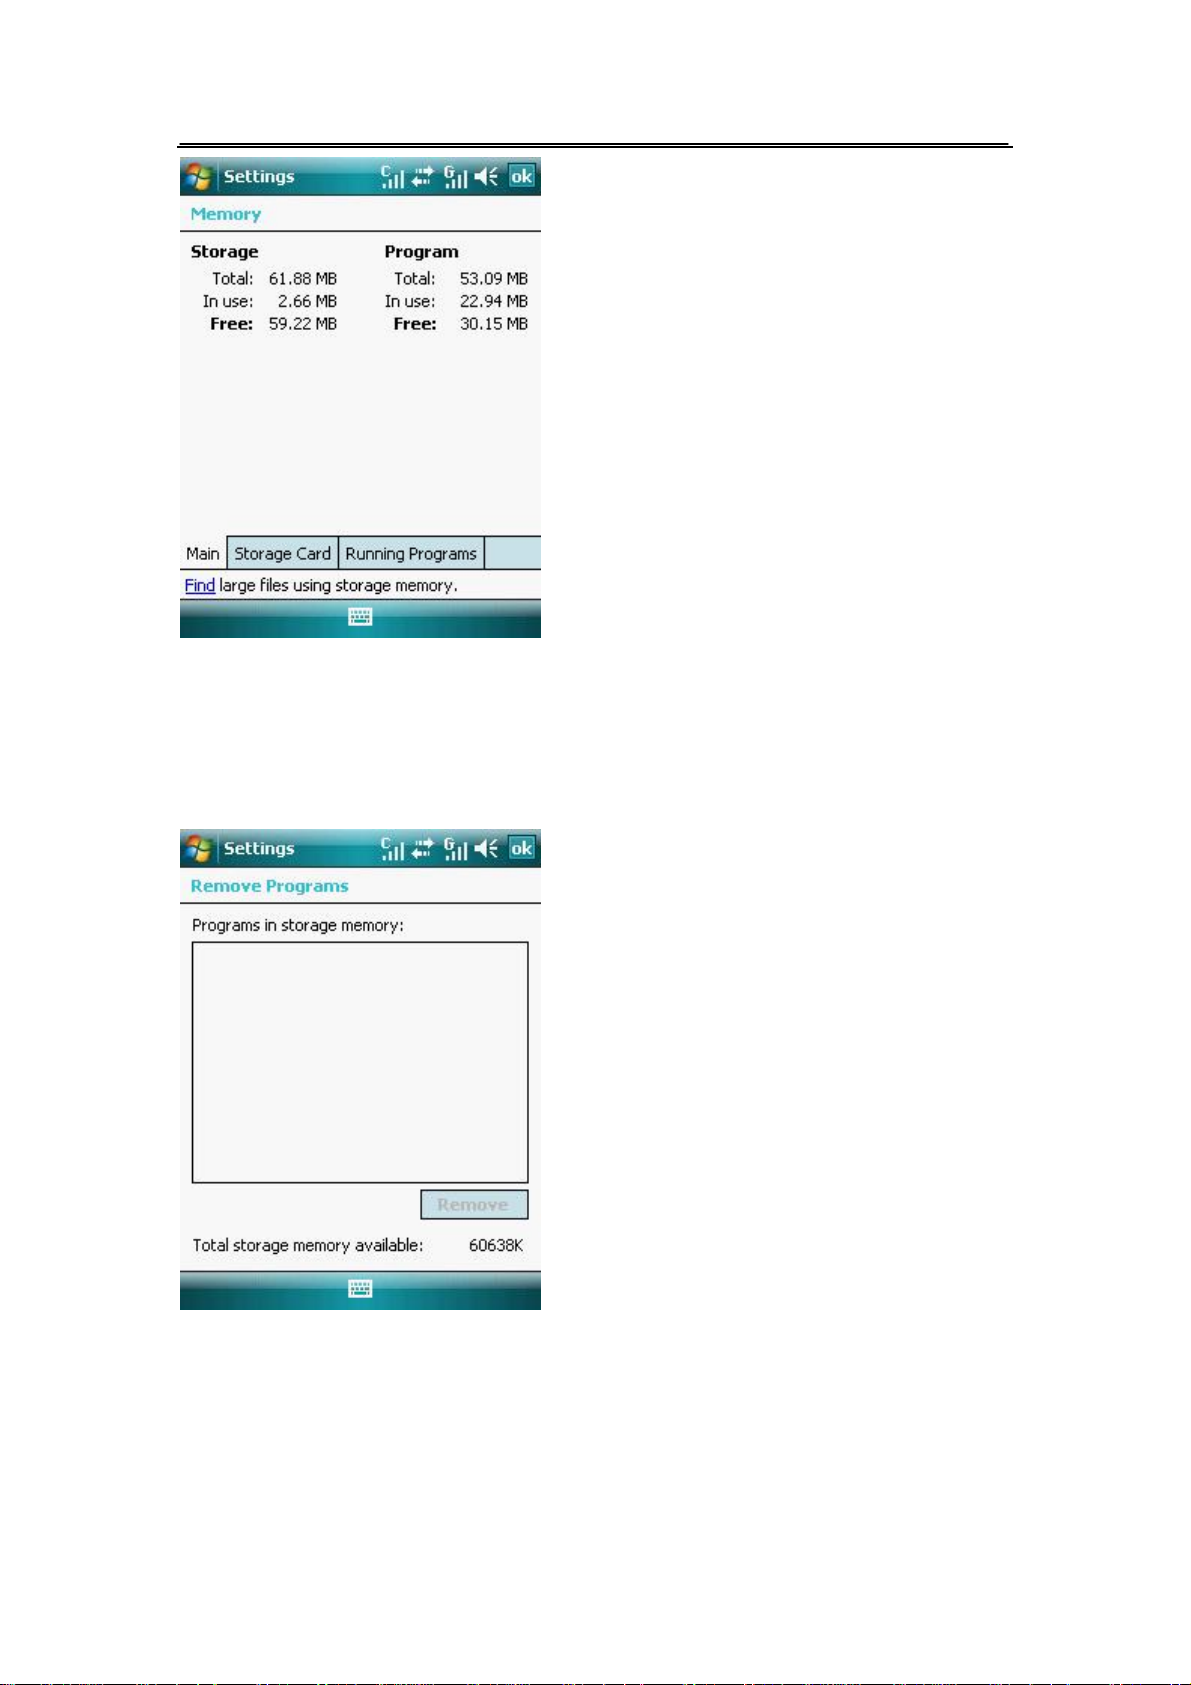
6.2.4. To remove programs
l Tap Start >Settings > System tab> Remove Programs
l You can also remove the programs that you installed.
6.2.5. Regional Settings
l Tap Start >Settings > System tab> Regional Settings
l Set the Regional configuration to use, including the format for Region, displaying numbers,
currency, date, and time on your device.
Page 51 of 84 Copyright©2009 Spice
Page 53
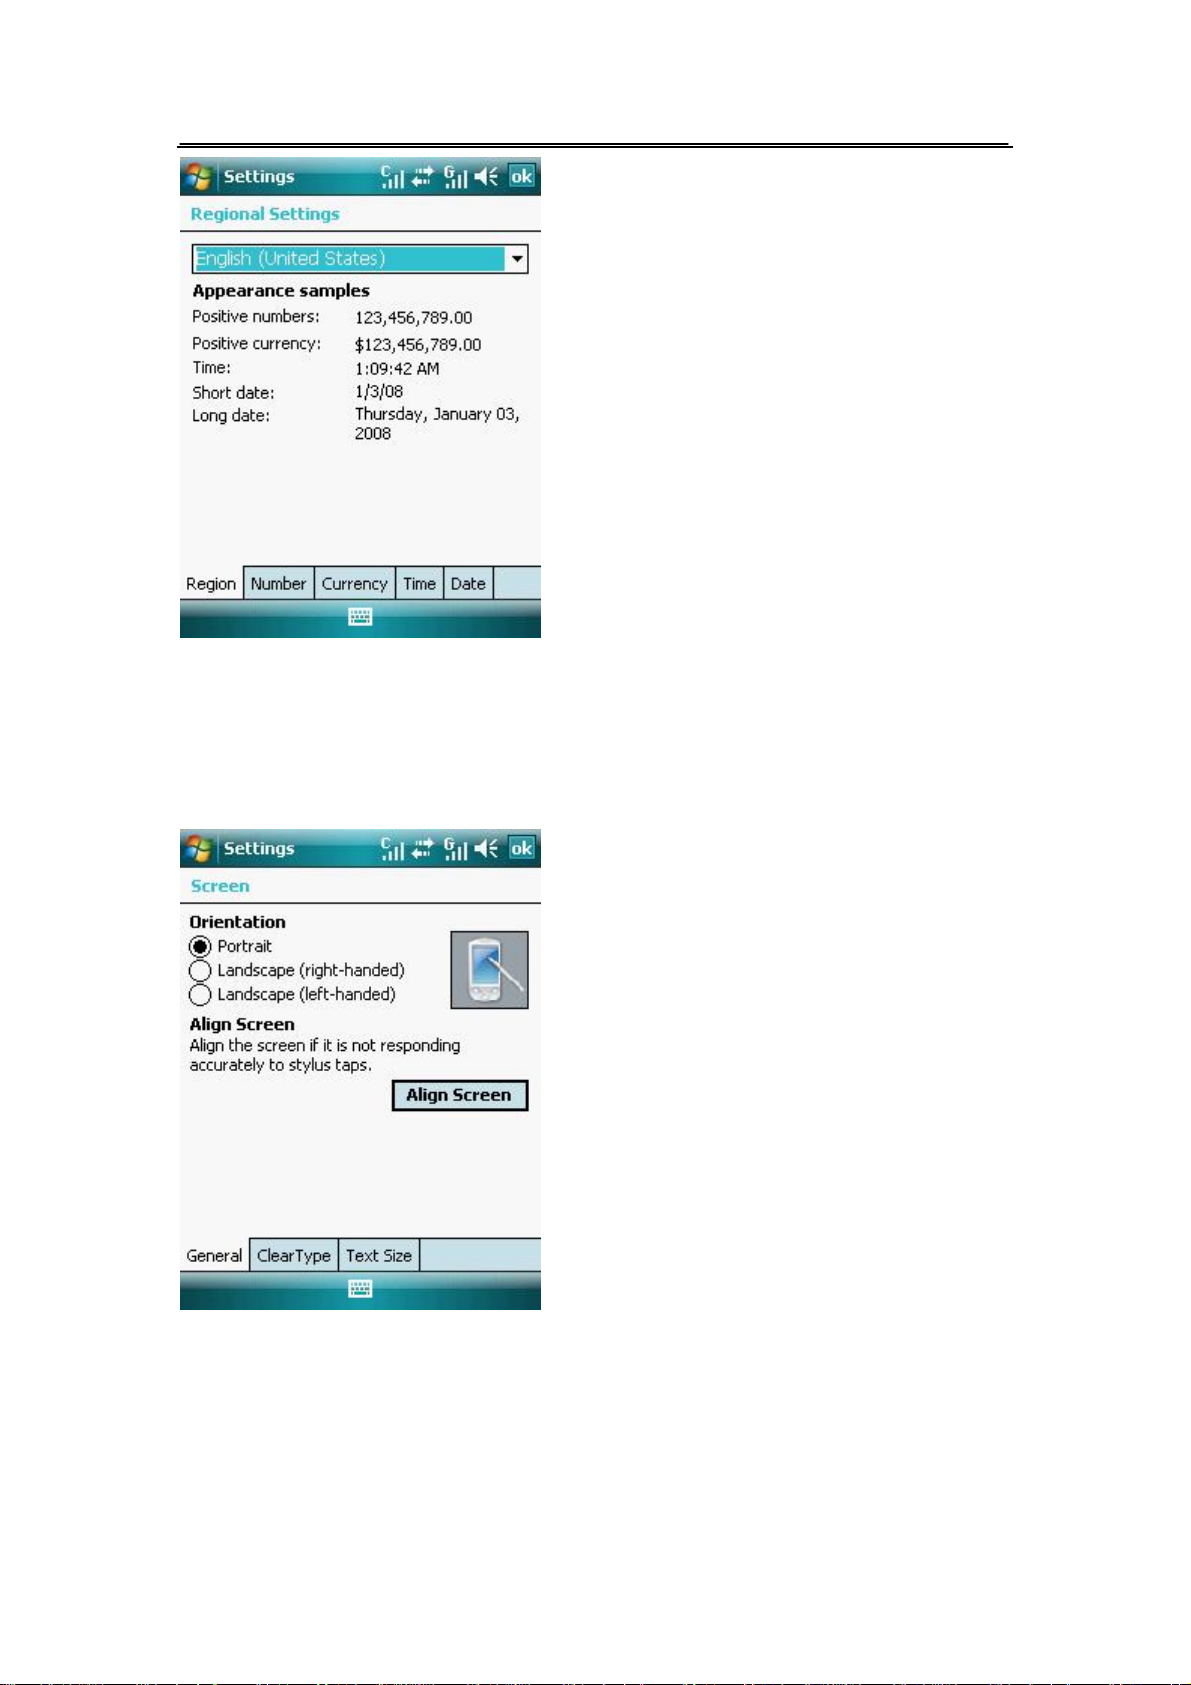
6.2.6. Screen Settings
l Tap Start >Settings > System tab> Screen
l Change the screen orientation, re-calibrate the screen, and change the screen text size.
6.2.7. Reset to factory Settings
l Tap Start >Settings > System tab> Reset to factory settings
l To remove all your data and files from the memory and reset your device to factory default
settings.
Page 52 of 84 Copyright©2009 Spice
Page 54
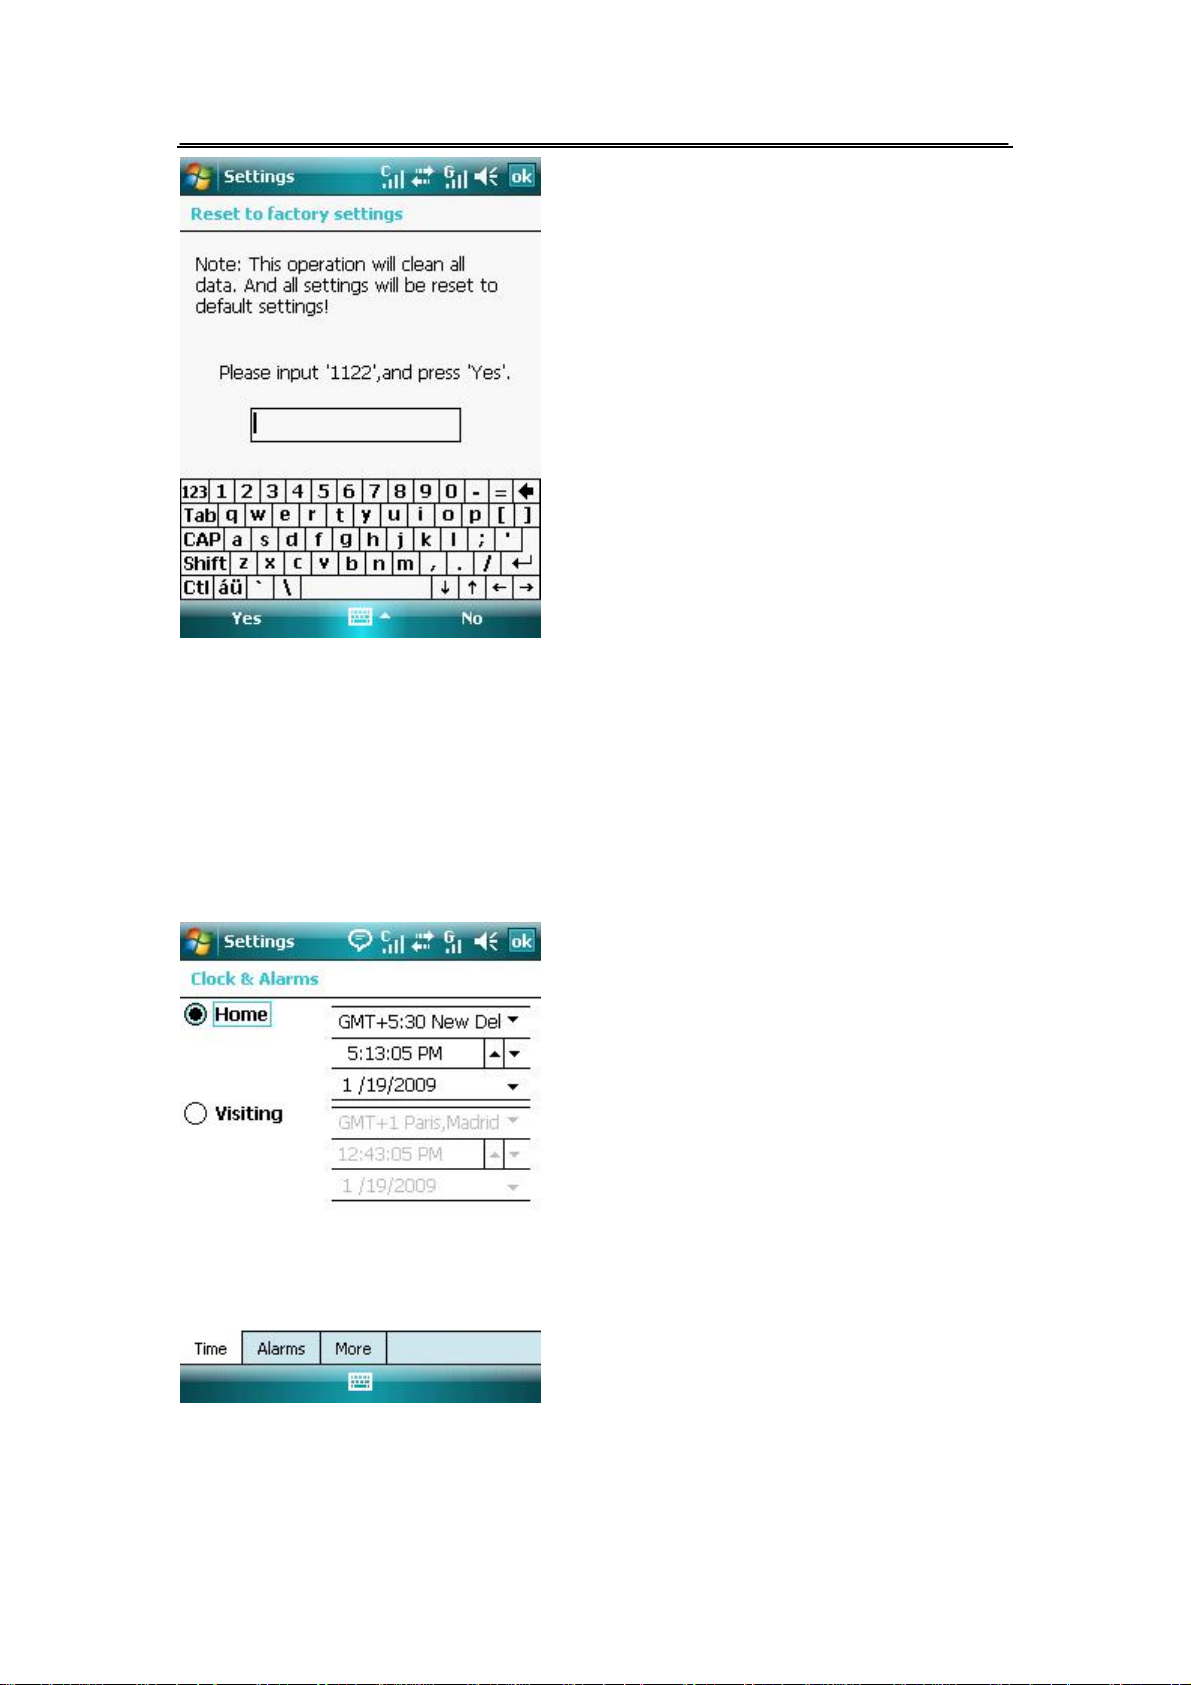
Tip:When the phone is off, you can also press the Right Softkey、the Camera key and the Power
key at the same time, after operating according to the display ,all settings will be reset to default
settings.
6.2.8. Clock and Alarms
l Tap Start >Settings > System tab> Clock&Alarms
l Set the device clock to the date and time of the locale or to a visiting time zone when you are
traveling. Alarms can also be set at specified days and times of a week.
Page 53 of 84 Copyright©2009 Spice
Page 55
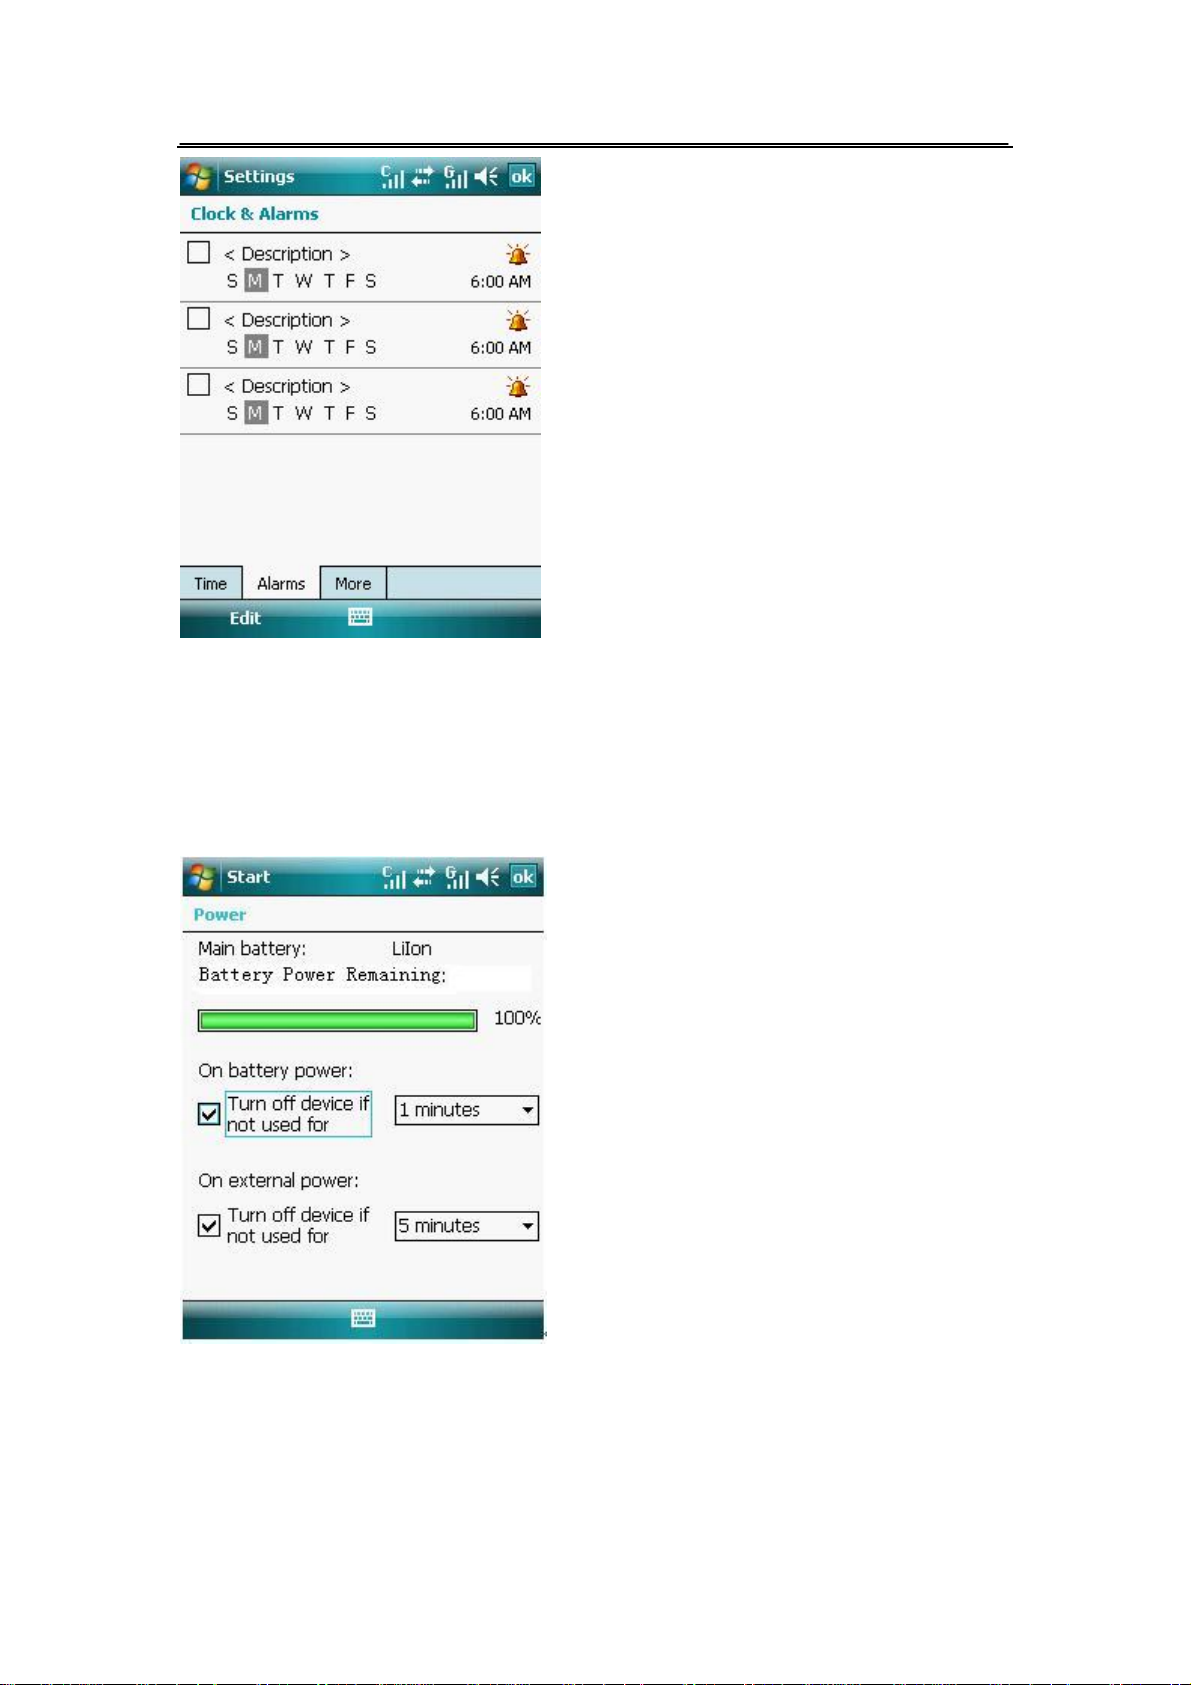
6.2.9. Power
l Tap Start >Settings > System tab> Power
l Check the remaining battery power.
6.2.10. Backlight Settings
l Tap Start >Settings > System tab> Backlight
l Set the backlight timer and adjust brightness.
Page 54 of 84 Copyright©2009 Spice
Page 56
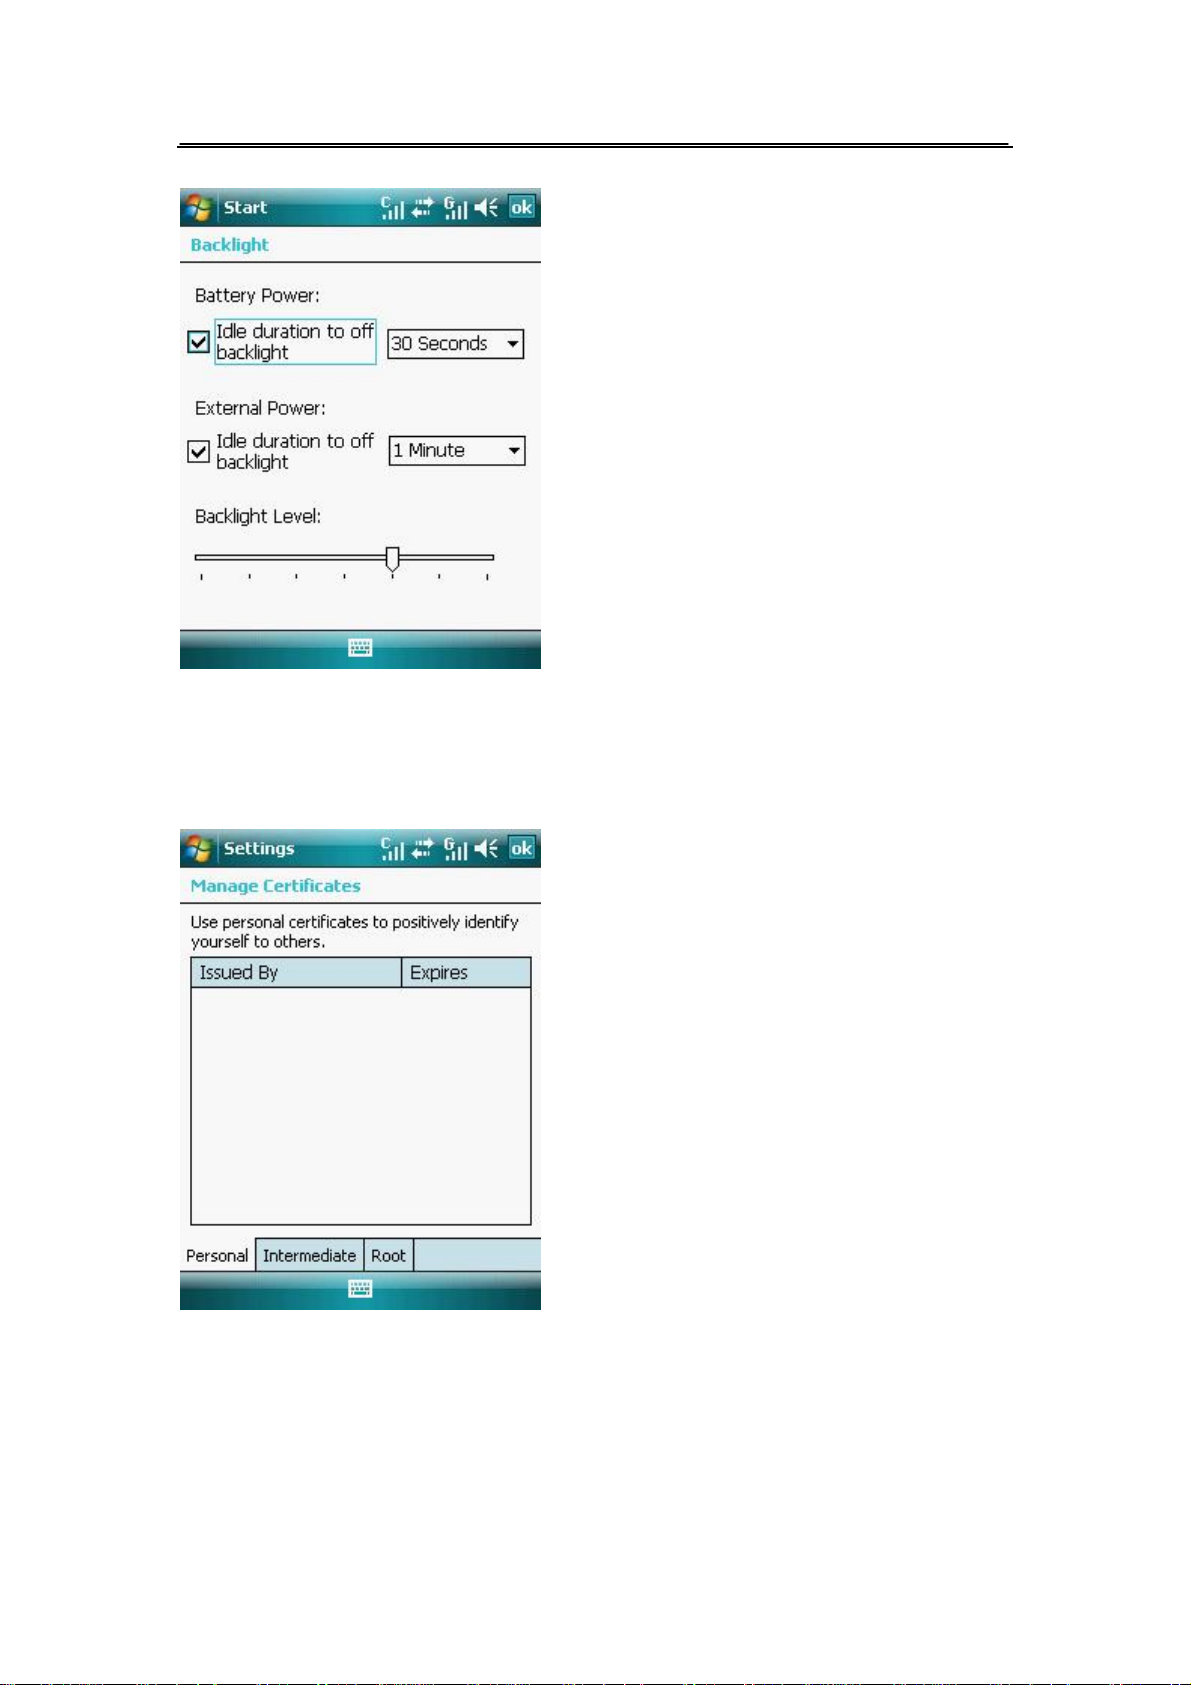
6.2.11. Certificates
l Tap Start >Settings > System tab> Certificates
l See information about certificates that are installed on your device.
Page 55 of 84 Copyright©2009 Spice
Page 57
6.3. Connections Settings
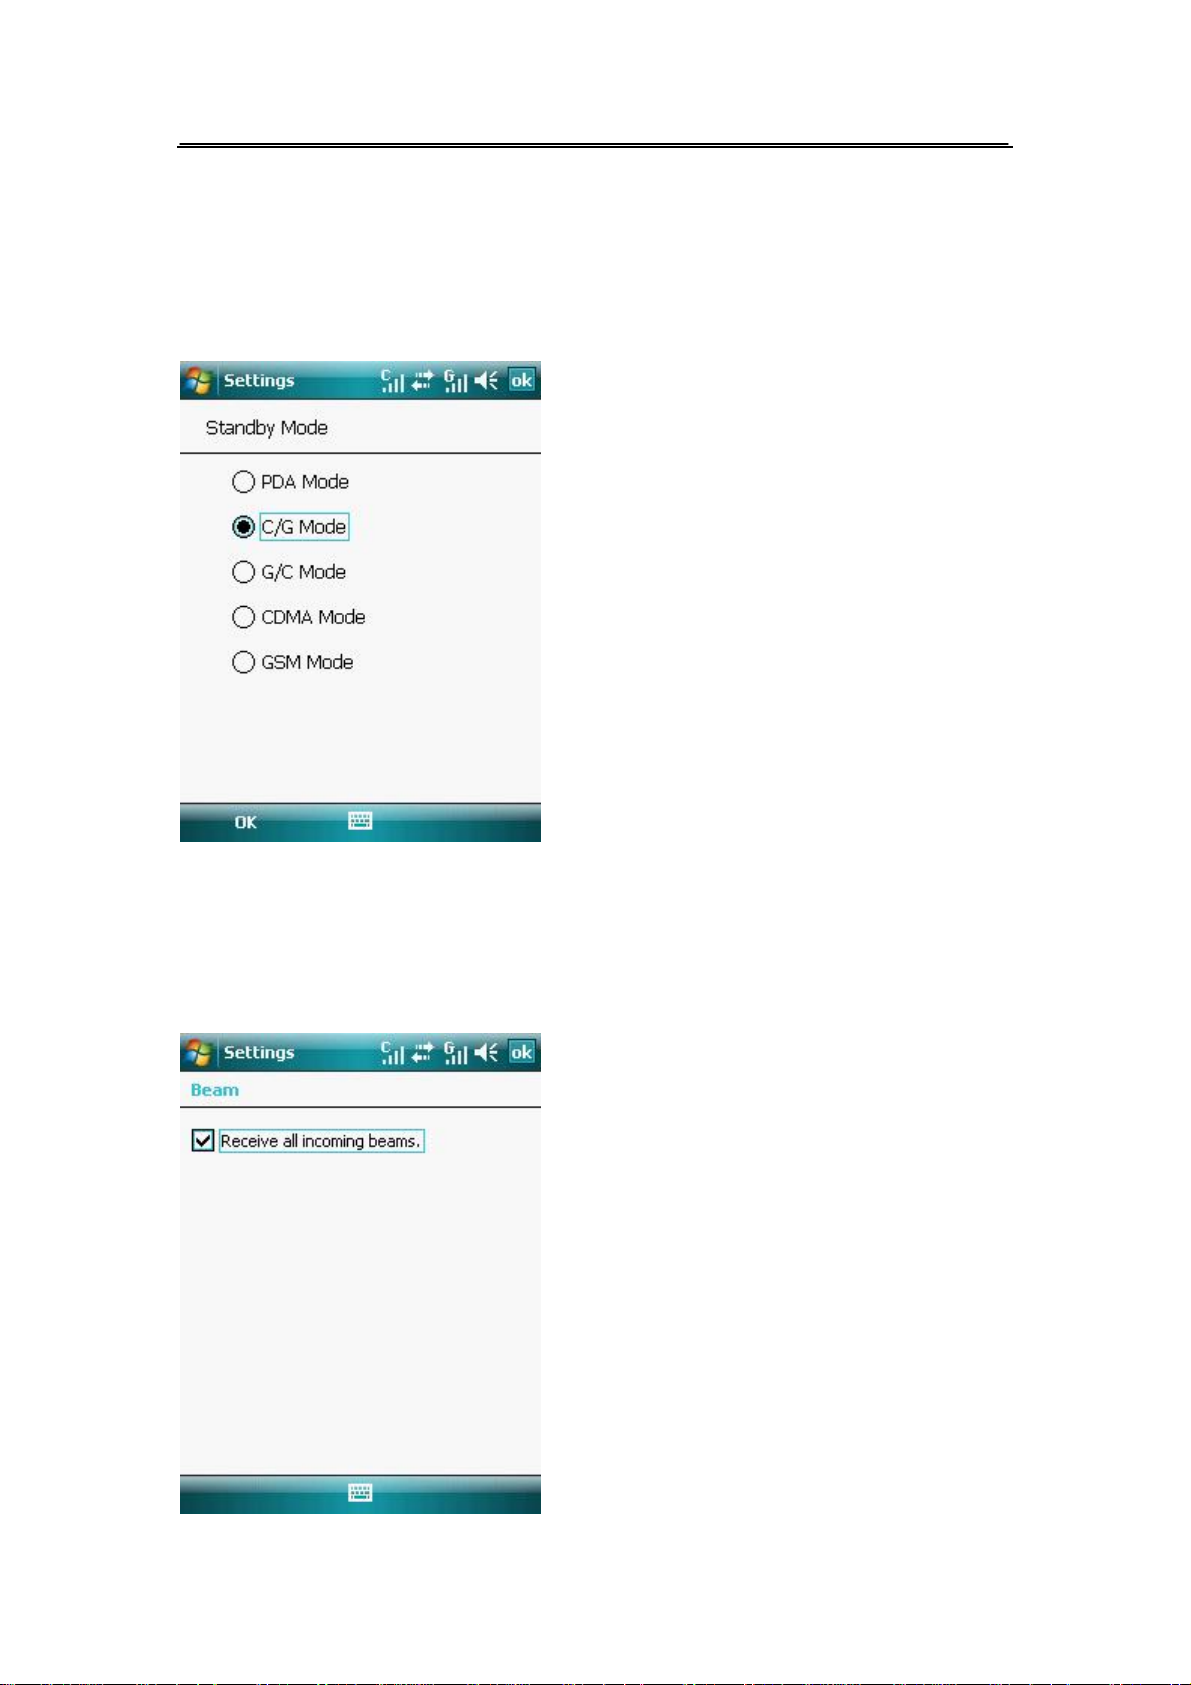
6.3.1. Standby Mode Settings
l Tap Start >Settings > Connections tab> Standby Mode
l Choose the standby mode for your device.
6.3.2. Beam
l Tap Start >Settings > Connections tab> Beam
l Set your device whether to receive all incoming beams.
Page 56 of 84 Copyright©2009 Spice
Page 58
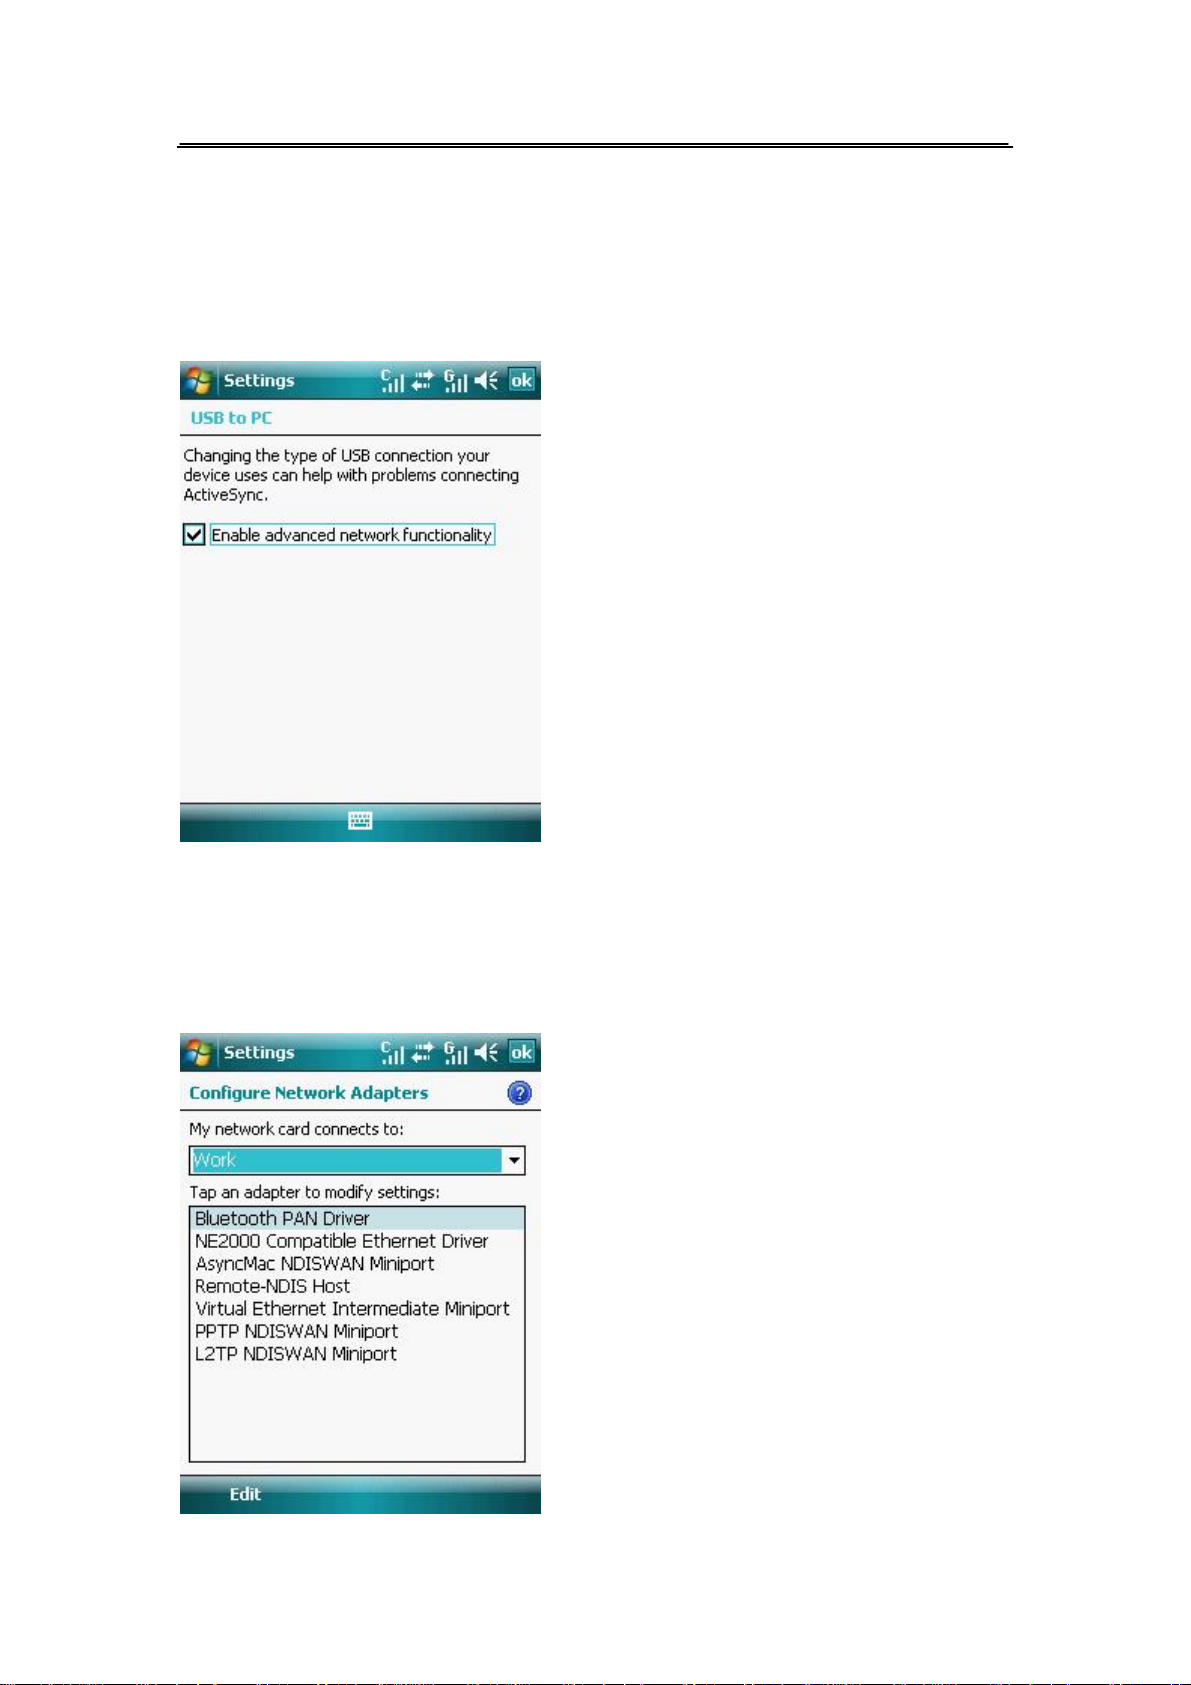
6.3.3. USB to PC
l Tap Start >Settings > Connections tab> USB to PC
l Set a USB serial connection between your device and PC when there are problems
connecting ActiveSync.
6.3.4. Network Cards
l Tap Start >Settings > Connections tab> Network Cards
l Allows your device to scan for available wireless network, also allows you to set up a
network card (if you have one inserted on your device).
Page 57 of 84 Copyright©2009 Spice
Page 59
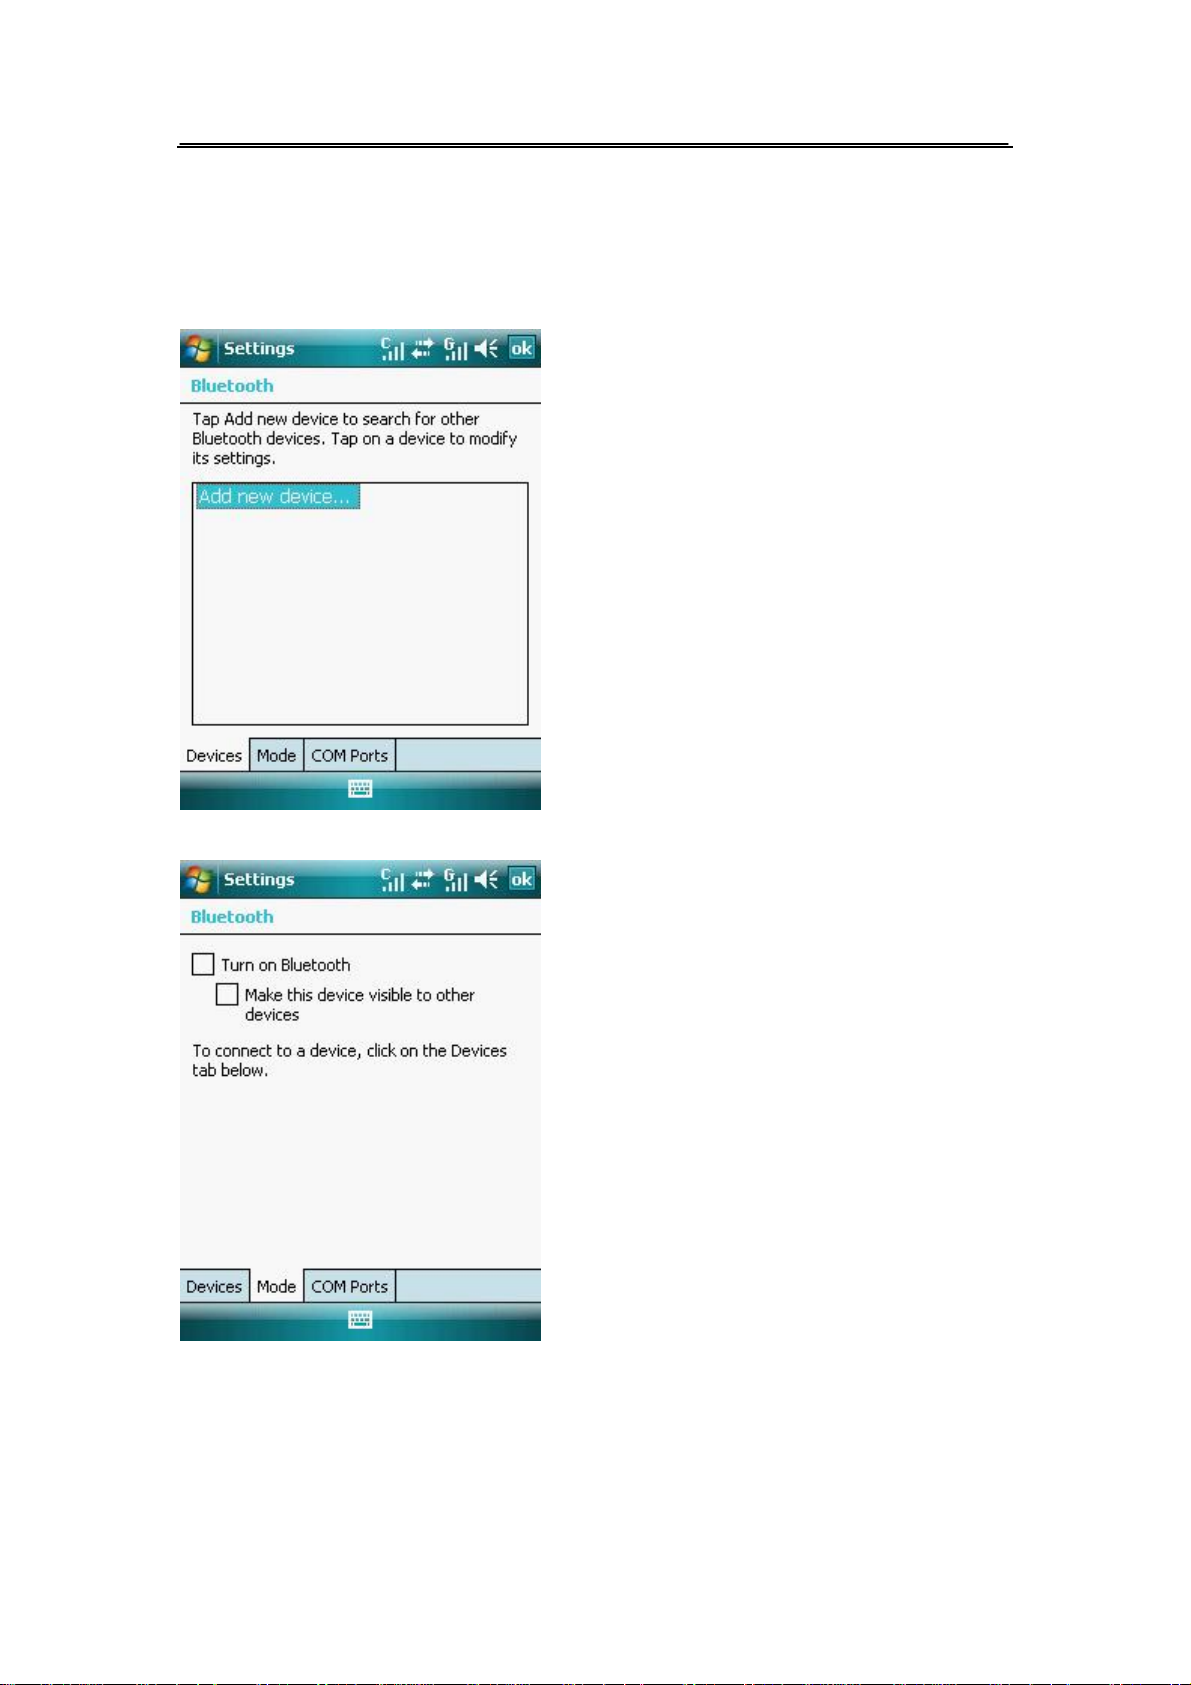
6.3.5. Bluetooth
l Tap Start >Settings > Connections tab> Bluetooth
l Tap Add new device to search for other Bluetooth devices.
l You can turn on Bluetooth and make this device visible to other devices.
l To set up a COM port.
Page 58 of 84 Copyright©2009 Spice
Page 60
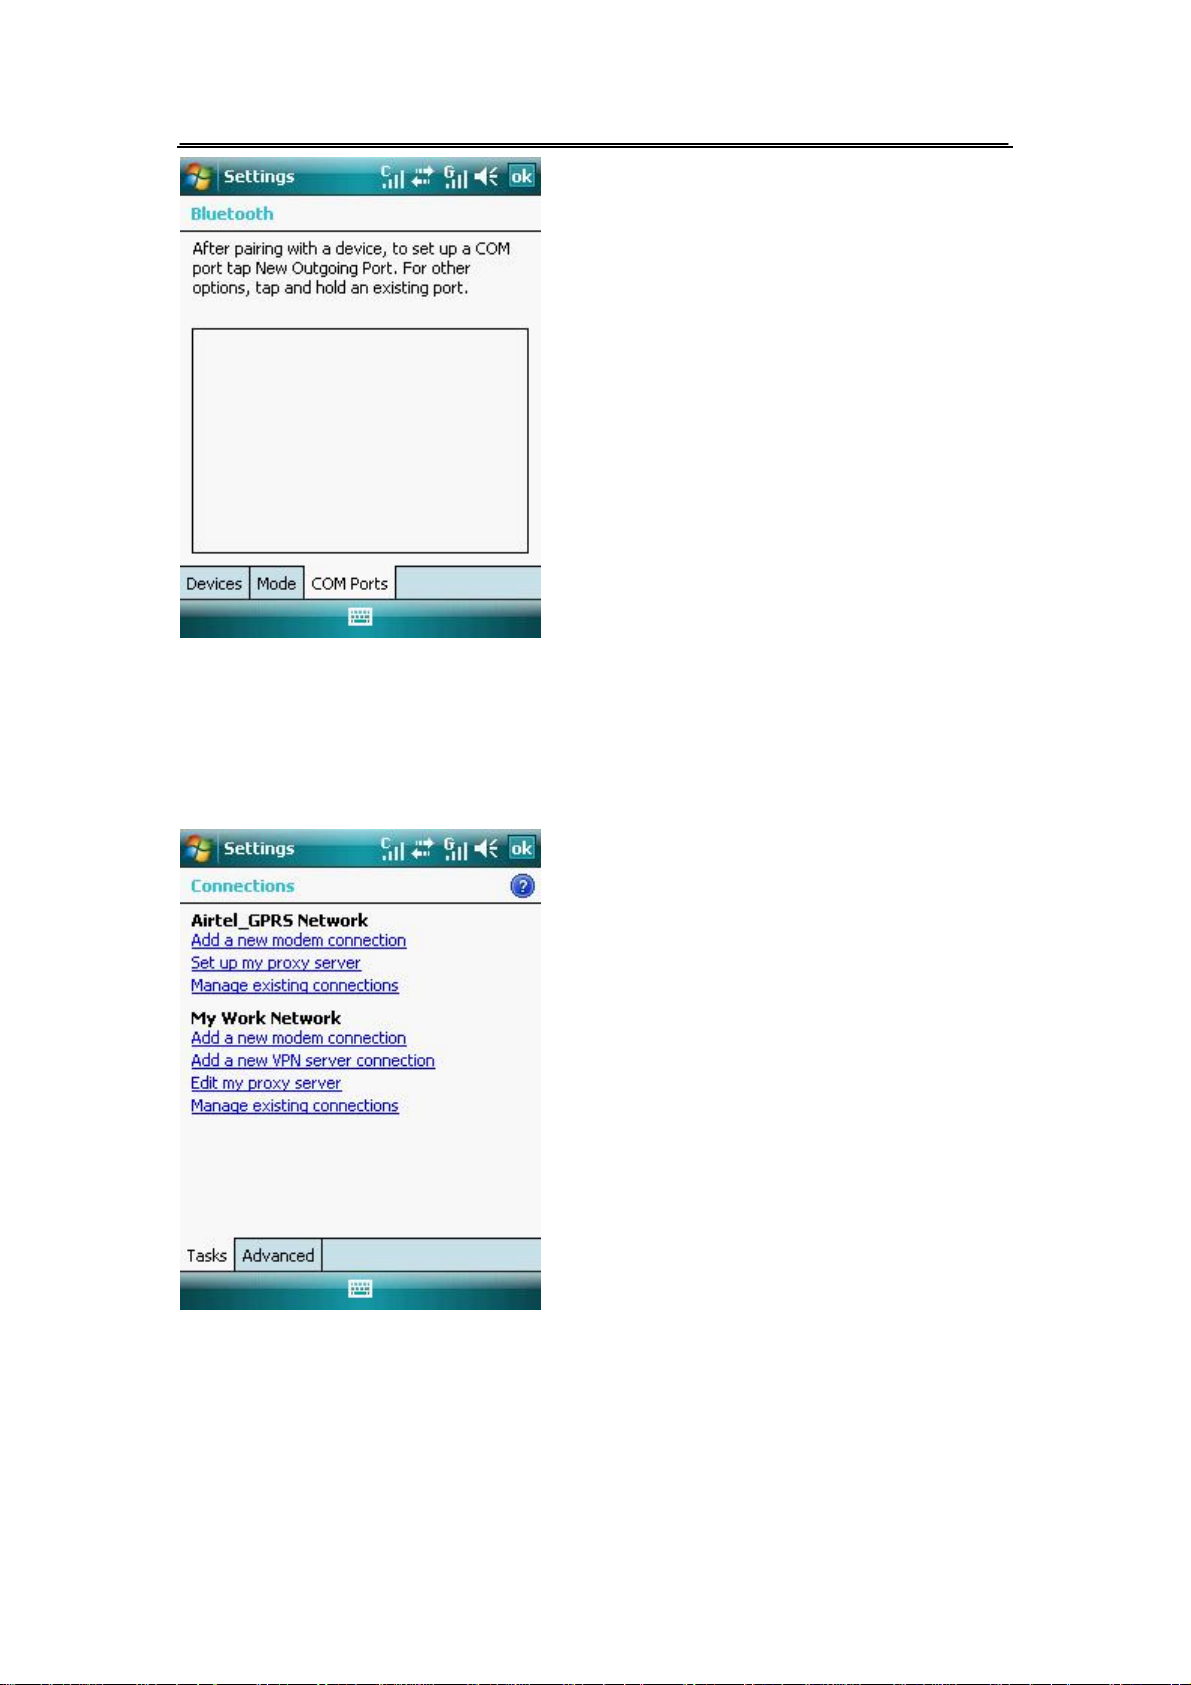
6.3.6. Connections
l Tap Start >Settings > Connections tab> Connections
l Set up one or more types of modem connections for your device, such as a phone dial-up,
GPRS, and more so that your device can connect to the internet or a private local network.
Page 59 of 84 Copyright©2009 Spice
Page 61
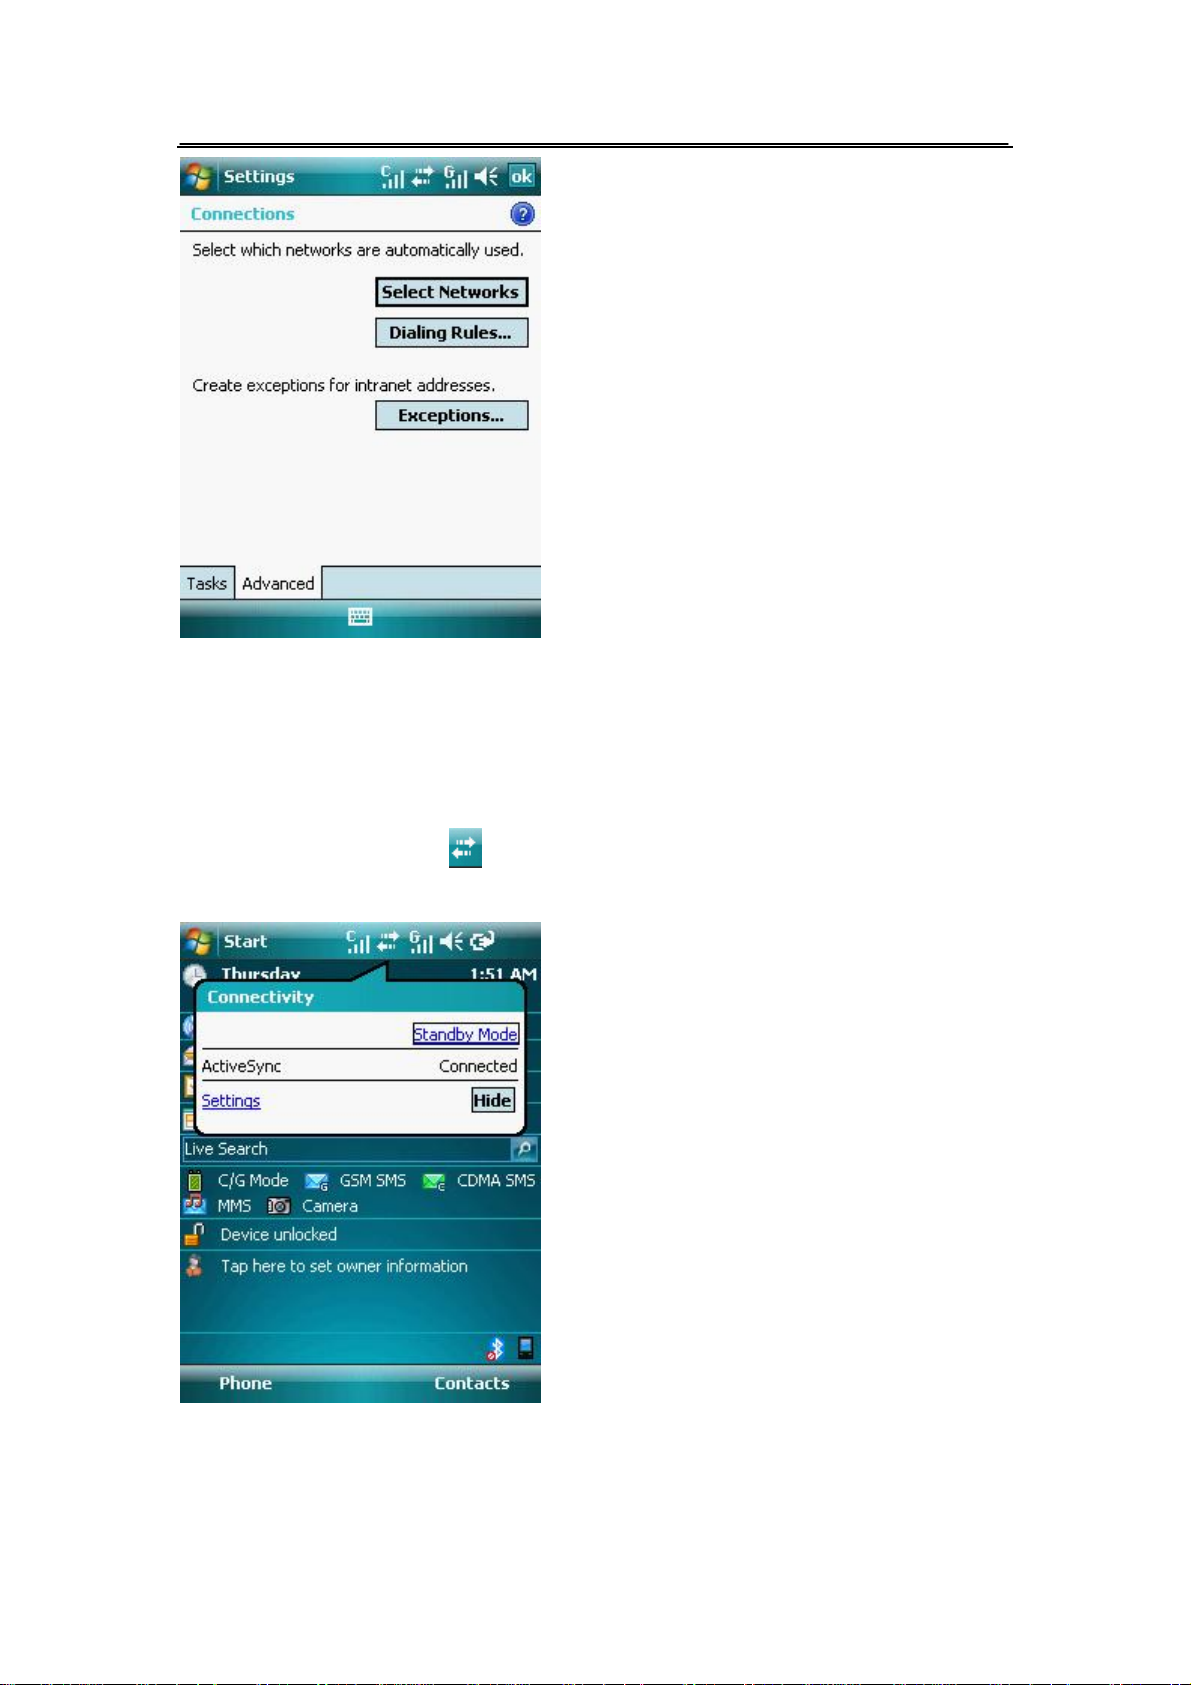
6.3.7. Setting a GPRS Connection
Your device allows you to connect with GPRS .It supports a wide range of bandwidths that allows
sending and receiving small bursts of data, such as email and web browsing.
To set a GPRS Connection in your device:
1. From the today screen, tap on the status bar.
2. From the pop-up call out, tap settings.
From the setting screen, select the Connections tab then tap Connections icon.
Page 60 of 84 Copyright©2009 Spice
Page 62
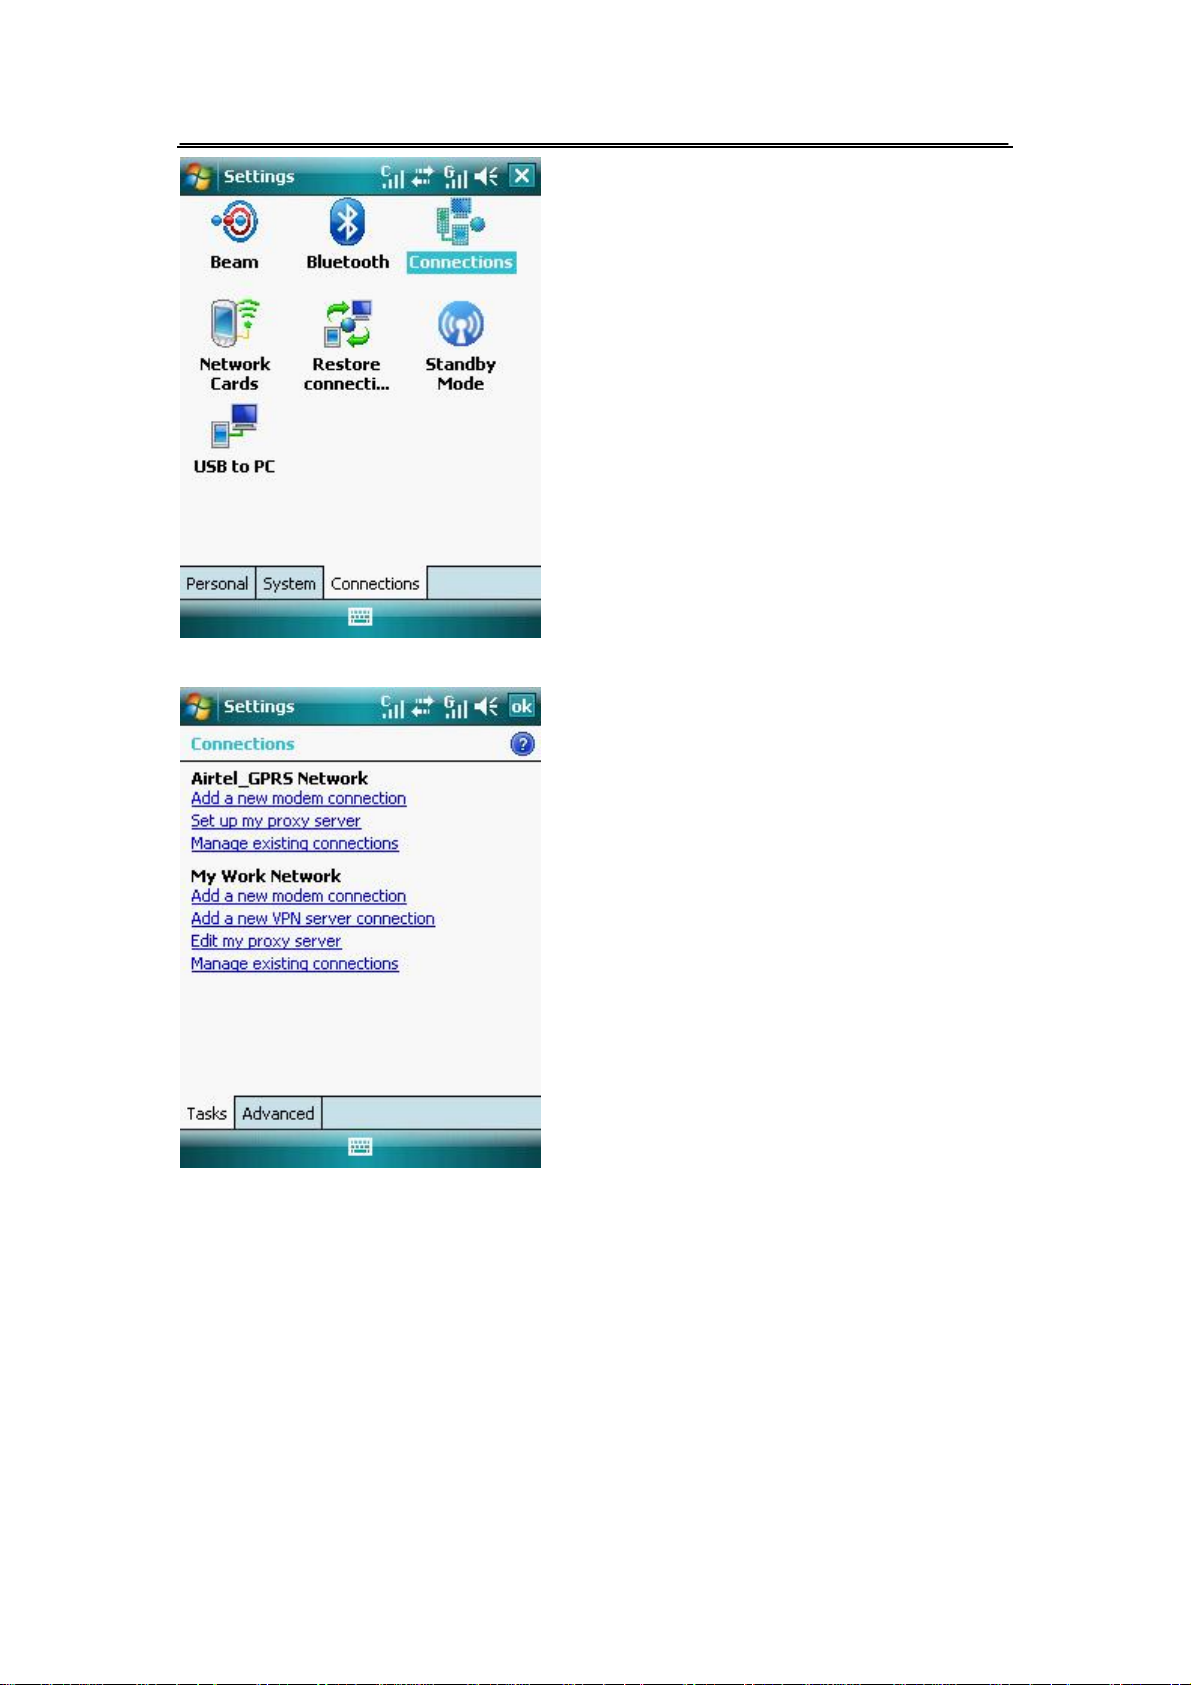
From the connection screen, tap Add a new modem connection.
Input a unique name for the connection and then select Cellular Line (GPRS) from the modem list.
Page 61 of 84 Copyright©2009 Spice
Page 63
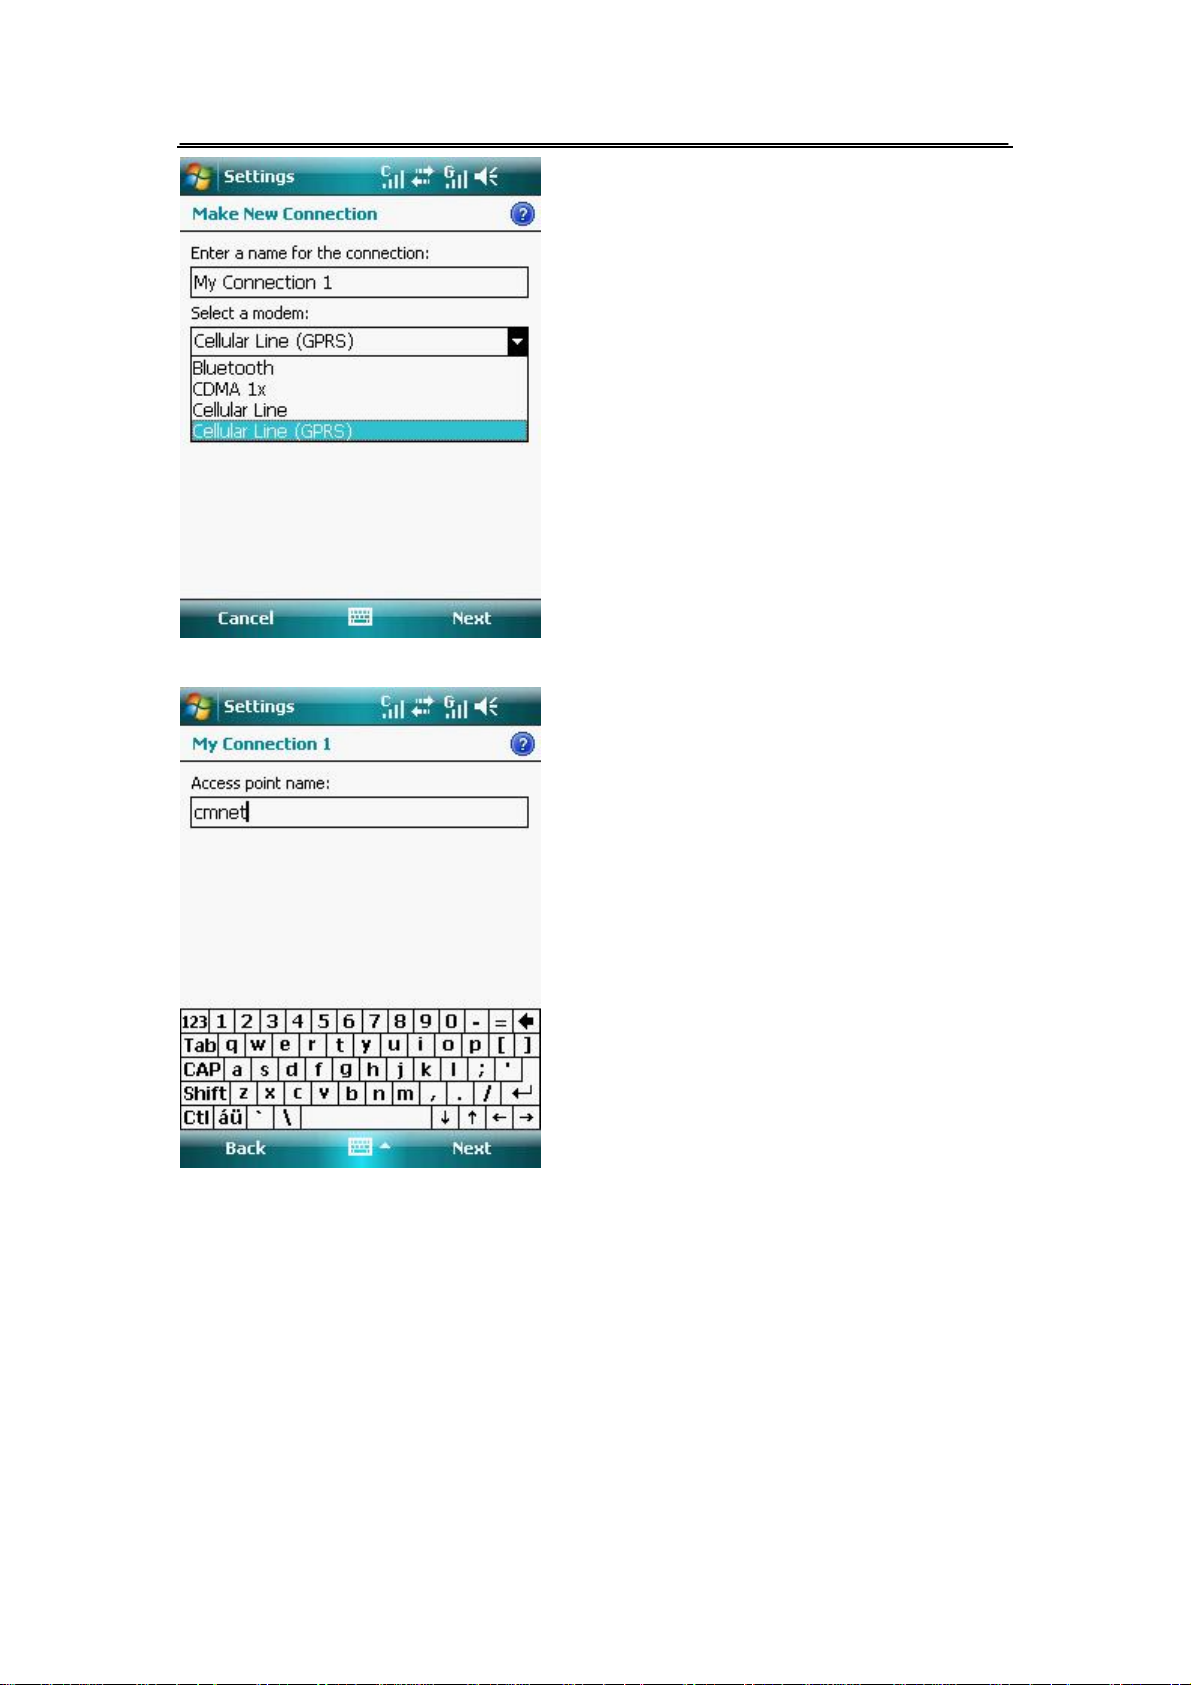
Input the Access point name.
Input your User name, Password and Domain then tap Finish. Contact your network administrator
for assistance.
Page 62 of 84 Copyright©2009 Spice
Page 64
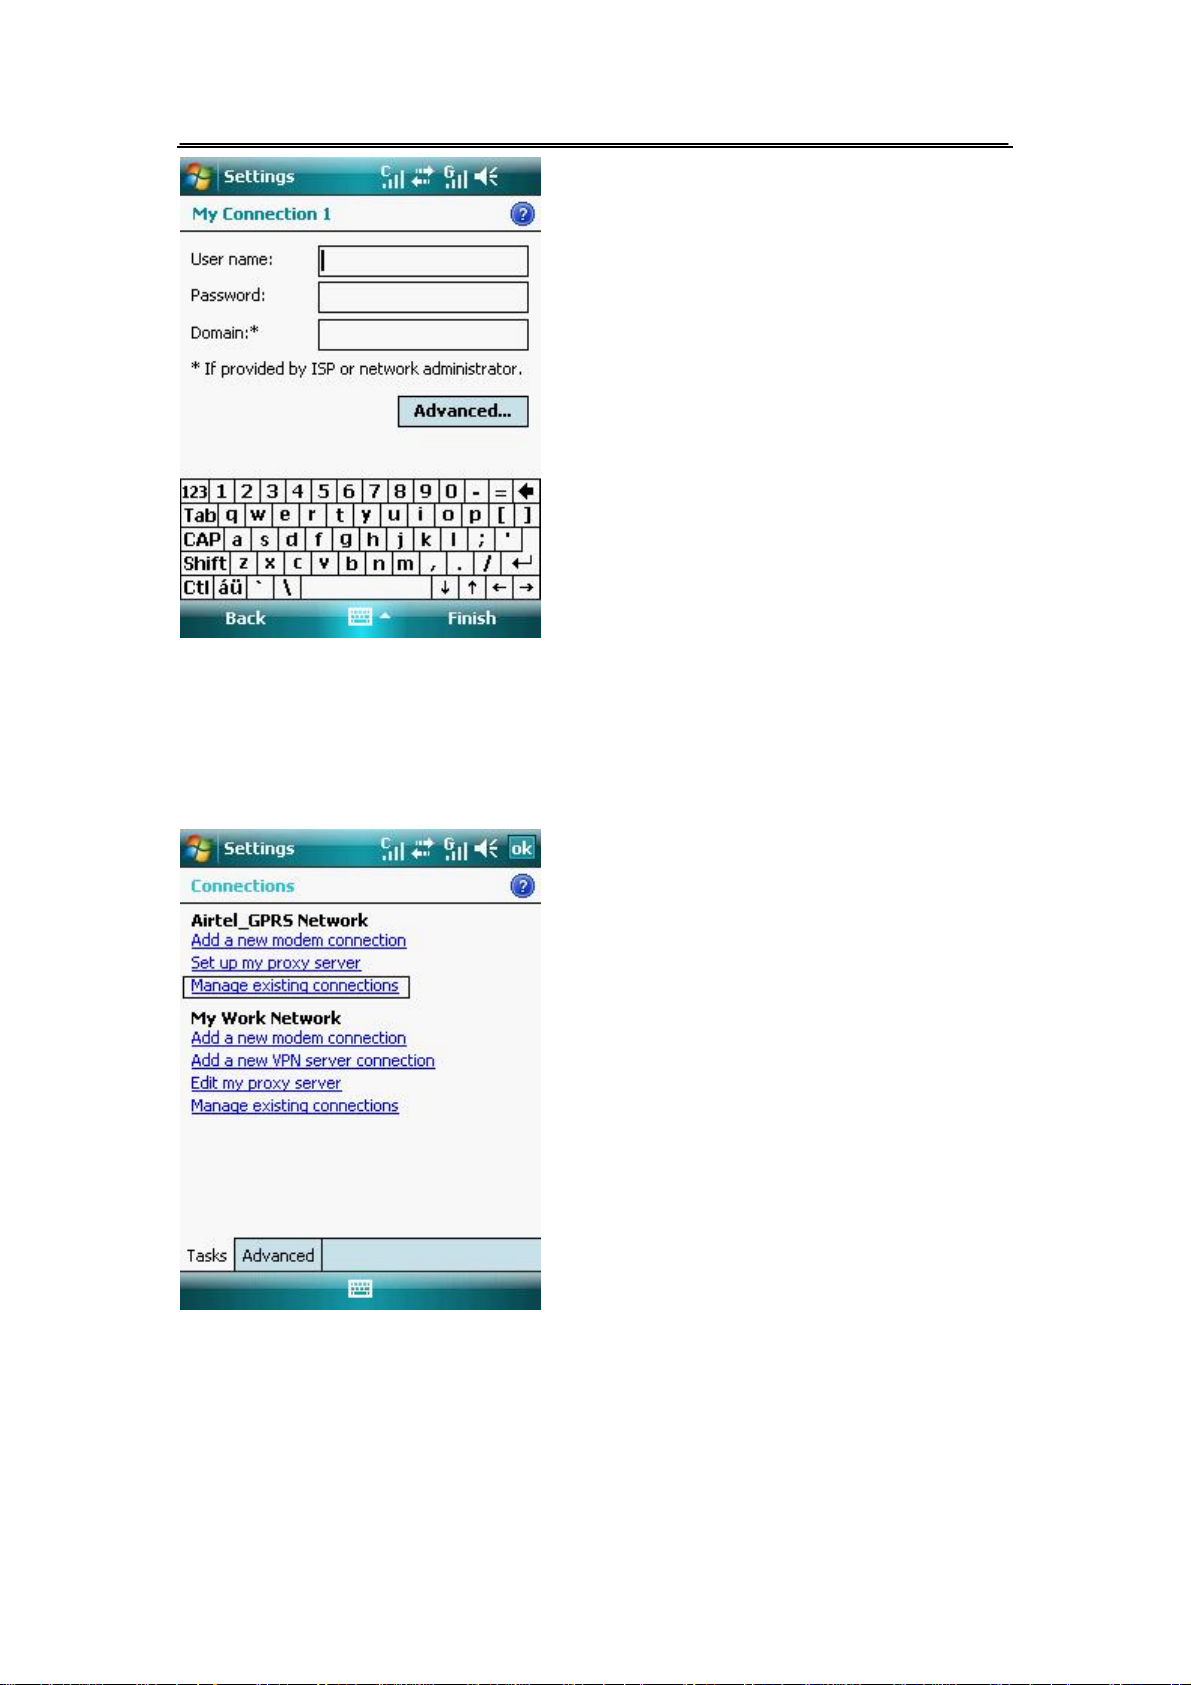
6.3.8. Connect GPRS
To connect GPRS:
l Tap Start >Settings>Connections tab then tap Connections icon.
l From the Connections screen, tap Manage existing connections.
l Tap and hold on an existing connection then from the pop-up menu tap Connect.
l Tap Delete to delete the selected connection setting.
l When connected, tap ok to exit.
Page 63 of 84 Copyright©2009 Spice
Page 65
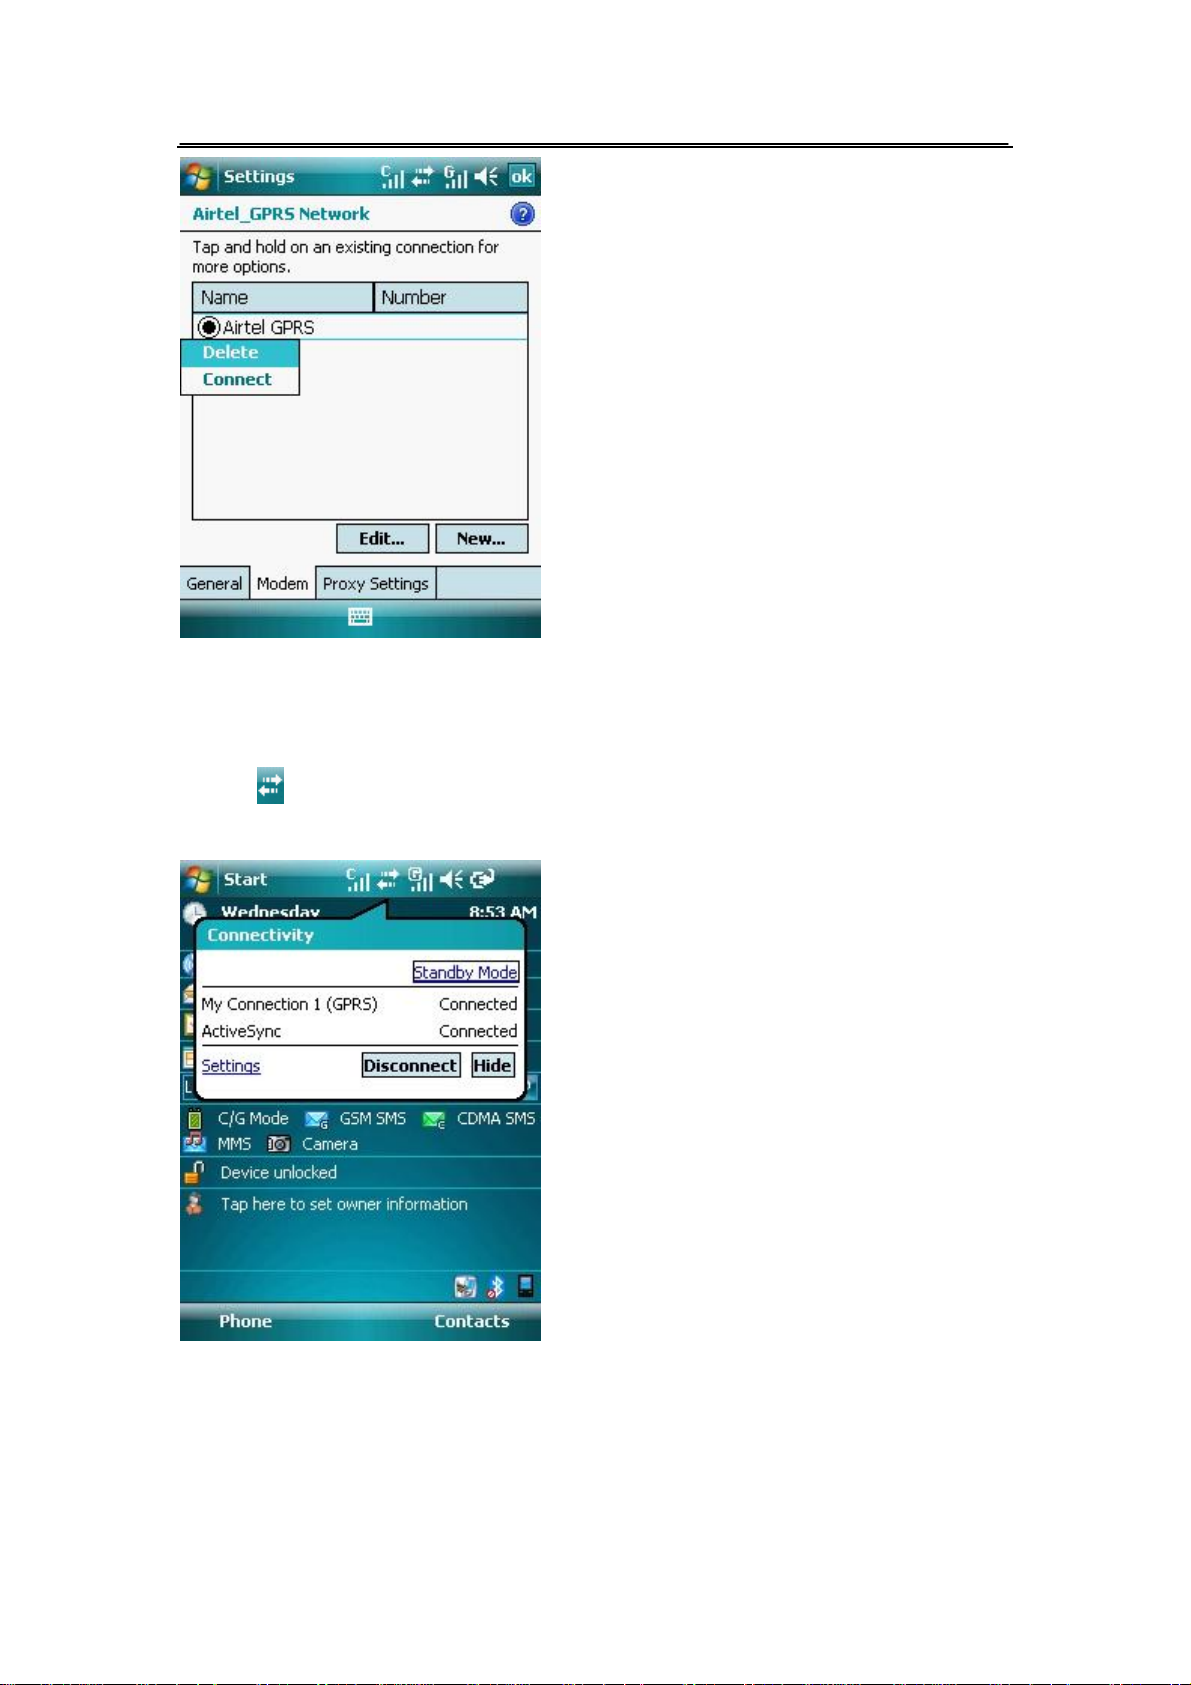
6.3.9. Disconnecting GPRS
To disconnect GPRS:
1. Tap from the status bar.
2. From the pop-up callout, tap Disconnect.
Page 64 of 84 Copyright©2009 Spice
Page 66

77.. WWoorrkkiinngg wwiitthh DDooccuummeennttss aanndd FFiilleess
7.1. Microsoft Office Word Mobile
Microsoft Office Word Mobile is a streamlined version of Microsoft Word. Word documents on
your PC can be opened and edited on your device. You can also create and edit documents and
templates in Word Mobile and save them *.doc*.rtf,*.txt, and *.dot files.
l Tap Start > Office Mobile>Word Mobile
1. In Word Mobile, tap New.
2. You will see either a blank document or template, depend on what you have selected as the
default template.
3. Enter text as desired.
4. Tap Menu then choose whether to set the font, paragraph alignment and indentation, insert
date, spelling and more.
5. When finished, tap OK to save the file.
To get more about Word Mobile:
When in Word Mobile, tap .
7.2. Microsoft Office Excel Mobile
Microsoft Office Excel Mobile makes it easy for you to open and edit Excel workbooks and
templates created on your PC. You can also create new workbooks and templates on your device.
l Tap Start > Office Mobile> Excel Mobile
1. In Excel Mobile, tap New.
2. You will see a blank document.
3. Enter text as desired.
4. Tap menu then choose whether to insert cells, charts, symbols or functions, format rows and
columns, and more.
5. When finished, tap OK to save the file.
To get more about Excel Mobile:
When in Excel Mobile, tap .
To use Excel built- in functions:
1. In Excel Mobile, tap Menu>Insert>Function
2. Tap Function to select the function to use.
Page 65 of 84 Copyright©2009 Spice
Page 67

7.3. Microsoft Office PowerPoint Mobile
Microsoft Office PowerPoint Mobile makes you open and view (not create) slide show
presentations, *.ppt and *.pps formats, created on your PC.
To start a slide presentation:
1. Tap Start > Office Mobile> PowerPoint Mobile to open the program.
2. In the presentation list, tap the slide show you want to view.
3. Tap the current slide to advance to the next slide.
4. To navigation between slides, tap >Next or Previous or tap Go to Slide and tap the slide
you want to view.
If the presentation is set up as a timed slide show, slides will advance automatically.
To stop a slide show:
In a PowerPoint Mobile Presentation, tap >End Show.
Page 66 of 84 Copyright©2009 Spice
Page 68

88.. EExxppeerriieenncciinngg MMuullttiimmeeddiiaa
8.1. Pictures & Videos
You can view the pictures as a slide show, send them via E-mail or Bluetooth, edit them or set
them as the background on the today screen.
8.1.1. To Open Pictures&Videos
l Tap Start > Programs >Pictures & Videos
8.1.2. To copy media files to your device
l Copy animation files from your PC or a storage card to the My Pictures folder on your
device.
l Copy video files to the My Videos folder.
8.1.3. To view media files
l Tap Start > Programs >Pictures & Videos
l Select a media file and tap view or play (if Video File) to view or play back the file.
8.1.4. Pictures and Videos Menu
Select a media file onscreen and tap Menu to open a list of options that you can do with the
selected media file.
8.1.5. Edit a picture
You can also edit a still image file such as rotate and crop.
l In Pictures &Videos, select the picture you want to edit and tap View.
l Tap Menu>Edit.
l Tap Rotate to rotate the picture 90 degrees or tap Menu to access more editing options.
8.2. Camera
Taking photos and recording video clips along with audio are easy with your device’s built-in
camera.
l Tap Start > Programs >Pictures & Videos >Camera, or press the Camera Key
Tap Menu displays the following functions:
Page 67 of 84 Copyright©2009 Spice
Page 69
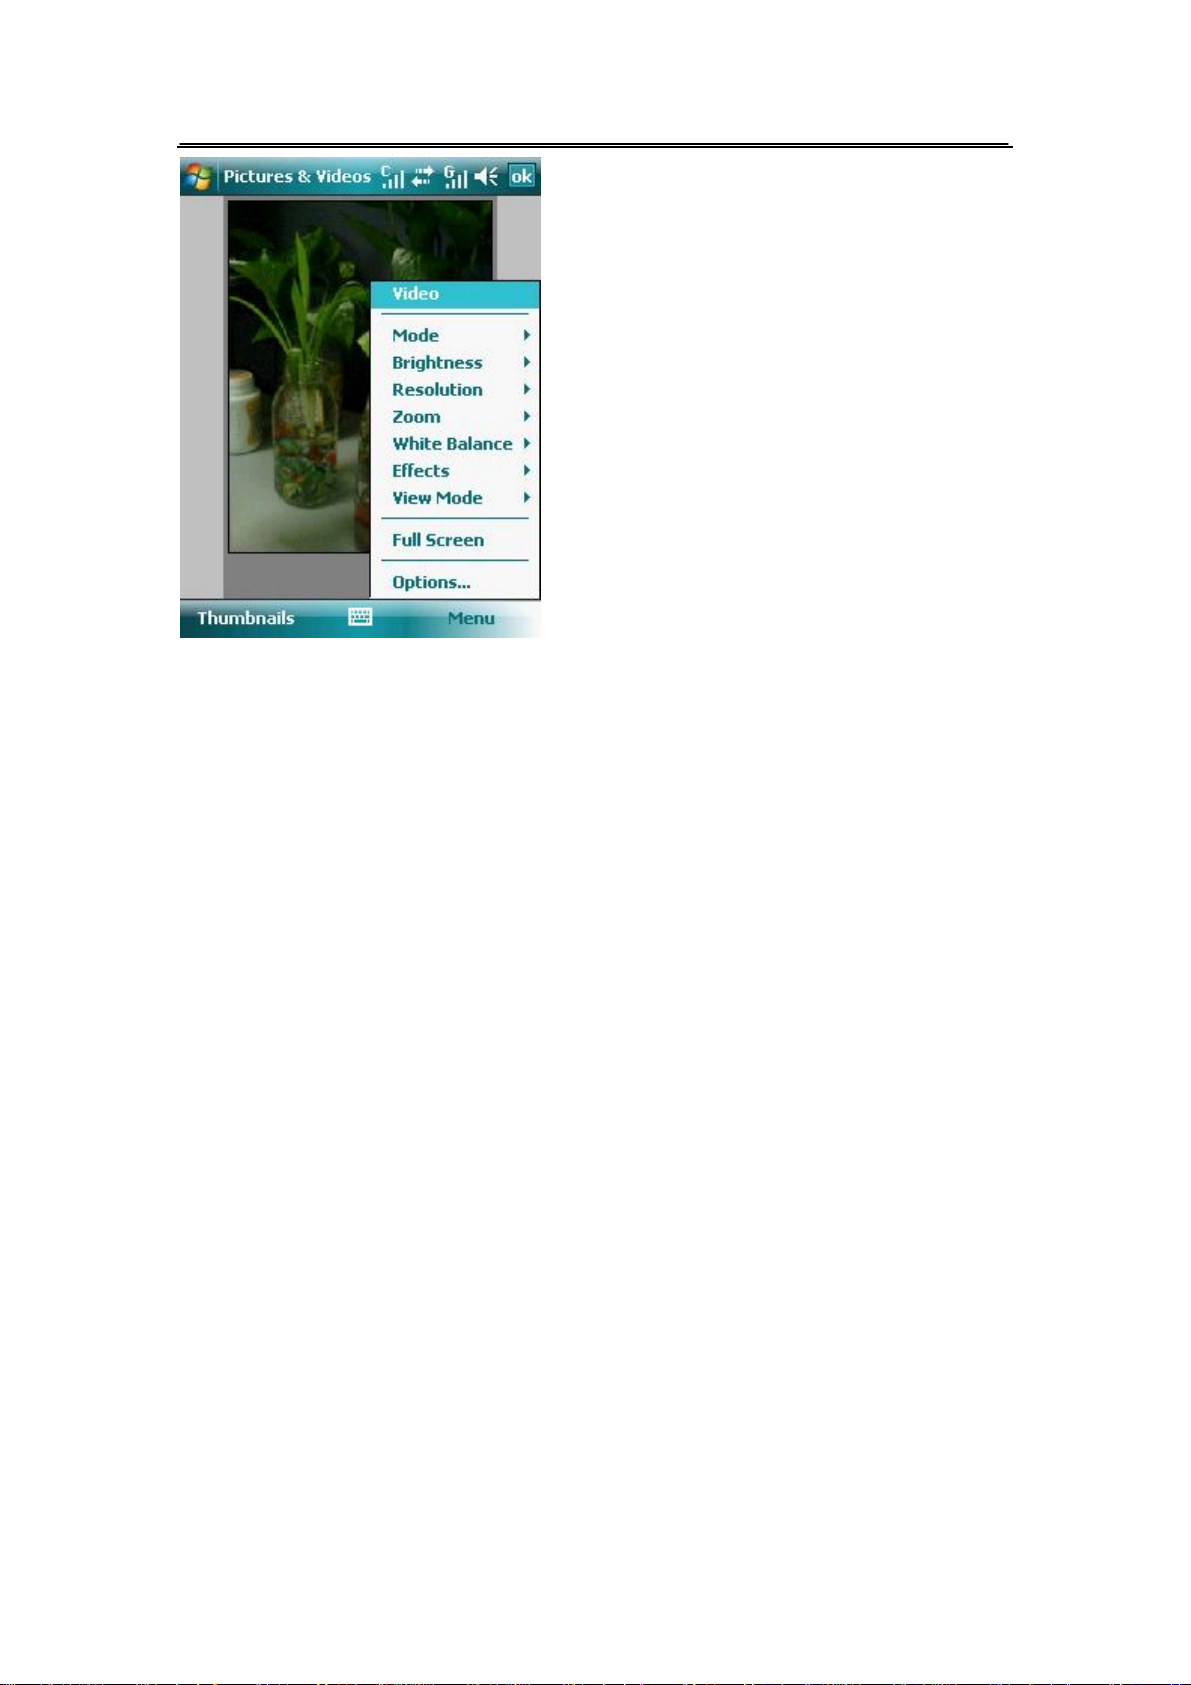
Video: To use the Video capture mode.
Mode: To select the capture mode.
Brightness: To adjust the brightness.
Resolution: To toggle among the different resolutions.
Zoom: To adjust the Zoom Ratio.
White Balance: To set the White Balance.
Effect: To set the special effect of photos.
Scene Mode: To set scene mode.
Full Screen: To enter Full Screen for capture.
Options: To input the filename prefix, select the memory of the files and the still image
compression level.
8.3. Video
l Tap Start > Programs >Pictures & Videos >Camera, tap Menu>Video
For the relevant operations, see Camera.
8.4. Windows Media Player Mobile
Tap Start >Windows Media
You can use Windows Media Player Mobile to play digital audio and video files that are stored on
your device or on a network, such as on a website.
8.4.1. To play media
Use the library on Windows Media Player to find and play songs, videos, and playlists that are
stored on your device or removable storage card.
1. If you are not on the library screen, tap Menu>Library.
Page 68 of 84 Copyright©2009 Spice
Page 70
2. On the library screen, tap the library arrow, then tap the media storage you want to use, for
example Storage Card.
3. In most cases, Windows Media Player automatically updates the library. However, you can
manually update the library to ensure that it contains new files that you recently copied to
your device or storage card. Tap Menu>Update Library to manually update the library list.
4. Select a category (for example My Music or My Playlist).
5. Tap and hold the item that you want to play (such as a song or artist name), then tap Play.
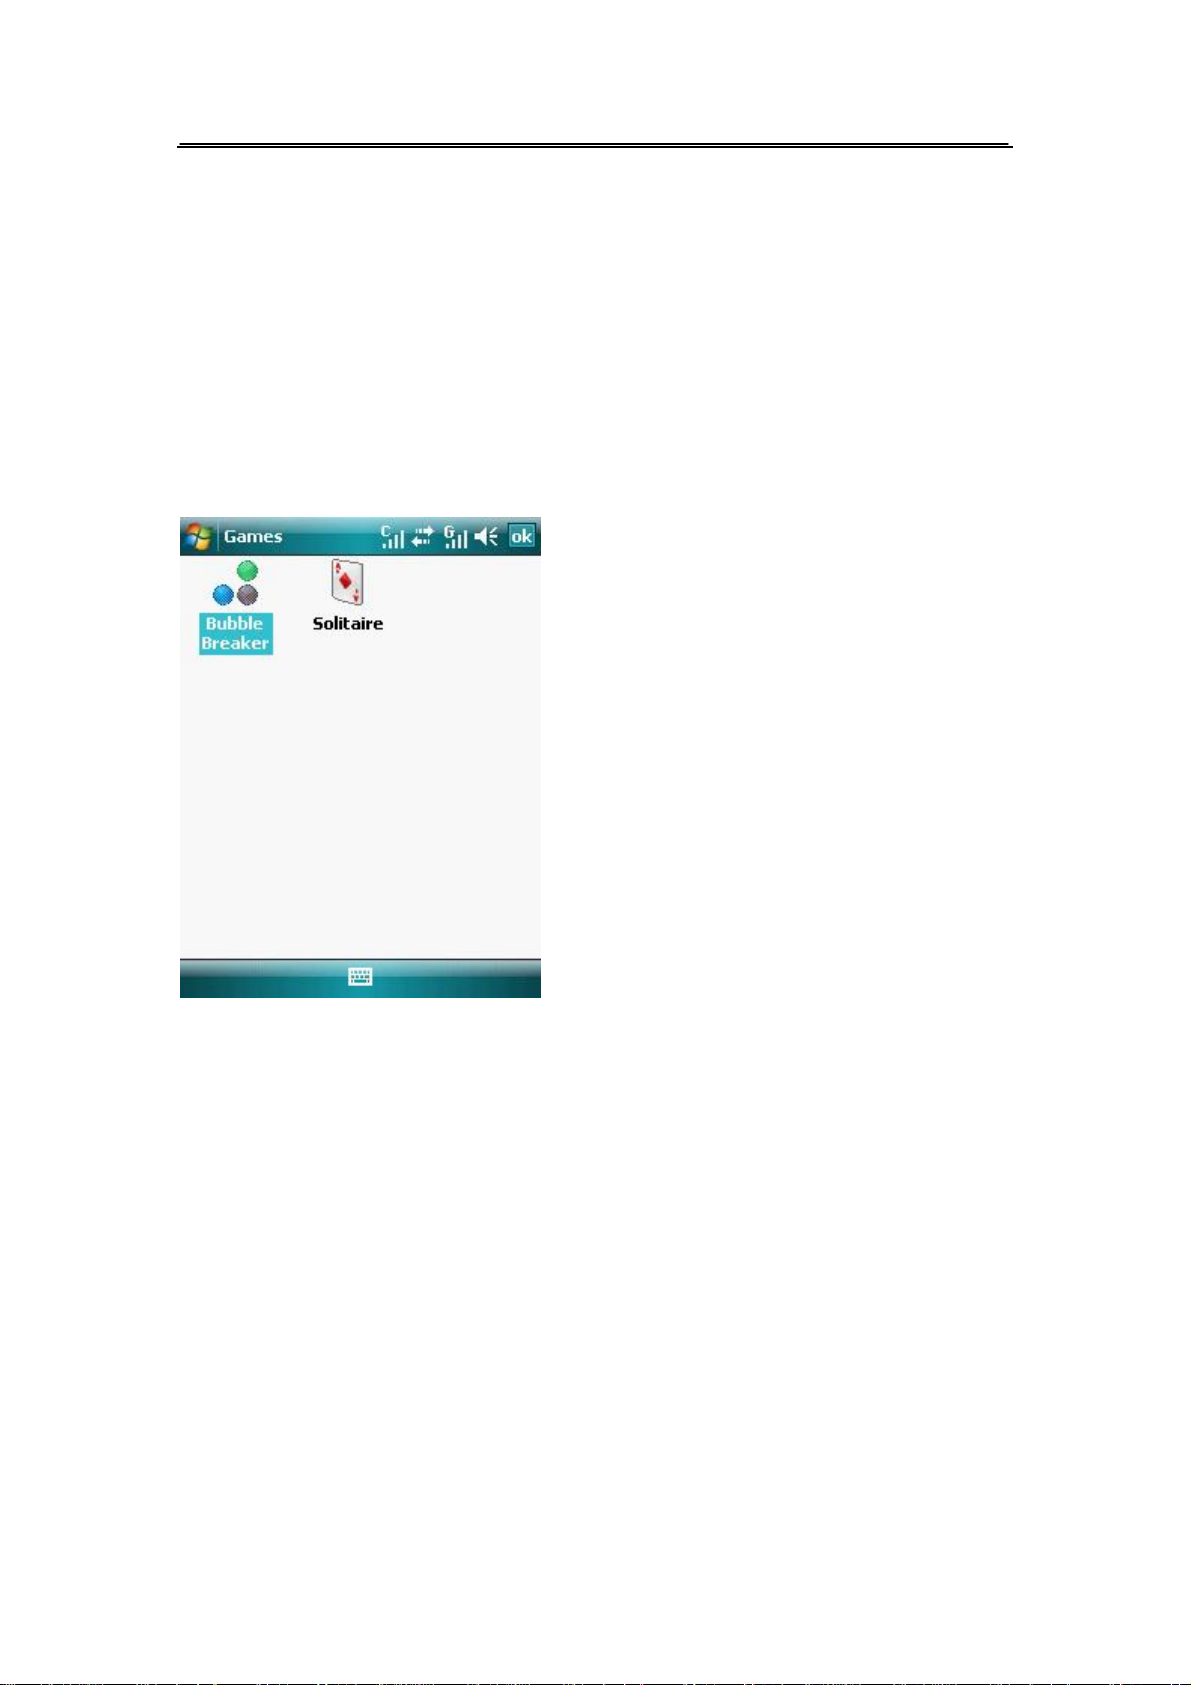
8.5. Games
l Tap Start > Programs > Games
8.6. Calculator
l Tap Start > Programs > Calculator
Perform basic arithmetic and calculation, such as addition, subtraction, etc.
Page 69 of 84 Copyright©2009 Spice
Page 71
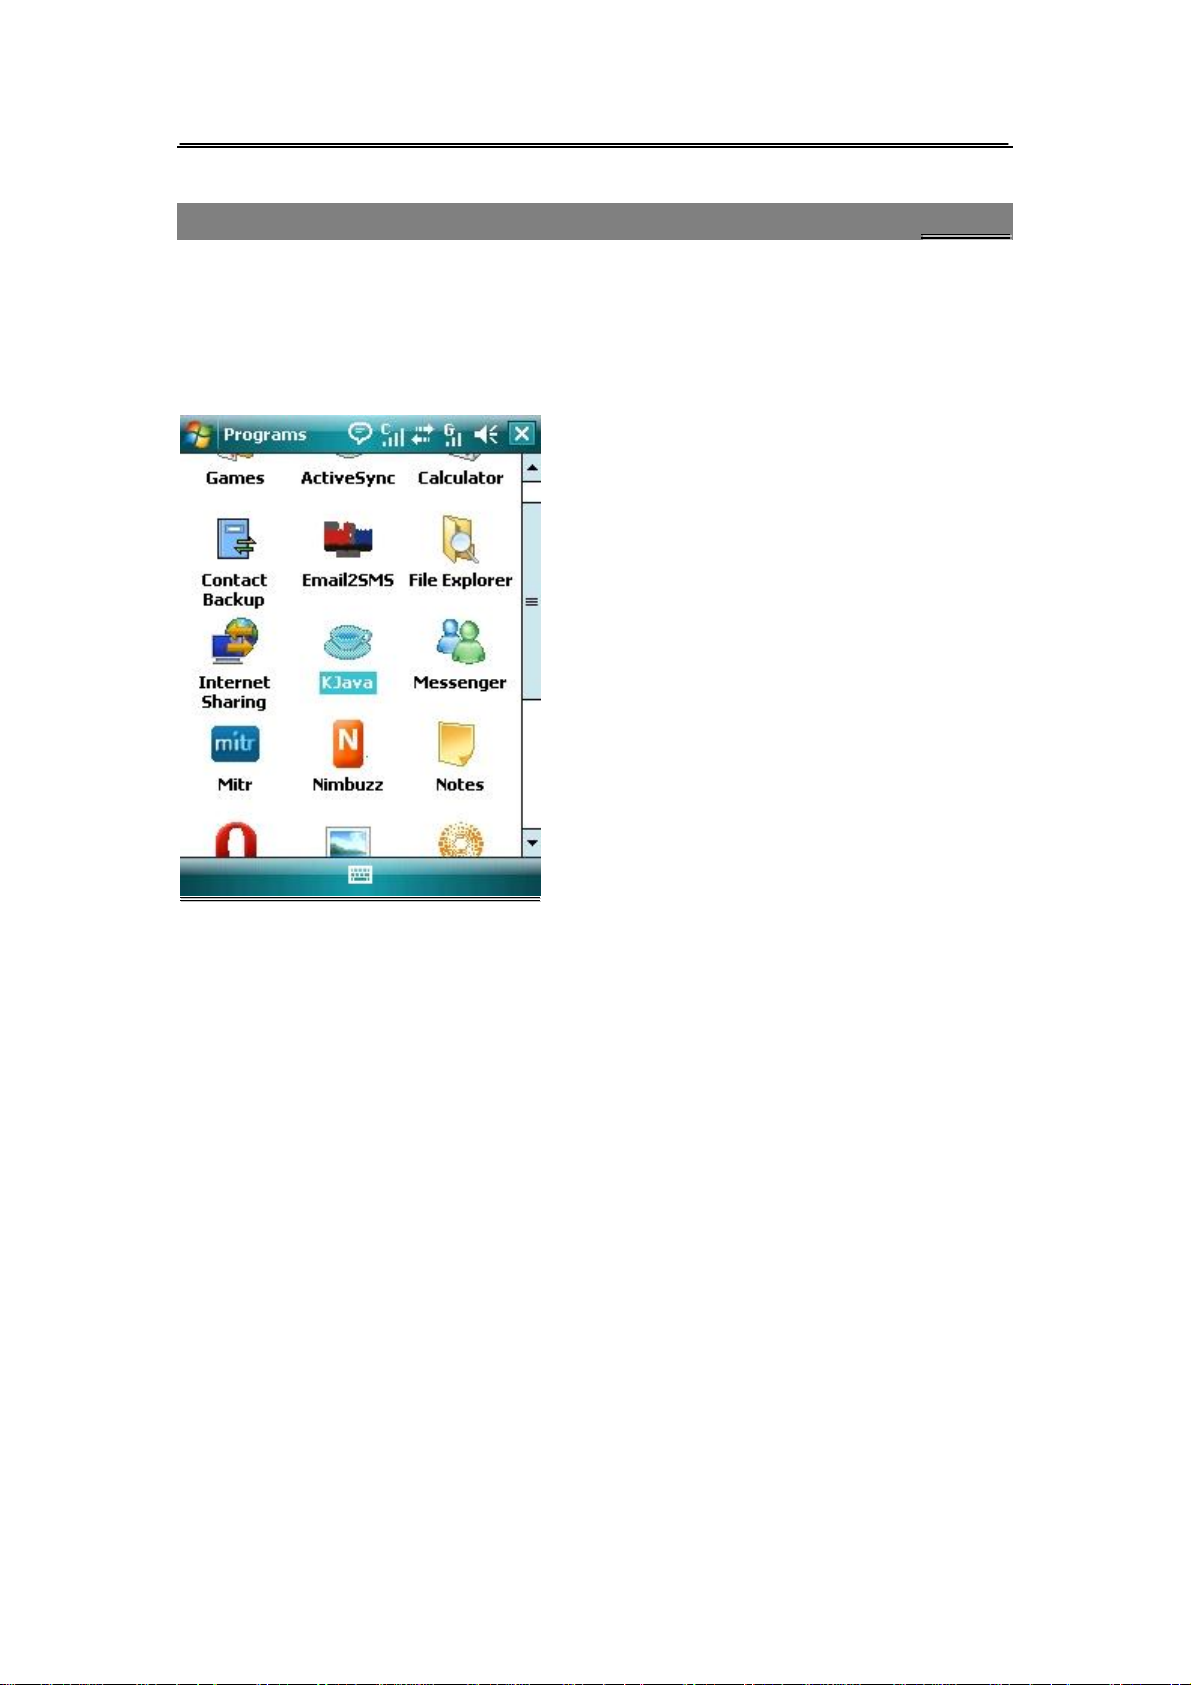
99.. KKJJaavvaa
l Tap Start > Programs > KJava
You can expand phone functionalities by installing KJava applications
You may download add-on applications with these two means:
l Download the applications to PC, and transfer them to the phone via USB config.
l Download the applications via WAP.
Page 70 of 84 Copyright©2009 Spice
Page 72

1100.. IInntteerrnneett SShhaarriinngg
Internet sharing connects your PC or notebook computer to the internet by using your device’s
data connection. You can choose to connect via USB.
To set up your device as a USB modem:
1. Tap Start>Programs>Internet Sharing
2. In the PC Connection select USB.
3. In the Network Connection list select the name of the connection that your device uses to
connect to the Internet.
4. Plug the cable between your device and the computer.
5. Tap Connect.
To end the internet connection:
On the Internet sharing screen, tap Disconnect.
Page 71 of 84 Copyright©2009 Spice
Page 73

1111.. UUssiinngg BBlluueettooootthh
Bluetooth is a short-range wireless communications technology. Devices with Bluetooth
capabilities can exchange information within a distance of about 10 meters without requiring a
physical connection. You can even beam information to a device in a deferent room, as long as it
is in the Bluetooth signal coverage range.
11.1. Bluetooth modes
Bluetooth on your device operates in three different modes:
l On: Bluetooth is turned on. Your device can detect other Bluetooth-enabled devices.
l Off: Bluetooth is turned off. In this mode, you can neither send nor receive information using
Bluetooth.
l Visible: Bluetooth is turned on, and all other Bluetooth-enabled devices can detect your
device.
Tip: By default, the Bluetooth is turned off. If you turn it on, then turn off your device,
Bluetooth also turns off. When you turn on your device again, Bluetooth automatically turns
on.
11.2. To turn Bluetooth on and make your device visible
1. On your device, tap Start>Settings>Connections tab>Bluetooth>Mode tab.
2. Select the Turn on Bluetooth and Make this device visible to other devices check boxes.
3. Tap ok.
11.3. Bluetooth partnerships
A Bluetooth partnership is a relationship that you create between your device and another
Bluetooth-enabled device in order to exchange information in a secure manner. Creating a
partnership between two devices involves entering a passcode again. Make sure that on the two
devices, Bluetooth is turned on and in visible mode.
To create a Bluetooth Partnership:
1. On your device, tap Start>Settings>Connections tab >Bluetooth.
2. On the device tab, tap Add a new device. Your device search for other Bluetooth devices and
display them in the box.
3. Tap the desired device name in the box.
4. Tap Next.
5. Wait for the paired device to accept the partnership. The receiving party needs to enter the
same passcode that you specified.
6. The name of the paired device is then displayed. You may edit and enter a new name for that
device.
Page 72 of 84 Copyright©2009 Spice
Page 74

7. Select the checkboxes of services that you want to use from the paired device.
8. Tap Finish.
To accept a Bluetooth partnership:
1. Ensure that the Bluetooth is turned on and in visible mode.
2. Tap Yes when prompted to establish a partnership with the other device.
3. Enter a passcode to establish a secure connection. The passcode must be between 1 and 16
characters.
4. Tap Next.
5. Tap Finish. You can now exchange information with the paired device.
11.4. Beam information using Bluetooth
You can beam information, such as contacts, calendar items, and tasks, as well as files from your
device to your computer or to another Bluetooth enabled device.
Tip: If your computer does not have built-in Bluetooth capability, you need to connect and use a
Bluetooth adapter.
To beam information from your device to a computer:
1. Turn on Bluetooth on your device, and make your device visible.
2. Your also need to set Bluetooth on your computer to visible mode.
3. Create a Bluetooth partnership between the two devices. After a partnership has been created
successfully, your computer is ready to receive Bluetooth beams.
4. On your device, you can select an item to beam, the item can be an appointment in your
calendar, a task, a contact card or a file.
5. To beam a contact, tap Menu>Send Contact>Beam. To beam other types of information, tap
Menu>Beam [type of item].
6. Tap the device name to which you want to send the beam.
Tip: If the computer or the device you want to beam to does not appear in your device’s Bluetooth
list, make sure that its Bluetooth is turned on and set to visible mode.
1122.. RReeuutteerrss
Reuters India gives you the latest India, World and Business news and more. Also, get the latest
stock market information along with tools like the currency converter and weather in your city on
your mobile phone.
Tap Start > Programs > Reuters
Page 73 of 84 Copyright©2009 Spice
Page 75
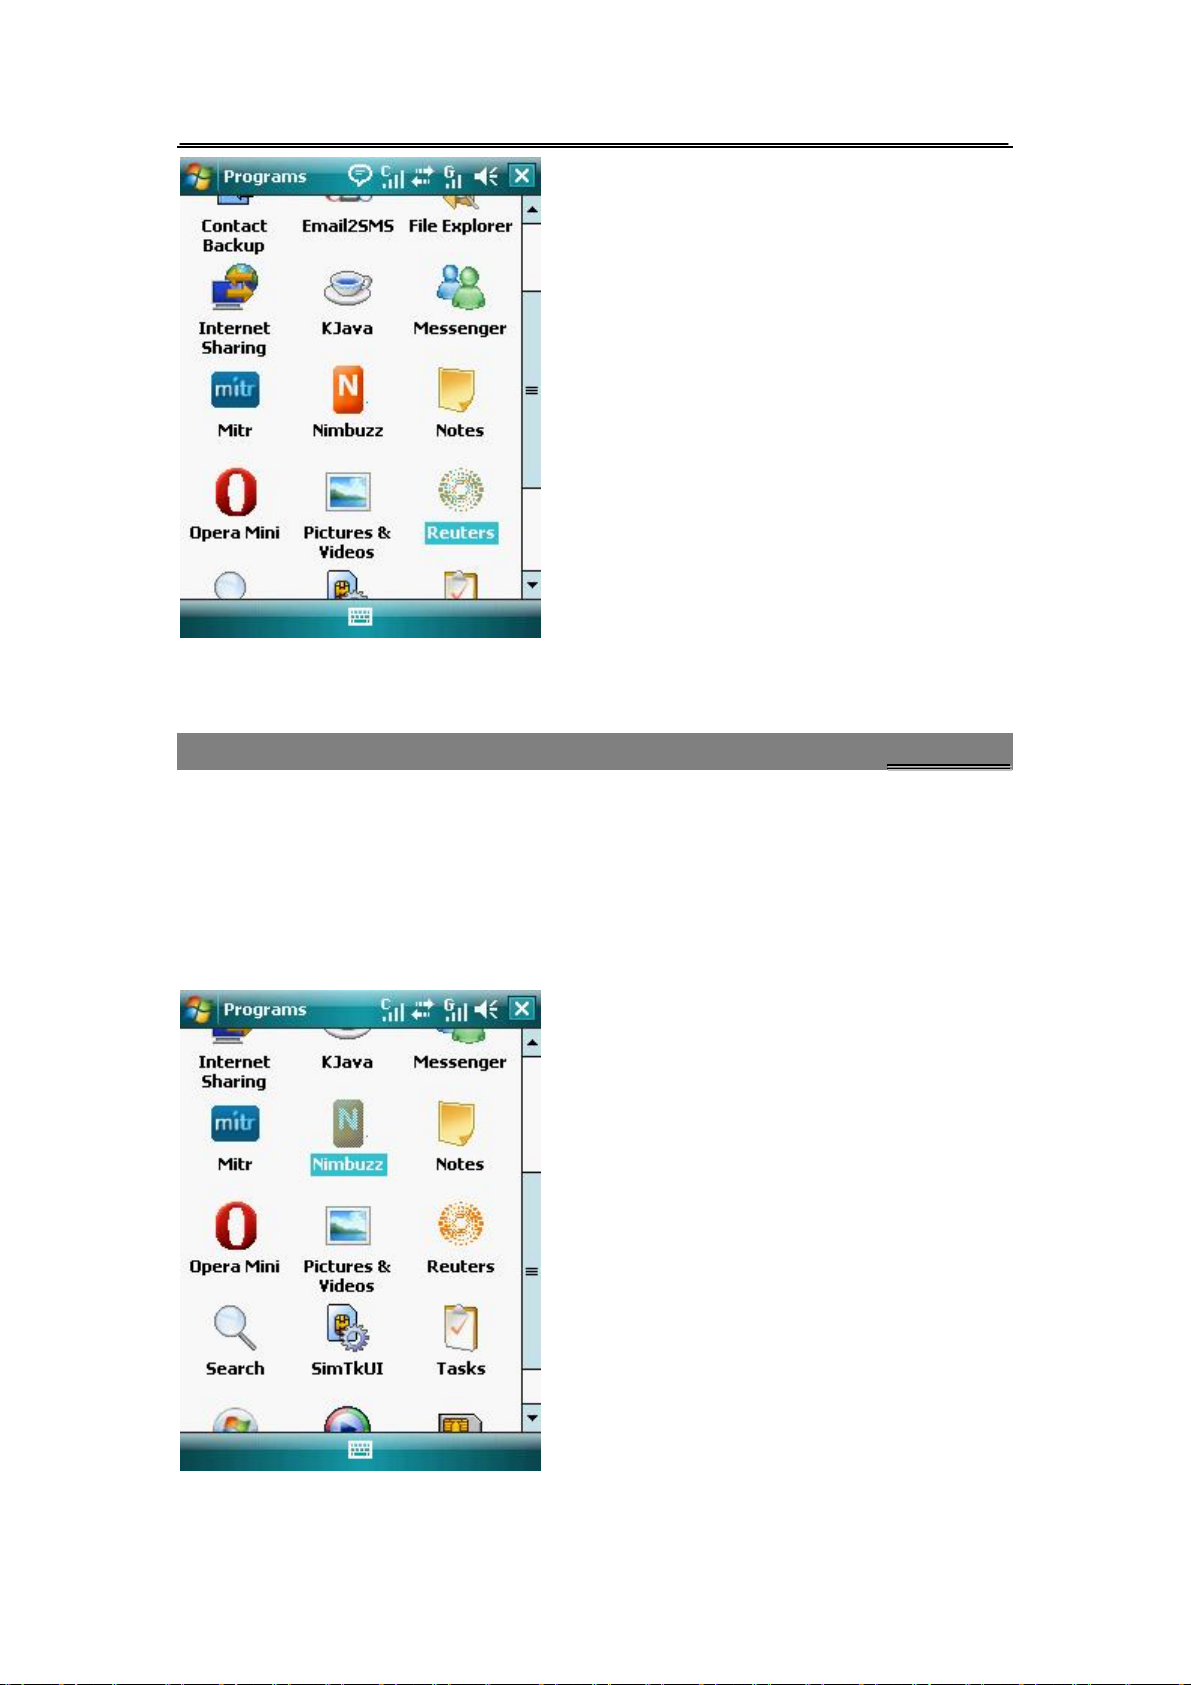
Tip: Please ensure that you have GPRS settings in your phone to open Reuters. Contact your
operator for GPRS settings.
1133.. NNiimmbbuuzzzz
Nimbuzz, another path-breaking innovation is available exclusively to the users of Spice Mobiles.
Nimbuzz is a common IM platform that allows one to chat, message and send files on the move.
This service is common for most of the commonly used IM portals including skype, MSN, yahoo,
ICQ, AIM, Google talk – one log-in, one contact list for all accounts.
Tap Start > Programs > Nimbuzz
Tip:Please check your GPRS settings before accessing Nimbuzz.
Page 74 of 84 Copyright©2009 Spice
Page 76
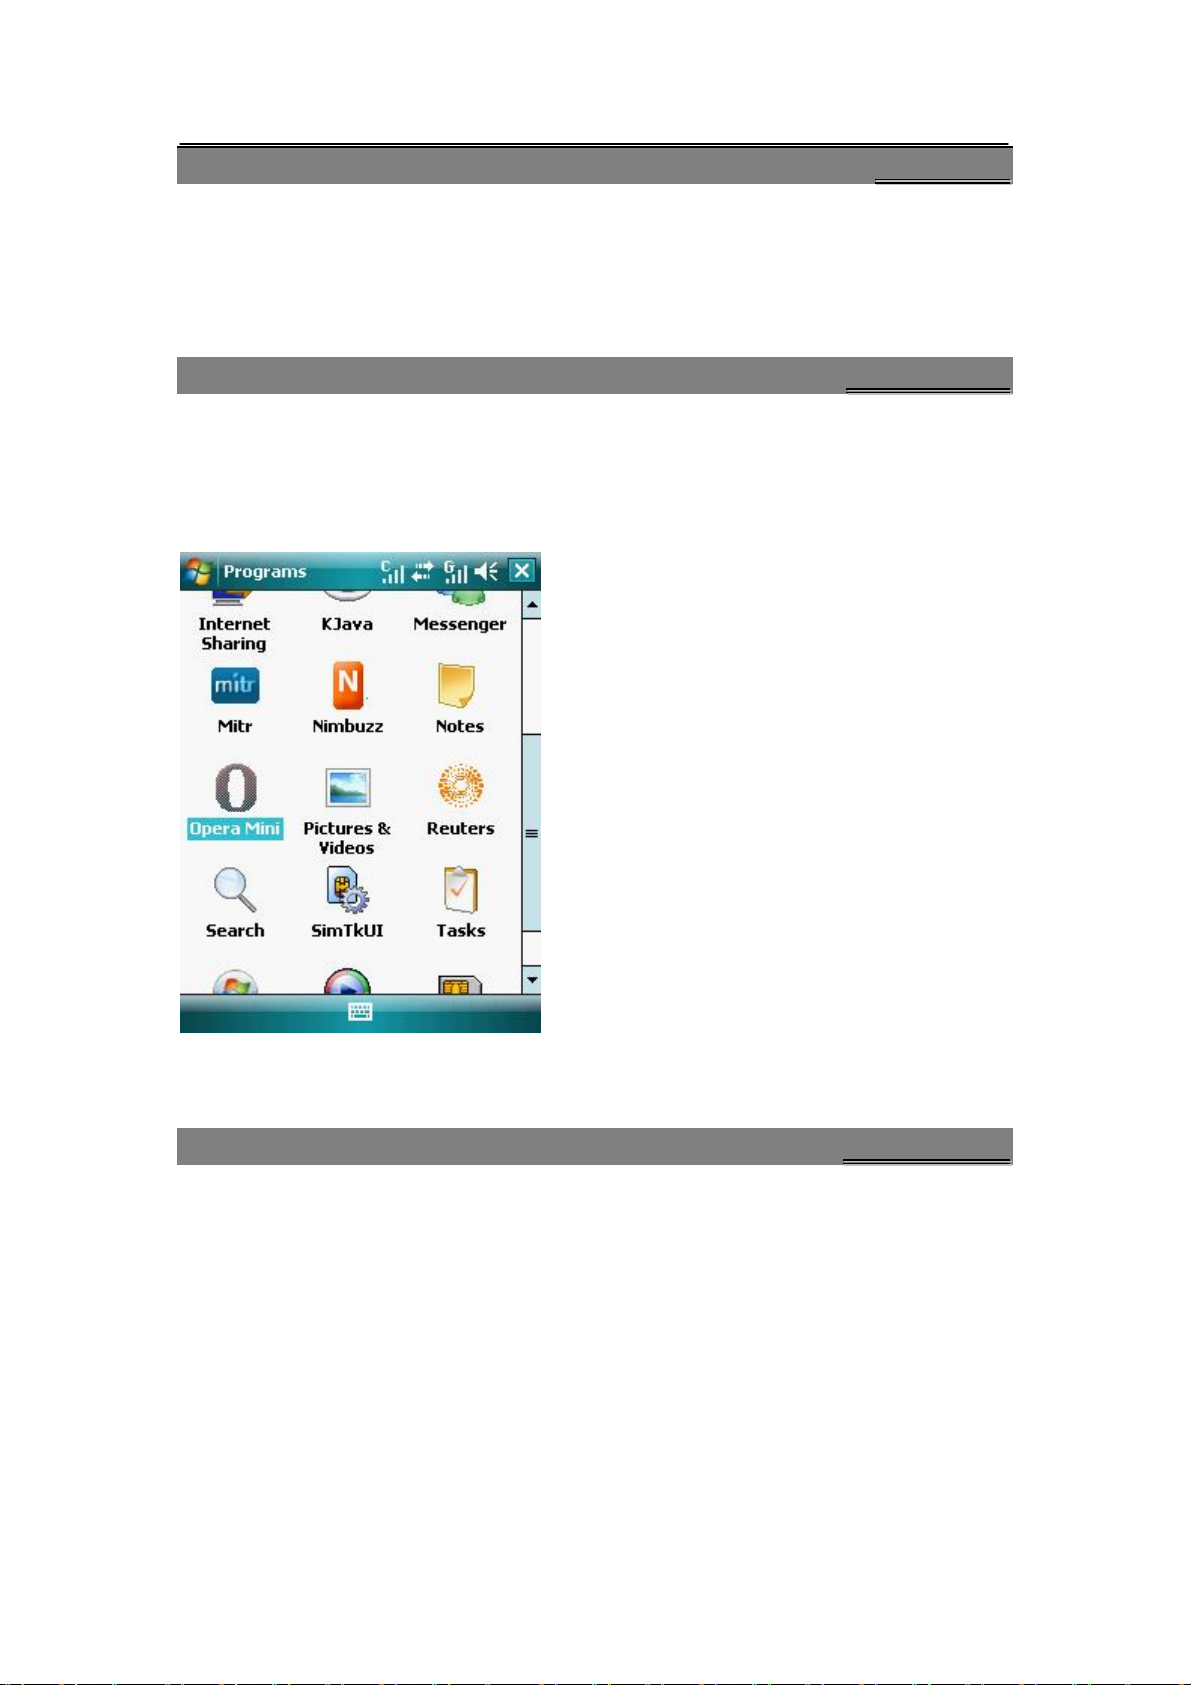
1144.. SSTTKK//UUTTKK
If your SIM card supports STK, you may use the corresponding value-added services.
Tap Start > Programs > SimTKUI
If your UIM card supports UTK, you may use the corresponding value-added services.
Tap Start > Programs ,the screen will display the corresponding functions.
1155.. OOppeerraa MMiinnii
Opera Mini is a fast and compact web browser that allows you to access the Internet on your
phone. With Opera Mini, you can use your cell phone to access web sites and content, including
your mail, community sites, news, blogs and more.
Tap Start > Programs > Opera Mini
Tip: Please ensure that you have GPRS settings in your phone to use Opera Mini. Contact your
operator for GPRS settings.
1166.. EEmmaaiill22SSMMSS
Emergic Email2SMS is a product of Netcore Solutions Pvt. Ltd. provided by Spice Mobiles.
Email2SMS allows you to receive email on your phone via SMS without GPRS. You can Read,
Reply, Compose and Forward your emails via SMS. This service is only available for Gmail,
Indiatimes and Corporate Account Holders. Spice Mobiles offers FREE subscription for one
month.
Tap Start > Programs > Email2SMS
Page 75 of 84 Copyright©2009 Spice
Page 77
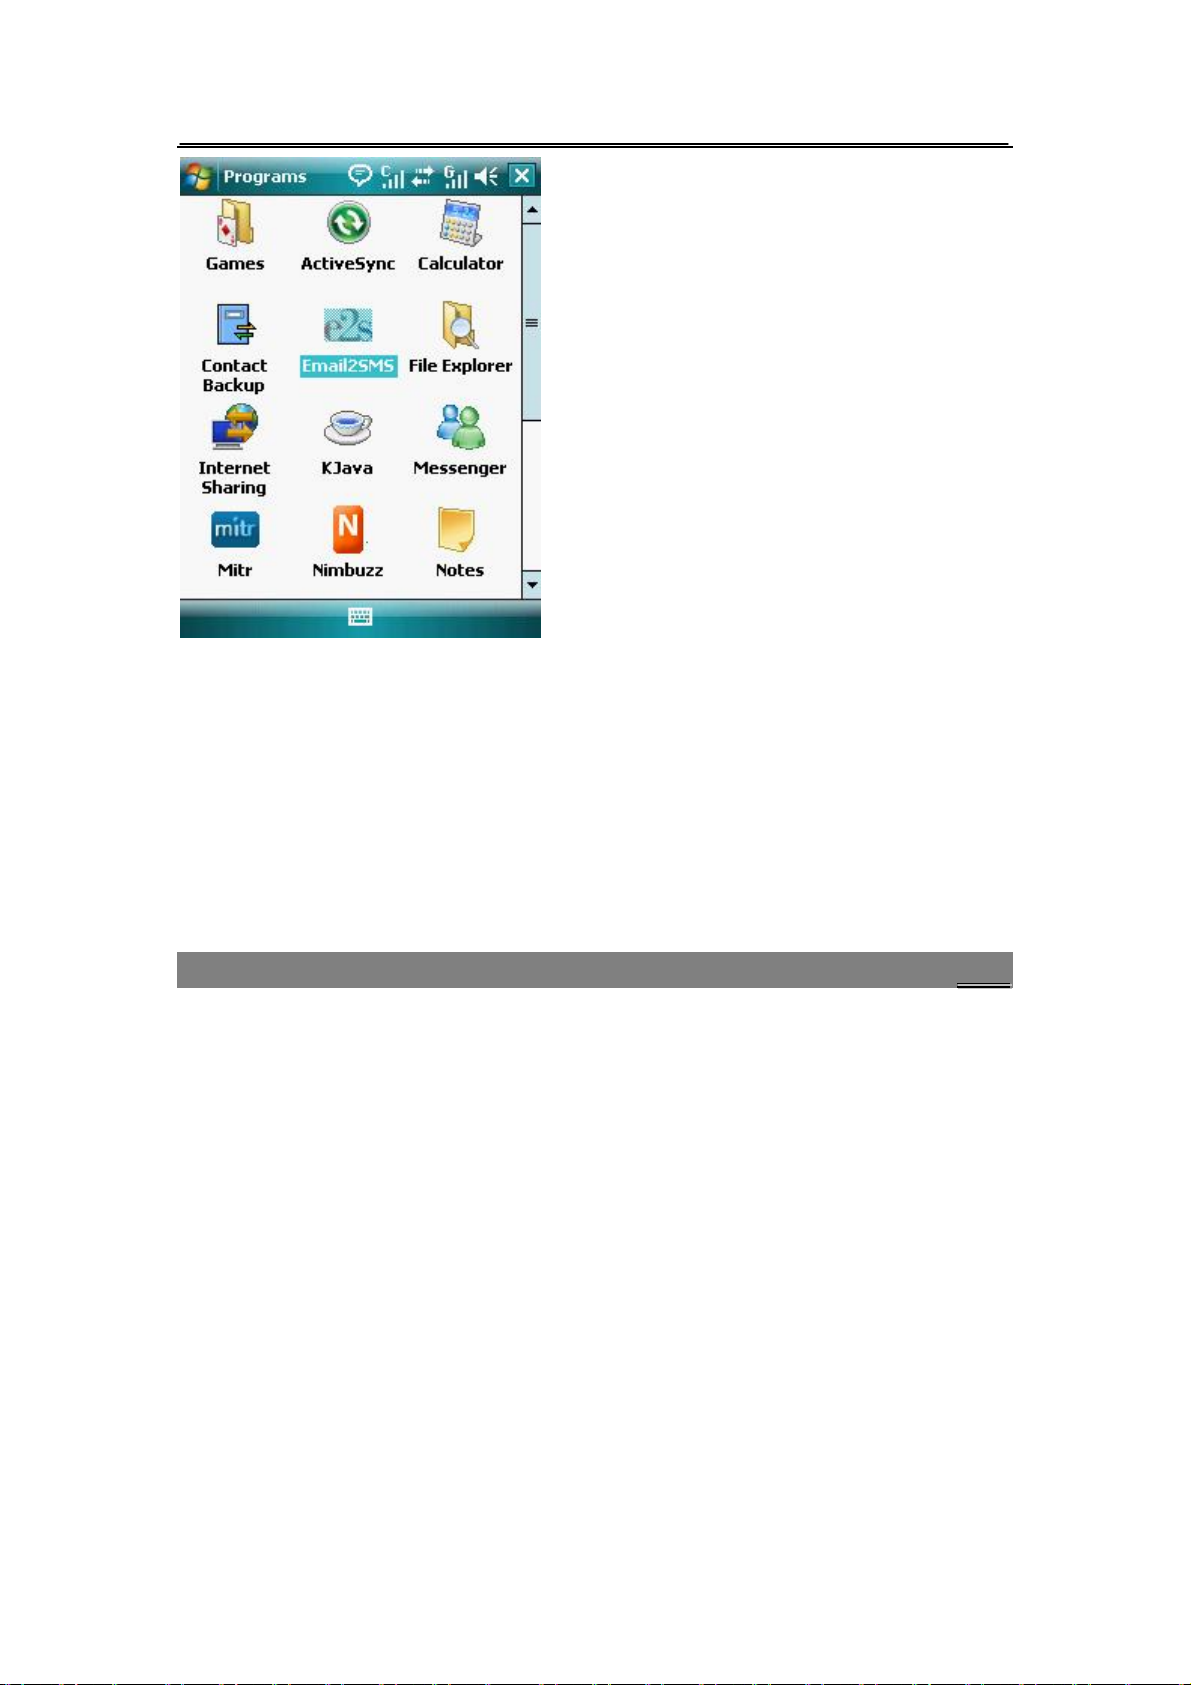
1. Just send SPICE START <Location> to 575758 to register for Email2SMS service.
For composing new mail type NEW <Receiver's Email-Id> S:<Subject> B:<Message> and send
it to 575758
2. For replying to any mail type REPLY <Message-Id> <Message> and send it to 575758
3. For replying to all in the mail type REPLY <Message-Id> <Message> and send it to 575758
4. For forwarding the mail type FWD <Message-Id> <Receiver's Email-Id> <Message> and
send it to 575758
5. For reading the remaining part of mail type READ <Message-Id> and send it to 575758
Tip: Message-Id is the number which you get at the end of SMS. i.e., 01,02,03,04.
1177.. MMiittrr
Mitr is a one stop shop for all kinds of applications suiting your lifestyle. It comes with few pre
loaded applications like Naukri.com, Jeevansathi.com and Sulekha.com. User can search and
download more applications from our server within Mitr.
Tap Start > Programs > Mitr
Page 76 of 84 Copyright©2009 Spice
Page 78
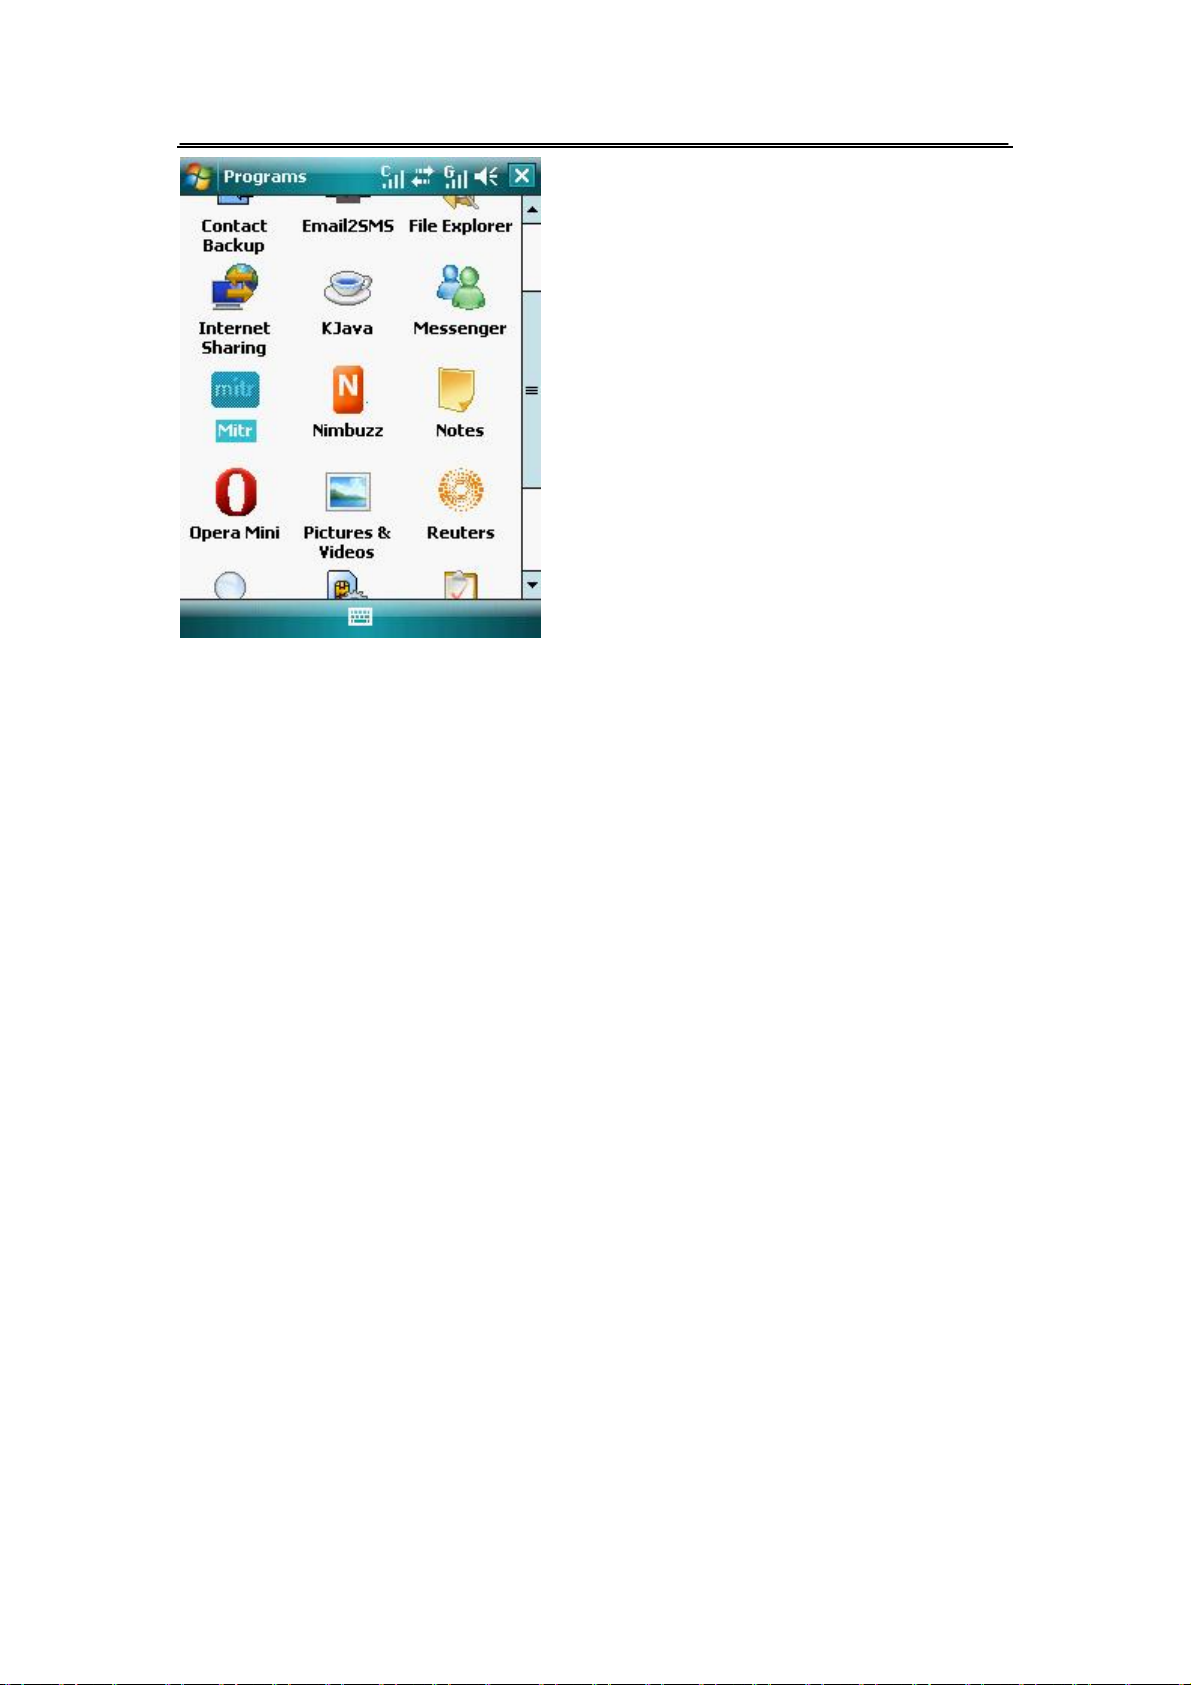
Tip: Please ensure that you have GPRS settings in your phone to use Mitr. Contact your operator
for GPRS settings.
Page 77 of 84 Copyright©2009 Spice
Page 79

1188.. AAbboouutt SSyynncchhrroonniizzaattiioonn
l ActiveSync synchronizes information on your device with information on your PC, such as
Outlook content .ActiveSync can also synchronize over a wireless or cellular network with
Microsoft Exchanger Server, if your company or service provider is running Microsoft
Exchanger Server with Exchange ActiveSync. When you Synchronize, ActiveSync compares
the information on your device with the information on your PC or exchange server, and
updates all data with recent changes.
l You can select and synchronize data in the following location using ActiveSync:
Contacts
Calendar
Email
Tasks
Notes
Favorites
Files
Media
Before you can synchronize information with pc, you must first install ActiveSync on your PC and
create a synchronization relationship between your device and the PC. You can install ActiveSync
from the getting started disc that comes with your PC. ActiveSync is already installed on your
device. If you lose your getting started CD, you can download the latest version of Microsoft
ActiveSync from the Microsoft’s Website (http://www.microsoft.com)
Once you have installed ActiveSync and setup a synchronization relationship, ActiveSync on the
PC recognizes your device when you connect it, and automatically transfers the synchronization
settings you specified on your device.
18.1. Synchronizing with Your PC
To synchronize your device with PC:
Follow the steps below to set up a synchronization to partnership:
1. Connect your device to your PC. The synchronization Setup Wizard automatically starts and
guides you to create a synchronization partnership. Click Next to proceed.
2. To synchronize your device with your PC, clear the Synchronize directly with a server
running Microsoft Exchange check box then click Next.
3. Select the information types that you want to synchronize then click Next.
4. Select or clear the Allow wireless data connections (such as MMS or Internet Calling) on
your device while it is connected to your computer checkbox according to your preference.
5. Click Finish.
When you finish the Wizard, Active Sync synchronizes your device automatically. Note that
support Outlook e-mails and other information will appear on your device after synchronization.
Page 78 of 84 Copyright©2009 Spice
Page 80
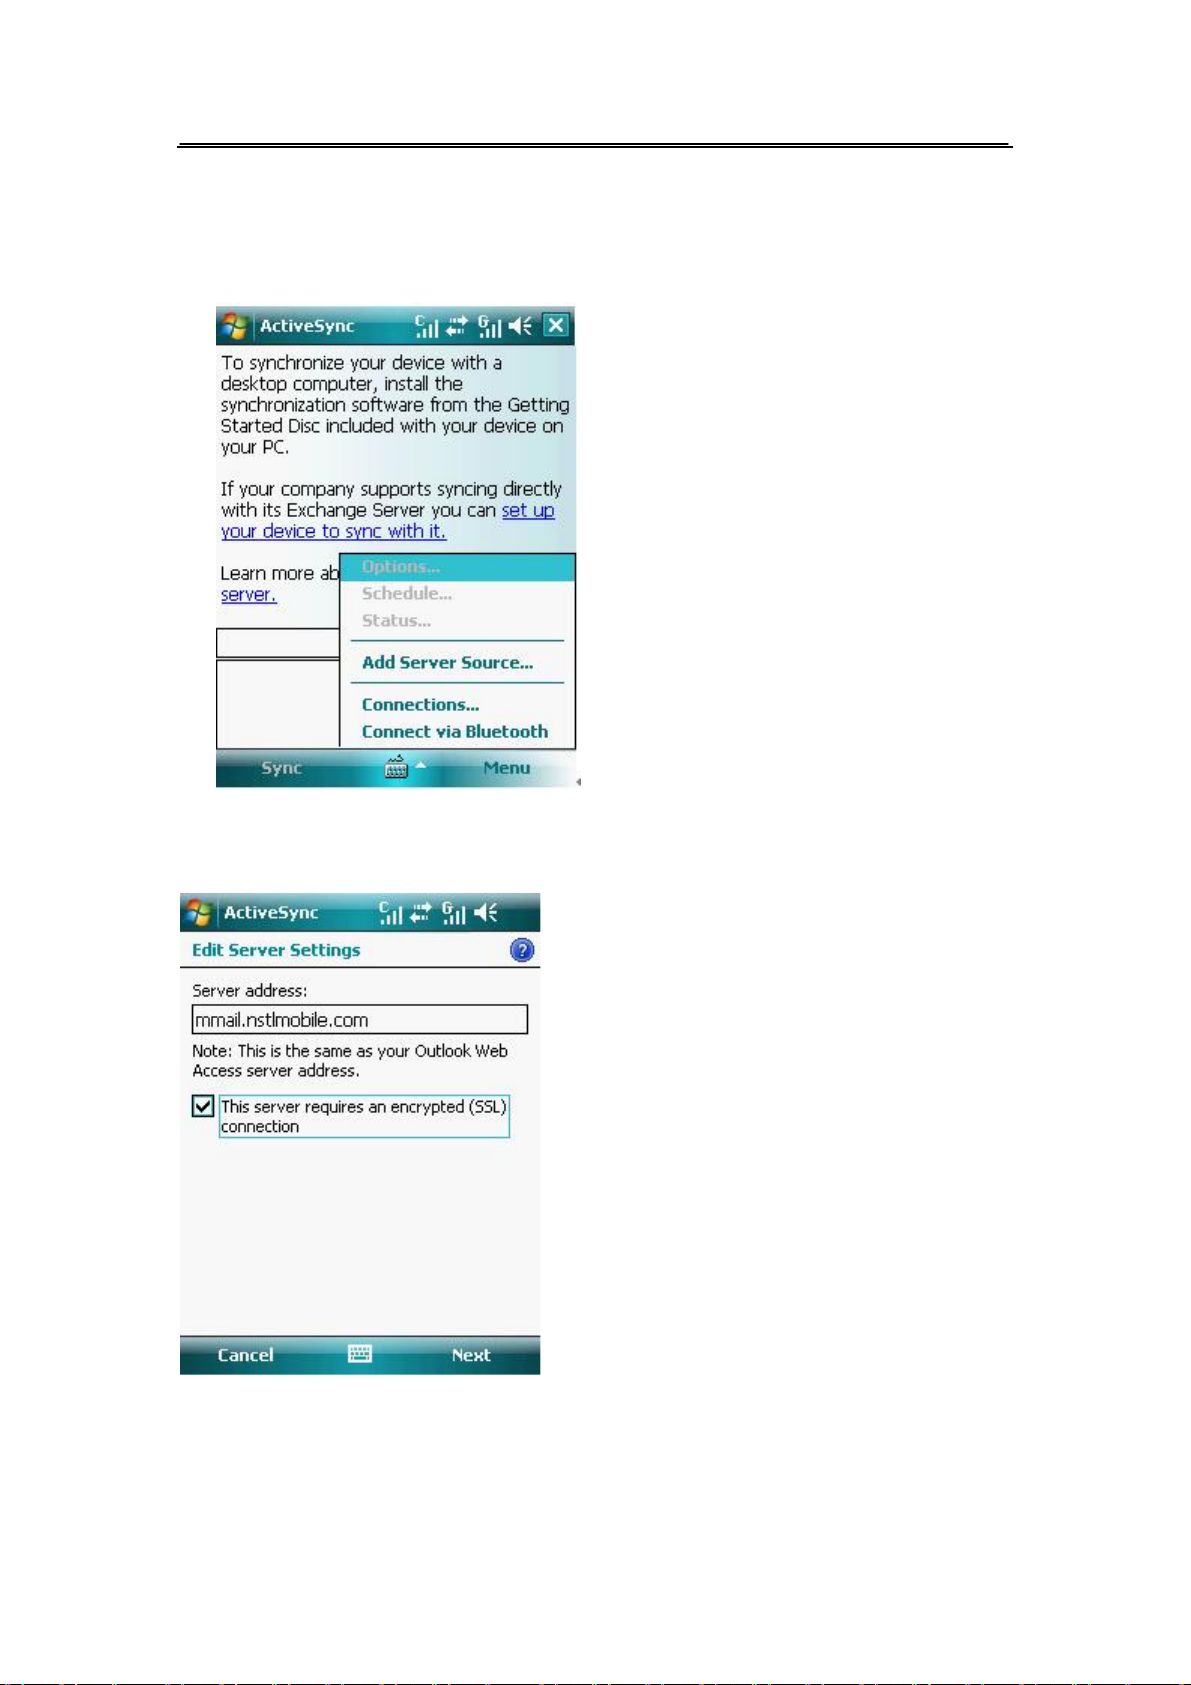
18.2. Synchronizing with Exchange Server
To synchronize your device with Exchange Server:
1. From the ActiveSync menu, tap Menu > Add Server Source.
2. In the Server Address field, input the name of the server running Exchange Server then tap
Next. If necessary tap the checkbox.
3. Input your name, password, and domain then tap Next.
Page 79 of 84 Copyright©2009 Spice
Page 81
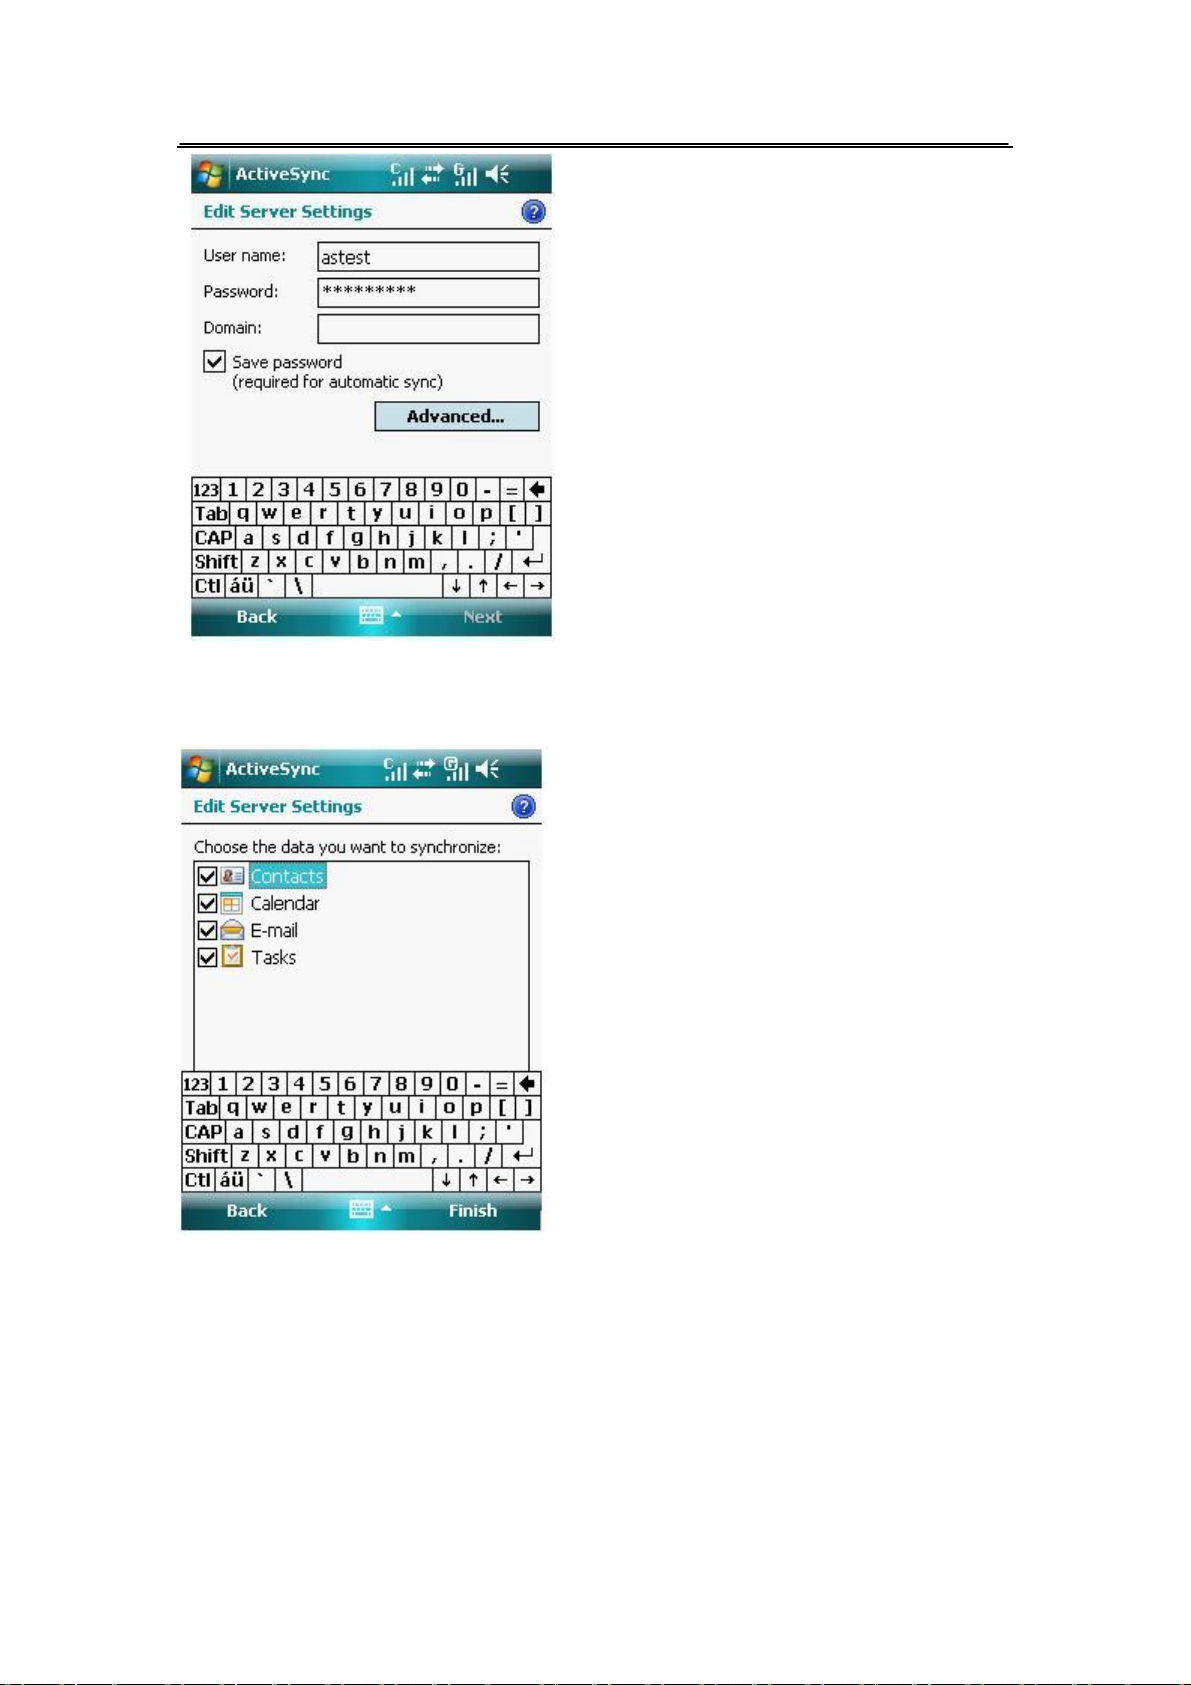
4. Tap the check boxes to select the data items that you want to synchronize with Exchange Server.
To change the available synchronization settings, select a data item then tap Settings. Tap Finish
when done.
5. Tap Sync to start the sync process.
Page 80 of 84 Copyright©2009 Spice
Page 82

1199.. FFiillee EExxpplloorreerr
l Tap Start > Programs >File Explorer.
You can manage your files and folders using File Explorer.
Page 81 of 84 Copyright©2009 Spice
Page 83

2200.. SSeeaarrcchhiinngg IInnffoorrmmaattiioonn
l Tap Start > Programs >Search
You can search files and other items stored in My Documents folder or on an installed
storage card of your memory.
Page 82 of 84 Copyright©2009 Spice
Page 84

2211..
l Use a dry soft cloth to wipe general dirt. For a large amount of dirt, use a soft towel soaked
with neutral scour and twisted to gently wipe the dirt and use a dry soft cloth to wipe the
phone.
l Do not use a hard cloth, benzene or thinner to wipe the phone, otherwise, the surface
of the phone will be scratched, change color or fade.
MMaaiinntteennaanncce
e
Page 83 of 84 Copyright©2009 Spice
Page 85

2222..
If any problem occurs in your phone, please refer to the help information in the table below. If the
problem continues, contact the dealer.
Problem
Unable to switch on
Unable to make a call
Communication
interrupted suddenly
l Is the battery power low? l Charge the battery.
l Is the battery inserted
l Is the phone outside of
l Is the phone number
l Are you in a place with
l Is there any object around
l Are you moving in high
Possible Causes Solutions
correctly?
the service area?
correct?
weak signal?
that obstructs signal
transmission?
speed during
conversation?
TTrroouubblleesshhoooottiinng
l Insert the battery
correctly.
l Move to a place where
signal can be received
strongly.
l Check that the number is
correct.
l Move to a place with
strong signal.
l Go to another place.
l The signal will interrupt
when the phone switch
between 2 cell station.
Please move in low
speed.
g
Unable to charge the
battery
Unable to respond to
taps
l Is the charger plugged to
the phone correctly?
l Is the power cable of the
charger disconnected
from the socket?
l Is the battery too old?
l Is the screen aligned
regularly?
l Plug the charger to the
phone correctly.
l Check the connection.
l Contact the seller to
replace the phone with a
new battery.
l Align the screen
2233.. AAfftteerr SSeerrvviicceess
For details, see the After Service Guide supplied with the phone.
Note: Spice does not take any responsibility of printing mistake in this User Manual.
Page 84 of 84 Copyright©2009 Spice
Page 86

 Loading...