

Page 1

Spice S-1200
User’s Manual
Page 2

II
Spice Mobiles Ltd. ©2010. All rights are reserved. No part of
this document may be reproduced without permission. All
trademarks and brand names mentioned in this publication
are property of their respective owners.
While all efforts have been made to ensure the accuracy of
all contents in this manual, we assume no liability for errors
or omissions or by statements of any kind in this manual,
whether such errors are omissions or statements resulting
from negligence, accidents, or any other cause. The
contents of this manual are subject to change without
notice.
Protect your environment! We strive to produce products in
compliance with global environmental standards. Please
consult your local authorities for proper disposal.
Note: User’s Manual is just to guide the user about
functionality of the phone. This should not be seen as any
certificate of technology. Some functions may vary due to
modifications and up gradations of software or due to
printing error.
© Copyright 2010
Page 3

III
Table of Contents
1. GETTING STARTED ..................................................................... 1
1.1 Getting to Know Your Phone........................................... 1
Front view ......................................................................... 1
Rear/Side views ................................................................. 2
Bottom/Side views.............................................................. 2
Keys/Buttons...................................................................... 3
1.2 Package Contents............................................................ 5
1.3 Installing the SIM Card and Battery ............................... 6
1.4 Charging the Battery....................................................... 9
1.5 Inserting the Memory Card ........................................... 10
2. USING YOUR PHONE................................................................. 11
2.1 Switching the Phone On and Off ................................... 11
2.2 Unlocking the Keypad ................................................... 11
2.3 Standby Mode ............................................................... 11
Status indicators in standby mode......................................12
2.4 Using the Main Menu..................................................... 13
Tips for operating the main menu ......................................13
The Main menu system......................................................13
2.5 Entering Text................................................................. 16
3. CALL FUNCTIONS...................................................................... 18
3.1 Making a Call................................................................. 18
3.2 Answering or Rejecting an Incoming Call..................... 19
3.3 Call Waiting................................................................... 19
Page 4

IV
3.4 Making a Conference Call.............................................. 19
Tips for Call Options..........................................................20
4. PHONEBOOK ............................................................................. 21
4.1 Quick Search ................................................................. 21
4.2 Search Contact.............................................................. 22
4.3 Add New Contact........................................................... 22
4.4 Copy All ......................................................................... 23
4.5 Delete All....................................................................... 23
4.6 Send All Contacts .......................................................... 23
4.7 Caller Groups................................................................. 24
4.8 Extra Numbers .............................................................. 25
4.9 Phonebook Settings ...................................................... 25
5. MESSAGE .................................................................................. 26
5.1 Messages....................................................................... 26
Writing/Sending messages.................................................26
Inbox ...............................................................................28
Outbox .............................................................................28
Sent messages..................................................................28
Drafts...............................................................................28
Templates .........................................................................28
Message Settings ..............................................................28
5.2 Email ............................................................................. 30
Setup Email Account..........................................................30
Send and Receive..............................................................30
Write Email.......................................................................30
Page 5

V
Inbox/Outbox/Sent/Drafts/Templates .................................31
Clear mail box...................................................................31
Delete marked Emails........................................................31
Templates .........................................................................31
5.3 Broadcast Message ....................................................... 31
5.4 Voice mail number ........................................................ 32
6. CALL HISTORY .......................................................................... 33
6.1 All Calls.......................................................................... 33
6.2 Dialled Calls................................................................... 34
6.3 Missed Calls................................................................... 34
6.4 Received Calls ............................................................... 34
6.5 Delete Call Logs............................................................. 35
6.6 Call Time ....................................................................... 35
6.7 Call Cost ........................................................................ 35
6.8 SMS Counters................................................................ 35
6.9 Data Counters ............................................................... 35
7. SETTINGS ................................................................................. 37
7.1 User profile.................................................................... 37
7.2 Phone setup .................................................................. 38
General.............................................................................38
Display settings.................................................................38
7.3 Bluetooth setup............................................................. 38
7.4 Call setup ...................................................................... 40
Call waiting.......................................................................40
Call divert .........................................................................41
Page 6

VI
Call barring .......................................................................41
Speed dial.........................................................................42
Caller ID ...........................................................................42
Call time reminder.............................................................42
Closed user group .............................................................43
Background sound.............................................................43
7.5 Network Setup .............................................................. 43
Network selection..............................................................43
Preferences.......................................................................43
GPRS connection...............................................................43
7.6 Security setup ............................................................... 43
SIM Lock ..........................................................................44
Phone Lock.......................................................................44
Auto Keypad Lock..............................................................44
Change Password..............................................................44
7.7 Restore factory settings................................................ 44
8. MEDIA CENTER ......................................................................... 45
8.1 Image Viewer................................................................ 45
8.2 Media Player.................................................................. 46
8.3 Sound Recorder............................................................. 47
8.4 FM Radio ....................................................................... 48
8.5 Schedule FM record....................................................... 49
8.6 Photo Editor .................................................................. 49
8.7 Sound effects ................................................................ 50
8.8 Fun & Games ................................................................. 50
9. FILE MANAGER ......................................................................... 53
Page 7

VII
9.1 Phone ............................................................................ 53
9.2 Memory Card................................................................. 53
10. DIGITAL CAMERA ................................................................... 54
10.1 Introduction................................................................ 54
10.2 Getting started with your camera............................... 60
Taking your first photo ......................................................60
Scene ...............................................................................60
Smart Scene .....................................................................61
Macro...............................................................................61
Flash ................................................................................61
Anti-Shake........................................................................61
Self Portrait.......................................................................61
Smile Detection.................................................................62
Face Detection ..................................................................62
Zoom in/out......................................................................62
Burst & M-Burst ................................................................62
Panorama .........................................................................63
Frame...............................................................................63
Recording your first video..................................................64
Recording Voice Memo ......................................................64
10.3 Camera/Video Settings ............................................... 64
Camera/Video Menu..........................................................64
10.4 Album.......................................................................... 68
View photos/videos on the screen ......................................68
Viewing M-Burst Photos.....................................................68
Listening to Voice Memo....................................................68
Viewing Photos /Videos on your TV ....................................69
Page 8

VIII
Zooming in/out during viewing photos................................69
Deleting photos/videos ......................................................69
Transferring Photos/Videos to your PC................................70
Using the Album Menu ......................................................70
10.5 Camera Settings.......................................................... 72
Setup Menu ......................................................................72
PictBridge Print (PTP) ........................................................73
11. ORGANIZER ............................................................................ 75
11.1 Calendar...................................................................... 75
11.2 Tasks ........................................................................... 76
11.3 Alarm........................................................................... 76
11.4 World Clock................................................................. 77
12. EXTRA ..................................................................................... 78
12.1 Calculator.................................................................... 78
12.2 Currency Converter ..................................................... 78
12.3 Stopwatch ................................................................... 78
13. SERVICES................................................................................ 79
13.1 STK (SIM Tool Kit)....................................................... 79
13.2 Internet....................................................................... 79
13.3 Data Account............................................................... 82
GSM data..........................................................................82
GPRS................................................................................82
14. Shortcuts ................................................................................ 83
15. Fun Spice ................................................................................ 84
15.1 SpiceGang ................................................................... 84
Page 9

IX
15.2 Opera Mini................................................................... 84
15.3 Reuters........................................................................ 84
15.4 Email2SMS .................................................................. 84
15.5 Nimbuzz ...................................................................... 85
15.6 Ngpay.......................................................................... 85
15.7 Mgurujee..................................................................... 86
15.8 Cricket Updates........................................................... 86
15.9 Free_SMS .................................................................... 86
15.10 Ibibo.......................................................................... 86
15.11 Job Search................................................................. 87
15.12 Mobile Tracker .......................................................... 87
16. TROUBLESHOOTING ............................................................... 88
APPENDIX..................................................................................... 91
A.1 General Information ..................................................... 91
Battery care......................................................................91
Care and maintenance.......................................................91
Product care .....................................................................91
A.2 Important Safety Information ...................................... 93
Access codes.....................................................................93
Radio frequency energy.....................................................93
Specific Absorption Rate (SAR) information.........................93
Electronic devices..............................................................94
Pacemaker........................................................................94
Hearing aids .....................................................................95
Aircraft .............................................................................95
Page 10

X
Potentially explosive atmospheres ......................................95
Driving .............................................................................95
Disposal of your old appliance............................................96
A.3 WEEE Notice.................................................................. 96
A.4 Emergency Calls............................................................ 97
A.5 Out of Warranty List ..................................................... 97
Page 11
1
1. GETTING STARTED
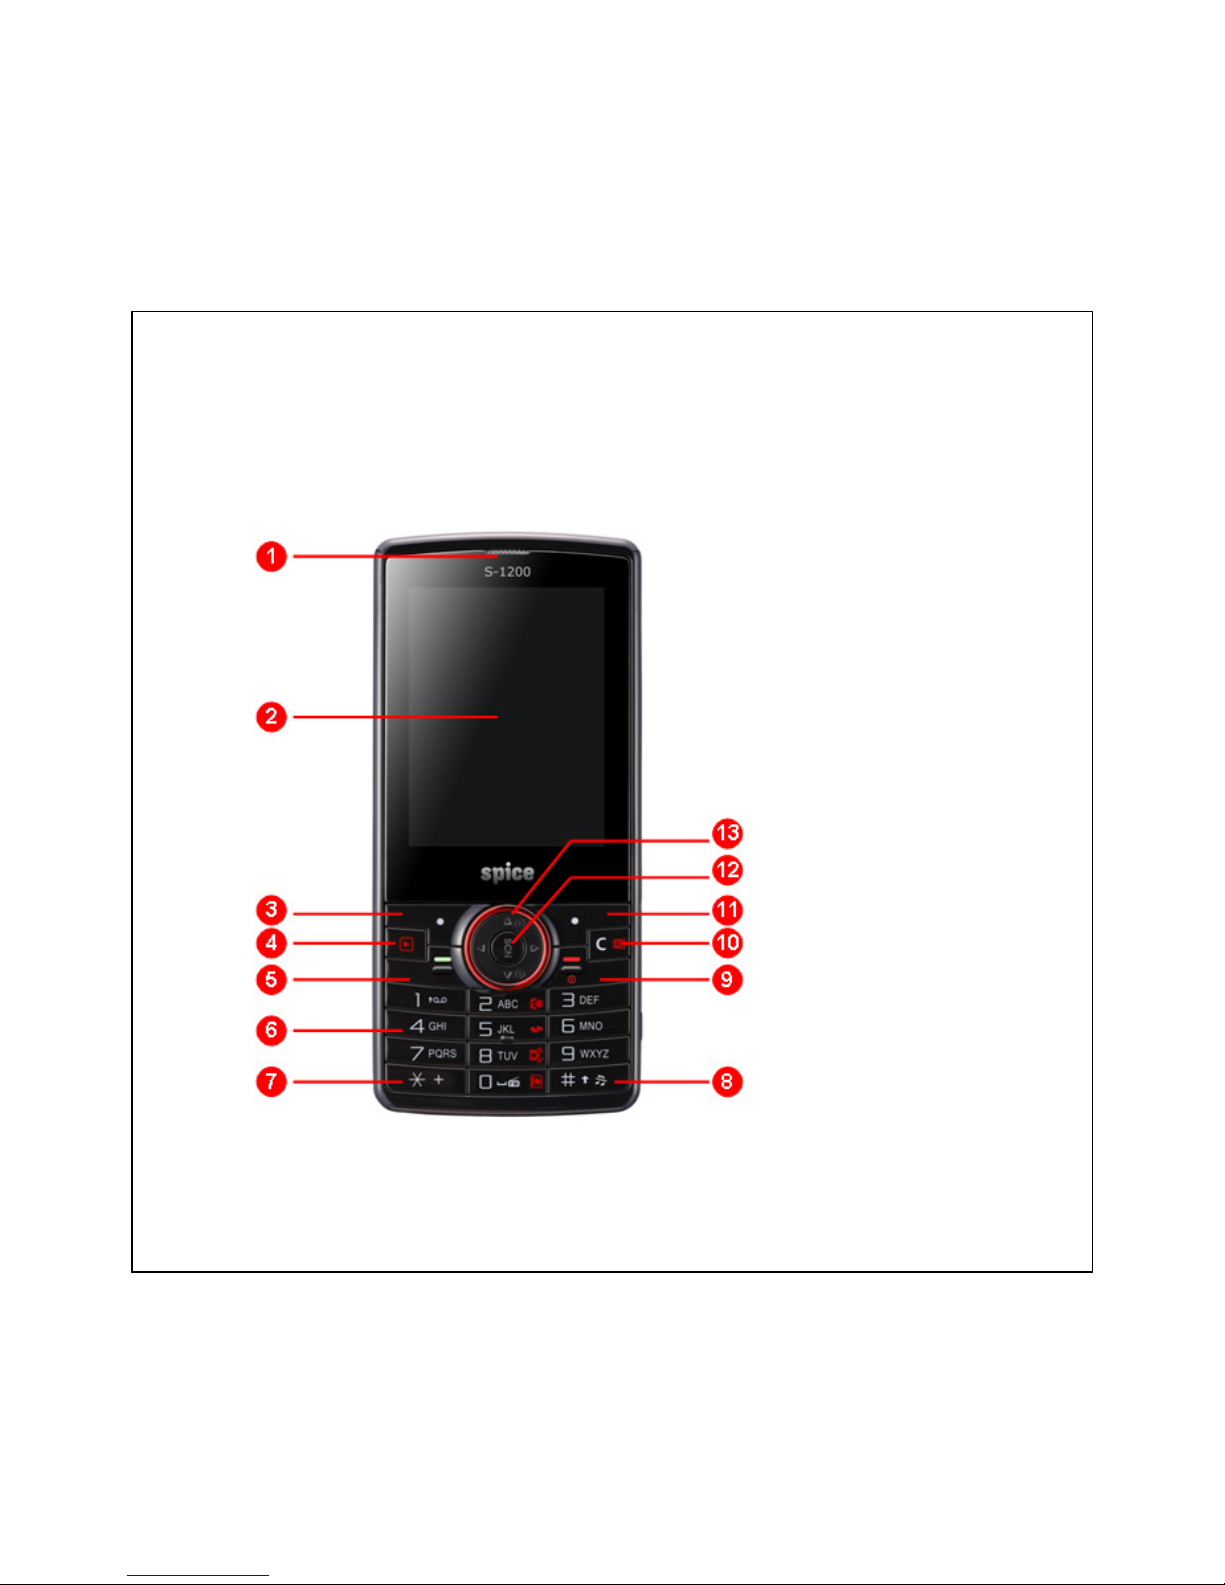
1.1 Getting to Know Your Phone
Front view
1. Earpiece
2. Main display
3. Left soft key
4. Playback key
5. Talk/Send key
6. Numeric keys
7.
*
key
8. # key
9. Power on/End key
10. Clear/Delete key
11. Right soft key
12. Center selection key
13. Navigation keys
Page 12
2
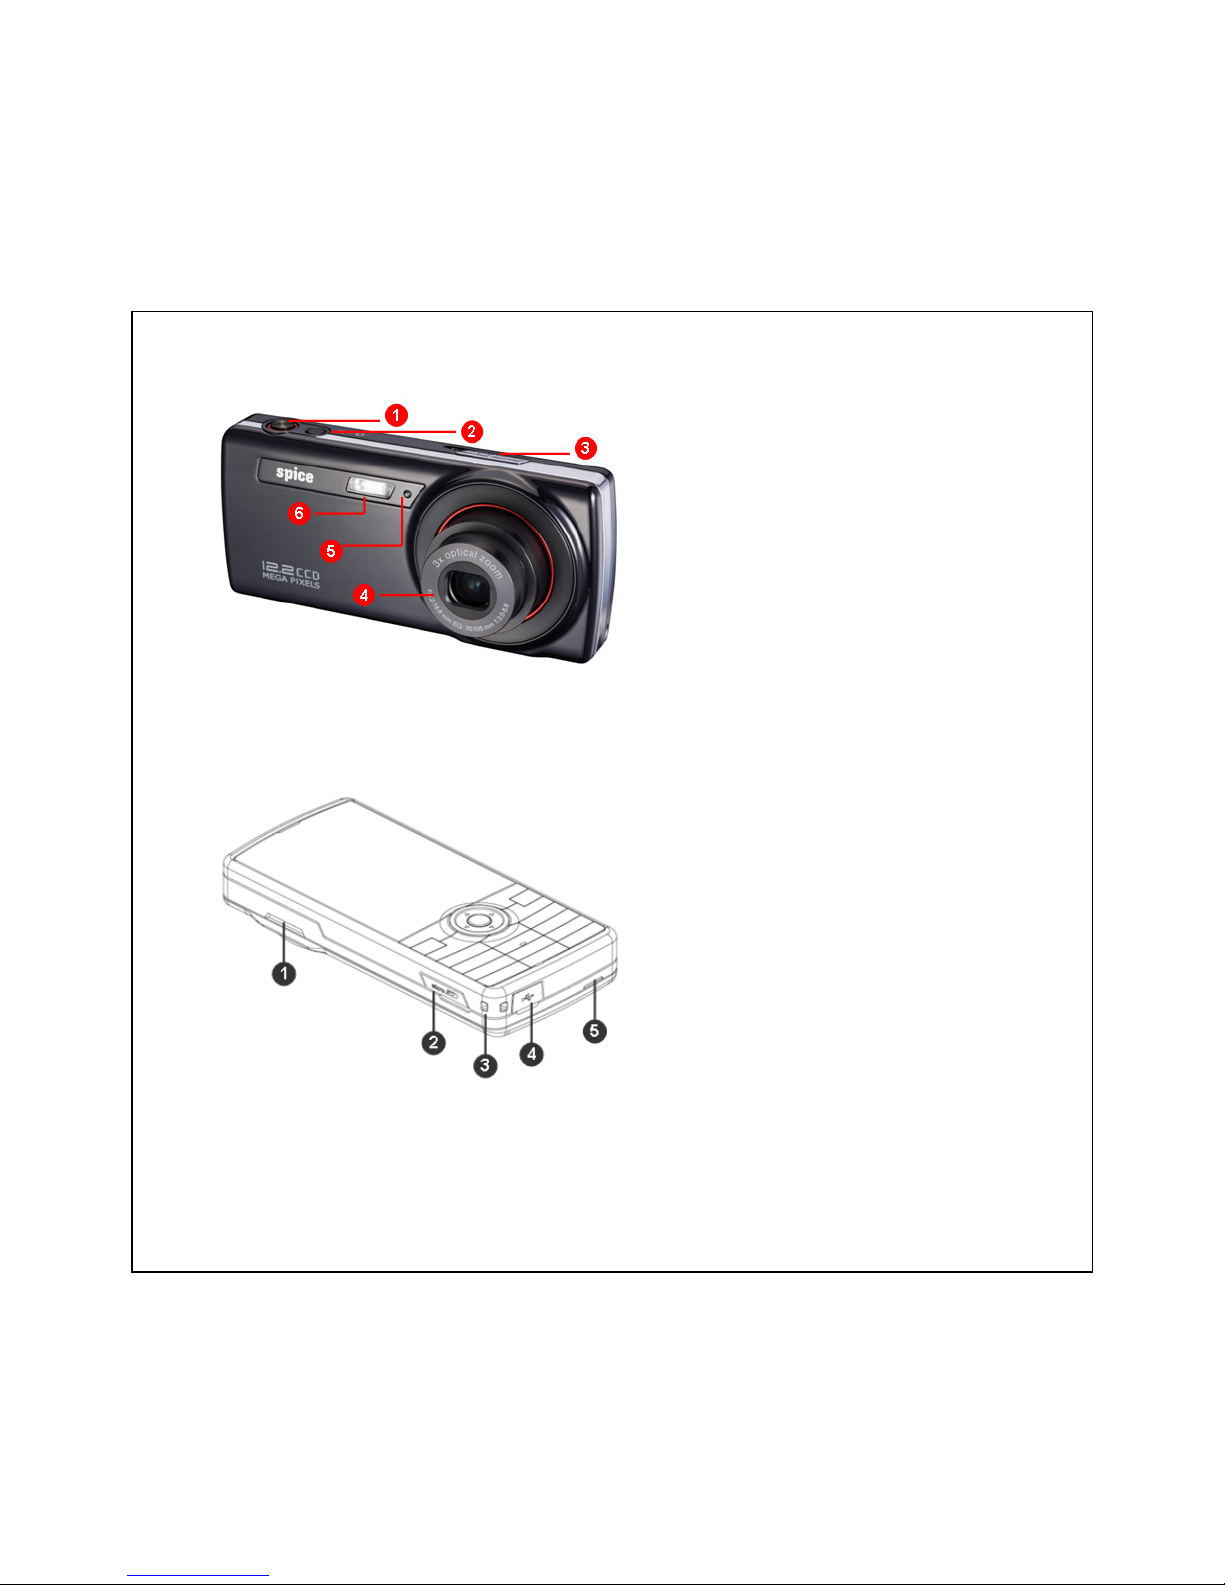
Rear/Side views
1. Camera shutter button
2. Camera/Video switch button;
Camera on/off button (only used
when Phone power is on)
3. Volume key;
Zoom key (only used in Camera
mode)
4. Optical zoom lens
5. Self-timer LED
6. Xenon flash
Bottom/Side views
1. Speaker
2.
microSD card slot
3.
Strap holder
4. USB port
5. Rear cover groove
Page 13
3
Keys/Buttons
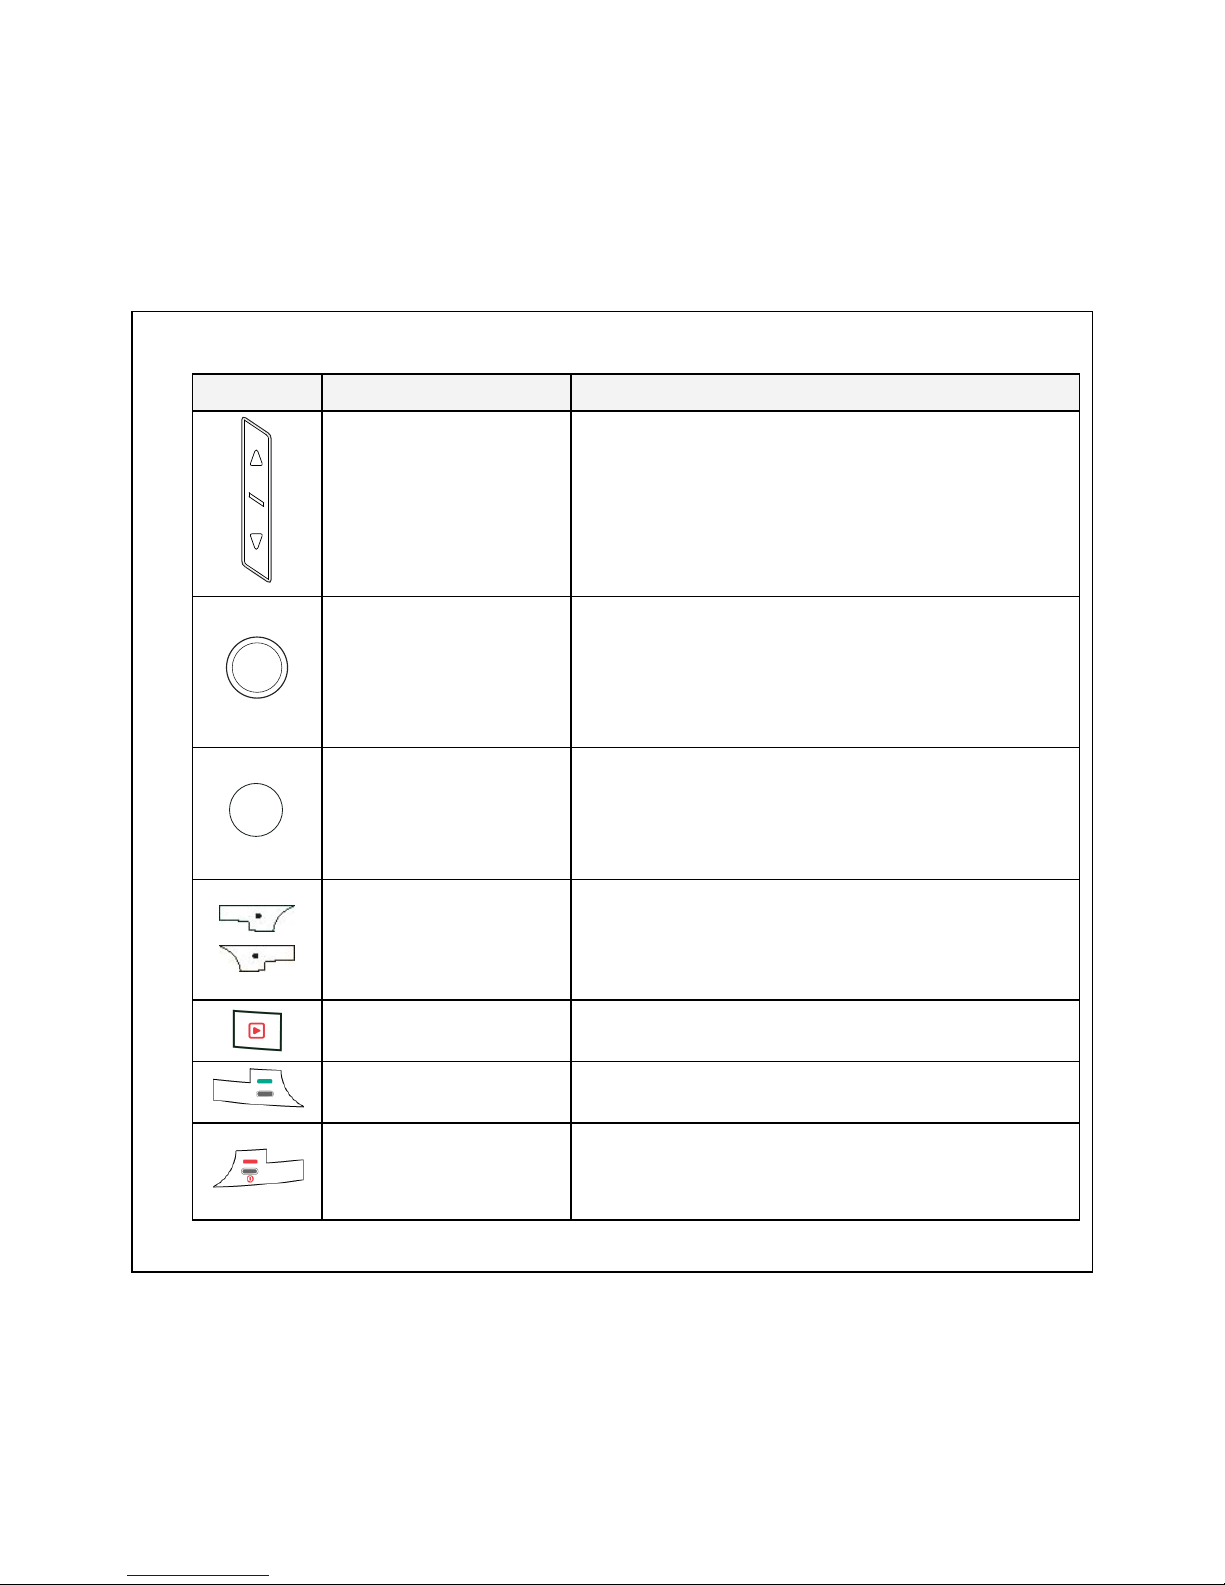
Icon Item Function
Volume/Zoom key
During a call, use the Volume key to adjust the
earpiece volume.
In Camera mode, this key can be used for zoom
in/out function.
Camera shutter button
The side Camera shutter button is functional only
when Camera mode is activated.
S1: Focus, S2: Take a picture or start/stop video
recording, while in the Album is used to start or stop
voice memo.
Camera/Video switch
button ; Camera on/off
button
Press and hold for camera on/off (only used when
phone power is on).
Short press to switch between capturing a picture
and video when in Camera mode.
Left and Right soft key
The associated key functions are displayed in the
bottom of main display screen. In standby mode, the
left soft key is used to access Menu; and the right
soft key is used to open Names.
Playback key
The Playback key is used to view photos and video
playback saved in the Album.
Talk/Send key
The Talk/Send key is used to make phone call after
dialing phone number or to pick up a phone call.
Power on/End key
Short Press: To end a call or application (eg:
Digital Camera).
Long press: To power on or off the phone.
Page 14
4
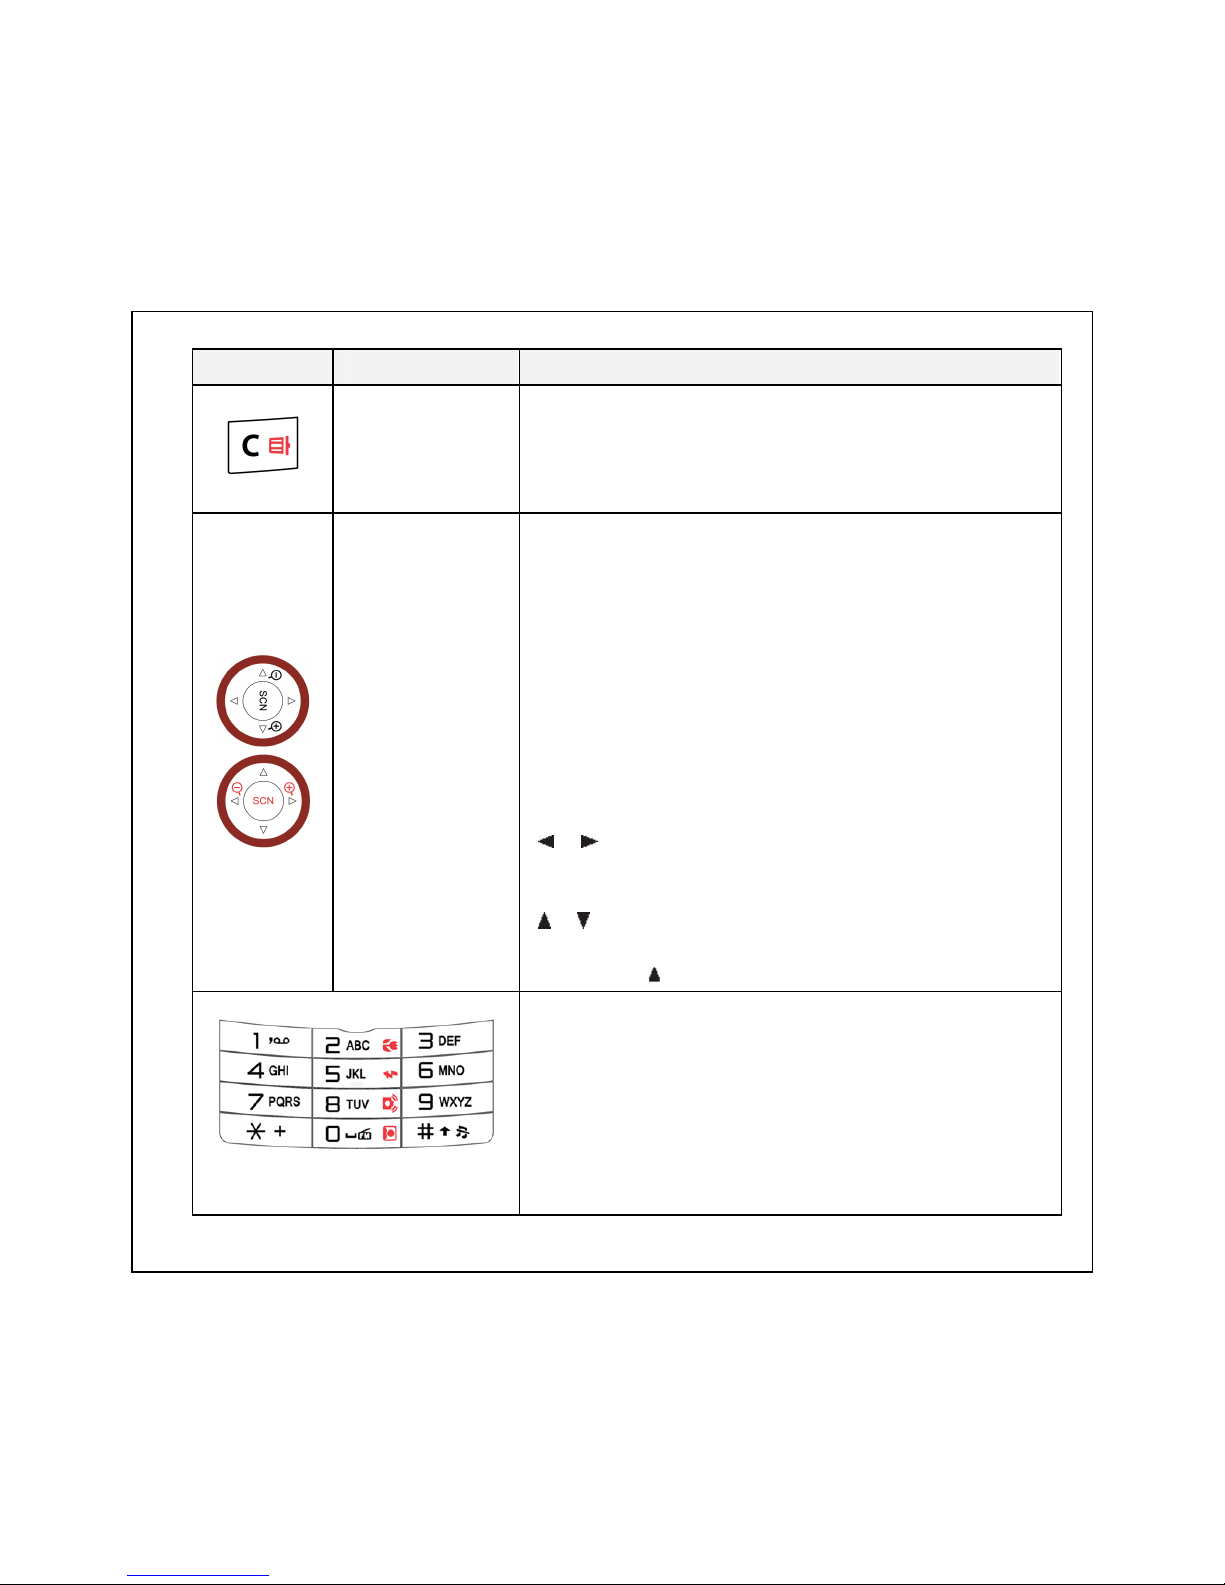
Icon Item Function
Clear/Delete key
To delete the input characters before the cursor or
selected items.
In Album mode, to delete the taken pictures or video
clips.
Navigation keys
In standby mode, the Navigation key is the quick access
to:
Up key: Fun Spice
Down key: Shortcuts
Left key: Write message
Right key: Bluetooth setup
Center Selection key: Media player
The Up key, Down key, Left key, and Right key can be
used to move cursors in the operation modes, like menu
option selection or message writing.
When launching camera, Red LED will light up.
/
• Press to move left/right in the OSD menu.
• Press to zoom out/zoom in the object.
/
• Press to move up/down in the OSD menu.
• Press to show/hide icons or information.
Numeric keys
In most of the time, the numeric keys are used to input
numbers or characters. In camera preview mode,
Numeric keys 2, 5, 8, 0 each is the hot key to:
2 key: enable or disable Macro mode
5 key: press to scroll through the Flash mode options
8 key: enable or disable Anti-Shake function
0 key: press to scroll through Auto, Self-Portrait, Smile
Detection and Face Detection.
Page 15
5
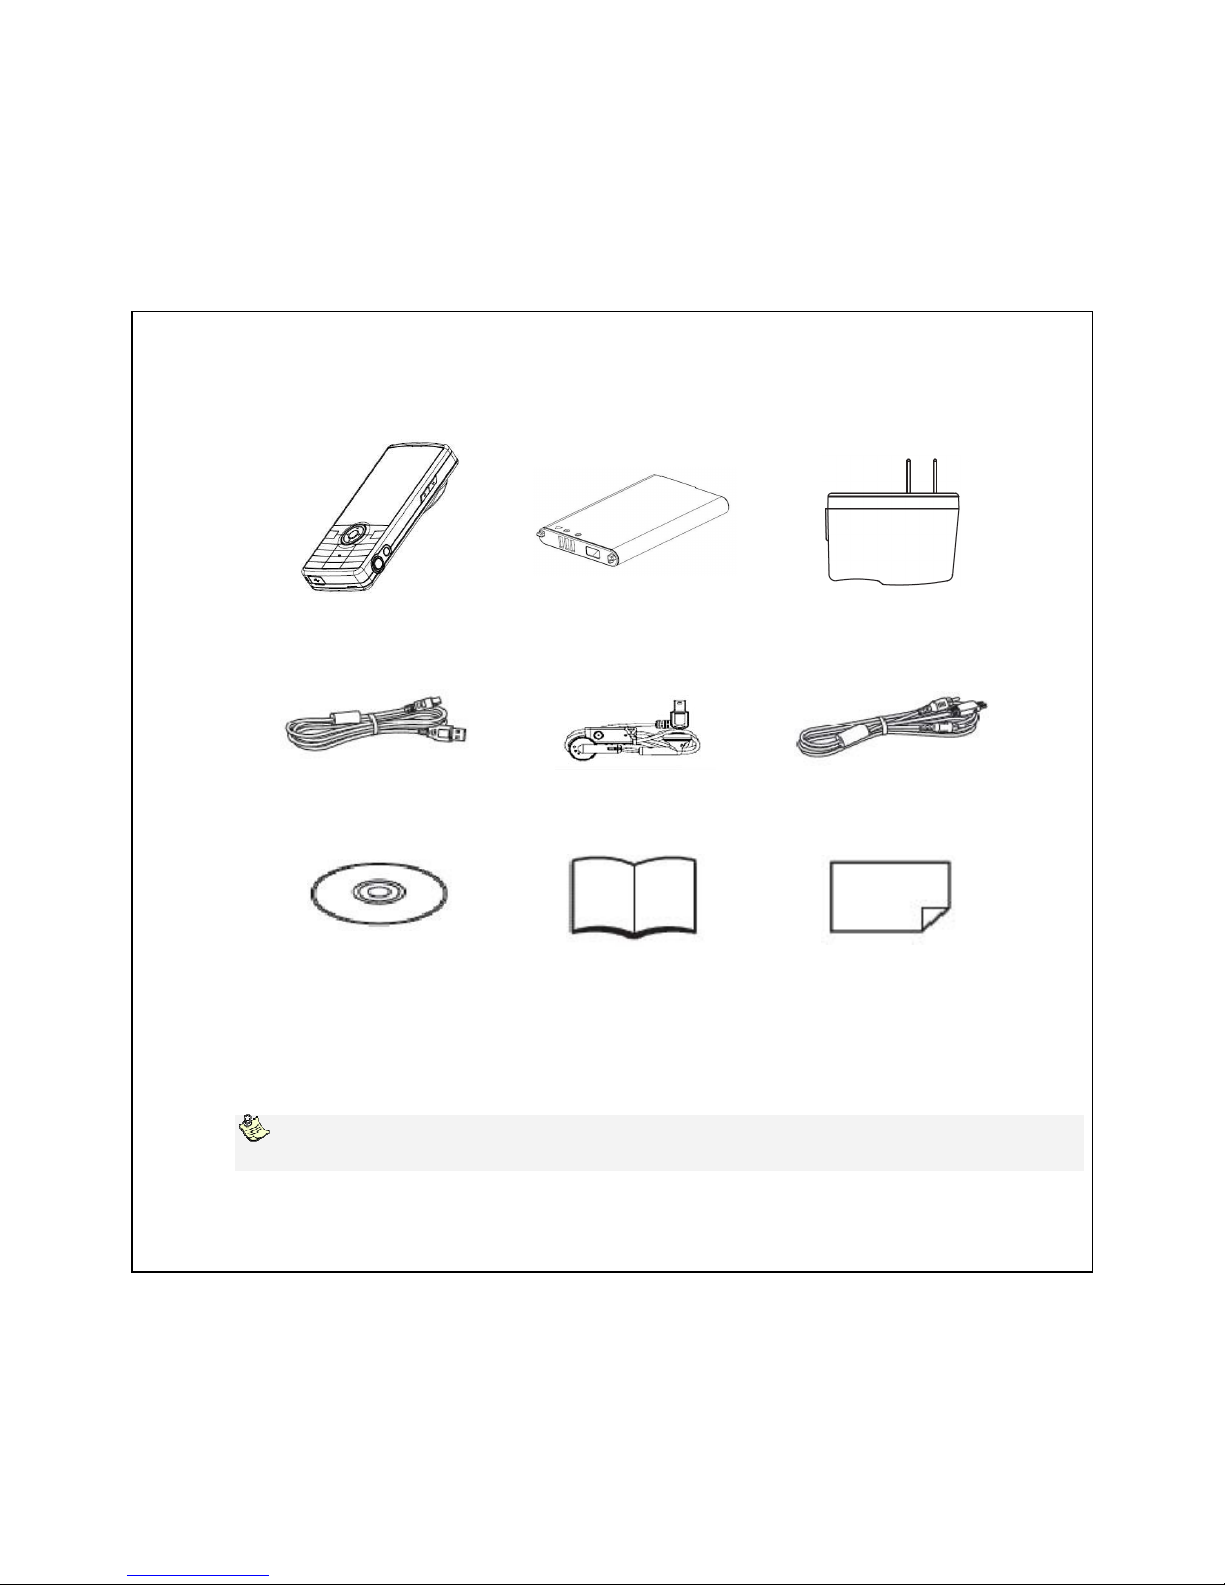
1.2 Package Contents
Please check that you have all of the items in the package carefully.
Mobile Phone
S-1200
Rechargeable Li-ion Battery
SAB-01
Travel Charger
SAC-01
USB Data Cable
SAD-01
Stereo Headset
SAH-01
USB AV (TV-out) Cable
SAM-01
Handset Manager CD User Manual (This Manual)
Service Center List
Note:
Use only the accessories supplied or accessories approved by
Spice
.
Page 16
6
1.3 Installing the SIM Card and Battery
Your SIM card is provided by your service provider and contains your basic subscriber
information, such as your phone number, phone book information, and service provider
information. Handle it with care and do not bend it or expose it to static electricity or dirt.
Before you begin, ensure that the phone is turned off. The SIM card slot is situated underneath
the battery.
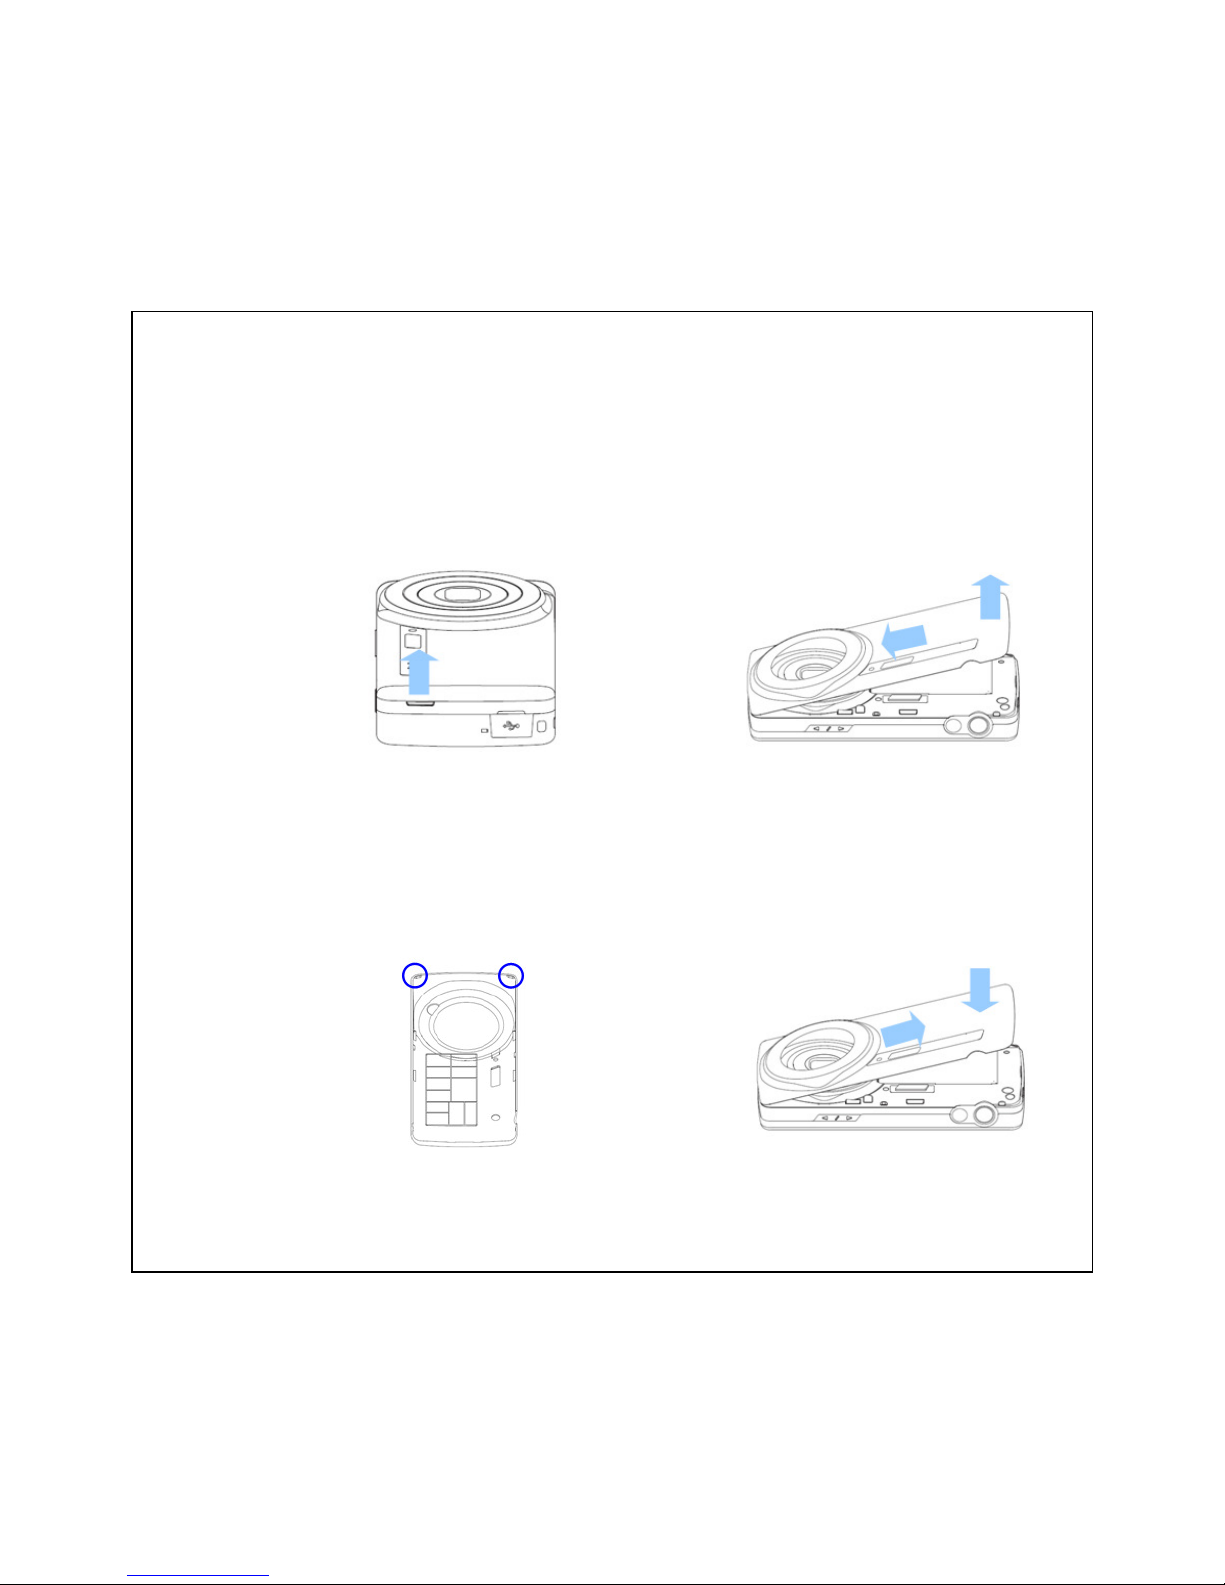
To detach the battery Cover
1. Firmly hold the phone with both hands and
the front panel facing down
2. Locate the groove for finger pick as shown
3. Lift up the battery cover
4. Push the lifted-up battery cover
towards the top of the phone
5. Detach the battery cover
To attach the battery Cover
1. Locate the two (2) hooks at the corner of
battery cover.
2. Hook the top of battery into the phone.
And then push down and fasten the
battery cover on the phone
Page 17
7
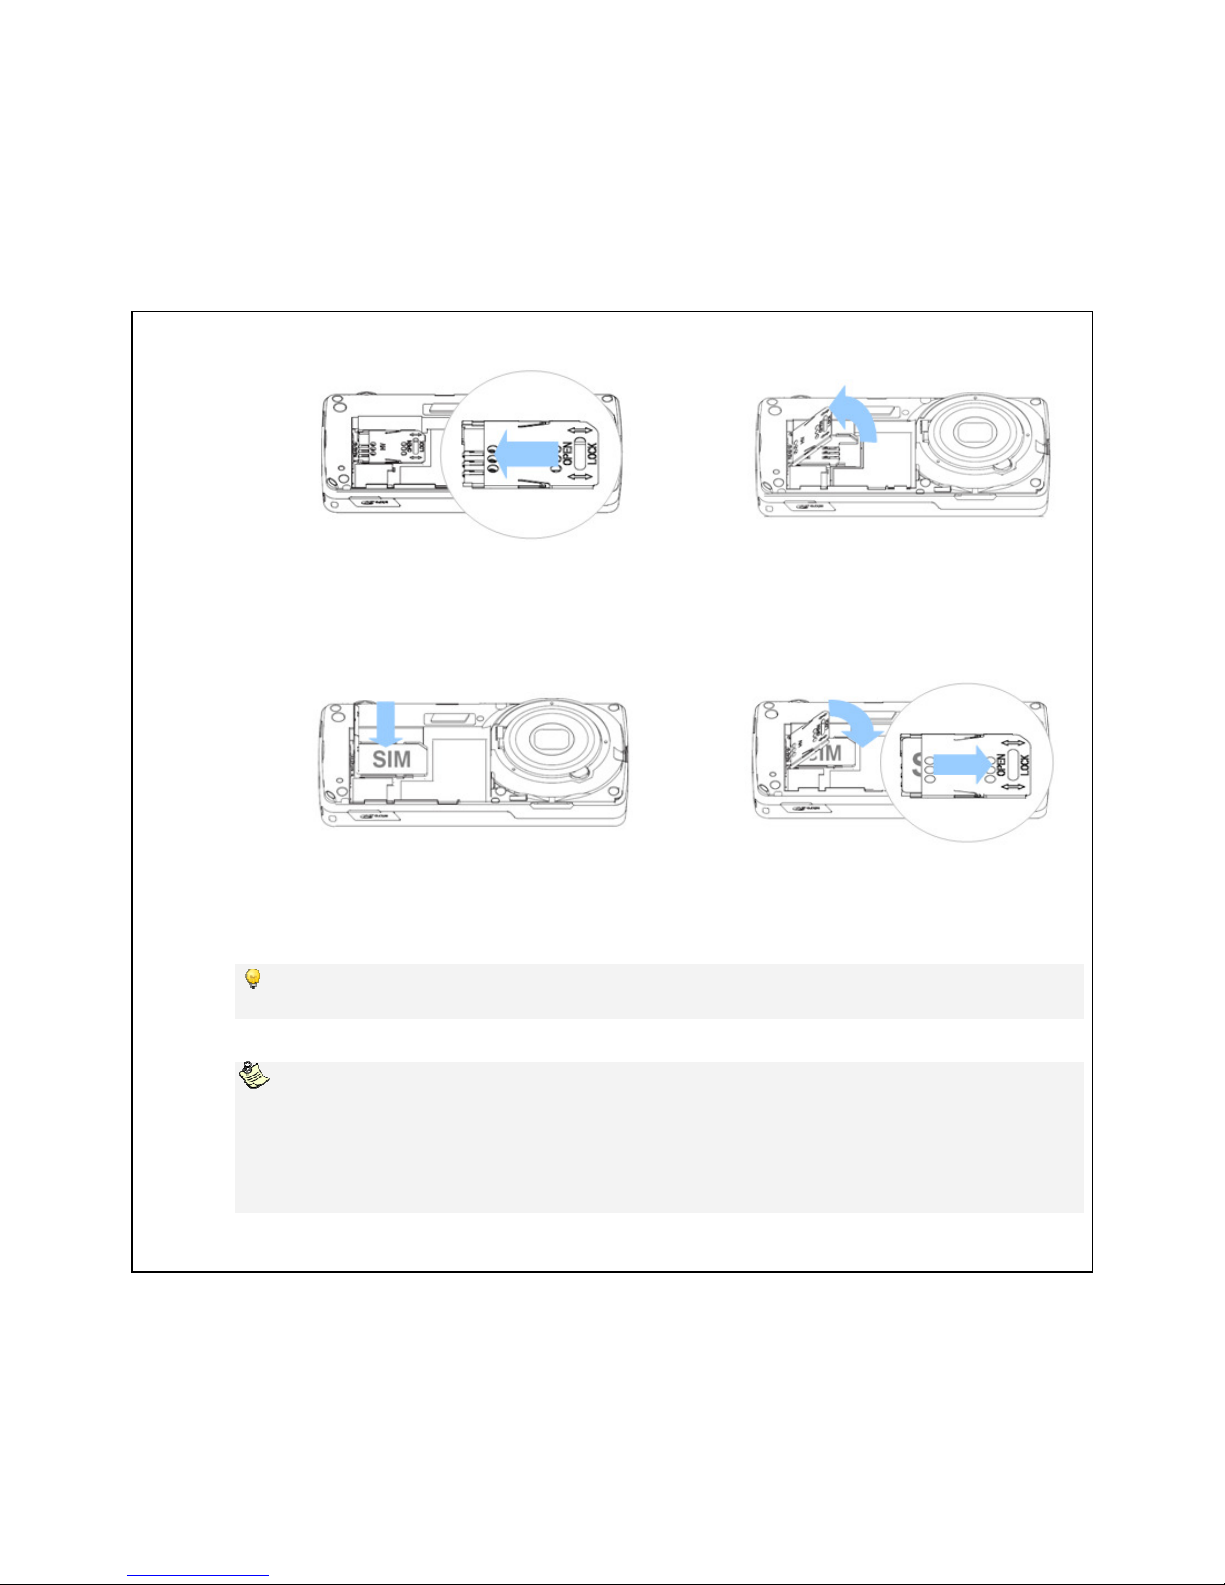
To install the SIM Card
1. Locate finger groove of the lid of SIM card
holder. Slide the lid towards the bottom of the
phone
2. Lift up the lid of the SIM card holder
1. Put in the SIM card into the slot
2. Push down the lid of SIM card holder.
Slide the lid towards the top of the
phone and get it be locked
Tip:
Insert the SIM card with the gold colored contacts facing the device.
Note
Your SIM (Subscriber Identity Module) card is provided by your service provider and contains
your basic subscriber information, such as your phone number, phone book information, and
service provider information. Handle it with care and do not bend it or expose it to static
electricity or dirt. Before you begin, ensure that the phone is turned off. The SIM card slot is
situated underneath the battery.
Page 18
8
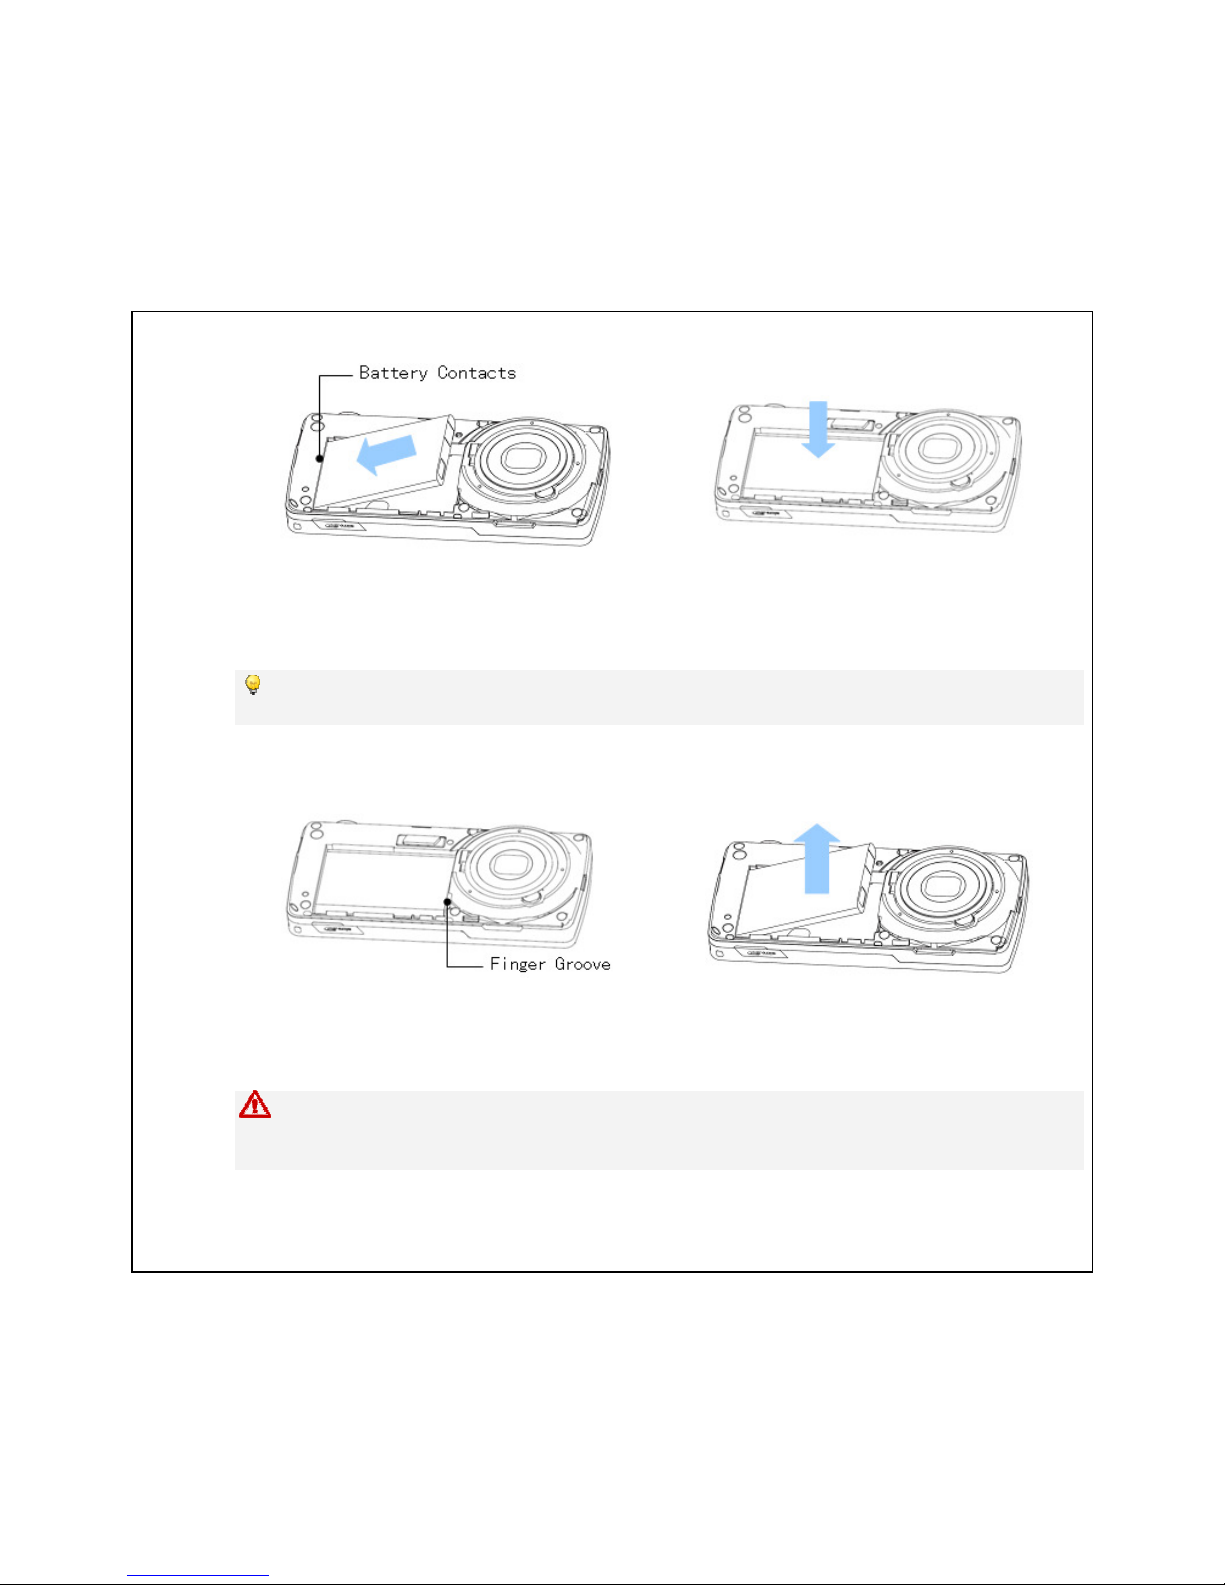
To install the battery pack
1. Align the battery’s exposed copper
contacts with the battery connectors
inside the battery compartment.
2. Insert the contact side of the battery
first and then gently push the battery
into the battery compartment.
Tip:
Insert the battery pack with the side indicator, ” This side up”, facing upwards
To remove the battery pack
1. Make sure the phone is turned off.
Locate the finger groove at the top edge
of the battery compartment.
2. Lift the battery pack from the groove to
remove it.
Warning:
Make sure the phone is turned off before you remove the battery pack. Do not remove the
battery when the phone is switched on, as this may damage the phone.
Page 19
9
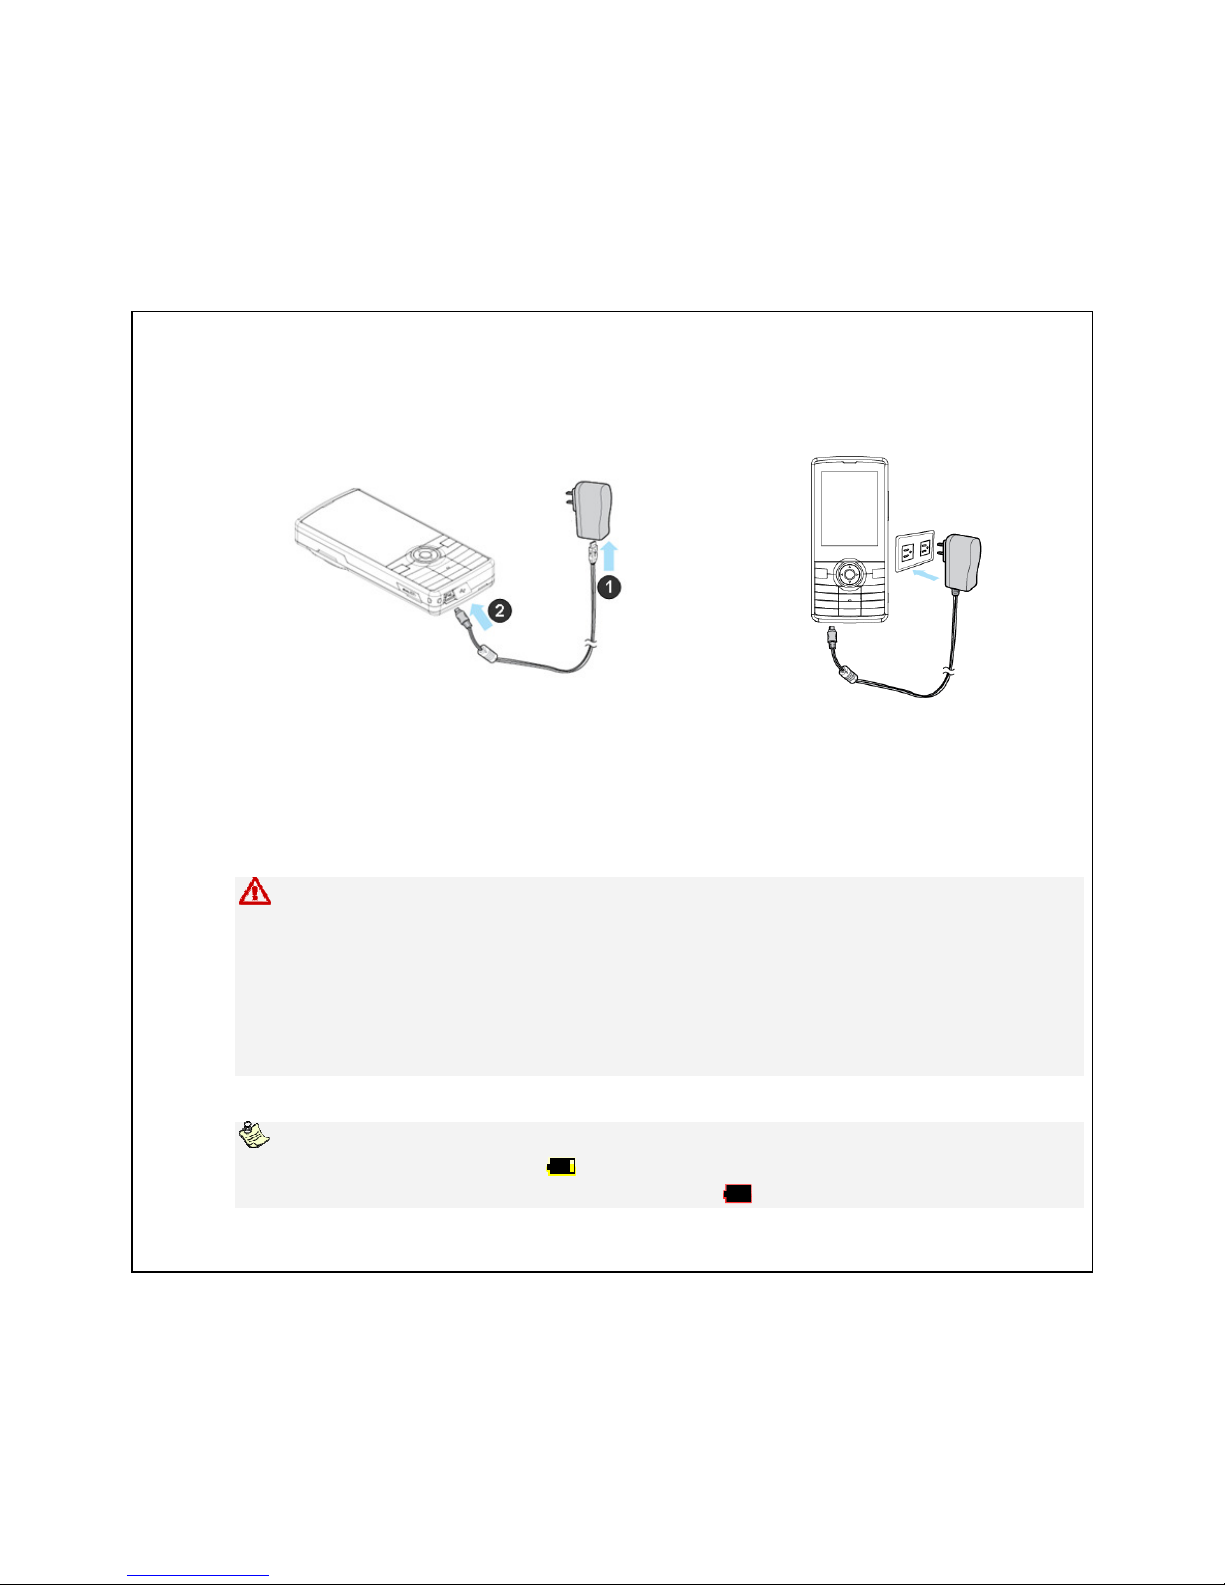
1.4 Charging the Battery
You must fully charge the battery before using your phone for the first time.
To charge the battery
1. Connect the USB interface of the USB data
cable to the provided Travel Charger.
2. Open the USB cap at the bottom of your
phone and connect the provided USB data
cable to the USB port.
3. Connect the Travel Charger to an AC
wall outlet
Warning:
Only use the specified travel charger and battery charger to charge the battery
Do not disassemble and short the battery pack
Do not dispose of the battery pact in fire or water
Do not store the battery pact in temperature over 60 oC
Do not remove the battery pack from the phone while you are charging it by using the travel
charger
As a safety precaution, the battery stops charging when it overheats
Note
When the battery runs low this “ ” will display and a warning will sound. The phone will
switch off automatically shortly after displaying this “ ” icon.
Page 20
10
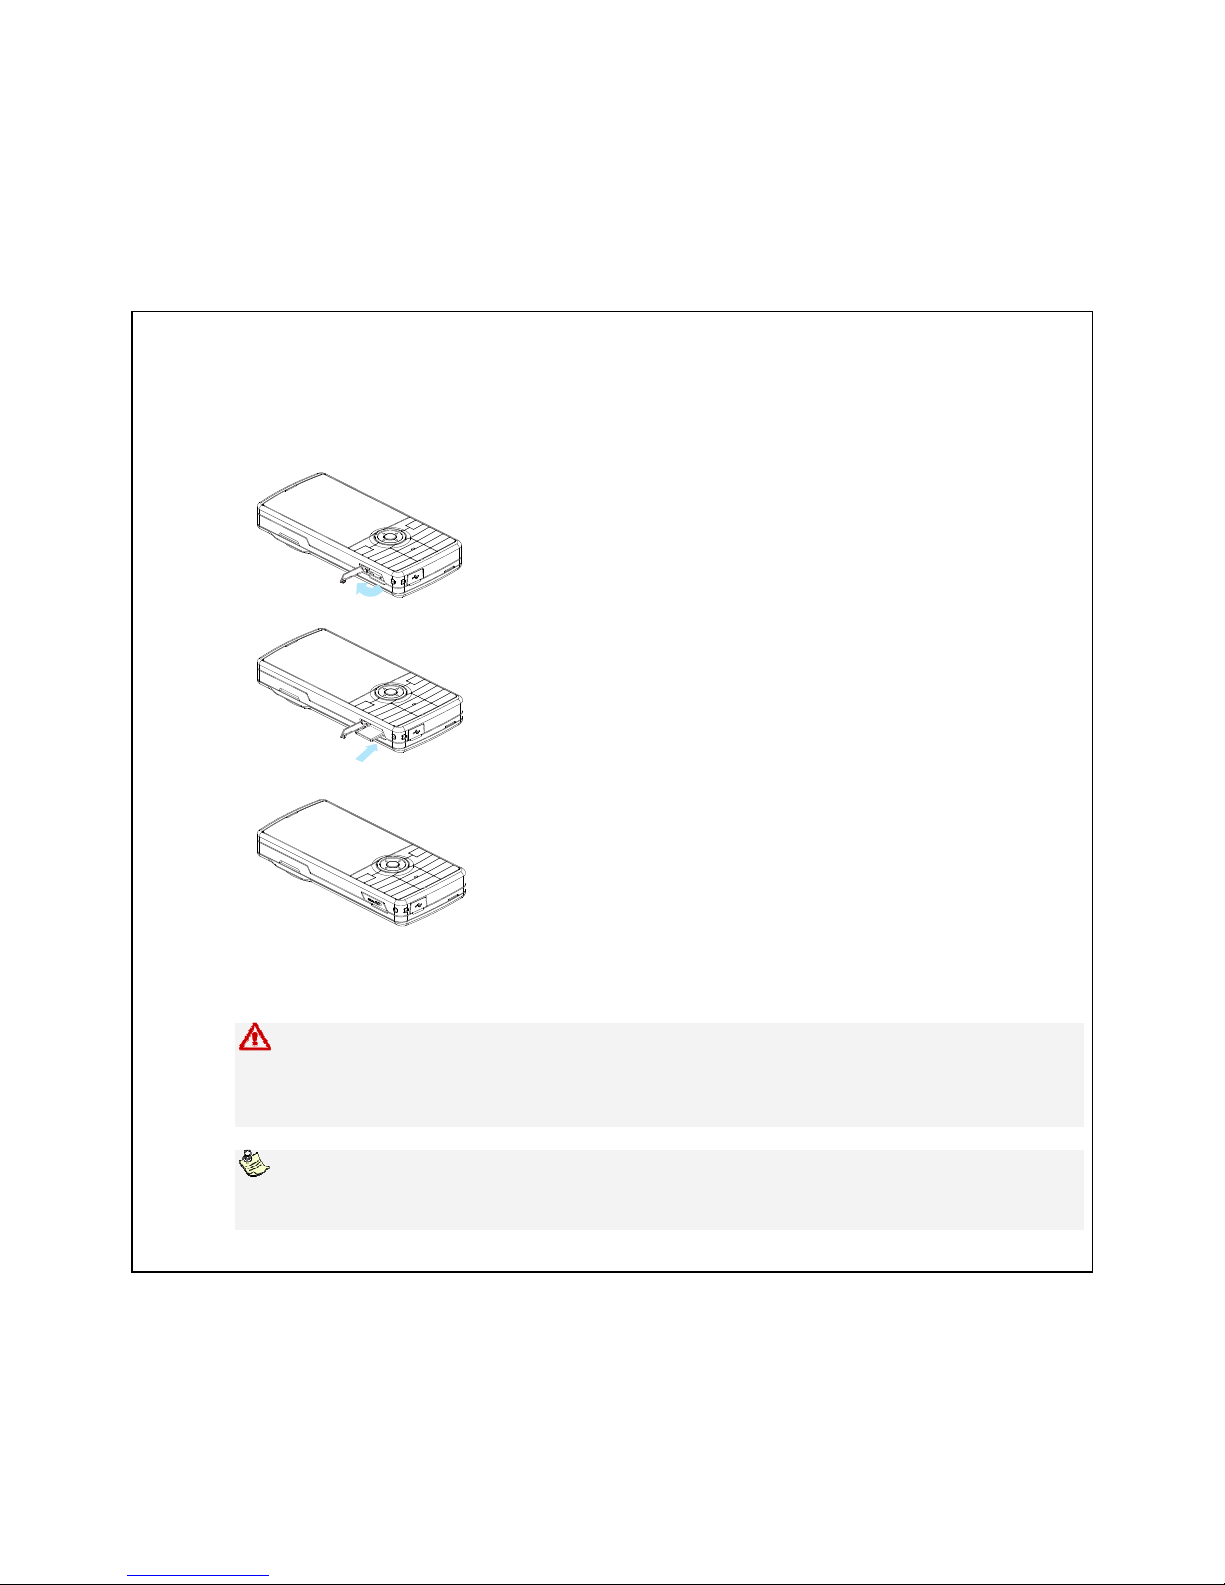
1.5 Inserting the Memory Card
You may use an optional microSD memory card for additional storage.
Follow these instructions to insert the memory card.
1. Open the microSD card slot cover
2. Insert the memory card into the memory card slot as shown
3. Close the microSD card slot cover
To remove the card, gently push the card until it pops out. Pull out the card carefully.
Warning:
Your device supports the hot swap feature for the insertion and removal of the microSD card.
Even though, when you need to remove the storage card while the phone is on, it is
recommended that you switch off the phone to avoid unexpected card damage.
Note:
The Digital Camera application does not feature internal memory, please insert memory card
when launching Digital Camera functions (Camera, Album and Video recorder)
Page 21
11
2. USING YOUR PHONE
2.1 Switching the Phone On and Off
You can power on and power off the phone by pressing and holding the key.
Note:
You can also use the phone without the SIM card. Dialing and receiving calls are disabled but
the multimedia functions, digital camera functions, and extras still operate.
Do not switch the phone on when wireless phone use is prohibited or when it may cause
interference or danger.
2.2 Unlocking the Keypad
The S-1200 can be locked automatically after a period of time to prevent an accidental press of
any buttons. Refer to the Security setup in the Settings menu to learn how to lock the
keypad (Refer to "Auto Keypad Lock" on page 44).
To unlock the keypad
1. When the phone is in the standby mode, the Unlock option appears in the lower right
corner of the screen.
2. Press the key followed by the key to unlock the keypad. The
keypad is then unlocked.
2.3 Standby Mode
When your phone is turned on but not in use, it is in the standby mode. In the standby mode,
the screen displays the following items, from left to right:
Menu: at the lower left corner of the screen.
Player: at the lower center of the screen
Names: at the lower right corner of the screen.
Press (Menu) to enter the main menu or press (Names) to enter
Phonebook list, or press
(Player) to enter Media Player. Indicators also appear on the
upper part of the screen.
Page 22
12
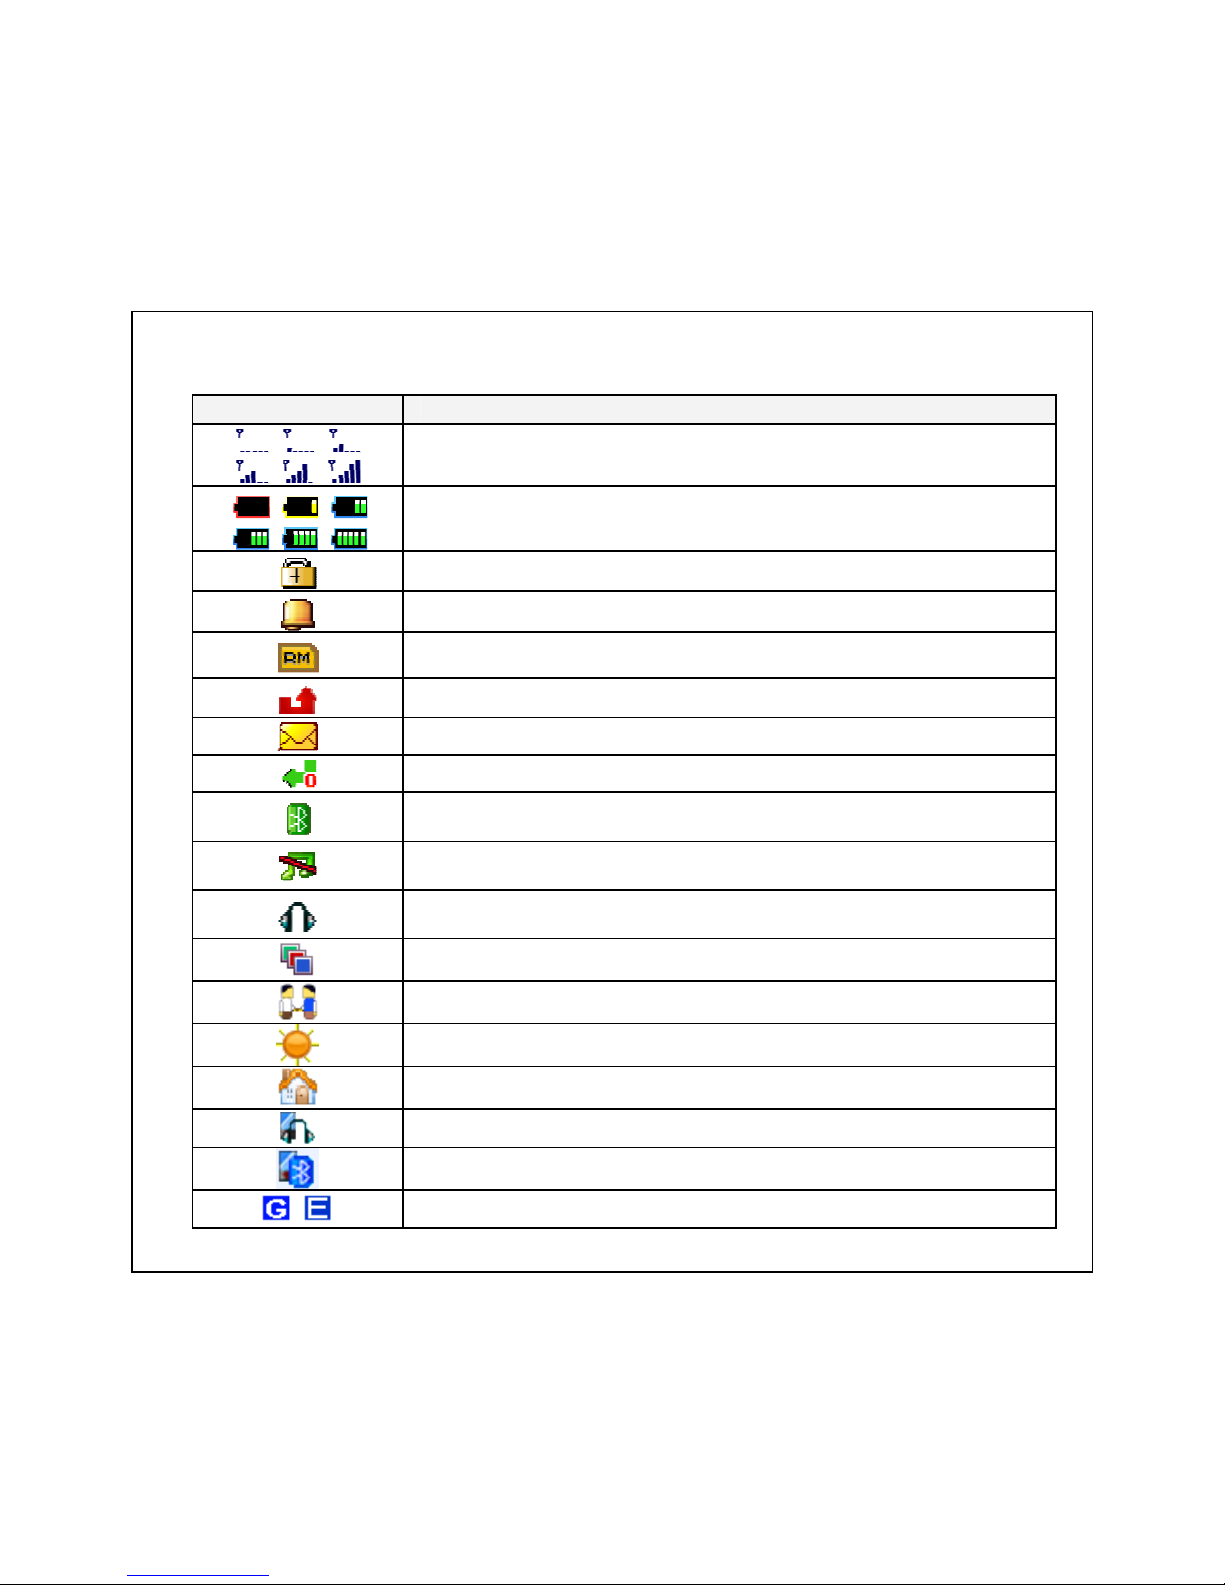
Status indicators in standby mode
The following table lists the indicators in the standby mode with their description.
Icon Description
Vertical bars indicate the signal strength of the GSM network signal.
Five bars indicate that your current position has the best reception.
Indicates the battery charge level.
Indicates your phone is locked.
Indicates the alarm clock is set.
Indicates the phone is roaming.
Indicates a missed call.
Indicates new messages.
Indicates all calls are diverted to another number.
Indicates the Bluetooth function is enabled on the phone and
connected to other Bluetooth-enabled device.
Indicates the Vibrator mode is enabled on the phone.
Indicates a headset is connected to the phone
Indicates the General user profile is enabled on the phone.
Indicates the Meeting user profile is enabled on the phone.
Indicates the Outdoor user profile is enabled on the phone.
Indicates the Indoor user profile is enabled on the phone.
Indicates the Headset user profile is enabled on the phone.
Indicates the Bluetooth user profile is enabled on the phone.
Indicates GPRS/EDGE service is available.
Page 23
13
2.4 Using the Main Menu
Tips for operating the main menu
In the standby mode, press the left soft key to view the main menu. Follow below
tips to navigate through the menu and menu options:
To view the menu, press the left soft key in the standby mode.
Use the navigation keys to move through the various menus.
The lower right corner displays the Back. Press the center selection key to select
the menu item.
To quickly exit from the menu, press the End key to exit the menu.
Use the navigation keys to select the submenu items and options. The left
soft key can also be used for selecting various options in submenus.
For example, to view missed calls, do the following:
1. Use the navigation keys to select the Call history from the main menu.
2. Press the center Selection key to confirm the selection. The Call history submenu
opens.
3. Move the cursor by pressing the up and down key to Missed calls submenu. Press the
center selection key to select the Missed calls option. A list of missed calls opens.
The Main menu system
Icon Main menu Sub-menu
Phonebook Quick search
Search contact
Add new contact
Copy all
Delete all
Send all contacts
Caller groups
Extra numbers
Phonebook settings
Page 24
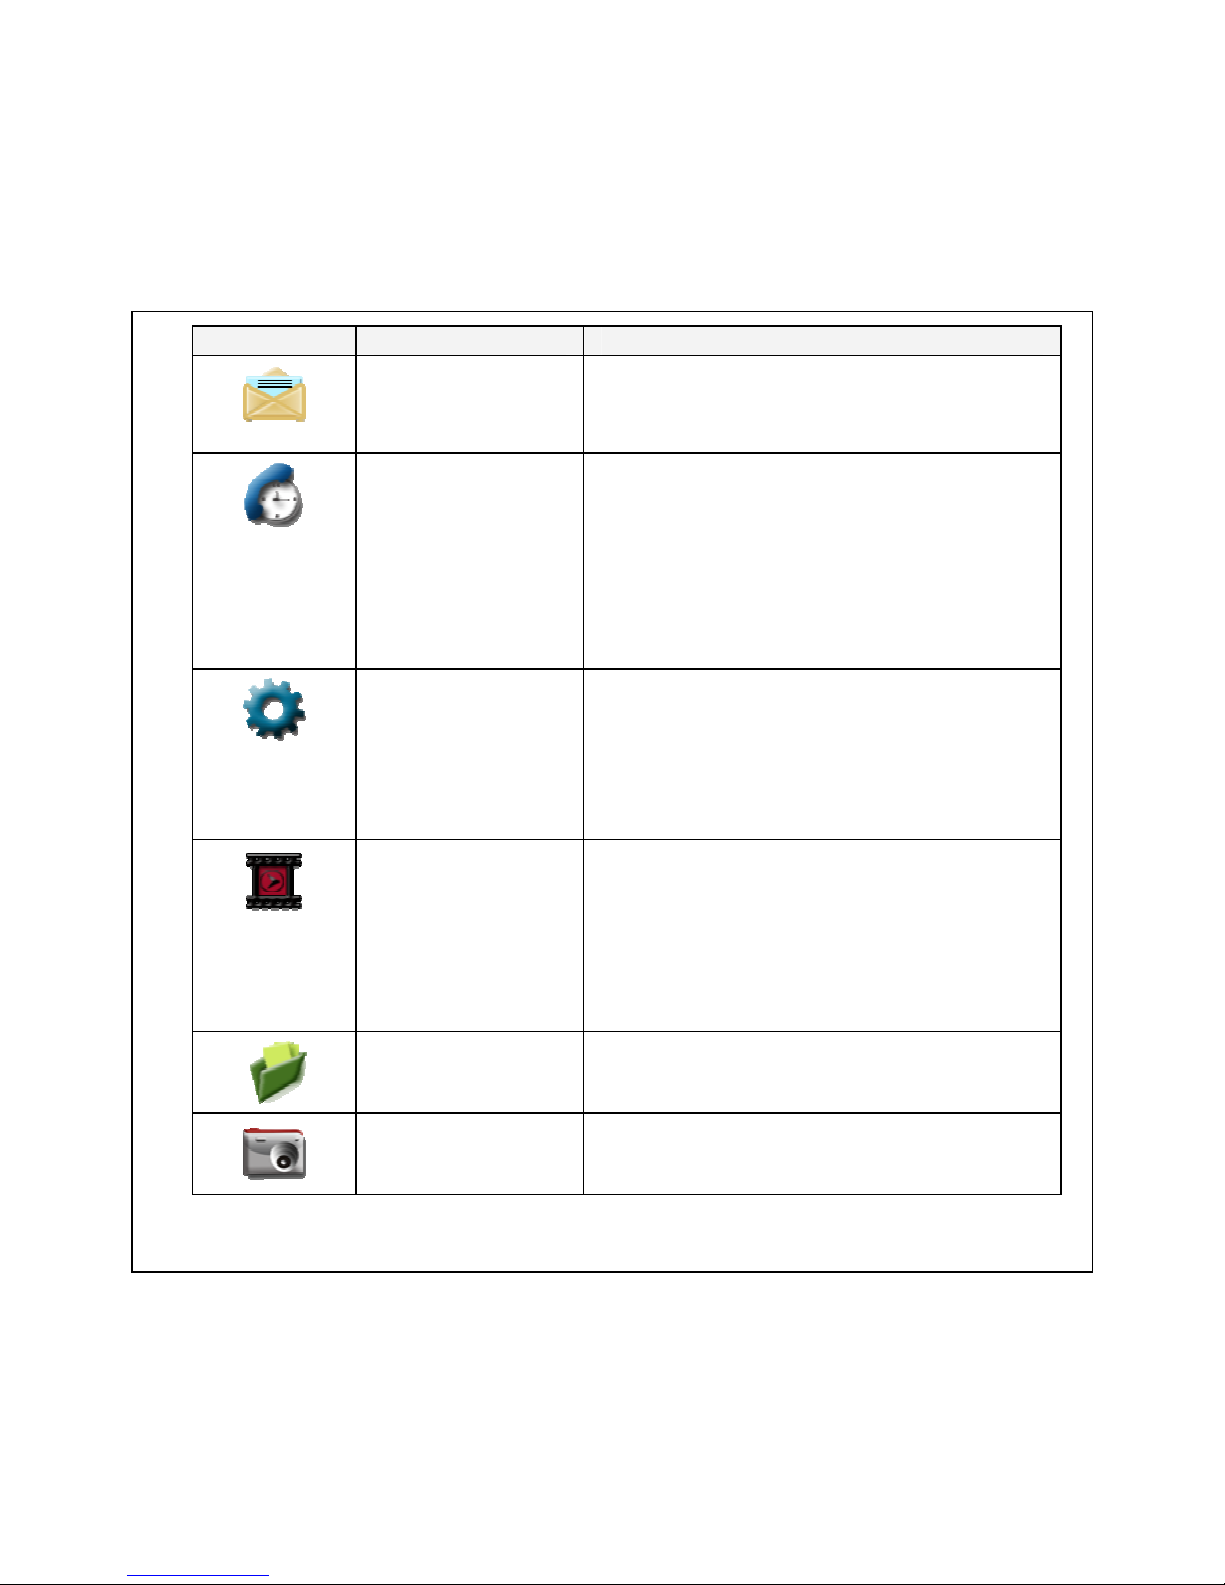
14
Icon Main menu Sub-menu
Message Messages
Email
Broadcast message
Voice mail number
Call history All calls
Dialled calls
Missed calls
Received calls
Delete call logs
Call time
Call cost
SMS counters
Data counters
Settings User profile
Phone setup
Bluetooth setup
Call setup
Network setup
Security setup
Restore factory settings
Media center Image viewer
Media player
Sound recorder
FM radio
Schedule FM record
Photo editor
Sound effects
Fun & Games
File manager Phone
Memory card
Digital camera Camera
Album
Video recorder
Page 25
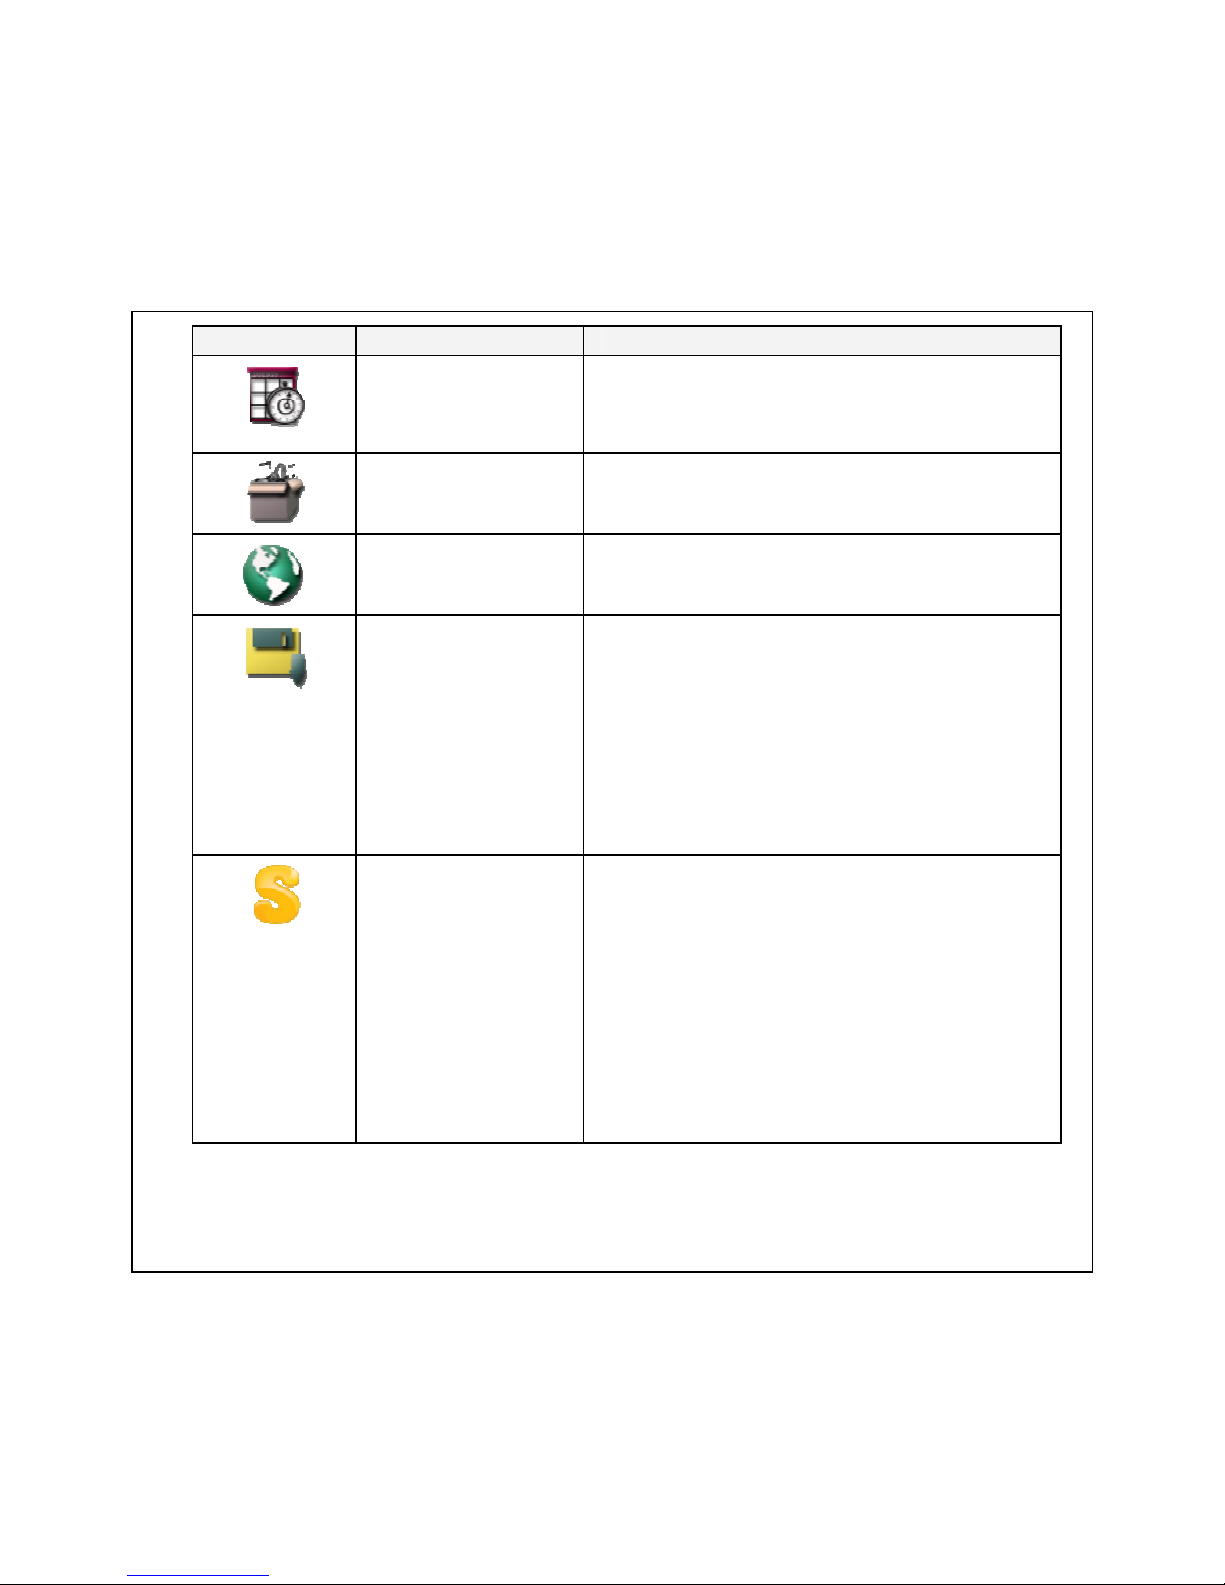
15
Icon Main menu Sub-menu
Organizer Calendar
Tasks
Alarms
World clock
Extras Calculator
Currency converter
Stopwatch
Services STK(SIM Tool Kit)
Internet
Data account
Shortcuts Alarms
Calendar
Calculator
User profile
File manager
Display settings
Media player
Sound recorder
Currency converter
Java
Fun Spice SpiceGang
Opera Mini
Reuters
Email2SMS
Nimbuzz
Ngpay
Mgurujee
Cricket Updates
Free_SMS
Ibibo
Job Search
Mobile Tracker
For details of each menu operation and function, please refer to the following relative chapters.
Page 26
16
2.5 Entering Text
You can enter characters and letters by using phone keypad, such as storing names in
Phonebook, writing a message, editing Greeting text.
Change writing language: Press the key (Options) to select writing language
when you are in the text mode. Press and hold the key to select writing
language. Short press the
key to switch the writing language sequentially.
Following are some of the input methods available in the phone.
T9 mode
This mode allows you to enter words with only one keystroke per letter. Each key on the
keypad has more than one letter. The T9 mode automatically compares your keystrokes with an
internal linguistic dictionary to determine the correct word, thus candidate words change with
each key you press.
ABC/abc/Abc mode
Press each key associated with the letter you want to enter once, twice, three times or more
until the letter is displayed.
T9ABC/T9abc/T9Abc mode
Use the to keys to enter text.
− Press once for the first letter.
− Press twice quickly for the second letter.
− And so on.
To insert a space, press the key once. To delete letter, press key.
Press and hold the key to delete all entered text.
Page 27
17
123 mode (Numeric mode)
Type numbers using one keystroke per number. To change to 123 mode in a text entry field,
press key until 123 mode is displayed.
Insert symbol
You may press the key or press Options > Insert symbol to insert punctuation
marks.
Using the T9 Mode
T9 uses a built-in dictionary to recognize the most commonly used word for every sequence of
key presses. As you press each key, the phone begins to display the words that it thinks you
are typing based on a built-in dictionary. As new letters are added, the word changes reflect the
most likely candidate from the dictionary.
When you are in the T9 mode, start entering a word by pressing to
keys. Press one key per letter.
If several options are found in the dictionary for a key sequence (a word), the most
probable is displayed first.
If the word is still incorrect after typing completely, press the Down navigation key once or
more to cycle through the other word options.
For example, Press to enter “Good”.
Page 28
18
3. CALL FUNCTIONS
This section gives you information about the calling service that your phone supports.
3.1 Making a Call
1. In the standby mode, enter the area code and the phone number.
2. Press the key to call.
Note:
If you enter the wrong number, press the Cancel key to delete the number.
Making a call from the Phonebook
1. In the standby mode, press the (Names) to enter Phonebook list.
2. Select a name from the Phonebook list and press the key to call.
3. Press the
key to end a call.
Or
1. Press Menu and choose Phonebook menu.
2. Use navigation keys to select Quick search or Search contact option. You can directly
select a name from the phonebook list or enter the name in the quick search field. Then
press the key to call.
Making an international call
1. In the standby mode, press the key twice to input 00 (international prefix
characters).
2. Enter the country code, the area code and the phone number.
3. Press the key to call.
Page 29
19
3.2 Answering or Rejecting an Incoming Call
To answer the incoming call
Press the key to answer the call when the phone rings.
To reject the incoming call
Press the key to reject the call when the phone rings.
3.3 Call Waiting
You can answer another incoming call while you have a call in progress.
During a call, press the Left soft key to enter Options and select Answer to
connect the new call, and the previous call will then be put on hold.
3.4 Making a Conference Call
You can make conference call while you have multiple calls in progress.
1. Make a call to the first participant as described previously (Refer to "Making a call" on
page 18).
2. Call the second participant during a call with the first participant.
3. Press the left soft key and select Conference. This joins the first and second
calls to the conference.
4. Repeat step 2 and 3 to allow new participants to be connected to the conference call.
5. Press Options and select End all to end the calls or press the key to end all
calls.
Note
Callers can be individually disconnected. You just select a caller press Options > End Single
during a conference call.
The conference call service may not be available on all networks. Contact your service
provider for more information
Page 30
20
Tips for Call Options
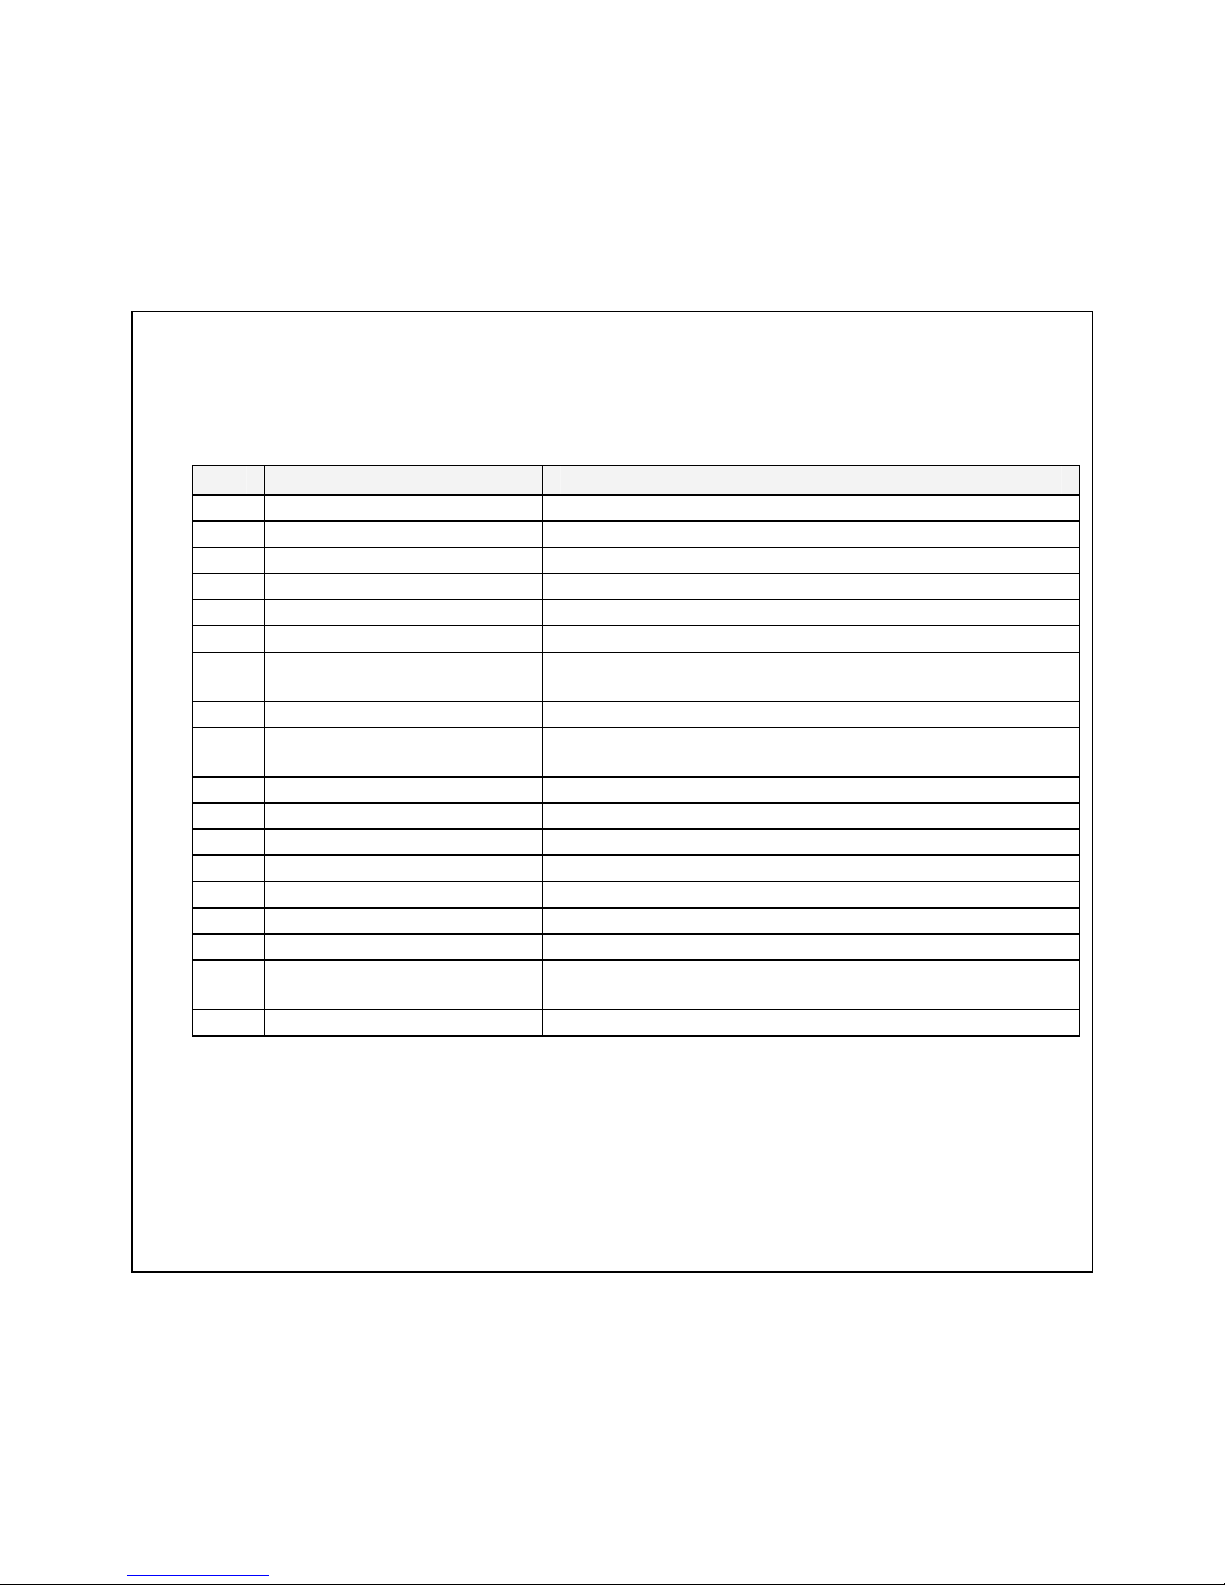
Many functions are available during active calls. Options 1 - 9 (below) are available when a new
call is made. Additional options (9-18) are available during a conference call.
No. Option Description
1 Hold single call Put a call on hold.
2 End single call End a call.
3 New call Make a new call during an active call.
4 Call history Make a new call from Call history during an active call.
5 Message Shortcut to Message menu.
6 Sound recorder Record your conversation during an active call.
7 Background sound Set on/Off the background sound during the
conversation.
8 Mute Set On/Off to mute the call during the conversation.
9 DTMF Set On/Off for DTMF (Dual Tone Multi-Frequency) tone
dialing system.
10
Retrieve Reconnect a holding call.
11
Retrieve conf. call Reconnect all holding calls.
12
Swap Switch between calls on hold and active.
13
Conference Make a multi-party conversation.
14
Transfer Transfer a call.
15
End Single End one of the participants in a conference call.
16
End all End a conference call.
17
H-Free/H-Held Choose either Hands free or held during a conference
call.
18
Split Suspend the conference call.
Page 31
21
4. PHONEBOOK
Your phonebook is saved either on the SIM card’s memory or Phone’s memory. You can also
choose to save on both. In the standby mode, press the Right soft key to enter
Phonebook list (Names).
4.1 Quick Search
The function gives you the convenience to search names saved in the contacts.
To search a name
1. From the main menu, select Phonebook and press the .
2. Select Quick search and press the .
3. Key in the first letter, and the phone shows all contacts starting with such a letter.
4. Select the one you wish to call by pressing the key to make a call.
Note
In the Search mode, you might press the # key to jump to the input method.
By default, your phone will list all the contacts saved in phone and SIM cards. In the
phonebook list, your phone will present you the contact information along with the SIM card
indicators that indicates in which storage location-Phone, SIM card that the selected contact
is stored and the background color corresponding to the storage location.
In the Phonebook list (Names), you can also press Options to edit the selected contact.
Edit: Allows you to edit name & phone numbers of the contact.
Delete: Deletes the selected contact’s information.
Copy to SIM/Copy to Phone: Copies the contact’s information to the phone or the
SIM card (depending on where you have saved the phone number).
Send vCard: Allows you to send a vCard via Text Message (SMS) or Multimedia
Message (MMS) on the desired SIM path or Bluetooth to the selected contact person.
Page 32
22
4.2 Search Contact
Use to search names saved in the phonebook.
To search a name
1. From the main menu, select Phonebook and press the .
2. Select Search contact and press the .
3. Key in full name or first letter of contact person’s name and press the . The
phonebook list automatically jumps to the first contact with the same corresponding letter.
4. Select the one you wish to call by pressing the key to make a call.
Note
In the Search mode, you might press Option to choose input method of writing language.
By default, your phone will list all the contacts saved in phone and SIM cards. In the
phonebook list, your phone will present you the contact information along with the SIM card
indicators that indicates in which storage location-Phone, SIM card that the selected contact
is stored and the background color corresponding to the storage location.
4.3 Add New Contact
Allows you create a new entry into the Phonebook menu. Your phone allows you to save 1500
entries of phone numbers.
To create a new entry
1. From the main menu, select Phonebook and press the .
2. Select Add new contact and press the .
3. Select storage location to the SIM card or to the Phone.
If you choose to store the new contact in SIM card, and then:
1. Select Name and edit the name of the entry.
2. Select Number and edit the phone number of the entry.
Page 33

23
3. Press Save and phone system will pop up a dialog message to ask you save or not the
new contact.
4. Select Yes and press the center selection key. Then the phone screen displays
“Saved”.
If you choose to store the new contact in the phone memory, and then:
1. Select Name and edit the name of the entry.
2. Select Number and edit the phone number.
3. Select Home number and edit the home number.
4. Select Office number and edit the office number.
5. Select Fax number and edit the fax number.
6. Select Email address and edit the email address.
7. Select Birthday and edit the birthday information.
8. Select Caller picture and add a picture to this new contact as the CLIP. You can choose
the picture from View picture and From file, or Delete reference.
9. Select Caller ringtone and add a ringtone to this new contact as the identified sound. You
can choose the ringtone from predefined ringtones stored in phone.
10. Select Save and phone system will pop up a dialog message to ask you save or not the
new contact.
11. Select Yes and press the center selection key. Then the phone screen displays
“Saved”.
4.4 Copy All
Copy the contact’s information to the phone or the SIM card (depending on where you have
saved the phone number).
4.5 Delete All
Delete contacts in a specific storage location of contacts.
4.6 Send All Contacts
All contacts can be sent via Bluetooth.
Page 34
24
4.7 Caller Groups
There are five default groups (Friends, Family, VIP, Business, Others) on the phone. You
can edit each group name with different tone/picture/video and member list. With the Caller
groups function, you can send a message to all members of a group at the same time.
To add contact into a caller group
1. From the main menu, select Phonebook and press the .
2. Select Caller groups and press the .
3. Choose a group and press the Edit.
4. Press Group members and press the . Then press Add. Now you can add contacts
to the selected group.
Note
You may modify the group name by pressing the Edit function.
Your phone provides the following options for groups:
Group name: You can give a new name to a selected group.
Caller ringtone: You are able to assign ring tone for a particular caller group.
Caller picture: You are able to set a picture for a particular caller group.
Group members: You will be presented with the list of contacts which are assigned to
a particular caller group. You could add contacts to a particular group or delete contacts
from the group via this function.
Page 35
25
4.8 Extra Numbers
You are allowed to edit Owner number, Fixed dial and SOS number for your personal
preference.
Note
Your service provider may program some special phone numbers into your SIM card. It is not
possible to modify the Service dial numbers if not supported.
4.9 Phonebook Settings
Your phone provides two phonebook settings to personalize your phone when displaying
contact information, including:
Name list filter: Display the phonebook list by SIM only, Phone only or Both.
Memory status: Display the capacity used and the total capacity of the phonebook in
the phone and the SIM card.
Page 36
26
5. MESSAGE
5.1 Messages
Your phone supports voice mail notification messages and text messages. Voice mail and short
message service (abbreviated as SMS) are network services. Your phone also allows you to
send and receive text messages contain pictures or melodies. A message with pictures is made
up of several text messages. Therefore, sending a message with pictures will cost more than a
single text only message.
The feature also allows you to send the message that contains text, sound and a picture.
Depending on the network, you may receive a text message that includes an Internet address
where you can view the multimedia message.
Your phone supports the following formats in MMS function.
Picture: JPG, GIF and BMP.
Sound: Scalable Polyphonic MIDI (SP-MIDI), i-Melody.
Note
You are not able to receive multimedia messages during a call, a game, or any active WAP
connection over GPRS data.
The maximum amount of text messages is 500.
The maximum amount of multimedia messages is 100. If your multimedia messages exceed
100, your phone pops up a message “Max number of stored MMS reached”.
Writing/Sending messages
To write a text message
1. From the main menu, select Message and press the .
2. Select Messages and press the .
3. Select Write message and press the .
4. Select Text message, and then press the to start writing.
5. You can also select following options: Insert symbol/ Writing language/Picture/My
Page 37
27
picture/Predefined animation/My animation/Melody/My melody/Predefined
sound/Use templates.
6. After finishing the writing, press (Cont.).
7. Input the phone number of recipients or search contacts from Phonebook.
8. press (Send).
Your phone provides the following options:
Recently used
Search contacts
Send by group
Note
To key in the content, please refer to Entering Text on page 16.
To write a multimedia message
1. From the main menu, select Message and press the .
2. Select Messages and press the .
3. Select Write message and press the .
4. Select Multimedia message, and then press the to start writing.
5. You can also personalize your message with various special effects by selecting following
options: Insert/Inset symbol/Writing language/Slide options/Preview/Details.
6. After finishing the writing, select the Done and select To options.
Your phone provides the following options:
Add number
Add Email address
Add number by group
Add Email address by group
Note
To use Multimedia message function, your network operator or service provider support is
necessary. Only phones that contain this function can receive and display Multimedia
message.
Page 38

28
Inbox
All incoming messages are saved in Inbox folder. You can reply and forward messages directly.
When you have received a message, the indicator appears on the display. If your inbox is full,
there will be a pop-up window to remind you to delete some of your old messages. Otherwise,
your message will be saved in the phone instead of the SIM card.
Outbox
Messages failed and to be sent are saved in Outbox folder. You can read outbox messages by
selecting Message > Messages > Outbox.
Sent messages
Messages delivered successfully are saved in Sent messages folder.
Drafts
You can store your message in your Drafts folder and work on it later.
Templates
There are several default templates in your phone for quick message writing. You can also
customize or delete these templates to suite your needs.
Message Settings
Your phone allows you to set up the SMS/MMS feature.
From the main menu, use your navigation keys to select Message > Messages >
Message settings > Text message. Your phone provides the following settings:
Profile settings: If more than one message profile is allowed by your SIM card, you
may edit the profile separately.
Common settings: You may select whether to enable or disable the Delivery report
and change the Reply path of your service center if any.
Memory status: You are able to check your memory status in the SIM card and
phone.
From the main menu, use your navigation keys to select Message > Messages >
Message settings > Multimedia settings. Your phone provides the following settings:
Edit profile: Edit Profile Name, MMSC address, data account and connection type.
Common settings:
Page 39

29
− Compose: You can set your composition format from the following options:
Slide timing: Sets time between slides (1 - 99 seconds).
Creation mode: Set mode between Free, Restricted or Warning.
Picture resizing: Allows you to resize picture: Off, 160x120, 320x240 or
640x480.
Best page time: Allows you to choose the options: On or Off.
Auto signature: Enable or disable to insert Auto signature.
Signature: Customize your personal signature.
− Sending:
Valid period: This is the duration that your message is stored in the
Messaging. You can set the duration between Maximum, 1 hour, 6 hours,
12 hours, 1 day or 1 week.
Delivery report: Enable or disable Delivery report request.
Read report: Enable or disable Read report request.
Priority: Give sending priority as High, Low or Medium.
Delivery time: Set delivery time between Immediate, 1 hour later, 12
hour later or 24 hour later.
Hide sender: Set whether to show or hide the sender’s address.
Send and save
− Retrieval:
Home network: Allows you to choose the options between Immediate,
Deferred or Reject.
Roaming: Allows you to choose 4 options such as As Home, Immediate,
Deferred or Reject.
Filters: Your phone will reject MMS messages that meet selected filter
criteria.
Read Report: Allows you to choose the options between On request,
Send or Never Send.
Delivery report: Enable or disable Delivery report request.
Viewer size: Allows you to set viewer size between Normal screen or Full
screen.
Memory status: You are able to check your memory status.
Page 40
30
Note
You may receive and send multimedia messages through certain network or service providers.
To edit the profile, contact your network service providers.
5.2 Email
Setup Email Account
You can use your phone to send and receive email messages containing text, sound and picture
via Email function. It’s easy to setup a POP3 or IMAP4 email account on your phone.
1. From the main menu, select Message and press the .
2. Select Email > Email accounts.
3. If you haven't setup email account, the Email Account wizard guides you through the
process of setting up your e-mail account.
Email address: Enter the Email address.
Protocol: Select protocol as POP3 or IMAP4.
Data account: Select your data account as GSM data or GPRS.
Incoming server: Enter the IP address or Server name of Incoming server
(POP3 or IMA4).
Outgoing server: Enter the IP address or Server name of Outgoing server
(SMTP).
User name: Enter the user name for your email account.
Password: Enter the password for your email account.
Account name: Enter email account name.
4. When finishing the above settings, press the to save. The new account name will be
displayed in account list under Email folder.
5. You can edit setting data by pressing Options.
Send and Receive
You can start sending and receiving email messages after setting up email account on your
phone.
Write Email
1. From the main menu, select Message and then press the .
Page 41

31
2. Select Email and press the .
3. Select Write Email and press the .
4. Start writing message.
5. Press Edit to enter recipients in the To: filed and insert subject and add attachment.
6. Confirm the sending information in editing screen and then press Done.
Send options
Your phone provides the following options:
Send
Send and save
Save to drafts: Save the message in drafts to be sent later.
Quit without saving: You will be prompted to clear or not this edited Email.
Inbox/Outbox/Sent/Drafts/Templates
The functions of those folders are the same as described in “5.1 Messages” chapter.
Clear mail box
Delete all email messages in the selected folder.
Delete marked Emails
Delete marked email messages.
Templates
There are several pre-defined Email templates. You can use them to facilitate your email
composing.
5.3 Broadcast Message
Your phone allows you to receive commercial messages. You can either enable or disable the
receiving mode and set some other options based on your personal preference.
Your phone provides the following options:
Receive mode: You can choose to receive or not to receive broadcast message.
Page 42
32
Read message: You can read messages by pressing or exit the by pressing
Back.
Languages: You can specify the desired broadcast language.
Channel setting: You can select a channel from the channel list or add new channel
where you want the messages to be received on the list. Once selected, you can edit or
delete the message.
5.4 Voice mail number
Your phone allows you to jump to your voice mailbox, if supported by your service provider.
Press and hold on the numeric key to listen your Voicemail box.
Note
To use this function, you may need to enter the voice server number obtained from your
service provider.
Page 43
33
6. CALL HISTORY
Your phone saves the call records of missed calls, received calls, dialed calls in the Call history.
You can check the most recent calls dialed, received, or missed. Your phone also offers the
functions: Delete, Edit, Send text message and Send multimedia message when you
select a certain phone number. Once the call list exceeds the memory limitation, the oldest
records will be deleted. You can press the key to have a quick review of missed,
dialed or received calls.
Note
When the SIM card is changed, the call records stored in phone are deleted but the call
records stored in the SIM card are not.
6.1 All Calls
Your phone records up to 60 entries of missed, dialed and received calls (20 entries each).
In Call history menu, choose All calls, and press the . Choose the desired number and
press the Open to view the call information. Press key in standby mode,
you can view information of call record or make a phone call to the selected number as well.
Your phone provides the following options:
Delete: Deletes the selected number from the call record.
Edit: Edit the phone number.
Send message:
− Send text message: Send a message to the selected number.
− Send multimedia message: Send a Multimedia message to the selected
number.
If the phone number is not from your phonebook, you can press Save and choose storage (To
SIM/To phone) to add it to phonebook.
Page 44

34
6.2 Dialled Calls
In Call history menu, choose Dialled calls and press the to view the records. View the
list of all the numbers you have called, your phone provides following options:
Delete: Deletes the selected number from the call record.
Edit: Edit the phone number.
Send message:
− Send text message: Send a message to the selected number.
− Send multimedia message: Send a Multimedia message to the selected
number.
6.3 Missed Calls
In Call history menu, choose Missed calls, and press the to view the records. View the
list of any calls you have missed, your phone provides following options:
Delete: Deletes the selected number from the call record.
Edit: Edit the phone number.
Send message:
− Send text message: Send a message to the selected number.
− Send multimedia message: Send a Multimedia message to the selected
number.
6.4 Received Calls
In Call history menu, choose Received Calls and press the to view the records. View
the list of all the numbers that have called you, your phone provides following options:
Delete: Deletes the selected number from the call record.
Edit: Edit the phone number.
Send message:
− Send text message: Send a message to the selected number.
− Send multimedia message: Send a Multimedia message to the selected
number.
Page 45

35
6.5 Delete Call Logs
In Call history menu, choose Delete call logs and press the to view the records. You
can delete call records from All calls, Dialled calls, Missed calls and Received calls.
6.6 Call Time
This function allows you to view the duration of your received calls and dialled calls. You can
also reset the call times.
The following timers are available:
Last call: Length of the last call.
Dialed calls: Length of the outgoing calls.
Received calls: Length of the incoming calls.
Reset all: Reset the call times.
6.7 Call Cost
Allow you to check the cost of your last call, all calls, remaining and reset the cost. To reset the
cost, you need PIN2 code.
Last call cost: Cost of the last call.
Total cost: Total cost of all calls made.
Reset cost: You may be required to enter PIN2 code to activate this function.
Max cost: You may be required to enter PIN2 code to activate this function.
Price per unit: You may be required to enter PIN2 code to activate this function.
6.8 SMS Counters
This function allows you to check the number of messages. You may press Reset to restart the
counter.
Your phone provides the following options:
Sent: Number of message you’ve sent.
Received: Number of message you’ve received.
6.9 Data Counters
You can check the total of data transferred over the web through the GPRS information option.
Page 46

36
Last sent: Size of data, in bytes, sent of the last transfer.
Last received: Size of data, in bytes, received of the last transfer.
All sent: Size of the data all sent.
All received: Size of the data all received.
Reset counter: Reset the data size counter.
Page 47
37
7. SETTINGS
7.1 User profile
You may set up the following 6 different profiles to adapt to different environmental conditions:
General , Meeting , Outdoor , Indoor , Headset and Bluetooth .
To activate the Profiles
The default User profile is General. When a User profile is activated, there is a corresponding
User profile symbol displayed as the status indicator on the standby screen. (Refer to the
“Status indicators” on page 12 )
Follow the below steps to activate the a profile in the User profile menu.
1. From the main menu, select Settings and press the .
2. Select User profiles and press the .
3. Select a desired profile and press the .
To edit the Profiles
You can customize the profiles of General / Meeting / Outdoor / Indoor / Headset /
Bluetooth to meet your needs.
1. From the main menu, select Settings and press the .
2. Select User profiles and press the .
3. Select a desired profile.
4. Press Options and select Customize and press the .
5. Select a desired option to customize.
Tone Setup: Sets desired ring tone.
Note
Please be careful not to injure your ears when ring volume is set high.
Volume: Adjusts the volume of ring tone and key tone.
Page 48

38
Alert Type: Selects different alert types (Ring only, Vib. only, Vib. and ring, Vib. then
ring, and Light only).
Ring Type: Toggles between single, repeat, ascending and descending rings.
Answer mode: You can select pressing Any key to answer a call.
7.2 Phone setup
General
Language: Set different display languages.
Writing language: Set different edit languages.
Time and date: This function allows you to set your home city, view and change the
time and date settings in your phone. You can also choose to auto update the date and
time.
Greeting text: Enables you to create or edit any message for your welcome note when
power on. You can also set status on/off Greeting text.
Flight mode: This function allows you to play the music player during flight if you switch
the mode to Flight Mode instead of Normal Mode.
− Off: GSM/GPRS network is available. You may make a call.
− On: GSM/GPRS is disabled. You cannot make a call.
− Query when power on: You must select either On or Off while the phone is on.
Phone status: This function allows you to view phone status, such as model, profile,
phone memory, card memory and battery.
Display settings
Wallpaper: Changes the standby screen wallpaper.
Themes: Enables you to change the theme.
LCD backlight: Adjust LCD brightness and backlight timer.
Screen saver: Disable or Choose screen saver.
− You can disable or define the screen saver start time. (5 sec to 1 min)
− To choose your screen saver select System or User defined.
Calendar idle screen: Displays or hide calendar on idle screen.
Show date and time: Displays or hide date and time on idle screen.
Clock type: There are two options available: Analog and Digital.
7.3 Bluetooth setup
Page 49

39
Your phone is equipped with Bluetooth technology, enabling you to connect the phone
wirelessly to other Bluetooth devices.
In some areas, use the Bluetooth wireless technology is restricted. For more information, please
consult with your local institution or service provider.
You can save battery power by turning the Bluetooth wireless function off while it is not in use
or in situations where Bluetooth use is prohibited, such as airline traveling.
Bluetooth is a short-range wireless communications technology capable of exchanging
information over a distance of about 10 meters without requiring a physical connection. But
Bluetooth wireless connections may be interfered because of such barriers as the wall or other
electronic equipment.
To start using Bluetooth technology
Your Bluetooth connection needs to be configured prior to operation. Once setup is complete,
the following Bluetooth icons will appear in the status bar.
: Bluetooth is active and connected.
: On but not in use.
: Stealth mode (Does not broadcast to other devices).
Power: Switch Bluetooth on or off.
Inquiry audio device: Search for and pair with an audio Bluetooth device, such as
Bluetooth headset. If there is an enabled Bluetooth device within a range of your
phone, press the for pairing. When asked for permission to connect to the
device, enter the pass code for the device, both in the phone and in the device that
you are connecting to.
My device:
− Inquiry new device: Search for new Bluetooth device.
− From here you can also find devices which had established a connection with
your phone. Select a device and press the to connect or disconnect. Or
select a device and press Options:
Rename: Rename the target device name.
Delete: Delete a device.
Delete all: Delete all devices.
Service list: Display service list.
Page 50
40
− Active devices: Display devices in use and its supported service. Press the
to disconnect with the selected device.
− Setting:
Visibility: To make your phone either visible or invisible. Press the
to turn on or off this function.
Change device name: Change the name of your phone. The name is
shown on other devices when your phone is detected.
Authentication: If activated, transmitting data over the Bluetooth in an
encrypted format.
Audio path: Allow you to choose either Leave in phone or Forward to
Bluetooth headset.
FTP settings: Customize your phone's shared folders and define access
right as Full control or Read only.
− About: Display my device information and supported services.
Note
Your phone supports the following Bluetooth profile services: Hands Free profile, Headset
profile, SPP profile, OPP profile, FTP profile, A2DP profile and AVRCP profile. Select "Inquiry
audio device" to search for Bluetooth headset or Notebook. Select "My device > Inquiry
new device" to search mobile phone device.
7.4 Call setup
Call waiting
This is a network service that allows notification to another caller, during an existing call.
1. Select Call setup and press the .
2. Select Call waiting and press the .
3. Select Activate, Deactivate or Query status and press the .
Note
Selecting Query status will enable you to see if the service is activated or deactivated.
Page 51

41
Call divert
You can set the call condition by which calls are diverted to another number.
To set call divert
1. Select Call setup and press the .
2. Select Call divert, then press the .
3. Select an item and press the .
4. Select Activate, Deactivate or Query Status and press the .
Your phone provides the following divert options:
Divert all voice calls: All voice calls are diverted.
Divert if busy: Calls are diverted when your phone is engaged on other calls.
Divert if unreachable: Calls are diverted when you are out of range of your provider.
Divert if no answer: Calls are diverted when the call is not answered.
Divert all data calls: All data calls are diverted.
Cancel all diverts: Cancels the above settings.
Call barring
A network service allows you to restrict incoming and outgoing calls on your phone. A password
is required for this function.
Outgoing calls:
− All calls: If activated, no calls can be made.
− International calls: If activated, no international calls may be made.
− International call except to home PLMN: If activated, only local calls or calls to
the home country (country of the network operator belonged to) may be made.
Incoming calls:
− All calls: If activated, no calls may be received.
− When roaming: If activated, you may not receive calls when you are outside your
home network.
Cancel all: Cancels barring settings (password is required.)
Change barring password: You can edit barring password here. Contact your
Page 52
42
provider for default password. This menu enables you to change your barring call
password.
Note
Both lines can be answered regardless of which is selected, however If you don't subscribe to
such a service and set your phone to Line 2, you will not be able to make calls.
Speed dial
If you assign a number saved in the Phonebook to one of the speed dialing keys (from 2 to 9),
then you can press speed dialing key in standby mode and press key to call the
phone number. You can set status On or Off when you select Call setup > Speed dial from
the main menu.
To assign the speed dial
1. Select Speed dial and press the .
2. Select Set number and press the .
3. Move the cursor with the Up and Dow navigation key, and then pick up one out from the 8
entries.
4. Select Edit and then phone system will bring you to the Phonebook list.
5. Select one of the contact from the list and press the .
Caller ID
You can decide how to present your identity by selecting Hide ID, Send ID or Set by
network when you make a call.
Call time reminder
This function allows you to set a time reminder during a call. Your phone provides the following
time alert options: Off/Single/Periodic.
Note
The minimum Periodic time is 30 seconds.
Page 53

43
Closed user group
This function allows you to set the limited call group. Only the person in the specific group is
allowed to make call to and receive call from.
Background sound
This function allows you add background sound during a call. Your phone provides the following
options: Select when make call/Playback settings/Effect list.
7.5 Network Setup
Network selection
Your phone provides you three options for network connectivity.
New search: Refreshes your network connection.
Select network: Displays a list of networks.
Selection mode: Toggles between Automatic and Manual modes.
Preferences
Preferred networks is used when the mode has been set to Automatic. The location numbers
in the preferred networks list show the search priority. Your service provider’s network will be
displayed. You can select your GSM/GPRS network if your provider offers multiple network
choices. (Remember to apply the international roaming service while traveling abroad)
Your phone provides the following options:
Add from list: Can select from over 300 networks worldwide.
New: Creates a new network list by entering MCC/MNC information and adjusting the
priority setting.
Change priority: Changes the priority settings in your preferred network list.
Delete: Deletes selected item.
GPRS connection
The handset can toggle the GPRS connection status between Always/When needed.
7.6 Security setup
You are able to set the SIM lock, Phone lock, Auto keypad lock and Change password
Page 54

44
on your phone. The Phone lock and Auto keypad lock settings are phone dependent.
SIM Lock
This function allows you to lock the SIM card with a specific PIN number. The feature is
designed to prevent the use of your SIM card if your phone becomes lost. You can switch SIM
lock on/off by inputting the PIN code.
Phone Lock
This is the function which allows you to lock or unlock your phone for protection purpose. You
need to enter a password when unlocking the phone. The default password is “1122”.
Auto Keypad Lock
This function allows you to automatically lock your phone’s keypad to prevent accidental
pressing of any keys.
Follow the below steps to set up this function.
From the main menu, select Settings and press the .
Select Security setup and press the .
Select the Auto keypad lock and press the .
Use the navigation keys to select a desired option and press the .
Change Password
This function allows you to change PIN, PIN2 and Phone password.
7.7 Restore factory settings
This function allows you to reset the entire phone to its factory defaults. (Password protected.)
Page 55
45
8. MEDIA CENTER
8.1 Image Viewer
All images from EMS, MMS and WAP can be reviewed from the Image Viewer mode. You can
toggle the browse style between List style or Matrix style when viewing images.
The default viewing storage of photos or images is the camera photo folder (Memory
card:\DCIM\100A1030\) in the inserted memory card.
Your phone provides the following selections when you select Media center > Image Viewer
> Options from the main menu:
Slideshow: Allow you to play images saved in the same folder as a slide show.
Edit: Edit images.
Browse style: Select the style when browsing pictures. Your phone offers the List
style and Matrix style to view your pictures.
Use as: Use your pictures as wallpaper, screen saver or caller picture.
Send: Forward your pictures to the selected recipients via the multimedia message,
email or Bluetooth.
Rename: Rename the file name.
Delete: Delete pictures in My Stuff.
Delete all files: Delete all pictures at once.
Sort by: Sort your photos by name, type, time or size.
Storage: Choose storage destination (phone or memory card).
Note
The maximum default size for sending a file via MMS is 300KB. (Varies according to service
provider)
To view the pictures
1. From the main menu, select Media center and press the .
2. Select Image Viewer and press the . Pictures are then displayed on the phone
screen.
3. Press Left/Right navigation key to browse your pictures saved in your phone/memory
card.
Page 56
46
4. Select a picture and press the or to zoom in/out. Then press the
Right soft key to go back to original view.
8.2 Media Player
The S-1200 has an integrated media player. You can enjoy listening to your favorite Audio or
Video on your phone using a compatible headset or via the internal loudspeaker.
Your phone supports the following formats in Media Player function.
Audio: MP3, AAC, AAC+, WAV, MIDI and AMR.
Video: MP4 and 3GP.
By default, the Media Type is filtered with Audio List. You can switch the media type between
Audio List and Video List.
To play the Audio or Video
1. From the main menu, select Media center and then press the .
2. Select Media player and press the .
3. You can select All media files to open a list of all Audio or Video tracks stored in your
phone / memory card or play from a customized playlist.
To customize play list
You can create play list according to your personal preference by adding Audio or Video tracks
from your phone or memory card.
To edit playlist
1. From the main menu, select Media center and press the .
2. Select Media player and press the .
3. Select My playlists and press the .
4. System will give the list of your stored playlists.
5. Press Options to create new playlist, delete playlist or rename playlist.
All media files
You can select whether or not update the “All media files” list automatically by switching on or
off the “Auto update media library” functionality in the Options. By default, this
Page 57
47
functionality is set as Off. Once this feature is activated, S-1200 will list down all the media files
corresponding to the selected media type atomically every time when the “All media files”
option in the Media player submenu list is selected.
When the “Auto update media library” functionality is set as Off, you can select the “Update
media library” option to update the media files list manually.
To change media player settings
You can customize the playback mode of media player for Audio and Videos.
Shuffle: Allows you to set all Audio and Videos by playing shuffled or one by one.
Repeat: Allows you to repeat all Audio and Video or one selected Audio and Videos.
Settings: Allows you to setup Player, Audio and Bluetooth settings.
8.3 Sound Recorder
Sound recorder is a simple recording tool provided functionality for you to manage audio files.
To start voice recording
1. From the main menu, select Media center and press the .
2. Select Sound recorder and press the .
3. Press Record to start recording.
Note
During a recording, you may pause or stop the voice recording anytime by pressing center
selection key or right soft key.
After recording, the file is saved in AMR, WAV or AWB formats.
Your phone provides the following additional options:
Play: Play the selected recorded audio file.
Append: Start a recording and append it to the selected audio file.
Rename: Rename the recorded audio file.
Delete: Delete the recorded audio file.
Page 58
48
Delete all files: Delete all recorded audio files.
Settings: Allow you to change the settings of storage location and file format.
Use as: Use as User profiles.
Send: Forward the selected recorded audio file as ringtone selections via Bluetooth or
to send as an MMS or an email.
8.4 FM Radio
This feature allows you to listen to your favor radio station anytime. A compatible headset or
enhancement needs to be attached to the device for the FM radio to function properly.
Note
You have to plug-in the earphone in order to use the FM radio.
To listen to the radio
1. Connect the headset to your phone.
2. From the main menu, select Media center and press the .
3. Select FM Radio and press the .
4. Use navigation key to search radio station. You can also press Options to search radio
frequency for available channels and automatically store to the channel list.
5. Press Options to edit the channel list. There are 9 stations you may pre-set.
Your phone provides the following options for radio:
Channel list: Bookmark up to 9 radio stations by entering the channel name and
frequency.
Manual input: Keys in the radio station frequency manually.
Preset auto search: Auto search available channels and automatically store them to
the channel list.
Settings: Changes background play, record format, audio quality, record storage and
channel effect settings. You can record in AMR, WAV or AWB formats.
Record: Records your favorite radio programs.
Page 59
49
Append: Resumes a previously recorded file.
File list: Manages recorded audio files.
8.5 Schedule FM record
You can schedule the FM recording by defining date, time, channel, and the recording settings.
You can schedule up to 4 recording plans.
8.6 Photo Editor
You can edit images stored on your phone or memory card.
Photo artist
1. From the main menu, select Media center and press the .
2. Select Photo editor and press the .
3. Select Photo artist and press the .
Search from file: Choose one image from Phone or Memory card to edit.
− Auto resize: Adjust the selected image to fix full display automatically.
− Main LCD clip: Resize and clip the image. Use navigation keys to move the
red rectangle to
− change clip area; press key (zoom in) / key (zoom out)
to resize the red rectangle. Press the OK to clip and the clipped image
will be adjusted to fix full display automatically.
− Manual clip: Resize and clip the image manually. Press to toggle
among three clip states.
− Clip help: Provide relevant operations for your guidance.
Your phone provides the following additional options:
− Save as: Save the clipped picture as a new file.
− Send: Send the saved file via Bluetooth, MMS or Email.
− Add frame: Add frame from predefined frame stored in phone.
− Add icon: Add icon from predefined icon stored in phone. You can move the
icon to your preferred position by pressing navigation keys and then press Done
Page 60
50
to stamp.
− Add text: Add text and edit Text style on the image. You can move the text to
your preferred position by pressing navigation keys and then press Done.
− Mirror: Use navigation keys to flip/mirror image.
− Rotate: Use navigation keys to rotate image.
− Add defect: Create a mosaic effect in the red rectangle area.
− Redeye reduction: Reduce the redeye effect in the red rectangle area.
Note
The method of choosing red rectangle area to add defect or reduce redeye is the same as
the manual clip area change method.
− Expand canvas: If the image is not fix to full display, you can adjust it by
selecting this option.
− Undo: Undo the last edit.
− Exit: Exit photo artist.
− Help: Provide relevant operations for your guidance.
Resize image: Resize the selected image.
Image tiles
This option allows you to tile 2, 4 or 9 images together into a large one. After finish selecting,
press Option and select Save as to save it.
8.7 Sound effects
This function allows you to select Audio effect and set Bass enhancement.
8.8 Fun & Games
Java
The S-1200 is designed to support Java applications. It is allowed to download and install Java
games or applications. Two games are already preloaded on your phone: AncientTreasures
and Grand Showhand.
Page 61
51
To use Java the first time
Before using the Java games, you must install the MIDlet to execute the Java games. Your
handset provider has integrated the MIDlet by default in the S-1200 and provides two methods
of installation: installation of the MIDlet from the WAP and installation of the MIDlet locally.
(Refer below for details)
To install Java games
1. From the main menu, select the Fun & Games and press the .
2. Select Java and press the .
3. Select a Java game you want to play and press the to start playing the game.
To download Java games from WAP
1. Go to the WAP site (Refer to "INTERNET" on page 79) and download the Java games from
the WAP site.
2. Download then Install applications, select Fun & Games and press the from the
main menu.
3. Select Java and press the .
4. Select one of the Java games and press to launch, Press Options to adjust the
settings, view the details, or delete the application.
To save Java games to File Manager menu
1. Save the Java game files to File Manager by the USB cable or memory card. The saving
progress is same as the to add the music tracks in your phone.
2. After installing the application, select Fun & Games from the main menu and press
.
3. Select Java and press the .
4. Select one of the Java games and press to launch, Press Options to adjust the
settings, view the details, or delete the application.
Note
Java MIDlet only read files with .jad or .jar extensions.
Page 62
52
To personalize an application
Your phone provides the following options when you select Fun & Games > Java >
Application from the main menu.
Setting: Define the permission level when using Java applications. Permission levels
are “Prompt at first”, “Prompt once”, “Allow”, “Never”, and “Prompt always”. The
following seven permission settings can be configured:
− Network Access: Allows to making a data connection via networks.
− Auto Invocation: Allows to automatically starting a MIDlet, for example, by push
registration.
− Messaging: Allows to sending or receive messages like SMS.
− Multimedia: Allows to recording Album, audio, video, and so on.
− Read user data: Allows to reading user data like phonebook or calendar entries.
− Write user data: Allows to writing user data.
− Local connectivity: Allows you to connect via local ports like Bluetooth or IrDA.
Details: Accesses information about java games and applications including: name of
application, memory size, application version, name of vender and authorized source.
Others Options: Delete/Network Profile/Restore default settings.
Note
Default java games cannot be deleted.
Java Settings
Your phone provides the following options when you select Fun & Games > Java Settings
from the main menu: Java audio/Java vibration/Java network/Heap size .
Java Default Security
Your phone provides the following default security options: Third party/Untrusted
domain/Restore default/Domain options. You can configure seven permission settings for each
of option individually.
Page 63
53
9. FILE MANAGER
In this menu, you can manage your images, photos, audio and others. There will be two
storages options available:
9.1 Phone
You may check files saved on your phone. When you enter File Manager, you may see a drive
Phone.
9.2 Memory Card
If memory card is plugged in, one more drive named Memory Card will display on the phone.
When you select Phone and press Options, your phone offers New folder and Format
functions. If you select Memory Card and press Options, your phone offers New folder,
Format, Remove, Rename and Details. You can view and send a picture. In addition, you
can set the picture as wallpaper.
Note
Formatting phone internal memory or memory card erases all data in the phone internal
memory or on the memory card. As you cannot retrieve the erased data, exercise adequate
caution before formatting.
Page 64
54
10. DIGITAL CAMERA
10.1 Introduction
To launch the Camera
There are two ways to turn on your camera:
1. Hold the Camera on/off button at the right side of the phone; or
2. Press the
left soft key and select Digital camera in Menu. Then, select
Camera again to launch the camera.
Note
The screen orientation will switch to the landscape mode automatically when you activate the
camera.
The Digital Camera application does not feature internal memory, please insert memory card
when launching Digital Camera functions (Camera, Album and Video recorder)
To close the Camera
Press key or press and hold Camera on/off button if you want to exit the
camera.
Note
The camera will NOT be available when:
- The battery is extremely low .
- Your phone is connected to PC with the USB data cable.
Page 65
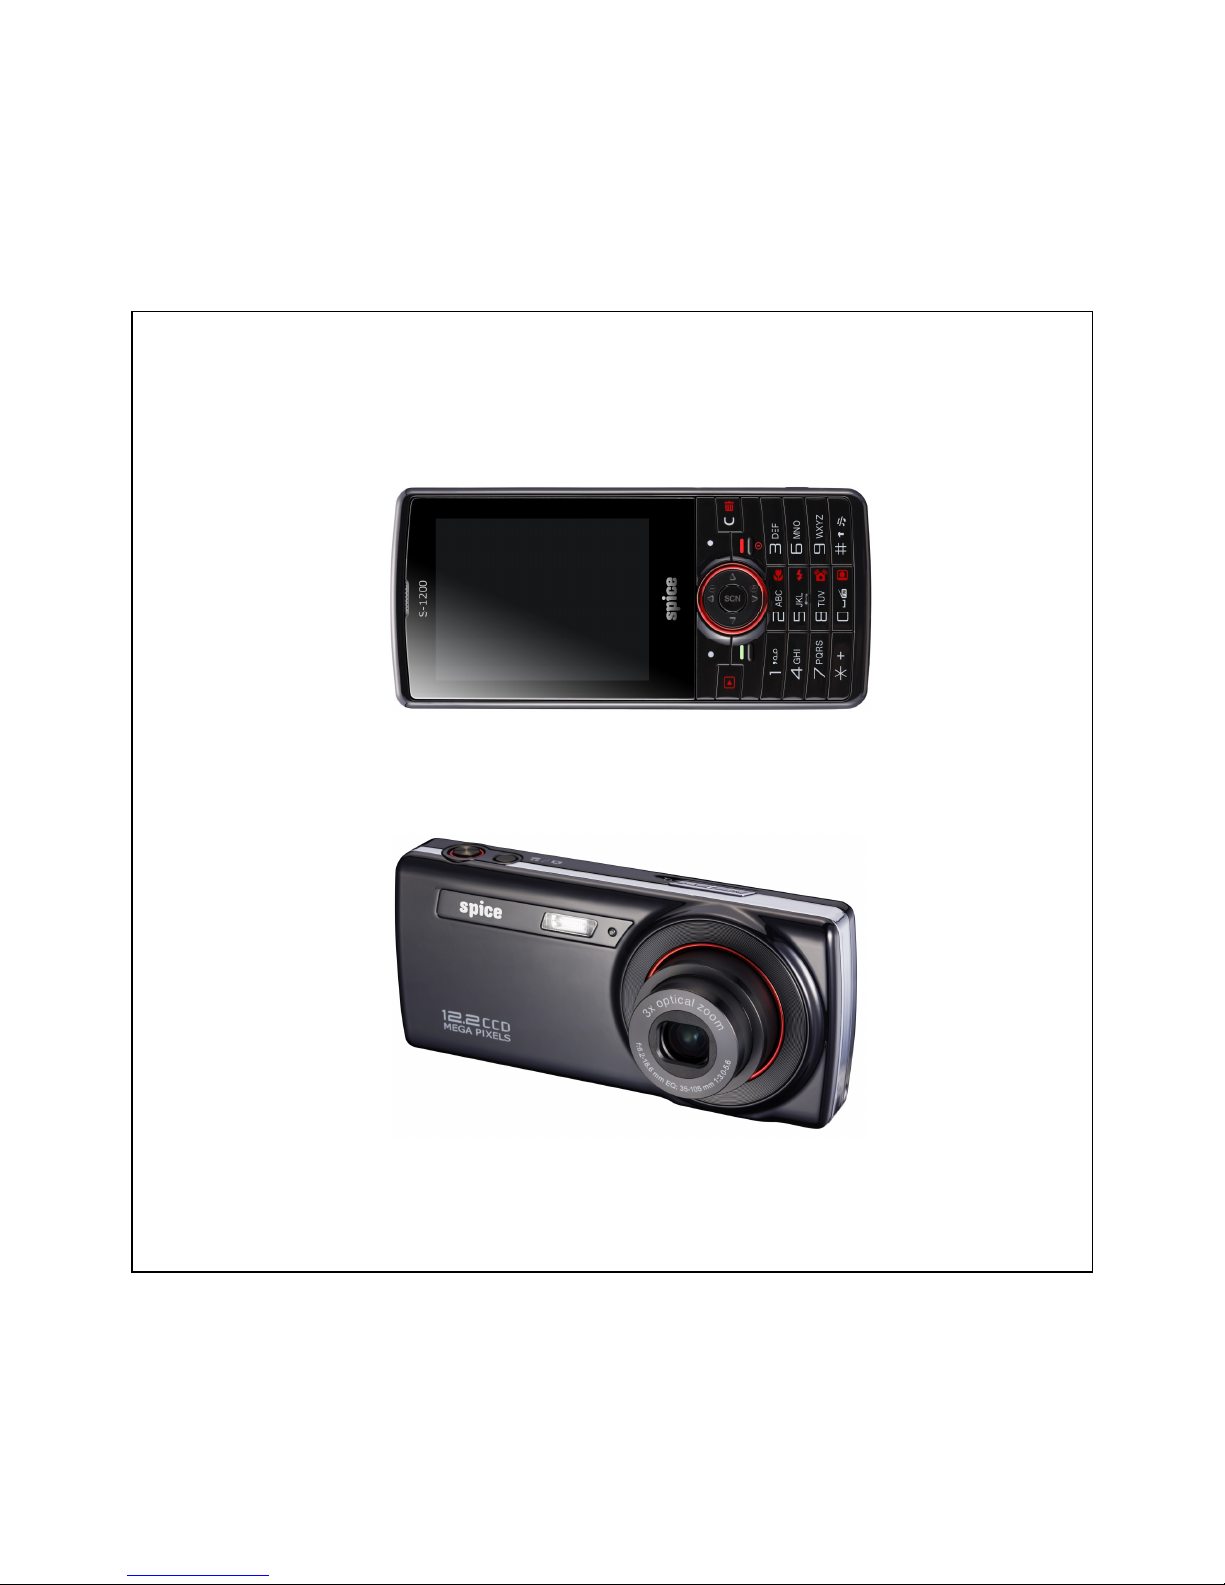
55
Camera Buttons/Keys and Functions
Front View (Camera Landscape)
Rear/Side View
Page 66
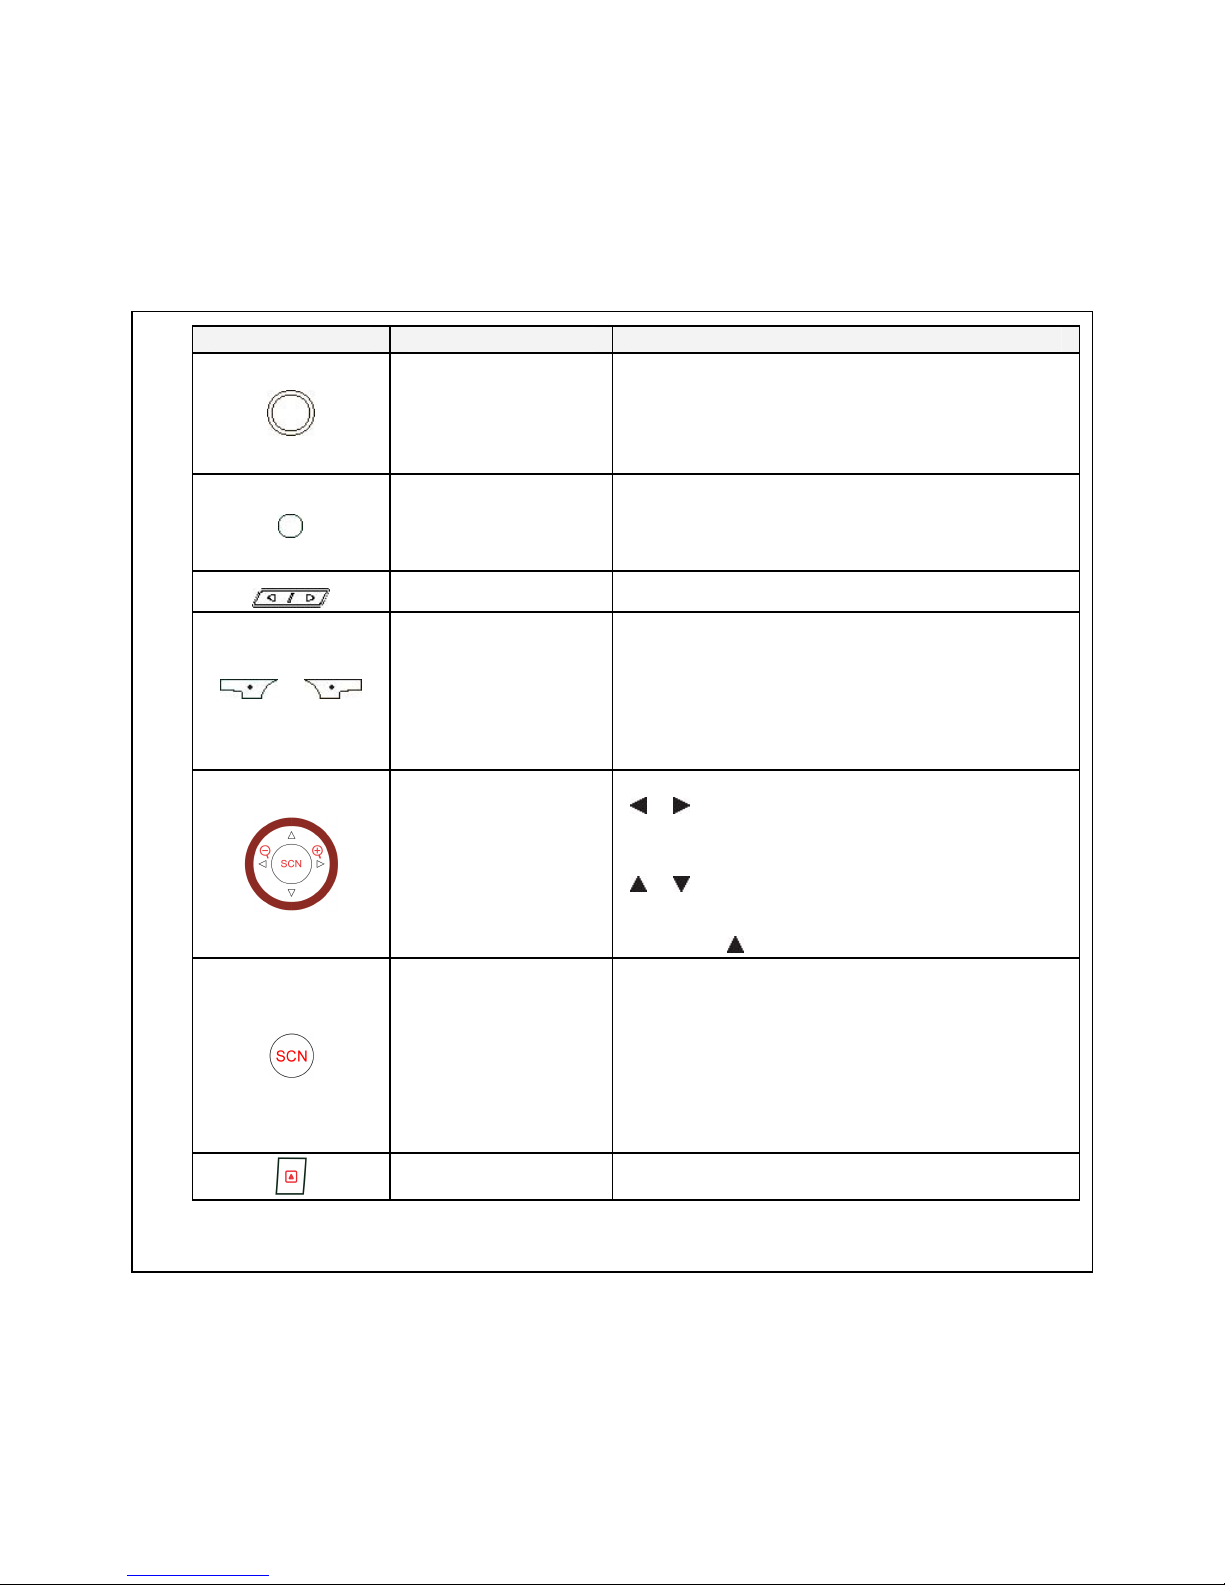
56
Icon Button/Key Function
Camera shutter
button
The side Camera shutter button is functional only
when Camera mode is activated.
S1: Focus, S2: Take a picture or start/stop video
recording, while in Album is used to start or stop
voice memo.
Camera/Video switch
button ; Camera
on/off button
Press and hold for camera on/off (only used
when phone power is on).
Short press to switch between capturing a
picture and video when in Camera mode.
Volume/Zoom Key Press to zoom out/in function.
/
Left and right soft
key
Left soft key - Enter OSD Menu button:
• Press to enter the OSD menu selection
options.
Right soft key - Exit OSD Menu button:
• Press to return to the previous menu or exit
the OSD menu.
4-Way navigation
key
When launching camera, Red LED will light up.
/
• Press to move left/right in the OSD menu.
• Press to zoom out/zoom in the object.
/
• Press to move up/down in the OSD menu.
• Press to show/hide icons or information.
Center selection key
1. Confirm the selection when using the OSD
menus.
2. In Camera mode:
• Press to select among the scene modes.
3. In Album mode:
• Press to start/pause the playback of the
Voice Memo or Video Playback.
Playback key Press to play the captured photos/videos.
Page 67
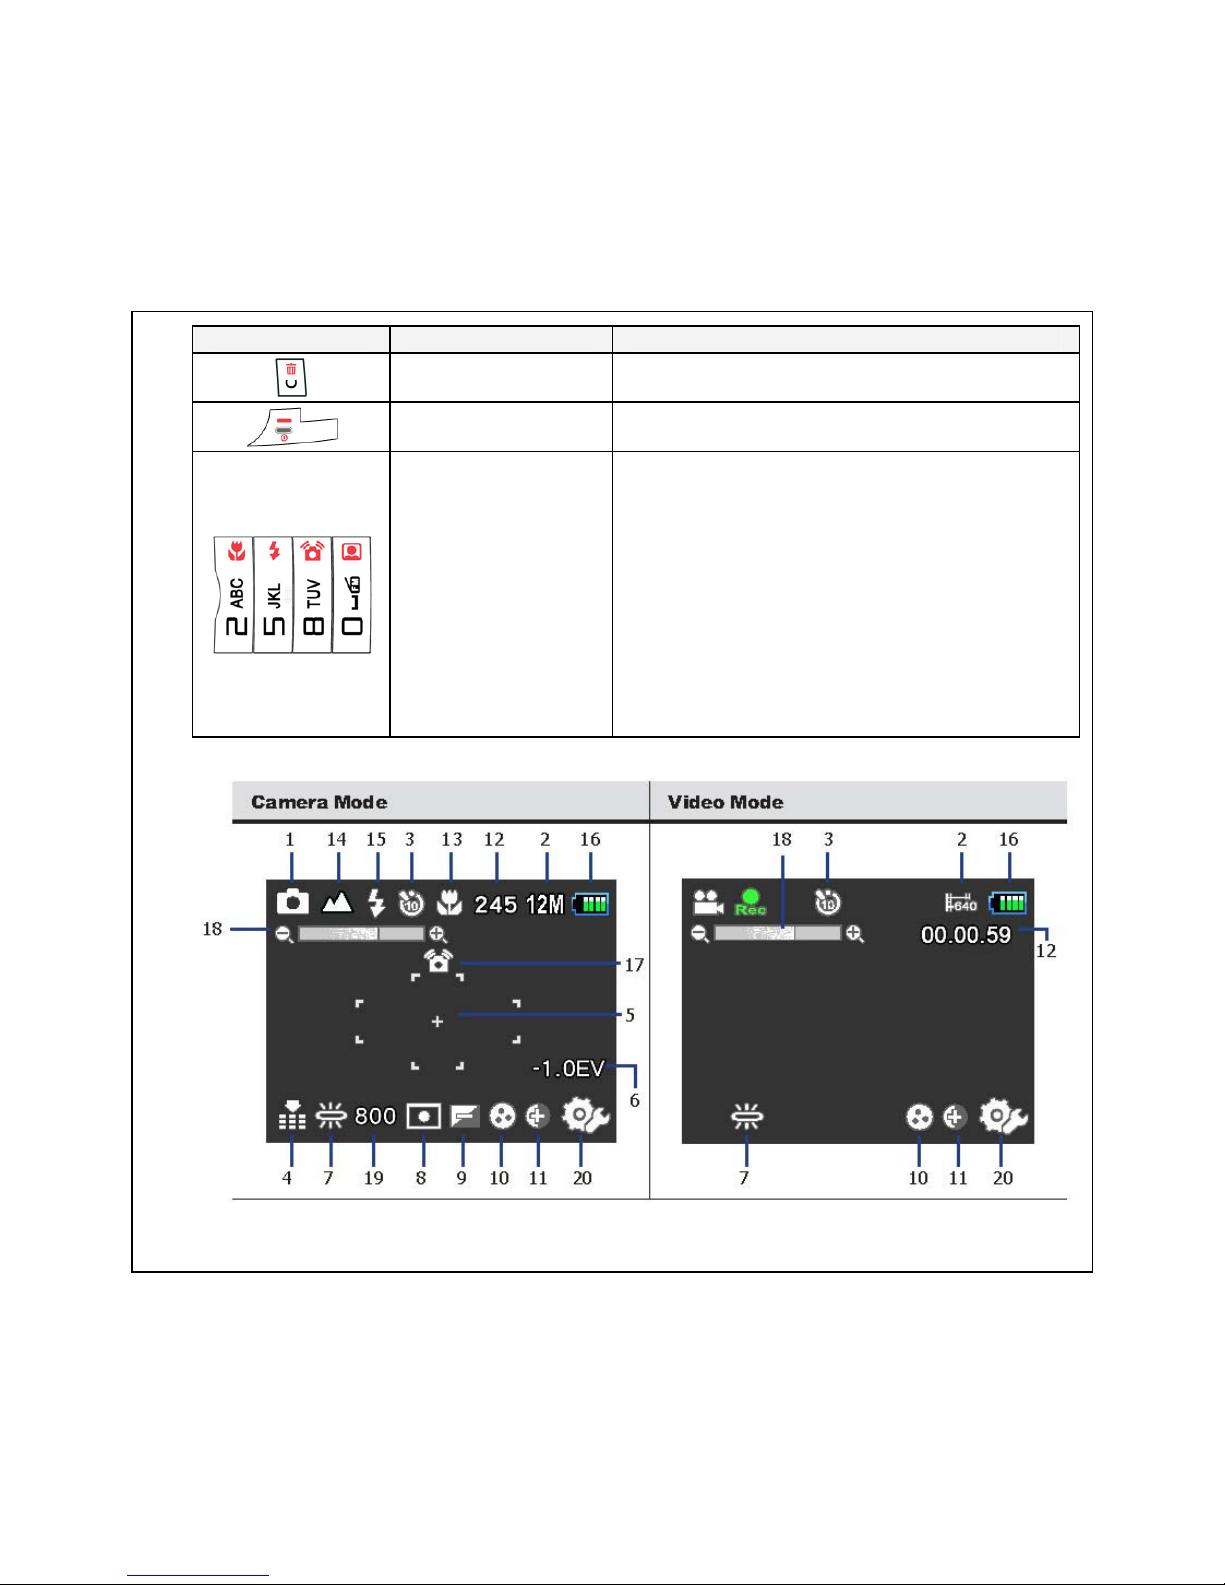
57
Icon Button/Key Function
Clear/Delete key
Press to delete one or all captured
photos/videos.
End key
Press to exit the camera and return to Standby
mode.
Numeric keys
In most of the time, the numeric keys are used
to input numbers or characters. In camera
preview mode, Numeric keys 2, 5, 8, 0 each is
the Hot Key to:
2 key: enable or disable Macro mode
5 key: press to scroll through the Flash mode
options
8 key: enable or disable Anti-Shake function
0 key: press to scroll through Auto, Self-Portrait,
Smile Detection and Face Detection
Camera/Video mode display
Page 68
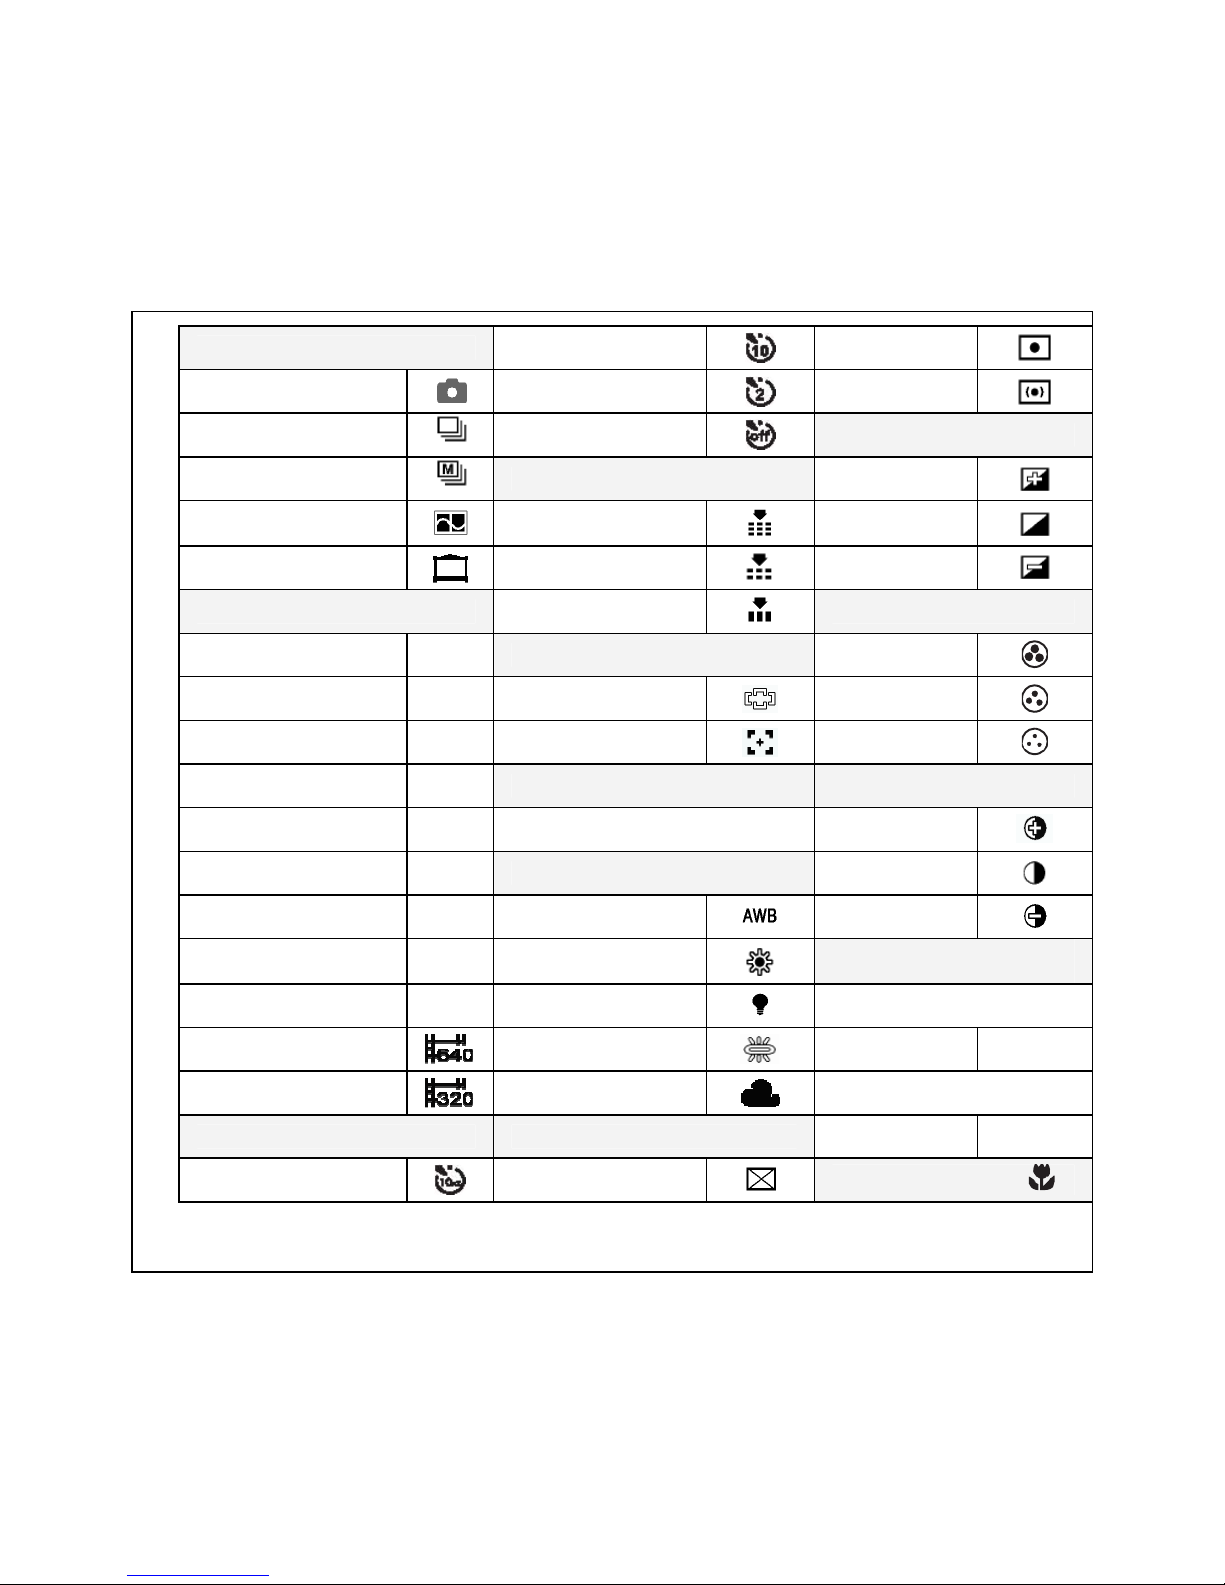
58
1. Shooting Mode 10 Seconds
Spot
Normal
2 Seconds
C-Weighted
Burst
Off
9. Sharpness
Multi Burst
4. Image Quality High
Panorama
(Left to right, Right to left)
Best
Normal
Frame
(9 default frames)
Better
Low
2. Image/Video Resolution Good
10. Saturation
12M 5. Focus Zone High
11M (3:2) Multi-Zone
Normal
9M (16:9) Center
Low
8M 6. EV Compensation 11. Contrast
5M -2.0EV ~+2.0EV High
3M 7. White Balance Normal
2M (16:9) Auto
Low
2M Sunny
12. Image Counter
(Camera and Video mode)
VGA Tungsten
Camera Mode
640x480
Fluorescent
Quantity 9999
320x240
Cloudy
Video Mode
3. Self-timer 8. AE Metering Time 00:00:00
10 Seconds X 2
Matrix
13. Macro
Page 69
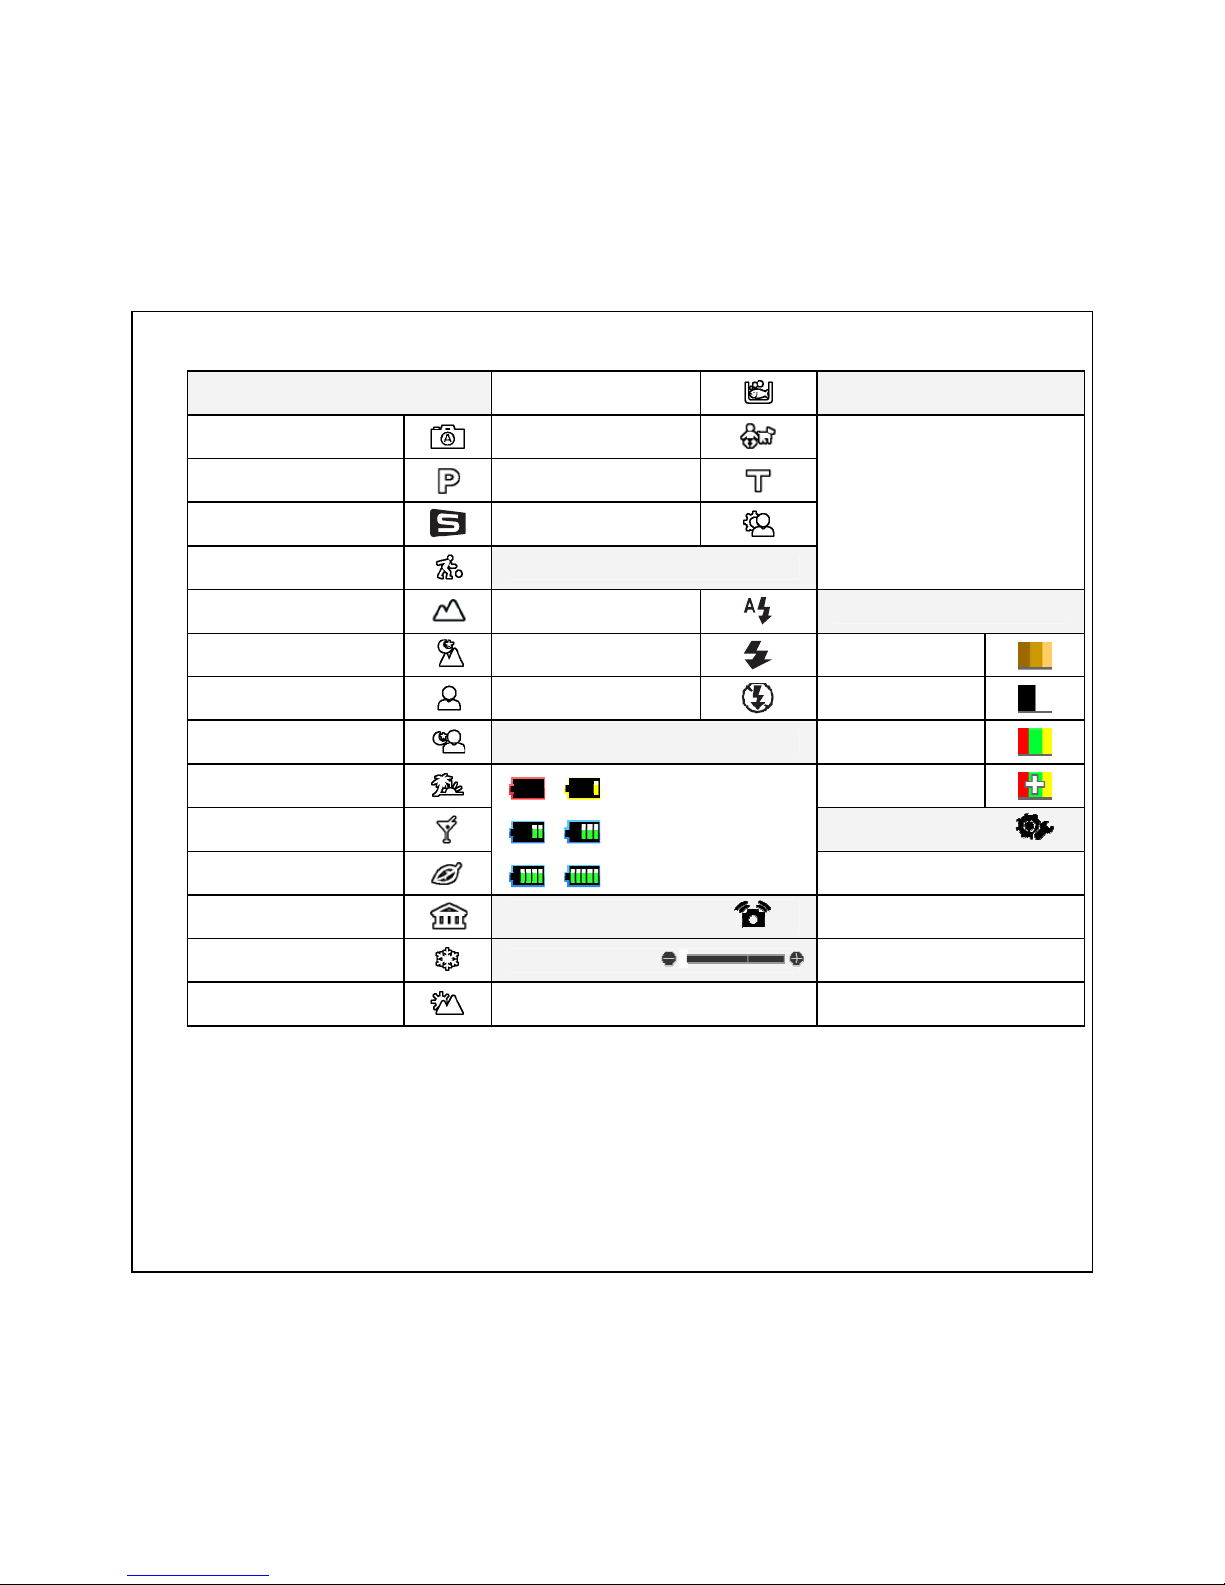
59
14. Scene Aquarium
19. ISO Speed
Auto
Kids & Pets
Auto ISO 400
P-Mode
Copy
ISO 80 ISO 800
Smart Scene
Backlight
ISO 100 ISO 1600
Sport
15. Flash ISO 200 ISO 3200
Landscape
Auto Flash
20. Color
Night Landscape
Fill Flash
Sepia
Portrait
Flash Off
Black & White
Night Portrait
16. Battery Indicator Color
Beach
Vivid
Party
21. Menu
Foliage
Museum
17. Anti-Shake
Snow
18. Zoom Bar
Sunset
Page 70
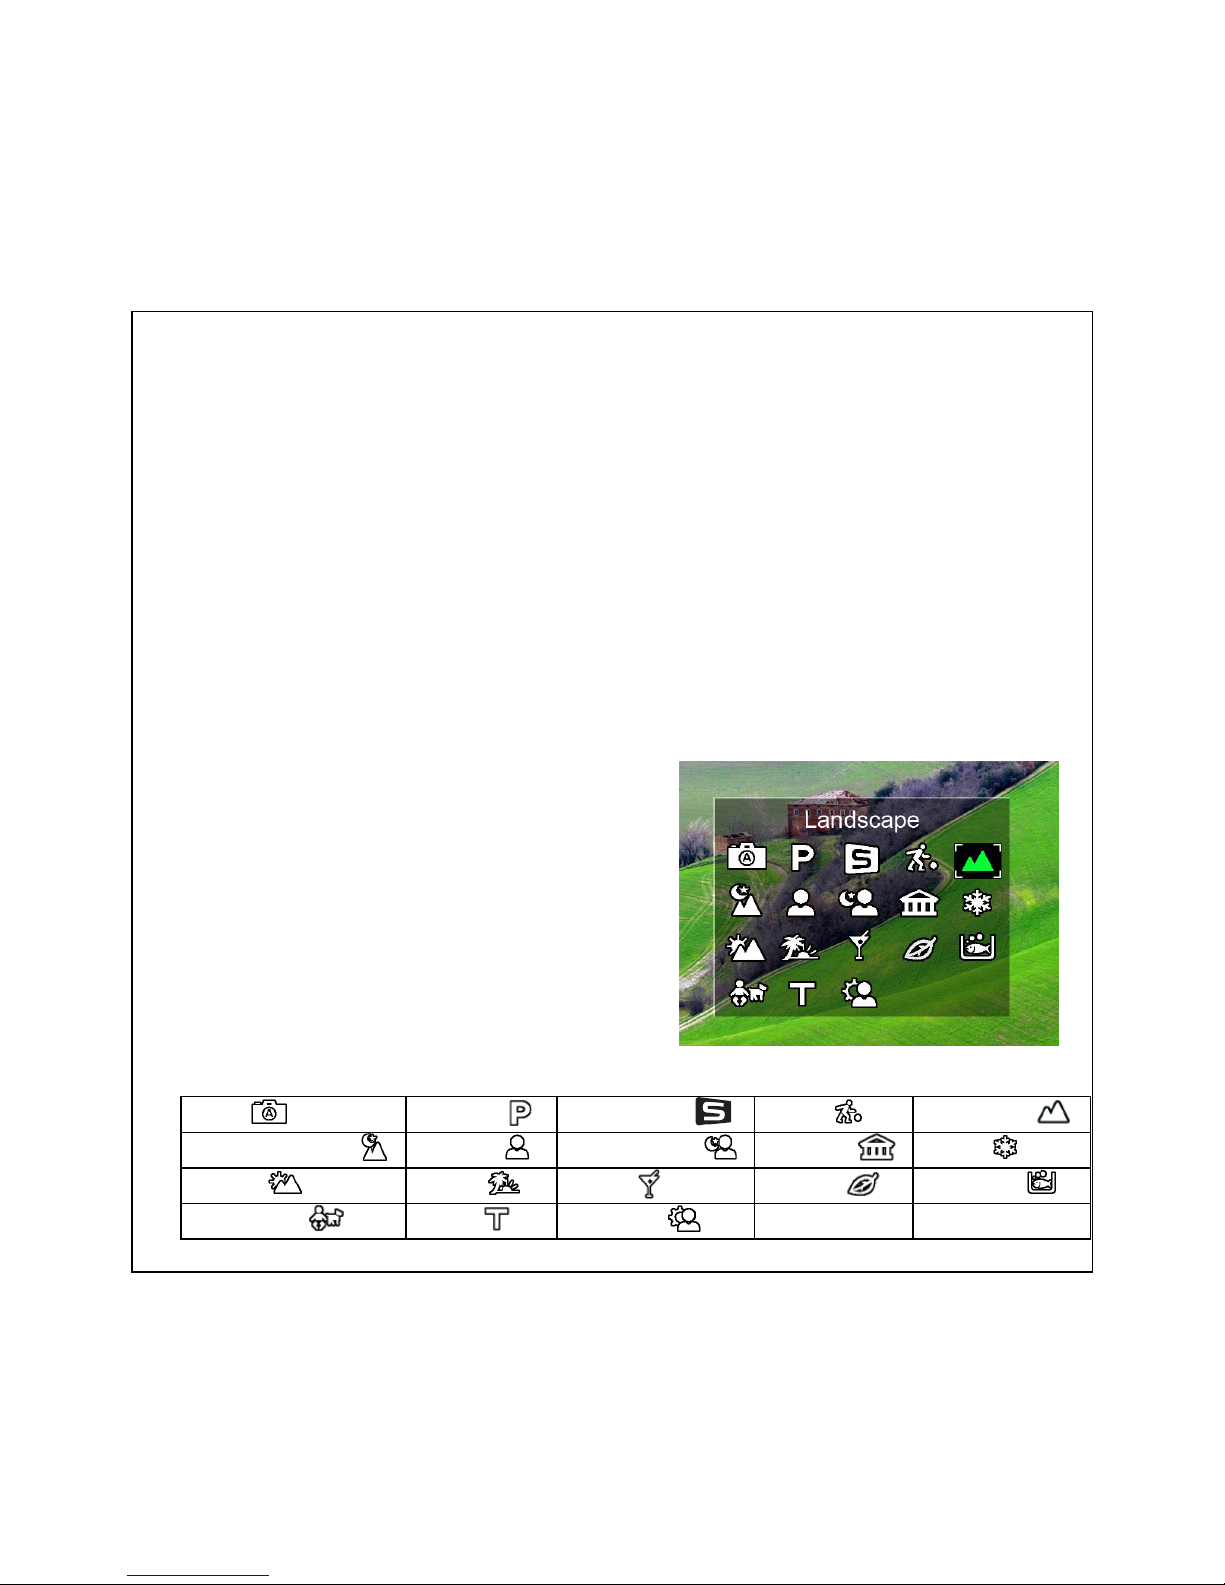
60
10.2 Getting started with your camera
Now that you are familiar with the layout of your camera, you are ready to start taking photos
and videos.
Taking your first photo
Taking a photo with Camera is very easy and simple.
1. Turn on the camera, frame the shot on the screen and press Shutter button halfway. The
camera automatically adjusts the focus and the exposure.
2. The focus bracket will turn to green when the camera is ready. Press Shutter button fully to
capture the photo. The photo is automatically saved.
3. After a quickly automatic preview on the screen, the viewfinder shows on the screen for the
next shot.
Scene
The camera supports various preset scenes for
shooting in different environments and
conditions. Each setting of scene is configured
automatically by the camera.
Press the center selection key and select
a scene you want by using the
navigation key to scroll through the
scenes
Then, press the center selection key
again to confirm the selection.
The scene icon appears on the screen to
indicate the scene is activated.
Auto P-Mode
Smart Scene Sport
Landscape
Night Landscape Portrait
Night Portrait
Museum
Snow
Sunset Beach
Party Foliage
Aquarium
Kids & Pets Copy Backlight
Page 71
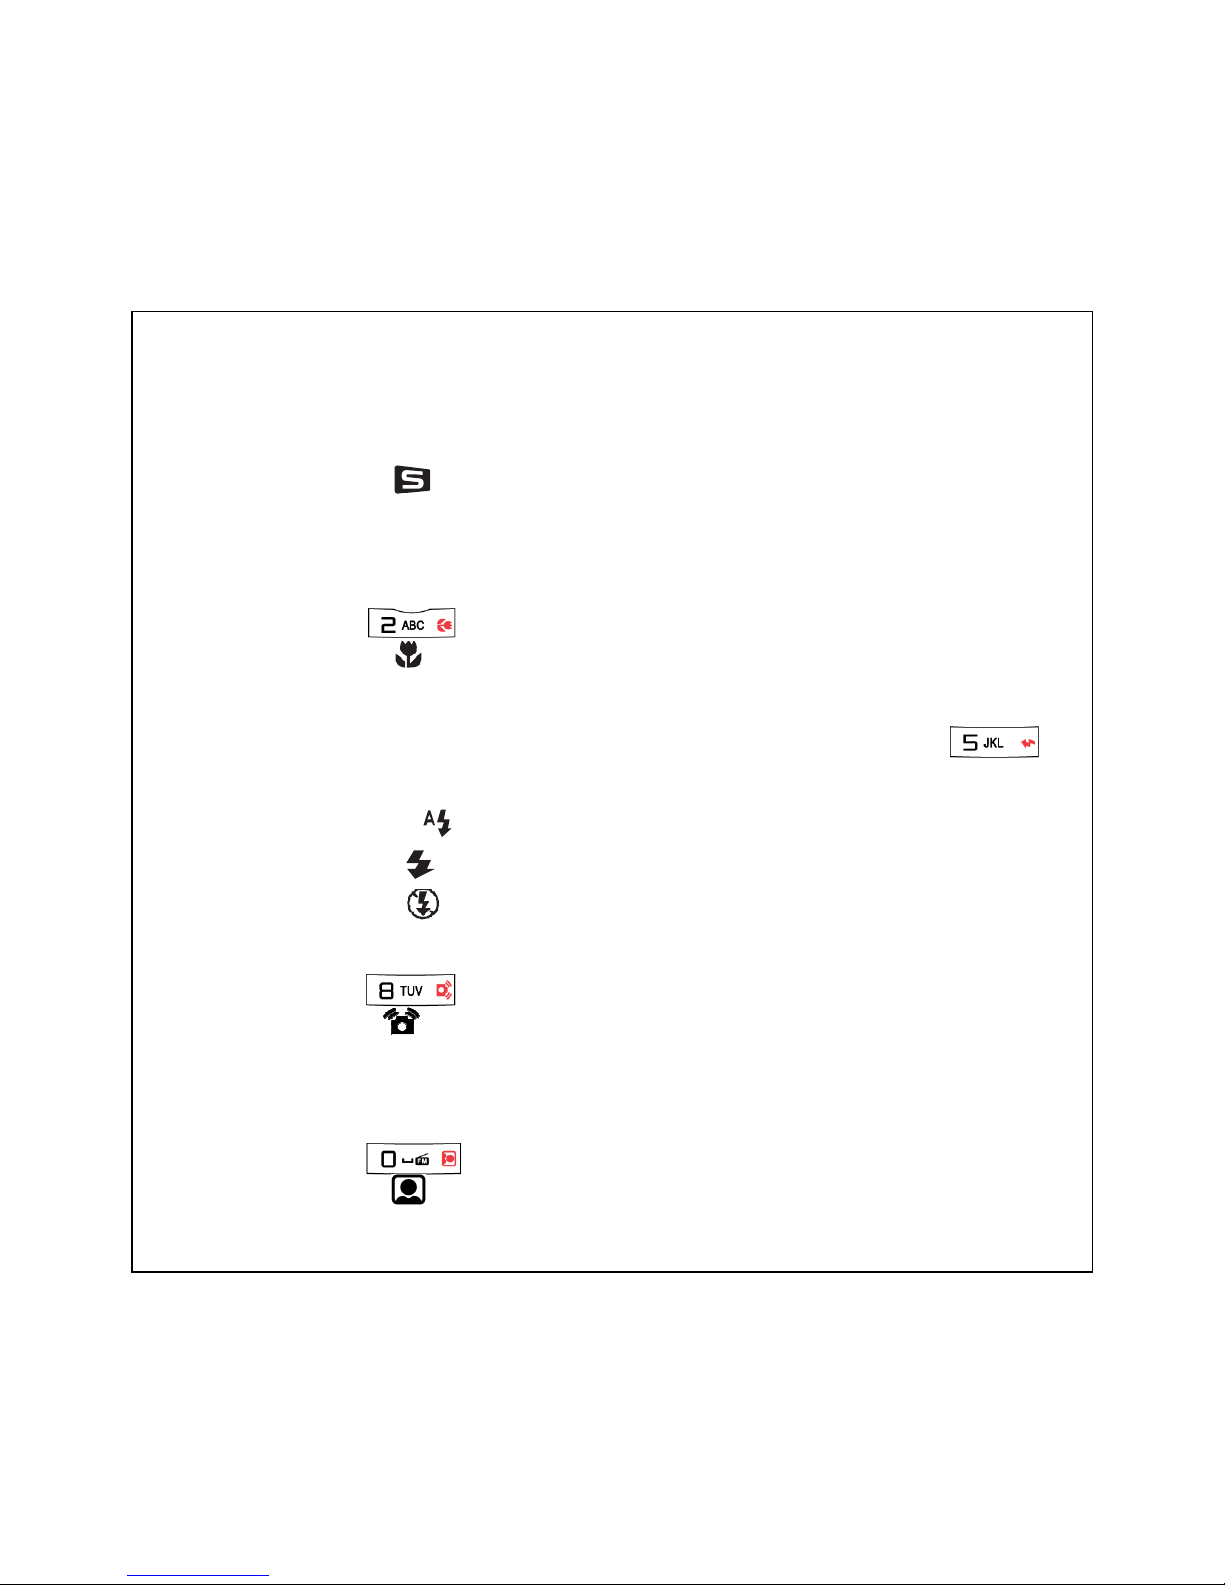
61
Smart Scene
When Smart Scene is enabled, the camera will automatically detect the possible scene you
may want to select.
Press the center selection key and select Smart Scene by using the navigation key.
Then, press the center selection key again to confirm the selection.
The icon appears on the screen to indicate the function is activated.
Macro
Macro is designed for the close up photography and can capture all details even though the
subject is very close to the camera.
Press key to enable Macro; or press it again to disable.
The icon appears on the screen to indicate the function is activated.
Flash
You can choose from three flash modes to suit various lighting conditions. Press key
to select an appropriate mode. The flash mode will remain the same for subsequent photos
until you change it by the way described above.
Auto Flash : Flash will light up automatically when needed.
Fill Flash : The flash always fires .
Flash Off : Flash is turned off.
Anti-Shake
Press key to enable Anti-Shake; or press it again to disable.
An icon will displays on the top of the screen when the function is activated.
Self Portrait
The up-to-date Self Portrait allows you to take self-portrait photos. When Self Portrait is
enabled, the camera will take a shot without pressing Shutter button.
Press key to cycle through to Self Portrait.
An icon will displays on the central top of the screen when the function is
activated.
Page 72
62
Turn the lens of the camera toward your face.
The camera will take a shot automatically.
Note
This function is available in any flash mode.
Burst, Macro and Self-Timer will be unavailable when Self Portrait is activated.
Smile Detection
Pressing key to cycle through to Smile Detection.
When smiles are detected, the white brackets will appear to track them. When one of the
detected faces smiles, the camera will automatically take photos.
Face Detection
Press of key to cycle through to Face Detection.
When faces are detected, the white brackets will appear to track them. If Shutter button is
pressed halfway, the green focus brackets will appear on the screen, and the camera will
automatically adjust the focus and the exposure. Then, press Shutter button fully to take
photos with the detected faces.
However, when the camera fails to detect the face, a white focus bracket will be displayed
according to the selected focus mode.
Zoom in/out
The camera is equipped with 3x optical zoom that allows you to zoom in your subject.
Press Volume/Zoom button or the navigation key / to zoom
out/zoom in your subject.
Burst & M-Burst
Burst feature allows you to take multiple consecutive photos by pressing and holding Shutter
button.
M-Burst feature allows you to take 16 consecutive VGA photos by pressing Shutter button
once.
Press key > Shooting Mode > Multi Burst or Burst.
Page 73
63
Once you select an option, frame and take your shot.
After you exit Camera, Burst or M-Burst automatically turns off. If you want to use
one of them for the next photo, press activate it by following the way
described above.
Panorama
Panorama allows you to shoot an ultra wide panoramic shot. You can create a wide-view
photo by stitching three shots into a single panoramic scene.
Press the key > Shooting Mode > Panorama.
You can take panoramic shots in either left-to-right or right-to-left
sequence. Press the navigation key / to select the direction in which the
sequence will be taken. Then, press the center selection key.
The frame record icon is displayed at the middle bottom of the screen to indicate
the location of the frame you are going to take for the panoramic scene.
Frame the first scene on the screen and press Shutter button.
After a quickly automatic preview on the screen, the viewfinder shows an overlay with
the first shot.
Capture the second/third scenes as taking the first one, and make sure that the edges
of shots overlapped. You can also retake the shot from the first one by pressing
key.
After you take three photos, Camera will automatically stitch them together into a
single panoramic scene.
You can view the result with Album by pressing key.
Note
If only two shots are taken, you can still press the center selection key to stitch them
together.
Frame
Frame allows you to add decoration frame before taking a photo. S-1200 supports 9 various
decoration frame types to make your captured photos funnier.
Press the > Shooting Mode > Frame.
Select a frame type by using the navigation key. Then, press the button to
Page 74

64
confirm the selection.
Recording your first video
You can also record video clips with Camera.
1. Turn on Camera, press the Camera/Video switch button; or
2. Press the center selection key and select Digital camera in Menu. Then, select Video
recorder again to turn on video recorder.
3. Frame your subject using the screen and press Shutter button to start recording. The
self-timer LED will be steady on to indicate the recording is in progress.
4. Press Shutter button again to stop recording. The video clip is automatically saved, and
the viewfinder shows on the screen for the next recording.
Recording Voice Memo
You can add a voice memo to a photo right after it is taken. Press the shutter button to start
the voice memo recording, and press the shutter button again to end the recording.
Note
Macro, Flash, Smile Detection, Face Detection are scene dependant.
10.3 Camera/Video Settings
This section will introduce the various settings you can modify for getting better results when
you take photos and videos.
Camera/Video Menu
1. Turn on the camera/video recorder, press key.
2. Press the navigation key to select/highlight the option you need, and then press the
center selection key to enter/confirm the selection.
3. After you select an option, press key to exit Camera/Video menu.
Note
All available options in this section may vary according to different modes.
Page 75

65
Shooting Mode
5 modes are available:
Normal Burst Multi Burst Panorama Frame
Image Resolution
Image Resolution setting refers to the size of the photo in pixels. Use the navigation key
/ to select from 9 settings:
12M 11M (3:2) 9M (16:9) 8M 5M
3M 2M (16:9) 2M VGA
Video Resolution
Video Resolution setting allows you to adjust the resolution at which your videos are
recorded. 2 settings are available:
640X480 320X240
Self-Timer
The camera comes with a self-timer that allows you to take photos after a predefined timeout.
Use the navigation key / to select from 4 settings:
10 Seconds X 2 10 Seconds 2 Seconds Off
Image Quality
Image Quality setting refers to the compression ratio of JPG. Higher image quality, more
memory spaces are required.
Use the navigation key / to select from 3 settings:
Best Better Good
Page 76

66
Focus Zone
Focus Zone setting allows you to select the number of zones the camera will focus on when
you take photos. Use the navigation key / to select from 2 settings:
Multi-Zone Center
EV Compensation
EV Compensation setting allows you to adjust the exposure or the amount of lights that
enters the lens when you capture the photos or videos. Use the navigation key / to
select from 13 settings:
+2 +1.7 +1.3 +1 +0.7 +0.3 0
-0.3 -0.7
-1 -1.3 -1.7
-2
White Balance
White Balance setting allows you to adjust the camera settings according to the ambient
white light when you take photos and videos. You can select the setting and preview it on the
screen. Use the navigation key / to select from 5 settings:
Auto Sunny Tungsten Fluorescent Cloudy
ISO Speed
ISO Speed setting allows you to adjust the CCD light-sensitivity. Use the navigation key /
to select from 8 settings:
Auto ISO 80 ISO 100 ISO 200
ISO 400 ISO 800 ISO 1600 ISO 3200
AE Metering
AE Metering setting allows you to select the area of the frame or the subject by which the
camera measures light. Use the navigation key / to select from 3 settings:
Matrix Spot C-Weighted
Page 77
67
Color
Color setting allows you to take photos and videos applying different colors or color tones for
the artistic effects. You can select the setting and preview it on the screen. Use the navigation
key / to select from 4 settings:
Vivid Color Black & White Sepia
Sharpness
Sharpness setting allows you to enhance the finer details of your photos. Use the navigation
key / to select from 3 settings:
High Normal Low
Saturation
Saturation setting allows you to adjust the saturations of the colors in your photos and videos.
Use the navigation key / to select from 3 settings:
High Normal Low
Contrast
Contrast setting allows you to adjust the contrasts of your photos and videos. Use the
navigation key / to select from 3 settings:
High Normal Low
Setup
See "10.5 Camera Settings" for more details on the menu options.
Note
White Balance, Color, Saturation, Contrast, and Setup are both Camera/Video modes
available.
Page 78
68
10.4 Album
View photos/videos on the screen
1. In Standby, press the left soft key and select Digital camera in Menu. Then,
select Album, or press , and then the most recent photo or video is displayed.
2. Use the navigation key / to scroll through all photos and videos.
3. Press the center selection key to begin the playback of any video; or press it again to
pause.
4. During playing, press navigation key / to skip to the previous/next photo or
video.
5. Press button to volume up/volume down/mute during the playback of any
video.
6. When the playback is finished, the first frame of the video will be displayed on the screen.
Viewing M-Burst Photos
To view your multi-burst photos on the LCD screen:
1. Press key to enter Album mode. The most recent photo or video clip is displayed.
2. Use the navigation key / to scroll through photos.
3. When reviewing a multi-burst image, it will be displayed from the 1st frame to the 16th
frame like a slideshow.
4. To stop the M-Burst slideshow, press the
center selection key to pause; or during
the slideshow, press the navigation key / to skip to the previous/next image.
Listening to Voice Memo
When you view a saved photo with the recorded voice memo:
1. To play the voice memo, press the center selection key; or press it again to pause.
2. To skip to the previous/next photo, press the navigation key / .
Page 79

69
Viewing Photos/Videos on your TV
To view images stored on the camera on your TV, you must connect via the USB port on the
side of the camera. To connect your camera to a TV:
1. Turn on the camera and make sure that the camera’s video out format is set to the same
as that of the TV.
2. Connect the USB AV Cable to the USB port on the camera.
3. Connect the other end of the cable to the TV’s AV input port.
4. The LCD screen turns blank and all images and video clips are displayed on the TV screen.
Zooming in/out during viewing photos
The feature of zoom can also be used during viewing your photos. This allows you to see them
in greater details.
To zoom in/out the photos:
1. Press key to zoom out/ zoom in during the playback of any photo; or press
the center selection key to cancel.
2. Use the navigation key to pan across the photo.
3. When you zoom in a photo, press key will allow you to crop the selection.
4. When a photo is zoomed out to the maximum, the screen will display all photos and
videos as a series of thumbnails.
Deleting photos/videos
The function of Delete allows you to remove the unwanted files stored on the storage card.
To delete a photo or video:
1. Press key to display Delete menu.
2. Press the navigation / and the center selection keys to select from the available
options:
All Images: select to delete all files.
This Image: select to delete the current photo or video.
Exit: select to cancel and exit Delete menu.
Page 80

70
Transferring Photos/Videos to your PC
To transfer photos and videos to PC, you need to set your phone as Mass storage first. Follow
the instructions below to complete the installation:
1. Connect the USB port of your phone to one of the USB ports on your PC by using the
included USB cable.
2. The internal memories of your phone and microSD card appear as the removable drives in
Windows File Explorer.
3. Copy the files from the drives to the directories on your PC.
Using the Album Menu
You can access Album menu to configure more settings.
To access Album menu:
1. Press key in Album and all available options are displayed on the screen; or
press key to cancel and exit Album menu.
2. Use the navigation key / to highlight an option. Then, press the center selection
key to access its submenu or to confirm the selection.
DPOF
DPOF (Digital Print Order Format) allows you to specify the number of copies of a certain
image that you want to print at a later date. Use this function to tag pictures stored in your
memory card with print information. You can tag all pictures to be printed or just the current
picture. You can also select how many copies print. When all images to be printed are tagged,
remove the memory card and take it to a photographic shop for printing, or use it with a DPOF
compatible printer.
Slideshow
The function of Slideshow allows you to view all stored photos in a continuous sequence.
Resize
The function of Resize allows you to change the image resolution.
Rotate
The function of Rotate allows you to change the orientations of the saved photos.
Protect
You can lock the photos or videos to protect them from being accidentally erased.
Divide
Page 81
71
The function of Divide allows you to cut the unnecessary portions in the videos.
Adaptive Lighting
The function of Adaptive Lighting allows you to produce photos that look more like what you
see with your own eyes.
Digital Filter
The captured photo can be applied with various digital optical filters.
Brightness Filter
You can set the brightness of each photo to make it brighter or darker.
Frame Composite
The function of Frame Composite supports various decoration frame types to make your
captured pictures funnier.
Note
The image resolution of the photo that you want apply the frame needs being higher than
3M.
The function does not support the cropped/rotated photos and will be unavailable when the
storage is not enough.
The size of the photo will be changed to 3M after applying the frame; even though the
original setting is higher than 3M.
Voice Memo
See "Recording Voice Memo" in 10.2 for more details.
Red-Eye Compensate
The function of Red-Eye Compensate allows you to perform red-eye compensate on a saved
photo.
Send
You can share your photos with other people via MMS or Bluetooth.
Use as
The captured photos can be used as the Wallpaper, Screen Saver or Caller Picture.
Setup
See "10.5 Camera Settings" for more details on the menu options.
Page 82
72
Note
The available options may vary for the photos and video.
You can also view the captured photos/videos with Album by pressing when using the
camera. If there is any unwanted file, simply press key to delete it; or press key
again to return to the viewfinder.
Press End key to exit Album.
10.5 Camera Settings
Setup Menu
Setup menu, available in Album/Camera/Video modes, allows you to configure the general
settings of the camera based on your preferences.
To access Setup menu:
1. Press key when you are in Album/Camera/Video modes.
2. Select Setup by using the navigation key / , and then press the center selection
key to enter.
3. Press the navigation key / to select/highlight the option you need, and then press
the center selection key to enter/confirm the selection.
Refer to the section below for more details about each setting.
Shutter
Shutter setting allows you to adjust the camera sound.
Digital Zoom
Digital Zoom setting allows you to turn the digital zoom function on or off.
Quick View
Quick View setting allows you to view the photo that you have just taken.
File No.
File No. setting allows you to reset the file number to 0001 or to set the file numbers in
continuous order.
USB Mode
USB Mode setting allows you to select the transfer method between your phone and PC.
Video Out
Page 83
73
Video Out setting allows you to adjust the video output, depending on the type of your TV.
Date Stamp
Date Stamp setting allows you to adjust the format in which the date will appear on each
photo or video.
Format
Format setting allows you to erase all data on the microSD card.
Note
Formatting a memory card erases all data on the memory card. As you cannot retrieve the
erased data, exercise adequate caution before formatting the memory card.
Reset
Reset setting allows you to reset the camera to the original factory default settings.
PictBridge Print (PTP)
PTP function allows you to print photos captured by the camera directly without connecting
your phone to PC.
When a PTP compliant printer is connected to your phone, the Printer Connecting screen will
display on the screen. Print menu pops up automatically.
Use the navigation key / to select an option and press the center selection key to
enter.
This Image
Print the selected photo with the current setting.
Index Print
Use this function to print all photos in the index format.
DPOF Image
Print DPOF photos. If there are selected DPOF photos with the number of copies setting ready,
Page 84
74
press the center selection key to confirm "DPOF Image" selection to enter the submenu.
All Images
Print all photos saved in memory.
Note
Suggest to use PTP compliant printer to print photos captured by the camera.
Page 85
75
11. ORGANIZER
11.1 Calendar
This feature allows you to keep track of your schedule and events saved in the calendar. You
can also set alarm tone reminders.
Note
When you enter the Calendar, the dates in which there are events stored are with small
icons and today is highlighted. You can check the event by moving the cursor with the
Up/Down/Left/Right navigation key to pick the date. Press Option and select View to look
into event details.
To add events in Calendar for the first time
1. From the main menu, select Organizer and press the .
2. Select Calendar and press the .
3. Use navigation Up and Down to select a date in which you want to add an event and press
the .
4. Select Add.
5. Select Reminder, Meeting or Course and press the .
6. Enter the time, place, details and press Save.
7. In the pop-up dialog box where the phone system asks you to save or not, select Yes to
finish the event setup.
When in the list of event corresponding to a specified date, you can read the stored event
details. And your phone provides with several options which allow you to perform advanced
operations:
Add: Add a new event to a specified day.
Edit: Edit a event on a specified day.
Delete: Delete a specific event.
Send: Send the event as a text message, a multimedia message, email or via Bluetooth.
Page 86

76
Save as file: Save the event as a new file.
To jump to a desired date
1. From the main menu, use the Up/Down navigation key to select Organizer and press the
.
2. Select Calendar and press the .
3. Press Options and select Jump to date.
4. Key in the year, month and day you wish to jump and press OK.
11.2 Tasks
This feature lists all of the tasks. You can also add, edit or delete the tasks from the options
under this feature.
To use Tasks for the first time
1. From the main menu, select Organizer and press the .
2. Select Tasks and press the .
3. Press Add to edit your to-do task by entering a date, time, description, etc.
4. Press Save.
5. In the pop-up dialog box where the phone system asks you to save or not, select Yes to
finish the tasks setup.
When in the list of task corresponding to a specified date, you can read the stored task details.
And your phone provides with several options which allow you to perform advanced operations:
Add: Add a new task to a specified day.
Edit: Edit a task on a specified day.
Delete: Delete a specific task.
Delete overdue: Delete overdue tasks.
Delete all: Delete all tasks.
Jump to date/View uncompleted/Send/Save as file
11.3 Alarm
This function allows you to set the alarm to ring at the time specified. The alarm clock works
even when the phone is switched off.
Page 87

77
1. From the main menu, select Organizer and press the .
2. Select Alarm and press the . You are allowed to set five sets of alarms.
3. Choose an alarm set and press Edit.
4. Setup the status, time and alarm tone.
5. Press Save.
6. In the pop-up dialog box where the phone system asks you to save or not, select Yes to
finish the alarm setup.
11.4 World Clock
You can select the city simply by pressing the navigation keys left/right. When the cross points
out a certain city, it will show the local date and time. You can also press Options to turn
on/off Daylight saving Time for foreign city.
Page 88

78
12. EXTRA
12.1 Calculator
The calculator applies simple calculator functions such as addition, subtraction, multiplication
and division.
12.2 Currency Converter
This feature helps you to convert foreign currencies. Within Currency converter, you can input
the exchange rate and insert the amount to convert Local to Foreign currencies.
12.3 Stopwatch
The stopwatch offers two modes: Typical stopwatch and nWay stopwatch.
Page 89
79
13. SERVICES
Services described in the following are supported by your service provider. If you cannot
connect to either one of those services, contact your service provider for further information.
13.1 STK (SIM Tool Kit)
In addition to the functions available in the phone, your service provider may offer additional
applications such as weather or stock market information via the SIM card.
To set the STK service
In Service menu, choose STK, press the to connect the service.
Note
The display name of STK in your phone is up to the name registered in your SIM card.
For availability, you need to register for the services from your service provider.
Accessing these services may involve sending an SMS for which you may be charged.
13.2 Internet
Your phone supports Web Browsing. You can obtain various services such as up-to date news,
weather, sports, and other information as well as e-mail and other Internet services. These
services are designed and maintained by your WAP service provider. The WAP service uses
Wireless Markup Language (WML) on their WAP pages. You cannot view standard Internet web
pages on your phone.
Note
To activate your WAP service, you may need to contact your service provider.
Homepage
To access the browser from the standby mode, go to internet and press Homepage. Once
connected, the homepage is displayed. The content depends on the service provider.
Page 90

80
To exit the browser
In browsing mode, you can press the key to exit the browser.
Bookmarks
You can use this menu to save URL addresses to quickly access your favorite websites. Press
Go to allows you to connect to a website. Your phone also provides you for the following
options.
Edit: Allows you to edit URL addresses.
Send: Allows you to send URL addresses via Text Message (SMS) or Multimedia
Message (MMS).
Delete: Allow you to delete single bookmark.
Delete all: Allow you to delete all bookmark.
Add Bookmark: Adds URL addresses to bookmark list.
History
You can view the recent pages you have visited. Press Go to to connect to the selected page.
Saved Pages
You can view the recent visited pages you have saved.
Enter Address
You can key in the URL address and enter the address followed by selecting OK. Your phone
will connect the URL you just keyed in.
Settings
GPRS (General Packet Radio Service) is a technology used for sending and receiving data over
the mobile network. The applications that use GPRS are WAP services, MMS and SMS
messaging and GPRS dial-up (such as Internet and e-mail). You can set the phone to
automatically register to a GPRS network when you switch the phone on.
Internet profiles
If the WAP settings have been set by the service provider, you can use the GPRS or GSM
Data immediately. If access to the internet profiles has already been assigned by your
service provider, select a profile and activate it.
Page 91
81
You can set the WAP settings manually. Then you have to contact your network operator
or service provider for appropriate settings.
To edit the settings manually
1. From the main menu, select Internet and press the .
2. Select Settings and press the .
3. Select the Internet profile and press the .
4. Press Edit to start setting.
5. Press Save to save settings.
To edit profile
Select a Internet profile and then press the to edit the profile. The options include:
Profile name, Homepage, Data Account and Connection type. If you need to get more
information, please contact your network service provider.
Note
In most cases, you only need to use one of the default profiles to access the Internet. The
settings are different from operator to operator. Please consult your operator or service
provider for the correct settings and proceed with care. Improper settings will cause the
connection to fail.
Browser options
You can set the timeout value for the browser, show or not show images, turn on/off play
sounds and allow or not allow cookies. (The phone will stop the browser if not connected
within the set time). You can also enable/disable images to affect browsing speed.
Push setup
You can choose either receiving or not receiving the service message which is saved in the
service inbox sent by your service provider.
Clear cache
The information or date you have accessed is stored in the cache of the phone. A cache is
a file buffer used to temporarily store dates. You can clear the history by selecting this
option.
Page 92

82
Clear cookies
To alleviate privacy and security concerns, (in case of lost or stolen phone) clear all
cookies that may contain sensitive information.
Trusted certificates
Displays trusted web certificates while browsing.
13.3 Data Account
Default data accounts based on major operators at the time this phone was manufactured are
provided.
You can access WAP via GSM or GPRS. To get the analogue or ISDN number information, you
may need to contact your operator. To get the access point of GPRS, you may need to contact
your operator.
GSM data
1. From the main menu, select Settings and press the .
2. Select Data account and press the .
3. Select GSM data and press the .
4. Press Edit to change the settings of data account: Account name, Number, User
name, Password, Line Type and Speed.
GPRS
1. From the main menu, select Settings and press the .
2. Select Data account and press the .
3. Select GPRS and press the .
4. Press Edit to change the settings of your data account: Account name, APN, User
name, Password and Auth. type.
Page 93

83
14. Shortcuts
Your phone provides Shortcuts function which enables you to access important or frequently
used functions quickly.
The default My Shortcuts are as follows:
Alarms
Calendar
Calculator
User profile
File manager
Display settings
Media player
Sound recorder
Currency converter
Java
To customize My Shortcuts
Press Options in the Shortcuts menu to select the desired item:
Add
Delete
Delete all
Change order
Page 94

84
15. Fun Spice
15.1 SpiceGang
SpiceGang is a WAP portal from where user can download Ringtones, Wallpapers, Animations,
Videos and other kind of content.
1. Check the GPRS settings for your operator
2. Initiate SpiceGang wap portal to browse and download the content
3. Charges for download apply as per operator pricing
Explore the whole world of Entertainment with SpiceGang.
15.2 Opera Mini
Opera Mini is a fast and compact web browser that allows you to access the Internet on your
phone. With Opera Mini, you can use your cell phone to access web sites and content, including
your mail, community sites, news, blogs and more.
Please ensure that you have GPRS settings in your phone to use Opera Mini. Contact your
operator for GPRS settings.
15.3 Reuters
Reuters India gives you the latest India, World and Business news and more. Also, get the
latest stock market information along with tools like the currency converter and weather in your
city on your mobile phone.
The services pre loaded on Spice Phones are Latest News, Weather Check, Currency Details and
Free News Alerts
Please ensure that you have GPRS settings in your phone to open Reuters. Contact your
operator for GPRS settings.
15.4 Email2SMS
Emergic Email2SMS is a product of Netcore Solutions Pvt. Ltd. provided by Spice Mobiles.
Email2SMS allows you to receive email on your phone via SMS without GPRS. You can Read,
Page 95
85
Reply, Compose and Forward your emails via SMS. This service is only available for Gmail,
Indiatimes and Corporate Account Holders. Spice Mobiles offers FREE subscription for one
month.
1. Just send SPICE START <Location> to 575758 to register for Email2SMS service.
For composing new mail type NEW <Receiver's Email-Id> S:<Subject> B:<Message>
and send it to 575758
2. For replying to any mail type REPLY <Message-Id> <Message> and send it to 575758
3. For replying to all in the mail type REPLY <Message-Id> <Message> and send it to
575758
4. For forwarding the mail type FWD <Message-Id> <Receiver's Email-Id> <Message>
and send it to 575758
5. For reading the remaining part of mail type READ <Message-Id> and send it to 575758
Note
Message-Id is the number which you get at the end of SMS. i.e., 01,02,03,04.
For more details contact Customer Support : Phone : +91 22 6662 8130, Email : [email protected],
Chat ID : [email protected], [email protected], [email protected]
15.5 Nimbuzz
Nimbuzz, another path-breaking innovation is available exclusively to the users of Spice Mobiles.
Nimbuzz is a common IM platform that allows one to chat, message and send files on the move.
This service is common for most of the commonly used IM portals including skype, MSN, yahoo,
ICQ, AIM, Google talk – one log-in, one contact list for all accounts.
Please check your GPRS settings before accessing Nimbuzz
15.6 Ngpay
What is ngpay?
ngpay is India’s first mobile marketplace.
You can use ngpay to buy air & rail tickets, pay your bills, buy movie tickets, shop for books &
gifts, do banking, make payments and more from your mobile phone in a fast, simple and
secure fashion.
Page 96

86
ngpay offers a range of services from it’s network of partners view current list. In a simple,
consolidated menu, you can discover and choose merchants, banks, or service providers with
whom you want to transact.
15.7 Mgurujee
MGurujee is India's leading M-Learning portal delivering unique anytime anywhere mobile
phone based learning experience with access to a wide variety of quality knowledge content
from market leaders.
The services pre loaded on Spice Phones are Sample Papers, Education Search, Job Search and
Calculator
Please check your GPRS settings before accessing MGurujee
15.8 Cricket Updates
Cricket Updates service is powered by ibibo. With this service you can now check live cricket
score and schedule of matched. You require GPRS connection to use this feature.
Please contact your operator for GPRS activation
15.9 Free_SMS
Free SMS service is powered by ibibo. You can now send free sms to your friends using this
feature. You require GPRS connection to use this feature.
Please contact your operator for GPRS activation
15.10 Ibibo
Now connect with the Ibibo community on Spice Mobiles. Go and create your profile, search for
people based on their age, sex & location, make new friends and send or receive blurbs. Invite
your existing friends to join your new community.
The services pre loaded on Spice Phones are Make New Friends, Cool Stuff, Cricket Updates and
Free SMS.
Page 97

87
15.11 Job Search
Job Search service is powered by ibibo. You can now search for jobs on the go with Spice
Mobiles. Just enter the keyword and location and find out plenty of jobs of your liking. You
require GPRS connection to use this feature.
Please contact your operator for GPRS activation
15.12 Mobile Tracker
Now be sure of your mobile phones with Mobile Tracker offered by Spice Mobiles. This feature
allows users to track their phone if they are lost or stolen. Switch on MTracker application and
whenever a new SIM is inserted in your phone you will receive a SMS on pre defined numbers.
Please check your GPRS settings before accessing Ibibo.
Page 98
88
16. TROUBLESHOOTING
Problem Solution
Telephone cannot be switched on Please take out battery and insert again. Then
press the to power on the phone.
Battery empty Charge battery. Check charging indicator on
display.
The battery doesn’t charge properly or the
phone sometimes turns itself off
Wipe the charging contacts, both on the phone
and on the battery, with a clear soft cloth.
Usage time of battery becomes shorter If the battery time is short, it may be due to the
user environment, a large volume of calls, or
weak signals.
Charging error - Temperature out of range Make sure the ambient temperature is right, wait
for a while, and the then charge again.
Charging error - Wrong travel charger Only use original Spice accessories.
Charging error - Battery defective Replace battery.
Charging error - No battery icon appears
when charging
The battery is empty or has been not used for a
long time. It may take a while before the battery
icon appears on the screen.
Forgot the phone code or password The default phone code is “1122”.
Enter PUK The PIN code has been entered incorrectly three
times in succession, and the phone is now
blocked. Enter the PUK supplied by your service
provider.
Loss of Network You may be in a weak signal area. Move and try
again. You are trying to access an option for
which you have no subscription with your service
provider. Contact the service provider for further
details.
You have entered a number but it was not
dialed
Be sure that you have pressed
key.
Be sure that you have accessed the right
network service.
Be sure that you have not set an outgoing call
Page 99
89
Problem Solution
barring option.
Be sure that you have entered the area code.
Your correspondent cannot reach you Be sure that your phone is switched on. Press
the
key for more than one second.
Be sure that you are accessing the network
service. Be sure that you have not set an
incoming call barring option.
Your correspondent cannot hear you
speaking
Be sure that you have switched off the
loudspeaker. Be sure that you are holding the
phone close enough to your mouth. The
microphone is located at the bottom of the
phone.
The voice quality of the call is poor Check the signal strength indicator on the
display. The number of bars indicates the signal
strength. Try moving the phone slightly or
moving closer to a window if you are in a
building.
No number is dialed when you recall a
Contacts entry
Use the Phonebook/Search feature to ensure the
number has been stored correctly. Resave the
number, if necessary.
Cannot use the Internet/WAP Your subscription does not include data
capability. You will need to contact your service
provider to enable the service.
Cannot use MMS/picture messages on your
phone
Your subscription does not include data
capability. You will need to contact your service
provider to enable the service.
Your device is hot to the touch When you continuously use certain application
(For Example: Digital Camera) over sometime,
your device may heat up. This is normal and
should not affect your device’s lifespan or
performance.
Insufficient memory space to complete Insufficient space in memory to rotate an image
or divide a video. Delete unnecessary images
Page 100
90
Problem Solution
and videos.
No image displays on the TV screen Incorrect TV-out type was selected. Set correct
TV-out type to match your TV system.
Insufficient space on the card Delete unnecessary images
If the above guidelines do not help you to solve the problem. Take note of the model number of
your mobile phone and a clear description of the problem. Contact your phone dealer or Spice
Service Center for help.
 Loading...