

Page 1

1
A L L R I G H T S R E S E R V E D
S Mobility Ltd ©2012. All rights are reserved. No part of this document can
be reproduced without permission. All trademarks and brand names
mentioned in this publication are property of their respective owners.
While all the efforts have been made to ensure the accuracy of contents in
this manual, we presume no responsibility for errors or omissions or
statements of any kind, whether such errors are omissions or statements
resulting from negligence, accidents, or any other cause. We operate a policy
of continuous development and reserve the right to make changes,
modifications and improvements to the device, device features/specifications
or any of its parts without prior notice.
The limited warranty does not cover user manuals or any third party
software, settings, content, data or links, whether included/downloaded in
the product, whether included during installment, assembly, shipping or any
other time in the delivery chain or otherwise and in any way acquired by you.
To the extent permitted by applicable law(s), Spice does not warrant that
any Spice software will meet your requirements, will work in combination
with any hardware or software applications provided by a third party, that
the operations of the software will be uninterrupted or error free or that any
defects in the software are correctable or will be corrected.
Page 2

2
User’s Manual is provided just to guide the user about the functionality of the
device. This does not seem to be any certificate of technology. Some functions may vary
due to modifications and up-gradations of software or due to printing mistake.
Page 3

3
T A B L E O F C O N T EN T S
A L L R I G HT S R E S ER VE D .......................................................... 1
T A B LE OF C O N T EN T S ............................................................. 3
S A F ET Y PR EC A U T I O N S ........................................................... 4
U N D ER ST A N D I NG Y O U R D EV I CE ............................................ 7
G E T T I N G ST AR TE D .............................................................. 11
B A S I C O P E R A T I O N S ............................................................. 13
M A I N ME N U ......................................................................... 15
C O N T A C T S ........................................................................... 16
M E S S A G ES ............................................................................ 17
C A LL LO GS ........................................................................... 20
M U LT I ME D I A ....................................................................... 22
S L I F E .................................................................................. 30
PR O F I L E S ............................................................................ 31
S T O R AG E ............................................................................. 32
B L U ET O O T H ........................................................................ 33
S E T T I N GS ............................................................................ 34
G A ME S ................................................................................. 38
O R GA N I Z E R ......................................................................... 39
S E R V I C E S ............................................................................. 46
U S I NG P HO N E AS M O DE M .................................................... 47
S U P PO R T AN D CO N T A C T ...................................................... 53
E N V I R O N ME N TA L C O N CE R N ................................................. 54
Page 4

4
S A F E T Y P R E C A U T I O NS
Please read the following safety guidelines before using the phone.
• Do not use the phone while you are driving.
• Do not place magnetic storage media near your phone. Radiation
from the phone may erase the information stored on them.
• Keep your phone and its accessories away from children.
• Mobile phones can interfere with the functioning of medical
devices such as hearing aids or pacemakers. People having
active medical implants should keep their cell phone at least
15 cm away from the implant.
• Permanent hearing loss may occur if you use earphones or
headphones at high volume.
• Use a wireless hands-free system (headphone/ headset) with a
low power Bluetooth emitter.
• Make sure the cell phone has a low SAR.
• Keep your calls short or send a text message (SMS) instead. This
advice applies specially to children adolescents and pregnant
women.
• Use cell phone when the signal quality is good.
Notice:
• Do not dismantle the device or accessories otherwise,
manufacturer is not liable to pay for damages as the device and
accessories are not covered by warranty.
• Use only original batteries and charging devices.
Page 5

5
• Please back up your important data timely and keep them
properly. The company is not liable for any failure to call or loss of
data due to mis-operation, poor signal or power cut, etc.
• All the screens in this manual are for reference only, and some
contents actually displayed may depend upon the presetting of
the service provider or the network operator, or the SIM card. If
any functions referred to in this manual are different from those of
your phone, please follow your phone.
• Improper use will invalidate the guarantee! These safety
instructions also apply to original accessories.
• Do not put your phone in a high-temperature place or use it in a
place with flammable gas such as a petrol pumps.
• Do not touch the charger, power cable or socket with wet hands.
This may cause an electric shock.
• Do not use the phone in an environment of extremely high or low
temperature, or an environment of high humidity. The
temperature recommended for using the phone is 5-35℃.
• If you have difficulties installing the battery, do not force the
installation. This may cause battery leakage, overheating,
explosion or even fire.
If your phone or any of its accessories do not function normally, then please visit
your nearest authorized service facility. The qualified personnel will assist you, and if
necessary, will arrange for the service.
Page 6

6
SAR (Specific Absorption Rate)
Your device conforms to the Indian guidelines for exposure to radio waves.
The limits are given in terms of a unit referred to as the Specific Absorption
Rate (SAR), which is a measure of the amount of radio frequency energy
absorbed by the body when using a mobile phone. The SAR value as per the
Indian guidelines standard is 1.6 watts per kg (Watt/kg), averaged over a 6
minutes period and taken over a volume containing a mass of 1 gram of
human tissue. The highest SAR value of this device when tested is 0.650
Watt/kg. You can check it by dialing *727# on your device.
Page 7
7
U N D E R S T A N D I N G Y O U R D E V I C E
General Device Information
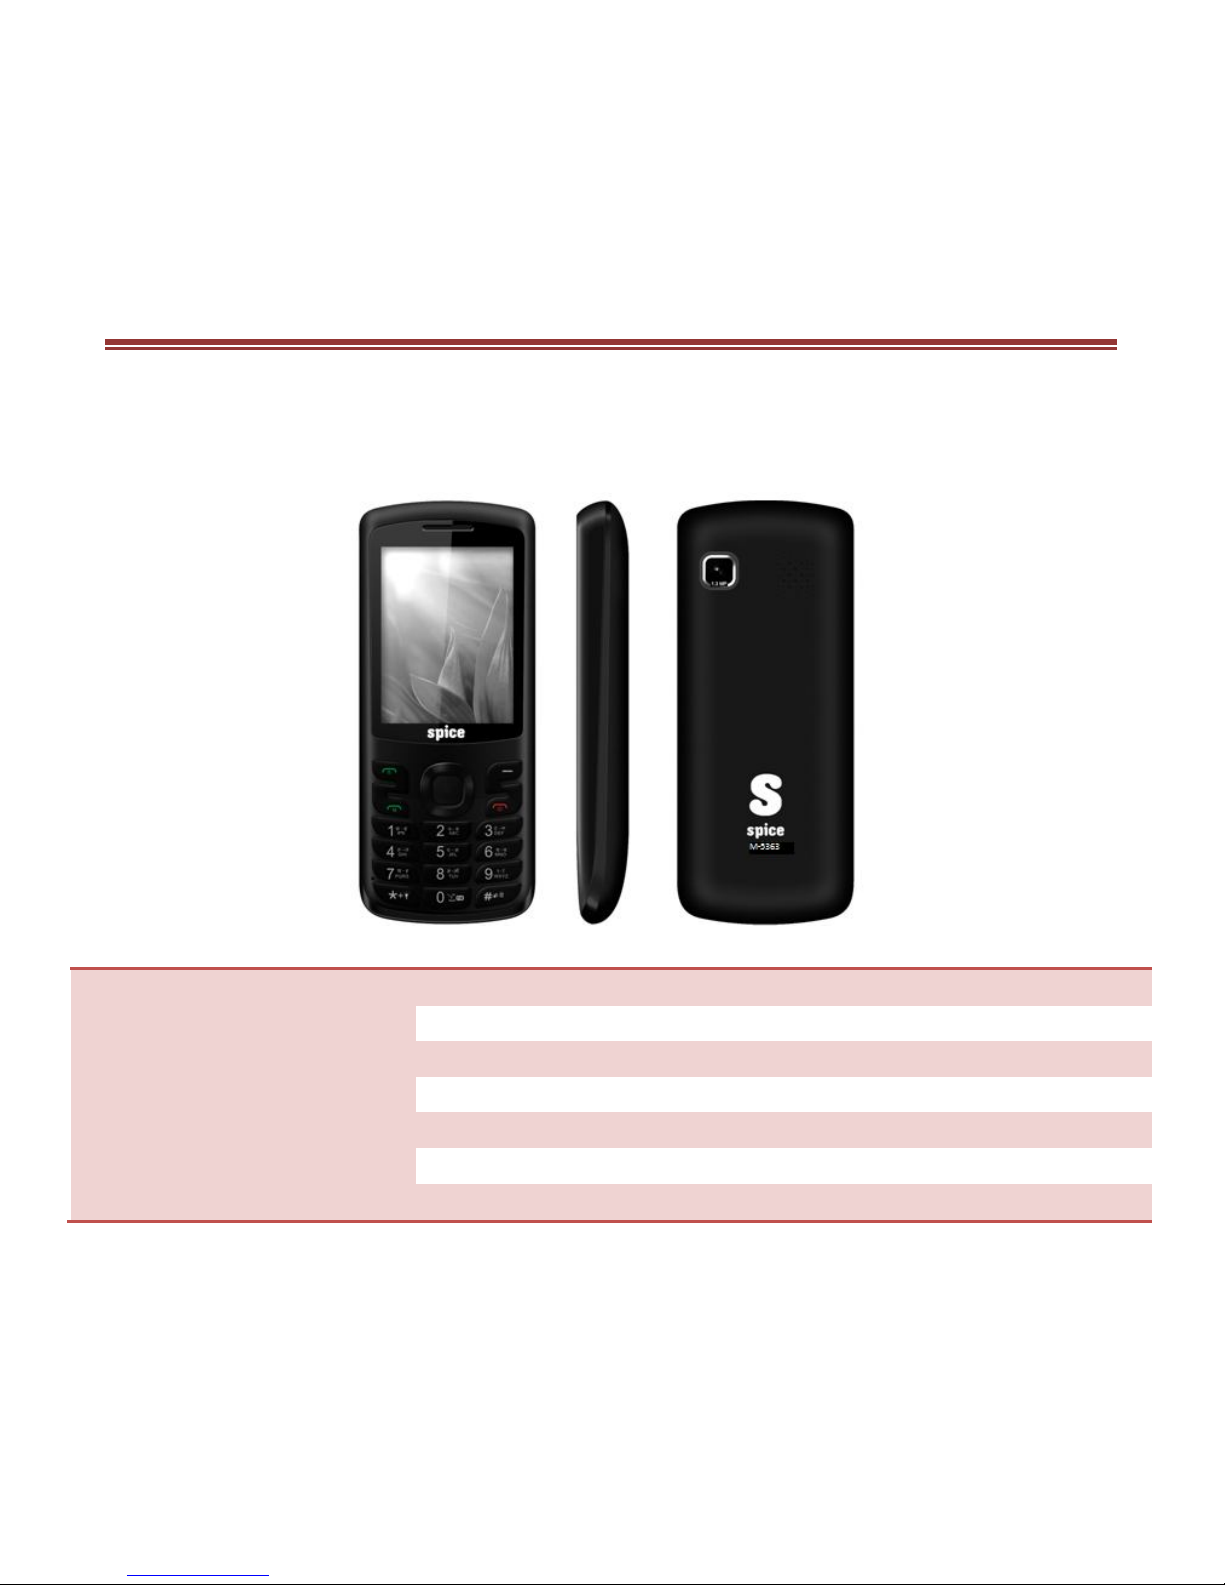
Your device encloses features, such as FM, 1.3 MP Camera, Audio Player,
Bluetooth, Video Player etc. The device is provided with two SIM slots, the
SIM inserted in slot1 is Master SIM, and the one in the slot2 is Slave SIM.
Technical Specifications
Battery
1800mAh
Charger
Input:100
-
240V Output:5V
Dimensions
100 x 60.6 x 13 mm
Weight
102g
Screen
Size:
6cm
, Resolution: 320x240, C
olo
r:
65k
Standby Time*
780
minutes
Maximum Talk Time*
300 minutes
*The standby time and maximum talk time depends upon the network signals and
settings.
Page 8
8
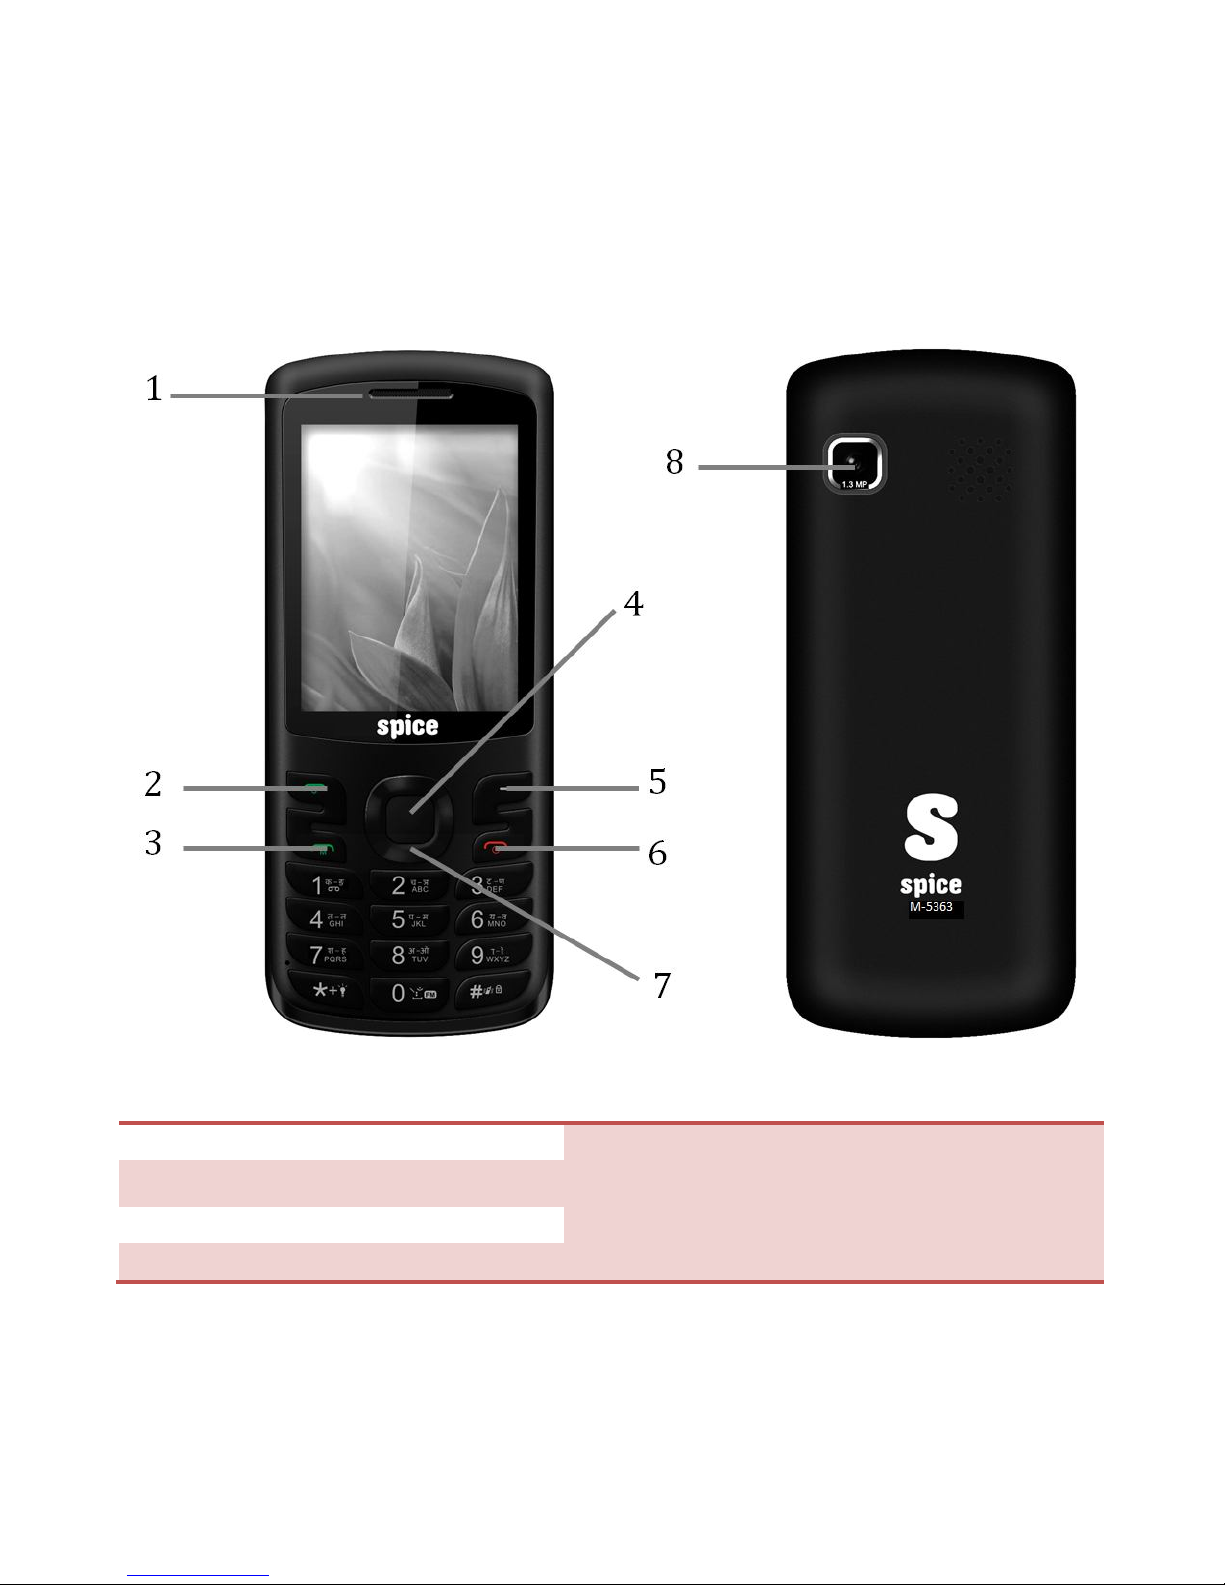
Device Overview
Position of Keys
1. Earpiece
2. LSK/Menu/Slave SIM Key
3. Master/Call Key
4. Ok/Center Ke
y
5. RSK/Right Soft Key
6. End/Power Key
7. Navigation Keys
8. Camera
Page 9

9
Function of Keys
Key
Function
Master SIM Key
To make/an
swer a call
.
In the standby mode, press this key to view Call
Logs.
End/Power Key
End an ongoing call.
In the menu mode, press this key to quit the
current menu and return back to the standby
mode.
Long press the key to switch on/off the device.
Right Soft
Key(RSK)
Use RSK to execute the functions indicated at the
right of the prompt bar on the screen.
Left Soft Key
(LSK)
Use
LSK
to execute the functions indicated at the
left of the prompt bar on the screen.
In the standby mode, use to access Main Menu.
After entering a no, use this key to make a call
from Slave SIM.
Numeric Keys
Use to enter numbers, letters and special
characters.
In the edit mode, press the * key to enter
symbols.
In the standby mode, long press 0 key to switch
on/off the FM, long press * key to switch
on/off the torch.
In the standby mode, Press RSK and # key to
Page 10
10
lock/unlock keypad.
Status Icons
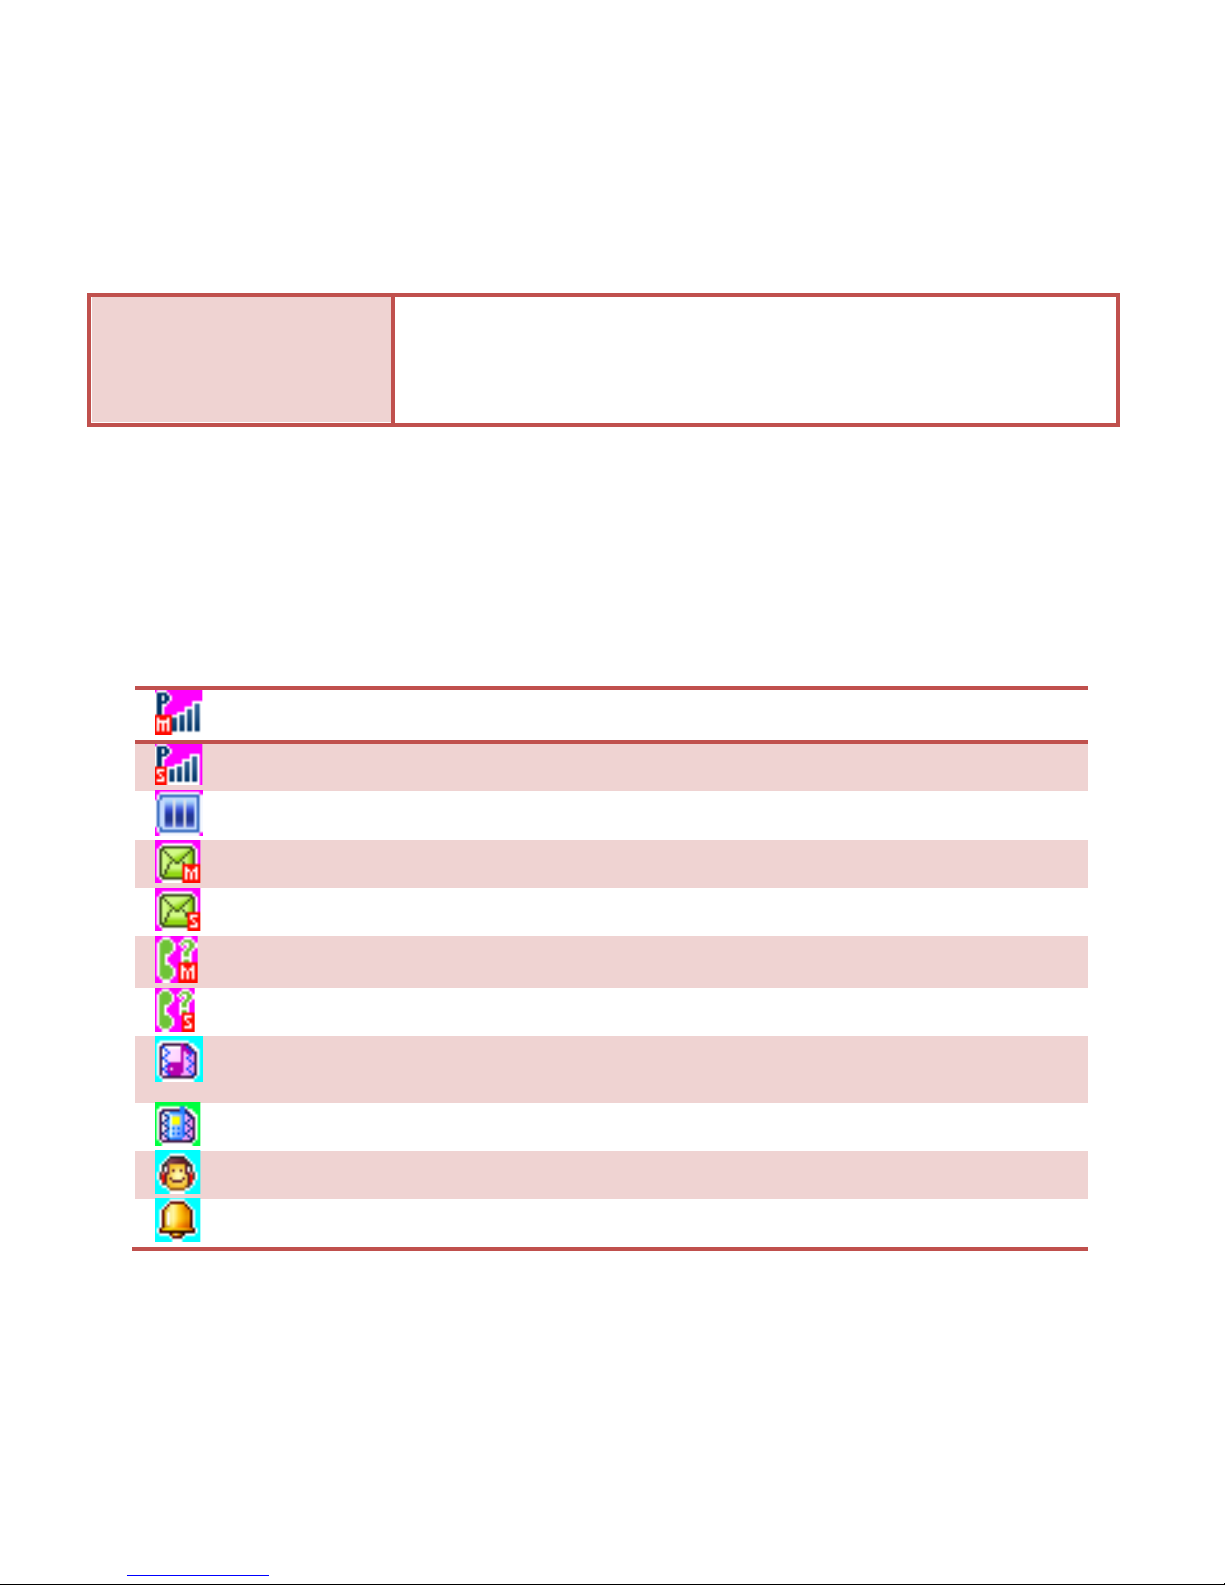
The table below lists various icons that might appear on the status bar while
using the device. Apart from the icons for signal strength level and the power,
other icons are displayed as per the current mode and priority of the device.
Indicates the network sig
nal strength of Master SIM.
Indicates the network signal strength of Slave SIM.
Indicates the current battery capacity.
Indicates that there is an unread message in Master SIM.
Indicates that there is an unread message in Slave SIM.
Indicate
s that there is a missed call in Master SIM.
Indicates that there is a missed call in Slave SIM.
Indicates that the current Sound Status is the Vibrate and Ring.
Indicates that the current Sound Status is the Vibrate only.
Indicates that the cu
rrent profile mode is the Headset mode.
Indicates that the current alarm clock is set as activated.
Page 11
11
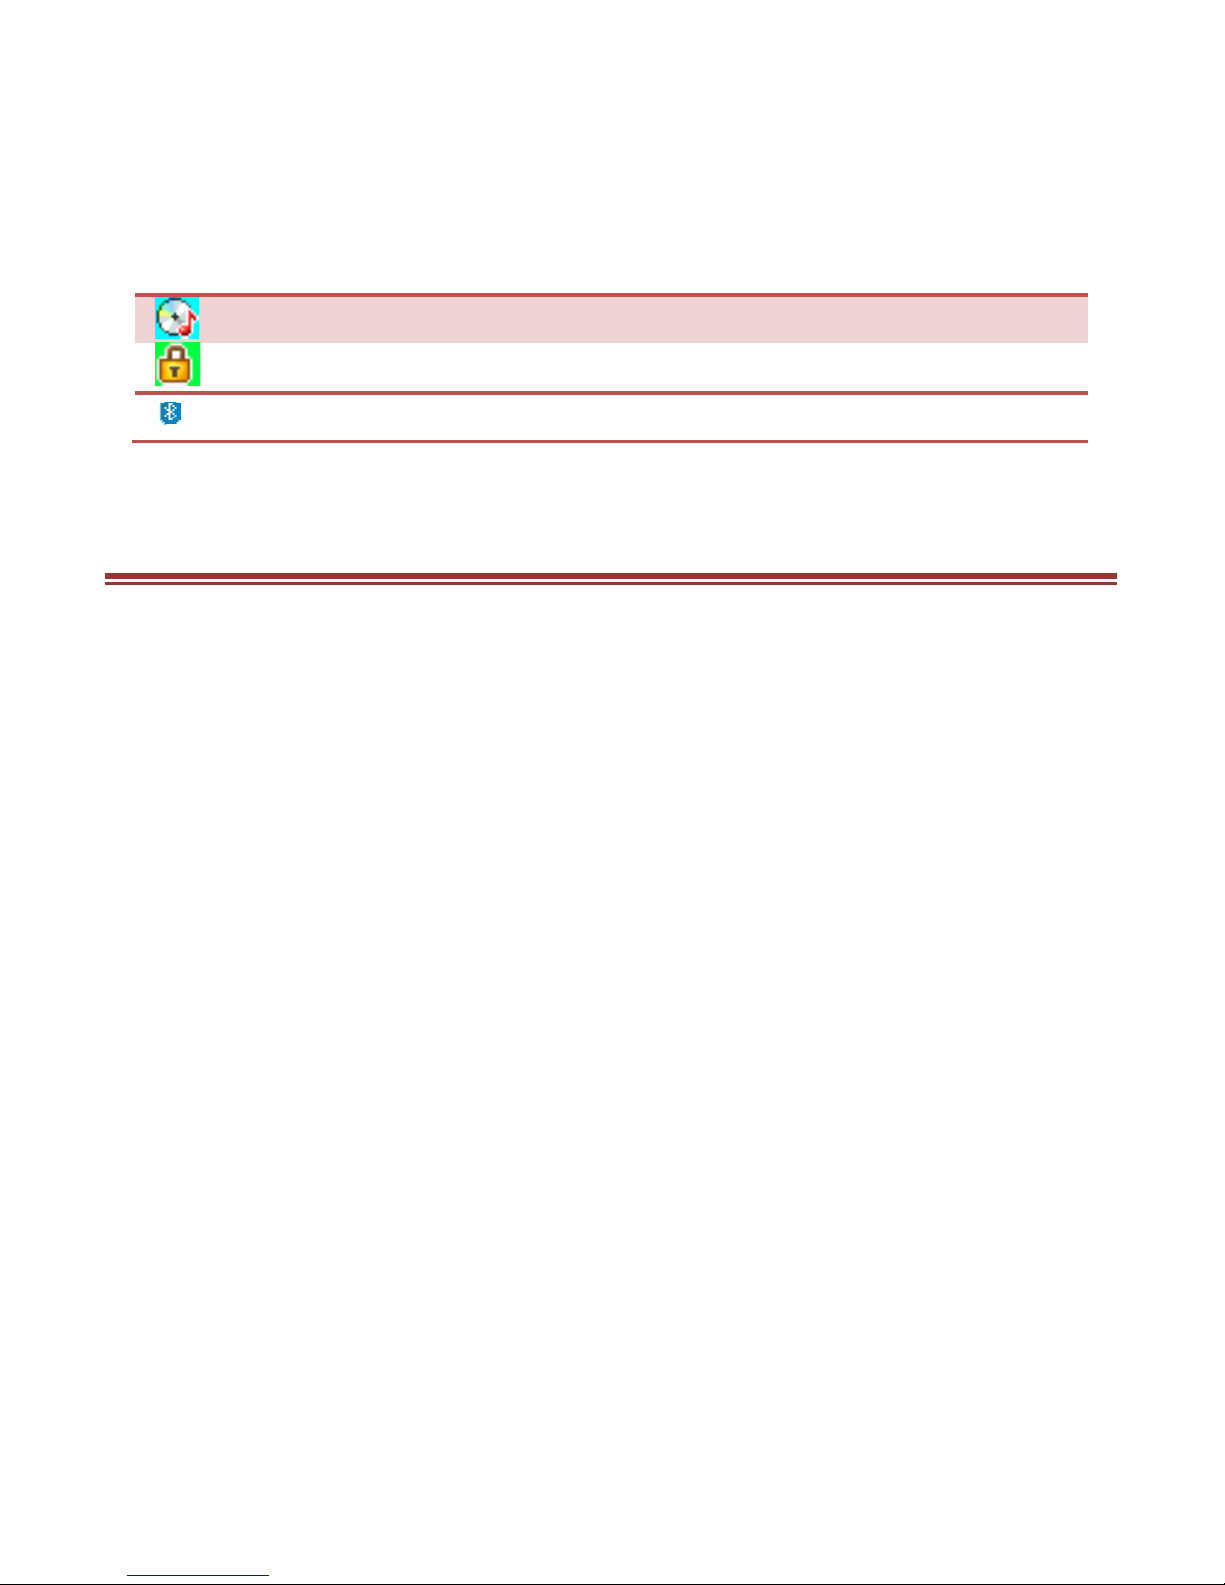
Indicates that the audio player is running.
Indicates the current keypad
-
locked state.
Indicates that the Bluetooth is turn on.
G E T T I N G S T A R TE D
Please switch off your device before inserting or removing the battery/SIM
card or memory card.
Installing SIM Card and Battery
Your device is provided with two SIM slots for two different SIM cards. The
SIM card inserted in the slot1 is called Master SIM, and the other one in the
slot2 is known as Slave SIM.
Remove the back cover of the device.
Hold the device with the front facing downwards; pull the battery
cover.
Insert the SIM cards in the device.
Attach the battery.
Push the battery cover until it clicks into place.
Installing Memory Card
Your device supports T-Flash card, which is a multimedia memory card used
to multiply the memory of the device. The T-flash card is small and should be
Page 12

12
pulled out/installed carefully and prudently in order to avoid any kind of
damage.
Switch off your device.
Remove the battery cover.
Slide the T-Flash card into the slot.
Attach the battery.
Push the battery cover until it clicks into place.
Charging the Battery
The device prompts a warning tone and message stating insufficient battery
when the battery power of your device is low.
Please follow the instructions mentioned below to charge your device:
Plug the connector of the charger into the jack of the device.
Plug the charger into a standard AC wall outlet.
When is shown on the screen, it indicates that there is not enough power
and you should now charge your device. When charging is complete, the
battery icon will stop flashing.
Charging……. Fully Charged…….
You must fully charge the battery before using the device for the first time. It
is recommended to charge the battery for four hours before using the device
for the first time.
If the device is turned on during charging, you can still make or answer calls,
but this will consume battery power, thus will extend the charging time of
the device.
Page 13

13
Switching On/Off the Device
To turn on/off the device, press and hold the End/Power Key.
If you have enabled the SIM Lock function then enter the PIN code (the 4 to
8 digits secret code of your SIM card). It is preconfigured and provided to
you by your network operator or retailer. If you enter an incorrect PIN code 3
times in succession, your SIM card will be locked. To unlock it, you must
obtain a code from your network operator.
Automatic Customer Registration
After 4 hours of usage a SMS from the device will be sent automatically for
the customer registration.
Standard SMS charges apply.
B A S I C O P E R A T I O N S
To Make Calls
If the icon / appears on the screen, then you can make or answer
calls. In order to make a call, please follow the steps mentioned below:
Input the phone number (should affix the international/national/regional
code or district code if necessary) and then press [M/S] in the standby
mode.
In the idle mode, press Master SIM Key to dial a phone number listed
in the recent call log.
Press and hold numeric keys [2]-[9] to dial the speed dial number
Page 14

14
assigned to the numeric keys.
You can select a contact number from the phonebook and call the
contact person.
The signal strength may influence the quality of connection.
To Dial International Number
Your device supports dialing the international emergency phone number,
such as 112 and 911. With the device, you can dial an emergency call in any
country or region under the normal situation regardless of SIM card inserted
when the device is located within the coverage of the GSM network. Input
the emergency phone number and press [M/S] to dial.
The device will select the main network automatically after powered on if it is
located within the coverage of the main network. The device can use other
network, called as roaming, if the device is not located within the coverage of
the main network when the network operator protocol permits.
You can dial or answer a call when the symbol of the network operator
appears on the screen.
Answer/Reject an Incoming Call
Press Master SIM Key to receive the incoming call. You can use
the earphone to answer the call when the generic headset is
inserted in the device.
Press [End Key] to reject an incoming call.
Page 15

15
Options During a Call
Press <Options> to use the following functions during the call:
Volume settings: adjust the call volume.
Hold single call: temporarily hold the current call.
End Single Call: end the current call.
New call: make a new call.
Phonebook: access the Contacts menu.
Call logs: access the Call Logs menu.
Messages: access the Messages menu.
Mute: select to mute the current call.
DTMF: Dual Tone Multi Frequency.
M A I N M E N U
Menu guides you to the various applications, features and utilities available in
your device. In the idle mode, press Left Soft Key (LSK) to access the Main
Menu. Use the navigation keys to select the desired menu and press
center/ok key to enter that menu.
Contacts
Messa
ges
Call
Logs
Multimedia
S Life
Profiles
Storage
Bluetooth
Settings
Games
Organizer
Services
Page 16
16
C O N T A CT S
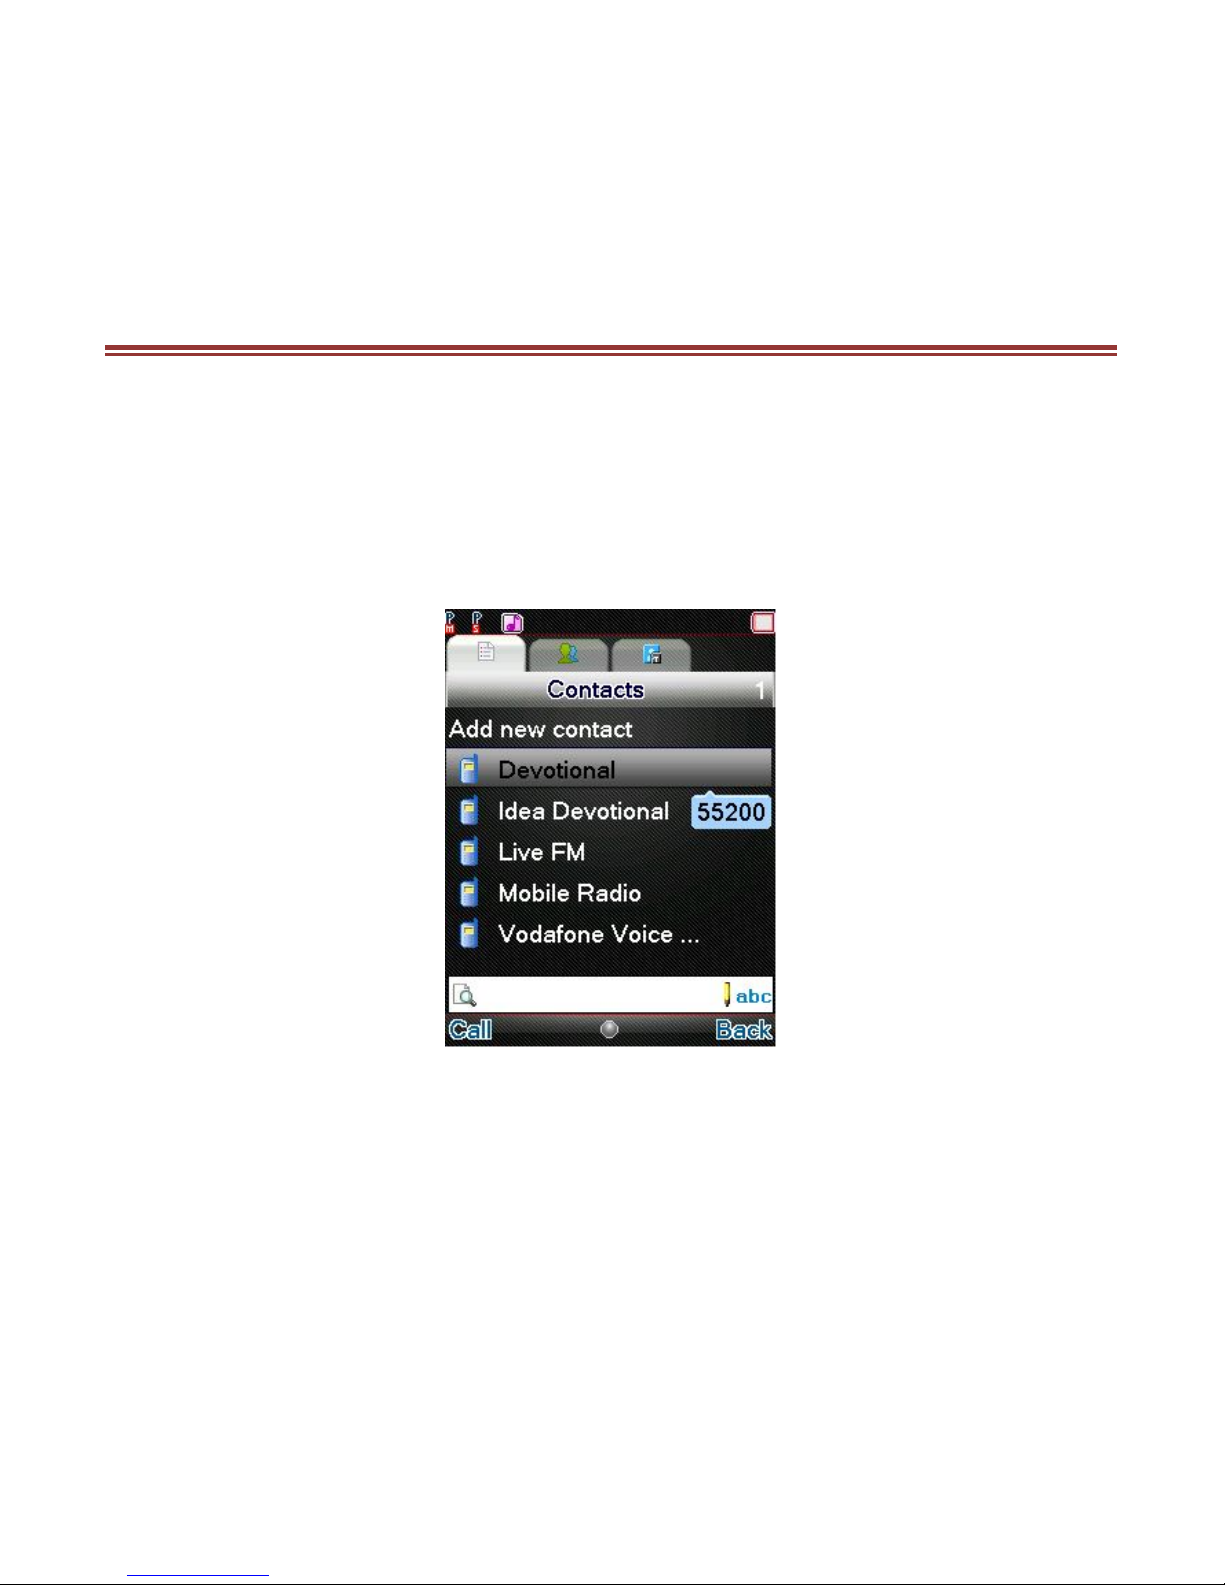
Contacts refer to the directory wherein all the contacts are stored in an
alphabetical order. You can view, edit, delete, send message and perform
various other functions on each contact.
Press LSK in the standby mode and then select contacts.
Add New Contact
Go to Main Menu > Contacts > Add new contact
Press Ok Key and select the desired storage
After selecting the desired storage, press ok and enter the contact
details
Page 17

17
Search Contact
Input the initials of a name to be searched.
Select a desired entry from the list.
M E S S A G E S
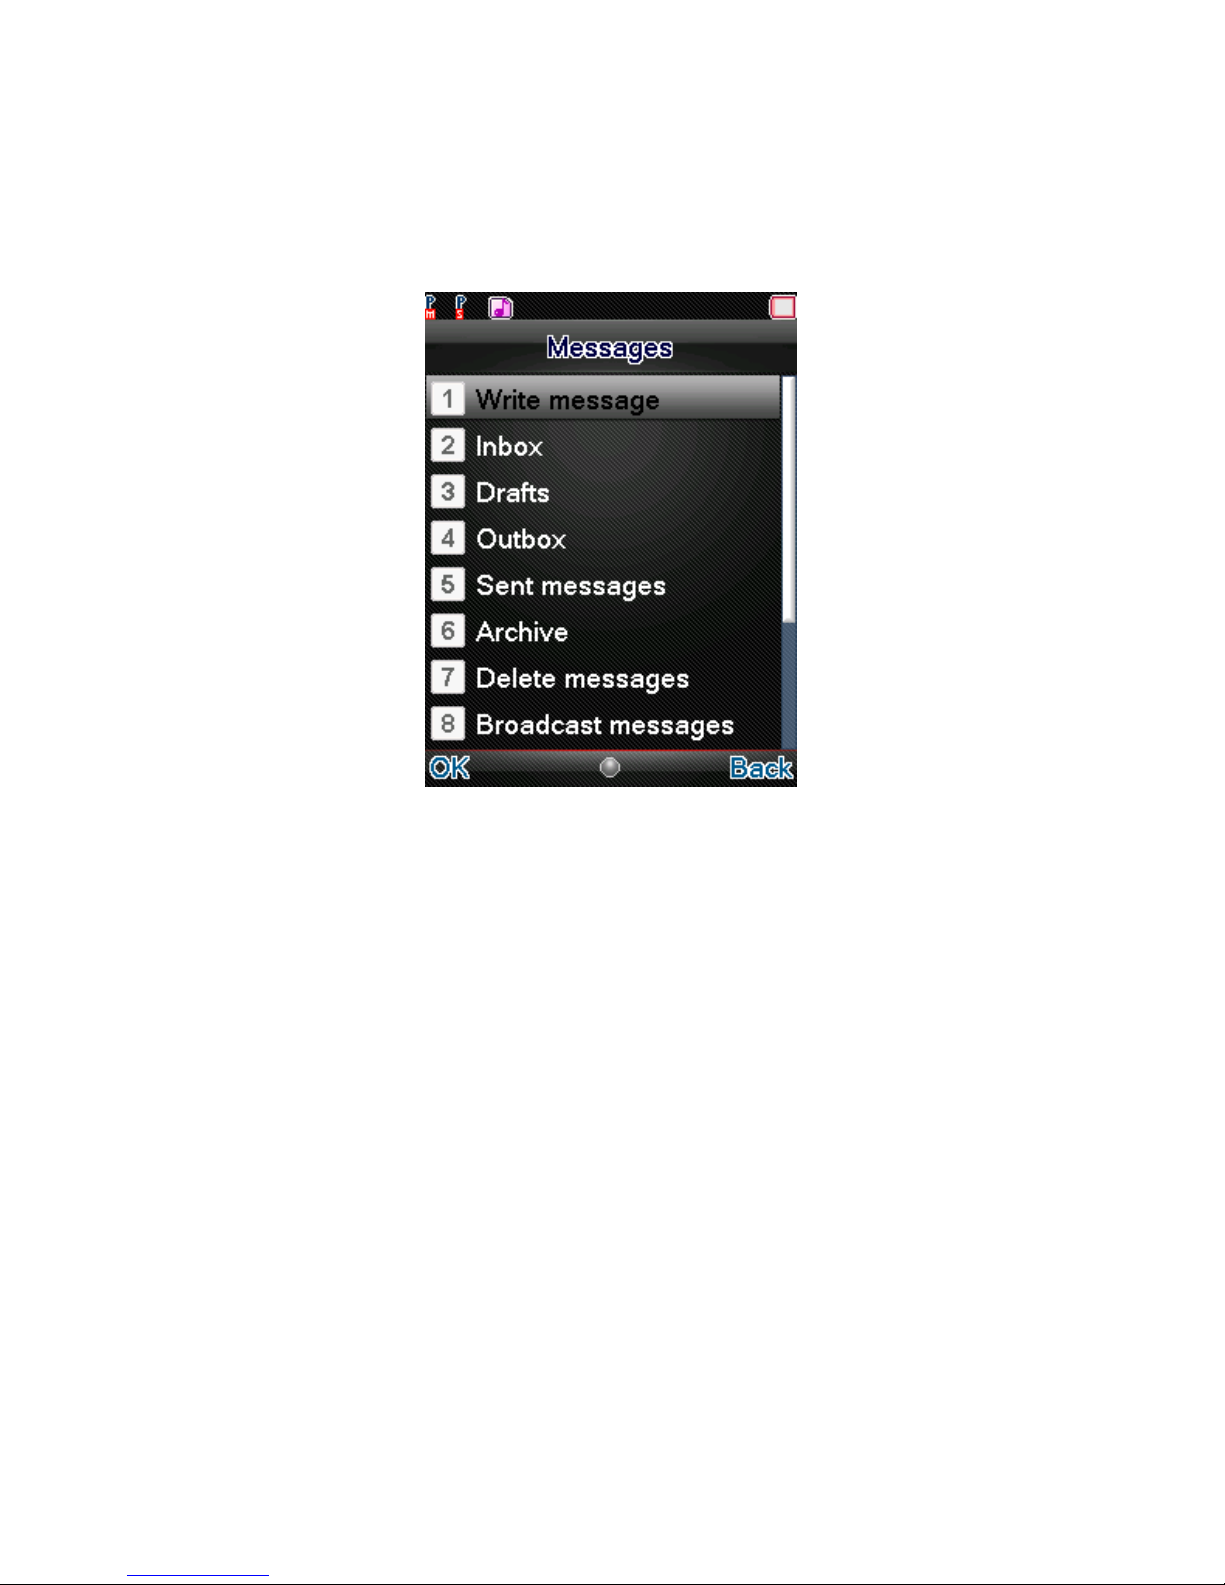
Your device features, sending and receiving of SMS (Short Message Service)
Press LSK (Left Soft Key) to access Main Menu and then select Messages.
Page 18
18
Write message
You can create and send message to a particular contact using this sub-menu.
Inbox
Inbox sub-menu enables you to view all the messages received on your
Master/Slave SIM.
Drafts
The created messages can be saved to drafts folder for future use. After
selecting a message from the Drafts folder, select Options to edit/delete or
send the saved message from the desired SIM.
Outbox
Page 19

19
The messages that are not sent successfully get stored in the Outbox folder.
Sent Message
All the messages that are sent successfully get stored in the Sent Messages.
Archive
You can move messages into the Archive
Delete messages
Delete all of the messages in the Inbox, Drafts, Outbox, Sent messages,
archive.
Broadcast Message
This network service enables you to receive all kind of text messages, such
as weather reports or transportation information. There are several
networks who afford this service in this world. Please consult your network
operator for more reference.
Receive mode: Turn on or off the Cell Broadcast.
Channel settings: You can choose Select, Add, Edit or Delete to
receive the Broadcast information.
Languages: Select the desired language to display the broadcast
message.
Read messages: Scroll the Up/Down Key to select the message.
Your network operator decides whether the language is supported or not.
SMS Templates
Page 20

20
Your device is provided with some commonly used pre-defined messages.
These messages can be edited and send instantly.
SMS Settings
You can view/change the SMS settings, such as profile, voicemail server,
delivery report etc by accessing this sub-menu.
SMS backup
You can export/import messages by accessing this sub-menu.
Schedule SMS
This service allows you to send a message to a particular contact at a time
pre-defined by you.
C A L L L O G S
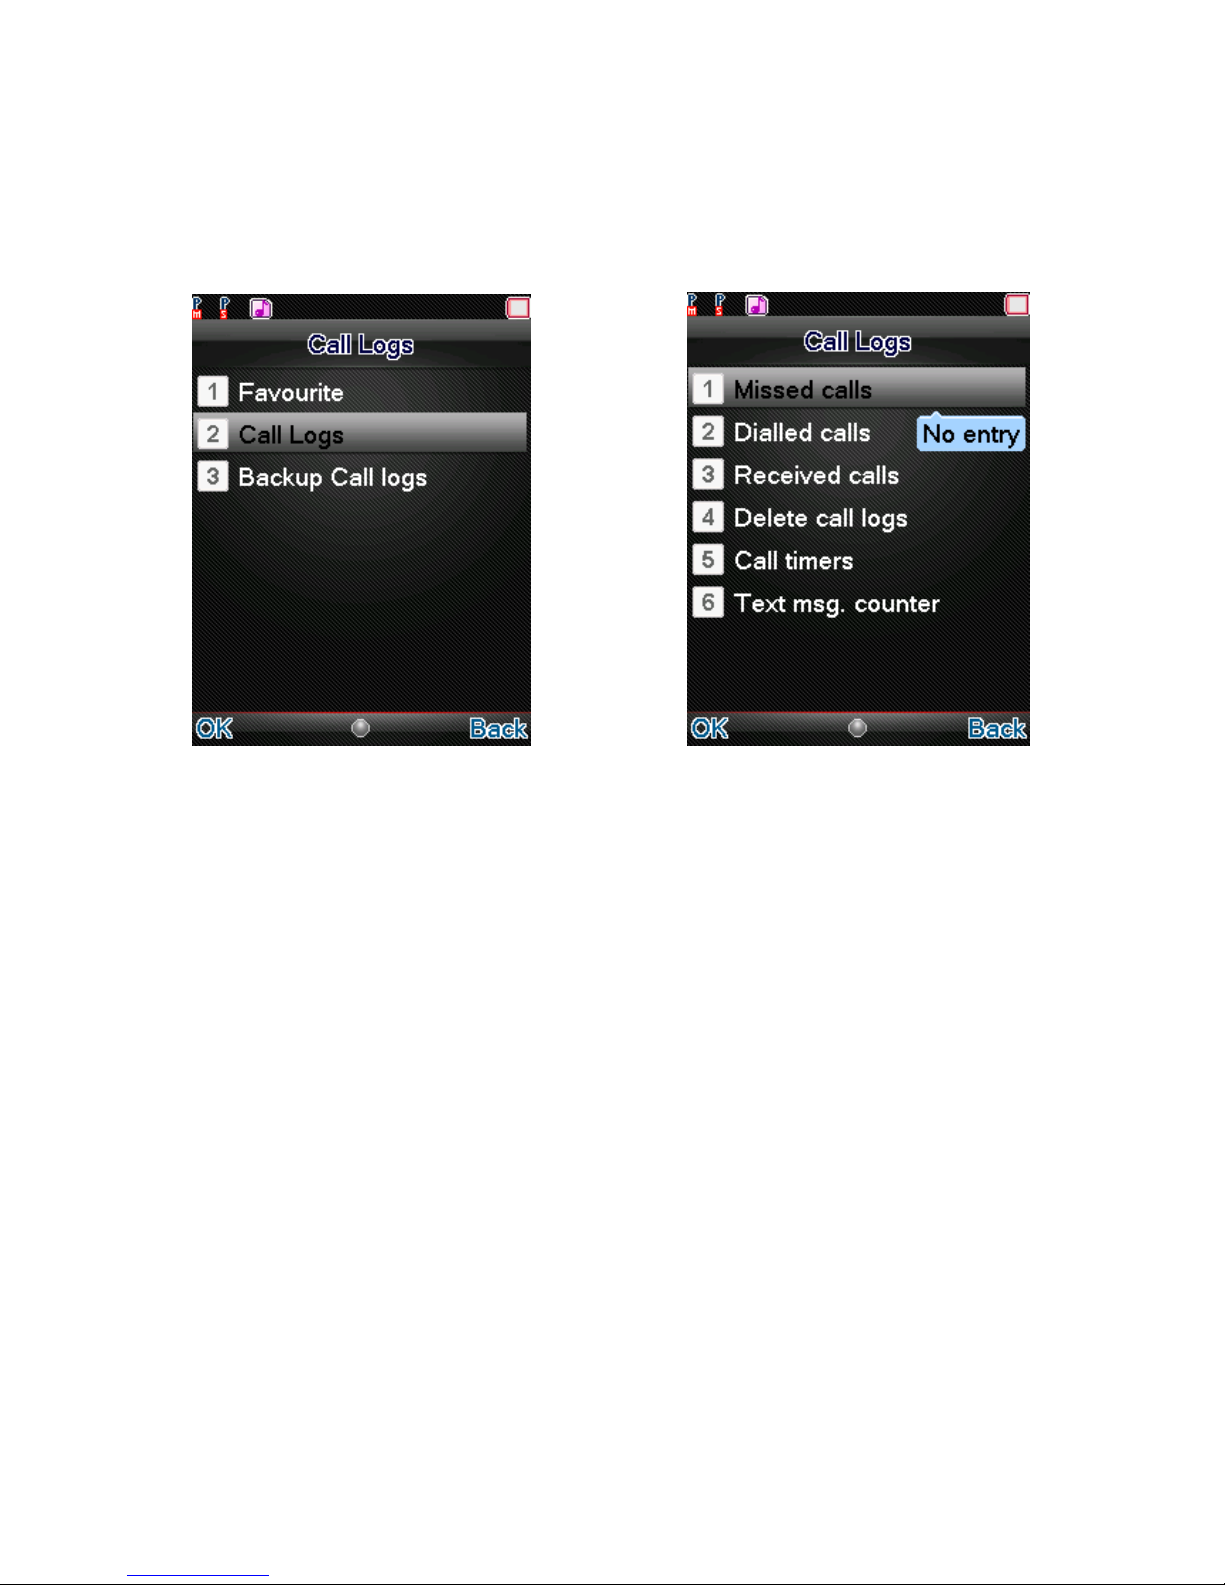
Call Logs sub-menu lets you view the call details i.e. the missed, received &
dialed call logs. In the standby mode, press left soft key to access Menu >
Call Logs > Call Logs. Scroll up/down to select a call and then press OK key
to view the details and perform operations, such as View, Call, Send SMS,
Add to blacklist, Delete etc.
Page 21
21
Favorite
The most frequently called contacts are saved to the favorite contact list,
enabling you to access the contacts quickly and easily.
Call Logs
Missed Calls
With this function, you can check the missed calls. Scroll the Up/Down keys
to select a missed call. Press OK key to access missed call information, and
perform operations, such as delete, save to phone book, call, edit and so on.
Dialed Calls
With this function, you can check the dialed calls. Press OK key to access
dialled call information, and perform operations, such as delete, save to
phone book, call, edit and so on.
Received Calls
Page 22

22
With this function, you can check the received calls. Press OK key to access
received call information, and perform operations, such as delete, save to
phone book, call, edit and so on.
Delete Call Log
Access this sub-menu to delete the call logs.
Call Timers
Last Call: The last call time can be checked.
Dialed Calls: The total time for all dialed calls can be checked.
Received Calls: The total time for all received calls can be checked.
Reset All: Reset the counters.
Text Message Counter
Sent: You can check and clear the number of sent messages.
Received: You can check and clear the number of received
messages.
Backup Call Logs
Your device also allows you to import/export call logs. Access this sub-menu
to backup the call history.
M U L T I M E D I A
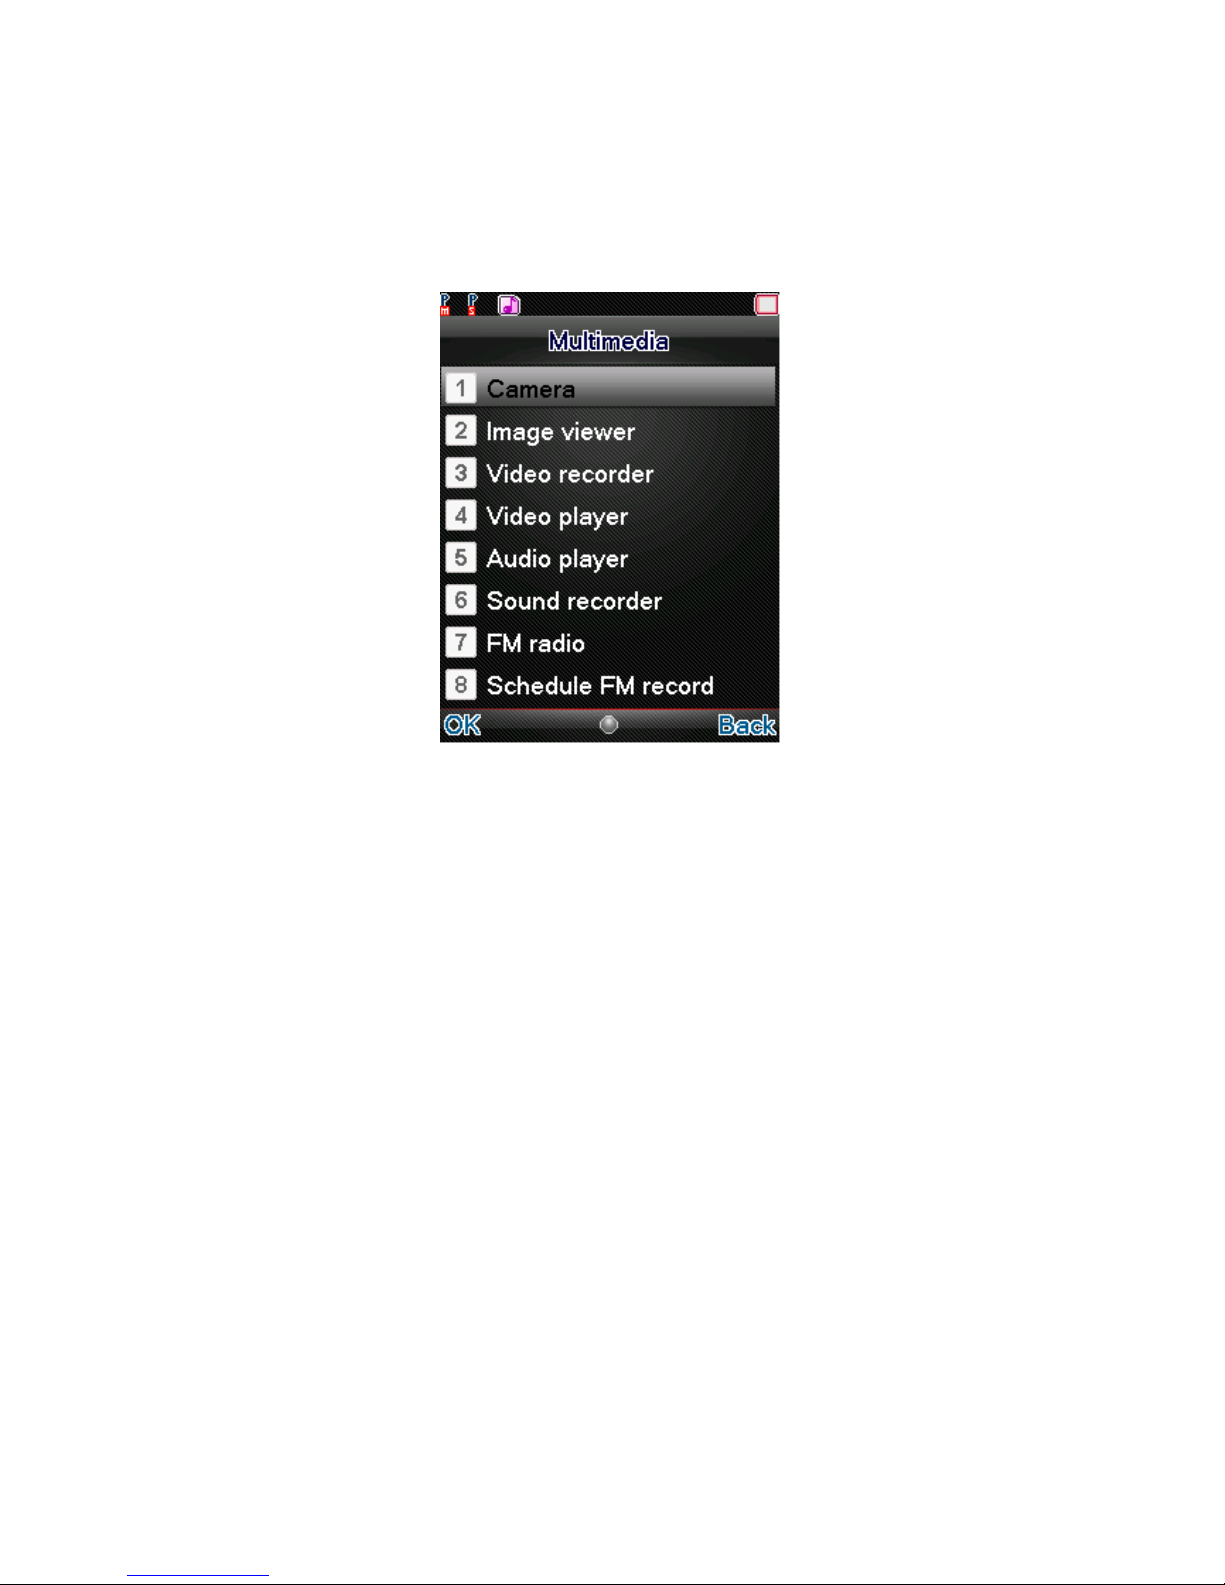
This menu is specifically designed for the entertainment purpose of the user.
To enter this menu, go to the main menu and select multimedia.
Page 23
23
CAMERA
Your device is provided with a 1.3 MP camera, which supports the
photographing and video shooting functions. The lens of the camera is
located at the back of the device and the screen is used as the viewing
window. Pictures are saved in the file system of the device or the memory
card.
Page 24
24
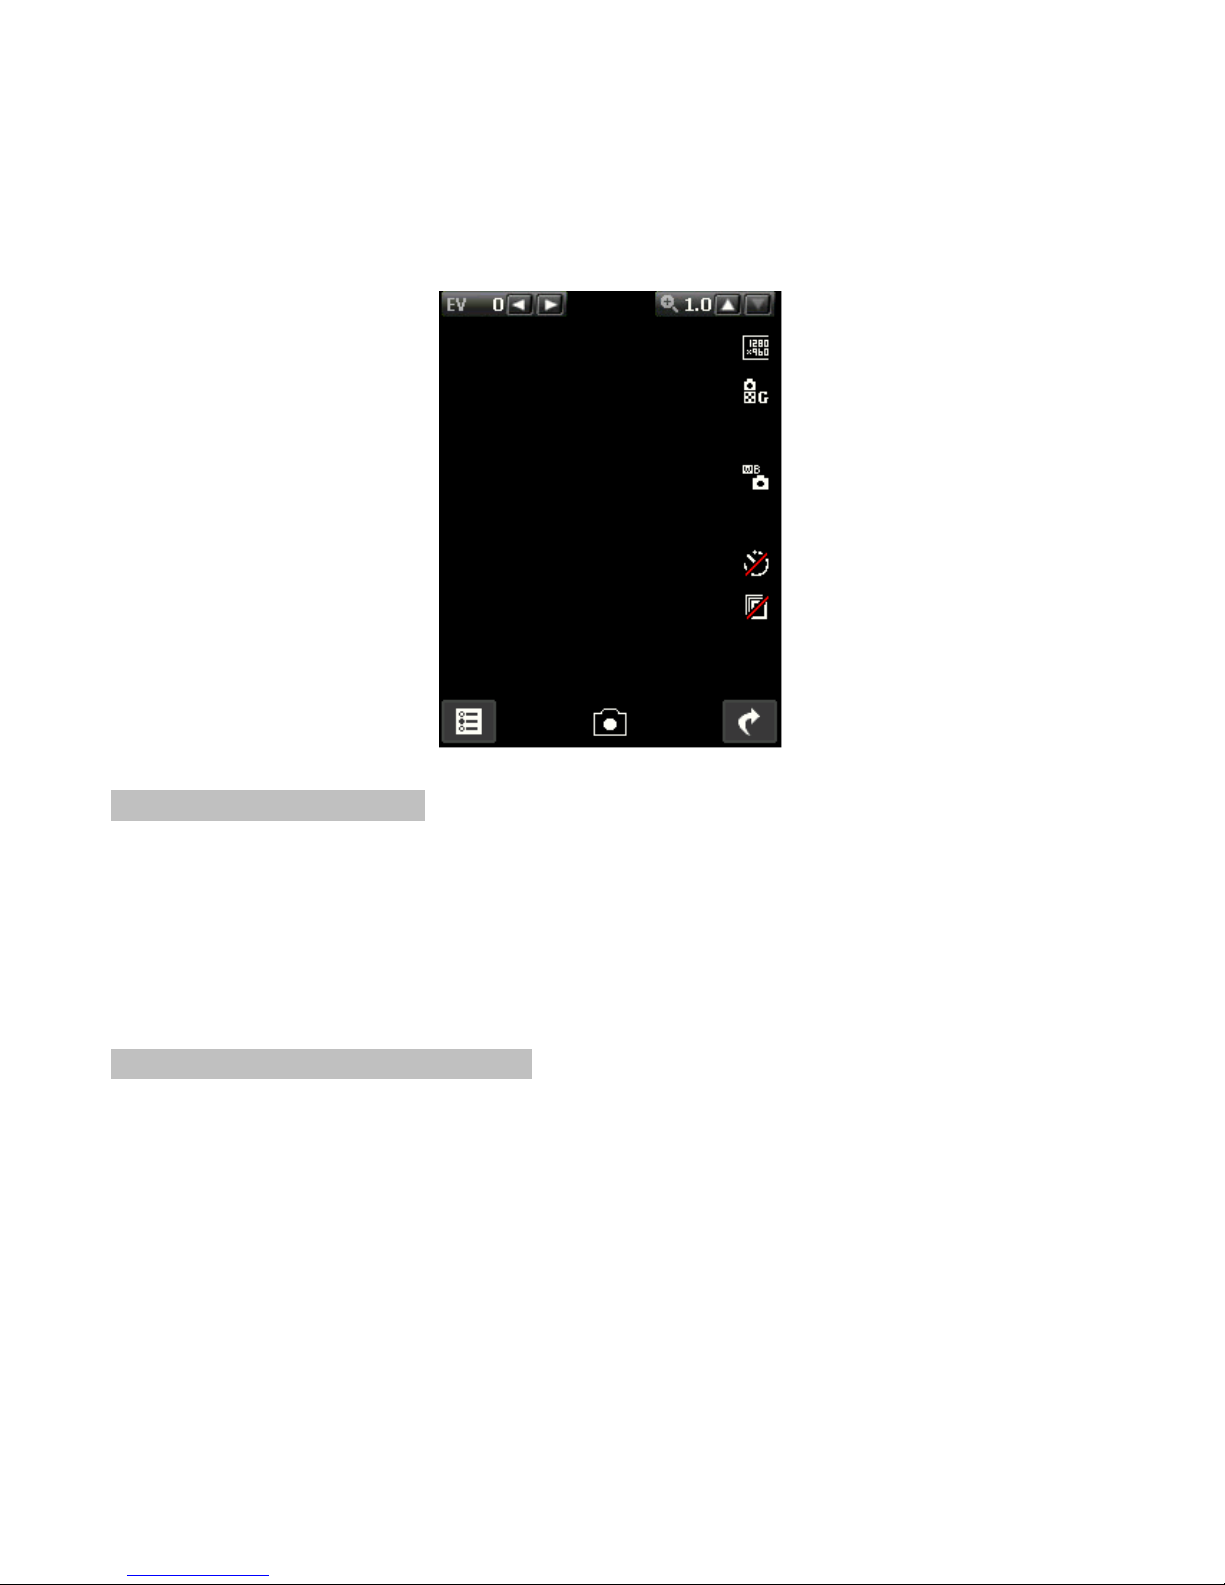
To Capture An Image:
Go to Main Menu > Multimedia > Camera
The camera screen will appear
Aim the device at the subject
Press the center key to capture the image
Configuring Camera Settings:
After switching on the camera mode, press LSK to configure the settings. You
can change the brightness, contrast, image size, image quality, white
balance and scene mode through settings.
Page 25
25
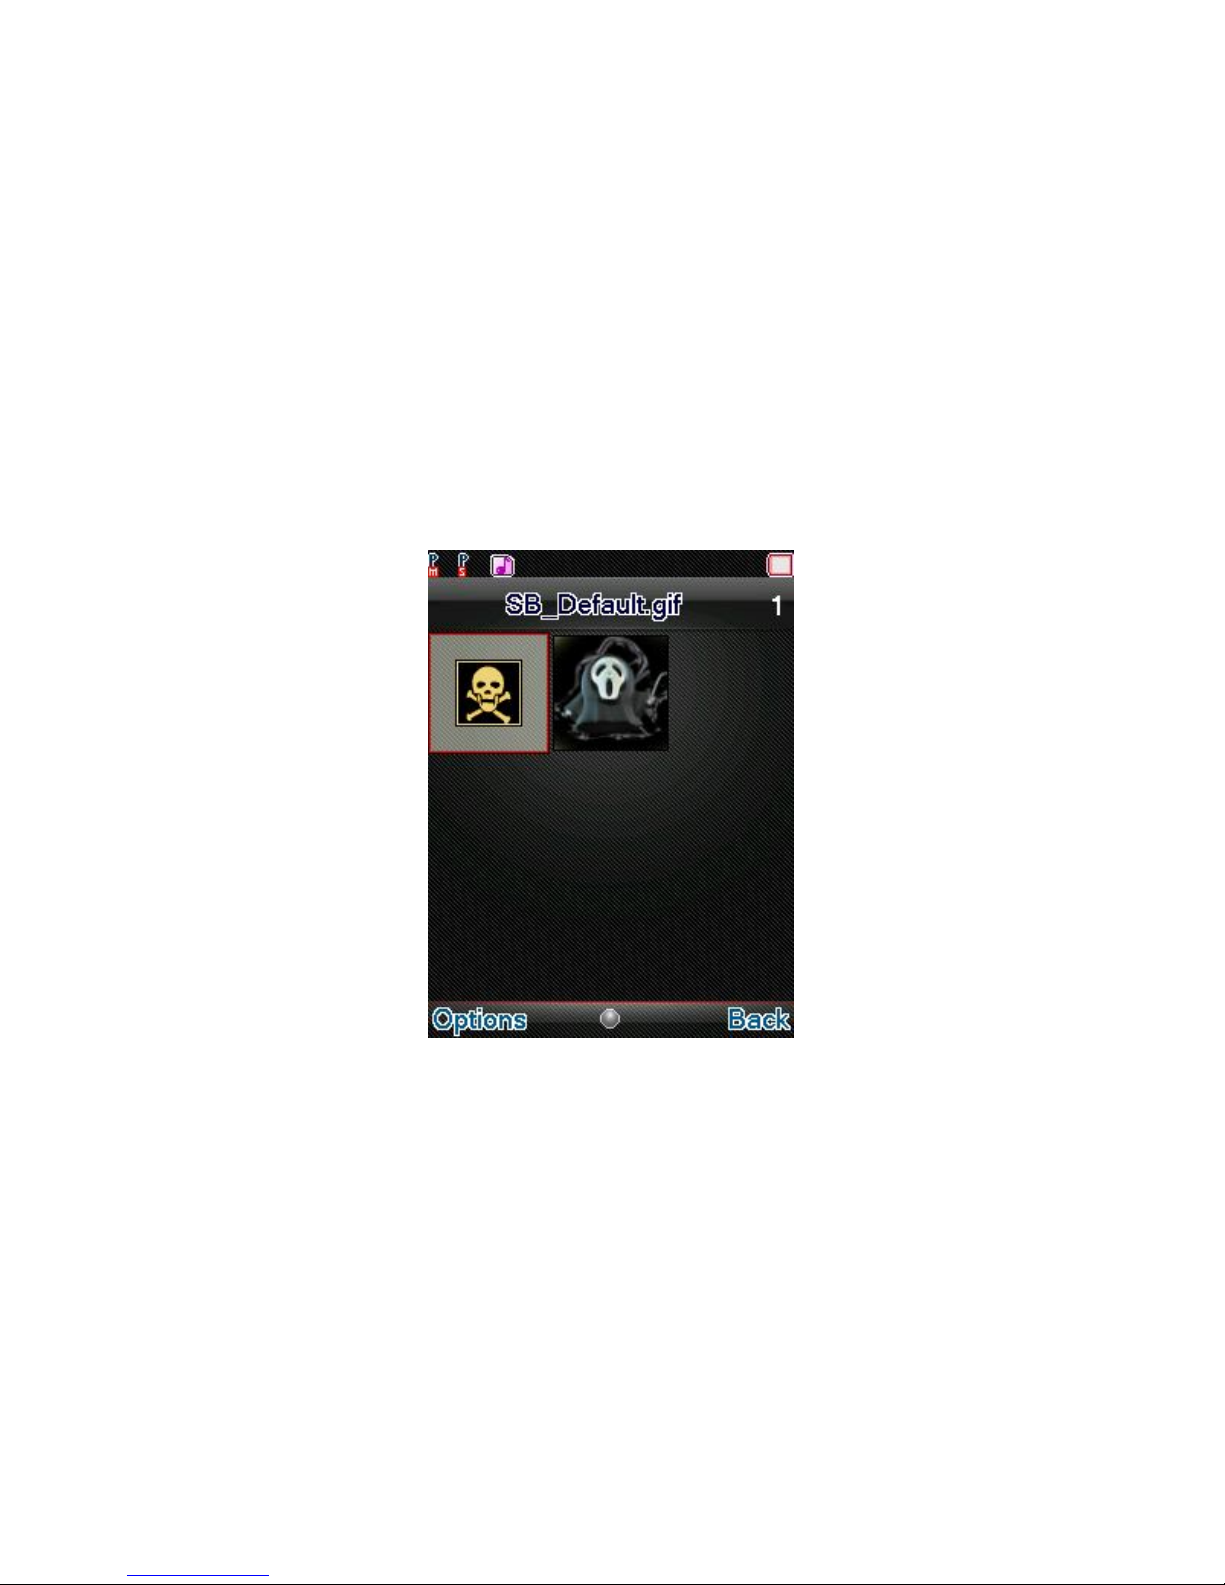
IMAGE VIEWER
Pictures taken can be accessed quickly through Image Viewer. Go to Menu >
Multimedia > Image Viewer. All the images available in the storage selected
by you will be displayed. Select an image to view OR press options to send
the selected image, change the storage, delete all files, use the image as
wallpaper/screen saver/caller picture, rename the file etc.
VIDEO RECORDER
In standby mode, select Menu > Multimedia > Video Recorder to launch the
video recorder and shoot your videos.
Page 26
26
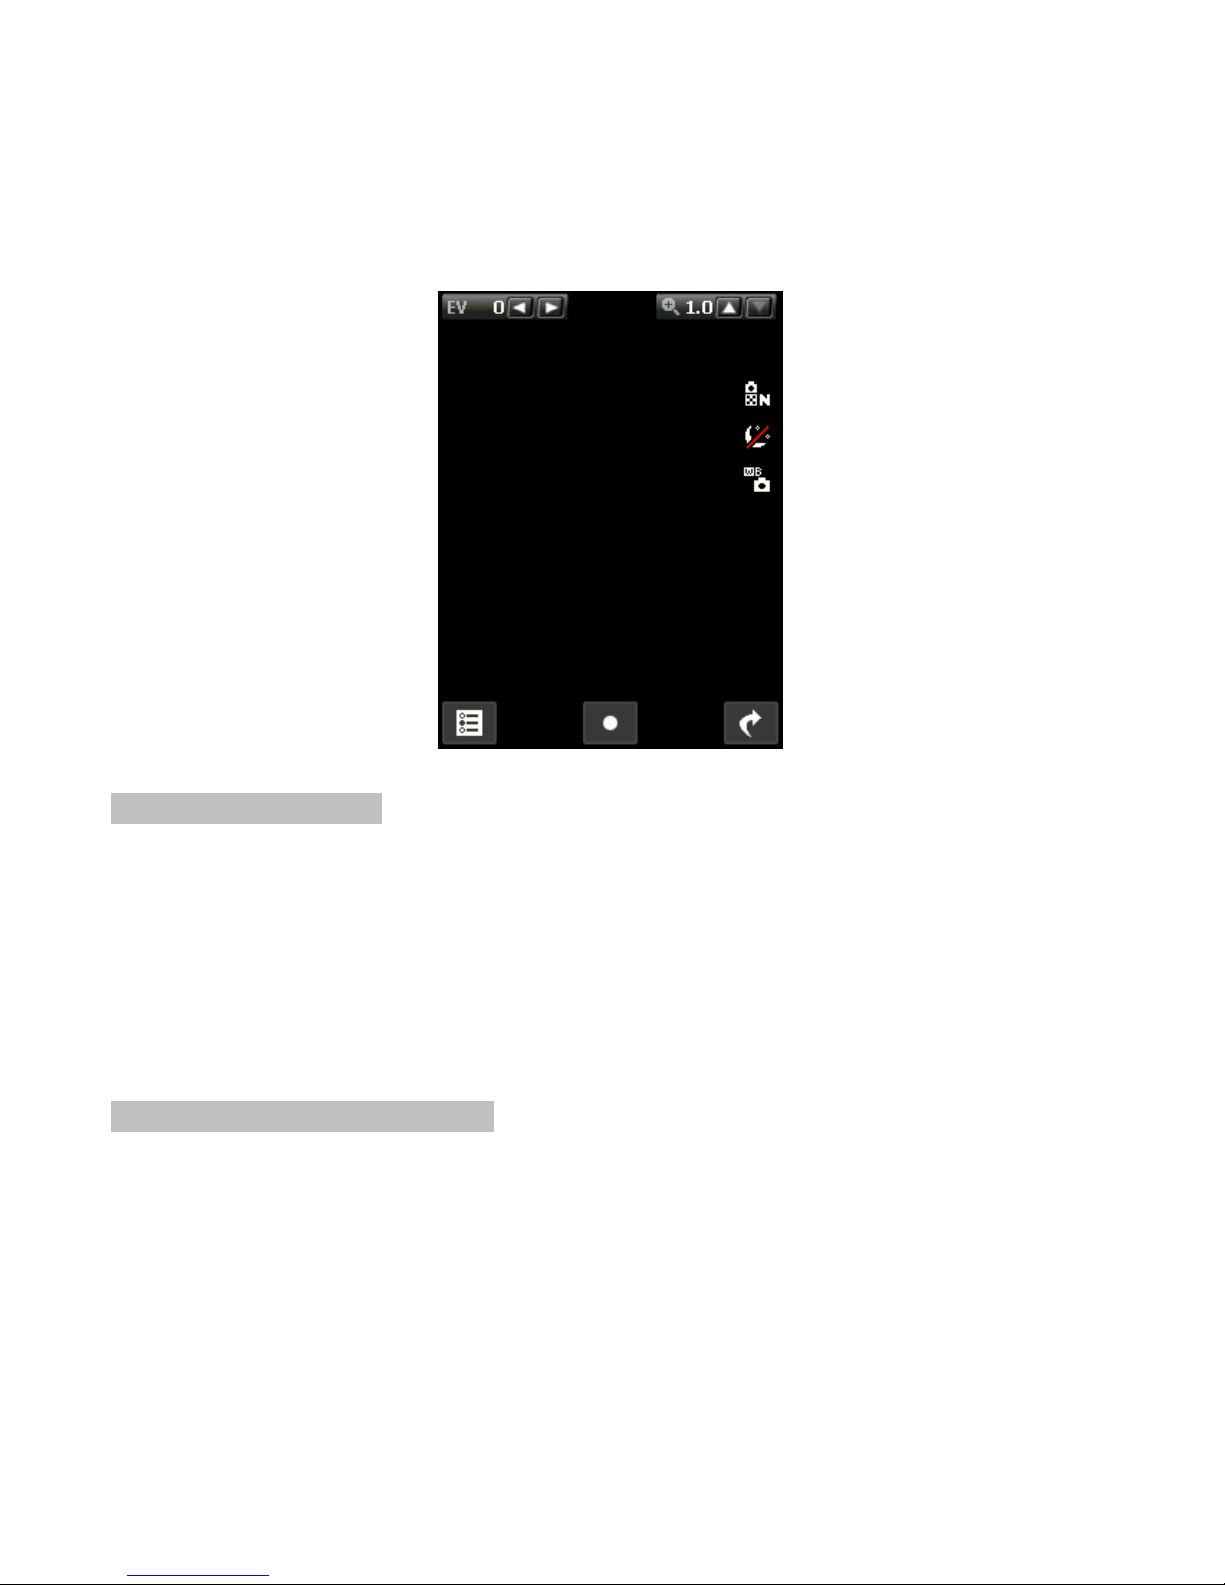
To Record A Video:
Go to Main Menu > Multimedia > Video Recorder
The video mode will appear
Aim the device at the subject
Press the center key to start recording
Configuring Video Settings
After switching on the video mode, press options/LSK to configure the
settings. You can change the brightness, video quality and white balance.
Page 27
27
VIDEO PLAYER
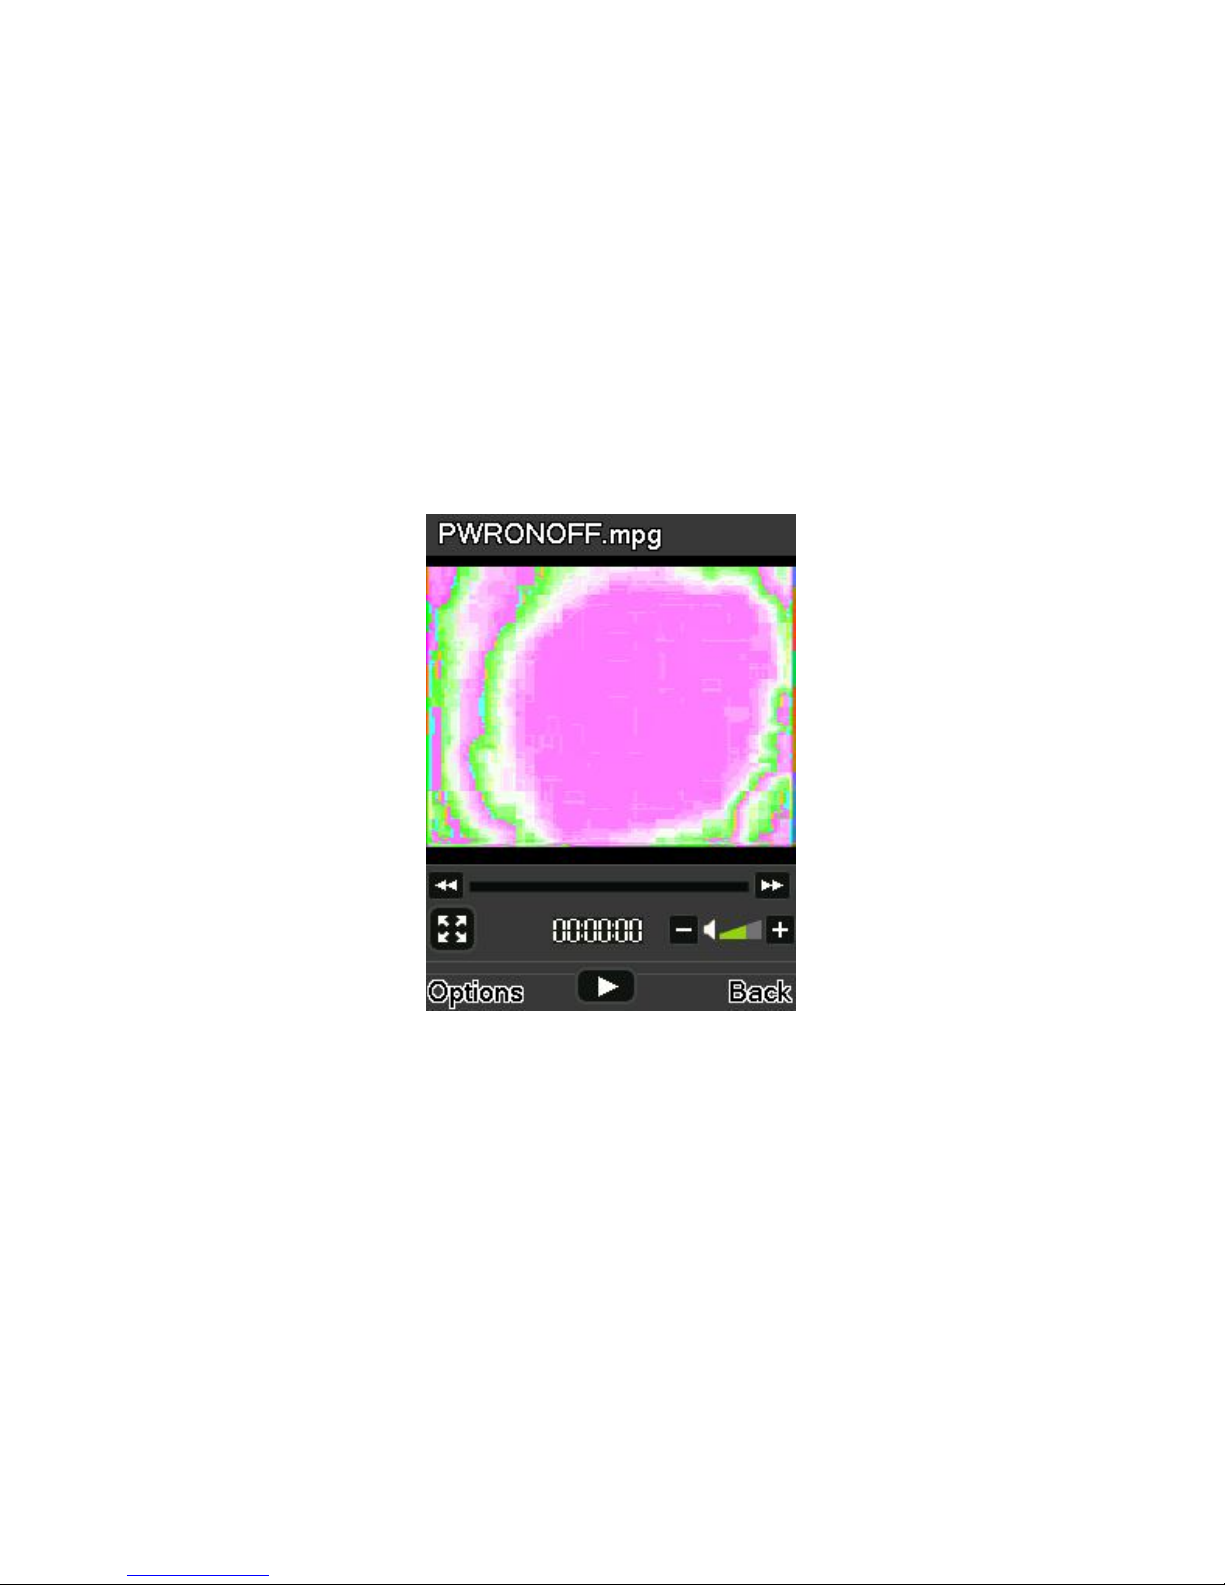
Your device supports playing various video formats. To access the Video
Player, go to Main Menu > Multimedia and select Video Player. All the videos
available on the storage selected by you, will be displayed. Select a video clip
and press OK key to open it. Press OK key to play the video clip.
AUDIO PLAYER
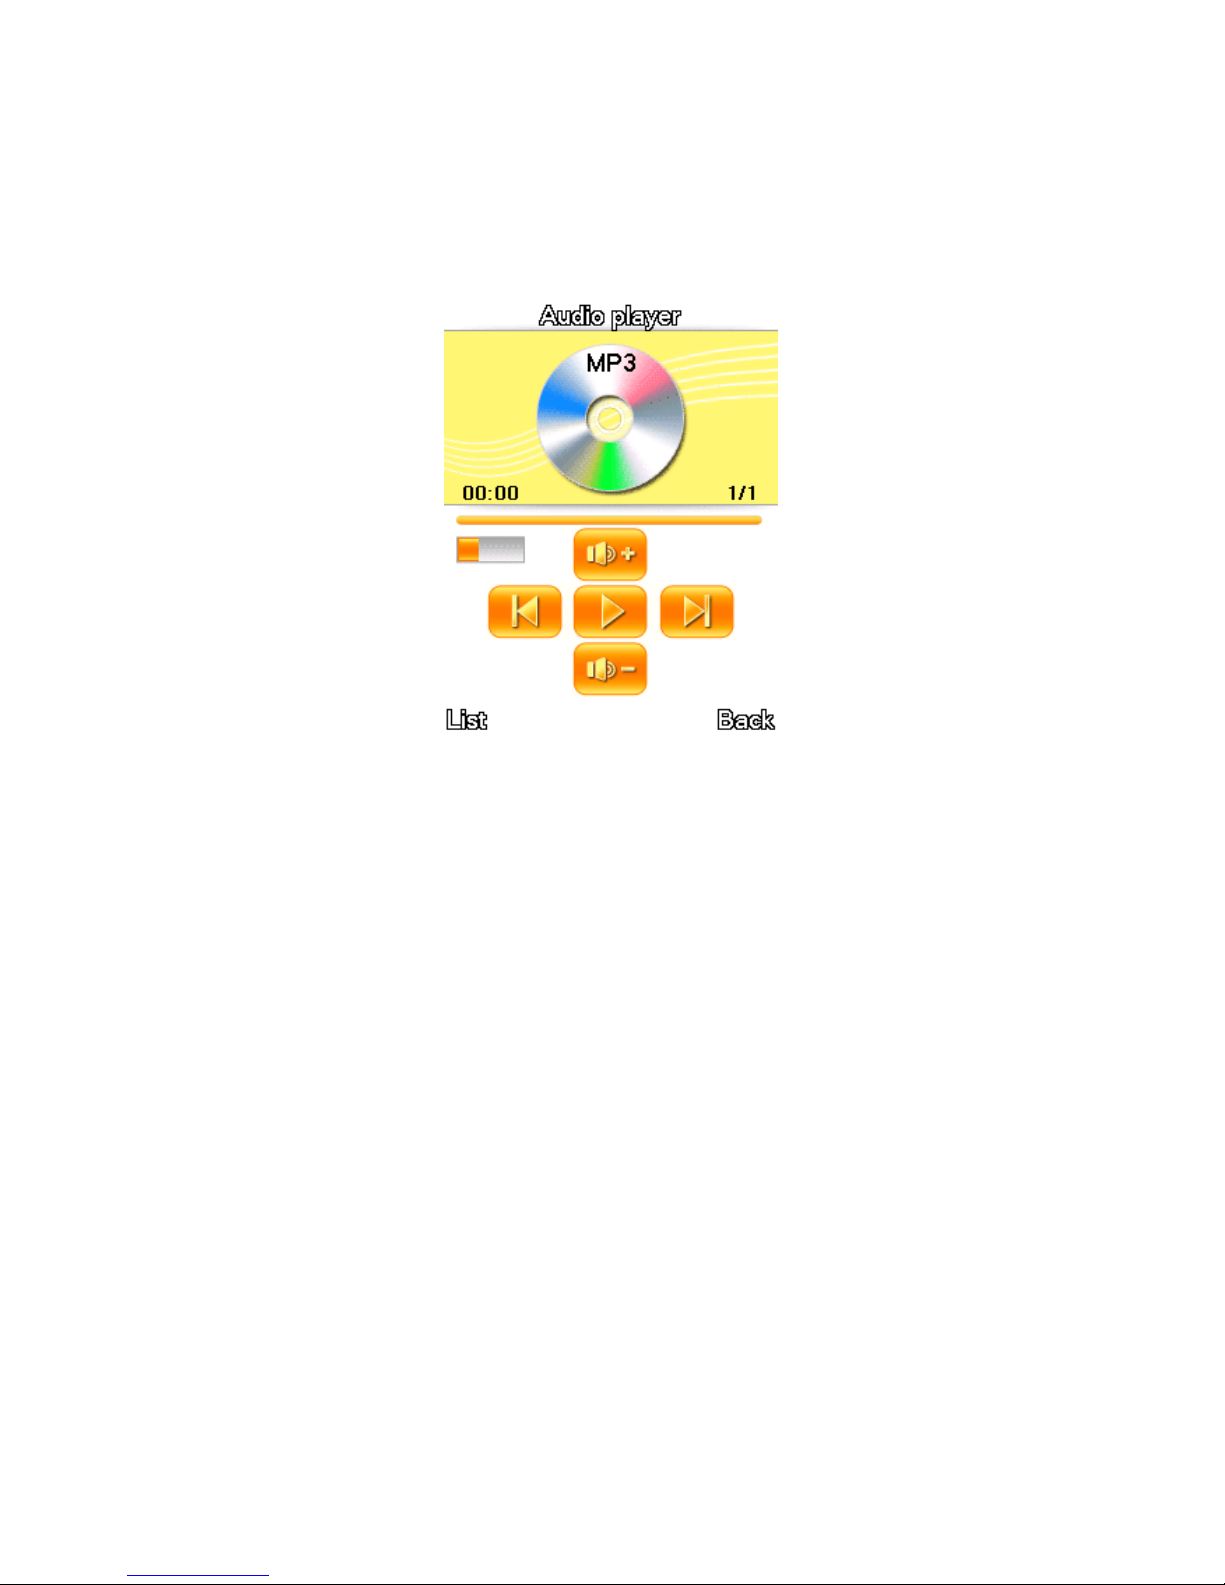
Audio Player allows you to play audio files. Please save your audio files in the
My Music folder of the T-Flash memory card. You can stop, pause, play and
switch to the next/previous song using the navigation keys.
Page 28
28
SOUND RECORDER
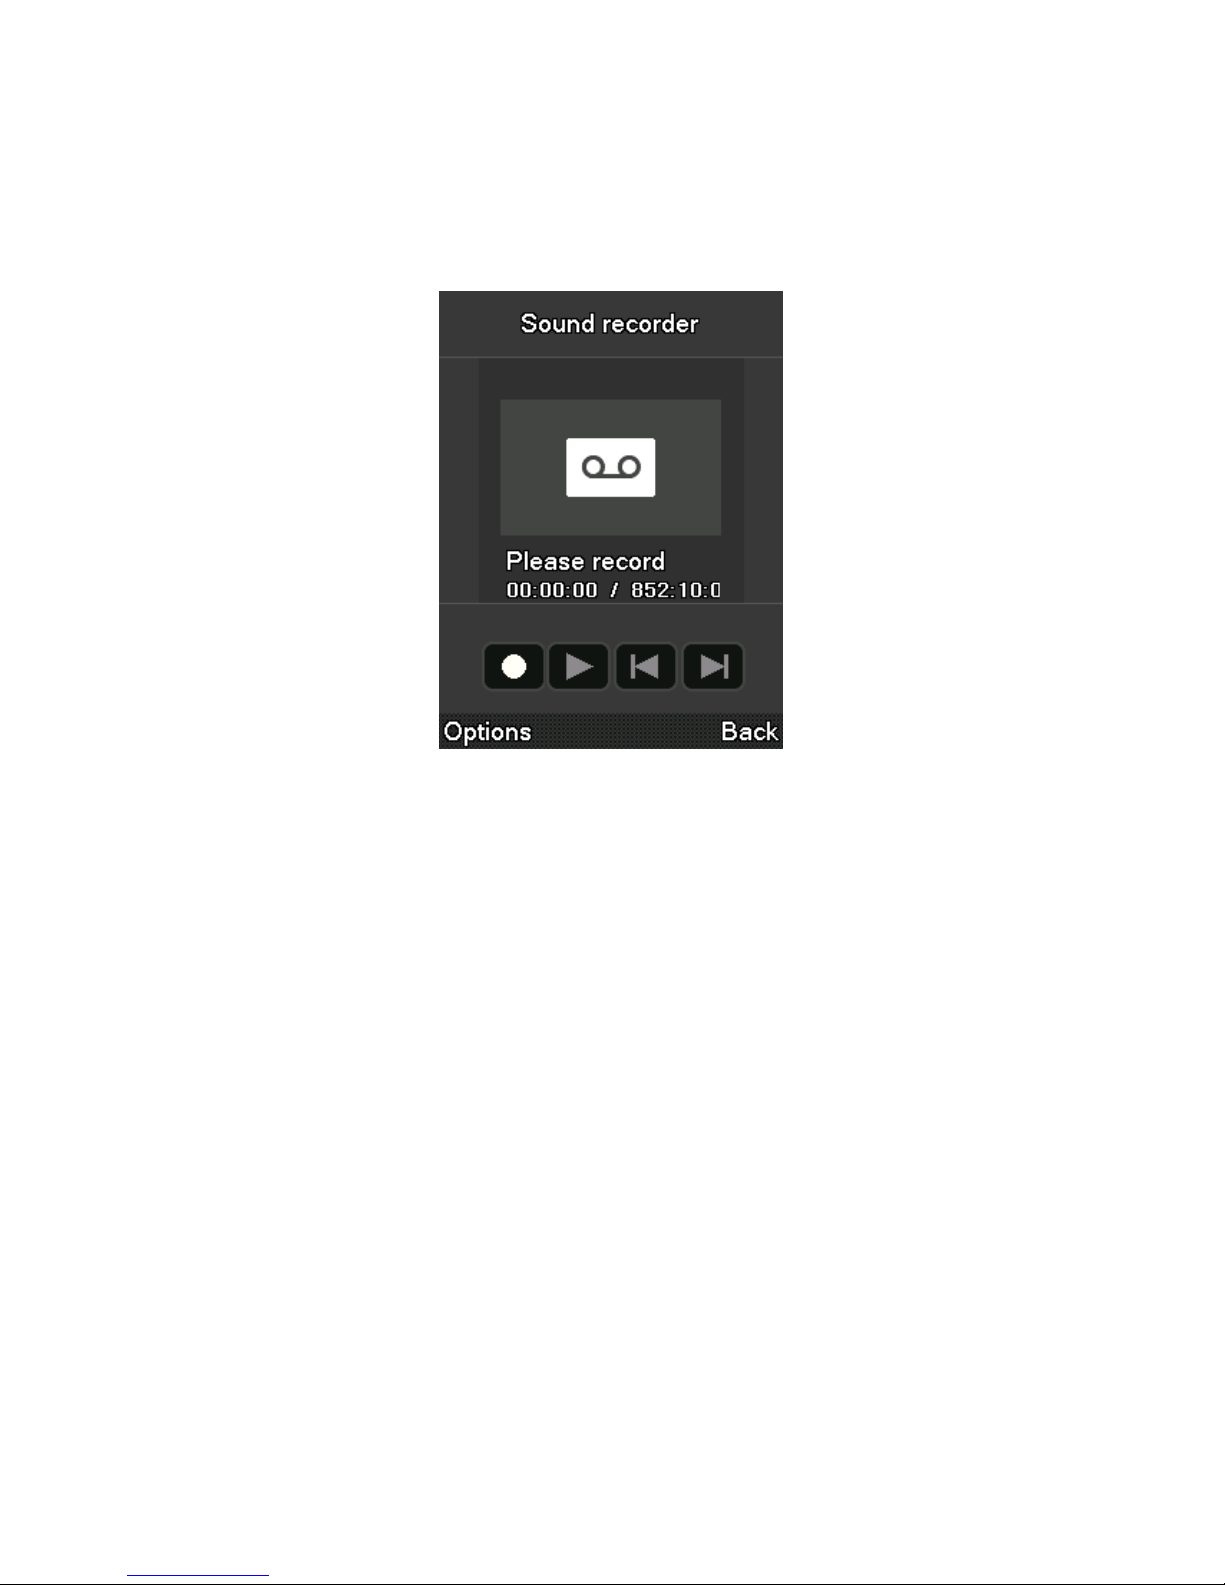
You can record conversations, which may be saved to the Audio folder under
File Manager. After selecting a recording, you can select to Play Append (only
for AMR), Rename, Delete, Delete All files, Use As and Send the file.
Page 29
29
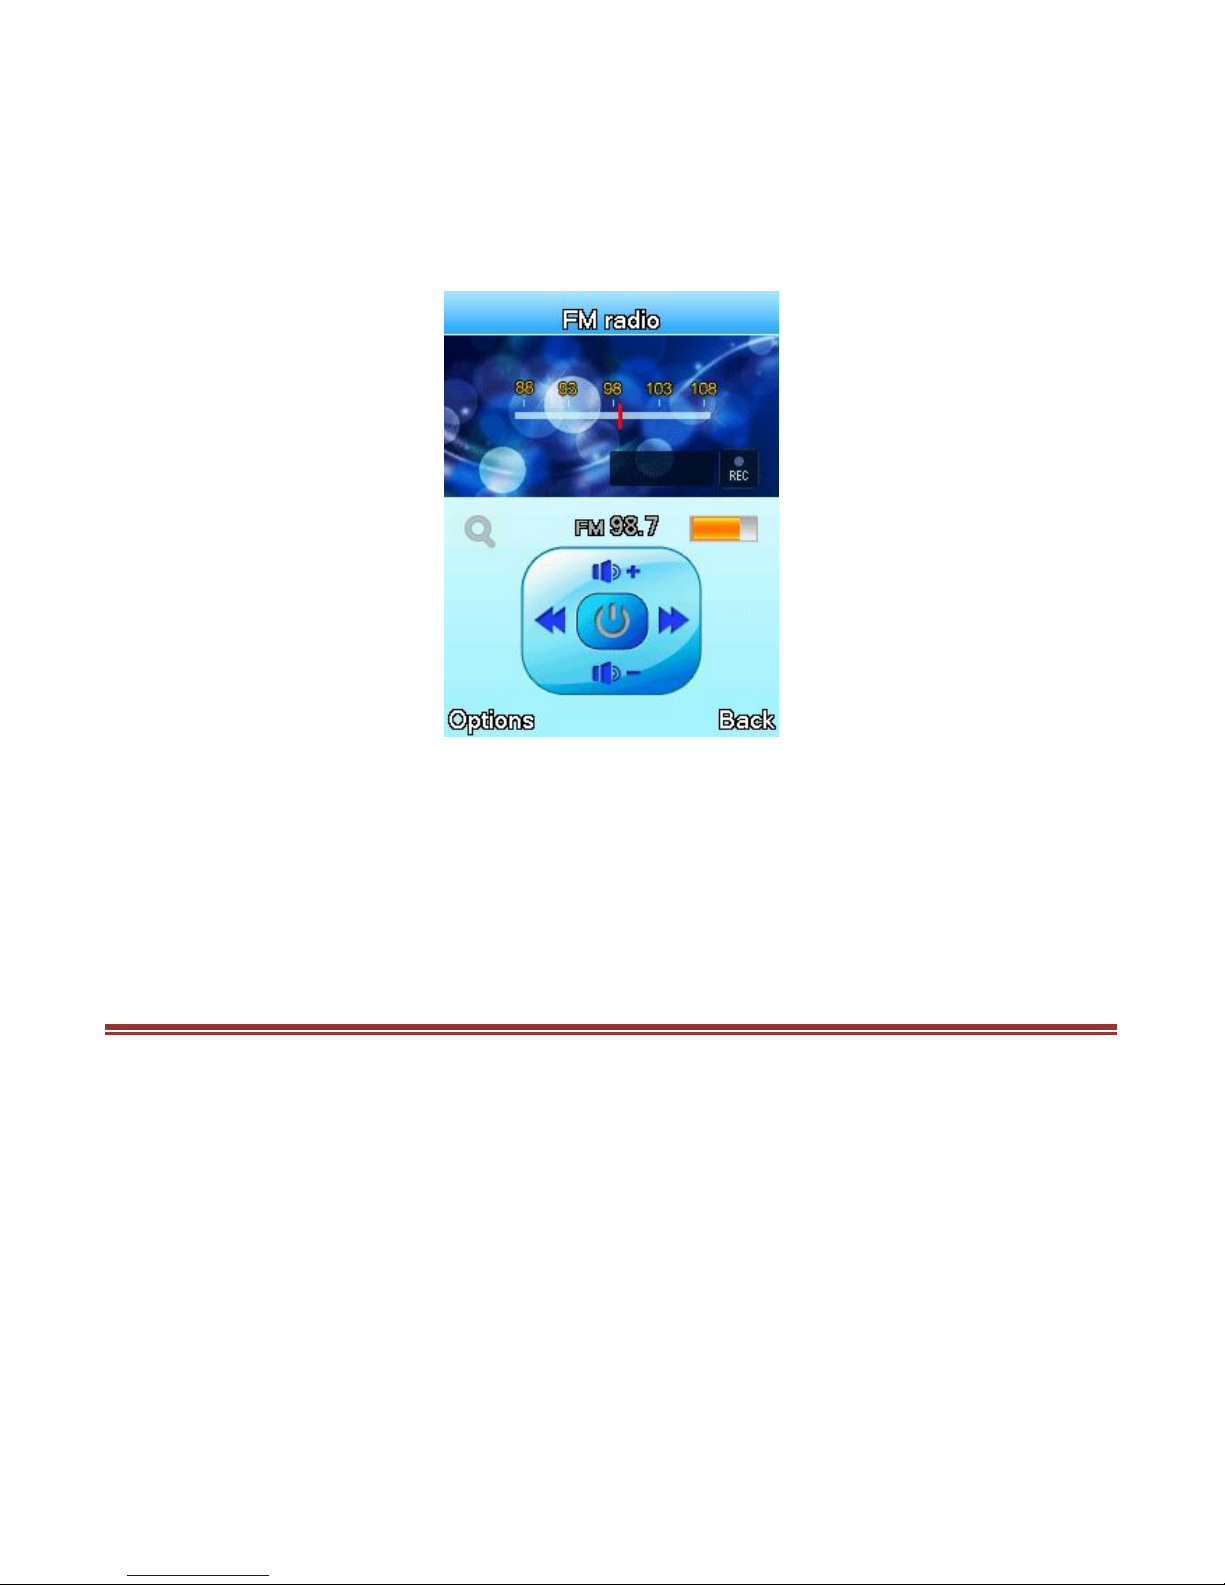
FM
You can use your device to listen to FM radio stations once the original
Headset is plugged into the accessories connector. Select FM Radio from
Multimedia Menu.
Page 30
30
SCHEDULE FM RECORD
This service allows you to recording a specific channel at a time pre-defined
by you.
S L I F E
S Life is On Device Portal offered by Spice to its customers. It allows you
access to your favorite services at a click on single button. The genre of
services span across Music, News, Entertainment, Information etc. This will
be updated by Spice from time to time; IMSI number will be fetched for this
purpose. The bouquet of services under S Life is different for different
operators. The current services under S Life require SMS and Voice Call
Page 31

31
services activated on your SIM card. We offer free as well as paid services for
your consumption under S Life.
*S Life is a network dependent feature.
P R O F I L E S
The device provides seven pre-defined user profiles that allow the operations
of the device to best suit the environment you are in. The profiles are
General, Silent, Meeting, Outdoor, My Style, Power Saving, and Flight
Mode.
General
Activate
Customize
Alert Type:
Ring Only: Just ringing, no vibration.
Vib. Only: Just Vibrating, no ringing.
Vib. and Ring: Ringing after vibration.
Vib then ring: Ringing then Vibration.
Ring Type:
Repeat: Rings continuously when a call is coming.
Ascending: Rings continuously and the volume increases gradually.
Beep once: Very short.
Tone Settings: Includes Master/Slave SIM Incoming Call, Power on,
Power off, Master/Slave SIM Message, Key. You can select built-in ring
tunes, or the tunes composed by yourself.
Page 32

32
Volume: Includes the volume setting of Ring Tone and Key Tone. The
volume degree is from 1 to 7.
Message/Slave SIM Tone: Select the tone for Master and Slave SIM
Keytone Volume: Set the volume for keytone
Power On/Off Tone: Select the power on/off tone
System Alert: Set it to on/off
Silent
Select to activate
Meeting
Please refer to “General” for more details.
Outdoor
Please refer to “General” for more details.
My Style
Please refer to “General” for more details.
Power Saving
This is a special profile which increases the usage time of the device. In this
profile only important functions of the device will work so the power
consumption of the device will be minimizes.
Flight Mode
Please set it on, when you board an airplane.
S T OR A G E
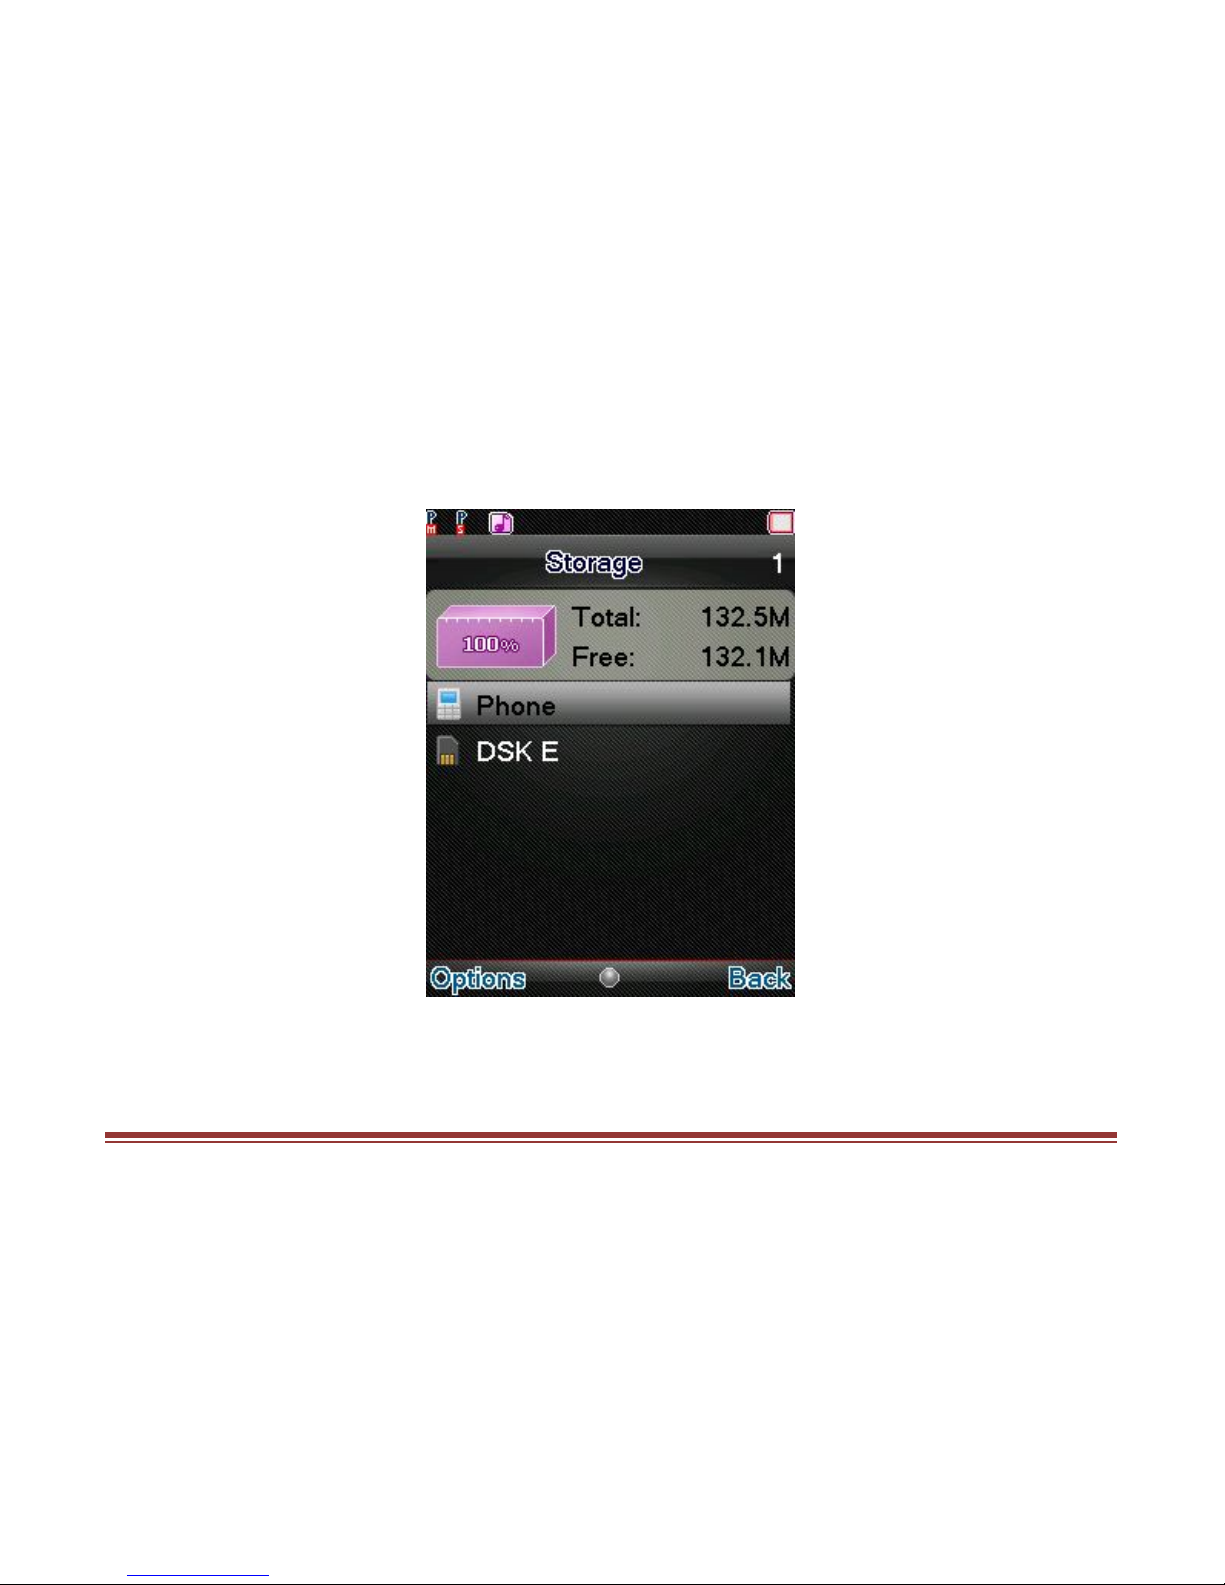
Storage enables you to browse, open and manage the data saved in the
Phone and Memory card. The device provides a certain space for users to
Page 33
33
manage files and supports the T-Flash card. You can use the storage to
conveniently manage various directories and files on the device and the TFlash card. Choose Files to enter the root directory of the memory. The root
directory will list the default folders, new folders and user files. You can also
format both the storage i.e. device and memory card.
B L U E T O O T H
You can transfer data, such as music to other device using Bluetooth. Search
the device and accept/transfer data. The received data is automatically
stored in the directory.
Page 34
34
Power: To activate or deactivate Bluetooth as needed.
Visibility: Make the device visible.
My device: To search new devices automatically.
Search audio device: To search audio devices automatically.
My name: Assign a name for your device.
Advanced: access other options, such as audio path, sharing
permission, storage etc.
S E T T I N G S
Page 35

35
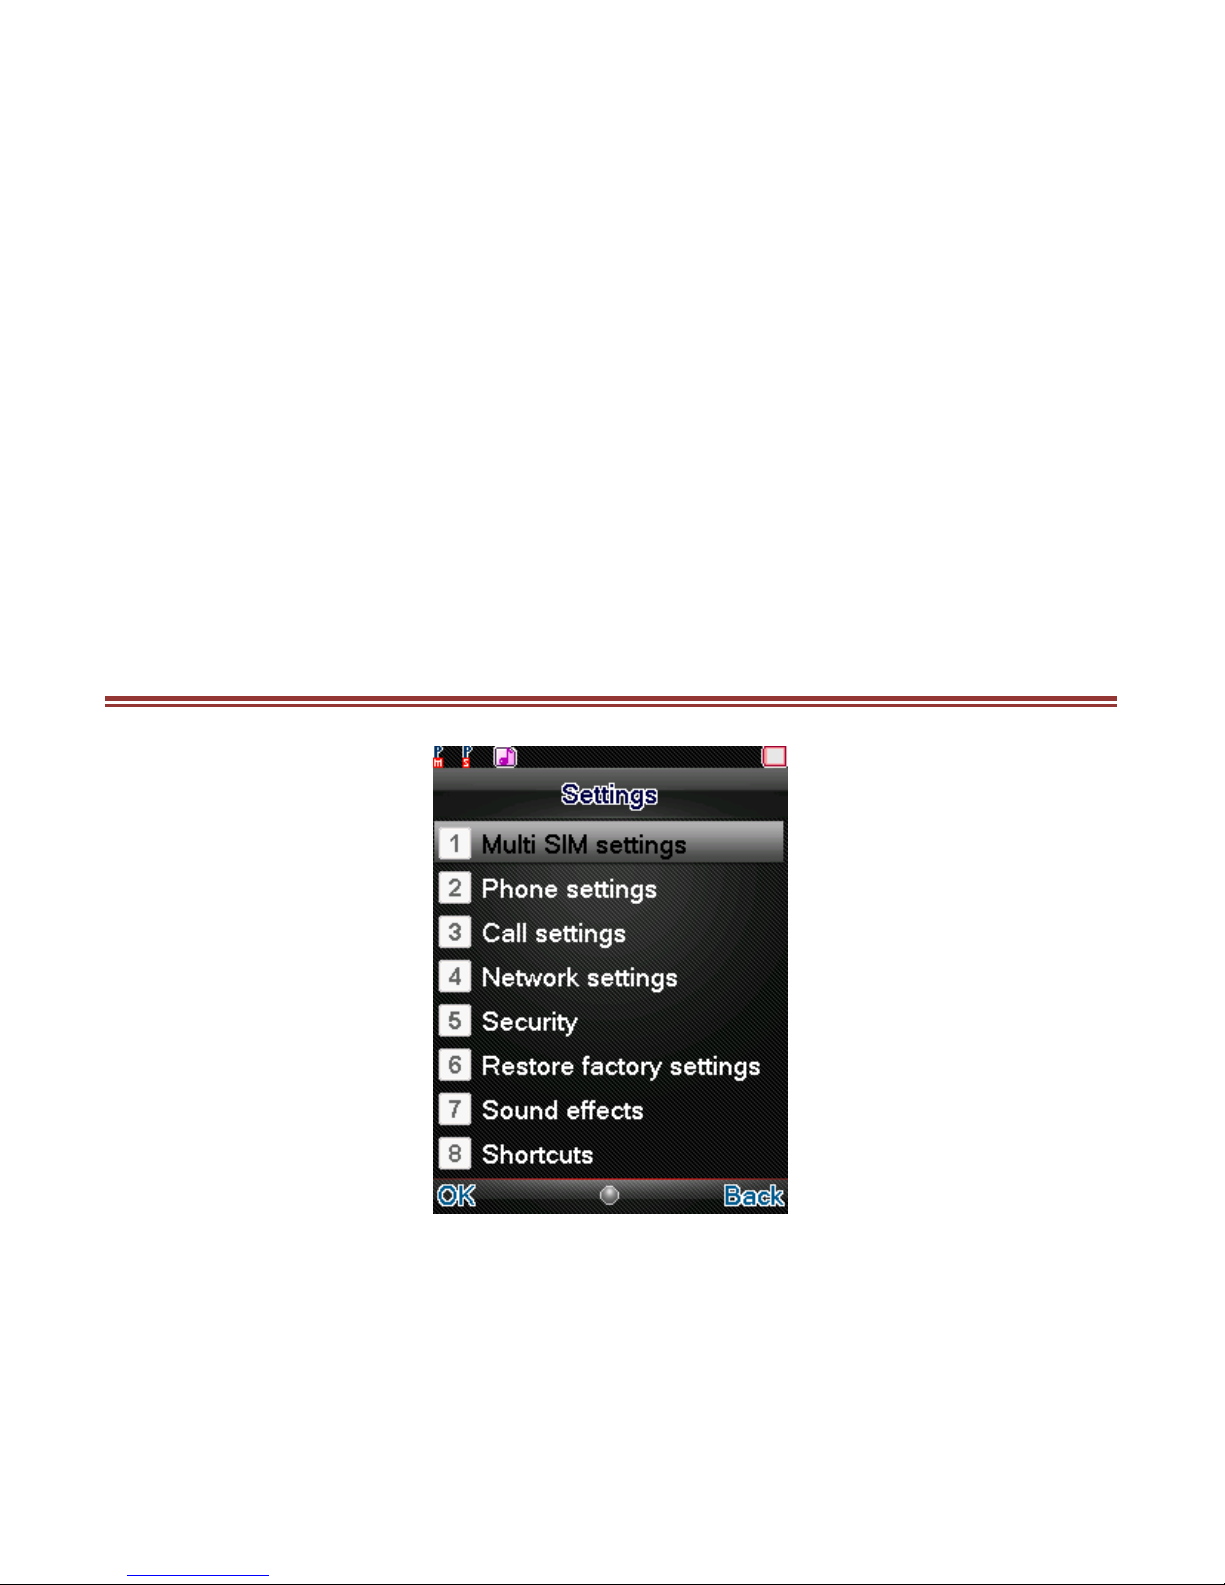
Multi SIM Settings
You can choose to operate both the SIM/only Master SIM/Only Slave SIM as
per your usage.
Phone Settings
Time and date
You can set Home City, Time/Date, Format and Update with time zone.
Auto Power On / Off
You can set the time for auto power on /off. Do turn the status on before
using that function, and then the time.
Language
Your device supports English language and Hindi language.
Preferred Input Method
Select the desired input method for the default input method.
Display Settings
With this function you can configure the basic status of display characteristics
including Wallpaper, Screen Saver, Main menu style, Clock type etc.
Dedicated key
With this function you can set the shortcut function of navigation keys.
Misc. Settings
LCD backlight: You can set the LCD backlight.
Call Settings
Master/Slave Call Settings
• Call Waiting > Activate, the network will notify you of a new
incoming call while you have a call in progress (Net work
Service).
Page 36

36
• Call Divert: This network service allows you to divert your
incoming calls to anther number. For details, contact your
service provider.
• Call Barring > Activate, this network service allows you to
restrict incoming calls from your device. For details, contact
your service provider.
Advanced Settings
• Blacklist: you can set 20 numbers. When this Black list is enabled,
you won’t receive the calls from the numbers entered in the
Blacklist.
• Whitelist: When white list is enabled, your device will auto
answer the calls from the numbers entered in the list.
• Auto Redial > On, the device will automatically redial the last
called number after a while if you fail to connect to the
number. The times for auto redial are up to 10 times. Press
Abort to end Auto Redial.
• Call Time Reminder: This function prompts you to end the call in
time to save the call cost. You can select Off, Single, or
Periodic.
• Answer mode: If any key is selected, you can press any key to
answer a call.
• Auto Call Record: Set it on to automatically record all calls.
• Smart Divert:The smart divert function is provided to avoid the
missed calls. When you are in call on the first number, the
incoming call from the second number will be diverted to the
first number if you have activated the smart divert function.
The device will remind you to check the smart divert status
each time when you power on the device.
Page 37

37
This function is based on service provider and smart divert function might
not work on some provider if they do not have not such service.
Network Settings
You can set the options of Master SIM network settings, Slave SIM network
settings and preferred mode.
Network Selection: You can choose Automatic or Manual to select the
network (Auto is recommended). When you select Automatic, the device will
make the preferential selection according to the network where the SIM card
belongs. When you select Manual, you are required to select the same
network as the registered network with the network operator by SIM card for
your use.
Security
SIM security: You will be asked to input the PIN. It can be configured if the
PIN is correct. If SIM card is set on, you will need to input the PIN every time
you switch on the power. If you enter incorrect PIN three times, you will be
asked to enter PUK. PUK is used to release and modify the locked PIN. If PUK
is not provided or missed, please consult your network operator.
Phone security: You can lock or unlock the phone. Enter the password to
activate or deactivate the phone lock. When the phone is locked, you will be
asked to enter the phone password. 4-8 numbers can be used for the phone
password. The default phone password is 1122. you can change phone
password
Auto keypad lock: You can lock/unlock the phone keyboard and set the Key
Lock Time to Off, 5 sec, 10sec, 30 sec, 1 min, and 5 min.
Mobile tracker: Now be sure of your device with Mobile Tracker. This
feature allows users to track their device if it is lost or stolen. Switch on
Page 38

38
Mobile Tracker application and whenever a new SIM is inserted in your device
you will receive a SMS on pre defined numbers.
1) Tracker Mode
This function requires your network support. You can set ON or OFF. When
the function is ON the device will send a message to the number which you
have set. The message will tell you that which number is using your device
now. The default password is 1122.
2) Number
You can set Tracker number.
TIP: This function requires your network support. When you set Tracker
Mode OFF, and then you can set the tracker number you want.
Private protection: Now you can protect your Call Logs, Contacts,
Messages and File Manager by using Private protection feature. If it is
switched on then all these services will become password protected. The
default password is 1122.
Restore Factory Settings
All settings can be restored to factory settings with this function. The default
password is 1122.
G A M E S
For your entertainment purpose, your phone is provided with interesting
games, such as Games, Smash n Win, Hungry Birds and IPL. To access this
function, press Menu>Games in the idle mode.
Page 39
39
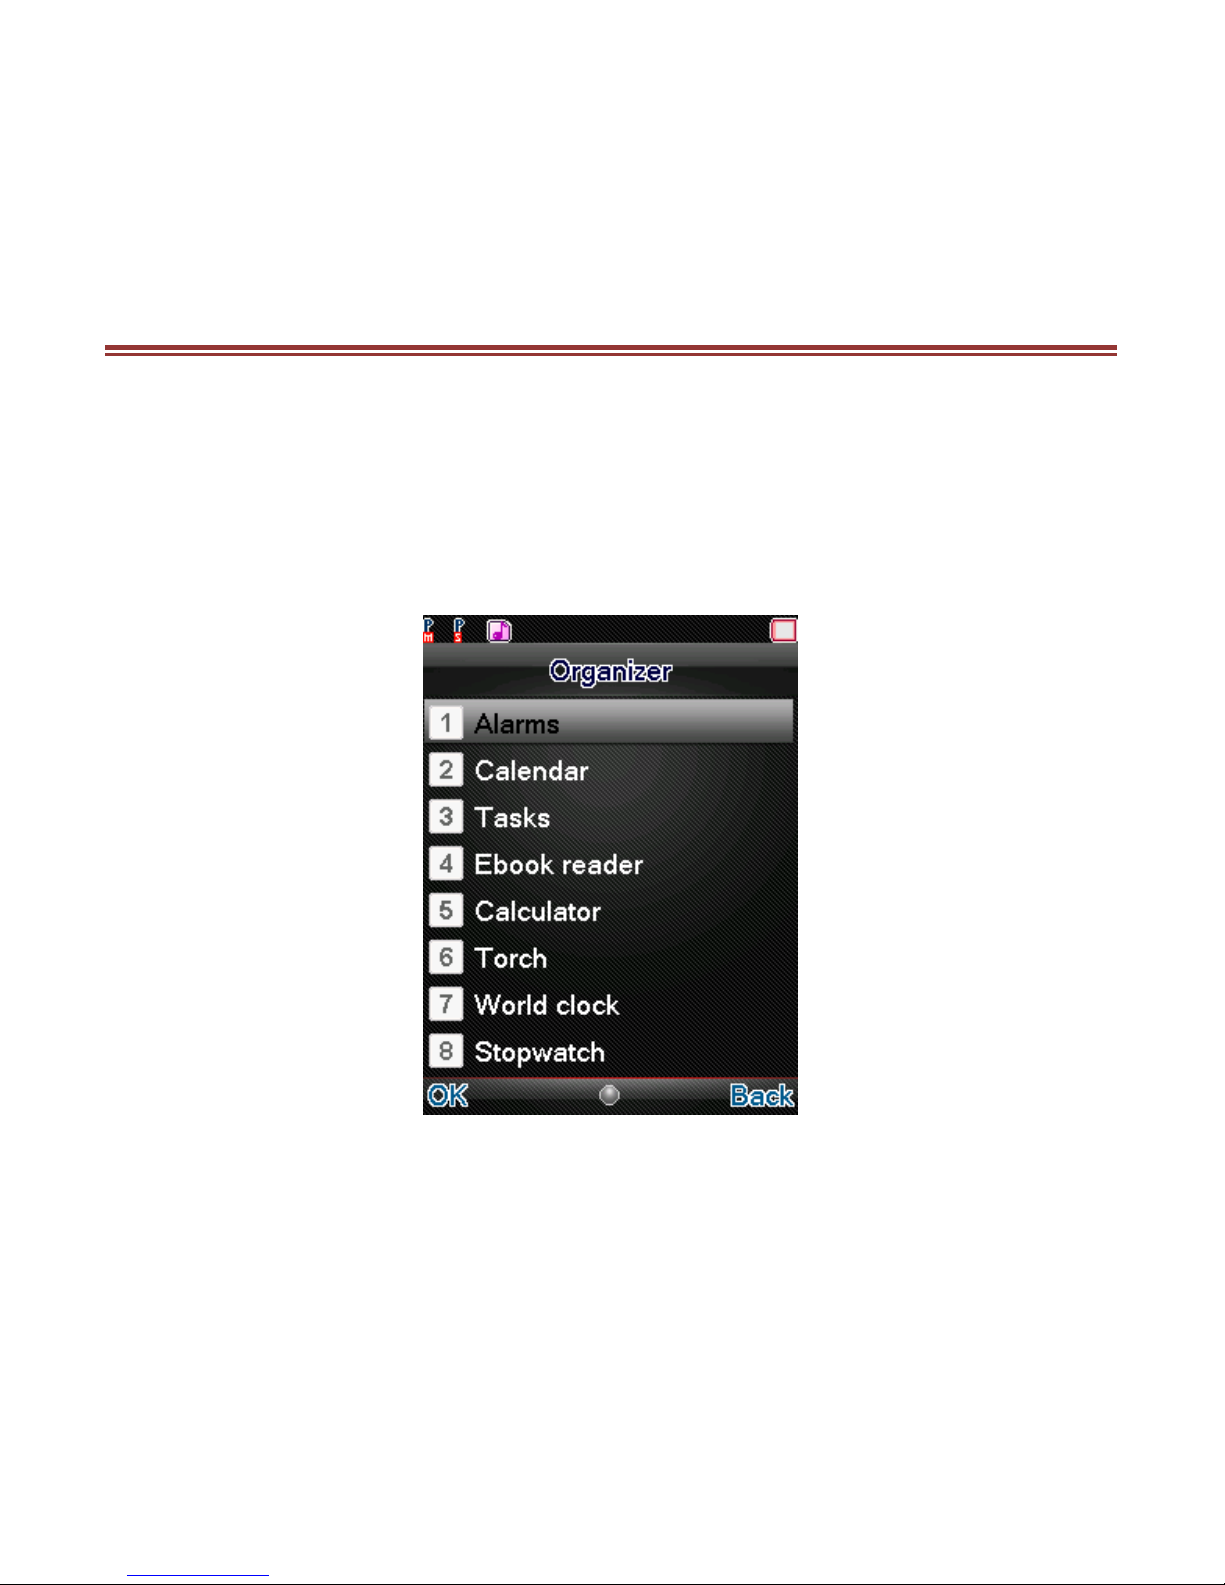
O R G A N I Z E R
The organizer menu gives you access to a number of additional features
including Alarm, Calendar, Tasks, Ebook Reader, Calculator, Torch, World
Clock, and Stopwatch.
Page 40
40
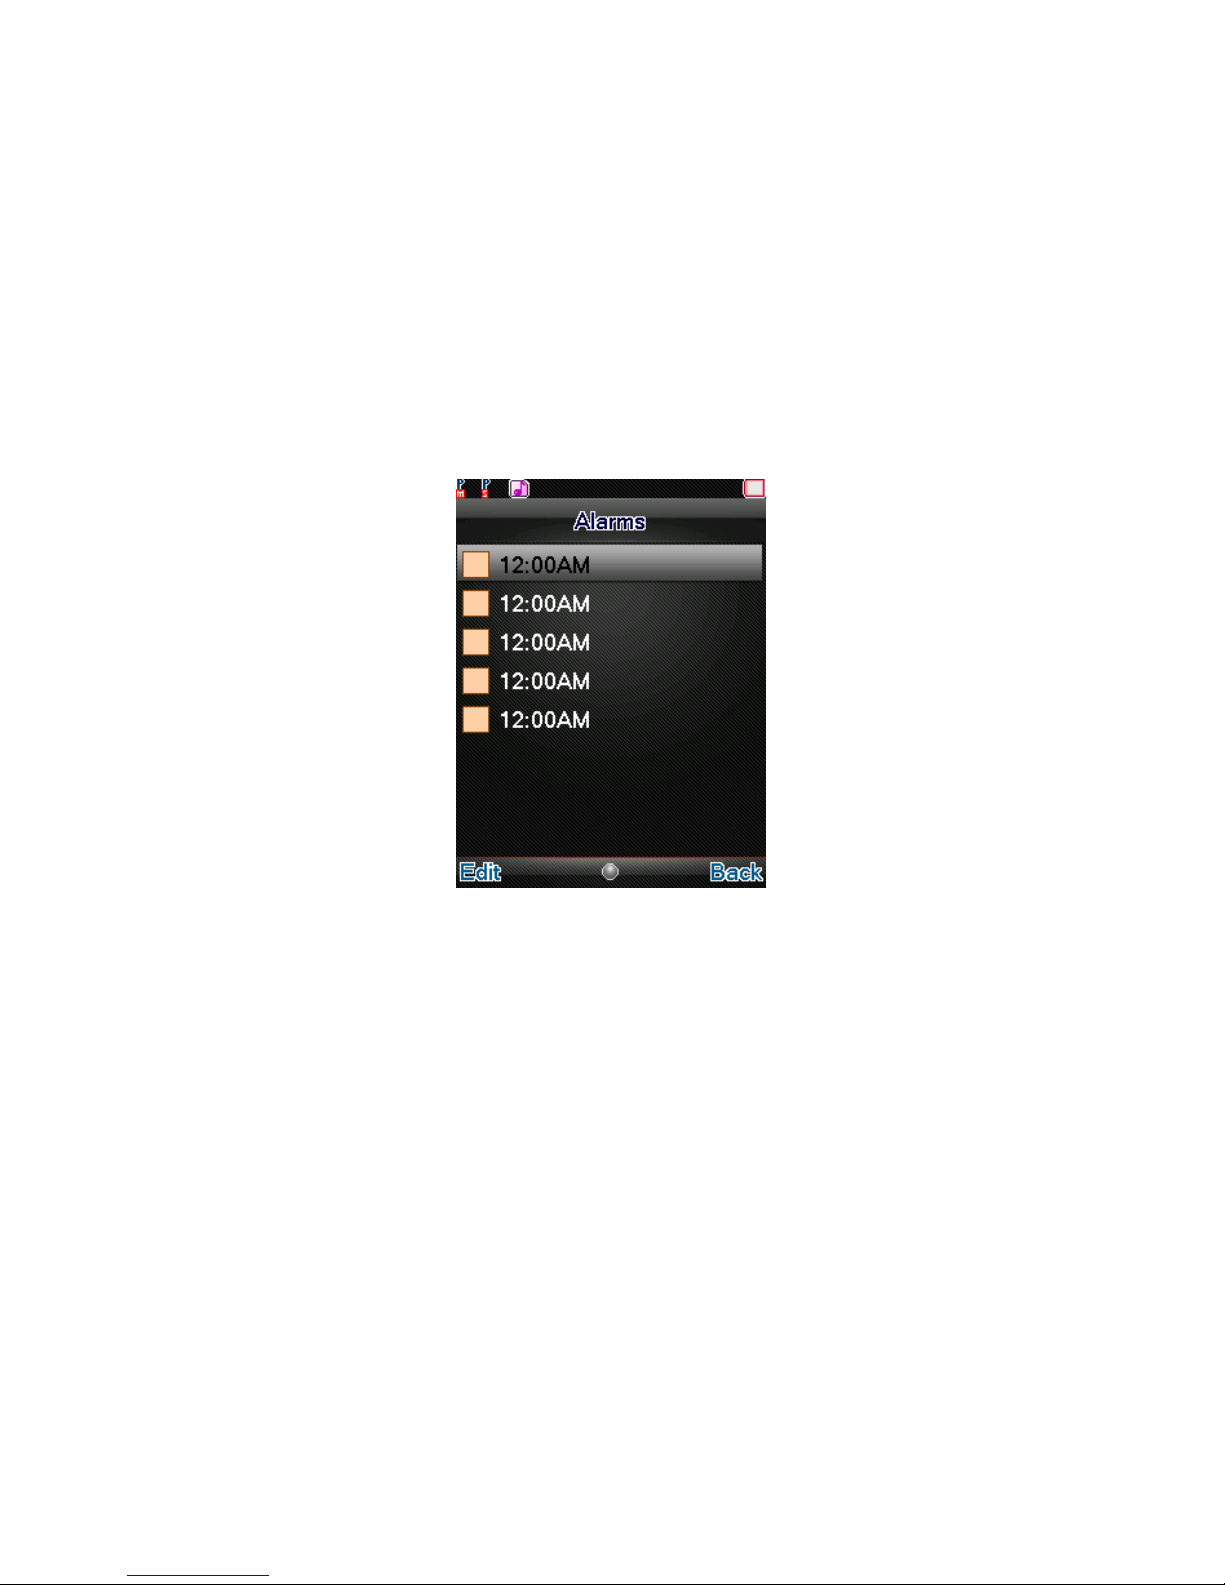
Alarm
Your device provides 5 alarms which you can set as per your needs. An icon
will appear on the desktop indicating the alarm is set to on. You can set/edit
the time, alarm tone, snooze time and alert type for each alarm.
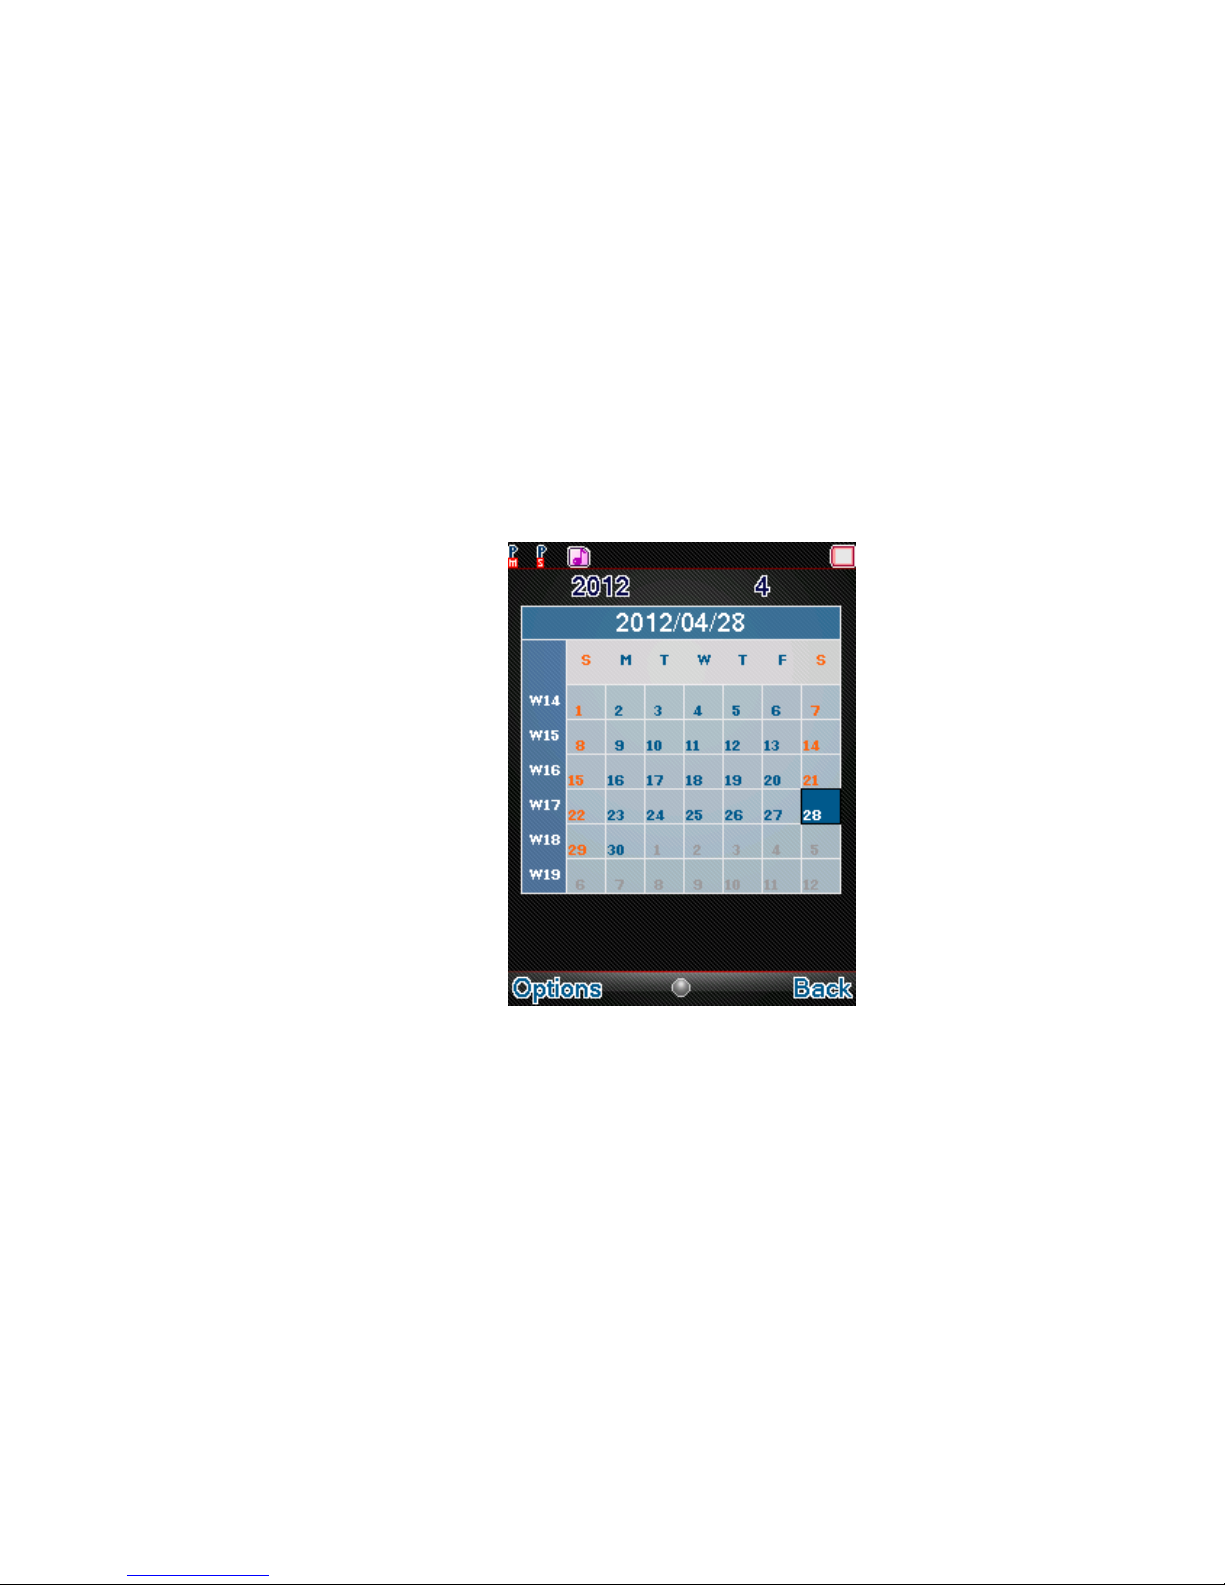
Calendar
You can view and edit the memo of a specified date with this function.
View: You can view or edit the daily arrangement of the day.
View all: You can view or edit all the daily arrangement of the day.
Add event: You can select task types: Reminder, Meeting, and
Course and so on.
Delete event: You can select delete entries form All, Overdue,
Spec Period.
Page 41
41
Jump to date: Skip to the specified date to view or edit the daily
arrangements of the day.
Go to today: Go to today’s date.
Go To weekly view: Go to the specified date to check which
week/Month it is.
Settings: You can set languages and info display.
Page 42
42
Tasks
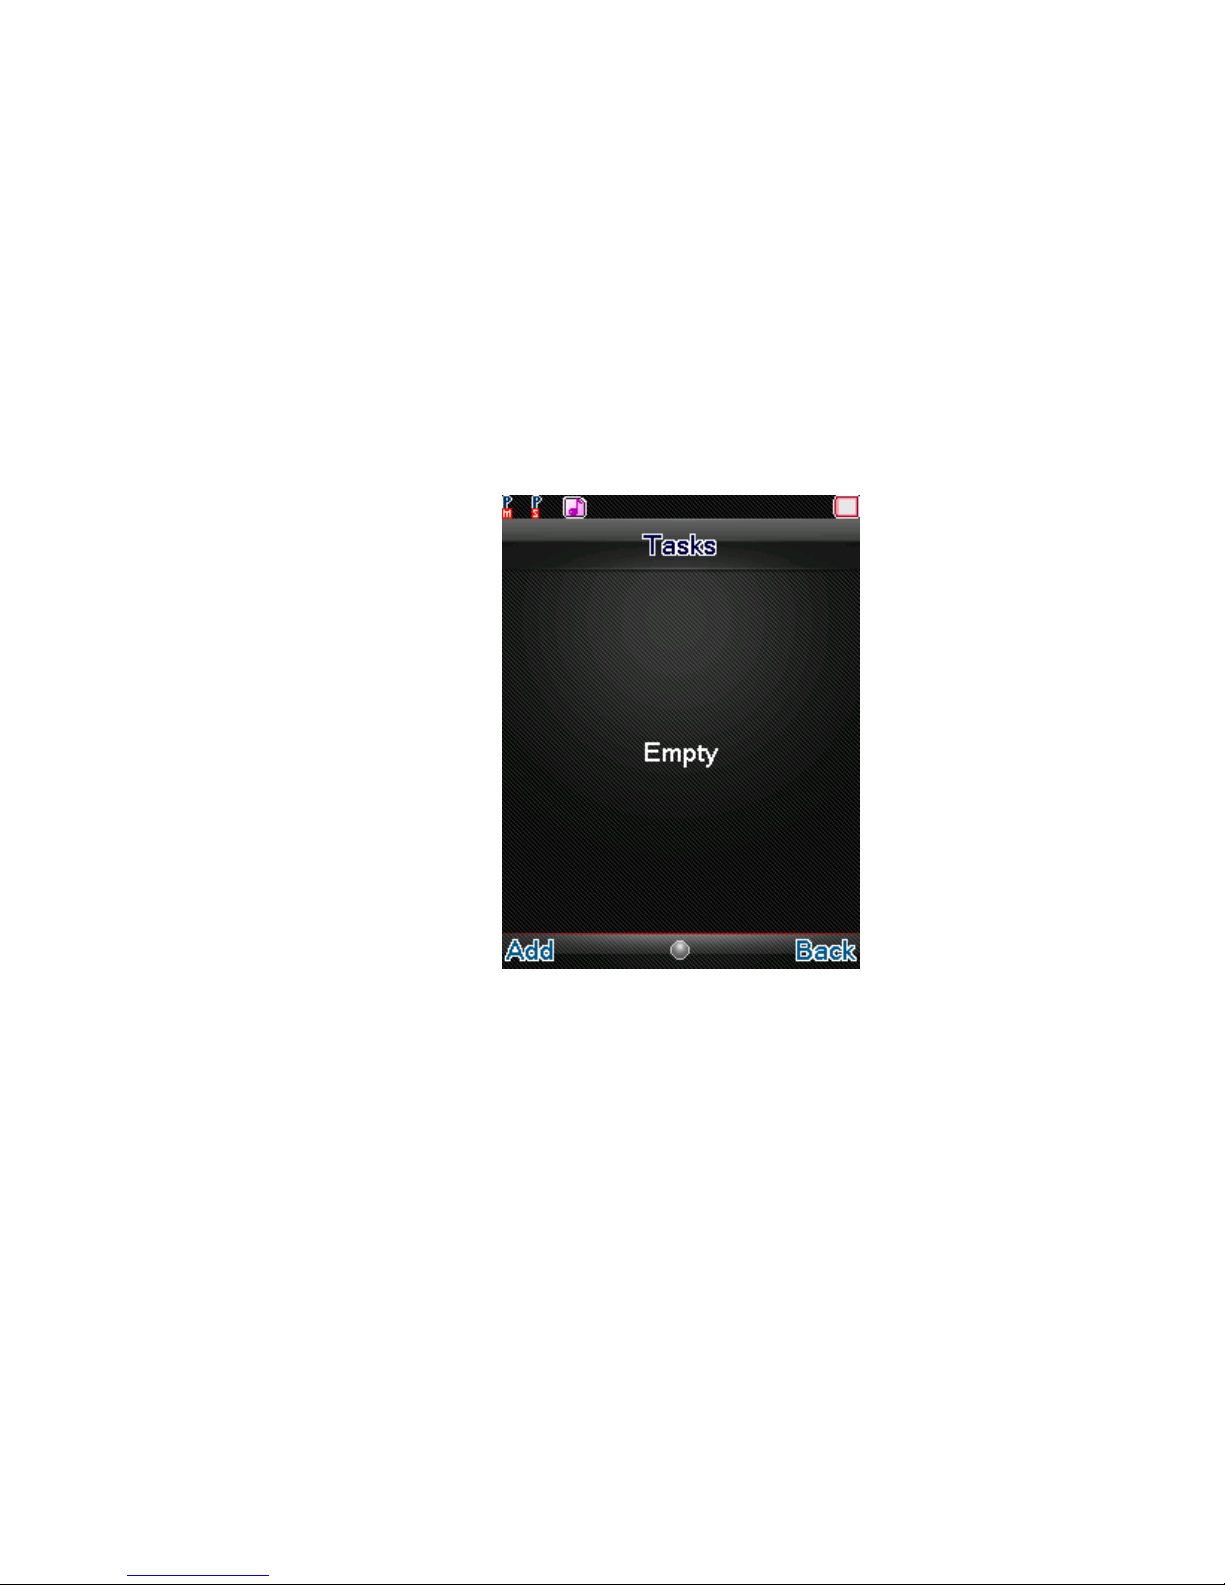
You can View, Add, Edit, Delete, Delete Overdue, Delete All, Send Vcalendar
and Save the list of tasks. Start up the Tasks and press OK. Press Add to
access to add a new memo.
Page 43
43
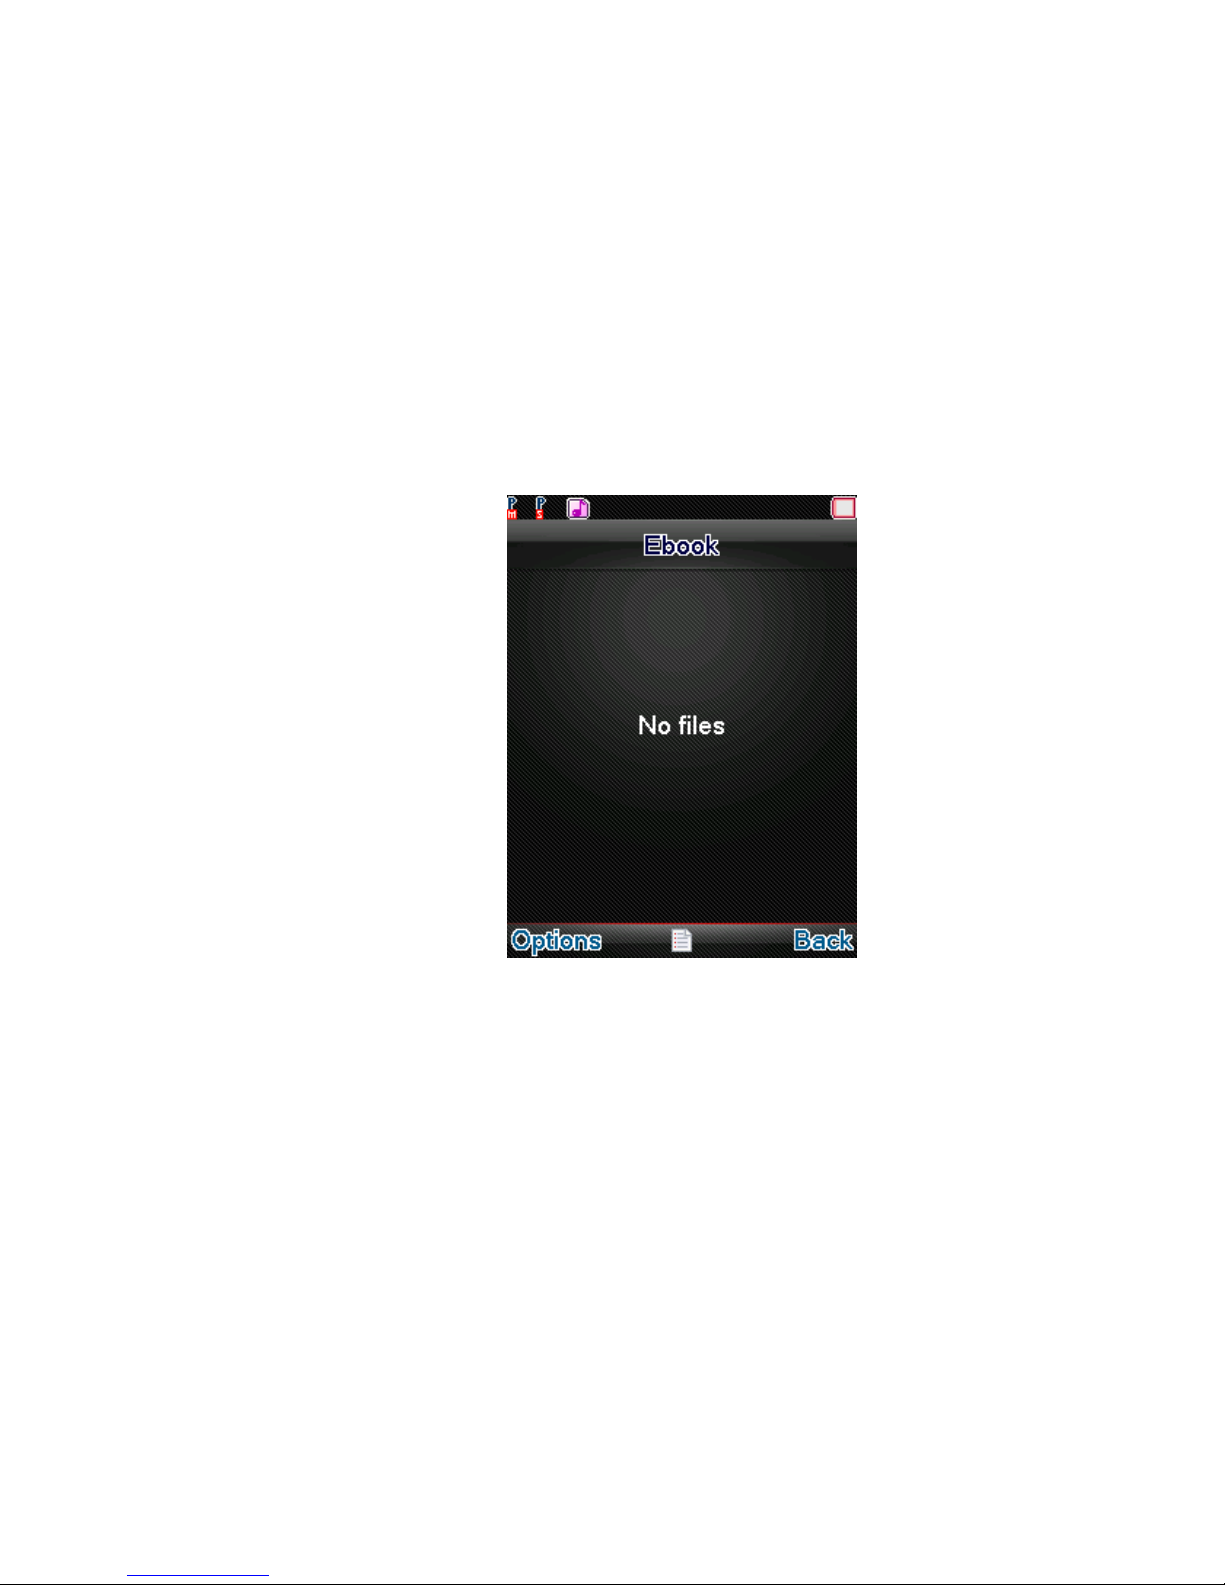
Ebook Reader
Your device supports reading files in the *.txt format, which is ideal for
reading an e-book. Store the *.txt files in the Ebook folder, and then you can
read them in E-Book reader.
Page 44
44
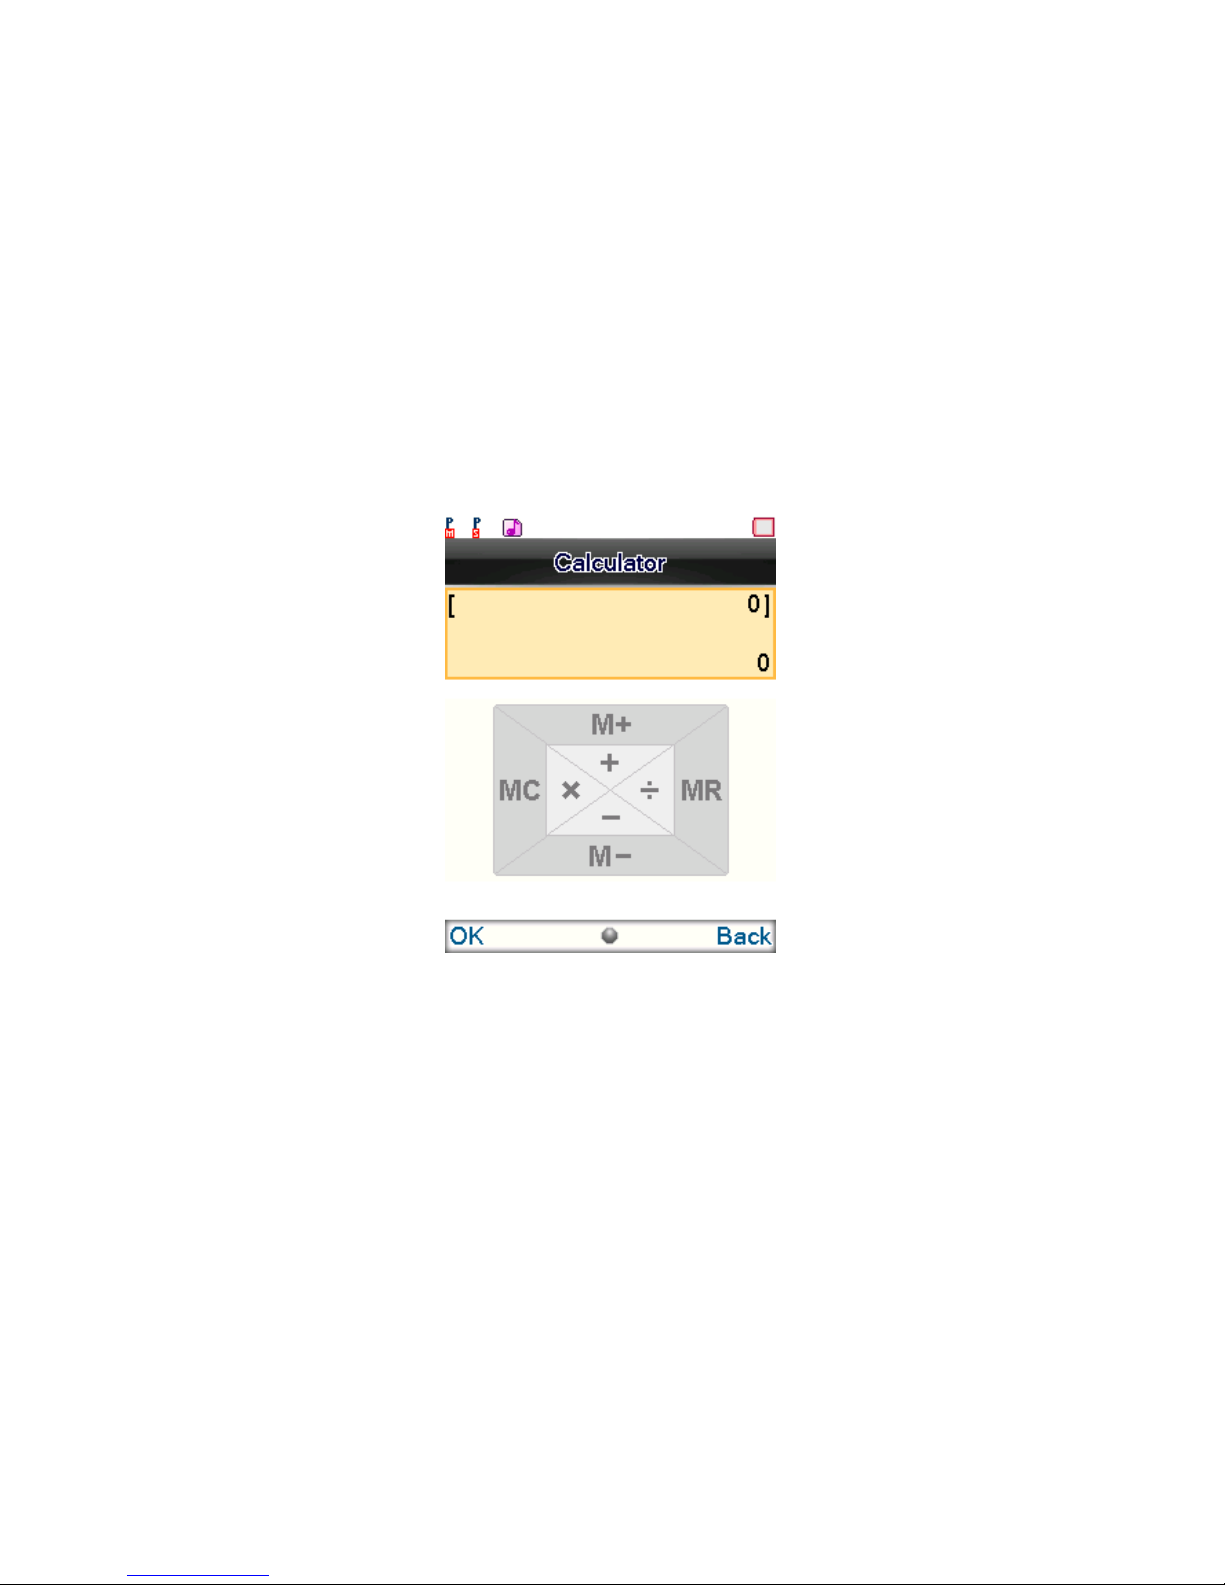
Calculator
Calculator enables you to make basic arithmetic calculations, such as
addition, subtraction, multiplication and division. Enter the numbers and
choose the desired operator. Use CLEAR to delete the entered numbers and
ok to get the output.
Torch
You can turn on/off the torch using this sub-menu.
Page 45
45
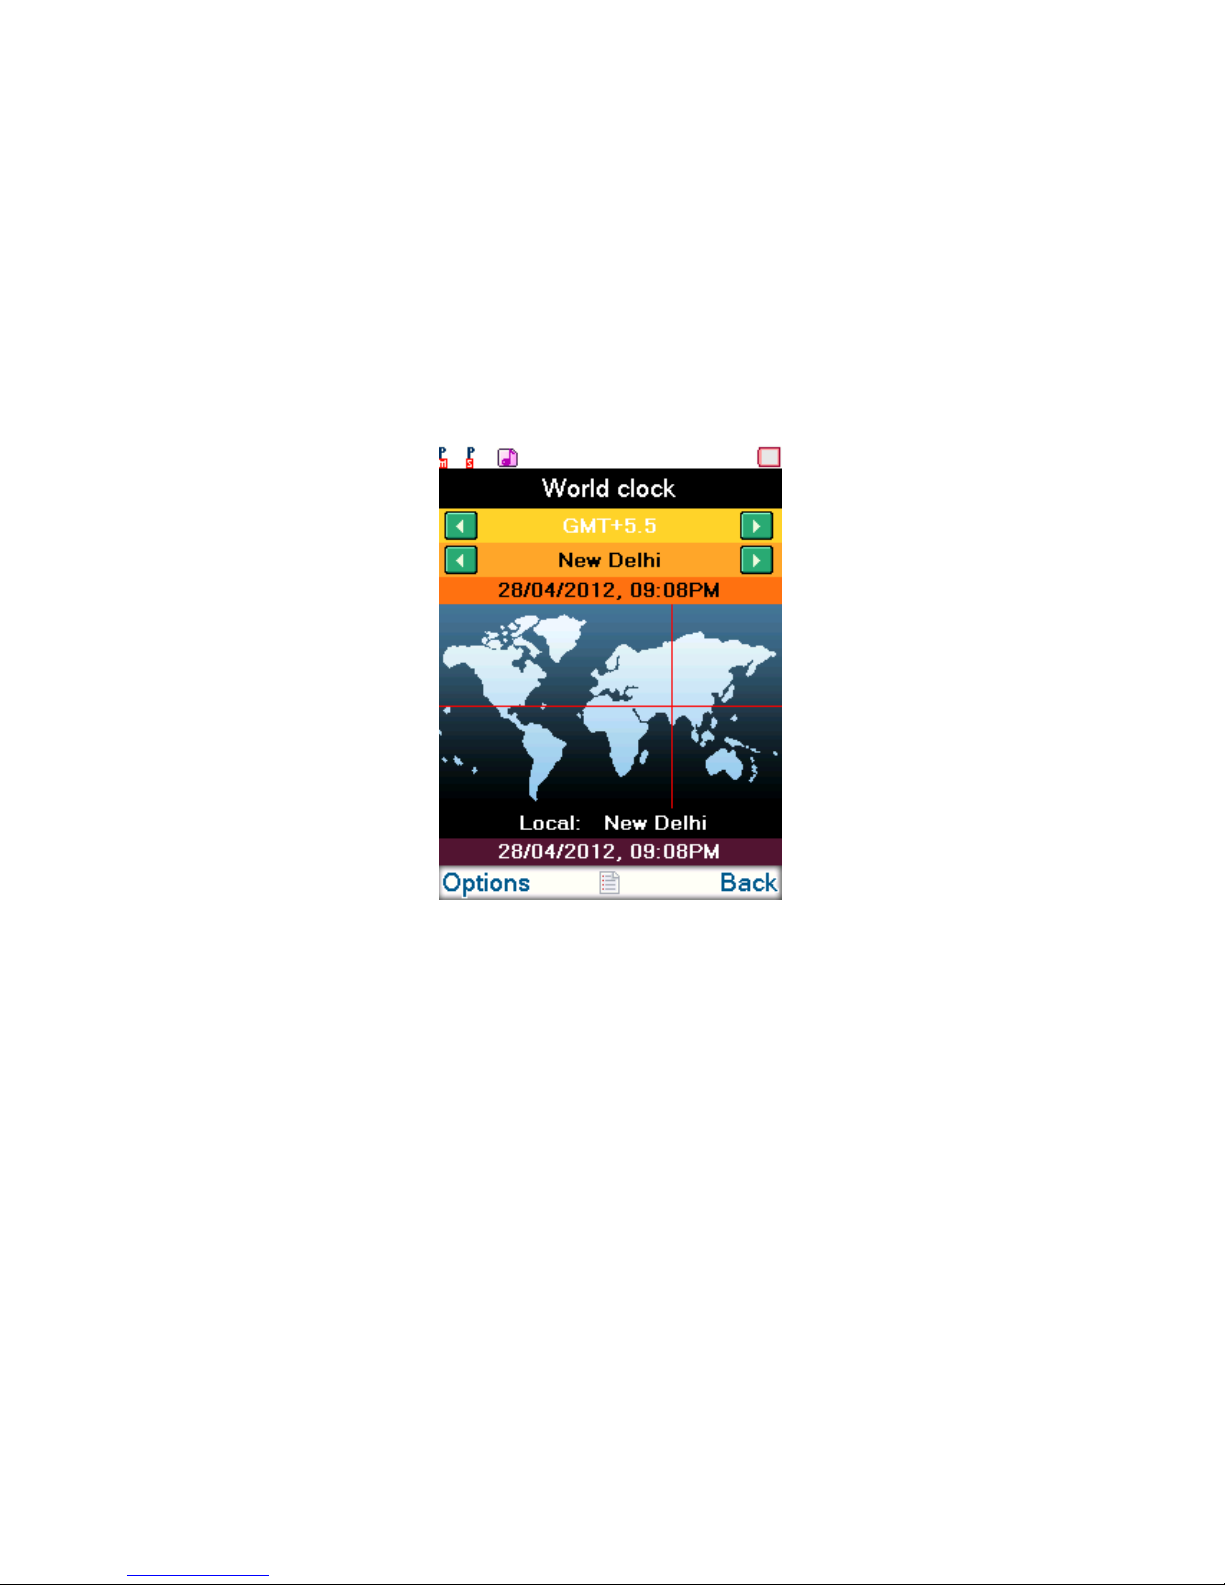
World Clock
Scroll to browse every city’s time zone in the world map. The related date
and time will display at the bottom of the screen.
Page 46
46
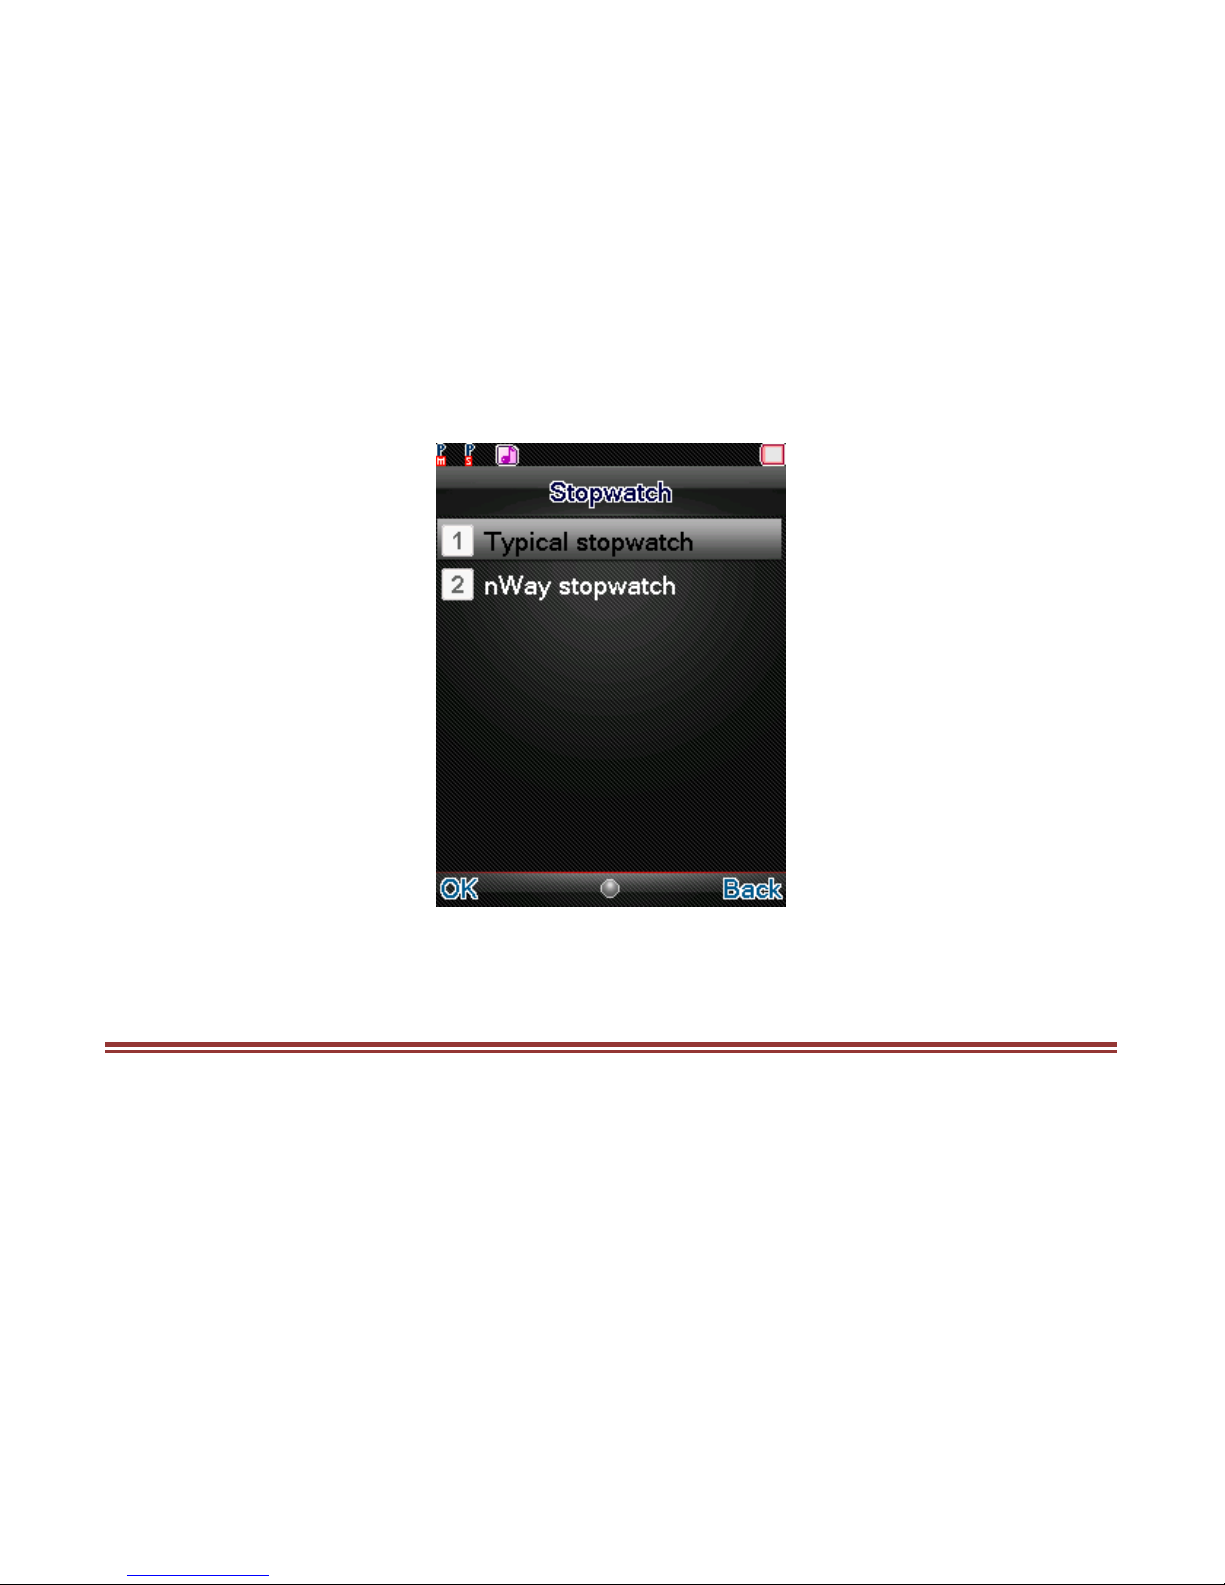
Stopwatch
Stopwatch is used for measuring time with possibility to register several
results and suspend/resume measurement.
S E R V I C E S
STK
Value-added service tool (SIM Tool Kit), depending on your SIM card type
and telecommunications providers to provide the service, and whether you
subscribe to this service. For detailed settings, please consult the local network
operator. Different network service providers provide different services.
Page 47

47
U S I N G P H O N E A S M O DE M
You can use your device as modem by connecting it to your system/laptop
via data cable. Kindly download the PC suit from the CD provided along with
the gift box. Please copy the Phone Suite program and drivers to your
computer hard drive. Unzip the Phone Suite program and drivers to your
computer root drive (for example: C:\)
1. Connect the phone to the computer with USB cable. The phone
will show an USB config menu, select COM port and click OK;
2. If this is the first time you are connecting your device to the
computer, a message stating “new device is detected” will pop on
your system. The computer will ask for driver installation, please
follow the windows popup and select the driver files from the
unzipped drivers folder;
3. After the driver is installed, the phone can communicate with the
computer via the Phone Suite program.
Page 48
48
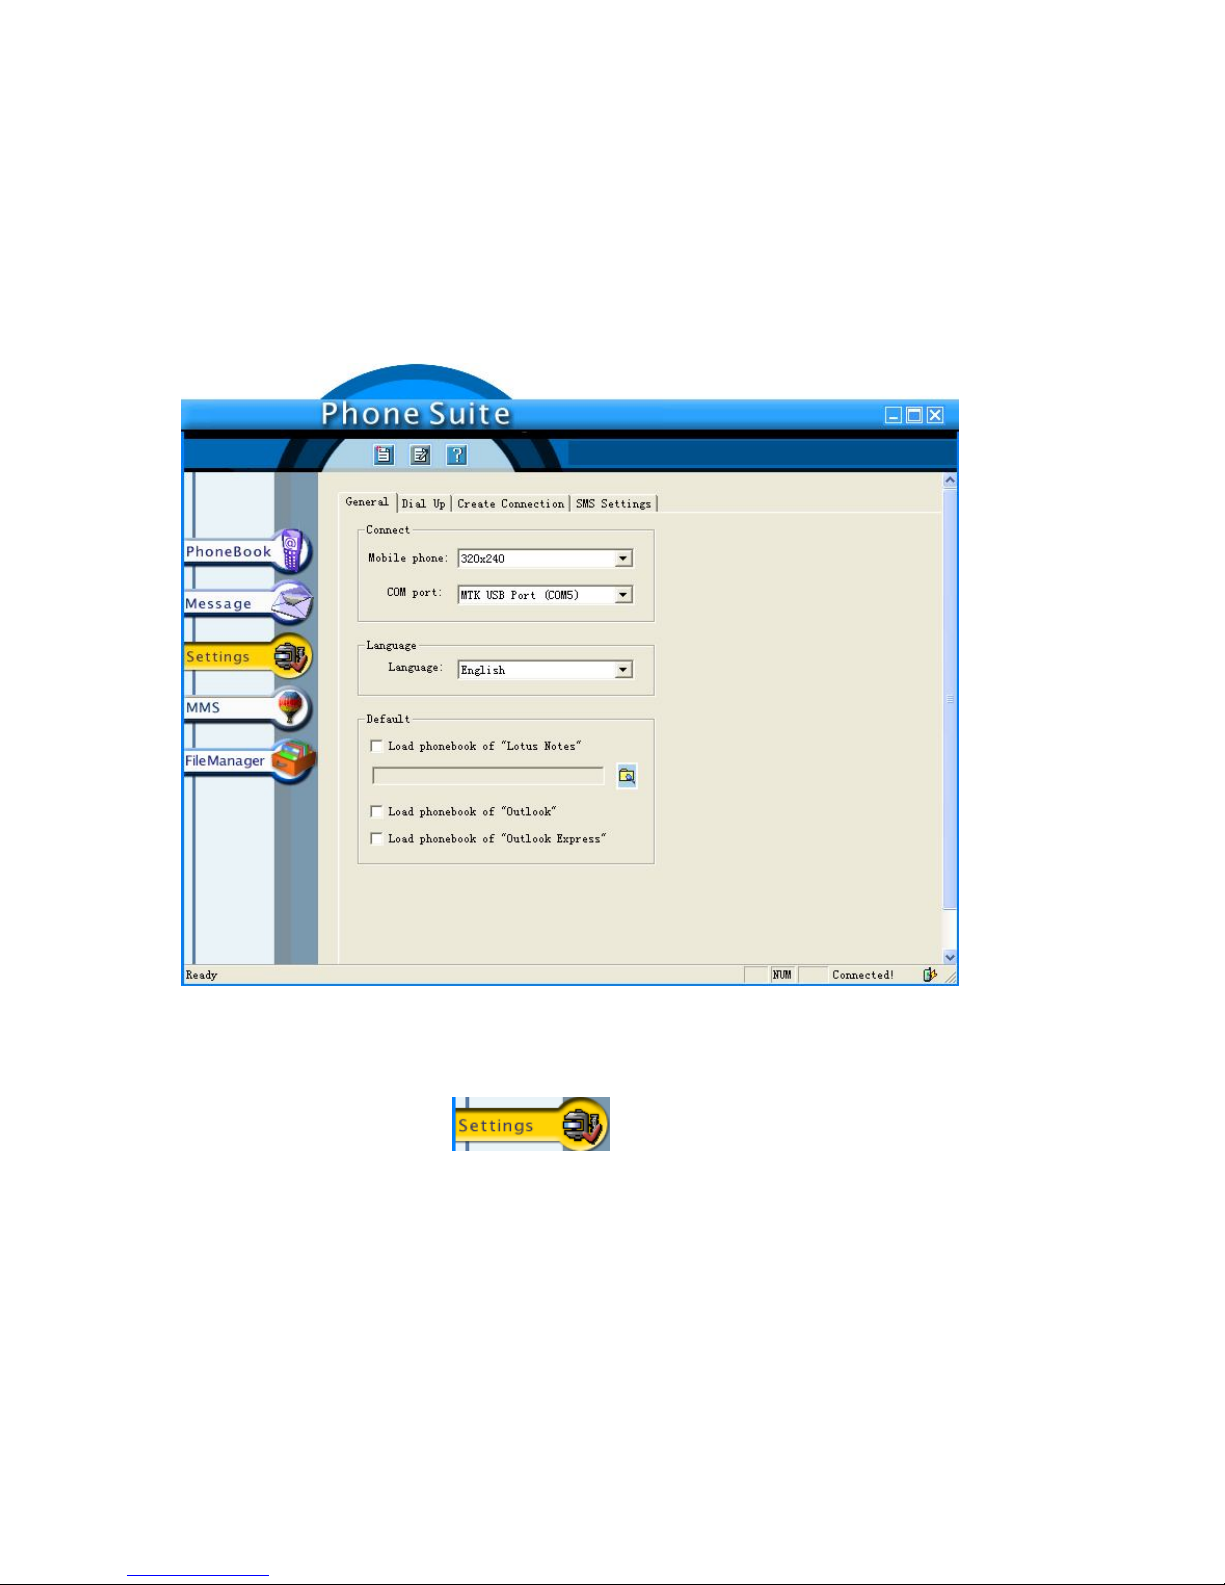
4. Open the PC Suite folder, and click the PhoneSuite.exe to run the
Phone Suite.
5. You need to set the COM port first, in order to allow the phone to
communicate.
6. Select settings , to find the COM port setting. Select
the “MTK USB Port”
Page 49
49
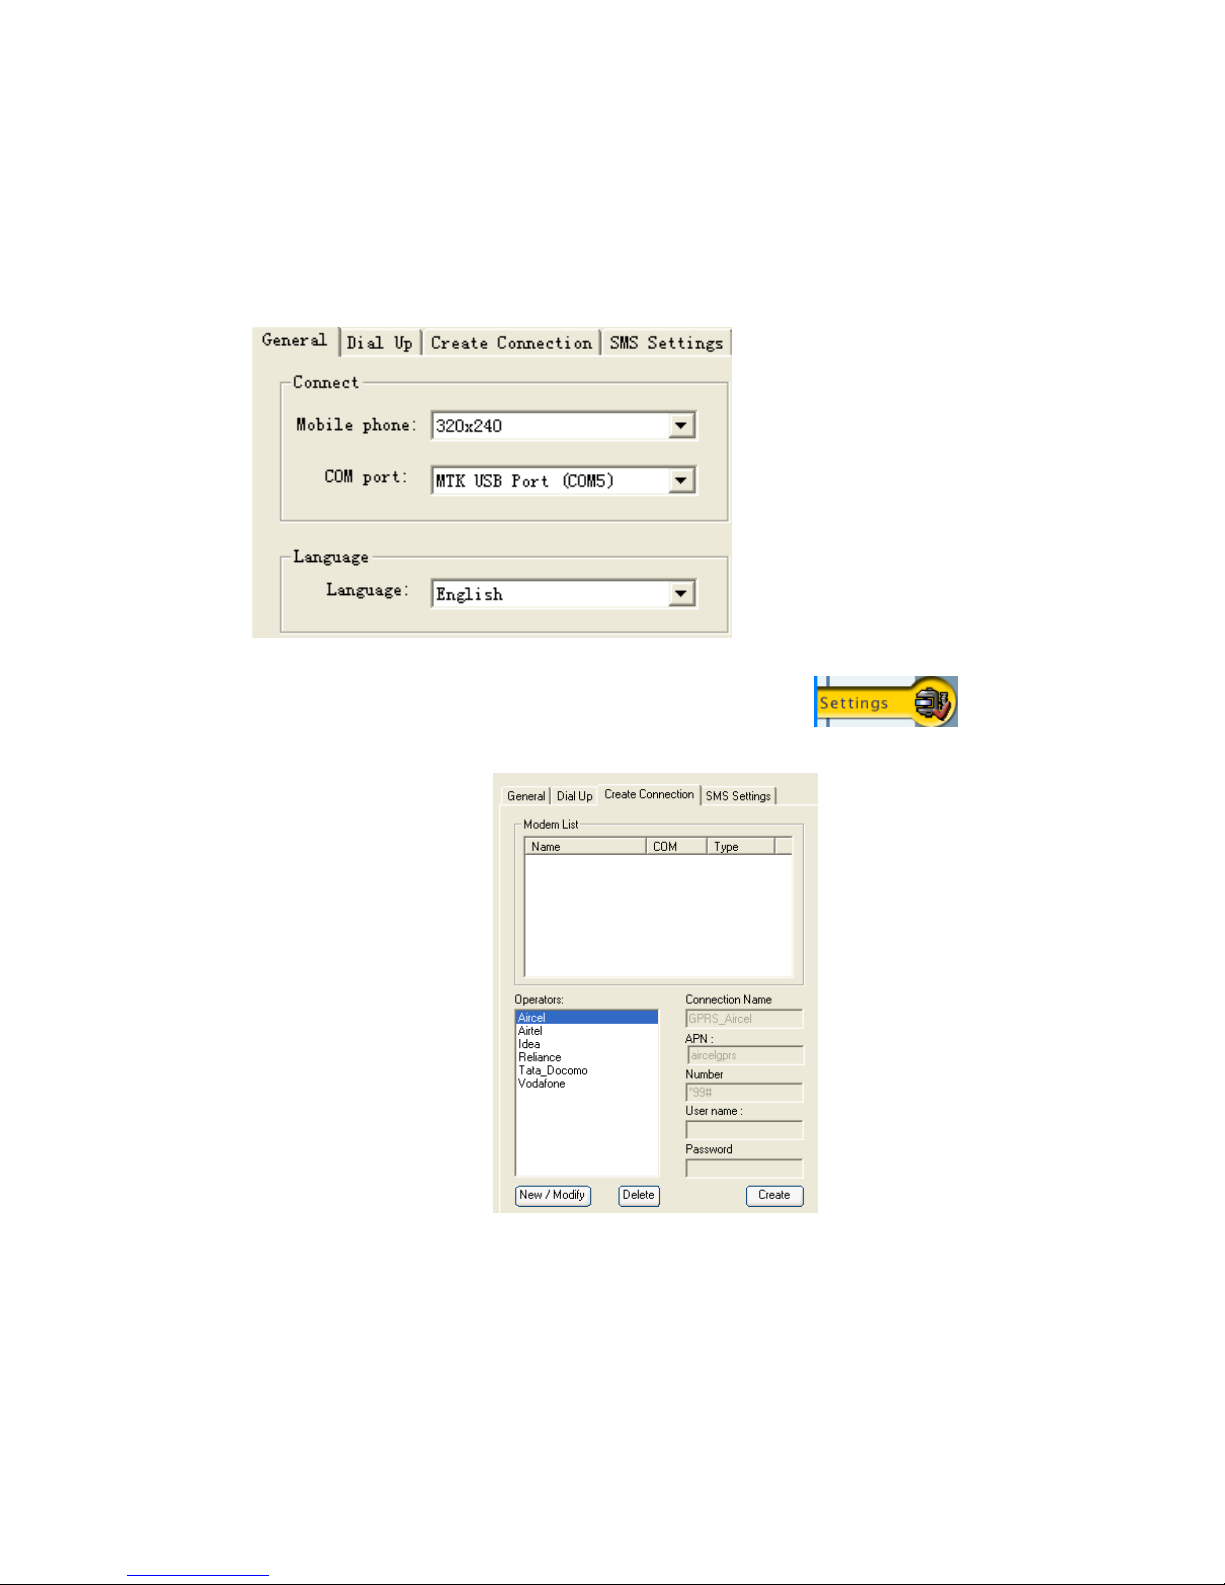
7. To setup GPRS modem, go to Settings and select
“Create Connection”
Page 50
50
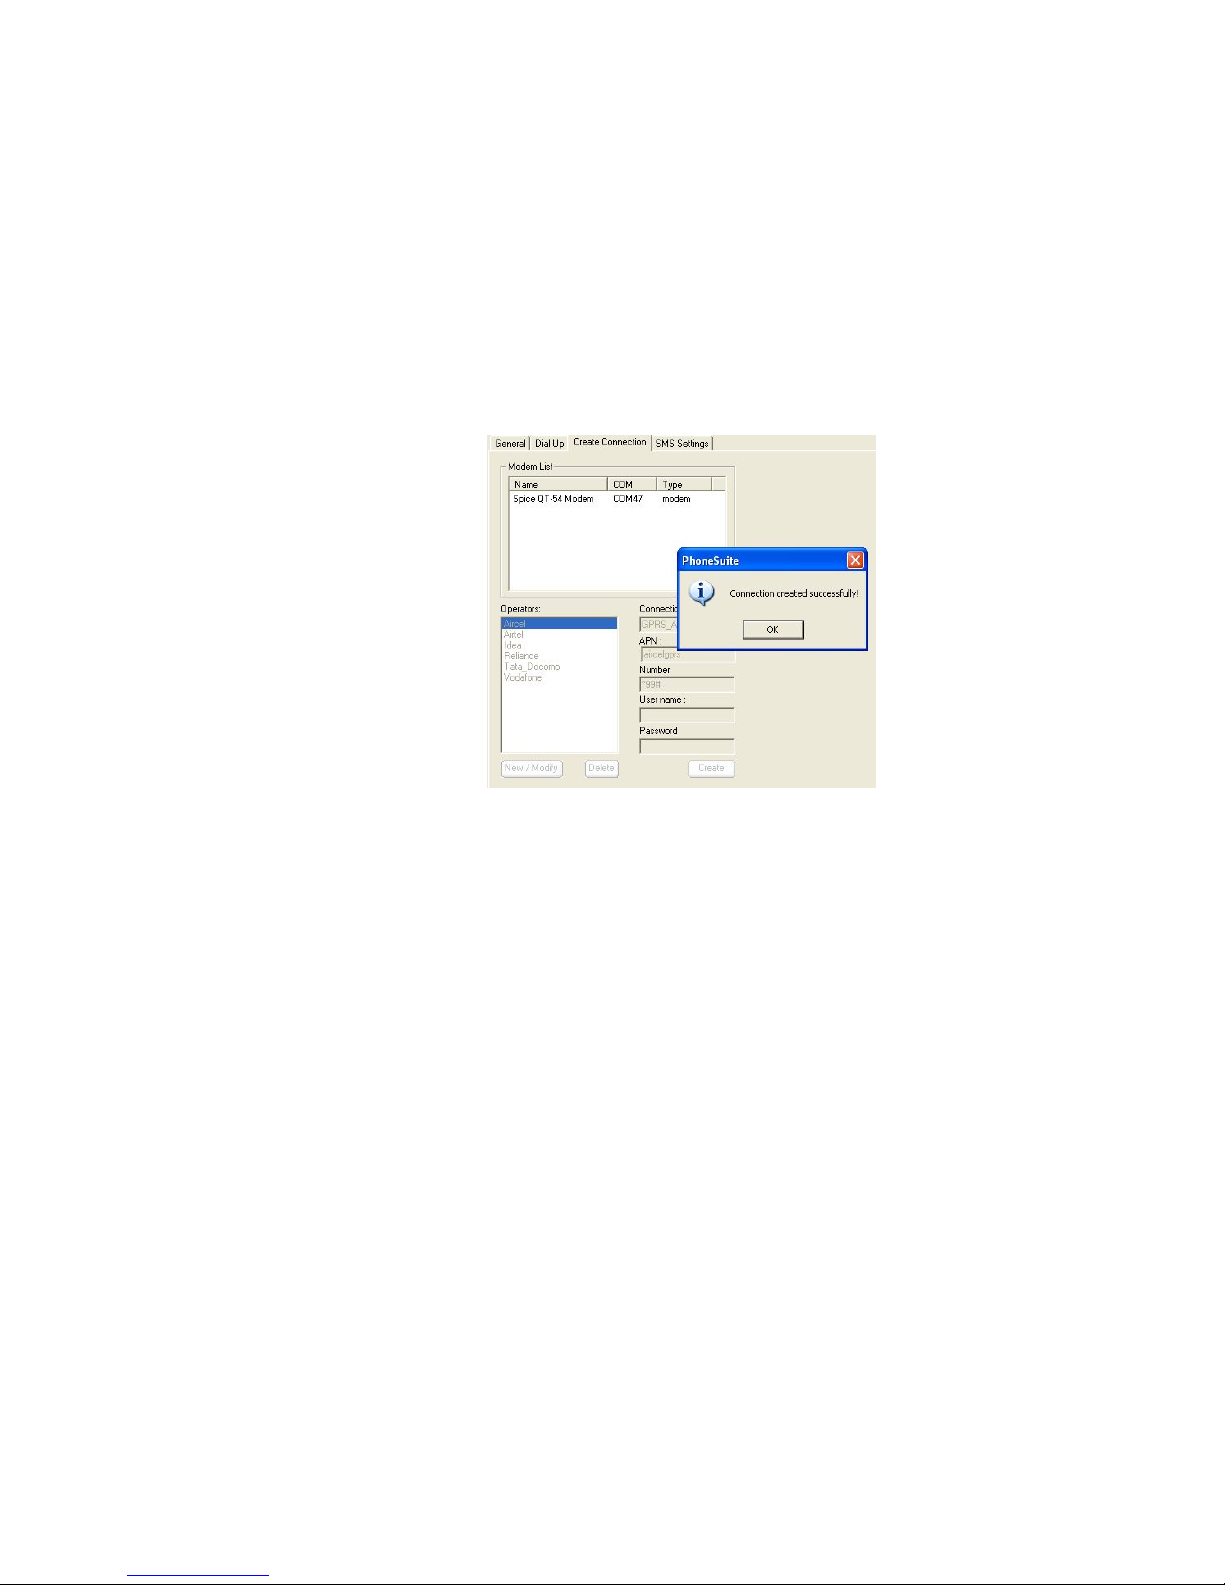
8. You can select the Operator profile which the phone is using, and
click the “Create” button to create the modem connection. The
below screen will appear once the connection is created.
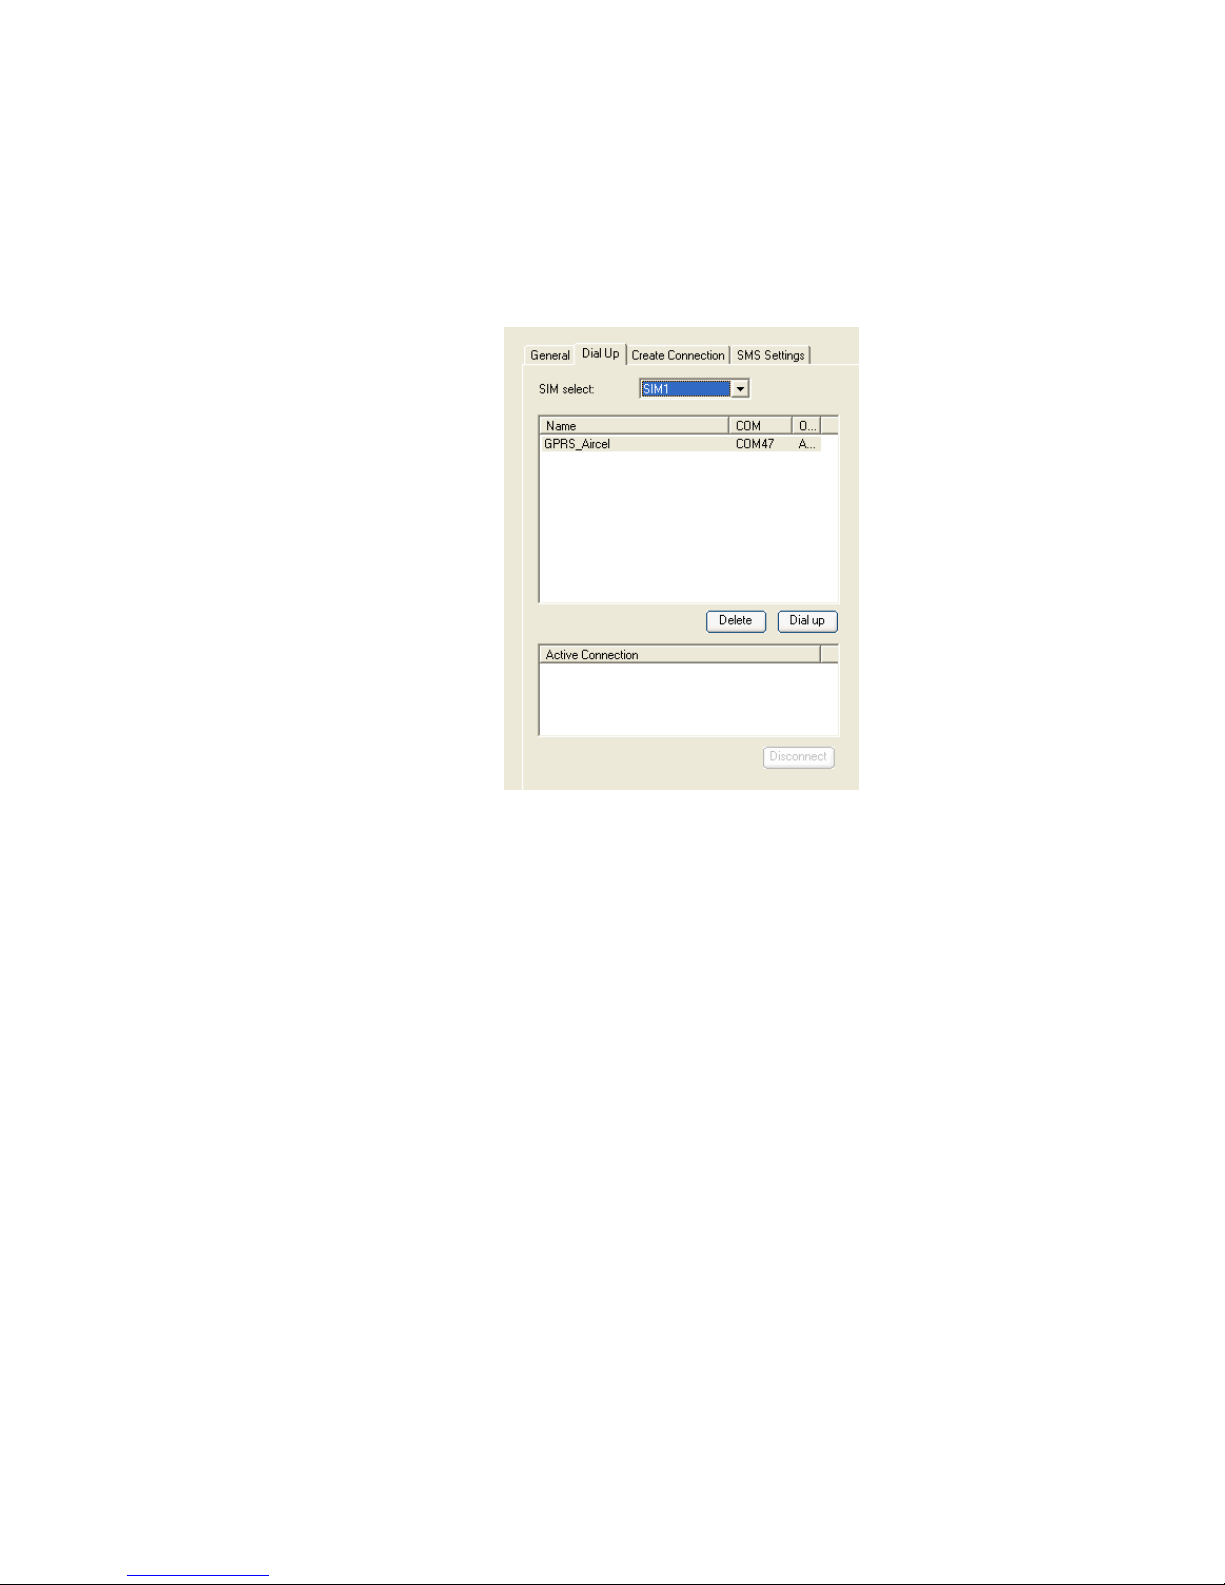
9. Then, select the “Dial Up” tab, and choose the correct SIM which
is using the same operator of the modem created in the pervious
steps.
Page 51
51
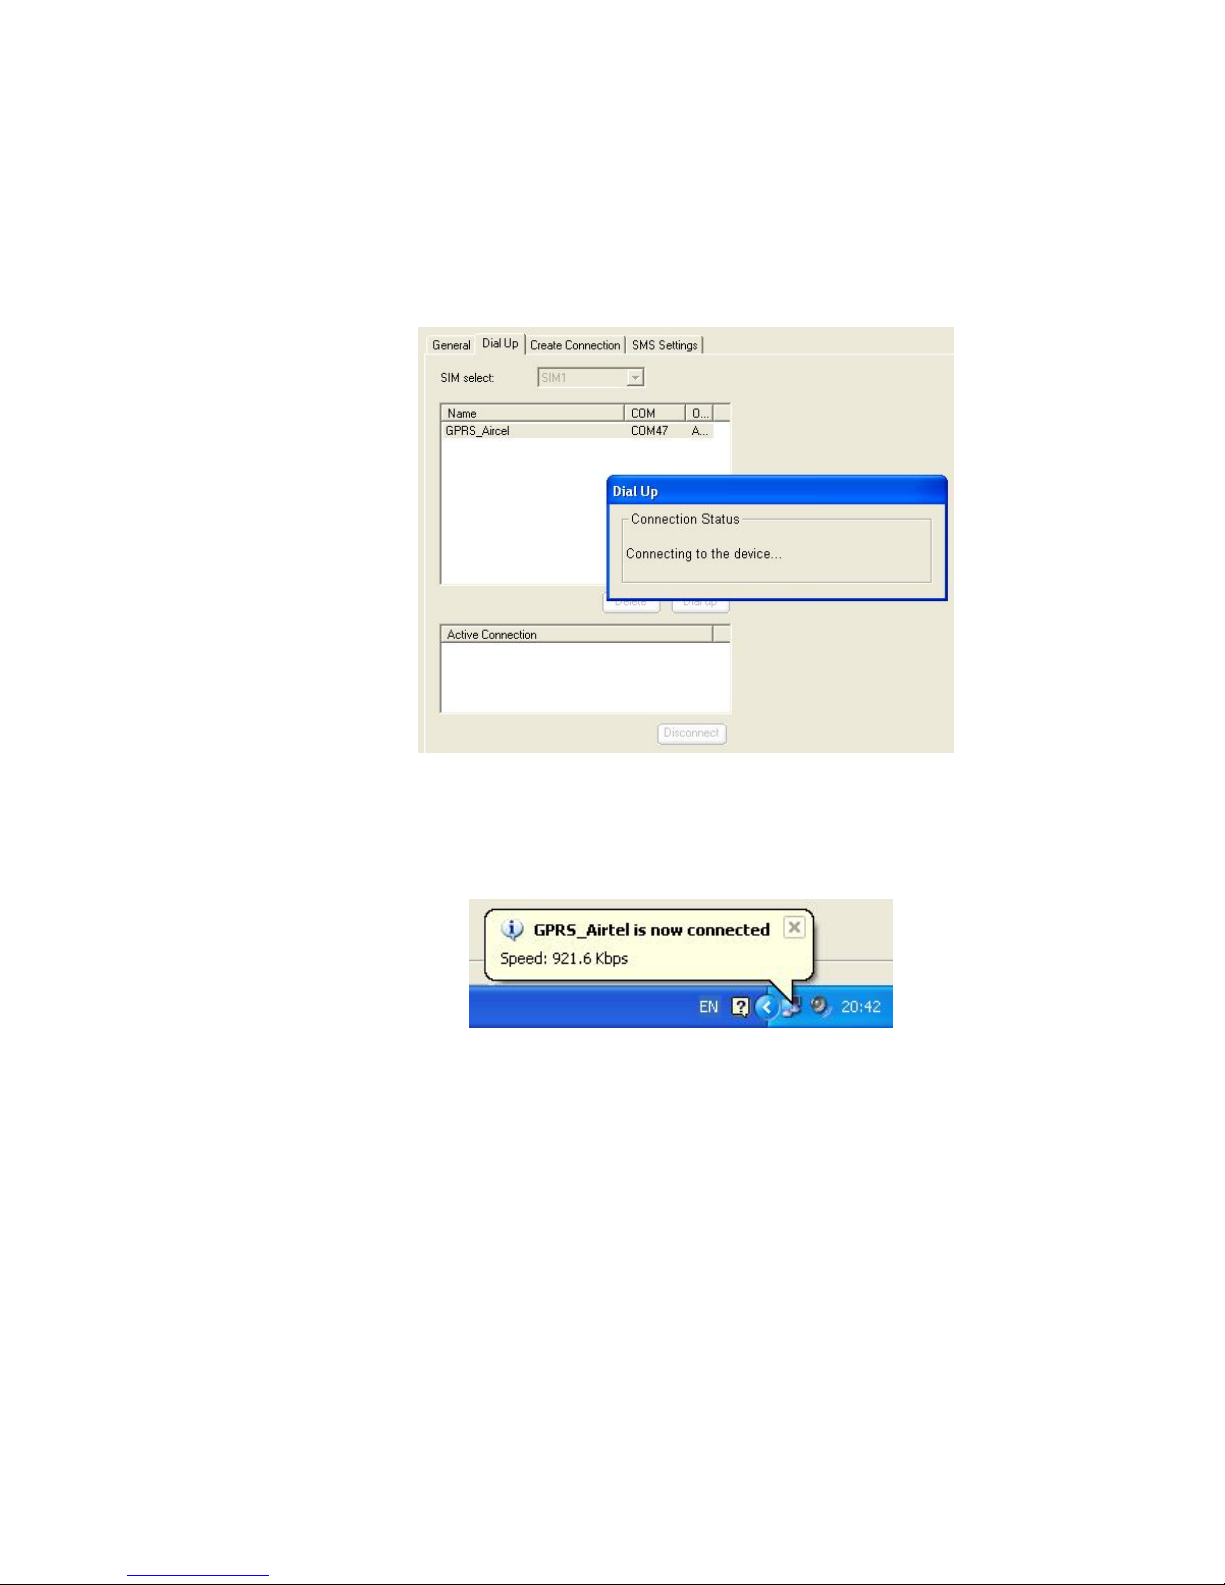
10. Select the modem, and click “Dial Up” button to create the
connection.
Page 52
52
11. Once the Connection is built successfully, you will find the modem
connection shown in the notification window.
Page 53

53
S U P P O R T A N D C O N T A C T
You can visit www.spice-mobile.com for additional information,
downloads and services related to your Spice handset.
For further assistance or queries, you can call on SPICE customer
care number 1800-300-77423 (toll free) or mail at
After sales service of the handset is confined to the country in which the purchasing
is done.
Page 54

54
EN V IRO N ME N T AL C O N CER N
Help us save Our Environment…GO GREEN..!!
All our endeavors are directed towards providing environment friendly
products to you. The material used in our devices are recyclable and can be
reused to make new products. We strive to make products that are safe for
our consumers as well as the environment. Come join hands with us and
make world a better place to live.
Preserve natural resources for future generations by recycling your phone.
The phone contains some metals, when recycled properly; these can be put
back into circulation, decreasing the need for new metal mining. Recycling
reduces the need for raw materials, saves energy, helps mitigate Global
Warming and reduces pollution, reduces waste products in landfills; therefore
preserving natural resources for the future and saving the planet.
Follow some simple steps and contribute towards saving the planet.
DOs
Recycle your handset and its accessories.
To protect natural resources and to promote re-use of the
material, kindly separate batteries from other type of waste.
Page 55

55
DONTs
Do not dispose off your mobile and its battery in fire.
Do not dispose your mobile with the regular waste.
Do not over charge your handset. Remove the charger when
battery is full.
Don’t trash your phone, instead RECYCLE it
This logo signifies that this product and/or its consitituents should not be
disposed off with other household waste.
Hazards of Improper handling, accidental breakage, damage and /or
improper recycling of hazardous elements
If this product is improperly handled, broken or damaged or carelessly
recycled or disposed off in the fire, can result in environmental and data
security concerns, including the following :
Page 56

56
Affect nearly every system in the human body and result in birth
defects, brain, heart, liver, kidney and skeletal system damage.
They will also significantly affect the nervous and reproductive
systems of the human body ;
When burned, create cancer-producing dioxins which are released
into the air we breathe ;
If thrown in landfills, may leach into groundwater affecting your
local community ;
In warm climates, the oxidation of mercury in the environment
can be accelerated, leading to the creation of oxidized Hg atoms
that are known to be associated with ozone depletion; and
Improper recycling additionally results in data security issues, as
private electronic information remains on hard drive, if not
properly removed before disposal.
How to Recycle
Please get your electronics products recycled only through authorized
recyclers, approved by Pollution Control Board. We provide facility of
recycling of our products. For details of our collection centers, please visit our
website or call our customer care. Help us to GO GREEN.
Constitution of Hazardous Elements in your Device:
Your device does not contain the following hazardous elements in a
proportion higher than the limits provided hereunder:
Page 57

57
a) maximum concentration value of 0.1% by weight in homogenous
materials for lead, mercury, hexavalent chromium,
polybrominated biphenyls and polybrominated diphenyl ethers ;
and
b) maximum concentration value of 0.01% by weight in homogenous
materials for cadmium.
The actual concentration of the above hazardous elements in your product is
as below:
Element
Concentration
Lead
400mg/kg(ppm)
Mercury
200mg/kg(ppm)
Hexavalent chromium
100mg/kg(ppm)
Polybrominated biphenyls
200mg/kg(ppm)
Polybrominated diphenyl ethers
50mg/kg(ppm)
Cad
m
ium
10mg/kg(ppm)
 Loading...